Embed Size (px)
Citation preview
What is Front Controller Pattern, give an example on this?It is a web application pattern where a single servlet delegates responsibility for a request to other components of an application to perform actual processing.Ex : ActionServlet in struts and DispatcherServlet in Spring.
7.1.1 Request Flow in Spring MVC
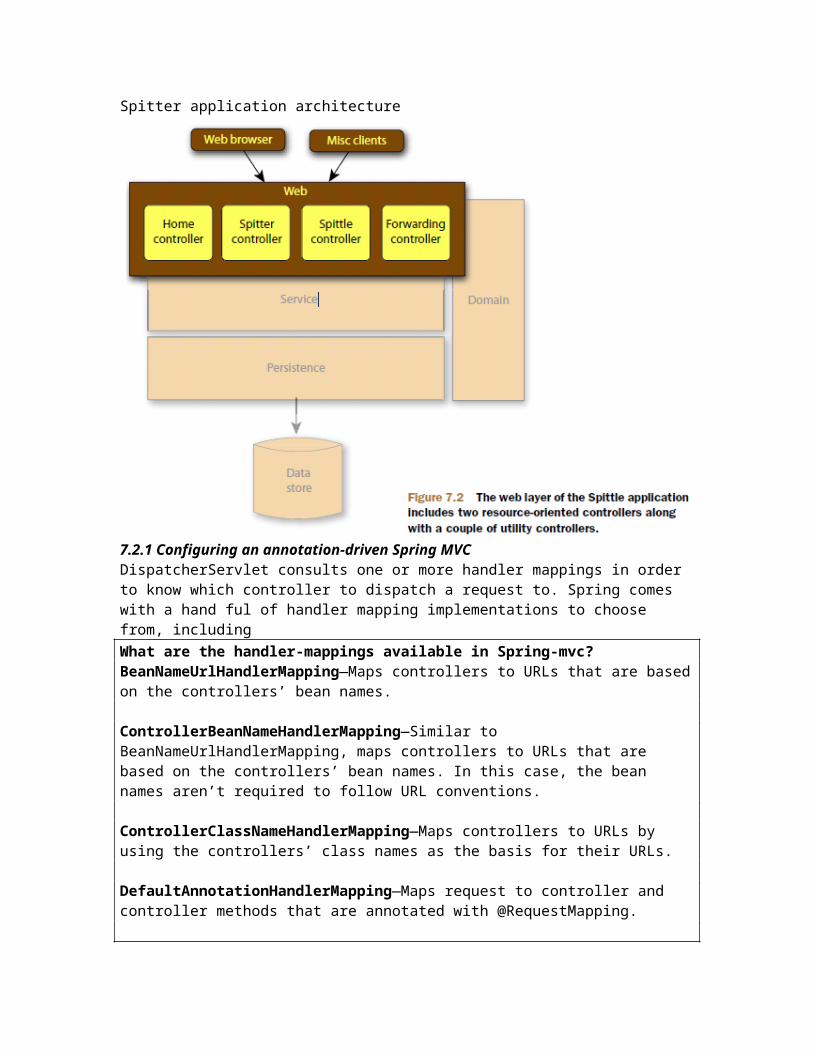
Figure 7.1 The web layer of the Spitter application includes two resource-oriented controllers along with a couple of utility controllers.
Figure7.1.1 More detailed spring-mvc request flow.

Figure7.1.2 InitializationExplain Spring-MVC architecture or Request Flow?1.when a spring-mvc webapplication deployed, webcontainer loads, creates and initializes the dispatcher servlet with resolvers, adapters and translators. Dispatcher servlet acts as a front controller to service the request.
2. when a request comes to spring-mvc web application, web-container gives the request responsibility to dispatcher-servlet, it gives the responsibility first to LocaleResolver to capture locale information from request and then to Multipart Resolver to check the request is having multipart/MIME-Type to transfer data from server/client and then to handler-mapping to provide the actual controller information( checking from dispatcher-servlet.xml) and then to handler chain to provide info about pre-processing and post-processing interceptors, called before and after controller.
3. In actual request processing, preprocessing- interceptor will be called first and then controller will validate the request payload and prepares the vo and invokes the business-method on business-delegate, business-delegate delegates this to the service-method on corresponding service (EJB, JMS …etc) and then Service invokes the persistence-methods on DAO (hibernate/JPA/EntityBeans) for database communication and process the data by applying business-rules and prepares the vo object and sends back to the delegate, delegate sends back to the controller. Controller prepares ModelAndView object, binding the model data(vo) got from business-delegate with view name ( to tell dispatchservlet which view has to be displayed and what has to be displayed) and will return to the dispatcher servlet andthen interceptor for post-processing will be called.
4. DispatcherServlet is responsible to check with view-resovler (configured in dispatcher-servlet.xml) for actual view to dispatch the request with model-data.
5. Now it is webcontainer’s responsibility to execute that view and sends back the response to client.
7.1.2 Setting up Spring MVCHow do you Configure the DispatcherServlet in the web.xml like below.?<servlet>
<servlet-name>spitter</servlet-name> <servlet-class> org.springframework.web.servlet.DispatcherServlet </servlet-class> <load-on-startup>1</load-on-startup>
</servlet>
<servlet-mapping> <servlet-name>spitter</servlet-name> <url-pattern>/</url-pattern></servlet-mapping>DispatcherServlet will try to load and create the application context from a file named spitter-servlet.xml (servletname-servlet.xml) from WEB-INF directory.
<load-on-startup>1</load-on-startup>means servlet will be loaded when an application started.
<url-pattern>/</url-pattern> means it’s the default servlet and that it’ll be responsible for handling all requests, including requests for static content.spitter-servlet.xml<?xml version="1.0" encoding="UTF-8"?>
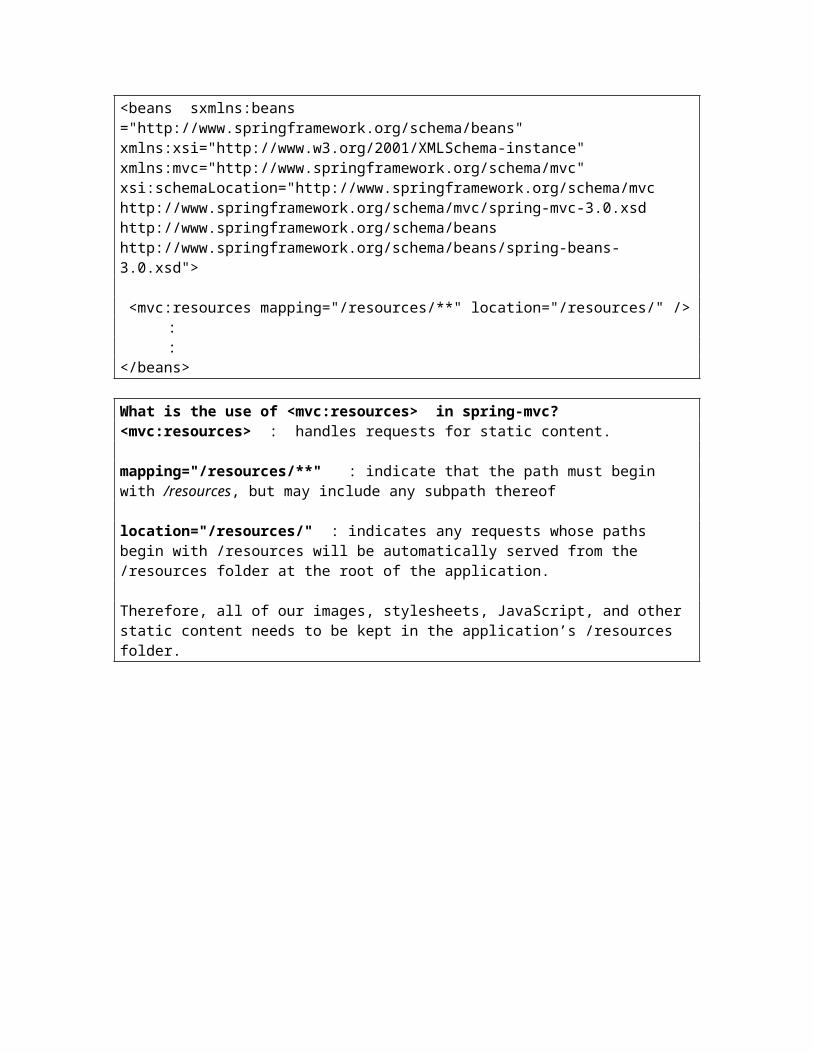
<beans sxmlns:beans ="http://www.springframework.org/schema/beans" xmlns:xsi="http://www.w3.org/2001/XMLSchema-instance" xmlns:mvc="http://www.springframework.org/schema/mvc" xsi:schemaLocation="http://www.springframework.org/schema/mvc http://www.springframework.org/schema/mvc/spring-mvc-3.0.xsd http://www.springframework.org/schema/beans http://www.springframework.org/schema/beans/spring-beans-3.0.xsd">
<mvc:resources mapping="/resources/**" location="/resources/" /> ::
</beans>
What is the use of <mvc:resources> in spring-mvc?<mvc:resources> : handles requests for static content.
mapping="/resources/**" : indicate that the path must begin with /resources, but may include any subpath thereof
location="/resources/" : indicates any requests whose paths begin with /resources will be automatically served from the /resources folder at the root of the application.
Therefore, all of our images, stylesheets, JavaScript, and other static content needs to be kept in the application’s /resources folder.
Spitter application architecture
7.2.1 Configuring an annotation-driven Spring MVC DispatcherServlet consults one or more handler mappings in order to know which controller to dispatch a request to. Spring comes with a hand ful of handler mapping implementations to choose from, includingWhat are the handler-mappings available in Spring-mvc?BeanNameUrlHandlerMapping—Maps controllers to URLs that are based on the controllers’ bean names.
ControllerBeanNameHandlerMapping—Similar to BeanNameUrlHandlerMapping, maps controllers to URLs that are based on the controllers’ bean names. In this case, the bean names aren’t required to follow URL conventions.
ControllerClassNameHandlerMapping—Maps controllers to URLs by using the controllers’ class names as the basis for their URLs.
DefaultAnnotationHandlerMapping—Maps request to controller and controller methods that are annotated with @RequestMapping.
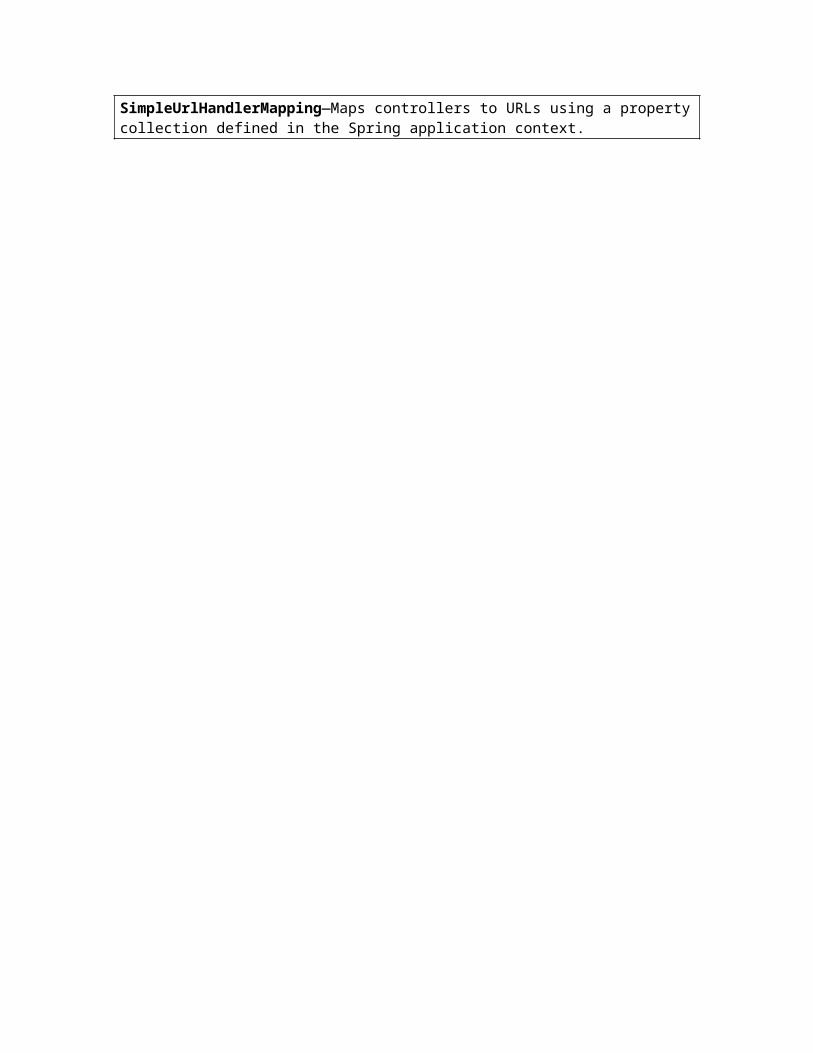
SimpleUrlHandlerMapping—Maps controllers to URLs using a property collection defined in the Spring application context.
What are the default handler-mappings in spring-mvc?If no handler mapping beans are found, then DispatcherServlet creates and uses BeanNameUrlHandlerMapping and DefaultAnnotationHandlerMapping.
How do you get all of the annotation-driven features you’ll need from Spring MVC? Is DefaultAnnotationHandlerMapping isn’t enough to get all annotation-driven features?DefaultAnnotationHandlerMapping maps requests to controller methods that are annotated with @RequestMapping. We are not just mapping requests to methods also using annotations to bind request parameters to handler method parameters, perform validation, and perform message conversion. There- fore, DefaultAnnotationHandlerMapping isn’t enough.
We need to configure in spitter-servlet.xml like below to get all annotation support.<mvc:annotation-driven/>
It registers several features, including JSR-303 validation support, message conversion, and support for field formatting.7.2.2 Defining the home page controllerpackage com.habuma.spitter.mvc; import javax.inject.Inject;import java.util.Map; import org.springframework.beans.factory.annotation.Autowired;import org.springframework.stereotype.Controller; import org.springframework.web.bind.annotation.RequestMapping; import com.habuma.spitter.service.SpitterService; @Controller public class HomeController {
public static final int DEFAULT_SPITTLES_PER_PAGE = 25; private SpitterService spitterService; @Inject public HomeController(SpitterService spitterService) {
this.spitterService = spitterService; } @RequestMapping({"/","/home"}) public String showHomePage(Map<String, Object> model) {
model.put("spittles", spitterService.getRecentSpittles( DEFAULT_SPITTLES_PER_PAGE)); return "home";
} }How the HomeController class will be automatically discovered and registered as bean ?1. we need to add @Controller 2. we need to configure <context: component-scan> in spitter-servlet.xml
@Controller annotation indicates that this class is a controller class. This is is a specialization of the @Component annotation.
<context: component-scan> will pick up and register @Controller-annotated classes as beans, just as if they were annotated with @Component.
HomeController class will be automatically discovered and registered as beans@RequestMapping :
1. it identifies showHomePage() as a request-handling method.2. it specifies that this method should handle requests whose path is either / or /home
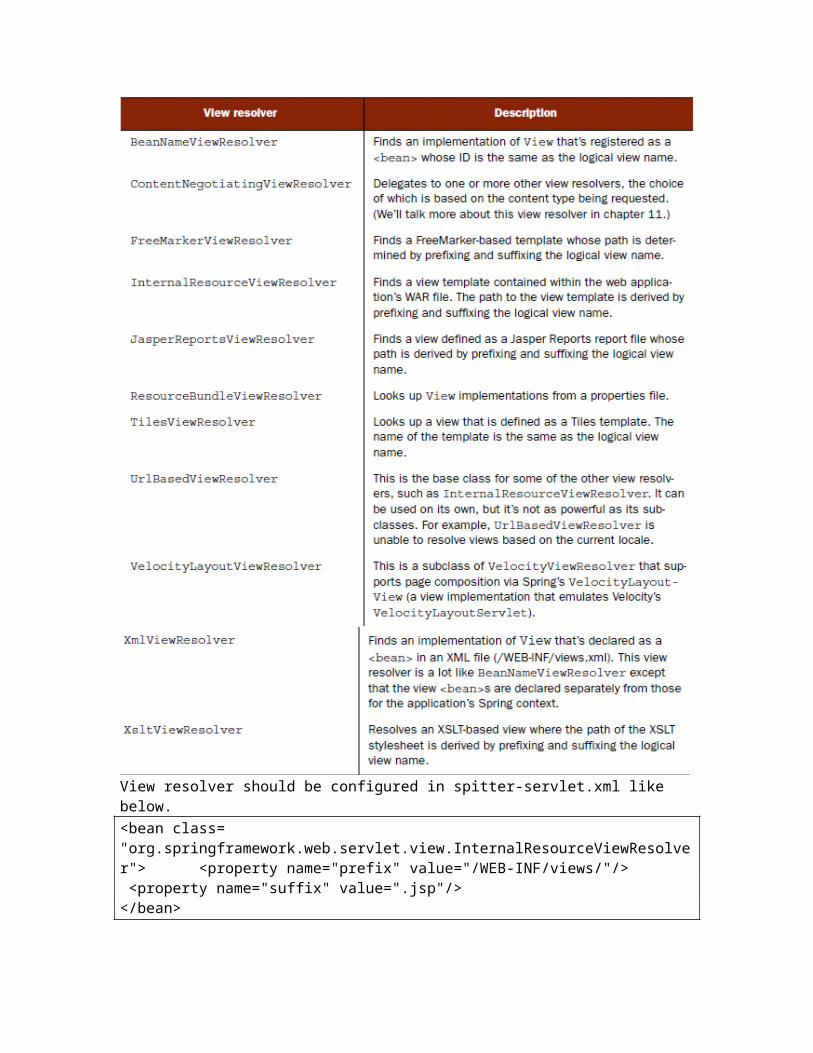
7.2.3 Resolving views
View resolver should be configured in spitter-servlet.xml like below.
<bean class= "org.springframework.web.servlet.view.InternalResourceViewResolver"> <property name="prefix" value="/WEB-INF/views/"/> <property name="suffix" value=".jsp"/></bean>
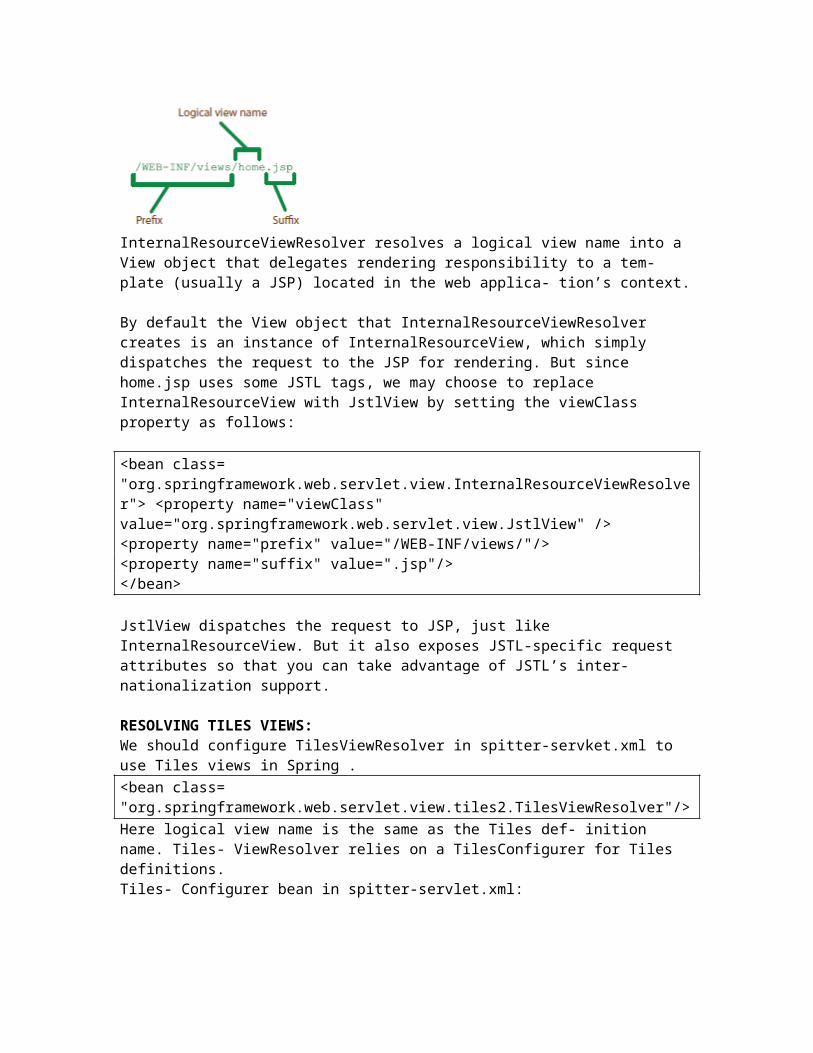
InternalResourceViewResolver resolves a logical view name into a View object that delegates rendering responsibility to a tem-plate (usually a JSP) located in the web applica- tion’s context.
By default the View object that InternalResourceViewResolver creates is an instance of InternalResourceView, which simply dispatches the request to the JSP for rendering. But since home.jsp uses some JSTL tags, we may choose to replace InternalResourceView with JstlView by setting the viewClass property as follows:
<bean class= "org.springframework.web.servlet.view.InternalResourceViewResolver"> <property name="viewClass" value="org.springframework.web.servlet.view.JstlView" /> <property name="prefix" value="/WEB-INF/views/"/> <property name="suffix" value=".jsp"/> </bean>
JstlView dispatches the request to JSP, just like InternalResourceView. But it also exposes JSTL-specific request attributes so that you can take advantage of JSTL’s inter- nationalization support.
RESOLVING TILES VIEWS:We should configure TilesViewResolver in spitter-servket.xml to use Tiles views in Spring . <bean class= "org.springframework.web.servlet.view.tiles2.TilesViewResolver"/>Here logical view name is the same as the Tiles def- inition name. Tiles- ViewResolver relies on a TilesConfigurer for Tiles definitions.Tiles- Configurer bean in spitter-servlet.xml: <bean class= "org.springframework.web.servlet.view.tiles2.TilesConfigurer"> <propertyname="definitions"> <list> <value>/WEB-INF/views/views.xml</value> </list> </property> </bean>TilesConfigurer loads one or more Tiles definition files and make them available for TilesViewResolver to resolve views from. We can have<value>/WEB-INF/views/**/views.xml</view> : means entire directory hierarchy under /WEB-INF/views should be searched for files named views.xml.
Views.xml<!DOCTYPE tiles-definitions PUBLIC "-//Apache Software Foundation//DTD Tiles Configuration 2.1//EN" "http://tiles.apache.org/dtds/tiles-config_2_1.dtd"><tiles-definitions> <definition name="template" template="/WEB-INF/views/main_template.jsp">
<put-attribute name="top" value="/WEB-INF/views/tiles/spittleForm.jsp" /> <put-attribute name="side" value="/WEB-INF/views/tiles/signinsignup.jsp" />
</definition> <definition name="home" extends="template">
<put-attribute name="content" value="/WEB-INF/views/home.jsp" /> </definition> </tiles-definitions>DispatcherServlet will send the request to Tiles to render the results using the home definition.
7.2.4 Defining the home page view<%@ taglib prefix="c" uri="http://java.sun.com/jsp/jstl/core" %> <%@ taglib prefix="s" uri="http://www.springframework.org/tags"%> <%@ taglib prefix="t" uri="http://tiles.apache.org/tags-tiles"%><div> <h2>A global community of friends and strangers spitting out their inner-most and personal thoughts on the web for everyone else to see.</h2> <h3>Look at what these people are spitting right now...</h3> <ol class="spittle-list"> <c:forEach var="spittle" items="${spittles}"> <s:url value="/spitters/{spitterName}" var="spitter_url" > <s:param name="spitterName" value="${spittle.spitter.username}" /> </s:url> <li> <span class="spittleListImage"> <img src= "http://s3.amazonaws.com/spitterImages/${spittle.spitter.id}.jpg" width="48" border="0" align="middle" onError= "this.src='<s:url value="/resources/images"/>/spitter_avatar.png';"/> </span> <span class="spittleListText"> <a href="${spitter_url}"> <c:out value="${spittle.spitter.username}" /></a> - <c:out value="${spittle.text}" /><br/> <small><fmt:formatDate value="${spittle.when}" pattern="hh:mma MMM d, yyyy" /></small> </span> </li> </c:forEach>
</ol> </div>The main difference between Spring’s <s:url> and JSTL’s <c:url> is that <s:url> supports parameterized URL paths. In this case, the path is parameterized with the Spitter’s username. For example, if the Spitter’s username is habuma and the serv-et-context name is Spitter, then the resulting path will be /Spitter/spitters/habuma.
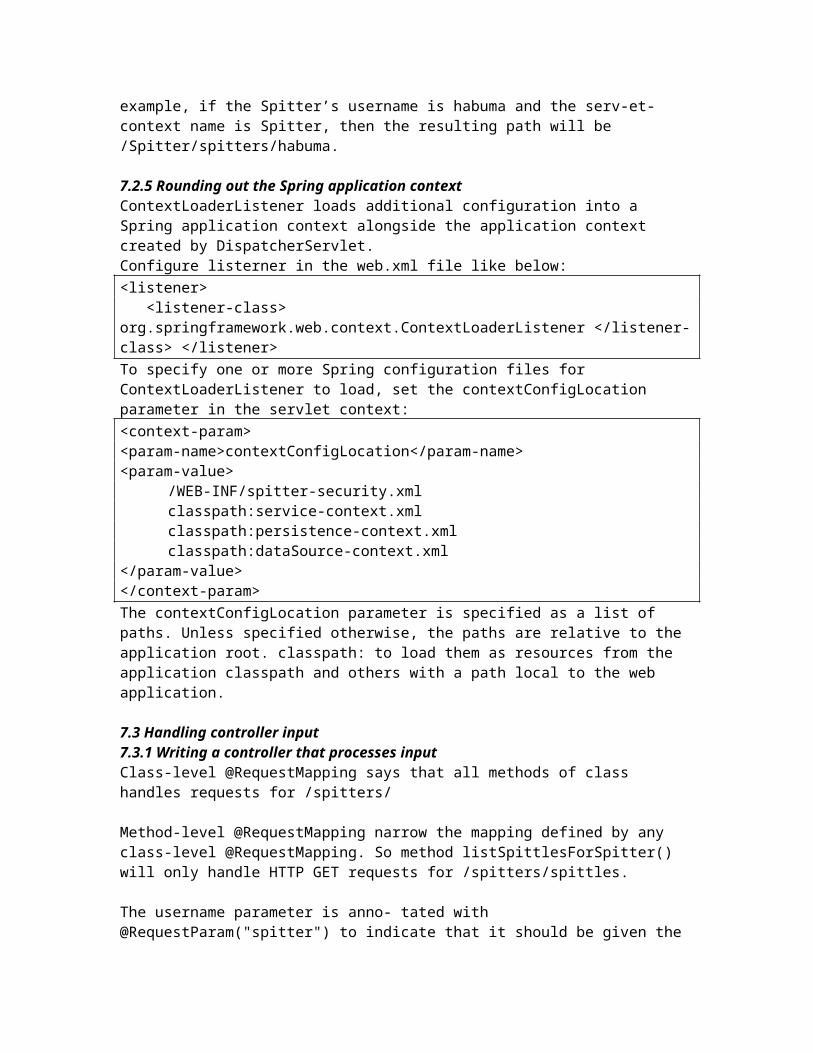
7.2.5 Rounding out the Spring application contextContextLoaderListener loads additional configuration into a Spring application context alongside the application context created by DispatcherServlet.Configure listerner in the web.xml file like below: <listener> <listener-class> org.springframework.web.context.ContextLoaderListener </listener-class> </listener>To specify one or more Spring configuration files for ContextLoaderListener to load, set the contextConfigLocation parameter in the servlet context: <context-param> <param-name>contextConfigLocation</param-name> <param-value>
/WEB-INF/spitter-security.xml classpath:service-context.xml classpath:persistence-context.xml classpath:dataSource-context.xml
</param-value> </context-param>The contextConfigLocation parameter is specified as a list of paths. Unless specified otherwise, the paths are relative to the application root. classpath: to load them as resources from the application classpath and others with a path local to the web application.
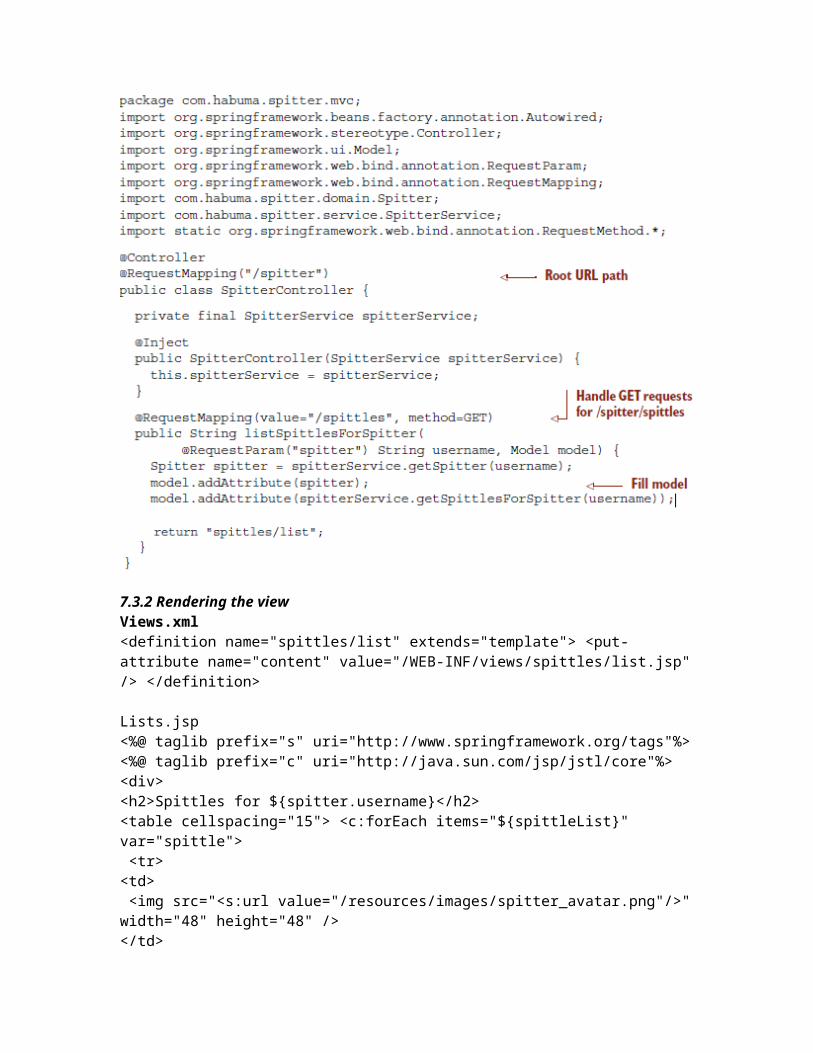
7.3 Handling controller input7.3.1 Writing a controller that processes inputClass-level @RequestMapping says that all methods of class handles requests for /spitters/
Method-level @RequestMapping narrow the mapping defined by any class-level @RequestMapping. So method listSpittlesForSpitter() will only handle HTTP GET requests for /spitters/spittles.
The username parameter is anno- tated with @RequestParam("spitter") to indicate that it should be given the value of the spitter query parameter in the request. listSpit- tlesForSpitter() will use that parameter to look up the Spitter object and its list of Spittles.
Do I really need @RequestParam? The @RequestParam annotation isn’t strictly required. @RequestParam is useful for binding query parameters to method parameters where the names don’t match. As a matter of convention, any parameters of a handler method that aren’t annotated otherwise will be bound to the query parameter of the same name. In the case of listSpittlesForSpitter(), if the parameter
were named spit- ter or if the query parameter were called username, then we could leave the @RequestParam annotation off.
@RequestParam also comes in handy when you compile your Java code without debugging information compiled in. In that circumstance, the name of the method parameter is lost and so there’s no way to bind the query parameter to the method parameter by convention. For that reason, it’s probably best to always use @RequestParam and not rely too heavily on the convention.
SpitterController.java
7.3.2 Rendering the viewViews.xml<definition name="spittles/list" extends="template"> <put-attribute name="content" value="/WEB-INF/views/spittles/list.jsp" /> </definition>
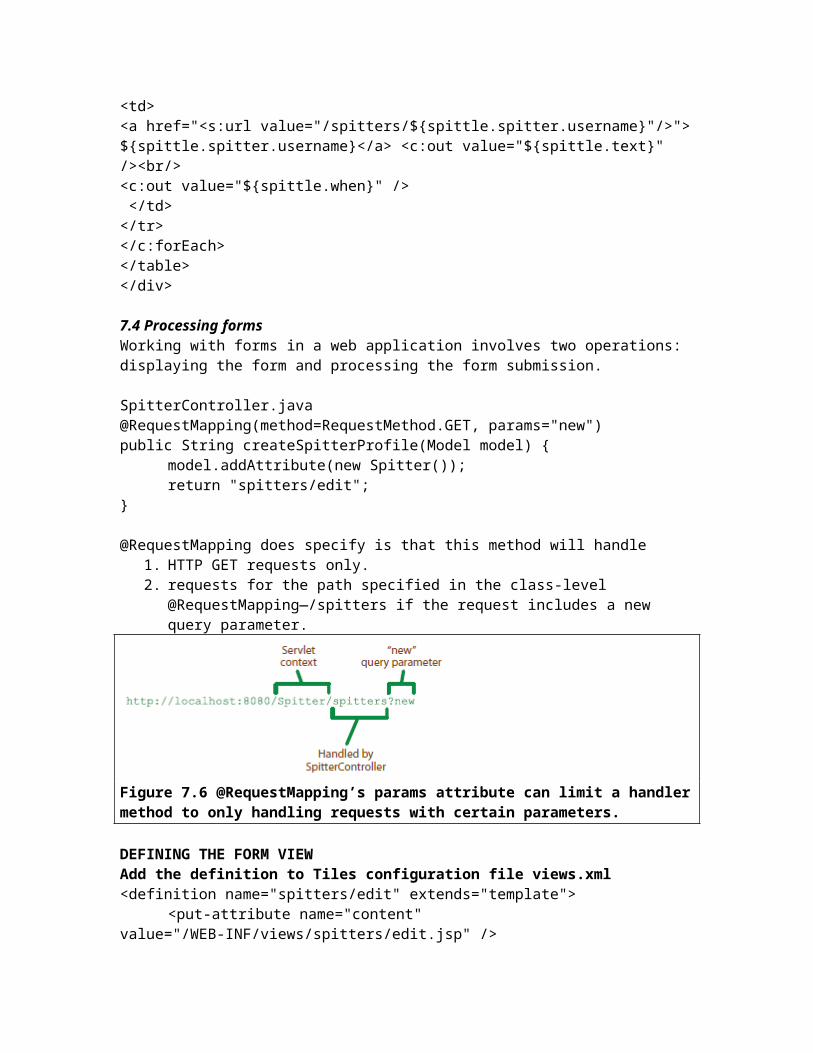
Lists.jsp<%@ taglib prefix="s" uri="http://www.springframework.org/tags"%> <%@ taglib prefix="c" uri="http://java.sun.com/jsp/jstl/core"%>
<div> <h2>Spittles for ${spitter.username}</h2> <table cellspacing="15"> <c:forEach items="${spittleList}" var="spittle"> <tr> <td> <img src="<s:url value="/resources/images/spitter_avatar.png"/>" width="48" height="48" /></td><td> <a href="<s:url value="/spitters/${spittle.spitter.username}"/>"> ${spittle.spitter.username}</a> <c:out value="${spittle.text}" /><br/> <c:out value="${spittle.when}" /> </td> </tr> </c:forEach> </table> </div>
7.4 Processing formsWorking with forms in a web application involves two operations: displaying the form and processing the form submission.
SpitterController.java@RequestMapping(method=RequestMethod.GET, params="new") public String createSpitterProfile(Model model) {
model.addAttribute(new Spitter()); return "spitters/edit";
}
@RequestMapping does specify is that this method will handle1. HTTP GET requests only.2. requests for the path specified in the class-level @RequestMapping—/spitters if the
request includes a new query parameter.
Figure 7.6 @RequestMapping’s params attribute can limit a handler method to only handling requests with certain parameters.
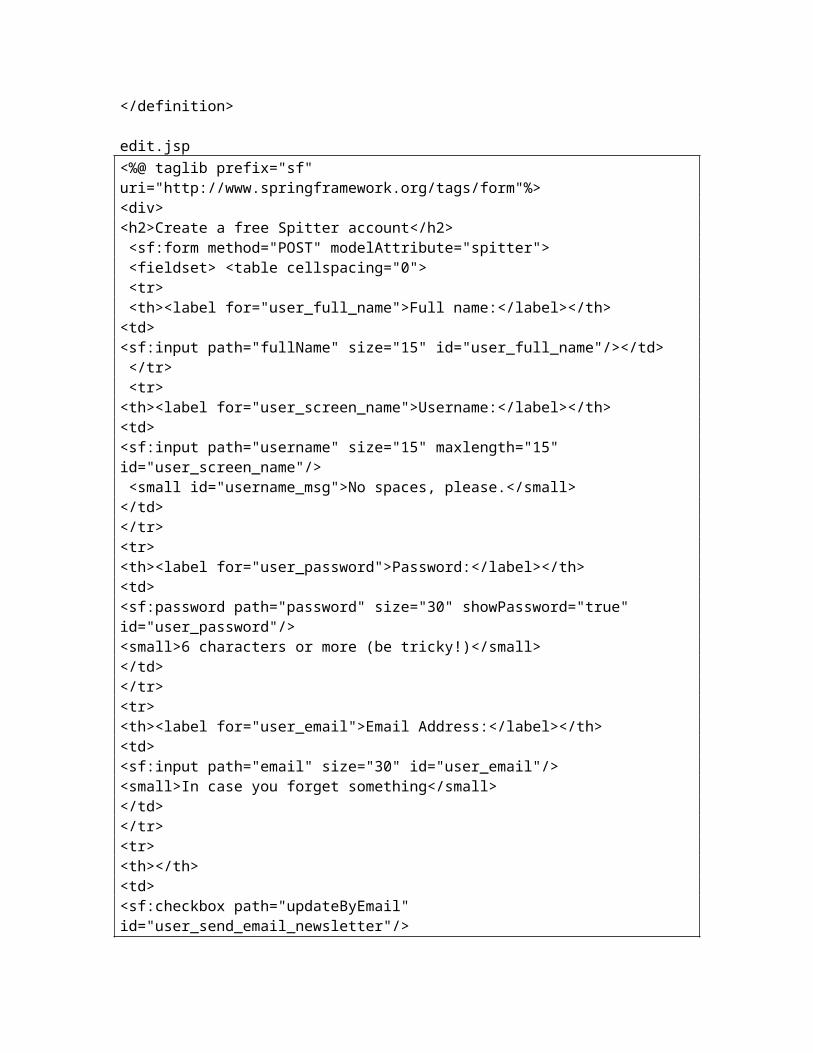
DEFINING THE FORM VIEWAdd the definition to Tiles configuration file views.xml<definition name="spitters/edit" extends="template">
<put-attribute name="content" value="/WEB-INF/views/spitters/edit.jsp" />
</definition>
edit.jsp<%@ taglib prefix="sf" uri="http://www.springframework.org/tags/form"%> <div> <h2>Create a free Spitter account</h2> <sf:form method="POST" modelAttribute="spitter"> <fieldset> <table cellspacing="0"> <tr> <th><label for="user_full_name">Full name:</label></th> <td><sf:input path="fullName" size="15" id="user_full_name"/></td> </tr> <tr> <th><label for="user_screen_name">Username:</label></th> <td><sf:input path="username" size="15" maxlength="15" id="user_screen_name"/> <small id="username_msg">No spaces, please.</small></td> </tr> <tr> <th><label for="user_password">Password:</label></th> <td><sf:password path="password" size="30" showPassword="true" id="user_password"/> <small>6 characters or more (be tricky!)</small> </td> </tr> <tr> <th><label for="user_email">Email Address:</label></th> <td><sf:input path="email" size="30" id="user_email"/> <small>In case you forget something</small> </td> </tr> <tr><th></th><td> <sf:checkbox path="updateByEmail" id="user_send_email_newsletter"/> <label for="user_send_email_newsletter" >Send me email updates!</label> </td> </tr> </table> </fieldset> </sf:form> </div>
1. The <sf:form> tag binds the Spitter object (identified by the modelAttribute attribute).
2. <sf:input>, <sf:password>, and <sf:checkbox> tags each have a path attribute that references the property of the Spitter object that the form is bound to.
3. With no URL specified, it’ll be submitted back to /spitters, the same URL path that displayed the form.
4. That means that the next thing to do is to write another handler method that accepts POST requests for /spitters.
7.4.2 Processing form input @RequestMapping(method=RequestMethod.POST) public String addSpitterFromForm(@Valid Spitter spitter, BindingResult bindingResult) { if(bindingResult.hasErrors()) {
return "spitters/edit"; } spitterService.saveSpitter(spitter); return "redirect:/spitters/" + spitter.getUsername();
}@Valid : indicates that the Spitter should pass validation before being passed in.
redirect: prefix signals the request should be redirected to the path that it precedes. By redirecting to another page, we can avoid duplicate submission of the form if the user clicks the Refresh button in their browser.
HANDLING REQUESTS WITH PATH VARIABLESSpitterController.java@RequestMapping(value="/{username}", method=RequestMethod.GET) public String showSpitterProfile(@PathVariable String username, Model model){
model.addAttribute(spitterService.getSpitter(username)); return "spitters/view";
}
showSpitterProfile() method to handle requests whose URLs have parameters embedded in their path. The {user- name} portion of the path is actually a placeholder that corresponds to the username method parameter that’s annotated with @PathVariable. Whatever value is in that location in a request’s path will be passed in as the value of username.
For example, if the request path is /username/habuma, then habuma will be passed in to showSpitterProfile() for the username.
7.4.3 Validating inputDECLARING VALIDATION RULESSpitter.java@Size(min=3, max=20, message= "Username must be between 3 and 20 characters long.") @Pattern(regexp="^[a-zA-Z0-9]+$", message="Username must be alphanumeric with no spaces") private String username;

@Size(min=6, max=20, message="The password must be at least 6 characters long.") private String password;
@Size(min=3, max=50, message= "Your full name must be between 3 and 50 characters long.") private String fullName;
@Pattern(regexp="[A-Za-z0-9._%+-]+@[A-Za-z0-9.-]+\.[A-Za-z]{2,4}", message="Invalid email address.") private String email;
DISPLAYING VALIDATION ERRORS<%@ taglib prefix="sf" uri="http://www.springframework.org/tags/form"%> <div> <h2>Create a free Spitter account</h2> <sf:form method="POST" modelAttribute="spitter" enctype="multipart/form-data"> <fieldset> <table cellspacing="0"> <tr> <th><sf:label path="fullName">Full name:</sf:label></th> <td><sf:input path="fullName" size="15" /><br/> <sf:errors path="fullName" cssClass="error" /> </td> </tr> <tr> <th><sf:label path="username">Username:</sf:label></th> <td><sf:input path="username" size="15" maxlength="15" /> <small id="username_msg">No spaces, please.</small><br/> <sf:errors path="username" cssClass="error" /> </td> </tr> <tr> <th><sf:label path="password">Password:</sf:label></th> <td><sf:password path="password" size="30" showPassword="true"/> <small>6 characters or more (be tricky!)</small><br/> <sf:errors path="password" cssClass="error" /> </td> </tr> <tr> <th><sf:label path="email">Email Address:</sf:label></th> <td><sf:input path="email" size="30"/> <small>In case you forget something</small><br/> <sf:errors path="email" cssClass="error" /> </td> </tr>
<tr> <th></th> <td> <sf:checkbox path="updateByEmail"/> <sf:label path="updateByEmail" >Send me email updates!</sf:label> </td> </tr> <tr> <th><label for="image">Profile image:</label></th> <td><input name="image" type="file"/> </tr> <tr> <th></th> <td><input name="commit" type="submit" value="I accept. Create my account."/></td> </tr> </table> </fieldset> </sf:form> </div>
If there are multiple errors for a single field, they’ll all be displayed, separated by an HTML <br/> tag. If you’d rather have them separated some other way, then you can use the delimiter attribute. The following <sf:errors> snippet uses delimiter to separate errors with a comma and a space: <sf:errorspath="fullName"delimiter="," cssClass="error"/>
The cssClass attribute refers to a class that’s declared in CSS to display in red so that it catches the user’s attention.
To display all of the errors in one place need a single <sf:errors> tag, with its path attribute set to *: <sf:errorspath="*"cssClass="error"/>
7.5 Handling file uploadsTo enable file uploads in the Spitter application, we’ll need to do three things:
1. Add a file upload field to the registration form 2. Tweak SpitterController’s addSpitterFromForm() to receive the uploaded file3. Configure a multipart file resolver in Spring
7.5.1 Adding a file upload field to the form<sf:form method="POST" modelAttribute="spitter" enctype="multipart/form-data"> <tr> <th><label for="image">Profile image:</label></th> <td><input name="image" type="file"/> </td></tr></sf:form>
7.5.2 Receiving uploaded files@RequestMapping(method=RequestMethod.POST) public String addSpitterFromForm(@Valid Spitter spitter, BindingResult bindingResult, @RequestParam(value="image", required=false) MultipartFile image){
if(bindingResult.hasErrors()) { return "spitters/edit";
}
spitterService.saveSpitter(spitter);
try { if(!image.isEmpty()) {
validateImage(image); saveImage(spitter.getId() + ".jpg", image);
} catch (ImageUploadException e) { bindingResult.reject(e.getMessage()); return "spitters/edit";
} return "redirect:/spitters/" + spitter.getUsername(); }
private void validateImage(MultipartFile image){ if(!image.getContentType().equals("image/jpeg")) {
throw new ImageUploadException("Only JPG images accepted");} }SAVING FILES TO THE FILE SYSTEM
private void saveImage(String filename, MultipartFile image) throws ImageUploadException { try {
File file = new File(webRootPath + "/resources/" + filename); FileUtils.writeByteArrayToFile(file, image.getBytes());
} catch (IOException e) { throw new ImageUploadException("Unable to save image", e);
}}webRootPath : it could be configured by value injection, either through a setWebRoot- Path() method or perhaps using SpEL and an @Value annotation to read the value from a configuration file.
7.5.3 Configuring Spring for file uploadsTo register a multipart resolver in Spring, we need to declare a bean that implements the MultipartResolver interface. Our choice of multipart resolvers is made easy by the fact that Spring only comes with one: CommonsMultipartResolver. It’s con- figured in Spring as follows:
<bean id="multipartResolver"class= "org.springframework.web.multipart.commons.CommonsMultipartResolver" p:maxUploadSize="500000"/>
x