Embed Size (px)
Citation preview
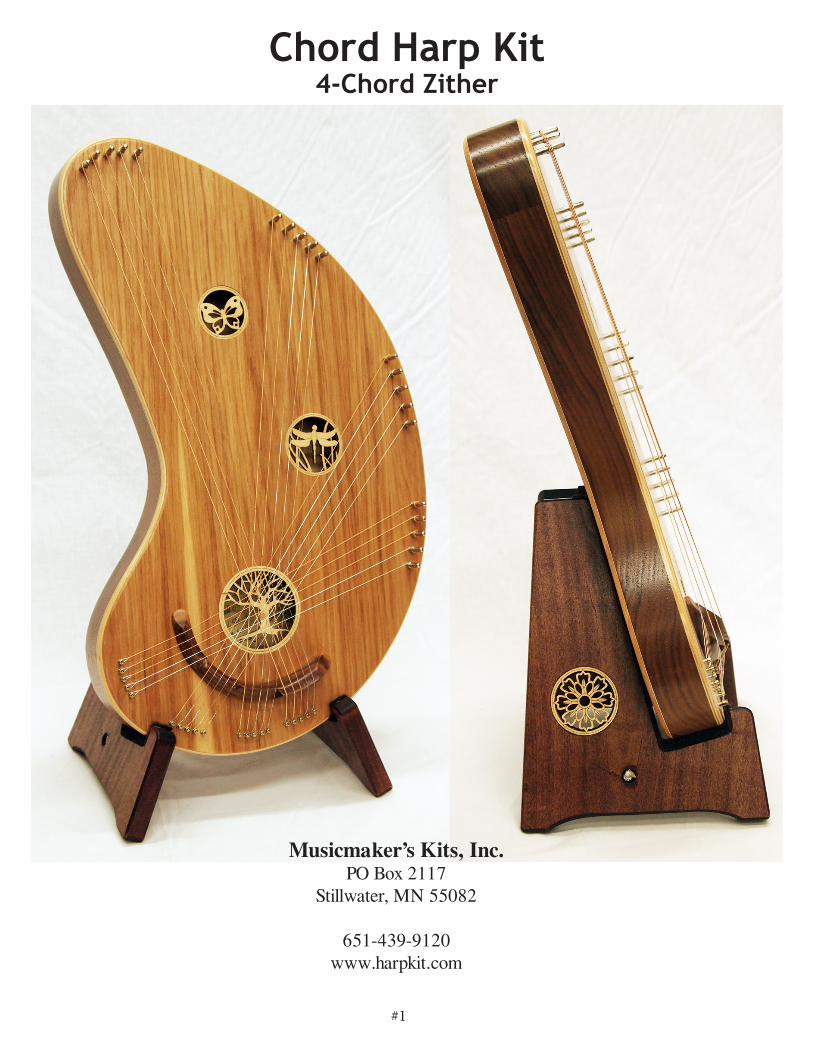
#1
Chord Harp Kit4-Chord Zither
Musicmaker’s Kits, Inc.PO Box 2117
Stillwater, MN 55082
651-439-9120www.harpkit.com

#2
Chord Harp Kit Parts
Wood Parts:
A - Front (Soundboard)B - BackC - BridgeD - Frame pieces (1, 2, 3)
Hardware:
E - Set of 20 StringsF - 20 Tuning PinsG - Tuning WrenchH - Flat PickI - Felt PickK - 20 Tail Pins
3 Rosettes2 Drill Bits (3/16” & #24)1 Needle FileSignature LabelAssembly Instructions
A
B
CD1
D2
D3
E
F
G
HI
K
A NOTE ABOUT GLUEWe strongly recommend that you use a modern woodworking glue for assembling this project. The yellowish
Aliphatic Resins (such as Elmer’s Carpenter’s Wood Glue or Titebond) are best for wood because of their excellent hold-ing power and simplicity of use.
When gluing parts together, be sure to put enough glue on the joint to wet the entire surfaces to be joined. A good sign of proper gluing is that a little excess will squeeze out around the joint when clamping pressure is applied. Too little glue may cause the parts to separate later, whereas too much glue makes things messy. We always keep a damp rag handy for quick cleanup, as necessary. It is especially helpful to keep your fingers clean while gluing, because gluey fingerprints have the embarrassing tendency to appear on the finished product in places you never expected.
IMPORTANTPlease take the time to check over the parts of your kit now, to make sure everything is there. If you discover a problem, call us right away so we can rectify it quickly without causing you much delay in your project.
Optional Accessories and DecorationsThis instrument can be customized in a number of ways, and it would be smart to plan ahead so you are ready with the proper tools and parts when you get to the right stage of construction. Here are some nice possibilities:
• Decorative Rosettes: We include 3 rosettes in the kit to fit the soundholes, but you may trade them for different designs from our catalog or web site if you prefer. There are currently 12 different options in each size (small, medium & large).
• Inlay banding around the top edge looks very nice. It takes two lengths of banding to go around the instrument, and you will need a router and inlay bit to cut the ledge for the banding (see step 10). Find inlay banding in our catalog or on our website (harpkit.com) by clicking the “Decorate Your Kit” tab. We also have a special router bit available there for this operation
• Stain: You might wish to darken the wood to bring out the grain pattern of the soundboard and make it look richer (see Step 16). We like Minwax brand stain/sealer. You’ll find many options at your hardware or builder’s supply store. Red Mahogany is our favorite color, and that is what we used for the darker instrument shown on the back of these kit instructions.

#3
Assembly Instructions
_____1. Begin by dry-fitting the frame parts. Use the back panel as a guide to arranging the parts in the correct orientation, as shown in Fig 1a.
Fig 1a Fig 1c
D1
D2
D3
Then set the back panel aside and place the three frame pieces together. If the joints do not match correctly (Fig 1b), flip part D2 end-for-end and try again. You want the frame to look like Fig 1c.
_____2. Use masking tape and woodworking glue to glue the three frame parts together on a nice flat surface.
HINT: Cover your table top with newspaper or plastic to keep the glue from adhering to that surface. We keep a white shelf board on hand for gluing this sort of thing because it is perfectly flat and has a smooth finished surface that repels most glues.
Use just enough glue to have some squeeze out when you push the parts together, as shown below.
HINT: Even though masking tape is not elastic, it helps to think of it as being slightly stretchy as you install it. Pull it tight in each direction so it holds the parts firmly in place. We often see people apply tape as if just the weight of the tape will hold the parts together -- not true. you must pull it tight as you hold the wood parts together and press the tape firmly to each piece of wood. Loose tape will not hold anything.
InsideFace of BackPanel
NOT THIS!
D2
Fig 1b
Fig 2a Fig 2b
D1
D2
D3
ProperFit

#4
Put glue on both ends of part D2 and tape those two joints in the same way, as shown below. Add tape to the inside and outside surfaces of each glue joint, but don’t bother turning the frame over to tape the other side -- that’s not necessary.
HINT: It helps reduce sanding time later if you make sure the outer surfaces of these parts are flush. The outside of the frame is all that will be visible on the finished instrument.
Part D2
_____3. After the glue sets for at least an hour, you can test-fit the frame to the inside surface of your back panel, as shown in Fig 3a. You should have some excess back ma-terial showing all around the instrument -- that’s fine. You will trim that off flush with the frame later in the project.
ALERT: Beware that you can assemble this instrument backwards, ending up with the back panel upside-down on top, and the soundboard upside-down on the bottom. We recommend marking the inside of the back panel and the inside of the front panel to make sure you don’t reverse them. The soundboard (with 3 sound holes) has punch-marks on the outside for marking the locations of the tuning pins and tail pins. The back panel has punch-marks too, but on the inside face -- only because we use the same jig for cutting both parts to identical size. The punch-marks on the back panel will be covered by the frame. When you orient the two panels with the insides facing each other, their shapes will match up together.
If you are left-handed and prefer strumming with your left instead of your right hand, we can provide you with a left-handed soundboard and back. In that case, you will reverse the illustrations in your mind as you follow the instructions from here to the end.
Flip the frame over and check each of the glue joints. They need to be clean and level. Use a coarse (80 grit) sanding block to level any irregularity and remove any excess glue bumps (fig 3b).
SandingBlock
Fig 2c
Fig 2d
Fig 3b
Fig 3a

#5
Before starting the next step, gather a bunch of clamps or weights to press the frame down against the back panel. We use about 18 spring clamps that open wide enough to hold the back to the frame, but you may use other types of clamps -- c-clamps, cam clamps, spool clamps, or heavy weights.
_____4. (WARNING: Look carefully to make sure your frame is oriented the same as Fig 4a when applying the glue -- otherwise the harp will be left-handed.) Squirt 2 generous lines of glue around the bottom surface of the frame (that you just cleaned up), and then turn the frame over onto the inside surface of the back panel, and clamp the back to the frame all the way around the perimeteras shown below (Fig 4b). You’ll need at least a dozen clamps -- more is better!
Fig 4a
_____5. When the glue has set (1-2 hours for most woodworking glue), you can re-move the clamps, the masking tape, and then sign the inside of the instrument where it can be seen through one of the soundholes (we included a self-adhesive “Hand Crafted” label with your kit for this purpose, but you can also write on the bare wood if you prefer).
Then sand the joints on this side of the frame with a flat sanding block to remove any bumps or irregularities.
______ 6. Get your clamps ready again, and squirt two full lines of glue around the frame again, as before (Fig 6a).
Fig 5
Fig 6a
Then turn the frame over (Fig 6b) onto the inside of the front panel (soundboard) and clamp fully as before (Fig 6c). Look for a little glue squeeze-out all around the frame.
IMPORTANT: Make sure the parts do not slide too far of alignment as you add the clamps. You need to see a little overhang of the front panel all the way around the frame. We recommend leaving this assembly to dry overnight.
Fig 6c
Fig 4b
Fig 6b
#6
POINT OF INTEREST: Some people ask if they should apply fi nish inside the instrument before closing it up. This is not necessary. Other instruments (guitars, violins, mandolins, harps, etc.) are not fi nished inside, and we see no reason to do it on this instrument.
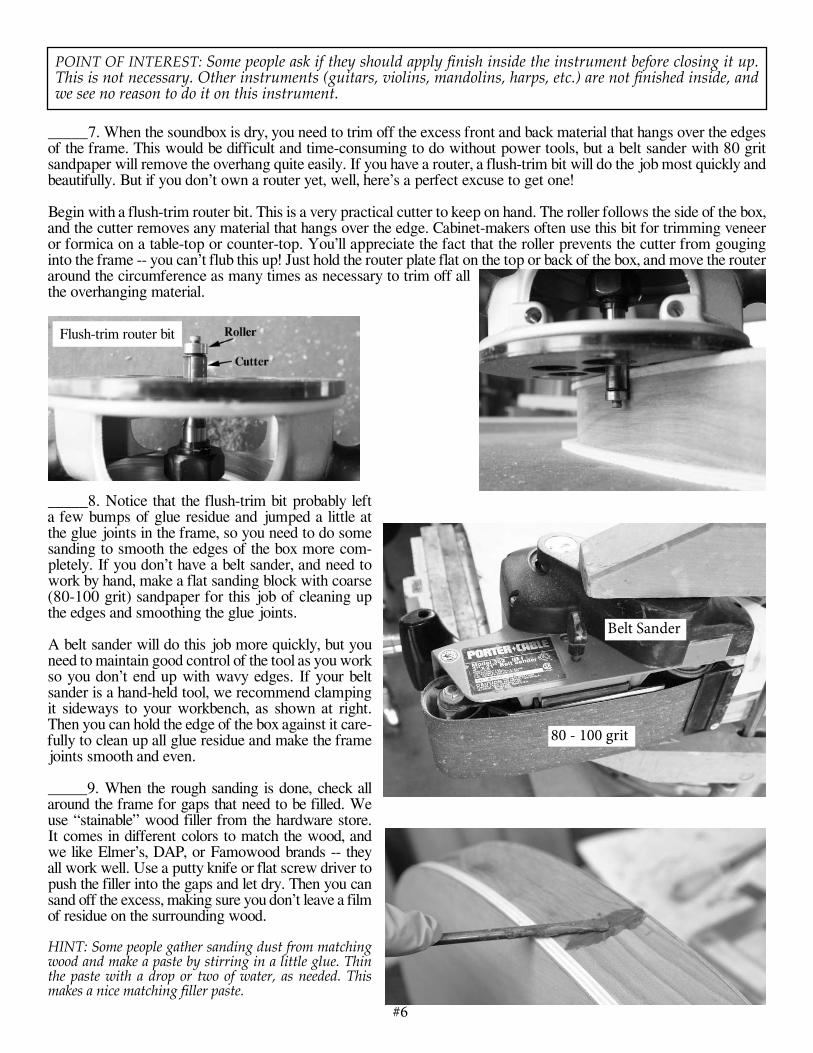
_____7. When the soundbox is dry, you need to trim off the excess front and back material that hangs over the edges of the frame. This would be difficult and time-consuming to do without power tools, but a belt sander with 80 grit sandpaper will remove the overhang quite easily. If you have a router, a flush-trim bit will do the job most quickly and beautifully. But if you don’t own a router yet, well, here’s a perfect excuse to get one!
Begin with a flush-trim router bit. This is a very practical cutter to keep on hand. The roller follows the side of the box, and the cutter removes any material that hangs over the edge. Cabinet-makers often use this bit for trimming veneer or formica on a table-top or counter-top. You’ll appreciate the fact that the roller prevents the cutter from gouging into the frame -- you can’t flub this up! Just hold the router plate flat on the top or back of the box, and move the router around the circumference as many times as necessary to trim off all the overhanging material.
_____8. Notice that the flush-trim bit probably left a few bumps of glue residue and jumped a little at the glue joints in the frame, so you need to do some sanding to smooth the edges of the box more com-pletely. If you don’t have a belt sander, and need to work by hand, make a flat sanding block with coarse (80-100 grit) sandpaper for this job of cleaning up the edges and smoothing the glue joints.
A belt sander will do this job more quickly, but you need to maintain good control of the tool as you work so you don’t end up with wavy edges. If your belt sander is a hand-held tool, we recommend clamping it sideways to your workbench, as shown at right. Then you can hold the edge of the box against it care-fully to clean up all glue residue and make the frame joints smooth and even.
_____9. When the rough sanding is done, check all around the frame for gaps that need to be filled. We use “stainable” wood filler from the hardware store. It comes in different colors to match the wood, and we like Elmer’s, DAP, or Famowood brands -- they all work well. Use a putty knife or flat screw driver to push the filler into the gaps and let dry. Then you can sand off the excess, making sure you don’t leave a film of residue on the surrounding wood.
HINT: Some people gather sanding dust from matching wood and make a paste by stirring in a little glue. Thin the paste with a drop or two of water, as needed. This makes a nice matching filler paste.
Belt Sander
80 - 100 grit
Flush-trim router bit
#7
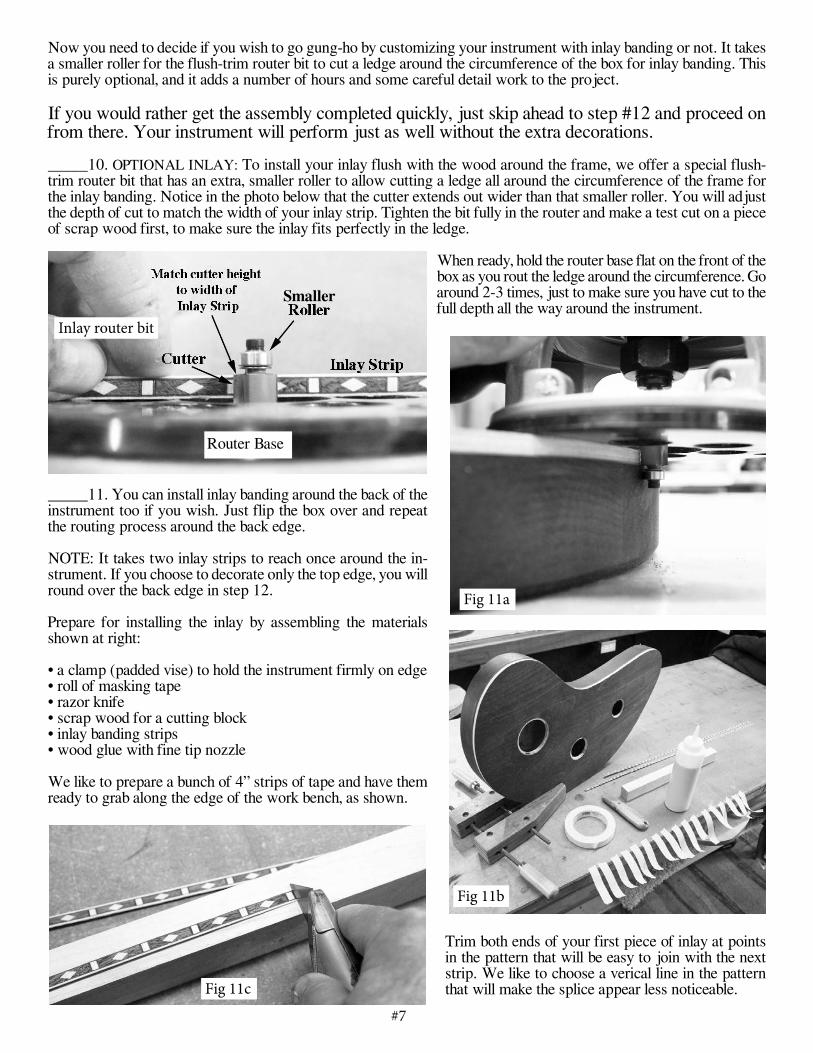
Now you need to decide if you wish to go gung-ho by customizing your instrument with inlay banding or not. It takes a smaller roller for the flush-trim router bit to cut a ledge around the circumference of the box for inlay banding. This is purely optional, and it adds a number of hours and some careful detail work to the project.
If you would rather get the assembly completed quickly, just skip ahead to step #12 and proceed on from there. Your instrument will perform just as well without the extra decorations.
_____10. OPTIONAL INLAY: To install your inlay flush with the wood around the frame, we offer a special flush-trim router bit that has an extra, smaller roller to allow cutting a ledge all around the circumference of the frame for the inlay banding. Notice in the photo below that the cutter extends out wider than that smaller roller. You will adjust the depth of cut to match the width of your inlay strip. Tighten the bit fully in the router and make a test cut on a piece of scrap wood first, to make sure the inlay fits perfectly in the ledge.
When ready, hold the router base flat on the front of the box as you rout the ledge around the circumference. Go around 2-3 times, just to make sure you have cut to the full depth all the way around the instrument.
_____11. You can install inlay banding around the back of the instrument too if you wish. Just flip the box over and repeat the routing process around the back edge.
NOTE: It takes two inlay strips to reach once around the in-strument. If you choose to decorate only the top edge, you will round over the back edge in step 12.
Prepare for installing the inlay by assembling the materials shown at right:
• a clamp (padded vise) to hold the instrument firmly on edge• roll of masking tape• razor knife• scrap wood for a cutting block• inlay banding strips• wood glue with fine tip nozzle
We like to prepare a bunch of 4” strips of tape and have them ready to grab along the edge of the work bench, as shown.
Trim both ends of your first piece of inlay at points in the pattern that will be easy to join with the next strip. We like to choose a verical line in the pattern that will make the splice appear less noticeable.
Router Base
Inlay router bit
Smaller
Fig 11a
Fig 11b
Fig 11c

#8
Start glue about hereStart on a gentle slope of the curve, as that will be an easier spot for your last splice when you come back around to fit the ends together.
Squirt a thin line of glue in the ledge, just 6 - 8” long, so it doesn’t skim over before you can get the inlay strip in place. HOW MUCH GLUE? Not too much, as it can make a mess. Think of a wet spaghetti noodle when squrting the line of glue -- that should be enough to work well.
HINT: Some glue bottles have a rather large or wide opening at the spout. You can narrow it down by covering part of the opening with masking tape. It is very helpful to control your application of glue!
Hold the inlay strip in place with generous amounts of mask-ing tape, as shown at right. Make sure the inlay is pushed all the way down into the slot as you apply the tape.
REMINDER: Even though masking tape is not elastic, it helps to think of it as being slightly stretchy as you install it. Pull it tight in each direction so it holds the inlay firmly in place. We often see people put tape on as if just the weight of the tape will hold the parts together -- not true. you must pull it tight and press the ends firmly to each face of the wood.
When you come to the sharpest curve on the instrument, han-dle the inlay gently so it doesn’t break when wrapping around this tight curve. Use a wet rag to dampen the next 6 inches of inlay strip (both sides) to make it more pliable. The water will soften the wood and make it flex more easily.
If your inlay strip does break, however, it’s no big deal to trim the ends and splice it together again as you glue it in place.
Use a fine tip glue bottle to squirt another line of glue into the ledge around this curved end of the instrument. Then put extra tape over the strip to hold it more completely around the curve (Fig 11g).
Continue in the same way all around the instrument. When you come to the end of the first strip, be sure to trim the beginning of the next strip to match the pattern nicely. You should be able to make the inlay appear to be one continuous length.
When you get all the way around to where you started, you may find that the pattern does not match up the way you expected. In that case, you may want to let the loose end of the second strip overlap the first one (that is already glued) so you can find a nicer part of the pattern for the joint. Use your razor knife to cut through both strips at the same time. Then clean out the underlying piece and glue the loose end down to butt up with the first strip. Be sure to use glue and tape at this end too.
Allow the inlay to dry overnight before removing the tape.
Fig 11d
Fig 11e
Fig 11f
Fig 11g

#9
_____13. Now for some sanding. It will be wise to use a random orbital sander at this point, with 120-180 grit sanding pad, to remove any machine marks and sand-ing belt scratches. Hold a strong light at a low angle to find scratches and marks that are obviously not part of the wood grain lines. The finish will look best when you eliminate all glue residue and scratches.
Use the sander sparingly on the top and back so you don’t wear through the thin veneers. You can be more aggressive around the edges where there are likely coarse sanding scratches and glue blobs.
_____12. Now is the time to do some rounding of the edges on the instrument. If you installed inlay banding around the top, you don’t want to round that edge, but you can put a generous round-over on the back edge (unless you went around the back with inlay too). If you skipped the inlay banding part of the project, you’ll want to round over both the front and the back edges of the box.
Using a router makes this quick and easy, though you can also achieve nice results by hand with a sanding block or an electric orbital hand sander. Here’s how to set up the router:
We like using a 3/8” radius cutter on this size box. Set the bit so it cuts almost to full depth, but not quite full. We like the outer “wing” of the cutter to be hidden about 1/16” below the bottom of the router plate. This way you get most of the rounding, but there’s no danger of cutting through the thin veneer on the front or back of the instrument. The same holds true for using a router table.
Be sure to tighten everything firmly on the router -- the chuck that holds the bit, and the clamp that holds the router base to the motor at the proper depth of cut. Then make a test cut on a piece of scrap wood to make sure you like the results.
When satisfied with the depth of cut, go ahead and trim all the way around the circumference of the instrument. Move the router steadily, not too fast, and not too slow. If you pause with the router bit against the wood, it will make a burn mark, so pull the bit away from the wood whenever you want to stop.
Remember, the roller keeps the bit from cutting too far -- don’t worry!
You’ll love how quick and easy this is.
Glue Residue
Coarse Sanding Scratches
Fig 12a Fig 12b
Fig 13a Fig 13b
#10
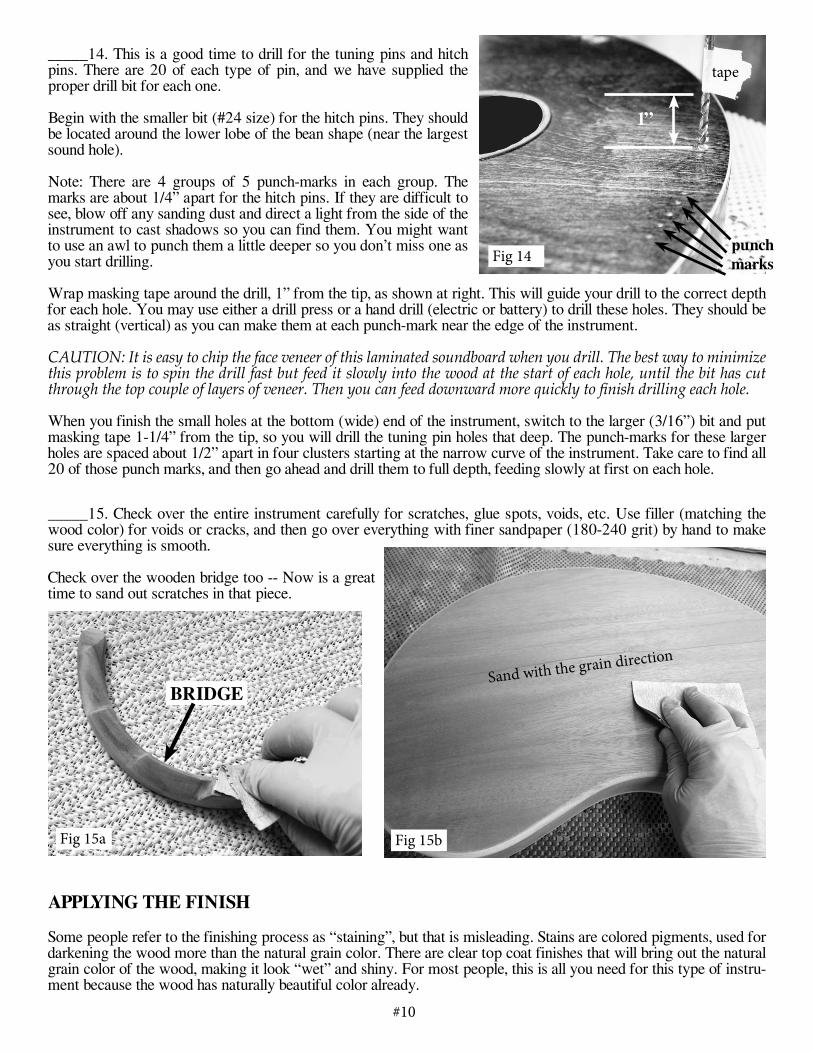
_____15. Check over the entire instrument carefully for scratches, glue spots, voids, etc. Use filler (matching the wood color) for voids or cracks, and then go over everything with finer sandpaper (180-240 grit) by hand to make sure everything is smooth.
Check over the wooden bridge too -- Now is a great time to sand out scratches in that piece.
APPLYING THE FINISH
_____14. This is a good time to drill for the tuning pins and hitch pins. There are 20 of each type of pin, and we have supplied the proper drill bit for each one.
Begin with the smaller bit (#24 size) for the hitch pins. They should be located around the lower lobe of the bean shape (near the largest sound hole).
Note: There are 4 groups of 5 punch-marks in each group. The marks are about 1/4” apart for the hitch pins. If they are difficult to see, blow off any sanding dust and direct a light from the side of the instrument to cast shadows so you can find them. You might want to use an awl to punch them a little deeper so you don’t miss one as you start drilling.
Wrap masking tape around the drill, 1” from the tip, as shown at right. This will guide your drill to the correct depth for each hole. You may use either a drill press or a hand drill (electric or battery) to drill these holes. They should be as straight (vertical) as you can make them at each punch-mark near the edge of the instrument.
CAUTION: It is easy to chip the face veneer of this laminated soundboard when you drill. The best way to minimize this problem is to spin the drill fast but feed it slowly into the wood at the start of each hole, until the bit has cut through the top couple of layers of veneer. Then you can feed downward more quickly to fi nish drilling each hole.
When you finish the small holes at the bottom (wide) end of the instrument, switch to the larger (3/16”) bit and put masking tape 1-1/4” from the tip, so you will drill the tuning pin holes that deep. The punch-marks for these larger holes are spaced about 1/2” apart in four clusters starting at the narrow curve of the instrument. Take care to find all 20 of those punch marks, and then go ahead and drill them to full depth, feeding slowly at first on each hole.
Some people refer to the finishing process as “staining”, but that is misleading. Stains are colored pigments, used for darkening the wood more than the natural grain color. There are clear top coat finishes that will bring out the natural grain color of the wood, making it look “wet” and shiny. For most people, this is all you need for this type of instru-ment because the wood has naturally beautiful color already.
BRIDGE
1”
tape
punch marksFig 14
Fig 15a
Sand with the grain direction
Fig 15b
#11
If you have installed inlay banding, you want to especially avoid applying dark stain because that will drastically dimish the beautiful colors of your decorative inlay. Just stick with a clear sealer and top coat.
_____16 If, however, you did not install inlay strips, and you want a very dark finish all around the instrument, such as the one shown on the back of these instructions, you can apply the stain now, as follows:
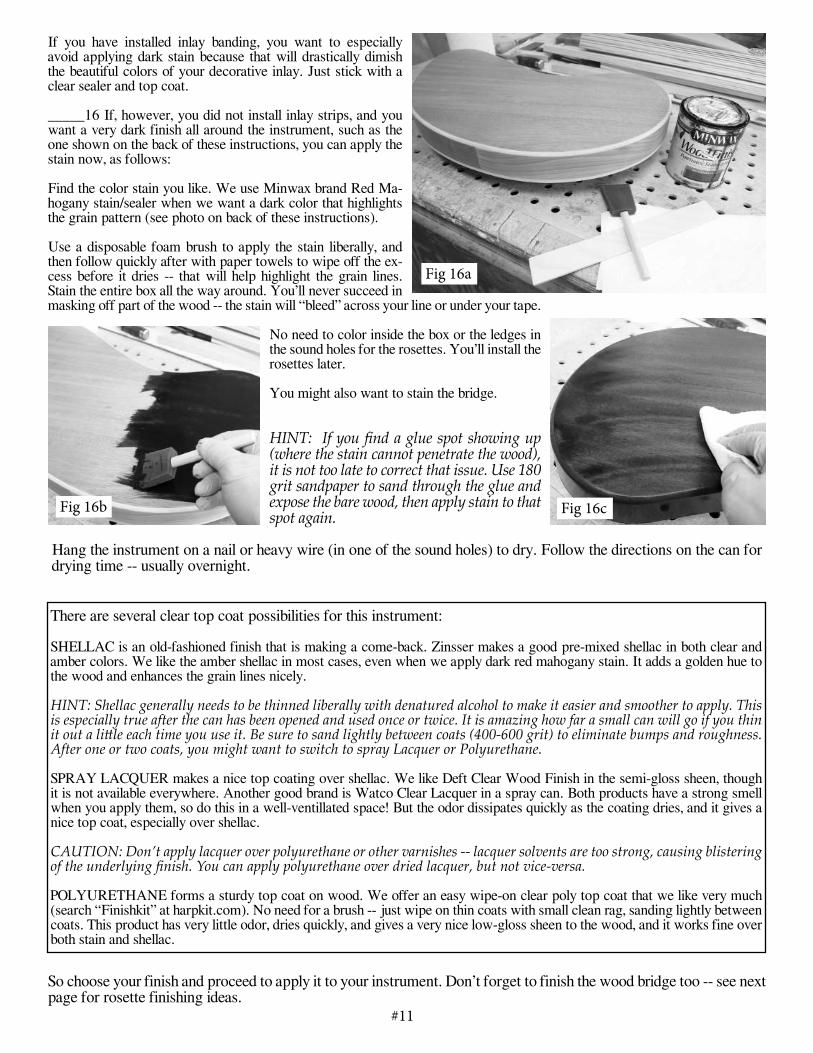
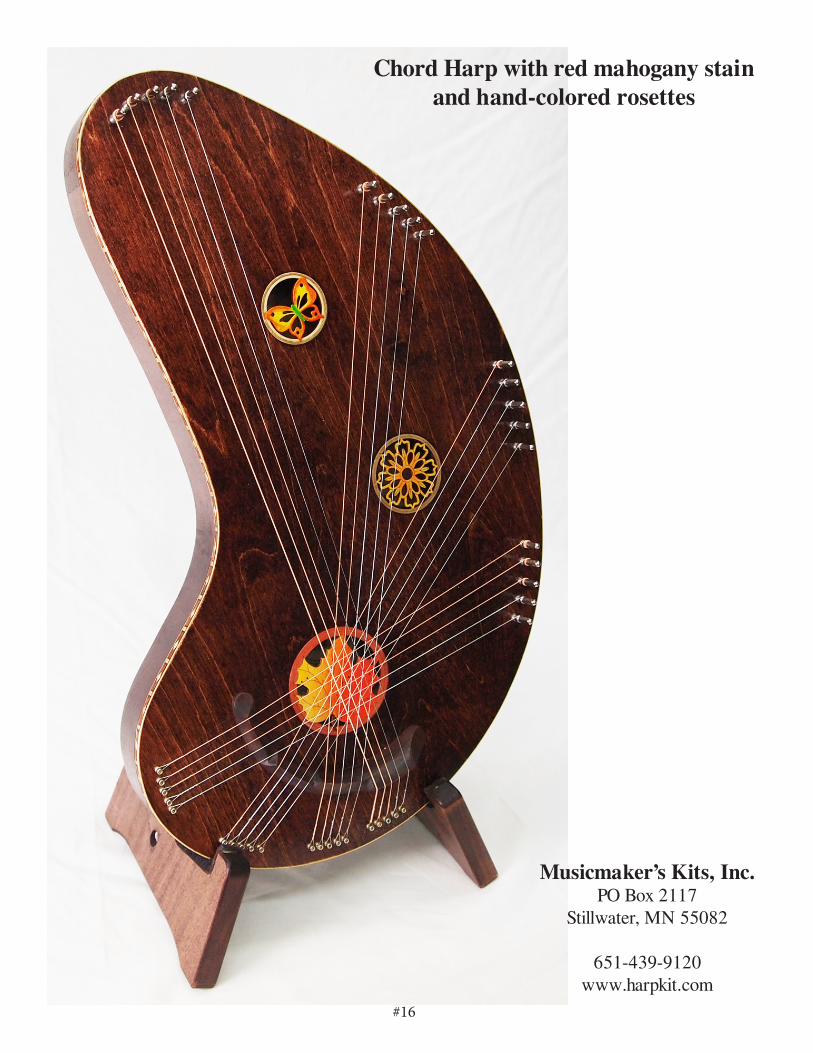
Find the color stain you like. We use Minwax brand Red Ma-hogany stain/sealer when we want a dark color that highlights the grain pattern (see photo on back of these instructions).
Use a disposable foam brush to apply the stain liberally, and then follow quickly after with paper towels to wipe off the ex-cess before it dries -- that will help highlight the grain lines. Stain the entire box all the way around. You’ll never succeed in masking off part of the wood -- the stain will “bleed” across your line or under your tape.
No need to color inside the box or the ledges in the sound holes for the rosettes. You’ll install the rosettes later. You might also want to stain the bridge.
HINT: If you fi nd a glue spot showing up (where the stain cannot penetrate the wood), it is not too late to correct that issue. Use 180 grit sandpaper to sand through the glue and expose the bare wood, then apply stain to that spot again.
Hang the instrument on a nail or heavy wire (in one of the sound holes) to dry. Follow the directions on the can for drying time -- usually overnight.
There are several clear top coat possibilities for this instrument:
SHELLAC is an old-fashioned finish that is making a come-back. Zinsser makes a good pre-mixed shellac in both clear and amber colors. We like the amber shellac in most cases, even when we apply dark red mahogany stain. It adds a golden hue to the wood and enhances the grain lines nicely.
HINT: Shellac generally needs to be thinned liberally with denatured alcohol to make it easier and smoother to apply. This is especially true after the can has been opened and used once or twice. It is amazing how far a small can will go if you thin it out a litt le each time you use it. Be sure to sand lightly between coats (400-600 grit) to eliminate bumps and roughness. After one or two coats, you might want to switch to spray Lacquer or Polyurethane.
SPRAY LACQUER makes a nice top coating over shellac. We like Deft Clear Wood Finish in the semi-gloss sheen, though it is not available everywhere. Another good brand is Watco Clear Lacquer in a spray can. Both products have a strong smell when you apply them, so do this in a well-ventillated space! But the odor dissipates quickly as the coating dries, and it gives a nice top coat, especially over shellac.
CAUTION: Don’t apply lacquer over polyurethane or other varnishes -- lacquer solvents are too strong, causing blistering of the underlying fi nish. You can apply polyurethane over dried lacquer, but not vice-versa.
POLYURETHANE forms a sturdy top coat on wood. We offer an easy wipe-on clear poly top coat that we like very much (search “Finishkit” at harpkit.com). No need for a brush -- just wipe on thin coats with small clean rag, sanding lightly between coats. This product has very little odor, dries quickly, and gives a very nice low-gloss sheen to the wood, and it works fine over both stain and shellac.
So choose your finish and proceed to apply it to your instrument. Don’t forget to finish the wood bridge too -- see next page for rosette finishing ideas.
Fig 16a
Fig 16b Fig 16c
#12
ROSETTES_____17. We like to sand the top surface of the rosettes to remove scratches, and then apply finish before installing them. Regular wood glue works well unless the ledge around the sound hole has been coated with finish already. In that case it will be better to use Superglue or 5-minute epoxy to hold the rosettes in place.
HINT: If you want to enhnce the rosett es with color, it is best to color them before applying shellac or other top coat. We used watercolor pencils (by Prismacolor) to shade the rosett es shown on the back cover of these instruc-tions. These pencils can be sharpened for detailed application, and you can dab water over the colors afterward to blend them nicely. Find them at an art supply store. Pratice on paper or the backside of the rosett e fi rst to see what eff ects you can achieve. If you make a mistake, just sand off the color and try again.
Apply a clear coat over the colors with either shellac, spray lacquer, or polyurethane after the colored decorations are dry. You may need 3-4 coats for a nice sheen, sanding lighlty between coats (600 grit).
When satisfied with the finish, glue the rosettes in place. Set a bottle or can on top of each one to press them down until dry (10 minutes or so).
INSTALLING HARDWARE AND STRINGS
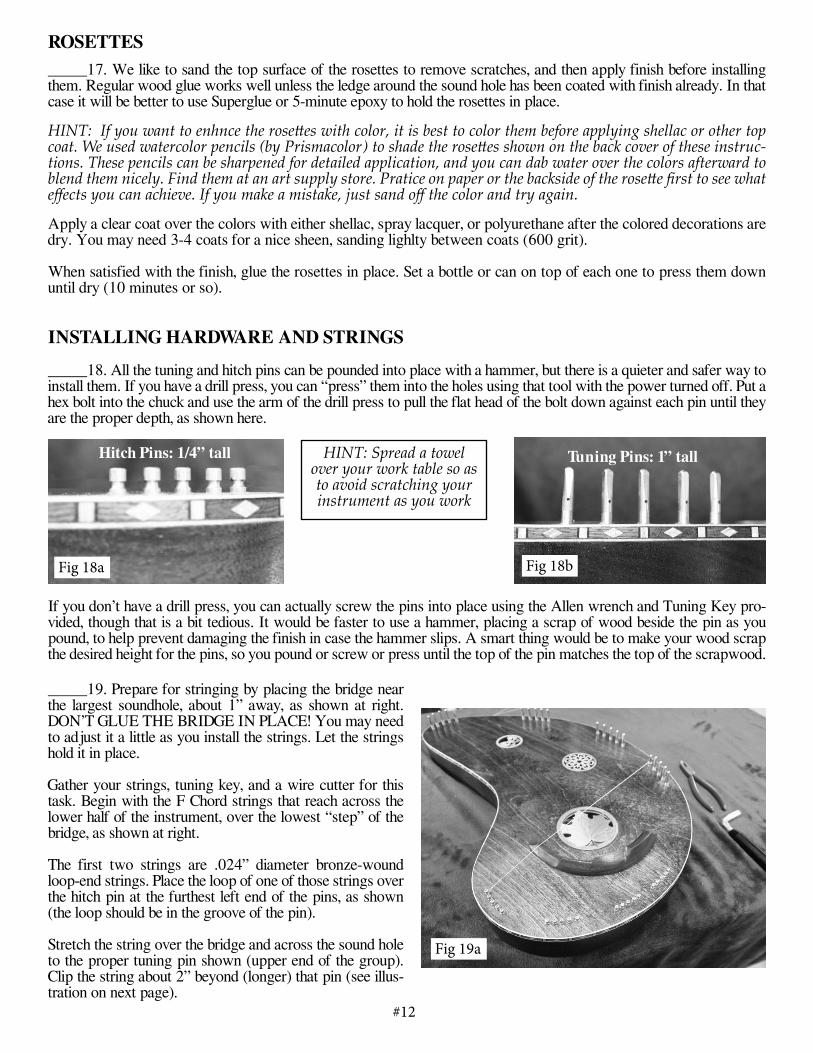
_____18. All the tuning and hitch pins can be pounded into place with a hammer, but there is a quieter and safer way to install them. If you have a drill press, you can “press” them into the holes using that tool with the power turned off. Put a hex bolt into the chuck and use the arm of the drill press to pull the flat head of the bolt down against each pin until they are the proper depth, as shown here.
If you don’t have a drill press, you can actually screw the pins into place using the Allen wrench and Tuning Key pro-vided, though that is a bit tedious. It would be faster to use a hammer, placing a scrap of wood beside the pin as you pound, to help prevent damaging the finish in case the hammer slips. A smart thing would be to make your wood scrap the desired height for the pins, so you pound or screw or press until the top of the pin matches the top of the scrapwood.
_____19. Prepare for stringing by placing the bridge near the largest soundhole, about 1” away, as shown at right. DON’T GLUE THE BRIDGE IN PLACE! You may need to adjust it a little as you install the strings. Let the strings hold it in place.
Gather your strings, tuning key, and a wire cutter for this task. Begin with the F Chord strings that reach across the lower half of the instrument, over the lowest “step” of the bridge, as shown at right.
The first two strings are .024” diameter bronze-wound loop-end strings. Place the loop of one of those strings over the hitch pin at the furthest left end of the pins, as shown (the loop should be in the groove of the pin).
Stretch the string over the bridge and across the sound hole to the proper tuning pin shown (upper end of the group). Clip the string about 2” beyond (longer) that pin (see illus-tration on next page).
Hitch Pins: 1/4” tall Tuning Pins: 1” tallHINT: Spread a towel over your work table so as to avoid scratching your instrument as you work
Fig 18a Fig 18b
Fig 19a

#13
NOTE: Stringing is a bit of an art. It is important to do a nice job here so you don’t end up with sharp ends of Wire that can poke a finger or catch on clothing as people handle the instrument. Another important thing is to try to wind the string evenly on the tuning pin. This requires figuring out a way to hold the excess slack wire in your left hand as you turn the tuning pin with your right hand. You might like to put a rubber mat under the box to keep it from sliding on the work table.
A. Cut the first wire about 2” beyond the appropriate tuning pin as shown here. The first string should cross the bottom “step” of the bridge near the end.
B. Pull the end of wire back and insert it into the tuning pin so it just barely shows through the other side of the pin, as shown at right.
C. Use the tuning key to turn the pin clockwise about 1/2 turn, leaving the string loose enough so it does not pull out of the little hole.
D. Then pull the string with your left hand to kink the end where it enters the hole, much like “setting the hook” when fishing.
E. Turn the tuning key to finish winding up the slack as you hold the excess wire with your left hand. Don’t over-tighten the string - you may break it. Just take up the slack so the string is taut.
Use your left thumb to pull the slack wire side-ways, keeping it taut as you turn the tuning pin clockwise untile the slack is pulled taut.
BE CAREFUL -- Don’t tighten too much or you’ll break the string!
bridge
F Chord
C Chord
G Chord
D Chord
Approx 1 inch space be-tween bridge & soundhole
F. Repeat this procedure with all strings, checking the wire sizes against the string chart as you move from the F chord through the C chord, G chord, and finally the D chord, laying the strings of each chord over the next “step” in the bridge.
NOTE; Use the small needle file to cut a shallow notch in the bridge for each string (about 1/4” apart) to keep them aligned evenly.
Read further stringing hints and tuning chart on next page.
#14
STRING CHART
D-CHORD:
D3 .042” Loop-End Wound String F#3 .032” Loop-End Wound String A3 .024” Loop-End Wound StringMiddle C4 .018” Loop-End Plain String F#4 .014” Loop-End Plain String
G CHORD:
G3 .032” Loop-End Wound String B3 .024” Loop-End Wound String D4 .020” Loop-End Plain String G4 .016” Loop-End Plain String B4 .012” Loop-End Plain String
C CHORD:
Middle C4 .024” Loop-End Wound String E4 .020” Loop-End Plain String G4 .018” Loop-End Plain String C5 .014” Loop-End Plain String E5 .012” Loop-End Plain String
F CHORD:
F4 .024” Loop-End Wound String A4 .024” Loop-End Wound String C5 .018” Loop-End Plain String C5 .018” Loop-End Plain String F5 .014” Loop-End Plain String
IMPORTANT: Because the strings all cross at four differ-ent levels above the wood, it is important to wind the strings neatly on the tuning pins to prevent strings of one level from buzzing against those of another level.
Some people have little or no experience stringing instru-ments, and the idea of controlling how the wire winds onto the pin as while turning with the tuning key is a daunting chal-lenge. Some wires are thin and slippery -- very difficult to hold in your fingers.
The trick is to hook the loop end of the wire to the hitch pin and get the free end started around the tuning pin so you can sim-ply pull the excess wire sideways with your left hand until it is taut in both directions, forming a kind of “V” shape. Then you can lift or lower the string with the left hand as you turn the key with your right. This will guide the windings neatly onto the pin. The “V” in the wire will gradually pull straight and taut be-tween the two pins.
If you break a string, you can order replacements from Mu-sicmakers. Contact us by phone or order on our web site. We show individual replacements under the menu heading “Strings” and then “Loop End Strings”, or you can order the entire set by searching for “Chord Harp” in the search win-dow.
HINT: When replacing a string, it is always best to turn the tuning pin backwards to lift it up higher than its neighbors before winding the new string on. The pins are threaded so they drive deeper into the wood as you turn them clockwise.
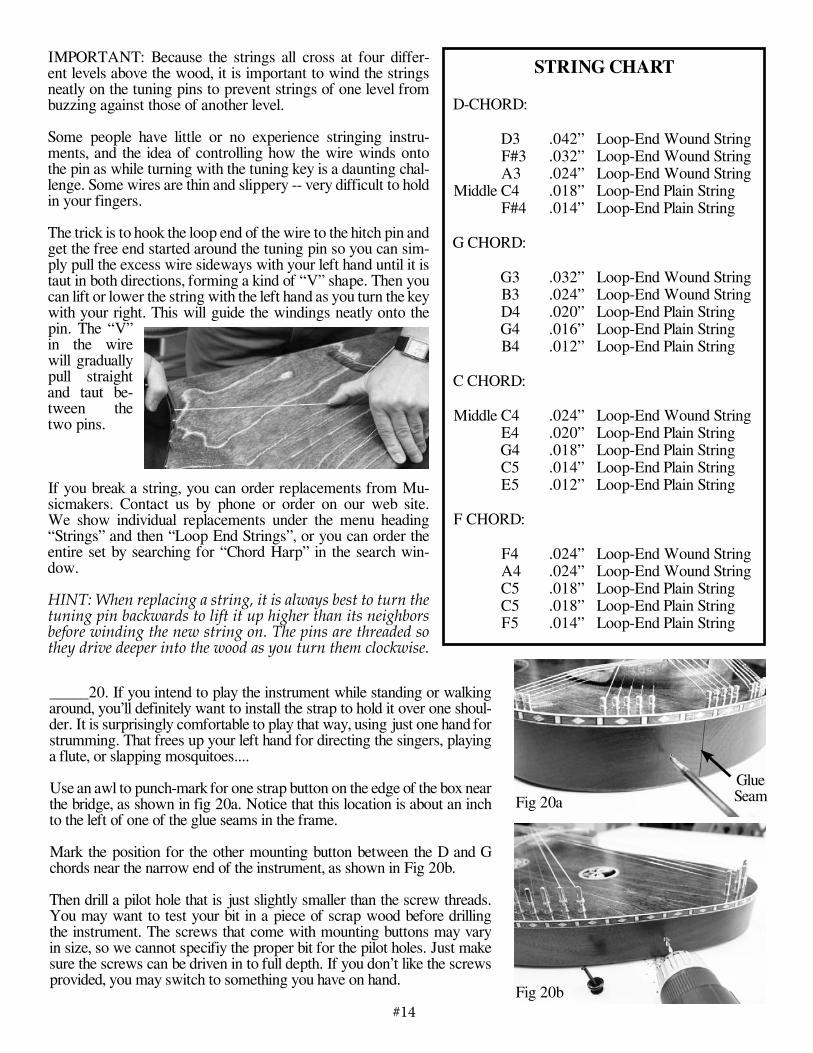
_____20. If you intend to play the instrument while standing or walking around, you’ll definitely want to install the strap to hold it over one shoul-der. It is surprisingly comfortable to play that way, using just one hand for strumming. That frees up your left hand for directing the singers, playing a flute, or slapping mosquitoes....
Use an awl to punch-mark for one strap button on the edge of the box near the bridge, as shown in fig 20a. Notice that this location is about an inch to the left of one of the glue seams in the frame.
Mark the position for the other mounting button between the D and G chords near the narrow end of the instrument, as shown in Fig 20b.
Then drill a pilot hole that is just slightly smaller than the screw threads. You may want to test your bit in a piece of scrap wood before drilling the instrument. The screws that come with mounting buttons may vary in size, so we cannot specifiy the proper bit for the pilot holes. Just make sure the screws can be driven in to full depth. If you don’t like the screws provided, you may switch to something you have on hand.
Glue SeamFig 20a
Fig 20b

#15
Screw the mounting buttons in place firmly, as shown at left. Then install the strap to the buttons -- which is often easier said than done. Sometimes we use an awl to help pry the leather button hole over the button.
The strap should go behind your back and over your left shoulder with the instrument in front, as shown below.
This instrument has four chords arranged in a way that allows you to play in two different keys. That means that if the song is too high to sing in the key of C (using C-F-G chords), you can play it in the lower key of G (using G-C-D) chords instead, or vice versa.
NOTE: If you are musically trained, you’ll notice that the D chord is actually tuned to D7 -- adding the 7th note makes the chord want to resolve back to the G chord (the root chord for key of G), and that is a nicer sound than just a straight D major chord.
You can play a G7 chord too, by pluck-ing the fi rst string in the F chord while strumming the G chord.
We have some good resources for 3-chord songs that you can play very easily on this instrument. You can ac-company literally hundreds of common songs that would be familiar to most people. Three chords basically form the foundation for any song. Of course, many songs get more complicated than that, but a good majority of sing-along songs require only three chords.
We have also designed a nice wooden stand that works well for displaying the Chord Harp (or our Reverie Harp, Hognose Psaltery, Kantele, Mandolin, Banjo, or Strumbly). Look for it in our catalog and on our web site. You can even add rosettes to the stand (shown) as a decorative option if you like.
#16
Musicmaker’s Kits, Inc.PO Box 2117
Stillwater, MN 55082
651-439-9120www.harpkit.com
Chord Harp with red mahogany stain and hand-colored rosettes