Embed Size (px)
Citation preview

Choosing & using
AS3 & AS6
Profiled Fibre cement sheetingManufacturers of Cladding Products for the Construction Industry
October 2012
CI/SfB(4-) Rf9

2 Introduction
introduction
Why choose Eternit fibre cement profile sheeting from Steadmans?
• Highly cost effective weatherproofing
• Virtually maintenance free
• No rust, rot or corrosion
• Resistant to chemical attack
• Vapour permeability reduces condensation
• Excellent noise and thermal insulation
• Quick and easy to install and fix
• Wide product and colour range
• 30 year guarantee (on request)
• Unbeatable after sales service
ContentsIntroduction 3
Profile AS6 and AS3 4 - 5
Windloadings 6 - 7
Accessories 8 - 9
Product selctor 10 - 11 (fold out)
Installation 12 - 13
Ten easy steps to fixing 14 - 15
Working with fibre cement roofing sheets 16

Introduction 3
Profile AS6 and Profile AS3Steadmans are distributors of AS6 and AS3 profiles from Marley
Eternit, the Country's largest manufacturer of fibre cement products
and the producers of profiled sheeting for over 90 years. The
products are differentiated by the size of corrugation in the sheets;
the AS3 profile having smaller corrugations than the AS6 profile.
Both types of sheet are manufactured from a selected blend of
Portland cement and water. This is reinforced with a mixture of both
natural and synthetic fibres. The longevity of this formulation has
enabled Marley Eternit to offer a 30 year guarantee on our sheets
and fittings (available on request).
Marley Eternit have always worked to improve safety when using our
range of roofing and cladding products. Building upon over 90 years
experience in the UK roofing industry we have developed a purpose
designed, reinforced fibre cement sheet - AS6 - that meets the high
standards of safety in roofing work set out in the Health and Safety
Executive document ‘Health and Safety in Roof Work’ (HSG 33). In
addition to the AS6 sheet, we are proud to be able to offer a
complementary range of accessories that meet the same high
standards of safety.
Eternit fibre cement profiled sheeting is manufactured in accordance
with a quality system registered under BS EN ISO 9001. They also
hold British Board of Agrément Certificate No. 00/3700.
Which profile?The decision to use AS6 or AS3 sheets will depend largely upon the
following four criteria:
1 The scale of the building in question.
2 Compatibility with any existing materials.
3 The distance from centre to centre of the horizontal fixing rails
or purlins.
4 Whether or not the roofing material is to be classified as
non-fragile.
Reference should therefore be made to the sheet sizes, fixing details
and product data provided in this leaflet before deciding which type
of profiled sheeting to use.
4 AS6 and AS3
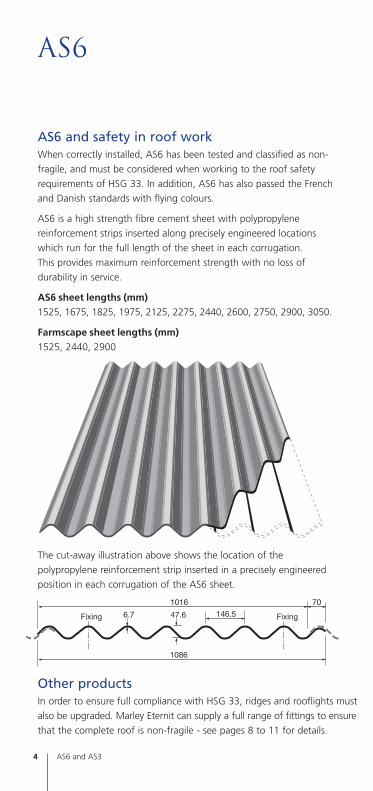
AS6
AS6 and safety in roof workWhen correctly installed, AS6 has been tested and classified as non-
fragile, and must be considered when working to the roof safety
requirements of HSG 33. In addition, AS6 has also passed the French
and Danish standards with flying colours.
AS6 is a high strength fibre cement sheet with polypropylene
reinforcement strips inserted along precisely engineered locations
which run for the full length of the sheet in each corrugation.
This provides maximum reinforcement strength with no loss of
durability in service.
AS6 sheet lengths (mm)1525, 1675, 1825, 1975, 2125, 2275, 2440, 2600, 2750, 2900, 3050.
Farmscape sheet lengths (mm)1525, 2440, 2900
The cut-away illustration above shows the location of the
polypropylene reinforcement strip inserted in a precisely engineered
position in each corrugation of the AS6 sheet.
Fixing Fixing 146.547.66.7
1086
1016 70
Other productsIn order to ensure full compliance with HSG 33, ridges and rooflights must
also be upgraded. Marley Eternit can supply a full range of fittings to ensure
that the complete roof is non-fragile - see pages 8 to 11 for details.

AS6 and AS3 5
AS3
AS3The lower profile of this product makes it particularly suitable for a
range of domestic, agricultural and light industrial buildings. It can
be laid to a minimum roof pitch of 10°.
AS3 sheet lengths (mm)1525, 2440, 3050.
Technical data AS6 AS3Overall width 1086mm 782mm
Net covering width 1016mm 650.8mm
Thickness (nominal) 6.7mm 5.8mm
Density (nominal) 1450kg/m3 1450kg/m3
Pitch of corrugations (nominal) 146.5mm 72.3mm
Depth of profile 47.6mm 19.8mm
Profile height category C A
Side lap 70mm 131.2mm
Minimum end lap 150mm 150mm
Maximum purlin centres 1375mm 925mm
Maximum rail centres 1825mm 1525mm
Maximum unsupported overhang 350mm 250mm
Approx. weight of roof as laid, with 150mm end laps, single skin including fixings 17kg/m2 14.5kg/m2
Minimum roof pitch 5° 10°
Fixing Fixing Fixing782
72.3
650.8
19.85.8
131.2

When using profiled sheeting the windloadings
of a location are critical to ensure the optimal
sealing requirements.
Exposure zonesApproximate wind driven
rain (litres/m2 per spell)
less than 56.5
equal to or greater than 56.5
6 Windloadings
windloadings
NotesMap based on BS 5534: Part 1: 1997, Figure 1
When buildings stand above their surroundings or are situated in open country with nowindbreaks within 1 km, they should be considered subject to severe exposure condi-tions.

Windloadings 7
LapThis describes how much one sheet overlaps another at either the
end (end lap) or the side (side lap).
PitchThis describes the degree to which the roof slopes.
Guidance procedureStep 1: ExposureDetermine the expected degree of exposure by examining the
adjacent map.
Step 2: Centres of supportSupport centres for roof sheeting should be a maximum of 1375mm
for AS6, or 925mm for AS3, for a superimposed load of up to
1.89kN/m2. There should be two fixings per sheet, per purlin. Where
windloadings exceed this level, please contact the Marley Eternit
Technical Department for advice before proceeding.
Step 3: Lap and sealEstablish requirement for lapping and sealing by reference to the
exposure zones map of the UK and the table below. See page 13
for sealing details.
Step 4: Fixings
Sheltered and moderate sitesLess than 56.5 l/m2 wind driven rain per spell
Minimum End lap Lap treatmentRoof pitch (mm) End laps Side laps
22.5° and over 150 Unsealed Unsealed
15° and over 300 Unsealed Unsealed
15° and over 150 Sealed Unsealed
10° and over 150 Sealed Sealed
Moderate and severe sitesMore than 56.5 l/m2 wind driven rain per spell
Minimum End lap Lap treatmentRoof pitch (mm) End laps Side laps
25° and over 150 Unsealed Unsealed
17.5° and over 150 Sealed Unsealed
15° and over 150 Sealed Sealed
10° and over 300 Sealed Sealed
NoteOn roofs over 10° pitch where parapets might allow snow build up, 300mm doublesealed end laps and single seal side laps are recommended. The minimum pitch forProfile 6 is 5°. Where slopes are between 5° and 10° the maximum slope lengthshould be 15m with double sealed end laps and single sealed side laps.

Accessories
Profile 3 Profile 6Cranked crown sheet N/A Girth: 750 or 900mm
Sizes: 5°, 7.5°, 10°,12.5°, 15°,
17.5°, 20°, 22.5°
Ventilating crank crown N/A Girth: 750mm
Sizes: 5°, 7.5°, 10°,12.5°, 15°,
17.5°, 20°, 22.5°
Two piece close fitting ridge Cover width: Cover width:650.8mm 1016mm
(adjustable) (adjustable)
Two piece ventilating ridge Cover width: Cover width:650.8mm 1016mm
(adjustable) (adjustable)
Two piece plain wing ridge Cover width: Cover width:650.8mm 1016mm
(adjustable) (adjustable)
Hooded two piece ridge finial N/A Available
Note: Cover widths indicated make allowance for overlap
8 Accessories

10 Product selector
product selector
1 Two-piece plain wing ridge cover
Adjustable over range
of roof pitches.
3 Ventilating cranked crown
For ventilation at apex of roof.
5 Roll top bargeboard
Decorative trim for corner
junction of roof and
gable end wall.
7 Eaves corrugationcloser
For blanking off corrugation
voids at eaves of roof.
2 Cranked crown sheet
For covering apex of roof.
4 Apron flashing
For weathering top of
mono-pitch lean-to roofs.
6 Externalcorner
Plain wing cover trim for
wall-to-wall and roof to
gable end wall.
8 Horizontalflashing piece
Used at junction of vertical
sheeting above a wall or at a
designed interruption of
sheeting

9 Eaves filler
For blocking corrugation
voids at eaves of roof
12
3
10
1112

9
4
7
8

Product selector 11
10 Hooded two piece ridgefinial
Made to suit roll top
bargeboards with two-piece
adjustable ridge
only. AS6R only
11 Two pieceventilatingridge cover
Adjustable over range of roof
pitches providing natural
ventilation
12 Two piececlose fittingridge cover
With profile wings adjustable
over range of roof pitches
5
6

AS3 AS6Eaves corrugation closure Cover width: Cover width:
650.8mm 1016mm
Size: 75mm Sizes: 65, 100(effective leg 150, 250mm
length) (effective leg length)
Handed left Universaland right
Eaves filler Cover width: Cover width:650.8mm 1016mm
Handed left Universaland right
Apron flashing Cover width: Cover width:650.8mm 1016mm
Size: 120° Size: 124°
Handed right Handed left
Roll top barge board Cover widths (200mm wing):1800mm (1650mm cover)2440mm (2250mm cover)3000mm (2850mm cover)
Farmscape: 1525, 2440mm
External corner Cover widths (200mm wing):1800mm (1650mm cover)2440mm (2250mm cover)
Cover width (300mm wing):3000mm (2850mm cover)
Horizontal flashing piece Cover widths:2080mm (2032mm cover)
75mm projection for single cladding
140mm projection for double cladding
Accessories 9

12 Installation
Whilst Eternit profiled sheeting is easy to install, the followingguidelines should be observed:
• The sheets should be installed smooth surface up.
• The sheets should be cut with a hand saw or slow speed reciprocating power saw.
• All fixing holes should be drilled, not punched, and should provideadequate clearance for the fastener shank (minimum 2mm).
• There should be two fixings per purlin or rail covered at the fixing points shown on pages 4 and 5.
• When using power tools in a confined area, dust extraction equipment is advisable.
• The dust and swarf generated when working with the sheets does not require any special handling requirements other than normal good housekeeping to maintain a clean working area.
FixingThe correct fixing of a sheet is important in order to avoid prematurefailure, corrosion or leaks in a roof. Many factors influence the fixingof a roof, such as the purlin or rail type and the nature of the roof inquestion. Particularly important is the type of fastening system usedand compliance with the manufacturer’s recommendations.
When fixing AS6 fibre cement profiled sheeting on roof slopes up to30° (double skin up to 15°) we recommend the use of topfixfasteners from SFS Stadler Limited. These fasteners provide a quickand effective one step fixing operation. However, they must beinstalled using the recommended depth locating powertool toprevent under or over tightening, which can damage the roof sheets.
When topfix fasteners are not used, the recommended fastenerdiameter is 8mm, which requires a clearance hole of 8mm + 2mm = 10mm. If using drive screws, the holes should be located centrallyon the timber purlins; for hook bolts or similar the hole should belocated 4mm upslope from the back edge of the purlin. 6mmdiameter fasteners can be used for AS3.NoteIn all instances the Sela washers and protective caps manufactured by SFS Stadler Ltdshould be utilised to ensure adequate weather protection.
Checking the
topfix fasteners
for tightness
installation

Installation 13
OverhangsSufficient overhangs must be allowed at the eaves to ensure that
rainwater discharges into the gutter. Verges must be overhung by
one complete corrugation unless a bargeboard is used.
Butyl strip Profile 3 8mm butyl strip Profile 6
Butyl strip
150mm min.
50mm
50mm
Side LapsSealingWhere appropriate, 8mm diameter butyl strips should be positioned as shown.
End Laps The minimum end lap for either Profile 3 or Profile 6 is 150mm, fixed
as shown in the section below.
Where double sealing is necessary, the second butyl strip should be
positioned 100-200mm below the fixing.
Note See page 7 for lap and seal requirements.

14 Ten easy steps to fixing
The fixing of a fibre cement roof can be accomplished by most
people if they follow these ten easy steps in conjunction with the
illustrations opposite. In order to weatherproof the roof, the butyl
strip must be installed as described on page 13 , and mitres cut to
avoid having four thicknesses of sheeting in the same plane at the
junctions of sides and end laps.
1 Lay sheet number 1 at the eaves without mitring.
2 Lay sheet number 2, mitring bottom right hand corner as per the
illustration opposite.
3 Lay sheet number 3, mitring as per step 2. Continue up the roof
slope to complete the first tier.
4 Lay sheet number 4 at the eaves of the next tier, mitring the top
left hand corner as per the illustration opposite.
5 Lay sheet number 5, mitring both top left hand and bottom right
hand corners as per illustration opposite, and continue up the
slope until ready to lay sheet number 6 at the ridge.
6 Lay sheet number 6 at the ridge, mitred as per step 2.
7 Repeat the procedure from and including step 4, working across
the roof from eaves to ridge, until there is room for only one
more tier to be laid, on the right hand edge.
8 Lay sheet number 7, mitring the top left hand corner. If
necessary, reducing the sheet width by cutting down the right
hand edge. All subsequent sheets in this final tier should be cut
accordingly.
9 Lay sheet number 8 as per step 7, continuing up the roof slope
until ready to lay the final sheet at the ridge.
10 Lay sheet number 9 at the ridge without mitring to complete the
roof.
Notes1 On a duo pitch roof start both slopes from the same end of the building.
One slope will therefore be sheeted left to right, the opposite slope will be sheeted right to left.
2 The corrugations of sheets must line up at the apex to ensure that the ridge accessories will fit.
3 When cranked crown sheets are used, both top courses of roofing sheets and the cranked crowns themselves must be mitred.
4 Always lay sheets with the correct end and side laps , as detailed elsewhere in this booklet.
5 Do not cut mitres in situ.
ten easy steps to fixing

Ten easy steps to fixing 15
150m
m
150m
m
131.2mm
3 to 6mm
Mitring plan single slope roof
Mitres opposite hand for laying right to leftDirection of lay left to right
Eaves
Ridge
3 66 6 9
2 5 5 5 8
1 4 4 4 7
Mitring Profile 6
Mitring Profile 3
150m
m
150m
m
70mm
3 to 6mm

16 Working with Eternit fibre cement roofing sheets
Storage and handling• When handling sheets, lift by the ends only.
• Stack sheets on firm, level ground to a maximum height of 1m. If on bearers, use at least 2 bearers for sheets up to 1.5m long and at least 3 bearers for longer sheets.
• Protect from damage. Store as close as possible to fixing site, allowing room for handling.
• Stack smooth face up.
• Protect from wind by stacking in a sheltered position or by holding down top sheets with ropes, weights or clips.
• A separate stack should be made of each length of sheet. If this is not possible, stack with the smallest on top and the longest at the bottom.
• If the sheets have been delivered in shrink-wrapped polythene, this should be retained for as long as possible. Partially used stacks should be protected from the weather by extending the top sheets 200mm at each end.
• After installation please note that due to the vapour permeability of Eternit fibre cement profile sheeting, dampness may appear on the underside of the sheet. This is a well known temporary phenomenon and will disappear following successive wet and dry periods. It in no way affects the weatherproof quality of the sheets.
Safety• The structure should be adequately prepared for the sheets.
• The position and fixing of all purlins and rails should be checked before starting sheeting.
• Ensure there is proper access to the roof.
• Workmen should not work directly beneath the area being sheeted.
• Provide a scraper at the bottom of all ladders to remove mud from boots.
• Sheeters should wear suitable clothing: wear boots or shoes (not Wellington boots), avoid loose, flapping clothing, avoid trousers with turn-ups.
• Treat as a fragile roof and always use crawling boards, roof ladders or walkways.
working with eternitfibre cement roofingsheets

Working with Eternit fibre cement roofing sheets 17
• Workmen should not be allowed to use the roof as a working platform during sheeting.
• Materials should not be stacked on the roof.
• It is possible for one man to safely handle smaller sheets at roof level on a calm day. However, safe handling of profiled sheets on a roof may require two men in certain circumstances.
• Two men are always required to lay the eaves course and the sheets above rooflights.
• Always lay the sheets in accordance with the approved sequence.
• Do not cut the sheets in a confined space since nuisance dust will be created.
• Remove all loose material from the roof as the work proceeds.
• Always fully fix the sheets as the work proceeds.
• Do not leave tools on the roof surface.
• Avoid deflecting a sheet whilst attempting to force a bearing.
• Sheets should be laid in tiers from the eaves to the ridge, thereby allowing easier use of crawling boards.
• Correct staging should always be laid over the purlins ahead of the sheeting.
• Where regular access is required to reach roof lights, ventilation and service ducts, properly constructed walkways should be provided.
• Take extra care on a roof during windy, wet or frosty weather.
• Take extra care on painted sheets whose surface will be more slippery than natural grey sheets.
• Do not step on side lap corrugations.
In addition to the Construction (Design and Management)Regulations 1994 (CDM), always observe the relevant provi-sions of the Health and Safety at Work legislation currently inforce.

www.steadmans.co.uk
A. Steadman & Son
England & Wales
Warnell, Welton
Carlisle
Cumbria
CA5 7HH
Tel: 01697 478 277
Fax: 01697 478 530
Northern Ireland & Ireland
Unit 5, Scarva Road Ind. Est.
Banbridge, Co. Down
Northern Ireland
BT32 3QD
Tel: 02840 660 516
Fax: 02840 660 517
Scotland
New Edinburgh Road
View Park
Uddingston
G71 6LL
Tel: 01506 437 753
Fax: 01506 440 716
Scotland
Mill of Crichie
Fyvie, Turriff
Aberdeenshire
AB53 8QL
Tel: 01651 891 668
Fax: 01651 891 698
E-mail: [email protected]
Online: www.steadmans.co.uk


![t/r 1Gl t rÂtina f'E of'='Jo. =s z =.1 -:,) ti =!l f-r- -r =rr 7J-f =,r^r =.1 ,,r tilttl 'l'rio. ' ]r.r =r{ =^r.,r =? î 7 r 7' ttll tT?? ('#('rf-f-ï!f-,!](https://img.pdfslide.us/doc/110x75/5e48d9f687fe5a51e31747f6/tr-1-gl-t-rtina-fe-ofjo-s-z-1-ti-l-f-r-r-rr-7j-f-rr-1.jpg)