Embed Size (px)
Citation preview
Products by Nasco Healthcare
Child Airway Decontamination SimulatorLF03506U
NP068_17_ChildAirwayDecon.indd 1 6/20/17 11:16 AM

NP068_17_ChildAirwayDecon.indd 2 6/20/17 11:16 AM
3
About the SimulatorSimple modifications to the existing Life/Form® Child Airway Management Trainer allow for a new aspect in training airway management! The Child Airway Decontamination or Suction Assisted Laryngoscopy and Airway Decontamination (S.A.L.A.D.) Simulator, developed in partnership with Dr. James DuCanto, Director of Simulation Center for Aurora St. Luke’s Medical Center in Milwaukee, Wisconsin, uses suction.to enhance first pass success-laryngoscopy FPS-L with a non-anesthetized patient in active emesis.
Features
• Child Airway Management Trainer simulates a non-anesthetized patient for practicing intubation, ventilation, and suction
• Anatomy and landmarks including teeth, tongue, oral and nasal pharynx, larynx, epiglottis, aryte-noids, false cords, true vocal cords, trachea, esophagus, and cricoid cartilage
• The trainer allows you to practice oral, digital, and nasal intubation, as well as E.T., E.O.A., P.T.L., E.G.T.A., L.M.A., Combitube, and King System insertion
• Suction techniques and proper cuff inflation with active emesis
• This trainer has room to maneuver, and a slightly anterior position, making it a great trainer for intro-ductory classes as well as advanced students
• Apply cricoid pressure to change the position of the trachea and close the esophagus
• Realistically practice the Sellick maneuver
• FPS-L while utilizing rigid suction catheter
• Features durable, rugged one piece construction
• Manual carotid pulse
• 5-year warranty
Actual product may vary slightly from photo. Nasco reserves the right to change product color, materials, supplies, or function as needed. This product contains dry natural rubber.
NP068_17_ChildAirwayDecon.indd 3 6/20/17 11:16 AM
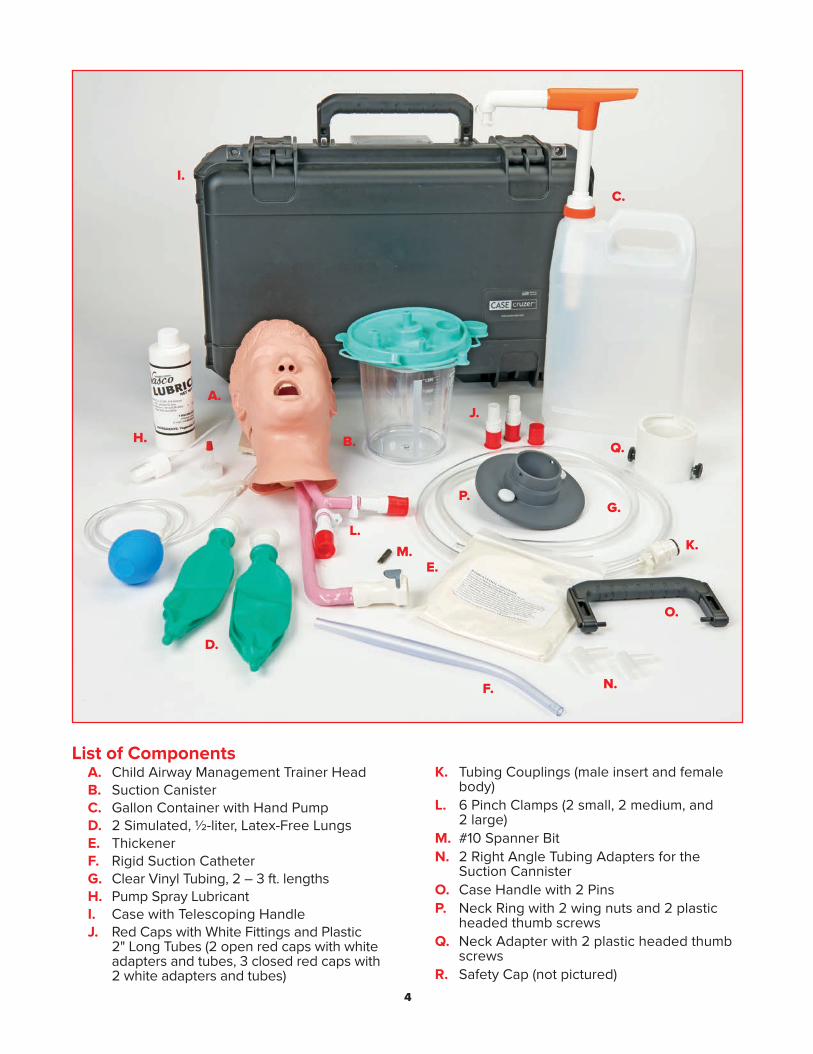
List of Components A. Child Airway Management Trainer Head B. Suction Canister C. Gallon Container with Hand Pump D. 2 Simulated, ½-liter, Latex-Free Lungs E. Thickener F. Rigid Suction Catheter G. Clear Vinyl Tubing, 2 – 3 ft. lengths H. Pump Spray Lubricant I. Case with Telescoping Handle J. Red Caps with White Fittings and Plastic 2" Long Tubes (2 open red caps with white adapters and tubes, 3 closed red caps with 2 white adapters and tubes)
K. Tubing Couplings (male insert and female body) L. 6 Pinch Clamps (2 small, 2 medium, and 2 large) M. #10 Spanner Bit N. 2 Right Angle Tubing Adapters for the Suction Cannister O. Case Handle with 2 Pins P. Neck Ring with 2 wing nuts and 2 plastic headed thumb screws Q. Neck Adapter with 2 plastic headed thumb screws R. Safety Cap (not pictured)
A.
B.
I.C.
D.
E.
F.
G.
H.
J.
K.L.
M.
N.
O.
4
Q.
P.
NP068_17_ChildAirwayDecon.indd 4 6/20/17 11:16 AM
Setup
A. Installing the Head
1. Remove the head and supplies from the case. Retain any packaging for future use.
2. Using the #10 Spanner Bit, remove the safety cap from the case.
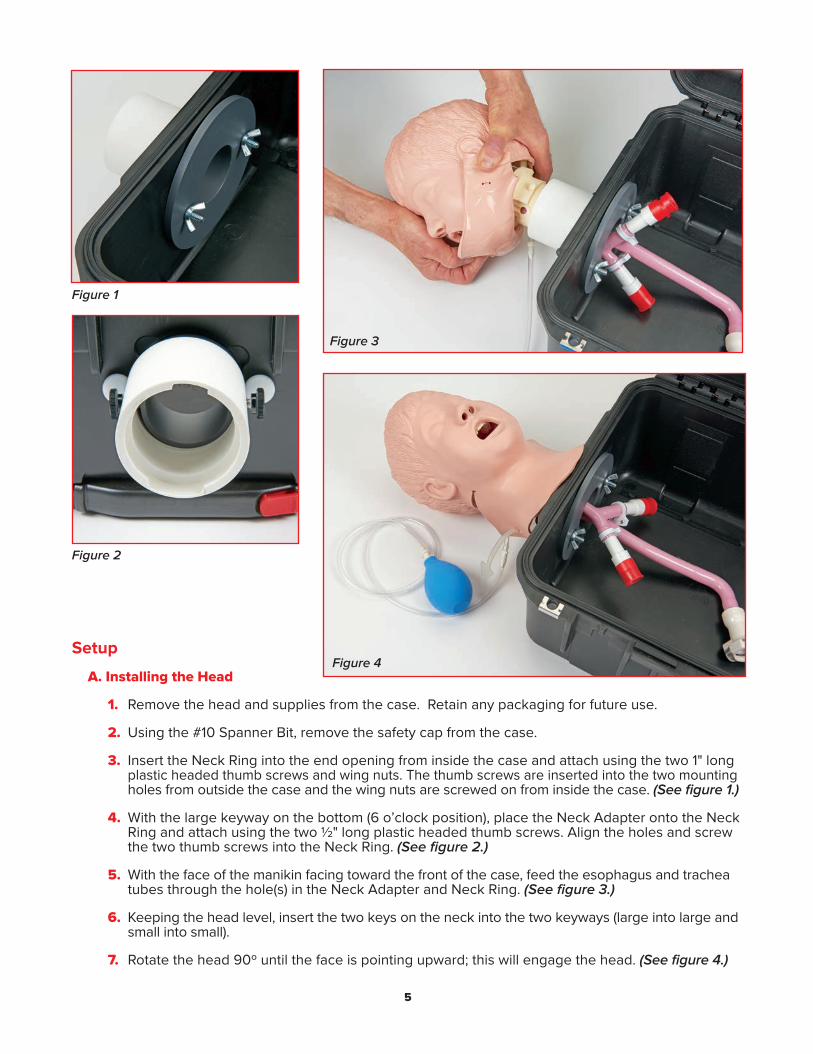
3. Insert the Neck Ring into the end opening from inside the case and attach using the two 1" long plastic headed thumb screws and wing nuts. The thumb screws are inserted into the two mounting holes from outside the case and the wing nuts are screwed on from inside the case. (See figure 1.)
4. With the large keyway on the bottom (6 o’clock position), place the Neck Adapter onto the Neck Ring and attach using the two 1/2" long plastic headed thumb screws. Align the holes and screw the two thumb screws into the Neck Ring. (See figure 2.)
5. With the face of the manikin facing toward the front of the case, feed the esophagus and trachea tubes through the hole(s) in the Neck Adapter and Neck Ring. (See figure 3.)
6. Keeping the head level, insert the two keys on the neck into the two keyways (large into large and small into small).
7. Rotate the head 90º until the face is pointing upward; this will engage the head. (See figure 4.)
5
Figure 4
Figure 3
Figure 1
Figure 2
Figure 4
NP068_17_ChildAirwayDecon.indd 5 6/20/17 11:16 AM
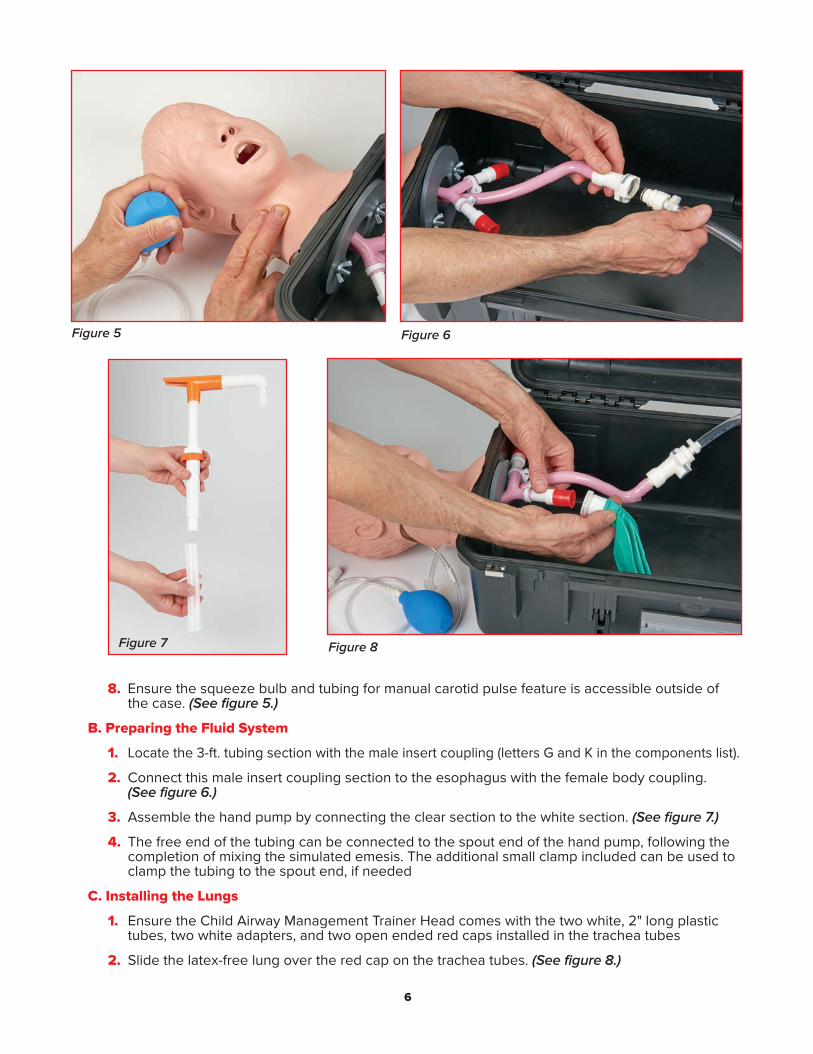
Figure 5 Figure 6
6
8. Ensure the squeeze bulb and tubing for manual carotid pulse feature is accessible outside of the case. (See figure 5.)
B. Preparing the Fluid System
1. Locate the 3-ft. tubing section with the male insert coupling (letters G and K in the components list).
2. Connect this male insert coupling section to the esophagus with the female body coupling. (See figure 6.)
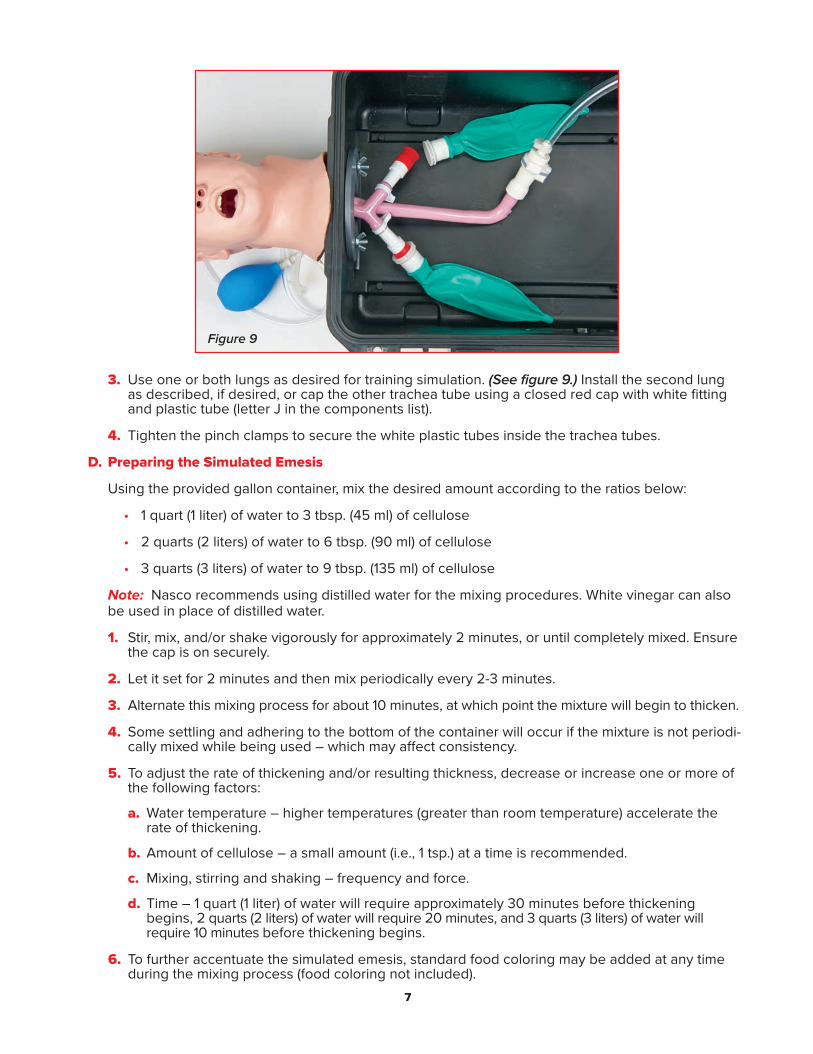
3. Assemble the hand pump by connecting the clear section to the white section. (See figure 7.)
4. The free end of the tubing can be connected to the spout end of the hand pump, following the completion of mixing the simulated emesis. The additional small clamp included can be used to clamp the tubing to the spout end, if needed
C. Installing the Lungs
1. Ensure the Child Airway Management Trainer Head comes with the two white, 2" long plastic tubes, two white adapters, and two open ended red caps installed in the trachea tubes
2. Slide the latex-free lung over the red cap on the trachea tubes. (See figure 8.)
Figure 8Figure 7
NP068_17_ChildAirwayDecon.indd 6 6/20/17 11:17 AM
7
3. Use one or both lungs as desired for training simulation. (See figure 9.) Install the second lung as described, if desired, or cap the other trachea tube using a closed red cap with white fitting and plastic tube (letter J in the components list).
4. Tighten the pinch clamps to secure the white plastic tubes inside the trachea tubes.
D. Preparing the Simulated Emesis
Using the provided gallon container, mix the desired amount according to the ratios below:
• 1 quart (1 liter) of water to 3 tbsp. (45 ml) of cellulose
• 2 quarts (2 liters) of water to 6 tbsp. (90 ml) of cellulose
• 3 quarts (3 liters) of water to 9 tbsp. (135 ml) of cellulose
Note: Nasco recommends using distilled water for the mixing procedures. White vinegar can also be used in place of distilled water.
1. Stir, mix, and/or shake vigorously for approximately 2 minutes, or until completely mixed. Ensure the cap is on securely.
2. Let it set for 2 minutes and then mix periodically every 2-3 minutes.
3. Alternate this mixing process for about 10 minutes, at which point the mixture will begin to thicken.
4. Some settling and adhering to the bottom of the container will occur if the mixture is not periodi- cally mixed while being used – which may affect consistency.
5. To adjust the rate of thickening and/or resulting thickness, decrease or increase one or more of the following factors:
a. Water temperature – higher temperatures (greater than room temperature) accelerate the rate of thickening.
b. Amount of cellulose – a small amount (i.e., 1 tsp.) at a time is recommended.
c. Mixing, stirring and shaking – frequency and force.
d. Time – 1 quart (1 liter) of water will require approximately 30 minutes before thickening begins, 2 quarts (2 liters) of water will require 20 minutes, and 3 quarts (3 liters) of water will require 10 minutes before thickening begins.
6. To further accentuate the simulated emesis, standard food coloring may be added at any time during the mixing process (food coloring not included).
Figure 9
NP068_17_ChildAirwayDecon.indd 7 6/20/17 11:17 AM
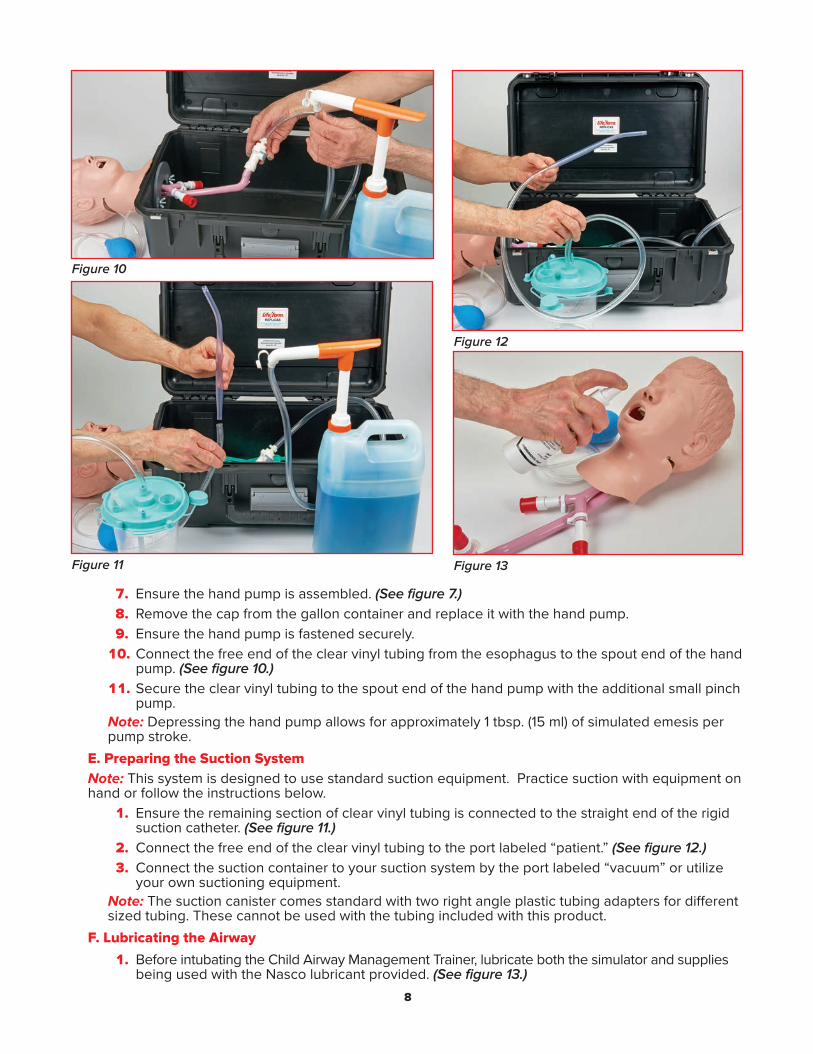
Figure 11
Figure 10
8
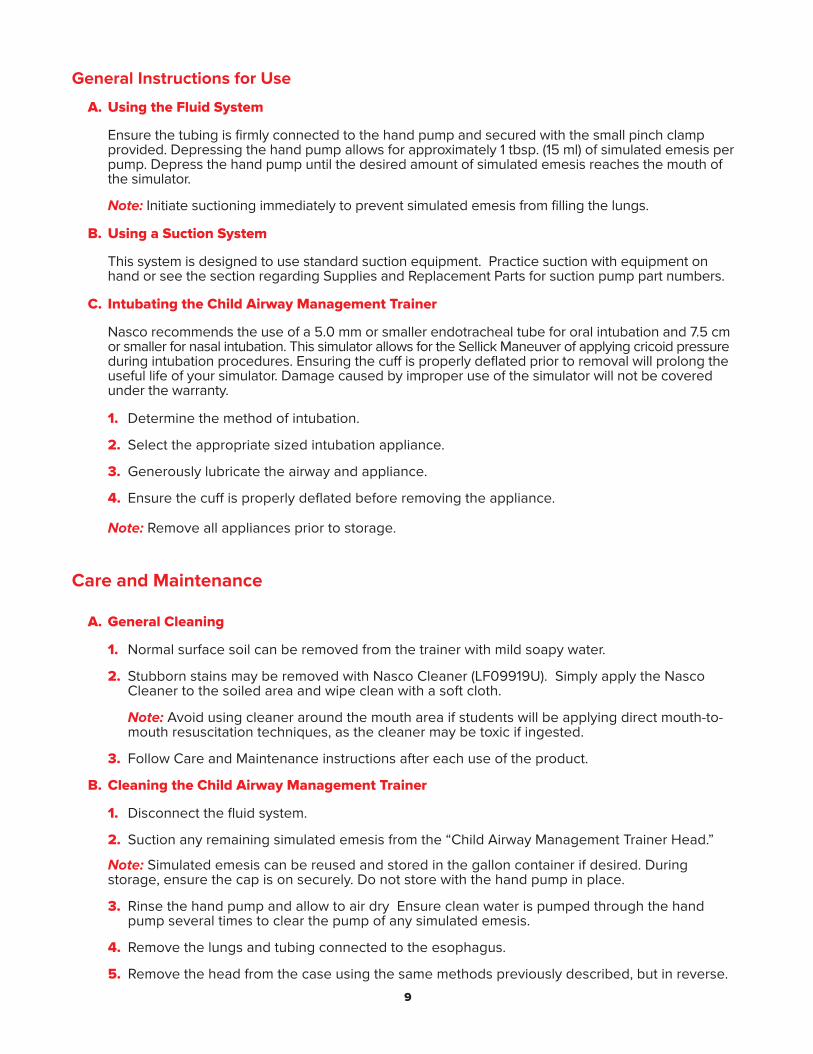
7. Ensure the hand pump is assembled. (See figure 7.) 8. Remove the cap from the gallon container and replace it with the hand pump. 9. Ensure the hand pump is fastened securely. 10. Connect the free end of the clear vinyl tubing from the esophagus to the spout end of the hand
pump. (See figure 10.) 11. Secure the clear vinyl tubing to the spout end of the hand pump with the additional small pinch
pump. Note: Depressing the hand pump allows for approximately 1 tbsp. (15 ml) of simulated emesis per
pump stroke. E. Preparing the Suction System Note: This system is designed to use standard suction equipment. Practice suction with equipment on
hand or follow the instructions below. 1. Ensure the remaining section of clear vinyl tubing is connected to the straight end of the rigid
suction catheter. (See figure 11.) 2. Connect the free end of the clear vinyl tubing to the port labeled “patient.” (See figure 12.) 3. Connect the suction container to your suction system by the port labeled “vacuum” or utilize
your own suctioning equipment. Note: The suction canister comes standard with two right angle plastic tubing adapters for different
sized tubing. These cannot be used with the tubing included with this product. F. Lubricating the Airway 1. Before intubating the Child Airway Management Trainer, lubricate both the simulator and supplies
being used with the Nasco lubricant provided. (See figure 13.)
Figure 12
Figure 13
NP068_17_ChildAirwayDecon.indd 8 6/20/17 11:17 AM
9
General Instructions for Use
A. Using the Fluid System
Ensure the tubing is firmly connected to the hand pump and secured with the small pinch clamp provided. Depressing the hand pump allows for approximately 1 tbsp. (15 ml) of simulated emesis per pump. Depress the hand pump until the desired amount of simulated emesis reaches the mouth of the simulator.
Note: Initiate suctioning immediately to prevent simulated emesis from filling the lungs.
B. Using a Suction System
This system is designed to use standard suction equipment. Practice suction with equipment on hand or see the section regarding Supplies and Replacement Parts for suction pump part numbers.
C. Intubating the Child Airway Management Trainer
Nasco recommends the use of a 5.0 mm or smaller endotracheal tube for oral intubation and 7.5 cm or smaller for nasal intubation. This simulator allows for the Sellick Maneuver of applying cricoid pressure during intubation procedures. Ensuring the cuff is properly deflated prior to removal will prolong the useful life of your simulator. Damage caused by improper use of the simulator will not be covered under the warranty.
1. Determine the method of intubation.
2. Select the appropriate sized intubation appliance.
3. Generously lubricate the airway and appliance.
4. Ensure the cuff is properly deflated before removing the appliance.
Note: Remove all appliances prior to storage.
Care and Maintenance
A. General Cleaning
1. Normal surface soil can be removed from the trainer with mild soapy water.
2. Stubborn stains may be removed with Nasco Cleaner (LF09919U). Simply apply the Nasco Cleaner to the soiled area and wipe clean with a soft cloth.
Note: Avoid using cleaner around the mouth area if students will be applying direct mouth-to- mouth resuscitation techniques, as the cleaner may be toxic if ingested.
3. Follow Care and Maintenance instructions after each use of the product.
B. Cleaning the Child Airway Management Trainer
1. Disconnect the fluid system.
2. Suction any remaining simulated emesis from the “Child Airway Management Trainer Head.”
Note: Simulated emesis can be reused and stored in the gallon container if desired. During storage, ensure the cap is on securely. Do not store with the hand pump in place.
3. Rinse the hand pump and allow to air dry Ensure clean water is pumped through the hand pump several times to clear the pump of any simulated emesis.
4. Remove the lungs and tubing connected to the esophagus.
5. Remove the head from the case using the same methods previously described, but in reverse.
NP068_17_ChildAirwayDecon.indd 9 6/20/17 11:17 AM
10
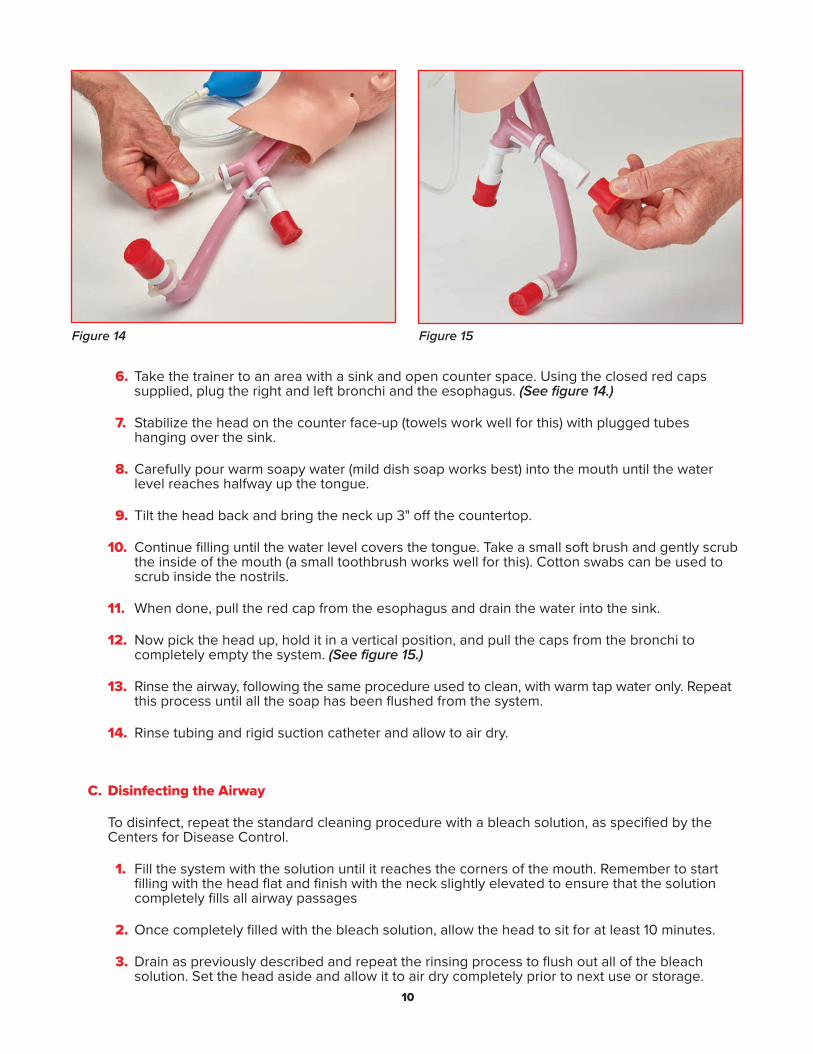
Figure 14
6. Take the trainer to an area with a sink and open counter space. Using the closed red caps supplied, plug the right and left bronchi and the esophagus. (See figure 14.)
7. Stabilize the head on the counter face-up (towels work well for this) with plugged tubes hanging over the sink.
8. Carefully pour warm soapy water (mild dish soap works best) into the mouth until the water level reaches halfway up the tongue.
9. Tilt the head back and bring the neck up 3" off the countertop.
10. Continue filling until the water level covers the tongue. Take a small soft brush and gently scrub the inside of the mouth (a small toothbrush works well for this). Cotton swabs can be used to scrub inside the nostrils.
11. When done, pull the red cap from the esophagus and drain the water into the sink.
12. Now pick the head up, hold it in a vertical position, and pull the caps from the bronchi to completely empty the system. (See figure 15.)
13. Rinse the airway, following the same procedure used to clean, with warm tap water only. Repeat this process until all the soap has been flushed from the system.
14. Rinse tubing and rigid suction catheter and allow to air dry.
C. Disinfecting the Airway
To disinfect, repeat the standard cleaning procedure with a bleach solution, as specified by the Centers for Disease Control.
1. Fill the system with the solution until it reaches the corners of the mouth. Remember to start filling with the head flat and finish with the neck slightly elevated to ensure that the solution completely fills all airway passages
2. Once completely filled with the bleach solution, allow the head to sit for at least 10 minutes.
3. Drain as previously described and repeat the rinsing process to flush out all of the bleach solution. Set the head aside and allow it to air dry completely prior to next use or storage.
Figure 15
NP068_17_ChildAirwayDecon.indd 10 6/20/17 11:17 AM
11
Cautions
. Do not place simulator in contact with any printed paper or plastic. The ink will transfer and cause an indelible stain. Similar inks, such as ballpoint pen ink, will also cause an indelible stain.
. Do not use Nasco Cleaner (LF09919U) around the nose or mouth of the simulator. The cleaner may be toxic if ingested.
. Properly lubricate the Child Airway Management Trainer Head and intubation appliances.
. Use only Nasco Pump Spray Lubricant (LF03644U) with this simulator. Other lubricants, such as silicone oil, may cause damage to the airway of the simulator.
. Ensure intubation appliances are used accordingly. Improper use of intubation appliances could damage the airway of the simulator. Damage to the airway will require the product to be returned to Nasco for repair.
. Actual product may vary slightly from photo. Nasco reserves the right to change product color, materials, supplies, or function as needed.
. Ensure trainer and all of the supplies are thoroughly cleaned and dry after each use.
Additional Supplies/Replacement Parts
LF03507U Tubing Replacement Kit (Child) – 2 lengths of clear vinyl tubing (each 3 ft.), 2 tubing couplings, 6 pinch clamps, 2 open red caps with white adapters, 3 closed red caps with 2 white adapters and 4 long plastic tubes (each 2")
LF03608U Child Airway Management Trainer Head
LF03501U Rigid Suction Catheter
LF03502U Suction Canister
LF03503U Gallon Container w/Hand Pump
LF03508U Replacement Lungs (Child), ½ liter, set of 2
LF03644U Pump Spray Lubricant, 8 oz.
LF03774U Thickener
SB52301U SSCOR VX2 2310V Variable Regulation Pump
SB52300U Universal Power Supply for SSCOR Pump 110V-220V
NP068_17_ChildAirwayDecon.indd 11 6/20/17 11:17 AM
COPYRIGHT © NASCO 2017 PRINTED IN U.S.A. NP068-17
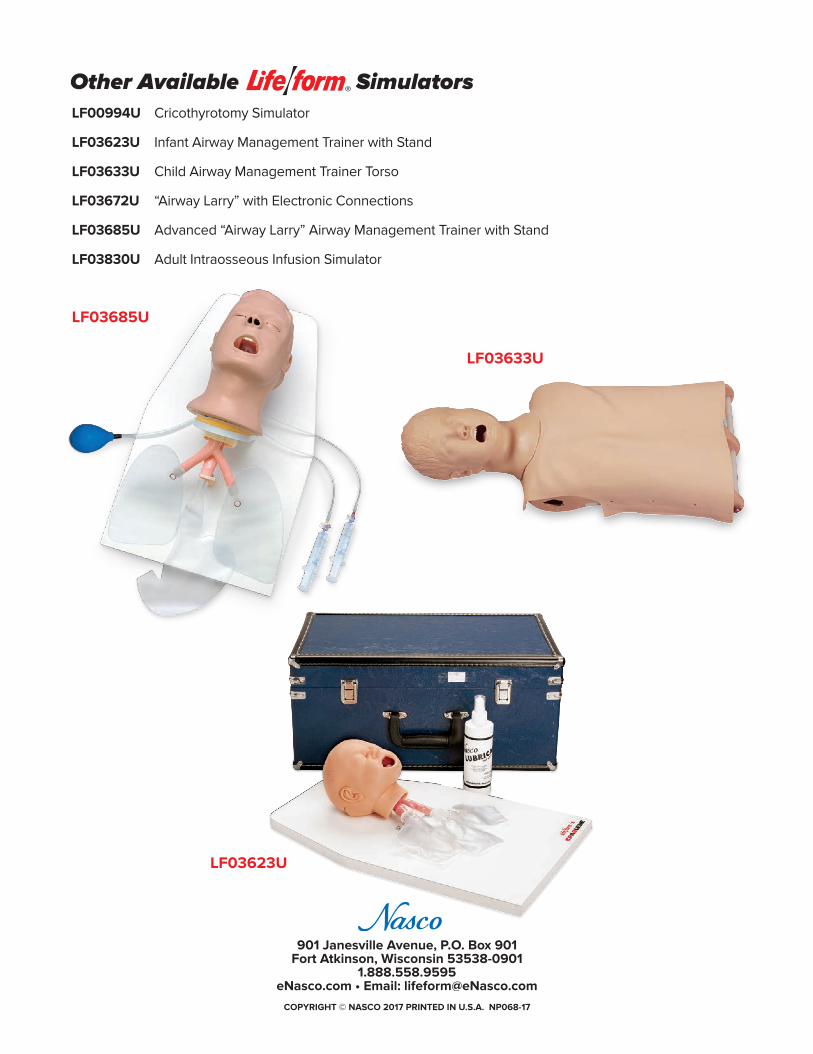
Other Available SimulatorsLF00994U Cricothyrotomy Simulator
LF03623U Infant Airway Management Trainer with Stand
LF03633U Child Airway Management Trainer Torso
LF03672U “Airway Larry” with Electronic Connections
LF03685U Advanced “Airway Larry” Airway Management Trainer with Stand
LF03830U Adult Intraosseous Infusion Simulator
901 Janesville Avenue, P.O. Box 901Fort Atkinson, Wisconsin 53538-0901
1.888.558.9595eNasco.com • Email: [email protected]
LF03685U
LF03623U
LF03633U
NP068_17_ChildAirwayDecon.indd 12 6/20/17 11:17 AM