Embed Size (px)
Citation preview

• Step by Step constructioninstruction.
• A complete bill of materials.
• Exploded view and elevationdrawings.
• How-to photos with instructivecaptions.
• Tips to help you complete theproject and become a betterwoodworker.
To download these plans,you will need Adobe Reader
installed on your computer. If you want to geta free copy, you can get it at: Adobe Reader.
Having trouble downloading the plans?• If you're using Microsoft Internet
Explorer, right click on the download linkand select "Save Target As" to downloadto your local drive.
• If you're using Netscape, right click onthe download link and select "Save LinkAs" to download to your local drive.
WJ025
“America’s leading woodworking authority”™
Cherry China Cabinet
Published in Woodworker’s Journal “The Complete Woodworker: Time-Tested Projects and Professional Techniques for Your Shop and Home”
WOODWORKER'S JOURNAL ©2007 ALL RIGHTS RESERVED
42 HOME PROJECTSWOODWORKER'S JOURNAL ©2007 ALL RIGHTS RESERVED

CHERRY CHINA CABINET 43
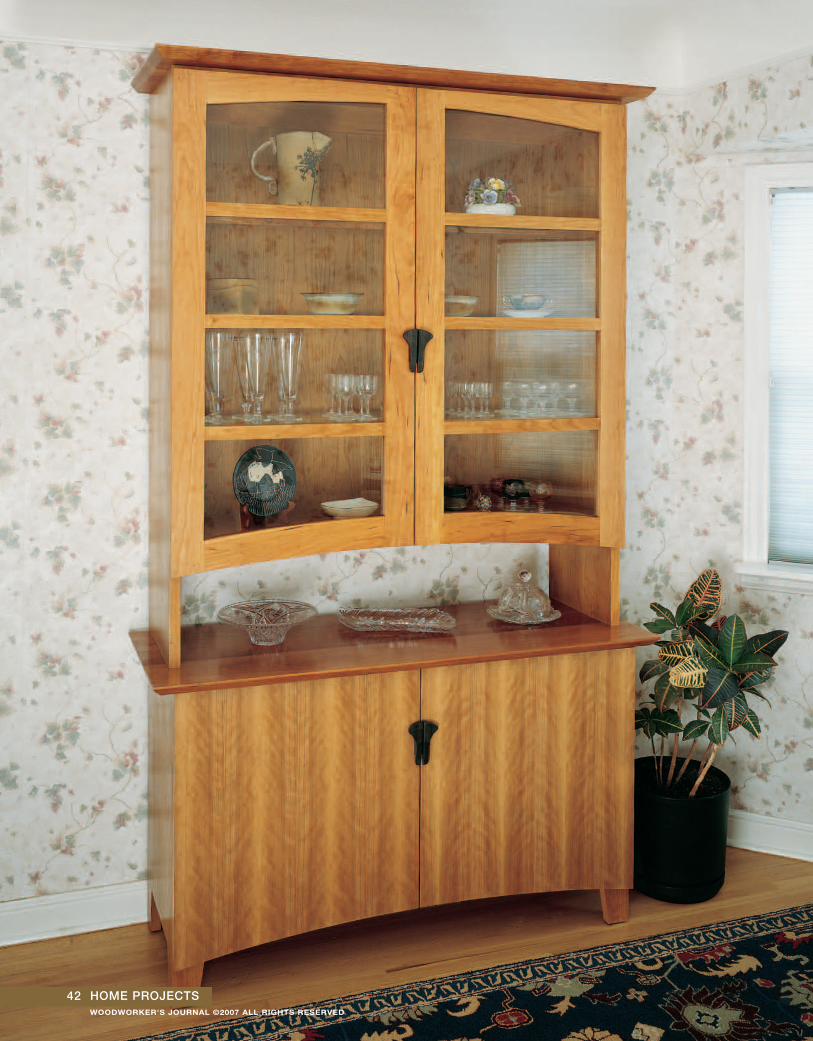
Of all the readers’ requests we’vereceived over the years for furniture plans,the perennial leader has been for chinacabinets. With that in mind, the designteam at Woodworker’s Journal developedthis beautiful project that, with care andpatience, is well within the abilities of anyintermediate to advanced hobbyist. It callsfor full 1"-thick solid cherry boards and1/2" and 3/4" cherry veneered plywood, all of which you should source beforeheading for the shop.
The cabinet is made up of two dis-tinct parts. The base houses five slidingshelves behind a pair of veneered doors.The upper section was designed toproudly display family treasures on itsglass shelves, keeping them dust-freebehind a pair of large glass doors.
Building from the Bottom UpFor the best effect, the upper and
lower units of this cabinet should flowtogether visually. The way to achieve thisis to run continuous grain all the way upthe side panels. So, the first step in construction is to edge-glue enoughhardwood to make these two panels,each large enough to yield both a lowerand an upper side. Make each sideblank 1" x 171⁄2" x 86", and you’ll havesufficient material for all the side pieces.
Jointing a dead-straight edge on the 1" thickglued-up side blanks is the first step inaccurately machining the carcass.
Cherry China CabinetInspired by readers’ requests, this china cabinet features classic clean lines, gentle
arches and hidden hardware. It’s amply sized to store all your finery, and the upper
cabinet will proudly display its contents through glass doors. Made carefully, this could
be the signature project for your dining room or a wonderful family gift.
After the glue dries, sand the pan-els and begin your machining by cuttingthe base sides (pieces 1) to size. Thenrefer to the Drawings on page 44 to layout the leg cutouts. Apply masking tapewhere the cut lines will be, to reducetearout. On the tape, mark the locationsof the two legs in each side, then cutaway the waste with a jigsaw.
There is a horizontal divider (piece2) above the bottom shelf (piece 3) inthe base cabinet, and the next step isto rout stopped dadoes for them (usinga straightedge as a guide) in each baseside. The divider is cut from nominal3/4"-thick stock: you may find it’s actually a hair shy of that. Plow thedadoes for the horizontal divider andthe cabinet bottom, and square up theirends with a sharp chisel. Both dadolocations are shown on the Drawings.Next, with your straightedge clamped inplace, plow a 3/4"-wide by 3/8"-deepdado across the top face of the hori-zontal divider—running from the front to back—to receive the vertical divider.
Dividers, Stringers and FeetWith the base sides completed, the
next step is to lay out the vertical divider(piece 4) and notch its back corner. Cutthe back and front feet (pieces 5) to size
and shape next, and give them a thor-ough sanding without softening theiredges. The front stringer (piece 6) is solidhardwood: lay out a gentle arc along itsbottom edge by bending a piece ofhardboard or 1/4" plywood along thearc, clamping it in place and drawing theline. Cut the arc on the band saw, thensand it thoroughly. A large drum sanderin the drill press works best for this, oryou can use part of the cutoff to makean arched sanding block. The backstringer (also piece 6) has no arc, sinceit’s not visible. Trim the front edges of thedividers with 1/4" hardwood (piece 7)before you begin assembly.
Attach the feet to the stringers withbiscuits, glue and clamps, then sandthem thoroughly after the glue has cured.
WOODWORKER'S JOURNAL ©2007 ALL RIGHTS RESERVED

44 HOME PROJECTS
1
24
7
5
5
6
6
12
3/4" 3/4"
63/8"
61/4"41/2"
41/2"
21/2"13/8"
45
3/4"
3/8"
3/4"
1/2"
3/4"
3/4"
153/4"
15"
161/4"
141/4"
21/4"
11/2"
11/4"
1/4"
3/4"
1/2"
1"
3/8"
3/4"
CL
CL
7
1
24
7
5
5
6
6
12
3/4" 3/4"
63/8"
61/4"41/2"
41/2"
21/2"13/8"
45
3/4"
3/8"
3/4"
1/2"
3/4"
3/4"
153/4"
15"
161/4"
141/4"
21/4"
11/2"
11/4"
1/4"
3/4"
1/2"
1"
3/8"
3/4"
CL
CL
7
1
24
7
5
5
6
6
12
3/4" 3/4"
63/8"
61/4"41/2"
41/2"
21/2"13/8"
45
3/4"
3/8"
3/4"
1/2"
3/4"
3/4"
153/4"
15"
161/4"
141/4"
21/4"
11/2"
11/4"
1/4"
3/4"
1/2"
1"
3/8"
3/4"
CL
CL
7
1
24
7
5
5
6
6
12
3/4" 3/4"
63/8"
61/4"41/2"
41/2"
21/2"13/8"
45
3/4"
3/8"
3/4"
1/2"
3/4"
3/4"
153/4"
15"
161/4"
141/4"
21/4"
11/2"
11/4"
1/4"
3/4"
1/2"
1"
3/8"
3/4"
CL
CL
7
Front Stringer(Front View)
Feet(Front and Side Views)
Base Side(Inside View)
The rabbetfor the backis cut afterassembly.
3/8"-deepdado forverticaldivider.
Chamfer the same profile intothe upper top (piece 34)
Top (End View)
HorizontalDivider (Top View)
Vertical Divider (Side View)
MATERIAL LIST – Lower Cabinet
T x W x L
1 Base Sides (2) 1" x 161⁄4" x 29"
2 Horizontal Divider (1) 3/4" x 141⁄4" x 46"
3 Bottom (1) 3/4" x 151⁄4" x 46"
4 Vertical Divider (1) 3/4" x 141⁄4" x 151⁄4"
5 Feet (4) 1" x 2" x 7"
6 Front and Back Stringers (2) 1" x 21⁄2" x 41"
7 Divider Trim (1) 1/4" x 3/4" x 62"
8 Top Stringers (2) 1" x 11⁄2" x 45"
9 Top Supports (2) 1" x 11⁄2" x 133⁄4"
10 Back (1) 1/2" x 46" x 22"
11 Glue Blocks (2) 1" x 11⁄2" x 11⁄2"
12 Top (1) 1" x 191⁄8" x 51"
13 Sliding Shelf Sides (10) 3/4" x 21⁄2" x 141⁄4"
T x W x L
14 Small Shelf Fronts (4) 3/4" x 21⁄2" x 203⁄8"
15 Large Shelf Front (1) 3/4" x 21⁄2" x 431⁄4"
16 Small Shelf Backs (4) 3/4" x 21⁄2" x 203⁄8"
17 Large Shelf Back (1) 3/4" x 21⁄2" x 431⁄4"
18 Small Shelf Bottoms (4) 1/4" x 131⁄2" x 203⁄8"
19 Large Shelf Bottom (1) 1/4" x 131⁄2" x 431⁄4"
20 Small Shelf Faces (4) 3/4" x 53⁄4" x 223⁄8"
21 Large Shelf Face (1) 3/4" x 53⁄4" x 447⁄8"
22 Drawer Slides (5 pairs) Full extension
23 Base Door Panels (2) 3/4" x 211⁄2" x 22"
24 Door Side and Top Trim (1) 3/4" x 1" x 150"
25 Door Bottom Trim (2) 3/4" x 21⁄2" x 22"
26 Veneer (4) 1/32" x 24" x 27"
Lower Cabinet Exploded View
WOODWORKER'S JOURNAL ©2007 ALL RIGHTS RESERVED

CHERRY CHINA CABINET 45
Small Shelf (Front View) Small Shelf (Side View)
The shelf faces are placed asymmetrically
Small Shelf (Top View)
1
10
2
3
4
5
6
7
8
9
11
12
13
13
13
14
20
20
20
18
18
16
3/4" 3/4"
115/16"
3/8"
3/8"
63/4" 81/2"
11/4"
14
13
20
1
1
10
2
3
4
5
6
7
7
8
89
9
11
12
13
20
14
26
1618
42
45
44
22
23
24
46
25
WOODWORKER'S JOURNAL ©2007 ALL RIGHTS RESERVED

46 HOME PROJECTS
Laminate the door layers in a shop-madeveneer press. The waxed platens resistglue and the clamping cauls and battenstransfer pressure to the glue-up. Youcan gently crown the battens or justglue a small section of veneer at thecenter of each batten.
Battens
Caul
Caul
Platen
Platen
Veneer
Veneer
Substrate
Battens
We used two different size biscuits onthis project. If your biscuit joiner won’taccommodate the small biscuits, substi-tute dowels or pocket hole joints instead.
Move to your router table and cutthe rabbets (see the Drawings) on theinside edges of the bottom stringer andfoot subassemblies. Your next prepara-tion step is to make a frame that nestlesinside the upper perimeter of the lowercabinet. Cut the top stringers and sup-ports (pieces 8 and 9) and join them atthe corners, using a pocket hole jig, tocreate a rectangular frame. On the drillpress, pre-drill and countersink elongatedholes in the top supports for the screwsthat will hold the top in place. Bore coun-tersunk holes across the bottom edge ofthe back top stringer; these screw holeswill also be used to secure the top.
Assembling the BaseNow you’re ready to assemble the
base. It’s a good idea to have somehelp for this. Begin by notching the trimand gluing the vertical divider into itsdado in the horizontal divider. (It’s easierto do this now than later, after the baseis assembled.) Next, cut the biscuitslots into the side and feet as seen inthe Exploded View.
After the glue sets, dry-fit the basetogether. When everything works, glueand clamp the leg subassemblies to the
sides, along with the bottom and hori-zontal divider. Drop the top stringer andsupport subassembly in from the top.Make sure the assembly is square as youtighten the clamps. Drive screws throughthe top supports into the base sides.
After the glue dries, use a rabbetingbit to reveal the 1/2" x 1/2"-deep rabbetfor the base back (piece 10). Square thecorners of the rabbet with a chisel, thenuse a pencil to mark the location of thehorizontal divider’s dado on the backedge of each cabinet side. Install theback with 1" panel nails, using yourpencil marks to locate the centerline ofthe horizontal divider. Two glue blocks(pieces 11) are now snugged and gluedinto place where the vertical dividermeets the front top stringer.
Building the Base TopWe decided to go with an edge-
glued solid hardwood top (piece 12)because it increases the overall qualityof the project. Have a local cabinetshop run the top through their wide beltsander before you trim it to size: theywon’t charge much and you’ll get veryuniform results. Use your table saw toform the 45˚ chamfers on the bottomedge, along the front and both ends,then sand the top. Install the top bydriving screws up through the top supports and the top back stringer.
Adding Sliding ShelvesAll five sliding shelves are built in
a similar fashion: only the dimensionschange. Move to the table saw, install a3/8" dado head and attach an auxiliaryfence to the miter gauge. Cut dadoeson the sides and rabbets on the frontsand backs. Note: the 3/8" locking jointuses the same set-up to mill both thedadoes and the rabbets on the shelfsides and fronts (pieces 13 through 17).All these dimensions can be found onthe Drawings on page 44.
Reconfigure your dado head toform 1/2"-wide by 3/8"-deep cuts forthe bottoms, and plow the grooves forthe shelf bottoms (pieces 18 and 19) inthe fronts, sides and back. Assemblethe shelves, gluing and clamping thecorners while letting the bottoms floatfreely in their grooves to account forwood movement.
Trim the shelf faces (pieces 20 and 21) to size, double-checking thesemeasurements with a dry-fit in theassembled base cabinet. Following the layout on page 45, band-saw the arc-shaped handle openings anddrum-sand the saw marks smooth.
Install the drawer slides (pieces 22)and the shelves according to the slidemanufacturer’s instructions. With theshelves installed, locate the faces sothere is a 1/8" gap between the pairs of
WOODWORKER'S JOURNAL ©2007 ALL RIGHTS RESERVED

CHERRY CHINA CABINET 47
Band-saw the matching curvedrails. Cut the tenons and theback rabbets first, whileyou still have flat reference edges towork from.
Cut the tenonsand rabbet
for the glassbefore cutting
the curvedshape on the rails.
The curved door rails on this cabinet arean important visual design element. Withthese rails, the key to success is to completeas much machining as possible while theyare still rectangular, then cut the curves on aband saw, as shown above. Remember,once they are curved, they become left andright upper and lower rails.
CUTTING CURVED DOOR
RAILSsmall ones, and screw all five in place from the back through predrilled,countersunk holes.
Making the Base DoorsThe base doors are plywood panels (pieces 23) with hardwood trim
(pieces 24 and 25) wrapped around the top and side edges. Miter-cut,glue and clamp these solid-wood strips in place. Sand the doors after theglue dries, then veneer both the front and back faces with cherry veneer(pieces 26). (It’s essential to veneer the back faces to achieve balance andavoid warping.) Use a shop-built veneer press like the one shown at left.
After the glue has cured, lay the doors on their openings and scribethe arcs onto their bottom edges. Band-saw the curves, then sand allthe edges gently and set the doors aside.
Constructing the Upper CarcassRemember those two large boards you glued up for the sides?
Make sure to trim the correct edge of each to make the upper sides(pieces 27) so the grain pattern is carried through from the base. Afterthey’re trimmed, you use a straightedge and a dovetail bit chucked inyour router to plow four sliding dovetails across the inside face of each(see the Drawings on page 48 for locations and the sidebar on page 50for details). Note that these are stopped dovetails.
The three shelves that hold the glass in the upper cabinet are simpleframe construction. Cut tenons on the ends of the six shelf ends (pieces28), using your table saw’s miter gauge and a dado head. Use a 1/4" bit inyour router table to create an open saddle mortise on the end of each shelfrail (pieces 29) and square up the mortise (see the Drawings).
Assemble the shelves with glue and clamps. Machine their longdovetailed shape on the ends (see sidebar, page 50) and cut them backto match the stopped dovetail slots in the sides. Use a bearing-guidedrabbeting bit to create the lip for the glass inserts (pieces 30), squaringup the corners with a sharp chisel.
Cut the cabinet bottom (piece 31) to size from solid hardwood, thenform the dovetailed ends as you did with the shelves. Band-saw the arcon the bottom edge of the lower stringer (piece 32) and front upperstringer (piece 33). Sand out the saw marks.
Dry-fit the shelves and the cabinet bottom to the upper sides. Cutbiscuit slots to attach the stringers to the cabinet sides (with the curvedones to the front). When you’re satisfied with the fit, disassemble theupper cabinet, sand all parts thoroughly, and then reassemble it withglue and clamps. With a project of this size, don’t hesitate to have abuddy give you a hand during assembly and glue-up.
Forming the Upper Top and BackThe upper top (piece 34) is another edge-glued solid hardwood
board like the top of the base cabinet. Cut it to size and form the 45°chamfer on the bottom lip of its front and side edges. To install it,
pre-drill slightly oversized holes (to allow for woodmovement) and countersink for screws that aredriven down through the top into the sides andthe upper stringers.
Follow the same procedure used earlier to cre-ate the rabbet for the upper back (piece 35), thenchisel out the corners and nail the back in place.
WOODWORKER'S JOURNAL ©2007 ALL RIGHTS RESERVED

Upper Cabinet Exploded View
48 HOME PROJECTS
1
10
2
3
4
5
6
7
8
9
11
12
13
14
15
29 28
27
37
37
37
39 39
38
36
36
36
3/4"
3/4"
115/16"
11/4"127/16"
91/2"
91/2"
91/2"
11/4"
11/4"
12"
9"
9"
3/4"
3/4"
3/4"
3/4"
1/2"
1"
1/4"1/4"
1/2"
1/2"
1/2"
1/2"
1/2"
1/2"
11/16"
41/2"
31/2"
3"19/16"
3"
1/4"
1/4"
1"
1/2"
1
10
2
3
4
5
6
7
8
9
11
12
13
14
15
29 28
27
37
37
37
39 39
38
36
36
36
3/4"
3/4"
115/16"
11/4"127/16"
91/2"
91/2"
91/2"
11/4"
11/4"
12"
9"
9"
3/4"
3/4"
3/4"
3/4"
1/2"
1"
1/4"1/4"
1/2"
1/2"
1/2"
1/2"
1/2"
1/2"
11/16"
41/2"
31/2"
3"19/16"
3"
1/4"
1/4"
1"
1/2"
1
10
2
3
4
5
6
7
8
9
11
12
13
14
15
29 28
27
37
37
37
39 39
38
36
36
36
3/4"
3/4"
115/16"
11/4"127/16"
91/2"
91/2"
91/2"
11/4"
11/4"
12"
9"
9"
3/4"
3/4"
3/4"
3/4"
1/2"
1"
1/4"1/4"
1/2"
1/2"
1/2"
1/2"
1/2"
1/2"
11/16"
41/2"
31/2"
3"19/16"
3"
1/4"
1/4"
1"
1/2"
1
10
2
3
4
5
6
7
8
9
11
12
13
14
15
29 28
27
37
37
37
39 39
38
36
36
36
3/4"
3/4"
115/16"
11/4"127/16"
91/2"
91/2"
91/2"
11/4"
11/4"
12"
9"
9"
3/4"
3/4"
3/4"
3/4"
1/2"
1"
1/4"1/4"
1/2"
1/2"
1/2"
1/2"
1/2"
1/2"
11/16"
41/2"
31/2"
3"19/16"
3"
1/4"
1/4"
1"
1/2"
Upper Door (Back View)
Upper Door Rail(Back and Top Views)
Rabbet
Lower Door Rail(Top and Front Views)
Upper Side (Inside View)
The upper doors arehung 1/2" below thebottom edge of thecabinet’s top.
Rabbet iscut afterassembly.
MATERIAL LIST – Upper Cabinet
T x W x L
27 Upper Sides (2) 1" x 14" x 55"
28 Shelf Ends (6) 3/4" x 21⁄2" x 91⁄4"
29 Shelf Rails (6) 3/4" x 21⁄2" x 46"
30 Shelf Glass (3) 1/4", Cut to fit
31 Cabinet Bottom (1) 3/4" x 133⁄16" x 46"
32 Lower Stringer (1) 1" x 31⁄8" x 45"
33 Upper Stringers (2) 1" x 31⁄4" x 45"
34 Upper Top (1) 1" x 171⁄8" x 51"
35 Upper Back (1) 1/2" x 453⁄4" x 471⁄2"
36 Lower Door Rails (2) 1" x 41⁄2" x 191⁄2"
37 Upper Door Rails (2) 1" x 3" x 191⁄2"
38 Muntins (6) 1/2" x 11⁄4" x 181⁄2"
39 Door Stiles (4) 1" x 3" x 461⁄8"
40 Door Glass (2) 1/4", Cut to fit
41 Upper Door Hinges (3 pairs) 21⁄2" Brass
42 Lower Door Hinges (2 pairs) 13⁄4" Brass
43 Glass Retainers (1) 1/4" x 1/4" x 240"
44 Door Pulls (4) 3/4" x 11⁄2" x 41⁄4"
45 Door Catches (4) Brass ball type
46 Anchor Strips (2) 1/8" x 3/4" x 3"
WOODWORKER'S JOURNAL ©2007 ALL RIGHTS RESERVED

ShelfJoineryDetail
LowerDoorRailDetail
Muntin Detail
27
37
45
34
35
33
33
31
32
38
39
44
27 36
40
302928
41
CHERRY CHINA CABINET 49
Muntin(Top andFront View)
1
10
2
3
4
5
6
7
8
9
38
12
13
14
15
3/4" 3/4"
115/16"
1/4"
1/4"
1/2"
1/8"
1
10
2
3
4
5
6
7
8
9
11
12
13
14
15
29 28
27
37
37
37
39 39
38
36
36
36
3/4"
3/4"
115/16"
11/4"127/16"
91/2"
91/2"
91/2"
11/4"
11/4"
12"
9"
9"
3/4"
3/4"
3/4"
3/4"
1/2"
1"
1/4"1/4"
1/2"
1/2"
1/2"
1/2"
1/2"
1/2"
11/16"
41/2"
31/2"
3"19/16"
3"
1/4"
1/4"
1"
1/2"
Shelf Joinery Detail(Side View)
45"
3 1/4"
R150"
1 3/4"
1
10
2
3
4
5
6
7
8
9
11
12
13
14
15
32 33
3/4" 3/4"
115/16"
13/4"1/8"
CL
Lower Stringer and Upper Stringer(Front View)
NOTE: The lowerand upper stringersare 1/8" different inwidth but have theidentical curve ontheir bottom edges.
WOODWORKER'S JOURNAL ©2007 ALL RIGHTS RESERVED

50 HOME PROJECTS
Create the matching tails on your router table after you’veplowed the grooves so you can easily test the fit.
Sliding dovetails are really just an upscale version of dadoes. The main advantage to the sliding dovetail is that it is a trulymechanical joint—its shape will not allow the joint topull apart. Plow the dovetail as you would a dado, with arouter and a straightedge. We used one of our favorite jigsbecause it has a built-in adjustable stop. It may be appar-ent, but it’s important to note that you can’t stop your routeras you plow the dovetail: you must cut it in one pass with the dovetailbit. (Its shape makes this essential.) It is a good idea to remove somematerial first with a straight bit and follow behind with the dovetail cut-ter to keep from overloading and breaking the fragile bit. When you’redone plowing the dovetail grooves, chuck the same bit into your routertable and create the shoulders (tails) of the joint, one side at a time.
SUPER EASY SLIDING DOVETAILS
Door Pull Pattern
44
44
Pull
Full-size Pattern (Front View)
MoldingFull-size(Front View)
Shape the mold-ing to create thepulls on yourtable saw beforeyou cut theircurved profiles.
Plow sliding dovetail grooveswith a router and clamped-onstraightedge.
Machining the Upper DoorsThese doors are really what sets this china cabinet apart.
They simultaneously enclose and protect the treasures withinwhile offering them for display. The door style continues thegracious arcs used throughout the project and, while theylook difficult to build, they really aren’t.
With the parts already cut to the rectangular dimensionsgiven in the Material List, begin construction by setting up adado head in your table saw. Use it and the miter gauge tocreate tenons on the ends of all four door rails (pieces 36 and37) and the six small muntins (pieces 38). Dimensions for
these are given in the Drawings. On the rails, you have to cut the large rabbets before you cut their curved aspects.Now lay out the shape of the door rails and, using a bandsaw, create their gracious arcs (see the sidebar on page 47).Sand these pieces smooth.
Again referring to the Drawings, lay out the five mortisesin each door stile (piece 39). If you do not have access to adedicated mortising machine, use a Forstner bit in your drillpress to remove most of the waste in these mortises, and finish up with a sharp chisel.
Glue and clamp the door parts, making sure the assemblies
WOODWORKER'S JOURNAL ©2007 ALL RIGHTS RESERVED

INSTALLING SOSS HIDDEN
HINGES
CHERRY CHINA CABINET 51
Tight-fitting and extremely strong, Soss hinges were the best solution to our design challenge.
For the solid-ebony pulls, first create a moldingas shown in the Drawings. Complete the pulls'organic shape on the band saw and disk sander.
are absolutely flat and square. After theglue dries, sand each door.
Completing the rabbet in the backof each door stile for the door glass(piece 40) takes a little thought. Use a straightedge and a 1/2"-diameterstraight bit for this operation. You’llneed to stop the rabbet short andsquare your corners with a chisel.
Installing the DoorsTo maintain the clean lines of this
project, we chose Soss hinges (pieces41 and 42) that are invisible when the doors are closed. Follow the manu-facturer’s instructions to create the two-level mortises (see sidebar at right)for these hinges, then dry-fit the doors.Be aware that the hinges are NOTadjustable, so you need to place themcorrectly the first time.
Do a final sanding of all parts, thenapply three coats of clear satin finish,sanding between coats with 400-gritwet/dry paper. Don’t forget to finish allfour sides of the glass retainer strips forthe upper doors (pieces 43). After thefinish dries, install the glass. This MUSTbe safety glass: anything else presentsa real physical danger to your family inthe event of breakage. Also, never orderthe glass until you have your doors
built. Miter the retainer strips to fit andsecure them with 1/2" pin nails. Pre-drillthe strips to avoid splitting.
Forming Ebony Door PullsWe made the door pulls (pieces
44) from solid ebony. This cabinet willlast generations and deserves the bestdetails. You’ll also notice that when thecabinet is closed up, there is no hard-ware visible...just wood.
The pulls start out as a piece ofmolding (see the Drawings on the facingpage for the profile) and then are cut andsanded to their final shape. Cross-cutthem to length and notch out their backto raise the mounting area of the pulls.Use a band saw and a disk sander tocomplete the shape. Polish them to 600-grit and apply a coat of penetratingoil for their finish. Wrap up by installing the brass door catches (pieces 45), asshown on the Exploded View, page 49.
The last step is to cut a piece of 1/8"-thick, 3/4" metal bar stock tocreate the anchor strips (pieces 46).Counterbore four holes and use theanchors to secure the top and bottomunits together. This is an important step to keep the tall upper cabinet fromtipping during use.
With the final details completed,move the cabinet to your dining roomand load it up with the good china.Let’s just hope your painstaking workdoesn’t put the china to shame!
Use a shop-made or commerciallyavailable jig to create the mortise forthe Soss hinges. This china cabinetrequired two different sizes.
The unique construction of Soss hinges means you’ll have to rout
a two-step mortise.
Finding hidden hinges sturdyenough to hang these large, heavydoors was a challenge. The answerturned out to be Soss hinges—which are elegant to look at andvery strong. We used a largermodel on the upper cabinet doorsthan on the lower cabinet. They areundeniably tricky to install but wellworth the effort. This style of hingefits into a two-level mortise that isbest created with a router and a jig. As with any tricky operation,practice your cuts on scrap lumberbefore milling the project parts.
Step 1
Step 2
WOODWORKER'S JOURNAL ©2007 ALL RIGHTS RESERVED