Embed Size (px)
Citation preview

0-CPMgmt1and2-VirtualEnv-NGX-R65andR70
Check Point Mgmt Essentials 1 & 2 - Virtual Environment
Objectives
• Know how to configure the virtual network environment used for the course materials.
• Know how to copy virtual machines from VMware WorkStation to Server.
• Know how to defragment virtual machines before cloning and deploying linked clones.
• Know how to use the ‘Virtual Infrastructure (VI) Web Interface’.
• Know the importance of the VNnet network adapter setting.
• Know how to use the ‘Virtual Network Editor’.
• Know how to create the SecurePlatform Virtual firewalls using VMware Server.
Prerequisites
• Host Computer, Minimum Specification, P4 1.8Ghz, 2GB RAM and 40GB of free disk space.
• VMware WorkStation or Server
• Windows 2003 Server Virtual Machine
• Windows XP Pro or Windows 7 Virtual Machine
• Check Point CD Evaluation Pack NGX R65 or R70
Release Date 14th July 2010
Version 2.1.01
This document applies to both NGX R65 and R70 course materials.
Check Point Management Essentials 1 – NGX R65 (CCSA)
Check Point Management Essentials 2 – NGX R65 (CCSE)
*Check Point Management Essentials 1 & 2 – NGX R70 (CCSA)
The course materials are available from
www.eLearnCheckPoint.com
Section 1 Check Point Mgmt Essentials 1 & 2 Virtual Environment
Section 2 Using VMware Server
Section 3 Creating the Firewalls using VMware Server – fwsite1 & fwsite2
*Check Point Changed the CCSA certification in R70. R70 CCSA now covers the topics that were in the NGX R65 CCSA & CCSE with clustering moving to the CCSE exam. A new topic list has been created for R70 CCSE. The eLearnCheckPoint CCSA R70 course materials will still include Clustering.
0-CPMgmt1and2-VirtualEnv-NGX-R65andR70 2 eLearnChecKPoint 2010
Contents
1 Check Point Mgmt Essentials 1 & 2 - Virtual Environment ........................................ 3 1.1 Course Environment & Network Diagrams....................................................... 3
1.1.1 Minimum Hardware & Software Requirements..................................... 3 1.1.2 The Core Environment – Network Diagram.......................................... 3 1.1.3 Firewall HA Environment – Network Diagram ...................................... 3 1.1.4 Sample Virtual Machines....................................................................... 4 1.1.5 Useful Software for the Virtual Windows 2003 Servers........................ 5
1.2 The Sample Virtual Machines – Created in VMware WorkStation .................. 6 1.2.1 The Base Machine – MgmtSite1Base................................................... 6 1.2.2 Accessing Files on the Local Host from within a Virtual Machine ........ 7 1.2.3 Defragment Virtual Machine ‘MgmtSite1Base’ and Host PC ............... 8 1.2.4 Create the Linked Clones - MgmtSite1, www-Site2, ClassRouter ....... 9 1.2.5 Configure the Linked Clone - MgmtSite1 .............................................. 13 1.2.6 Configure the Linked Clone - www-Site2 .............................................. 13 1.2.7 Configure the Linked Clone - ClassRouter ........................................... 14 1.2.8 Files required and Machines to run in VMware Server......................... 15 1.2.9 The vpnclient Virtual Machine - Windows XP Pro or Windows 7 ......... 16
2 Using VMware Server ....................................................................................................... 17 2.1 VMware Server Basics...................................................................................... 17
2.1.1 VMware Web Connectivity to the Host Machine................................... 17 2.1.2 VMware Server VI Web Interface.......................................................... 17 2.1.3 Creating a DataStore and Importing the Virtual Machines ................... 18 2.1.4 VMWare Server Virtual Network Editor................................................. 19 2.1.5 Configuring the Virtual Network Editor for the Course Environment .... 23
3 Creating the Firewalls using VMware Server – fwsite1 & fwsite2............................. 25 3.1 Creating the Virtual Machine - fwsite1.............................................................. 25
3.1.1 Virtual Machine – fwsite1 ...................................................................... 25 3.1.2 Adding Hardware to fwsite1 .................................................................. 28 3.1.3 Installing SecurePlatform on fwsite1..................................................... 30
3.2 Creating the Virtual Machine – fwsite2 ............................................................. 31 3.2.1 Virtual Machine – fwsite2 ...................................................................... 31 3.2.2 Adding Hardware to fwsite2 .................................................................. 34

0-CPMgmt1and2-VirtualEnv-NGX-R65andR70 3 eLearnChecKPoint 2010
1 Check Point Mgmt Essentials 1 & 2 - Virtual Environment
The course materials can be completed using virtual machines or actual physical machines. The course materials assume that you will be using virtual machines. The materials and environment were tested using VMware WorkStation 6.5 and Server 2.0.2.
1.1 Course Environment & Network Diagrams
All of the explanations and exercises in the course materials use the IP addressing for the environment as illustrated in the following diagrams.
1.1.1 Minimum Hardware & Software Requirements
The lowest specification host machine the course materials were tested on.
IBM Thinkpad T42, P4M, 1.8GHz, 2GB RAM
Windows XP Pro 32-bit
Minimum free disk space 40GB The virtual machines were allocated a maximum 256MB and 8GB disk space. The IBM T42 laptop with 2GB RAM was able to run 5 virtual machines at the same time. The virtual machine RAM might need to be lowered to 128MB for some of the machines when running 5 machines at the same time. 4GB of RAM on the host computer is recommended.
1.1.2 The Core Environment – Network Diagram
The basic setup for the course is shown below. For a large part of the course materials only three virtual machines need to be powered on.
• MgmtSite1 – 10.1.1.1 • fwsite1 – 172.21.1.1 • ClassRouter – 172.21.1.254
The ClassRouter doubles up as an external client, Web & FTP server. Any number of additional machines can be added to customize the environment.
To Internet
192.168.100.0/24
172.21.1.0/24
172.29.9.0/24
254
11
2
1
254
254
ClassRouter/Server
Web/FTP
fw.site1.com
10.1.1.0/24
254
Internal Users
Web/FTP
1
172.22.2.0/24
254
1
Web/FTP
www.site2.com
fw.site2.com
10.2.2.0/24
254
10
Test VPN client
Site 2
Site 1
Web/FTP
mgmt.site1.comwww-int.site1.com
VMnet5
VM
net7
VMnet6
VMnet0 (Bridged)
VMnet0
VMnet4
VMnet0
192.168.200.0/24
1.1.3 Firewall HA Environment – Network Diagram
This configuration is only used during the firewall Cluster HA exercises. The extra firewalls fwa, fwb are created at the start of the HA Module.

0-CPMgmt1and2-VirtualEnv-NGX-R65andR70 4 eLearnChecKPoint 2010
172.21.1.0/24
10.1.1.0/24
SmartCenter
252
254
1
2
253
fwa fwb
3
192.168.101.0/24 192.168.100.0/24192.168.100.0/24252 253252 253Sync link
254
1
254
x Virtual address
172.21.1.0/24
192.168.101.0/24
External Net(VMnet0)
10.1.1.0/24
192.168.100.0/24
254
1
254
eth0
eth2
eth3
eth1
eth0
eth2
eth3
eth1
2 3
252 253
252 253
252 253
fwa fwb
Sync Link(VMnet3)
Public DMZ(VMnet4) Internal Net
(VMnet5)
254
Site1-Cluster
1.1.4 Sample Virtual Machines
It is recommended that you create your own virtual machines for the class environment. If you are experienced with VMware then you will already have reference machines that will just need IP address changes. If you are not familiar with VMware then creating the machine environment is a very useful exercise. Use 32-bit virtual machines for any machine that has a Check Point Firewall or SmartCenter product installed. Supported OS - http://www.checkpoint.com/ngx/upgrade/requirements/r65.html A useful google search ‘Check Point lifecycle’.
Sample reference machines for MgmtSite1, ClassRouter, www-Site2, VPNclient are supplied as part of the course materials. The machines listed in red should be available before starting the course materials. The machines listed in blue will be required for later modules during the course.
Machine Name Details
ClassRouter This server can optionally be configured with a VMnet NAT interface to access external networks like the Internet.
Router between different sites. Also runs an FTP & Web Server. OS: Windows 2003 Server IP: 172.21.1.254 IP: 172.22.2.254 IP: 172.29.9.254 Route: 10.1.1.0/24 gw 172.21.1.1 Route: 10.2.2.0/24 gw 172.22.2.1
MgmtSite1
SmartCenter for site1, also runs an FTP and Web server. The SmartConsole clients are installed on this machine. OS: Windows 2003 Server IP: 10.1.1.1 GW: 10.1.1.254
www-Site2 Web server for Site2, also SmartCenter for site2 when required. OS: Windows 2003 Server IP: 10.2.2.1 GW: 10.2.2.254
VPNClient Client machine for testing VPNs. OS: Windows XP Pro IP: 172.29.9.10 GW: 172.29.9.254

0-CPMgmt1and2-VirtualEnv-NGX-R65andR70 5 eLearnChecKPoint 2010
fwsite1 Created when required.
Firewall for Site1. OS: SecurePlatform (Linux) eth0: 172.21.1.1 eth1: - eth2: 192.168.100.254 eth3: 10.1.1.254
fwsite2 Created when required.
Firewall for Site2. OS: SecurePlatform (Linux) eth0: 172.22.2.1 eth1: 192.168.200.254 eth2: 10.2.2.254
fwa Created when required.
Firewall for Site1 Primary HA gateway OS: SecurePlatform (Linux) eth0: 172.21.1.2 eth1: 192.168.101.252 eth2: 192.168.100.252 eth3: 10.1.1.252
fwb Created when required.
Firewall for Site1 Secondary HA gateway OS: SecurePlatform (Linux) eth0: 172.21.1.3 eth1: 192.168.101.253 eth2: 192.168.100.253 eth3: 10.1.1.253
When creating the SecurePlatform virtual machines it is better to create them as new virtual machines rather than clone them. Creating them individually is good practice for becoming familiar with SecurePlatform installations.
1.1.5 Useful Software for the Virtual Windows 2003 Servers
The following software list would be useful if installed on the Windows 2003 Server virtual machines for the classroom environment. Some of the applications are used as part of an exercise during the course. All of the software can be downloaded from the Internet and may have specific license and usage restrictions.
Software Details
7-Zip* File compressor
cpclean Check Point tool for removing Check Point software from Windows OS. (Does not remove startup menu and desktop links).
Filezilla client GUI FTP client that also supports sftp. Filezilla server can be installed if you would like to try setting up rules that allow sftp connections. Microsoft IIS WEB & FTP servers are turned on for the sample virtual machines.
KiwiTools Kiwi_Catools, useful suite of tools. Contains tftp server. The default maximum file transfer size is 68MB. Increase the size if testing Check Point snapshot image backup and recovery using tftp.
MD5* Several versions are available md5.exe, md5sums.exe are command line versions.
Nmap* The ultimate scanner, www.insecure.org
Putty* Most commonly used ssh client.
RemoteDesktop Manager Useful tool for managing remote connections like ssh, https.
Superscan4* Network scanner.
Sys Internals Debugging tools for Windows
UltraVNC* Remote control application, useful alternative to MS-RDP to test during the course.
Wireshark* Network protocol Analyser. * Used as part of an exercise during the Check Point Mgmt Essentials 1& 2 courses.
Once you have a working test environment any number of useful client/server applications can be installed and tested to ensure that the Check Point Security Policy rules are set correctly to allow the Client/Server application to work.

0-CPMgmt1and2-VirtualEnv-NGX-R65andR70 6 eLearnChecKPoint 2010
For applications that do not supply port information the best method to find out which ports are being used is to monitor the events in the firewall logs and look for the port interaction between the client and server.
1.2 The Sample Virtual Machines – Created in VMware WorkStation
This section describes the details of the how the sample virtual machines were created. The virtual machines were created using VMware WorkStation 6.5 and are all 32-bit machines. WMware WorkStation allows you to create base reference configurations and then clone the machine. A full or linked clone can be created. Full clones can be copied to other machines and run independently of the original base machine files. Linked clones use a lot less disk space but require the base machine files to be available when linked clones are copied to another computer. Clones allow you to experiment with the virtual machine without affecting the original. If the clone becomes a mess it can be discarded and a new clone of the original machine created. Linked clones take less than a minute to create. Machines created in VMware WorkStation can be imported directly into VMware Server by simply copying the files to a directory that VMware server can access.
1.2.1 The Base Machine – MgmtSite1Base
This machine is built as the reference for all of the Windows 2003 Server machines that are cloned and used as part of the course.
• This machine is never started or used as part of the course materials. • The machine files must be available for the linked clones to work. • The location of the files is important.
Linked clones that are created from this base build are
• MgmtSite1 • www-Site2 • ClassRouter
Several virtual machines including ‘Windows Server 2003 R2 Enterprise Edition’ can be downloaded from the VMware ‘Virtual Appliance Marketplace’ and used as a base build to start with. The directory structure has been created to make it easy for these machines to be deployed to VMware Server. The whole directory C:\VMachines can be copied to the host running VMware Server. In VMware Server a ‘DataStore’ is added that points to the directory where the virtual machines are located C:\VMachines or whichever subdirectory the files are copied to.
CDISO will contain the ISO images of the CDs that the virtual machines will access. MgmtSite1Base will contain the files for the base ‘Windows 2003 Server’ build. This machine is never powered on during the course. vpnclient will contain the files for the base ‘Windows XP Pro’ build. You could use the Windows 7 beta appliance from the VMware appliance marketplace as an alternative machine. zScreenImages contains any screen background images for the virtual machines. zSoftware will contain software packages that the virtual machines need to install. The letter ‘z’ at the beginning of the directory name is just to force the listing to appear at the bottom of the list. Typically the software directory might look like the following.

0-CPMgmt1and2-VirtualEnv-NGX-R65andR70 7 eLearnChecKPoint 2010
The MgmtSite1Base files should look similar the following.
Before making any full or linked clones from the base server build it should be cleaned up by removing all temporary and unnecessary files to reduce its size. It is very easy to end up with lots of temporary files when installing software.
1.2.2 Accessing Files on the Local Host from within a Virtual Machine
In VMware WorkStation it is easy to allow a virtual machine to have access to the local hosts files. This is useful when installing software on the virtual machine. Instead of copying the software onto the virtual machine you can install the software from a share on the host computer. The host computer is the machine running VMware workStation or Server.
In the virtual machine settings under ‘Options’ shared folders can be added. Shares can be added while the virtual machine is powered on or off. If the virtual machine is not running the only options will be ‘Disabled’ or ‘Always enabled’
Shares should only be enabled when needed. Select ‘Add…’
Select the directory to Share

0-CPMgmt1and2-VirtualEnv-NGX-R65andR70 8 eLearnChecKPoint 2010
The share should be mounted as ‘Read-only’ unless you are copying files from the virtual machine to the local host. The default is to allow Read/Write.
The share will be added to the listed of accessible shares.
When the virtual machine is powered on the share will be available.
1.2.3 Defragment Virtual Machine ‘MgmtSite1Base’ and Host PC
After the base Windows 2003 Server machine has been completely built and unnecessary files removed a defragmenter tool should be run. The order of defragmentation should be
• Use the tool available on the virtual machine • Use the VMware WorkStation tool • Use the host computer tool

0-CPMgmt1and2-VirtualEnv-NGX-R65andR70 9 eLearnChecKPoint 2010
Windows 2003 Server – Computer Management – Disk Defragmenter
Virtual Machine Settings – Utilities – Defragment
Host Computer (Win XP Pro) Computer Management – Storage – Diskeeper Lite
Make a zip copy of the ‘MgmtSite1Base’ machine. This should be done before any linked clones are created. The zipped copy can now be used to recreate a new base machine if required. Please note that just because it is easy to make copies of virtual machines it does not remove the requirement for you to have proper licensing before using them. Licensing is the responsibility of the user.
1.2.4 Create the Linked Clones - MgmtSite1, www-Site2, ClassRouter
The virtual machine ‘MgmtSite1Base’ should be shutdown. Select the ‘MgmtSite1Base’ tab Whichever virtual machine tab is selected will be the machine that is cloned. Select VM – Clone…

0-CPMgmt1and2-VirtualEnv-NGX-R65andR70 10 eLearnChecKPoint 2010
The wizard will step through the cloning process.
No snapshots (linked clones) of this machine exist yet. Only the current state is available to be cloned.
Create a linked clone
Enter the machine name – MgmtSite1 The directory name will automatically be set to the same as the machine name.

0-CPMgmt1and2-VirtualEnv-NGX-R65andR70 11 eLearnChecKPoint 2010
The linked clone will take less than a minute to create.
Check the directory for MgmtSite1Base A new virtual disk file will be created for the linked clone ‘…cl2-000001’.
This file will not increase in size. This is a second full clone of the original virtual machine – ‘…cl2’
Check the directory for MgmtSite1 The virtual disk file called ‘Windows Server 2003 Standard Edition-cl3’ will be created along with the configuration files. This virtual disk file is where any changes to the machine are written. When you start the machine and complete the basic configuration the file will grow to about 200MB.
Since a linked clone now exists for ‘MgmtSite1Base’ do not run this machine. Only the linked clones need to be run.
Create the linked clone – ‘www-Site2’ Make sure the tab for ‘MgmtSite1Base’ is selected before starting the clone process.
0-CPMgmt1and2-VirtualEnv-NGX-R65andR70 12 eLearnChecKPoint 2010
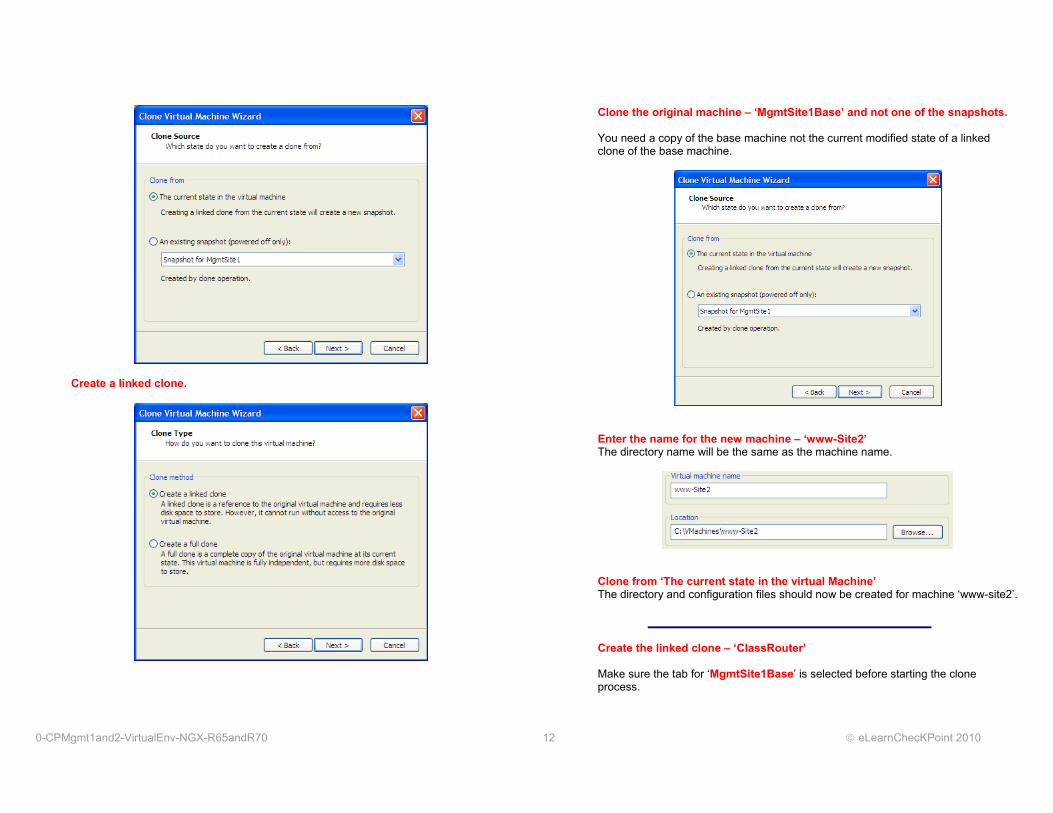
Create a linked clone.
Clone the original machine – ‘MgmtSite1Base’ and not one of the snapshots. You need a copy of the base machine not the current modified state of a linked clone of the base machine.
Enter the name for the new machine – ‘www-Site2’ The directory name will be the same as the machine name.
Clone from ‘The current state in the virtual Machine’ The directory and configuration files should now be created for machine ‘www-site2’.
Create the linked clone – ‘ClassRouter’ Make sure the tab for ‘MgmtSite1Base’ is selected before starting the clone process.

0-CPMgmt1and2-VirtualEnv-NGX-R65andR70 13 eLearnChecKPoint 2010
Clone from ‘The current state in the virtual Machine’ The directory and configuration files should now be created for machine ‘ClassRouter’.
The Three Machines should be available in VMware WorkStation. Make sure the MgmtSite1Base is not in the Favorites list. You do not want to start it by accident. The new clones are used and modified, never the base reference machine.
1.2.5 Configure the Linked Clone - MgmtSite1
Edit the VM Settings and set the network adapter to Custom - VMnet5
Set the CD/DVD to the Check Point Windows ISO image. Power On Mgmtsite1 Configure MgmtSite1
MgmtSite1 No. Task 1 Set the IP Address and default gateway
IP Address: 10.1.1.1 Netmask: 255.255.255.0 Gateway: 10.1.1.254
2 Check that the machine name is ‘mgmt’ 3 Check the Domain is ‘site1.com’ 4 Copy the hosts file from
C:\VMachines\zScreenImages to C:\windows\system32\drivers\etc
5 Set the background screen image to ‘mgmtsite1.png’ Location - C:\VMachines\zScreenImages
6 Turn off Automatic updates.
7 Install any extra software not installed on the base machine.
1.2.6 Configure the Linked Clone - www-Site2
Edit the VM settings and set the network adapter to Custom - VMnet6

0-CPMgmt1and2-VirtualEnv-NGX-R65andR70 14 eLearnChecKPoint 2010
Set the CD/DVD to the Check Point Windows ISO image. Power On www-Site2 Configure www-Site2
www-Site2 No. Task 1 Set the IP Address and default gateway
IP Address: 10.2.2.1 Netmask: 255.255.255.0 Gateway: 10.2.2.254
2 Change the Machine name to ‘www-site2’ 3 Change the domain to ‘site2.com’ 4 Copy the hosts file from
C:\VMachines\zScreenImages to C:\windows\system32\drivers\etc
5 Set the background screen image to ‘www-Site2.png’ Location - C:\VMachines\zScreenImages
6 Turn off Automatic updates
7 Install any extra software not installed on the base machine.
1.2.7 Configure the Linked Clone - ClassRouter
Edit the VM settings and set the network interface to VMnet0 (Bridged) Add another network adapter and set the adapter to NAT
The second network adapter is only really needed for this machine if access to local networks is required. It is possible to let ClassRouter have access to the Internet to allow downloads that can then be distributed to any internal virtual machine that can connect to the 172.21.1.254 address.

0-CPMgmt1and2-VirtualEnv-NGX-R65andR70 15 eLearnChecKPoint 2010
Set the CD/DVD to the Check Point Windows ISO image. Power on ClassRouter Configure ClassRouter
ClassRouter No. Task 1 Edit the first network interface
IP Address: 172.21.1.254 Netmask: 255.255.255.0 Leave the default gateway blank
2 Select Advanced and add two secondary IP addresses IP Address: 172.22.2.254 Netmask: 255.255.255.0 IP Address: 172.29.9.254 Netmask: 255.255.255.0
3 Edit the second network interface Set this to DHCP The address allocated will be from the VMnet8 NAT address space.
4 Use a command box to add two routes route -p add 10.1.1.0 mask 255.255.255.0 172.21.1.1 route -p add 10.2.2.0 mask 255.255.255.0 172.22.2.1
5
Copy the hosts file from C:\VMachines\zScreenImages to C:\windows\system32\drivers\etc
6 Set the background screen image to ‘ClassRouter.png’ Location - C:\VMachines\zScreenImages
7 Turn off Automatic updates
8
Make sure this machine can act as a router Use ‘regedit’ Find the key – ‘ipenablerouter’ Change the value to be 1 A reboot will be required before this change takes affect.
9 Install any extra software not installed on the base machine.
1.2.8 Files required and Machines to run in VMware Server
All of the virtual machines should be shutdown in VMware WorkStation so that no lock files are left open. If a lock directory exists in a virtual machine directory it can safely be deleted providing you know that it is not being used by anyone else. All of the files under the C:\VMachines directory will need to be copied to the host computer that will be running VMware Server.

0-CPMgmt1and2-VirtualEnv-NGX-R65andR70 16 eLearnChecKPoint 2010
The directory and files in C:\VMachines\MgmtSite1Base are required for the following machines to work.
• MgmtSite1 • www-site2 • ClassRouter
MgmtSite1Base should NOT be powered on. MgmtSite1Base should NOT be added as a machine into the VMware Server inventory.
1.2.9 The vpnclient Virtual Machine - Windows XP Pro or Windows 7
The virtual appliance marketplace has several beta releases of Windows 7 that can also be used. The ‘vpnclient’ is a full clone of a Windows XP Base Build – 3.3GB
This machine is only used as a test source client for incoming connections and as the VPN client machine when using SecureClient.
vpnclient No. Task 1 Set the IP address and default gateway
IP Address: 172.29.9.10 Netmask: 255.255.255.0 Gateway: 172.29.9.10
2 Set the background screen image to ‘vpnclient.png’ Location - C:\VMachines\zScreenImages
3 Turn off Automatic updates 4 Install any extra software, like network scanners you might need.

0-CPMgmt1and2-VirtualEnv-NGX-R65andR70 17 eLearnChecKPoint 2010
2 Using VMware Server
This section contains details about configuring the VMware Server environment and creating the firewall virtual machines using VMware Server. If you are using VMware WorkStation then the course materials explain the steps required for creating the SecurePlatform firewalls. Setting and changing the VMnet configuration is much simpler in VMware WorkStation than Server. Some parts of this section (example commands) assume VMware Server is installed on a Windows based platform.
2.1 VMware Server Basics
This section just covers some of the basics of VMware server to get you started if you are unfamiliar with using it. The VMware Server documentation should be used as the primary reference for fully understanding all the features available. Virtual Machines are managed using VMware Infrastructure (VI) Web Interface.
2.1.1 VMware Web Connectivity to the Host Machine
After installing VMware Server sometimes the VI Web Interface has problems with connectivity to the local host on port 8333. Typical errors messages are
• The server could not complete a request (HTTP 0). • The server could not complete a request (HTTP 200 text/plain). • Error opening the remote virtual machine ct-x70:8333\80: An unexplained
error occurred. • The server could not complete a request (HTTP 12152 ).
The web interface repeatedly loses connectivity when managing virtual machines via the VI Web Interface tool. This can happen as frequently as every 5 minutes. The hostname of the machine that VMware Server is running on must be in the ‘hosts’ file, this may solve the problem with no further action. On a Windows machine the IP address does not usually appear unless the network media is visible, a network cable is connected. This can be a problem for the VI Web Interface as it loses connectivity if the IP address for the hostname in the ‘hosts’ file is not available.
The best solution is to give the local network interface a static IP address and use that in the hosts file. However, the problem still remains if the network cable is removed. See Microsoft article ID: 239924 - How to disable the media Sensing feature for TCP/IP in windows. Locate the following registry subkey: HKEY_LOCAL_MACHINE\System\CurrentControlSet\Services\Tcpip\Parameters Add the following registry entry to the Parameters subkey: Name: DisableDHCPMediaSense Data type: REG_DWORD (Boolean) Value: 1 Reboot. This should keep the VI Web Interface stable without randomly losing connectivity.
2.1.2 VMware Server VI Web Interface
The VI Web Interface is used to create and manage all the virtual machines running on VMware Server. The virtual machines can be managed from any networked computer. Make sure you can ping the hostname for the local machine before trying to connect to the VI Web Interface. Connect to the WMware Server Home page
This will connect to ‘https://ct-x60:8333/ui/’ for a host named ‘ct-x60’. Since no valid SSL certificate has been installed, just select continue. Authentication The username and password must be the ‘Administrator’ for the local host you are logging into until you have configured users and permissions in the VI Web Inteface.

0-CPMgmt1and2-VirtualEnv-NGX-R65andR70 18 eLearnChecKPoint 2010
No user permissions are required to be configured to complete the ‘Check Point Mgmt Essentials 1 & 2’ courses. Creating permission profiles is outside the scope of this document.
The following shows the display for a fresh install of VMware Server with no ‘DataStores’ or Virtual Machines defined.
Copy the example virtual machines to C:\VMachines on the host running VMware Server.
2.1.3 Creating a DataStore and Importing the Virtual Machines
Virtual machines that are created in VMware WorkStation can be directly imported into VMware Server. Select ‘Add DataStore’ Enter the Name – Check Point Training Select the path – C:\VMachines
The ‘Check Point Training’ directory will be added to the list of DataStores.
Multiple DataStores (Directories containing virtual machines) can be created, each containing a group of machines related to a specific test environment. This DataStore will be used for the NGX R65 virtual machines, another one could contain the same machines but be for the R70 test environment. Add the following virtual machines to the DataStore.
• ClassRouter • MgmtSite1 • vpnclient • www-Site2

0-CPMgmt1and2-VirtualEnv-NGX-R65andR70 19 eLearnChecKPoint 2010
The Inventory should show the four virtual Machines.
All of the machines should be turned on to check they function correctly after being copied. VMware Server will know the machine has been copied. If you moved it to a new location on the same server you can select ‘I_moved_it’. These are copied machines from another server.
2.1.4 VMWare Server Virtual Network Editor
If you make changes to the network definitions in the Virtual Network Editor you must select – ‘Refresh Network List’ in the VI Web Interface before virtual machines will see the changes. The Virtual Network Editor is used to configure the default networks that are associated with each VMnet. Each VMnet is a virtual switch.
192.168.100.0/24
172.21.1.0/24
254
11
2
1
254
ClassRouter
Web/FTP
fw.site1.com
10.1.1.0/24
254
Internal Users
Web/FTP
Site 1
Web/FTP
mgmt.site1.comwww-int.site1.com
VMnet5
Bridged (VMnet0)VM
net4
Catalyst 2960 Series
7x6x5x4x3x2x1x
1
CONSOLE8x
Catalyst 2960 Series
7x6x5x4x3x2x1x
1
CONSOLE8x
Catalyst 2960 Series
7x6x5x4x3x2x1x
1
CONSOLE8x
To relate this to a real environment you might have a single switch for the External and Public DMZ networks each on a different VLAN. A single switch for all the external public networks is often required in an HA firewall environment where the VLANs on the switch need to be trunked to a remote site.

0-CPMgmt1and2-VirtualEnv-NGX-R65andR70 20 eLearnChecKPoint 2010
VMnet0 VMnet4
VLAN10 VLAN4172.21.1.0/24
192.168.100.0/24
Catalyst 2960 SERIES
MODE
SYSTRPSMASTRSTATDUPLXSPEED
1
1X
2X
1 2 3 4 5 6 7 8 9 10
11X
12X
11 12
2
13X
14X
13 14 15 16 17 18 19 20 21 22
23X
24X
23 24
25X
26X
25 26 27 28 29 30 31 32 33 34
35X
36X
35 36
37X
38X
37 38 39 40 41 42 43 44 45 46
47X
48X
47 48
External Switch
The default installation of VMware Server sets ‘Host-only’ networks for VMnet 1 – 9. This creates 9 virtual network IP addresses on the host computer. VMware WorkStation only defaults to two ‘Host-only’ networks, VMnet 1 & 8. Defining ‘Host-only’ network adapters means that a VMware virtual network adapter will appear on the host with an IP address. This allows virtual machines to connect directly to the host computer. Normally you would only need one or two VMware virtual adapters to be visible to the local machine. It does depend on what you are doing. VMnet8 is the only one used during the ‘Check Point Mgmt Essentials 1 & 2’ course materials. It is configured on the virtual machine ‘ClassRouter’. C:\Documents and Settings\neila>ipconfig Windows IP Configuration Ethernet adapter VMware Network Adapter VMnet7: Connection-specific DNS Suffix . : IP Address. . . . . . . . . . . . : 192.168.180.1 Subnet Mask . . . . . . . . . . . : 255.255.255.0 Default Gateway . . . . . . . . . : Ethernet adapter VMware Network Adapter VMnet6: Connection-specific DNS Suffix . : IP Address. . . . . . . . . . . . : 192.168.184.1 Subnet Mask . . . . . . . . . . . : 255.255.255.0 Default Gateway . . . . . . . . . : Ethernet adapter VMware Network Adapter VMnet5: Connection-specific DNS Suffix . : IP Address. . . . . . . . . . . . : 192.168.47.1 Subnet Mask . . . . . . . . . . . : 255.255.255.0 Default Gateway . . . . . . . . . :
Ethernet adapter VMware Network Adapter VMnet4: Connection-specific DNS Suffix . : IP Address. . . . . . . . . . . . : 192.168.164.1 Subnet Mask . . . . . . . . . . . : 255.255.255.0 Default Gateway . . . . . . . . . : Ethernet adapter VMware Network Adapter VMnet3: Connection-specific DNS Suffix . : IP Address. . . . . . . . . . . . : 192.168.223.1 Subnet Mask . . . . . . . . . . . : 255.255.255.0 Default Gateway . . . . . . . . . : Ethernet adapter Wireless Network Connection: Connection-specific DNS Suffix . : IP Address. . . . . . . . . . . . : 192.168.169.100 Subnet Mask . . . . . . . . . . . : 255.255.255.0 Default Gateway . . . . . . . . . : 192.168.169.254 Ethernet adapter Local Area Connection: Media State . . . . . . . . . . . : Media disconnected Ethernet adapter VMware Network Adapter VMnet1: Connection-specific DNS Suffix . : IP Address. . . . . . . . . . . . : 192.168.29.1 Subnet Mask . . . . . . . . . . . : 255.255.255.0 Default Gateway . . . . . . . . . : Ethernet adapter VMware Network Adapter VMnet2: Connection-specific DNS Suffix . : IP Address. . . . . . . . . . . . : 192.168.132.1 Subnet Mask . . . . . . . . . . . : 255.255.255.0 Default Gateway . . . . . . . . . : Ethernet adapter VMware Network Adapter VMnet8: Connection-specific DNS Suffix . : IP Address. . . . . . . . . . . . : 192.168.232.1 Subnet Mask . . . . . . . . . . . : 255.255.255.0 Default Gateway . . . . . . . . . : Ethernet adapter VMware Network Adapter VMnet9: Connection-specific DNS Suffix . : IP Address. . . . . . . . . . . . : 192.168.46.1 Subnet Mask . . . . . . . . . . . : 255.255.255.0 Default Gateway . . . . . . . . . :

0-CPMgmt1and2-VirtualEnv-NGX-R65andR70 21 eLearnChecKPoint 2010
The network address used for each VMnet is configured in the Virtual Network Editor. These network addresses only apply if you are using DHCP for the virtual machine. If you use fixed IP addresses you can use any IP address on an interface and associate it with any VMnet (virtual switch). You only need to match the networks in your virtual machine if you want it to connect to the local host computer. The ‘Summary’ tab shows the details of all VMnets 0 – 9.
‘Automatic Bridging’ tab. VMnet0 is used as the default bridged network. This is not normally changed although for some environments you might want multiple bridged interfaces on the host running VMware Server. It will automatically bridge to one of the network interfaces on the host computer. If a specific interface should not be used then it can be excluded from the list. A specific interface can be selected for VMnet0. For example you may have both a LAN and wireless network interface on your laptop and want to use the LAN while at work and switch to using the Wireless interface at home.
The virtual machine will be unaware that it is using a different real physical interface to connect to external networks when you switch between them.
The ‘Host Virtual Network Mapping’ tab sets the interface to use for each VMnet.
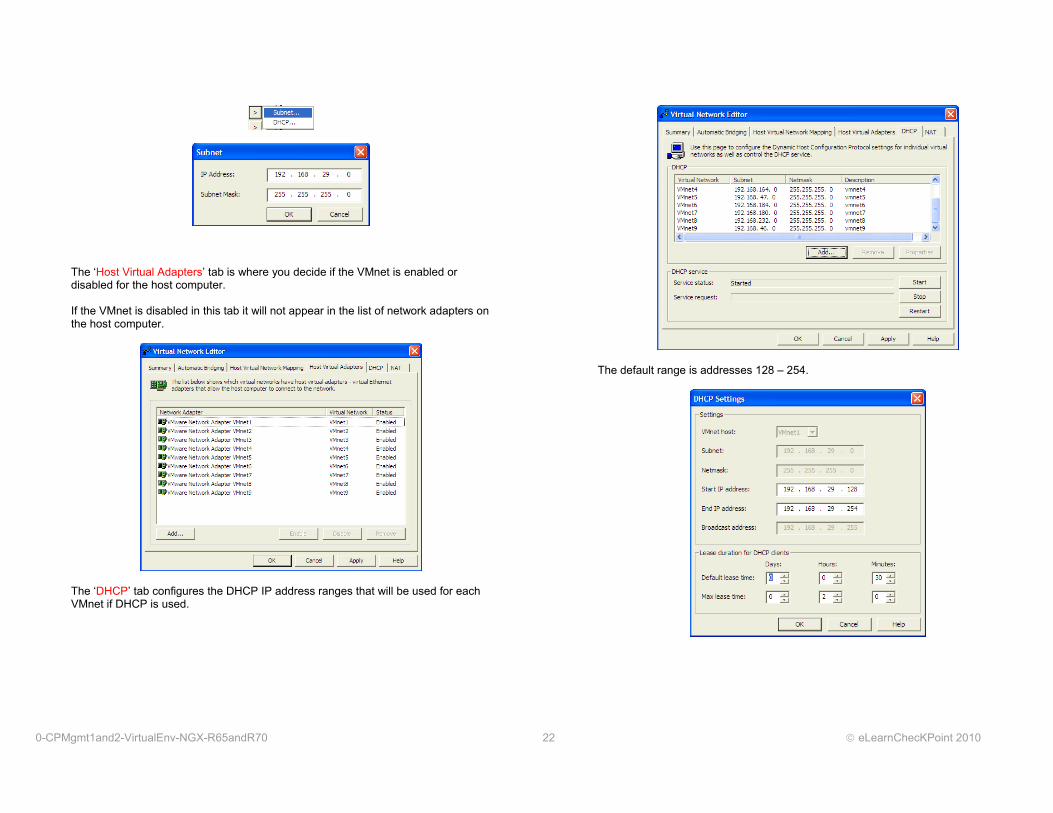
The subnet associated with each VMnet for DHCP can be configured by selecting the ‘>’.
0-CPMgmt1and2-VirtualEnv-NGX-R65andR70 22 eLearnChecKPoint 2010
The ‘Host Virtual Adapters’ tab is where you decide if the VMnet is enabled or disabled for the host computer. If the VMnet is disabled in this tab it will not appear in the list of network adapters on the host computer.
The ‘DHCP’ tab configures the DHCP IP address ranges that will be used for each VMnet if DHCP is used.
The default range is addresses 128 – 254.

0-CPMgmt1and2-VirtualEnv-NGX-R65andR70 23 eLearnChecKPoint 2010
The ‘NAT’ tab uses VMnet8 by default. You can only have one NAT interface for a VMware WorkStation or Server host.
Any virtual machine that uses VMnet8 will be able to connect to the same networks that the host has access to since connections will appear to originate from the host computer IP address. The ClassRouter is configured with two interfaces using
• VMnet0 for the 172.21.1.254, 172.22.2.254 & 172.29.9.254 addresses. • VMnet8 for connections that hide behind the local host IP address.
You might want to disable VMnet8 if you do not want the ClassRouter to have access to the same networks the host computer is connected to. If you run a web proxy on ClassRouter and VMnet8 is enabled then it is possible to configure web clients on the internal machines 10.1.1.1 and 10.2.2.1 to have access to the Internet if the host computer has access to the Internet. This may not work where the host computer must use a web proxy to access the Internet.
2.1.5 Configuring the Virtual Network Editor for the Course Environment
The default install of VMware Server might not allow the individual VMnets to be set for the interfaces required for the virtual machines created in VMware WorkStation. After importing the sample virtual machines you may end up only being able to set the network interface to one of three options. These might be the only options listed in the pull down menu.
• Bridged – VMnet0 • HostOnly • NAT – VMnet8
The VMnet[2-7] & 9 may not be in the list.
You will need to be able to select the specific VMnet for each network interface. This will allocate the network interface to the right virtual switch. To change the list so that all VMnets are available you must use the ‘Virtual Network Editor’ and then use ‘Refresh Network List’ in the VI Web Interface. Edit the VMnets in the ‘Host Virutal Adapter’ tab Change the setting for VMnet[1 – 7] & 9 to disabled.

0-CPMgmt1and2-VirtualEnv-NGX-R65andR70 24 eLearnChecKPoint 2010
In some cases you may have to remove them all and then add them all back then disable them before they become visible in VI Web Access Interface. In the ‘VI Web’ tool select – ‘Refresh Network List’
Edit one of the Virtual machines and check that all the VMnets are now listed in the pull down menu.
Only two ‘Host-only’ VMnets have been left enabled. C:\Documents and Settings\neila>ipconfig Windows IP Configuration
Ethernet adapter VMware Network Adapter VMnet8: Connection-specific DNS Suffix . : IP Address. . . . . . . . . . . . : 192.168.232.1 Subnet Mask . . . . . . . . . . . : 255.255.255.0 Default Gateway . . . . . . . . . : Ethernet adapter VMware Network Adapter VMnet1: Connection-specific DNS Suffix . : IP Address. . . . . . . . . . . . : 192.168.29.1 Subnet Mask . . . . . . . . . . . : 255.255.255.0 Default Gateway . . . . . . . . . : Ethernet adapter Wireless Network Connection: Connection-specific DNS Suffix . : IP Address. . . . . . . . . . . . : 192.168.169.100 Subnet Mask . . . . . . . . . . . : 255.255.255.0 Default Gateway . . . . . . . . . : 192.168.169.254 Ethernet adapter Local Area Connection: Media State . . . . . . . . . . . : Media disconnected C:\Documents and Settings\neila> Make sure that the Network adapter(s) for each virtual machine is on the right VMnet.

0-CPMgmt1and2-VirtualEnv-NGX-R65andR70 25 eLearnChecKPoint 2010
3 Creating the Firewalls using VMware Server – fwsite1 & fwsite2
This section contains details for creating the SecurePlaftorm firewalls fwsite1 & fwsite2. If you make a mistake when installing SecurePlaftorm just delete the virtual machine and start again. The most common mistake is to install both the SmartCenter and Firewall when only the Firewall should be installed.
3.1 Creating the Virtual Machine - fwsite1
The firewall for Site1 requires four network adapters and one serial interface defined for the virtual machine before installing SecurePlaftorm.
3.1.1 Virtual Machine – fwsite1
Select - Create Virtual Machine
Enter the name – fwsite1
Select – ‘Linux operating system’ and the version ‘Red Hat Linux’
Leave the default memory size to 256MB
If you run out of memory when attempting to run multiple virtual machines on the host then the memory size can be temporarily reduced to 128MB.

0-CPMgmt1and2-VirtualEnv-NGX-R65andR70 26 eLearnChecKPoint 2010
Create the Virtual disk.
Use the default location for the virtual disk
Add a Network Adapter Normally at least one is added during the creation of the virtual machine. Additional network adapters can be added after stepping through the initial configuration. The firewall will need extra adapters but do that after the basic settings for fwsite1 have been configured.
Set the Network Adapter to be ‘Bridged’
This network adapter will be ‘eth0’ in SecurePlatform and connected to the external network 172.21.1.0/24. Use an ISO image for the CDROM

0-CPMgmt1and2-VirtualEnv-NGX-R65andR70 27 eLearnChecKPoint 2010
Set the image to the Check Point SecurePlatform version R65 or R70.
Make sure ‘Connect at Power On:’ is selected
Do not add a floppy drive.
Add a USB Controller

0-CPMgmt1and2-VirtualEnv-NGX-R65andR70 28 eLearnChecKPoint 2010
Check the Machine summary before selecting ‘Finish’
The base configuration files have been created. The virtual disk file will only grow in size once you install SecurePlatform.
3.1.2 Adding Hardware to fwsite1
Select – Add Hardware
Select – Network Adapter
Select VMnet3
This will be the Firewall Sync interface eth1 for an HA configuration.

0-CPMgmt1and2-VirtualEnv-NGX-R65andR70 29 eLearnChecKPoint 2010
Add another network adapter. Use VMnet4
This will be the DMZ interface eth2. Add another network adapter. Use VMnet5
This will be the Internal interface eth3. Add a Serial Port
The serial port is not strictly necessary since all of the virtual machines will be running on a single host and a console to the firewall is always available. Adding the Serial Port just allows the virtual environment to be a closer reflection to a real environment where you always end up at some point having to use a serial console connection. It is possible to install a Check Point Security Policy that locks out remote connections. Recovery usually requires console access.
Select – ‘Use Named Pipe’
The Pipe Name must use the format - \\.\pipe\name The name ‘com_1’ must match a pipe name created on another virtual machine.
Select Next to complete the hardware changes.

0-CPMgmt1and2-VirtualEnv-NGX-R65andR70 30 eLearnChecKPoint 2010
The summary of the virtual machine should look similar to the following.
3.1.3 Installing SecurePlatform on fwsite1
Power on the Virtual Machine
Select the window to start a Console You may have to install the console if it has never been installed before.
In the console window select any key within 90 seconds to start the install.
The full details of completing the SecurePlatform installation are in the ‘Check Point Mgmt Essentials 1’ training materials. After stepping through the installation use ‘admin/admin’ to login and finish off the system and Check Point product installation. System changes are made by running ‘sysconfig’.

0-CPMgmt1and2-VirtualEnv-NGX-R65andR70 31 eLearnChecKPoint 2010
3.2 Creating the Virtual Machine – fwsite2
The firewall for Site2 requires three network adapters and one serial interface defined for the virtual machine before installing SecurePlaftorm.
3.2.1 Virtual Machine – fwsite2
Create a new virtual machine – fwsite2
Select – ‘Linux’ and ‘Red Hat Linux’
Leave the memory to the default
Create a new virtual disk
The default 8GB should be enough.

0-CPMgmt1and2-VirtualEnv-NGX-R65andR70 32 eLearnChecKPoint 2010
Add a Network Adapter
Set the Network Adapter to ‘Bridged’
This will be the external interface eth0. Use an ISO image for the CDROM
Set the image to the Check Point SPLAT ISO.

0-CPMgmt1and2-VirtualEnv-NGX-R65andR70 33 eLearnChecKPoint 2010
Make sure ‘Connect at Power On:’ is selected.
Do not add a Floppy Drive.
Add a USB Controller.
Select Next to create fwsite2.

0-CPMgmt1and2-VirtualEnv-NGX-R65andR70 34 eLearnChecKPoint 2010
3.2.2 Adding Hardware to fwsite2
Two additional network adapters and one serial port are required. Select – Add Hardware
Select Network Adapter
This adapter will be the DMZ eth1. Set the network connection to VMnet7

0-CPMgmt1and2-VirtualEnv-NGX-R65andR70 35 eLearnChecKPoint 2010
Add another Network Adapter and set the Network adapter to VMnet6.
Add a Serial Port Select – ‘Use Named Pipe’
Enter the Pipe name - \\.\pipe\com_1
You will have to set the name to ‘com_2’ if you want to use the serial port on fwiste1 and fwsite2 at the same time. You could add another serial port on MgmtSite1 with a name ‘com_2’.
The Machine should now have the right hardware defined and is ready for Check Point SecurePlatform to be installed.