Embed Size (px)
Citation preview

Document number: 55-16-005-001
March 2018 Charon-SSP for Linux Version 2.0.1 – User’s Guide (Version 1)
Charon-SSP for Linux – Version 2.0.1 User’s Guide

Document number: 55-16-005-001
© Stromasys 2018 Charon-SSP for Linux Version 2.0.1 – User’s Guide 2
Contents
1 About This Guide ........................................................................................................................... 11
1.1 Intended Audience ................................................................................................................................. 11
1.2 Document Structure ............................................................................................................................... 12
1.3 Obtaining Documentation ..................................................................................................................... 12
1.4 Obtaining Technical Assistance ........................................................................................................... 12
1.5 Conventions ............................................................................................................................................ 13
2 Introduction .................................................................................................................................... 14
2.1 Supported Virtual Hardware .................................................................................................................. 15
3 Host System Requirements .......................................................................................................... 16
3.1 Hardware Requirements ........................................................................................................................ 16
3.2 Software Requirements ......................................................................................................................... 17 3.2.1 Operating System .............................................................................................................................................................. 17 3.2.2 Other Software Requirements .......................................................................................................................................... 17
4 Charon-SSP Software Installation ............................................................................................... 18
4.1 Packages and Installation Overview .................................................................................................... 18
4.1.1 Host Operating System Specifics for Installation .......................................................................................................... 18 4.1.1.1 Installation Packages for Supported Host Operating Systems ..................................................................... 18 4.1.1.2 Installation Commands on Supported Host Operating Systems ................................................................... 19
4.2 Installing the Charon-SSP Components .............................................................................................. 20
4.2.1 Installing the Sentinel HASP Software for Linux ........................................................................................................... 20 4.2.1.1 Sentinel HASP Prerequisites ......................................................................................................................... 20 4.2.1.2 Sentinel HASP Installation Steps .................................................................................................................. 20 4.2.1.3 Sentinel HASP Post-Installation Tasks ......................................................................................................... 21
4.2.2 Initial License Installation .................................................................................................................................................. 22 4.2.3 Installing the Charon-SSP Software for Linux ............................................................................................................... 22
4.2.3.1 Charon-SSP Prerequisites ............................................................................................................................ 22 4.2.3.2 Charon-SSP Software Installation Steps ...................................................................................................... 22 4.2.3.3 Charon-SSP Post-Installation Tasks ............................................................................................................. 22
4.2.3.3.1 Setting the PATH variable ....................................................................................................................... 23 4.2.3.3.2 Installing the bridge-utils Package ........................................................................................................... 23
4.2.4 Installing the Charon-SSP Manager for Linux ............................................................................................................... 23 4.2.4.1 Charon-SSP Manager Post-Installation Tasks on Linux ............................................................................... 24
4.2.4.1.1 Installing the Xephyr X-Server ................................................................................................................. 24 4.2.4.1.2 Creating a Desktop Menu Item for Charon-SSP Manager ...................................................................... 24
4.2.5 Installing the Charon-SSP Manager for Microsoft Windows ........................................................................................ 27 4.2.5.1 Charon-SSP Manager Post-Installation Tasks on Microsoft Windows ......................................................... 28
4.2.6 Installing the Charon-SSP Director for Linux ................................................................................................................. 28 4.2.6.1 Charon-SSP Director Prerequisites .............................................................................................................. 28 4.2.6.2 Charon-SSP Director Software Installation Steps ......................................................................................... 28 4.2.6.3 Charon-SSP Director Post-Installation Tasks on Linux................................................................................. 28
4.2.6.3.1 Creating a Desktop Menu Item for Charon-SSP Director ....................................................................... 28 4.2.7 Installing the Charon-SSP Director for Microsoft Windows ......................................................................................... 29
4.2.7.1 Charon-SSP Director Prerequisites .............................................................................................................. 29

Document number: 55-16-005-001
© Stromasys 2018 Charon-SSP for Linux Version 2.0.1 – User’s Guide 3
4.2.7.2 Charon-SSP Director Software Installation Steps ......................................................................................... 29 4.2.8 Installing the Charon-SSP Agent for Linux ..................................................................................................................... 30
4.2.8.1 Charon-SSP Agent Prerequisites .................................................................................................................. 30 4.2.8.2 Charon-SSP Agent Software Installation Steps ............................................................................................ 30
4.2.9 Installing the Charon-SSP Barebone Distribution ......................................................................................................... 31 4.2.9.1 General Information about the Barebone Distribution ................................................................................... 31 4.2.9.2 Basic Installation Steps for the Barebone Distribution .................................................................................. 31 4.2.9.3 Charon-SSP Barebone Post-Installation Tasks ............................................................................................ 35
4.2.9.3.1 Changing the Charon-SSP Manager Password ...................................................................................... 36 4.2.9.3.2 Changing the Charon-SSP Barebone User Password ............................................................................ 37 4.2.9.3.3 Changing the Charon-SSP Barebone Distribution root Password .......................................................... 37 4.2.9.3.4 Setting the Default Webpage to the License Management Utility ........................................................... 37 4.2.9.3.5 Security for the Sentinel Runtime Environment....................................................................................... 37
5 Configuring and Using the Charon-SSP Software .................................................................... 38
5.1 Overview .................................................................................................................................................. 38
5.2 Charon-SSP Directory Structure .......................................................................................................... 38
5.3 Interaction of the Charon-SSP Components ....................................................................................... 39
5.4 Using the Charon-SSP Director ............................................................................................................ 39
5.4.1 Starting the Charon-SSP Director.................................................................................................................................... 40 5.4.2 Working with the Charon-SSP Director .......................................................................................................................... 40
5.4.2.1 Charon-SSP Director Main Menu Bar ........................................................................................................... 41 5.4.2.2 Managing Charon-SSP Director Subgroups ................................................................................................. 42 5.4.2.3 Charon-SSP Director System Context Menu ................................................................................................ 43 5.4.2.4 Charon-SSP Director Additional Context Menu ............................................................................................ 43 5.4.2.5 Charon-SSP Director Keyboard Shortcuts .................................................................................................... 43
5.5 Using the Charon-SSP Manager ........................................................................................................... 44
5.5.1 Starting the Charon-SSP Manager .................................................................................................................................. 44 5.5.1.1 Connecting to the Charon-SSP Agent of the Target System ........................................................................ 45 5.5.1.2 Charon-SSP Manager Window Overview ..................................................................................................... 47
5.5.2 Creating a Virtual Machine ............................................................................................................................................... 49 5.5.3 Configuring a Virtual Machine .......................................................................................................................................... 50
5.5.3.1 Hardware Family Configuration (Model) ....................................................................................................... 51 5.5.3.2 CPU Configuration ........................................................................................................................................ 52 5.5.3.3 DIT Configuration .......................................................................................................................................... 54 5.5.3.4 Memory Configuration ................................................................................................................................... 55 5.5.3.5 Graphics Configuration .................................................................................................................................. 56 5.5.3.6 SCSI Storage Configuration .......................................................................................................................... 60
5.5.3.6.1 Creating a New Virtual Disk Container File ............................................................................................. 61 5.5.3.6.2 Creating a New Virtual Tape Container File ............................................................................................ 62 5.5.3.6.3 Adding or Editing a Virtual SCSI Device ................................................................................................. 62 5.5.3.6.4 Physical Disk Parameters on Charon-SSP ............................................................................................. 64 5.5.3.6.5 Removing a Virtual Storage Device ........................................................................................................ 65
5.5.3.7 Configuring a Floppy Drive ............................................................................................................................ 65 5.5.3.8 TTYA Configuration ....................................................................................................................................... 66
5.5.3.8.1 Physical Console Device ......................................................................................................................... 67 5.5.3.8.2 Network Console Device ......................................................................................................................... 68
5.5.3.9 TTYB Configuration ....................................................................................................................................... 69 5.5.3.10 TTYX Configuration ..................................................................................................................................... 70
5.5.3.10.1 Prerequisites .......................................................................................................................................... 70

Document number: 55-16-005-001
© Stromasys 2018 Charon-SSP for Linux Version 2.0.1 – User’s Guide 4
5.5.3.10.2 TTYX On-Board Mode on Charon-SSP/4U(+) ...................................................................................... 71 5.5.3.10.2.1 Adding Serial Ports in TTYX On-Board Mode ................................................................................. 71 5.5.3.10.2.2 Modifying or Removing TTYX On-Board Mode Ports ..................................................................... 73 5.5.3.10.2.3 Managing TTYX On-Board Mode Ports on Solaris ......................................................................... 73
5.5.3.10.3 DIGI AccelePort Mode on Charon-SSP/4U(+) ...................................................................................... 74 5.5.3.10.3.1 Adding Serial Ports in DIGI AccelePort Mode ................................................................................. 74 5.5.3.10.3.2 Modifying or Removing Ports in DIGI AccelePort Mode ................................................................. 74 5.5.3.10.3.3 Solaris Driver Installation for DIGI AccelePort Emulation ............................................................... 75 5.5.3.10.3.4 Managing DIGI AccelePort Ports on Solaris ................................................................................... 75
5.5.3.10.4 Adding a DIGI PCI Pass-Through Device ............................................................................................. 76 5.5.3.10.5 TTYX Ports on Charon-SSP/4M ............................................................................................................ 77
5.5.3.10.5.1 Adding Serial Ports in TTYX Mode on SUN-4M .............................................................................. 77 5.5.3.10.5.2 Modifying or Removing Ports in TTYX Mode on SUN-4M .............................................................. 77 5.5.3.10.5.3 Managing SUN-4M TTYX Ports on Solaris ..................................................................................... 77
5.5.3.11 GPIB Configuration ..................................................................................................................................... 78 5.5.3.12 Parallel Interface Configuration ................................................................................................................... 79 5.5.3.13 Audio Configuration ..................................................................................................................................... 80 5.5.3.14 Ethernet Configuration ................................................................................................................................ 82 5.5.3.15 NVRAM Configuration ................................................................................................................................. 84 5.5.3.16 License Settings .......................................................................................................................................... 85 5.5.3.17 Log Configuration ........................................................................................................................................ 86
5.5.3.17.1 Viewing the Charon-SSP Log Files ....................................................................................................... 87 5.5.4 Virtual Machine Context Menu ......................................................................................................................................... 88
5.5.4.1 Run the Virtual Machine ................................................................................................................................ 88 5.5.4.2 Virtual Machine Settings ................................................................................................................................ 88 5.5.4.3 Remove Machine from the List ...................................................................................................................... 89 5.5.4.4 Delete VM from Disk ..................................................................................................................................... 89 5.5.4.5 Rename VM ................................................................................................................................................... 90 5.5.4.6 Backup VM (Charon-SSP Baremetal only) ................................................................................................... 90
5.5.5 Managing Virtual Networks ............................................................................................................................................... 90 5.5.5.1 Managing Network Connections ................................................................................................................... 91 5.5.5.2 Creating a Virtual Network ............................................................................................................................ 91 5.5.5.3 Deleting a Virtual Network ............................................................................................................................. 93 5.5.5.4 Resizing a Virtual Network ............................................................................................................................ 94
5.5.6 Miscellaneous Management Tasks ................................................................................................................................. 95 5.5.6.1 Gathering Host Information ........................................................................................................................... 95 5.5.6.2 Adding an Existing Virtual Machine to the Charon-SSP Manager ................................................................ 95 5.5.6.3 Determining the Charon-SSP Manager Version ........................................................................................... 95 5.5.6.4 Modifying the Charon-SSP Agent Preferences ............................................................................................. 96 5.5.6.5 Setting Console Options ................................................................................................................................ 97 5.5.6.6 Retrieving a Charon-SSP Core Dump .......................................................................................................... 98
5.5.7 Baremetal-only Tools ......................................................................................................................................................... 99 5.5.7.1 Baremetal File Manager ................................................................................................................................ 99 5.5.7.2 Baremetal Storage Manager ....................................................................................................................... 100 5.5.7.3 Setting Time and Date for Charon-SSP Baremetal..................................................................................... 100 5.5.7.4 Baremetal SFTP Server .............................................................................................................................. 101
5.6 Using Charon-SSP from the Command-Line .................................................................................... 102
5.6.1 Program Name ................................................................................................................................................................. 102 5.6.2 Synopsis ............................................................................................................................................................................ 102 5.6.3 Description ........................................................................................................................................................................ 102 5.6.4 Exit Status ......................................................................................................................................................................... 104 5.6.5 Examples ........................................................................................................................................................................... 104

Document number: 55-16-005-001
© Stromasys 2018 Charon-SSP for Linux Version 2.0.1 – User’s Guide 5
5.7 Using the Charon-SSP Agent .............................................................................................................. 105
5.7.1 Starting the Charon-SSP Agent Service ....................................................................................................................... 105 5.7.2 Stopping the Charon-SSP Agent Service ..................................................................................................................... 105 5.7.3 TCP/IP Ports Used by the Charon-SSP Agent ............................................................................................................ 105
5.8 User Access to the Virtual SPARC System ....................................................................................... 106
5.8.1 Console Access ................................................................................................................................................................ 106 5.8.1.1 Physical Serial Console Access .................................................................................................................. 106 5.8.1.2 TCP/IP-based Serial Console Access via Charon-SSP Manager .............................................................. 107 5.8.1.3 TCP/IP-based Serial Console Access without Charon-SSP Manager ........................................................ 108 5.8.1.4 Console Access via the Emulated Graphics Device ................................................................................... 109 5.8.1.5 Serial Console Access on Windows ............................................................................................................ 110 5.8.1.6 Graphical Console Access on Windows ..................................................................................................... 111
5.8.2 Graphical Interface via X11 Server on Linux and Baremetal..................................................................................... 112 5.8.2.1 Enabling XDMCP......................................................................................................................................... 113
5.8.2.1.1 Enabling XDMCP on Solaris 2.5 to Solaris 9 ........................................................................................ 113 5.8.2.1.2 Enabling XDMCP on Solaris 10 ............................................................................................................ 114
5.8.2.2 Configuring and Starting the X11 Server in Charon-SSP Manager ............................................................ 114 5.8.2.3 X11 Server Configuration Parameters ........................................................................................................ 115
5.8.2.3.1 Use Cases for the X-Server Additional Options .................................................................................... 115 5.8.2.4 Stopping the X11 Server ............................................................................................................................. 117
5.8.3 Using the X-Server on Windows .................................................................................................................................... 117
6 Additional Charon-SSP Tools .....................................................................................................120
6.1 iSCSI Initiator ........................................................................................................................................ 120
6.1.1 Prerequisites on the Host System ................................................................................................................................. 120 6.1.2 Adding an iSCSI Target .................................................................................................................................................. 121 6.1.3 Removing an iSCSI Target ............................................................................................................................................. 123
6.2 NFS Server ............................................................................................................................................ 123 6.2.1 Prerequisites ..................................................................................................................................................................... 124 6.2.2 Adding an NFS Share ...................................................................................................................................................... 124 6.2.3 Removing an NFS Share ................................................................................................................................................ 125
6.3 VNC Server ............................................................................................................................................ 125
6.3.1 Prerequisites ..................................................................................................................................................................... 125 6.3.2 Enabling and Disabling the VNC Server ....................................................................................................................... 126 6.3.3 Connecting to the Charon-SSP Host via VNC ............................................................................................................. 126
6.4 Using a Jumpstart Server .................................................................................................................... 126
7 Data Transfer to/from the Charon-SSP Host .............................................................................128
7.1 Using NFS for Data Transfer ............................................................................................................... 128
7.1.1 Charon-SSP Host Configured as NFS Server ............................................................................................................. 129
7.2 Using SCP for Data Transfer—Conventional Product ..................................................................... 131
7.3 Using SFTP for Data Transfer ............................................................................................................. 132
8 SSH VPN Operation ......................................................................................................................133
8.1 Prerequisites ......................................................................................................................................... 133 8.1.1 Create and Upload the Public SSH Key ....................................................................................................................... 133 8.1.2 Adapt SSH Configuration on Charon-SSP Host System ........................................................................................... 134
8.2 Setting up the VPN Tunnel .................................................................................................................. 134

Document number: 55-16-005-001
© Stromasys 2018 Charon-SSP for Linux Version 2.0.1 – User’s Guide 6
8.2.1 Steps on the Remote Linux System .............................................................................................................................. 135 8.2.2 Steps on the Charon-SSP Host System ....................................................................................................................... 135 8.2.3 Steps on the Solaris Guest System ............................................................................................................................... 135
9 License Management....................................................................................................................136
9.1 Licensing Charon-SSP—General Aspects ........................................................................................ 136
9.2 Managing Licenses with Charon-SSP Manager................................................................................ 137 9.2.1 Viewing the License Details ............................................................................................................................................ 137 9.2.2 Gathering Customer to Vendor (C2V) Details ............................................................................................................. 137 9.2.3 Applying Vendor to Customer (V2C) License Updates .............................................................................................. 139 9.2.4 License Manager .............................................................................................................................................................. 140
9.3 Managing Licenses from the Command-Line ................................................................................... 140
9.3.1 Viewing the License Details ............................................................................................................................................ 141 9.3.2 Gathering Customer to Vendor (C2V) Details ............................................................................................................. 142 9.3.3 Applying Vendor to Customer (V2C) License Updates .............................................................................................. 142
9.4 Managing Licenses with Sentinel Admin Control Center ................................................................ 143
9.4.1 Viewing Licenses.............................................................................................................................................................. 143 9.4.2 Gathering Customer to Vendor (C2V) Details ............................................................................................................. 144 9.4.3 Applying Vendor to Customer (V2C) License Updates .............................................................................................. 144 9.4.4 Allowing Access to and from Network License Servers ............................................................................................. 145
9.4.4.1 Controlling Access to the License Server on the Client Side ...................................................................... 146 9.4.4.2 Controlling Access to Network Licenses on the Server Side ...................................................................... 147
9.4.5 Removing a Software License ....................................................................................................................................... 148
9.5 Troubleshooting License Key Application ........................................................................................ 148
10 Charon-SSP Software Upgrade ...................................................................................................149
10.1 Host Operating System Specifics for Upgrade ................................................................................. 149 10.1.1 Charon-SSP Installation Packages ............................................................................................................................ 149 10.1.2 Upgrade Commands on Supported Host Systems .................................................................................................. 150
10.2 Upgrading the Charon-SSP Software on Linux ................................................................................ 150
10.3 Upgrading the Charon-SSP Barebone Distribution ......................................................................... 151
10.4 Upgrading the Charon-SSP Software on Windows .......................................................................... 152
11 Charon-SSP Software Deinstallation .........................................................................................153
11.1 Removing the Sentinel HASP Software ............................................................................................. 153
11.2 Removing the Charon-SSP Packages on Linux ............................................................................... 153
11.3 Removing the Charon-SSP Manager on Windows ........................................................................... 154
11.4 Removing the Charon-SSP Director on Windows ............................................................................ 155

Document number: 55-16-005-001
© Stromasys 2018 Charon-SSP for Linux Version 2.0.1 – User’s Guide 7
Appendix
A Appendix – Configuration File Reference .................................................................................156
A.1 Syntax .................................................................................................................................................... 156 A.1.1 Section ............................................................................................................................................................................... 156 A.1.2 Properties .......................................................................................................................................................................... 156 A.1.3 Comments ......................................................................................................................................................................... 156 A.1.4 Blank Lines ........................................................................................................................................................................ 157
A.2 Reference .............................................................................................................................................. 157
A.2.1 [cpu] Section ..................................................................................................................................................................... 157 A.2.1.1 dit ................................................................................................................................................................ 157 A.2.1.2 dit_page_size .............................................................................................................................................. 157 A.2.1.3 fp_opt1, fp_opt2, fp_opt3 ............................................................................................................................ 157 A.2.1.4 number ........................................................................................................................................................ 158 A.2.1.5 idle ............................................................................................................................................................... 158 A.2.1.6 ht ................................................................................................................................................................. 158
A.2.2 [ethernet] Section ............................................................................................................................................................. 159 A.2.2.1 interface ...................................................................................................................................................... 159 A.2.2.2 mac ............................................................................................................................................................. 159 A.2.2.3 model .......................................................................................................................................................... 160
A.2.3 [ethernet_n] Section ......................................................................................................................................................... 160 A.2.4 [log] Section ...................................................................................................................................................................... 160
A.2.4.1 destination ................................................................................................................................................... 161 A.2.4.2 path ............................................................................................................................................................. 161 A.2.4.3 severity ........................................................................................................................................................ 161 A.2.4.4 rotation ........................................................................................................................................................ 162
A.2.5 [nvram] Section ................................................................................................................................................................. 162 A.2.5.1 disable_autoboot ......................................................................................................................................... 162 A.2.5.2 hostid ........................................................................................................................................................... 162 A.2.5.3 path ............................................................................................................................................................. 163
A.2.6 [ram] Section ..................................................................................................................................................................... 163 A.2.6.1 allocator ....................................................................................................................................................... 163 A.2.6.2 size .............................................................................................................................................................. 163
A.2.7 [scsi_n] Section ................................................................................................................................................................ 164 A.2.7.1 lun_X ........................................................................................................................................................... 164 A.2.7.2 type ............................................................................................................................................................. 165 A.2.7.3 pass_through .............................................................................................................................................. 165 A.2.7.4 removable ................................................................................................................................................... 166
A.2.8 [scsix_n] Section .............................................................................................................................................................. 166 A.2.9 [floppy] Section ................................................................................................................................................................. 166
A.2.9.1 type ............................................................................................................................................................. 167 A.2.9.2 path ............................................................................................................................................................. 167
A.2.10 [system] Section ............................................................................................................................................................ 167 A.2.10.1 cpu_affinity ................................................................................................................................................ 167 A.2.10.2 io_affinity ................................................................................................................................................... 167 A.2.10.3 io_cpus ...................................................................................................................................................... 168 A.2.10.4 machine ..................................................................................................................................................... 168
A.2.11 [ttya] Section .................................................................................................................................................................. 168 A.2.11.1 port ............................................................................................................................................................ 169 A.2.11.2 restrict_access .......................................................................................................................................... 169 A.2.11.3 start_console ............................................................................................................................................. 169

Document number: 55-16-005-001
© Stromasys 2018 Charon-SSP for Linux Version 2.0.1 – User’s Guide 8
A.2.11.4 type ........................................................................................................................................................... 169 A.2.11.5 log_path .................................................................................................................................................... 170 A.2.11.6 Examples .................................................................................................................................................. 170
A.2.12 [ttyb] Section .................................................................................................................................................................. 171 A.2.13 [ttyx] Section .................................................................................................................................................................. 171 A.2.14 [digi_ppt_n] Section ...................................................................................................................................................... 171
A.2.14.1 Path ........................................................................................................................................................... 171 A.2.15 [gpib_n] Section............................................................................................................................................................. 171
A.2.15.1 Path ........................................................................................................................................................... 171 A.2.16 [parallel] Section ............................................................................................................................................................ 172
A.2.16.1 Printer ........................................................................................................................................................ 172 A.2.17 [license] Section ............................................................................................................................................................ 172
A.2.17.1 regular_key_id........................................................................................................................................... 172 A.2.17.1 backup_key_id .......................................................................................................................................... 172
A.2.18 [graphics] Section ......................................................................................................................................................... 173 A.2.18.1 type ........................................................................................................................................................... 173 A.2.18.2 dual_display .............................................................................................................................................. 173 A.2.18.3 remote_display .......................................................................................................................................... 174 A.2.18.4 display1 and display2 ................................................................................................................................ 174 A.2.18.5 remote_port1 and remote_port2 ............................................................................................................... 174 A.2.18.6 console ...................................................................................................................................................... 174 A.2.18.7 mouse_port ............................................................................................................................................... 174 A.2.18.8 keyboard_port ........................................................................................................................................... 175 A.2.18.9 keyboard_layout ........................................................................................................................................ 175 A.2.18.10 resolution ................................................................................................................................................. 175 A.2.18.11 full_screen ............................................................................................................................................... 176 A.2.18.12 refresh_rate ............................................................................................................................................. 176
A.2.19 [audio] Section ............................................................................................................................................................... 176 A.2.19.1 enable ....................................................................................................................................................... 176 A.2.19.2 server ........................................................................................................................................................ 177
B Appendix – OpenBoot Console ..................................................................................................178
B.1 OpenBoot Console Overview .............................................................................................................. 178
B.2 OpenBoot Console Command Reference ......................................................................................... 178
B.2.1 banner ................................................................................................................................................................................ 178 B.2.2 boot .................................................................................................................................................................................... 179 B.2.3 devalias .............................................................................................................................................................................. 179 B.2.4 help ..................................................................................................................................................................................... 180 B.2.5 history................................................................................................................................................................................. 180 B.2.6 nvalias ................................................................................................................................................................................ 181 B.2.7 nvunalias ........................................................................................................................................................................... 181 B.2.8 printenv .............................................................................................................................................................................. 182 B.2.9 probe-scsi .......................................................................................................................................................................... 182 B.2.10 quit ................................................................................................................................................................................... 183 B.2.11 reset ................................................................................................................................................................................ 183 B.2.12 setenv ............................................................................................................................................................................. 184 B.2.13 show-devs ...................................................................................................................................................................... 185
C Appendix – Command-Line Utilities Reference ........................................................................186
C.1 Prerequisites ......................................................................................................................................... 186
C.2 Disabling the Charon-SSP Agent Service ......................................................................................... 186

Document number: 55-16-005-001
© Stromasys 2018 Charon-SSP for Linux Version 2.0.1 – User’s Guide 9
C.3 Configure the Shell Path ...................................................................................................................... 186
C.4 Reference .............................................................................................................................................. 186
C.4.1 hasp_srm_view ................................................................................................................................................................. 186 C.4.2 hasp_update ..................................................................................................................................................................... 188 C.4.3 mkdskcmd ......................................................................................................................................................................... 189 C.4.4 mtd ...................................................................................................................................................................................... 190 C.4.5 ncu ...................................................................................................................................................................................... 190

Document number: 55-16-005-001
© Stromasys 2018 Charon-SSP for Linux Version 2.0.1 – User’s Guide 10
Document Revisions Date Version Comments
14 March 2018 Initial version (v.001) Initial version based on product version 2.0.1

Document number: 55-16-005-001
© Stromasys 2018 Charon-SSP for Linux Version 2.0.1 – User’s Guide / About This Guide 11
1 About This Guide
This preface describes conventions and content of this user's guide. It describes the intended audience, how to obtain
copies of this guide, related documentation, and further support.
Please note: The sample outputs in this document may show earlier versions than the one documented in this
manual, but they are still representative of what a user will see.
1.1 Intended Audience
This user’s guide is intended for anyone who needs to install, configure, or manage the Stromasys Charon-SSP
processor/platform virtualization software. The content of this manual is targeted at general users (not just system
managers and administrators). However, a general working knowledge of the host platform (Linux) and its conventions is
expected.
This user’s guide covers the following Stromasys software packages, which make up the overall product:
The virtualization software itself:
Charon-SSP/4M for Linux
Charon-SSP/4U for Linux
Charon-SSP/4U+ for Linux
Graphical management capability for the product:
Charon-SSP Director for Linux
Charon-SSP Director for Windows
Charon-SSP Manager for Linux
Charon-SSP Manager for Windows
Charon-SSP Agent for Linux
Complete package containing the full software set including the underlying host operating system:
Charon-SSP Barebone distribution (including Charon-SSP/4M/4U/4U+)
Additional product variants
The Baremetal appliance package, which contains the full software set including the underlying host operating
system: The host operating system is not visible to the user of the system. This product variant is described detail in a
separate user’s guide (Charon-SSP Baremetal User’s Guide).
This guide covers the conventional Charon-SSP product (individual RPM packages or Barebone distribution).
However, some sections contain references to the Baremetal distribution (e.g., to indicate small differences in an
otherwise identical procedure). To differentiate between the two product types, they are called conventional
Charon-SSP product and Baremetal distribution respectively.

Document number: 55-16-005-001
© Stromasys 2018 Charon-SSP for Linux Version 2.0.1 – User’s Guide / About This Guide 12
1.2 Document Structure
The document contains the following main sections:
Host System Requirements: Hardware and Software requirements that the host system must meet for Charon-SSP to run properly.
Charon-SSP Software Installation: Installation of the individual software packages making up the Charon-SSP product; installation of the Barebone distribution that bundles all necessary software.
Configuring and Using the Charon-SSP Software: Introduction to the operation of Charon-SSP Director and Charon-SSP Manager; creating a virtual SPARC system and configuring the virtual hardware; running and accessing a Charon-SSP instance.
Additional Charon-SSP Tools: Configuring supporting tools such as iSCSI initiator, NFS server, and VNC server.
Data Transfer to/from the Charon-SSP Host: Introduction to different methods for data transfer to/from the Charon-SSP host that are intended to support migration situations.
License Management: Introduction to the Charon-SSP license management tools.
SSH VPN Operation: Configuring an encrypted tunnel to the Charon-SSP host across a public network.
Charon-SSP Software Upgrade and Charon-SSP Software Deinstallation
Appendices: Configuration File Reference, OpenBoot Console Reference, and Command-Line Utilities Reference
1.3 Obtaining Documentation
The latest released version of this manual and other related documentation are available on the Stromasys support
website at https://stromasys.atlassian.net/wiki/display/KBP/Charon-SSP.
1.4 Obtaining Technical Assistance
Several support channels are available to cover the Charon-SSP SPARC virtualization product.
If you have a support contract with Stromasys, please visit http://www.stromasys.com/support/ for up-to-date support
telephone numbers and business hours. Alternatively, the support center is available via email at
If you purchased the Charon-SSP product through a Value Added Reseller (VAR), please contact them directly.
For further information on purchases and the product best suited to your requirements, please contact your regional sales
team:
Region Email address Phone Address
Australasia-Pacific [email protected]
+852 3520 1030 Room 1102, 11/F, Lee Garden One,
33 Hysan Avenue, Causeway Bay,
Hong Kong, China
Americas [email protected]
+1 919 239 8450 2840 Plaza Place, Ste 450
Raleigh, NC 27612
U.S.A.
Europe, Middle-
East and Africa [email protected]
+41 22 794 1070 Avenue Louis-Casai 84
5th Floor
1216 Cointrin
Switzerland

Document number: 55-16-005-001
© Stromasys 2018 Charon-SSP for Linux Version 2.0.1 – User’s Guide / About This Guide 13
1.5 Conventions
Throughout the document, the following conventions apply:
Notation Description
$ The dollar sign indicates a reference to the environment variables for UNIX / Linux variants.
# The number sign represents the super-user prompt for UNIX / Linux.
User
input
Bold type in interactive examples indicates typed user input.
<path> Bold monospace type enclosed by angle brackets indicates command parameters and parameter
values.
Output Monospace type in interactive examples indicates command response output.
[ ] In syntax definitions, brackets indicate optional items.
... In syntax definitions, a horizontal ellipsis indicates that the preceding item can be repeated one or
more times.
dsk0 Italic monospace type, in interactive examples, indicates typed, context dependent user input.
This symbol represents the Enter key without typed user input. Used, for example, to tell the user to
select the default value by pressing enter.
{version} Indicates version of Charon-SSP release in the format major.minor.revision for example: 1.0.36
The following document specific definitions apply:
Term Description
Host The hardware and the Linux 64-bit-system on which Charon-SSP/4M/4U runs.
Guest The virtual SPARC created by Charon-SSP/4M/4U on the host.
Windows All supported versions of Microsoft Windows.
The core SPARC virtual machines are available in the following versions:
Charon-SSP/4M: 32-bit SPARC V8 Sun-4m architecture
Charon-SSP/4U(+): 64-bit SPARC V9 Sun-4u architecture
The products listed above support almost identical configuration mechanisms, system console, and interfaces. Therefore,
options, interfaces, etc. that apply to both products will be collectively called Charon-SSP in this document. Platform-
specific features will be identified and the relevant platform will be specified.

Document number: 55-16-005-001
© Stromasys 2018 Charon-SSP for Linux Version 2.0.1 – User’s Guide / Introduction 14
2 Introduction
In 1987, Sun Microsystems released the SPARC V7 processor. A 32-bit RISC processor featuring the unique Berkeley
RISC designed register-window. Soon after this, in 1990, the SPARC V8 followed – a revision of the original SPARC V7,
with the most notable inclusion of hardware divide and multiply instructions. The SPARC V8 processors formed the basis
for a number of Sun Microsystems servers and workstations such as the SPARCstation 5, 10 and 20.
In 1993, the SPARC V8 was followed by the 64-bit SPARC V9 processor. This too became the basis for a number of Sun
Microsystem servers and workstations, such as the Enterprise 250 and 450.
Due to hardware obsolescence and lack of spare or refurbished parts, software and systems developed for these older
SPARC-based workstations and servers have become harder to maintain. To fill the continuous need for certain, end-of-
life SPARC-based systems, Stromasys S.A. developed the Charon-SSP line of virtual machine products. The following
products are software-based, virtual machine replacements for the specified native-hardware SPARC systems:
Charon-SSP/4M supports the following virtual systems:
Sun-4m family (for example Sun SPARCstation 20):
Originally, a multiprocessor Sun-4 variant, based on the MBus processor module bus introduced in the
SPARCServer 600MP series. The Sun-4m architecture later also encompassed non-MBus uniprocessor systems
such as the SPARCstation 5, utilizing SPARC V8-architecture processors. Supported by SunOS 4.1.2 onwards
and Solaris 2.1 to Solaris 9. SPARCServer 600MP support was dropped after Solaris 2.5.1.
Charon-SSP/4U(+) supports the following virtual systems:
Sun-4u family (for example Sun Enterprise 450):
(U for UltraSPARC) – this variant introduced the 64-bit SPARC V9 processor architecture and UPA processor
interconnect first used in the Sun Ultra series. Supported by 32-bit versions of Solaris starting from version 2.5.1.
The first 64-bit Solaris release for Sun-4u was Solaris 7. UltraSPARC I support was dropped after Solaris 9.
Solaris 10 supports Sun-4u implementations from UltraSPARC II to UltraSPARC IV.
Figure 1: Seamless migration from SPARC hardware to virtual SPARC on x86-64
The Charon-SSP virtual machines allow users of Sun and Oracle SPARC-based computers to replace their native
hardware in a way that requires little or no change to the original system configuration. This means you can continue to
run your applications and data without the need to switch or port to another platform. The Charon-SSP virtual machines
run on commodity, Intel 64-bit based systems ensuring the continued protection of your investment.

Document number: 55-16-005-001
© Stromasys 2018 Charon-SSP for Linux Version 2.0.1 – User’s Guide / Introduction 15
Charon-SSP/4U+ supports the same virtual SPARC platforms as Charon-SSP/4U. However, Charon-SSP/4U+ takes
advantage of Intel’s VT-x/EPT hardware assisted virtualization technology in modern Intel CPUs to offer end users better
virtual CPU performance. Charon-SSP/4U+ requires Intel CPUs with VT-x/EPT capability and must be installed on a
dedicated Intel-based host. Running this product in a VM is not supported.
The Charon-SSP/4M virtual machines support the following guest operating system releases:
SunOS 4.1.3 - 4.1.4
Solaris 2.3 to Solaris 9
The Charon-SSP/4U(+) virtual machines support the following guest operating system releases:
Solaris 2.5.1 to Solaris 10
2.1 Supported Virtual Hardware
The different families of Charon-SSP virtual machines support a number of different hardware devices. The table below
describes the device features and maximum number supported by the different Charon-SSP virtual machine families.
Charon-SSP Supported Virtual Hardware
Charon-SSP/4M Charon-SSP/4U(+) *
SPARC V8 (32-bit) Y
SPARC V9 (64-bit) Y**
Max. number of CPUs 4 24
Max. RAM 64MB to 512MB 1GB to 128GB
Ethernet Controllers 2 19
SCSI Controllers 1 2
SCSI Devices 7 30
Serial Ports
2 built-in ports
and
8 ports as SBus card (STC)
emulation
2 built-in ports, plus
14 ports on-board mode emulation, or
32 ports as Digi AccelePort 920 emulation, or
32 ports (4 x Digi AccelePort 920), or
8 ports (4 x Digi AccelePort C/X)
in PCI pass-through mode***
Parallel Ports 1
Graphics Controller 1 (CGTHREE or CGSIX) 1 (CGSIX or RAGE XL)
Audio controllers 1 1
GPIB controller NI-488.2 GPIB device in PCI pass-through
mode***
* Charon-SSP/4U+ has same virtual hardware specification as Charon-SSP/4U.
** SPARC V9 is backward compatible. Hence, Charon-SSP/4U can also support V8 32-bit systems.
*** Only supported on Barebone and Baremetal distributions.

Document number: 55-16-005-001
© Stromasys 2018 Charon-SSP for Linux Version 2.0.1 – User’s Guide / Host System Requirements 16
3 Host System Requirements
To ensure the optimal performance for the emulated SPARC-based systems, it is important to follow some guidelines
regarding the setup of the Charon-SSP host system as described in the following sections.
3.1 Hardware Requirements
To run the Charon-SSP virtual machine products, the host system must have one or more Intel 64-bit processors
providing more than two cores in total.
Basic guidelines for selecting the host system hardware:
Intel Server based on Haswell v3 processors or Desktop Core I7 (CPU frequency at least 3.0GHz).
Minimum number of host system CPU cores: at least one CPU core for the host operating system plus for
each Charon-SSP instance
o one CPU core for each emulated CPU of the instance, and o at least one additional CPU core for I/O.
Minimum memory requirements: at least 2GB of RAM for the host operating system plus for each Charon-SSP
instance
o the configured memory of the instance, and o 2GB of RAM to allow for DIT optimization, emulator requirements, run time buffers, SMP and graphics
emulation.
Charon-SSP/4U+ requires an Intel CPU with Intel’s VT-x/EPT feature.
Disable hyperthreading for Charon-SSP versions before 1.4.1. Starting with this version, configure the
hyperthreading option in the Charon-SSP Manager if the Charon-SSP host must use hyperthreading.
At least one available USB port (if USB license key is used).
Single dedicated network adapter for each configured virtual network adapter in Charon-SSP unless the virtual
network functionality of Charon-SSP is used. In this case, TAP interfaces attached to a virtual bridge on the host
system can be used as the basis for Charon-SSP virtual network adapters.
Free PCI slots to install serial line cards if the Digi PCI pass-through feature is to be used.
Free PCI or PCIe slots to install GPIB cards if the GPIB PCI pass-through feature is to be used.
Please note: The sizing guidelines above—in particular regarding number of host CPU cores and host memory—are
general guidelines. Every use case has to be reviewed and the actual host sizing has to be adapted as necessary.
For example, the number of I/O CPUs may have to be increased if the guest applications produce a high I/O load.
The Charon-SSP software can run on dedicated hardware or in a virtual machine. Supported hypervisors:
VMware ESXi 5.x and 6.x
Xen
Microsoft Hyper-V
Linux KVM
If a VM is used:
Configure it to support a Linux x86_64 environment and follow the hardware requirements listed above to
configure the virtual hardware with sufficient capacity for all instances of Charon-SSP that are to run on it.
Network adapters must support promiscuous mode. If this is not possible, the MAC address of the emulated
adapter must be hard-coded to the MAC address of the physical adapter as described in the Ethernet
configuration section.
Guest additions (e.g. VMware Tools) that enhance the usability of the guest system (e.g., video capabilities,
mouse integration, shared folders) may be installed (conventional product only), but they are not prerequisites.
Please note: Charon-SSP/4U+ utilizes special hardware functionality to deliver improved performance. Due to the
hardware requirements it can only be used on real hardware with Intel’s VT-x/EPT hardware assisted virtualization
technology. Running Charon-SSP/4U+ in a VM is not supported.

Document number: 55-16-005-001
© Stromasys 2018 Charon-SSP for Linux Version 2.0.1 – User’s Guide / Host System Requirements 17
3.2 Software Requirements
This section provides an overview of the software prerequisites for running Charon-SSP.
3.2.1 Operating System
The Charon-SSP virtual machine products run on Linux systems. Stromasys supports the following Linux distributions and
releases as host environments for Charon-SSP:
Oracle Linux 7 (64 bit)
Red Hat Enterprise Linux 6.5 and higher (64 bit)
CentOS 7 (64 bit)
Stromasys strongly recommends using a Linux distribution and version for which long term support is available.
The Linux version selected should receive regular updates, in particular security updates. If for any reason this
requirement cannot be met, the host system must be placed in a secure network.
3.2.2 Other Software Requirements
Some of the Charon-SSP components have particular software prerequisites. Such prerequisites are specified in the
installation chapter of the respective components, or together with the configuration task for which they are required.

Document number: 55-16-005-001
© Stromasys 2018 Charon-SSP for Linux Version 2.0.1 – User’s Guide / Charon-SSP Software Installation 18
4 Charon-SSP Software Installation
This chapter describes the installation of the components of the Charon-SSP product and recommended or necessary
post-installation tasks.
4.1 Packages and Installation Overview
The Charon-SSP for Linux suite of products provides much more than just a SPARC virtual machine. The overall product
consists of the following parts:
Kit for aksusbd – Sentinel runtime environment required for licensing the software
Charon-SSP/4U(+) – 64-bit SPARC V9 Sun-4u architecture
Charon-SSP/4M – 32-bit SPARC V8 Sun-4m architecture
Charon-SSP Manager – GUI-based virtual machine manager (local and remote)
Charon-SSP Director – GUI-based manager for distributed host systems running multiple virtual machines
Charon-SSP Agent – Bridge for communication between the Charon-SSP virtual machine and the Charon-SSP
Manager; enables the Charon-SSP Director to discover Charon-SSP hosts automatically.
All these individual packages are also available as combined packages:
Charon-SSP Barebone distribution – Combined installation kit as an ISO file. It includes all Charon-SSP packages, the underlying host operating system, and all additional packages necessary to deploy Charon-SSP in VMs or on real hardware.
Charon-SSP Baremetal distribution – Appliance-type kit as an ISO file. It also includes everything needed to run Charon-SSP. Additionally the underlying operating system does not have to be managed by the user. The system and the Charon-SSP application are managed using a comprehensive GUI. This distribution is described in a separate user’s guide.
Charon-SSP/4U+ is only available as part of the Barebone and Baremetal distributions. They contain Charon-
SSP/4M, Charon-SSP/4U and Charon-SSP/4U+.
Please note: Charon-SSP needs a valid license (license dongle or software license) to run a SPARC virtual
machine. The tools to manage licenses are part of the Charon-SSP packages, but the license needs to be
obtained in a separate step. License management is described in the License Management chapter.
4.1.1 Host Operating System Specifics for Installation
The supported Linux host operating systems use the same package management system (RPM). Hence, the package
names and the installation steps are mostly identical if the individual RPMs are used.
The Charon-SSP management GUI can also be run on Microsoft Windows and is delivered in separate Windows
packages in addition to the Linux packages.
4.1.1.1 Installation Packages for Supported Host Operating Systems
The installation packages described in this section consist of RPM packages for Linux, or Windows installer packages.
You can download the required package(s) from Stromasys or receive them on a read-only medium, such as a CD-ROM.
If you do not have the software package(s) yet, please contact either Stromasys or your Value Added Reseller (VAR) for
further assistance.

Document number: 55-16-005-001
© Stromasys 2018 Charon-SSP for Linux Version 2.0.1 – User’s Guide / Charon-SSP Software Installation 19
The following table shows the names of the relevant installation packages:
Product
Charon-SSP software package names
Linux Windows
Sentinel runtime environment
aksusbd-<version>.rpm Not supported
Charon-SSP/4M/4U/4U+
charon-ssp-4m-{version}-x86_64.rpm
charon-ssp-4u-{version}-x86_64.rpm
charon-ssp-4u+-{version}-x86_64.rpm (to update Barebone systems)
Not supported
Charon-SSP Manager charon-manager-ssp-{version}.rpm charon-manager-
ssp-{version}.zip
Charon-SSP Director charon-director-ssp-{version}.rpm charon-director-
ssp-{version}.zip
Charon-SSP Agent charon-agent-ssp-{version}-x86_64.rpm Not supported
The installation of these packages is shown in the sections below. The installation of the Charon-SSP Barebone
distribution is described in the chapter Installing the Charon-SSP Barebone Distribution. The installation of the Charon-
SSP Baremetal distribution is described in a separate user’s guide.
Please note: The versions of the Charon-SSP packages installed on one system must match. Therefore, you all
installed packages must have the same version. Exception: several versions of the Charon-SSP Manager can
coexist on one system to be used, for example, by the Charon-SSP Director when managing remote host
systems running different versions of Charon-SSP. However, a Charon-SSP Manager can only manage Charon-
SSP installations running the same version as the Charon-SSP Manager.
4.1.1.2 Installation Commands on Supported Host Operating Systems
The following table provides an overview of the installation commands for the supported host operating systems. For
details, please refer to the relevant man-pages on Linux, or the help system on Windows. The table only lists command-
line installation options for Linux. There are also graphical installation tools. To describe all of them is outside the scope of
this document.
Operating system specific installation commands
Linux
Windows RPM package installation (Red Hat, CentOS, Oracle Linux)
Package manager (uses repositories, takes care of dependencies, etc.)
# yum install <package-name>
(Older versions may need localinstall instead of install for local packages; newer versions use local installation if package name is a file name.) Windows
software installer
Command to install individual local packages
# rpm -i </path/to/package>
All installation steps on Linux must be performed from a privileged account as denoted by the ‘#’ prompt. On Windows, the installation must be performed with Administrator rights.

Document number: 55-16-005-001
© Stromasys 2018 Charon-SSP for Linux Version 2.0.1 – User’s Guide / Charon-SSP Software Installation 20
4.2 Installing the Charon-SSP Components
This section describes the installation of the different Charon-SSP packages that make up the overall Charon-SSP
product.
4.2.1 Installing the Sentinel HASP Software for Linux
The software component Sentinel HASP runtime is needed for licensing the Charon-SSP Software on Linux. Without
this package, it is not possible to run the Charon-SSP virtual machine software. The installation package is provided as a
separate RPM package.
4.2.1.1 Sentinel HASP Prerequisites
The Sentinel HASP software is provided as a 32-bit package. As an installation prerequisite, it needs the 32-bit version of
the glibc library installed on the Linux host system.
If this package is missing, you will receive an error message similar to the following:
The 32-bit support is missing. Please install the x86 compatibility packages
required by your distribution and retry the installation.
In this case, you need to install the 32-bit glibc library before you can install the Sentinel HASP software.
The following table lists the installation steps for the glibc library package:
Installing 32-bit support for the sentinel HASP software on Linux
Step Description Command
1
Install 32-bit glibc-library (if not yet installed, dependencies are installed automatically).
Please note that Red Hat Enterprise Linux must be registered to have access to the repositories.
# yum install glibc.i686
Should the host system not have access to the Internet, please follow the instructions for installing the library without
Internet access as described in the document How to install the glibc library without Internet access.
4.2.1.2 Sentinel HASP Installation Steps
The following table lists the installation steps for the Sentinel HASP software:
Installing the Sentinel HASP software for Linux
Step Description Command
1 Install the Sentinel HASP Runtime
# yum install aksusbd-{version}.i586.rpm
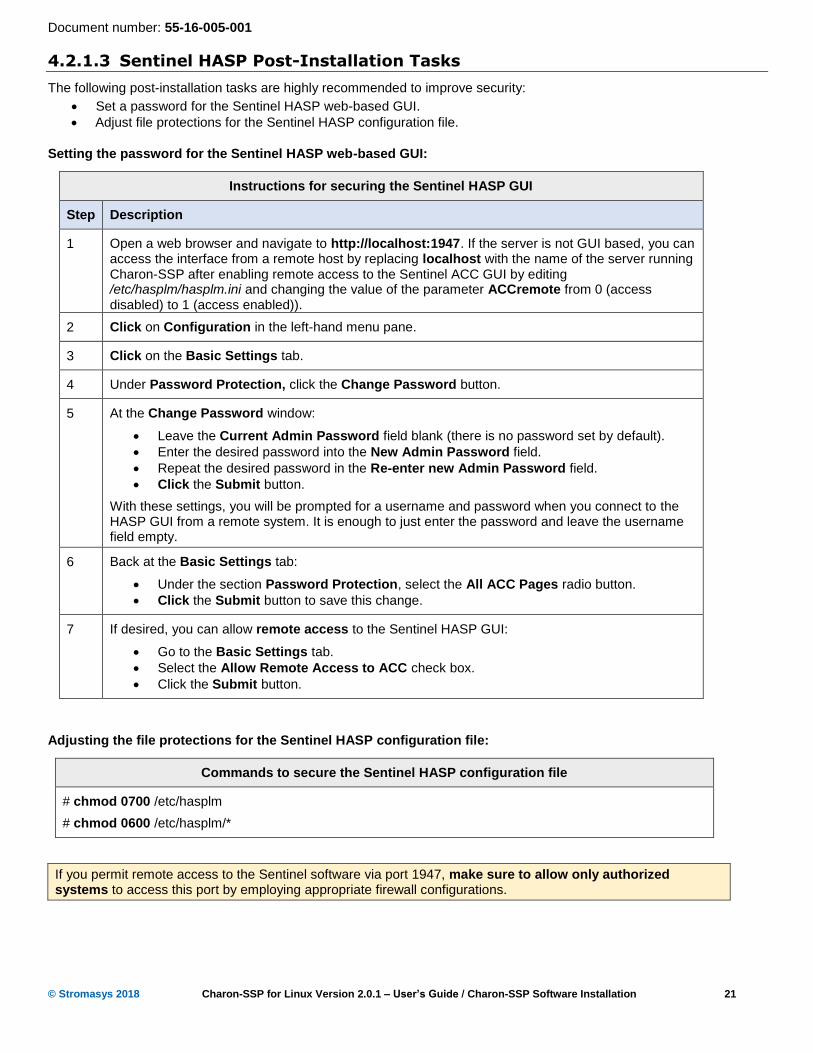
Document number: 55-16-005-001
© Stromasys 2018 Charon-SSP for Linux Version 2.0.1 – User’s Guide / Charon-SSP Software Installation 21
4.2.1.3 Sentinel HASP Post-Installation Tasks
The following post-installation tasks are highly recommended to improve security:
Set a password for the Sentinel HASP web-based GUI.
Adjust file protections for the Sentinel HASP configuration file.
Setting the password for the Sentinel HASP web-based GUI:
Instructions for securing the Sentinel HASP GUI
Step Description
1 Open a web browser and navigate to http://localhost:1947. If the server is not GUI based, you can access the interface from a remote host by replacing localhost with the name of the server running Charon-SSP after enabling remote access to the Sentinel ACC GUI by editing /etc/hasplm/hasplm.ini and changing the value of the parameter ACCremote from 0 (access disabled) to 1 (access enabled)).
2 Click on Configuration in the left-hand menu pane.
3 Click on the Basic Settings tab.
4 Under Password Protection, click the Change Password button.
5 At the Change Password window:
Leave the Current Admin Password field blank (there is no password set by default).
Enter the desired password into the New Admin Password field.
Repeat the desired password in the Re-enter new Admin Password field.
Click the Submit button.
With these settings, you will be prompted for a username and password when you connect to the HASP GUI from a remote system. It is enough to just enter the password and leave the username field empty.
6 Back at the Basic Settings tab:
Under the section Password Protection, select the All ACC Pages radio button.
Click the Submit button to save this change.
7 If desired, you can allow remote access to the Sentinel HASP GUI:
Go to the Basic Settings tab.
Select the Allow Remote Access to ACC check box.
Click the Submit button.
Adjusting the file protections for the Sentinel HASP configuration file:
Commands to secure the Sentinel HASP configuration file
# chmod 0700 /etc/hasplm
# chmod 0600 /etc/hasplm/*
If you permit remote access to the Sentinel software via port 1947, make sure to allow only authorized systems to access this port by employing appropriate firewall configurations.

Document number: 55-16-005-001
© Stromasys 2018 Charon-SSP for Linux Version 2.0.1 – User’s Guide / Charon-SSP Software Installation 22
4.2.2 Initial License Installation
After the installation of the Sentinel Runtime Software, you can install the Charon-SSP license on the system.
If you purchased a hardware license, you can simply plug the dongle into a free USB port on the system.
If you purchased a software license, you need to create a fingerprint file in C2V (customer-to-vendor) format containing the system characteristics. Use this file to request a license for your system from Stromasys.
If you have an existing license that needs to be updated, you need to create a customer-to-vendor (C2V) file and use this file to request a license update from Stromasys.
If your license is a network license served by a license server, make sure your client system has access to the license server.
Please refer to the License Management chapter for detailed information about managing licenses.
4.2.3 Installing the Charon-SSP Software for Linux
The Charon-SSP packages provide the core emulator functions to run virtual SPARC systems. This chapter shows their
installation.
4.2.3.1 Charon-SSP Prerequisites
Before installing Charon-SSP for Linux virtual machine software, you need to install the Sentinel HASP software. With this
software, Charon-SSP is able to locate the Sentinel HASP key and provide the license to the product appropriately. The
installation of the Sentinel HASP Software is described in section Installing the Sentinel HASP Software for Linux.
4.2.3.2 Charon-SSP Software Installation Steps
The following table shows the installation steps for Charon-SSP/4M and Charon-SSP/4U:
Installing Charon-SSP/4M and Charon-SSP/4U
Step Description Command
1
Install the Charon-SSP/4M package
(32-bit SPARC V8 virtual machine based on the Sun-4m architecture)
# yum install charon-ssp-4m-{version}-x86_64.rpm
2
Install the Charon-SSP/4U(+) package
(64-bit SPARC V9 virtual machine based on the Sun-4u architecture)
# yum install charon-ssp-4u-{version}-x86_64.rpm
or
# yum install charon-ssp-4u+-{version}-x86_64.rpm
(The Charon-SSP/4U+ package is only supported for updates to the Barebone distribution.)
After the installation of Charon-SSP/4M and Charon-SSP/4U, both packages together require approximately 7 MB of disk
space. If Charon-SSP/4M and Charon-SSP/4U+ are installed, 12 MB of disk space are required.
4.2.3.3 Charon-SSP Post-Installation Tasks
The following post-installation tasks are recommended to improve the usability of the software:
Add the Charon-SSP for Linux Software to the PATH variable of the shell.
Install bridge-utils package if you plan to use the virtual network feature.

Document number: 55-16-005-001
© Stromasys 2018 Charon-SSP for Linux Version 2.0.1 – User’s Guide / Charon-SSP Software Installation 23
4.2.3.3.1 Setting the PATH variable
The following table shows the steps to append the Charon-SSP paths to the PATH variable of the shell:
Steps to add Charon-SSP directories to PATH variable
Shell Step Description
C Shell
1 Open the file .login with a text editor.
2 Add the line
setenv PATH $PATH:/opt/charon-ssp/ssp-4m:/opt/charon-ssp/ssp-4u
to the end of the file.
Bourne Shell (e.g. bash or sh)
1 Open the appropriate file (.profile, .bash_profile, or .bashrc) with a text editor.
2 Add the lines PATH=$PATH:/opt/charon-ssp/ssp-4m:/opt/charon-ssp/ssp-4u export PATH
to the end of the file.
4.2.3.3.2 Installing the bridge-utils Package
If you plan to use the virtual network feature of Charon-SSP, you need to install the bridge-utils package on Linux if it is
not already installed.
The following table lists the installation steps for the bridge-utils package:
Installing bridge-utils
Step Description Command
1 Install bridge-utils (if not already installed; dependencies are installed automatically)
# yum install bridge-utils
4.2.4 Installing the Charon-SSP Manager for Linux
The Charon-SSP Manager provides a graphical management interface for local and remote virtual SPARC systems.
The following table shows the steps to install the Charon-SSP Manager on Linux:
Installing Charon-SSP Manager for Linux
Step Description Command
1 Install the Charon-SSP Manager # yum install charon-manager-ssp-{version}.rpm
After the installation, the Charon-SSP Manager will use approximately 4 MB of disk space. After the installation of Xephyr,
it will use approximately 6 MB of disk space.
Starting with Charon-SSP version 2, it is supported to have several versions of the Charon-SSP manager on a system to manage remote systems with versions different from the local system. If you want to retain an old version of the Charon-SSP manager, copy the content of the directory /opt/charon-manager to another directory, e.g., /opt/charon-manager-<version> before installing a different version. Later, you can use this version to manage remote systems with matching versions.

Document number: 55-16-005-001
© Stromasys 2018 Charon-SSP for Linux Version 2.0.1 – User’s Guide / Charon-SSP Software Installation 24
The following example shows the installation of the Charon-SSP Manager (the output may vary slightly depending on
Linux distribution and version):
[root@localhost]# yum install charon-manager-ssp*.rpm
[lines removed]
Last metadata expiration check: 0:05:08 ago on Thu Aug 24 14:35:22 2017.
Dependencies resolved.
================================================================================
Package Arch Version Repository Size
================================================================================
Installing:
charon-manager-ssp x86_64 1.5.23-1 @commandline 939 k
Transaction Summary
================================================================================
Install 1 Package
Total size: 939 k
Installed size: 3.2 M
Is this ok [y/N]: y
Downloading Packages:
Running transaction check
Transaction check succeeded.
Running transaction test
Transaction test succeeded.
Running transaction
Installing : charon-manager-ssp-1.5.23-1.x86_64 1/1
Verifying : charon-manager-ssp-1.5.23-1.x86_64 1/1
Installed:
charon-manager-ssp.x86_64 1.5.23-1
Complete!
4.2.4.1 Charon-SSP Manager Post-Installation Tasks on Linux
The following post-installation tasks are highly recommended to improve usability and security of the product:
Installing the Xephyr X-Server
Creating a Charon-SSP Manager Menu Item
After all components have been installed, change the password used when the Charon-SSP Manager connects to the Charon-SSP Agent. See Changing the Charon-SSP Manager Password for more information.
4.2.4.1.1 Installing the Xephyr X-Server
To use an X-Server on Linux in conjunction with the Charon-SSP Manager (described in Graphical Interface via X11
Server for Linux), it is necessary to install the Xephyr X-server.
Use the following commands to install the software on Linux:
Installing the X11 Server on Linux
Linux System Installation commands
Red Hat, CentOS, Oracle Linux # yum install xorg-x11-server-Xephyr
4.2.4.1.2 Creating a Desktop Menu Item for Charon-SSP Manager
This step creates a desktop menu item for Charon-SSP Manager.
Please note: Different distributions and different desktop environments have different ways to add desktop
launchers and menu items. This section describes some commonly used approaches, but there may be
differences in how this is handled in your desktop environment.

Document number: 55-16-005-001
© Stromasys 2018 Charon-SSP for Linux Version 2.0.1 – User’s Guide / Charon-SSP Software Installation 25
There are two steps to be performed:
1. Create an application shortcut (launcher). 2. Add the launcher to the desktop menu.
Create an application shortcut:
Many desktop environments allow a user to create a new desktop shortcut by right-clicking on the desktop. However,
newer Linux distributions, especially the ones using GNOME 3 as the basis for their desktop environments, no longer
have this option. They also do not always have a menu visible on the desktop by default.
On such systems, you can create the application shortcut manually as described below, or use one of the optional menu
administration packages, such as alacarte, which provides a GUI to create such shortcuts.
Creating an application shortcut using alacarte:
Start alacarte from the command-line and select New Item. This opens the following window where you can enter the
information for the Charon-SSP Manager as shown below.
The data needed (path of executable and icon name) is listed in the manual example below. Clicking on OK creates a
Charon-SSP Manager item in the category Other in this example. You can select any other category to create your
shortcut.
Figure 2: Using alacarte to add menu items

Document number: 55-16-005-001
© Stromasys 2018 Charon-SSP for Linux Version 2.0.1 – User’s Guide / Charon-SSP Software Installation 26
Creating an application shortcut manually:
Creating an application shortcut for the Charon-SSP Manager manually
Step Description
1 Using sudo or a privileged account, create the file /usr/local/share/applications/charon-ssp-
manager.desktop.
2 Add the following text to the file created in step 1 and save it.
[Desktop Entry] Version=1.4.1 Name=Charon-SSP Manager Exec=/opt/charon-manager/ssp-manager/ssp-manager Icon=/opt/charon-manager/ssp-manager/resource/charon.png Terminal=false Type=Application StartupNotify=true Categories=System;
3 Set the file protections and ownership appropriately:
# chmod 0644 /usr/local/share/applications/charon-ssp-manager.desktop
# chown root:root /usr/local/share/applications/charon-ssp-manager.desktop
Add the application shortcut to the desktop menu:
If your desktop environment provides a desktop menu, you will find the Charon-SSP Manager entry in the category you
configured. An example is shown below:
Figure 3: Sample desktop menu item

Document number: 55-16-005-001
© Stromasys 2018 Charon-SSP for Linux Version 2.0.1 – User’s Guide / Charon-SSP Software Installation 27
On Systems that do not provide such a menu on the desktop, there are other ways to access the applications. For
example, on plain GNOME 3 systems click on the link Activities in the upper left corner, search for the Charon-SSP
Manager, and add it to the favorites by right-clicking on it.
4.2.5 Installing the Charon-SSP Manager for Microsoft Windows
The following sections cover the procedures for installing the Charon-SSP Manager for Windows software and the
associated post-installation tasks. Please note: the installation process may also install a required version of the .NET
software. This happens automatically, if needed, and is not described in this section.
Supported Windows versions:
Microsoft Windows 10
Microsoft Windows 8
Microsoft Windows 7
Microsoft Windows Vista
Windows Server 2008
The Charon-SSP Manager for Windows software is shipped as a zipped archive package. To complete the installation,
use the following instructions.
Installing Charon-SSP Manager for Microsoft Windows
Step Description
1 Right-click the zip archive charon-manager-ssp-{version}.zip and select Extract All...
2
A window titled Extract Compressed (Zipped) Folders opens. In this window:
Click the Show extracted files when complete checkbox.
Click the Extract button.
3 A new Windows Explorer window opens showing the extracted packages.
4 Double-click the setup.exe executable to begin the installation.
5 If you are presented with an Open File - Security Warning window, click the Run button.
6
You should now see the Charon-SSP Manager Setup Wizard. To proceed with the installation click the Next button.
If the Windows Installer reports that Charon-SSP Manager for Windows is already installed, you need
to deinstall the currently installed software before you can install a different version.
7
To accept the default installation options, simply click on Next without modifying any options.
Alternatively the following installation options can be adjusted:
Click on Browse to select an alternative installation target.
Click the appropriate radio button, Everyone or Just for Me, to specify system-wide or private installation respectively (the system-wide installation will prompt for the administrator password).
To determine the approximate disk usage after the installation, click the Disk Cost button.
Once all options have been set, click on Next.
8 Proceed with the installation by clicking on Next.
9 Once the installation has completed, click on Close to exit the SSP-Manager Setup Wizard.
10
The installation process creates:
A Charon Manager icon on the desktop
A Charon Manager entry in the Start menu
Starting with Charon-SSP version 2, it is supported to have several versions of the Charon-SSP Manager on a system to manage remote systems with versions different from the local system. The Charon-SSP Manager installation preserves older versions. Later, you can use these versions to manage remote systems with matching versions.

Document number: 55-16-005-001
© Stromasys 2018 Charon-SSP for Linux Version 2.0.1 – User’s Guide / Charon-SSP Software Installation 28
4.2.5.1 Charon-SSP Manager Post-Installation Tasks on Microsoft Windows
Stromasys recommends that you check Windows Update for any critical Microsoft .NET Framework updates, and to
install them if any are available.
If the default password has not been changed yet, it is recommended to change the password used when the Charon-
SSP Manager connects to the Charon-SSP Agent. See Changing the Charon-SSP Manager Password for more
information.
4.2.6 Installing the Charon-SSP Director for Linux
The Charon-SSP Director provides a GUI-based management for a number of distributed host systems each running one
or more Charon-SSP virtual systems. This chapter shows the installation of the Charon-SSP Director.
4.2.6.1 Charon-SSP Director Prerequisites
For proper operation, the Charon-SSP Director requires the Charon-SSP Manager to be installed on the same system.
4.2.6.2 Charon-SSP Director Software Installation Steps
The following table shows the steps to install the Charon-SSP Director on Linux:
Installation steps for Charon-SSP Director for Linux
Step Description Command
1 Install the Charon-SSP Director # yum install charon-director-ssp-{version}.rpm
After the installation, Charon-SSP Director requires approximately 300 KB of disk space.
4.2.6.3 Charon-SSP Director Post-Installation Tasks on Linux
The following post-installation task is not necessary, but recommended to improve usability of the product:
Create a Charon-SSP Director Menu Item
4.2.6.3.1 Creating a Desktop Menu Item for Charon-SSP Director
This task creates a desktop menu item for Charon-SSP Director.
The steps required for creating a desktop icon are the same as described for the Charon-SSP Manager (section Creating
a Desktop Menu Item for Charon-SSP Manager).
Differences with respect to the required parameters:
The path of the executable is /opt/charon-director/ssp-director/ssp-director.
The path of the icon is /opt/charon-director/ssp-director/resource/director.png.
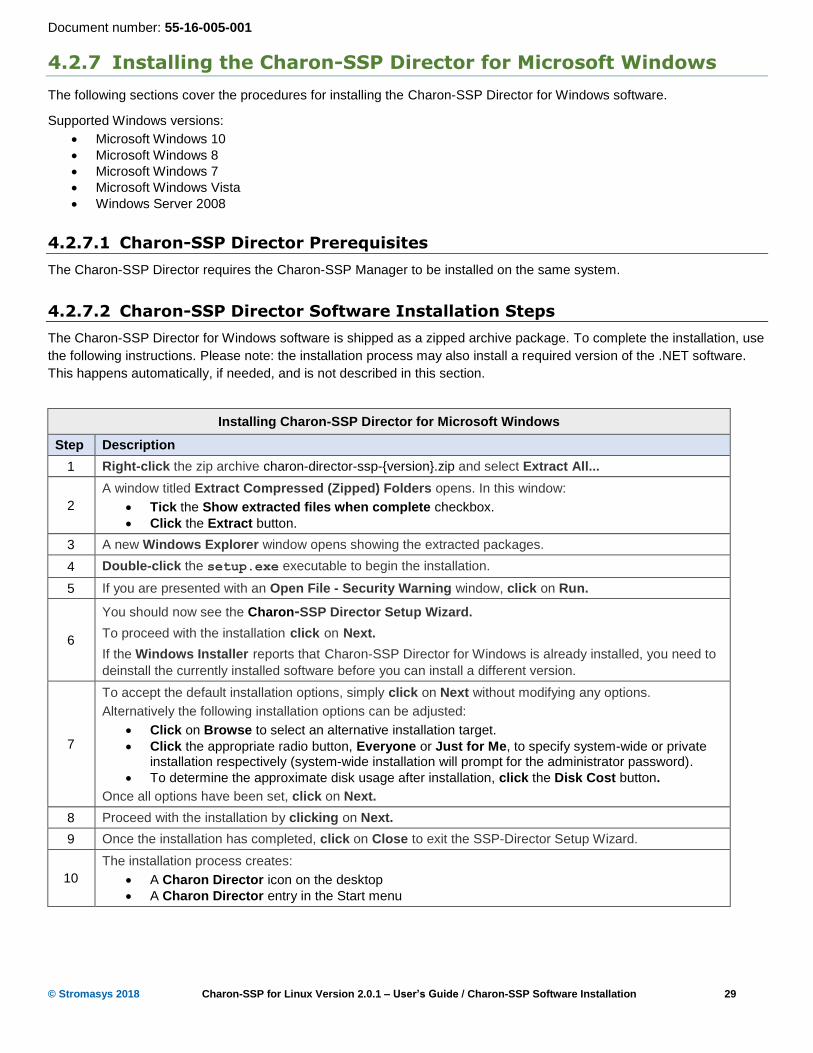
Document number: 55-16-005-001
© Stromasys 2018 Charon-SSP for Linux Version 2.0.1 – User’s Guide / Charon-SSP Software Installation 29
4.2.7 Installing the Charon-SSP Director for Microsoft Windows
The following sections cover the procedures for installing the Charon-SSP Director for Windows software.
Supported Windows versions:
Microsoft Windows 10
Microsoft Windows 8
Microsoft Windows 7
Microsoft Windows Vista
Windows Server 2008
4.2.7.1 Charon-SSP Director Prerequisites
The Charon-SSP Director requires the Charon-SSP Manager to be installed on the same system.
4.2.7.2 Charon-SSP Director Software Installation Steps
The Charon-SSP Director for Windows software is shipped as a zipped archive package. To complete the installation, use
the following instructions. Please note: the installation process may also install a required version of the .NET software.
This happens automatically, if needed, and is not described in this section.
Installing Charon-SSP Director for Microsoft Windows
Step Description
1 Right-click the zip archive charon-director-ssp-{version}.zip and select Extract All...
2
A window titled Extract Compressed (Zipped) Folders opens. In this window:
Tick the Show extracted files when complete checkbox.
Click the Extract button.
3 A new Windows Explorer window opens showing the extracted packages.
4 Double-click the setup.exe executable to begin the installation.
5 If you are presented with an Open File - Security Warning window, click on Run.
6
You should now see the Charon-SSP Director Setup Wizard.
To proceed with the installation click on Next.
If the Windows Installer reports that Charon-SSP Director for Windows is already installed, you need to
deinstall the currently installed software before you can install a different version.
7
To accept the default installation options, simply click on Next without modifying any options.
Alternatively the following installation options can be adjusted:
Click on Browse to select an alternative installation target.
Click the appropriate radio button, Everyone or Just for Me, to specify system-wide or private installation respectively (system-wide installation will prompt for the administrator password).
To determine the approximate disk usage after installation, click the Disk Cost button.
Once all options have been set, click on Next.
8 Proceed with the installation by clicking on Next.
9 Once the installation has completed, click on Close to exit the SSP-Director Setup Wizard.
10
The installation process creates:
A Charon Director icon on the desktop
A Charon Director entry in the Start menu

Document number: 55-16-005-001
© Stromasys 2018 Charon-SSP for Linux Version 2.0.1 – User’s Guide / Charon-SSP Software Installation 30
4.2.8 Installing the Charon-SSP Agent for Linux
The Charon-SSP Agent provides the connection between the Charon-SSP Manager and the virtual SPARC systems. It
also enables the Charon-SSP Director to find Charon-SSP hosts automatically.
4.2.8.1 Charon-SSP Agent Prerequisites
The Charon-SSP Agent can only be used on a system that also has the Charon-SSP software installed.
4.2.8.2 Charon-SSP Agent Software Installation Steps
The following table shows the steps to install the Charon-SSP Agent on Linux:
Installing the Charon-SSP Agent for Linux
Step Description Command
1 Install the Charon-SSP Agent # yum install charon-agent-ssp-{version}-x86_64.rpm
After the installation, Charon-SSP Agent uses approximately 3 MB of disk space. Since the Charon-SSP Agent hierarchy
is the default location for emulator configuration and log files, this amount may increase significantly during operation.
The following example shows the installation of Charon-SSP Agent Manager (the output may vary slightly depending on
Linux distribution and version):
[root@localhost]# yum install charon-agent-ssp*.rpm
[lines removed]
Last metadata expiration check: 0:04:56 ago on Thu Aug 24 14:35:22 2017.
Dependencies resolved.
================================================================================
Package Arch Version Repository Size
================================================================================
Installing:
charon-agent-ssp x86_64 1.5.23-1 @commandline 1.1 M
Transaction Summary
================================================================================
Install 1 Package
Total size: 1.1 M
Installed size: 2.5 M
Is this ok [y/N]: y
Downloading Packages:
Running transaction check
Transaction check succeeded.
Running transaction test
Transaction test succeeded.
Running transaction
Installing : charon-agent-ssp-1.5.23-1.x86_64 1/1
Starting charon-agentd-ssp (via systemctl): [ OK ]
Verifying : charon-agent-ssp-1.5.23-1.x86_64 1/1
Installed:
charon-agent-ssp.x86_64 1.5.23-1
Complete!
If you downgrade to an older version (1.4.x or lower), the storage format of the agent password is not compatible with the one used in newer versions. This will cause login-failures. To prevent this:
delete the file /opt/charon-agent/ssp-agent/etc/passwd.conf before installing the old agent version or before starting the agent (this will re-create the file with default password stromasys), or
edit the file after the installation and replace the content of the file with the password in clear text (do not add carriage-return/newline). Restart the agent (/etc/init.d/charon-agentd-ssp restart).

Document number: 55-16-005-001
© Stromasys 2018 Charon-SSP for Linux Version 2.0.1 – User’s Guide / Charon-SSP Software Installation 31
4.2.9 Installing the Charon-SSP Barebone Distribution
4.2.9.1 General Information about the Barebone Distribution
The Charon-SSP Barebone distribution is an ISO-file containing the Charon-SSP virtual machine software, the underlying
host operating system (CentOS 7.3 at the time of writing), and associated utilities for Linux. This software is distributed
either as an ISO image or as a physical read-only media, such as a CD-ROM or DVD. If you do not have a copy of the
Charon-SSP Barebone distribution, please contact either Stromasys or your Value Added Reseller for further help.
The Charon-SSP Barebone distribution can run on dedicated hardware or in a virtual machine. The following hypervisors
are supported:
VMware ESXi 5.x and 6.x
Xen
Microsoft Hyper-V
Linux KVM
Please note: The Charon-SSP Barebone distribution contains Charon-SSP/4M, Charon-SSP/4U and Charon-
SSP/4U+. Charon-SSP/4U+ utilizes special hardware functionality to deliver improved performance. Due to the
hardware requirements it can only be used on real hardware with Intel’s VT-x/EPT hardware assisted
virtualization technology. Running Charon-SSP/4U+ in a VM is not supported. After installing Charon-SSP, the
Charon-SSP Manager provides an option for Charon-SSP/4U instances to select whether the host system runs
on hardware supported by Charon-SSP/4U+ or not.
The Open Virtual Machine Tools for virtual machines hosted on VMware (version 10.0.5-4 at the time of writing) are pre-
installed in the Charon-SSP Barebone distribution. These tools provide additional functionality for better host/guest
integration when the Charon-SSP Barebone system is installed inside a VMware virtual machine. You can determine the
version of the preinstalled Open Virtual Machine Tools software using the following command
# /usr/bin/vmware-toolbox-cmd -v
For more information about these tools, please refer to the following VMware knowledgebase article:
http://kb.vmware.com/kb/2073803.
4.2.9.2 Basic Installation Steps for the Barebone Distribution
The following table shows the basic installation steps for the Charon-SSP Barebone distribution:
Charon-SSP Barebone distribution installation tasks
Step Description
1 If the host system is a virtual machine (not supported for Charon-SSP/4U+):
Configure the virtual machine for a Linux x86-64 environment.
Use the requirements specified in the section Hardware Requirements to configure the virtual hardware with sufficient capacity for all Charon-SSP instances that are to run on it.
Attach the Charon-SSP Barebone distribution ISO or physical CD to the VM.
Power up the VM and boot from the CD.
If the host system is a physical machine:
Verify that your system meets the hardware requirements.
Load the Charon-SSP CD.
Boot the system from the CD.

Document number: 55-16-005-001
© Stromasys 2018 Charon-SSP for Linux Version 2.0.1 – User’s Guide / Charon-SSP Software Installation 32
2 Upon successful boot, you should see the following screen:
For all configuration sections: To get back to this installation summary page, press Done in the upper left corner.
For an installation from local media with default network settings, proceed as follows:
Click on DATE & TIME to select your time zone.
Click on KEYBOARD to select a different keyboard layout.
Click on INSTALLATION DESTINATION to select the system disk(s) and partition options.
If you require additional information about the installation process, please refer to the CentOS
documentation.

Document number: 55-16-005-001
© Stromasys 2018 Charon-SSP for Linux Version 2.0.1 – User’s Guide / Charon-SSP Software Installation 33
3 The installation options for the destination storage are shown on the following screen:
Select the disk(s) you want to use for the system.
Select your partitioning preferences (if you do not choose the automatic partition configuration, the partitioning page will open next).
Press Done in the upper left corner to finish your disk selection and get back to the Installation Summary page.

Document number: 55-16-005-001
© Stromasys 2018 Charon-SSP for Linux Version 2.0.1 – User’s Guide / Charon-SSP Software Installation 34
4 Once you have completed the configuration options, press Begin installation on the Installation Summary page.
This leads to the installation progress page:
The options to set the root password and to create a user account are grayed out, because they are
preconfigured for Charon-SSP Barebone.
5 The base installation continues. At completion, you will be asked to reboot the system.
Ensure that the CD media is ejected to prevent booting the Charon-SSP Barebone distribution
installer again.

Document number: 55-16-005-001
© Stromasys 2018 Charon-SSP for Linux Version 2.0.1 – User’s Guide / Charon-SSP Software Installation 35
6 Following a successful installation and reboot, you can log in with the default user and password. The default username is charon; the default password is stromasys. After logging in, you should be presented with the following screen:
The installation of the Charon-SSP Barebone distribution is now complete.
4.2.9.3 Charon-SSP Barebone Post-Installation Tasks
The following post installation tasks are highly recommended for improved security and usability:
Change the Charon-SSP Manager password.
Change the Charon-SSP Barebone user password.
Change the Charon-SSP root password.
Set the browser start page to the Sentinel HASP administration page.
Improve license software security.

Document number: 55-16-005-001
© Stromasys 2018 Charon-SSP for Linux Version 2.0.1 – User’s Guide / Charon-SSP Software Installation 36
4.2.9.3.1 Changing the Charon-SSP Manager Password
The primary interface to Charon-SSP Barebone distribution is Charon-SSP Manager. For improved security, it is highly
recommended to change default password stromasys.
The following instructions describe the necessary steps to change password.
Charon-SSP Manager password change instructions
Step Description
1
Log in to the local Charon-SSP Manager
using the default password stromasys and
click Connect.
2 Click on the Virtual Machine menu.
3 From the Virtual Machine drop-down menu, click Preferences.
4
Next to the label Do you want to change the
password? Click YES.
5 Enter the existing password in the field Current password.
Enter the new password in the New password and Confirm new password fields.
6 Click Save.

Document number: 55-16-005-001
© Stromasys 2018 Charon-SSP for Linux Version 2.0.1 – User’s Guide / Charon-SSP Software Installation 37
4.2.9.3.2 Changing the Charon-SSP Barebone User Password
The Charon-SSP Barebone environment is managed from the charon user account. It is highly recommended to change
default password stromasys. The following instructions describe the steps to change password.
Charon-SSP Barebone user password change instructions
Step Description
1 Click on Applications and then the Terminal icon in Favorites to start a shell.
2 Execute the command passwd.
3
The passwd program provides the following prompts. Enter the appropriate information at each one:
Current password:
New password:
Confirm new password:
4 Type exit to leave the shell.
4.2.9.3.3 Changing the Charon-SSP Barebone Distribution root Password
The default password of the root user is stromasys. It is highly recommended to change it to a secure password.
Charon-SSP Barebone distribution root password change instructions
Step Description
1 Click on Applications and then the Terminal icon in Favorites to start a shell.
2 Become the root user by entering the command su. When prompted for a password, enter the default
password.
3 Execute the command passwd.
4
The passwd program provides the following prompts. Enter the appropriate information at each one:
New password:
Confirm new password:
5 Type exit once to leave the root user and then again to leave the shell.
4.2.9.3.4 Setting the Default Webpage to the License Management Utility
To configure the web browser to use the Sentinel HASP Admin Control Center as its home page, proceed as follows:
Instruction to configure license utility as default webpage
Step Description
1 In the Applications menu in the Favorites section click on the Web Browser icon.
2 Once the Web Browser has loaded, click on the menu symbol on the right and then on Preferences.
3 Under the General tab in the Preferences window, set the Home Page field to http://127.0.0.1:1947
4 Click on Close.
5 Exit the Web Browser and re-enter to see the License Utility load when the Web Browser starts.
4.2.9.3.5 Security for the Sentinel Runtime Environment
To ensure proper security for the Charon-SSP Barebone installation, please follow post-installation steps described in the
section Installing the Sentinel HASP Software for Linux.

Document number: 55-16-005-001
© Stromasys 2018 Charon-SSP for Linux Version 2.0.1 – User’s Guide / Configuring and Using the Charon-SSP Software 38
5 Configuring and Using the Charon-SSP Software
5.1 Overview
The following sections provide a detailed description of the individual parts of Charon-SSP for Linux and their use.
For the Charon-SSP environment, the most relevant documentation is the section Using the Charon-SSP Manager. It
describes the primary interface used to manage the hosted virtual machines. However, the conventional Charon-SSP
products also provide command-line access. For this, please refer to the sections Using Charon-SSP from the Command-
Line and Using the Charon-SSP Agent in this user’s guide.
Unless otherwise specified, the term Charon-SSP/4U in this chapter applies to both the Charon-SSP/4U and Charon-
SSP/4U+ versions.
5.2 Charon-SSP Directory Structure
The Charon-SSP Software for Linux is installed under the /opt directory of the host system.
If all packages are installed, there are the following subdirectories (one per package):
charon-agent
charon-director
charon-manager
charon-ssp
Below, you find a short summary of the content of the individual directories focusing on items that may be of interest from
a user’s perspective. The lists are not a complete inventory.
The charon-agent directory contains (under the ssp-agent subdirectory)
the Charon-SSP Agent executable file (in ./bin) and the log file (in ./agent-log) of the Charon-SSP Agent,
the virtual SPARC configuration files under their respective architecture and machine names in ssp/sun-4m/<virtual machine name> or ssp/sun-4u/<virtual machine name> (unless manually created in a different location),
the virtual SPARC system and console log files under ssp/<architecture name>/<virtual machine name>, unless the default has been changed by the user,
additional configuration files under the etc directory,
scripts that can be added to the Linux startup to start virtual machines automatically at boot are located in the ssp/script/ directory,
command-line utilities for license management, disk and tape management and network management under the utils directory.
The charon-director directory contains (under the ssp-director subdirectory) the Charon-SSP Director executable
and supporting files.
The charon-manager directory contains (under the ssp-manager subdirectory)
the Charon-SSP Manager executable (in bin),
the executable for remote display of the graphical console (in bin),
default configuration values for Charon instances (in config/ssp),
cached Charon instance configurations and built-in console cache of the instances (in ssp/<hostip>/<architecture name>/<virtual machine name>), and
configuration information saved by the Charon-SSP Manager, e.g. the X11 configuration.

Document number: 55-16-005-001
© Stromasys 2018 Charon-SSP for Linux Version 2.0.1 – User’s Guide / Configuring and Using the Charon-SSP Software 39
The charon-ssp directory contains mainly the SPARC virtual machine executables ssp4m, ssp4u, and ssp4u-plus. It
also contains supporting scripts, default configurations (ssp4u.cfg and ssp4m.cfg) and the executable to display the
graphical console locally.
5.3 Interaction of the Charon-SSP Components
The software components of the Charon-SSP product suite work together to provide the environment for running and
managing virtual SPARC systems. The management components can run on the same or on different systems as the
virtual SPARC machines.
The following image provides a first overview of the interaction between the Charon-SSP components:
Figure 4: Charon-SSP components and their interaction
The Charon-SSP Agent uses port 9091 (TCP and UDP) to communicate with the Charon-SSP Manager and Director. For
the communication with the Charon-SSP Director, port 9101 (UDP) is also required.
Each of the components is described in detail in the following sections.
5.4 Using the Charon-SSP Director
The Charon-SSP Director is a GUI-based system for managing multiple host systems that each run one or more Charon-
SSP guests. It can run on a Baremetal system or on a Linux or Windows system and requires the Charon-SSP Manager
to be installed on the same system. The Charon-SSP Director can detect host systems on the same subnet automatically.
Other systems can be added manually. This software component is especially useful in environments with several host
systems.

Document number: 55-16-005-001
© Stromasys 2018 Charon-SSP for Linux Version 2.0.1 – User’s Guide / Configuring and Using the Charon-SSP Software 40
5.4.1 Starting the Charon-SSP Director
On conventional Charon-SSP installations, the Charon-SSP director can be started by clicking on the associated icon,
or via the command-line.
Use the following command to start the Charon-SSP director from the command-line on Linux:
$ /opt/charon-director/ssp-director/ssp-director
On Charon-SSP Baremetal installations, the Charon-SSP director can be started by clicking on the Charon Director
icon on the Charon screen.
Conventional Charon-SSP installations only: When starting the Charon-SSP Director on a Linux or Windows
system with a non-operational Charon-SSP Manager path configured, it will prompt the user to select the desired
Charon-SSP Manager image (select the correct version and the ssp-manager.exe from the respective bin folder).
This can happen, for example, if the Charon-SSP Manager is not installed at the default location in order to keep
several versions of the Manager on the system.
5.4.2 Working with the Charon-SSP Director
Starting the Charon-SSP Director opens the main screen with automatically detected and manually added systems:
Figure 5: Charon-SSP Director – Main window

Document number: 55-16-005-001
© Stromasys 2018 Charon-SSP for Linux Version 2.0.1 – User’s Guide / Configuring and Using the Charon-SSP Software 41
5.4.2.1 Charon-SSP Director Main Menu Bar
The main menu bar of the Charon-SSP Director offers the following options:
Main menu bar of Charon-SSP Director
Menu item
Description
Add If systems have not been detected automatically, one or more Charon-SSP host systems can be
added to the Charon-SSP Director:
1. Click on the Add symbol. A new window opens.
2. If required, select the batch option.
3. For a single system, add Name, IP Address, and
optionally the password required to connect to the
Charon-SSP Agent of this system. To add the
password enable Remember Password.
4. When adding a group of systems, specify the starting
and ending IP Address.
5. Click OK to return to the main page.
6. Conventional product only: optionally use the
field Manager to add the path to a non-default
Charon-SSP Manager. This can be helpful if the
default Charon-SSP Manager has a different
version than the one installed on the target
system.
Refresh To refresh the host system status via the automatic discovery process, click on the Refresh symbol.
Options Allows you to set options to automatically refresh the system information display in Charon-SSP
Director:
1. Click on the Options symbol. This opens a new window.
2. Activate the refresh interval and set it to your preferred value.
3. Optionally, you can choose to remove unresponsive systems automatically.
4. Click OK to return to the main page.
Conventional Charon-SSP products only: if the Charon-SSP Manager has been installed in a
non-default location, you can also specify the image location here. Note: if the Charon-SSP Director
is started with a non-operational Charon-SSP Manager path, it will prompt the user to select the
correct Charon-SSP Manager image (select the correct version and the ssp-manager.exe from the
respective bin folder).
About Displays the version of the Charon-SSP director.

Document number: 55-16-005-001
© Stromasys 2018 Charon-SSP for Linux Version 2.0.1 – User’s Guide / Configuring and Using the Charon-SSP Software 42
5.4.2.2 Managing Charon-SSP Director Subgroups
The Charon-SSP Director allows grouping systems into subgroups. Subgroups are managed from the context menu in the
left pane of the window. Right-click on an empty space under Home to open the subgroup context menu. Opening the
context menu to add a subgroup when an existing subgroup is selected allows you to create a new subgroup under the
existing group.
Figure 6: Charon-SSP Director sub-group menu
Charon-SSP Director subgroup menu
Menu item Description
Add Sub-group Clicking on this option opens a window to specify the
name of the new subgroup. After confirmation, the
subgroup will be shown under Home or an existing sub-
group (depending on where the context menu was
opened).
Rename Group Prompts for the new name of the selected group.
Delete Group Deletes the selected subgroup and groups below it, but not the systems within the groups.
Expand groups Expands the list of subgroups under the selected position (Home or a specific group).
Collapse groups Collapses the list of subgroups under the selected position (Home or a specific group).
The parent group always shows all systems of the subordinated groups. The Home screen shows all systems.

Document number: 55-16-005-001
© Stromasys 2018 Charon-SSP for Linux Version 2.0.1 – User’s Guide / Configuring and Using the Charon-SSP Software 43
5.4.2.3 Charon-SSP Director System Context Menu
When selecting one of the displayed systems in Charon-SSP Director, information about the system is displayed in the
right-hand pane, including the number of Charon-SSP instances on the system—overall and the number of active Charon-
SSP instances. A right-click on the selected system opens a context menu with the following options:
Charon-SSP Director System Context Menu
Menu item Description
Connect to
machine
This option opens the Charon-SSP Manager to connect to the Charon-SSP Agent of the
selected system. If you did not store the agent password for the target system, this will open the
Charon-SSP Manager’s login window:
1. Enter the password for the Charon-SSP Agent of the target machine.
2. Click on Connect.
3. The Charon-SSP Manager opens with the target machine information. Continue with the
section Using the Charon-SSP Manager to learn about the functions of the Charon-SSP
Manager.
Edit machine You can change the same parameters as when adding a host system manually.
Update Refresh the status display for the machine.
Copy Copy the machine definition. It can be pasted by right-clicking in an empty space in the machine list window and selecting Paste from the context menu.
Delete Delete the selected system. This will delete the system from the current group and all subgroups of the group. If used from Home, the system will be deleted from Charon-SSP Director.
Select all Selects all systems in the system display section.
5.4.2.4 Charon-SSP Director Additional Context Menu
When clicking on an empty space in the system list area, a small context menu opens with the following functions:
Charon-SSP Director Additional Context Menu
Menu item Description
Add machine This option allows adding one or more systems to the current group. See the description in the
Main Menu Bar section above for more detail.
Paste Insert previously copied machine definitions.
Select all Selects all systems in the system display section.
5.4.2.5 Charon-SSP Director Keyboard Shortcuts
The following keyboard shortcuts are available in Charon-SSP Director:
Charon-SSP Director keyboard shortcuts
Action Shortcut
Copy Ctrl+C
Paste Ctrl+V
Select all Ctrl+A
Delete DEL

Document number: 55-16-005-001
© Stromasys 2018 Charon-SSP for Linux Version 2.0.1 – User’s Guide / Configuring and Using the Charon-SSP Software 44
5.5 Using the Charon-SSP Manager
The Charon-SSP Manager is the GUI-based management interface for Charon-SSP. With the Charon-SSP Manager, you
can manage multiple virtual machines, licenses, and virtual networks across a number of remote hosts.
The Charon-SSP Manager can run on the same machine as the Charon-SSP virtual machine or on a remote system. It
can run on a Baremetal system or on a Linux or Windows system.
The following sections describe how to use the Charon-SSP Manager for the different aspects of managing a Charon-
SSP virtual machine. The main management topics in this section are:
Creating a Virtual Machine
Configuring a Virtual Machine o Model configuration o CPU and optimization configuration o Memory configuration o Graphics configuration o Storage configuration o Terminal device configuration o Ethernet configuration o Audio configuration o GPIB device configuration o License settings o Log configuration
Virtual Machine Context Menu o Running a virtual machine o Accessing the virtual machine settings o Renaming a VM o Removing a VM from the Charon-SSP Manager list o Deleting a VM from disk
Managing Virtual Networks
Miscellaneous Management Tasks
Please note: Editing the configuration of an emulator instance after an upgrade from an older version of Charon-
SSP may apply changes to the configuration of an emulated system that will make the configuration incompatible
with the older version of Charon-SSP.
It is therefore strongly recommended to save a backup copy of the emulator configurations before using the
new version of the Charon-SSP Manager.
5.5.1 Starting the Charon-SSP Manager
On conventional Charon-SSP installations, the Charon-SSP Manager can be started by clicking on the associated
icon, or via the command-line.
On Linux, use the following command to start the Charon-SSP manager from the command-line:
$ /opt/charon-manager/ssp-manager/ssp-manager
On Charon-SSP Baremetal installations, the Charon-SSP Manager can be started by clicking on the Charon Manager
icon on the Charon screen.
In the Charon-SSP Barebone distribution, the Charon-SSP Manager is started automatically when user charon
logs in. It can be restarted via the command-line or the desktop icon.

Document number: 55-16-005-001
© Stromasys 2018 Charon-SSP for Linux Version 2.0.1 – User’s Guide / Configuring and Using the Charon-SSP Software 45
5.5.1.1 Connecting to the Charon-SSP Agent of the Target System
Starting the Charon-SSP Manager opens a login window similar to the one below:
Figure 7: Charon-SSP Manager – Login window
To proceed, enter the address of the system running the Charon-SSP Agent into the IP address field (127.0.0.1 for the
local host system) and the password for that system into the Password field. The default password is stromasys. To
connect to the target Charon-SSP system click on Connect. This opens the main screen of the Charon-SSP Manager as
described in the next section.
Please note:
If you have not yet changed the default password, you are strongly advised to do this now. Leaving the default password unchanged poses a significant security risk. Use the Preferences option in the Virtual Machine menu of the Charon-SSP Manager to change the password.
The Charon-SSP Agent listens on port 9091. To connect to a remote Charon-SSP agent, make sure that this port is not blocked by a firewall.
If you use the Charon-SSP Manager to manage remote Charon-SSP host and guest systems, additional ports may have to be allowed to pass through intermediate firewalls (e.g. the TCP port configured for an emulated serial console port).
If you receive an error similar to the one displayed in this screenshot, verify that the host specified in the IP
address field is correct. On conventional Charon-SSP installations, check that the Charon-SSP agent is
installed and that it is running on the host.

Document number: 55-16-005-001
© Stromasys 2018 Charon-SSP for Linux Version 2.0.1 – User’s Guide / Configuring and Using the Charon-SSP Software 46
If the target system is a conventional Charon-SSP installation, use the following steps to check if the Charon-SSP
Agent is running on the target system and to start it, if required.
Checking the Charon-SSP Agent status on a conventional Charon-SSP installation
Step Description
1 To check if the Charon-SSP Agent is running, use the following command:
$ ps -ef | grep -i charon-agent
If the agent is running, you will see an output similar to the following:
root 10573 1 0 Feb09 pts/6 00:01:37 /opt/charon-agent/ssp-agent/ssp-agent
2 If the Charon-SSP Agent is not running, use the following command to start it:
# service charon-agentd-ssp start or
# /etc/init.d/charon-agentd-ssp start
If the target system is a Charon-SSP Baremetal system and the Charon-SSP Agent does not respond to the login
request after repeated attempts, shut down all active Charon-SSP instances and reboot the host system.
There can only be one single connection to the Charon-SSP Agent at any one time. A second connection from a different Charon-SSP Manager client leads to an immediate disconnection and the following message.

Document number: 55-16-005-001
© Stromasys 2018 Charon-SSP for Linux Version 2.0.1 – User’s Guide / Configuring and Using the Charon-SSP Software 47
5.5.1.2 Charon-SSP Manager Window Overview
The following image provides a first overview of the available menu functions and symbols.
Charon-SSP Manager menu items are adapted to the type (conventional or Baremetal) of the managed target system. Hence, the following images show the Charon-SSP Manager overview for the conventional and the Baremetal products.
Not all Charon-SSP Manager menu items shown below are supported on all types of Charon-SSP host systems. If a function is not supported on the host system, the menu item will not be displayed. Example: the VNC Server item is only supported on Barebone and Baremetal systems. Hence, it will not be displayed on conventional RPM-based Charon-SSP host systems.
Managed host system runs a conventional Charon-SSP installation:
Figure 8: Charon-SSP Manager (conventional) – Main window
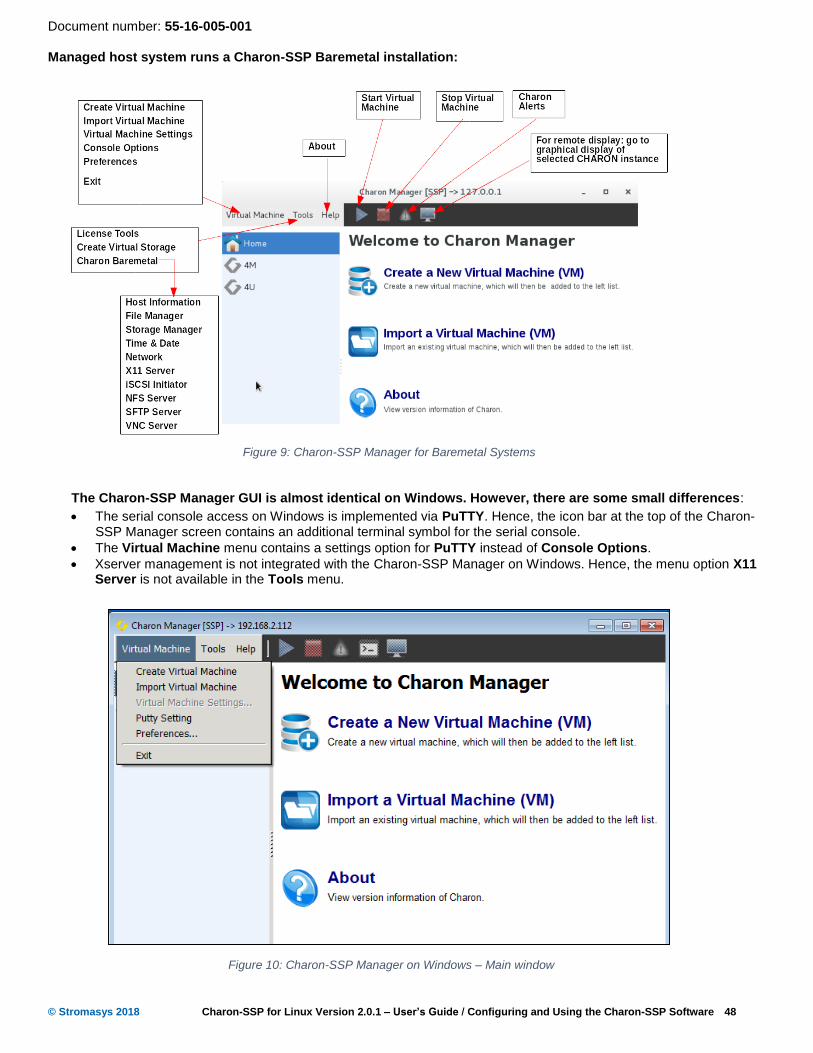
Document number: 55-16-005-001
© Stromasys 2018 Charon-SSP for Linux Version 2.0.1 – User’s Guide / Configuring and Using the Charon-SSP Software 48
Managed host system runs a Charon-SSP Baremetal installation:
The Charon-SSP Manager GUI is almost identical on Windows. However, there are some small differences:
The serial console access on Windows is implemented via PuTTY. Hence, the icon bar at the top of the Charon-SSP Manager screen contains an additional terminal symbol for the serial console.
The Virtual Machine menu contains a settings option for PuTTY instead of Console Options.
Xserver management is not integrated with the Charon-SSP Manager on Windows. Hence, the menu option X11 Server is not available in the Tools menu.
Figure 9: Charon-SSP Manager for Baremetal Systems
Figure 10: Charon-SSP Manager on Windows – Main window

Document number: 55-16-005-001
© Stromasys 2018 Charon-SSP for Linux Version 2.0.1 – User’s Guide / Configuring and Using the Charon-SSP Software 49
The Charon-SSP Manager virtual machine pane on the left has some additional functions applicable to all product
variants:
Double-clicking on Home sorts the virtual machines alphabetically. Repeating the action toggles between ascending and descending sort order.
The position of a virtual machine in the list can be changed by manual drag-and-drop.
A right-click in the pane when no virtual machine is selected opens a context menu to create or import a virtual machine.
5.5.2 Creating a Virtual Machine
The first step to running an emulated SPARC machine is to create the initial configuration using the following steps.
Steps to create a virtual machine
Step Description
1
From the opening screen titled Welcome to Charon Manager, click the Create a New Virtual Machine
icon. Alternatively, use the Create option in the Virtual Machine menu or, while Home is selected, right-
click into an empty area in the virtual machine list pane. This will open a small context menu with the
option to create a new virtual machine.
2
Select the appropriate Hardware Model by clicking the radio button labelled with the SPARC family that
most closely matches the system to you wish to run. The hardware family SUN-4M represents a SPARC
V8 32-bit model; the family SUN-4U represents a SPARC V9 64-bit model. The configured model must
be covered by your license.
3 Enter a name for the virtual machine in the Virtual machine name field.
4 Click on OK.
The steps above create a basic new virtual machine configuration. The new virtual machine is listed the left-hand pane of
the management interface showing the Virtual machine name you specified.
The screenshot below shows the management interface screen after the virtual machines 4M and 4U were created.
Figure 11: Charon-SSP Manager main window with virtual machine
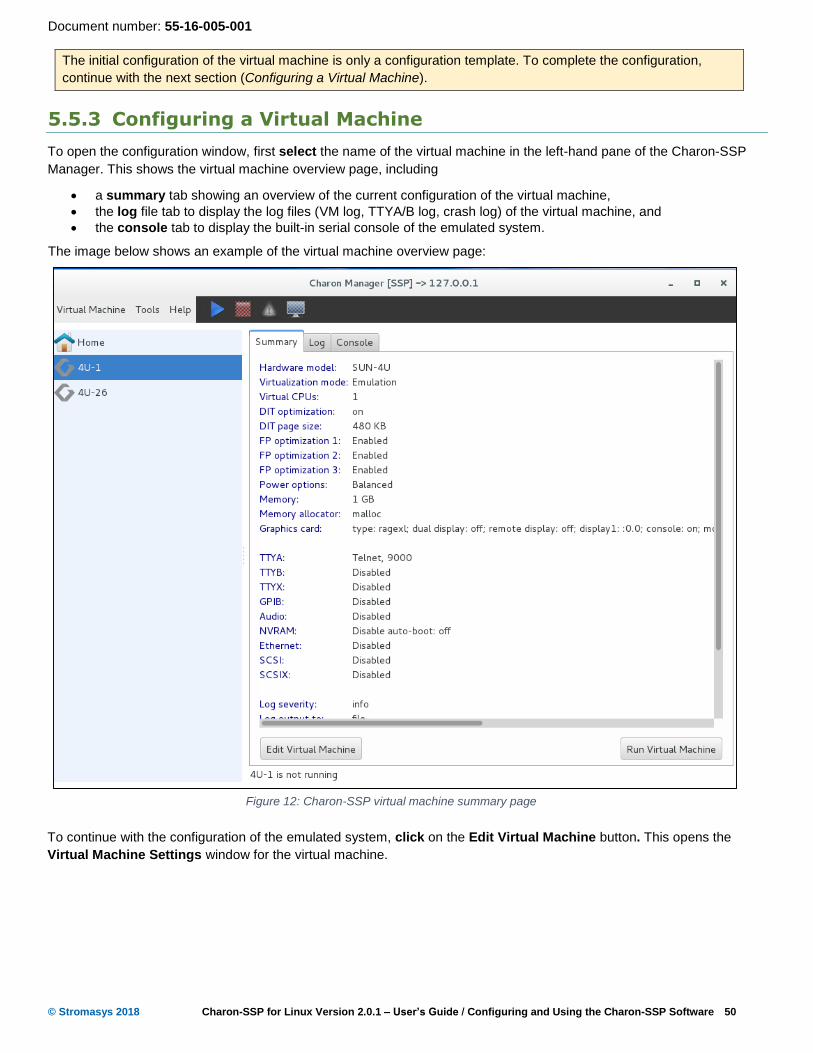
Document number: 55-16-005-001
© Stromasys 2018 Charon-SSP for Linux Version 2.0.1 – User’s Guide / Configuring and Using the Charon-SSP Software 50
The initial configuration of the virtual machine is only a configuration template. To complete the configuration,
continue with the next section (Configuring a Virtual Machine).
5.5.3 Configuring a Virtual Machine
To open the configuration window, first select the name of the virtual machine in the left-hand pane of the Charon-SSP
Manager. This shows the virtual machine overview page, including
a summary tab showing an overview of the current configuration of the virtual machine,
the log file tab to display the log files (VM log, TTYA/B log, crash log) of the virtual machine, and
the console tab to display the built-in serial console of the emulated system.
The image below shows an example of the virtual machine overview page:
To continue with the configuration of the emulated system, click on the Edit Virtual Machine button. This opens the
Virtual Machine Settings window for the virtual machine.
Figure 12: Charon-SSP virtual machine summary page
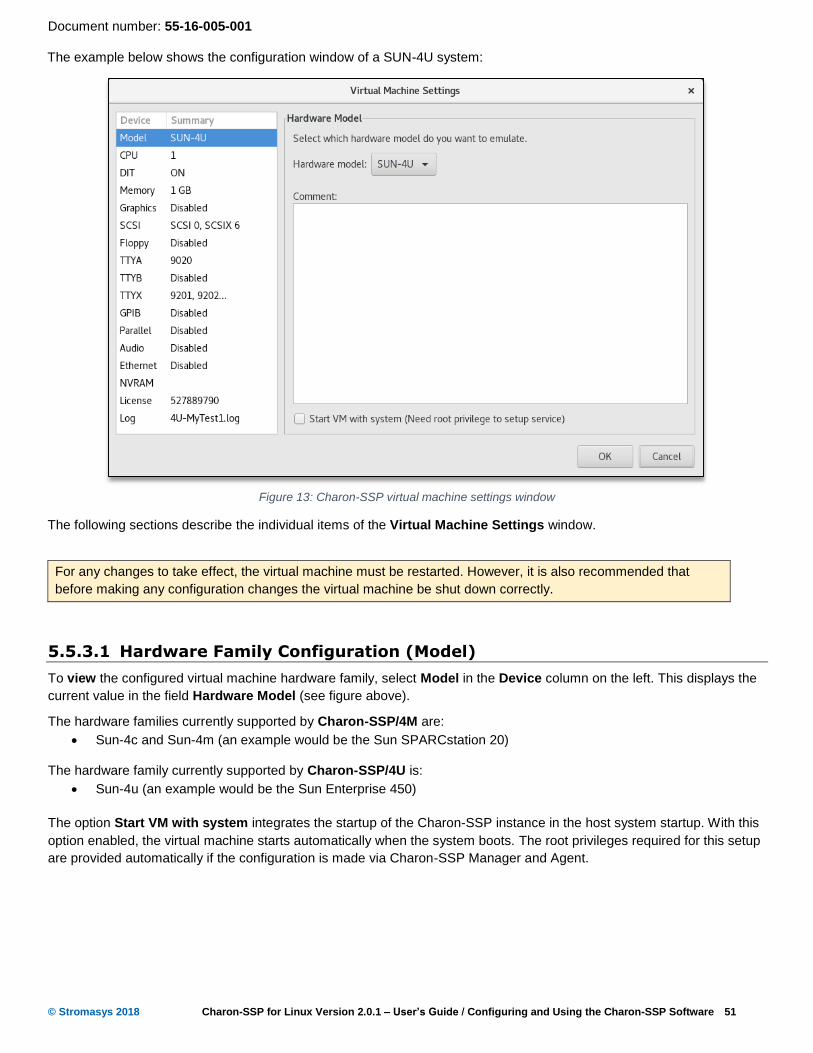
Document number: 55-16-005-001
© Stromasys 2018 Charon-SSP for Linux Version 2.0.1 – User’s Guide / Configuring and Using the Charon-SSP Software 51
The example below shows the configuration window of a SUN-4U system:
Figure 13: Charon-SSP virtual machine settings window
The following sections describe the individual items of the Virtual Machine Settings window.
For any changes to take effect, the virtual machine must be restarted. However, it is also recommended that
before making any configuration changes the virtual machine be shut down correctly.
5.5.3.1 Hardware Family Configuration (Model)
To view the configured virtual machine hardware family, select Model in the Device column on the left. This displays the
current value in the field Hardware Model (see figure above).
The hardware families currently supported by Charon-SSP/4M are:
Sun-4c and Sun-4m (an example would be the Sun SPARCstation 20)
The hardware family currently supported by Charon-SSP/4U is:
Sun-4u (an example would be the Sun Enterprise 450)
The option Start VM with system integrates the startup of the Charon-SSP instance in the host system startup. With this
option enabled, the virtual machine starts automatically when the system boots. The root privileges required for this setup
are provided automatically if the configuration is made via Charon-SSP Manager and Agent.

Document number: 55-16-005-001
© Stromasys 2018 Charon-SSP for Linux Version 2.0.1 – User’s Guide / Configuring and Using the Charon-SSP Software 52
5.5.3.2 CPU Configuration
To view or change the current virtual machine CPU configuration, select CPU in the Device column of the left-hand pane.
Figure 14: Charon-SSP virtual machine CPU configuration
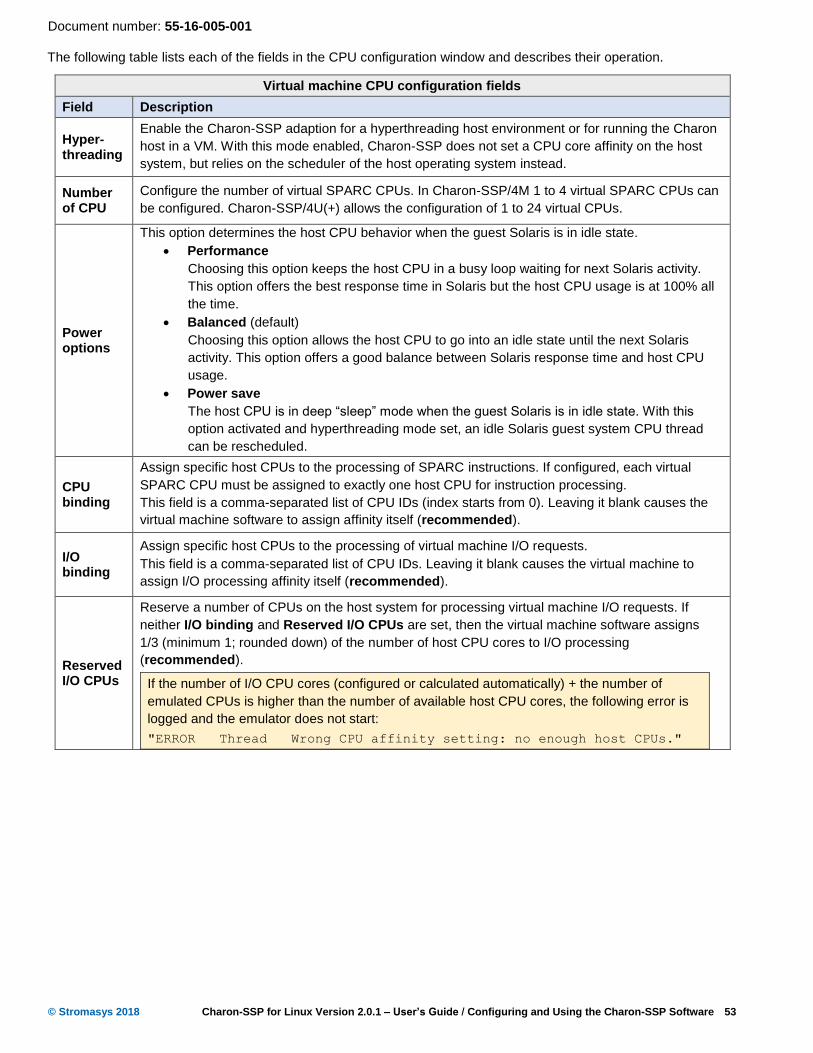
Document number: 55-16-005-001
© Stromasys 2018 Charon-SSP for Linux Version 2.0.1 – User’s Guide / Configuring and Using the Charon-SSP Software 53
The following table lists each of the fields in the CPU configuration window and describes their operation.
Virtual machine CPU configuration fields
Field Description
Hyper-threading
Enable the Charon-SSP adaption for a hyperthreading host environment or for running the Charon
host in a VM. With this mode enabled, Charon-SSP does not set a CPU core affinity on the host
system, but relies on the scheduler of the host operating system instead.
Number of CPU
Configure the number of virtual SPARC CPUs. In Charon-SSP/4M 1 to 4 virtual SPARC CPUs can
be configured. Charon-SSP/4U(+) allows the configuration of 1 to 24 virtual CPUs.
Power options
This option determines the host CPU behavior when the guest Solaris is in idle state.
Performance
Choosing this option keeps the host CPU in a busy loop waiting for next Solaris activity.
This option offers the best response time in Solaris but the host CPU usage is at 100% all
the time.
Balanced (default)
Choosing this option allows the host CPU to go into an idle state until the next Solaris
activity. This option offers a good balance between Solaris response time and host CPU
usage.
Power save
The host CPU is in deep “sleep” mode when the guest Solaris is in idle state. With this
option activated and hyperthreading mode set, an idle Solaris guest system CPU thread
can be rescheduled.
CPU binding
Assign specific host CPUs to the processing of SPARC instructions. If configured, each virtual
SPARC CPU must be assigned to exactly one host CPU for instruction processing.
This field is a comma-separated list of CPU IDs (index starts from 0). Leaving it blank causes the
virtual machine software to assign affinity itself (recommended).
I/O binding
Assign specific host CPUs to the processing of virtual machine I/O requests.
This field is a comma-separated list of CPU IDs. Leaving it blank causes the virtual machine to
assign I/O processing affinity itself (recommended).
Reserved I/O CPUs
Reserve a number of CPUs on the host system for processing virtual machine I/O requests. If
neither I/O binding and Reserved I/O CPUs are set, then the virtual machine software assigns
1/3 (minimum 1; rounded down) of the number of host CPU cores to I/O processing
(recommended).
If the number of I/O CPU cores (configured or calculated automatically) + the number of
emulated CPUs is higher than the number of available host CPU cores, the following error is
logged and the emulator does not start:
"ERROR Thread Wrong CPU affinity setting: no enough host CPUs."

Document number: 55-16-005-001
© Stromasys 2018 Charon-SSP for Linux Version 2.0.1 – User’s Guide / Configuring and Using the Charon-SSP Software 54
5.5.3.3 DIT Configuration
To view or change the current DIT configuration, select DIT in the Device column of the left-hand pane.
The following table lists each of the fields in the CPU configuration window and describes their operation.
Virtual machine CPU configuration fields
Field Description
Virtualization
Mode
Emulation selects the Charon-SSP/4U emulator, Intel VT-x/EPT informs the manager that the hardware prerequisites for running Charon-SSP/4U+ are met. This option is not available on Charon-SSP/4M or if Charon-SSP/4U+ is not installed. This setting is not stored in the emulator configuration file, but in the file /opt/charon-agent/ssp-agent/ssp/vm.dat.
Attempting to run Charon-SSP/4U+ on insufficient hardware will cause the instance to exit with an error message (depending on host hardware, for example, “MMU module insertion failed, please check if VT-X is enabled in BIOS” or “The host CPU doesn’t support Intel VT-x / EPT”).
DIT Optimization
This option controls the Dynamic Instruction Translation (DIT). DIT is a just in time compilation technology to dynamically optimize the SPARC instruction execution on x86-64 platform. This option is on by default.
DIT page size
This option controls the size of the translation buffer holding the translated binary code that results from the DIT optimization. It can be increased to a maximum of 2048KB. This parameter should only be changed if the log file indicates that the DIT optimization was disabled because the translation buffer size was too small. This option is available on Charon-SSP/4U(+) only.
FP optimization 1-3
Controls the levels (1-3) of floating-point optimization. These options are available on Charon-SSP/4U(+) only. All optimization levels should be enabled if a SPARC with of 1.0+ GHz is replaced. In other cases, they can be enabled if performance problems are encountered with floating-point applications. Off by default, as not all applications profit from it.
Figure 15: Charon-SSP virtual machine CPU configuration

Document number: 55-16-005-001
© Stromasys 2018 Charon-SSP for Linux Version 2.0.1 – User’s Guide / Configuring and Using the Charon-SSP Software 55
5.5.3.4 Memory Configuration
To view or change the current memory configuration, select Memory in the Device column on the left.
The following table lists each of the fields in the memory configuration window and describes their effect.
Virtual Machine memory configuration fields
Field Description
Memory for this virtual machine
Set the amount of RAM allocated to the virtual SPARC machine. Memory must be allocated
in certain increments. The table below describes the allocation rules for each virtual
machine family.
Virtual machine family Memory allocation rules
SUN-4M 64MB, 128MB, 256MB and 512MB
SUN-4U 1 – 128 GB in 1GB increments
Memory allocator This option specifies the memory allocation method used for the virtual machine. The
default is malloc. It is appropriate for most cases. Please contact Stromasys if your
environment has special memory requirements.
Allocator Description
Malloc All virtual machine RAM is allocated from system heap.
Mmap All virtual machine RAM is allocated from file backed virtual
memory by memory mapping.
Figure 16: Charon-SSP virtual machine memory options

Document number: 55-16-005-001
© Stromasys 2018 Charon-SSP for Linux Version 2.0.1 – User’s Guide / Configuring and Using the Charon-SSP Software 56
5.5.3.5 Graphics Configuration
To view or change the current graphics emulation configuration, select Graphics in the left-hand pane. This opens the
graphics configuration window. As shown below, the graphics emulation is disabled by default.
Figure 17: Graphics emulation disabled by default
To enable it, select a graphics card type from the drop-down menu. Possible values are
CGSIX or CGTHREE on Charon-SSP/4M
CGSIX or RAGE XL on Charon-SSP/4U(+)
The CGTHREE adapter is a graphic adapter with frame buffer; the CGSIX adapter is a graphic adapter with frame buffer
and 2D acceleration, the Rage XL is a graphic adapter with frame buffer, 8MB Memory, and 2D acceleration.
The following image shows the options on a SUN-4U system:
Figure 18: Graphics device selection on SUN-4U
Select one of the supported graphics options.

Document number: 55-16-005-001
© Stromasys 2018 Charon-SSP for Linux Version 2.0.1 – User’s Guide / Configuring and Using the Charon-SSP Software 57
This opens the configuration window as shown in the example below:
Figure 19: Graphics configuration window

Document number: 55-16-005-001
© Stromasys 2018 Charon-SSP for Linux Version 2.0.1 – User’s Guide / Configuring and Using the Charon-SSP Software 58
The following table describes the graphics configuration options:
Charon-SSP virtual machine graphics configuration fields
Field Description
Type
Selection of supported graphics options:
CGSIX or CGTHREE on Charon-SSP/4M
CGSIX or Rage XL on Charon-SSP/4U(+)
Disabled
Screen
Number of screens:
Single: use one screen
Dual: use two screens
Location for displaying the graphics output:
Local: display graphics output only on the local system
Remote: graphics output can be displayed on the local system and or a remote system
Display
Defines the DISPLAY variable to be used by the graphics output. The default value is “:0.0” (display 0 screen 0). This value has to be set to match the display configuration on the system where the graphics output is to be displayed.
If a dual screen configuration is selected, two display variables can be defined.
Remote port
Defines the port(s) to which a Charon-SSP Manager on a remote system connects to display the graphics output of the guest system. The default value is 11100 for a single screen configuration. For a dual screen configuration, the default ports are 11100 and 11101. Only relevant for remote screen configurations.
Console
Defines whether the graphical device should act as the console of the guest system.
ON: the graphics device is the system console of the guest system (default). In this case, the serial console window in Charon-SSP Manager is not available.
OFF: the serial console in Charon-SSP Manager or an external serial console is used.
Mouse port Port for transmitting mouse event data. Default 11001.
Keyboard port
Port for transmitting keyboard event data. Default 11000.
Keyboard layout
The appropriate keyboard layout can be selected from the drop-down menu.
Resolution
The appropriate resolution can be selected from the drop-down menu.
CG3 supports 800 x 600, 1024 x 768 and 1152 x 900;
CG6 and Rage XL support 1024 x 768, 1152 x 900, 1280 x 1024, and 1600 x 1280.
Full screen
If set to ON, the emulated graphics device will start in full-screen mode. Best results are achieved if the resolution of the host system display matches the resolution of the emulated device. To toggle between full-screen and normal mode during operation use the key combination CTRL+SHIFT+F after after clicking into the window to give it focus.
Refresh rate The refresh rate for the graphical output can be set to a value between 20 and 100. Charon-SSP/4U(+) only.
Mouse and keyboard capture and release:
When you click into the graphics device window, it will capture mouse and keyboard.
To release mouse and keyboard press LEFT-CTRL+ESC.
Use the toggle key combination (CTRL+SHIFT+F) to return to the normal host system desktop without running the the
virtual SPARC graphics device in full-screen mode (first click into the window to make sure it has focus).

Document number: 55-16-005-001
© Stromasys 2018 Charon-SSP for Linux Version 2.0.1 – User’s Guide / Configuring and Using the Charon-SSP Software 59
In addition to configuring the graphics emulation in the Charon-SSP Manager, there are several prerequisites:
Prerequisites for using the graphics emulation
Where Description
Host system
Ensure that the required ports for display, mouse, and keyboard events are not blocked by a firewall (especially when using remote display).
Only relevant for conventional non-Barebone systems: For a local graphics device, ensure that the local root user is allowed to display X applications on the defined display. Verify this using the xhost command without parameters. If the root user does not have access, the local graphics display will not open and the Charon-SSP log will show repeatedly that a connection to the display is attempted and disconnected again. To add the permissions, use the command xhost SI:localuser:root. Note: testing root access using an X-application with the sudo or su command is not a valid test.
Solaris guest
Ensure that the required drivers (SUNWcg6*, SUNWdfb*, SUNWm64*) are installed on the system. They are part of the standard system and are normally installed if the matching devices are found. Should they be missing, the packages can be installed or the drivers can be copied from the installation CD (must be same version and patch level as on Solaris guest). The name of the drivers are cgsix, cgthree, and m64.
After configuring the graphical device or changing the configuration between single and dual screen configurations, reboot the system with the boot <device> -r option to create the correct /dev/fb* devices.
If the Solaris graphical user interface is to be used on the device, ensure that o /usr/openwin/bin is in the path of the user, o dtlogin is enabled at system start (e.g., on Solaris 2.6: /usr/dt/bin/dtconfig -e)
Ensure that the X-server starts on the correct fb device (default /dev/fb). Otherwise, it may fail with the message that the device does not exist. If such a problem occurs, perform the following steps: o Create the directory /etc/dt/config. o Copy /usr/dt/config/Xservers into /etc/dt/config. o Modify the X-server start line to contain the correct /dev/fb* line. You can find the existing
framebuffer devices using ls -l /dev/fb*. Sample line in the Xservers file: :0 Local local_uid@console root /usr/openwin/bin/Xsun :0 -dev /dev/fb0 -nobanner If you use a dual monitor configuration, you have to add a second -dev entry. Please note that on Solaris 10 the path for the Xserver is /usr/X11/bin/Xserver.
The following image shows a dual screen setup on one physical screen (for illustration purposes only):
Figure 20: Dual screen display on one physical monitor

Document number: 55-16-005-001
© Stromasys 2018 Charon-SSP for Linux Version 2.0.1 – User’s Guide / Configuring and Using the Charon-SSP Software 60
5.5.3.6 SCSI Storage Configuration
To view or change the current virtual machine SCSI configuration, select SCSI in the Device column of the left-hand
pane. This opens the SCSI configuration window similar to the one shown below.
From this window, you can create virtual disk and tape container files. You can also attach virtual storage devices (both
physical devices and container files) to the virtual machine. When selecting an existing virtual storage device, you can
modify or remove it.
The Create Virtual Storage option is also available in the Tools menu of the Charon-SSP manager. The
functions provided are identical to the functions provided via the Virtual Machine Settings window shown
above.
Figure 21: Virtual SCSI device configuration window

Document number: 55-16-005-001
© Stromasys 2018 Charon-SSP for Linux Version 2.0.1 – User’s Guide / Configuring and Using the Charon-SSP Software 61
5.5.3.6.1 Creating a New Virtual Disk Container File
It is often convenient to use container files for virtual disk and tape devices. This section describes how to create disk
container files.
To create a virtual disk container file, click on Create Virtual Storage in the SCSI device Virtual Machine Settings
window. This displays the Create Virtual Storage dialog opened on the virtual disk tab as shown below.
Figure 22: Create new virtual disk
To create a virtual disk container file, follow the instructions listed below.
Steps for creating a new virtual disk container file
Step Description
1
Select the virtual disk type from the drop-down list Virtual disk type.
If you select a preconfigured Virtual disk type the Block number field is updated to match that
model.
If you specify the type of Custom, enter the container file size as a number of 512-byte blocks at the
field Block number.
2 Specify a name for the virtual disk container file in the field Virtual disk name.
3 Select the location on the host filesystem for the container file by clicking on the location selection
button and selecting the correct path. The default is different depending on the Charon-SSP product.
4 Click on Create to create the virtual disk container file.
Depending on the size of the container file, this may take some time.
Before the disk can be used by the Solaris guest system, it must be added to the system configuration and formatted by the Solaris guest according to the customer specific requirements.
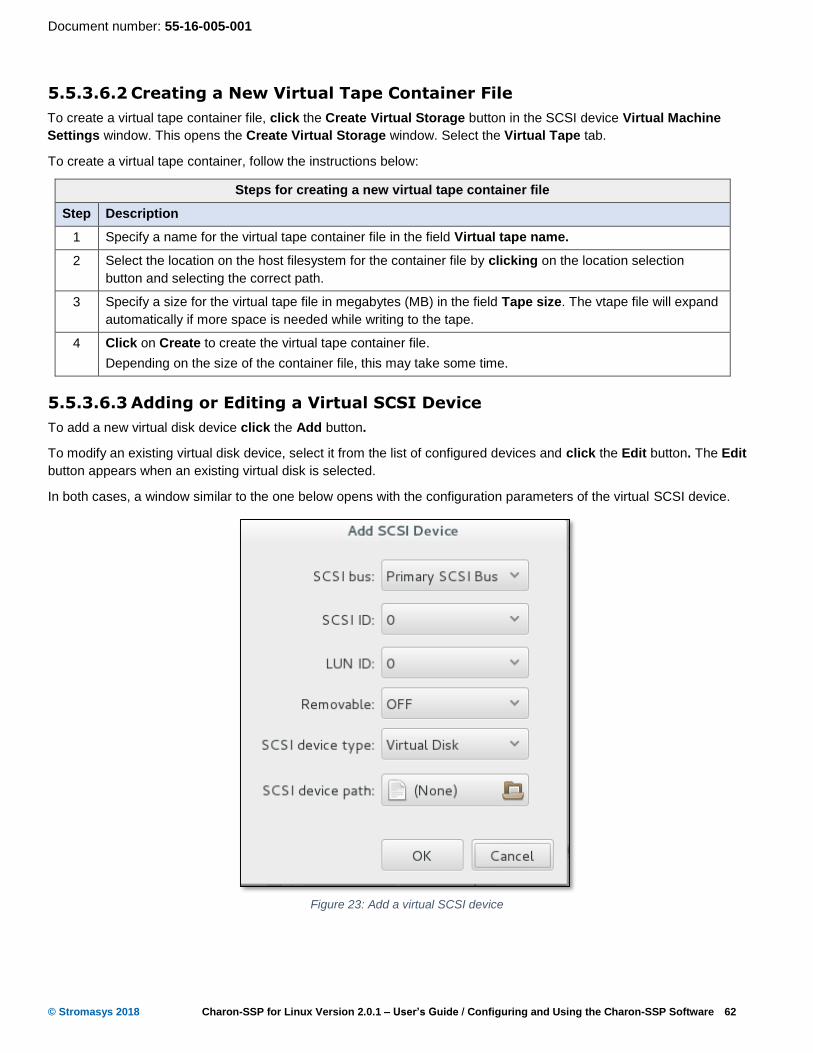
Document number: 55-16-005-001
© Stromasys 2018 Charon-SSP for Linux Version 2.0.1 – User’s Guide / Configuring and Using the Charon-SSP Software 62
5.5.3.6.2 Creating a New Virtual Tape Container File
To create a virtual tape container file, click the Create Virtual Storage button in the SCSI device Virtual Machine
Settings window. This opens the Create Virtual Storage window. Select the Virtual Tape tab.
To create a virtual tape container, follow the instructions below:
Steps for creating a new virtual tape container file
Step Description
1 Specify a name for the virtual tape container file in the field Virtual tape name.
2 Select the location on the host filesystem for the container file by clicking on the location selection
button and selecting the correct path.
3 Specify a size for the virtual tape file in megabytes (MB) in the field Tape size. The vtape file will expand
automatically if more space is needed while writing to the tape.
4 Click on Create to create the virtual tape container file.
Depending on the size of the container file, this may take some time.
5.5.3.6.3 Adding or Editing a Virtual SCSI Device
To add a new virtual disk device click the Add button.
To modify an existing virtual disk device, select it from the list of configured devices and click the Edit button. The Edit
button appears when an existing virtual disk is selected.
In both cases, a window similar to the one below opens with the configuration parameters of the virtual SCSI device.
Figure 23: Add a virtual SCSI device

Document number: 55-16-005-001
© Stromasys 2018 Charon-SSP for Linux Version 2.0.1 – User’s Guide / Configuring and Using the Charon-SSP Software 63
The following table lists the fields in the Add/Edit SCSI Device configuration window and describes their operation.
Add/Edit virtual SCSI device configuration fields
Fields Description
SCSI bus Specify either the Primary SCSI Bus or the External SCSI Bus.
Please note: the External SCSI Bus is supported on Charon-SSP/4U(+) only.
SCSI ID
SCSI device identification number.
Charon-SSP/4M: Acceptable values are a 3-bit narrow SCSI device IDs between 0 and 7.
Charon-SSP/4U: Acceptable values are a 4-bit wide SCSI device IDs between 0 and 15.
The SCSI device ID 7 is reserved for the SCSI host bus adapter. It cannot be used for a
user-configurable SCSI device.
LUN ID
SCSI device LUN ID. A SCSI device is identified by a combination of bus, target ID (SCSI ID), and LUN ID. This parameter must be configured to match the storage device configuration. Valid IDs are 0 through 7. Default value is 0.
The LUNs configured for one SCSI target ID must belong to the same virtual device type.
Removable Default setting: OFF. If enabled, the emulator will start even though the device is not available on the host.
SCSI device
type
Drop-down list of configurable device types. The table below describes the available device
types:
SCSI device type Description
Virtual Disk Virtual disk device backed by a container file.
Virtual CDROM Virtual CDROM device backed by a container file.
Virtual Tape Virtual tape device backed by a container file.
Physical Disk Virtual disk device mapped to a physical disk or a physical disk
partition on the host system.
Physical CDROM Virtual CDROM device connected to a host-attached physical optical
drive.
Physical Tape Virtual tape device connected to host attached physical tape drive.
Generic Generic SCSI device.
SCSI device
path
Click on the path button to specify the location of the virtual SCSI device. The table below
lists example device paths depending on the setting of the SCSI device type option.
SCSI device type Sample SCSI device path
Virtual Disk /usr/local/vm/lela/scsi0.vdisk
Virtual CDROM /usr/local/share/iso/sunos_4.1.4.iso
Virtual Tape /usr/local/vm/lela/scsi1.vtape
Physical Disk /dev/sda
Physical CDROM /dev/sr1
Physical Tape /dev/st0
Generic Device /dev/sg0

Document number: 55-16-005-001
© Stromasys 2018 Charon-SSP for Linux Version 2.0.1 – User’s Guide / Configuring and Using the Charon-SSP Software 64
5.5.3.6.4 Physical Disk Parameters on Charon-SSP
The Charon-SSP virtual machines offer additional options when adding physical disks as virtual SCSI devices. The
windows for adding a new device and for editing an existing device contain the same fields. The configuration windows
are different for Charon-SSP/4U(+) and Charon-SSP/4M because only Charon-SSP/4U(+) supports a second SCSI bus.
The two different configuration windows are shown below:
Physical disk parameter configuration window
Add physical disk on Charon-SSP/4U(+) Add physical disk on Charon-SSP/4M
The following table describes the additional parameters available for physical disks on Charon-SSP:
Additional physical disk parameters
Field Description
Pass through
You can select OFF (default) or ON. SCSI pass-through is used to allow direct access to SCSI
devices. Such devices can be locally or remotely connected SCSI storage devices (e.g. local disks,
iSCSI connected disks, Fibre Channel disks, etc.) and other SCSI devices that support the SCSI
command set. On the host side, this feature depends on the generic SCSI driver (SG) capabilities of
the host operating system. The emulator does not depend on particular adapter types.
This feature is useful, for example, for using shared disks in cluster environments (fencing / persistent
reservations) and special SCSI peripherals, such as tape robots or SCSI-connected serial devices
and scanners.
Serial Number
The serial number is a physical characteristic of hard disks and is used mainly to persistently and
unambiguously identify iSCSI mapped disks (and possibly Fibre Channel disks), for which the device
identification on the host (i.e. /dev/sdX) may change when the host system reboots. If the Serial
Number field is enabled, the field SCSI device path is disabled.
On conventional Charon-SSP systems, use the following command to locate the serial number of a
disk (either ID_SERIAL_SHORT or ID_SCSI_SERIAL can be used):
# udevadm info -q property -n /dev/sdc | grep SERIAL
(for the sample device /dev/sdc).
On a Baremetal installation, you can find the serial number using the Storage Manager that is
started from the Tools > Charon Baremetal menu of the Charon-SSP Manager.

Document number: 55-16-005-001
© Stromasys 2018 Charon-SSP for Linux Version 2.0.1 – User’s Guide / Configuring and Using the Charon-SSP Software 65
5.5.3.6.5 Removing a Virtual Storage Device
To remove a virtual storage device, select the device in the Virtual Machine Settings SCSI configuration window, then
click the Remove button. The device is removed immediately from the configuration. The Charon-SSP Manager does not
ask for confirmation.
If the virtual SCSI storage device is attached to a container file, the file itself is not removed with the configuration.
5.5.3.7 Configuring a Floppy Drive
Floppy drives are only supported on Charon-SSP/4M. A a physical or a virtual floppy drive can be added to the
configuration. The way to configure a virtual floppy is very similar to the virtual disk or virtual tape configuration described
above (via the Create Virtual Storage option).
Figure 24: Floppy configuration screen

Document number: 55-16-005-001
© Stromasys 2018 Charon-SSP for Linux Version 2.0.1 – User’s Guide / Configuring and Using the Charon-SSP Software 66
5.5.3.8 TTYA Configuration
To view or change the current virtual machine console configuration, select TTYA in the Device column of the left-hand
pane. This opens the TTYA configuration window, shown below. In this example, TTYA is disabled.
Figure 25: Virtual machine TTYA disabled
It is possible to configure the virtual console type by selecting one of the four options described below from the drop-down
list labelled Type.
Virtual machine console types
Type Description
TCP raw Configure the console device as a network device (TCP socket) without any protocol enabled.
Telnet Configure the console device as a network device (TCP socket) with the telnet protocol enabled.
Physical Configure the console device as physical terminal directly attached to the host system.
Disable Disable the virtual console device entirely.
The following sections describe the specific configuration details of the physical and network consoles.

Document number: 55-16-005-001
© Stromasys 2018 Charon-SSP for Linux Version 2.0.1 – User’s Guide / Configuring and Using the Charon-SSP Software 67
5.5.3.8.1 Physical Console Device
The image below shows the configuration window for a physical console device.
Options:
Device: opens a drop-down list to let the user select from the directly attached serial ports available on the host system (tty* devices).
Log: used to enable and disable the console log. For details, see description in the next section.
Figure 26: TTYA physical console device

Document number: 55-16-005-001
© Stromasys 2018 Charon-SSP for Linux Version 2.0.1 – User’s Guide / Configuring and Using the Charon-SSP Software 68
5.5.3.8.2 Network Console Device
When configuring a network console device, the user can select one of two modes: TCP raw (serial line without protocol)
or Telnet (serial line with telnet protocol support).
The image below shows the configuration window for a network console device with telnet protocol support:
Figure 27: TTYA network console via TCP socket

Document number: 55-16-005-001
© Stromasys 2018 Charon-SSP for Linux Version 2.0.1 – User’s Guide / Configuring and Using the Charon-SSP Software 69
The following table lists all the additional fields in the network-console configuration window and describes their function.
Virtual machine TTYA network device configuration fields
Fields Description
Port
This option specifies the TCP/IP port to use when listening for incoming console client connections.
A different port must be specified for each network console and serial port used on the same
Charon-SSP host system. Using a port that is already in use results in the following error messages
in the virtual machine log file.
To access the console of a guest system across the network, make sure the port configured for
the console is permitted by any intermediate firewalls.
Console
Specify in which way the network console will be viewed. Not visible if graphics device is
configured with console enabled.
Console Description
Built-in The built-in console is displayed and accessible from the Console tab in the Charon
Manager. The console process listens on TCP port 9000 by default.
External
An external network console device allows an external client (e.g., a telnet client) to
connect to the console port and interact with the virtual console device. If you choose
this option, the console tab of the Charon-SSP Manager will not be shown for the
system in question. By default, Charon-SSP will try to start a PuTTY window
(conventional Charon-SSP systems: check if the root user can display X-
applications on DISPLAY :0 and if PuTTY is installed on the system).
Access
Unlimited Connection to the console is possible via a remote network connection.
Local only Connection to the console is only possible from the local host.
Log
When this box is checked, Charon-SSP writes a console log (/opt/charon-agent/ssp-agent/ssp/sun-4u/<vm-name>/<vm-name>_ttya.log). Conventional product only: the path can be changed in the configuration file.
Please note: the log file configured here is separate from the file the Charon-SSP Manager uses to cache the console output for the built-in serial console of the Charon-SSP Manager.
5.5.3.9 TTYB Configuration
To view or change the virtual machine TTYB configuration, select TTYB in the Device column of the left-hand pane. The
virtual TTYB serial device can be configured as both a physical or network connected device. The configuration of this
device is very similar to TTYA. For further details related to configuring this device, consult the section TTYA
Configuration.

Document number: 55-16-005-001
© Stromasys 2018 Charon-SSP for Linux Version 2.0.1 – User’s Guide / Configuring and Using the Charon-SSP Software 70
5.5.3.10 TTYX Configuration
The TTYX configuration provides additional serial ports to the virtual SPARC system.
The additional serial port emulation in Charon-SSP provides different modes:
1. For Charon-SSP 4U(+):
On-board Mode, which extends the original number of two built-in serial ports by a maximum of 14 additional serial ports (On-board mode).
DIGI AccelePort 920 emulation for up to 4 boards with 8 ports each, i.e., 32 serial ports (DIGI AccelePort mode).
DIGI PCI pass-through provides the guest Solaris system with direct access to physical serial DIGI devices.
2. For Charon-SSP 4M:
SBus serial card emulation with 8 ports.
5.5.3.10.1 Prerequisites
The following table shows the prerequisites for the TTYX configuration:
Prerequisites for the TTYX configuration
TTYX Option Host system serial ports Solaris in virtual SPARC
TTYX on board mode
(SUN-4U only)
Supported serial ports
or
Network ports (sockets)
No additional drivers needed.
First boot after configuration must use the command boot <disk> -r (reconfigure) to create the appropriate special devices for the new serial ports.
DIGI AccelePort mode
(SUN-4U only)
Supported serial ports
or
Network ports (sockets)
Required driver: Charon-SSP emulates the Digi AccelePort 8r 920-PCI board. The driver is available on: http://www.digi.com/support/productdetail?pid=1385
Because the emulated board does not support interrupts, the option no interrupt must be set when installing the driver.
DIGI board PCI pass-through*
(SUN-4U only)
Max. 4 physical serial controllers:
Digi AccelePort 920, or
Digi Accele C/X
PCI pass-through (PPT) driver is delivered with Charon-SSP.
Required driver: the driver for Digi AccelePort 8r 920-PCI and Digi Accele C/X is available on: http://www.digi.com/support/productdetail?pid=1385
The option no interrupt must be set when installing the driver.
TTYX 4M (SUN-4M only)
Supported serial ports
or
Network ports (sockets)
No additional drivers needed (STC driver).
First boot after configuration must use the command boot <disk> -r (reconfigure) to create the appropriate special devices for the new serial ports.
*Only supported on Barebone and Baremetal distributions
When choosing a PCI serial board or an external port server you must take into account the requirements of
your applications on Solaris. If modem control is required, the physical serial ports mapped to the emulated
ports must provide this feature. If you have specific requirements with respect to the electrical interface
provided on a serial port (e.g., RS232 or RS485), you have to consider this when selecting the physical serial
port board or server.
In addition or as an alternative to serial ports added via the TTYX configuration, IP-based port servers are also possible.
Their drivers create virtual serial ports on Solaris. This option is independent of what is described in this chapter. It can be
useful, for example if Charon-SSP is running in a VM and needs access to a larger number of physical serial ports.

Document number: 55-16-005-001
© Stromasys 2018 Charon-SSP for Linux Version 2.0.1 – User’s Guide / Configuring and Using the Charon-SSP Software 71
5.5.3.10.2 TTYX On-Board Mode on Charon-SSP/4U(+)
To add, change, or remove additional serial ports in TTYX on-board mode, click on TTYX in the left-hand pane of the
Virtual Machine Settings window. A window similar to the following screenshot of a Charon-SSP/4U instance opens.
The example shows one configured serial port (socket) and the options to Edit, Remove, or Add.
The Edit and Remove buttons become available when selecting an existing port.
The option On board mode is checked, i.e., the serial ports are configured in TTYX on-board mode.
Select serial port mode as the first step. If you configure serial ports first and then change this option, your
configured serial ports will be deleted.
5.5.3.10.2.1 Adding Serial Ports in TTYX On-Board Mode
This section describes how to add ports in on-board mode using either physical serial ports or network ports (TCP
sockets).
Adding network based serial ports (TCP sockets):
To add serial ports that are TCP sockets (raw mode), click on Add. Then
select the name of the port from the Serial line menu
select the TTY type TCP
enter a unique port number for the socket
click on OK
Figure 28: TTYX configuration window (On-board mode)

Document number: 55-16-005-001
© Stromasys 2018 Charon-SSP for Linux Version 2.0.1 – User’s Guide / Configuring and Using the Charon-SSP Software 72
The following image shows an example:
The socket number must be unique for each serial line used on the host. Otherwise, a socket IO error will occur
and a corresponding message will be written the log file of the virtual system.
Adding physical ports:
To add physical serial ports, click on Add. Then
select the name of the port from the Serial line menu
select the TTY type Physical
select the name of the physical serial port from the TTY device drop-down list (tty* devices)
click on OK
The following image shows an example:
The additional serial ports are named TTYC, TTYD, etc. To activate them in Solaris, reboot the system with the
reconfigure (boot <disk> -r) option.
Figure 30: Adding physical serial port
Figure 29: Adding network port (socket) as serial port

Document number: 55-16-005-001
© Stromasys 2018 Charon-SSP for Linux Version 2.0.1 – User’s Guide / Configuring and Using the Charon-SSP Software 73
5.5.3.10.2.2 Modifying or Removing TTYX On-Board Mode Ports
Modifying serial ports:
If you want to change the configuration of a port, perform the following steps:
Open the TTYX configuration window and select the port in question.
Click on Edit. This opens a window very similar to the window for adding a port.
Make your changes and click on OK to save them.
Deleting serial ports:
If you want to delete ports, perform the following steps:
Open the TTYX configuration window and select the port you want to delete.
Click on Remove to delete this serial port.
After removing ports, you can adjust the Solaris configuration by again by booting with the boot <disk> -r command.
5.5.3.10.2.3 Managing TTYX On-Board Mode Ports on Solaris
After booting Solaris with the reconfigure option, the new serial ports should be available in Solaris. The easiest way to
manage them is the graphical management tool that comes with Solaris.
In older versions, this is the admintool.
In Solaris 10, this is the Solaris Management Console smc.
The following two examples show how the additional ports are displayed in each of the tools. Details about the port
configuration can be found in the appropriate Solaris system management guides.
Example of newly added serial ports in the admintool of Solaris 2.6:
Figure 31: TTYX on-board mode ports in admintool
Example of newly added serial ports in smc on Solaris 10:
Figure 32: TTYX on-board mode ports in smc

Document number: 55-16-005-001
© Stromasys 2018 Charon-SSP for Linux Version 2.0.1 – User’s Guide / Configuring and Using the Charon-SSP Software 74
5.5.3.10.3 DIGI AccelePort Mode on Charon-SSP/4U(+)
To add, change, or remove additional serial ports in DIGI board mode, click on TTYX in the Virtual Machine Settings
window. A window similar to the following screenshot opens.
Note that the option Digi AccelePort 920 PCI is selected. The configured serial ports in the example are network ports
(TCP sockets).
Select serial port mode as the first step. If you configure serial ports first and then change this option, your
configured serial ports will be deleted.
5.5.3.10.3.1 Adding Serial Ports in DIGI AccelePort Mode
Adding serial ports in DIGI AccelePort mode works in the same way as for ports in TTYX on-board mode. Please refer to
the section Adding Serial Ports in TTYX On-Board Mode.
Note that the created ports have different names than in on-board mode: They are called TTY_1, TTY_2, etc.
5.5.3.10.3.2 Modifying or Removing Ports in DIGI AccelePort Mode
Modifying and removing ports in DIGI AccelePort mode works in the same way as for ports in on-board mode. Please
refer to the section Modifying or Removing TTYX On-Board Mode Ports for details.
Figure 33: TTYX configuration window (DIGI AccelePort mode)

Document number: 55-16-005-001
© Stromasys 2018 Charon-SSP for Linux Version 2.0.1 – User’s Guide / Configuring and Using the Charon-SSP Software 75
5.5.3.10.3.3 Solaris Driver Installation for DIGI AccelePort Emulation
Charon-SSP/4U emulates a Digi AccelePort 8r 920-PCI board. For Solaris to be able to use these ports, the appropriate
driver needs to be installed.
You can download the driver from http://www.digi.com/support/productdetail?pid=1385. On the same page, you also
find the installation guides and other documents relevant to the serial port controller. If you have questions, please contact
the Stromasys support team.
The driver packages are data-stream packages. Hence, the installation command is similar to the following example:
Sample installation command for DIGI board driver (Solaris 10)
# pkgadd -d 40002543_A.bin
The prompts and information texts during the installation in conjunction with the installation guide will lead you through the
driver installation.
However, there are two important items to note during the installation:
Select the correct DIGI board PCI adapter (option 0 for the AccelePort Xr 920 PCI adapter emulated by the DIGI AccelePort emulation). Later on, you will have to choose the number of ports (8) for it.
Make sure that interrupts for the board are disabled (answer: y) because interrupts are not supported by the emulated device or the PCI pass-through device.
The following image shows these two steps during the installation:
Figure 34: DIGI driver installation
Select the AccelePort Xr PCI board (option 0) and leave interrupts disabled on the board (answer: y).
Note: if you install the driver for DIGI PCI pass-through devices, the Digi Accele C/X is also supported.
The driver installation creates new terminal devices under /dev/dty.
5.5.3.10.3.4 Managing DIGI AccelePort Ports on Solaris
The system does not need to be rebooted after the driver installation. The serial ports are available immediately after a
successful installation.
As with the ports in on-board mode, the easiest way to manage the created ports is the graphical management tool that
comes with Solaris. In older versions, this is the admintool. In Solaris 10, this is the Solaris Management Console smc.

Document number: 55-16-005-001
© Stromasys 2018 Charon-SSP for Linux Version 2.0.1 – User’s Guide / Configuring and Using the Charon-SSP Software 76
The following example shows how the ports (a001-8) are displayed in the smc tool on Solaris 10. Details about the port
configuration can be found in the appropriate Solaris system management guides.
Figure 35: DIGI board ports in smc
5.5.3.10.4 Adding a DIGI PCI Pass-Through Device
To add a DIGI PCI pass-through device, select the appropriate option on the configuration screen, and then select the
device (the devices provided by the Charon-SSP pass-through driver are named kdigi*):
Figure 36: DIGI Board PCI Pass-Through

Document number: 55-16-005-001
© Stromasys 2018 Charon-SSP for Linux Version 2.0.1 – User’s Guide / Configuring and Using the Charon-SSP Software 77
On Solaris, the driver supporting the device must be installed. See section about Digi board emulation mode for more
information. Make sure to select the correct adapter during the driver installation. If any host operating system driver has
been loaded for the PCI board to be used in PPT mode, it must be unloaded (and possibly blacklisted).
The management of the new serial devices in Solaris is the same as described above.
5.5.3.10.5 TTYX Ports on Charon-SSP/4M
Charon-SSP/4M emulates a STC SBus card with eight serial ports and one parallel port. This card is supported by the
standard drivers.
5.5.3.10.5.1 Adding Serial Ports in TTYX Mode on SUN-4M
Adding serial ports in TTYX mode on Charon-SSP/4M works in the same way as for ports in TTYX on-board mode on
Charon-SSP/4U. Please refer to the section Adding Serial Ports in TTYX On-Board Mode.
Note that the created ports have different names than in TTYX on-board mode: They are called TTY_1, TTY_2, etc.
5.5.3.10.5.2 Modifying or Removing Ports in TTYX Mode on SUN-4M
Modifying and removing ports TTYX mode on Charon-SSP/4M works in the same way as for ports in TTYX on-board
mode on Charon-SSP/4U. Please refer to the section Modifying or Removing TTYX On-Board Mode Ports for details.
5.5.3.10.5.3 Managing SUN-4M TTYX Ports on Solaris
After booting Solaris with the reconfigure option (boot <disk> -r), the new serial ports should be available in Solaris. The
easiest way to manage them is the graphical management tool that comes with Solaris.
In older versions, this is the admintool.
In Solaris 10, this is the Solaris Management Console smc.
The following example shows the admintool output of a Solaris 2.6 system:
Figure 37: TTYX ports on Solaris 2.6 in a Charon-SSP/4M instance

Document number: 55-16-005-001
© Stromasys 2018 Charon-SSP for Linux Version 2.0.1 – User’s Guide / Configuring and Using the Charon-SSP Software 78
5.5.3.11 GPIB Configuration
Charon-SSP can pass a PCI or PCIe GPIB device to the guest Solaris system as an NI-488.2 GPIB device. To select an
existing device, select the GPIB configuration option in the left-hand pane. This will open the configuration window, where
you can add a new GPIB device, or edit and remove an existing one. The sample output below shows the add dialog:
Use the GPIB device drop down menu to select the desired device (the devices provided by the Charon-SSP pass-
through driver are named kni*). Then press OK.
To edit or remove an existing device, select it. This will activate the Edit and Remove buttons.
The GPIB PCI pass-through devices are only supported on the Barebone and Baremetal distributions, and only for
SUN-4U(+).
Prerequisites:
Solaris: use the original device driver for the device.
Host operating system: unload operating system specific drivers for the device (if present). The device is handled by the Charon-SSP pass-through driver.
Figure 38: GPIB configuration

Document number: 55-16-005-001
© Stromasys 2018 Charon-SSP for Linux Version 2.0.1 – User’s Guide / Configuring and Using the Charon-SSP Software 79
5.5.3.12 Parallel Interface Configuration
Charon-SSP/4M emulates a STC SBus card with eight serial ports and one parallel port. This card is supported by the
standard drivers.
To configure the parallel port in the Charon-SSP Manager, click on the option Parallel in the left-hand panel. This opens
the configuration screen for the parallel port:
After enabling the parallel port, you can select a parallel device or file on the host system. The device name on Solaris is
/dev/bpp0. To make sure the device is available, boot the guest Solaris system with the reconfigure option (boot
<device> -r).
Figure 39: Parallel port configuration on for Sun-4M

Document number: 55-16-005-001
© Stromasys 2018 Charon-SSP for Linux Version 2.0.1 – User’s Guide / Configuring and Using the Charon-SSP Software 80
5.5.3.13 Audio Configuration
To enable, disable, or change an audio server for the emulated Solaris system, click on the option Audio in the left-hand
pane:
After enabling the functionality, you can set the IP address of the audio server and click on OK to save the settings. The
default is the local host system. Currently, only pulse-audio on Linux is a supported audio server.
The audio emulation supports the following features:
DBRIe interface + CS4215 mmcodec
Mono, Stereo Playback and recording
uLaw, aLaw, 8/16 bit linear
Sample rates from 5513Hz to 48000Hz (Voice to DAT quality)
Volume control, balance, mute
In addition to providing an emulated sound card to the Solaris guest operating system, the audio configuration also enables the Keyboard Buzz feature, i.e., it allows Solaris applications to create keyboard beeps.
Figure 40: Audio configuration screen

Document number: 55-16-005-001
© Stromasys 2018 Charon-SSP for Linux Version 2.0.1 – User’s Guide / Configuring and Using the Charon-SSP Software 81
Prerequisites:
On the audio server, PulseAudio must be enabled for network access. On the Barebone and Baremetal distributions,
this is preconfigured. On other Linux systems, perform the following steps to enable network access to PulseAudio:
Configure PulseAudio on Linux for network access
Step Description Command
1 Check if PulseAudio is installed on the system.
# rpm -qa | grep -i pulseaudio
If the software is not installed, use
# yum install pulseaudio pulseaudio-utils
to install it.
2 Enable network access to the PulseAudio server.
Edit the PulseAudio configuration file:
If PulseAudio is run in a non-root account (normal case):
# vi /etc/pulse/default.pa
If PulseAudio is run as root user (system mode):
# vi /etc/pulse/system.pa
Add the following line if it does not already exist :
load-module module-native-protocol-tcp auth-anonymous=1
Save the file.
3 Restart the PulseAudio server.
Stop the PulseAudio server:
$ pulseaudio -k
Start the PulseAudio server:
$ pulseaudio --start
If the default.pa file was modified, these commands must be run as the non-root user under which PulseAudio was originally started. If PulseAudio was started under the root account and the system.pa file was modified, this can also be done as the root user.
4 Check if the server is listening to its port.
# netstat -an | grep 4713 or # netstat -a | grep -i pulse
Make sure access to the PulseAudio server port is not blocked by a firewall. However, access to the port should only be allowed as required in order to minimize security risks.
On Solaris, the audio driver is part of the standard Solaris installation kit. So no additional driver should be needed.
However, after configuring the audio server for the instance in Charon-SSP Manager,
the Charon instance needs to be restarted, and
the Solaris guest must be booted with the reconfigure option (boot <device> -r) to create the /dev/audio device.
Note: If the PulseAudio configuration is changed to stop the network listener while the guest Solaris system is running, the
audio device in the guest stops working. If the network listener is then re-enabled, the audio device will not start working
again until the emulator instance has been restarted.
If only the Keyboard Buzz feature will be used, the Solaris guest system does not require an active sound card.
Testing the audio functionality:
After configuring the audio function and rebooting the Solaris guest system, use the command line utilities
audioplay/audiorecord, the GUI-based Java media player, sdtaudio, or audiotool depending on the Solaris version
used. These tools allow you to record and play back audio.

Document number: 55-16-005-001
© Stromasys 2018 Charon-SSP for Linux Version 2.0.1 – User’s Guide / Configuring and Using the Charon-SSP Software 82
5.5.3.14 Ethernet Configuration
To view or change the virtual machine Ethernet configuration, select Ethernet in the Device column of the left-hand pane.
Figure 41: Virtual machine Ethernet configuration
Charon-SSP/4U allows the user to select between the controller models HME and QFE (4-port FastEthernet) for
additional emulated Ethernet adapters. This option is not available for Charon-SSP/4M.
Please note that the first configured Ethernet interface in the Charon-SSP Manager represents the SPARC on-board device and must be of type HME. Hence, it will always show model HME even if type QFE has been selected.
Prerequisites for QFE controllers on Solaris:
After newly configuring one or more QFE Ethernet ports, boot the guest system with the reconfigure flag (boot <disk> -r).
To support the QFE controller, Solaris needs the Sun Quad FastEthernet Adapter Driver (SUNWqfed). This package is
bundled with the Solaris operating environment starting with Solaris 2.6 Hardware: 5/98. For earlier versions of Solaris,
the vendor provided a driver CD with the adapter. After installing the driver, the interfaces should become visible in the
ifconfig output upon entering the command ifconfig qfeX plumb. X denotes the interface number. Use prtconf to
identify the correct interface numbers. To assign an address to the qfeX interface, create a /etc/hostname.qfeX file with
the hostname for the interface and add the address for the hostname to /etc/hosts.
QFE configuration notes:
To configure a QFE Ethernet ports:
Select QFE in the Add-on adapter model drop-down menu.
Configure the on-board Ethernet device. This will be of type HME even if adapter model QFE is selected.
Configure the desired number of emulated QFE ports (the number does not have to be a multiple of four).
If the guest system does not use the HME controller, you can create a virtual network without an external interface and assign one of the bridge interfaces to the controller as a kind of dummy interface.
Alternatively, you could assign the localhost interface (lo) to the unused emulated Ethernet device.

Document number: 55-16-005-001
© Stromasys 2018 Charon-SSP for Linux Version 2.0.1 – User’s Guide / Configuring and Using the Charon-SSP Software 83
Charon-SSP Ethernet configuration screen functions:
To create a virtual network, click the Create Virtual Network button. For further details on creating, changing and removing a virtual network, see the section Managing Virtual Networks. Do not use Charon-SSP Virtual Networks in combination with VMware ESXi vSwitch virtual network adapters. The vSwitch does not implement the STP protocol. This could lead to a layer-2 loop disrupting normal network operation.
To modify an existing virtual Ethernet adapter, select it from the list of configured devices and click the Edit button.
To remove an existing virtual Ethernet adapter, select the adapter from the list of configured devices and click the Remove button.
To add a new virtual Ethernet adapter click the Add button.
After selecting to add or to edit an adapter, a window similar to the one below opens with the configuration parameters of
the virtual Ethernet device.
Figure 42: Edit Ethernet adapter
The following table lists and describes the fields in the Add/Edit Ethernet Adapter configuration window:
Virtual Ethernet configuration fields
Field Description
Interface
Select the host attached Ethernet device to be connected to the virtual device. This field is a drop-
down list of all the network adapters available on the host system. The interface must allow
promiscuous mode. It is permitted to assign the localhost interface (lo) to an emulated device (if the
device will not be used by the guest). It is also permitted to add the same physical device to
multiple emulated Ethernet devices of the same instance. However, this is not recommended for
performance reasons. Assigning the same physical interface to more than one Charon-SSP
instance is not permitted. If an interface is already in use, it will prevent the instance from starting.
On VMware ESXi and other hypervisors promiscuous mode is disabled by default on virtual adapters. It should be enabled for Charon-SSP Ethernet adapters to work properly. If this is not possible for some reason, the MAC address of the emulated adapter can be set to the physical VMware ESXi network adapter MAC address. See Set MAC Address parameter below.
Set MAC Address
To force the MAC address of the virtual Ethernet device to a specific value, select the checkbox
and enter the address in groups of two character hexadecimal digits, separated by a colon, e.g.
08:00:2b:aa:bb:cc.
This option can be useful in cases where licensing is tied to a network adapter MAC address. It can also be used as a workaround (setting it to the physical VMware ESXi network adapter MAC address) if the VMware virtual network adapter cannot be set to promiscuous mode.

Document number: 55-16-005-001
© Stromasys 2018 Charon-SSP for Linux Version 2.0.1 – User’s Guide / Configuring and Using the Charon-SSP Software 84
5.5.3.15 NVRAM Configuration
To view or change the NVRAM configuration of the emulated system, select NVRAM in the left-hand pane of the Virtual
Machine Settings Window:
On this screen, two parameters can be configured:
NVRAM Configuration Fields
Field Description
Host ID This option can be useful in cases where licensing is tied to the host ID of the physical system.
Disable auto-boot
Default: OFF. The automatic boot of the emulated system can be disabled.
Figure 43: NVRAM configuration

Document number: 55-16-005-001
© Stromasys 2018 Charon-SSP for Linux Version 2.0.1 – User’s Guide / Configuring and Using the Charon-SSP Software 85
5.5.3.16 License Settings
This setting is optional. It helps to manage a situation where multiple license keys are available on the system.
Open the license settings by clicking on the License option in the left-hand panel. Using the license settings, you can
define a primary and a backup license key. This is useful if there is a production license and a backup license limited to a
certain number of hours runtime. In this case, the parameters in this section avoid the unintentional depletion of the
backup-key hours. The parameters can also be used to define the correct key should Charon-SSP identify the key for a
different product as the default key by mistake.
The following example shows the configuration window:
Add the desired license IDs for the primary and backup key.
On a conventional Charon-SSP installation, you can use the following command to identify the license ID of all installed
licenses (run from a local terminal):
$ /opt/charon-agent/ssp-agent/utils/license/hasp_srm_view -all
On both, a conventional Charon-SSP and a Baremetal installation, you can use the Charon-SSP Manager License
Management tools to identify the license ID. Refer to the license management section for more detail.
Figure 44: Parameters to define primary and secondary license key

Document number: 55-16-005-001
© Stromasys 2018 Charon-SSP for Linux Version 2.0.1 – User’s Guide / Configuring and Using the Charon-SSP Software 86
5.5.3.17 Log Configuration
To view or change the virtual machine logging configuration, select Log in the Device column of the left-hand pane.
The log configuration of the conventional Charon-SSP products has one additional option: the log-file path can be
configured:
Figure 45: Log configuration Charon-SSP Baremetal
Figure 46: Log configuration conventional Charon-SSP products

Document number: 55-16-005-001
© Stromasys 2018 Charon-SSP for Linux Version 2.0.1 – User’s Guide / Configuring and Using the Charon-SSP Software 87
The following table lists each of the fields in the log configuration window and describes their operation.
Virtual machine logging configuration fields
Field Description
Log path Specify the path and name of the log file. Available on conventional products only. On
Charon-SSP Baremetal, a default path will be used for all log files.
Severity Set the minimum level of messages that should be reported. Legal values are debug, info,
warning, error and fatal. The default is info.
Output to Indicate the location to which virtual machine logging information should be written. The default is
file.
Option Description
file Write virtual machine logging information only to the file configured in Log
path.
console Write virtual machine logging information only to the virtual machine console.
all Write virtual machine logging information to both the file configured in Log path
and the virtual machine console.
Rotation
Select the number of old versions of the log files to be saved. The Charon-SSP log files are
rotated when the virtual machine starts and, during operation, based on the number of lines
written to the log. Once the number of log lines reaches 800.000, the log is rotated.
5.5.3.17.1 Viewing the Charon-SSP Log Files
Currently, Charon-SSP writes three types of instance specific log files:
The virtual machine log: it documents the operation and potential problems of the Charon-SSP instance in question. For example, if no valid license is available, this is logged here.
The console log: if configured, Charon-SSP keeps a console log for TTYA and TTYB.
Crash log: should the Charon-SSP instance terminate unexpectedly, trace-backs and similar information are found in this log file. The contents help Stromasys engineering to identify and repair the problem.
The log files can be viewed using Log tab of the Charon-SSP Manager:
To select a log file, click on the file-browser button. This shows all available logs in the default (or configured log path) and
lets you select a file. You can also select a different file path to display log files in other locations.
Entering text into the search field and pressing find will filter the log contents according to the search string.
Figure 47: Log tab of the Charon-SSP Manager

Document number: 55-16-005-001
© Stromasys 2018 Charon-SSP for Linux Version 2.0.1 – User’s Guide / Configuring and Using the Charon-SSP Software 88
5.5.4 Virtual Machine Context Menu
Each configured virtual machine in the Charon-SSP Manager has a context menu that is opened by clicking on the virtual
machine with the right mouse button. The image below shows a sample from a conventional Charon-SSP installation
with the following options:
Run Virtual Machine
Virtual Machine Settings
Remove VM from the List
Delete VM from Disk
Rename VM
Charon-SSP Baremetal has one additional context menu item:
Backup VM
These options are described in the following sections.
Right-clicking into the virtual machine list pane when no virtual machine is selected opens an additional small context
menu with options to create or import a virtual machine.
5.5.4.1 Run the Virtual Machine
The option Run the Virtual Machine starts the virtual machine. The Charon-SSP icon next to the machine name changes
from gray to multi-color to indicate a running instance. After starting the virtual machine, all options in the context menu
apart from Virtual Machine Settings (and, in the case of a Baremetal system, Backup VM) are inactive until the virtual
machine is stopped again.
The Run the Virtual Machine option is equivalent to
clicking on Run Virtual Machine at the right-hand bottom of the virtual machine summary page, or
clicking on the blue triangle at the top of the Charon-SSP Manager window.
This option is inactive while the virtual machine is running.
5.5.4.2 Virtual Machine Settings
The option Virtual Machine Settings leads to the configuration options that are described in section Configuring a Virtual
Machine.
Figure 48: Charon-SSP virtual machine context menu

Document number: 55-16-005-001
© Stromasys 2018 Charon-SSP for Linux Version 2.0.1 – User’s Guide / Configuring and Using the Charon-SSP Software 89
5.5.4.3 Remove Machine from the List
The option Remove Machine from the List removes the virtual machine from the machine list in the Charon-SSP
Manager. The associated configuration file and virtual storage container files are not deleted. If needed, the machine can
be re-opened and imported into the Charon-SSP Manager using the Import option under the Virtual Machine menu item
of the Charon-SSP Manager.
Important: Due to restrictions in Charon-SSP Baremetal version 2.0.1, virtual machines removed from the Charon-
SSP Manager cannot be re-imported into the Manager without using a workaround.
Workaround: If you need to remove a virtual machine from the Charon-SSP Manager on a Baremetal system and
expect to reuse the configuration at a later time, back up the configuration file and other virtual machine data using the
Backup VM menu item (see below). Later, you can extract the data from the ZIP-file and import the configuration into
the Manager.
This option is inactive while the virtual machine is running.
5.5.4.4 Delete VM from Disk
The complete removal of a virtual machine must be performed in several steps. Each of these steps is detailed below.
Steps to remove a virtual machine
Step Description
1 Shut down the guest operating system and stop the virtual machine if it is running. The menu option to
delete a virtual machine is inactive while the virtual machine is running.
2 Right-click on the name of the virtual machine in the left hand pane of Charon-SSP Manager.
3
The context menu is displayed.
Select Delete VM from Disk.
Important: In older versions, Charon-SSP Manager may not ask you to confirm this action and
the configuration and log files are immediately deleted. Associated virtual storage container files
are not deleted.
4 Any configurations and log files related to the system no longer exist.

Document number: 55-16-005-001
© Stromasys 2018 Charon-SSP for Linux Version 2.0.1 – User’s Guide / Configuring and Using the Charon-SSP Software 90
5.5.4.5 Rename VM
The option Rename VM allows you to rename your virtual machine. Click on this option to open the following window:
Figure 49: Renaming a virtual machine
Enter the new name for the virtual machine and press OK. The virtual machine appears in the Charon-SSP Manager with
the new name. This action renames the configuration directory of the virtual machine and the associated configuration file.
This option is inactive, while the virtual machine is running.
5.5.4.6 Backup VM (Charon-SSP Baremetal only)
On a Charon-SSP Baremetal host system, use this function create a ZIP-file of the configuration file, log files and other
VM information. When this option is selected, a window opens where storage location and ZIP-file name can be selected.
The resulting backup can be copied to a remote system via SFTP (via the user storage).
This function does not backup the virtual and physical disks used by the Charon-SSP instance.
5.5.5 Managing Virtual Networks
Charon-SSP Manager provides a feature to configure a collection of virtual network tap (TAP) devices that constitute a
host-attached virtual LAN. These interfaces are bridged via a physical network device on the host system that allows the
virtual LAN to connect to the physical LAN. Alternatively, a bridge without external connection can be created.
The use of this option requires bridge-utils to be installed on the system. If this is not yet the case on a conventional
Charon-SSP installation, refer to the installation section of the corresponding user’s guide. The package is
preinstalled on Barebone and Baremetal distributions.
Do not use Charon-SSP Virtual Networks in combination with VMware ESXi vSwitch virtual network adapters. The
vSwitch does not implement the STP protocol. This could lead to a layer 2 loop disrupting network operation.

Document number: 55-16-005-001
© Stromasys 2018 Charon-SSP for Linux Version 2.0.1 – User’s Guide / Configuring and Using the Charon-SSP Software 91
5.5.5.1 Managing Network Connections
In preparation to creating a virtual network, you can display and change the current network interface configuration of the
host system. To open the Network Connections configuration window, go to Tools > Virtual Network > Network
Connections (conventional Charon-SSP installation) or Tools > Charon Baremetal > Network > Network Connections
(Charon-SSP Baremetal).
This opens a window similar to the one below:
Using this window, you can set up the existing host system network interfaces according to your requirements. Once you
have created a virtual bridge with TAP interfaces, these interfaces will also be visible here. The OK button confirms any
changes made and Close discards them.
Assigning a manual address of 0.0.0.0 (netmask 255.255.255.255) to an interface will cause it to be up, but no IP
address will be assigned by the host system (i.e., the interface can be dedicated to the guest system).
It is permissible that both, host system and guest system assign their own IP address to the same interface.
However, this is not recommended, as it will cause non-optimal network performance
5.5.5.2 Creating a Virtual Network
A virtual network can be used to create a virtual bridge on the host system with a number of virtual network interfaces
attached to it. The virtual interfaces can be used as network interfaces when configuring Charon-SSP instances. This
virtual network can be connected to the external network using a so-called binding interface, or it can be internal to the
host system. To create a new virtual network, follow the menu path Tools > Virtual Network > Create Virtual Network
(conventional Charon-SSP installation) or Tools > Charon Baremetal > Network > Create Virtual Network (Baremetal
installation) to open the Create Virtual Network window as shown in the screenshot below:
Figure 50: Configuring available network connections

Document number: 55-16-005-001
© Stromasys 2018 Charon-SSP for Linux Version 2.0.1 – User’s Guide / Configuring and Using the Charon-SSP Software 92
The available configuration options are described in the table below:
Configuration options for creating a virtual network
Field Description
Binding interface
If set to ON, a physical interface can be selected from the Virtual bridge interface
dropdown menu, on which the bridge is configured.
If set to OFF, a user-defined name can be entered in the Virtual bridge name field.
This name will be used in naming the bridge and TAP interfaces instead of using the
physical interface name.
STP for bridge Enable or disable the Spanning Tree Protocol on the virtual bridge.
Virtual bridge
interface
Dropdown menu to select a physical interface that will provide an external network
connection to the bridge. Inactive if the binding interface is disabled.
Virtual bridge name
Used to set a user-defined bridge name if the binding interface is disabled. This name
will be used in place of the physical interface name when creating the bridge and TAP
interfaces. In addition, all interfaces of this type of virtual network are prefixed by the
string “ssp”. Inactive if the binding interface is enabled.
Number of virtual
adapters Specify how many virtual adapters are needed.
Method
Specify the method used for addressing the interface used to connect the host to the
external network. Options are DHCP and Manual. If the binding interface is disabled,
manual configuration is mandatory (to assign a configuration to the host-internal
bridge interface).
Address If manual addressing is selected, the host IP address can be added in this field. The
field is inactive if DHCP is selected.
Netmask If manual addressing is selected, the netmask for the host IP address can be added in
this field. The field is inactive if DHCP is selected.
Gateway If manual addressing is selected, the default gateway for the host can be added in this
field. The field is inactive if DHCP is selected.
Figure 51: Virtual network configuration screen
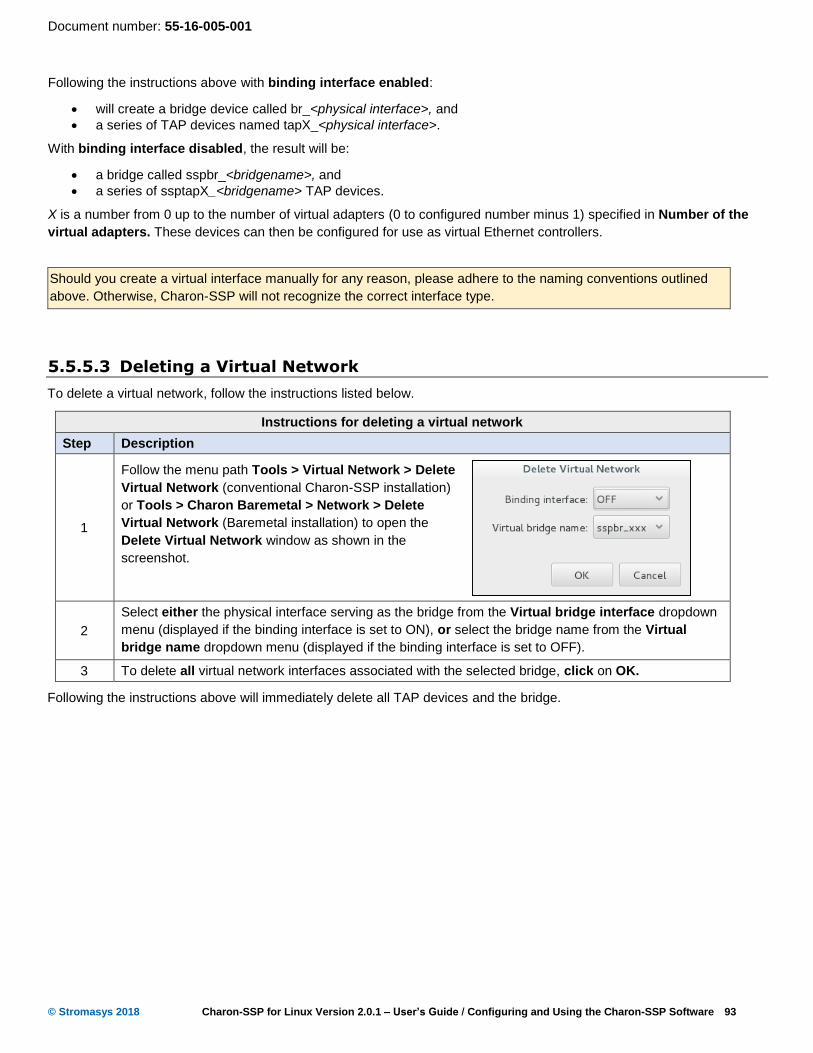
Document number: 55-16-005-001
© Stromasys 2018 Charon-SSP for Linux Version 2.0.1 – User’s Guide / Configuring and Using the Charon-SSP Software 93
Following the instructions above with binding interface enabled:
will create a bridge device called br_<physical interface>, and
a series of TAP devices named tapX_<physical interface>.
With binding interface disabled, the result will be:
a bridge called sspbr_<bridgename>, and
a series of ssptapX_<bridgename> TAP devices.
X is a number from 0 up to the number of virtual adapters (0 to configured number minus 1) specified in Number of the
virtual adapters. These devices can then be configured for use as virtual Ethernet controllers.
Should you create a virtual interface manually for any reason, please adhere to the naming conventions outlined
above. Otherwise, Charon-SSP will not recognize the correct interface type.
5.5.5.3 Deleting a Virtual Network
To delete a virtual network, follow the instructions listed below.
Instructions for deleting a virtual network
Step Description
1
Follow the menu path Tools > Virtual Network > Delete
Virtual Network (conventional Charon-SSP installation)
or Tools > Charon Baremetal > Network > Delete
Virtual Network (Baremetal installation) to open the
Delete Virtual Network window as shown in the
screenshot.
2
Select either the physical interface serving as the bridge from the Virtual bridge interface dropdown
menu (displayed if the binding interface is set to ON), or select the bridge name from the Virtual
bridge name dropdown menu (displayed if the binding interface is set to OFF).
3 To delete all virtual network interfaces associated with the selected bridge, click on OK.
Following the instructions above will immediately delete all TAP devices and the bridge.

Document number: 55-16-005-001
© Stromasys 2018 Charon-SSP for Linux Version 2.0.1 – User’s Guide / Configuring and Using the Charon-SSP Software 94
5.5.5.4 Resizing a Virtual Network
To resize a virtual network, follow the instructions listed below.
Instructions for resizing a virtual network
Step Description
1 Shut down any running guest operating systems and stop all virtual machines connected to the virtual
network TAP devices.
2 Delete the current virtual network, using the instructions detailed in Deleting a Virtual Network.
3 Re-create the virtual network using the instructions detailed in Creating a Virtual Network. Make sure
to specify the new virtual network size in the Number of the virtual adapters field.
4 Reconfigure the Ethernet configuration of the virtual machines. This step is only necessary if shrinking
the virtual network and only if the virtual machines are configured for TAP devices that no longer exist.
5 Start the attached virtual machines.
Shrinking a virtual network may make it necessary to adjust a number of virtual machine configurations because
the name of their virtual Ethernet interface has changed.

Document number: 55-16-005-001
© Stromasys 2018 Charon-SSP for Linux Version 2.0.1 – User’s Guide / Configuring and Using the Charon-SSP Software 95
5.5.6 Miscellaneous Management Tasks
The following sections describe some additional functions provided by the Charon-SSP Manager interface that may be
useful in certain instances.
Gathering Host Information
Adding an Existing Virtual Machine to Charon-SSP Manager
Determining the Charon-SSP Manager Version
Modifying the Charon-SSP Agent Preferences
5.5.6.1 Gathering Host Information
To view the details of the system hosting the Charon-SSP instance, follow the menu path Tools > Host Information
(conventional Charon-SSP product) or Tools > Charon Baremetal > Host Information (Baremetal installation) to open a
window similar to the one below.
This window provides details of the host system's hardware configuration and operating system version.
5.5.6.2 Adding an Existing Virtual Machine to the Charon-SSP Manager
To add an existing virtual machine to the Charon-SSP Manager, you have to use the Import function. This function is
available in the Virtual Machine menu (when Home is selected), on the Home page of the Charon-SSP Manager, and in
the context menu of the virtual machine pane when no Charon-SSP instance is selected.
The Import function lets you select an existing Charon-SSP virtual machine configuration and a name for the newly
added system.
The imported configuration may have to be adapted to the possibly different environment on the new host system.
For example, the path to the virtual storage container files or the names of network devices may be different when
compared to the previous environment.
5.5.6.3 Determining the Charon-SSP Manager Version
To display the version of Charon-SSP Manager currently running, select Help > About from the menu bar. This will open
a window displaying the version of the software.
Figure 52: Host information display

Document number: 55-16-005-001
© Stromasys 2018 Charon-SSP for Linux Version 2.0.1 – User’s Guide / Configuring and Using the Charon-SSP Software 96
5.5.6.4 Modifying the Charon-SSP Agent Preferences
To modify the preferences maintained by the Charon-SSP Agent software, follow the menu path Virtual Machine >
Preferences to open a window similar to the one shown below.
The preferences window offers the following configuration options:
To limit the access to the Charon-SSP agent to the local system, check the box under Agent Option.
The password to be used by the Charon-SSP Manager to connect to the current Charon-SSP Agent can be
modified by clicking on the YES button next to Do you want to change the password? This will open a
change-password dialog. Please note that on Baremetal systems, this will change all management and user
passwords for the system.
Conventional Charon-SSP product only: It is possible to alter the root location of the Charon-SSP executable
images. This might be useful, for example if multiple versions of Charon-SSP have been installed. In this case,
this can be used to switch between them. To change the root location, alter the pathname in the field Location.
This configuration does not actually move any files. It only changes the pointer to the directory.
Figure 53: Agent preferences window Baremetal product
Figure 54: Agent preferences window conventional product

Document number: 55-16-005-001
© Stromasys 2018 Charon-SSP for Linux Version 2.0.1 – User’s Guide / Configuring and Using the Charon-SSP Software 97
5.5.6.5 Setting Console Options
The way the Charon-SSP Manager displays the built-in console can be influenced by using the console options
configuration. To open the configuration window, select Virtual Machine > Console Options. This displays a window
similar to the following:
The configuration window contains two configuration options for the built-in console:
Font settings allows selecting a different font to use for displaying the console output. Click on the Change button to select the desired font from a menu.
Log settings allows selecting the number of lines cached for the console display area in the Charon-SSP Manager. When the virtual machine is stopped, the console display tab shows the cached lines of console output for this machine. Please note, this log setting is not related to defining a log file in the TTYA and TTYB configuration.
Figure 55: Console options configuration

Document number: 55-16-005-001
© Stromasys 2018 Charon-SSP for Linux Version 2.0.1 – User’s Guide / Configuring and Using the Charon-SSP Software 98
5.5.6.6 Retrieving a Charon-SSP Core Dump
If Charon-SSP instances encounter an unrecoverable problem, they may write a core dump. The user may be instructed
by Stromasys support to retrieve such a core dump and make it available to Stromasys for troubleshooting.
This description applies to systems running the Charon-SSP software including the Charon-SSP Agent (default for
Barebone and Baremetal systems). Administrators of systems without a running Charon-SSP Agent who want to enable
core dumps for Charon-SSP instances must configure their own environment. At startup, the agent will configure the core-
dump location depending on the Charon-SSP variant:
Conventional, RPM-based Charon-SSP installation: /home/
Conventional, Barebone Charon-SSP installation: /home/charon
Baremetal Charon-SSP installation: /charon/storage
The name of the core dump written to the configured location consists of several components:
Example: core-ssp4m-11-1514348663.5048
In the above example
ssp4m is the name of application,
11 is the signal causing the core dump,
1514348663 is the Unix tick time since 1970, and
5048 is the process ID of affected process.
Copying the file off the system:
The written core-dump file is owned by the root user and not readable by other users. Therefore, you need root privileges
to copy the file of the system.
On a conventional system: o Become the root user. o Either copy the file to another system using SCP or SFTP, or o attach a USB device to the system, mount it, copy the file to the USB device, unmount, and remove the
device.
On a Baremetal system: Either
o Attach a USB device to the system. o Use the Storage Manager to mount it. o Use the File Manger to copy the core dump file to the USB device. o Use the Storage Manager to unmount the USB device. o Remove the USB device from the system.
Or
o Open the File Manager. o Navigate to the core dump file in /charon/storage. o Rename the core dump file, e.g., by adding a suffix to it. This will make the file world-readable. o Connect to the system using SFTP (user: storage) and retrieve the core dump file.

Document number: 55-16-005-001
© Stromasys 2018 Charon-SSP for Linux Version 2.0.1 – User’s Guide / Configuring and Using the Charon-SSP Software 99
5.5.7 Baremetal-only Tools
When Charon-SSP Manager is connected to a Baremetal system, many tools in the Charon-SSP Manager Tools
menu are shown in the Tools > Charon Baremetal menu instead of the main Tools menu. In addition to the tools and
options described above, there are tools that are only available when the Charon-SSP Manager is used to manage a
Baremetal system. These tools are:
File Manager
Storage Manager
Time & Date
SFTP Server
They are accessible in Charon-SSP manager vial Tools > Charon Baremetal.
5.5.7.1 Baremetal File Manager
As the operating system tools of a Charon-SSP Baremetal system are not accessible to the user, the file manager allows
the user to manage files and directories in the data area of the Charon-SSP host system. The image below shows an
example of a file manager window:
As indicated in the context menu displayed, the file manager enables basic file management tasks:
Create a new folder
Cut, copy, and paste files
Delete files
Rename files
The buttons at the bottom of the window allow closing the file manager or opening the storage manager. The triangle at
the top right shows relevant alerts, if any such alerts exist.
Figure 56: Baremetal file manager

Document number: 55-16-005-001
© Stromasys 2018 Charon-SSP for Linux Version 2.0.1 – User’s Guide / Configuring and Using the Charon-SSP Software 100
5.5.7.2 Baremetal Storage Manager
As the operating system tools of a Charon-SSP Baremetal system are not accessible to the user, the storage manager
allows the user to manage storage devices connected to the Charon-SSP host system. The image below shows an
example of a storage manager window:
As indicated in the context menu displayed, the storage manager enables the following tasks:
Adding a device to the Charon-SSP host system data storage
Detaching a device from the Charon-SSP host system data storage
Mounting and unmounting a file system (for example, if a USB device was attached to the system)
Formatting a volume
Using the buttons at the bottom of the window, the storage manager can be closed, or the file manager can be opened.
5.5.7.3 Setting Time and Date for Charon-SSP Baremetal
The Time & Date option allows setting the time and date of the Charon-SSP Baremetal system via Charon-SSP Manager.
The following image shows the available options:
In this window you can
enable NTP or manually set time and date, and
configure the time zone.
Figure 57: Baremetal storage manager
Figure 58: Baremetal time and date menu
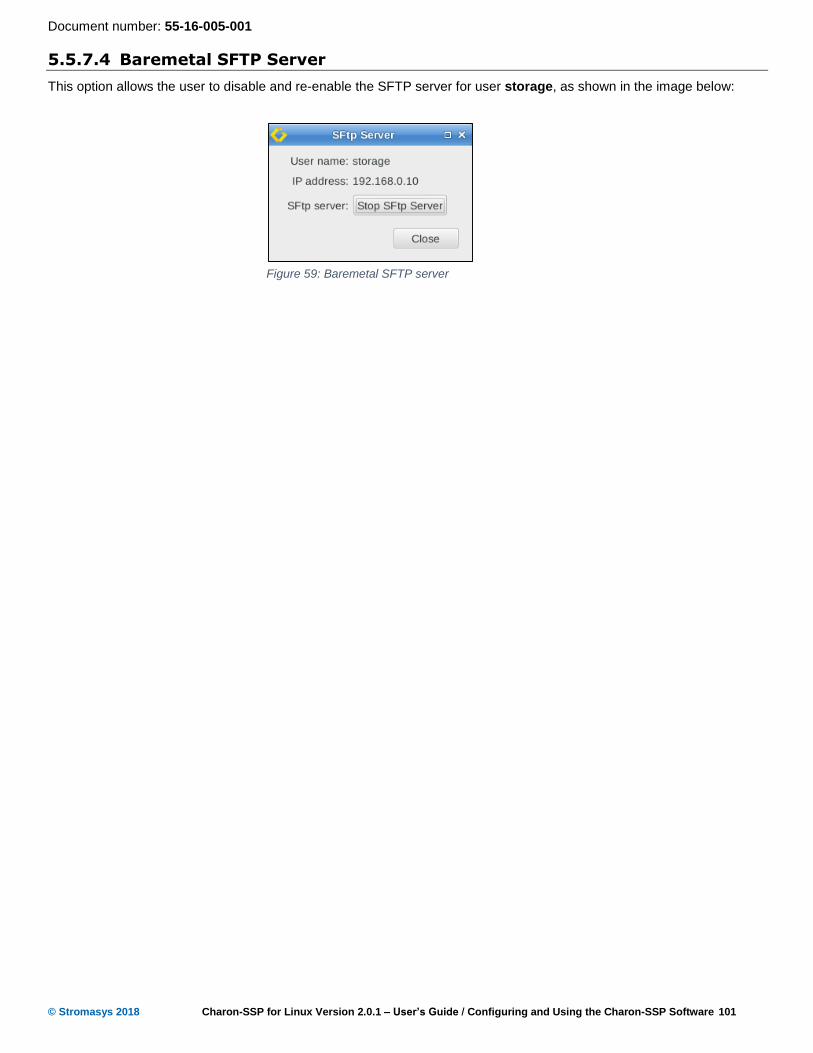
Document number: 55-16-005-001
© Stromasys 2018 Charon-SSP for Linux Version 2.0.1 – User’s Guide / Configuring and Using the Charon-SSP Software 101
5.5.7.4 Baremetal SFTP Server
This option allows the user to disable and re-enable the SFTP server for user storage, as shown in the image below:
Figure 59: Baremetal SFTP server
Document number: 55-16-005-001
© Stromasys 2018 Charon-SSP for Linux Version 2.0.1 – User’s Guide / Configuring and Using the Charon-SSP Software 102
5.6 Using Charon-SSP from the Command-Line
If you want to start a Charon-SSP instance from the command-line and later use Charon-SSP Manager to
manage the instance, you need to give the Charon-SSP instance an alias that is the same as the virtual machine
name in the Charon-SSP Manager. Otherwise, the Charon-SSP Manager will not recognize the running Charon-
SSP instance.
5.6.1 Program Name
The executable programs to run Charon-SSP from the command-line are listed below:
ssp4m – Charon-SSP/4M 32-bit SPARC V8, Sun-4m architecture virtual machine
ssp4u or ssp4u-plus – Charon-SSP/4U(+) 64-bit SPARC V9, Sun-4u architecture virtual machine
The full path to the executable programs is /opt/charon-ssp/ssp-4m/ssp4m, /opt/charon-ssp/ssp-4u/ssp4u and
/opt/charon-ssp/ssp-4u/ssp4u-plus respectively.
5.6.2 Synopsis
The syntax of the commands is specified below:
ssp4m | ssp4u | ssp4u-plus <options and values>
5.6.3 Description
This is the lowest level access to the Charon-SSP virtual machine software. It can be started in four different modes:
In utility mode, it is possible to specify the -l, -s, and -k options to list and terminate running instances.
In both foreground and background mode, the ssp4m/ssp4u software can be used to run a SPARC virtual machine. The difference between the two is that in background mode the virtual machine runs as a daemon, releasing the controlling terminal.
In interactive mode, a virtual machine and an interactive session are started for debugging purposes. This mode is for use by Stromasys only. Its options are not documented in detail in this guide.

Document number: 55-16-005-001
© Stromasys 2018 Charon-SSP for Linux Version 2.0.1 – User’s Guide / Configuring and Using the Charon-SSP Software 103
The following table describes all the options that can be passed to the ssp4m/ssp4u command-line utility.
Virtual machine command-line options
Option Description
-a alias_name
--alias=alias_name
Assign an alias to the new virtual machine instance. This option can be very useful when
attempting to locate a specific instance in the list reported by the -l option.
If this option is not specified, a name of the form instance-NN will be assigned
automatically, where NN consists of two digits from 0 - 9. A virtual machine instance
started via the Charon-SSP Manager shows its configured name as the alias.
-d
--daemon
Run the virtual machine as a daemon. This option cannot be combined with -i.
-f config_file
--config=config_file
When starting a new instance, use this option to specify the path and name of the virtual
machine configuration file. For further details about the format of this file, see the
Configuration File Reference Appendix. This is a mandatory argument, unless one of the
options -h, -k or -l is used.
-h
--help
Displays a brief usage message.
-i
--interactive
Start emulator in interactive mode. This option is reserved for use by Stromasys support. Do not use this mode unless advised to do so by Stromasys support. This option cannot be combined with -d.
-k pid
--kill=pid
Stop the virtual machine instance specified by pid. Use the -l to determine the process id of the relevant instance. This option cannot be combined with any of the other options. Please note that this command will not shut down the guest operating system cleanly.
-l
--list
This option lists the currently running Charon-SSP instances. The list consists of the following columns:
pid – process id of the virtual machine,
alias – instance alias specified by the -a option at startup,
start time – timestamp indicating when the virtual machine instance was started,
log time – timestamp indicating last event,
log code – descriptive code indicating the type of event, and
name – name of Charon-SSP image.
This option cannot be combined with any of the other options.
-p
--pause
Start the Charon-SSP instance, but do not boot the guest operating system (no autoboot).
-s name
--stop=name
Stop the virtual machine instance specified by name. Use the -l to determine the name of
the relevant instance. This option cannot be combined with any of the other options.
Please note that this command will not shut down the guest operating system cleanly.
-v
--version
Displays the Charon-SSP version.
--auto-boot?[=value]
Set parameter auto-boot? to true or false.
When no value specified, and this is the last command line parameter, the command displays the current setting of the parameter (the virtual machine will not be started).
--boot-device[=device]
Set default boot-device.
When no value is specified, and this is the last command line parameter, the command displays the current value of the parameter (the virtual machine will not be started).
If no option is provided, the command will show the help page.
If the command is started with only the filename parameter, it will start in foreground mode.

Document number: 55-16-005-001
© Stromasys 2018 Charon-SSP for Linux Version 2.0.1 – User’s Guide / Configuring and Using the Charon-SSP Software 104
5.6.4 Exit Status
The ssp4m and ssp4u/ssp4u-plus virtual machines exit with 0 on success and 255 if an error occurs.
5.6.5 Examples
If the configuration file is set up without using Charon-SSP Manager, the template files provided (/opt/charon-ssp/ssp-
4u/ssp4u.cfg and /opt/charon-ssp/ssp-4m/ssp4m.cfg) can be used as a starting point.
The following is a very basic example configuration file.
Example SUN-4M configuration
[system]
model = "SUN-4M"
[ram]
size = 64
[nvram]
path = ./vm.nvram
[ethernet]
interface = eth0
[ttya]
type = terminal
[log]
severity = info
destination = console
path = vm.log
Assuming the configuration file above is stored in vm.config the following command can be used to start the virtual
machine and connect to the console (console type terminal indicates that the current terminal is to be the console).
# /opt/charon-ssp/ssp-4m/ssp4m -f vm.config
This generates output similar to the following on the current terminal:
Charon-SSP virtual machine output
***************************************************************
Charon-SSP/4M - sun4m VM v1.5.23
Copyright (C) 1998-2017 Stromasys S.A. All Rights Reserved.
***************************************************************
[lines removed]
2017-09-01 09:03:09 INFO VM DIT is ON
2017-09-01 09:03:09 INFO NVRAM Initialize NVRAM with ./vm.nvram......
2017-09-01 09:03:09 ERROR NVRAM Can not open ./vm.nvram
2017-09-01 09:03:09 INFO NVRAM Initialize NVRAM with ./ssp4m_default.dat......
2017-09-01 09:03:09 INFO Memory Allocating 67108864 bytes memory from system...
***************************************************************
Charon-SSP/4M - sun4m VM v1.5.23
Copyright (C) 1998-2017 Stromasys S.A. All Rights Reserved.
***************************************************************
CPU_#0 TI, TMS390Z50(3.x) 0Mb External cache
CPU_#1 ******* NOT installed *******
CPU_#2 ******* NOT installed *******
CPU_#3 ******* NOT installed *******

Document number: 55-16-005-001
© Stromasys 2018 Charon-SSP for Linux Version 2.0.1 – User’s Guide / Configuring and Using the Charon-SSP Software 105
>>>>> Power On Self Test (POST) is running .... <<<<<
sun4m/SPARC V8 (1 X 390Z50), No Keyboard
Emulate OBP Rev. 2.25, 64 MB memory installed, Serial #12648430.
Ethernet address 38:fa:31:6e:b6:71, Host ID: 72c0ffee.
Type help for more information
ok
5.7 Using the Charon-SSP Agent
The Charon-SSP Agent is a Linux service running on a system with Charon-SSP virtual SPARC systems that are to be
managed by the Charon-SSP Manager. This service provides the interface between the Charon-SSP Manager and the
virtual machine software. It also enables automatic detection of Charon-SSP host systems by the Charon-SSP Director. A
prerequisite for installing the Charon-SSP Agent is that the Charon-SSP virtual machine software must be installed on the
same system.
The following sections describe how to use the Charon-SSP Agent software.
The directory /opt/charon-agent/ssp-agent/ssp and its sub-directories contain the configuration files, the log files, and
other configuration information for SPARC virtual machines created using the Charon-SSP Manager. A backup of
/opt/Charon-agent/ssp-agent/ssp saves this information for all virtual machines created by the Charon-SSP Manager.
Please note that a user can also create virtual machine configurations manually in other locations on the filesystem. In
addition, virtual disk containers are usually stored in a different location. Such configuration data and the virtual disk
containers of all Charon-SSP instances must be backed up separately.
The default installation of the Charon-SSP Agent uses a default password. To improve the security for the
Charon-SSP Agent and the virtual machines, to which it interfaces, please complete the tasks documented in the
section Changing the Charon-SSP Manager Password.
5.7.1 Starting the Charon-SSP Agent Service
The Charon-SSP Agent service can be started by executing one of the following commands from a privileged account:
# service charon-agentd-ssp start
or
# /etc/init.d/charon-agentd-ssp start
5.7.2 Stopping the Charon-SSP Agent Service
The Charon-SSP Agent service can be stopped by executing one of the following commands from a privileged account:
# service charon-agentd-ssp stop
or
# /etc/init.d/charon-agentd-ssp stop
5.7.3 TCP/IP Ports Used by the Charon-SSP Agent
The Charon-SSP Agent uses port 9091 (TCP and UDP) to communicate with the Charon-SSP Manager and Director. For
the communication with the Charon-SSP Director, port 9101 (UDP) is also required.

Document number: 55-16-005-001
© Stromasys 2018 Charon-SSP for Linux Version 2.0.1 – User’s Guide / Configuring and Using the Charon-SSP Software 106
5.8 User Access to the Virtual SPARC System
Depending on how the virtual machine console device has been configured, it is possible to access the console in a
number of different ways. Access via the graphical user interface is also possible.
The configuration of the following options is shown in the remainder of this section:
Console access
Physical serial console access
TCP/IP based serial console access from Charon-SSP Manager
TCP/IP based serial console access without Charon-SSP Manager
Console access via the emulated graphics device
Graphical user interface via an X-server
Enabling XDMCP on Solaris 2.5 and higher
Enabling XDMCP on Solaris 10
Starting the X-server
Stopping the X-server
X-server configuration parameters
5.8.1 Console Access
5.8.1.1 Physical Serial Console Access
For physical console access, the virtual machine must be configured to attach the virtual serial port to a physical serial
port on the host system. This configuration task is performed using the Charon-SSP Manager as shown in Physical
Console Device.
Additional serial port configuration options, such as speed, parity, and stop-bits must be configured using the ttya-mode
variable in the OpenBoot guest environment. The following example shows the default configuration values for ttya-
mode.
Displaying ttya-mode console variable
ok printenv
Parameter Name Value Default Value
auto-boot? false true
boot-file -v
boot-device disk:a disk1 disk net
ttya-mode 9600,8,n,1,- 9600,8,n,1,-
ttyb-mode 9600,8,n,1,- 9600,8,n,1,-
For additional information regarding the configuration of the ttya-mode variable, see the OpenBoot Command Reference
in the appendix.

Document number: 55-16-005-001
© Stromasys 2018 Charon-SSP for Linux Version 2.0.1 – User’s Guide / Configuring and Using the Charon-SSP Software 107
5.8.1.2 TCP/IP-based Serial Console Access via Charon-SSP Manager
From the Charon-SSP Manager you can access the serial console via the Console tab. The example below shows the
console of a SUN-4M system.
To configure the serial console access for the Charon-SSP Manager, use a TTYA configuration similar to the one below.
The port type must be TCP Raw or Telnet.
The console parameter must be set to Built-in.
The TCP port specified must not be used for another application or another emulated Charon-SSP serial port on the same host system.
Access can be set to Local Only to restrict access to the console to the local system, or to Unlimited to allow access across the network.
To access the console of a guest system across the network, make sure the port configured for the console is
permitted by any intermediate firewalls.
.
Figure 60: Charon-SSP Manager console tab

Document number: 55-16-005-001
© Stromasys 2018 Charon-SSP for Linux Version 2.0.1 – User’s Guide / Configuring and Using the Charon-SSP Software 108
Only one connection to the console is possible. If you connect to the built-in console via the Charon-SSP
Manager and open a second console connection to the system at the same time (e.g., via telnet), the currently
active console connection will be terminated.
5.8.1.3 TCP/IP-based Serial Console Access without Charon-SSP Manager
The serial console can also be configured for network access only. If you configure TTYA via the Charon-SSP Manager
GUI, the configuration of the serial port itself is identical to the one for the Charon-SSP Manager built-in console tab.
However, the console type is external. This will disable the console tab of Charon-SSP Manager.
Once configured, any terminal emulator with telnet capability can be used to connect to the port on the host system and
access the guest system's serial console. The console emulates a VT100 terminal. By default, Charon-SSP will try to start
a local PuTTY window (on conventional Charon-SSP systems: check if the root user can display X-applications on
DISPLAY :0 and if PuTTY is installed on the system).
If a raw connection is being used (TCP Raw instead of Telnet), there is local echo when connecting with a Linux telnet
client (every input is echoed twice). To avoid this, you can enable the telnet-option mode character after using the telnet
escape key to get to the telnet command prompt. You can also place the command in the .telnetrc file.
To access the console of a guest system across the network, make sure the port configured for the console is
permitted by any intermediate firewalls.
Only one connection to the console is possible. If you connect to an external serial console over TCP/IP and
open a second console connection to the system at the same time, the currently active console connection will
be terminated.
Figure 61: Configure console access from CHARON Manager
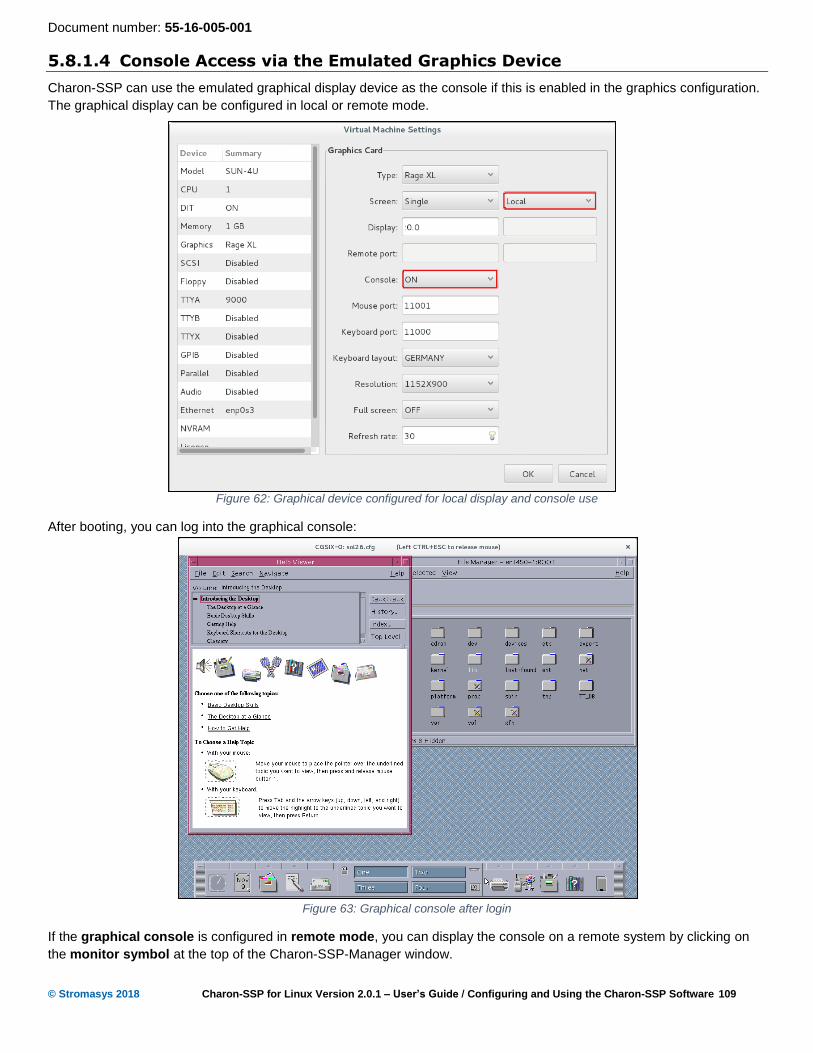
Document number: 55-16-005-001
© Stromasys 2018 Charon-SSP for Linux Version 2.0.1 – User’s Guide / Configuring and Using the Charon-SSP Software 109
5.8.1.4 Console Access via the Emulated Graphics Device
Charon-SSP can use the emulated graphical display device as the console if this is enabled in the graphics configuration.
The graphical display can be configured in local or remote mode.
Figure 62: Graphical device configured for local display and console use
After booting, you can log into the graphical console:
Figure 63: Graphical console after login
If the graphical console is configured in remote mode, you can display the console on a remote system by clicking on
the monitor symbol at the top of the Charon-SSP-Manager window.

Document number: 55-16-005-001
© Stromasys 2018 Charon-SSP for Linux Version 2.0.1 – User’s Guide / Configuring and Using the Charon-SSP Software 110
Figure 64: Remote console accessed by Charon-SSP Manager on different system
When using a remote display, the display variable defined in the Charon-SSP Manager graphics section must
match the setting of the system where the graphical console is to be displayed.
5.8.1.5 Serial Console Access on Windows
The Windows version of the Charon-SSP Manager does not have the same built-in console functionality as the Baremetal
and Linux versions. Instead, PuTTY is used to access the console of a virtual SPARC system on a remote Charon-SSP
host. The following image shows the different layout of the Charon-SSP Manager window on a Windows system:
Instead of the access to the built-in console, there is a terminal symbol in the upper bar that represents the PuTTY client.
The console tab is only used to show cached console output while the instance is not running.
Figure 65: Charon-SSP Manager on Windows

Document number: 55-16-005-001
© Stromasys 2018 Charon-SSP for Linux Version 2.0.1 – User’s Guide / Configuring and Using the Charon-SSP Software 111
Once you have started a virtual SPARC machine, you can click on the PuTTY symbol to access the SPARC console. The
following image shows an example of console output in a PuTTY window.
The Tools menu contains an option to modify the PuTTY Settings.
5.8.1.6 Graphical Console Access on Windows
The Charon-SSP Manager on Windows can also use a remote graphical console if the CHARON instance has been
configured accordingly. To do this, select a running Charon-SSP instance and click on the monitor symbol at the top of the
Charon-SSP Manager:
See Console Access via the Emulated Graphics Device for configuration details.
Figure 66: SPARC console access via PuTTY on Windows
Figure 67: Graphical Console Symbol Charon-SSP Manager on Windows

Document number: 55-16-005-001
© Stromasys 2018 Charon-SSP for Linux Version 2.0.1 – User’s Guide / Configuring and Using the Charon-SSP Software 112
5.8.2 Graphical Interface via X11 Server on Linux and Baremetal
The Charon-SSP Manager can set up an X11 login session using Xephyr and the XDMCP protocol.
Xephyr is a nested X-server that can run within a normal Linux or Baremetal GUI-based user session. It supports the
Solaris GUI (Java Desktop, Openwin, CDE, and Gnome) and can provide graphics 3D acceleration based on the OpenGL
1.4 specification.
Running an X-server to access the graphical Solaris interface, requires a network configuration that allows a TCP/IP
connection between the system running the X-server and the Solaris Guest operating system (Stromasys recommends
that both systems be in the same subnet). To create a network connection between the local Charon-SSP host system
and the guest system, different configurations are possible:
Using physical network adapters or VMware virtual adapters on same vSwitch, for example:
o eth0 reserved for the Charon-SSP host system with IP address 192.168.0.100, and
o eth1 assigned to the Charon-SSP instance as hme0 with IP address 192.168.0.120.
This requires eth0 and eth1 physically connected to the same external switch/LAN segment.
Using Charon-SSP virtual network (e.g. eth0 with 1 tap interface), for example:
o br0_eth0 bridged interface assigned to the host system with IP address 192.168.0.100, and
o tap0 assigned to the Charon-SSP instance as hme0 with IP address 192.168.0.120.
If the X-server runs on a remote system, the remote system must have a working TCP/IP connection to the guest system
running in the Charon-SSP instance.
The Xephyr nested X-server listen for connections on port range 6000-6020 or on the port you specify in the X11
Server configuration in Charon-SSP Manager. These ports must be allowed if a firewall (e.g. iptables on Linux) is
used and protecting those ports. For a quick assessment, in case the X-server does not show the dtlogin screen,
the following commands on a conventional Charon-SSP installation can be used to turn off the firewall temporarily
(depending on what firewall is being used).
# systemctl stop firewalld or # service stop iptables
On a Baremetal installation, use the Firewall menu item in the System Toolbox.
Ask your network system administrator to configure proper access to the required port range.

Document number: 55-16-005-001
© Stromasys 2018 Charon-SSP for Linux Version 2.0.1 – User’s Guide / Configuring and Using the Charon-SSP Software 113
The screenshot below shows an X-session from Charon-SSP Manager to a guest running Oracle Solaris 10.
Figure 68: X11 session to a guest running Solaris 10
5.8.2.1 Enabling XDMCP
Before using the X-server, XDMCP must be enabled on the guest system. The actions for enabling XDMCP are different,
depending on the version of Solaris installed on the guest. Follow the relevant sub-section below to configure XDMCP on
your guest.
5.8.2.1.1 Enabling XDMCP on Solaris 2.5 to Solaris 9
Use the following instructions to enable remote login over XDMCP up to Solaris 9.
Enable remote XDMCP login up to Solaris 9
Step Description
1 Edit the file /usr/dt/config/Xconfig
# vi /usr/dt/config/Xconfig
2 Locate the following line and insert a comment character, '#', at the beginning of the line.
Dtlogin.requestPort: 0
3
Save the configuration file and restart the X-server (if there is no dtlogin file in /etc/init.d, you have to run /usr/dt/bin/dtconfig -e first):
# /etc/init.d/dtlogin restart

Document number: 55-16-005-001
© Stromasys 2018 Charon-SSP for Linux Version 2.0.1 – User’s Guide / Configuring and Using the Charon-SSP Software 114
5.8.2.1.2 Enabling XDMCP on Solaris 10
Use the following commands to enable remote login over XDMCP on Solaris 10.
Enable remote XDMCP login on Solaris 10
# svccfg -s cde-login setprop 'dtlogin/args=""'
# svcadm restart cde-login
5.8.2.2 Configuring and Starting the X11 Server in Charon-SSP Manager
Once XDMCP has been enabled on the guest, use the following basic instructions to start the X-server display. The
parameters are described in detail in the next section. You can add multiple profiles with different sets of parameters to
the configuration of the Charon-SSP Manager.
Basic steps for configuring and starting the X11 server
Step Description
1
Open the X11 server Configuration window from Charon-
SSP Manager by following the menu path Tools > X11
Server (conventional Charon-SSP product) or Tools >
Charon Baremetal > X11 Server (Baremetal installation).
Here you can start/stop already configured X11 servers and
add, modify or delete them.
To add a new server, click on Add. This opens the Add X11
Profile window shown in the screenshot:
2
Configure the X11 server by completing the fields:
Enter a profile name
Enter the address or name of the guest in the field IP address.
Choose the keyboard layout preferred for this X-session.
Select the host IP address from which the X-server connects to guest Solaris.
Select the port to be used for the communication.
Select the X-session screen resolutions or Full Screen from the Resolution drop down box.
Add additional X-server parameters by checking Other options and entering the desired parameters, e.g., a non-default font-path. Possible parameters are listed in the man-pages for Xephyr and Xserver and below in the section X11 Server Configuration Parameters.
Click OK to save the configuration
3 Click on Start to start the selected X-server.

Document number: 55-16-005-001
© Stromasys 2018 Charon-SSP for Linux Version 2.0.1 – User’s Guide / Configuring and Using the Charon-SSP Software 115
5.8.2.3 X11 Server Configuration Parameters
The parameters of the X11 server configuration are explained in the following table:
X11 server configuration parameters
Parameter Description
Profile name Name to identify a specific set of configuration parameters in the list of saved configurations.
IP address IP address of the guest Solaris system.
Keyboard Select the required keyboard from the drop-down list. You can select from the layouts
provided by the Charon-SSP host operating system.
From If the system running the X-server has only one IP address, this parameter can be left at
default. If there is more than one IP address configured on the X-Server host, select the
address that is on the same subnet as the Solaris guest or at least reachable from Solaris.
This parameter prevents older Solaris versions from choosing a random (potentially
unreachable) address from multiple IP addresses available on the host running the X-Server.
Port Values 6001 - 6100. The port number determines on which display the X-server is started. For
example, port 6001 results in the X-server running on display “:1”.
Display Read-only field. Shows the display number based on the port number selected.
Resolution This parameter can be adapted to specific requirements of applications with respect to the X-
server capabilities (“VISUALS”). One example would be the 256-bit indexed color visual, which
requires a display depth of 8 bits. It also allows users to set the X display to full screen mode.
Other options When this option is enabled, X-server specific configuration options can be added. Below,
some important use cases are described. For a description of all available parameters, see the
man-pages for Xephyr and Xserver.
5.8.2.3.1 Use Cases for the X-Server Additional Options
The following examples show three use cases for the Other options parameter:
Font-server over TCP/IP
Dual monitor configuration
Virtual monitor using 2-3 real monitors
Font-server over TCP/IP:
Frequently, the host operating system (X-Server) fonts do not match the fonts used by Solaris applications. This problem
can be avoided by making Solaris the font-server for the X-server. XDMCP automatically tries to set the font-path to the
Solaris system. However, XDMCP on different Solaris versions behaves differently with respect to mapping the font-
server if the font-path is not explicitly configured.
How Solaris XDMCP sets the font-path by default
Solaris Version
XDMCP Behavior
Solaris 8 and below
Solaris requests to map the font-path using its own hostname+domainname and port 7100. If the
result of this name combination cannot be translated to a valid IP address on the system running the
X-server (via /etc/hosts or DNS), the mapping of the font path to the Solaris font-server will fail. If the
Solaris system does not have a valid domain name, the transmitted string will be in the form of
hostname.:7100.
Solaris 9 and above
Solaris requests to map the font path using its own IP address and port 7100.

Document number: 55-16-005-001
© Stromasys 2018 Charon-SSP for Linux Version 2.0.1 – User’s Guide / Configuring and Using the Charon-SSP Software 116
The automatic mapping only works reliably for single monitor configurations. For any dual monitor configuration, the
font-path to the Solaris system must be explicitly set.
The following table shows the steps necessary to use a Solaris system as the font-server for the X-server on Linux or
Baremetal:
Use case: Solaris as X11 font-server over TCP/IP
Step Description
1
On Solaris: make sure that the font-server is enabled in /etc/inetd.conf (line starting with fs must be uncommented).
# Sun Font Server
#
fs stream tcp wait nobody /usr/openwin/lib/fs.auto fs
2
On Solaris: verify that the file /usr/openwin/lib/X11/fontserver.cfg has the correct values for font-path and
maximum number of clients.
# font server configuration file
# $XConsortium: config.cpp,v 1.7 91/08/22 11:39:59 rws Exp $
clone-self = on
use-syslog = off
catalogue =
/usr/openwin/lib/X11/fonts/F3bitmaps/,/usr/openwin/lib/X11/fonts/Type1/,/usr/openwin/lib/X11/font
s/Speedo/,/usr/openwin/lib/X11/fonts/misc/,/usr/openwin/lib/X11/fonts/75dpi/,/usr/openwin/lib/X11
/fonts/100dpi/
# in decipoints
default-point-size = 120
default-resolutions = 75,75,100,100
client-limit = 10
3
On the system running the X-server: use the Charon-SSP Manager to configure an X11 profile with Other options set to
-fp tcp/Solaris_IP_Address:7100
4 Start the X-server.
Dual monitor configuration:
Xephyr can be configured to use two monitors. The following table shows the Other options for this use case:
Use case: Dual monitor
Step Description
1 On the host system: configure an X11 profile with Other options set to
-screen <res1>x<res2>x<depth> -fp tcp/Solaris_IP_Address:7100
This configuration enables the second screen and define a font server.
The resolution normally is the same as the one selected for the first screen in the drop-down menus.
2 Start the X-server.
The attached screenshot shows a very simple
example (both windows on the same physical
screen) of the outcome:

Document number: 55-16-005-001
© Stromasys 2018 Charon-SSP for Linux Version 2.0.1 – User’s Guide / Configuring and Using the Charon-SSP Software 117
Virtual monitor configuration:
Xephyr can be configured to use two or three monitors as one virtual monitor. Using the xinerama qualifier, two monitors
are treated as one virtual monitor where windows can be moved between these monitors. The following table shows the
configuration steps:
Use case: Virtual monitor
Step Description
1 On the host system: configure an X11 profile with Other options set to
-screen <res1>x<res2>x<depth> -fp tcp/Solaris_IP_Address:7100 +xinerama
This configuration combines the first and second screen to a virtual monitor and define a font server.
2 Start the X-server.
5.8.2.4 Stopping the X11 Server
To stop the X-server, follow the instructions below.
Instructions for stopping the X-server
Step Description
1
Open the X11 Server Configuration
window from Charon-SSP Manager
by following the menu path
Tools > X11 Server (conventional
Charon-SSP product) or Tools >
Charon Baremetal > X11 Server
(Baremetal installation).
2 Select the X-server you want to stop.
3
Click the Stop button to terminate the X-session.
If multiple sessions to the same host are open, it will be necessary to repeat these steps for each
session.
5.8.3 Using the X-Server on Windows
You can access the graphical user interface of the virtual SPARC system from Windows using an X-server. However, the
steps are different from the ones used via the Charon-SSP Manager on Linux and Baremetal. First, you need to install an
X-server. There are several commercial products. However, there are also free X-server packages, for example the X-

Document number: 55-16-005-001
© Stromasys 2018 Charon-SSP for Linux Version 2.0.1 – User’s Guide / Configuring and Using the Charon-SSP Software 118
server integrated in Cygwin, VcXsrv, or Xming. The following examples use Xming. The installer for Xming and more
product information are available on http://www.straightrunning.com/XmingNotes/.
The following table shows the steps needed on a Windows 7 system to access the virtual SPARC system using an X-
server. Please note that for your application a different X-server and different configuration choices may be required.
Using an X11 server on Windows
Step Description
1 Enable XDMCP on Solaris, as described in the section Enabling XDMCP.
2 Start XLaunch from the Xming section in the Start menu.
Make sure that Xming is not already running before you start.
3 Select the option One Window. This is one of the options supporting XDMCP.
Press Next to continue.
4 Select XDMCP for the session.
Press Next to continue.

Document number: 55-16-005-001
© Stromasys 2018 Charon-SSP for Linux Version 2.0.1 – User’s Guide / Configuring and Using the Charon-SSP Software 119
5 Enter the IP address or hostname of the virtual SPARC system.
Press Next to continue.
6 Finish the setup by continuing through the remainder of the sections (for this example all the defaults
were accepted) and press Finish on the last configuration screen of XLaunch.
7 The Solaris graphical login screen is displayed and
after logging in, you will see the graphical desktop:

Document number: 55-16-005-001
© Stromasys 2018 Charon-SSP for Linux Version 2.0.1 – User’s Guide / Additional Charon-SSP Tools 120
6 Additional Charon-SSP Tools
The Tools menu of the Charon-SSP Manager provides additional tools not directly related to the management and
configuration of virtual machines. They are described in this section.
6.1 iSCSI Initiator
The iSCSI protocol encapsulates SCSI data into TCP packets. iSCSI allows a host to connect to storage via an Ethernet
connection.
Important iSCSI terms:
iSCSI terms
Term Description
iSCSI initiator The initiator is the iSCSI client. The iSCSI client has block level access to the iSCSI
devices.
iSCSI target The target is the iSCSI server. The iSCSI server offers its devices to the clients. One
device can be accessed by one client.
Discovery Process, by which the initiator finds the targets.
As the name indicates, the Charon-SSP tool represents an iSCSI initiator, i.e. an iSCSI client. This tool can be used to
discover iSCSI targets and add devices. These devices can be used later for configuring SCSI storage for the virtual
SPARC system.
6.1.1 Prerequisites on the Host System
When using iSCSI on a conventional Charon-SSP installation, please note that the Charon-SSP iSCSI initiator uses
the standard tools available on Linux systems. The package name is listed below:
Linux iSCSI prerequisites
Linux distribution Package name
Red Hat, CentOS, Oracle Linux iscsi-initiator-utils
The required packages must be installed prior to using the iSCSI initiator tool on Charon-SSP. They are preinstalled on
the Barebone and Baremetal distributions.

Document number: 55-16-005-001
© Stromasys 2018 Charon-SSP for Linux Version 2.0.1 – User’s Guide / Additional Charon-SSP Tools 121
6.1.2 Adding an iSCSI Target
This section lists the necessary steps to add an iSCSI target for the use of Charon-SSP.
Steps to add an iSCSI target
Step Description
1 In the Charon-SSP Manager, select the
iSCSI Initiator from the Tools (or
Tools > Charon Baremetal) menu.
This opens the iSCSI Initiator window
displaying the currently available targets.
If no target has been added, the screen
is empty.
2 If authentication to/from the targets is required,
click on Settings. This will open the following
window where you can enable or disable CHAP
authentication for discovery and session setup.
For discovery and session setup, after enabling
the configuration by selecting Enable in the
CHAP drop-down menu, you can set
Username and Password if the initiator is authenticated by the target(s).
Username in and Password in if the target is to be authenticated by the initiator.
The information entered will be stored in
/etc/iscsi/iscsid.conf.
To remove the configuration from the system,
select Disabled in the CHAP drop-down menu.

Document number: 55-16-005-001
© Stromasys 2018 Charon-SSP for Linux Version 2.0.1 – User’s Guide / Additional Charon-SSP Tools 122
3 Click Add to open the iSCSI discovery window.
To discover a new target, enter the IP address of the
server and click on Discovery. This adds the target
identification to the list. In the background, the
Charon-SSP manager starts the iscsid, if needed.
4 To add the discovered target to the system, select it
and click on OK.
Afterwards close the window by clicking on Close.
5 The iSCSI Initiator window should now display the selected target.
When you are done with adding the targets, you can
close the window.
6 Conventional Charon-SSP installations:
To verify that an iSCSI session has been established, enter the following command in a Linux terminal window: # iscsiadm -m session
To identify the device name associated with the connected target, enter the following command in the terminal window: # iscsiadm -m session -P3
At the end of the output, there is an entry similar to the following:
Attached scsi disk sdc
This example shows that /dev/sdc can be used to configure a disk for Charon-SSP.
Charon-SSP Baremetal installations: use the Storage Manager to identify the name of the newly
added iSCSI disk(s).

Document number: 55-16-005-001
© Stromasys 2018 Charon-SSP for Linux Version 2.0.1 – User’s Guide / Additional Charon-SSP Tools 123
Please note: SCSI device naming on the Charon-SSP host operating system is not guaranteed to be persistent
across reboots. If you have several mapped disks, their names may change when the system is rebooted. To
implement persistent disk mapping for Charon-SSP you can use the Serial Number option in the SCSI disk
configuration.
Conventional Charon-SSP installations: use the following command to locate the serial number of a disk (either
ID_SERIAL_SHORT or ID_SCSI_SERIAL can be used):
# udevadm info -q property -n /dev/sdc | grep SERIAL
(for the sample device /dev/sdc)
Baremetal installations: you can find the serial number using the Storage Manager in the Tools menu of the
Charon-SSP Manager.
6.1.3 Removing an iSCSI Target
Before removing an iSCSI Target, ensure that it is no longer in use and not associated with any disks you need
for your virtual SPARC systems! Charon-SSP acts on the delete request immediately and does not ask for
confirmation.
To remove an iSCSI target from the system, select iSCSI Initiator from the Tools menu of the Charon-SSP Manager.
In the iSCSI initiator window, select the target you want to delete and click the Delete button.
Figure 69: iSCSI target selected for deletion
6.2 NFS Server
The NFS Server tool allows you to define file systems or directories to be exported via NFS to the systems specified in
the configuration.
Please note:
The NFS Server tool of the Charon-SSP Manager is not a full-featured NFS administration tool. It allows a basic
NFS Server configuration with the purpose of enabling additional data transfer options during the Solaris
migration from the physical system into the virtual Charon-SSP environment.
It is not meant to be an additional permanent storage option for Charon-SSP.

Document number: 55-16-005-001
© Stromasys 2018 Charon-SSP for Linux Version 2.0.1 – User’s Guide / Additional Charon-SSP Tools 124
This section shows the basic use of this tool. The section Data Transfer to/from the Charon-SSP Host shows an example
of how this tool could be used in a migration scenario.
6.2.1 Prerequisites
When using this feature on a conventional Charon-SSP host system, please note that it relies on the NFS server
capabilities of the Linux host. If the relevant packages have not already been installed, you will receive an error message
asking you to install them when you try to use the NFS Server feature of the Charon-SSP Manager.
The packages are preinstalled on Barebone and Baremetal distributions.
NFS Server package name:
NFS server utilities – package names
Distribution Package name
Red Hat, CentOS, Fedora, Oracle Linux nfs-utils
6.2.2 Adding an NFS Share
To add an NFS share, select NFS Server in the Tools (or Tools > Charon Baremetal) menu of the Charon-SSP
Manager. In the NFS Server Configuration window click on Add. This opens the following window:
Enter the host address or fully qualified domain name of the host for which access is to be allowed in the field Guest.
Select the path to export in Location and specify whether write access should be allowed.
Click on OK to accept the configuration. The NFS share is displayed in the NFS Server Configuration window.
The definitions are stored in the file /etc/exports. Charon-SSP starts the NFS service on the host system automatically.
Conventional Charon-SSP products only: any additional NFS configuration options (e.g. UID mappings) or path
ownerships would need to be configured through the Linux shell. Please refer to the man-pages for exports. If you modify
the /etc/exports file and open the Charon-SSP Manager NFS server configuration again, you will see these changes, but
you will not be able to edit them.
Figure 70: Adding an NFS share

Document number: 55-16-005-001
© Stromasys 2018 Charon-SSP for Linux Version 2.0.1 – User’s Guide / Additional Charon-SSP Tools 125
Additional tasks:
Make sure any firewall between the NFS server and the NFS clients allows rpcbind, nfsd, mountd, statd, and lockd. To
enable a proper firewall configuration, it could become necessary to provide static assignments for some ports that are
dynamically assigned under normal circumstances (only possible on conventional Charon-SSP installations). As a
quick test to check if the local firewall causes problems with NFS you can disable the firewall temporarily. Make sure to re-
enable the firewall after the test.
Example command to disable the firewall on Linux temporarily when using a conventional Charon-SSP product:
# systemctl stop firewalld
On a Baremetal installation, use the Firewall menu item in the System Toolbox.
Verifying the export:
Either on the NFS server itself (if it is a conventional Charon-SSP installation) or on another system enabled as an
NFS client, you can use the following command to verify the list of exported file systems. It displays the list of exported
filesystems and for which hosts they are exported.
$ showmount -e <ip-address-of-nfs-server>
6.2.3 Removing an NFS Share
To remove an NFS share, select NFS Server in the Tools (or Tools > Charon Baremetal) menu of the Charon-SSP
Manager.
In the NFS Server Configuration window select the NFS share in question and click on Delete. The share is removed
from the Charon-SSP Manager and the /etc/exports file.
Before removing an NFS export definition, ensure that it is no longer in use. Charon-SSP acts on the delete
request immediately and does not ask for confirmation.
6.3 VNC Server
Charon-SSP Manager on Baremetal and Barebone installations comes with a feature to configure a VNC server for the
host system. This allows access to the host system desktop across the network.
6.3.1 Prerequisites
Software prerequisites:
The required software (tigervnc-server-minimal, tigervnc-license, tigervnc-server) is preinstalled on the Barebone and
Baremetal distributions.
On conventional (non-Barebone) systems, these packages can be installed using the package management system of
the host and a VNC server can be configured manually.
The remote system requires a VNC client package (e.g., vinagre).
Firewall prerequisites:
Access to port 5902 of the host system must be allowed.

Document number: 55-16-005-001
© Stromasys 2018 Charon-SSP for Linux Version 2.0.1 – User’s Guide / Additional Charon-SSP Tools 126
6.3.2 Enabling and Disabling the VNC Server
To configure the VNC server, use the Charon-SSP Manager. Open the menu option Tools > VNC Server (or Tools >
Charon Baremetal > VNC Server). This will open a window displaying already configured VNC servers and offering to
create a new server. Click on Create to proceed.
The next window will allow you to define the Display number between 1 and 10 via the drop-down menu:
Click on OK to create the server. This will automatically start the VNC server.
To stop the VNC server and remove the configuration, select the server from the configuration and press the Kill button.
6.3.3 Connecting to the Charon-SSP Host via VNC
To connect to the Charon-SSP host from a remote system via VNC, you need to start a VNC client with the correct
parameters.
An example command would be similar to the following (using the VNC client vinagre):
$ vinagre <charon-ssp-host>::5902:1
This connects to the Charon-SSP host, port 5902, display “:1” (user charon).
The VNC server will request a password. The default password is stromasys. Conventional product only: The password
can be changed on the Charon-SSP host using the command vncpassword (assuming the tigervnc packages have been
installed). On Baremetal systems, this password is changed together with all other management passwords using the
Charon-SSP Manager (Preferences option in the Virtual Machines menu).
6.4 Using a Jumpstart Server
A Charon-SSP instance can use a jumpstart server to install a supported Solaris guest system. This section does not
describe how to configure a jumpstart server. This is documented in the Solaris system documentation. This section only
provides a short overview of important points from the Charon-SSP perspective.
Charon-SSP supports RARP and DHCP (Charon-SSP/4U only) configurations.
The CHARON instance needs to be configured with an Ethernet interface on the same LAN segment as the jumpstart
server to allow the Ethernet broadcast messages sent by the client to be received by the server. Ensure that the
necessary traffic (ICMP, RARP or DHCP, TFTP, Portmapper and NFS) are not blocked by a firewall.
Figure 71: VNC Server configuration

Document number: 55-16-005-001
© Stromasys 2018 Charon-SSP for Linux Version 2.0.1 – User’s Guide / Additional Charon-SSP Tools 127
Once the jumpstart server has been configured with the MAC address and the IP address of the client system and the
desired Solaris version has been made available for installation, the Charon-SSP instance can be booted and the Solaris
system can be installed.
Boot command for a RARP configuration: boot net - install
Boot command for a DHCP configuration: boot net:dhcp - install
The following image shows the start of the booting process (RARP configuration:
Figure 72: Charon-SSP network boot

Document number: 55-16-005-001
© Stromasys 2018 Charon-SSP for Linux Version 2.0.1 – User’s Guide / Data Transfer to/from the Charon-SSP Host 128
7 Data Transfer to/from the Charon-SSP Host
This section shows a few options for transferring data between the Charon-SSP host system and Solaris systems running
on real or emulated hardware.
This list is by no means comprehensive, but meant as an assistance to get started.
Even though the following examples often refer to the Charon-SSP Barebone distribution, they are mostly also
applicable to other installations of Charon-SSP.
Explicit information is also provided about Baremetal specifics, as needed.
7.1 Using NFS for Data Transfer
As mentioned, the NFS Server tool provided by the Charon-SSP Manager is intended to be a support for migration
scenarios and not a permanent Charon-SSP storage option. Hence, this example shows the steps to export a filesystem
on the Charon-SSP host that can be mounted from Solaris (on physical and emulated systems) to indirectly transfer data
between the two Solaris systems via the filesystem exported by the Charon-SSP host.
The following image provides an overview of the setup:
Figure 73: NFS example overview
Prerequisites:
The Solaris guest system must be installed.
There must be IP connectivity between the Charon-SSP host system and both the Solaris guest system and the Solaris on the physical system.
The firewall on the host system must be configured to permit the NFS traffic, or be temporarily disabled.
Please note that often a direct data transfer between the physical and the virtual Solaris system is possible. In many
cases, this may be the preferred migration option.

Document number: 55-16-005-001
© Stromasys 2018 Charon-SSP for Linux Version 2.0.1 – User’s Guide / Data Transfer to/from the Charon-SSP Host 129
7.1.1 Charon-SSP Host Configured as NFS Server
You can export NFS shares from the Charon-SSP host system so that Solaris systems can mount them. This gives you
the possibility to share data indirectly between the NFS client systems. Please note, that this is a much-simplified example
and different environments may need a more sophisticated setup.
The following example shows how to mount an NFS share exported by the Charon-SSP host system from two different
Solaris systems and use it to exchange data.
First, configure filesystems to be exported by the host system:
Steps to setup an NFS server on the Charon-SSP host system
Step Description
1 On conventional Charon-SSP products:
Open a shell terminal (on the Charon-SSP Barebone host use Applications > Favorites >
Terminal).
2 On conventional Charon-SSP products:
Create the directory that you want to export, e.g. under the current user. For example:
$ mkdir ./myexport
If not already correct, set the owner to charon (Barebone) or to root (on other conventional
systems).
On a Baremetal installation:
Use Tools > Charon Baremetal > File Manager to create the new directory. The owner will be
user storage.
3 Configure the Charon-SSP NFS Server for the two
planned clients as shown in Adding an NFS Share.
Export the filesystem with write access as shown in the
screenshot.
4 The resulting NFS Server configuration window
should show exports for two NFS clients similar to this
screenshot. Charon-SSP sets the owner of the
exported directory to user
root (on conventional non-Barebone systems)
charon (on Barebone systems)
storage (on Baremetal systems)

Document number: 55-16-005-001
© Stromasys 2018 Charon-SSP for Linux Version 2.0.1 – User’s Guide / Data Transfer to/from the Charon-SSP Host 130
As the second step, verify the exported filesystems from Solaris and mount them:
Steps on Solaris to verify and mount the exported filesystems
Step Description
1 Start NFS client on both of the Solaris systems, if necessary.
# /etc/init.d/nfs.client start
Solaris 10: This script only starts lockd and statd if NFS filesystems are listed in the file /etc/vfstab.
However, the command mount -F nfs also starts the two daemons, if needed.
2 Make sure the NFS export is recognized by the NFS client. On the NFS clients, enter the command
# showmount -e <serveraddress>
This should show if and what the server exports. The output could be similar to the following:
# showmount -e 192.168.2.104
export list for 192.168.2.104:
/myexport 192.168.2.81,192.168.2.82
3 Mount the exported filesystem on the Solaris NFS clients as in the following example:
# mount -F nfs 192.168.2.104:/myexport /mntnfs
4 Now, when you copy data from one Solaris system to the mounted filesystem it is accessible for the
other Solaris system.
After the successful configuration, both systems can access the filesystem and share data as shown in the following
examples.
Sample output on Solaris system 192.168.2.81 (representing physical system). This system copies data to the NFS
filesystem:
# showmount -e 192.168.2.104
export list for 192.168.2.104:
/myexport 192.168.2.81,192.168.2.82
# mount -F nfs 192.168.2.104:/myexport /mntnfs
# df /mntnfs
/mntnfs (192.168.2.104:/myexport):41083952 blocks 22552716 files
# tar -cf /mntnfs/sol1-etc.tar ./etc
# ls -l /mntnfs
total 8064
-rw-r--r-- 1 nobody4 other 2040320 Feb 11 12:45 sol1-etc.tar
Sample output on Solaris system 192.168.2.82 (representing Solaris guest system). This system can access the data
copied to the NFS filesystem:
# showmount -e 192.168.2.104
export list for 192.168.2.104:
/myexport 192.168.2.81,192.168.2.82
# mount -F nfs 192.168.2.104:/myexport /mntnfs
# df /mntnfs
/mntnfs (192.168.2.104:/myexport):41075896 blocks 22552715 files
# ls -l /mntnfs
total 8064
-rw-r--r--+ 1 nobody4 other 2040320 Feb 11 13:45 sol1-etc.tar
In a migration situation, the physical system could use the NFS filesystem as the target for ufsdump or dd output.

Document number: 55-16-005-001
© Stromasys 2018 Charon-SSP for Linux Version 2.0.1 – User’s Guide / Data Transfer to/from the Charon-SSP Host 131
The guest systems could access the data to run ufsrestore or use the dd of a complete disk (Slice s2) as a temporary
virtual disk (vdisk). As mentioned above, it is often possible to transfer data directly between the two Solaris systems. This
may be the preferred way in many cases.
When the NFS filesystem is no longer needed, it can be unmounted from both Solaris clients with a command similar to
the following example:
# umount <mounted-nfs-filesystem>
7.2 Using SCP for Data Transfer—Conventional Product
With SCP, single files or directory structures (recursive copy) can be copied to and from Charon-SSP host system.
SSH/SCP is pre-installed in the Barebone and Baremetal distributions. Note that on the Baremetal distribution only
SFTP is supported for this kind of data transfer.
The following table shows some of the possible commands:
SCP command syntax examples
Task Command
Copy single file to another system $ scp <local-file> <user>@<remote-host>:<remote-file-path>
Copy a directory recursively to another system $ scp -r <local-path> <user>@<remote-host>:<remote-path>
Copy a single file from another system $ scp <user>@<remote-host>:<remote-file-path> <local-file>
Copy a directory recursively from another system $ scp -r <user>@<remote-host>:<remote-path> <local-path>
To transfer files between another system and the Charon-SSP Linux host of the Barebone distribution, use the commands
listed above with the user name charon and the password of this user. The following example shows how a small
directory tree is copied to the charon user account from another system:
$ scp -r ./Tmp [email protected]:
[email protected]'s password:
file4.txt 100% 0 0.0KB/s 00:00
file3.txt 100% 0 0.0KB/s 00:00
file1.txt 100% 0 0.0KB/s 00:00
file2.txt 100% 0 0.0KB/s 00:00
For frequent file transfers between the same user accounts, you can create SSH keys for the users and add the
key of each user to the $HOME/.ssh/authorized_keys file of the respective user on the other system. This
enables file transfer and SSH login without having to enter a password every time.
SSH/SCP availability on Solaris:
To use SSH/SCP on older versions of Solaris (e.g. Solaris 2.6), this software must be obtained from a provider of public
domain Solaris packages, such as unixpackages.com. They often require a small fee.
On more modern Solaris versions (e.g. Solaris 10), packages are available on the Solaris installation media that provide
this functionality.

Document number: 55-16-005-001
© Stromasys 2018 Charon-SSP for Linux Version 2.0.1 – User’s Guide / Data Transfer to/from the Charon-SSP Host 132
7.3 Using SFTP for Data Transfer
SFTP is another file transfer program that can be used for secure file transfers between the Charon-SSP host system and
other systems. It is pre-installed on the Barebone and Baremetal distributions and uses SSH as its base protocol. The
SFTP program can be used interactively (similarly to FTP) and in non-interactive mode. When used in interactive mode,
you can use the help command to learn about the command syntax. SFTP can resume interrupted file transfers.
The following example shows how a directory structure is recursively copied from the Charon-SSP host (IP address
192.168.2.107 in the example) by another system:
$ sftp [email protected]
[email protected]'s password:
Connected to 192.168.2.107.
sftp> ls Tmp
Tmp/A Tmp/B Tmp/C
sftp>
sftp> get -r Tmp/
Fetching /home/charon/Tmp/ to Tmp
Retrieving /home/charon/Tmp
Retrieving /home/charon/Tmp/B
Retrieving /home/charon/Tmp/B/b
Retrieving /home/charon/Tmp/B/a
Retrieving /home/charon/Tmp/A
Retrieving /home/charon/Tmp/A/b
Retrieving /home/charon/Tmp/A/a
Retrieving /home/charon/Tmp/C
sftp>
sftp> bye
The interactive command to copy files to the Charon-SSP host system from another system is the command put.
There are also GUI-based public domain SFTP clients, for example filezilla. These need to be installed with the system
specific package management system.
To connect to a Barebone Charon-SSP host, use charon as the user for this operation.
To connect to a Baremetal Charon-SSP host, use the user storage.
To disable/enable the SFTP service on a Charon-SSP Baremetal system use: Tools > Charon Baremetal > SFtp
Server.
SFTP availability on Solaris:
SFTP is part of the SSH software on Solaris. To use SSH/SFTP on older versions of Solaris (e.g. Solaris 2.6), this
software must be obtained from a provider of public domain Solaris packages, such as unixpackages.com. They often
require a small fee. On more modern Solaris versions (e.g. Solaris 10), packages are available on the Solaris installation
media that provide this functionality.

Document number: 55-16-005-001
© Stromasys 2018 Charon-SSP for Linux Version 2.0.1 – User’s Guide / SSH VPN Operation 133
8 SSH VPN Operation
If the connection between the Charon-SSP host system, including the configured Charon-SSP guest systems, and the
rest of the customer’s network runs over a public network, it is necessary to secure the traffic against unauthorized
access.
The example in this section describes how to configure a point-to-point SSH-based VPN tunnel between the Charon-SSP
host and a remote Linux system across a public network. Topologies that are more complicated will require other, more
sophisticated, solutions.
The customer is responsible for ensuring that any VPN solution meets the requirements of the company’s
security guidelines. The example in this chapter is only for illustrative purposes.
8.1 Prerequisites
The example shows how to use a script on a remote Linux system to set up an SSH VPN tunnel to the Charon-SSP host system. This assumes that a public SSH key has been copied to the root user of the Charon-SSH host system as shown below.
If the guest Solaris system should also use the tunnel, IP forwarding must be enabled on the host system (see steps for tunnel setup in the next section).
Conventional product only (this is pre-configured on a Baremetal system): o Adapt the SSH configuration on the Charon-SSP host system to allow root login, enable VPN tunnels,
and, if needed, enable login via SSH key.
8.1.1 Create and Upload the Public SSH Key
Action Command
Create an SSH key-pair on the remote system that will be used as the tunnel end-point.
$ ssh-keygen
The command will prompt you for the name of the key file. It will also prompt you for a passphrase to protect the private key (optional). The command creates two files containing the public (*.pub) and the private key.
Baremetal Charon-SSP system: Connect to the Charon-SSP host (user storage) via SFTP to copy the key. Connect once via SSH to activate the key.
$ sftp storage@<charon-ssp-host-ip>
sftp> put <path-to-public-key> id_rsa.pub
sftp> bye
Note: independent of the file name on the remote system, the target file name (id_rsa.pub) is mandatory so that Charon-SSP can find the key and incorporate it into the SSH configuration. Activate the key by connecting to the Baremetal system via SSH to user root once: # ssh root@<charon-ssp-host-ip>
After entering your password, you will be told to use the private key for logins and the connection will be terminated. The key is now active.
Conventional Charon-SSP system: Connect to the Charon-SSP host (user root) via SFTP.
$ sftp root@<charon-ssp-host-ip>
sftp> put <path-to-public-key> <keyname>.pub
sftp> bye
Log in to the Charon-SSP host system and add <keyname>.pub to /root/.ssh/authorized_keys. Make sure, the file permissions are set such that only the owner has access to the files.
Charon-SSP Baremetal: If the public key needs to be removed, use the Public Key option on the toolbox tab.
To change the public key, remove it and then re-install it following the procedure described above.
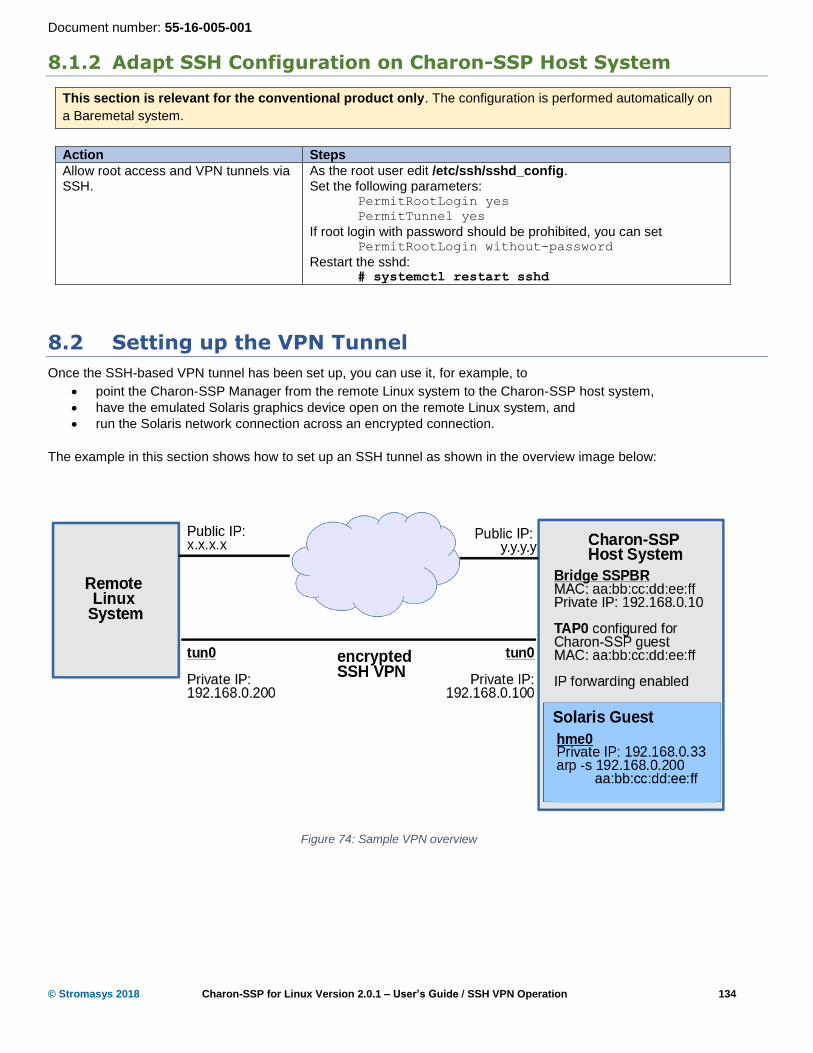
Document number: 55-16-005-001
© Stromasys 2018 Charon-SSP for Linux Version 2.0.1 – User’s Guide / SSH VPN Operation 134
8.1.2 Adapt SSH Configuration on Charon-SSP Host System
This section is relevant for the conventional product only. The configuration is performed automatically on
a Baremetal system.
Action Steps
Allow root access and VPN tunnels via SSH.
As the root user edit /etc/ssh/sshd_config. Set the following parameters:
PermitRootLogin yes
PermitTunnel yes
If root login with password should be prohibited, you can set PermitRootLogin without-password
Restart the sshd: # systemctl restart sshd
8.2 Setting up the VPN Tunnel
Once the SSH-based VPN tunnel has been set up, you can use it, for example, to
point the Charon-SSP Manager from the remote Linux system to the Charon-SSP host system,
have the emulated Solaris graphics device open on the remote Linux system, and
run the Solaris network connection across an encrypted connection.
The example in this section shows how to set up an SSH tunnel as shown in the overview image below:
Figure 74: Sample VPN overview

Document number: 55-16-005-001
© Stromasys 2018 Charon-SSP for Linux Version 2.0.1 – User’s Guide / SSH VPN Operation 135
8.2.1 Steps on the Remote Linux System
As the user root on the remote Linux system, perform the following steps to set up the VPN tunnel according to the
overview image above:
Action Command
Create the SSH tunnel to the Charon-SSP host.
# ssh -i /<user-home-dir>/.ssh/<private-key> -NTCf -w 0:0
<y.y.y.y>
-i denotes the path to the private key matching the public key copied to
the host system. -w denotes the number of the local and remote tunnel interfaces for tunnel
device forwarding -N denotes that no remote command should be executed
-T disables pseudo-terminal allocation
-C requests data compression
-f requests that the command go into the background before command
execution
If the guest Solaris system should also use the VPN tunnel, enable IP forwarding on the Charon-SSP host system.
# ssh -i /<user-home-dir>/.ssh/<private-key> -T <y.y.y.y>
'/sbin/sysctl -w net.ipv4.ip_forward=1'
Configure the tunnel interface on the Charon-SSP host.
# ssh -i /<user-home-dir>/.ssh/<private-key> -T <y.y.y.y>
'ip link set tun0 up;ip addr add 192.168.0.100/32 peer
192.168.0.200 dev tun0;iptables -I INPUT -i tun0 -p all -j
ACCEPT; iptables -F FORWARD'
Configure the tunnel on the remote Linux system.
# ip link set tun0 up
# ip addr add 192.168.0.200/32 peer 192.168.0.100 dev tun0
# iptables -I INPUT -i tun0 -p all -j ACCEPT
# route add -net 192.168.0.0/24 gw 192.168.0.100
Please note that the commands that can be executed on a Charon-SSP Baremetal system via SSH to the root user are
restricted to the commands required to set up the VPN tunnel.
8.2.2 Steps on the Charon-SSP Host System
On the Charon-SSP host system, configure a virtual network without binding interface and a TAP interface to be used as
the Ethernet interface of the Solaris guest system. To match the example above, use the address 192.168.0.10 as the IP
address for the bridge. For detailed configuration steps, see the sections Creating a Virtual Network and Ethernet
Configuration.
8.2.3 Steps on the Solaris Guest System
Configure the Solaris guest interface with an IP address of the virtual network (192.168.0.33 in the example above).
Configure a static ARP entry using the command: # arp -s 192.168.0.200 <aa:bb:cc:dd:ee:ff>.
Adapt IP and MAC address to your environment.

Document number: 55-16-005-001
© Stromasys 2018 Charon-SSP for Linux Version 2.0.1 – User’s Guide / License Management 136
9 License Management
All Stromasys CHARON virtual machine software products are licensed using either
a Sentinel HASP (Hardware Against Software Piracy) USB key, or
a Software license provided by Sentinel
A license can be installed locally on the system or—in case of a network license—it can be served to clients on the
network by a license server. To use the products you must have either a valid physical license key or a valid software
license.
The following Charon-SSP products require a valid license to operate:
Charon-SSP/4M
Charon-SSP/4U
Charon-SSP Barebone and Baremetal distributions
Charon-SSP/4U+
The following products work in conjunction with the licensed products, but do not require the HASP license or a software
license for their own operation:
Charon-SSP Manager
Charon-SSP Director
Charon-SSP Agent
For a comprehensive description of licensing for CHARON products, please refer to the Charon Licensing Handbook on
the Stromasys web page.
9.1 Licensing Charon-SSP—General Aspects
It is possible to gather license information and apply license keys using a number of tools. These tools provide both
command-line (conventional product only) and GUI interfaces to manage the licenses for Charon-SSP products. They
also allow licenses to be managed either locally on the host system or remotely from a client (running either Linux or
Microsoft Windows).
These are the basic four steps to create or update a license:
1. Generate a C2V (customer to vendor) key information file.
2. Submit the C2V information to Stromasys Orders Administration.
3. Receive one or more V2C (vendor to customer) license key files.
4. Apply the V2C files to the local system.
The following sections describe how to perform these tasks using the different tools available.
The steps “create C2V file” and “apply V2C files” are performed on the Charon-SSP host if a hardware or software
license is locally installed. If a network license is used, these steps are performed on the license server.
For customers licensed with USB HASP keys: Please note these keys contain a built-in battery, which must not be
completely discharged. It is recommended that unused keys be connected to spare USB ports from time to time
for charging. In the event that a key fails, do not discard the key. Please contact Stromasys Customer Support
immediately.

Document number: 55-16-005-001
© Stromasys 2018 Charon-SSP for Linux Version 2.0.1 – User’s Guide / License Management 137
9.2 Managing Licenses with Charon-SSP Manager
The Charon-SSP Manager provides a user-friendly graphical interface for the management of licenses. The following
sections describe how to use these tools to perform the following tasks:
Viewing the License Details
Gathering Customer to Vendor (C2V) Details
Applying Vendor to Customer (V2C) License Update
Managing License Parameters
The license drivers installed to interact with the Sentinel licenses on the system come with a web-based management
interface, the Sentinel Admin Control Center (ACC). This tool provides additional management functions and can be run
from a local web-browser (conventional product) or from a web-browser on a remote system (URL: http://<targethost-
name-or-ip:1947).
9.2.1 Viewing the License Details
To view the license details of an attached license click the menu path Tools > License Tools > License Viewer. This
opens a License Viewer window, similar to the following.
Figure 75: Charon-SSP Manager license viewer showing a physical USB HASP key
If the license details are not displayed and the USB HASP has recently been reconnected or exchanged, it may be
necessary to click on Refresh. To exit the window, click on Close.
If there is more than one license available on the system, scroll down to see all available licenses.
9.2.2 Gathering Customer to Vendor (C2V) Details
The following steps describe the process of gathering the customer to vendor (C2V) data file. This information is used by
Stromasys to generate a license data file.

Document number: 55-16-005-001
© Stromasys 2018 Charon-SSP for Linux Version 2.0.1 – User’s Guide / License Management 138
If a software license is to be used, the CHARON-SSP Manager automatically detects if there is already an existing software license.
If yes, the following steps will create a C2V file to request an update to this existing license.
If no, the following steps will create a fingerprint file to request a new software license.
Instructions for gathering Customer to Vendor (C2V) data
Step Description
1 Open the License Update window by
clicking on Tools > License Tools >
License Update in the Charon-SSP
Manager.
The license update window opens.
2 Click the Export C2V File tab. Select the type of license in License type drop-down box. There are
two options to choose from:
Hardware License: If several dongles are attached to the system, please enter the ID of the license
in question into the License ID field to select the dongle, or use the Sentinel Admin Control Center
(ACC) where you can select the correct dongle. The license ID can be found using the license
viewer tool.
Software License: Ensure that no USB HASP key has been attached. Otherwise, the C2V file will
be created for the existing USB dongle. If this cannot be changed and you need to create a
fingerprint file, please use the hasp_srm_view -fgp command instead (not available on
Baremetal installations). Access to visible, conflicting network licenses can be disabled in the
Sentinel ACC or via the License Manager)—otherwise such licenses will prevent a successful
fingerprint creation.
3 Provide a file name in the C2V file field.
Specify where the C2V file should be saved on the local system (where the manager is running) by
clicking the path adjacent to the Location label.
Click the Apply button.
4 After a few moments the utility will response with a
dialogue box similar to the example.
Click the OK button to proceed.
5 Locate the *.c2v file saved above and send it via email to Stromasys Orders Administration
at [email protected] (the email address for the AMS region is [email protected]).

Document number: 55-16-005-001
© Stromasys 2018 Charon-SSP for Linux Version 2.0.1 – User’s Guide / License Management 139
9.2.3 Applying Vendor to Customer (V2C) License Updates
After sending the C2V file to Stromasys Orders Administration (see Gathering Customer to Vendor (C2V) Details) you will
receive a response with one or two V2C files attached. Once the response from Stromasys Orders Administration has
been received, follow the instructions below to apply the V2C files and license the software.
If there are multiple key files, it is important that they be applied in the correct order. The format key (*_fmt.v2c)
file must always be applied first.
Instructions for applying Vendor to Customer (V2C) data
Step Description
1 Save the V2C (vendor to customer) files received from Stromasys Orders Administration. Depending on
the license type, you may have received one or two V2C files:
1. A license file to format the key (for hardware licenses only). The file name is of the format *_fmt.v2c.
Applicable to USB hardware licenses only.
2. The license key file. The file name is of the format *.v2c.
Steps 2 to 4 must be performed for each of the license key files, starting with the format key file (if it
exists).
2 Open the License Update window: Click on
the menu path Tools > License Tools >
License Update.
Select the tab Import V2C File.
3 Locate the saved V2C (vendor to customer) files by clicking on the button labelled “…”. If a format key
file exists, use this file first.
4 Apply the license file by clicking on the Apply button.
5 If a second V2C file was supplied, repeat the process starting with step 2 using the second file.

Document number: 55-16-005-001
© Stromasys 2018 Charon-SSP for Linux Version 2.0.1 – User’s Guide / License Management 140
9.2.4 License Manager
The license manager functionality of the Charon-SSP Manager provides quick access to selected license configuration
parameters. To access the license manager use the menu path Tools > License Tools > License Manager. This will
open the license manager window:
Description of the available parameters:
Parameters available via the license manager
Parameter Description
Allow Remote
Access to ACC
When selected, other network users can access the Sentinel Admin Control Center
(ACC) and perform actions on this system. Unselected by default. The Sentinel ACC
provides a web-based user interface for license management. If access is enabled, it can
be accessed from a remote system via a browser (URL: <target-system>:1947).
Allow Access from
Remote Clients
Selecting this check box will enable remote systems to access this Sentinel License
Manager. This is needed if the system acts as a license server for clients on the network.
Allow Access to Remote Licenses
When selected, this system will search for remote Sentinel License Managers on the
local network. This is needed, if the system is to use a license served by a license
manager on the network.
Broadcast Search
for Remote
Licenses
When selected this system will search for remote Sentinel License Managers on the local
network via broadcasts.
Note that the broadcast search uses a random UDP port from 30000 to 65535. Any
firewall between the client and the server must be configured to allow these ports (also
on the client side) in addition to the TCP port 1947.
If this is disabled, the addresses of systems to search must be defined in the search
parameter field.
Remote License
Search Parameters
Defines the specific systems that will be searched by this system in order to detect remote Sentinel License Managers and licenses served by them.
Systems are specified by their IP addresses (for example, 10.1.1.17), by the broadcast addresses of an address range (for example, 10.1.1.255), or by the system name (for example, system1.example.com).
When using the IPv6 protocol, use the IPv6 address format. For example, type FF02::1 to
access all remote Sentinel License Managers that are part of the default local group
defined in the IPv6 subnet.
9.3 Managing Licenses from the Command-Line
Charon-SSP provides two command-line utilities for the management of licenses. The following sections describe how to
use these tools for the following tasks:
Viewing the license details
Gathering Customer to Vendor (C2V) details
Applying Vendor to Customer (V2C) license updates
The complete documentation for the two utilities (hasp_srm_view and hasp_update) used in this section can be found in
Appendix C.
Path to the license command-line tools: /opt/charon-agent/ssp-agent/utils/license/, unless otherwise specified.

Document number: 55-16-005-001
© Stromasys 2018 Charon-SSP for Linux Version 2.0.1 – User’s Guide / License Management 141
9.3.1 Viewing the License Details
To view the current details of the license key, use the hasp_srm_view utility. The following shows an example of the
output generated by this utility. To display all available licenses, use the -all parameter instead of -l.
Example of license data output from hasp_srm_view
$ /opt/charon-agent/ssp-agent/utils/license/hasp_srm_view -l
License Manager running at host: localhost.localdomain
License Manager IP address: 127.0.0.1
The Physical KeyId: 1538162443
CHARON Sentinel HASP License key section
Reading 4032 bytes
License Manager running at host: localhost.localdomain
License Manager IP address: 127.0.0.1
The License Number: 1002784
The License KeyId: 1538162443
The Master KeyId: 2131943932
Release date: 10-APR-2015
Release time: 14:50:51
Update number: 2
End User name: User1
Purchasing Customer name: Stromasys Asia Pacific
Virtual Hardware: SPARCstation_20, Enterprise_450
Product Name: Charon-SSP/4M, Charon-SSP/4U for Linux x64
Product Code: CHSSP-xxxxx-LI
Major Version: 1
Minor Version: 0
Maximum Build: 99999
Minimum Build: 1
Host CPU supported: X64
Host Operating System required: LINUX
CPU's allowed: 24
Maximum virtual memory: 32768MB
Instances allowed: 3
Released product expiration date: 28-May-2015
Field Test product expiration date: 28-May-2015
The hasp_srm_view command only works with a local connection to the system containing the license. Running the command via a remote connection leads to the error message:
Sentinel HASP key not found or of improper type (1).
Workaround: # ssh localhost /opt/charon-agent/ssp-agent/utils/license/hasp_srm_view -l

Document number: 55-16-005-001
© Stromasys 2018 Charon-SSP for Linux Version 2.0.1 – User’s Guide / License Management 142
9.3.2 Gathering Customer to Vendor (C2V) Details
Gathering the customer to vendor data file requires different commands depending on the type of license.
With existing software license and for all cases where HASP USB license key is used:
To gather the customer to vendor (C2V) data file, use the following command:
Command to gather C2V data file (software license or HASP USB key must be present)
$ hasp_srm_view -c2v /path/to/keydata.c2v
If using this command over a remote connection (e.g., ssh), use the workaround provided in the section above.
If there are multiple hardware keys available to the system, you can use the –key parameter of the
hasp_srm_view command to identify a specific key for which to gather the C2V file. Older versions do
not have this option. There, you can use the Sentinel Admin Control Center (ACC) to gather the C2V file
for the correct hardware key, or (temporarily) remove all keys but the one for which a C2V file is to be
created. See section Managing Licenses with Sentinel Admin Control Center.
To request a new software license:
To gather the customer to vendor (C2V) data file that is also called fingerprint in this case, use the following
command:
Command to gather Customer to Vendor data file for new software license
$ hasp_srm_view -fgp /path/to/keydata.c2v
In both cases, the resulting file should then be sent to Stromasys Orders Administration via email,
[email protected] (the email address for the AMS region is [email protected]).
9.3.3 Applying Vendor to Customer (V2C) License Updates
License keys received from Stromasys Orders Administration can be applied using the hasp_update command-line
utility. In some cases, depending on the license type there maybe one or two V2C files to apply.
1. A license file to format the key (optional, for hardware licenses only). The file name is of the format *_fmt.v2c.
2. The license key file. The filename is of the format *.v2c.
If there are multiple key files, it is important that they be applied in the correct order. The format key file must
always be applied first.
To apply a V2C file, use the following command:
Command to apply Vendor to Customer (V2C) license file
$ hasp_update u /path/to/key.v2c

Document number: 55-16-005-001
March 2018 Charon-SSP for Linux Version 2.0.1 – User’s Guide (Version 1)
9.4 Managing Licenses with Sentinel Admin Control Center
This method can also be used on Charon-SSP Baremetal installations. However, as these host systems do not
have a local web browser, the web browser must run on a different system and the URL needs to be directed to
the Charon-SSP Baremetal host. In addition, remote access to ACC must be allowed in Tools -> License Tools
-> License Manager and the firewall settings must allow port 1947/tcp.
9.4.1 Viewing Licenses
To display the licenses available on the local system with the Sentinel Admin Control Center (ACC), perform the following
steps:
Open a web-browser
Go to the URL http://localhost:1947/_int_/devices.html. This option corresponds to the menu item Sentinel Keys (if you want to display the licenses available on a remote system, replace localhost with the correct hostname).
A screen similar to the following opens:
Figure 76: Display of available licenses in Sentinel ACC
The sample shows a time-limited local USB key (Key Type: HASP HL Time) and a network license based on a software
license (Key Type: HASP SL).
The Sentinel ACC does not display the Charon product details. For displaying the detailed license content, please use the
Charon-SSP Manager GUI or the command-line tools.

Document number: 55-16-005-001
© Stromasys 2018 Charon-SSP for Linux Version 2.0.1 – User’s Guide / License Management 144
9.4.2 Gathering Customer to Vendor (C2V) Details
You can create a C2V file using the Sentinel ACC, but not a fingerprint file. Follow the steps below to create the C2V file:
1. Open the web-browser on the Sentinel Key page of the Sentinel ACC (URL: http://localhost:1947/_int_/devices.html):
Figure 77: Sentinel Key page with C2V option
2. Click on the option C2V at the right hand side of the window for the key you plan to update. 3. A new screen will be displayed to download the C2V file:
Figure 78: Sentinel ACC C2V download page
4. Download and save the C2V file.
Send the file to Stromasys Orders Administration via email, [email protected] (the email address for the AMS
region is [email protected]).
9.4.3 Applying Vendor to Customer (V2C) License Updates
To use the Sentinel ACC on the local system to apply V2C files, open the URL http://localhost:1947/_int_/checkin.html
(this is the link for the option Update/Attach).

Document number: 55-16-005-001
© Stromasys 2018 Charon-SSP for Linux Version 2.0.1 – User’s Guide / License Management 145
The page displayed will be similar to the one in the following image:
Figure 79: Sentinel ACC V2C installation page
Click on the button Browse (called Choose File on some products/versions) and select the appropriate file in the file
browser window that opens.
Click on Apply File to apply the V2C file. If you received two files, start with the *_fmt.v2c file and repeat the step for
the second .v2c file.
9.4.4 Allowing Access to and from Network License Servers
The communication between license server and client systems uses the IP protocol. This means that IP connectivity must
be established between client and server. If client and server are not on the same network, they need the correct routing
entry (or default route) to enable this communication.
Port 1947 is used as the destination port for the communication between the License Managers. The communication uses
both UDP and TCP. These protocols are used for different purposes:
UDP: This protocol is used by the client hosts to discover a license server on the network. If the option Broadcast Search for Remote Licenses is enabled in ACC (Access from Remote Clients tab), the Sentinel License Manager on the client host sends UDP broadcasts to port 1947 to discover a license server. Alternatively, search parameters can be specified, in which case the Sentinel License Manager on the client sends UDP "pings" to the addresses listed. UDP is also used to notify connected License Managers in case the local License Manager is stopped.
TCP: This protocol is used to connect to the discovered license servers via port 1947 and to transfer license data from them.
The following ports are used for the communication between license server and client hosts. They must not be blocked by
a firewall.
On the server side (where network license has been installed), port 1947 must be open for incoming TCP and UDP traffic to allow clients access to the license.
On the client side, traffic is initiated using ports 30000 through 65535 as the source ports and port 1947 as the target port. If broadcast search for remote licenses is to be used, the client also receives UDP traffic from port 1947 of the license server to ports 30000 through 65535.

Document number: 55-16-005-001
© Stromasys 2018 Charon-SSP for Linux Version 2.0.1 – User’s Guide / License Management 146
9.4.4.1 Controlling Access to the License Server on the Client Side
A client host on the network can enable or prevent the visibility of network licenses, or change the options used to
discover and access network licenses provided by a license server. These tasks are also performed in the Sentinel Admin
Control Center:
1. Open a web-browser and go to the URL http://localhost:1947/_int_/config_to.html (option: Configuration / Access
to Remote License Managers).
2. This opens a configuration page similar to the following:
Figure 80: Permitting/Denying access to remote license managers
3. Possible actions:
Activate the check-box next to the field Allow Access to Remote Licenses to enable access to license servers. Press Submit to save the setting.
Clear the check-box next to the field Allow Access to Remote Licenses to disable access to license servers. Press Submit to save the setting.
If the option Broadcast Search for Remote Licenses is activated, it enables a broadcast search for license servers on the local network without having to enter the address of a license server.
If the option Broadcast Search for Remote Licenses is not enabled or cannot be used in the customer specific setting,
you can enter specific IP addresses or host names that should be searched for network licenses in the Remote License
Search Parameters field. Please refer to the Sentinel ACC help function for more information.

Document number: 55-16-005-001
© Stromasys 2018 Charon-SSP for Linux Version 2.0.1 – User’s Guide / License Management 147
9.4.4.2 Controlling Access to Network Licenses on the Server Side
The license manager on the license server can be configured to allow or disallow access from remote clients to the
network licenses installed on the license server.
To access this configuration option, perform the following steps:
1. Open a web-browser and go to the URL http://localhost:1947/_int_/config_from.html (option: Configuration /
Access from Remote Clients).
2. This opens a configuration page similar to the following:
Figure 81: Permitting/Denying access from remote clients
3. Possible actions:
To allow access from remote clients, activate the check-box next to the field Allow Access from Remote Clients and press Submit at the bottom of the page.
To refuse access from remote clients, clear the check-box next to the field Allow Access from Remote Clients and press Submit at the bottom of the page.
The field Access Restrictions provides the ability to refine access rules, for example by specifying IP addresses or
address ranges. Please refer to the Sentinel ACC help function for details.

Document number: 55-16-005-001
© Stromasys 2018 Charon-SSP for Linux Version 2.0.1 – User’s Guide / License Management 148
9.4.5 Removing a Software License
A hardware license can simply be unplugged from the system to which it is connected.
An obsolete software license must be removed using the steps described below.
To remove an obsolete software license or a software license in cloned state from the system, perform the following
steps:
1. Go to http://localhost:1947 to access the Sentinel ACC and choose Sentinel Keys.
2. In the Sentinel ACC, locate the target Sentinel SL AdminMode license to be removed (a cloned license in the example).
3. Press the Certificates button at the right side of the SL description:
Figure 82: Sentinel Key page with certificate display option
4. In the Certificates section, note the name and path of the corresponding certificate:
Figure 83: Certificate path information and name needed for deletion
5. Remove the certificate file. In the example above the file to remove is C:\Program Files (x86)\Common
Files\SafeNet Sentinel\Sentinel LDK\installed\68704\387285561437702475_base.v2c . On Linux,
the certificate files are typically stored in /var/hasplm/installed/68704/.
6. Reboot the CHARON host
7. Start Sentinel HASP Admin Control Center (ACC) again to verify that the software license has been removed.
9.5 Troubleshooting License Key Application
Should there be a failure when trying to display or load the license key, review the error codes listed on the Stromasys
website and the associated solutions. If these solutions do not resolve the problem, please contact your VAR or the
Stromasys Customer Support Center (maintenance contract required) using the details in the section Obtaining Technical
Assistance.

Document number: 55-16-005-001
© Stromasys 2018 Charon-SSP for Linux Version 2.0.1 – User’s Guide / Charon-SSP Software Upgrade 149
10 Charon-SSP Software Upgrade
This section describes the upgrade of the individual Charon-SSP software components.
10.1 Host Operating System Specifics for Upgrade
The supported Linux host operating systems use the same package management system (RPM). Hence, the package
names and the installation steps are mostly identical.
The management GUI can also be run on Microsoft Windows and is delivered as separate Windows packages in addition
to the Linux packages.
10.1.1 Charon-SSP Installation Packages
The packages of the Charon-SSP for Linux virtual machine software provided as RPM packages as described in the
installation section of this document. The software for Windows is provided as Windows installer packages. You can
download the required package(s) from Stromasys or receive them on a read-only medium, such as a CD-ROM. If you do
not have the software package(s), please contact either Stromasys or your Value Added Reseller (VAR) for further help.
The following table shows relevant installation package names. The update of these packages is shown in the following
sections.
Product
Charon-SSP software package names
Linux Windows
Sentinel runtime environment
aksusbd-<version>.rpm Not supported
Charon-SSP/4M/4U/4U+
charon-ssp-4m-{version}-x86_64.rpm
charon-ssp-4u-{version}-x86_64.rpm
charon-ssp-4u+-{version}-x86_64.rpm (to update Barebone systems)
Not supported
Charon-SSP Manager charon-manager-ssp-{version}.rpm charon-manager-
ssp-{version}.zip
Charon-SSP Director charon-director-ssp-{version}.rpm charon-director-
ssp-{version}.zip
Charon-SSP Agent charon-agent-ssp-{version}-x86_64.rpm Not supported

Document number: 55-16-005-001
© Stromasys 2018 Charon-SSP for Linux Version 2.0.1 – User’s Guide / Charon-SSP Software Upgrade 150
10.1.2 Upgrade Commands on Supported Host Systems
The following table provides an overview of the upgrade commands. For details, please refer to the relevant man-pages
on Linux or the help system on Windows.
Operating system specific installation commands
Linux Windows
Package manager (uses repositories, takes care of dependencies, etc.)
# yum update <package-name> Windows software installer Command to
upgrade individual local packages
# rpm -u </path/to/package>
All update steps must be performed from a privileged account as denoted by the ‘#’ prompt
10.2 Upgrading the Charon-SSP Software on Linux
This section describes the package update for RPM-based Linux distributions.
The versions of the Charon-SSP packages installed on one system must match. Therefore, you have to upgrade all installed packages to the same version.
Exception: Starting with Charon-SSP version 2, it is supported to have several versions of the Charon-SSP Manager on a system to manage remote systems with versions different from the local system. If you want to retain an old version of the Charon-SSP manager, copy the content of the directory /opt/charon-manager to another directory, e.g. /opt/charon-manager-<version> before upgrading. Later, you can use this version to manage remote systems with matching versions.
Once all required packages are available on the Linux host, you can upgrade them by following the steps below:
Upgrading the Charon-SSP packages on RPM-based systems
Step Description
1 Shut down the virtual SPARC systems.
2 Run the upgrade command for Charon-SSP (assuming that all packages are in the current working directory):
# yum update charon*.rpm Red Hat, CentOS, Oracle Linux
3 Run the upgrade command for the Sentinel HASP (if a new version is included with Charon-SSP):
# yum update aksusbd-{version}.rpm Red Hat, CentOS, Oracle Linux
4 Restart the virtual SPARC systems.

Document number: 55-16-005-001
© Stromasys 2018 Charon-SSP for Linux Version 2.0.1 – User’s Guide / Charon-SSP Software Upgrade 151
The following output shows a sample upgrade with the full set of Charon-SSP packages in the current working directory:
Upgrading Charon-SSP packages on systems using RPM packages
# yum update charon*.rpm
[lines removed] Last metadata expiration check: 0:00:05 ago on Thu Aug 24 14:35:22 2017.
Dependencies resolved.
================================================================================
Package Arch Version Repository Size
================================================================================
Upgrading:
charon-agent-ssp x86_64 1.5.23-1 @commandline 1.1 M
charon-director-ssp x86_64 1.5.23-1 @commandline 91 k
charon-manager-ssp x86_64 1.5.23-1 @commandline 939 k
charon-ssp-4m x86_64 1.5.23-1 @commandline 1.3 M
charon-ssp-4u x86_64 1.5.23-1 @commandline 1.6 M
Transaction Summary
================================================================================
Upgrade 5 Packages
Total size: 5.0 M
Is this ok [y/N]: y
Downloading Packages:
Running transaction check
Transaction check succeeded.
Running transaction test
Transaction test succeeded.
Running transaction
Upgrading : charon-ssp-4u-1.5.23-1.x86_64 1/10
Upgrading : charon-ssp-4m-1.5.23-1.x86_64 2/10
Upgrading : charon-manager-ssp-1.5.23-1.x86_64 3/10
Upgrading : charon-director-ssp-1.5.23-1.x86_64 4/10
Stopping charon-agentd-ssp (via systemctl): [ OK ]
Upgrading : charon-agent-ssp-1.5.23-1.x86_64 5/10
Starting charon-agentd-ssp (via systemctl): [ OK ]
Cleanup : charon-ssp-4u-1.3.18-1.x86_64 6/10
Cleanup : charon-ssp-4m-1.3.18-1.x86_64 7/10
Cleanup : charon-manager-ssp-1.3.18-1.x86_64 8/10
Cleanup : charon-director-ssp-1.3.18-1.x86_64 9/10
Cleanup : charon-agent-ssp-1.3.18-1.x86_64 10/10
Verifying : charon-agent-ssp-1.5.23-1.x86_64 1/10
Verifying : charon-director-ssp-1.5.23-1.x86_64 2/10
Verifying : charon-manager-ssp-1.5.23-1.x86_64 3/10
Verifying : charon-ssp-4m-1.5.23-1.x86_64 4/10
Verifying : charon-ssp-4u-1.5.23-1.x86_64 5/10
Verifying : charon-agent-ssp-1.3.18-1.x86_64 6/10
Verifying : charon-director-ssp-1.3.18-1.x86_64 7/10
Verifying : charon-manager-ssp-1.3.18-1.x86_64 8/10
Verifying : charon-ssp-4m-1.3.18-1.x86_64 9/10
Verifying : charon-ssp-4u-1.3.18-1.x86_64 10/10
Upgraded:
charon-agent-ssp.x86_64 1.5.23-1 charon-director-ssp.x86_64 1.5.23-1
charon-manager-ssp.x86_64 1.5.23-1 charon-ssp-4m.x86_64 1.5.23-1
charon-ssp-4u.x86_64 1.5.23-1
Complete!
Of course, you can run the command for each package individually.
10.3 Upgrading the Charon-SSP Barebone Distribution
If upgrades or patches become available for the Charon-SSP Barebone distribution, Stromasys will provide appropriate
packages. The Charon-SSP software itself can be upgraded as described above.

Document number: 55-16-005-001
© Stromasys 2018 Charon-SSP for Linux Version 2.0.1 – User’s Guide / Charon-SSP Software Upgrade 152
10.4 Upgrading the Charon-SSP Software on Windows
To upgrade the Charon-SSP Manager and the Charon-SSP Director for Windows, follow the installation instructions in the
sections Installing the Charon-SSP Manager for Windows and Installing the Charon-SSP Director for Windows.
Starting with Charon-SSP version 2, it is supported to have several versions of the Charon-SSP Manager on a system to manage remote systems with versions different from the local system. The Charon-SSP Manager installation preserves older versions. Later, you can use these versions to manage remote systems with matching versions.
Should the installer display an error message about an old version already being installed, the existing package must be
removed before the new one can be installed. The process for removing the Charon-SSP Manager and the Charon-SSP
Director for Windows is described in the sections Removing the Charon-SSP Manager on Windows and Removing the
Charon-SSP Director on Windows. Once removed, use the steps described in the installation sections to complete the
upgrade of Charon-SSP Manager and Charon-SSP Director for Windows.

Document number: 55-16-005-001
March 2018 Charon-SSP for Linux Version 2.0.1 – User’s Guide (Version 1)
11 Charon-SSP Software Deinstallation
This section describes the removal of the Charon-SSP Software.
Please shut down any running components of Charon-SSP before removing the software.
11.1 Removing the Sentinel HASP Software
To remove the Sentinel HASP software, execute the following commands on the Linux host system as shown in the table
below.
Sentinel HASP for Linux deinstallation commands
Product Name Deinstallation command for RPM packages
Sentinel HASP Software # rpm -e aksusbd
Removing the Sentinel HASP license software does not remove any site-specific configuration files in /etc/hasplm.
11.2 Removing the Charon-SSP Packages on Linux
To deinstall the Charon-SSP software for Linux, execute the rpm command for the packages as shown in the table below.
Charon-SSP for GNU/Linux deinstallation commands
Product Name Deinstallation commands for RPM packages
Red Hat, CentOS, Oracle Linux deinstallation of individual packages (rpm example)
Charon-SSP/4M # rpm -e charon-ssp-4m
Charon-SSP/4U(+) # rpm -e charon-ssp-4u
# rpm -e charon-ssp-4u+
Charon-SSP Manager # rpm -e charon-manager-ssp
Charon-SSP Director # rpm -e charon-director-ssp
Charon-SSP Agent # rpm -e charon-agent-ssp
Red Hat, CentOS, Oracle Linux deinstallation of all CHARON packages (yum example)
All packages named charon* # yum erase charon*
During the deinstallation process, only the Charon-SSP for Linux software is removed. All user data, including
virtual disks, configuration files, and virtual tapes are left untouched. The user can then archive or delete the
files.
If you downgrade to an older version (1.4.x or lower), the storage format of the agent password is not compatible with the one used in newer versions. This will cause login-failures. To prevent this:
delete the file /opt/charon-agent/ssp-agent/etc/passwd.conf before installing the old agent version or before starting the agent (this will re-create the file with default password stromasys), or
edit the file after the installation and replace the content of the file with the password in clear text (do not add carriage-return/newline). Restart the agent (/etc/init.d/charon-agentd-ssp restart).

Document number: 55-16-005-001
© Stromasys 2018 Charon-SSP for Linux Version 2.0.1 – User’s Guide / Charon-SSP Software Deinstallation 154
11.3 Removing the Charon-SSP Manager on Windows
To remove the Charon-SSP Manager software, follow the steps listed below for the specific host operating systems.
Microsoft Windows 8 and Windows Server 2012
Removing Charon-SSP Manager from Microsoft Windows 8 and Windows Server 2012
Step Task
1 Press WinKey+X to access the Power User Menu.
Click Control Panel.
2 Switch View by to Small Icons or Large Icons.
Click Programs and Features.
3 Select SSP-Manager from the list of installed software.
Click Uninstall.
Microsoft Windows 7, Vista, Server 2008, and Server 2008 R2
Removing Charon-SSP Manager from Microsoft Windows 7, Vista, Server 2008 and Server 2008 R2
Step Task
1 Click Start, and then click Control Panel.
2 Switch View by to Small Icons or Large Icons.
Click Programs and Features.
3 Select SSP-Manager from the list of installed software
Click Uninstall.

Document number: 55-16-005-001
© Stromasys 2018 Charon-SSP for Linux Version 2.0.1 – User’s Guide / Charon-SSP Software Deinstallation 155
11.4 Removing the Charon-SSP Director on Windows
To remove the Charon-SSP Director software, follow the steps listed below for the specific host operating systems.
Microsoft Windows 8 and Windows Server 2012
Removing Charon-SSP Director from Microsoft Windows 8 and Windows Server 2012
Step Task
1 Press WinKey+X to access the Power User Menu.
Click Control Panel.
2 Switch View by to Small Icons or Large Icons.
Click Programs and Features.
3 Select charon-director from the list of installed software.
Click Uninstall.
Microsoft Windows 7, Vista, Server 2008, and Server 2008 R2
Removing Charon-SSP Director from Microsoft Windows 7, Vista, Server 2008 and Server 2008 R2
Step Task
1 Click Start, and then click Control Panel.
2 Switch View by to Small Icons or Large Icons.
Click Programs and Features.
3 Select charon-director from the list of installed software
Click Uninstall.

Document number: 55-16-005-001
© Stromasys 2018 Charon-SSP for Linux Version 2.0.1 – User’s Guide / Appendix 156
A Appendix – Configuration File Reference
The Charon-SSP virtual machines can be configured using a text-based configuration file or the Charon-SSP Manager
GUI. The configuration settings made via the GUI are stored in the configuration file.
This section describes the format and content of the text-based configuration file. The configuration file is made up of a
number of sections that describe various aspects of the virtual machine environment. This appendix describes the
different sections and their syntax.
The initial configuration files used by the Charon-SSP Manager are found in /opt/charon-manager/ssp-
manager/config/ssp/.
A.1 Syntax
The configuration file format for Charon-SSP follows the “INI file” format originally used by MS-DOS and 16-bit Microsoft
Windows. The syntax is described in EBNF (Extended Bakus Naur Format) below.
Configuration file syntax in EBNF
file := (section)+ section := ‘[‘ NAME ‘]’ ‘\n’ (key)+ key := NAME ‘=’ VALUE ‘\n’
The following briefly describes each syntax element used in the configuration.
A.1.1 Section
The configuration file is divided into sections. These sections are denoted by names enclosed in ‘[‘and ‘]’. Example
section header:
[system]
There is no “end of section” delimiter. A section ends when either the end of file is reached or a new section is
encountered.
A.1.2 Properties
Configuration options (properties) are specified as key/value pairs. Key names are separated from values by the ‘=’
character. All characters following the ‘=’ character to the end of the line are considered part of the value. The following
example shows a key/value pair.
port = /dev/ttyS0
Configuration property names are case-sensitive. This means that “port” and “Port” are not equivalent.
A.1.3 Comments
Comments are ignored by the emulator. They are provided for human readers and writers to leave informative notes. A
comment starts with the ' #' character and continues to the end of the line. The following example shows a comment line:
# Charon-SSP configuration file comment

Document number: 55-16-005-001
© Stromasys 2018 Charon-SSP for Linux Version 2.0.1 – User’s Guide / Appendix 157
A.1.4 Blank Lines
Blank lines are ignored by the emulator. They should be used to break up the configuration file, making it easier for a
human reader to analyze.
A.2 Reference
The following sections describe how to use the configuration objects and their members to set up a virtual SPARC
machine.
A.2.1 [cpu] Section
This section controls options related to the operation of the virtual machines CPUs. The following list shows all available options:
dit – Enable/disable dynamic instruction translation.
dit_page_size – Specify the dit page size.
fp_opt1, fp_opt2, fp_opt3 – Floating point optimization.
number – Specify number of virtual CPUs.
ht – Specify if the host system uses hyperthreading or runs in a VM.
idle – Specify host CPU behavior when the guest system is idle.
A.2.1.1 dit
Enable/disable dynamic instruction translation.
Syntax
dit = on | off
Description
This option enables of disables the Dynamic Instruction Translation (DIT) mode. This can provide significant performance
increase if enabled.
Enabling this option will consume approximately 600MB of additional host memory.
A.2.1.2 dit_page_size
Defines the page size for Dynamic Instruction Translation (Charon-SSP/4U(+)) only.
Syntax
dit_page_size = size-in-KB
Description
This option defines the DIT page size in KB. It can have a maximum of 2048KB. This parameter should only be changed if
the log file indicates that the DIT optimization was disabled because the translation buffer size was too small.
Valid options for size-in-KB are values between 480KB and 2048KB in 64KB increments. Exception: the last step to
2048KB only uses a 32KB increment.
A.2.1.3 fp_opt1, fp_opt2, fp_opt3
Specifies if floating-point optimization is to be used, and at what level.
Syntax

Document number: 55-16-005-001
© Stromasys 2018 Charon-SSP for Linux Version 2.0.1 – User’s Guide / Appendix 158
fp_opt1 = on | off
fp_opt2 = on | off
fp_opt3 = on | off
Description
If all three parameters are set to off, no floating-point optimization is used. By setting a parameter to on, the respective
optimization level is activated. If a SPARC CPU with 1.0+ GHz is to be emulated, all three levels of optimization should be
enabled.
A.2.1.4 number
Specifies the number of virtual CPUs.
Syntax
number = cpu-count
Description
This option specifies the total number of CPUs the virtual machine is to provide. The table below lists the supported virtual
machine families and the maximum number of CPUs for each.
Maximum number of CPUs per virtual machine family
Machine hardware family Emulated model (example) Max. CPUs
SUN-4M Sun SPARCstation 20 4
SUN-4U Sun Enterprise 450 24
A.2.1.5 idle
Defines the host CPU behavior when guest Solaris is in idle state.
Syntax
idle = none | pause | sleep
Description
When guest Solaris is in idle state, the host CPU behavior is defined the specific value assigned to idle attribute. The
value could be one of below:
Idle values
Value Description
none Corresponds to “Performance” in CHARON Manager setting. The host CPU keeps running Solaris idle
handling instructions.
pause Corresponds to “Balanced” in CHARON Manager setting. The host CPU turns to shallow pause mode.
sleep Corresponds to “Power save” in CHARON Manager setting. The host CPU turns to deep sleep mode.
A.2.1.6 ht
Indicates that the host system uses hyperthreading or runs on a VM, for example in VMware.

Document number: 55-16-005-001
© Stromasys 2018 Charon-SSP for Linux Version 2.0.1 – User’s Guide / Appendix 159
Syntax
ht = on | off
Description
The CHARON instance can adapt to a host environment with hyperthreading or a host running in a VM.
ht values
Value Description
off Host system does not use hyperthreading and does not run in a VM.
on Host system uses hyperthreading or runs in a VM.
A.2.2 [ethernet] Section
This section describes the virtual Ethernet adapters attached to the virtual machine. The following list describes the available options:
interface – Attach virtual Ethernet interface to host attached adapter.
mac – Specifies virtual Ethernet adapter MAC address.
model – Specifies which type of Ethernet adapter is presented to the guest system.
For virtual models that support the feature, it is possible to configure multiple Ethernet controllers. For an example configuration and details on section naming, see [ethernet_n] section.
A.2.2.1 interface
Attaches a virtual Ethernet interface to host attached adapter.
Syntax
interface = host-device
Description
The interface option is used to attach the virtual Ethernet adapter to a physical host adapter.
A.2.2.2 mac
Specify virtual Ethernet adapter MAC address.
Syntax
mac = aa:bb:cc:dd:ee:ff
Description
This optional parameter can be used to force the physical address of the network adapter to a certain address. This can
be particularly relevant in the case where a software product may be licensed against the network adapter of a native
SPARC system. It can also be used to define a hard-coded MAC address as a workaround (setting it to the physical
VMware ESXi network adapter MAC address) if the adapter cannot set to promiscuous mode for some reason.

Document number: 55-16-005-001
© Stromasys 2018 Charon-SSP for Linux Version 2.0.1 – User’s Guide / Appendix 160
A.2.2.3 model
Defines the Ethernet adapter model will be presented to the guest system. Available only on Charon-SSP/4U(+).
Syntax
model = hme | qfe
Description
Charon-SSP can emulate the QFE 4-port Ethernet adapter. This is indicated by setting the model to qfe in the
configuration.
Please note that the first configured Ethernet interface represents the SPARC on-board device and must be of type
HME.
A.2.3 [ethernet_n] Section
This section is used for virtual machine configurations where there are multiple Ethernet controllers. The properties are
the same as those described in the [ethernet] section. However, the section naming is slightly different in that the names
are suffixed with an underscore and the controller number.
Valid controller numbers are
1 for Charon-SSP/4M
1 - 18 for Charon-SSP/4U(+)
The configuration example below demonstrates the configuration of two virtual Ethernet adapters.
Sample Ethernet adapter configuration
[ethernet_1] interface = intbr0 model = hme
[ethernet_2] interface = intbr1 mac = 08:00:2b:aa:bb:cc model = hme
A.2.4 [log] Section
This section describes the configuration of the Charon-SSP for Linux virtual machine logging facility. The following list
shows the properties supported by this section:
destination – Logging facility output destination.
path – Logging output path.
severity – Logging severity level.
rotation – Number of old versions of the log file to be kept
It is important to note that all properties in this section must be configured correctly to ensure that the virtual
machine will start. The message Failed to set up the log! indicates that something in the logging section is not
configured correctly or there are no write permissions to the log file.
Faults in the logging facility configuration could be:
incorrect path or insufficient privilege to create the file,
property or properties not configured, or
misconfigured property value.

Document number: 55-16-005-001
© Stromasys 2018 Charon-SSP for Linux Version 2.0.1 – User’s Guide / Appendix 161
A.2.4.1 destination
Logging facility output destination.
Syntax
destination = log-destination
Description
This property controls the destination of the logging facility output. The table below lists all possible values for log-
destination.
Logging Destination Keywords
Destination Description
all Write output to all possible destinations.
console Write output to the /dev/console device only.
file Write output to the file specified by path only.
A.2.4.2 path
Logging output file path.
Syntax
path = log-path
Description.
Specify a file path in log-path. The virtual machine log messages will be written to the specified file.
This configuration property must be present, even if destination is set to a value other than all or file.
A.2.4.3 severity
Logging severity level.
Syntax
severity = level
Description
Virtual machine logging messages are arranged into levels to make messages more relevant and reduce log file size. The
severity property controls the level of the messages that are included in the logging output. The list below lists these
levels from most to least verbose. Setting logging to a specific level also includes all levels below it. For example, setting
severity to warning ensures that error and fatal are also included in the output and other levels are not.
Logging severity levels
Level Description
debug Debug and all lower level messages are logged.

Document number: 55-16-005-001
© Stromasys 2018 Charon-SSP for Linux Version 2.0.1 – User’s Guide / Appendix 162
info Informational and all lower level messages are logged.
warning Warning and all lower level messages are logged.
error Error and all lower level messages are logged.
fatal Only fatal error messages are logged.
A.2.4.4 rotation
Number of old versions to be kept.
Syntax
rotation = number-of-versions
Description.
Specify the number of versions in the number-of-versions. The number can be between 1 and 20. The Charon-SSP logs
are rotated upon startup of the emulator instance and, during operation, based on the number of lines written to the log.
Once the number of log lines reaches 800.000, the log is rotated.
A.2.5 [nvram] Section
This section is used to configure the location of the NVRAM backing file store as well as some other NVRAM options. The
list below describes the options that can be set:
disable_autoboot – Autoboot of the guest system is disabled.
hostid – Set Sun Host ID.
path – Specify location and name of console NVRAM file.
A.2.5.1 disable_autoboot
Disable autoboot of guest system even if this has been configured in the OpenBoot Console.
Syntax
disable_autoboot = 0 | 1
Description
If the value of this parameter is set to 1, the guest system will not boot automatically when the Charon-SSP instance is
started with autoboot enabled in the OpenBoot Console. If the value is set to 0, the OpenBoot Console setting will be
honored.
A.2.5.2 hostid
Set Sun Host ID.
Syntax
hostid = hex-hostid
Description
This optional property can be used to configure the Sun Host ID of the virtual machine. This may be useful in cases,
where the software licenses are tied to the host ID of the physical SPARC system. The value of hex-hostid is of the format
0xnnnnnnnn.

Document number: 55-16-005-001
© Stromasys 2018 Charon-SSP for Linux Version 2.0.1 – User’s Guide / Appendix 163
A.2.5.3 path
Specify location and name of console NVRAM file.
Syntax
path = nvram-path
Description
This property specifies the location and name of the console NVRAM image. It contains information such as environment
variable settings, boot flags, etc. Set nvram-path to filename (including the path) on the host system where this
information can be stored.
A.2.6 [ram] Section
This section controls the virtual machine memory environment. The following list describes these options:
allocator – Virtual machine memory allocator.
size – Virtual machine memory size.
A.2.6.1 allocator
Virtual machine memory allocator.
Syntax
allocator = memory-allocator
Description
The allocator option is used to indicate to the virtual machine which memory allocation method the host system uses to
allocate the virtual memory environment. The memory-allocator value can be set according to the table below:
Virtual machine memory allocators
Allocator Description
malloc All virtual machine RAM is allocated from system heap. This is the default and is appropriate for most cases. Please contact Stromasys if your environment has special memory requirements.
mmap All virtual machine RAM is allocated from file-backed virtual memory via mmap.
A.2.6.2 size
Virtual machine memory size.
Syntax
size = memory-size
Description
This option specifies the amount of host memory that the virtual machine should make available to the guest. It is
specified in megabytes (MB). The table below describes the allocation rules for each virtual machine model.

Document number: 55-16-005-001
© Stromasys 2018 Charon-SSP for Linux Version 2.0.1 – User’s Guide / Appendix 164
Virtual machine allocation increments and maximum sizes
Virtual machine family Memory allocation rules
SUN-4M (e.g. Sun SPARCstation 20) 64MB, 128MB, 256MB, and 512MB.
SUN-4U (e.g. Sun Enterprise 450) 1 - 128 GB in 1 GB increments (expressed as MB: 1GB = 1024MB).
If the memory size for a SUN-4U is not correctly entered as a MB value corresponding to a multiple of 1024, the virtual machine does not start and prints the following error message in the log:
ERROR VM Memory size should be integral multiple of 1024MB
A.2.7 [scsi_n] Section
This section describes the virtual SCSI storage device configuration. Each device requires a separate section heading,
where n is replaced with a SCSI ID number between 0 and 15 (0 to 7 for SUN-4M). The example below shows the
configuration entries for a physical tape device attached at SCSI ID 5. All devices are attached to the internal bus of the
SPARC virtual machine.
Physical tape device attached at SCSI ID 5
[scsi_5] lun_0 = /dev/tape type = tape
The following list describes the available options for [scsi_n] sections:
lun_X – Virtual SCSI storage device path.
type – Specify type of virtual SCSI storage device.
pass_through – Turn SCSI pass-through on or off.
removable – Defines if emulator can start with this device missing.
Please note that the parameters path and serial_number have been superseded by the lun_X parameter.
For virtual models that support the feature, it is possible to configure additional virtual SCSI devices attached on an external SCSI controller. For an example configuration and details on section naming, see section [scsix_n].
The SCSI ID 7 is reserved for the virtual SCSI host bus adapter; consequently, it is not possible to configure a
section titled [scsi_7].
Charon-SSP/4M supports a maximum of 7 SCSI devices. If you add a SCSI device section outside this range, e.g.
[scsi_8], they will be ignored and the disks will not be available to the virtual machine.
A.2.7.1 lun_X
Physical or virtual device identification and LUN definition for virtual SCSI storage devices.
Please note: this parameter supersedes the following parameters of earlier versions:
serial_number – if a physical disk is added by specifying its serial number, this number is stored in the lun_X parameter.
path – the path to the physical device or storage container file is now stored in the lun_X parameter.
The old parameters are understood by the new version. The Charon-SSP Manager will convert the parameters
when the configuration is first saved via the Charon-SSP manager. After this, manual changes will be necessary
to return to the old version should this be required.

Document number: 55-16-005-001
© Stromasys 2018 Charon-SSP for Linux Version 2.0.1 – User’s Guide / Appendix 165
Syntax
lun_X = virtual device container file path | physical host-device | physical disk serial number
Description
The lun_X option is used to define the LUN of the virtual SCSI device and to attach the virtual SCSI device to
a virtual storage container file on the host (virtual device container file path),
a physical host storage device (path to physical host device or physical disk serial number), or
a generic SCSI device on the host (path to generic scsi device).
One [scsi_n] section can have several lun_X definitions. X can have a value from 0 through 7 and must be unique in one scsi_n section.
If the physical disk serial number is to be used (device type must be disk), it can be determined using the following command:
# udevadm info -q property -n /dev/diskname | grep SERIAL
Either ID_SERIAL_SHORT or ID_SCSI_SERIAL can be used.
All lun_X entries in one [scsi_n] section must be for virtual SCSI devices of the same type.
A.2.7.2 type
Specify type of virtual SCSI storage device.
Syntax
type = device-type
Description
This property describes the type of the virtual SCSI storage device. It is possible to attach a range of devices in various
formats, including container files and physical devices. The table below describes each possible value for device-type.
Virtual storage device types
Device type Description Example path
cdrom Physical optical device. /dev/cdrom
disk Physical disk device. /dev/sda
tape Physical tape device. /dev/tape
iso Virtual CD-ROM ISO container file. /usr/local/share/iso/suns-4.1.4.iso
vdisk Virtual disk container file. /usr/local/vm/bender/disk0.vdisk
vtape Virtual tape container file. /usr/local/vm/leela/tape0.vtape
generic Generic SCSI device /dev/sg0
A.2.7.3 pass_through
Enable or disable SCSI pass-through for physical disks.
Syntax
pass_through = on | off

Document number: 55-16-005-001
© Stromasys 2018 Charon-SSP for Linux Version 2.0.1 – User’s Guide / Appendix 166
Description
This option allows you to turn SCSI pass-through on or off. Turning it on allows direct access to SCSI devices to the
virtual system. This feature is useful, for example, for using shared disks in cluster environments (fencing / persistent
reservations) and special SCSI peripherals, such as tape robots or SCSI-connected serial devices and scanners.
A.2.7.4 removable
Defines if emulator can start with this device missing.
Syntax
removable = on | off
Description
If the parameter is set to on, the emulator can start even when the device is not present on the host system. If the
parameter is set to off, Charon-SSP will log an error and stop if the device is missing from the host.
A.2.8 [scsix_n] Section
These sections are used for virtual machine configurations that support the external (although not necessarily physically
external) SCSI controller, such as the Sun Enterprise 450 (hardware family SUN-4U). Each device requires a separate
section heading, where n is replaced with a SCSI ID number between 0 and 15. The example below shows a
configuration of three devices (one CD-ROM backed by an ISO container, one generic SCSI device, and two physical
disks on one SCSI target ID) attached to the external SCSI bus.
Example external SCSI device configuration
[scsix_3] type = generic lun_3 = /dev/sg0 removable = on [scsix_5] type = disk lun_0 = S21JNXAGA00047N lun_1 = S51JNXAGA00047N removable = off [scsix_6] type = iso lun_0 = /usr/local/share/iso/solaris.1.1.2.iso removable = off
The section properties described in the section [scsi_n] are also applicable here.
The SCSI ID 7 is reserved for the virtual SCSI host bus adapter; consequently, it is not possible to configure a section titled [scsix_7].
A.2.9 [floppy] Section
The section is used to configure a virtual floppy device. This feature is available on Charon-SSP/4M only. The following
options can be set in this section:
type – Specify whether a container file or a physical floppy is to be used.
path - Path to container file or physical device.

Document number: 55-16-005-001
© Stromasys 2018 Charon-SSP for Linux Version 2.0.1 – User’s Guide / Appendix 167
A.2.9.1 type
Specify whether a container file or a physical floppy is to be used.
Syntax
type = virtual | physical
Description
Set parameter to virtual if a container file is to be used. Set it to physical if a real device on the host system is to be
used.
A.2.9.2 path
Path to container file or physical device.
Syntax
path = path-to-container | physical-device
Description
Set the parameter to the path of the container file to be used for the virtual floppy (e.g., /my/virtual/devices/ flptest.flp). Set
the parameter to the physical device if a real device on the host system is to be used (e.g., /dev/fd0).
A.2.10 [system] Section
The system section is used to configure "system-wide" properties of the virtual machine. The list below describes the
options that can be set:
cpu_affinity – Assigns virtual CPU processing to a specific host CPU.
io_affinity – Assigns virtual machine I/O processing to a specific host CPU.
io_cpus – Number of host CPUs reserved for virtual machine I/O processing.
machine – Specifies the SPARC system model of the virtual machine.
A.2.10.1 cpu_affinity
Assign virtual CPU processing to a specific host CPU.
Syntax
cpu_affinity = cpu-affinity [, cpu-affinity [, ... ] ]
Description
This option is a comma-separated list of host CPUs (or cores) that the virtual machine assigns to virtual CPU threads. If
this option is used, there must be exactly one host CPU in the list for each virtual SPARC CPU.
The virtual machine will assign affinity automatically if this option is not set.
A.2.10.2 io_affinity
Assigns virtual machine I/O processing to a specific host CPU.
Syntax
io_affinity = io-affinity [, io-affinity [, ... ] ]

Document number: 55-16-005-001
© Stromasys 2018 Charon-SSP for Linux Version 2.0.1 – User’s Guide / Appendix 168
Description
This option accepts a comma delimited list of specific host CPUs (or cores) the virtual machine assigns to I/O processing.
If this option is not set, the virtual machine will assign affinity automatically.
A.2.10.3 io_cpus
Number of host CPUs reserved for virtual machine I/O processing.
Syntax
io_cpus = cpu-count
Description
Use this option to reserve a specific number of host CPUs (or cores) for virtual machine I/O processing. If neither
io_affinity nor io_cpus are set, the virtual machine will automatically reserve one third of the host CPUs (or cores) for I/O
processing (rounded down, minimum one).
A.2.10.4 machine
Specify the SPARC hardware-family of the virtual machine.
Syntax
machine = "model-name"
Description
The machine keyword is used to indicate the specific hardware family of the SPARC-based systems to be emulated. The
following table lists the possible values of model-name and an example of systems they represent.
Virtual machine model names
Model name (configured hardware family) Hardware represented (examples)
SUN-4U Sun Enterprise 450
SUN-4M Sun SPARCstation 20
The model-name value must be specified exactly as specified above (including capitalized letters). The specified model must be covered by the Charon-SSP license for the emulator instance to run successfully.
A.2.11 [ttya] Section
The ttya section is used to configure the first serial port (sometimes used as the console) on the SPARC virtual machine.
Using the associated options it is possible to attach the virtual serial port to a network socket or a physical serial port
attached to the host. The list below describes the options that can be configured:
port – Specify to which device the virtual serial port is connected.
restrict_access – Allow access from remote hosts or only from the local host.
start_console – Start PuTTY at virtual machine boot.
type – Virtual serial port type.
log_path – Path of the console log.

Document number: 55-16-005-001
© Stromasys 2018 Charon-SSP for Linux Version 2.0.1 – User’s Guide / Appendix 169
A.2.11.1 port
Specification of the device for the virtual serial port.
Syntax
port = port-spec
Description
This option is dependent on the setting of the type option. The table below describes the valid settings for port-spec in
relation to the port type listed in the first column.
Virtual serial port settings
If port type is...
Values for port-spec parameter Description
physical Path to physical device, e.g. /dev/ttyS0
The virtual serial port is attached to a physical serial port
attached to the host.
socket TCP/IP socket number, e.g. 9000 The virtual serial port is attached to a network port to which terminal applications can connect. Raw serial connection.
telnet TCP/IP socket number, e.g. 9000 The virtual serial port is attached to a network port to which
terminal applications can connect. The port supports the telnet
protocol.
terminal Local Linux host terminal is used Using the current terminal for input and output of the emulated
SPARC system.
A.2.11.2 restrict_access
Allow access from remote hosts or only from the local host.
Syntax
restrict_access = on | off
Description
If set to on, access to the console on TTYA is only possible from the local system. Otherwise, when TTYA is defined as a
network port (TCP socket), access from remote systems is possible.
A.2.11.3 start_console
Start PuTTY at virtual machine boot.
Syntax
start_console = off | on
Description
This option enables (or disables) the automatic starting of PuTTY when the virtual machine starts. This option is enabled
by default if the console is defined to be external (instead of built-in) in the Charon-SSP Manager.
A.2.11.4 type
Port type of the virtual serial device.

Document number: 55-16-005-001
© Stromasys 2018 Charon-SSP for Linux Version 2.0.1 – User’s Guide / Appendix 170
Syntax
type = port-type
Description
This option configures how the serial console port is connected. The table below lists the possible values for port-type and
their purpose.
Virtual serial port types
Port type Description
physical The virtual serial port is connected to a physical, host-attached serial port.
socket The virtual serial port is to be connected to a network socket. Raw serial connection.
telnet The virtual serial port is to be connected to a network socket and supports telnet.
terminal The virtual port uses the current terminal console for virtual SPARC input & output. Please
note that if a unique TCP port is specified for this type, the console is also reachable via
the network. This should be reserved for exceptional well-defined cases.
For details of the port specifications available for the selected port type, see the port section.
A.2.11.5 log_path
Enable console log and define path of log file.
Syntax
log_path = file-path
Description
This option enables the collection of console log information in the file designated by file-path.
A.2.11.6 Examples
The following configuration extract demonstrates how to attach the virtual serial port to the host device /dev/ttyS0.
Configuring ttya for physical console access
# Virtual serial console attached to host device /dev/ttyS0.
[ttya]
type = physical
port = /dev/ttyS0
The configuration extract below shows a parameters for ttya to accept incoming telnet connections on port 9000/tcp on
the host. Note that the option to restrict access to the local host is disabled.
Configuring ttya for network console access
# SPARCstation 20 serial console redirected to network
# port 9000/tcp.
[ttya]
type = telnet
port = 9000
restrict_access = off

Document number: 55-16-005-001
© Stromasys 2018 Charon-SSP for Linux Version 2.0.1 – User’s Guide / Appendix 171
A.2.12 [ttyb] Section
The ttyb section is used to configure the second serial port on the SPARC virtual machine. Using the available options it is
possible to attach the virtual serial port to a network socket or a physical serial port attached to the host. The configuration
options are the same as for ttya described in preceding section.
A.2.13 [ttyx] Section
The ttyX section is used to configure additional serial ports on the SPARC virtual machine. For Charon-SSP/4U(+), this is
accomplished either as additional emulated ports (max. 14 ports named ttyc, ttyd, etc.) or as an emulated DIGI board
(max. 32 ports named tty_1, tty_2, etc.). The latter requires a special driver on the Solaris guest system.
For Charon-SSP/4M, 8 serial ports named tty_1 through tty_8 can be configured.
It is possible to attach the virtual serial port to a network socket or a physical serial port of the host system using the
available configuration options. Please refer to the description of the port and type parameters in the ttya section for
further information (port type terminal and port type telnet are not supported in the ttyx section).
A.2.14 [digi_ppt_n] Section
This section defines a serial DIGI board in PCI pass-through mode. Available on Charon-SSP/4U(+) only. The number n
defines the sequence number of the pass-through device definitions. The section has one configurable parameter:
path – Specifies the special file representing the PCI device.
A.2.14.1 Path
Specifies the special file representing the PCI device.
Syntax
path = special-file
Description
The PPT (PCI pass-through) driver delivered as part of the Charon-SSP kit provides /dev/kdigi* devices. Such devices
can be defined in the path parameter to be handed to the guest operating system as a PCI pass-through device.
Currently, Digi AccelePort 920 and C/X cards are supported. The appropriate driver is required on Solaris.
A.2.15 [gpib_n] Section
This section defines a GPIB board in PCI pass-through mode. Available on Charon-SSP/4U(+) only. The number n
defines the sequence number of the pass-through device definitions. The section has one configurable parameter:
path – Specifies the special file representing the PCI device.
A.2.15.1 Path
Specifies the special file representing the PCI device.
Syntax
path = special-file
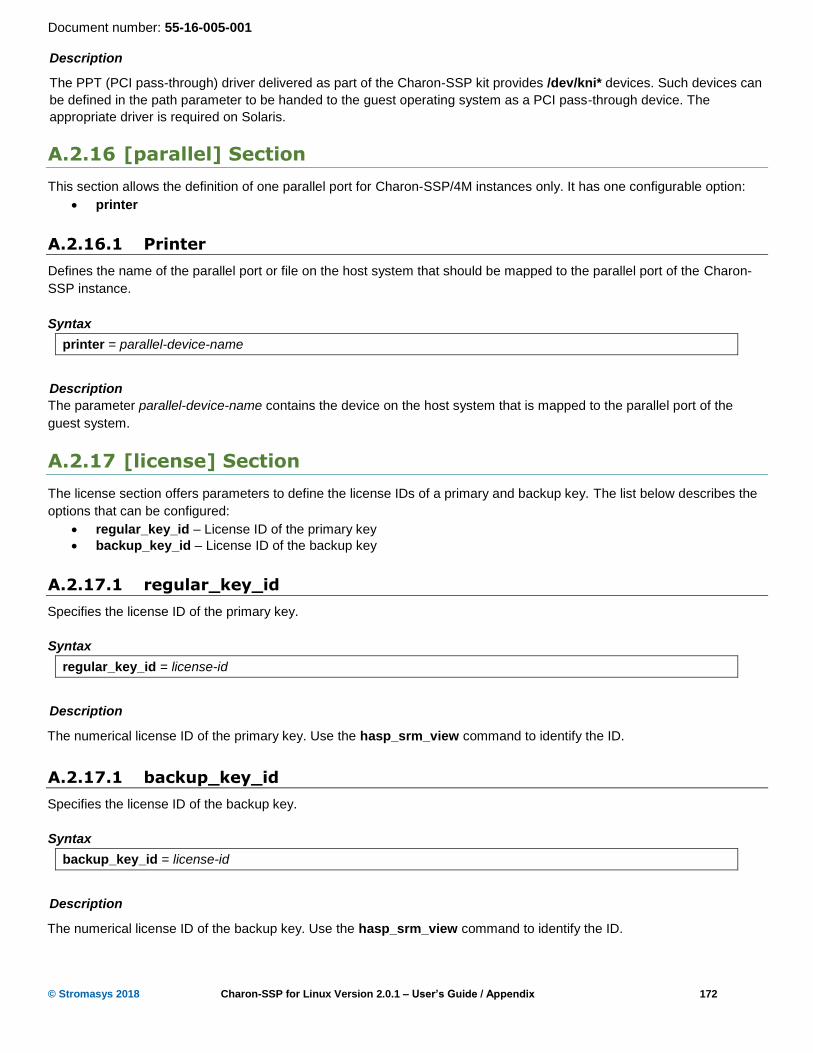
Document number: 55-16-005-001
© Stromasys 2018 Charon-SSP for Linux Version 2.0.1 – User’s Guide / Appendix 172
Description
The PPT (PCI pass-through) driver delivered as part of the Charon-SSP kit provides /dev/kni* devices. Such devices can
be defined in the path parameter to be handed to the guest operating system as a PCI pass-through device. The
appropriate driver is required on Solaris.
A.2.16 [parallel] Section
This section allows the definition of one parallel port for Charon-SSP/4M instances only. It has one configurable option:
printer
A.2.16.1 Printer
Defines the name of the parallel port or file on the host system that should be mapped to the parallel port of the Charon-
SSP instance.
Syntax
printer = parallel-device-name
Description
The parameter parallel-device-name contains the device on the host system that is mapped to the parallel port of the
guest system.
A.2.17 [license] Section
The license section offers parameters to define the license IDs of a primary and backup key. The list below describes the
options that can be configured:
regular_key_id – License ID of the primary key
backup_key_id – License ID of the backup key
A.2.17.1 regular_key_id
Specifies the license ID of the primary key.
Syntax
regular_key_id = license-id
Description
The numerical license ID of the primary key. Use the hasp_srm_view command to identify the ID.
A.2.17.1 backup_key_id
Specifies the license ID of the backup key.
Syntax
backup_key_id = license-id
Description
The numerical license ID of the backup key. Use the hasp_srm_view command to identify the ID.

Document number: 55-16-005-001
© Stromasys 2018 Charon-SSP for Linux Version 2.0.1 – User’s Guide / Appendix 173
A.2.18 [graphics] Section
The graphics section defines the parameters for the emulated graphics device. The following parameters can be
configured:
type – type of graphics device
dual_display – whether one or two screens should be used
remote_display – whether the display should be local or remote
display1 – DISPLAY variable for screen 1
display2 – DISPLAY variable for screen 2
remote_port1 – port on which the display is served to remote clients (screen 1)
remote_port2 – port on which the display is served to remote clients (screen 2)
console – whether the graphical device should be the console of the guest system
mouse_port – port to transmit mouse events
keyboard_port – port to transmit keyboard events
keyboard_layout – country specific keyboard setting
resolution – resolution of the emulated graphical display
full_screen – enable full-screen mode for the emulated device
refresh_rate – refresh rate of the emulated graphical display
A.2.18.1 type
Type of graphics display to be emulated.
Syntax
type = graphics-type
Description
This option enables the emulation of a graphical device or disables it.
Settings of graphics-type
Graphics type Description
disabled Graphical device emulation is disabled.
cgsix Enables the emulation of graphics card CGSIX.
cgthree Enables the emulation of graphics card CGTHREE (Sun-4m only).
ragexl Enables the emulation of graphics card Rage XL (Sun-4u only).
A.2.18.2 dual_display
Optionally enables the dual-screen configuration.
Syntax
dual_display = on | off
Description
This option determines if one or two screens will be used. If enabled, it will also activate the settings for display2 and
remote_port2 (if remote_display is enabled).

Document number: 55-16-005-001
© Stromasys 2018 Charon-SSP for Linux Version 2.0.1 – User’s Guide / Appendix 174
A.2.18.3 remote_display
Optionally enables the remote graphics display.
Syntax
remote_display = on | off
Description
This option determines if the graphical display is local to the emulator host or if it can also be displayed on a remote host.
If enabled, it will also activate the settings for remote_port1 and remote_port2 (if dual_display is enabled).
A.2.18.4 display1 and display2
The X display of the host that is to be used for the emulated graphical device.
Syntax
display1 = display-variable1
display2 = display-variable2
Description
These options define the display(s) of the Linux host that should be used. Format: :display.screen, for example :1.0 to
select display 1, screen 0.
The option display2 is only active when dual_display is enabled.
A.2.18.5 remote_port1 and remote_port2
The port on the host that is to be used for making the graphical display available to remote systems.
Syntax
remote_port1 = port-number1
remote_port2 = port_number2
Description
These options define the port number(s) on the Linux host that should be used to make the display available to remote
systems. The port number settings are only relevant if remote_display is enabled.
The option remote_port2 is only active when dual_display is also enabled. Default ports: 11100 and 11101.
A.2.18.6 console
Enables or disables the Solaris console on the emulated graphics display.
Syntax
console = on | off
Description
This option determines if the graphical display is also the console of the emulated system. If enabled, the console tab in
the Charon-SSP Manager will be unavailable.
A.2.18.7 mouse_port
The port on the host that is to be used for transmitting mouse events.

Document number: 55-16-005-001
© Stromasys 2018 Charon-SSP for Linux Version 2.0.1 – User’s Guide / Appendix 175
Syntax
mouse_port = port-number
Description
This option defines the port number on the Linux host that should be used to transmit mouse events. Default port: 11001.
A.2.18.8 keyboard_port
The port on the host that is to be used for transmitting keyboard events.
Syntax
keyboard_port = port-number
Description
This option defines the port number on the Linux host that should be used to transmit keyboard events. Default port:
11000.
A.2.18.9 keyboard_layout
Defines the keyboard layout to be used for the emulated graphics device.
Syntax
keyboard_layout = layout-number
Description
This option sets the keyboard layout to be used.
Values for layout-number
Value Layout Value Layout
0 US 11 SWEDEN_FINLAND
2 FRENCH_BELGIUM 12 SWISS_FRENCH
3 CANADA_FRENCH 13 SWISS_GERMAN
4 DENMARK 14 UK
5 GERMANY 32 JAPAN
6 ITALY
7 NETHERLANDS
8 NORWAY
9 PORTUGAL
10 SPAIN_LATIN
A.2.18.10 resolution
Defines the resolution of the emulated graphics device.
Syntax
resolution = screen-resolution
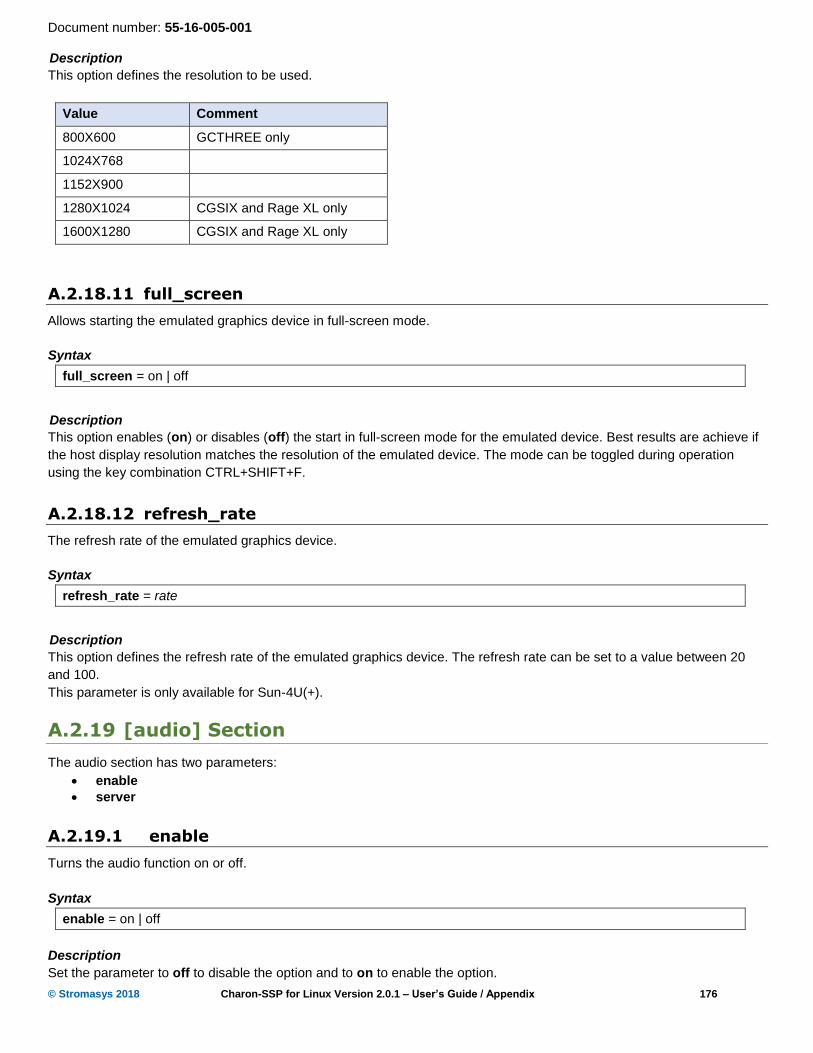
Document number: 55-16-005-001
© Stromasys 2018 Charon-SSP for Linux Version 2.0.1 – User’s Guide / Appendix 176
Description
This option defines the resolution to be used.
Value Comment
800X600 GCTHREE only
1024X768
1152X900
1280X1024 CGSIX and Rage XL only
1600X1280 CGSIX and Rage XL only
A.2.18.11 full_screen
Allows starting the emulated graphics device in full-screen mode.
Syntax
full_screen = on | off
Description
This option enables (on) or disables (off) the start in full-screen mode for the emulated device. Best results are achieve if
the host display resolution matches the resolution of the emulated device. The mode can be toggled during operation
using the key combination CTRL+SHIFT+F.
A.2.18.12 refresh_rate
The refresh rate of the emulated graphics device.
Syntax
refresh_rate = rate
Description
This option defines the refresh rate of the emulated graphics device. The refresh rate can be set to a value between 20
and 100.
This parameter is only available for Sun-4U(+).
A.2.19 [audio] Section
The audio section has two parameters:
enable
server
A.2.19.1 enable
Turns the audio function on or off.
Syntax
enable = on | off
Description
Set the parameter to off to disable the option and to on to enable the option.

Document number: 55-16-005-001
© Stromasys 2018 Charon-SSP for Linux Version 2.0.1 – User’s Guide / Appendix 177
A.2.19.2 server
Defines the audio server
Syntax
server = ip-address
Description
Set the IP-address of the audio server. The default is the local host system.

Document number: 55-16-005-001
© Stromasys 2018 Charon-SSP for Linux Version 2.0.1 – User’s Guide / Appendix 178
B Appendix – OpenBoot Console
B.1 OpenBoot Console Overview
The Charon-SSP SPARC virtual machines use a subset of the Sun OpenBoot console found on native Sun workstations
and servers. The figure below shows the initial console screen at boot on a virtual SPARCstation 20.
SPARCstation 20 OpenBoot console
SMCC SPARCstation 20 Emulator by Stromasys
CPU_#0 TI, TMS390Z50(3.x) 0Mb External cache
CPU_#1 ****** NOT installed ******
CPU_#1 ****** NOT installed ******
CPU_#1 ****** NOT installed ******
>>>>> Power On Self Test (POST) is running .... <<<<<
SPARCstation 20 (1 X 390Z50), No Keyboard
Emulate OBP Rev. 2.25, 64 MB memory installed, Serial #12648430.
Ethernet address 2:c:29:4a:d3:29, Host ID: 72c0ffee.
Type help for more information
Can not load boot block!
ok
B.2 OpenBoot Console Command Reference
The following sections describe the currently supported console commands.
B.2.1 banner
Display power-on banner.
Syntax
banner
Description
Use this command to display the power-on banner.
Example
The following example demonstrates the output of the banner command on Charon-SSP configured as a SPARCstation
20.
Example banner command output
ok banner
SPARCstation 20 (1 X 390Z50), No Keyboard
Emulate OBP Rev. 2.25, 64 MB memory installed, Serial #12648430.
Ethernet address 2:c:29:4a:d3:29, Host ID: 72c0ffee.

Document number: 55-16-005-001
© Stromasys 2018 Charon-SSP for Linux Version 2.0.1 – User’s Guide / Appendix 179
B.2.2 boot
Load operating system.
Syntax
boot [ device-alias ] [ boot-args ]
Description
This command boots the specified device-alias passing any optional boot-args to the kernel. The boot-args must be
recognized as valid by the Solaris kernel used. Booting from a ZFS disk is supported starting with Charon-SSP version
1.4.1 if the Solaris version supports this feature.
For more information about device aliases, see the devalias command.
Example
The following example demonstrates the output of the boot command on Charon-SSP configured as a SPARCstation 20
and booting SunOS 4.1.4 from CD-ROM.
Example boot command output
ok boot cdrom
Boot device: /iommu@f,e0000000/sbus@f,e0001000/espdma@f,400000/esp@f,800000/sd@6,0:d File and args: -v
Boot Release 4.1.4 (sun4m) #2: Fri Oct 14 11:07:52 PDT 1994
Copyright (c) 1983-1990, Sun Microsystems, Inc.
Boot: Romvec version 3.
root on /iommu@f,e0000000/sbus@f,e0001000/espdma@f,400000/esp@f,800000/sd@6,0:d fstype 4.2
Boot: vmunix
.Size: 868352.........................................................................................
...........................................................................................................
...........................................................................................................
.......................................................................................+2319136+75288 bytes
Statistics:
SuperSPARC: PAC ENABLED
SunOS Release 4.1.4 (MUNIX) #2: Fri Oct 14 11:09:07 PDT 1994
Copyright (c) 1983-1993, Sun Microsystems, Inc.
B.2.3 devalias
Display device aliases.
Syntax
devalias
Description
This commands display the current device aliases. This shows the link between the aliases, such as cdrom and the
devices shown in the device tree, listed by show-devs.
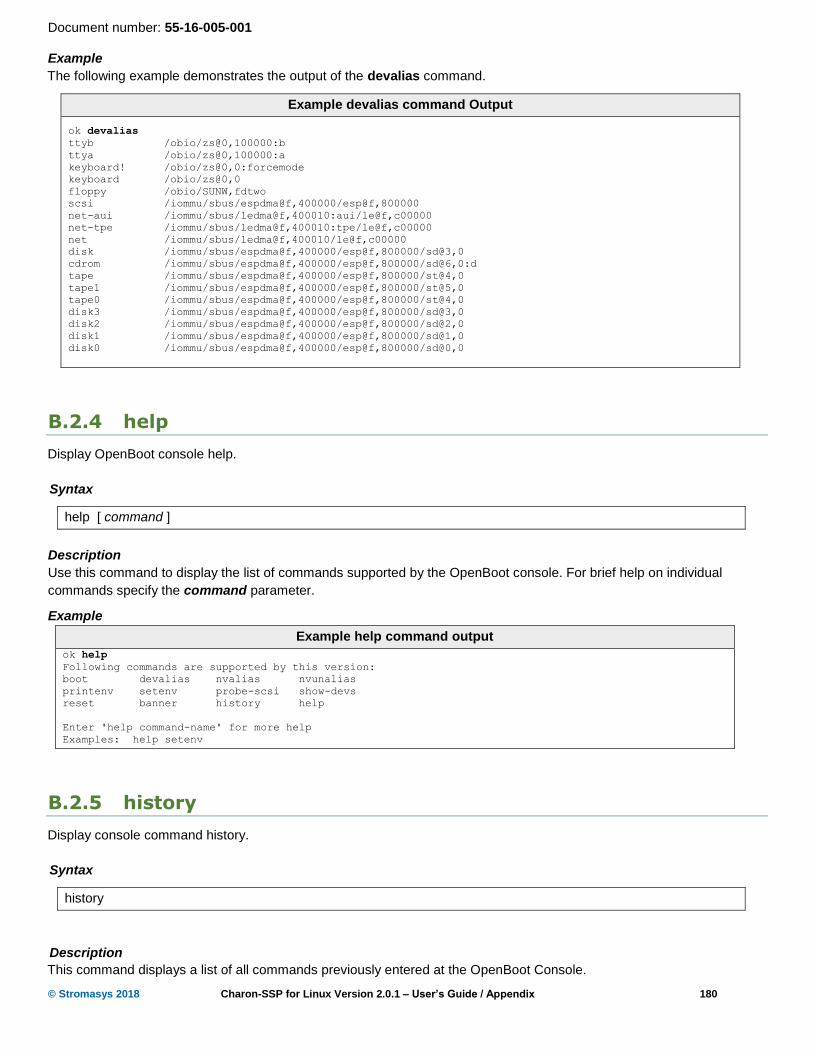
Document number: 55-16-005-001
© Stromasys 2018 Charon-SSP for Linux Version 2.0.1 – User’s Guide / Appendix 180
Example
The following example demonstrates the output of the devalias command.
Example devalias command Output
ok devalias
ttyb /obio/zs@0,100000:b
ttya /obio/zs@0,100000:a
keyboard! /obio/zs@0,0:forcemode
keyboard /obio/zs@0,0
floppy /obio/SUNW,fdtwo
scsi /iommu/sbus/espdma@f,400000/esp@f,800000
net-aui /iommu/sbus/ledma@f,400010:aui/le@f,c00000
net-tpe /iommu/sbus/ledma@f,400010:tpe/le@f,c00000
net /iommu/sbus/ledma@f,400010/le@f,c00000
disk /iommu/sbus/espdma@f,400000/esp@f,800000/sd@3,0
cdrom /iommu/sbus/espdma@f,400000/esp@f,800000/sd@6,0:d
tape /iommu/sbus/espdma@f,400000/esp@f,800000/st@4,0
tape1 /iommu/sbus/espdma@f,400000/esp@f,800000/st@5,0
tape0 /iommu/sbus/espdma@f,400000/esp@f,800000/st@4,0
disk3 /iommu/sbus/espdma@f,400000/esp@f,800000/sd@3,0
disk2 /iommu/sbus/espdma@f,400000/esp@f,800000/sd@2,0
disk1 /iommu/sbus/espdma@f,400000/esp@f,800000/sd@1,0
disk0 /iommu/sbus/espdma@f,400000/esp@f,800000/sd@0,0
B.2.4 help
Display OpenBoot console help.
Syntax
help [ command ]
Description
Use this command to display the list of commands supported by the OpenBoot console. For brief help on individual
commands specify the command parameter.
Example
Example help command output
ok help
Following commands are supported by this version:
boot devalias nvalias nvunalias
printenv setenv probe-scsi show-devs
reset banner history help
Enter 'help command-name' for more help
Examples: help setenv
B.2.5 history
Display console command history.
Syntax
history
Description
This command displays a list of all commands previously entered at the OpenBoot Console.

Document number: 55-16-005-001
© Stromasys 2018 Charon-SSP for Linux Version 2.0.1 – User’s Guide / Appendix 181
Example
The following example demonstrates the output of the history command.
Example history command output
ok history
1 printenv
2 help
3 help devalias
4 help history
5 help probe-scsi
6 probe-scsi
7 show-devs
8 banner
B.2.6 nvalias
Stores devalias values in NVRAMRC.
Syntax
nvalias <alias> <device-path>
Description
Stores the device aliases in in NVRAMRC. The alias persists until the nvunalias or set-defaults command is executed.
Example
The following example demonstrates the use of the nvalias command to create and store a device alias named disk3 that
represents a SCSI disk with a target ID of 3 on a SPARCstation 10 system.
Example nvalias command
ok nvalias disk3 /pci@1f,0/pci@1,1/ide@3/disk@3,0
B.2.7 nvunalias
Removes a device alias from NVRAMRC.
Syntax
nvunalias <alias>
Description
Deletes the corresponding alias from NVRAMRC.

Document number: 55-16-005-001
© Stromasys 2018 Charon-SSP for Linux Version 2.0.1 – User’s Guide / Appendix 182
B.2.8 printenv
Display environment variables.
Syntax
printenv
Description
Use this command to print the current and default values of OpenBoot console variables.
Example
The following examples illustrate the output of the printenv command.
Sample printenv command output on Charon-SSP/4M
ok printenv
Parameter Name Value Default Value
auto-boot? false true
local-mac-address? false true
boot-file -v
boot-device disk:a disk1 disk net
ttya-mode 9600,8,n,1,- 9600,8,n,1,-
ttyb-mode 9600,8,n,1,- 9600,8,n,1,-
Sample printenv command output on Charon-SSP/4U
ok printenv
Variable Name Value Default Value
auto-boot? false true
local-mac-address? true true
output-device ttya screen
input-device ttya keyboard
boot-file -v
boot-device /pci@1f,4000/scsi@3/disk@1,0:a disk net
ttya-mode 9600,8,n,1,- 9600,8,n,1,-
ttyb-mode 9600,8,n,1,- 9600,8,n,1,-
diag-file -v
diag-device net disk net
diag-switch? true true
B.2.9 probe-scsi
Scan SCSI bus for attached devices.
Syntax
probe-scsi
Description
This command scans the SCSI bus to locate attached devices.

Document number: 55-16-005-001
© Stromasys 2018 Charon-SSP for Linux Version 2.0.1 – User’s Guide / Appendix 183
Example
The following example demonstrates the output of the probe-scsi command on system with a single virtual CD-ROM.
Example probe-scsi command output
ok probe-scsi
Target 0
Unit 0 Disk virtual Scsicdrom (c)SRI0200
B.2.10 quit
Shutdown virtual machine.
Syntax
quit
Description
Use this command to shut down the virtual machine.
Example
The following example demonstrates the output of the quit command on Charon-SSP configured as a SPARCstation 20.
Example quit command output
ok quit
The system will be shutdown soon...
B.2.11 reset
Restart the system.
Syntax
reset
Description
This command restarts the SPARC virtual machine.

Document number: 55-16-005-001
© Stromasys 2018 Charon-SSP for Linux Version 2.0.1 – User’s Guide / Appendix 184
Example
The following example demonstrates the output of the reset command on Charon-SSP configured as a SPARCstation 20.
Example reset command output
ok reset
SMCC SPARCstation 20 Emulator by Stromasys
CPU_#0 TI, TMS390Z50(3.x) 0Mb External cache
CPU_#1 ****** NOT installed ******
CPU_#1 ****** NOT installed ******
CPU_#1 ****** NOT installed ******
>>>>> Power On Self Test (POST) is running .... <<<<<
SPARCstation 20 (1 X 390Z50), No Keyboard
Emulate OBP Rev. 2.25, 64 MB memory installed, Serial #12648430.
Ethernet address 2:c:29:4a:d3:29, Host ID: 72c0ffee.
Type help for more information
ok
B.2.12 setenv
Set console environment variables.
Syntax
setenv variable value
setenv variable --
Description
This command sets a console configuration variable to a specific value. The current and default values of the variables
are shown by the printenv command. To restore a variable to its default value, specify ‘--‘ in place of the value. For a
complete list of possible variable names and their descriptions, see the table below.
Variable Description
auto-boot? If true, boots automatically after power on or reset.
local-mac-address? If true, the MAC address of the network card is used instead of the system MAC
address.
output-device Output device used at power-on.
input-device Input device used at power-on.
boot-device Space delimited list of devices to define boot attempt sequence.
boot-file A string of arguments to be passed to the boot loader (e.g. -a or -v).
ttya-mode Serial line configuration for ttya
ttyb-mode Serial line configuration for ttyb
diag-file Diagnostic mode boot arguments.
diag-device Diagnostic startup source device.
diag-switch? Indicates if system should run in diagnostics mode.
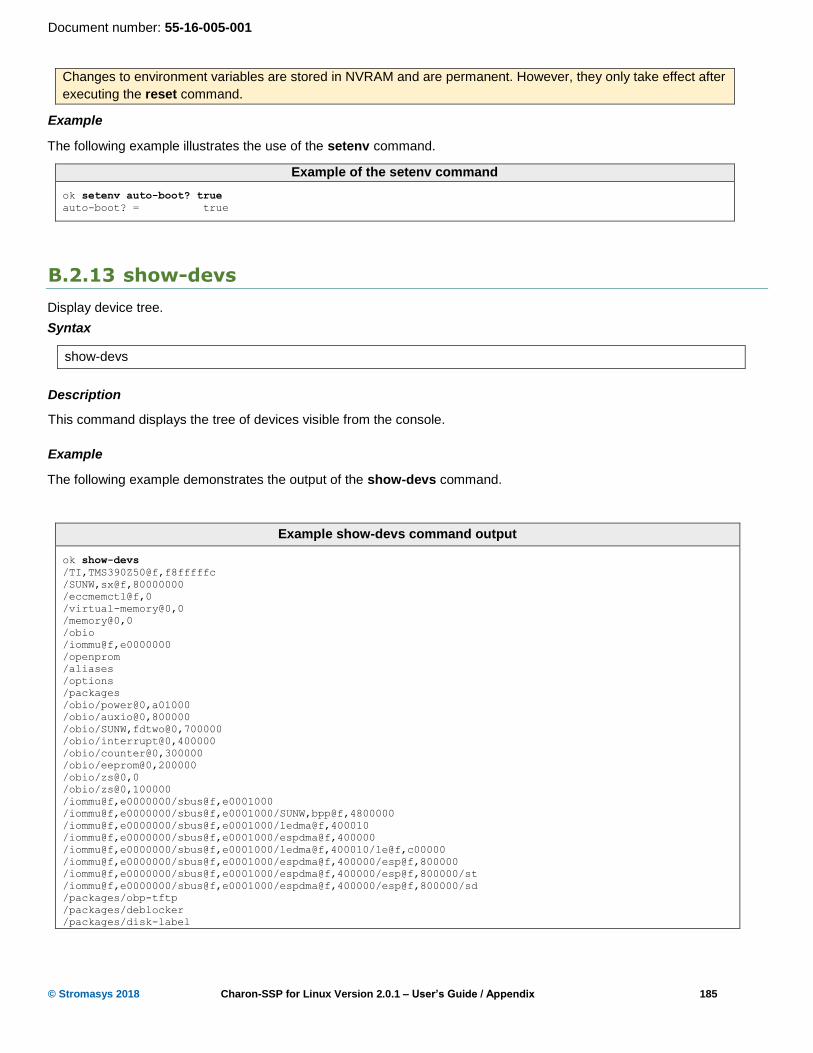
Document number: 55-16-005-001
© Stromasys 2018 Charon-SSP for Linux Version 2.0.1 – User’s Guide / Appendix 185
Changes to environment variables are stored in NVRAM and are permanent. However, they only take effect after
executing the reset command.
Example
The following example illustrates the use of the setenv command.
Example of the setenv command
ok setenv auto-boot? true
auto-boot? = true
B.2.13 show-devs
Display device tree.
Syntax
show-devs
Description
This command displays the tree of devices visible from the console.
Example
The following example demonstrates the output of the show-devs command.
Example show-devs command output
ok show-devs
/TI,TMS390Z50@f,f8fffffc
/SUNW,sx@f,80000000
/eccmemctl@f,0
/virtual-memory@0,0
/memory@0,0
/obio
/iommu@f,e0000000
/openprom
/aliases
/options
/packages
/obio/power@0,a01000
/obio/auxio@0,800000
/obio/SUNW,fdtwo@0,700000
/obio/interrupt@0,400000
/obio/counter@0,300000
/obio/eeprom@0,200000
/obio/zs@0,0
/obio/zs@0,100000
/iommu@f,e0000000/sbus@f,e0001000
/iommu@f,e0000000/sbus@f,e0001000/SUNW,bpp@f,4800000
/iommu@f,e0000000/sbus@f,e0001000/ledma@f,400010
/iommu@f,e0000000/sbus@f,e0001000/espdma@f,400000
/iommu@f,e0000000/sbus@f,e0001000/ledma@f,400010/le@f,c00000
/iommu@f,e0000000/sbus@f,e0001000/espdma@f,400000/esp@f,800000
/iommu@f,e0000000/sbus@f,e0001000/espdma@f,400000/esp@f,800000/st
/iommu@f,e0000000/sbus@f,e0001000/espdma@f,400000/esp@f,800000/sd
/packages/obp-tftp
/packages/deblocker
/packages/disk-label

Document number: 55-16-005-001
© Stromasys 2018 Charon-SSP for Linux Version 2.0.1 – User’s Guide / Appendix 186
C Appendix – Command-Line Utilities Reference
In many cases, it may be preferable to be able to perform maintenance and management tasks for the command-line of
the Linux host system. This section describes how to set up the PATH environment variable to use these utilities as well
as a comprehensive reference.
C.1 Prerequisites
The utilities described in this reference section are installed as a part of the Charon-SSP Agent for Linux software.
Depending on your environment, you may not need or want support for the GUI environment. If this is the case, it is
recommended that following the installation of the Charon-SSP Agent the Agent service be immediately disabled.
C.2 Disabling the Charon-SSP Agent Service
Use the following commands to disable the Charon-SSP Agent service and avoid automatic start up at system boot.
Disable the Charon-SSP Agent service
# chkconfig charon-agentd-ssp off
C.3 Configure the Shell Path
To add the command-line utilities to a C Shell environment, add the following to the end of .login:
Add command-line utilities to C Shell .login
setenv PATH $PATH:/opt/charon-agent/ssp-agent/utils/license
setenv PATH $PATH:/opt/charon-agent/ssp-agent/utils/mkdisk
setenv PATH $PATH:/opt/charon-agent/ssp-agent/utils/mktape
To add the command-line utilities to a Bourne Shell environment (e.g. bash or sh), add the following to the end of .profile,
.bash_profile, or bashrc:
Add command-line utilities to Bourne Shell login profile
PATH=$PATH:/opt/charon-agent/ssp-agent/utils/license
PATH=$PATH:/opt/charon-agent/ssp-agent/utils/mkdisk
PATH=$PATH:/opt/charon-agent/ssp-agent/utils/mktape
export PATH
C.4 Reference
The following utilities can be used from the command-line to support and manipulate the Charon-SSP host environment.
C.4.1 hasp_srm_view
Name
hasp_srm_view – CHARON Sentinel HASP Utility
Synopsis

Document number: 55-16-005-001
© Stromasys 2018 Charon-SSP for Linux Version 2.0.1 – User’s Guide / Appendix 187
hasp_srm_view [OPTION]
Description
The hasp_srm_view utility provides a simple command-line utility for gathering Sentinel license information. If no options
are specified, -l, is specified by default.
-?, -h, -help
Display the utility usage message.
-c2v FILENAME
Collect the Sentinel HASP key status information and write it to FILENAME.
-fgp FILENAME
Collect the host fingerprint information for generating a new Sentinel software license to FILENAME.
-l
Show the product license details for default key.
-all
Show the product license details for all available keys.
-key KEYNUMBER
Show the product license details for specific key. If used with –c2v, extract the C2V file for a specific key
(available starting from Charon-SSP version 2).
Exit Status
The hasp_srm_view utility exits with 0 on success and with a non-zero value if an error occurs.
Retrieve C2V data:
0 – success 1 – failure
Create a host fingerprint: 0 – success 1 – failure
Command line argument processing: 0 – success 1 – missing argument 2 – unknown argument
The command also returns return code zero if the command itself ran successfully, but a Sentinel restriction was
encountered (e.g. trying to display a license over a remote connection). In such cases, an error message is displayed.

Document number: 55-16-005-001
© Stromasys 2018 Charon-SSP for Linux Version 2.0.1 – User’s Guide / Appendix 188
Examples
The following example shows the output of the -l qualifier for an attached Sentinel USB HASP key.
License Manager running at host: localhost.localdomain
License Manager IP address: 127.0.0.1
The Physical KeyId: 663427931
CHARON Sentinel HASP License key section
Reading 4032 bytes
License Manager running at host: localhost.localdomain
License Manager IP address: 127.0.0.1
The License Number: 1002783
The License KeyId: 663427931
The Master KeyId: 2131943298
Release date: 24-MAR-2015
Release time: 11:47:56
Update number: 3
End User name: Stromasys Asia Pacific
Purchasing Customer name: Stromasys Asia Pacific
Virtual Hardware: SPARCstation_20
Product Name: Charon-SSP/4M for Linux x64
Product Code: CHSSP-xxxxx-LI
Major Version: 1
Minor Version: 0
Maximum Build: 99999
Minimum Build: 1
Host CPU supported: X64
Host Operating System required: LINUX
CPU's allowed: 1
Maximum virtual memory: 512MB
Instances allowed: 4
Released product expiration date: 01-Oct-2015
Field Test product expiration date: 01-Oct-2015
The following example shows how to create a C2V (customer to vendor) file for requesting a license update from
Stromasys.
$ hasp_srm_view -c2v /tmp/hasp.c2v
C.4.2 hasp_update
Name
hasp_update – Sentinel HASP Update and Transfer Utility
Synopsis
hasp_update u filename
Description
The hasp_update utility provides a simple command-line interface for manipulating the HASP License Key.
u Apply the HASP key update found in filename.

Document number: 55-16-005-001
© Stromasys 2018 Charon-SSP for Linux Version 2.0.1 – User’s Guide / Appendix 189
Exit Status
The hasp_update program exits with 0 on success and with 255 if an error occurs.
Examples
The following example demonstrates the application of a V2C (vendor-to-customer) license key file.
Applying a Vendor to Customer (V2C) license key update
# hasp_update u /tmp/0002_1002784_27-May-2015.v2c
C.4.3 mkdskcmd
Name
mkdskcmd – CHARON virtual disk container creation utility.
Synopsis
mkdskcmd [OPTION] ...
Description
Create virtual disk container files for use with the CHARON family of virtual machines. By default, this utility displays a
usage message.
Mandatory arguments to long options are mandatory for short options too.
-a, --avtable PATHNAME
Use this option to specify an alternate location, PATHNAME, of the known disk device table.
-c, --blcount BLOCKCOUNT
Specify the number of blocks, BLOCKCOUNT, in the virtual disk container file.
Use this option with -z or --blsize to set the block size.
-d, --disk NAME
Specify the NAME of a known disk type. Use -l (--list) to see a list of disk types supported by the utility.
-h, --help
Display the utility usage message.
-l, --list
Display a list of the known disk types.
-o, --output FILENAME
Specify the pathname of the virtual disk container file.
-s, --silent
Do not write any output to the terminal.
-z, --blsize BLOCKSIZE
Specify the BLOCKSIZE in bytes when creating a custom virtual disk container file. This option must be
used with -c (--blcount).

Document number: 55-16-005-001
© Stromasys 2018 Charon-SSP for Linux Version 2.0.1 – User’s Guide / Appendix 190
Exit Status
The mkdskcmd utility exits with 0 on success and with a non-zero value if an error occurs.
Examples
The following example creates the virtual disk container file /usr/local/vm/leela/disk0.vdisk using the geometry of a
Seagate ST446452W 46GB disk drive.
# mkdskcmd -o /usr/local/vm/leela/disk0.vdisk -d ST446452W
This example creates a virtual disk container file, /usr/local/vm/bender/disk0.vdisk, using a block size of 4,096 bytes and
16,384 blocks.
# mkdskcmd -o /usr/local/vm/bender/disk0.vdisk -z 4096 -c 16384
C.4.4 mtd
Name
mtd – CHARON virtual tape creation utility.
Synopsis
mtd [OPTION] ...
Description
Create virtual tape files from physical tapes for the use of CHARON family of virtual machines. By default, this utility
displays the usage message.
Mandatory arguments to long options are mandatory for short options too.
Usage:
mtd <tape-device-name> <file-name> [options]
or:
mtd <file-name> <tape-device-name>
<tape-device-name> name of the physical tape device
<file-name> name of the virtual tape file
Options:
/log=<file name> log file name
/reads=<number> number of attempts to read the damaged data block
/ignore try to ignore the bad blocks and continue execution
/buffer=<buffer size> the unit of buffer size in kilobytes. The default size is 64k.
If the tape block size is larger than that, you should indicate it to prevent the
backup from failing.
C.4.5 ncu
This utility is obsolete in versions after 1.4.x. Its functionality has been integrated in other Charon components.