Embed Size (px)
Citation preview

CHAPTER TWO: TABLE OF CONTENTSLearning Objectives Page 1Introduction 1Section 1: Configuration TheoryL.O. 1 Set Up a New or Existing Company 3
Create Data File 4Enter Company Information 4Add a Chart of Account 4Identify Inegration Accounts 4Customize Financial Statements 5
No Customization 5User Define 5Hierarchy Chart of Accounts Defined 6Title of Finanical Statements 6
Enter Beginning Balances 6L.O. 2 Verification of Setup
Print a Chart of Accounts 7Print Financial Statements 8Printa Trial Balance 8
Section 2: Business Works Users Guide-System Manager ModuleL.O. 3 Business Works System Manager Module Commands
9L.O. 4 Business Works User's Guide-General Ledger 11
Create G/L Empty data files 11Create Deppartment 12Maintain Chart of Accounts 12
Add Chart of Account 13Change an Account 14Delete an Account 14
Customize Financial Statements 14Enter Beginning Balances 16Enter Budgets 16Print Set-up Reports 18
Section 3: Student ApplicationL.O. 5 How to Use the Sample Problem and Chapter Exercises
Move From Company to Company 19How to turn in your Lab Work 19
SUSY'S BALLOON SERVICE 20Introduction 21Set-up Company 21
Create Company 21Enter Company Information 22Create General Ledger Data 22Enter Chart of Accounts 23Print Chart of Accounts 24Enter Account Budgets 25
Summary 27Key Terms 27
6/29/2003 2-1

Review Questions 28Self Examiniation Questions 28Dr. Detail Phd 29ABC Company 32
FIGURESFigure 2.1 System Manager Utility Menu Page 9Figure 2.2 System Manager Maintenance 9Figure 2.3 Maintain Company -New Company 10Figure 2.4 Create G/L Data 11Figure 2.5 G/L Data Options Screen 11Figure2.6 Create Departments 12Figure 2.7 G/L Account Menu 12Figure 2.8 Add Chart of Accounts 13Figure 2.9 Duplicate Chart of Account Message 13Figure2.10 Delete G/L Account 14Figure 2.11Customize Financial Statements 15Figure 2.12Customize Balance Sheet 15Figure 2.13Customize Income Statement 15Figure2.14 Enter Initial Account Balance 16Figure 2.15Budget Commands 16Figure 2.16Maintain Account Budgets 17Figure 2.17Budget Calculations 17Figure2.18 Reports Menu 18Figure 2.19Select Type of Report 18Figure 2.20Add Susy's Company 21Figure 2.21Susy's Start-up Screen 22Figure2.22 Company Information 22Figure 2.23General Ledger Utilities Menu 23Figure 2.24Susy's G/L Data Options Screen 23Figure 2.25Chart of Account Entry 24Figure2.26 Maintain Account Budgets 25
ReportsChart of Accounts Page 24Account Budgets 26Income Statement, Budgeted 27
6/29/2003 2-2

COMPANY SYSTEM CONFIGURATION
LEARNING OBJECTIVES
After completing this chapter the student will be able to:
1.Understand the basics of setting up a new or existing company.2.Verify that the company’s configuration is correct.
3.Identify the commands in the Business Work System Manager module.4.Identify the Business Works General Ledger module commands used to create a company.
5.Set up new companies or an existing company with the Business Works program by performing the provided lab exercises.
The setup of any company onto the computer system is the most important part of converting any account system to the computer. If the company is set up improperly the reports will not be printed properly and the transactions will not be presented in the correct manner. Understanding the initial setup procedures and how they affect the entire accounting system will aid in finding the problems, should any appear. The basics of company configuration and setup will be discussed in this chapter. Students will then have the opportunity to implement what was learned by performing data entry for sample problem.
INTRODUCTION
The following is the procedure for setting up a new or existing company;
1. Add a new company.2. Create General Ledger data files.3. Add company information, name, address in the System Manager menu.4. Add the Chart of Accounts.5. Identify the accounts used for special journals.6. Customize the Income Statement and Balance Sheet for the particular
company. 7. Print the Chart of Account.8. Print an Income Statement and Balance Sheet to verify the structure of the
financial Statements.9. Enter beginning balances if this is not a new company.10. Print a Trial Balance for companies with beginning balances to prove the
equality before entering new transactions. Print a Budgeted Income Statement to check the set up is correct.
SECTION 1:CONFIGURATIONTHEORY_______________ _______________
Set Up a NewOr ExistingCompany
L.O.1
6/29/2003 2-3
2
ADD NEW COMPANY
CREATE DATAFILE
ENTER COMPANYINFORMATION
ADD ACHARTOF ACCOUNTS
IDENTIFYINTEGRATIONACCOUNTS
Most Accounting Programs will have an existing company already created. Business Works uses Dixie Rose Florist and Bike Works International. The user can access this company for help in setting up their company. Before any data files can be created, the company name and code needs to be created.
Data files must be created before entering information into the accounting program. There are two basic ways to create these files. The first, and probably the must common, is for the program to create the empty data files as the first part of the setup. The other method is for the user to create the files by copying the empty data files from a disk provided with the program to a new disk or hard disk. The Business Works program employs the first method and creates the data files for each module through a utility command.
Once the data files are created, company information can be entered. The amount of information can vary greatly. It can be as simple as the company name, if only the General Ledger module is used. As more modules are used, more company information is required.
The company information command is usually in the Configuration or System Management module. The Business Works program places company information in the System Management module.
After the company name, the most important data to enter is the Chart of Accounts. Once the complete Chart of Accounts is set up it only needs to be maintained (Add, Change, or Delete).
The Chart of Accounts is set up first because the account numbers are used to define the accounts that will be used for the integration process and the design of the Income Statement and Balance Sheet.
Integration accounts are the General Ledger accounts that are used to send information from the other modules to the master module—the General Ledger. The individual modules accumulate the data from the transactions into these accounts and then send the totals to the General Ledger.
Some programs have one screen to enter all the integration accounts. While other programs require each module to supply these integration accounts.
The integration accounts are used by the system to create all or parts of the entries in the journals automatically. For instance, when printing checks, do not input any account codes. The system looks into this record for the three codes it needs (cash, accounts payable and discounts) then makes the entry itself. Another example, when accounts payable invoices are entered, only the debit account needs to be entered. The system again looks here to find the credit account (accounts payable).
Another account number that must be supplied tells the system where to close revenue and expense accounts when financial statements are prepared. Closing a computer based system is much different (and easier) from closing a manual system. Some programs require the entry of special closing accounts while others like Business Works only require that you identify the Retained Earnings account. The Retained Earnings account is then used to close the month and year.
Only valid, existing accounts will be accepted into these fields, so the chart of accounts must be entered (at least partly) prior to entering this information.
6/29/2003 2-4
A lookup window containing valid accounts will open if an invalid account is entered.
The design of the financial statements is based on the subclassifications of the Chart of Accounts. The basic subclassifications are:
Assets Liabilities
Current Assets Current Liabilities Property, Plant, & Equipment (Fixed) Long Term Liabilities Intangible Investments
Owner’s Equity Revenue Retained Earnings Sales Revenue Capital Service Revenue
Cost of Goods Sold Other Cost of Goods Sold Other IncomeExpenses Other Expense General and Administrative Selling Expense
Each subclassification has a group of account numbers. For example, current assets would be a group defined by the account numbers with the first two digits 10 – 14, for example, 100-149, 1000-1499. Notice the last account number ends in 9. Fixed or plant assets would be in the range 15-19 or 150-199, 1500-1999. The number of digits in the account number will change depending on the complexity of the Chart of Accounts structure.
There are three basic methods for accounting programs to customize the design of the financial statement.
1. No customization—user must adjust Chart of Account to fit program requirements.
CUSTOMIZEFINANCIALSTATEMENTS____________ ____________
6/29/2003 2-5
A/R Integration Accounts

2. User defines the group range of each given subclassification.
3. A complex hierarchy chart of accounts ( see next section) determines the design of the financial statement.
In Method 1 the program will tell the user what account numbers fit into a certain subclassification when entering the Chart of Accounts. This will make it easier to set up; however, the user must adjust the structure of the Chart of Accounts to fit the program requirements. For example, if 5000-5999 represented the user’s Cost of Goods Sold range, but the program required it to be in the 4500-4999 range, the user would need to change the Chart of Accounts.
In Method 2, the basic subclassifications are given but the user defines the range of accounts that fit into these subclassifications. For example, the user would enter 5000 as the beginning of the Cost of Goods Sold subclassification group and 5999 as the end of that subclassification. This method requires an additional command for the user to enter the number, which provides for the flexibility of various Chart of Account numbers. This method can be used by most business. The Business Works program uses this method.
NO CUSTOMIZATION
USER DEFINE
HIERARCHY CHARTOF ACCOUNT DEFINED
TITLE OF FINANCIALSTATEMENTS____________ ____________
ENTER BEGINNINGBALANCE________________ ________________
If the program does not define the subclassifications or their range, the user must provide it in the Chart of Accounts. This is accomplished with a hierarchy of accounts. This hierarchy will tell the program the user’s number for each classification (Asset, Liability, Equity, Revenue, and Expense),subclassification, and account. This hierarchy will determine the design of the financial statements. For examples, if 1-Assets represents a title of assets, then 10-Current Assets, 13- Marketable Securities,16- Fixed Assets would represent subclassifications; 101- Cash would be an account that will accept transactions. The program will assume all Revenue and Expense accounts will appear on the Income Statement in the order they appear in the Chart of Accounts. The Balance Sheet will include all Assets, Liabilities, and Equity Accounts. This method provides a great deal of flexibility but is difficult to set up. If the structure is missing title or an account is classified as a title account instead of a detail account that will accept transactions, the financial statements will not be correct but could look correct.
Many times the user will need to have a different title for the Income Statement, such as Profit/Loss Statement, and for Balance Sheet, such as Statement of Financial Position. The user can define the groups and can also change the name of the statement. The Business Works Program will allow you to do this in G/L Utilities - Customize Income Statement/Balance Sheet setup by writing over the existing title.
Beginning balances are balances in each account that have accumulated for the life of the company (Assets, Liabilities, Equity) or for the current year (Revenue and Expenses). If the company is new, no beginning balances would have accumulated. However, if the user is converting the company books from manual to automated or to another accounting program, there will be beginning balances. If the conversion is at the beginning of the fiscal year all that will be required is to enter the balances of the asset, liability, and equity accounts. If the conversion is within the current fiscal year the revenue and expense account balances will need to be added. If the conversion is in the middle of an accounting month/period the net dollar amount (Debit minus Credits) of the
6/29/2003 2-6

activity (transactions) for the account must be entered to the Capital account. Some programs only allow for conversion at the beginning of the period; others will allow mid-period conversion. (Business Works allows both) The account name and number as well as the dollar amounts for the Beginning balance of each account are taken from the company’s trial balance.
There are three basic methods for entering beginning balances:
1. At the time the account is added.2. With a special command.3. As a Journal entry.
The easiest method is to include the beginning balance as a field to enter when entering the Chart of Accounts number and name. The second method has a special command usually entitled “Enter Beginning Balance”. This command will list all the account names and numbers in which the user enters the debit or credit balance. YOU MUST PLACE A - BEFORE A CREDIT BALANCE. This method is also easy as all the beginning balances are entered at one time instead of with each account. There is, however, a possibility of entering the wrong balance for the account. This problem is solved by having a running balance to show if you balance to zero.
The third method is to create a large journal entry to enter the balances for each account. Because the books should always be in balance the debits must equal the credits. If there are more accounts to enter than the limit in a journal entry, divide the beginning balances into two entries:
1. Enter the Debit balances with a credit to Income Summary:
CashAccount ReceivableOffice SuppliesEquipmentDrawingSales Return and AllowancesSales DiscountPurchasesRent ExpenseSalary ExpenseSupplies Expense Income Summary
2. Enter the Credit balances with a debit to Income Summary:
Income Summary Accum Depr-Equipment
Accounts PayableCapitalSalesPurchase Returns and AllowancesPurchase Discounts
After the two journal entries the Income Summary Account will equal zero. Be sure to perform a month-end closing to prevent leaving activity in the account. Some programs require the user to use the previous month as the date of the journal entry.
6/29/2003 2-7

Printing the report and statements provides a tool to make sure the setup is correct. Checking these printouts carefully before entering any transactions will save many problems in the future.
Print the Chart of Accounts to make sure all accounts are added correctly. Consider the following items when verifying the accuracy of the Chart of Accounts:
1. Are all accounts in their proper classification and subclassification?
2. Does every account number have a full name and is it spelled correctly?
3. Do the income summary and suspense accounts exist?
VerificationOf Setup
L.O.2 ____
PRINT A CHARTOF ACCOUNTS______________ ______________
PRINT THEFINANCIALSTATEMENTS_________________
PRINT A TRIAL BALANCE
If you are adding a new company, use the printed income statement and balance sheet to verify the proper design. The totals in the account should all be 0. Some questions to ask are:
1. Are Assets, Liabilities, and Equity Accounts on the Balance Sheet and Revenue and Expenses on the Income Sheet?
2. Does the Cost of Goods Sold Section of the Income Statement include the proper accounts?
3. Is the company name and period date correct?4. Are the Classification and Subclassification titles correct?
If an existing company is being setup during the fiscal period the Income Statement will reflect the current and year-to-date income. These two totals (Current/YTD) should be the same. The Balance Sheet should include values for each account. The net income (loss) should be reflected somewhere in the Owner’s Equity section.
Business Works will not print accounts that do not have a balance. To check your Income Statement set up you must enter budget data.
Print a Trial Balance to test the equity of the accounting equation. This will show that the debits equal the credits. However, it will not show if the beginning balance was entered in the wrong account. For new companies all the accounts will have a balance of zero. Print the trial balance and check for the proper design. For existing companies there will be balances in the accounts.
To check the validity of the Trial Balance the user should consider:
1. Are all the normal balances (increase side) on the correct side?
2. Do the debits equal the credits?
3. Is the ending date correct?
6/29/2003 2-8
Section 2: Business Works Users Guide System Manager Module
BUSINESS WORKS SYSTEM MANAGER MODULE COMMANDSL.O. 3
The functions available through the System Manager menu affect system-wide parameters and options. In an actual processing environment access to these functions is normally restricted by password to a limited number of users. Also, if the system is networked, a particular company data can only have one user. Restore and create company features are limited to one person.
The Business Works program uses the System Manager module to let you enter the setup information, Figure 2.1 presents the commands of the System Manager. Each command affects the entire system and all the modules. The Accounts Receivable module requires some information, while other information will affect the Accounts Payable and other modules.
The Business Works System Manager Utility menu allows the user to manipulate the entire company data such as Changing the Posting and Reporting date- very helpful if the wrong day was entered in the company start-up screen. The System Status command provides the user with the version number and the total disk space for both the system and the program. Report Groups allows the user to create groups of reports that can be printed by simply selecting one command. User Preference command provides levels for passwords as previously discussed in Chapter One. Switch Companies allows the user to move from company to company without leaving the program.
Figure 2.2 System Manager-Maintenance Menu
6/29/2003 2-9
Figure 2.1SYSTEM MANAGER- UTILITY
SYSTEM MANAGER UTILITY MENU
SYSTEM MANAGER MAINTENANCE

System Preference (See Figure 1.11 in Chapter 1) allows you to format the entire company's data and also certain system requirements. It also lets the user customize the notification messages given by the program.
Company information allows entry of the name, two one-line address, and a one-line city, state and zip. They all have a maximum of 35 alphanumeric characters. The user can change this information at any time.
Users provides the ability to allow users restricted access to various information. For example, check printing, closing and report printing. This access can be either for all or one of the modules. See passwords in Chapter One.
Audit Report allows the user to see what activities have been performed for any company using the program.
Maintain Company allows the user to add, change the name, delete the company or list all the companies being used by the program. This is your first step to create your own data if not using the data disk included in the text. Click on the New box and enter an eight alphanumeric code for the company then the full company name.
NEW
Zip Codes enable the user to simply enter the zip code instead of placing the name and state in that field.
Custom reports, worksheets, Mail Merge are advanced and will not be discussed currently.
Back up and Restore has been previously discussed in Chapter one for the installation of the program and backup the data.
6/29/2003 2-10
Company Name
Company Figure 2.3New Company

BUSINESS WORKS USER'S GUIDE-GENERAL LEDGER(L.O. 4)
Once the Company has been created and the System features have been entered the General Ledger must be set up. The steps to set up the General Ledger are1. Create General Ledger Data2. Enter the Chart of Accounts 3. Customize the Financial Statements4. Enter Beginning Balances, if any5. Enter Budget for Income Statement accounts6. Print Reports to verify set up
Create Data Once the company data has been created, each module will need empty data files. Empty data files in the General Ledger can be created in two ways:1) Utilities from the pull down menu2) Select maintenance and add a chart of account, the create data files will
come up automatically.
STEP ONE: CREATE G/L Empty data Files1. Select Create G/L Data files from the Utilities Menu2. A note appears about exclusive option. This states that only this company can be worked on by
one person at a time. Click on OK.3. A note stating that any data created will erase any other data on the hard drive for that company.
Click on Yes since there should be no other data.4. The options screen appears. Select data for two years and create the chart of accounts from
scratch instead of using the Standard Chart of Accounts. Make sure the data starts at the first month of the company's fiscal year. Click on OK.
5. The CREATE screen appears. Type the word CREATE, Click on OK.6. A screen stating "Creating G/L Data Screen" appears while the program creates the data.7. Next a note appears stating that 4 steps must occur in the proper order to create the data
correctly. The four steps are 1)Create departments 2)Create Chart of Accounts 3)Enter Initial Account Balances and 4) Enter budget for Revenue and Expense accounts. Click on OK.
8. The Main Menu appears.
Create Departments6/29/2003 2-11
Figure 2.4Select Create G/L Data
Figure 2.5G/L Data Options Screen
Figure 2.4 Create G/L Data
Departments are used to sort your revenue and expenses into groups such as service and sales.The activity buttons are used to enter the department number and department name. The departments must first be created to be used in the Chart of Accounts. Departments will not be used in the text to simplify data entry.
Step Two:Maintain Chart of AccountsThe four basic maintenance commands are ADD, CHANGE, VIEW AND DELETE. The Business Works programs uses the basic buttons as described in Chapter one to perform these functions. The NEW button must be pressed to add a new chart of account. To change the account name bring the account to the screen, highlight the name and overwrite the current name. Note: The account number cannot be changed. It must be deleted first and then the new one added,
6/29/2003 2-12
Figure 2.7G/L Account Menu
Figure 2.6Create Departments

Add Chart of Accounts
FIELDS
CORRECTIONS
The account number can be from one to six alphanumeric characters. Business Works uses three numbers , a period, two numbers for the department. Be careful since this number could be easily confused with dollars and cents.
The description (name) can be up to thirty-five alphanumeric characters.
The account class can be posting, consolidated, and start subtotal and end subtotal. It allows the user to have a hierarchy chart of accounts. Most accounts should be posting.
Account Type provides the program with the classification of each account. The types are Assets(A), Liabilities (L), Owner’s Equity (O), Revenue ®, and Expenses (E). The program will use the types to indicate the normal balance and the financial statement on which it appears. Be very careful the previous entry is the default. Be sure to include one account that is classified as a Retained Earnings account. Subtype is only for current assets and liabilities.
Every field except the account number can be changed until transactions are entered. Once transactions are entered, only the type and name of the account can be changed.
Duplicate Accounts When entering new account number the Business Works program will first search for duplicate accounts. If there are duplicate accounts and the number already exists the program will display the message “ACCOUNT # ALREADY EXIST”.
6/29/2003 2-13
Figure 2.8Chart of Account Entry
Figure 2.9Duplicate Chart of Account Error Message

The field in the Chart of Account main file may need to be changed, especially the name. To change a field follow the steps below.
1. While in the G/L Account Maintenance screen, enter the account number in the first box. This will display all the fields of the entered account.
2. Highlight the field to change, except the account number.3. Either enter the new name or select from the down arrow screen.4. Click on the save button
If an account has been added incorrectly and has no balance or activity in it, the account can be deleted. An account is also deleted when it is no longer needed. Accounts should be deleted at the end of the fiscal year. It is necessary to wait until the end of the years to delete an account that has been used during the year so that all accounts available for use during the year are included in the chart of Account.
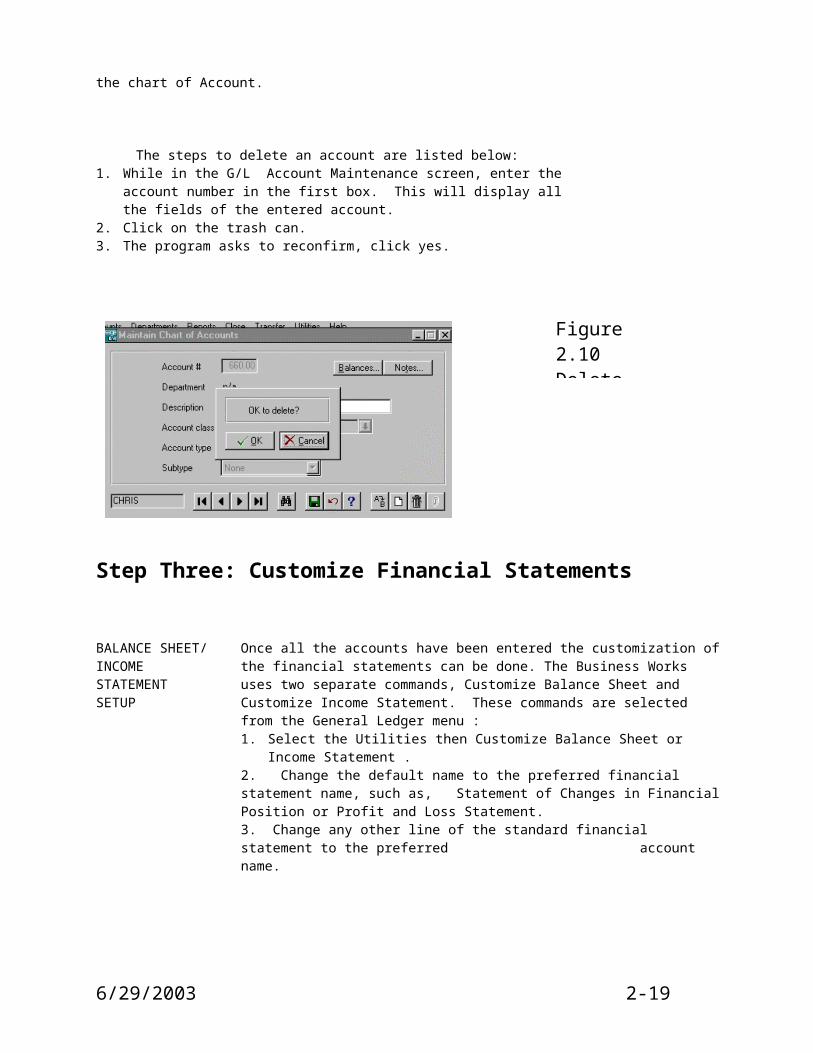
The steps to delete an account are listed below:1. While in the G/L Account Maintenance screen, enter the account number
in the first box. This will display all the fields of the entered account.2. Click on the trash can.3. The program asks to reconfirm, click yes.
CHANGE AN ACCOUNT
DELETE ANACCOUNT
Step Three: Customize Financial Statements
BALANCE SHEET/INCOMESTATEMENTSETUP
Once all the accounts have been entered the customization of the financial statements can be done. The Business Works uses two separate commands, Customize Balance Sheet and Customize Income Statement. These commands are selected from the General Ledger menu :1. Select the Utilities then Customize Balance Sheet or Income Statement .2. Change the default name to the preferred financial statement name, such as, Statement of Changes in Financial Position or Profit and Loss Statement. 3. Change any other line of the standard financial statement to the preferred account name.
6/29/2003 2-14
Figure 2.10Delete G/L
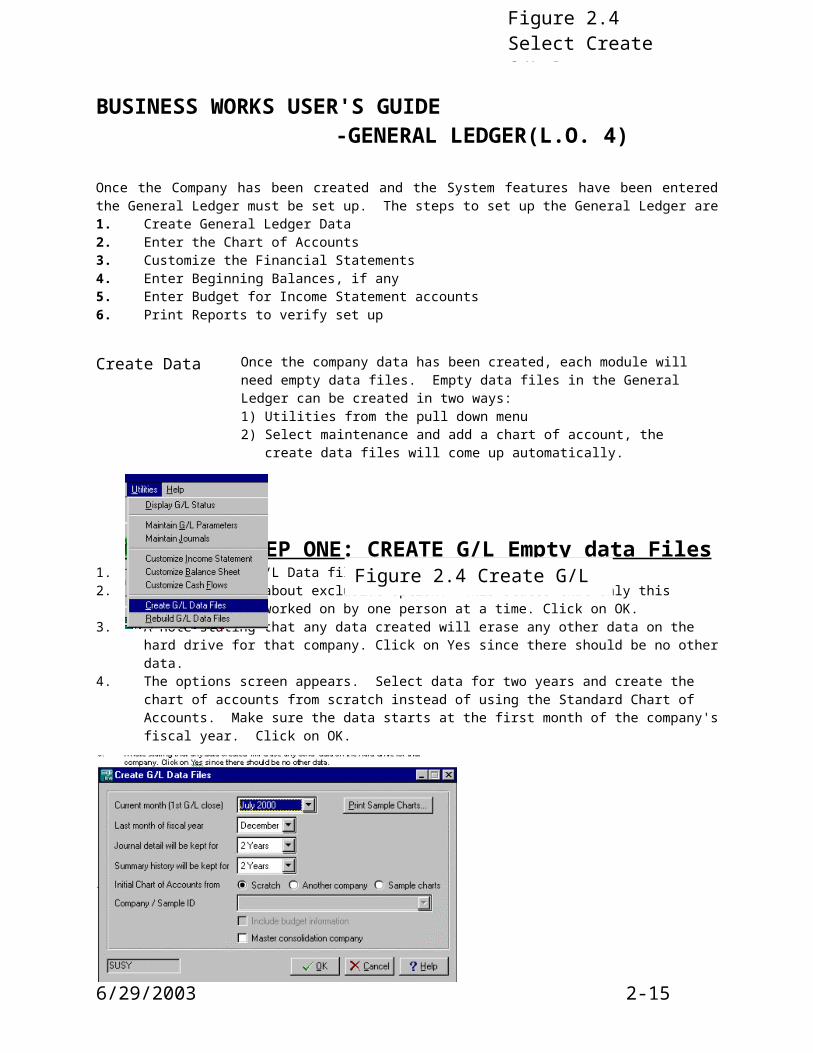
Figure 2.11 Customize Financial Statements
Figure 2.12 Customize Balance Sheet
6/29/2003 2-15
Figure 2.10Delete G/L Account
Figure 2.13Customize Income Statement

Step Four: Enter Beginning BalancesTo input the “Beginning balance” first select Accounts from the General Ledger. Next, select "Enter Initial Account Balances" from the Accounts pull down menu. At each account number type the dollar amount and press Enter for debit balances or enter the balance followed by a minus sign for credit balances. If there are no beginning balances to enter, press tab to by pass the account and 0 will be added.
Be careful to watch for contra accounts that will have the opposite of the normal balance,
Step Five: Enter Budgets for Revenue and Expense AccountsBusiness Works keeps budgets for the revenue and expense accounts on a month to month basis using dollars and percentage per month. The program allows the user to enter the budgets using two methods: 1) Maintain Budgets- enter the exact amount. Print Budget Worksheet -A command that prints a worksheet is included to aid the user. 2) Calculate Budget - program will calculate the budget based on prior data and selected increase or decrease in the previous amounts.
After calculating the budget it is always good procedure to print the budget. Print Account Budgets
1) Maintain BudgetsClick on the month to enter. For revenue put a minus sign first then the dollar. This will represent a credit balance. Enter the amount for each month and then save. Use the right arrow to go to the next account. Enter in the remaining revenue and expense in the same manner.
6/29/2003 2-16
Figure 2.14Enter Initial Account Balance
Budget
Figure 2.15Budget Commands

2) Calculate Budget.The program will calculate a budget based on previous years data.
6/29/2003 2-17
Figure 2.16Maintain Account Budgets
Figure 2.17Budget Calculations

Step Six: Print Set-up Reports
After entering the data to set up the company, certain reports need to be printed to show the company setup in case of problems. These reports are: Chart of Accounts, Budgets, and if there are beginning balances a Trial Balance.Always remember to bring the report to the screen before printing. See Chapter One - Print Options after selecting Reports command and the title of the report.
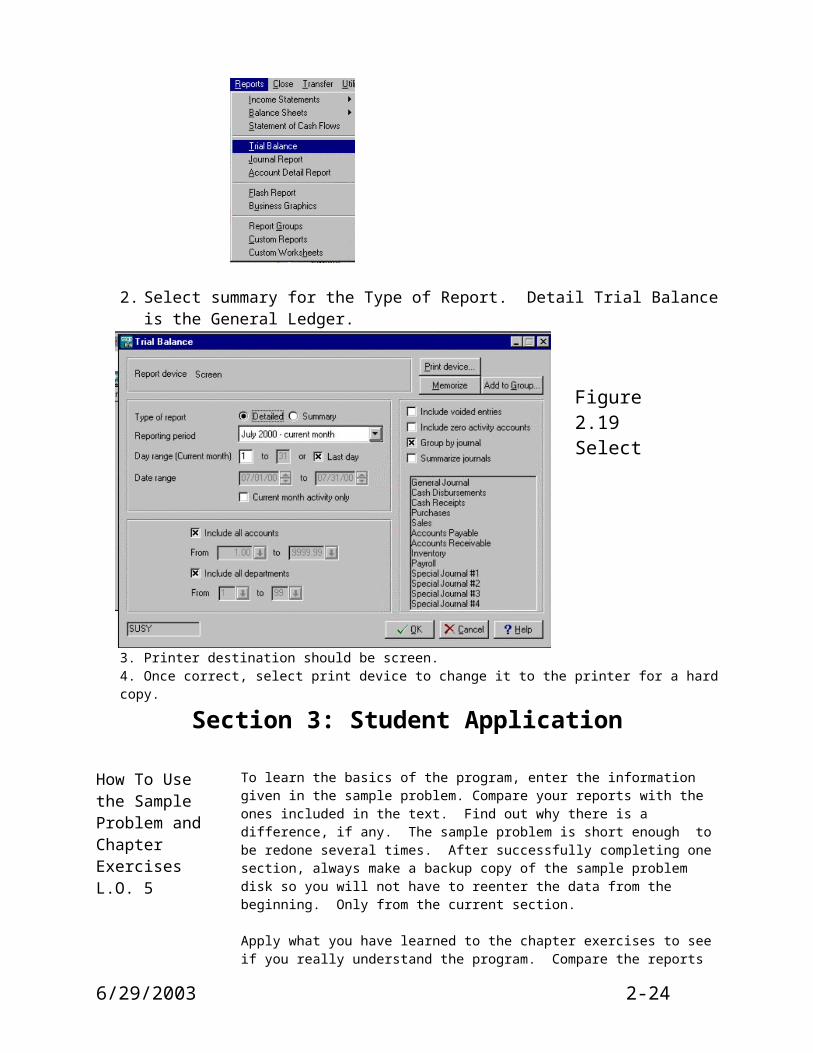
Chart of Accounts1. Select Print Chart of Accounts from the pull down menu - Accounts. ( See Figure 2.15)2. Printer destination should be screen. 3. Once correct, select print device to change it to the printer for a hard copy.Budgets1. Select Print Accounts Budgets from the pull down menu - Accounts. ( See Figure 2.15)2. Printer destination should be screen. 3. Once correct, select print device to change it to the printer for a hard copy.Trial Balance1. From the Reports menu select Trial Balance.
2. Select summary for the Type of Report. Detail Trial Balance is the General Ledger.
6/29/2003 2-18
Figur 2.18 Reports Menu
Figure 2.19Select Type of
3. Printer destination should be screen. 4. Once correct, select print device to change it to the printer for a hard copy.
Section 3: Student Application
How To Use the Sample Problem and Chapter ExercisesL.O. 5
Move From Company to Company
How to turn in your Lab Work
To learn the basics of the program, enter the information given in the sample problem. Compare your reports with the ones included in the text. Find out why there is a difference, if any. The sample problem is short enough to be redone several times. After successfully completing one section, always make a backup copy of the sample problem disk so you will not have to reenter the data from the beginning. Only from the current section.
Apply what you have learned to the chapter exercises to see if you really understand the program. Compare the reports to the chapter exercise check totals on the cover sheet to see if the totals are correct. Note that posting a transaction to the wrong account will still give the correct totals. As with the sample problem, always make a backup copy of the data at the end of the exercise.
If the existing company exercise (ABC Company) is selected, enter the data for the existing company from the pages following the cover sheet. In converting the accounting records from manual to computerized, it is necessary to enter the cumulative totals of the transactions in the accounts or any balance. This is called the Beginning, Initial, or Opening Balances. See the discussion on Beginning Balances in this chapter to enter the balances for the ABC company.
To move from Susy to Dr. Detail or ABC Company without leaving the program follow the 5 easy steps. Not having to leave the program every time the company changes will save a great deal of time.
1. Go to System Manager2. Select Utilities3. Select Switch Companies4. Select Company ID ( click on )5. Enter correct date
After going through the lab work (Sample Problem, Exercises, Practice Set) and printing all the reports, follow the steps to turn in the work.
NOTE: Once the work is completed for the particular company for the given month, turn in the reports to the instructor.
1. Put the reports in the order given on the cover sheet located at the beginning of the instructions for each lab work section.
2. Keep the pages together using a folder, staple, clip -- whatever you instructor desires.
3. Make sure your name is on the cover sheet.4. Include your archival disk and audit test for the instructor to grade. Note there
is no audit test for Chapter Two.
6/29/2003 2-19

Name _____________________________ Date_____________
Susy's Balloon Service
Cover SheetChapter TwoGeneral Ledger SetupOrder of Reports to be attached :Chart of AccountsIncome Statement - Budgeted 7/01/XXAccount Budget
6/29/2003 2-20

Did you make a back-up/archival copy?Susy’s BalloonService Setup
INTRODUCTION
Set-up Company
CREATE COMPANY(Briefly introduced in Chapter 1 pg 31)
Susan Casey has just started a balloon decorating business in which she plans to sell balloon decorations and structures. (She does not yet sell individual balloons.) Susan decided to name her company Susy’s Balloon Service. In September, when her business gets organized, she plans to rent a small office in the middle of the town’s business district. Her home address is 460 Lake Avenue, Glendale, CA 92801. She has no employees yet, but hopes that her clientele will increase so that she can afford to hire help. She has several helium tanks, balloons, accessories, and decorating supplies to make her structures. Balloons purchased by Susy’s are recorded in the Balloon Access. Expense account. Her clientele includes individuals and large companies. Individuals pay with check and cash when the balloon structures are completed. She bills large companies on a net 30-day basis.
Steps to set-up Susy's Balloon Service1. Create company and enter company information2. Create G/L data3. Enter Chart of Accounts4. Enter Account Budgets5. Print Reports
CREATE COMPANYFrom the Main Menu click on the System Manager menu. This will change the pull down menu. This step will not be necessary if the disk with the text is being used.
1. Start-up the Business Works program with the Sample Company. Use the December 1997 date for posting and report date. Keep this date for the sample
2. Select the System Manager Menu.3. Select Maintain Companies from the Maintenance pull down menu.4. From the Maintain Companies screen select the NEW Icon5. Enter a code for your company--This can be Susy and your initials or your
name. This is the name you will use in the start-up screen.6. Enter the company name. This is the name that will appear on all your
reports. There are two ways to enter your name. 1) Simply put SUSY- your full name or place a dash after the Susy's Balloon Service and enter your first name. For example, Susy's Balloon Service - Christy
7. Click on the disk icon to save the company. 8. The message "Change the company". Click on Yes.9. The message "Back-up copy of Sample". Click on No.
6/29/2003 2-21
Figure 2.20Add Susy's Company

10. Start up the company using the code you have just entered. Use 7/1/XX as the date for posting and reporting. The Password field will only be available if the password in System Set-up is checked.
11. Click on OK if your screen matches the below screen.
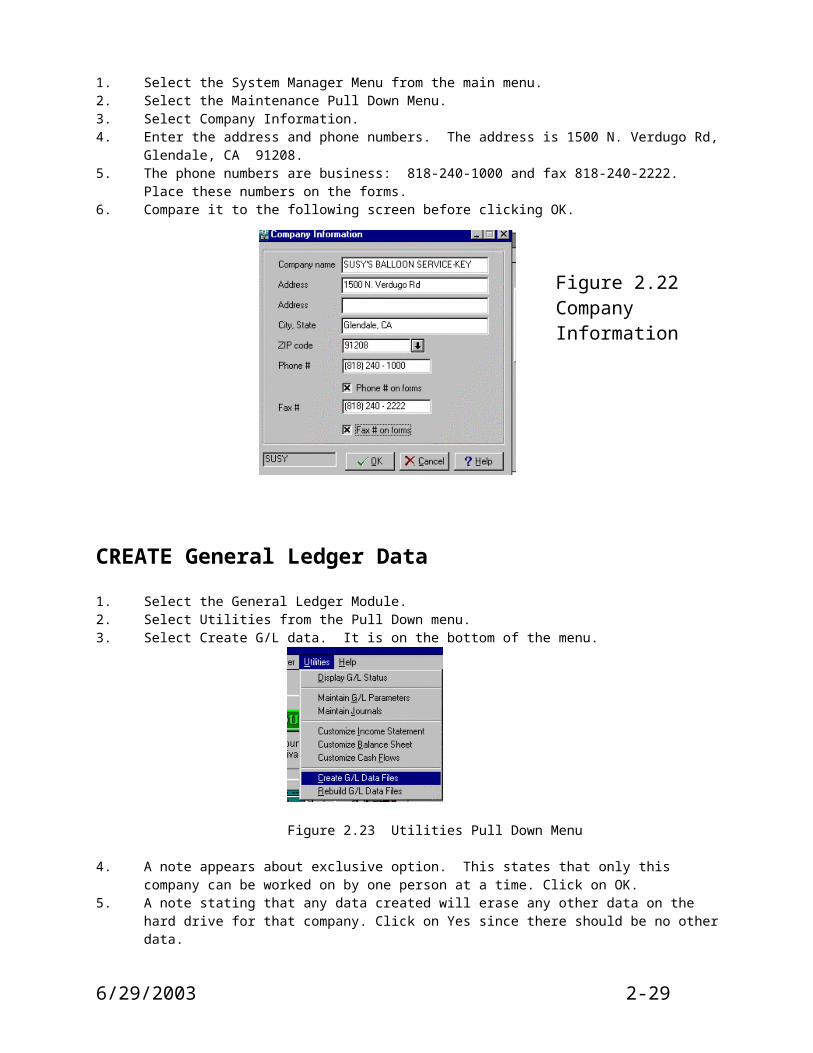
Enter Company Information1. Select the System Manager Menu from the main menu.2. Select the Maintenance Pull Down Menu.3. Select Company Information.4. Enter the address and phone numbers. The address is 1500 N. Verdugo Rd, Glendale, CA
91208.5. The phone numbers are business: 818-240-1000 and fax 818-240-2222. Place these numbers
on the forms.6. Compare it to the following screen before clicking OK.
CREATE General Ledger Data1. Select the General Ledger Module.
6/29/2003 2-22
Figure 2.21Susy's Start up Screen
Figure 2.22Company Information

2. Select Utilities from the Pull Down menu.3. Select Create G/L data. It is on the bottom of the menu.
Figure 2.23 Utilities Pull Down Menu
4. A note appears about exclusive option. This states that only this company can be worked on by one person at a time. Click on OK.
5. A note stating that any data created will erase any other data on the hard drive for that company. Click on Yes since there should be no other data.
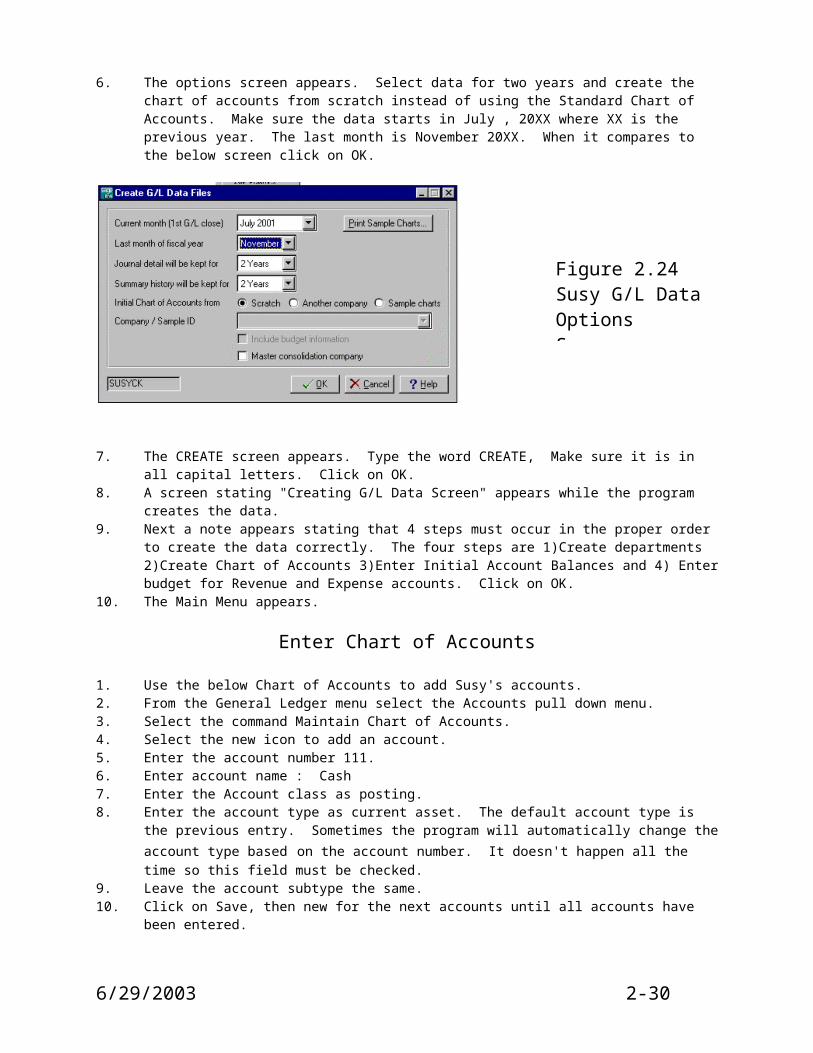
6. The options screen appears. Select data for two years and create the chart of accounts from scratch instead of using the Standard Chart of Accounts. Make sure the data starts in July , 20XX where XX is the previous year. The last month is November 20XX. When it compares to the below screen click on OK.
7. The CREATE screen appears. Type the word CREATE, Make sure it is in all capital letters.
Click on OK.8. A screen stating "Creating G/L Data Screen" appears while the program creates the data.9. Next a note appears stating that 4 steps must occur in the proper order to create the data
correctly. The four steps are 1)Create departments 2)Create Chart of Accounts 3)Enter Initial Account Balances and 4) Enter budget for Revenue and Expense accounts. Click on OK.
10. The Main Menu appears.
Enter Chart of Accounts
1. Use the below Chart of Accounts to add Susy's accounts.2. From the General Ledger menu select the Accounts pull down menu.3. Select the command Maintain Chart of Accounts.4. Select the new icon to add an account.5. Enter the account number 111.6. Enter account name : Cash7. Enter the Account class as posting.
6/29/2003 2-23
Figure 2.24Susy G/L Data OptionsScreen
8. Enter the account type as current asset. The default account type is the previous entry. Sometimes the program will automatically change the account type based on the account number. It doesn't happen all the time so this field must be checked.
9. Leave the account subtype the same.10. Click on Save, then new for the next accounts until all accounts have been entered.
Print the Chart of Accounts
1. Select Print Chart of Accounts from the pull down menu - Accounts. ( See Figure 2.15)2. Printer destination should be screen. 3. Once correct, select print icon for a hard copy.
Enter Account Budgets
6/29/2003 2-24
Figure 2.25Chart of Account Entry
5
506

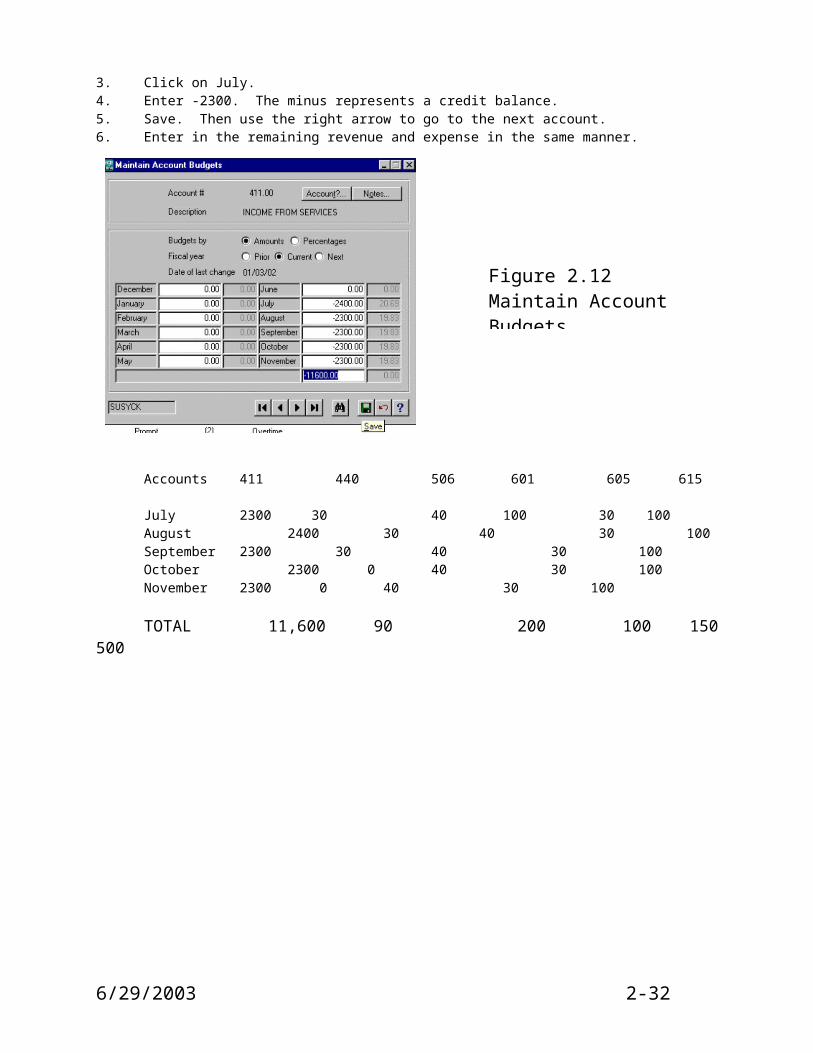
1. Select Maintain Account Budgets from the Accounts menu.2. Use the right arrow to select the 411.3. Click on July.4. Enter -2300. The minus represents a credit balance.5. Save. Then use the right arrow to go to the next account. 6. Enter in the remaining revenue and expense in the same manner.
Accounts 411 440 506 601 605 615
July 2300 30 40 100 30 100August 2400 30 40 30 100September 2300 30 40 30 100October 2300 0 40 30 100November 2300 0 40 30 100
TOTAL 11,600 90 200 100 150 500
6/29/2003 2-25
Figure 2.12Maintain Account Budgets

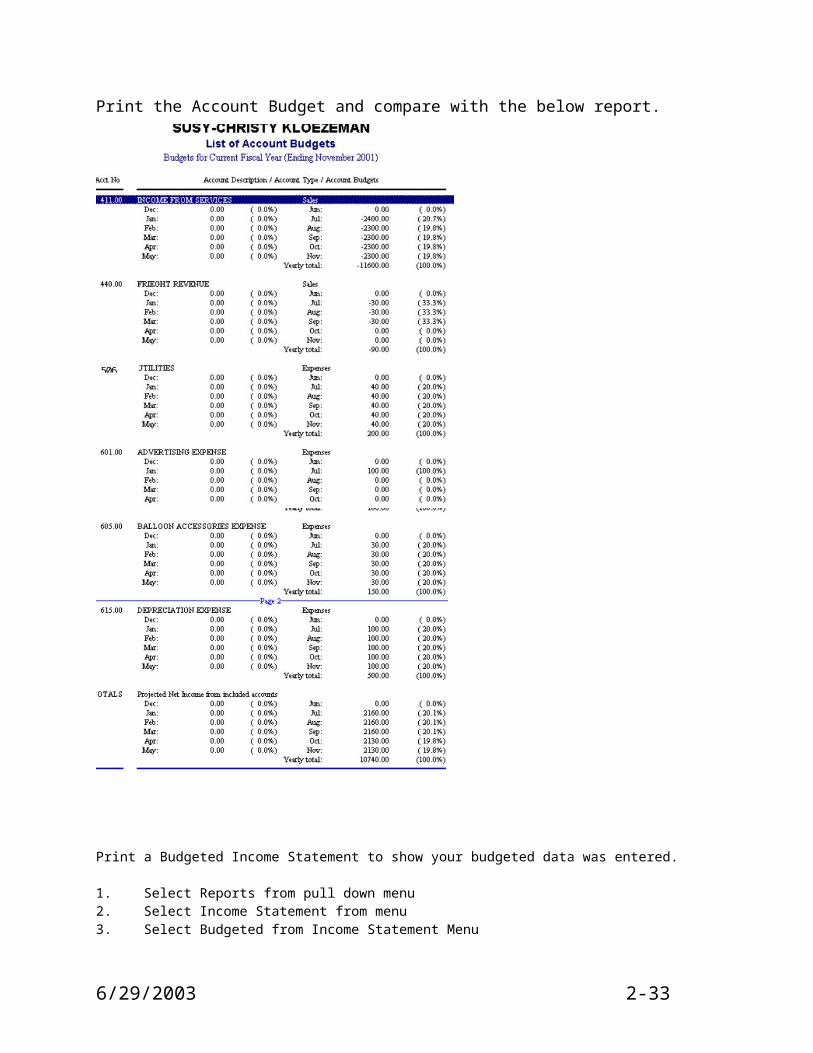
Print the Account Budget and compare with the below report.
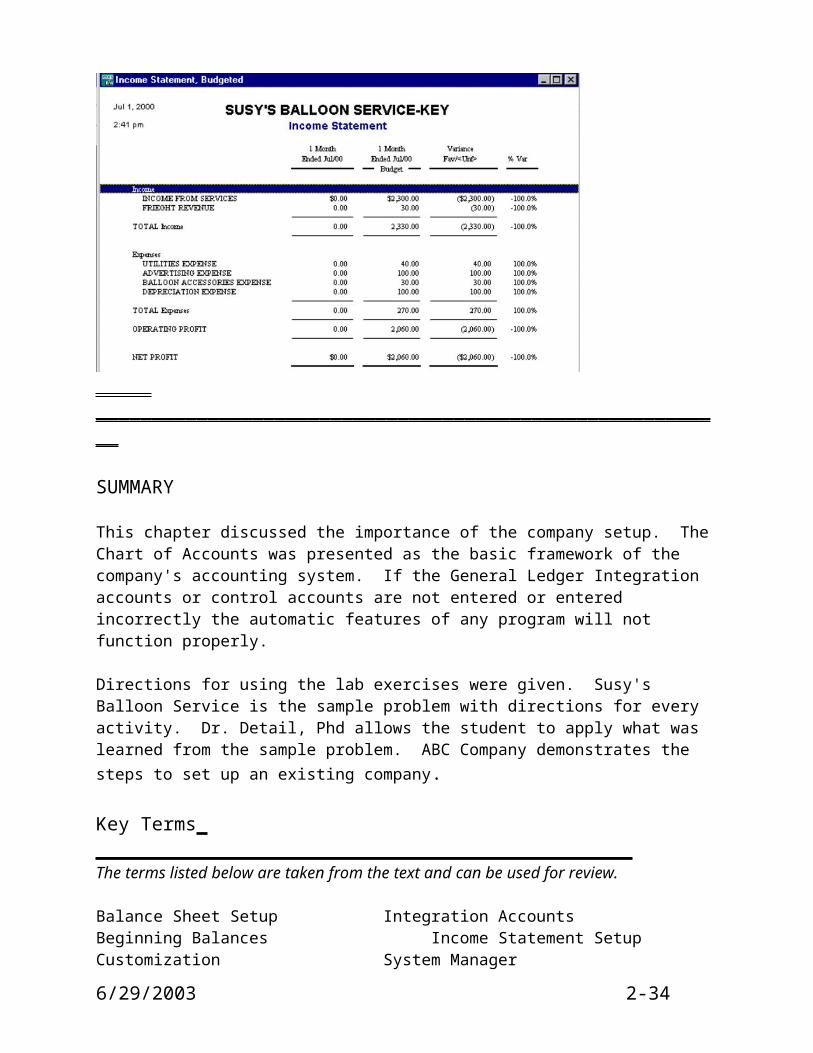
Print a Budgeted Income Statement to show your budgeted data was entered.
1. Select Reports from pull down menu2. Select Income Statement from menu3. Select Budgeted from Income Statement Menu
6/29/2003 2-26
_________________________________________________________
SUMMARY
This chapter discussed the importance of the company setup. The Chart of Accounts was presented as the basic framework of the company's accounting system. If the General Ledger Integration accounts or control accounts are not entered or entered incorrectly the automatic features of any program will not function properly.
Directions for using the lab exercises were given. Susy's Balloon Service is the sample problem with directions for every activity. Dr. Detail, Phd allows the student to apply what was learned from the sample problem. ABC Company demonstrates the steps to set up an existing company.
Key Terms ________________________________________________The terms listed below are taken from the text and can be used for review.
Balance Sheet Setup Integration AccountsBeginning Balances Income Statement SetupCustomization System ManagerHierarchy Chart of Accounts
6/29/2003 2-27

Chapter Two - Review Questions
1. Put the following steps to set up a company's accounting system in their proper order.
_____ Enter Initial Account Balances_____ Enter the Chart of Accounts_____ Create company and Enter the company name and address_____ Enter the budget amounts_____ Print Balance Sheet and Income Statement to check setup_____ Create G/L data files_____ Customize Financial Statements, if necessary
2. Where is the information obtained for the integration accounts?
3. List the fields to be entered when adding an account.
4. What command would be used to change the name of the Financial Statements?
Self-Examination Questions True/False
_____1. The utilities menu allows the user to customize the accounting program for a particular company.
_____2. Changing the company name is a command in the Integration Accounts.
_____3. Always make a backup copy when you finish the setup procedures so you do not have to start over completely should there be a problem with the data.
_____4. Balance Sheet Setup allows you to set the subclassifications for the expenses.
_____5. If an account does not exist for Sales or Purchases discount, the Sales or Purchases account can be used for the integration account.
_____7. You can change the title of the Income Statement to Statement of Income.
6/29/2003 2-28
Name __________________________ Date __________
DR. DETAIL, PHd
Cover SheetChapter 2
General Ledger Setup
Order of Report to be attached:Chart of AccountsAccount Budgets6/29/2003 2-29
Income Statement - Budget July 1, 20XX
Dr. Detail, Phd - Setup
Robert Hawk is in the business of detailing (fine cleaning) all types of cars. Car detailing is the process of hand waxing the outside of the car. Cleaning the carpets, vacuuming the entire car and even using Q-tips to clean the crevices. He plans to add other services once he gets this business going. There is no rent expense or other expenses associated with rent as he works out of his home.
His address is 701 Orange Grove Blvd, Alhambra, CA 91801. He has one helper who is paid at the end of each month. Dr. Detail works on both a cash and credit basis.
NOTE: A new company must be created by opening the sample problem and adding a new company.
1. Create the company using July 01, 20XX date.2. Enter the company name and address.3. Create General Ledger data.4. Enter the Chart of Accounts. Print the chart of accounts5. Enter the Income Statement Budget6. Print the Income statement--Budget7. Place the cover sheet on top of all the printouts. Put two holes at the
top of the pages and place into the folder. Make sure the folder is labeled for Chapter Two- Dr. Detail.
6/29/2003 2-30

Chart of Accounts/Budget - Dr. Detail Budget(5 months)1101 Operating Cash-Bank of America1102 Saving- Wells Fargo1110 Accounts Receivable1201 Cleaning Supplies1601 Truck1602 Accum Depr - Truck1701 Vacuum Cleaner1702 Accum Depr -Vacuum Cleaner2010 Accounts Payable3010 Robert Hawk, Capital3020 Robert Hawk, Drawing3999 Retained Earnings4010 Detailing Revenue 36,0006001 Wage Expense 15,0006002 Pager Rent 2006003 Office Supplies Expense 1,0007101 Cleaning Supplies Expense 1,5007102 Depreciation Expense 1,0007103 Miscellaneous Expense 100
Total Expense 18,800NET INCOME 17,200
6/29/2003 2-31
Name __________________________ Date________
COVER SHEETChapter two
General Ledger Setup
Order of Reports to be attached:
Chart of AccountsAccount Balances
Trial Balance 7/1/XXProfit and Loss Statement
Statement of Financial Position
Did you make a back-up copy?6/29/2003 2-32
A B C COMPANY
ABC CompanyABC Company is run by Paul and Kathy who have been in business for two years. It is a retail business selling foreign made goods. ABC buys from three major suppliers and sells the products through catalogues. The purchases of the product from the vendors are made once an order is placed: therefore no inventory need be kept. Sales and purchases are recorded at the same time. ABC is primarily a cash-basis business, but receivables are also used.
The office is located at 23 E. Palm Ave, Glendale, CA 91208
The business owns the office and leases part to a hairdressor and a gym. At the present time there are no employees.
1. Create ABC Company-Your Name using July 01,20XX date.2. Enter company name, address and company information. 3. Create General Ledger data.4. Enter the Chart of Accounts.5. Enter Beginning Balances.6. Enter Budgets.7. Enter Financial Statements setup; Use the title :Statement of Financial
Position and Profit/Loss Statement.8. Print Balance Sheet and Income Statement for verification.9. Place the cover sheet on the top of all the printout and place them in a
folder marked ABC Company, Chapter 2
Trial Balance - ABC Company Beginning Balances1010 Cash 23,1331110 A/R 14,5031200 Supplies 4001300 Prepaid Insurance 1,6001501 Building 500,0001502 Accum Depr-Bldg (6,660)1600 Land 80,000
6/29/2003 2-33
2010 A/P (22,476)2501 Mortgage Payable (370,000)3010 Minor Capital (220,500)3011 Minor Drawing3999 Retained Earnings
ABC Budget(5 months)4011 Korean Sales 5,0004012 Japanese Sales 10,0004013 African Sales 60,0004200 Sales Returns & Allow (200)4300 Sales Discount ( 40)4400 Freight Out 100
Total Revenue 74,860
5000 *Purchases 35,0005010 *Purchases Ret & Allow (500) *Cost of
Goods Sold5020 *Purchases Discount ( 50)5030 *Freight In 1006010 Utilities Expense 8006020 Insurance Expense 6006030 Printing Expense 506040 Advertising Expense 2,0006050 Postage Expense 5006060 Supplies Expense 1,3006070 Depreciation Expense 4,500
Total Expense 44,3008100 Rent Income (12,000)9101 Interest Expense 3,8009102 Property Tax 1,0009103 Repair and Maintenance 1,000
Total Other Revenue 6,200NET INCOME 36,760
6/29/2003 2-34
![[PPT]Hilton Maher Selto Chapter 8 - Glendale …gcc.glendale.edu/ckloezem/220/Chap008.ppt · Web viewTitle Hilton Maher Selto Chapter 8 Subject Process-Costing Systems Author Charles](https://img.pdfslide.us/doc/110x75/5b6c7db97f8b9a180d8c1566/ppthilton-maher-selto-chapter-8-glendale-gcc-web-viewtitle-hilton-maher.jpg)

![[PPT]Hilton Maher Selto Chapter 4 - Glendale Community …gcc.glendale.edu/ckloezem/220/Chap004.ppt · Web viewTitle Hilton Maher Selto Chapter 4 Subject Activity-Based Costing Systems](https://img.pdfslide.us/doc/110x75/5ac40e097f8b9aa0518d171b/ppthilton-maher-selto-chapter-4-glendale-community-gcc-viewtitle-hilton.jpg)