Embed Size (px)
Citation preview

7
So you’re eager to start building a website? By the end of this chapter, you will have done just that!
You start by getting your computer primed for building websites. That means you’re going to install a text editor and a lot of web browsers. I take you on a brief tour through some of the most popular text editors, web browsers, and developer tools so you can decide which ones you want to use.
Once you have your computer set up for building websites, you’ll learn about HTML elements and attributes. These are the basic building blocks that make up web pages.
There are a few things that all good web developers should know. That said, toward the end of this chapter, you will learn how to validate the HTML code that you have been writing. You will also learn that your websites can sometimes behave differently depending on which browser they are being viewed in.
What is HTML? Hyper Text Markup Language, or HTML, is the basic code that makes up the foundation of every website on the World Wide Web. HTML is used for marking up text and other page content, and for defining how a web page is structured.
chapter one
getting Started with HTML5
05_9781118356555-ch01.indd 7 11/1/12 1:48 PM
COPYRIG
HTED M
ATERIAL

H T M L 5 F o u n d a t i o n s8
Google ChromeGoogle’s web browser, Chrome, is known for being both fast and secure. It also boasts great sup-port for the latest HTML5 and CSS3 technologies. Chrome has some great developer tools that you will be using later in this book to interact with the web pages that you create. Google Chrome also updates itself automatically whenever a newer version is available. You can download the latest version of Chrome at http://www.google.com/chrome.
Mozilla FirefoxOne of Firefox’s greatest strengths is its vast extension library that contains loads of great tools, including the very popular Firebug developer tools, to help you build websites. The browser also has great support for the majority of HTML5 technologies. Firefox also has an automatic update feature, similar to that found in Google Chrome. Download the latest ver-sion at http://www.mozilla.org/en-US/firefox/new/.
Apple SafariApple‘s Safari browser is popular with Mac and Windows users alike. The built-in developer tools can also be useful when trying to diagnose a problem in a web page. Like Google Chrome, Safari also has great support for some of the latest HTML5 technologies. You can grab the latest version of Safari from http://www.apple.com/safari/.
Microsoft Internet ExplorerInternet Explorer (IE) is still one of the most popular browsers used today. Microsoft has released many versions of IE over the years, and it is worth noting that not all Windows operating systems will support the latest versions of IE. Windows XP, for example, does not support any versions of Internet Explorer past IE8. This means that Windows XP users will never get the latest HTML5 features without installing extra plug-ins or a different browser. Some older versions of the browser were plagued with bugs that meant that developers had to spend hours of extra time getting their web pages to display correctly. Fortunately, Microsoft has done a great job with the latest versions of IE (9 and 10) and has also managed to incorporate some of the latest HTML5 technologies. The latest version of IE will usually be downloaded when you perform Windows Updates; otherwise you can get it at http://windows.microsoft.com/en-GB/internet-explorer/products/ie/home.
OperaOpera has been gaining in popularity in recent years, due in part to the success of its mobile browser. Opera software is a driving force in the development of the HTML5 specification, and has implemented a lot of HTML5 technologies in the latest versions of its browser. Like Chrome, Opera also has an auto-update feature. You can download the latest version of Opera at http://www.opera.com/browser.
A web page is made up of lots of content—text, images, even videos. Each of these pieces of content is marked up using HTML syntax (a collection of words and symbols that can be understood by computer programs). HTML is also used to describe the structure of the page, defining each of the different sections it may have (such as a header, content area, and footer).
HTML is used to define the page content and how it is structured, but it is not responsible for how the page actually looks—the color, borders, and positioning of elements. That is a job for Cascading Style Sheets, or CSS, which you will look at briefly later in this book. There is also one other language that is commonly used when building websites. JavaScript is a pro-gramming language that is used in conjunction with HTML and CSS to build interactive features for web pages. Later in this book you will be using JavaScript to build custom play-back controls for a video.
HTML is always evolving. The latest revision of HTML is HTML5, the subject of this book. The official specification for HTML5 outlines a large number of new features that enable web developers to create websites that are faster and smarter than those they could build using older versions of HTML. These new features include LocalStorage (which enables developers to store data on the user’s computer) and HTML5 Video (that enables video playback in your web browser without needing a plug-in like Flash) as well as new interactive elements, such as date pickers and sliders.
The term HTML5 has become somewhat of a buzzword in recent years, used by clients, bosses, and developers alike to describe what is coming next in the journey of web technolo-gies. Although this usage is common, it is not strictly accurate. HTML5 is just one part of a large number of standards that are collectively referred to as New Exciting Web Technologies (NEWT). Alongside HTML5, NEWT also encompasses things like WebGL (3D graphics in the browser) and GeoLocation (finding a user’s location). Although GeoLocation is not strictly part of HTML5, you will learn about it later in this book because it is so cool that I just couldn’t leave it out.
Setting up your ToolsBefore you can start building your own web pages, you first need to set up some tools. You likely have at least one browser and possibly a text editor already installed on your computer, but you’ll want to widen your range of browsers and you’ll need to add some specialist devel-oper tools, too.
BrowsersMany different web browsers are available, and it is important that you test your website in all of the most popular ones in order to make sure that your website looks and behaves as you want it to. I recommend installing the latest version of each of the following five brows-ers (if they are available for your operating system):
05_9781118356555-ch01.indd 8 11/1/12 1:48 PM

c H a p T e r O n e G e t t i n G s t a r t e d w i t h h t M L 5 9
Google ChromeGoogle’s web browser, Chrome, is known for being both fast and secure. It also boasts great sup-port for the latest HTML5 and CSS3 technologies. Chrome has some great developer tools that you will be using later in this book to interact with the web pages that you create. Google Chrome also updates itself automatically whenever a newer version is available. You can download the latest version of Chrome at http://www.google.com/chrome.
Mozilla FirefoxOne of Firefox’s greatest strengths is its vast extension library that contains loads of great tools, including the very popular Firebug developer tools, to help you build websites. The browser also has great support for the majority of HTML5 technologies. Firefox also has an automatic update feature, similar to that found in Google Chrome. Download the latest ver-sion at http://www.mozilla.org/en-US/firefox/new/.
Apple SafariApple‘s Safari browser is popular with Mac and Windows users alike. The built-in developer tools can also be useful when trying to diagnose a problem in a web page. Like Google Chrome, Safari also has great support for some of the latest HTML5 technologies. You can grab the latest version of Safari from http://www.apple.com/safari/.
Microsoft Internet ExplorerInternet Explorer (IE) is still one of the most popular browsers used today. Microsoft has released many versions of IE over the years, and it is worth noting that not all Windows operating systems will support the latest versions of IE. Windows XP, for example, does not support any versions of Internet Explorer past IE8. This means that Windows XP users will never get the latest HTML5 features without installing extra plug-ins or a different browser. Some older versions of the browser were plagued with bugs that meant that developers had to spend hours of extra time getting their web pages to display correctly. Fortunately, Microsoft has done a great job with the latest versions of IE (9 and 10) and has also managed to incorporate some of the latest HTML5 technologies. The latest version of IE will usually be downloaded when you perform Windows Updates; otherwise you can get it at http://windows.microsoft.com/en-GB/internet-explorer/products/ie/home.
OperaOpera has been gaining in popularity in recent years, due in part to the success of its mobile browser. Opera software is a driving force in the development of the HTML5 specification, and has implemented a lot of HTML5 technologies in the latest versions of its browser. Like Chrome, Opera also has an auto-update feature. You can download the latest version of Opera at http://www.opera.com/browser.
A web page is made up of lots of content—text, images, even videos. Each of these pieces of content is marked up using HTML syntax (a collection of words and symbols that can be understood by computer programs). HTML is also used to describe the structure of the page, defining each of the different sections it may have (such as a header, content area, and footer).
HTML is used to define the page content and how it is structured, but it is not responsible for how the page actually looks—the color, borders, and positioning of elements. That is a job for Cascading Style Sheets, or CSS, which you will look at briefly later in this book. There is also one other language that is commonly used when building websites. JavaScript is a pro-gramming language that is used in conjunction with HTML and CSS to build interactive features for web pages. Later in this book you will be using JavaScript to build custom play-back controls for a video.
HTML is always evolving. The latest revision of HTML is HTML5, the subject of this book. The official specification for HTML5 outlines a large number of new features that enable web developers to create websites that are faster and smarter than those they could build using older versions of HTML. These new features include LocalStorage (which enables developers to store data on the user’s computer) and HTML5 Video (that enables video playback in your web browser without needing a plug-in like Flash) as well as new interactive elements, such as date pickers and sliders.
The term HTML5 has become somewhat of a buzzword in recent years, used by clients, bosses, and developers alike to describe what is coming next in the journey of web technolo-gies. Although this usage is common, it is not strictly accurate. HTML5 is just one part of a large number of standards that are collectively referred to as New Exciting Web Technologies (NEWT). Alongside HTML5, NEWT also encompasses things like WebGL (3D graphics in the browser) and GeoLocation (finding a user’s location). Although GeoLocation is not strictly part of HTML5, you will learn about it later in this book because it is so cool that I just couldn’t leave it out.
Setting up your ToolsBefore you can start building your own web pages, you first need to set up some tools. You likely have at least one browser and possibly a text editor already installed on your computer, but you’ll want to widen your range of browsers and you’ll need to add some specialist devel-oper tools, too.
BrowsersMany different web browsers are available, and it is important that you test your website in all of the most popular ones in order to make sure that your website looks and behaves as you want it to. I recommend installing the latest version of each of the following five brows-ers (if they are available for your operating system):
05_9781118356555-ch01.indd 9 11/1/12 1:48 PM

H T M L 5 F o u n d a t i o n s10
• Notepad++ is a popular text editor for Windows developers, and the best bit is that it is completely free (as in beer). It supports many different programming languages, including the ones that you will be using in this book. Download Notepad++ at http://notepad-plus-plus.org/download/v6.1.html.
• gedit is a simple text editor that is available for all flavors of Linux that use the GNOME desktop environment (such as Ubuntu). It supports themes and syntax high-lighting, and you can also find loads of great plug-ins online. Like Notepad++, gedit is free. You can download gedit at http://gedit.en.softonic.com/download.
You need a text editor to begin creating your website, so if you don’t have one on your machine already, download one now and install it.
Developer ToolsSometimes, when you are building a website you want to quickly manipulate the page styles or test some JavaScript without having to go back to your text editor to make the changes. This is where developer tools come in. All of the most popular web browsers either have developer tools built in or have extensions available that will give you similar functionality. You will find that you become most accustomed to the tools available in your browser of choice; however, it is useful to know how to access and use the developer tools in other browsers in case you have to look into a compatibility issue when testing your websites.
In this section, you learn how to access (and in some cases install) the developer tools for Chrome, Firefox, Safari, Opera, and Internet Explorer.
• Chrome Developer Tools—Access the Chrome developer tools from the Chrome browser by clicking on the little wrench to the right of the address bar and selecting the Developer Tools option from the Tools menu. Alternatively, you can right-click on an element on the screen and select Inspect Element from the context menu. Figure 1-2 shows the Google UK home page being inspected using the Chrome developer tools.
The Chrome developer tools contain lots of features to help you interact with and monitor your web pages. The tools that you will be using the most for the examples in this book can be found in the Elements, Scripts, and Console tabs in the developer tools window. I use the Chrome developer tools throughout this book.
• Firebug for Firefox—Firebug does not come bundled with a fresh installation of Firefox, so with Firefox open, you need to download the latest version from http://getfirebug.com. Firebug is free to use.
Once you have the Firebug extension installed, access it by choosing Tools➜Web Developer➜Firebug➜Open Firebug. As with the Chrome developer tools, you can also access Firebug by right-clicking an element on the page and selecting Inspect Element with Firebug from the context menu.
Text EditorsYour text editor is your faithful sidekick. You will use it to write all your HTML, CSS, and JavaScript code. A good text editor can actually make you more productive and help you to quickly identify any errors that you may make while coding. In this section, I list four of the most popular text editors for Mac, Windows, and Linux, but many other alternatives are available.
• Sublime Text 2 is rapidly gaining popularity among developers because of its flexibil-ity and its great set of features. It is used in the latest Treehouse videos and offers loads of features, including themes, code completion, and snippets. Sublime Text 2 is not free, but many developers find that purchasing it is a good investment because it can help to increase your productivity. Currently, versions are available for Mac, Linux, and Windows. You can download Sublime Text 2 at http://www.sublimetext.com/2. Figure 1-1 shows Sublime Text 2 in action.
Figure 1-1 Editing an HTML document with Sublime Text 2.
• TextWrangler is a good general-purpose text editor that is available for the Mac. Unlike Sublime Text 2, TextWrangler is free. You can download it from http://www.barebones.com/products/TextWrangler/.
05_9781118356555-ch01.indd 10 11/1/12 1:48 PM

c H a p T e r O n e G e t t i n G s t a r t e d w i t h h t M L 5 11
• Notepad++ is a popular text editor for Windows developers, and the best bit is that it is completely free (as in beer). It supports many different programming languages, including the ones that you will be using in this book. Download Notepad++ at http://notepad-plus-plus.org/download/v6.1.html.
• gedit is a simple text editor that is available for all flavors of Linux that use the GNOME desktop environment (such as Ubuntu). It supports themes and syntax high-lighting, and you can also find loads of great plug-ins online. Like Notepad++, gedit is free. You can download gedit at http://gedit.en.softonic.com/download.
You need a text editor to begin creating your website, so if you don’t have one on your machine already, download one now and install it.
Developer ToolsSometimes, when you are building a website you want to quickly manipulate the page styles or test some JavaScript without having to go back to your text editor to make the changes. This is where developer tools come in. All of the most popular web browsers either have developer tools built in or have extensions available that will give you similar functionality. You will find that you become most accustomed to the tools available in your browser of choice; however, it is useful to know how to access and use the developer tools in other browsers in case you have to look into a compatibility issue when testing your websites.
In this section, you learn how to access (and in some cases install) the developer tools for Chrome, Firefox, Safari, Opera, and Internet Explorer.
• Chrome Developer Tools—Access the Chrome developer tools from the Chrome browser by clicking on the little wrench to the right of the address bar and selecting the Developer Tools option from the Tools menu. Alternatively, you can right-click on an element on the screen and select Inspect Element from the context menu. Figure 1-2 shows the Google UK home page being inspected using the Chrome developer tools.
The Chrome developer tools contain lots of features to help you interact with and monitor your web pages. The tools that you will be using the most for the examples in this book can be found in the Elements, Scripts, and Console tabs in the developer tools window. I use the Chrome developer tools throughout this book.
• Firebug for Firefox—Firebug does not come bundled with a fresh installation of Firefox, so with Firefox open, you need to download the latest version from http://getfirebug.com. Firebug is free to use.
Once you have the Firebug extension installed, access it by choosing Tools➜Web Developer➜Firebug➜Open Firebug. As with the Chrome developer tools, you can also access Firebug by right-clicking an element on the page and selecting Inspect Element with Firebug from the context menu.
Text EditorsYour text editor is your faithful sidekick. You will use it to write all your HTML, CSS, and JavaScript code. A good text editor can actually make you more productive and help you to quickly identify any errors that you may make while coding. In this section, I list four of the most popular text editors for Mac, Windows, and Linux, but many other alternatives are available.
• Sublime Text 2 is rapidly gaining popularity among developers because of its flexibil-ity and its great set of features. It is used in the latest Treehouse videos and offers loads of features, including themes, code completion, and snippets. Sublime Text 2 is not free, but many developers find that purchasing it is a good investment because it can help to increase your productivity. Currently, versions are available for Mac, Linux, and Windows. You can download Sublime Text 2 at http://www.sublimetext.com/2. Figure 1-1 shows Sublime Text 2 in action.
Figure 1-1 Editing an HTML document with Sublime Text 2.
• TextWrangler is a good general-purpose text editor that is available for the Mac. Unlike Sublime Text 2, TextWrangler is free. You can download it from http://www.barebones.com/products/TextWrangler/.
05_9781118356555-ch01.indd 11 11/1/12 1:48 PM

H T M L 5 F o u n d a t i o n s12
you use Safari on Windows, you may need to display the menu bar by clicking the cog in the top-right corner and selecting Show menu bar. You can access all of Safari’s developer tools, including Web Inspector, from the Developer drop-down menu.
Safari also has a number of other developer tools that enable you to easily turn off caching, images, styling, and JavaScript. These tools can be very useful when testing how a website will look and behave in less capable browsers.
• IE Developer Tools—Internet Explorer has a set of built-in developer tools that can be accessed through the Tools menu or by pressing F12 on your keyboard.
The IE developer tools contain all the features that you would expect, including ele-ment, CSS, and JavaScript inspectors as well as a console. There are also a number of tools to help you test your website on older versions of IE. These tools are useful because some of the older versions of Internet Explorer had bugs that can affect how your web pages will be displayed to users. There is also a Validate menu that includes links to easily validate the page you are viewing using the W3C validator. You learn about web page validation later in this chapter.
Building your First HTML5 Web PageYou’re still here, and you have your tools set up. Great! Now it’s time to start writing some real markup. In this section, you build your very first web page using HTML, in just three simple steps.
all download code files for the exercises in the book are available from the book’s website at http://www.wiley.com/go/treehouse/html5foundations, and are grouped into folders by chapters. the code for this exercise can be found in the Chapter 1 folder, in folder 1.
1. Start by creating a new file called index.html with your chosen text editor and save it on your desktop. Web page files are saved with an .html file extension. This exten-sion tells the web browser that it should read the contents as HTML, construct the relevant page elements, and apply the styling you provide. If you were to save a file as a .txt file, for example, the browser would not recognize that it was an HTML file and would simply display the contents of the file in plain text (that is, the user would see the code).
the home page of your website should always be named index.html because this is the file that the web server will look to return when somebody visits the root of your website. For example, if a visitor goes to http://example.org, the web server will look for an index file in the root directory of the website—that is, http://example.org/index.html. the root directory is the top-level folder in your web space.
Figure 1-2 Inspecting a web page using the Chrome developer tools.
You can change the location of the Firebug tools panel by clicking the Firebug icon in the top-left corner and selecting an option from the Firebug UI Location menu.
• Dragonfly for Opera—Opera’s Dragonfly developer tools are built directly into the browser so there are no extensions to install. You can access Dragonfly by going to Tools➜Advanced and selecting Opera Dragonfly.
Dragonfly has many of the standard developer tools that you would expect from a modern browser. The Documents and Scripts tabs will be particularly useful when building the examples in this book. Note that the developer tools are updated auto-matically when new versions are released.
• Web Inspector in Safari—Safari’s Web Inspector Developer Tools are similar to the developer tools found in Google Chrome. That’s because they are both built upon the Web Inspector tools in WebKit.
Before you can access the developer tools in Safari, you need to enable them. To do this, open the Preferences pane by pressing Ctrl plus the comma key in Windows or Command plus the comma key on a Mac. In the Preferences pane, click on the Advanced tab and select the checkbox labeled Show Develop Menu in Menu Bar. You should now see the Develop menu appear in the menu bar at the top of the screen. If
05_9781118356555-ch01.indd 12 11/1/12 1:48 PM

c H a p T e r O n e G e t t i n G s t a r t e d w i t h h t M L 5 13
you use Safari on Windows, you may need to display the menu bar by clicking the cog in the top-right corner and selecting Show menu bar. You can access all of Safari’s developer tools, including Web Inspector, from the Developer drop-down menu.
Safari also has a number of other developer tools that enable you to easily turn off caching, images, styling, and JavaScript. These tools can be very useful when testing how a website will look and behave in less capable browsers.
• IE Developer Tools—Internet Explorer has a set of built-in developer tools that can be accessed through the Tools menu or by pressing F12 on your keyboard.
The IE developer tools contain all the features that you would expect, including ele-ment, CSS, and JavaScript inspectors as well as a console. There are also a number of tools to help you test your website on older versions of IE. These tools are useful because some of the older versions of Internet Explorer had bugs that can affect how your web pages will be displayed to users. There is also a Validate menu that includes links to easily validate the page you are viewing using the W3C validator. You learn about web page validation later in this chapter.
Building your First HTML5 Web PageYou’re still here, and you have your tools set up. Great! Now it’s time to start writing some real markup. In this section, you build your very first web page using HTML, in just three simple steps.
all download code files for the exercises in the book are available from the book’s website at http://www.wiley.com/go/treehouse/html5foundations, and are grouped into folders by chapters. the code for this exercise can be found in the Chapter 1 folder, in folder 1.
1. Start by creating a new file called index.html with your chosen text editor and save it on your desktop. Web page files are saved with an .html file extension. This exten-sion tells the web browser that it should read the contents as HTML, construct the relevant page elements, and apply the styling you provide. If you were to save a file as a .txt file, for example, the browser would not recognize that it was an HTML file and would simply display the contents of the file in plain text (that is, the user would see the code).
the home page of your website should always be named index.html because this is the file that the web server will look to return when somebody visits the root of your website. For example, if a visitor goes to http://example.org, the web server will look for an index file in the root directory of the website—that is, http://example.org/index.html. the root directory is the top-level folder in your web space.
Figure 1-2 Inspecting a web page using the Chrome developer tools.
You can change the location of the Firebug tools panel by clicking the Firebug icon in the top-left corner and selecting an option from the Firebug UI Location menu.
• Dragonfly for Opera—Opera’s Dragonfly developer tools are built directly into the browser so there are no extensions to install. You can access Dragonfly by going to Tools➜Advanced and selecting Opera Dragonfly.
Dragonfly has many of the standard developer tools that you would expect from a modern browser. The Documents and Scripts tabs will be particularly useful when building the examples in this book. Note that the developer tools are updated auto-matically when new versions are released.
• Web Inspector in Safari—Safari’s Web Inspector Developer Tools are similar to the developer tools found in Google Chrome. That’s because they are both built upon the Web Inspector tools in WebKit.
Before you can access the developer tools in Safari, you need to enable them. To do this, open the Preferences pane by pressing Ctrl plus the comma key in Windows or Command plus the comma key on a Mac. In the Preferences pane, click on the Advanced tab and select the checkbox labeled Show Develop Menu in Menu Bar. You should now see the Develop menu appear in the menu bar at the top of the screen. If
05_9781118356555-ch01.indd 13 11/1/12 1:48 PM

H T M L 5 F o u n d a t i o n s14
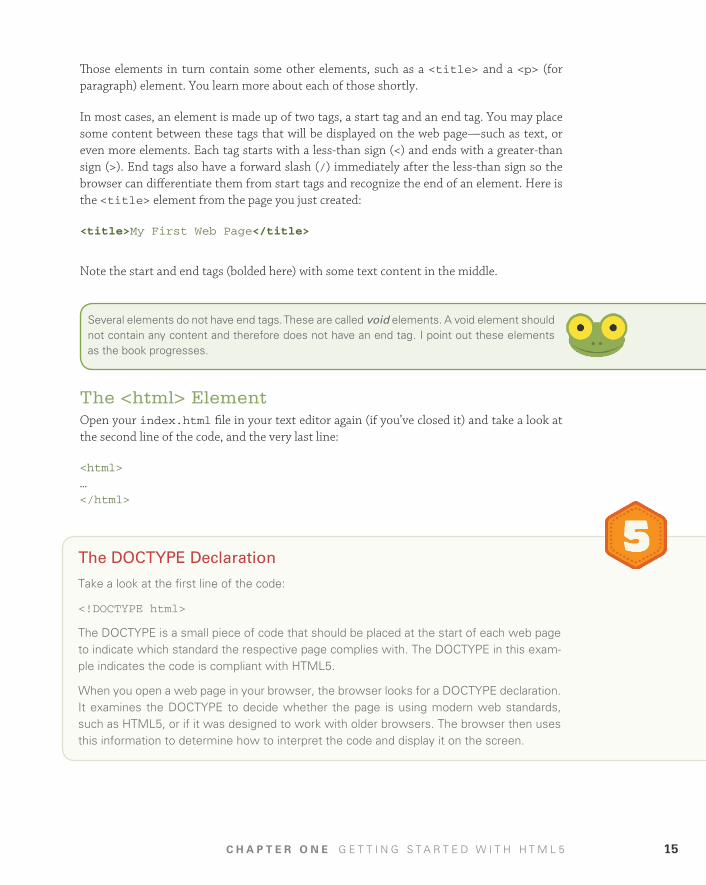
Those elements in turn contain some other elements, such as a <title> and a <p> (for paragraph) element. You learn more about each of those shortly.
In most cases, an element is made up of two tags, a start tag and an end tag. You may place some content between these tags that will be displayed on the web page—such as text, or even more elements. Each tag starts with a less-than sign (<) and ends with a greater-than sign (>). End tags also have a forward slash (/) immediately after the less-than sign so the browser can differentiate them from start tags and recognize the end of an element. Here is the <title> element from the page you just created:
<title>My First Web Page</title>
Note the start and end tags (bolded here) with some text content in the middle.
several elements do not have end tags. these are called void elements. a void element should not contain any content and therefore does not have an end tag. i point out these elements as the book progresses.
The <html> ElementOpen your index.html file in your text editor again (if you’ve closed it) and take a look at the second line of the code, and the very last line:
<html>
…
</html>
2. Type the following code in your index.html file. (This code can also be downloaded from the book’s companion website.)
<!DOCTYPE html>
<html>
<head>
<title>My First Web Page</title>
</head>
<body>
<p>Hello World</p>
</body>
</html>
3. Save your index.html file.
Now open the index.html file in your favorite web browser by double-clicking the file on your desktop. To open it in a browser other than the default one on your computer, right-click on the file and select a program from the Open With menu. This is how you will access your web page files for all the examples in this book.
You should see a page that looks like Figure 1-3.
Figure 1-3 Your first HTML5 web page.
If your web page doesn’t look like the one in the figure, check that you typed all the code cor-rectly. Make sure that you check the spelling of the words within the angle brackets, too.
That’s it! You have successfully created your very first web page. It really wasn’t as hard as you thought it would be, was it? I know, it’s not very colorful or exciting, but that will come soon enough. First, let’s explore this code a bit.
Constructing elementsHTML web pages are made up of a number of elements; think of these as the components of a web page. Each element has a particular purpose; it might contain some text content, a heading, an image, or some information to be used by the browser. The code in your example includes three main elements: an <html> element, a <head> element, and a <body> element.
05_9781118356555-ch01.indd 14 11/1/12 1:48 PM
c H a p T e r O n e G e t t i n G s t a r t e d w i t h h t M L 5 15
Those elements in turn contain some other elements, such as a <title> and a <p> (for paragraph) element. You learn more about each of those shortly.
In most cases, an element is made up of two tags, a start tag and an end tag. You may place some content between these tags that will be displayed on the web page—such as text, or even more elements. Each tag starts with a less-than sign (<) and ends with a greater-than sign (>). End tags also have a forward slash (/) immediately after the less-than sign so the browser can differentiate them from start tags and recognize the end of an element. Here is the <title> element from the page you just created:
<title>My First Web Page</title>
Note the start and end tags (bolded here) with some text content in the middle.
several elements do not have end tags. these are called void elements. a void element should not contain any content and therefore does not have an end tag. i point out these elements as the book progresses.
The <html> ElementOpen your index.html file in your text editor again (if you’ve closed it) and take a look at the second line of the code, and the very last line:
<html>
…
</html>
2. Type the following code in your index.html file. (This code can also be downloaded from the book’s companion website.)
<!DOCTYPE html>
<html>
<head>
<title>My First Web Page</title>
</head>
<body>
<p>Hello World</p>
</body>
</html>
3. Save your index.html file.
Now open the index.html file in your favorite web browser by double-clicking the file on your desktop. To open it in a browser other than the default one on your computer, right-click on the file and select a program from the Open With menu. This is how you will access your web page files for all the examples in this book.
You should see a page that looks like Figure 1-3.
Figure 1-3 Your first HTML5 web page.
If your web page doesn’t look like the one in the figure, check that you typed all the code cor-rectly. Make sure that you check the spelling of the words within the angle brackets, too.
That’s it! You have successfully created your very first web page. It really wasn’t as hard as you thought it would be, was it? I know, it’s not very colorful or exciting, but that will come soon enough. First, let’s explore this code a bit.
Constructing elementsHTML web pages are made up of a number of elements; think of these as the components of a web page. Each element has a particular purpose; it might contain some text content, a heading, an image, or some information to be used by the browser. The code in your example includes three main elements: an <html> element, a <head> element, and a <body> element.
The DOCTYPE Declaration
take a look at the first line of the code:
<!DOCTYPE html>
the doCtYPe is a small piece of code that should be placed at the start of each web page to indicate which standard the respective page complies with. the doCtYPe in this exam-ple indicates the code is compliant with htML5.
when you open a web page in your browser, the browser looks for a doCtYPe declaration. it examines the doCtYPe to decide whether the page is using modern web standards, such as htML5, or if it was designed to work with older browsers. the browser then uses this information to determine how to interpret the code and display it on the screen.
05_9781118356555-ch01.indd 15 11/1/12 1:48 PM

H T M L 5 F o u n d a t i o n s16
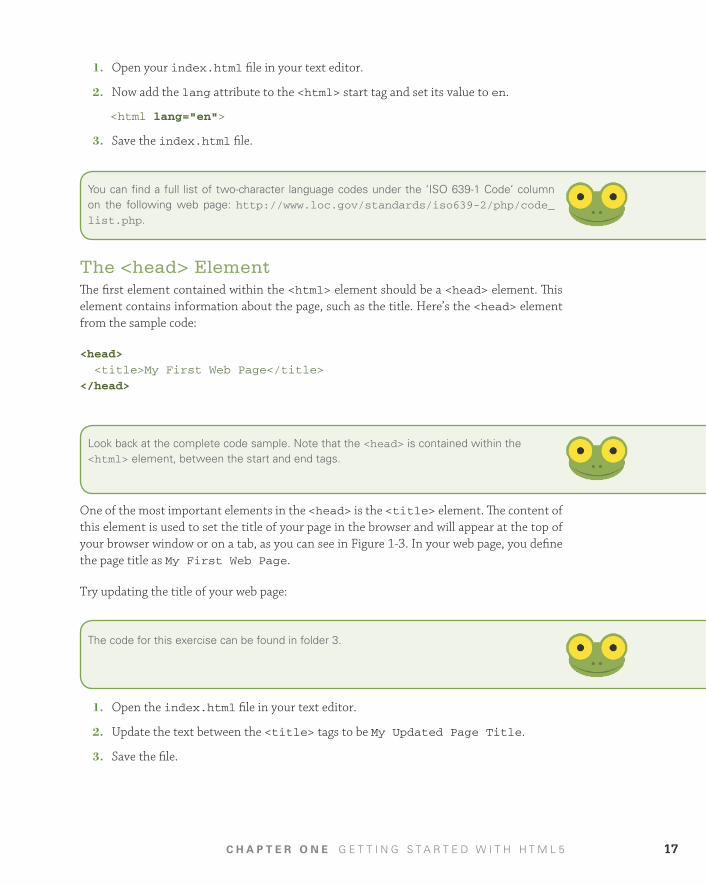
1. Open your index.html file in your text editor.
2. Now add the lang attribute to the <html> start tag and set its value to en.
<html lang=”en”>
3. Save the index.html file.
You can find a full list of two-character language codes under the ‘iso 639-1 Code’ column on the following web page: http://www.loc.gov/standards/iso639-2/php/code_list.php.
The <head> ElementThe first element contained within the <html> element should be a <head> element. This element contains information about the page, such as the title. Here’s the <head> element from the sample code:
<head>
<title>My First Web Page</title>
</head>
Look back at the complete code sample. note that the <head> is contained within the <html> element, between the start and end tags.
One of the most important elements in the <head> is the <title> element. The content of this element is used to set the title of your page in the browser and will appear at the top of your browser window or on a tab, as you can see in Figure 1-3. In your web page, you define the page title as My First Web Page.
Try updating the title of your web page:
the code for this exercise can be found in folder 3.
1. Open the index.html file in your text editor.
2. Update the text between the <title> tags to be My Updated Page Title.
3. Save the file.
These lines indicate the start and end of the <html> element. The <html> element is the root of an HTML document. This means that it should contain all your HTML code. The only code that should not be placed within this element is the DOCTYPE declaration (see side-bar). You can see that all the other elements (the <head> and <body>) are nested within the <html> element in your code.
AttributesStart tags can also contain additional information by using attributes. These attributes con-tain a value (or a set of values) and are listed before the tag is closed with the > sign. Here’s an example, the <img> element. The <img> element is used to add an image to your web page. Note that this is a void element so it has no end tag.
<img src=”image.jpg” width=”300” height=”100”
alt=”A description of the image.”>
This image element has four different attributes: src, width, height, and alt. Each of these attributes is assigned a value that passes some information to the browser. The value is placed within quotation marks. This example uses the src (source) attribute to tell the browser that the image that you want to display is the image.jpg file. You use the width attribute, with a value of 300, to tell the browser that your image should be displayed 300 pixels wide, and the height attribute with a value of 100 to make it 100 pixels tall. The value of the alt attribute here provides some text that the browser might display if the image cannot be loaded. You learn more about the <img> element, as well as lots of other content elements, in Chapter 4.
The <html> element is often used to define the language of the content within the docu-ment. This is done by adding a lang attribute to the start tag that has a two-character lan-guage code as its value. (This applies only to the actual page content and not to the tag names; they should always be written in English.) The following example defines the content lan-guage as English by adding the lang attribute with the value ”en”. (I highlight the new por-tion of the code with each new example so you can identify it easily.)
<html lang=”en”>
Ready to play with your code again? Let’s define the content language for your web page.
the code for this exercise can be found in folder 2.
05_9781118356555-ch01.indd 16 11/1/12 1:48 PM
c H a p T e r O n e G e t t i n G s t a r t e d w i t h h t M L 5 17
1. Open your index.html file in your text editor.
2. Now add the lang attribute to the <html> start tag and set its value to en.
<html lang=”en”>
3. Save the index.html file.
You can find a full list of two-character language codes under the ‘iso 639-1 Code’ column on the following web page: http://www.loc.gov/standards/iso639-2/php/code_list.php.
The <head> ElementThe first element contained within the <html> element should be a <head> element. This element contains information about the page, such as the title. Here’s the <head> element from the sample code:
<head>
<title>My First Web Page</title>
</head>
Look back at the complete code sample. note that the <head> is contained within the <html> element, between the start and end tags.
One of the most important elements in the <head> is the <title> element. The content of this element is used to set the title of your page in the browser and will appear at the top of your browser window or on a tab, as you can see in Figure 1-3. In your web page, you define the page title as My First Web Page.
Try updating the title of your web page:
the code for this exercise can be found in folder 3.
1. Open the index.html file in your text editor.
2. Update the text between the <title> tags to be My Updated Page Title.
3. Save the file.
These lines indicate the start and end of the <html> element. The <html> element is the root of an HTML document. This means that it should contain all your HTML code. The only code that should not be placed within this element is the DOCTYPE declaration (see side-bar). You can see that all the other elements (the <head> and <body>) are nested within the <html> element in your code.
AttributesStart tags can also contain additional information by using attributes. These attributes con-tain a value (or a set of values) and are listed before the tag is closed with the > sign. Here’s an example, the <img> element. The <img> element is used to add an image to your web page. Note that this is a void element so it has no end tag.
<img src=”image.jpg” width=”300” height=”100”
alt=”A description of the image.”>
This image element has four different attributes: src, width, height, and alt. Each of these attributes is assigned a value that passes some information to the browser. The value is placed within quotation marks. This example uses the src (source) attribute to tell the browser that the image that you want to display is the image.jpg file. You use the width attribute, with a value of 300, to tell the browser that your image should be displayed 300 pixels wide, and the height attribute with a value of 100 to make it 100 pixels tall. The value of the alt attribute here provides some text that the browser might display if the image cannot be loaded. You learn more about the <img> element, as well as lots of other content elements, in Chapter 4.
The <html> element is often used to define the language of the content within the docu-ment. This is done by adding a lang attribute to the start tag that has a two-character lan-guage code as its value. (This applies only to the actual page content and not to the tag names; they should always be written in English.) The following example defines the content lan-guage as English by adding the lang attribute with the value ”en”. (I highlight the new por-tion of the code with each new example so you can identify it easily.)
<html lang=”en”>
Ready to play with your code again? Let’s define the content language for your web page.
the code for this exercise can be found in folder 2.
05_9781118356555-ch01.indd 17 11/1/12 1:48 PM

H T M L 5 F o u n d a t i o n s18
Figure 1-4 Your web page with the new text you just added.
In this section, you learned how to create the underlying structure of a web page; however, none of these elements really controls the physical layout of the page. In Chapter 2, you learn about the elements used to create the visual sections of a web page.
You can see a full list of htML5 elements in appendix a.
Now if you open the index.html file in your web browser, you should see that the page title has changed. This is displayed either at the top of the browser or in the browser tab, depend-ing on which browser you are using.
The <body> ElementAfter the <head> element comes a new element—the <body>. In this element, you place all the content that will be displayed in the browser window. The following code shows the <body> element from your web page.
<body>
<p>Hello World</p>
</body>
You can have only one <body> element in a page.
The Hello World text here has been placed within a <p> (paragraph) element. This ele-ment is used for blocks of text. You look at this element in more detail in Chapter 4.
Try adding some new content to your web page:
the code for this exercise can be found in folder 4.
1. Open the index.html file in your web browser.
2. Add the following code underneath the existing <p> element.
<p>HTML5 Rocks!</p>
3. Save the file.
Now open the index.html file in your web browser. You should see that the new text is displayed on the page, as shown in Figure 1-4. Easy, right?
05_9781118356555-ch01.indd 18 11/1/12 1:48 PM

c H a p T e r O n e G e t t i n G s t a r t e d w i t h h t M L 5 19
Figure 1-4 Your web page with the new text you just added.
In this section, you learned how to create the underlying structure of a web page; however, none of these elements really controls the physical layout of the page. In Chapter 2, you learn about the elements used to create the visual sections of a web page.
You can see a full list of htML5 elements in appendix a.
Now if you open the index.html file in your web browser, you should see that the page title has changed. This is displayed either at the top of the browser or in the browser tab, depend-ing on which browser you are using.
The <body> ElementAfter the <head> element comes a new element—the <body>. In this element, you place all the content that will be displayed in the browser window. The following code shows the <body> element from your web page.
<body>
<p>Hello World</p>
</body>
You can have only one <body> element in a page.
The Hello World text here has been placed within a <p> (paragraph) element. This ele-ment is used for blocks of text. You look at this element in more detail in Chapter 4.
Try adding some new content to your web page:
the code for this exercise can be found in folder 4.
1. Open the index.html file in your web browser.
2. Add the following code underneath the existing <p> element.
<p>HTML5 Rocks!</p>
3. Save the file.
Now open the index.html file in your web browser. You should see that the new text is displayed on the page, as shown in Figure 1-4. Easy, right?
Nesting Elements
the practice of placing one element within another is called nesting. think of nesting as a big tree diagram. You start with one element (<body>); this element has a number of other elements nested within it (in your web page, the <p> elements). these elements then in turn have elements nested within them, and so on. this creates a huge tree of elements with a number of different levels.
the position of each of the elements within your code is important. Make sure that both the start and end tags of your element are nested within the same element. For example, you should never have a start tag within the <body> element and the end tag outside of it. this code would be invalid, but more importantly, it will sometimes cause your web page to be displayed incorrectly in a web browser.
indenting elements that are nested within others (as you have done with the <p> elements in your web page) is useful to quickly identify the structure of your htML code.
05_9781118356555-ch01.indd 19 11/1/12 1:48 PM

H T M L 5 F o u n d a t i o n s20
• Best practices—Valid code follows a set of best practices that have been designed by working groups, and so by learning to write valid code you are also learning the best practices for building web pages. This is especially important for people who are new to web development because often browsers will automatically correct mistakes that you have made in your code without telling you about them. This can lead you to believe that you are writing nice valid code when, in fact, you are making a lot of mistakes.
• More maintainable web pages—Writing code that conforms to a widely accepted set of standards makes it easier for multiple people to work on one project. Inevitably, everybody has his or her own, slightly different, programming style; by following web standards when writing code, you can ensure that your markup is consistent and easy for other people to understand.
• It’s just more professional—If you are serious about creating quality sites, writing good valid code will show people that you know what you are doing. If you work in cli-ent services, it is also a great way of showing your clients that you are committed to building websites that are future-proof, maintainable, and standards-compliant. (Pro Tip: Clients like those words; put them in your project proposals.)
Using validator.w3.orgSeveral code validators are available, but the exercises for this book use http://validator. w3.org.
Validator.w3.org is a free service maintained by the W3C that you can use to validate your HTML and CSS code against various web standards. You can run your code through the vali-dator in a number of ways.
• Provide a link to a page on the web.
• Upload a file from your computer.
• Copy and paste your code directly into the browser.
The validator will attempt to identify what version of HTML the page is written in by looking at the DOCTYPE declaration at the top of the page. (See the sidebar on DOCTYPEs, earlier in this chapter.) This enables the validator to run your code against the relevant set of web stan-dards. You can also explicitly tell the validator which standard you would like to test against by selecting one from the Document Type drop-down menu in the More Options section on the validator home page.
It’s time to test the web page that you created earlier to see if it validates.
1. Open http://validator.w3.org.
2. Select the Validate by Direct Input method.
Validating your Web PageValidating your web pages allows you to be sure that your code is standards-compliant. This means that the code that you write follows the best practices and guidelines outlined in the relevant web standards.
Why Should You Validate?Although validation is not mandatory, it is an important part of the development process. You should validate your code for a number of reasons:
• Debugging your code—Validation can be a useful way to find errors in your code that may be causing problems with how a page is being displayed in web browsers. For example, it is easy to miss an end tag in your code, resulting in problems with how browsers show the layout of the page. Using a validator can help you to find where end tags are missing or incorrectly placed, saving you a lot of time going painstakingly through each line of your code to check that you have used tags correctly.
• Future-proofing your code—Just because your code works in browsers today does not mean that it will work in the future. Browser makers generally implement tech-nologies as they are defined in the relevant specifications, and these specifications are designed to ensure that technologies will be backwards compatible with older versions. This means that if you follow the web standards today, your code is more likely to work in the future because browser makers have a better idea of how your code is structured and what it is trying to do.
What Are Web Standards?
web standards are specifications developed by organizations such as the w3C (world wide web Consortium) and whatwG (web hypertext application technology working Group)—developers sure like their acronyms! these specifications outline how browser makers should implement new technologies in their browsers and how developers should use these technologies.
the actual specifications are often very long and fairly dull to read. Luckily, however, there are concise versions of the htML5 specification available for developers that cut out the more boring stuff aimed at browser makers. You can find the whatwG web developer version of the htML5 spec at http://developers.whatwg.org/ and the w3C version at http://dev.w3.org/html5/html-author/.
Just to make things a little more confusing, the w3C and whatwG both maintain separate versions of the htML5 specification. these are mainly identical, but i have found that the whatwG tends to adopt new technologies more quickly than the w3C does.
05_9781118356555-ch01.indd 20 11/1/12 1:48 PM

c H a p T e r O n e G e t t i n G s t a r t e d w i t h h t M L 5 21
• Best practices—Valid code follows a set of best practices that have been designed by working groups, and so by learning to write valid code you are also learning the best practices for building web pages. This is especially important for people who are new to web development because often browsers will automatically correct mistakes that you have made in your code without telling you about them. This can lead you to believe that you are writing nice valid code when, in fact, you are making a lot of mistakes.
• More maintainable web pages—Writing code that conforms to a widely accepted set of standards makes it easier for multiple people to work on one project. Inevitably, everybody has his or her own, slightly different, programming style; by following web standards when writing code, you can ensure that your markup is consistent and easy for other people to understand.
• It’s just more professional—If you are serious about creating quality sites, writing good valid code will show people that you know what you are doing. If you work in cli-ent services, it is also a great way of showing your clients that you are committed to building websites that are future-proof, maintainable, and standards-compliant. (Pro Tip: Clients like those words; put them in your project proposals.)
Using validator.w3.orgSeveral code validators are available, but the exercises for this book use http://validator. w3.org.
Validator.w3.org is a free service maintained by the W3C that you can use to validate your HTML and CSS code against various web standards. You can run your code through the vali-dator in a number of ways.
• Provide a link to a page on the web.
• Upload a file from your computer.
• Copy and paste your code directly into the browser.
The validator will attempt to identify what version of HTML the page is written in by looking at the DOCTYPE declaration at the top of the page. (See the sidebar on DOCTYPEs, earlier in this chapter.) This enables the validator to run your code against the relevant set of web stan-dards. You can also explicitly tell the validator which standard you would like to test against by selecting one from the Document Type drop-down menu in the More Options section on the validator home page.
It’s time to test the web page that you created earlier to see if it validates.
1. Open http://validator.w3.org.
2. Select the Validate by Direct Input method.
Validating your Web PageValidating your web pages allows you to be sure that your code is standards-compliant. This means that the code that you write follows the best practices and guidelines outlined in the relevant web standards.
Why Should You Validate?Although validation is not mandatory, it is an important part of the development process. You should validate your code for a number of reasons:
• Debugging your code—Validation can be a useful way to find errors in your code that may be causing problems with how a page is being displayed in web browsers. For example, it is easy to miss an end tag in your code, resulting in problems with how browsers show the layout of the page. Using a validator can help you to find where end tags are missing or incorrectly placed, saving you a lot of time going painstakingly through each line of your code to check that you have used tags correctly.
• Future-proofing your code—Just because your code works in browsers today does not mean that it will work in the future. Browser makers generally implement tech-nologies as they are defined in the relevant specifications, and these specifications are designed to ensure that technologies will be backwards compatible with older versions. This means that if you follow the web standards today, your code is more likely to work in the future because browser makers have a better idea of how your code is structured and what it is trying to do.
05_9781118356555-ch01.indd 21 11/1/12 1:48 PM

H T M L 5 F o u n d a t i o n s22
all Browsers are Not Created equalIn an ideal world, you would be able to code a website and have it behave the same in all web browsers. Sadly, this is not the case. Cross-browser compatibility is an issue that all web developers have to tackle regularly, and often it can be a real pain and lead you to spending hours trying to work around a bug that is present in a browser.
To demonstrate this, take a look at Figures 1-6 and 1-7. These figures show the same HTML web page displayed in Google Chrome and Internet Explorer (using IE7 compatibility mode). Notice how the navigation links are inline in Google Chrome but appear in a list in Internet Explorer.
Figure 1-6 A simple HTML web page in Google Chrome.
Figure 1-7 The same HTML web page displayed in Internet Explorer (using IE7 compatibility mode).
It is important to remember that HTML5 is still very new, and therefore, not all browsers will support the technologies that you will learn to use in this book. Furthermore, your users will not always be running the latest versions of their web browsers. You would be surprised how many people are still using IE6 (which was released in 2001!). Business users are espe-cially renowned for using outdated browsers, often because of the restrictions put in place by IT departments. I believe that over the next few years the problem of users running outdated browsers will largely be solved by the introduction of the automatic-update features present in many modern web browsers.
3. Copy and paste your code into the text box.
4. Click Check.
You should now see that your code passed validation as HTML5 (see Figure 1-5). Congratulations!
Figure 1-5 Your web page passed validation as HTML5.
Does Your Code Always Have to Validate?Validation is a great tool for web developers, but it is just that, a tool. There will be times when it is not realistic to produce pages that pass validation. Sometimes there are small little hacks that you will have to write in order to get some browsers (read: IE) to play ball, and these will show up as errors when you come to validate your pages. Ideally you want your pages to have as few errors as possible, but even some of the most well-known websites don’t pass validation. (Try running http://google.com or http://yahoo.com through the W3C validator.)
Just remember: Web standards are not strict rules. They are more like guidelines. Validation is a tool to help you produce better websites; it should never limit you.
05_9781118356555-ch01.indd 22 11/1/12 1:48 PM

c H a p T e r O n e G e t t i n G s t a r t e d w i t h h t M L 5 23
all Browsers are Not Created equalIn an ideal world, you would be able to code a website and have it behave the same in all web browsers. Sadly, this is not the case. Cross-browser compatibility is an issue that all web developers have to tackle regularly, and often it can be a real pain and lead you to spending hours trying to work around a bug that is present in a browser.
To demonstrate this, take a look at Figures 1-6 and 1-7. These figures show the same HTML web page displayed in Google Chrome and Internet Explorer (using IE7 compatibility mode). Notice how the navigation links are inline in Google Chrome but appear in a list in Internet Explorer.
Figure 1-6 A simple HTML web page in Google Chrome.
Figure 1-7 The same HTML web page displayed in Internet Explorer (using IE7 compatibility mode).
It is important to remember that HTML5 is still very new, and therefore, not all browsers will support the technologies that you will learn to use in this book. Furthermore, your users will not always be running the latest versions of their web browsers. You would be surprised how many people are still using IE6 (which was released in 2001!). Business users are espe-cially renowned for using outdated browsers, often because of the restrictions put in place by IT departments. I believe that over the next few years the problem of users running outdated browsers will largely be solved by the introduction of the automatic-update features present in many modern web browsers.
3. Copy and paste your code into the text box.
4. Click Check.
You should now see that your code passed validation as HTML5 (see Figure 1-5). Congratulations!
Figure 1-5 Your web page passed validation as HTML5.
Does Your Code Always Have to Validate?Validation is a great tool for web developers, but it is just that, a tool. There will be times when it is not realistic to produce pages that pass validation. Sometimes there are small little hacks that you will have to write in order to get some browsers (read: IE) to play ball, and these will show up as errors when you come to validate your pages. Ideally you want your pages to have as few errors as possible, but even some of the most well-known websites don’t pass validation. (Try running http://google.com or http://yahoo.com through the W3C validator.)
Just remember: Web standards are not strict rules. They are more like guidelines. Validation is a tool to help you produce better websites; it should never limit you.
05_9781118356555-ch01.indd 23 11/1/12 1:48 PM

H T M L 5 F o u n d a t i o n s24
Even though some of your users may not be able to use the latest features of HTML5, you should not be scared of using those features in your websites. As long as the core functional-ity of your website will work in older browsers, you will be fine.
As you progress through the examples in this book, I walk you through the techniques needed to fix the most common cross-compatibility issues that you will encounter.
SummaryCongratulations; you are officially on your way to becoming an awesome HTML5 developer!
At the start of this chapter, I promised that you would build your first web page by this point, and you have. It may not be flashy, but you have now covered some of the core fundamentals of HTML.
A huge number of browsers and development tools are available to modern-day web devel-opers, and you learned about some of the most popular. I encourage you to play around with each of these tools to find the set that you are most comfortable working with. The same goes for browsers. Mozilla Firefox and Google Chrome are often among the first to imple-ment new web technologies, but find the one that you like most. You will probably discover it is the one with the best developer tools. Make sure that you have all the popular browsers installed because you will need to use them all in order to test that your web pages are cross-browser compatible and available to as many users as possible.
In Chapter 2, you learn how to structure your web pages in more depth and what each struc-tural element is responsible for. You will also be introduced to Joe Balochio and his chain of pizza restaurants. Throughout this book, you will be creating a brand new website for Joe’s business—a site that uses many of HTML5’s fantastic new technologies.
05_9781118356555-ch01.indd 24 11/1/12 1:48 PM
![[MS-HTML5]: Microsoft Edge / Internet Explorer HTML5 ......2.1.55 [HTML5] Section 4.9.5 The tbody element ..... 55 2.1.56 [HTML5] Section 4.9.8 The tr element..... 55 2.1.57 [HTML5]](https://img.pdfslide.us/doc/110x75/5fb29d840f1bb936bf5a22fb/ms-html5-microsoft-edge-internet-explorer-html5-2155-html5-section.jpg)
![[MS-HTML5E]: Microsoft Edge / Internet Explorer Extensions ... · HTML5 Specification Intellectual Property Rights Notice for Open Specifications Documentation ... History Revision](https://img.pdfslide.us/doc/110x75/5f79de62762b9a7f78695a4d/ms-html5e-microsoft-edge-internet-explorer-extensions-html5-specification.jpg)
![[MS-INDEXDB]: Microsoft Edge / Internet Explorer Indexed ... · Windows Internet Explorer 10 Internet Explorer 11 Internet Explorer 11 for Windows 10 Microsoft Edge Each browser version](https://img.pdfslide.us/doc/110x75/5f6247bba7b60d5e1c2cdd91/ms-indexdb-microsoft-edge-internet-explorer-indexed-windows-internet-explorer.jpg)


![[MS-HTML5]: Microsoft Edge / Internet Explorer HTML5 ... · 1 / 173 [MS-HTML5] - v20170314 Microsoft Edge / Internet Explorer HTML5 Standards Support Document Copyright © 2017 Microsoft](https://img.pdfslide.us/doc/110x75/5e9a97a51fd59a08fc61c899/ms-html5-microsoft-edge-internet-explorer-html5-1-173-ms-html5-v20170314.jpg)


![[MS-HTML5]: Microsoft Edge / Internet Explorer …...Microsoft Edge / Internet Explorer HTML5 Standards Support Document Intellectual Property Rights Notice for Open Specifications](https://img.pdfslide.us/doc/110x75/5e9a9185566493310c7ff612/ms-html5-microsoft-edge-internet-explorer-microsoft-edge-internet-explorer.jpg)