Embed Size (px)
Citation preview

CHAPTER
279
All-In-One / LPI Linux Essentials Certification / Tracy /101-X / Chapter 9
9Managing File Ownership and PermissionsIn this chapter, you will learn about
• Managing file ownership• Mounting file and directory permissions
Recall that in an earlier chapter we identified two tasks for you to accomplish when managing user access to a Linux system:
● Control who can access the system.
● Define what users can do after they have logged in to the system.
We addressed the first point earlier. We control who accesses the system by imple-menting users and groups. In this part of this chapter, we’re going to address the second point. We need to define what users can do after they have logged in to the system. Let’s begin by discussing file and directory ownership.
Managing File OwnershipTo effectively control who can do what in the file system, you need to first consider who “owns” files and directories. We’re going to discuss the following in this regard:
● How ownership works
● Managing ownership from the command line
How Ownership WorksAny time a user creates a new file or directory, his or her user account is assigned as that file or directory’s “owner.” For example, suppose the tux user logs in to his Linux sys-tem and creates a file named project_tasks.odt using LibreOffice in his home directory. Because he created this file, tux is automatically assigned ownership of project_tasks.odt. By right-clicking this file in the system’s graphical user interface and selecting Properties | Permissions, you can view who owns the file. This is shown in Figure 9-1.
09-ch09.indd 279 3/4/13 5:59 PM
LPI Linux Essentials Certification All-in-One Exam Guide
280
All-In-One / LPI Linux Essentials Certification / Tracy /101-X / Chapter 9
Notice in Figure 9-1 that there are actually two owners for project_tasks.odt. The first is the name of the user who owns the file. In this case, it’s tux, but the users group owns the file as well. That’s because users is the primary group that tux belongs to.
You can also view file ownership from the command line using the ls –l command. This has been done in tux’s home directory in this example:
tux@ws2:~> ls –l total 88 drwxr-xr-x 2 tux users 4096 Oct 12 21:57 bin drwxr-xr-x 2 tux users 4096 Oct 12 21:59 Desktop drwxr-xr-x 2 tux users 4096 Oct 12 22:00 Documents drwxr-xr-x 2 tux users 4096 Oct 12 21:59 Downloads drwxr-xr-x 2 tux users 4096 Oct 12 21:59 Music drwxr-xr-x 2 tux users 4096 Oct 12 21:59 Pictures -rw-r--r-- 1 tux users 9177 Oct 17 20:30 project_tasks.odtdrwxr-xr-x 2 tux users 4096 Oct 12 21:59 Public drwxr-xr-x 2 tux users 4096 Oct 12 21:57 public_html drwxr-xr-x 2 tux users 4096 Oct 12 21:59 Templates drwxr-xr-x 2 tux users 4096 Oct 12 21:59 Videos drwxr-xr-x 3 tux users 4096 Oct 16 16:13 VMwareTools tux@ws2:~>
Notice that the third column in the output displays the name of the file or direc-tory’s owner (tux) while the fourth column displays the name of the group that owns it (users). While file and directory ownership is automatically assigned at creation, it can be modified.
Figure 9-1 Viewing file ownership
09-ch09.indd 280 3/4/13 5:59 PM
Chapter 9: Managing File Ownership and Permissions
281
All-In-One / LPI Linux Essentials Certification / Tracy /101-X / Chapter 9
Managing Ownership from the Command LineFile and directory ownership isn’t a fixed entity. Even though ownership is automati-cally assigned at creation, it can be modified. You can specify a different user and/or group as the owner of a given file or directory. To change the user who owns a file, you must be logged in as root. To change the group that owns a file, you must be logged in as root or as the user who currently owns the file.
This can be done with either graphical or command-line tools. Staying true to the form of this book, we’re going to focus on command-line utilities, including the following:
● chown
● chgrp
Using chownThe chown utility can be used to change the user or group that owns a file or directory. The syntax for using chown is chown user.group file or directory. For example, suppose you wanted to change the project_tasks.odt file’s owner to the ksanders user. You would enter chown ksanders /home/tux/myfile.txt, as shown here:
ws2:~ # ls -l /home/tux/project_tasks.odt -rw-r--r-- 1 tux users 9177 Oct 17 20:30 /home/tux/project_tasks.odt ws2:~ # chown ksanders /home/tux/project_tasks.odt ws2:~ # ls -l /home/tux/project_tasks.odt -rw-r--r-- 1 ksanders users 9177 Oct 17 20:30 /home/tux/project_tasks.odtws2:~ #
Notice that this command changed the user who owns the file to ksanders. However, also notice that the group that owns the file is still users. This was assigned when the file was created because tux’s primary group is named users. If you wanted to change this to the root group, of which the root user is a member, you would enter chown .root /home/tux/project_tasks.odt. The period (.) before the group name tells chown that the entity specified is a group, not a user account. After executing this command, the owning group is changed to root, as shown here:
ws2:~ # chown .root /home/tux/project_tasks.odt ws2:~ # ls -l /home/tux/project_tasks.odt -rw-r--r-- 1 ksanders root 9177 Oct 17 20:30 /home/tux/project_tasks.odtws2:~ #
You could actually change both the user and the group that owns the file all at once with a single chown command. To do this in this example, you would enter chown ksanders.root /home/tux/project_tasks.odt. This tells chown that the user to change ownership to is ksanders and the group to change ownership to is root.
NOTE You can use the –R option with chown to change ownership on many files at once recursively.
09-ch09.indd 281 3/4/13 5:59 PM
LPI Linux Essentials Certification All-in-One Exam Guide
282
All-In-One / LPI Linux Essentials Certification / Tracy /101-X / Chapter 9
Using chgrpIn addition to chown, you can also use chgrp to change the group that owns a file or directory. Simply enter chgrp group file or directory. For example, to change the group ownership of the /home/tux/project_tasks.odt file discussed in the previous examples from users to root, you would enter chgrp root /home/tux/project_tasks.odt.
Let’s practice managing ownership in the following exercise.
Exercise 9-1: Managing Ownership In this exercise, you will practice modifying file and directory ownership from the shell prompt of your Linux system. Complete the following:
1. Verify that you are logged in to your system.
2. Open a terminal session.
3. If necessary, switch to your root user account with the su – command.
4. Verify that your user account is a member of the research group by doing the following:
a. At the shell prompt, enter cat /etc/group.
b. Verify that your current user is a member of the research group, as shown here:research:!:1000:dtracy,rtracy,tux
c. If your user is not a member of the research group, add it using the groupmod command.
5. Change to the / directory by entering cd / at the shell prompt.
6. Create a new directory named RandD by entering mkdir RandD at the shell prompt.
7. At the shell prompt, enter ls –l. Notice that the root user account and the root group are the owners of the new directory.
8. Change ownership of the directory to your user account and the research group by entering chown your_username.research RandD at the shell prompt.
9. Enter ls –l again at the shell prompt. Verify that ownership of the RandD directory has changed to your user account and the research group. This is shown here:ws2:/ # ls –l total 105 drwxr-xr-x 2 tux research 4096 Mar 18 09:45 RandD
NOTE The research group was configured in Chapter 8, Exercise 8-2.
Now that you understand users, groups, and owners, you are finally ready to work with Linux file system permissions.
09-ch09.indd 282 3/4/13 5:59 PM
Chapter 9: Managing File Ownership and Permissions
283
All-In-One / LPI Linux Essentials Certification / Tracy /101-X / Chapter 9
Table 9-1 Linux Permissions
Managing File and Directory PermissionsManaging ownership represents only a part of what needs to be done to control access to files and directories in the Linux file system. Ownership only specifies who owns what. It doesn’t say what you can or can’t do with files and directories. To do this, you need to set up and manage permissions. You need to understand the following:
● How permissions work
● Managing permissions from the command line
● Working with default permissions
● Working with special permissions
How Permissions WorkUnlike ownership, permissions are used to specify exactly what a particular user may do with files and directories in the file system. These permissions may allow a user to view a file but not modify it. They may allow a user to open and modify a file. They may even allow a user to run an executable file. Permissions may also be configured to prevent a user from seeing a file within a directory.
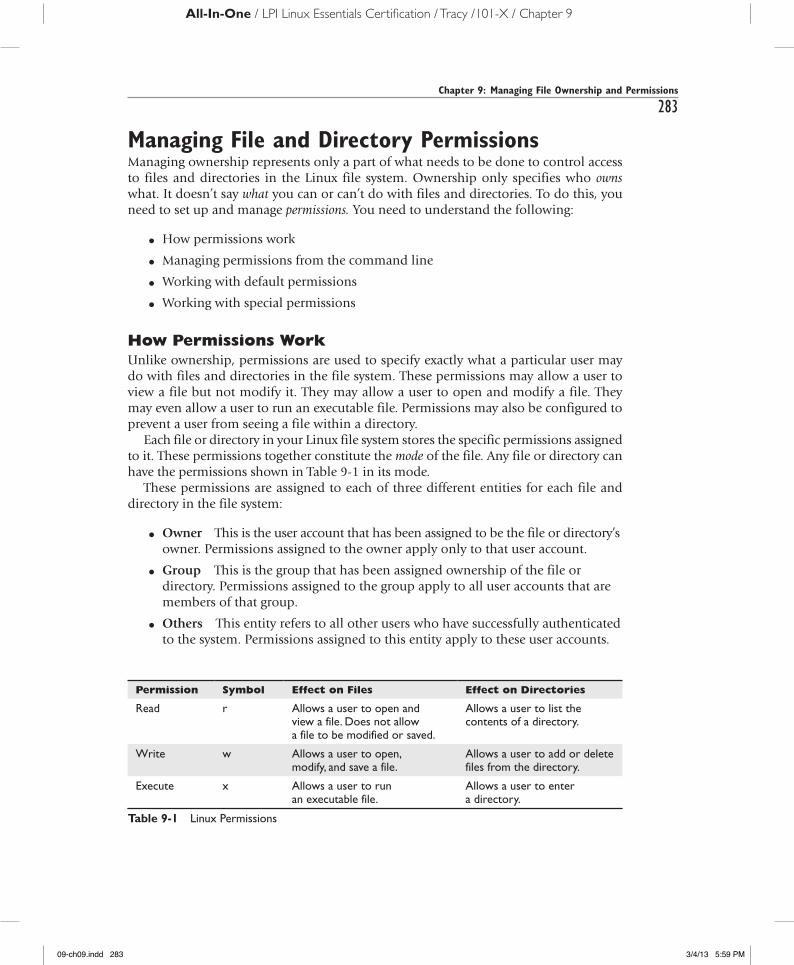
Each file or directory in your Linux file system stores the specific permissions assigned to it. These permissions together constitute the mode of the file. Any file or directory can have the permissions shown in Table 9-1 in its mode.
These permissions are assigned to each of three different entities for each file and directory in the file system:
● Owner This is the user account that has been assigned to be the file or directory’s owner. Permissions assigned to the owner apply only to that user account.
● Group This is the group that has been assigned ownership of the file or directory. Permissions assigned to the group apply to all user accounts that are members of that group.
● Others This entity refers to all other users who have successfully authenticated to the system. Permissions assigned to this entity apply to these user accounts.
Permission Symbol Effect on Files Effect on Directories
Read r Allows a user to open and view a file. Does not allow a file to be modified or saved.
Allows a user to list the contents of a directory.
Write w Allows a user to open, modify, and save a file.
Allows a user to add or delete files from the directory.
Execute x Allows a user to run an executable file.
Allows a user to enter a directory.
09-ch09.indd 283 3/4/13 5:59 PM
LPI Linux Essentials Certification All-in-One Exam Guide
284
All-In-One / LPI Linux Essentials Certification / Tracy /101-X / Chapter 9
Be aware that permissions are additive. That means it is possible for one user account to receive permissions assigned to more than one entity. For example, suppose I assign the read and write permissions to a file to Owner and the execute permission to Group. If ksanders is the file Owner, users is the Group, and ksanders is a member of users, then ksanders receives both the permissions assigned to Owner and Group, and her effective permissions would be rwx.
Also, be very careful about what permissions you assign to Others. Basically, every user on the system belongs to Others; therefore, any permission you grant to Others gets assigned to anyone who successfully authenticates to the system. In some cases, this can be very useful. However, in others, it can get you in a lot of trouble! Just ask yourself before assigning permissions, “Do I really want everyone to have this kind of access to this file or directory?”
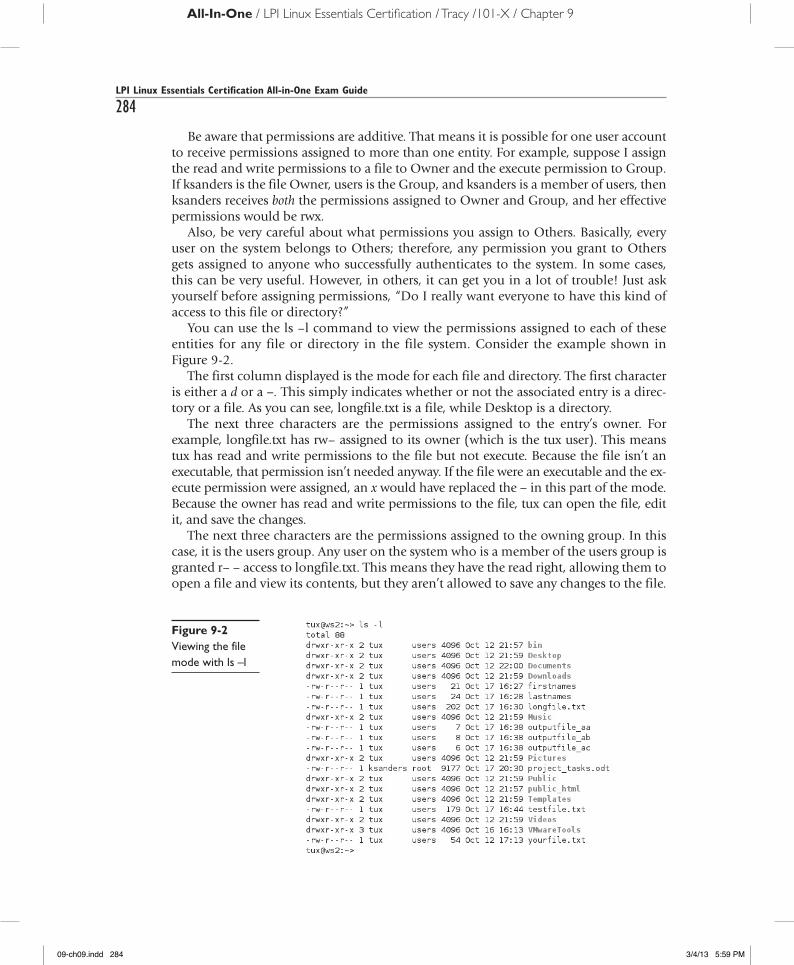
You can use the ls –l command to view the permissions assigned to each of these entities for any file or directory in the file system. Consider the example shown in Figure 9-2.
The first column displayed is the mode for each file and directory. The first character is either a d or a –. This simply indicates whether or not the associated entry is a direc-tory or a file. As you can see, longfile.txt is a file, while Desktop is a directory.
The next three characters are the permissions assigned to the entry’s owner. For example, longfile.txt has rw– assigned to its owner (which is the tux user). This means tux has read and write permissions to the file but not execute. Because the file isn’t an executable, that permission isn’t needed anyway. If the file were an executable and the ex-ecute permission were assigned, an x would have replaced the – in this part of the mode. Because the owner has read and write permissions to the file, tux can open the file, edit it, and save the changes.
The next three characters are the permissions assigned to the owning group. In this case, it is the users group. Any user on the system who is a member of the users group is granted r– – access to longfile.txt. This means they have the read right, allowing them to open a file and view its contents, but they aren’t allowed to save any changes to the file.
Figure 9-2 Viewing the file mode with ls –l
09-ch09.indd 284 3/4/13 5:59 PM
Chapter 9: Managing File Ownership and Permissions
285
All-In-One / LPI Linux Essentials Certification / Tracy /101-X / Chapter 9
The last three characters in the mode are the permissions assigned to others, mean-ing any legitimately authenticated user on the system who isn’t the owner and isn’t a member of the owning group. In this example, these users are also assigned r– – rights to longfile.txt, granting them read access.
Before we progress any further, you should know that permissions for each entity can also be represented numerically. This is done by assigning a value to each permis-sion, as shown in Table 9-2.
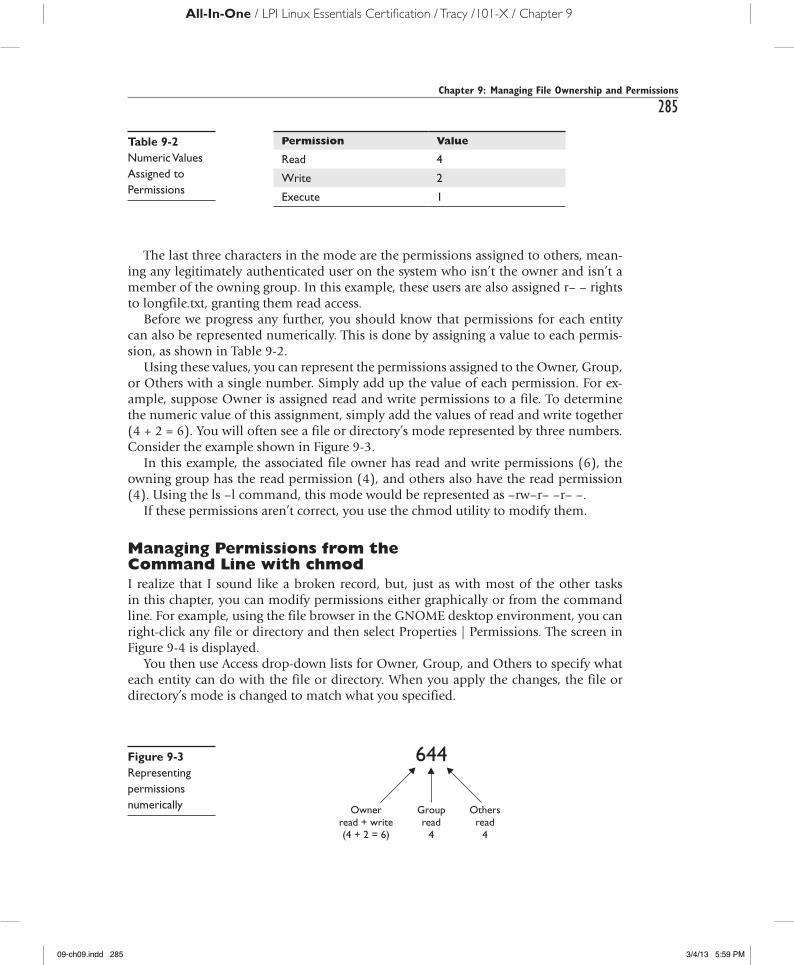
Using these values, you can represent the permissions assigned to the Owner, Group, or Others with a single number. Simply add up the value of each permission. For ex-ample, suppose Owner is assigned read and write permissions to a file. To determine the numeric value of this assignment, simply add the values of read and write together (4 + 2 = 6). You will often see a file or directory’s mode represented by three numbers. Consider the example shown in Figure 9-3.
In this example, the associated file owner has read and write permissions (6), the owning group has the read permission (4), and others also have the read permission (4). Using the ls –l command, this mode would be represented as –rw–r– –r– –.
If these permissions aren’t correct, you use the chmod utility to modify them.
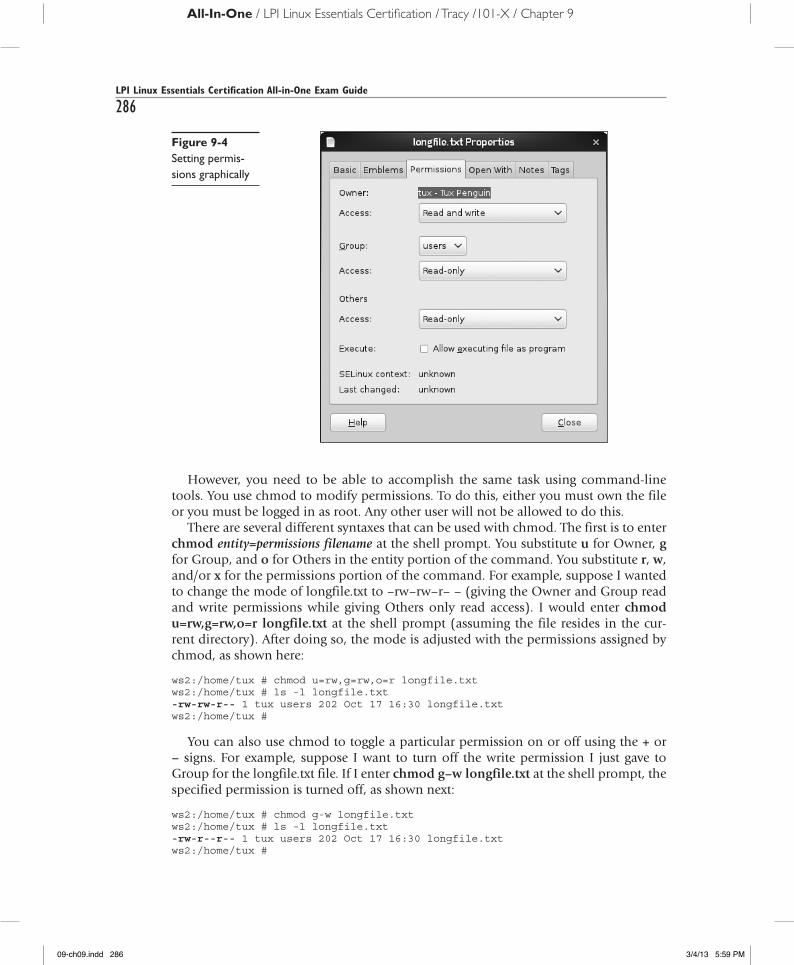
Managing Permissions from the Command Line with chmodI realize that I sound like a broken record, but, just as with most of the other tasks in this chapter, you can modify permissions either graphically or from the command line. For example, using the file browser in the GNOME desktop environment, you can right-click any file or directory and then select Properties | Permissions. The screen in Figure 9-4 is displayed.
You then use Access drop-down lists for Owner, Group, and Others to specify what each entity can do with the file or directory. When you apply the changes, the file or directory’s mode is changed to match what you specified.
Figure 9-3 Representing permissions numerically
Permission Value
Read 4
Write 2
Execute 1
Table 9-2 Numeric Values Assigned to Permissions
09-ch09.indd 285 3/4/13 5:59 PM
LPI Linux Essentials Certification All-in-One Exam Guide
286
All-In-One / LPI Linux Essentials Certification / Tracy /101-X / Chapter 9
However, you need to be able to accomplish the same task using command-line tools. You use chmod to modify permissions. To do this, either you must own the file or you must be logged in as root. Any other user will not be allowed to do this.
There are several different syntaxes that can be used with chmod. The first is to enter chmod entity=permissions filename at the shell prompt. You substitute u for Owner, g for Group, and o for Others in the entity portion of the command. You substitute r, w, and/or x for the permissions portion of the command. For example, suppose I wanted to change the mode of longfile.txt to –rw–rw–r– – (giving the Owner and Group read and write permissions while giving Others only read access). I would enter chmod u=rw,g=rw,o=r longfile.txt at the shell prompt (assuming the file resides in the cur-rent directory). After doing so, the mode is adjusted with the permissions assigned by chmod, as shown here:
ws2:/home/tux # chmod u=rw,g=rw,o=r longfile.txt ws2:/home/tux # ls -l longfile.txt -rw-rw-r-- 1 tux users 202 Oct 17 16:30 longfile.txtws2:/home/tux #
You can also use chmod to toggle a particular permission on or off using the + or – signs. For example, suppose I want to turn off the write permission I just gave to Group for the longfile.txt file. If I enter chmod g–w longfile.txt at the shell prompt, the specified permission is turned off, as shown next:
ws2:/home/tux # chmod g-w longfile.txt ws2:/home/tux # ls -l longfile.txt -rw-r--r-- 1 tux users 202 Oct 17 16:30 longfile.txtws2:/home/tux #
Figure 9-4 Setting permis-sions graphically
09-ch09.indd 286 3/4/13 5:59 PM
Chapter 9: Managing File Ownership and Permissions
287
All-In-One / LPI Linux Essentials Certification / Tracy /101-X / Chapter 9
If I wanted to turn the permission back on, I would enter chmod g+w longfile.txt. You can substitute u or o to modify the permission to the file or directory for Owner and Others as well.
Finally, you can also use numeric permissions with chmod. This is the option I use most often. You can modify all three entities at once with only three characters. To do this, enter chmod numeric_permission filename.
Going back to our earlier example, suppose I wanted to grant read and write permis-sions to Owner and Group, but remove all permissions to Others. That would mean Owner and Group’s permissions would be represented numerically as 6. Because Others gets no permissions, its permissions would be represented by 0. I could implement this by entering chmod 660 longfile.txt at the shell prompt. When I do, the appropriate changes are made, as shown here:
ws2:/home/tux # chmod 660 longfile.txt ws2:/home/tux # ls -l longfile.txt -rw-rw---- 1 tux users 202 Oct 17 16:30 longfile.txt ws2:/home/tux #
TIP You can use the –R option with chmod to change permissions on many files at once recursively.
Let’s practice managing permissions in the following exercise.
Exercise 9-2: Managing Permissions In this exercise, you will practice modi-fying permissions from the shell prompt of your Linux system. You will create a design document for your hypothetical Research and Design team and modify its permissions to control access.
Complete the following:
1. Verify that you are logged in to your system.
2. If necessary, switch to your root user account with the su – command.
3. Change to the /RandD directory by entering cd /RandD at the shell prompt.
4. Create a design document for your team and restrict access to it by doing the following:
a. Create a new file named design_doc.odt by entering touch design_doc.odt at the shell prompt.
b. At the shell prompt, enter ls –l. Notice that the root user account and the root group are the owners of the new file.
c. Change ownership of the file to your user account and the research group using the chown command.
d. Enter ls –l again at the shell prompt. Verify that ownership of the file directory has changed to your user account and the research group. Notice that Owner has rw– permissions to the file, but Group only has r-- permission.
09-ch09.indd 287 3/4/13 5:59 PM

LPI Linux Essentials Certification All-in-One Exam Guide
288
All-In-One / LPI Linux Essentials Certification / Tracy /101-X / Chapter 9
e. Grant Owner rw– permissions by entering chmod g+w design_doc.odt at the shell prompt.
f. Enter ls –l again at the shell prompt. Notice that Owner and Group now both have read/write access to the file.
g. Notice that Others have read access to the file. You need to keep this document confidential, so remove this access by entering chmod 660 design_doc.odt at the shell prompt.
h. Enter ls –l again. Verify that Others have no permissions to this file.
5. Next, you need to control access to the research directory itself using permissions. Do the following:
a. At the shell prompt, enter cd ...
b. At the shell prompt, enter ls –l. Notice that Owner has full access to the RandD directory, but Group is missing the write permission to the directory. Also notice that Others can read the directory contents (r) and can enter the directory (x).
c. Grant Group full access to the directory and remove Others access to the directory completely by entering chmod 770 RandD at the shell prompt.
d. Enter ls –l at the shell prompt. Verify that Owner and Group have full access while Others has no access.
Working with Default PermissionsYou may have noticed as we’ve worked through exercises and examples in this course that whenever you create a new file or directory in the file system, a default set of per-missions is automatically assigned without any intervention on your part.
By default, Linux assigns rw–rw–rw– (666) permissions to every file whenever it is created in the file system. It also assigns rwxrwxrwx (777) permissions to every directory created in the file system. However, these aren’t the permissions the files or directories actually end up with. Let’s take a look at an example.
Suppose tux created a new directory named revenue in his home directory and a file named projections.odt in the revenue directory. Based on what we just discussed, the revenue directory should have a mode of rwxrwxrwx and the projections.odt file should have a mode of rw–rw–rw–. However, this isn’t the case, as shown here:
tux@ws2:~> ls –l total 92 drwxr-xr-x 2 tux users 4096 Oct 12 21:57 bin drwxr-xr-x 2 tux users 4096 Oct 12 21:59 Desktop drwxr-xr-x 2 tux users 4096 Oct 12 22:00 Documents drwxr-xr-x 2 tux users 4096 Oct 12 21:59 Downloads drwxr-xr-x 2 tux users 4096 Oct 12 21:59 Music drwxr-xr-x 2 tux users 4096 Oct 12 21:59 Pictures drwxr-xr-x 2 tux users 4096 Oct 12 21:59 Public drwxr-xr-x 2 tux users 4096 Oct 12 21:57 public_html drwxr-xr-x 2 tux users 4096 Oct 17 21:13 revenue
09-ch09.indd 288 3/4/13 5:59 PM
Chapter 9: Managing File Ownership and Permissions
289
All-In-One / LPI Linux Essentials Certification / Tracy /101-X / Chapter 9
tux@ws2:~> ls -l r* total 0 -rw-r--r-- 1 tux users 0 Oct 17 21:13 projections.odt tux@ws2:~>
Notice that the revenue directory has a mode of rwxr–xr–x (755). This means the directory owner has read, write, and execute permissions to the directory. Group and Others have read and execute permissions to the directory. Likewise, notice that the projections.odt file has a mode of rw–r– –r– – (644). The Owner has read and write permissions, while Group and Others have only the read permission.
These aren’t the default permissions Linux is supposed to assign! Why did this hap-pen? It’s because the default permissions are too liberal. Think about it. The default directory mode would allow anyone on the system to enter any directory and delete any files they wanted to! Likewise, the default file mode would allow any user on the system to modify a file you created. What a nightmare!
To increase the overall security of the system, Linux uses a variable called umask to automatically remove permissions from the default mode whenever a file or directory is created in the file system. The value of umask is a three-digit number, as shown next (ignoring the first 0):
ws2:~ # umask 0022 ws2:~ #
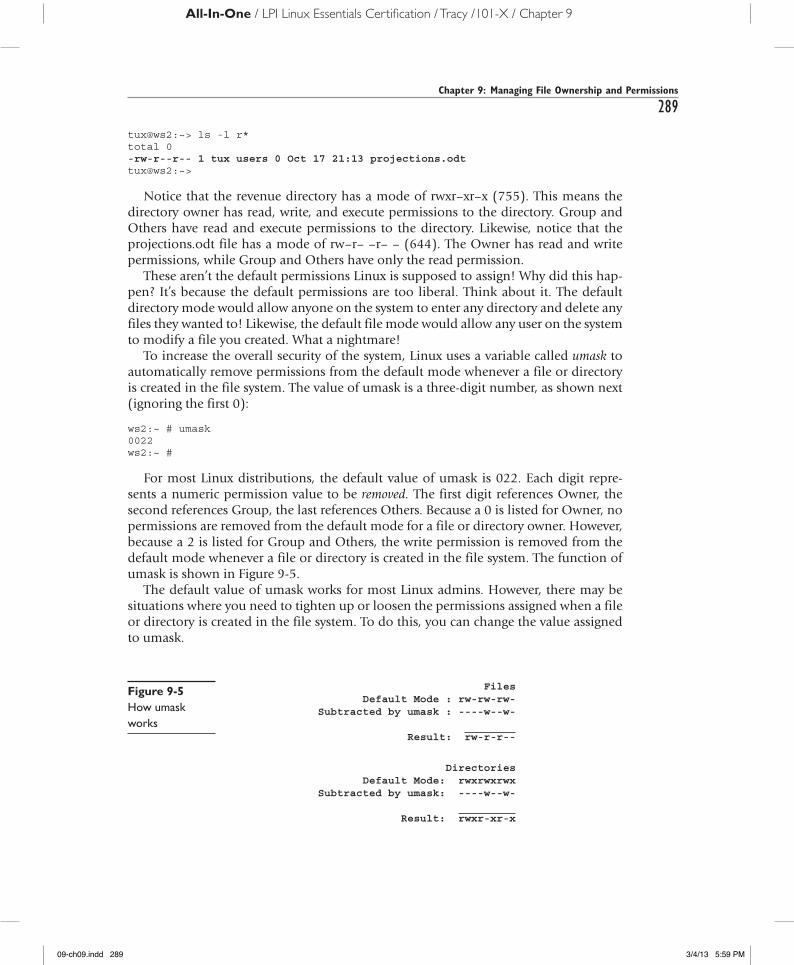
For most Linux distributions, the default value of umask is 022. Each digit repre-sents a numeric permission value to be removed. The first digit references Owner, the second references Group, the last references Others. Because a 0 is listed for Owner, no permissions are removed from the default mode for a file or directory owner. However, because a 2 is listed for Group and Others, the write permission is removed from the default mode whenever a file or directory is created in the file system. The function of umask is shown in Figure 9-5.
The default value of umask works for most Linux admins. However, there may be situations where you need to tighten up or loosen the permissions assigned when a file or directory is created in the file system. To do this, you can change the value assigned to umask.
FilesDefault Mode : rw-rw-rw-
Subtracted by umask : ----w--w-
Result: rw-r-r--
DirectoriesDefault Mode: rwxrwxrwx
Subtracted by umask: ----w--w-
Result: rwxr-xr-x
Figure 9-5 How umask works
09-ch09.indd 289 3/4/13 5:59 PM
LPI Linux Essentials Certification All-in-One Exam Guide
290
All-In-One / LPI Linux Essentials Certification / Tracy /101-X / Chapter 9
This can be done in two ways. First, if you only need to make a temporary change to umask, you can enter umask value at the shell prompt. For example, if you wanted to remove the execute permission that is automatically assigned to Others whenever a new directory is created, you could enter umask 023. This would cause the write per-mission (2) to be removed from Group upon creation as well as write (2) and execute (1) from Others. This will effectively disallow anyone from entering the new directory except for the directory owner or members of the owning group. This is shown here:
ws2:~ # umask 023 ws2:~ # umask 0023 ws2:~ # mkdir /home/ksanders/temp ws2:~ # ls –l /home/ksanders drwxr-xr-x 2 ksanders users 4096 Mar 10 16:43 bin -rw-rw---- 1 ksanders users 0 Mar 18 08:02 contacts.odt drwxr-xr-x 2 ksanders users 4096 Mar 10 16:43 public_html drwxr-xr-x 2 ksanders users 4096 Mar 18 11:06 revenue drwxr-xr-- 2 root root 4096 Mar 18 11:14 tempws2:~ #
Notice that, because the value of umask was changed, the execute permission (x) was removed from Others in the mode when the temp directory was created.
This method for modifying umask works great; however, it isn’t persistent. If you were to restart the system, umask would revert to its original value. That’s because the value of umask is automatically set each time the system boots using the umask param-eter in the /etc/profile file or the /etc/login.defs file, depending upon your distribution.
If you want to make your change to umask permanent, simply edit the appropriate configuration file in a text editor and set the value of umask to your desired value.
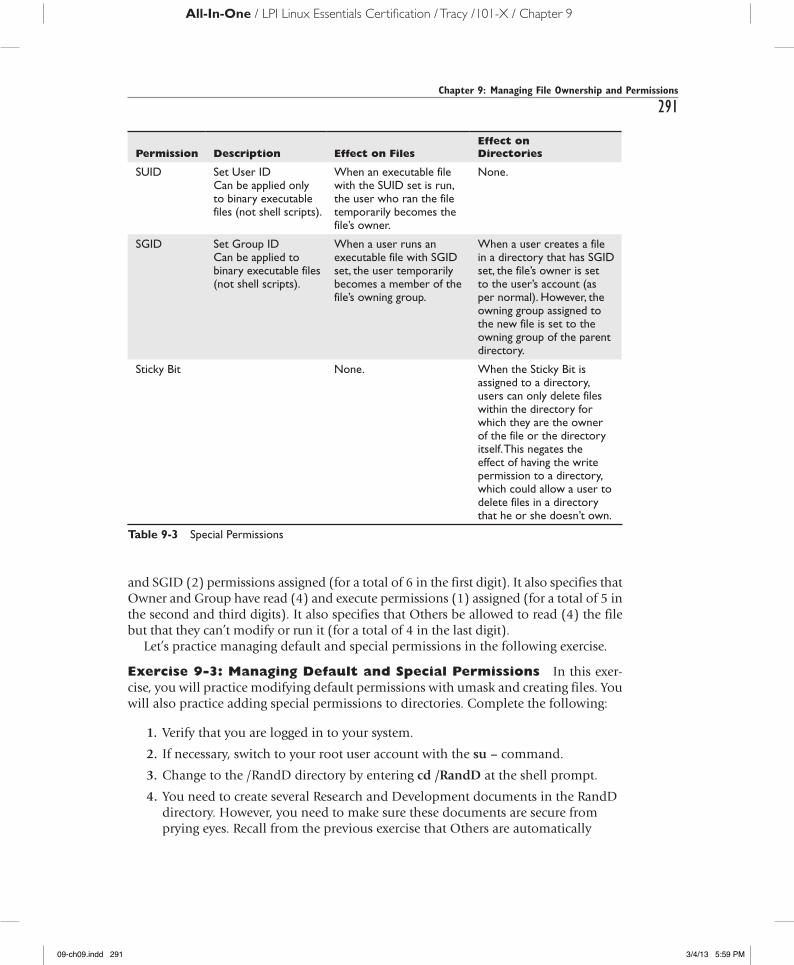
Working with Special PermissionsMost of the tasks you will complete with permissions will be with the read, write, and execute permissions. However, there are several other special permissions that you can assign to files and directories in your file system. These are shown in Table 9-3.
These special permissions are referenced as an extra digit added to the beginning of the file or directory’s mode. As with regular permissions, each of these special permis-sions has a numerical value assigned to it, as shown here:
● SUID: 4
● SGID: 2
● Sticky Bit: 1
You can assign these special permissions to files or directories using chmod. Just add an extra number to the beginning of the mode that references the special permissions you want to associate with the file or directory.
For example, suppose you wanted to apply the SUID and SGID permissions to a file named runme that should be readable and executable by Owner and Group. You would enter chmod 6554 runme at the shell prompt. This specifies that the file have SUID (4)
09-ch09.indd 290 3/4/13 5:59 PM
Chapter 9: Managing File Ownership and Permissions
291
All-In-One / LPI Linux Essentials Certification / Tracy /101-X / Chapter 9
and SGID (2) permissions assigned (for a total of 6 in the first digit). It also specifies that Owner and Group have read (4) and execute permissions (1) assigned (for a total of 5 in the second and third digits). It also specifies that Others be allowed to read (4) the file but that they can’t modify or run it (for a total of 4 in the last digit).
Let’s practice managing default and special permissions in the following exercise.
Exercise 9-3: Managing Default and Special Permissions In this exer-cise, you will practice modifying default permissions with umask and creating files. You will also practice adding special permissions to directories. Complete the following:
1. Verify that you are logged in to your system.
2. If necessary, switch to your root user account with the su – command.
3. Change to the /RandD directory by entering cd /RandD at the shell prompt.
4. You need to create several Research and Development documents in the RandD directory. However, you need to make sure these documents are secure from prying eyes. Recall from the previous exercise that Others are automatically
Permission Description Effect on FilesEffect on Directories
SUID Set User ID Can be applied only to binary executable files (not shell scripts).
When an executable file with the SUID set is run, the user who ran the file temporarily becomes the file’s owner.
None.
SGID Set Group ID Can be applied to binary executable files (not shell scripts).
When a user runs an executable file with SGID set, the user temporarily becomes a member of the file’s owning group.
When a user creates a file in a directory that has SGID set, the file’s owner is set to the user’s account (as per normal). However, the owning group assigned to the new file is set to the owning group of the parent directory.
Sticky Bit None. When the Sticky Bit is assigned to a directory, users can only delete files within the directory for which they are the owner of the file or the directory itself. This negates the effect of having the write permission to a directory, which could allow a user to delete files in a directory that he or she doesn’t own.
Table 9-3 Special Permissions
09-ch09.indd 291 3/4/13 5:59 PM
LPI Linux Essentials Certification All-in-One Exam Guide
292
All-In-One / LPI Linux Essentials Certification / Tracy /101-X / Chapter 9
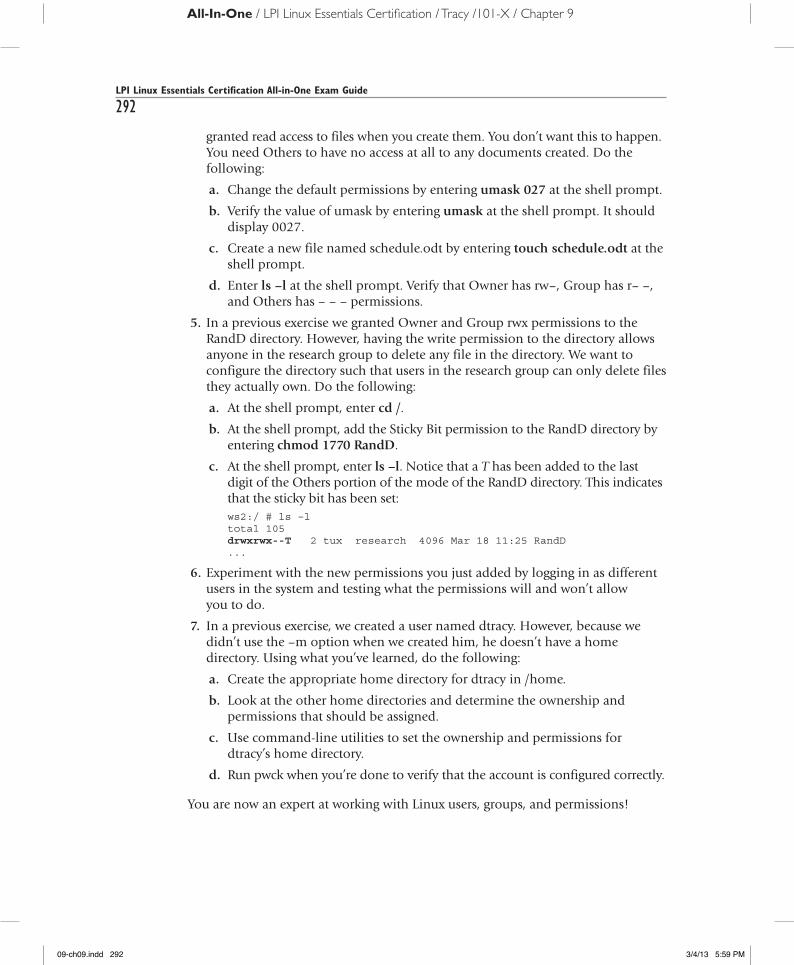
granted read access to files when you create them. You don’t want this to happen. You need Others to have no access at all to any documents created. Do the following:
a. Change the default permissions by entering umask 027 at the shell prompt.
b. Verify the value of umask by entering umask at the shell prompt. It should display 0027.
c. Create a new file named schedule.odt by entering touch schedule.odt at the shell prompt.
d. Enter ls –l at the shell prompt. Verify that Owner has rw–, Group has r– –, and Others has – – – permissions.
5. In a previous exercise we granted Owner and Group rwx permissions to the RandD directory. However, having the write permission to the directory allows anyone in the research group to delete any file in the directory. We want to configure the directory such that users in the research group can only delete files they actually own. Do the following:
a. At the shell prompt, enter cd /.
b. At the shell prompt, add the Sticky Bit permission to the RandD directory by entering chmod 1770 RandD.
c. At the shell prompt, enter ls –l. Notice that a T has been added to the last digit of the Others portion of the mode of the RandD directory. This indicates that the sticky bit has been set:ws2:/ # ls –l total 105 drwxrwx--T 2 tux research 4096 Mar 18 11:25 RandD...
6. Experiment with the new permissions you just added by logging in as different users in the system and testing what the permissions will and won’t allow you to do.
7. In a previous exercise, we created a user named dtracy. However, because we didn’t use the –m option when we created him, he doesn’t have a home directory. Using what you’ve learned, do the following:
a. Create the appropriate home directory for dtracy in /home.
b. Look at the other home directories and determine the ownership and permissions that should be assigned.
c. Use command-line utilities to set the ownership and permissions for dtracy’s home directory.
d. Run pwck when you’re done to verify that the account is configured correctly.
You are now an expert at working with Linux users, groups, and permissions!
09-ch09.indd 292 3/4/13 5:59 PM
Chapter 9: Managing File Ownership and Permissions
293
All-In-One / LPI Linux Essentials Certification / Tracy /101-X / Chapter 9
Chapter ReviewIn this chapter, we discussed ownership and permissions. I pointed out that users and groups only control who can access the system. They don’t control what the user can do with files or directories in the file system. To do this, we need to implement ownership and permissions.
I also pointed out that, whenever a user creates a file or directory, that user is auto-matically assigned to be its owner. In addition, the group the user belongs to becomes the file or directory’s group owner. These defaults can be changed; however, you must be logged in as root to change a file or directory’s owner or be logged in as its owner to change its group.
To modify ownership, you use the chown command. This command can change both the user and/or the group that owns a file or directory. If you only want to change the group, you can also use the chgrp command.
I then pointed out that ownership alone can’t control user access to files and directo-ries. To fully control access, we need Linux file system permissions. Permissions define what a user can and cannot do with a given file or directory. Linux uses the following permissions:
● Read
● Write
● Execute
Linux assigns permissions to the following entities:
● Owner
● Group
● Others
The permissions assigned to Owner, Group, and Others together constitute a file or directory’s mode. I emphasized that Linux permissions are additive. If a given user is both an owner and member of the owning group, then he or she receives permissions assigned for a file or directory to Owner and Group.
I then pointed out that permissions can be represented numerically for Owner, Group, and Others using the following values:
● Read: 4
● Write: 2
● Execute: 1
By adding up each permission assigned to a given entity, you can represent all of the permissions assigned with a single number. For example, a value of 7 indicates that all
09-ch09.indd 293 3/12/13 10:10 AM
LPI Linux Essentials Certification All-in-One Exam Guide
294
All-In-One / LPI Linux Essentials Certification / Tracy /101-X / Chapter 9
permissions have been assigned. A value of 5 indicates read and execute permissions have been assigned.
We then discussed the chmod tool that is used to manage permissions from the shell prompt. The chmod utility can use any of the following syntaxes to assign permissions to Owner, Group, and/or Others:
● chmod u=rw,g=rw,o=r file_or_directory
● chmod u+rw,g+rw,o+r file_or_directory
● chmod 664 file_or_directory
At this point, we began a discussion of default Linux permissions. I told you that, by default, Linux automatically assigns new files with rw–rw–rw– permissions and new directories with rwxrwxrwx permissions upon creation. However, to increase security, the umask variable is used to automatically remove some permission. The default umask value is 022, which removes the write permission from Group and Others when a file or directory is created. We pointed out that you can change the value of umask by entering umask value at the shell prompt.
We also briefly discussed the special permissions that you can assign, including
● SUID: 4
● SGID: 2
● Sticky Bit: 1
We pointed out that you assign these permissions with chmod by adding an extra digit before the Owner digit in the command using the values just shown.
Accelerated Review
● Ownership defines which user and group owns a particular file or directory in the file system.
● You can use the ls –l command to view ownership.
● You can use the chown utility to configure user and group ownership of a file or directory.
● You can use the chgrp utility to change group ownership.
● You must be logged in as root to change user ownership.
● You must be logged in as root or as the file/directory owner to change group ownership.
● Permissions are used to define what users may or may not do with files or direc-tories in the file system.
● Linux uses the read, write, and execute permissions for files and directories.
● Linux permissions are assigned to Owner, Group, and Others.
09-ch09.indd 294 3/4/13 5:59 PM
Chapter 9: Managing File Ownership and Permissions
295
All-In-One / LPI Linux Essentials Certification / Tracy /101-X / Chapter 9
● Linux permissions are additive.
● The permissions assigned to Owner, Group, and Others constitute the file or directory’s mode.
● Permissions can be represented numerically: read=4, write=2, and execute=1.
● Summing all permissions assigned to an entity, such as Owner, allows you to represent all assigned permissions with a single number.
● You use the chmod utility to modify permissions.
● Linux assigns rw–rw–rw– permissions by default to new files and rwxrwxrwx permissions to new directories.
● These permissions are too relaxed for most situations, so the umask variable is used to subtract specific permissions from the defaults.
● The default value of umask is 022, which subtracts the write permission (2) from Group and Others.
● You can modify the value of umask to change the default permissions assigned upon creation.
● Linux also includes three default special permissions: Sticky Bit, SUID, and SGID.
● You assign special permissions with chmod by adding an additional digit before the Owner digit in the command.
Questions
1. You need to change the owner of a file named /var/opt/runme from mireland, who is a member of the users group, to dnelson, who is a member of the edi-tors group. Assuming you want to change both user and group owners, which command will do this?
A. chown mireland dnelson /var/opt/runme
B. chown –u “dnelson” –g “editors” /var/opt/runme
C. chown dnelson /var/opt/runme
D. chown dnelson.editors /var/opt/runme
2. Which permission, when applied to a directory in the file system, will allow a user to enter the directory?
A. Read
B. Write
C. Execute
D. Access Control
09-ch09.indd 295 3/4/13 5:59 PM
LPI Linux Essentials Certification All-in-One Exam Guide
296
All-In-One / LPI Linux Essentials Certification / Tracy /101-X / Chapter 9
3. A user needs to open a file, edit it, and then save the changes. What permissions does he need to do this? (Choose two.)
A. Read
B. Write
C. Execute
D. Modify
4. A file named employees.odt has a mode of rw–r– –r– –. If rtracy is the file’s owner, what can he do with it?
A. He can open the file and view its contents, but he can’t save any changes.
B. He can open the file, make changes, and save the file.
C. He can change ownership of the file.
D. He can run the file if it’s an executable.
5. A file named employees.odt has a mode of rw–r– –r– –. If mhuffman is not the file’s owner but is a member of the group that owns this file, what can he do with it?
A. He can open the file and view its contents, but he can’t save any changes.
B. He can open the file, make changes, and save the file.
C. He can change ownership of the file.
D. He can run the file if it’s an executable.
6. A file named employees.odt has a mode of rw–r– –r– –. If mireland is not the file’s owner and is not a member of the group that owns this file, what can she do with it?
A. She can open the file and view its contents, but she can’t save any changes.
B. She can open the file, make changes, and save the file.
C. She can change ownership of the file.
D. She can run the file if it’s an executable.
7. A file named myapp has a mode of 755. If dnelson doesn’t own this file and isn’t a member of the group that owns the file, what can she do with it?
A. She can change the group that owns the file.
B. She can open the file, make changes, and save the file.
C. She can change ownership of the file.
D. She can run the file.
09-ch09.indd 296 3/4/13 5:59 PM
Chapter 9: Managing File Ownership and Permissions
297
All-In-One / LPI Linux Essentials Certification / Tracy /101-X / Chapter 9
8. You need to change the permissions of a file named schedule.odt such that the file owner can edit the file, users who are members of the group that owns the file can edit it, and users who are not owners and don’t belong to the owning group can view it but not modify it. Which command will do this?
A. chmod 664 schedule.odt
B. chmod 555 schedule.odt
C. chmod 777 schedule.odt
D. chmod 644 schedule.odt
9. You just created a new script file named myapp.sh. However, when you try to run it from the command prompt, the bash shell generates an error that says -bash: ./myapp.sh: Permission denied. Which command will fix this problem?
A. chmod u+r myapp.sh
B. chmod u+x myapp.sh
C. chmod u+w myapp.sh
D. chmod u+T myapp.sh
10. Your Linux system’s umask variable is currently set to a value of 077. A user named jcarr (who is a member of the users group) creates a file named mythoughts.odt. What can users who are members of the users group do with this file?
A. They can view the file, but they can’t modify or save it.
B. They can open, modify, and save the file.
C. They can open, modify, and save the file. They can also execute the file if it is an executable.
D. They have no access to the file at all.
11. An executable file has the SUID permission set. If this file is run on the system, who owns the file?
A. The user who created the file remains the owner.
B. The user who ran the file becomes the file’s permanent owner.
C. The user who ran the file becomes the file’s temporary owner.
D. The root user becomes the file’s owner.
12. The /Projects directory has the SGID special permission set. What effect does this have when a user tries to create a file in this directory? (Choose two.)
A. The file’s owner is set to the user who created the file.
B. The file’s owner is set to the user who owns the directory.
C. The owning group of the file is set to the owning group of the directory.
D. The owning group of the file is set to the primary group of the user who created the file.
E. The file’s owner is set to root.
F. The owning group of the new file is set to the root group.
09-ch09.indd 297 3/4/13 5:59 PM
LPI Linux Essentials Certification All-in-One Exam Guide
298
All-In-One / LPI Linux Essentials Certification / Tracy /101-X / Chapter 9
13. Which special permission can’t be assigned to a file?
A. SUID
B. SGID
C. Sticky Bit
D. None of the above. All special permissions can be assigned to a file.
14. A directory is owned by the users group and has a mode of rwxrwxr– – permissions assigned to that group. It also has the Sticky Bit permission set. What effect does this have on files within the directory?
A. Users who are members of the users group can only delete files within the directory for which they are the owner.
B. No user is allowed to delete files in this directory.
C. Users who are members of the users group can delete any file within the directory.
D. Others can enter the directory and delete files within the directory for which they are the owner.
Answers
1. D. Entering chown dnelson.editors /var/opt/runme will change the user and group owners of the runme file to dnelson and editors.
2. C. The execute permission allows a user to enter a directory in the file system.
3. A, B. The user must have read and write permissions to open and modify a file.
4. B. In the mode shown, Owner is given read and write permissions (rw–). Because rtracy is the file’s owner, he can open and view file contents (r). He can also modify and save changes to the file (w).
5. A. In the mode shown, Group is given the read permission only. Because mhuff-man is a member of the group, he can only open and view file contents. He can’t modify and save the file.
6. A. In the mode shown, Others are given the read permission only (r). Because mireland is neither the file’s owner nor a member of the owning group, she can only open and view file contents. She can’t modify and save changes to the file.
7. D. Because dnelson isn’t the owner and isn’t a member of the owning group, she is granted the rights assigned to Others, which are read (4) and execute (1). This allows her to run the file.
8. A. Entering chmod 664 schedule.odt will grant Owner and Group read (4) and write (2) permissions. It will also grant Others read (4) permission.
9. B. Entering chmod u+x myapp.sh will grant the file’s Owner the execute permission (x). The script file can then be run at the shell prompt.
09-ch09.indd 298 3/4/13 5:59 PM
Chapter 9: Managing File Ownership and Permissions
299
All-In-One / LPI Linux Essentials Certification / Tracy /101-X / Chapter 9
10. D. Because umask is set to 077, all permissions (read=4, write=2, execute=1) are removed from Group and Others. Therefore, members of the owning group have no access to the file.
11. C. The SUID permission causes the user who runs the file to temporarily become the file’s owner.
12. A, C. Because the file’s parent directory has the SGID permission set, the file’s owner is set to the user who created the file while the owning group is set to the owning group of the directory where the file resides.
13. C. The Sticky Bit special permission can’t be assigned to a file. It can only be assigned to directories.
14. A. The Sticky Bit permission negates the effect of the group write permissions. As a result, users who are members of the users group can only delete files within the directory for which they are the owner.
09-ch09.indd 299 3/4/13 5:59 PM
All-In-One / LPI Linux Essentials Certification / Tracy /101-X / Chapter 9
09-ch09.indd 300 3/4/13 5:59 PM