Embed Size (px)
Citation preview
Installing Ubuntu
Secrets in This Chapter
Preparing Your PC
Installing from LiveCD
Installing from Alternate CD
Server Installation
Chapter
3
95080c03.indd 47 1/26/09 12:19:47 AM

48 Part 1: Starting Out with Ubuntu
Once you’ve decided that Ubuntu is the Linux distribution for you, and that it’ll work properly on your PC, you should install it on your hard drive to get its full benefits.
Although the Ubuntu installation process has become fine tuned and streamlined over the years, there are still a few things you need to be concerned about when installing the system. This chapter discusses what you should think about before you start the installa-tion, then walks through the process step by step to ensure that your Ubuntu installation experience is a happy one.
Preparing Your PCBefore you start the installation process, you should take some time to analyze the work-station or server you’re going to use for your Ubuntu system. Although the Linux world has made great advances in hardware support, there are still a few things you need to watch out for. This section describes some of the things you should look at while analyz-ing your hardware.
System RequirementsIn the old days of Linux (the 1990s), one of the selling points of the Linux operating sys-tem was that it could run on just about any old piece of computer hardware you had lying around. Unfortunately, with the popularity of fancy graphical desktop environments, those days are mostly over (see Chapter 1, “What Is Ubuntu?”).
To get the most from your Ubuntu desktop experience, you’ll want to have a fairly decent hardware configuration. Although Ubuntu may not require quite as many resources as some other operating systems, it still requires some effort to run.
Here’s a list of the minimum hardware components suggested for an Ubuntu desktop installation:
CPU:♦♦ In the past, determining the CPU in a workstation was a simple task. It was easy to tell whether you had a 286, 386, or 486 processor. These days a plethora of processors are available, and it’s not always easy to figure out which ones are better or faster. Ubuntu supports all of the 32-bit AMD and Intel families of pro-cessors, including the i386 platform and the newer multicore processors that are popular in workstations and server-oriented Xeon processors. Ubuntu also sup-ports 64-bit AMD and Intel processors. With these processors you can use either the 32-bit desktop Ubuntu installation or the 64-bit Ubuntu installation custom-ized for the 64-bit environment. The minimum recommendation for a graphical desktop environment is a 1.2 GHz x86-class processor. Slower processors might work, but you might not be happy with the results. Note that Ubuntu also supports the Intel x86 Macintosh hardware platforms, including newer Mac desktop and notebook workstations.Memory:♦♦ The minimum amount of memory suggested depends on what you want to do with your Ubuntu system. To properly run the GNOME desktop environment plus the advanced applications, you’ll want at least 384 MB of memory. However, as with any advanced graphical operating system, if you intend to use the desktop applications to their fullest, I’d suggest having more memory. For server environ-ments, it depends mostly on the load you expect your server to undertake. For a basic server environment Ubuntu requires only 64 MB of memory (because there
95080c03.indd 48 1/26/09 12:19:47 AM
Chapter 3: Installing Ubuntu 49
aren’t any graphics requirements on the server), but for high-volume web, data-base, or mail servers, you’ll want at least 2 GB of memory available. The Ubuntu operating system also uses swap space, which is a special area reserved on the hard drive for virtual memory (see Chapter 1). Swap space helps increase the amount of memory available to the system, although with a performance penalty. When Ubuntu runs out of physical memory, it swaps out memory blocks to the swap area. When the memory blocks are needed, Ubuntu must swap them back into the physical memory. This process obviously takes more time than accessing data directly from the physical memory.Hard drive:♦♦ The minimum hard drive space suggested for a typical Ubuntu instal-lation is 1.8 GB; however, if you want to be able to do anything with your system after you install Ubuntu, you’ll probably want to have more disk space. Remember also to factor in the swap space area when determining your total hard disk size requirements. The minimum suggested by Ubuntu is 4 GB, although you could possibly survive with less. Ubuntu recognizes most types of hard drive installa-tions, such as secondary disks and USB disks. The way you get more disk space depends on your system and your budget.CD/DVD drive:♦♦ These days just about every PC comes with some type of CD and/or DVD drive. However, many older systems don’t have them. If you’re planning on using the LiveCD, you’ll need some type of CD/DVD drive in your PC. Be careful when purchasing a new CD/DVD drive because there are generally two types available. The type you need depends on the disk controller used in your system. The majority of workstation-oriented systems use the integrated device electronics (IDE) controller, while many server-oriented systems use the small computer system interface (SCSI) controller (see the “Installing a Hard Drive” section in this chapter). You must purchase the CD/DVD drive appropriate for your disk controller. If you decide to use the Wubi installer to install Ubuntu, you can use your network card to download the ISO image file and install directly from that without using a CD or DVD. With this method you should be able to avoid purchasing a CD/DVD drive (unless, of course, you want to use the CD/DVD for playing audio CDs or video DVDs).Keyboard:♦♦ A keyboard is a basic requirement for most workstations. Even if you run a hands-off server, some systems require a connected keyboard to boot. Ubuntu supports different types of keyboards, as well as different language key-boards. When you run the LiveCD installation, Ubuntu will prompt you for the type of keyboard you’re using. Take note if you’re using a special keyboard so you can select the proper keyboard during the installation process.Mouse:♦♦ In a graphical desktop environment, having a mouse is almost a necessity (although Ubuntu does include support for nonmouse navigation). Mouse technol-ogy has come a long way since the early days of PCs. You can purchase all types of mouse devices, from the standard rolling-ball mouse to an optical mouse to a wireless mouse. There are also different places for the mouse to connect, such as a serial port, a PS/2 port, and a USB port. Ubuntu has the ability to automatically detect most mouse devices. If your mouse requires special drivers for special but-tons or features, such as scroll wheels, it may or may not work in Ubuntu. Many newer laptops use a touchpad to provide control of the mouse pointer as well as scrolling and clicking features. Ubuntu can handle these features. Sound card:♦♦ If you intend to use any of the multimedia features available in Ubuntu, such as playing music CDs, watching DVDs, or listening to downloaded
95080c03.indd 49 1/26/09 12:19:47 AM
50 Part 1: Starting Out with Ubuntu
audio files, you’ll need to have a sound card installed in your workstation. Ubuntu can automatically detect most sound cards without requiring any additional driv-ers. Ubuntu also detects and installs drivers for some proprietary sound cards. However, these drivers are considered unsupported, and, if you experience any problems, you’re on your own.Video card:♦♦ A video card can make or break a workstation system. Ubuntu can automatically detect and use most standard video cards. Due to the graphical-ori-ented environment used by the Ubuntu desktop, you’ll want to use a VGA graphics card capable of at least 1024 × 768 resolution. With the popularity of PC gaming, many workstations use advanced 3-D accelerator video cards. Ubuntu provides support for many standard 3-D video cards, such as ATI, Intel, and NVIDIA, and can use customized drivers for cards that provide them. Some of the more exotic video cards may be a problem, especially if they don’t include a Linux driver. Similar to sound cards, Ubuntu can use unsupported drivers for video cards, but be wary of using these drivers because other things can break when installed.Printer:♦♦ Ubuntu has the ability to automatically detect and configure most com-mon desktop and network printers. This ability also applies to many of the newer all-in-one printers that can scan documents. However, you may have to choose the correct driver for your particular brand and model. Make a note of what brand and model of printer you’re using and how you’ll need to connect to it (parallel printer cable, USB cable, or network address).Modem:♦♦ Ubuntu supports using modems to dial remote computer systems and as a way to access the Internet. Ubuntu can automatically detect and use most standard modems, including external and internal modems. One type of modem to be care-ful about is Winmodems. Winmodems are popular in laptops and require special software (usually found in Microsoft Windows) to operate. Many Winmodems are now supported in the Linux world. However, if you can avoid a Winmodem, do so.Network card:♦♦ With the popularity of home networks, many workstations come with some type of network connectivity interface built into the motherboard. Ubuntu does an excellent job of detecting most wired and even wireless network interfaces. If your network is connected to the Internet, Ubuntu will automatically configure itself to retrieve software and security patches from the Ubuntu servers across the network. Depending on your network environment, you may have to customize the network configuration settings for the network device.
If you are unsure about the hardware in your system, the following web sites can provide information about hardware configuration that work with Ubuntu (or Linux in general):
https://wiki.ubuntu.com/HardwareSupport
https://help.ubuntu.com/community/Hardware
http://www.tldp.org/HOWTO/Hardware-HOWTO
These sites provide updated information about what devices work and often explain how to get them working in an Ubuntu environment.
95080c03.indd 50 1/26/09 12:19:47 AM
Chapter 3: Installing Ubuntu 51
Often the hardest part of an Ubuntu installation is finding enough disk space on a sys-tem to install it. If you’re converting a workstation into an Ubuntu-only workstation, that shouldn’t be an issue. However, if you want to keep your existing Windows workstation setup and add Ubuntu, that can take some work.
Because it is a common setup, the next section discusses how to prepare your Windows PC for installing Ubuntu in a dual-boot environment.
Creating a Place for UbuntuTo install Ubuntu permanently on your PC, you’ll need to have a hard disk area set up for it. There are three common options for this setup:
Replace the existing operating system on your hard drive with Ubuntu.♦♦
Install Ubuntu on a second hard drive.♦♦
Partition an existing hard drive to include Ubuntu.♦♦
Obviously, the easiest solution for installing Ubuntu on a PC is to replace the existing operating system installed on the hard drive. The Ubuntu installation easily guides you through this process. Just remember that when you’re done, you won’t have the original files from your previous operating system. If you want to keep any files, you’ll need to back them up yourself to media that you can read from Ubuntu.
Laptops often pose a problem for Linux distributions. Many older laptops use proprietary hardware devices that aren’t supported by Linux. On some of these laptops, Ubuntu may not even be able to run the LiveCD. Older laptops with pro-prietary video systems are especially prone to fail in the Linux environment.
However, most newer laptops use more standard hardware that Ubuntu can detect and use without any problems. Pay special attention to the video, modem, and wireless network cards used in your laptop because these devices cause the most problems. A great resource for working with Linux and laptops is www.linux-laptop.net. It provides valuable guidance from users who’ve success-fully loaded specific Linux distributions on specific laptops.
If you’re purchasing a new laptop, you should check it for Ubuntu compatibility, either by booting it using the Ubuntu LiveCD or by verifying its hardware on the various Ubuntu and Linux hardware web sites.
With the popularity of virtual server programs such as VMWare and Sun VirtualBox, many Linux enthusiasts load Ubuntu within a virtual environment running inside a Windows operating system. If you’re trying to do that, just fol-low the Ubuntu installation method to replace the existing operating system on the hard drive. Just make sure that you’re inside your virtual server environment before doing that!
95080c03.indd 51 1/26/09 12:19:47 AM
52 Part 1: Starting Out with Ubuntu
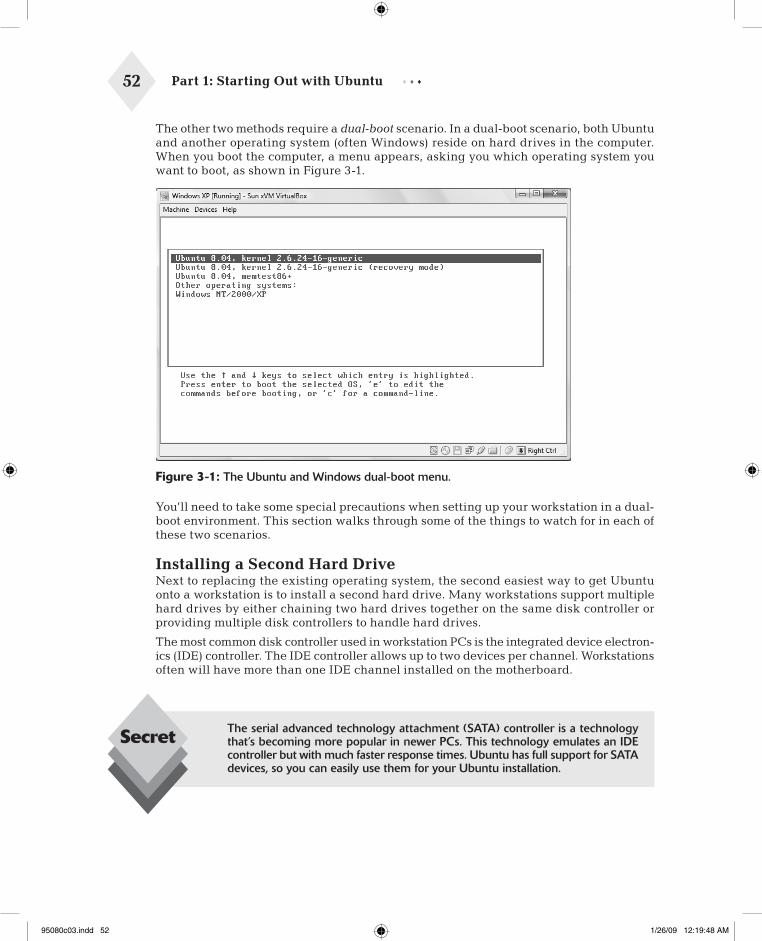
The other two methods require a dual-boot scenario. In a dual-boot scenario, both Ubuntu and another operating system (often Windows) reside on hard drives in the computer. When you boot the computer, a menu appears, asking you which operating system you want to boot, as shown in Figure 3-1.
Figure 3-1: The Ubuntu and Windows dual-boot menu.
You’ll need to take some special precautions when setting up your workstation in a dual-boot environment. This section walks through some of the things to watch for in each of these two scenarios.
Installing a Second Hard DriveNext to replacing the existing operating system, the second easiest way to get Ubuntu onto a workstation is to install a second hard drive. Many workstations support multiple hard drives by either chaining two hard drives together on the same disk controller or providing multiple disk controllers to handle hard drives.
The most common disk controller used in workstation PCs is the integrated device electron-ics (IDE) controller. The IDE controller allows up to two devices per channel. Workstations often will have more than one IDE channel installed on the motherboard.
The serial advanced technology attachment (SATA) controller is a technology that’s becoming more popular in newer PCs. This technology emulates an IDE controller but with much faster response times. Ubuntu has full support for SATA devices, so you can easily use them for your Ubuntu installation.
95080c03.indd 52 1/26/09 12:19:48 AM
Chapter 3: Installing Ubuntu 53
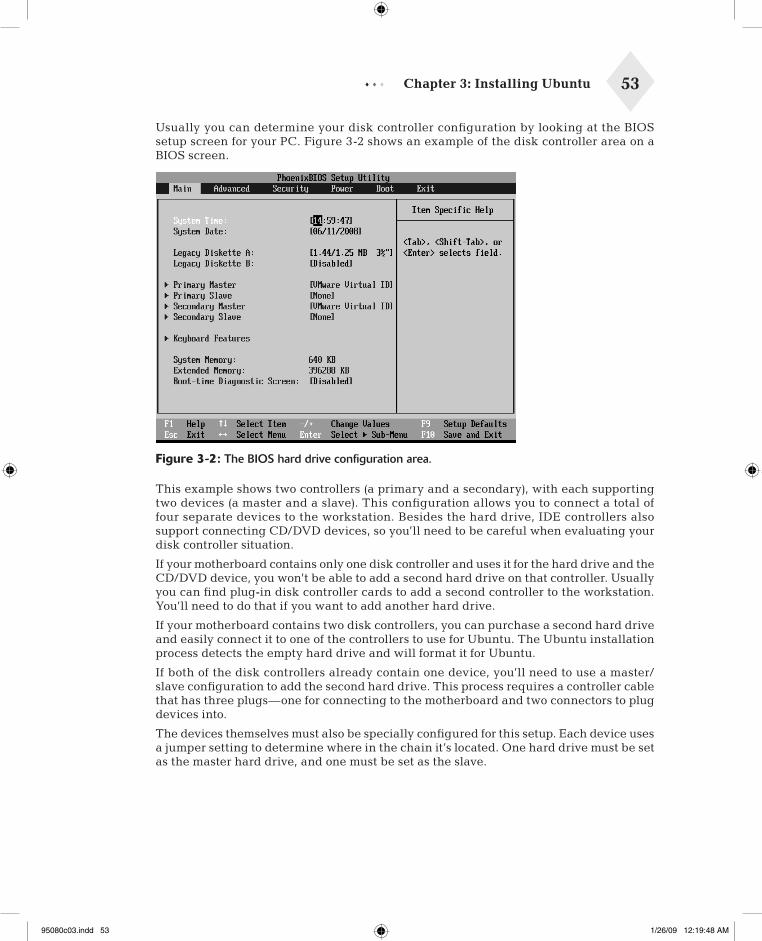
Usually you can determine your disk controller configuration by looking at the BIOS setup screen for your PC. Figure 3-2 shows an example of the disk controller area on a BIOS screen.
Figure 3-2: The BIOS hard drive configuration area.
This example shows two controllers (a primary and a secondary), with each supporting two devices (a master and a slave). This configuration allows you to connect a total of four separate devices to the workstation. Besides the hard drive, IDE controllers also support connecting CD/DVD devices, so you’ll need to be careful when evaluating your disk controller situation.
If your motherboard contains only one disk controller and uses it for the hard drive and the CD/DVD device, you won’t be able to add a second hard drive on that controller. Usually you can find plug-in disk controller cards to add a second controller to the workstation. You’ll need to do that if you want to add another hard drive.
If your motherboard contains two disk controllers, you can purchase a second hard drive and easily connect it to one of the controllers to use for Ubuntu. The Ubuntu installation process detects the empty hard drive and will format it for Ubuntu.
If both of the disk controllers already contain one device, you’ll need to use a master/slave configuration to add the second hard drive. This process requires a controller cable that has three plugs—one for connecting to the motherboard and two connectors to plug devices into.
The devices themselves must also be specially configured for this setup. Each device uses a jumper setting to determine where in the chain it’s located. One hard drive must be set as the master hard drive, and one must be set as the slave.
95080c03.indd 53 1/26/09 12:19:48 AM
54 Part 1: Starting Out with Ubuntu
Partitioning an Existing Hard DrivePartitioning an existing hard drive is the most complicated method for installing Ubuntu on an existing workstation. Normally, if you have an existing operating system on your workstation (such as Windows XP or Vista), it uses the entire hard drive installed on the PC. During installation, Ubuntu allows you to split the hard drive into multiple sections, called partitions. It will then install the operating system on the new partition. The original operating system still resides on the first partition, allowing you to run it, just as before, in a dual-boot configuration.
Before you run the Ubuntu installation, you’ll want to know what your particular hard drive setup is, so you’ll know how much space you can allocate for Ubuntu. Here are the steps in preparing your existing hard drive for the Ubuntu installation.
Many advanced server systems use a small computer system interface (SCSI) hard drive controller instead of an IDE controller. SCSI controllers typically allow up to seven devices per controller channel (although some newer ones allow 16 devices). These controllers are popular in servers that support multiple hard drives in a redundant array of inexpensive disk (RAID) configuration. RAID systems use multiple hard drives to emulate a single hard drive for fault-tolerance purposes. There are several formats of RAID support:
RAID0: Divides data among multiple hard drives but without redundancy.•RAID1: Writes all data to two or more drives (called • mirroring).RAID2: Incorporates error detection codes within stored data.•RAID3: Stores data across several drives at the byte level, reserving one drive to •store a parity bit. The parity bit is used to rebuild an individual drive if it fails.RAID4: Stores data across several drives at the block level, reserving one •drive to store a parity bit.RAID5: Stores data across several drives at the block level; also writes a parity •bit for each block on the drives.
RAID1 is common when only two hard drives are present. One hard drive is the primary, and the other is a hot backup. The disk controller performs all disk write requests from the operating system on both hard drives. RAID3 and RAID5 are the most popular methods of RAID disk support and usually require three or more hard drives. Both of these methods can recover data from a complete failure of any one disk in the system.
Despite the “inexpensive” part of its name, RAID technology can be expensive, and it is used primarily for high-availability server environments. The Ubuntu server installation can detect and use most SCSI controllers and RAID configu-rations.
However, don’t confuse a hardware RAID environment with a software RAID. Many Windows servers allow you to emulate a RAID environment using standard disk hardware. This is called a software RAID because there aren’t multiple disks, but the operating system acts as if there are. Ubuntu will work with standard disk drives, but it won’t emulate a RAID environment using them.
95080c03.indd 54 1/26/09 12:19:48 AM
Chapter 3: Installing Ubuntu 55
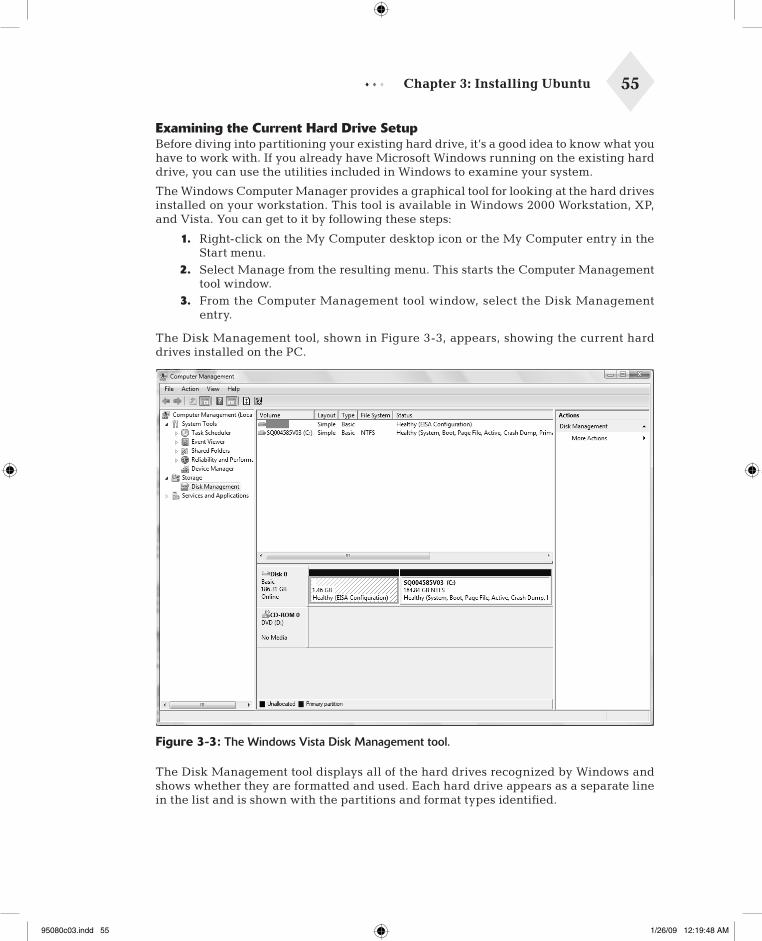
Examining the Current Hard Drive SetupBefore diving into partitioning your existing hard drive, it’s a good idea to know what you have to work with. If you already have Microsoft Windows running on the existing hard drive, you can use the utilities included in Windows to examine your system.
The Windows Computer Manager provides a graphical tool for looking at the hard drives installed on your workstation. This tool is available in Windows 2000 Workstation, XP, and Vista. You can get to it by following these steps:
1. Right-click on the My Computer desktop icon or the My Computer entry in the Start menu.
2. Select Manage from the resulting menu. This starts the Computer Management tool window.
3. From the Computer Management tool window, select the Disk Management entry.
The Disk Management tool, shown in Figure 3-3, appears, showing the current hard drives installed on the PC.
Figure 3-3: The Windows Vista Disk Management tool.
The Disk Management tool displays all of the hard drives recognized by Windows and shows whether they are formatted and used. Each hard drive appears as a separate line in the list and is shown with the partitions and format types identified.
95080c03.indd 55 1/26/09 12:19:48 AM
56 Part 1: Starting Out with Ubuntu
Many newer workstations utilize a hidden partition to store important recovery informa-tion. A hidden partition is a section of the hard drive that’s partitioned, but not assigned a drive letter, by the operating system. Even if you see only a C: drive on your Windows setup, your hard drive may still contain two partitions, as shown in the example in Figure 3-3. The hidden partition can’t be used for Ubuntu, or you’ll lose the ability to restore your Windows system if it crashes.
If you see an area on the hard drive marked unallocated, that means the hard drive has free space that’s not part of the Windows partition. You can use this as part of the Ubuntu partition. If it’s 4 GB or larger, then you don’t have to do anything to your existing Windows partition. You can install Ubuntu directly into the unallocated hard drive areas without having to alter the existing Windows partition.
If you see only a single partition that’s allocated for Windows on your hard drive, you’ll need to continue with the partitioning process to free up space for Ubuntu.
Determining Free SpaceThe next step in the partition process is to determine how much free space you have on your existing hard drive. Remember, you’ll need at least 4 GB of free space for Ubuntu, plus you’ll probably want to keep some extra free space for the original operating system.
To find out how much free space is available on your Windows partition, you can turn again to the Windows Computer Management tool. The top portion of the Disk Management window shows detailed statistics for each hard drive partition.
The statistics shown include the total size of the partition and the amount of free space available. Make note of the free space available on the partition. That’s the amount of space you’ll have available to divvy up between the existing Windows partition and the new Ubuntu partition.
Once you’ve determined the amount of space you have available for Ubuntu, the next step is to ensure that the space on the disk is really empty.
Defragmenting FilesDuring the normal course of using your workstation, Windows tends to write files at ran-dom places on the hard drive. This can spread data over the entire disk space area. When you split the hard drive into partitions, you’ll want to ensure that you don’t lose any of the data used in the Windows system, including system and data files.
To make a clean partition of the hard drive, you’ll need to make sure that all of the Windows data are moved toward one end of the hard drive. This process is commonly done with a defragmenting tool.
A common mistake is to assign all of the free space on a hard drive to the new Ubuntu partition. You’ll want to keep some free space assigned to the Windows partition; otherwise, the Windows operating system installed might not boot properly. It’s always a good idea to have at least 1 GB of free space available on the Windows partition, even if you’re not planning on adding any new software or data.
95080c03.indd 56 1/26/09 12:19:48 AM
Chapter 3: Installing Ubuntu 57
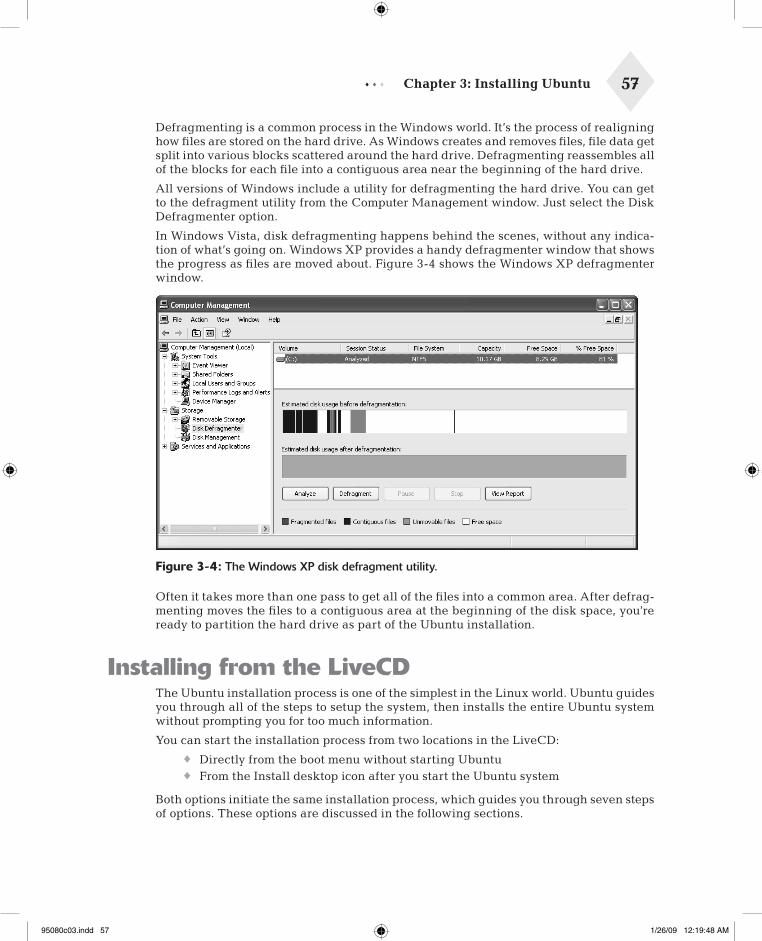
Defragmenting is a common process in the Windows world. It’s the process of realigning how files are stored on the hard drive. As Windows creates and removes files, file data get split into various blocks scattered around the hard drive. Defragmenting reassembles all of the blocks for each file into a contiguous area near the beginning of the hard drive.
All versions of Windows include a utility for defragmenting the hard drive. You can get to the defragment utility from the Computer Management window. Just select the Disk Defragmenter option.
In Windows Vista, disk defragmenting happens behind the scenes, without any indica-tion of what’s going on. Windows XP provides a handy defragmenter window that shows the progress as files are moved about. Figure 3-4 shows the Windows XP defragmenter window.
Figure 3-4: The Windows XP disk defragment utility.
Often it takes more than one pass to get all of the files into a common area. After defrag-menting moves the files to a contiguous area at the beginning of the disk space, you’re ready to partition the hard drive as part of the Ubuntu installation.
Installing from the LiveCDThe Ubuntu installation process is one of the simplest in the Linux world. Ubuntu guides you through all of the steps to setup the system, then installs the entire Ubuntu system without prompting you for too much information.
You can start the installation process from two locations in the LiveCD:
Directly from the boot menu without starting Ubuntu♦♦
From the Install desktop icon after you start the Ubuntu system♦♦
Both options initiate the same installation process, which guides you through seven steps of options. These options are discussed in the following sections.
95080c03.indd 57 1/26/09 12:19:48 AM
58 Part 1: Starting Out with Ubuntu
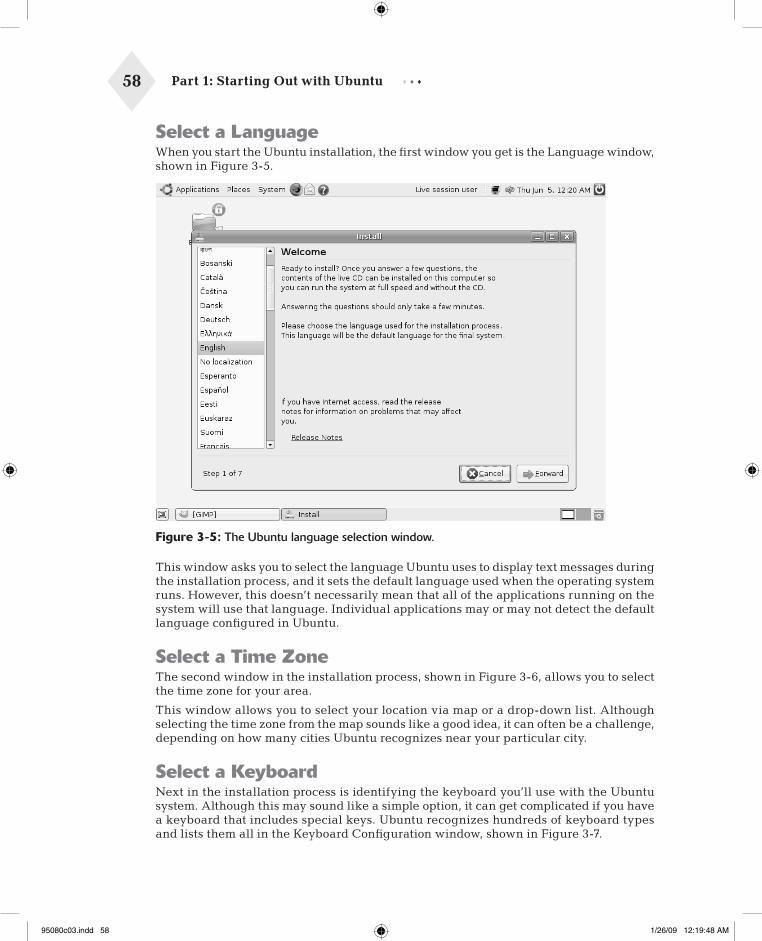
Select a LanguageWhen you start the Ubuntu installation, the first window you get is the Language window, shown in Figure 3-5.
Figure 3-5: The Ubuntu language selection window.
This window asks you to select the language Ubuntu uses to display text messages during the installation process, and it sets the default language used when the operating system runs. However, this doesn’t necessarily mean that all of the applications running on the system will use that language. Individual applications may or may not detect the default language configured in Ubuntu.
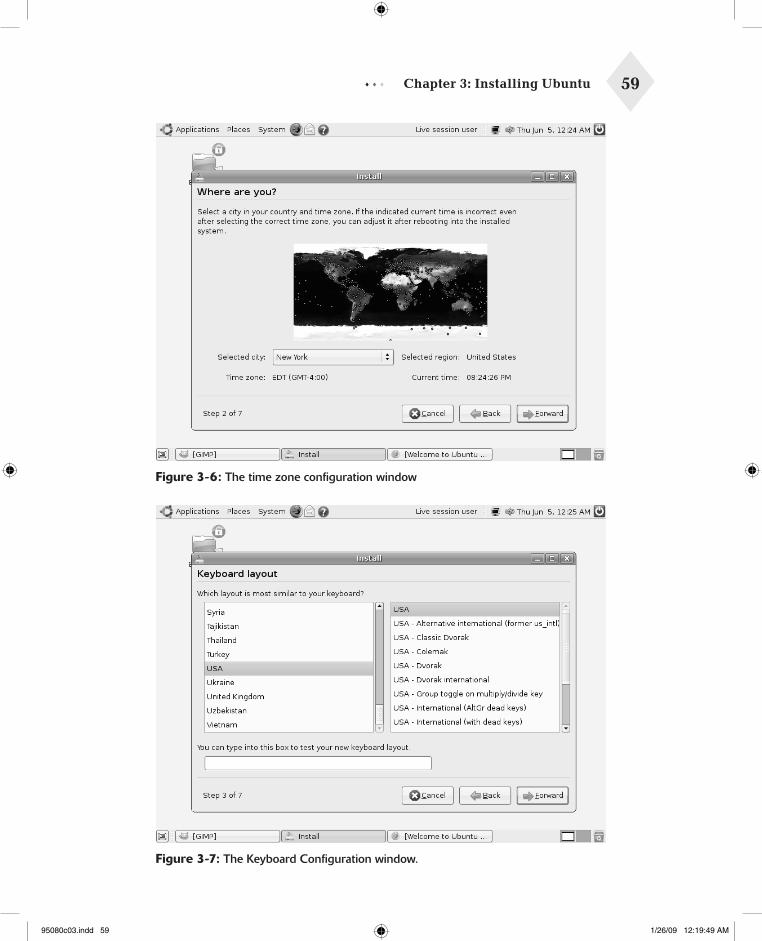
Select a Time ZoneThe second window in the installation process, shown in Figure 3-6, allows you to select the time zone for your area.
This window allows you to select your location via map or a drop-down list. Although selecting the time zone from the map sounds like a good idea, it can often be a challenge, depending on how many cities Ubuntu recognizes near your particular city.
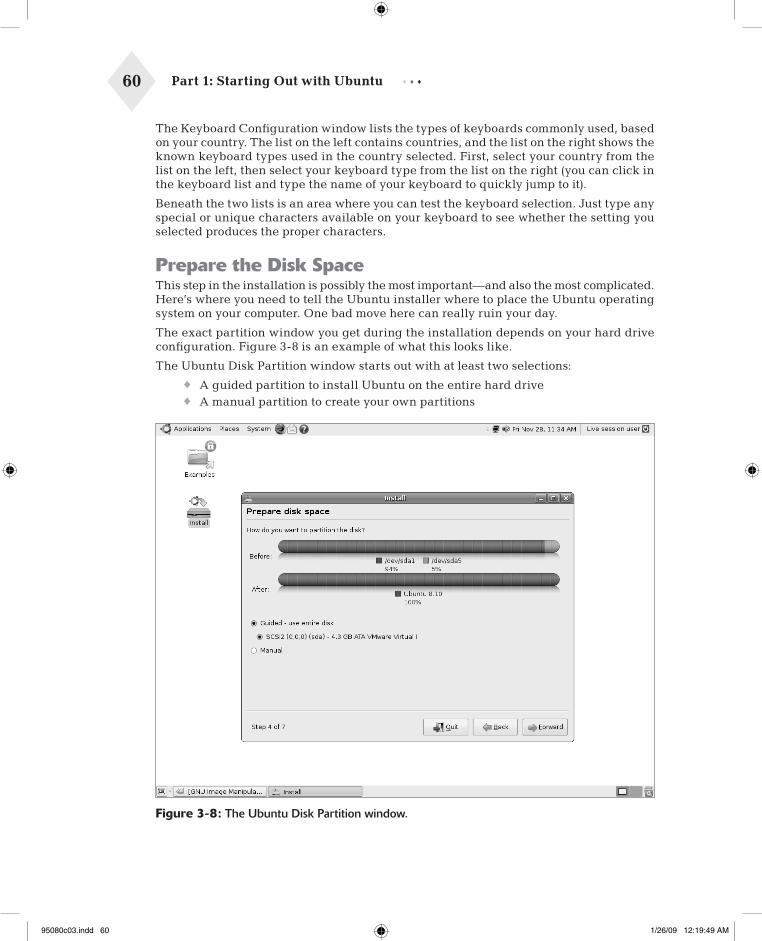
Select a KeyboardNext in the installation process is identifying the keyboard you’ll use with the Ubuntu system. Although this may sound like a simple option, it can get complicated if you have a keyboard that includes special keys. Ubuntu recognizes hundreds of keyboard types and lists them all in the Keyboard Configuration window, shown in Figure 3-7.
95080c03.indd 58 1/26/09 12:19:48 AM
Chapter 3: Installing Ubuntu 59
Figure 3-6: The time zone configuration window
Figure 3-7: The Keyboard Configuration window.
95080c03.indd 59 1/26/09 12:19:49 AM
60 Part 1: Starting Out with Ubuntu
The Keyboard Configuration window lists the types of keyboards commonly used, based on your country. The list on the left contains countries, and the list on the right shows the known keyboard types used in the country selected. First, select your country from the list on the left, then select your keyboard type from the list on the right (you can click in the keyboard list and type the name of your keyboard to quickly jump to it).
Beneath the two lists is an area where you can test the keyboard selection. Just type any special or unique characters available on your keyboard to see whether the setting you selected produces the proper characters.
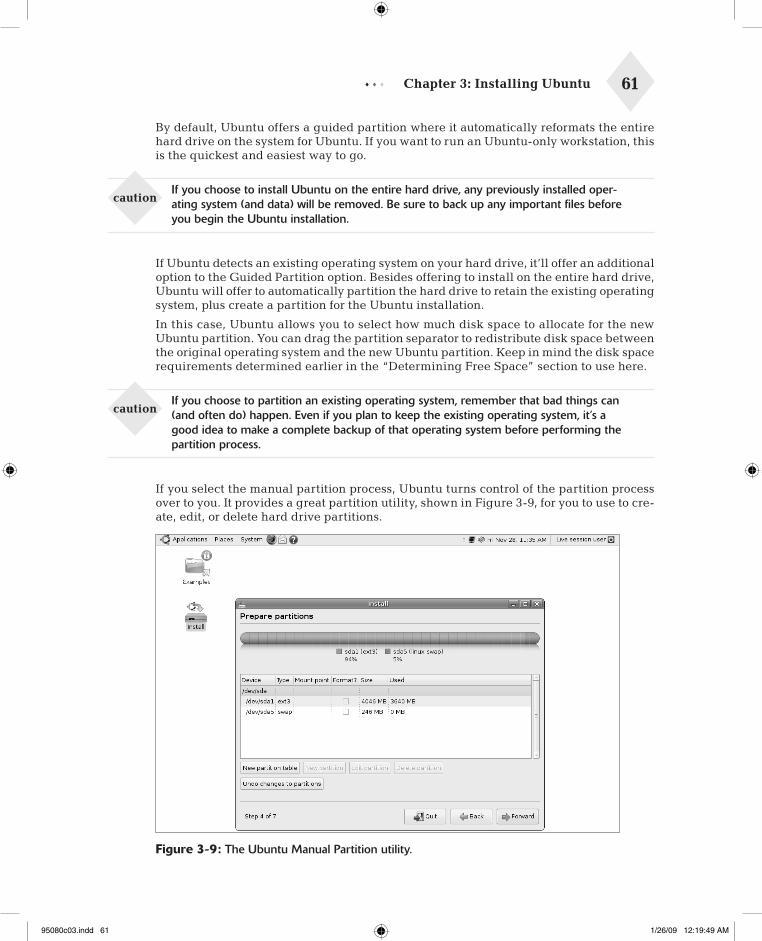
Prepare the Disk SpaceThis step in the installation is possibly the most important—and also the most complicated. Here’s where you need to tell the Ubuntu installer where to place the Ubuntu operating system on your computer. One bad move here can really ruin your day.
The exact partition window you get during the installation depends on your hard drive configuration. Figure 3-8 is an example of what this looks like.
The Ubuntu Disk Partition window starts out with at least two selections:
A guided partition to install Ubuntu on the entire hard drive♦♦
A manual partition to create your own partitions♦♦
Figure 3-8: The Ubuntu Disk Partition window.
95080c03.indd 60 1/26/09 12:19:49 AM
Chapter 3: Installing Ubuntu 61
By default, Ubuntu offers a guided partition where it automatically reformats the entire hard drive on the system for Ubuntu. If you want to run an Ubuntu-only workstation, this is the quickest and easiest way to go.
If you choose to install Ubuntu on the entire hard drive, any previously installed oper-ating system (and data) will be removed. Be sure to back up any important files before you begin the Ubuntu installation.
If Ubuntu detects an existing operating system on your hard drive, it’ll offer an additional option to the Guided Partition option. Besides offering to install on the entire hard drive, Ubuntu will offer to automatically partition the hard drive to retain the existing operating system, plus create a partition for the Ubuntu installation.
In this case, Ubuntu allows you to select how much disk space to allocate for the new Ubuntu partition. You can drag the partition separator to redistribute disk space between the original operating system and the new Ubuntu partition. Keep in mind the disk space requirements determined earlier in the “Determining Free Space” section to use here.
If you choose to partition an existing operating system, remember that bad things can (and often do) happen. Even if you plan to keep the existing operating system, it’s a good idea to make a complete backup of that operating system before performing the partition process.
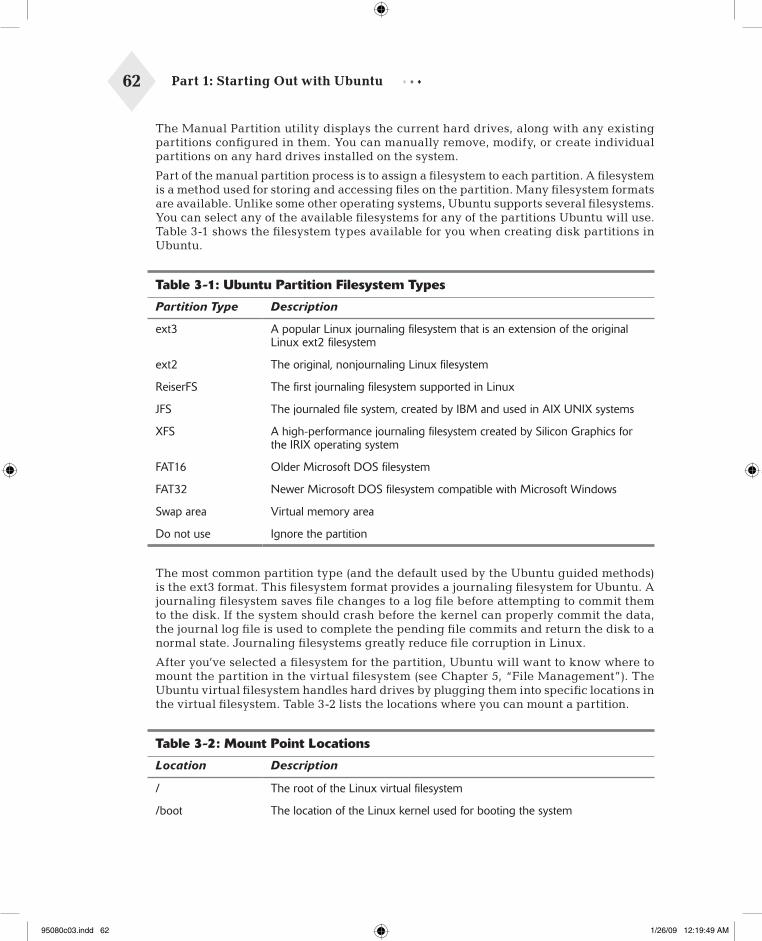
If you select the manual partition process, Ubuntu turns control of the partition process over to you. It provides a great partition utility, shown in Figure 3-9, for you to use to cre-ate, edit, or delete hard drive partitions.
Figure 3-9: The Ubuntu Manual Partition utility.
95080c03.indd 61 1/26/09 12:19:49 AM
62 Part 1: Starting Out with Ubuntu
The Manual Partition utility displays the current hard drives, along with any existing partitions configured in them. You can manually remove, modify, or create individual partitions on any hard drives installed on the system.
Part of the manual partition process is to assign a filesystem to each partition. A filesystem is a method used for storing and accessing files on the partition. Many filesystem formats are available. Unlike some other operating systems, Ubuntu supports several filesystems. You can select any of the available filesystems for any of the partitions Ubuntu will use. Table 3-1 shows the filesystem types available for you when creating disk partitions in Ubuntu.
Table 3-1: Ubuntu Partition Filesystem Types
Partition Type Description
ext3 A popular Linux journaling filesystem that is an extension of the original Linux ext2 filesystem
ext2 The original, nonjournaling Linux filesystem
ReiserFS The first journaling filesystem supported in Linux
JFS The journaled file system, created by IBM and used in AIX UNIX systems
XFS A high-performance journaling filesystem created by Silicon Graphics for the IRIX operating system
FAT16 Older Microsoft DOS filesystem
FAT32 Newer Microsoft DOS filesystem compatible with Microsoft Windows
Swap area Virtual memory area
Do not use Ignore the partition
The most common partition type (and the default used by the Ubuntu guided methods) is the ext3 format. This filesystem format provides a journaling filesystem for Ubuntu. A journaling filesystem saves file changes to a log file before attempting to commit them to the disk. If the system should crash before the kernel can properly commit the data, the journal log file is used to complete the pending file commits and return the disk to a normal state. Journaling filesystems greatly reduce file corruption in Linux.
After you’ve selected a filesystem for the partition, Ubuntu will want to know where to mount the partition in the virtual filesystem (see Chapter 5, “File Management”). The Ubuntu virtual filesystem handles hard drives by plugging them into specific locations in the virtual filesystem. Table 3-2 lists the locations where you can mount a partition.
Table 3-2: Mount Point Locations
Location Description
/ The root of the Linux virtual filesystem
/boot The location of the Linux kernel used for booting the system
95080c03.indd 62 1/26/09 12:19:49 AM

Chapter 3: Installing Ubuntu 63
Location Description
/home User directories for storing personal files and individual application setting files
/tmp Temporary files used by applications and the Linux system
/usr A common location for multi-user application files
/var The variable directory, commonly used for log files and spool files
/opt Optional package installation directory for third-party applications
/usr/local A common alternative location for optional multi-user package installations
If you create just one partition for Ubuntu, you must mount it at the root mount point (/). If you have additional partitions available, you can mount them in other locations within the virtual filesystem.
If you’re using the manual partition method, don’t forget to allocate a partition for the swap area, even if you already have lots of physical memory installed on your system. The standard rule of thumb is to create as large of a swap area as you have physical memory. Thus, if you have 2 GB of physical memory, create a 2 GB partition and assign it as the swap area.
This keeps user files separate from the operating system files. With this technique, a user who tries to store many large files won’t take up all of the disk space and crash the system. Even if the installation is just for a single-user personal workstation, this technique can prevent you from accidentally using up all the disk space and crashing your system.
Once you’ve created the partition settings (either manually or via the Ubuntu guided method) you’re ready to move on to the next step in the installation process.
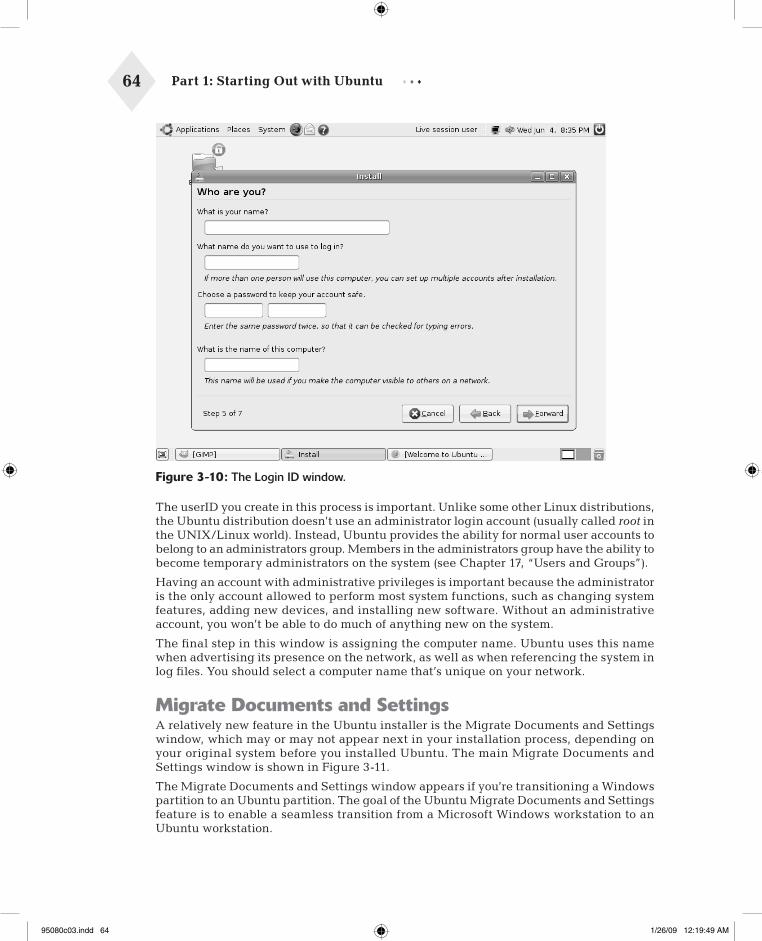
Create a Login IDUp next in the installation process is selecting a Login ID, shown in Figure 3-10.
Table 3-2: (continued)
One problem with Linux is that if the root mount point hard drive becomes full, the system will be unable to boot. To prevent this from happening, many Linux administrators create a separate partition for the /home mount point, where user files are normally stored.
95080c03.indd 63 1/26/09 12:19:49 AM
64 Part 1: Starting Out with Ubuntu
Figure 3-10: The Login ID window.
The userID you create in this process is important. Unlike some other Linux distributions, the Ubuntu distribution doesn’t use an administrator login account (usually called root in the UNIX/Linux world). Instead, Ubuntu provides the ability for normal user accounts to belong to an administrators group. Members in the administrators group have the ability to become temporary administrators on the system (see Chapter 17, “Users and Groups”).
Having an account with administrative privileges is important because the administrator is the only account allowed to perform most system functions, such as changing system features, adding new devices, and installing new software. Without an administrative account, you won’t be able to do much of anything new on the system.
The final step in this window is assigning the computer name. Ubuntu uses this name when advertising its presence on the network, as well as when referencing the system in log files. You should select a computer name that’s unique on your network.
Migrate Documents and SettingsA relatively new feature in the Ubuntu installer is the Migrate Documents and Settings window, which may or may not appear next in your installation process, depending on your original system before you installed Ubuntu. The main Migrate Documents and Settings window is shown in Figure 3-11.
The Migrate Documents and Settings window appears if you’re transitioning a Windows partition to an Ubuntu partition. The goal of the Ubuntu Migrate Documents and Settings feature is to enable a seamless transition from a Microsoft Windows workstation to an Ubuntu workstation.
95080c03.indd 64 1/26/09 12:19:49 AM

Chapter 3: Installing Ubuntu 65
Figure 3-11: The Ubuntu installer’s Migrate Documents and Settings window.
In this step the installer looks in the hard drive partitions you’re replacing for any existing Windows partitions. If it finds them, it offers to help migrate any Windows user accounts to the Ubuntu environment.
This tool looks for the Documents and Settings folder in an existing Microsoft Windows installation, then attempts to duplicate that environment in Ubuntu. If any Windows users configured, the Migrate Documents and Settings displays the individual user names, along with folders containing data for that user. The tool allows you to select which users to migrate, along with which folders to migrate. Currently, the Windows user features Ubuntu will attempt to migrate are
Internet Explorer bookmarks♦♦
Files in the My Documents folder♦♦
Files in the My Pictures folder♦♦
Files in the My Music folder♦♦
Wallpaper saved by the user♦♦
The Migrate Documents and Settings feature is an aggressive feature in Ubuntu that allows current Windows users an easy way to migrate to Ubuntu.
Although the Migrate Documents and Settings feature is useful, don’t rely on it to work properly. If you’re migrating a Windows workstation to an Ubuntu workstation, it’s always a good idea to make a copy of your important data before starting the migration process.
95080c03.indd 65 1/26/09 12:19:49 AM
66 Part 1: Starting Out with Ubuntu
Review OptionsThe final step in the installation process requires you to review and confirm all of the features you selected in the previous installation steps. You can backtrack to a previ-ous installation option window and modify your selections. Pay close attention to the disk partition settings because once you click the Install button those settings become permanent.
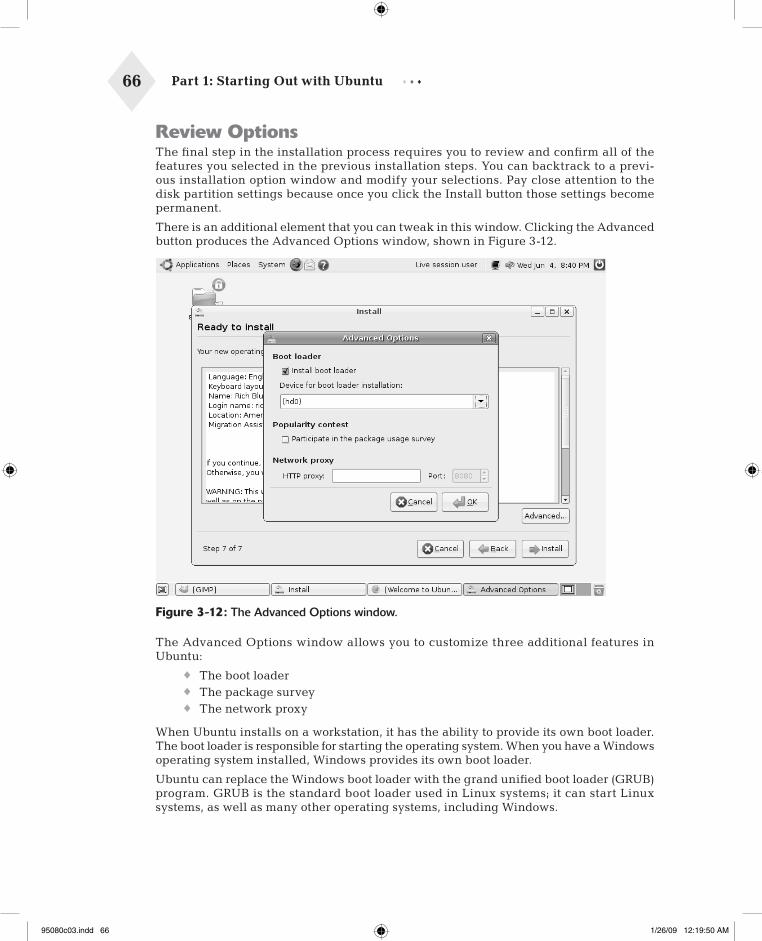
There is an additional element that you can tweak in this window. Clicking the Advanced button produces the Advanced Options window, shown in Figure 3-12.
Figure 3-12: The Advanced Options window.
The Advanced Options window allows you to customize three additional features in Ubuntu:
The boot loader♦♦
The package survey♦♦
The network proxy♦♦
When Ubuntu installs on a workstation, it has the ability to provide its own boot loader. The boot loader is responsible for starting the operating system. When you have a Windows operating system installed, Windows provides its own boot loader.
Ubuntu can replace the Windows boot loader with the grand unified boot loader (GRUB) program. GRUB is the standard boot loader used in Linux systems; it can start Linux systems, as well as many other operating systems, including Windows.
95080c03.indd 66 1/26/09 12:19:50 AM
Chapter 3: Installing Ubuntu 67
GRUB can be loaded in either the master boot record (MBR) of the first hard drive (called hd0 in Ubuntu) or, in a multiple hard drive system, it can reside on the hard drive that contains the Linux partition.
The Advanced Options window allows you to configure this feature. By default, Ubuntu enables GRUB and installs it in the MBR of the first hard drive.
The second step in the Advanced Options window is a package usage survey. The pack-age usage survey retrieves some nonpersonal information about your setup (such as the CPU type, amount of memory, amount of hard drive space, and installation method you used) and sends it to a central repository for statistical purposes. You can view the cur-rent package usage survey results by going to the web site http://popcon.ubuntu.com, where several different tables and graphs show current survey totals.
The final step in the Advanced Options window is to set a network proxy server. Some local networks (especially those in businesses) must filter any outgoing network traffic to restrict what web sites employees can access. This is done using a network proxy.
The firewall blocks all normal HTTP access from the network, but the network proxy can receive HTTP requests, then block the unacceptable ones and forward the allowed ones. This capability gives a company total control over what its employees can and can’t access on the Internet from the corporate network.
If your Ubuntu workstation is on a network that uses a network proxy, you must configure that feature for your Internet access to work properly.
When you’ve finished setting any advanced options, you’re ready to start the installation. After starting the installation there’s nothing more for you to do other than sit back and watch things happen. The Ubuntu installer takes over, creating the disk partitions you specified and installing the entire Ubuntu operating system.
Installing from the Alternate Install CDIf your workstation can’t run the LiveCD, you can possibly install Ubuntu using the alter-nate install CD. The alternate install CD performs a text-based installation of the Ubuntu system instead of the GUI-oriented LiveCD install. This installation requires less memory and a less advanced video card.
If you use the alternate install CD, you can still install the Ubuntu GUI desktop environ-ment. Often you can run the Ubuntu GUI desktop just fine after installing the applications and customizing the graphics for your specific video environment.
You may also notice that you can uncheck the check box for installing the boot loader. This option won’t install any boot loader and will just create the partitions and install Ubuntu. Use this feature if you already have Linux installed in another partition and want to add an Ubuntu partition. You can then manually configure the existing GRUB boot menu to include the new Ubuntu partition.
The GRUB boot menu is stored in the /boot/grub/menu.lst file.
95080c03.indd 67 1/26/09 12:19:50 AM
68 Part 1: Starting Out with Ubuntu
For the most part, the alternate install CD requests the same information for the instal-lation as the LiveCD, but it uses text-oriented menus instead of graphical GUI menus. You’ll be prompted to select the installation language, the time zone, the keyboard type (the alternate install CD can even autodetect most standard types of keyboards), and the default userID and host name information.
The alternate install CD provides something that’s not available in the LiveCD, and that feature appears in the disk partitioning section. Linux systems can use a feature called logical volume management (LVM), which allows you to create dynamic partitions on your system. You can add and remove disk space from LVM partitions at any time, providing a flexible way to allocate disk space on your system.
The follow sections describe how to use LVM in both the guided and manual partition methods when using the alternate install CD.
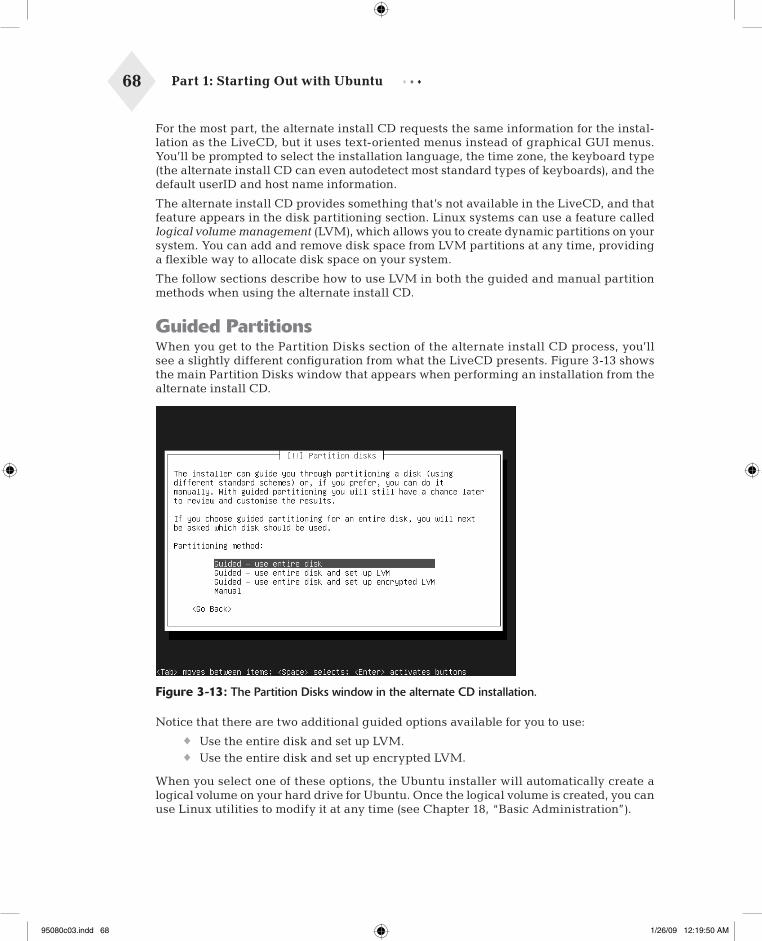
Guided PartitionsWhen you get to the Partition Disks section of the alternate install CD process, you’ll see a slightly different configuration from what the LiveCD presents. Figure 3-13 shows the main Partition Disks window that appears when performing an installation from the alternate install CD.
Figure 3-13: The Partition Disks window in the alternate CD installation.
Notice that there are two additional guided options available for you to use:
Use the entire disk and set up LVM.♦♦
Use the entire disk and set up encrypted LVM.♦♦
When you select one of these options, the Ubuntu installer will automatically create a logical volume on your hard drive for Ubuntu. Once the logical volume is created, you can use Linux utilities to modify it at any time (see Chapter 18, “Basic Administration”).
95080c03.indd 68 1/26/09 12:19:50 AM
Chapter 3: Installing Ubuntu 69
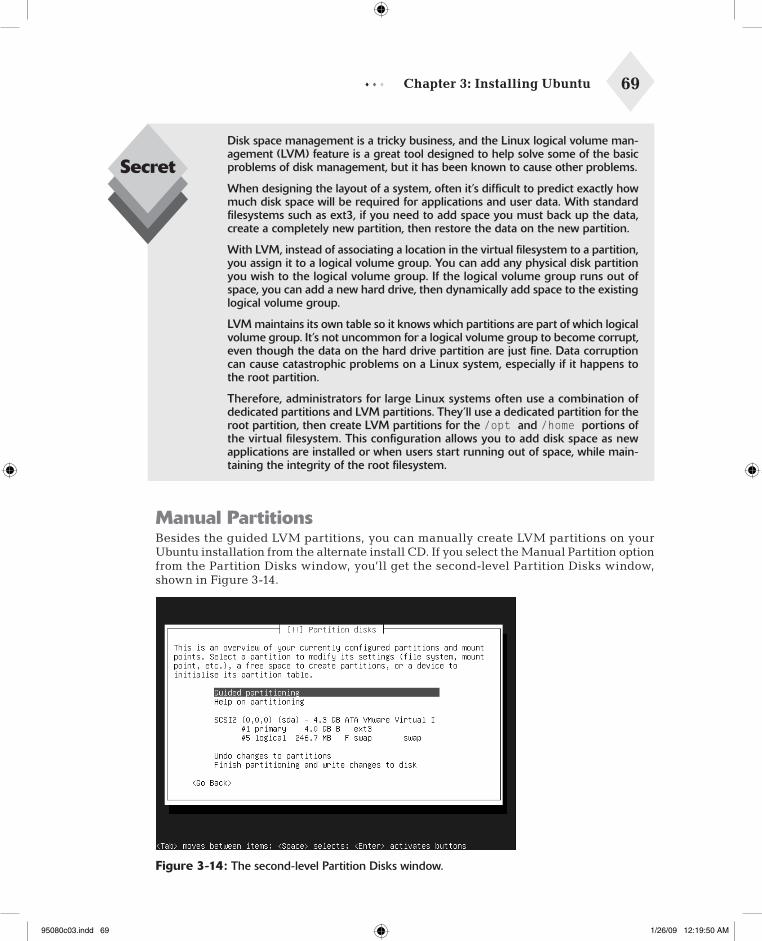
Manual PartitionsBesides the guided LVM partitions, you can manually create LVM partitions on your Ubuntu installation from the alternate install CD. If you select the Manual Partition option from the Partition Disks window, you’ll get the second-level Partition Disks window, shown in Figure 3-14.
Figure 3-14: The second-level Partition Disks window.
Disk space management is a tricky business, and the Linux logical volume man-agement (LVM) feature is a great tool designed to help solve some of the basic problems of disk management, but it has been known to cause other problems.
When designing the layout of a system, often it’s difficult to predict exactly how much disk space will be required for applications and user data. With standard filesystems such as ext3, if you need to add space you must back up the data, create a completely new partition, then restore the data on the new partition.
With LVM, instead of associating a location in the virtual filesystem to a partition, you assign it to a logical volume group. You can add any physical disk partition you wish to the logical volume group. If the logical volume group runs out of space, you can add a new hard drive, then dynamically add space to the existing logical volume group.
LVM maintains its own table so it knows which partitions are part of which logical volume group. It’s not uncommon for a logical volume group to become corrupt, even though the data on the hard drive partition are just fine. Data corruption can cause catastrophic problems on a Linux system, especially if it happens to the root partition.
Therefore, administrators for large Linux systems often use a combination of dedicated partitions and LVM partitions. They’ll use a dedicated partition for the root partition, then create LVM partitions for the /opt and /home portions of the virtual filesystem. This configuration allows you to add disk space as new applications are installed or when users start running out of space, while main-taining the integrity of the root filesystem.
95080c03.indd 69 1/26/09 12:19:50 AM
70 Part 1: Starting Out with Ubuntu
In this window you can manually select a partition to modify or delete, or you can add a new partition. The first entry shows the actual hard drive device detected. The indented entries under that show the free space on that hard drive, plus any existing partitions on that hard drive, and their information.
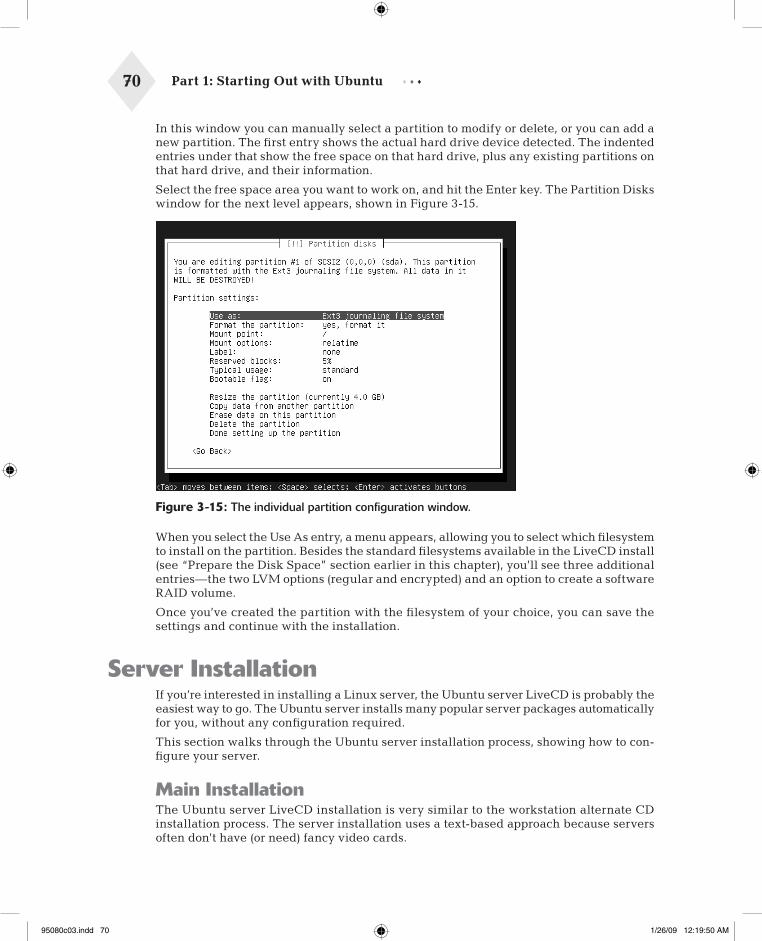
Select the free space area you want to work on, and hit the Enter key. The Partition Disks window for the next level appears, shown in Figure 3-15.
Figure 3-15: The individual partition configuration window.
When you select the Use As entry, a menu appears, allowing you to select which filesystem to install on the partition. Besides the standard filesystems available in the LiveCD install (see “Prepare the Disk Space” section earlier in this chapter), you’ll see three additional entries—the two LVM options (regular and encrypted) and an option to create a software RAID volume.
Once you’ve created the partition with the filesystem of your choice, you can save the settings and continue with the installation.
Server InstallationIf you’re interested in installing a Linux server, the Ubuntu server LiveCD is probably the easiest way to go. The Ubuntu server installs many popular server packages automatically for you, without any configuration required.
This section walks through the Ubuntu server installation process, showing how to con-figure your server.
Main InstallationThe Ubuntu server LiveCD installation is very similar to the workstation alternate CD installation process. The server installation uses a text-based approach because servers often don’t have (or need) fancy video cards.
95080c03.indd 70 1/26/09 12:19:50 AM
Chapter 3: Installing Ubuntu 71
The first few steps in the Ubuntu server installation are the same as the alternate CD installation. You’ll be asked to select a language, then the Ubuntu installer will ask whether you want it to detect your keyboard. Selecting the Yes option initiates a series of questions about special keys on your keyboard. After the dust settles, Ubuntu will show the recommended keyboard setting. If you don’t think the keyboard selection is correct, you can start over.
The next step in the process is the network configuration. Because you’re installing a server, Ubuntu assumes that the server will need to be connected to a network. Ubuntu first attempts to acquire an IP address for your network using the dynamic host configu-ration protocol (DHCP).
This method requires a server on the network that’s responsible for assigning and main-taining IP addresses for the network. Many routers provide this feature.
The Ubuntu server installation also allows you to partition the hard disk for the server. The installer provides four guided methods for partitioning the hard disk:
Using the existing hard drive partitions♦♦
Using the entire hard disk♦♦
Using a logical volume manager (LVM) to allow you to easily add more disk to ♦♦
the same logical volumes later onUsing an encrypted LVM system to safeguard your server data♦♦
Besides these four guided methods you can create the hard disk partitions manually. Once you have set up your hard disk environment, you can select which server programs the installer should install for you.
Server ProgramsThe most important part of the Ubuntu server installation process is determining which server programs you need to run on your server. Table 3-3 shows the server packages that you can automatically install from the server installation process.
The problem with acquiring an IP address using DHCP is that you’re not guar-anteed to keep the same IP address. For workstations, that is no big deal, but for a server, it can be a huge problem because clients need a consistent, reliable way to reach the server.
There are two ways to solve this problem. Most DHCP servers (even routers that perform DHCP server functions) allow you to dedicate an IP address to a specific host. If your DHCP server provides this feature, find the MAC address of your Ubuntu server system and add it to the DHCP server for a static IP address assignment.
The other method is to keep the Ubuntu server off your network during this part of the installation process. If the DHCP query fails, the Ubuntu installation program will query you for specific IP address information.
95080c03.indd 71 1/26/09 12:19:50 AM
72 Part 1: Starting Out with Ubuntu
Table 3-3: The Ubuntu Server Packages
Package Description
DNS server The BIND domain name server package
LAMP server The Linux Apache web server with PHP programming language support and the MySQL database server
Tomcat The Apache Java servlet application web server
Mail server The Postfix email server
OpenSSH server Provides secure socket shell (SSH) access to the server
PostgreSQL server The PostgreSQL open-source database server
Print server The common UNIX print server (CUPS)
Samba file server Provides file sharing services for Windows networks
Each of these server packages is discussed in more detail later in this book. The following sections provide a brief overview of each of the servers to give you an idea what they’re used for.
The DNS ServerThe Berkeley Internet Name Domain (BIND) package is a popular server that provides domain name service (DNS) for networks. Every network on the Internet must have a domain name server. Many networks employ the services of an Internet service provider (ISP) to handle the DNS server for their network. However, you can use the Ubuntu server software to run your own DNS server. See Chapter 20, “DNS Server,” for details on how to set up and install a DNS server on your network.
The LAMP ServerThe Linux-Apache-MySQL-PHP (LAMP) server is a popular web programming envi-ronment. Many sites use LAMP technology to support online stores, blogs, and content management systems (CMS). A LAMP server environment is often difficult to configure, due to the multitude of packages that need to be synchronized. The Ubuntu server takes all of the hassle out of installing a LAMP server by preconfiguring all of the individual components to operate properly.
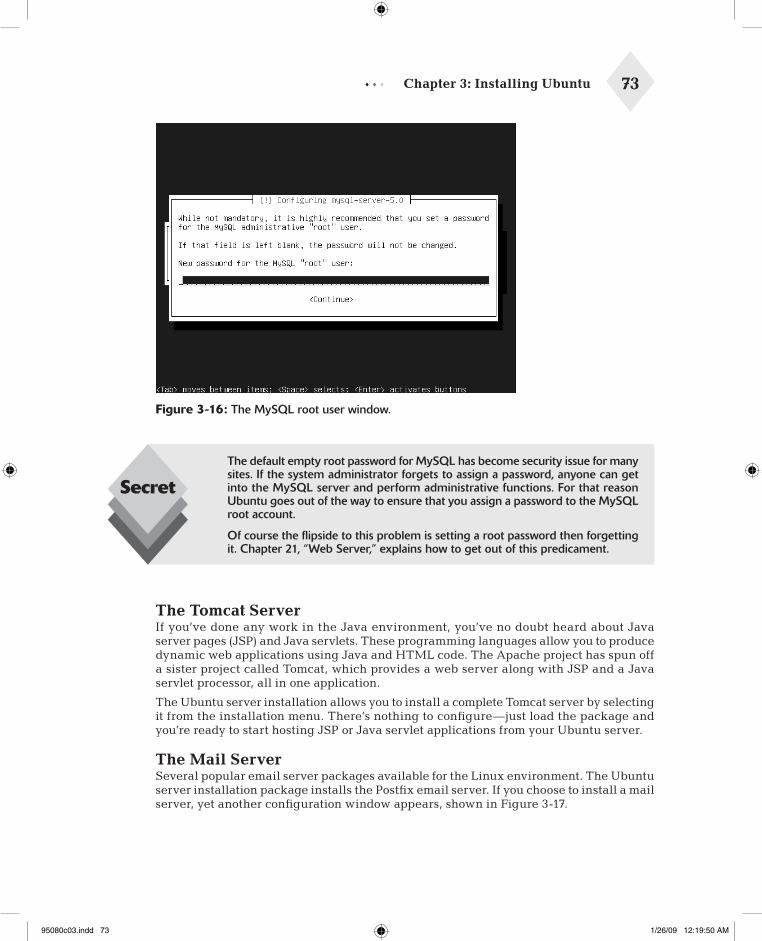
If you install the LAMP server, the installation process displays an additional query window, shown in Figure 3-16.
The MySQL server uses user accounts to access databases contained within the server. The main administrative user account is the root user. By default this user account doesn’t have a password, which could be a dangerous thing, especially if your Ubuntu server is on an open network.
You can select a password for the root MySQL user account from this window.
95080c03.indd 72 1/26/09 12:19:50 AM
Chapter 3: Installing Ubuntu 73
Figure 3-16: The MySQL root user window.
The Tomcat ServerIf you’ve done any work in the Java environment, you’ve no doubt heard about Java server pages (JSP) and Java servlets. These programming languages allow you to produce dynamic web applications using Java and HTML code. The Apache project has spun off a sister project called Tomcat, which provides a web server along with JSP and a Java servlet processor, all in one application.
The Ubuntu server installation allows you to install a complete Tomcat server by selecting it from the installation menu. There’s nothing to configure—just load the package and you’re ready to start hosting JSP or Java servlet applications from your Ubuntu server.
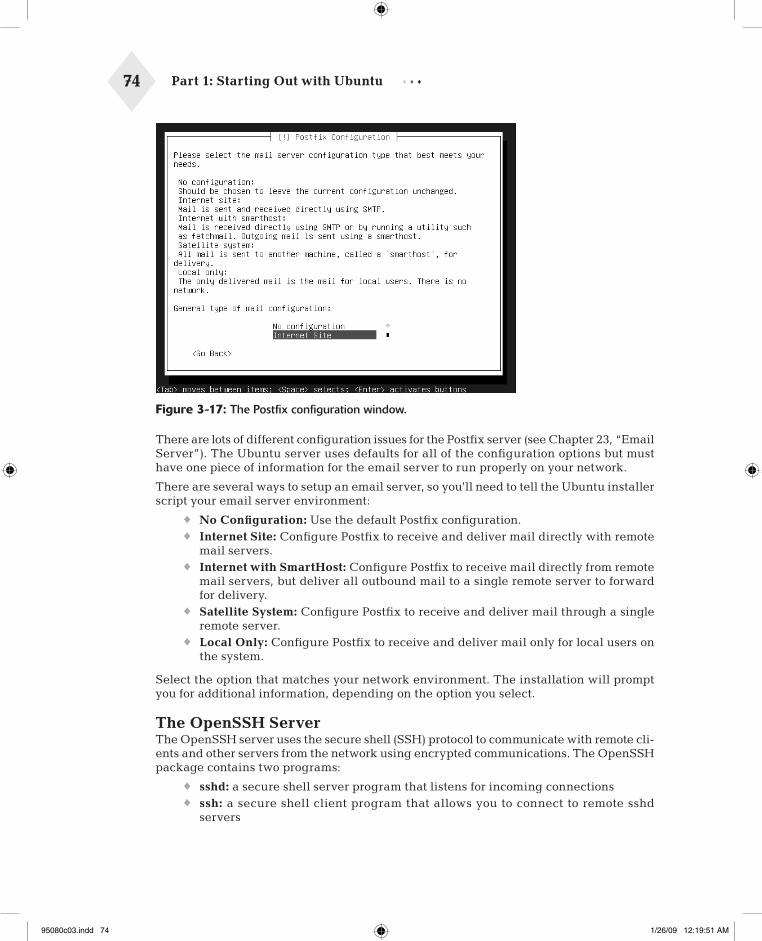
The Mail ServerSeveral popular email server packages available for the Linux environment. The Ubuntu server installation package installs the Postfix email server. If you choose to install a mail server, yet another configuration window appears, shown in Figure 3-17.
The default empty root password for MySQL has become security issue for many sites. If the system administrator forgets to assign a password, anyone can get into the MySQL server and perform administrative functions. For that reason Ubuntu goes out of the way to ensure that you assign a password to the MySQL root account.
Of course the flipside to this problem is setting a root password then forgetting it. Chapter 21, “Web Server,” explains how to get out of this predicament.
95080c03.indd 73 1/26/09 12:19:50 AM
74 Part 1: Starting Out with Ubuntu
Figure 3-17: The Postfix configuration window.
There are lots of different configuration issues for the Postfix server (see Chapter 23, “Email Server”). The Ubuntu server uses defaults for all of the configuration options but must have one piece of information for the email server to run properly on your network.
There are several ways to setup an email server, so you’ll need to tell the Ubuntu installer script your email server environment:
No Configuration:♦♦ Use the default Postfix configuration.Internet Site:♦♦ Configure Postfix to receive and deliver mail directly with remote mail servers.Internet with SmartHost:♦♦ Configure Postfix to receive mail directly from remote mail servers, but deliver all outbound mail to a single remote server to forward for delivery.Satellite System:♦♦ Configure Postfix to receive and deliver mail through a single remote server.Local Only:♦♦ Configure Postfix to receive and deliver mail only for local users on the system.
Select the option that matches your network environment. The installation will prompt you for additional information, depending on the option you select.
The OpenSSH ServerThe OpenSSH server uses the secure shell (SSH) protocol to communicate with remote cli-ents and other servers from the network using encrypted communications. The OpenSSH package contains two programs:
sshd:♦♦ a secure shell server program that listens for incoming connectionsssh:♦♦ a secure shell client program that allows you to connect to remote sshd servers
95080c03.indd 74 1/26/09 12:19:51 AM
Chapter 3: Installing Ubuntu 75
The OpenSSH environment uses a command line interface (see Chapter 19, “The Ubuntu Command Line”) where you can submit Linux commands to the remote server and view the responses.
The PostgreSQL ServerAlthough the LAMP server uses the popular MySQL Open Source database, the Ubuntu server also supports another popular open source database, PostgreSQL. The PostgreSQL server is often considered more powerful than MySQL in high-volume environments, and it contains some features found in expensive commercial database servers. You can install the LAMP server and the PostgreSQL server to provide both database server environ-ments on your server.
The PostgreSQL server is discussed in more detail in Chapter 24, “Database Server.”
The Print ServerThe Ubuntu print server package uses the common UNIX print server (CUPS) to advertise any connected printers on the network. This feature provides a great way to share printers among other UNIX systems on the network. See Chapter 22, “Samba and Print Servers,” for details on how to set up a CUPS server using the Ubuntu server.
The Samba File ServerThe Samba file server is a powerful package that allows the Ubuntu server to interact on a Microsoft Windows network. It provides shared folders and shared printers for Windows workstations and other Windows servers. The Samba software turns your Ubuntu server into a full-featured Windows server, even allowing it to join a Windows domain.
Not only does the Samba software provide Windows server features, but it also provides a client mode. In the Samba client mode you can connect to remote Windows server shares and retrieve files, or print to remote Windows network printers. Chapter 22 provides details on how to configure and use your Samba software.
Upgrading UbuntuIf you already have a version of Ubuntu running on your system, Ubuntu allows you to upgrade to a new version fairly painlessly. There are three methods of performing upgrades to Ubuntu systems:
A sequential upgrade from one version to the next♦♦
A long-term support (LTS) upgrade from one LTS version to the next LTS ♦♦
versionA clean upgrade of any version to a new version♦♦
A sequential upgrade allows you to upgrade to the next available Ubuntu version. For example, you can directly upgrade version 7.10 to 8.04, 8.04 to 8.10, and 8.10 to 9.04.
Ubuntu also provides special versions called long-term support (LTS). Ubuntu supports these versions with security patches and software updates for up to 3 years. The LTS versions come out at odd intervals between regular Ubuntu version releases, so they aren’t directly connected to the latest available version. However, you can directly upgrade one LTS ver-sion to the next LTS version. Thus, you can directly upgrade 6.06 LTS to 8.04 LTS.
95080c03.indd 75 1/26/09 12:19:51 AM
76 Part 1: Starting Out with Ubuntu
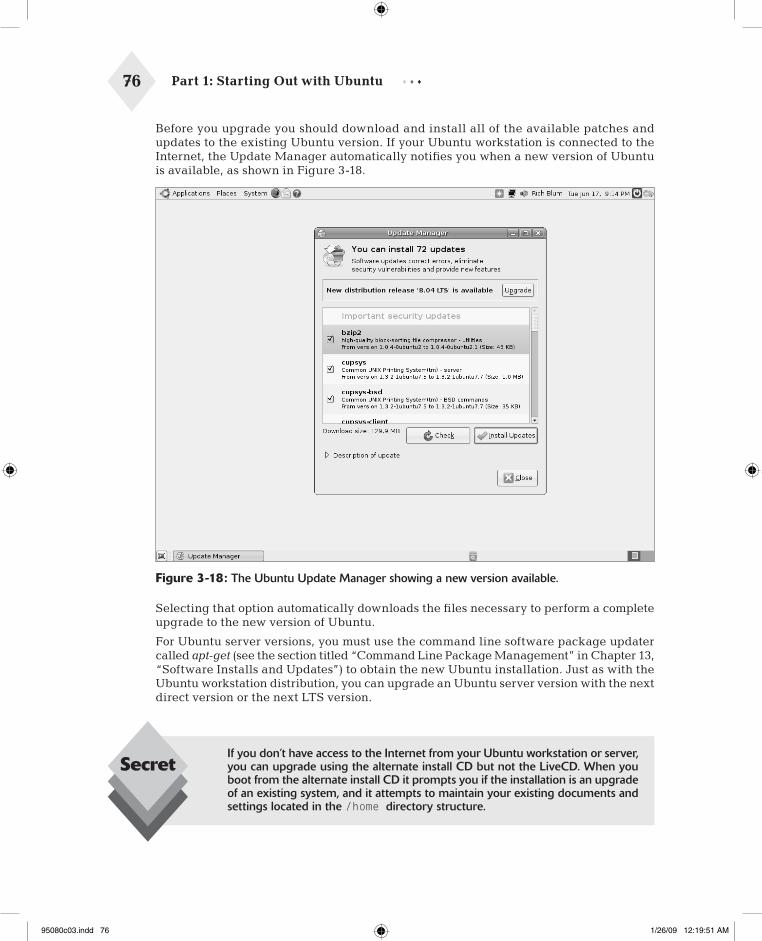
Before you upgrade you should download and install all of the available patches and updates to the existing Ubuntu version. If your Ubuntu workstation is connected to the Internet, the Update Manager automatically notifies you when a new version of Ubuntu is available, as shown in Figure 3-18.
Figure 3-18: The Ubuntu Update Manager showing a new version available.
Selecting that option automatically downloads the files necessary to perform a complete upgrade to the new version of Ubuntu.
For Ubuntu server versions, you must use the command line software package updater called apt-get (see the section titled “Command Line Package Management” in Chapter 13, “Software Installs and Updates”) to obtain the new Ubuntu installation. Just as with the Ubuntu workstation distribution, you can upgrade an Ubuntu server version with the next direct version or the next LTS version.
If you don’t have access to the Internet from your Ubuntu workstation or server, you can upgrade using the alternate install CD but not the LiveCD. When you boot from the alternate install CD it prompts you if the installation is an upgrade of an existing system, and it attempts to maintain your existing documents and settings located in the /home directory structure.
95080c03.indd 76 1/26/09 12:19:51 AM
Chapter 3: Installing Ubuntu 77
SummaryThis chapter walked through the processes required to install Ubuntu on your worksta-tion or server system. The main way to install an Ubuntu workstation or server is via the LiveCD.
Before trying to install Ubuntu, you should take an inventory of the hardware devices installed on your PC so you can be prepared for any installation problems. If you intend to keep an existing operating system on your PC, you’ll need to determine how you’ll install Ubuntu. If you plan on partitioning a single hard drive, you’ll need to defragment the Windows partition before running the Ubuntu installation. You’ll also need to determine how much disk space you can allocate for the Ubuntu installation.
The LiveCD guides you through all of the requirements for setting up the Ubuntu soft-ware. As part of the installation process, it’ll examine the installed hard drives and offer to automatically guide you through the necessary setup. You can choose to allow Ubuntu to use the entire hard drive, partition an existing hard drive for a new Ubuntu partition, or use a second hard drive for Ubuntu.
Besides the guided partition you can manually alter the partitions on your PC during the installation. If you decide to manually create and edit partitions, don’t forget to create a swap area at least the same size as the amount of physical memory in the PC.
The Ubuntu workstation distribution also provides an alternate install CD, which performs the same installation process as the LiveCD install (plus a few additional features) in a text-oriented environment. You can use the alternate install CD to setup logical volume management (LVM) partitions, which allow you to freely add and remove disk space from partitions.
The Ubuntu server installation is a text-oriented installation that provides installation options to install several preconfigured software packages, including a DNS server, an email server, a LAMP server, a print server, and a Samba server.
The next chapter looks at the Ubuntu desktop. It describes the individual features of the desktop and provides in-depth information about how to configure your desktop just the way you want it.
95080c03.indd 77 1/26/09 12:19:51 AM

95080c03.indd 78 1/26/09 12:19:51 AM