Embed Size (px)
Citation preview

Microsoft Word 2010 - Level 2
© Watsonia Publishing Page 49 Lists
CHAPTER 6 LISTS
A list in Microsoft Word is a series of items preceded by a bullet or number. You can apply bullets or numbers to a list, as well as modify the bullet type or numbering format to suit the requirements of the document.
In this session you will:
gain an understanding of lists
learn how to apply bullets to a list or selection
learn how to modify a bullet definition
learn how to modify a bullet
learn how to apply numbering to a list
learn how to define a number format
learn how to renumber a list
gain an understanding of multilevel lists
learn how to apply a multilevel list
learn how to promote and demote list items
learn how to define a new multilevel list
learn how to define a multilevel list style
learn how to modify a multilevel list style.
INFOCUS
WPL_W809

Microsoft Word 2010 - Level 2
© Watsonia Publishing Page 50 Lists
UNDERSTANDING LISTS
There are three types of lists that you can create in Microsoft Word: bulleted, numbered and multilevel. Items in a bulleted list are preceded by a bullet ● or other symbol. Items in numbered
lists are preceded by a number or letter. Multilevel lists are hierarchical and items may be preceded by a symbol, number or letter. This page discusses the differences between them.
Bulleted Lists
Bulleted lists are used for items that have no particular priority, such as a list of features or facts. They have only one level and each item is preceded by a bullet or other symbol. Examples include:
A filled round circle, known as a bullet
o An open circle
A fancy icon
Or any other symbol that takes your fancy
Ideally the bullet you choose will reflect the tone and purpose of the communication, and will conform to company standards and requirements.
Numbered Lists
Numbered lists are used for items that have a sequence or priority, such as a series of instructions. They can also be used for identification, so that the item can be referred to easily. Examples of numbering systems used in numbered lists include:
The Arabic numbering system 1, 2, 3...
Roman numerals, either capitals I, II, III or lowercase i, ii, iii...
Alphabetic, either capitals A, B, C or lowercase a, b, c...
Each of the numbers may or may not be accompanied by a symbol such as a period (.) or a bracket, and the numbering system you choose will affect the alignment of the numbers and text.
Multilevel Lists
Multilevel lists are used where there is a sequence and when you want each paragraph numbered separately. This is especially useful for documents with a formal structure such as policies and exam papers. Multilevel lists can use all numbers, all bullets or a mixture of both. They have a hierarchy, so the symbol or number that is used for a particular paragraph will depend on how far in the paragraph is indented. The alignment of the number or bullet and the corresponding text will depend on the settings that are defined for the list style. The position of the First Line Indent Marker controls the position of the number or bullet, and the position of the Hanging Indent Marker controls the position of the text.

Microsoft Word 2010 - Level 2
© Watsonia Publishing Page 51 Lists
APPLYING BULLETS
Try This Yourself:
Op
en
Fil
e Before starting this exercise
you MUST open the file W809 Lists_1.docx...
Select the list items as shown
Click on the drop arrow for
Bullets to display the
Bullet Library
This shows you that None is currently selected and that there are seven standard bullets to choose from...
Point to different bullets to see them applied temporarily to the list in Live Preview
Click on the tick symbol to apply it as a bullet
You will notice that the paragraph spacing between each point is also reduced…
Click on the drop arrow for
Bullets again
This time it shows you which bullets you have applied recently and which bullets are used in the document...
Click on the drop arrow for
Bullets to close the
library
Click outside the text to deselect it and save the document
For Your Reference…
To apply bullets using the Bullet Library:
1. Select the list
2. Click on the drop arrow for Bullets
3. Click on the symbol of your choice
Handy to Know…
Make sure that the bullet style you choose is appropriate to the purpose and tone of your communication. If you select a bullet that is too fancy, casual or humorous, for example, you risk distracting the reader or sending the wrong message.
1
2
When you apply bullets to a list or selection, the default bullet that Word applies is a filled circle ●. Word also provides a library of other symbols— including picture fonts and images— that you can
also apply as bullets. Some of the more common symbols are displayed in the Bullet Library, and you click on a symbol to apply that bullet style to your selection.
4

Microsoft Word 2010 - Level 2
© Watsonia Publishing Page 52 Lists
DEFINING A BULLET
Try This Yourself:
Sa
me
Fil
e Continue using the previous
file with this exercise, or open the file W809 Lists_2.docx...
Select the bulleted list
Let’s define a new bullet and apply it at the same time...
Click on the drop arrow for
Bullets and select
Define New Bullet to display the Define New Bullet dialog box
Click on [Symbol] to display the Symbol dialog box
The current symbol, a tick , is shown selected...
Click on the five pointed star in the top row
Notice that you are selecting a symbol from the Wingdings font, which is dedicated to special characters like these...
Click on [OK] to accept the symbol and then click on [OK] to apply it to the bulleted list
The ticks will be replaced by stars – giving you a true five star rating...
Click outside the list to deselect it
Save the document
For Your Reference…
To define a bullet:
1. Click on the drop arrow for Bullets and
select Define New Bullet
2. Click on [Symbol]
3. Click on a new symbol
4. Click on [OK] and click on [OK]
Handy to Know…
If you click on [Picture] in the Define New Bullet dialog box, you can select from a range of image bullets.
You can add a bullet to the Bullet Library.
Click on the drop arrow for Bullets ,
right-click on the bullet under Document Bullets and select Add to Library.
2
3
If you find that none of the bullets in the Bullet Library are suitable for your document, you can define a new bullet. The new bullet is then added to the Bullet Library and becomes
available to all documents. You can specify a symbol or a picture and change the font settings of the symbol you select.
5
Microsoft Word 2010 - Level 2
© Watsonia Publishing Page 53 Lists
MODIFYING A BULLET
Try This Yourself:
Sa
me
Fil
e Continue using the previous file
with this exercise, or open the file W809 Lists_3.docx...
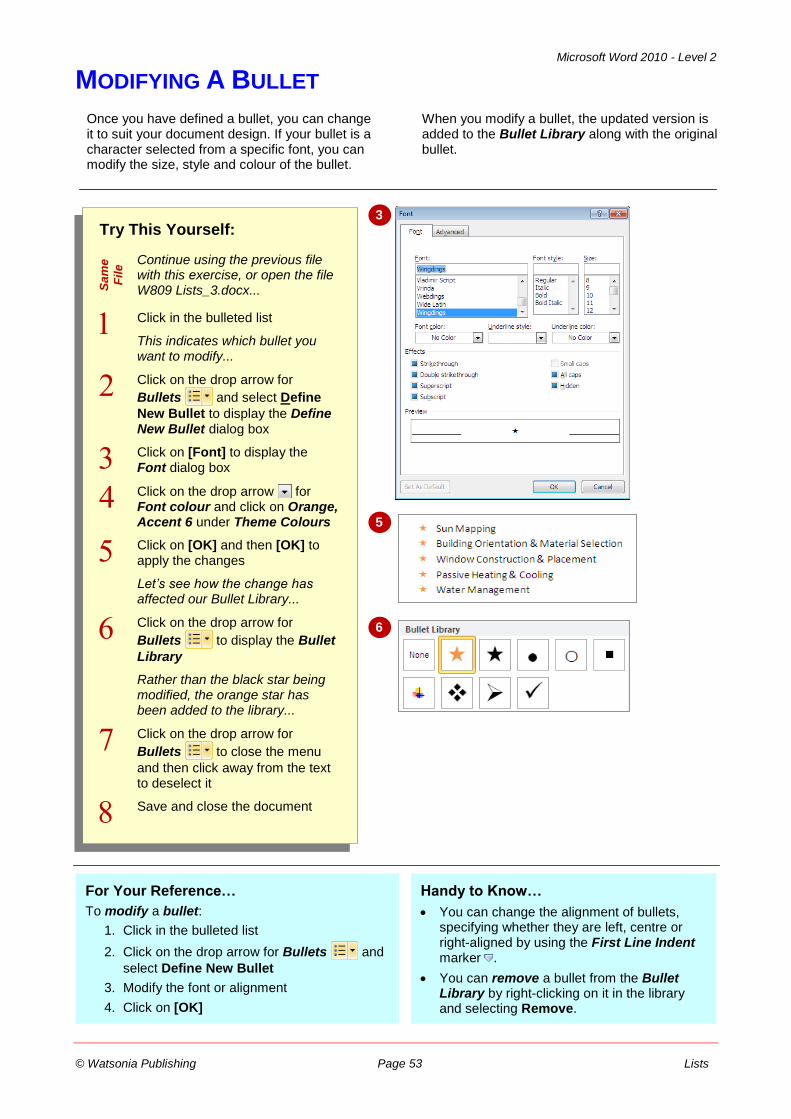
Click in the bulleted list
This indicates which bullet you want to modify...
Click on the drop arrow for
Bullets and select Define
New Bullet to display the Define New Bullet dialog box
Click on [Font] to display the Font dialog box
Click on the drop arrow for Font colour and click on Orange, Accent 6 under Theme Colours
Click on [OK] and then [OK] to apply the changes
Let’s see how the change has affected our Bullet Library...
Click on the drop arrow for
Bullets to display the Bullet
Library
Rather than the black star being modified, the orange star has been added to the library...
Click on the drop arrow for
Bullets to close the menu
and then click away from the text to deselect it
Save and close the document
For Your Reference…
To modify a bullet:
1. Click in the bulleted list
2. Click on the drop arrow for Bullets and
select Define New Bullet
3. Modify the font or alignment
4. Click on [OK]
Handy to Know…
You can change the alignment of bullets, specifying whether they are left, centre or right-aligned by using the First Line Indent marker .
You can remove a bullet from the Bullet Library by right-clicking on it in the library and selecting Remove.
3
5
Once you have defined a bullet, you can change it to suit your document design. If your bullet is a character selected from a specific font, you can modify the size, style and colour of the bullet.
When you modify a bullet, the updated version is added to the Bullet Library along with the original bullet.
6

Microsoft Word 2010 - Level 2
© Watsonia Publishing Page 54 Lists
APPLYING NUMBERING
Try This Yourself:
Op
en
Fil
e Before starting this exercise
you MUST open the file W809 Lists_4.docx...
Select the four lines of text as shown
Click on the drop arrow for
Numbering to display
the Numbering Library
Point to the options in the Numbering Library to test drive different options in Live Preview
The list will change as you point to different formats and the spacing between the lines will reduce...
Click on 1) 2) 3) to apply this format
Click away from the text to deselect it
With numbering it is clearly a sequential process
Save the document
For Your Reference…
To apply numbering:
1. Select the text
2. Click on the drop arrow for Numbering
3. Click on the numbering format of your choice
Handy to Know…
If you have several numbered lists in a longer document, make sure that you use the same format consistently unless there is a good reason to change it. If different lists in the same document use different formats, it may confuse your reader.
1
2
When you first apply numbers to a list from the Numbering Library, the default numbering format is Arabic numerals followed by a period, i.e. 1. 2., and so on. Word provides a range of
other numbering formats that you can apply to your lists or headings. A range of standard formats are
displayed in the Numbering Library.
5

Microsoft Word 2010 - Level 2
© Watsonia Publishing Page 55 Lists
DEFINING A NUMBER FORMAT
Try This Yourself:
Sa
me
Fil
e Continue using the previous file
with this exercise, or open the file W809 Lists_5.docx...
Select the numbered list
You can apply the new number format at the same time as defining it...
Click on the drop arrow for
Numbering and select
Define New Number Format to display the Define New Number Format dialog box
Click just after the parentheses for
Number format and press to
delete the parentheses
Click on the drop arrow for Alignment and select Right
This pushes the numbers out to the left of the first line indent marker, as shown in the Preview...
Click on [Font] to display the Font dialog box
Select Bold for Font Style and select 12 for Size, then click on the drop arrow for Font Colour and select Dark Blue, Text 2
Click on [OK] to return to the Define New Number Format dialog box and then click on [OK] to apply the formatting
Click away from the text to deselect it and save the document
For Your Reference…
To define a number format:
1. Click on the drop arrow for Numbering
2. Select Define New Number Format
3. Change the number style, format, font attributes and alignment as required
4. Click on [OK]
Handy to Know…
To modify a number format, click in the text that contains the number format you want to change, click on the drop arrow for
Numbering and select Define New
Number Format. Make changes as required
and then click on [OK].
2
6
If none of the standard numbering systems in the Numbering Library suit your document, or you want to create your own numbering format, you can define a number format. The new number
format will be added to the Numbering Library and becomes available to all documents. You can specify the numbering style, format and alignment, as well as the font attributes.
8

Microsoft Word 2010 - Level 2
© Watsonia Publishing Page 56 Lists
RENUMBERING A LIST
Try This Yourself:
Sa
me
Fil
e Continue using the previous file
with this exercise, or open the file W809 Lists_7.docx...
Click after the colon immediately before the list and press
Type Used Air
Click at the end of the second point and press twice
When you press once,
Word assumes you want to continue the numbered list;
pressing again tells Word to
discontinue the list and return to normal text…
Type Fresh Air
Now let’s reset the numbering of the second list…
Click at the start of the third point then click on the drop arrow for
Numbering and select Set
Numbering Value to display the Set Numbering Value dialog box
Click on the down arrow for Set value to until it reads 1
Click on [OK]
The numbering of the second list is now reset…
Save and close the document
For Your Reference…
To renumber a list:
1. Click in the text
2. Click on the drop arrow for Numbering
3. Select Set Numbering Value
4. Adjust the Set value to figure
5. Click on [OK]
Handy to Know…
If you select Continue from previous list Word will examine the numbering of the previous list in the document, and then start the numbering in the current list using the next number or letter in the sequence.
2
7
There may be times when you want to renumber values in a list, such as when you want the numbering to begin at 3, for example, or you want to continue the numbering sequence from a
previous list in the document. This might come in handy if you split a list and want both lists to start at 1, for example.
6
5

Microsoft Word 2010 - Level 2
© Watsonia Publishing Page 57 Lists
UNDERSTANDING MULTILEVEL LISTS
Multilevel lists contain several levels of numbering or bullets, or both. Multilevel lists are used where there is a need for a hierarchy of lists– headings, subheading and points within the
subheadings, for example. Multilevel lists in Word contain nine levels. This page examines a few types of multilevel lists and how they work in Word.
Numbered Multilevel Lists
Some documents must be numbered so that individual paragraphs or sentences can be identified quickly and easily, such as contracts and laws. In this case, numbering can be applied using multilevel lists. Examples of multilevel lists created using numbers and letters are:
1. Heading
1.1. Subheading
1.1.1. Paragraph
1.1.1.1. Subparagraph
1.1.2. Paragraph
1.2. Subheading
2. Heading
Bulleted and Combination Multilevel Lists
You can also create a hierarchy of bullets in a multilevel list, or use a combination of numbers and bullets. This enables you to use numbers where they are needed but use bullets if a priority or sequence does not apply. For example:
Heading
Subheading
Paragraph
Subparagraph
Controlling Levels in a Multilevel List
To start a multilevel list, like any other numbered list, type the number in the required format and
press or Increase Indent . When you press , this tells Word that you want to start a
numbered list. To demote the next list item (that is, take it down one level in the hierarchy), press to continue the numbering on the next line, then press to indent and apply the next-level
number format. To continue the list in that number format, press and type the list item. To
promote the next list item (that is, take it up one level in the hierarchy), press + .
To move a list item up in the hierarchy, you need to click at the beginning of the line and press
+ or Decrease Indent .
Press to continue the list in the same
style, or press or Increase Indent
to demote the list item; each list item will be indented at the default tab stops
In the example above, Sub point Two
has been promoted by pressing
+ or Decrease Indent

Microsoft Word 2010 - Level 2
© Watsonia Publishing Page 58 Lists
APPLYING A MULTILEVEL LIST
Try This Yourself:
Op
en
Fil
e Before starting this exercise
you MUST open the file W809 Lists_8.docx...
Select all of the text from Before you go to the end of the document
Click on Multilevel List to
display the Multilevel List Library
Point to each of the Multilevel List Library options to see a magnified version of them
Click on the first option to the right of None
The format will be applied to the text. Because there are no levels in the text, they are numbered consecutively...
Select the items numbered 2 to 5 then click on Increase
Indent in the Paragraph
group
This makes them part of question 1 and numbers them accordingly...
Repeat step 5 for the other three questions
You now have a multilevel list
Save the document
For Your Reference…
To apply a multilevel list:
1. Select the text
2. Click on Multilevel List
3. Click on an option in the Library
4. Adjust the levels of the list as required
Handy to Know…
You must use Increase Indent or
Decrease Indent when promoting or
demoting multiple list items. If you press
with multiple list items selected, the selection will be deleted.
4
5
Word provides a number of multilevel numbering and bullet list styles to choose from. These styles are available in the Multilevel List Library. To apply a multilevel list, select the text to be
included in the list and select a style from the Multilevel List Library. Word will assign the style to the list, and then you can promote and demote list items as required.

Microsoft Word 2010 - Level 2
© Watsonia Publishing Page 59 Lists
PROMOTING AND DEMOTING LIST ITEMS
Try This Yourself:
Sa
me
Fil
e Continue using the previous file
with this exercise, or open the file W809 Lists_9.docx...
Select the four list items below question 1 and then click on
Decrease Indent
The list items are promoted…
Press + to undo and
then click in the first question
We’ll change the level of this line to start with...
Click on Multilevel List
and point to Change List Level to display the available levels
Click on a) to renumber the list
Click to the left of the second question, then press to
demote the list item
Click to the left of the third question, then click on Increase
Indent to demote the list item
Repeat step 5 for the fourth question
Select list items b) to e), click on
Multilevel List and select
Change List Level then click on i)
Repeat step 7 for the remaining answers and save the document
For Your Reference…
To promote and demote list items:
1. Click in or select the list item/s and then:
Click on Increase Indent to demote or
Decrease Indent to promote, or
Press to demote or + to
promote
Handy to Know…
You cannot use or Increase Indent
to demote the first item in a list, as the entire list will be indented to the next default tab stop. To demote the first item in a list, you must select Change List Level in the
Multilevel List Library.
1
4
You can promote or demote list items in the hierarchy. When you promote or demote a paragraph, heading or list item, the numbers or bullets will adjust accordingly to reflect the
current list level position. There are several ways to adjust the level of an item or paragraph in a multilevel list, which you will be shown here.
5
8

Microsoft Word 2010 - Level 2
© Watsonia Publishing Page 60 Lists
DEFINING A MULTILEVEL LIST
Try This Yourself:
Sa
me
Fil
e Continue using the previous
file with this exercise, or open the file W809 Lists_10.docx...
Click in the list and then click
on Multilevel List and
select Define New Multilevel List to display the Define new Multilevel list dialog box
Ensure that 1 is selected under Click level to modify, then click after 1) in Enter formatting for number, press
to remove the bracket then
press
Click on 2 under Click level to modify to display its settings
Click on the drop arrow for Number style for this level and click on A, B, C, ...
Click after A) in Enter formatting for number, press
to remove the bracket then
press
Click on [OK] then click outside the list to deselect it and display the new format
Save the document
For Your Reference…
To define a multilevel list:
1. Click on Multilevel List
2. Select Define New Multilevel List
3. Select a level then make the required changes
4. Click on [OK]
Handy to Know…
New multilevel list definitions are not added to the Multilevel List Library automatically. To add one to the library, click on Multilevel
List and right-click on the list under
Lists in Current Documents, then select
Add to List Library.
1
2
While the Multilevel List Library has a good selection of list styles to choose from, you may find the need to customise a list style to suit your purpose. This is called defining a multilevel list.
When defining a multilevel list, you can select the number style, format, as well as alignment and indent settings. When you update a list style, the list items using that style will also be updated
Microsoft Word 2010 - Level 2
© Watsonia Publishing Page 61 Lists
CREATING A MULTILEVEL LIST STYLE
Try This Yourself:
Sa
me
Fil
e Continue using the previous file
with this exercise, or open the file W809 Lists_11.docx...
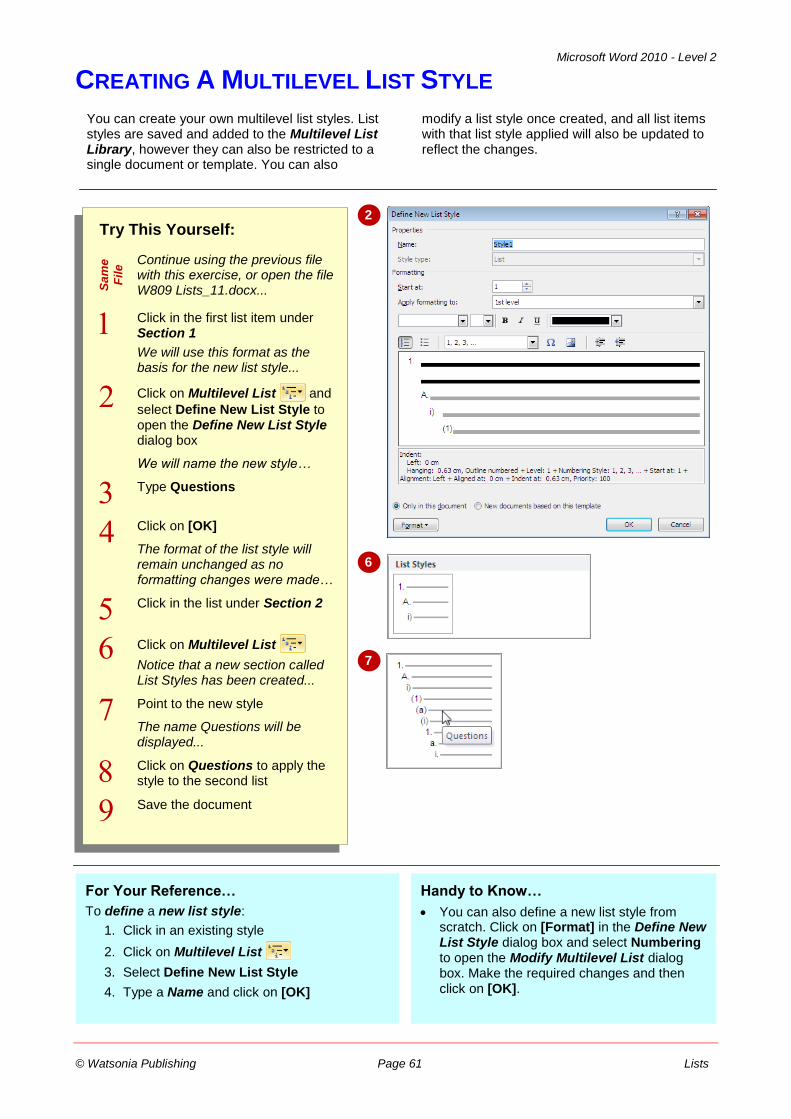
Click in the first list item under Section 1
We will use this format as the basis for the new list style...
Click on Multilevel List and
select Define New List Style to open the Define New List Style dialog box
We will name the new style…
Type Questions
Click on [OK]
The format of the list style will remain unchanged as no formatting changes were made…
Click in the list under Section 2
Click on Multilevel List
Notice that a new section called List Styles has been created...
Point to the new style
The name Questions will be displayed...
Click on Questions to apply the style to the second list
Save the document
For Your Reference…
To define a new list style:
1. Click in an existing style
2. Click on Multilevel List
3. Select Define New List Style
4. Type a Name and click on [OK]
Handy to Know…
You can also define a new list style from scratch. Click on [Format] in the Define New List Style dialog box and select Numbering to open the Modify Multilevel List dialog box. Make the required changes and then click on [OK].
2
6
You can create your own multilevel list styles. List styles are saved and added to the Multilevel List Library, however they can also be restricted to a single document or template. You can also
modify a list style once created, and all list items with that list style applied will also be updated to reflect the changes.
7

Microsoft Word 2010 - Level 2
© Watsonia Publishing Page 62 Lists
MODIFYING A MULTILEVEL LIST STYLE
Try This Yourself:
Op
en
Fil
e Before starting this exercise
you MUST open the file W809 Lists_12.docx...
Click in the first list
You can make changes to lists formatted with a style without having to select them all...
Click on Multilevel List to
display the gallery, then right-click on the list style Questions and select Modify to open the Modify Style dialog box
Click on the drop arrow for
Apply formatting to and select 2
nd level, then click on
the drop arrow for the
format (shows 1, 2, 3,) and select a, b, c,
Click on New documents based on this template
Any new documents based on the Normal.dot template will have this list style available to use…
Click on [OK] to apply the changes
You will notice that both lists have been updated to reflect the changes to the list style...
Save and close the document
For Your Reference…
To modify a multilevel list style:
1. Click on Multilevel List
2. Right-click on the style in List Styles and select Modify
3. Make the required formatting changes
4. Click on [OK]
Handy to Know…
You can assign a shortcut key combination to a list style, such as + for the style
Questions. This makes it quicker to apply a multilevel style. Click on [Format] in the Modify Style dialog box and select Shortcut key. Press the key combination and then click on [Assign].
2
5
The advantage of using list styles, especially in long documents, is that if you make changes to the list style, all lists with that list style applied will be updated to reflect the changes. When you
modify a style, you can make formatting changes to the list levels, as well as select in which documents or templates the list style will be made available.