Embed Size (px)
Citation preview
Chapter 6: Create Pages with Page Designer
6-1
CHAPTER 6: CREATE PAGES WITH PAGE DESIGNER Objectives
The objectives are:
• Introduce the new page object and its elements. • Describe page controls, their properties and triggers. • Discuss page types that are available, their characteristics and show
examples in which they are used. • Describe Page Designer and Action Designer. • Discuss best practices in designing pages. • Use the Page Designer to create a card page, set the Importance
property and add actions. • Create a list page and link a card page. • Modify RoleCenter Page to deploy pages.
Introduction In Microsoft Dynamics® NAV 2009, pages replace forms as the main way of displaying, entering and modifying data. Pages provide an easy way to create a task-oriented, professional looking and dynamic user interface.
The following shows components of a page and how they are related.
FIGURE 6.1 PAGE COMPONENTS AND THEIR RELATION
This chapter introduces the fundamental concepts of pages and basic tasks involved in designing pages by using Page Designer.
Microsoft Official Training Materials for Microsoft Dynamics ™ Your use of this content is subject to your current services agreement
What’s New for Microsoft Dynamics® NAV 2009 Installation and Development
6-2
Page Overview
Pages behave just as forms, and similar to forms, are used to enter information into database tables, as well as retrieve and display information from them. Pages can access one table at a time or combine information from several tables.
Pages provide a flexible foundation for building many types of display objects. Compared to the Classic Client which has card forms and list forms, the RoleTailored Client has equivalent page types and several new ones that help build pages with special layouts. Pages also contain new types of controls that enable advanced representation of system data and shortcuts to system features.
It is still possible to create a page that is unbound (not bound to a table). For example, a page that is used as a menu from which users can run other pages or reports, such as a RoleCenter page.
The main difference between forms and pages is that events and application logic called by pages are run on the Microsoft Dynamics NAV Service instead of on the client. These make Microsoft Dynamics NAV 2009 a much more secure, scalable and flexible application.
Pages are created and modified in the Page Designer.
Page Properties
Page properties describe how a page behaves when it is displayed by the RoleTailored Client. They are used in basically the same way as form properties. Pages have less properties than forms, and some are used in a similar manner, such as ID, Name, Caption and SourceTable. Pages also have distinct properties that are not available in forms, namely:
• PageType • CardFormID • InstructionalTextML • LinksAllowed
The Page Types and Characteristics lesson provides more information on PageType property and how it is used to create different pages.
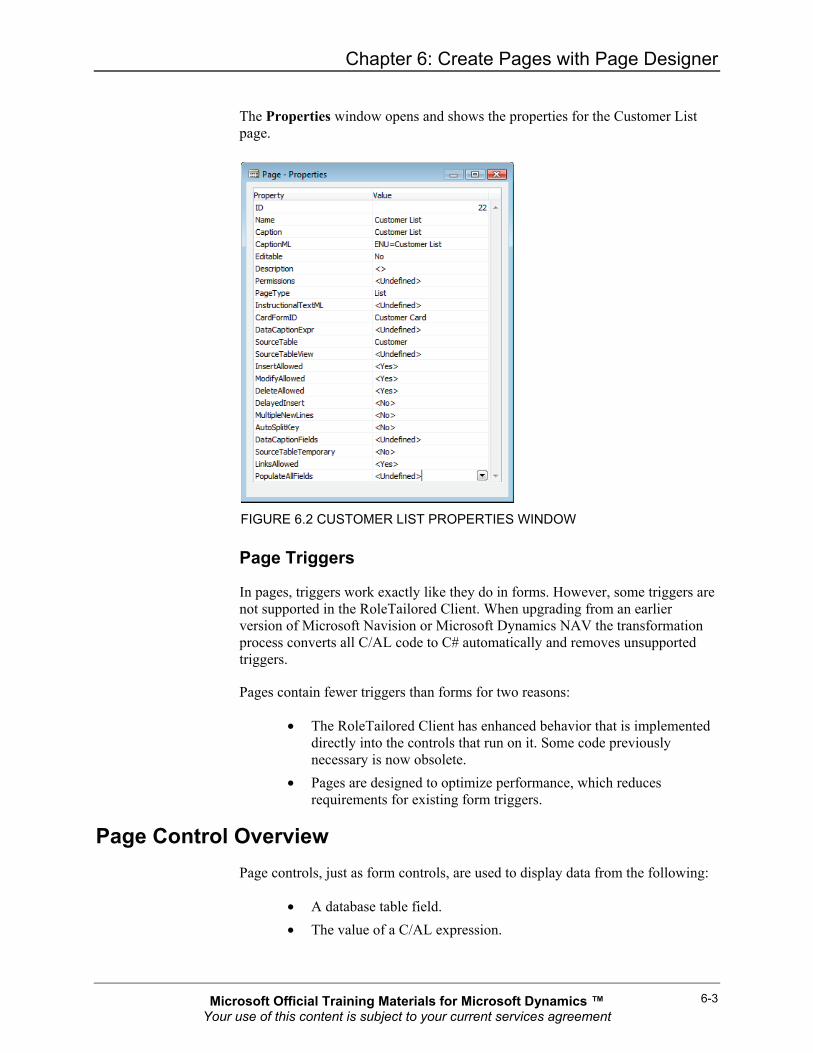
Page properties can be viewed and modified from the Properties window which is accessed from Page Designer. To view properties for the Customer List page:
1. Open the Customer List page in the Page Designer. 2. Scroll down and select a blank line at the bottom of the page. 3. Click View > Properties.
Microsoft Official Training Materials for Microsoft Dynamics ™ Your use of this content is subject to your current services agreement
Chapter 6: Create Pages with Page Designer
6-3
The Properties window opens and shows the properties for the Customer List page.
FIGURE 6.2 CUSTOMER LIST PROPERTIES WINDOW
Page Triggers
In pages, triggers work exactly like they do in forms. However, some triggers are not supported in the RoleTailored Client. When upgrading from an earlier version of Microsoft Navision or Microsoft Dynamics NAV the transformation process converts all C/AL code to C# automatically and removes unsupported triggers.
Pages contain fewer triggers than forms for two reasons:
• The RoleTailored Client has enhanced behavior that is implemented directly into the controls that run on it. Some code previously necessary is now obsolete.
• Pages are designed to optimize performance, which reduces requirements for existing form triggers.
Page Control Overview Page controls, just as form controls, are used to display data from the following:
• A database table field. • The value of a C/AL expression.
Microsoft Official Training Materials for Microsoft Dynamics ™ Your use of this content is subject to your current services agreement
What’s New for Microsoft Dynamics® NAV 2009 Installation and Development
6-4
• Bitmap pictures. • Static information such as a descriptive text.
The concept of bound and unbound controls remains the same as in forms.
There are several new controls available in pages and some which are reimplemented for the RoleTailored Client. New page controls include the following:
• FactBoxes • FastTabs • Cues
The concept of command buttons and menu buttons is replaced by action controls, which is designed in Action Designer. More information is available in the Action Type and Subtype section.
Page Control Properties
Use page control properties to link controls to underlying tables and to determine what happens when information is entered into a field. Different page controls can have different sets of properties. For example, container, group and field controls, each have their own unique sets of properties.
Unlike form control properties, page control properties do not describe how a control is positioned in terms of an X and Y position. In forms, a control can be specifically defined as a text box or a check box. In pages, how a control is rendered depends on its SourceExpr property. For example, if the SourceExpr property is a boolean field, then that control is rendered as a check box in the RoleTailored Client.
Both page properties and page control properties are defined on the Properties window, which can be edited when the page is opened in the Page Designer.
Variables vs Expression
The use of expression in some page control properties enables dynamic appearance of these controls, depending on the value of expression. For example, in a form, a text box control has a visible property, which values are limited to Yes or No.
In a page, a field's visible property value is an expression. The field's visibility can be controlled by assigning an expression that returns TRUE or FALSE to its visible property. The default value of control properties that accept expression is <TRUE> instead of <Yes>.
Microsoft Official Training Materials for Microsoft Dynamics ™ Your use of this content is subject to your current services agreement
Chapter 6: Create Pages with Page Designer
6-5
Page Control Triggers
In pages, only field type controls and action controls have triggers. Similar to page triggers, page control triggers work exactly like they do in forms. However, some control triggers are not supported in the RoleTailored Client.
The difference between supported properties and triggers in pages and forms demands a functionality redesign when upgrading to Microsoft Dynamics NAV 2009.
ExtendedDataType Property
ExtendedDataType property is a new property introduced in a field in a table. Depending on this property, the RoleTailored Client renders fields differently to enhance the user experience. The options available are as follows:
• None • Phone No. • Url • E-mail • Ratio
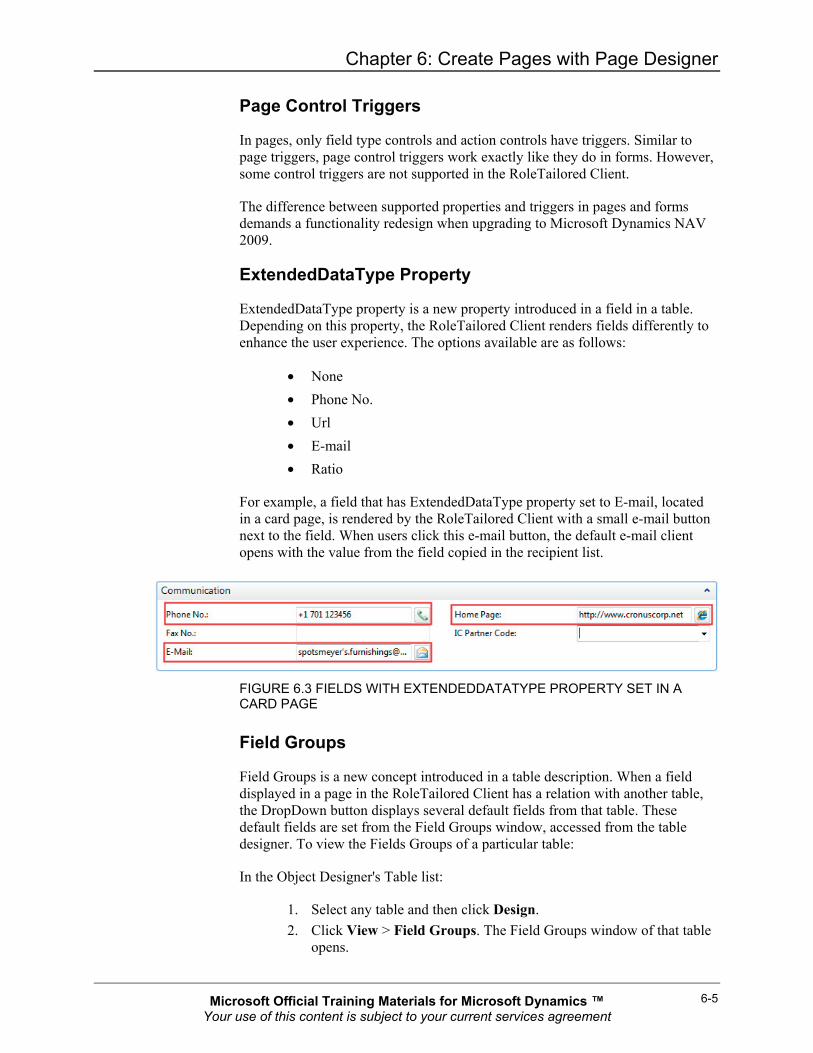
For example, a field that has ExtendedDataType property set to E-mail, located in a card page, is rendered by the RoleTailored Client with a small e-mail button next to the field. When users click this e-mail button, the default e-mail client opens with the value from the field copied in the recipient list.
FIGURE 6.3 FIELDS WITH EXTENDEDDATATYPE PROPERTY SET IN A CARD PAGE
Field Groups
Field Groups is a new concept introduced in a table description. When a field displayed in a page in the RoleTailored Client has a relation with another table, the DropDown button displays several default fields from that table. These default fields are set from the Field Groups window, accessed from the table designer. To view the Fields Groups of a particular table:
In the Object Designer's Table list:
1. Select any table and then click Design. 2. Click View > Field Groups. The Field Groups window of that table
opens.
Microsoft Official Training Materials for Microsoft Dynamics ™ Your use of this content is subject to your current services agreement
What’s New for Microsoft Dynamics® NAV 2009 Installation and Development
6-6
Page Types Overview
Page type is a new concept introduced in Microsoft Dynamics NAV 2009. Although forms are also categorized in types, they are not strictly bound to these. Pages are different in this case. Pages are interpreted differently in the RoleTailored Client, depending on their page type. This makes page type the most important concept to understand when designing pages.
Page Types, Characteristics and Example
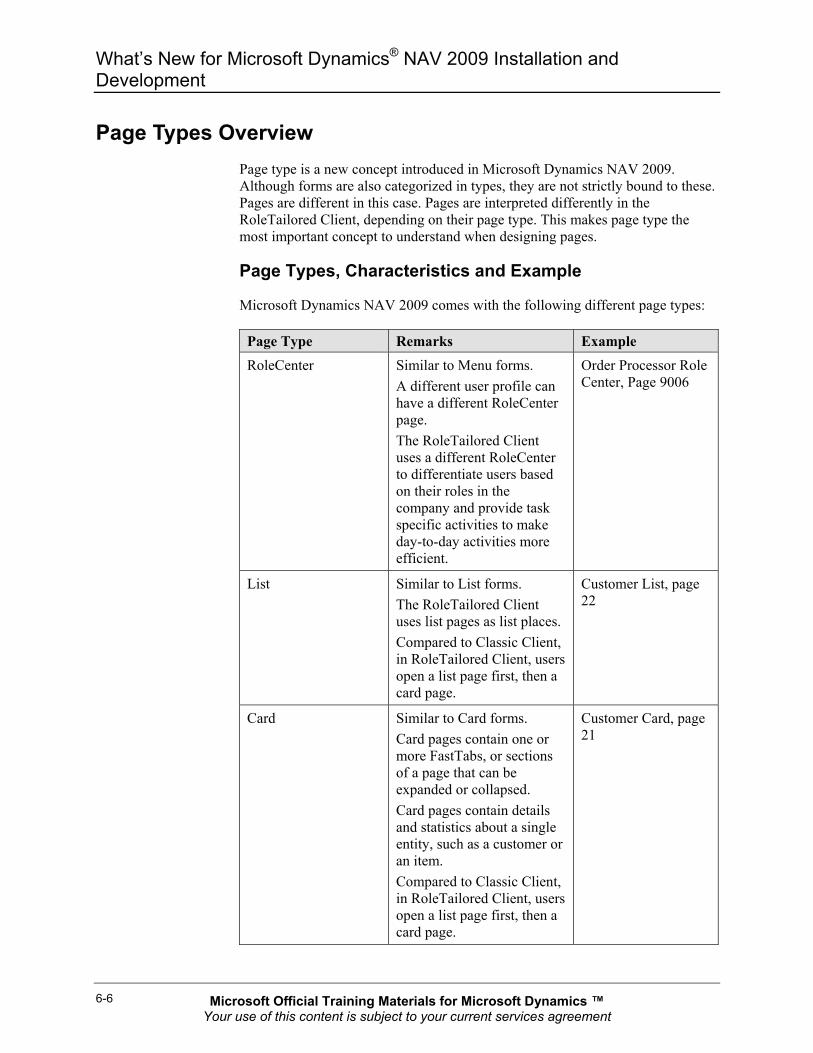
Microsoft Dynamics NAV 2009 comes with the following different page types:
Page Type Remarks Example RoleCenter Similar to Menu forms.
A different user profile can have a different RoleCenter page. The RoleTailored Client uses a different RoleCenter to differentiate users based on their roles in the company and provide task specific activities to make day-to-day activities more efficient.
Order Processor Role Center, Page 9006
List Similar to List forms. The RoleTailored Client uses list pages as list places. Compared to Classic Client, in RoleTailored Client, users open a list page first, then a card page.
Customer List, page 22
Card Similar to Card forms. Card pages contain one or more FastTabs, or sections of a page that can be expanded or collapsed. Card pages contain details and statistics about a single entity, such as a customer or an item. Compared to Classic Client, in RoleTailored Client, users open a list page first, then a card page.
Customer Card, page 21
Microsoft Official Training Materials for Microsoft Dynamics ™ Your use of this content is subject to your current services agreement
Chapter 6: Create Pages with Page Designer
6-7
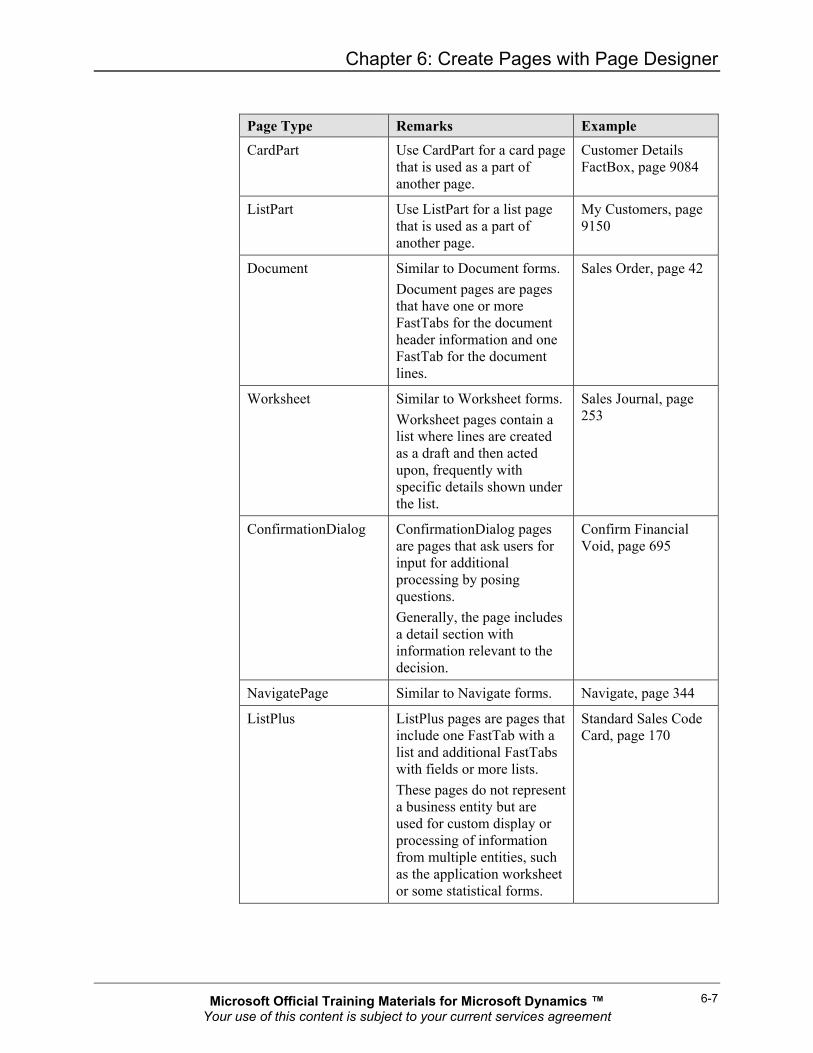
Page Type Remarks Example CardPart Use CardPart for a card page
that is used as a part of another page.
Customer Details FactBox, page 9084
ListPart Use ListPart for a list page that is used as a part of another page.
My Customers, page 9150
Document Similar to Document forms. Document pages are pages that have one or more FastTabs for the document header information and one FastTab for the document lines.
Sales Order, page 42
Worksheet Similar to Worksheet forms. Worksheet pages contain a list where lines are created as a draft and then acted upon, frequently with specific details shown under the list.
Sales Journal, page 253
ConfirmationDialog ConfirmationDialog pages are pages that ask users for input for additional processing by posing questions. Generally, the page includes a detail section with information relevant to the decision.
Confirm Financial Void, page 695
NavigatePage Similar to Navigate forms. Navigate, page 344
ListPlus ListPlus pages are pages that include one FastTab with a list and additional FastTabs with fields or more lists. These pages do not represent a business entity but are used for custom display or processing of information from multiple entities, such as the application worksheet or some statistical forms.
Standard Sales Code Card, page 170
Microsoft Official Training Materials for Microsoft Dynamics ™ Your use of this content is subject to your current services agreement

What’s New for Microsoft Dynamics® NAV 2009 Installation and Development
6-8
Page Designer Overview
In Microsoft Dynamics NAV 2009, the introduction of the three-tier architecture together with the new RoleTailored Client has entailed implementing some far-reaching changes in the C/SIDE development environment. A new Page Designer is introduced to design, create and modify pages.
Page Designer is accessed from the Object Designer. This means development is still done in the Object Designer on the Classic Client that accesses the database directly and does not use the Microsoft Dynamics NAV Service. After designing pages in the Page Designer, developers save and compile objects in the usual manner and test the results in the RoleTailored Client.
The RoleTailored Client for Microsoft Dynamics NAV displays data in pages. There are several different kinds of pages, such as list page, card page and RoleCenter pages explained in the previous Page Types and Characteristics section.
Control Type and Subtype
When designing a page, developers specify a hierarchy of page elements and decide which data is displayed by each element instead of positioning controls on forms by specifying the X and Y coordinates. This frees developers from the tedious pixel-level editing and the static layout of Form Designer. The central activity in page design is specifying the contents of the page in relation to the different Microsoft Dynamics NAV page types such as List, Card, Journal, and Worksheet.
In turn, when end-users view the pages and interact with the application, they can personalize the appearance of the parts of the application that they have access to. End-users can specify both the placement and the appearance of the elements within the page hierarchy that is defined by the developer/administrator/super user. Microsoft Dynamics NAV 2009 contains more personalization options than earlier versions of Microsoft Navision or Microsoft Dynamics NAV.
Every page element is a control with a specific type and subtype and every page has a container control to start with. There are three subtypes of container, namely:
Subtype Purpose ContentArea General usage. An ordinary page (non-role center) has
this as the top most element.
RoleCenterArea Used for RoleCenter Page, instead of ContentArea.
FactboxArea Used to define FactBox controls in a page
Every page must have at least a container control as the top most element.
Microsoft Official Training Materials for Microsoft Dynamics ™ Your use of this content is subject to your current services agreement

Chapter 6: Create Pages with Page Designer
6-9
The next control type is group. Group control is used to group several other controls together. There are four group subtypes, namely:
Subtype Purpose Group Create FastTabs in card pages and/or group several controls
together.
Repeater Present data in a tabular format, such as in list page.
CueGroup Create CueGroups, such as in the SO Processor Activities page.
FixedLayout Fix layout of other controls, such as controls in the bottom section of Journals, example General Journals.
The other two control types are field and part. They do not have a subtype.
Field control is the smallest entity in page elements. It is the actual control that is used to display:
• A database table field. • The value of a C/AL expression. • Bitmap pictures. • Static information such as a descriptive text.
Part control is used to show another page or system data as a part of the current page. There are several important properties for Part, namely:
• PartType • PagePartID • SystemPartID • ChartPartID
These properties define what kind of part is displayed in the page.
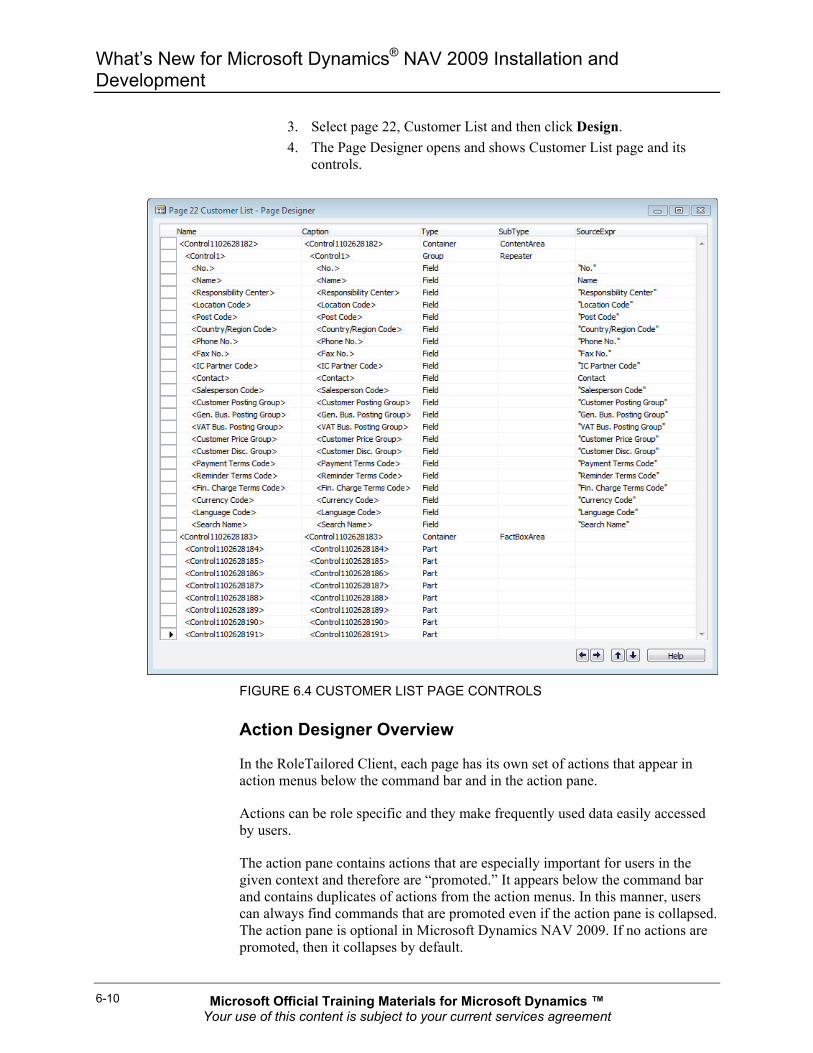
To open Customer List page in the Page Designer:
1. Click Tools > Object Designer to open the Object Designer. 2. Click the Page button to open the Page list.
Microsoft Official Training Materials for Microsoft Dynamics ™ Your use of this content is subject to your current services agreement
What’s New for Microsoft Dynamics® NAV 2009 Installation and Development
6-10
3. Select page 22, Customer List and then click Design. 4. The Page Designer opens and shows Customer List page and its
controls.
FIGURE 6.4 CUSTOMER LIST PAGE CONTROLS
Action Designer Overview
In the RoleTailored Client, each page has its own set of actions that appear in action menus below the command bar and in the action pane.
Actions can be role specific and they make frequently used data easily accessed by users.
The action pane contains actions that are especially important for users in the given context and therefore are “promoted.” It appears below the command bar and contains duplicates of actions from the action menus. In this manner, users can always find commands that are promoted even if the action pane is collapsed. The action pane is optional in Microsoft Dynamics NAV 2009. If no actions are promoted, then it collapses by default.
Microsoft Official Training Materials for Microsoft Dynamics ™ Your use of this content is subject to your current services agreement
Chapter 6: Create Pages with Page Designer
6-11
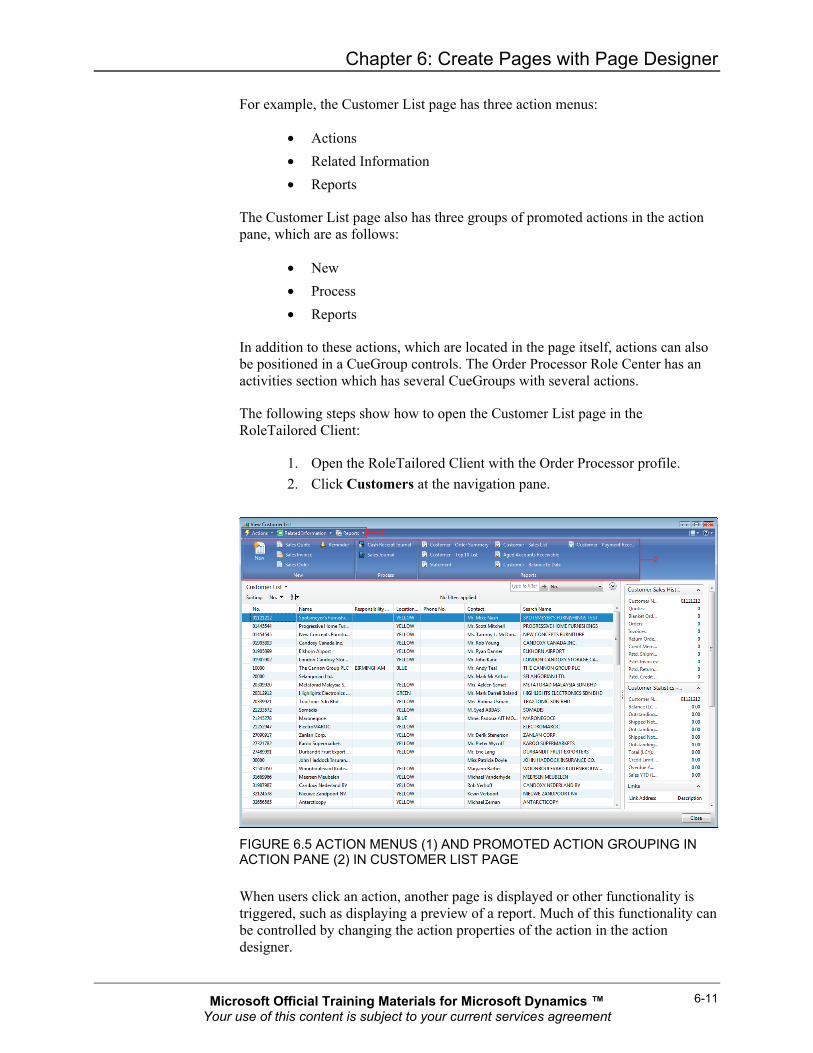
For example, the Customer List page has three action menus:
• Actions • Related Information • Reports
The Customer List page also has three groups of promoted actions in the action pane, which are as follows:
• New • Process • Reports
In addition to these actions, which are located in the page itself, actions can also be positioned in a CueGroup controls. The Order Processor Role Center has an activities section which has several CueGroups with several actions.
The following steps show how to open the Customer List page in the RoleTailored Client:
1. Open the RoleTailored Client with the Order Processor profile. 2. Click Customers at the navigation pane.
FIGURE 6.5 ACTION MENUS (1) AND PROMOTED ACTION GROUPING IN ACTION PANE (2) IN CUSTOMER LIST PAGE
When users click an action, another page is displayed or other functionality is triggered, such as displaying a preview of a report. Much of this functionality can be controlled by changing the action properties of the action in the action designer.
Microsoft Official Training Materials for Microsoft Dynamics ™ Your use of this content is subject to your current services agreement

What’s New for Microsoft Dynamics® NAV 2009 Installation and Development
6-12
Users are also able to customize actions by using the personalization dialogs that are available in the RoleTailored Client.
Some actions are generated by the system, such as View, Edit, New and Delete and cannot be changed, whereas other actions can be added or removed by an administrator/super user from the existing list by using the Action Designer.
The Action Designer is accessed from the Page Designer.
Action Type and Subtype
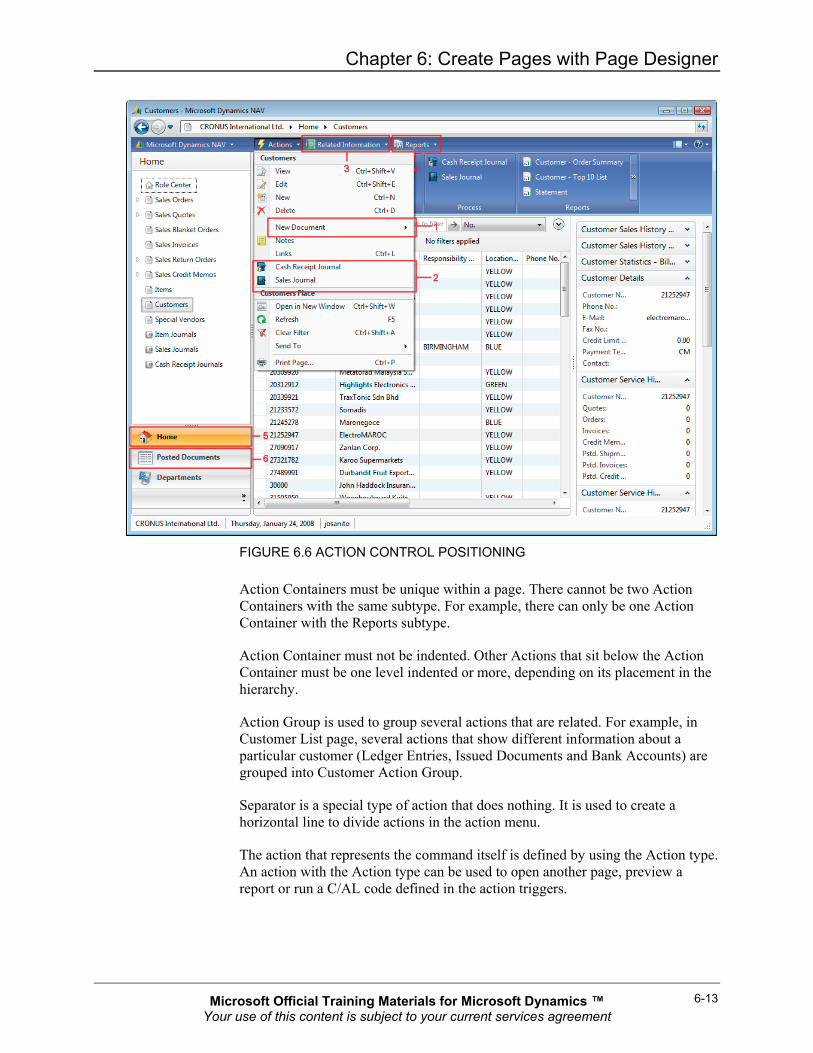
There are four types of action in page objects, they are as follows:
• Action Container • Action • Separator • Action Group
Action Container is the top level element in the hierarchy and must always have a subtype. Other action types that sit below it do not have subtypes. Subtype is used to decide where in the page, an action will be positioned. Depending on the subtype, action can be put in the following positions:
Subtype Where it is positioned
Where used Figure 6.6
NewDocumentItems Action menu, Actions/New Document
All pages 1
ActionItems Action menu, Actions, below Links
All pages 2
RelatedInformation Action menu, Related Information
All pages 3
Reports Action menu, Reports All pages 4
HomeItems Navigation pane, Home panel
Role Centers 5
ActivityButtons Navigation pane, below Home panel
Role Centers 6
Microsoft Official Training Materials for Microsoft Dynamics ™ Your use of this content is subject to your current services agreement
Chapter 6: Create Pages with Page Designer
6-13
FIGURE 6.6 ACTION CONTROL POSITIONING
Action Containers must be unique within a page. There cannot be two Action Containers with the same subtype. For example, there can only be one Action Container with the Reports subtype.
Action Container must not be indented. Other Actions that sit below the Action Container must be one level indented or more, depending on its placement in the hierarchy.
Action Group is used to group several actions that are related. For example, in Customer List page, several actions that show different information about a particular customer (Ledger Entries, Issued Documents and Bank Accounts) are grouped into Customer Action Group.
Separator is a special type of action that does nothing. It is used to create a horizontal line to divide actions in the action menu.
The action that represents the command itself is defined by using the Action type. An action with the Action type can be used to open another page, preview a report or run a C/AL code defined in the action triggers.
Microsoft Official Training Materials for Microsoft Dynamics ™ Your use of this content is subject to your current services agreement
What’s New for Microsoft Dynamics® NAV 2009 Installation and Development
6-14
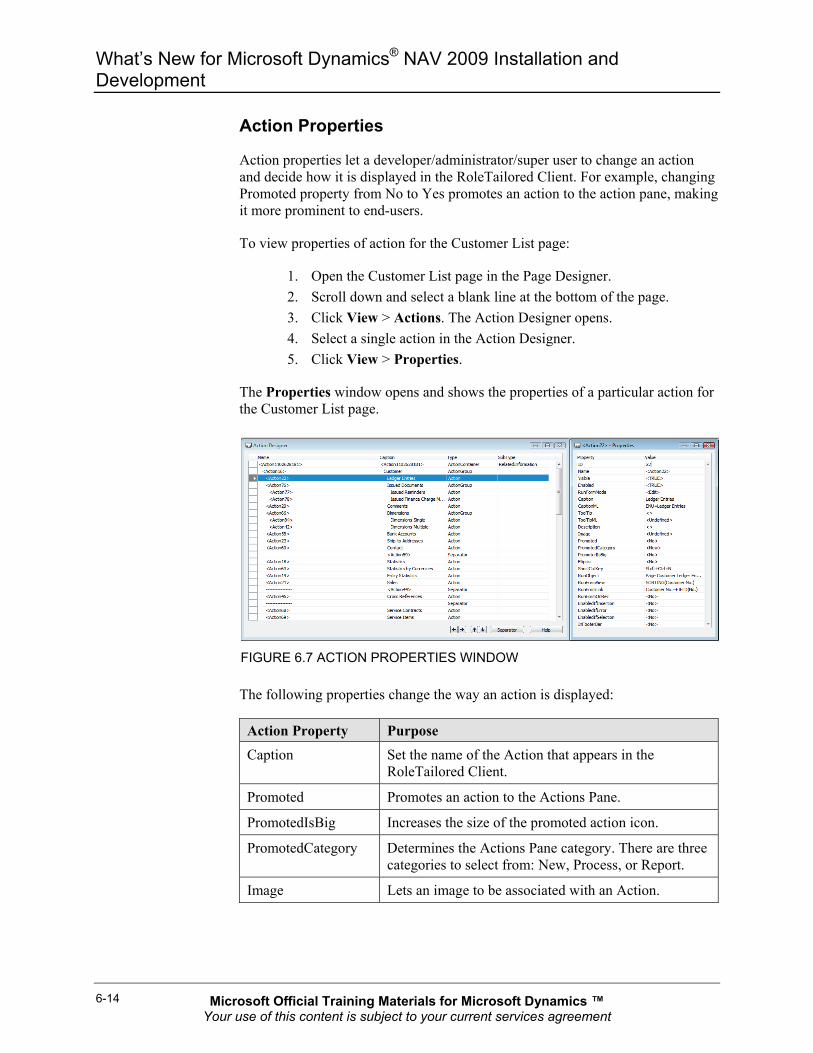
Action Properties
Action properties let a developer/administrator/super user to change an action and decide how it is displayed in the RoleTailored Client. For example, changing Promoted property from No to Yes promotes an action to the action pane, making it more prominent to end-users.
To view properties of action for the Customer List page:
1. Open the Customer List page in the Page Designer. 2. Scroll down and select a blank line at the bottom of the page. 3. Click View > Actions. The Action Designer opens. 4. Select a single action in the Action Designer. 5. Click View > Properties.
The Properties window opens and shows the properties of a particular action for the Customer List page.
FIGURE 6.7 ACTION PROPERTIES WINDOW
The following properties change the way an action is displayed:
Action Property Purpose Caption Set the name of the Action that appears in the
RoleTailored Client.
Promoted Promotes an action to the Actions Pane.
PromotedIsBig Increases the size of the promoted action icon.
PromotedCategory Determines the Actions Pane category. There are three categories to select from: New, Process, or Report.
Image Lets an image to be associated with an Action.
Microsoft Official Training Materials for Microsoft Dynamics ™ Your use of this content is subject to your current services agreement
Chapter 6: Create Pages with Page Designer
6-15
Similar to page controls, some property value of action controls are assignable expressions instead of static variables. This enables multiple actions to be dynamically hidden/shown depending on certain criteria. A good example for this usage is page 6510, Item Tracking Lines.
Action properties also define what activity is performed when users click the action, for example, the RunObject, RunFormLink and RunFormMode property. The concept is similar to the same properties in command button controls in forms.
Designing Page: Best Practices After knowing the components that make a page and how they are defined in Page Designer, the following are some best practices when designing pages:
• Think about the types of users that use the new page and list the tasks that they perform.
• Make a list of the fields, commands and links needed for the page. • Select the page type that best matches the content displayed on the
page. • Set the source table of the page to the table that contains the primary
set of data that the page displays. • Design the page by using Page Designer by specifying a hierarchy of
page elements. Determine the details of how data is displayed by adjusting the properties of each element on the page.
• Consider any supplemental sources of information that add value to the page and add these as FactBoxes. Perhaps existing FactBoxes can support the design.
• Simplify the user experience by reducing what users see by default. This can be achieved by doing the following: o Promote Actions to appropriate groups with the appropriate
sequence and size. o Set the Importance property to Additional for fields that are used
less than three out of ten times. o Display one to three FactBoxes by default.
• Add the new page to the menu suite so that it is included on the
Departments page. • If the page is a list place, consider specific user profiles to have a
link to this page from their RoleCenter page. • If the page is a task page, consider which list places from which it is
useful to link to and add the link.
Microsoft Official Training Materials for Microsoft Dynamics ™ Your use of this content is subject to your current services agreement
What’s New for Microsoft Dynamics® NAV 2009 Installation and Development
6-16
Demonstration: Create a Card Page
Susan is an Order Processor in Cronus International Ltd. She enters sales related information. Her role expands in such a way that she is now also responsible to create Purchase Orders to certain Vendors.
To make Susan's day-to-day work easier, create a Special Vendor Card page for Susan to manage her Vendors and create Purchase Orders directly from it.
Create a Blank Page
Typically, the Page Wizard is used to create a page. The following steps create a new blank page from scratch.
In Microsoft Dynamics NAV Classic Client:
1. Click Tools > Object Designer. The Object Designer opens. 2. Click the Page button to open the Page list. 3. Click New. The New Page window opens. 4. Click OK to create a blank page. The Page designer opens. There is
no element yet in the page. 5. Type the following on the first line of the Page Designer:
o Name: Special Vendor Card o Type: Container o SubType: ContentArea
NOTE: Every page must have a container which is the top most element of the page.
Attach a Source Table
A blank page is unbound when it is created. This means it is not associated with any table. These steps show how to associate a blank page with a table.
1. Go to an empty line the Page Designer. 2. Click View > Properties. The Properties window of the page
opens.
NOTE: When the page already has many controls, to open the Properties window of the page, go to the last line and then click View > Properties.
Microsoft Official Training Materials for Microsoft Dynamics ™ Your use of this content is subject to your current services agreement
Chapter 6: Create Pages with Page Designer
6-17
3. Set the following properties: o Name: Special Vendor Card o Caption: Special Vendor Card
Notice that the CaptionML property is automatically set according to the caption property.
o PageType: Card o SourceTable: Vendor
4. Close the Properties window.
Add a FastTab
FastTabs are new controls introduced in Microsoft Dynamics NAV 2009. The concept is similar to tab control in forms. These steps show how to add a FastTab to a page.
1. Go to the next line. The page elements automatically indent. 2. Type the following:
o Caption: General o Type: Group o SubType: Group
This is the first FastTab in the page and it is called General FastTab.
Add Simple Controls
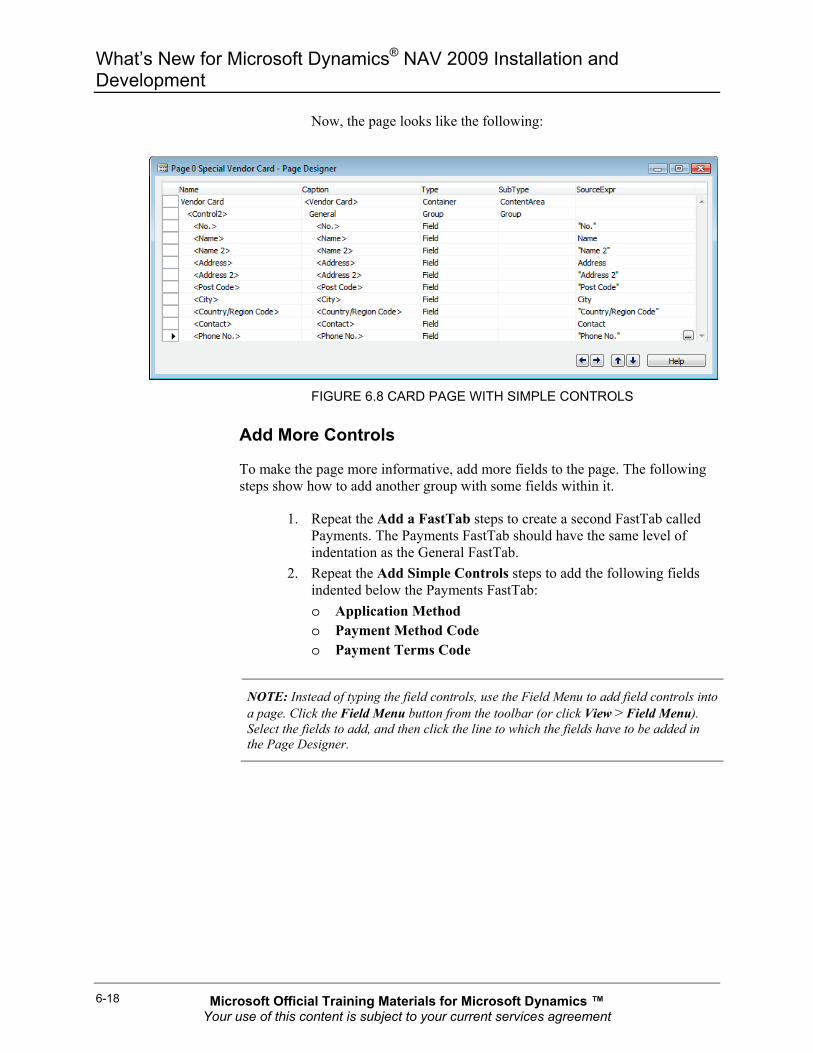
Field controls are the actual control that is used to display data. These steps show how to add several fields into a page.
1. Go to the next line, and type the following: o Type: Field o SourceExpr: “No.”
This adds the No. field to the page.
NOTE: Instead of typing the SourceExpr, click the AssistEdit button next to SourceExpr and select from the list of available options.
2. Repeat step 1 for Name, Name 2, Address, Address 2, Post Code,
City, Country/Region Code, Contact, and Phone No. fields.
Microsoft Official Training Materials for Microsoft Dynamics ™ Your use of this content is subject to your current services agreement
What’s New for Microsoft Dynamics® NAV 2009 Installation and Development
6-18
Now, the page looks like the following:
FIGURE 6.8 CARD PAGE WITH SIMPLE CONTROLS
Add More Controls
To make the page more informative, add more fields to the page. The following steps show how to add another group with some fields within it.
1. Repeat the Add a FastTab steps to create a second FastTab called Payments. The Payments FastTab should have the same level of indentation as the General FastTab.
2. Repeat the Add Simple Controls steps to add the following fields indented below the Payments FastTab: o Application Method o Payment Method Code o Payment Terms Code
NOTE: Instead of typing the field controls, use the Field Menu to add field controls into a page. Click the Field Menu button from the toolbar (or click View > Field Menu). Select the fields to add, and then click the line to which the fields have to be added in the Page Designer.
Microsoft Official Training Materials for Microsoft Dynamics ™ Your use of this content is subject to your current services agreement
Chapter 6: Create Pages with Page Designer
6-19
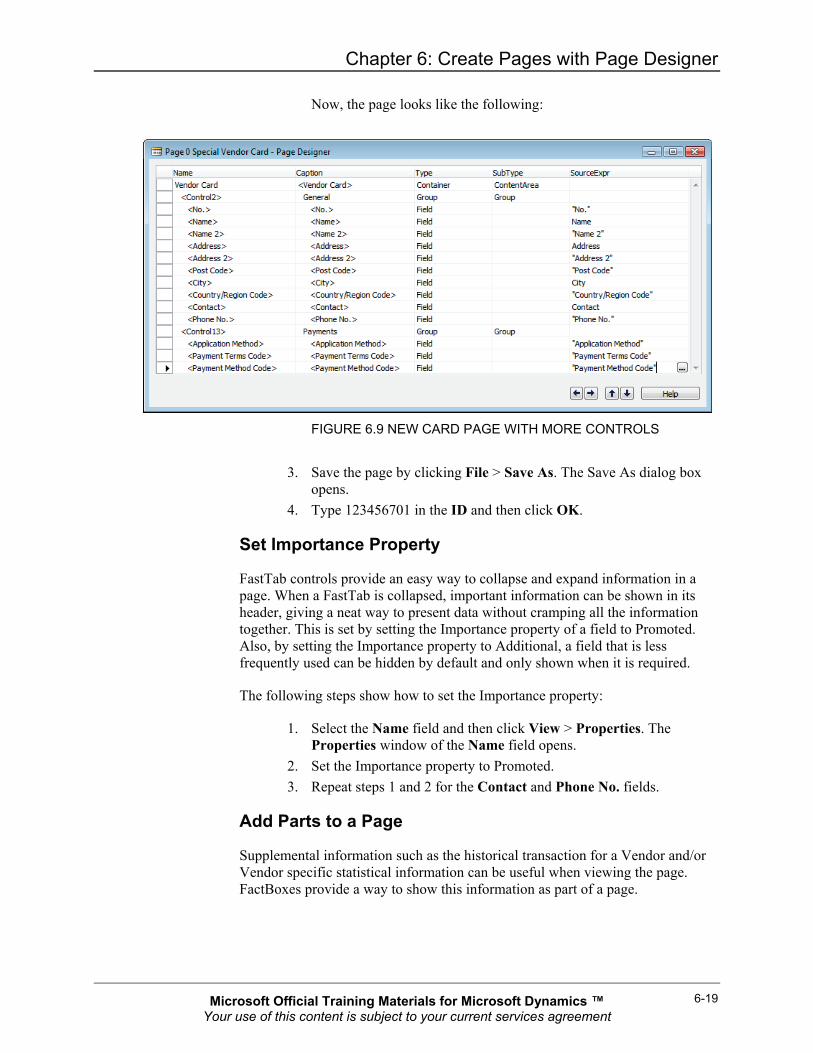
Now, the page looks like the following:
FIGURE 6.9 NEW CARD PAGE WITH MORE CONTROLS
3. Save the page by clicking File > Save As. The Save As dialog box
opens. 4. Type 123456701 in the ID and then click OK.
Set Importance Property
FastTab controls provide an easy way to collapse and expand information in a page. When a FastTab is collapsed, important information can be shown in its header, giving a neat way to present data without cramping all the information together. This is set by setting the Importance property of a field to Promoted. Also, by setting the Importance property to Additional, a field that is less frequently used can be hidden by default and only shown when it is required.
The following steps show how to set the Importance property:
1. Select the Name field and then click View > Properties. The Properties window of the Name field opens.
2. Set the Importance property to Promoted. 3. Repeat steps 1 and 2 for the Contact and Phone No. fields.
Add Parts to a Page
Supplemental information such as the historical transaction for a Vendor and/or Vendor specific statistical information can be useful when viewing the page. FactBoxes provide a way to show this information as part of a page.
Microsoft Official Training Materials for Microsoft Dynamics ™ Your use of this content is subject to your current services agreement
What’s New for Microsoft Dynamics® NAV 2009 Installation and Development
6-20
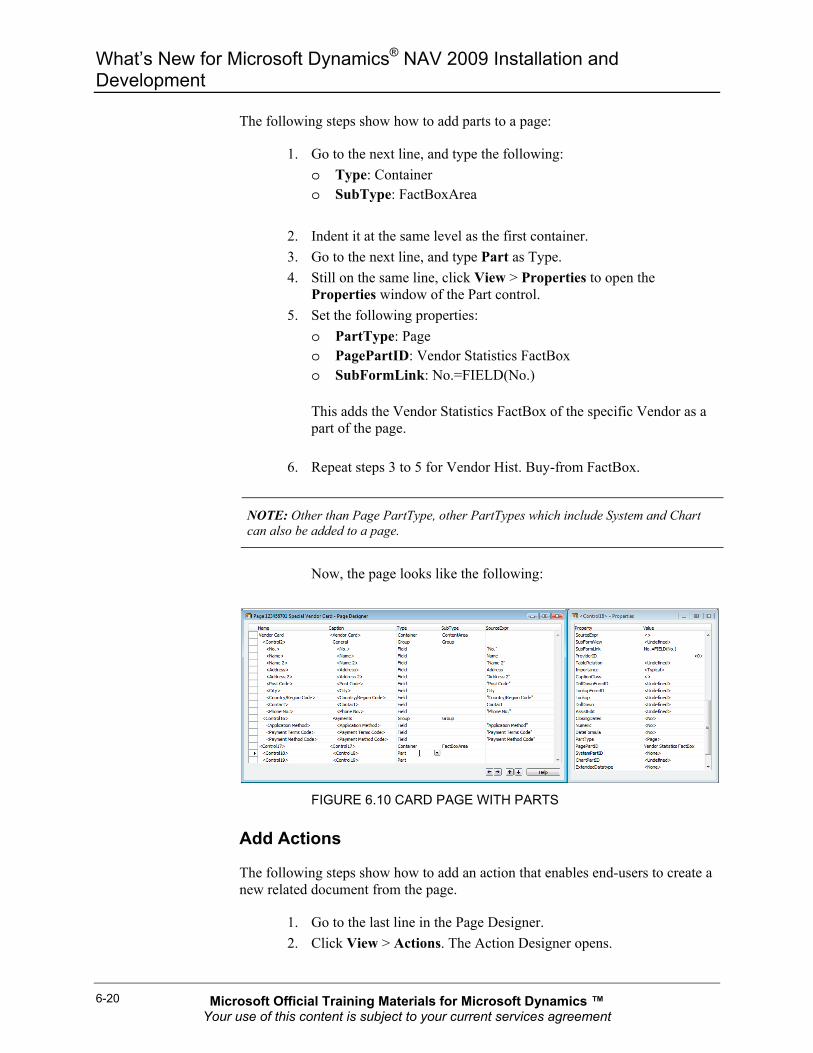
The following steps show how to add parts to a page:
1. Go to the next line, and type the following: o Type: Container o SubType: FactBoxArea
2. Indent it at the same level as the first container. 3. Go to the next line, and type Part as Type. 4. Still on the same line, click View > Properties to open the
Properties window of the Part control. 5. Set the following properties:
o PartType: Page o PagePartID: Vendor Statistics FactBox o SubFormLink: No.=FIELD(No.)
This adds the Vendor Statistics FactBox of the specific Vendor as a part of the page.
6. Repeat steps 3 to 5 for Vendor Hist. Buy-from FactBox.
NOTE: Other than Page PartType, other PartTypes which include System and Chart can also be added to a page.
Now, the page looks like the following:
FIGURE 6.10 CARD PAGE WITH PARTS
Add Actions
The following steps show how to add an action that enables end-users to create a new related document from the page.
1. Go to the last line in the Page Designer. 2. Click View > Actions. The Action Designer opens.
Microsoft Official Training Materials for Microsoft Dynamics ™ Your use of this content is subject to your current services agreement
Chapter 6: Create Pages with Page Designer
6-21
3. Type the following on the first line: o Type: ActionContainer o SubType: NewDocumentItems
4. Go to the next line. The page element automatically indents. 5. Type the following:
o Caption: Purchase Order o Type: Action
6. Still on the same line, click View > Properties to open the
Properties window of the action. 7. Set the following properties:
o RunFormMode: Create o RunObject: Page Purchase Order o RunFormLink: Buy-from Vendor No.=FIELD(No.) o Image: Document o Promoted: Yes o PromotedIsBig: No o PromotedCategory: New
Add More Actions
The following steps show how to add an action to run a related report from the page.
1. Go to the next line, and type the following: o Type: ActionContainer o SubType: Reports
2. Indent the line to the same level as the first ActionContainer. 3. Go to the next line. The page element automatically indents. 4. Type the following:
o Caption: Vendor - Balance to Date o Type: Action
5. Still on the same line, click View > Properties to open the
Properties window of the action. 6. Set the following properties:
o RunObject: Report Vendor - Balance to Date o Promoted: Yes o PromotedIsBig: No o PromotedCategory: Report
Microsoft Official Training Materials for Microsoft Dynamics ™ Your use of this content is subject to your current services agreement

What’s New for Microsoft Dynamics® NAV 2009 Installation and Development
6-22
Now, the Action Designer looks like the following:
FIGURE 6.11 ACTION DESIGNER OF THE CARD PAGE
7. Click File > Save, and then click OK to save the page.
Demonstration: Create a List Page The next step is to create a list place, where the Special Vendor Card page can be called. A list place is a page with List page type.
Create a List Page
Typically, the Page Wizard is used to create a page. The following steps describe how to create a new list page from scratch.
1. Create a blank page. 2. Specify the ContentArea container and name it Special Vendor List. 3. Set the following page properties:
o Name: Special Vendor List o PageType: List o SourceTable: Vendor o CardFormID: Special Vendor Card
4. Add a group control with a repeater subtype. 5. Add three field controls with SourceExpr No., Name, and Address. 6. Save and compile the page as page 123456702, Special Vendor List.
Microsoft Official Training Materials for Microsoft Dynamics ™ Your use of this content is subject to your current services agreement
Chapter 6: Create Pages with Page Designer
6-23
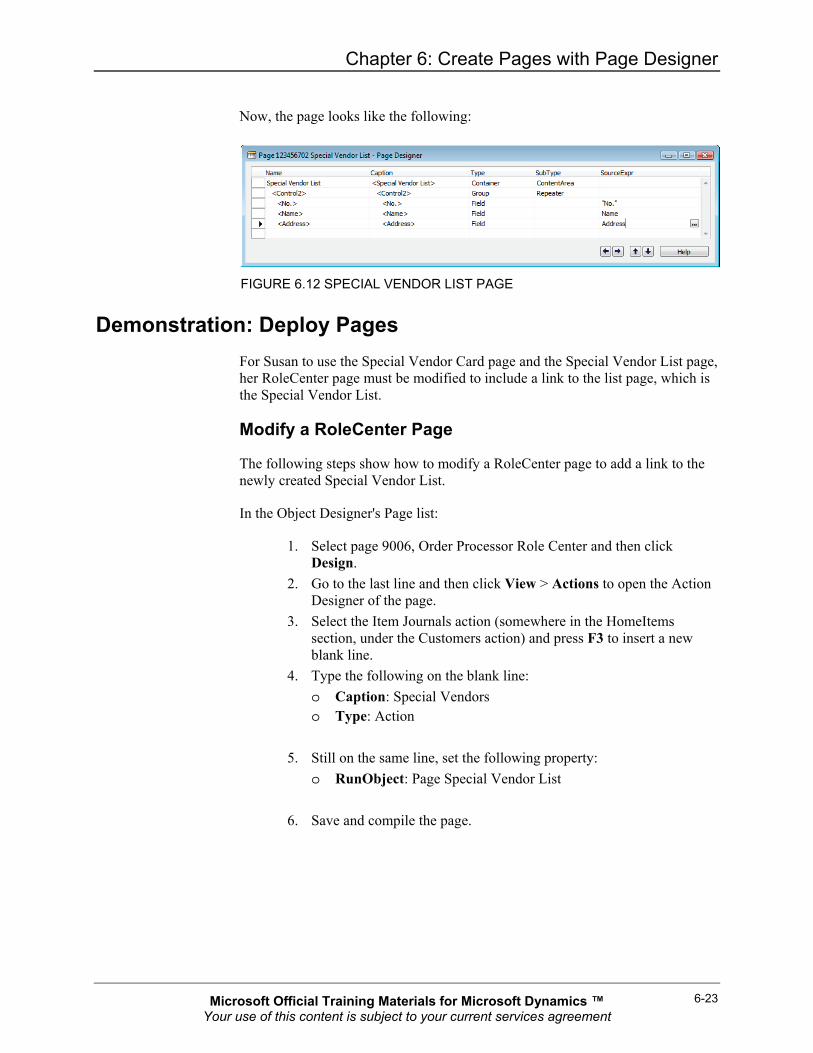
Now, the page looks like the following:
FIGURE 6.12 SPECIAL VENDOR LIST PAGE
Demonstration: Deploy Pages For Susan to use the Special Vendor Card page and the Special Vendor List page, her RoleCenter page must be modified to include a link to the list page, which is the Special Vendor List.
Modify a RoleCenter Page
The following steps show how to modify a RoleCenter page to add a link to the newly created Special Vendor List.
In the Object Designer's Page list:
1. Select page 9006, Order Processor Role Center and then click Design.
2. Go to the last line and then click View > Actions to open the Action Designer of the page.
3. Select the Item Journals action (somewhere in the HomeItems section, under the Customers action) and press F3 to insert a new blank line.
4. Type the following on the blank line: o Caption: Special Vendors o Type: Action
5. Still on the same line, set the following property:
o RunObject: Page Special Vendor List
6. Save and compile the page.
Microsoft Official Training Materials for Microsoft Dynamics ™ Your use of this content is subject to your current services agreement
What’s New for Microsoft Dynamics® NAV 2009 Installation and Development
6-24
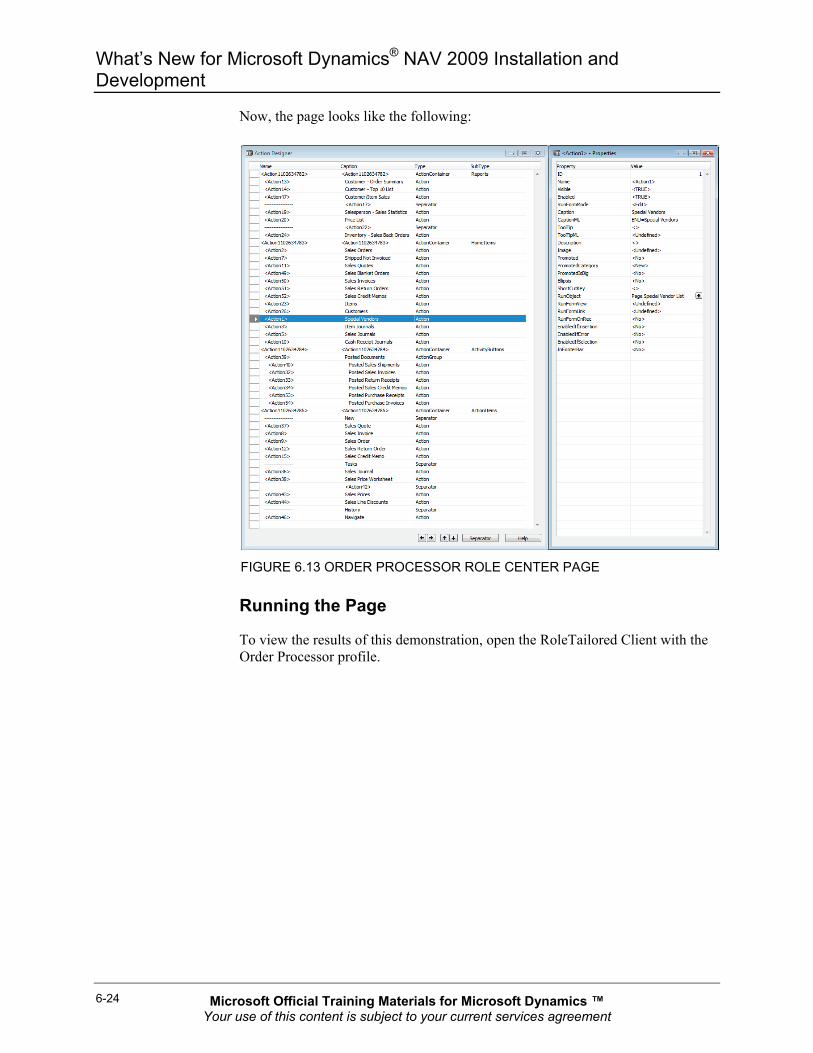
Now, the page looks like the following:
FIGURE 6.13 ORDER PROCESSOR ROLE CENTER PAGE
Running the Page
To view the results of this demonstration, open the RoleTailored Client with the Order Processor profile.
Microsoft Official Training Materials for Microsoft Dynamics ™ Your use of this content is subject to your current services agreement
Chapter 6: Create Pages with Page Designer
6-25
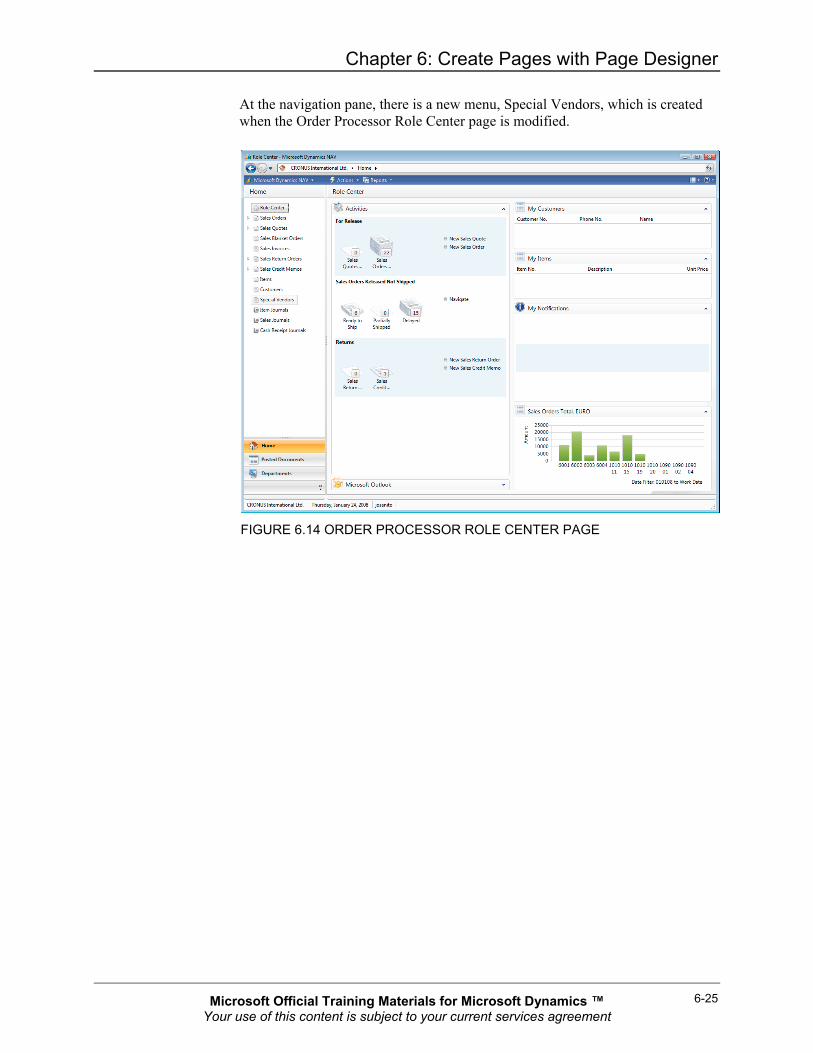
At the navigation pane, there is a new menu, Special Vendors, which is created when the Order Processor Role Center page is modified.
FIGURE 6.14 ORDER PROCESSOR ROLE CENTER PAGE
Microsoft Official Training Materials for Microsoft Dynamics ™ Your use of this content is subject to your current services agreement
What’s New for Microsoft Dynamics® NAV 2009 Installation and Development
6-26
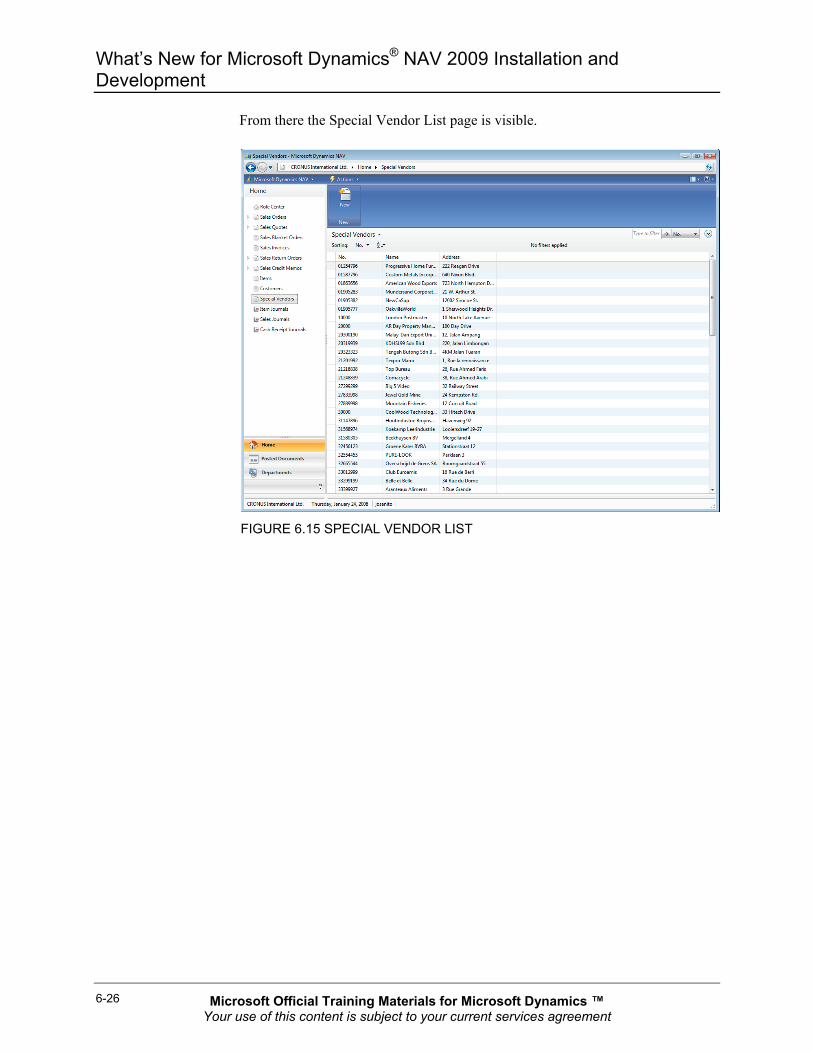
From there the Special Vendor List page is visible.
FIGURE 6.15 SPECIAL VENDOR LIST
Microsoft Official Training Materials for Microsoft Dynamics ™ Your use of this content is subject to your current services agreement
Chapter 6: Create Pages with Page Designer
6-27
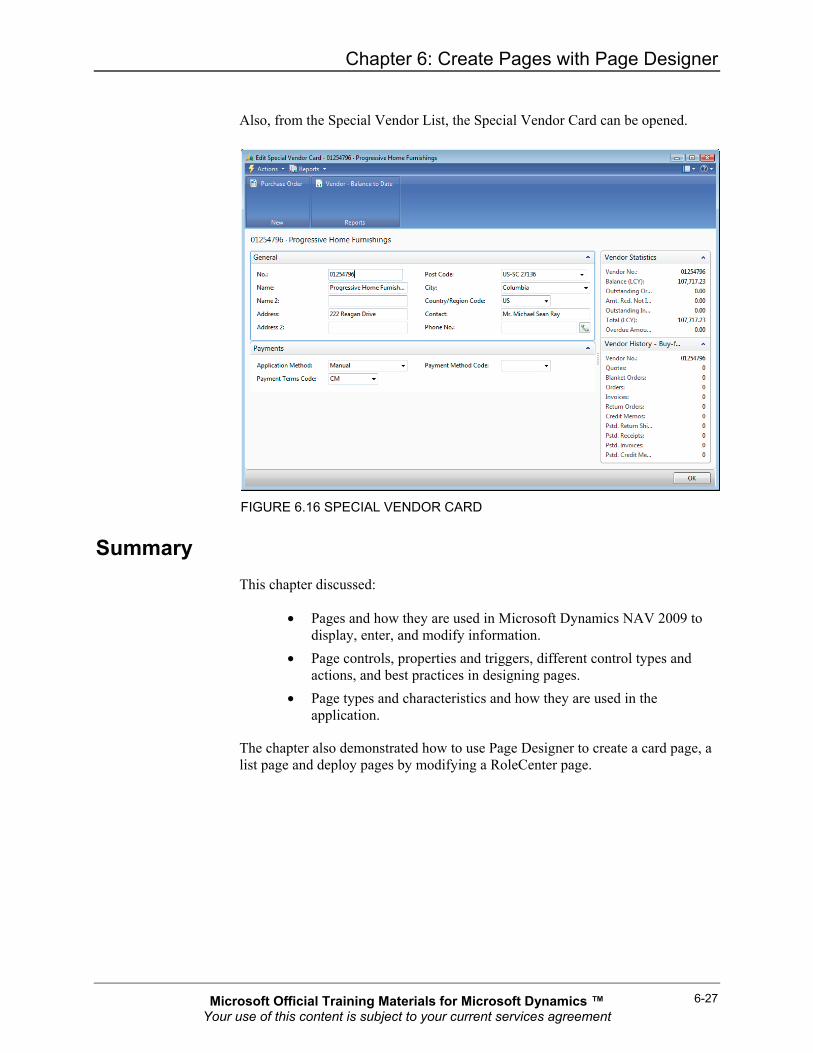
Also, from the Special Vendor List, the Special Vendor Card can be opened.
FIGURE 6.16 SPECIAL VENDOR CARD
Summary This chapter discussed:
• Pages and how they are used in Microsoft Dynamics NAV 2009 to display, enter, and modify information.
• Page controls, properties and triggers, different control types and actions, and best practices in designing pages.
• Page types and characteristics and how they are used in the application.
The chapter also demonstrated how to use Page Designer to create a card page, a list page and deploy pages by modifying a RoleCenter page.
Microsoft Official Training Materials for Microsoft Dynamics ™ Your use of this content is subject to your current services agreement
What’s New for Microsoft Dynamics® NAV 2009 Installation and Development
6-28
Quick Interaction: Lessons Learned
Take a moment and write down three key points you have learned from this chapter:
1.
2.
3.
Microsoft Official Training Materials for Microsoft Dynamics ™ Your use of this content is subject to your current services agreement