Embed Size (px)
Citation preview

Chapter 4 Linked-lists
4.1 Ordered Lists Revisited
Let us revisit our ordered-list. Let us assume that we use it for storing roll
numbers of students in a class in ascending order. We can make the
assumption that these roll numbers are of type integer. Assuming a class
size of 50, we can create an object of OrderedList as follows:
OrderedList <int> class1(50);
Everything looks fine except the fact that in practice class sizes are quite
variable – we can have classes of sizes ranging from less than 10 to classes
having a few hundred students. The problem is that if we allocated
memory for the maximum possible class size then we would be wasting a
lot of space for the usual cases. On the other hand if we did not do that
then our program would not be able to handle large classes. We could
overcome this difficulty by dynamically reallocating memory if it was
determined at run time that more space was needed1. Accordingly we
rewrite the insert method (Fig…)
void OrderedList <class T>::
insert(T value)
{
if (isFull() ) {
resize();
}
// insert value in the list
}
void OrderedList <class T>::
resize(float inc = 10.0)
{
MaxSize = MaxSize*(1 + inc/100);
T * temp = new T[MaxSize];
if (temp == NULL)
raise OUT_OF_MEMORY;
for (int i = 0; i < mSize; i++)
temp[i] = ListArray[i];
delete []ListArray;
ListArray = temp;
}
As can be seen easily, the resize method achieves its objective in O(N).
However, we now have a system in which the required space grows
dynamically according to the need.
1 C++ template class vector does something similar
Chapter 4 – Linked-Lists Page 2 of 37
This system nevertheless suffers from the problem of a lot of data
movement. The function resize involves significant amount of data
movement and for complex data types it could be a very heavy and time
consuming operation. The same is true for insert, remove, and change
operations as well. On the average, these operations require shifting n/2
elements from their original location to a new position. The overall time
complexity of these operations remains O(n) but the data movement
makes them very inefficient if large amounts of data is involved.
When we deal with linear or ordered-lists, it is in general not required to
have a random access to the elements. e.g., we usually do not need to ask
questions like: who is the 8th person in this class? The data is usually
processed in a strictly sequential order. Therefore we only need a
mechanism to access the next element. If we can somehow tell where the
next element is stored, we can eliminate this restriction of placing the
next element at the next physical location. This gives rise to the notion of
logical adjacency as opposed to physical adjacency. In that case, in order
to access elements of a list, all we need is a starting point and some means
to move from one element to the next. In other words, we need a starting
point and a link from one element to the next.
This observation can be used to avoid movement of data in the case of
insert, remove, and change operations by just maintaining logical
adjacency of elements instead of requiring them to be physically adjacent
as well. The order of the sequence can be maintained by simply recording
where the next element in the sequence is physically present. This results
in a chain like structure where we can access the elements in the chain by
just following the links in the chain. Such an organization is known as a
linked-list. A detailed discussion on linked-lists follows.
4.2 Implementing Linked-Lists
Linked-list can be implemented in an array (exercise # …) but it is much
easier to implement a linked-list with the help of pointers and dynamic
memory allocation.
Chapter 4 – Linked-Lists Page 3 of 37
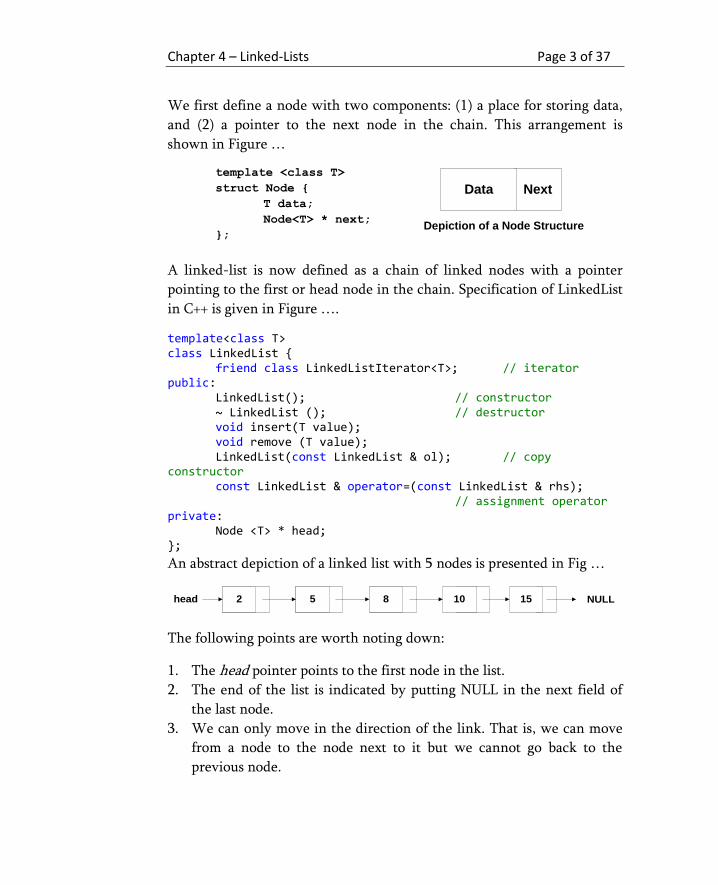
We first define a node with two components: (1) a place for storing data,
and (2) a pointer to the next node in the chain. This arrangement is
shown in Figure …
template <class T>
struct Node {
T data;
Node<T> * next;
};
A linked-list is now defined as a chain of linked nodes with a pointer
pointing to the first or head node in the chain. Specification of LinkedList
in C++ is given in Figure ….
template<class T> class LinkedList { friend class LinkedListIterator<T>; // iterator public: LinkedList(); // constructor ~ LinkedList (); // destructor void insert(T value); void remove (T value); LinkedList(const LinkedList & ol); // copy constructor const LinkedList & operator=(const LinkedList & rhs); // assignment operator private: Node <T> * head; };
An abstract depiction of a linked list with 5 nodes is presented in Fig …
2 5 8 10 15head NULL
The following points are worth noting down:
1. The head pointer points to the first node in the list.
2. The end of the list is indicated by putting NULL in the next field of
the last node.
3. We can only move in the direction of the link. That is, we can move
from a node to the node next to it but we cannot go back to the
previous node.
NextData
Depiction of a Node Structure
Chapter 4 – Linked-Lists Page 4 of 37
Let us now define and discuss at each method of the LinkedList abstract
data type.
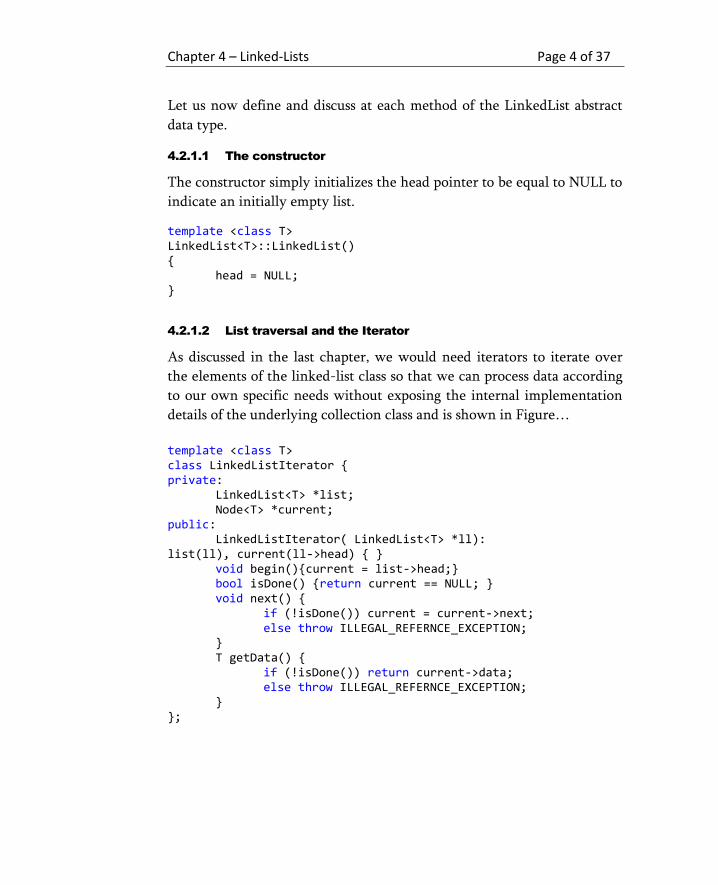
4.2.1.1 The constructor
The constructor simply initializes the head pointer to be equal to NULL to
indicate an initially empty list.
template <class T> LinkedList<T>::LinkedList() { head = NULL; }
4.2.1.2 List traversal and the Iterator
As discussed in the last chapter, we would need iterators to iterate over
the elements of the linked-list class so that we can process data according
to our own specific needs without exposing the internal implementation
details of the underlying collection class and is shown in Figure…
template <class T> class LinkedListIterator { private: LinkedList<T> *list; Node<T> *current; public: LinkedListIterator( LinkedList<T> *ll): list(ll), current(ll->head) { } void begin(){current = list->head;} bool isDone() {return current == NULL; } void next() { if (!isDone()) current = current->next; else throw ILLEGAL_REFERNCE_EXCEPTION; } T getData() { if (!isDone()) return current->data; else throw ILLEGAL_REFERNCE_EXCEPTION; } };
Chapter 4 – Linked-Lists Page 5 of 37
We can now use this iterator to process information stored in the lined-
list as shown in Figure…
LinkedList<int> intList;
// add data to the list
LinkedListIterator<int> myIterator(&intList);
// create iterator and attach list to it
for(myIterator.begin(); !myIterator.isDone(); myIterator.next())
cout << myIterator.getData() << " ";
4.2.1.3 Inserting and deleting a node after a given node
Insertion and deletion are the two fundamental operations for any
container class. Before discussing insertion and deletion in general, let us
define the following two methods (not shown in class specification): (a)
insert an element after a given node, and (b) delete the node after a given
node. These two functions will help us in understanding a number of
concepts involved in implementing linked-lists.
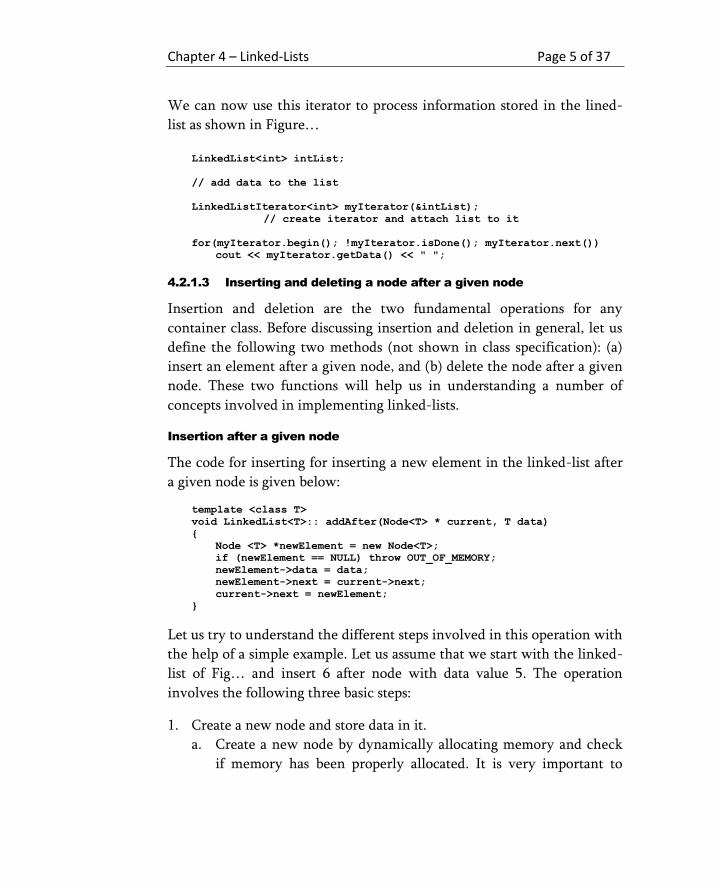
Insertion after a given node
The code for inserting for inserting a new element in the linked-list after
a given node is given below:
template <class T>
void LinkedList<T>:: addAfter(Node<T> * current, T data)
{
Node <T> *newElement = new Node<T>;
if (newElement == NULL) throw OUT_OF_MEMORY;
newElement->data = data;
newElement->next = current->next;
current->next = newElement;
}
Let us try to understand the different steps involved in this operation with
the help of a simple example. Let us assume that we start with the linked-
list of Fig… and insert 6 after node with data value 5. The operation
involves the following three basic steps:
1. Create a new node and store data in it.
a. Create a new node by dynamically allocating memory and check
if memory has been properly allocated. It is very important to
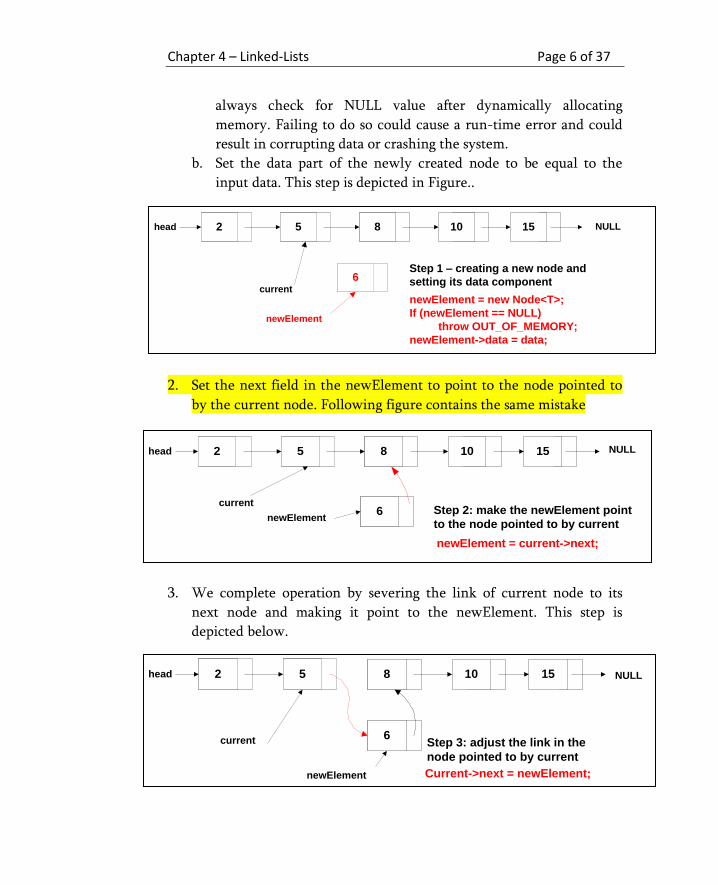
Chapter 4 – Linked-Lists Page 6 of 37
always check for NULL value after dynamically allocating
memory. Failing to do so could cause a run-time error and could
result in corrupting data or crashing the system.
b. Set the data part of the newly created node to be equal to the
input data. This step is depicted in Figure..
2. Set the next field in the newElement to point to the node pointed to
by the current node. Following figure contains the same mistake
3. We complete operation by severing the link of current node to its
next node and making it point to the newElement. This step is
depicted below.
2 5 8 10 15head
6current
newElement
newElement = new Node<T>;
If (newElement == NULL)
throw OUT_OF_MEMORY;
newElement->data = data;
Step 1 – creating a new node and
setting its data component
NULL
2 5 8 10 15head
newElement6
current
newElement = current->next;
Step 2: make the newElement point
to the node pointed to by current
NULL
2 5 8 10 15head
newElement
6current
Current->next = newElement;
Step 3: adjust the link in the
node pointed to by current
NULL
Chapter 4 – Linked-Lists Page 7 of 37
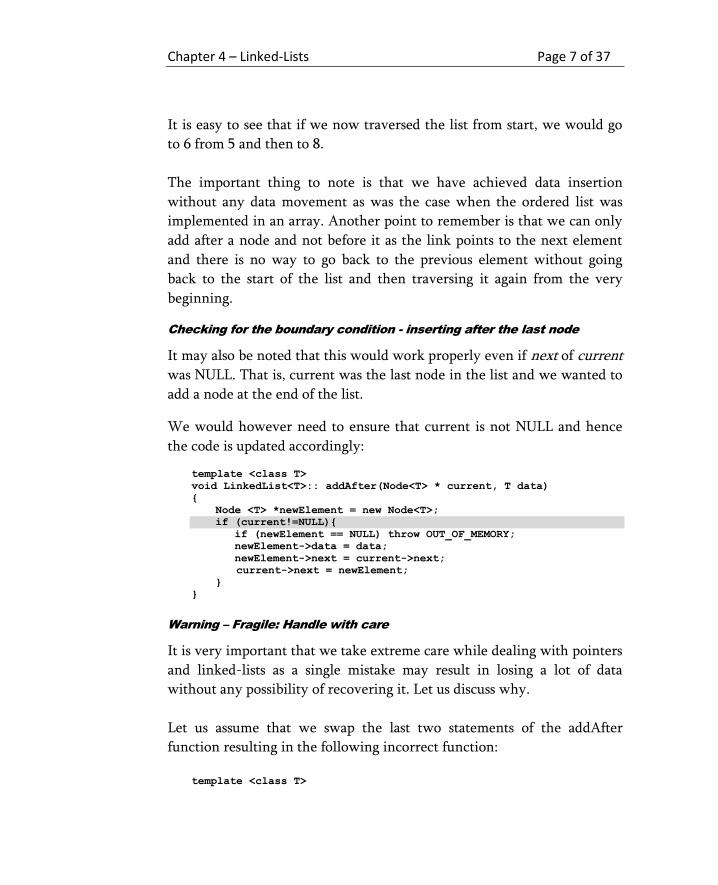
It is easy to see that if we now traversed the list from start, we would go
to 6 from 5 and then to 8.
The important thing to note is that we have achieved data insertion
without any data movement as was the case when the ordered list was
implemented in an array. Another point to remember is that we can only
add after a node and not before it as the link points to the next element
and there is no way to go back to the previous element without going
back to the start of the list and then traversing it again from the very
beginning.
Checking for the boundary condition - inserting after the last node
It may also be noted that this would work properly even if next of current was NULL. That is, current was the last node in the list and we wanted to
add a node at the end of the list.
We would however need to ensure that current is not NULL and hence
the code is updated accordingly:
template <class T>
void LinkedList<T>:: addAfter(Node<T> * current, T data)
{
Node <T> *newElement = new Node<T>;
if (current!=NULL){
if (newElement == NULL) throw OUT_OF_MEMORY;
newElement->data = data;
newElement->next = current->next;
current->next = newElement;
}
}
Warning – Fragile: Handle with care
It is very important that we take extreme care while dealing with pointers
and linked-lists as a single mistake may result in losing a lot of data
without any possibility of recovering it. Let us discuss why.
Let us assume that we swap the last two statements of the addAfter
function resulting in the following incorrect function:
template <class T>
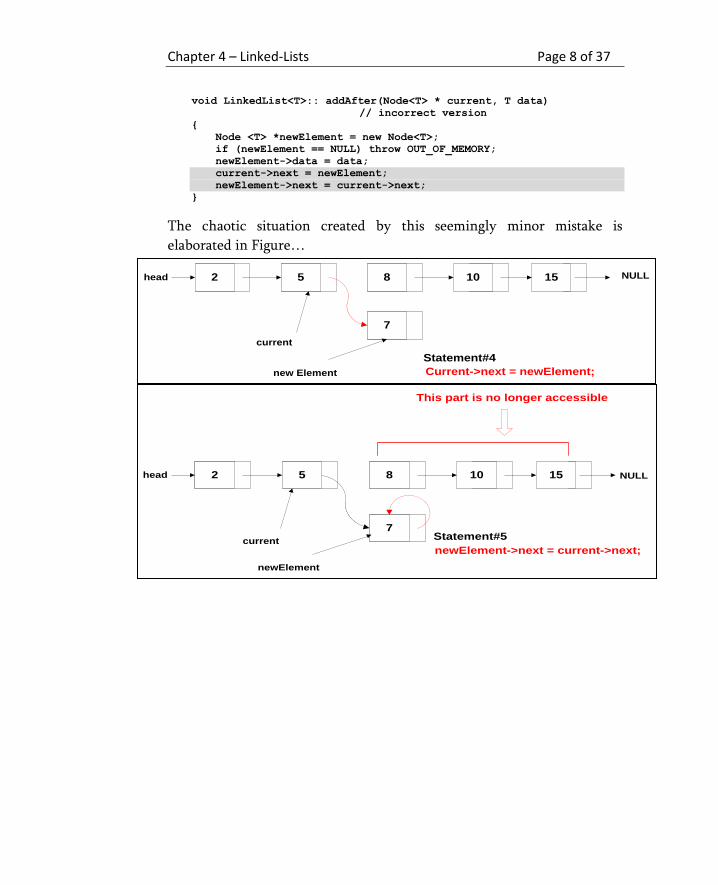
Chapter 4 – Linked-Lists Page 8 of 37
void LinkedList<T>:: addAfter(Node<T> * current, T data)
// incorrect version
{
Node <T> *newElement = new Node<T>;
if (newElement == NULL) throw OUT_OF_MEMORY;
newElement->data = data;
current->next = newElement;
newElement->next = current->next;
}
The chaotic situation created by this seemingly minor mistake is
elaborated in Figure…
2 5 8 10 15head
7
current
new Element Current->next = newElement;
Statement#4
NULL
2 5 8 10 15head
7
This part is no longer accessible
current
newElement
newElement->next = current->next;
Statement#5
NULL
Chapter 4 – Linked-Lists Page 9 of 37
Deleting a node next to a given node
Let us now look at the initial version of the code to delete the node after a
given node, the second of the two private methods mentioned above.
template <class T>
void LinkedList<T>:: deleteAfter(Node<T> * current)
// incorrect version
{
Node<T> *temp;
temp = current->next;
current->next = current->next->next;
// same as
// current->next = temp->next;
delete temp;
}
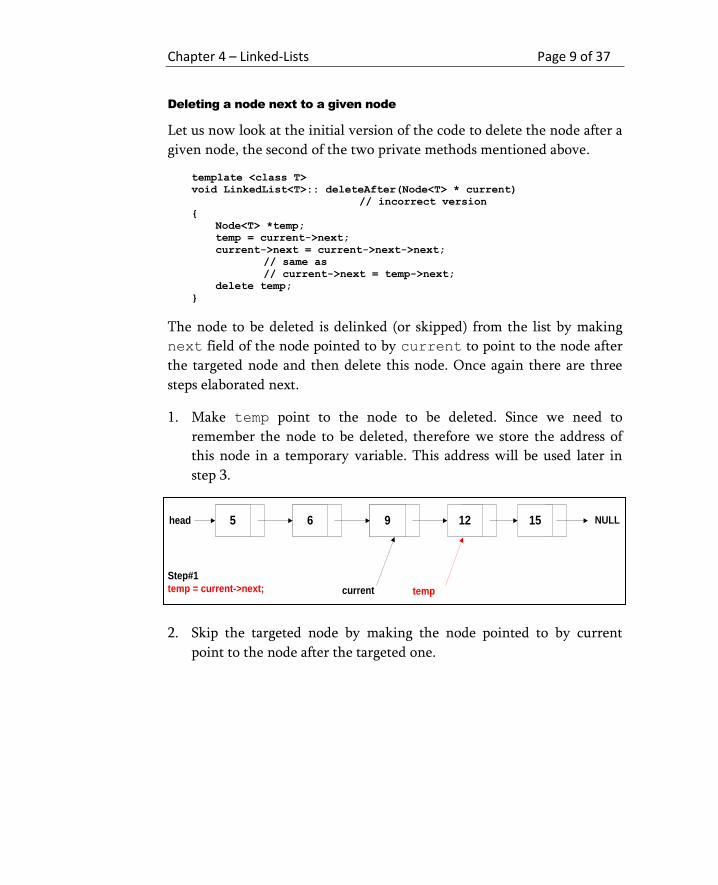
The node to be deleted is delinked (or skipped) from the list by making
next field of the node pointed to by current to point to the node after
the targeted node and then delete this node. Once again there are three
steps elaborated next.
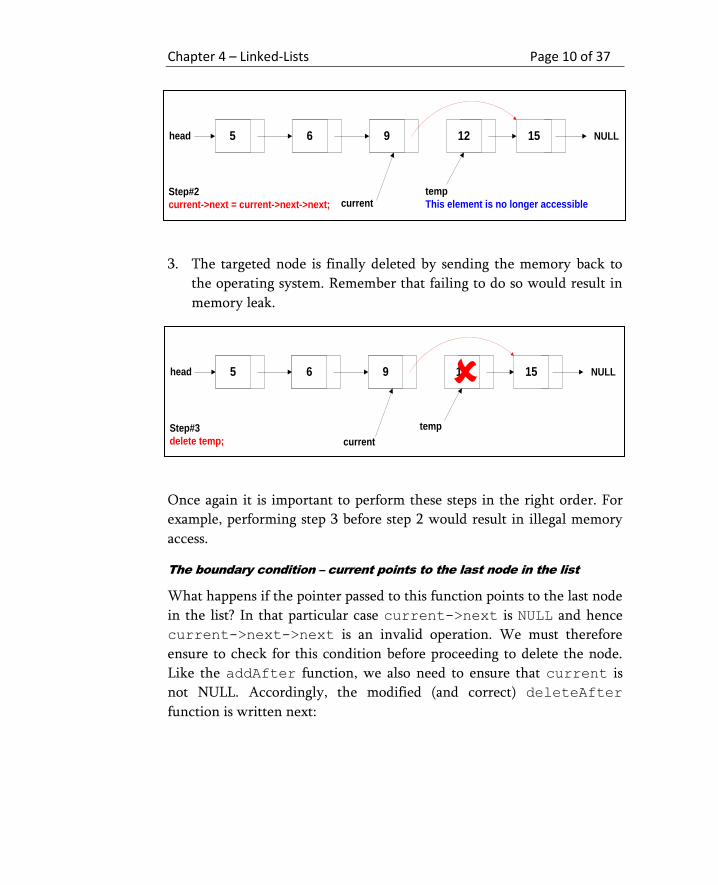
1. Make temp point to the node to be deleted. Since we need to
remember the node to be deleted, therefore we store the address of
this node in a temporary variable. This address will be used later in
step 3.
2. Skip the targeted node by making the node pointed to by current
point to the node after the targeted one.
5 6 9 12 15head
current temp
Step#1
temp = current->next;
NULL
Chapter 4 – Linked-Lists Page 10 of 37
3. The targeted node is finally deleted by sending the memory back to
the operating system. Remember that failing to do so would result in
memory leak.
Once again it is important to perform these steps in the right order. For
example, performing step 3 before step 2 would result in illegal memory
access.
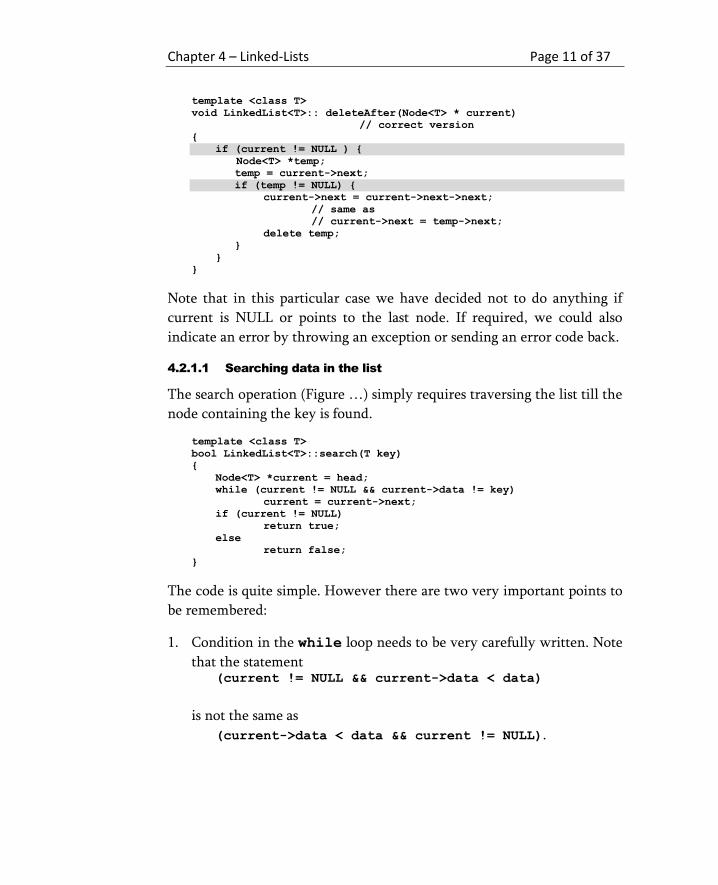
The boundary condition – current points to the last node in the list
What happens if the pointer passed to this function points to the last node
in the list? In that particular case current->next is NULL and hence
current->next->next is an invalid operation. We must therefore
ensure to check for this condition before proceeding to delete the node.
Like the addAfter function, we also need to ensure that current is
not NULL. Accordingly, the modified (and correct) deleteAfter
function is written next:
5 6 9 12 15head
currenttemp
This element is no longer accessible Step#2
current->next = current->next->next;
NULL
5 6 9 12 15head
û
current
Step#3
delete temp;
temp
NULL
Chapter 4 – Linked-Lists Page 11 of 37
template <class T>
void LinkedList<T>:: deleteAfter(Node<T> * current)
// correct version
{
if (current != NULL ) {
Node<T> *temp;
temp = current->next;
if (temp != NULL) {
current->next = current->next->next;
// same as
// current->next = temp->next;
delete temp;
}
}
}
Note that in this particular case we have decided not to do anything if
current is NULL or points to the last node. If required, we could also
indicate an error by throwing an exception or sending an error code back.
4.2.1.1 Searching data in the list
The search operation (Figure …) simply requires traversing the list till the
node containing the key is found.
template <class T>
bool LinkedList<T>::search(T key)
{
Node<T> *current = head;
while (current != NULL && current->data != key)
current = current->next;
if (current != NULL)
return true;
else
return false;
}
The code is quite simple. However there are two very important points to
be remembered:
1. Condition in the while loop needs to be very carefully written. Note
that the statement (current != NULL && current->data < data)
is not the same as
(current->data < data && current != NULL).
Chapter 4 – Linked-Lists Page 12 of 37
In the first case, because of short-circuiting current->data will not
be evaluated if current is NULL. On the other hand, in the second
case, since we access data before checking the value of current, the
program will most probably crash when current becomes NULL.
2. Linked-lists do not provide random access to nodes – if a nodes needs
to be accessed, it must be reached sequentially, starting from the first
node. That means, even if the data was stored in ascending or
descending order, we could not use something like binary search.
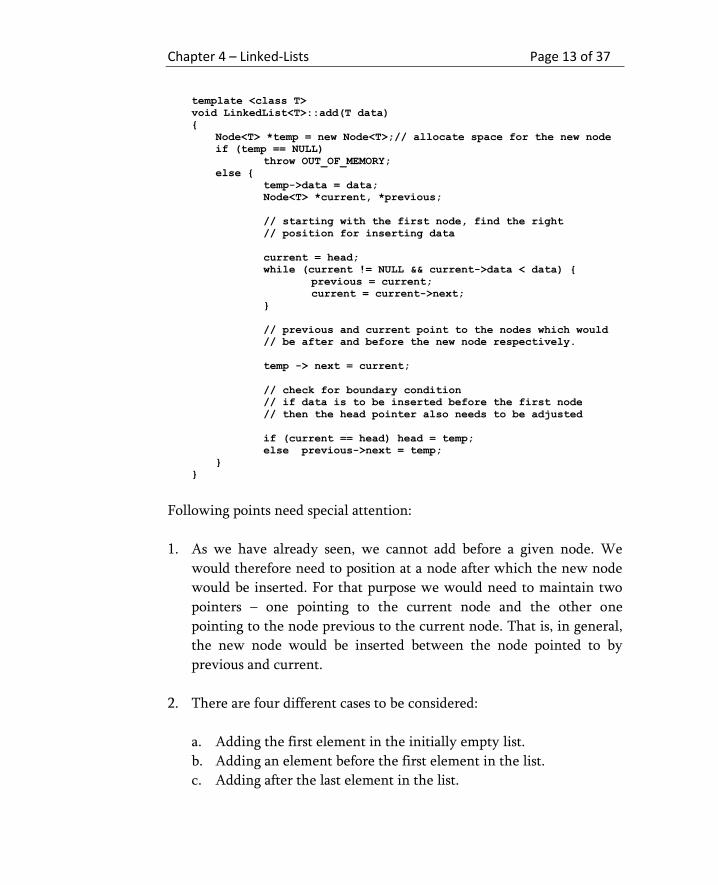
4.2.1.2 Insertion into a linked-list
Let us assume that our linked-list is used to store data in ascending order.
Inserting an element would then require inserting it at its right place so
that the required order is maintained. We would need to perform the
following 3 steps:
3. Allocate memory for the new node
4. Find the right position for insertion of data.
5. Insert the new node
In addition, for the proper working of the function, we would need to
identify boundary conditions and ensure that the code works for those
conditions.
The code is presented in Fig…
Chapter 4 – Linked-Lists Page 13 of 37
template <class T>
void LinkedList<T>::add(T data)
{
Node<T> *temp = new Node<T>;// allocate space for the new node
if (temp == NULL)
throw OUT_OF_MEMORY;
else {
temp->data = data;
Node<T> *current, *previous;
// starting with the first node, find the right
// position for inserting data
current = head;
while (current != NULL && current->data < data) {
previous = current;
current = current->next;
}
// previous and current point to the nodes which would
// be after and before the new node respectively.
temp -> next = current;
// check for boundary condition
// if data is to be inserted before the first node
// then the head pointer also needs to be adjusted
if (current == head) head = temp;
else previous->next = temp;
}
}
Following points need special attention:
1. As we have already seen, we cannot add before a given node. We
would therefore need to position at a node after which the new node
would be inserted. For that purpose we would need to maintain two
pointers – one pointing to the current node and the other one
pointing to the node previous to the current node. That is, in general,
the new node would be inserted between the node pointed to by
previous and current.
2. There are four different cases to be considered:
a. Adding the first element in the initially empty list.
b. Adding an element before the first element in the list.
c. Adding after the last element in the list.
Chapter 4 – Linked-Lists Page 14 of 37
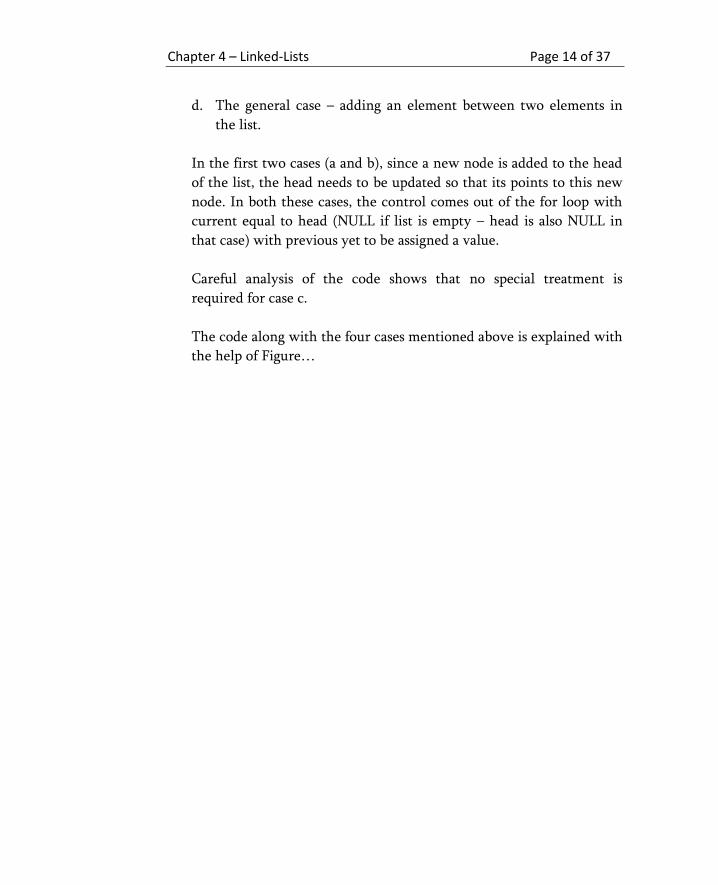
d. The general case – adding an element between two elements in
the list.
In the first two cases (a and b), since a new node is added to the head
of the list, the head needs to be updated so that its points to this new
node. In both these cases, the control comes out of the for loop with
current equal to head (NULL if list is empty – head is also NULL in
that case) with previous yet to be assigned a value.
Careful analysis of the code shows that no special treatment is
required for case c.
The code along with the four cases mentioned above is explained with
the help of Figure…
Chapter 4 – Linked-Lists Page 15 of 37
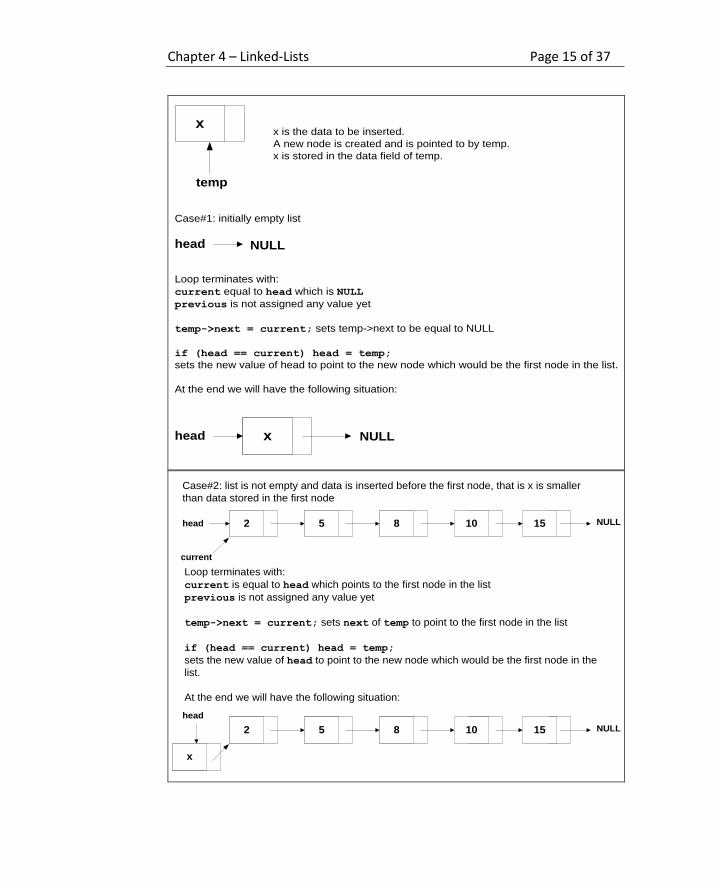
x
head NULL
temp
Case#1: initially empty list
Loop terminates with:
current equal to head which is NULL
previous is not assigned any value yet
temp->next = current; sets temp->next to be equal to NULL
if (head == current) head = temp;
sets the new value of head to point to the new node which would be the first node in the list.
At the end we will have the following situation:
xhead NULL
x is the data to be inserted.
A new node is created and is pointed to by temp.
x is stored in the data field of temp.
x
2 5 8 10 15head NULL
Case#2: list is not empty and data is inserted before the first node, that is x is smaller
than data stored in the first node
Loop terminates with:
current is equal to head which points to the first node in the list
previous is not assigned any value yet
temp->next = current; sets next of temp to point to the first node in the list
if (head == current) head = temp;
sets the new value of head to point to the new node which would be the first node in the
list.
At the end we will have the following situation:
current
2 5 8 10 15
head
NULL
Chapter 4 – Linked-Lists Page 16 of 37
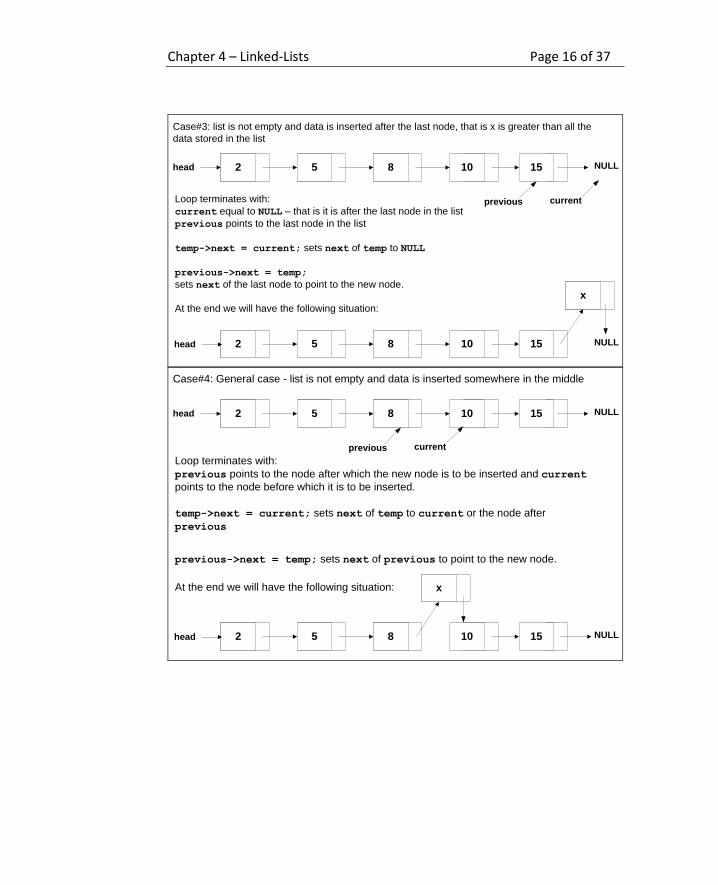
x
2 5 8 10 15head NULL
Case#3: list is not empty and data is inserted after the last node, that is x is greater than all the
data stored in the list
Loop terminates with:
current equal to NULL – that is it is after the last node in the list
previous points to the last node in the list
temp->next = current; sets next of temp to NULL
previous->next = temp;
sets next of the last node to point to the new node.
At the end we will have the following situation:
current
2 5 8 10 15 NULL
previous
head
x
2 5 8 10 15head NULL
Case#4: General case - list is not empty and data is inserted somewhere in the middle
Loop terminates with:
previous points to the node after which the new node is to be inserted and current
points to the node before which it is to be inserted.
temp->next = current; sets next of temp to current or the node after
previous
previous->next = temp; sets next of previous to point to the new node.
At the end we will have the following situation:
current
2 5 8 10 15 NULL
previous
head
Chapter 4 – Linked-Lists Page 17 of 37
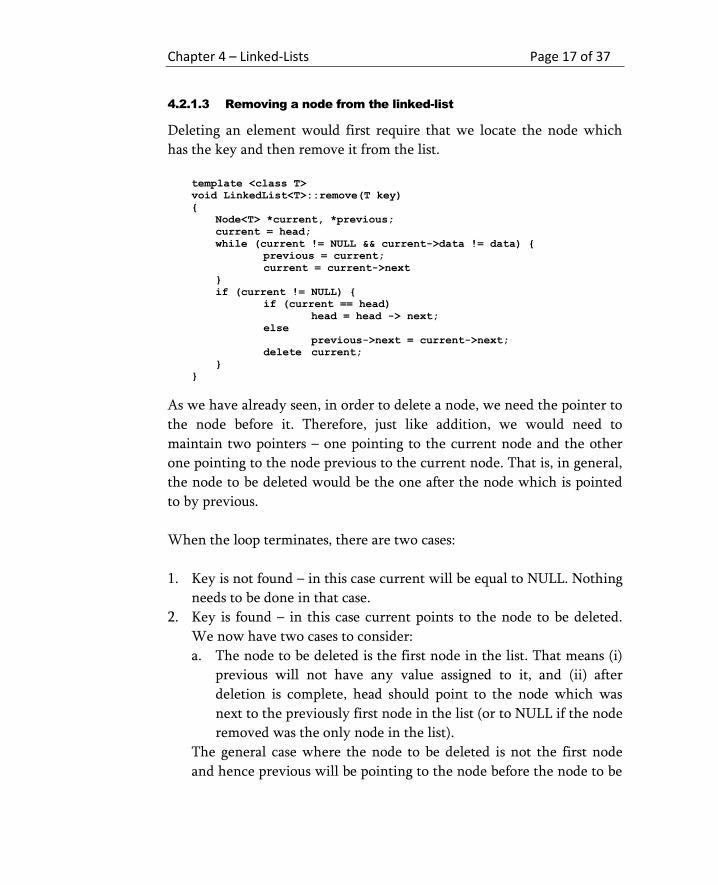
4.2.1.3 Removing a node from the linked-list
Deleting an element would first require that we locate the node which
has the key and then remove it from the list.
template <class T>
void LinkedList<T>::remove(T key)
{
Node<T> *current, *previous;
current = head;
while (current != NULL && current->data != data) {
previous = current;
current = current->next
}
if (current != NULL) {
if (current == head)
head = head -> next;
else
previous->next = current->next;
delete current;
}
}
As we have already seen, in order to delete a node, we need the pointer to
the node before it. Therefore, just like addition, we would need to
maintain two pointers – one pointing to the current node and the other
one pointing to the node previous to the current node. That is, in general,
the node to be deleted would be the one after the node which is pointed
to by previous.
When the loop terminates, there are two cases:
1. Key is not found – in this case current will be equal to NULL. Nothing
needs to be done in that case.
2. Key is found – in this case current points to the node to be deleted.
We now have two cases to consider:
a. The node to be deleted is the first node in the list. That means (i)
previous will not have any value assigned to it, and (ii) after
deletion is complete, head should point to the node which was
next to the previously first node in the list (or to NULL if the node
removed was the only node in the list).
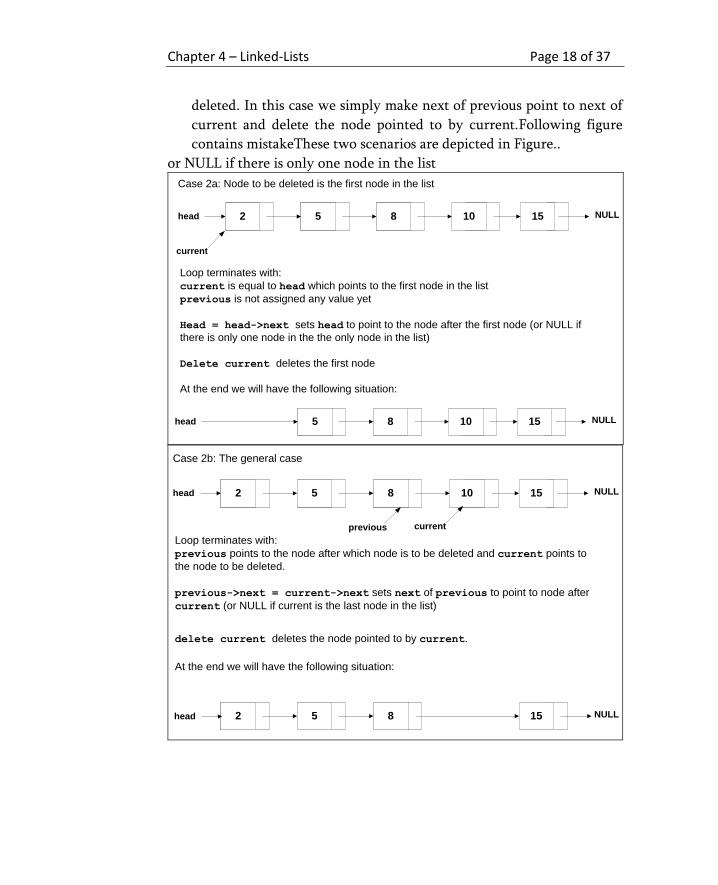
The general case where the node to be deleted is not the first node
and hence previous will be pointing to the node before the node to be
Chapter 4 – Linked-Lists Page 18 of 37
deleted. In this case we simply make next of previous point to next of
current and delete the node pointed to by current.Following figure
contains mistakeThese two scenarios are depicted in Figure..
or NULL if there is only one node in the list
2 5 8 10 15head NULL
Case 2a: Node to be deleted is the first node in the list
Loop terminates with:
current is equal to head which points to the first node in the list
previous is not assigned any value yet
Head = head->next sets head to point to the node after the first node (or NULL if
there is only one node in the the only node in the list)
Delete current deletes the first node
At the end we will have the following situation:
current
5 8 10 15head NULL
2 5 8 10 15head NULL
Case 2b: The general case
Loop terminates with:
previous points to the node after which node is to be deleted and current points to
the node to be deleted.
previous->next = current->next sets next of previous to point to node after
current (or NULL if current is the last node in the list)
delete current deletes the node pointed to by current.
At the end we will have the following situation:
current
2 5 8 15 NULL
previous
head
Chapter 4 – Linked-Lists Page 19 of 37
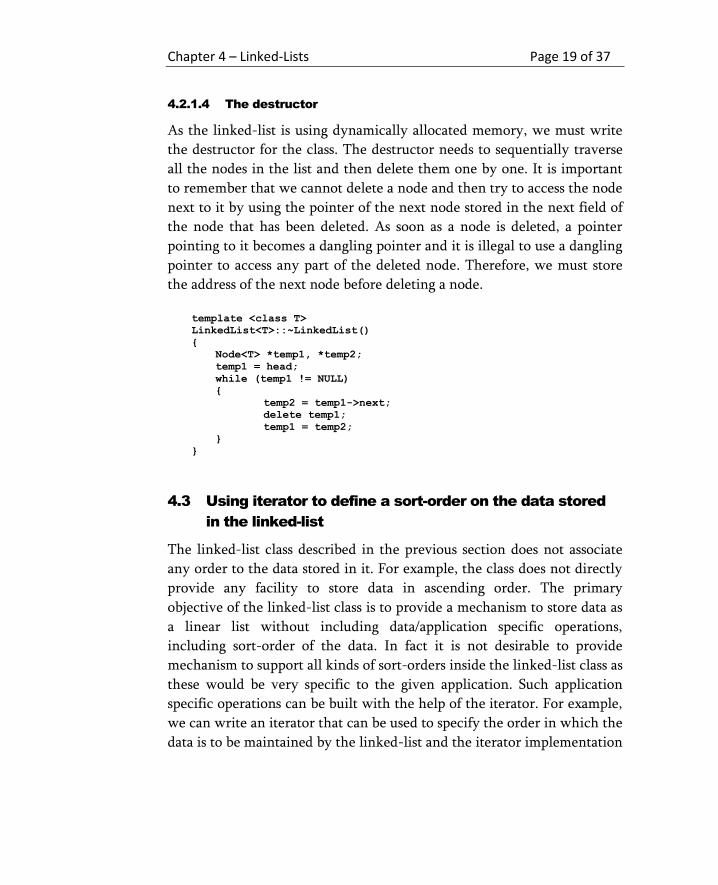
4.2.1.4 The destructor
As the linked-list is using dynamically allocated memory, we must write
the destructor for the class. The destructor needs to sequentially traverse
all the nodes in the list and then delete them one by one. It is important
to remember that we cannot delete a node and then try to access the node
next to it by using the pointer of the next node stored in the next field of
the node that has been deleted. As soon as a node is deleted, a pointer
pointing to it becomes a dangling pointer and it is illegal to use a dangling
pointer to access any part of the deleted node. Therefore, we must store
the address of the next node before deleting a node.
template <class T>
LinkedList<T>::~LinkedList()
{
Node<T> *temp1, *temp2;
temp1 = head;
while (temp1 != NULL)
{
temp2 = temp1->next;
delete temp1;
temp1 = temp2;
}
}
4.3 Using iterator to define a sort-order on the data stored
in the linked-list
The linked-list class described in the previous section does not associate
any order to the data stored in it. For example, the class does not directly
provide any facility to store data in ascending order. The primary
objective of the linked-list class is to provide a mechanism to store data as
a linear list without including data/application specific operations,
including sort-order of the data. In fact it is not desirable to provide
mechanism to support all kinds of sort-orders inside the linked-list class as
these would be very specific to the given application. Such application
specific operations can be built with the help of the iterator. For example,
we can write an iterator that can be used to specify the order in which the
data is to be maintained by the linked-list and the iterator implementation
Chapter 4 – Linked-Lists Page 20 of 37
given in Figure… can be used maintain data in the linked-list ascending
order.
To support insertion of data in ascending order, the iterator
implementation given in section … is modified to maintain a pointer to
the node before the current node and two list manipulation methods
namely insert and remove to insert and remove data from the linked-list
and maintain the required order.
Chapter 4 – Linked-Lists Page 21 of 37
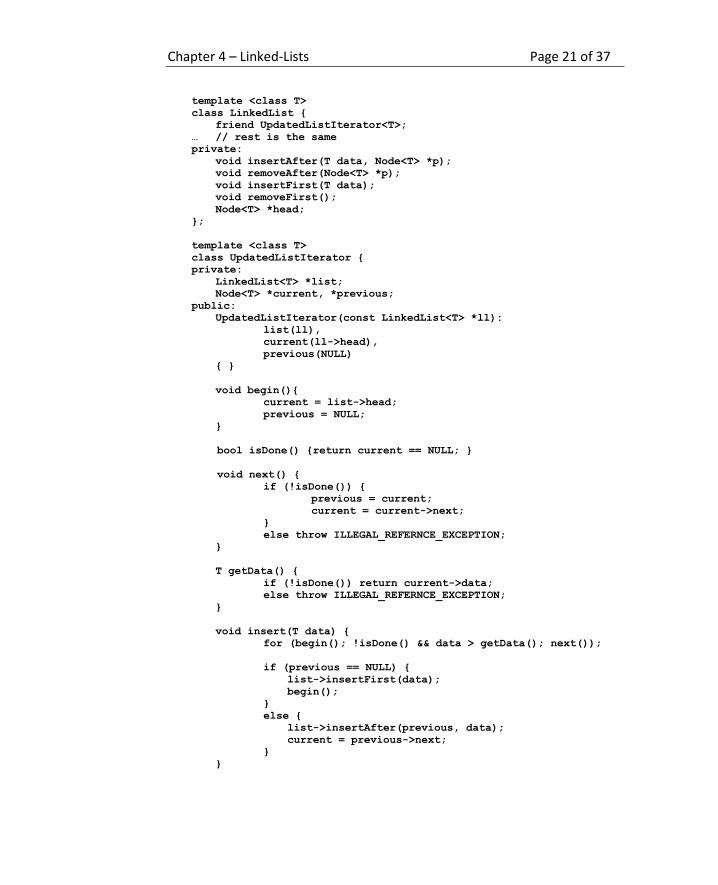
template <class T>
class LinkedList {
friend UpdatedListIterator<T>;
… // rest is the same
private:
void insertAfter(T data, Node<T> *p);
void removeAfter(Node<T> *p);
void insertFirst(T data);
void removeFirst();
Node<T> *head;
};
template <class T>
class UpdatedListIterator {
private:
LinkedList<T> *list;
Node<T> *current, *previous;
public:
UpdatedListIterator(const LinkedList<T> *ll):
list(ll),
current(ll->head),
previous(NULL)
{ }
void begin(){
current = list->head;
previous = NULL;
}
bool isDone() {return current == NULL; }
void next() {
if (!isDone()) {
previous = current;
current = current->next;
}
else throw ILLEGAL_REFERNCE_EXCEPTION;
}
T getData() {
if (!isDone()) return current->data;
else throw ILLEGAL_REFERNCE_EXCEPTION;
}
void insert(T data) {
for (begin(); !isDone() && data > getData(); next());
if (previous == NULL) {
list->insertFirst(data);
begin();
}
else {
list->insertAfter(previous, data);
current = previous->next;
}
}

Chapter 4 – Linked-Lists Page 22 of 37
void remove(T data) {
for (begin(); !isDone() && data > getData(); next());
if (!isDone() && data == getData()) {
if (previous == NULL) {
list->removeFirst();
begin();
}
else {
list->removeAfter(previous);
current = previous->next;
}
}
}
};
This concept can be extended for more leverage and flexibility. For
example, the iterator implementation can be modified so that, instead of
insert and remove, we provide three list manipulation methods namely
insertAfterCurrent, insertBeforeCurrent, and removeCurrent to perform
the operations suggested by the method names. Figure… shows
implementation of these methods.
void insertAfterCurrent(T data) {
if (!isDone()){
list->insertAfter(current, data);
current = previous->next;
}
else throw ILLEGAL_REFERNCE_EXCEPTION;
}
void insertBeforeCurrent(T data) {
if (previous == NULL) {
list->insertFirst(data);
begin();
}
else {
list->insertAfter(previous, data);
current = previous->next;
}
}
void removeCurrent() {
if (!isDone()){
if (previous == NULL) {
list->removeFirst();
begin();
}
else {
list->removeAfter(previous);
current = previous->next;
}
else throw ILLEGAL_REFERNCE_EXCEPTION;
}
Chapter 4 – Linked-Lists Page 23 of 37
}
This provides greater flexibility and control to the client program. For
example, as shown below, this iterator can now be used to insert data in
descending order.
void insertDescending(T &data, UpdatedListIterator<T> &li) {
for(li.begin(); !li.isDone() && data > li.getData();li.next());
li.insertBeforeCurrent(data);
}
Chapter 4 – Linked-Lists Page 24 of 37
4.4 Using linked-lists to implement stacks and queues
As stack and queue are linear data structures where random access of
elements stored in these data structures is not required, they can be very
easily implemented by using linked-lists.
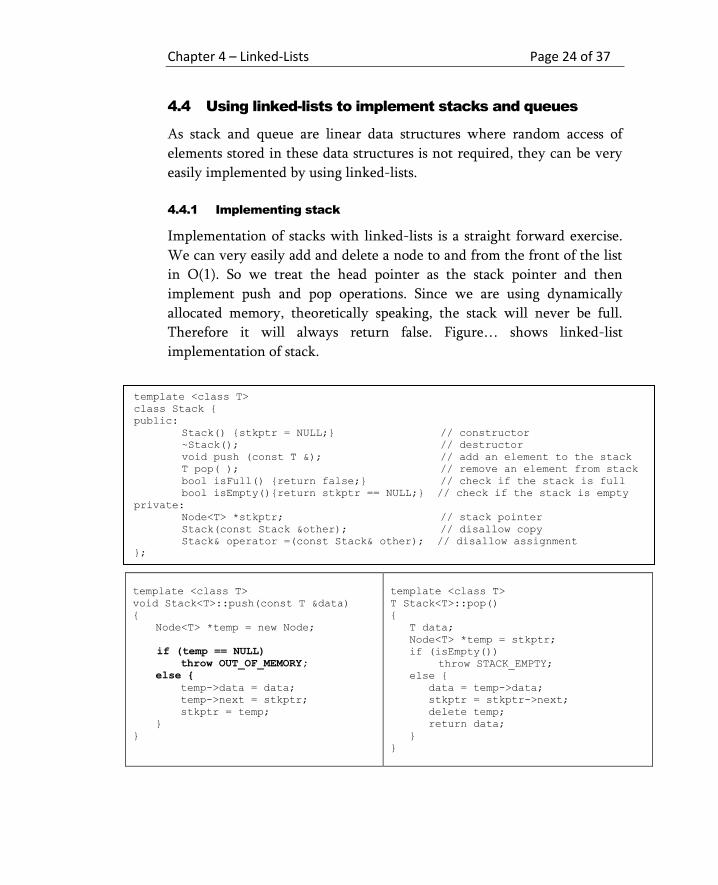
4.4.1 Implementing stack
Implementation of stacks with linked-lists is a straight forward exercise.
We can very easily add and delete a node to and from the front of the list
in O(1). So we treat the head pointer as the stack pointer and then
implement push and pop operations. Since we are using dynamically
allocated memory, theoretically speaking, the stack will never be full.
Therefore it will always return false. Figure… shows linked-list
implementation of stack.
template <class T>
void Stack<T>::push(const T &data)
{
Node<T> *temp = new Node;
if (temp == NULL)
throw OUT_OF_MEMORY;
else {
temp->data = data;
temp->next = stkptr;
stkptr = temp;
}
}
template <class T>
T Stack<T>::pop()
{
T data;
Node<T> *temp = stkptr;
if (isEmpty())
throw STACK_EMPTY;
else {
data = temp->data;
stkptr = stkptr->next;
delete temp;
return data;
}
}
template <class T>
class Stack {
public:
Stack() {stkptr = NULL;} // constructor
~Stack(); // destructor
void push (const T &); // add an element to the stack
T pop( ); // remove an element from stack
bool isFull() {return false;} // check if the stack is full
bool isEmpty(){return stkptr == NULL;} // check if the stack is empty
private:
Node<T> *stkptr; // stack pointer
Stack(const Stack &other); // disallow copy
Stack& operator =(const Stack& other); // disallow assignment
};

Chapter 4 – Linked-Lists Page 25 of 37
4.4.2 Implementing queue
As opposed to stack, in queues additions and deletions are carried out at
two different ends. We would therefore need to maintain information
about the first and last node in the list. As depicted in Fig…, this can be
very easily done by keeping pointers to the first and last nodes in the list.
The only questions to be answered are:
1. Can we add and remove in O(1) from two different ends of a linked
list?
2. Which end should be designated as front and which should be used as
rear?
So, given a linked-list with two pointers pointing to the first and last
nodes in the list, we ask the following questions:
1. Can we add before the first node in O(1)?
2. Can we add after the last node in O(1)?
3. Can we delete the first node in O(1)?
4. Can we delete the last node in O(1)?
As we have already seen in the case of stack, the answers to the first and
third questions are yes.
The answer to the second question once again is yes. How? Let us see. Let
us assume that we have the following linked-list with pointers to the first
and last node in the list.
2 5 8 10 15
first
NULL
last
if t points to the new node to be inserted at the end, we can achieve that
as follows:
last->next = t; t->next = NULL; last = t;
Chapter 4 – Linked-Lists Page 26 of 37
The answer to the fourth question is no because after deleting the last
node in the list, the pointer pointing to the last node must be readjusted to
point to the one before that. Since we cannot go back to the previous
node in O(1), we cannot therefore perform this operation in O(1).
In short, we can add or delete to and from the first node in O(1) but the
only add in O(1) at the last node.
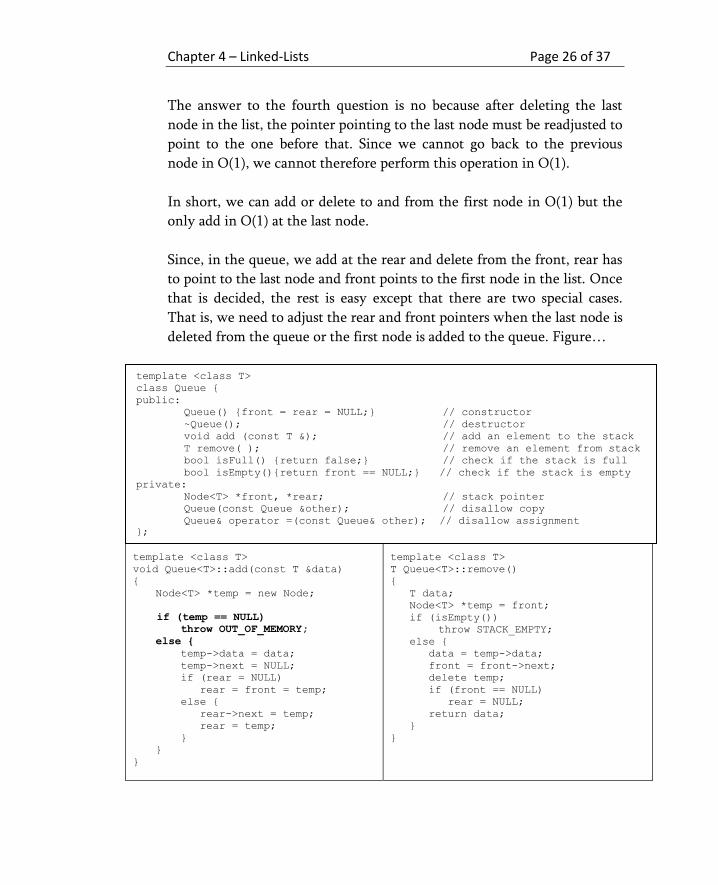
Since, in the queue, we add at the rear and delete from the front, rear has
to point to the last node and front points to the first node in the list. Once
that is decided, the rest is easy except that there are two special cases.
That is, we need to adjust the rear and front pointers when the last node is
deleted from the queue or the first node is added to the queue. Figure…
template <class T>
void Queue<T>::add(const T &data)
{
Node<T> *temp = new Node;
if (temp == NULL)
throw OUT_OF_MEMORY;
else {
temp->data = data;
temp->next = NULL;
if (rear = NULL)
rear = front = temp;
else {
rear->next = temp;
rear = temp;
}
}
}
template <class T>
T Queue<T>::remove()
{
T data;
Node<T> *temp = front;
if (isEmpty())
throw STACK_EMPTY;
else {
data = temp->data;
front = front->next;
delete temp;
if (front == NULL)
rear = NULL;
return data;
}
}
template <class T>
class Queue {
public:
Queue() {front = rear = NULL;} // constructor
~Queue(); // destructor
void add (const T &); // add an element to the stack
T remove( ); // remove an element from stack
bool isFull() {return false;} // check if the stack is full
bool isEmpty(){return front == NULL;} // check if the stack is empty
private:
Node<T> *front, *rear; // stack pointer
Queue(const Queue &other); // disallow copy
Queue& operator =(const Queue& other); // disallow assignment
};
Chapter 4 – Linked-Lists Page 27 of 37
4.5 Revisiting Linked-Lists implementation – using dummy
head node to eliminate special cases
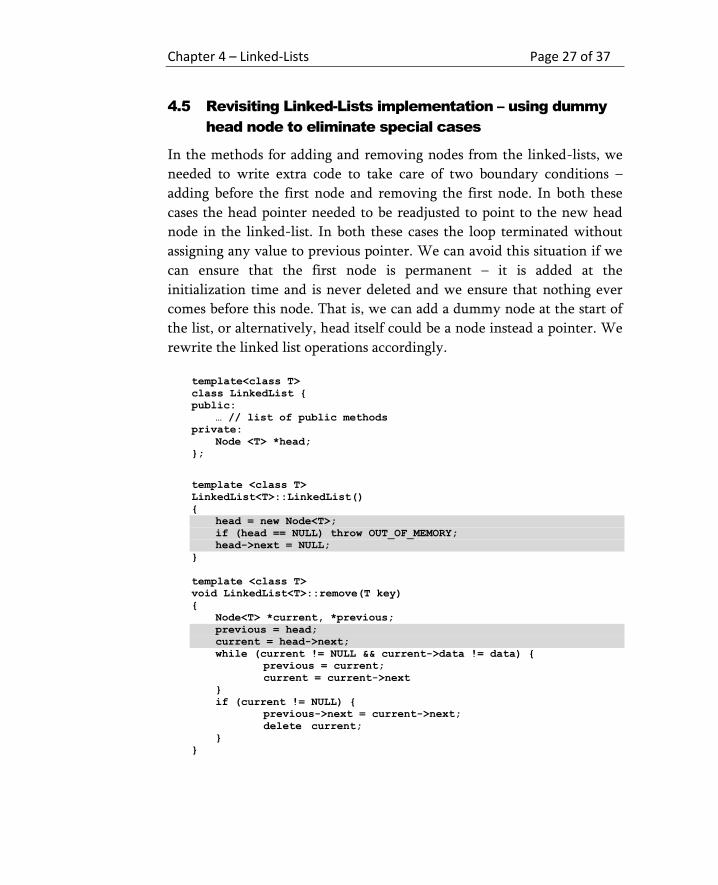
In the methods for adding and removing nodes from the linked-lists, we
needed to write extra code to take care of two boundary conditions –
adding before the first node and removing the first node. In both these
cases the head pointer needed to be readjusted to point to the new head
node in the linked-list. In both these cases the loop terminated without
assigning any value to previous pointer. We can avoid this situation if we
can ensure that the first node is permanent – it is added at the
initialization time and is never deleted and we ensure that nothing ever
comes before this node. That is, we can add a dummy node at the start of
the list, or alternatively, head itself could be a node instead a pointer. We
rewrite the linked list operations accordingly.
template<class T>
class LinkedList {
public:
… // list of public methods
private:
Node <T> *head;
};
template <class T>
LinkedList<T>::LinkedList()
{
head = new Node<T>;
if (head == NULL) throw OUT_OF_MEMORY;
head->next = NULL;
}
template <class T>
void LinkedList<T>::remove(T key)
{
Node<T> *current, *previous;
previous = head;
current = head->next;
while (current != NULL && current->data != data) {
previous = current;
current = current->next
}
if (current != NULL) {
previous->next = current->next;
delete current;
}
}
Chapter 4 – Linked-Lists Page 28 of 37
template <class T>
void LinkedList<T>::add(T data)
{
Node<T> *temp = new Node<T>;
if (temp == NULL) throw OUT_OF_MEMORY;
else {
temp->data = data;
Node<T> *current, *previous;
previous = head;
current = head->next;
while (current != NULL && current->data < data) {
previous = current;
current = current->next;
}
temp -> next = current;
previous->next = temp;
}
}
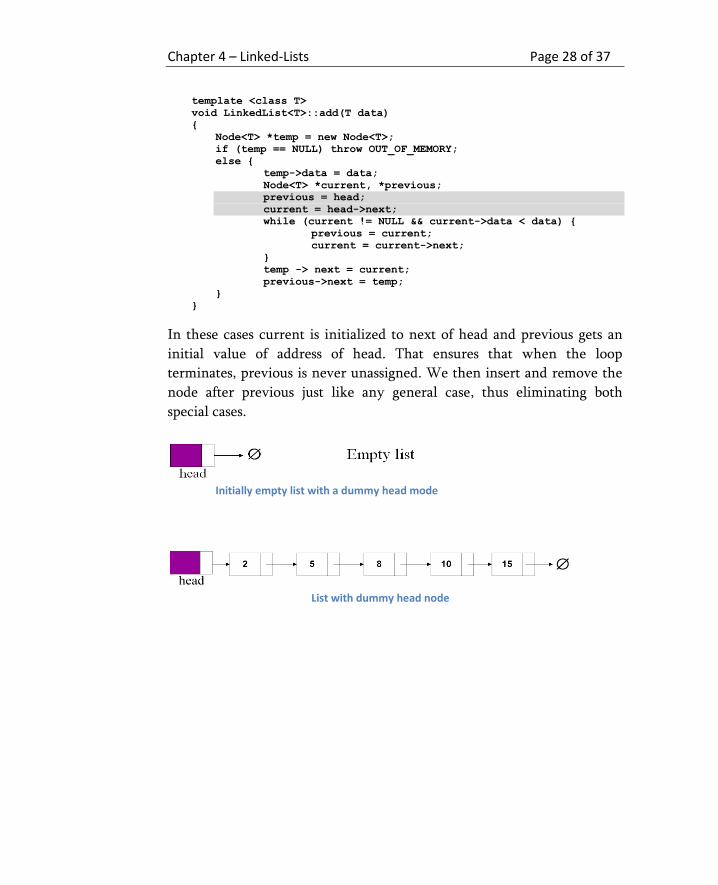
In these cases current is initialized to next of head and previous gets an
initial value of address of head. That ensures that when the loop
terminates, previous is never unassigned. We then insert and remove the
node after previous just like any general case, thus eliminating both
special cases.
Initially empty list with a dummy head mode
List with dummy head node
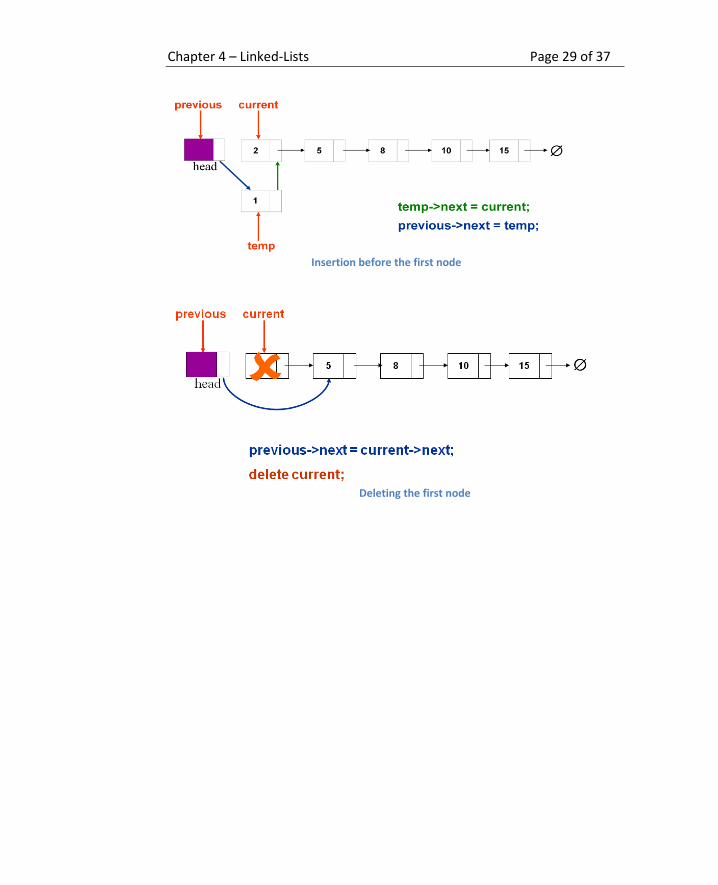
Chapter 4 – Linked-Lists Page 29 of 37
Insertion before the first node
Deleting the first node
Chapter 4 – Linked-Lists Page 30 of 37
4.6 Circular lists
In many situations a circular structure is more suitable as compared to a
linear structure. For example, it would be easier and natural to process
information about a polygon if its corners were stored in a circular
structure. Similarly, round-robin queues are better organized as circular
entities. Such organizations, known as circular lists, can be achieved vey
easily by linking the last and first node of the list together. That is, by
replacing the NULL in the next field of the last node by the address of the
first node of the list.
One big advantage of a circular list is that each node of the list can be
reached from every other node (in O(N)). Traversal of the list can start
from any node and ends when the start node is reached again. Viewed
another way, a circular linked-list has no designated start or end nodes
and pointer to any node can serve as the starting point.
It is much easier to implement a circular list if, instead of the first node,
pointer to the last node (also called the tail) is maintained. The tail pointer
provides access to both the last and first nodes in the list in O(1). It is also
helpful in applications like queue where access to both ends of the list is
required.
Circular lists can be implemented with or without the dummy head/tail
node. Partial implementation of the list with a pointer to tail is given in
Figure…. Because all nodes of the list are connected with one another and
traversal can start from any node, iteration becomes a little complex and
requires handling of some special cases. There is also a danger of ending
up in an infinite loop if code is not written carefully.
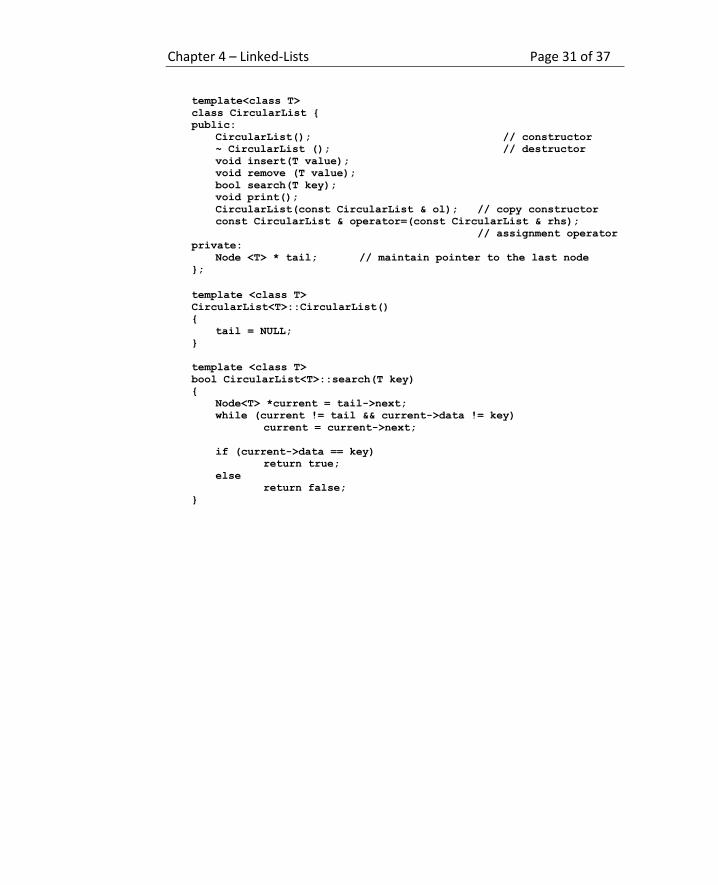
Chapter 4 – Linked-Lists Page 31 of 37
template<class T>
class CircularList {
public:
CircularList(); // constructor
~ CircularList (); // destructor
void insert(T value);
void remove (T value);
bool search(T key);
void print();
CircularList(const CircularList & ol); // copy constructor
const CircularList & operator=(const CircularList & rhs);
// assignment operator
private:
Node <T> * tail; // maintain pointer to the last node
};
template <class T>
CircularList<T>::CircularList()
{
tail = NULL;
}
template <class T>
bool CircularList<T>::search(T key)
{
Node<T> *current = tail->next;
while (current != tail && current->data != key)
current = current->next;
if (current->data == key)
return true;
else
return false;
}
Chapter 4 – Linked-Lists Page 32 of 37
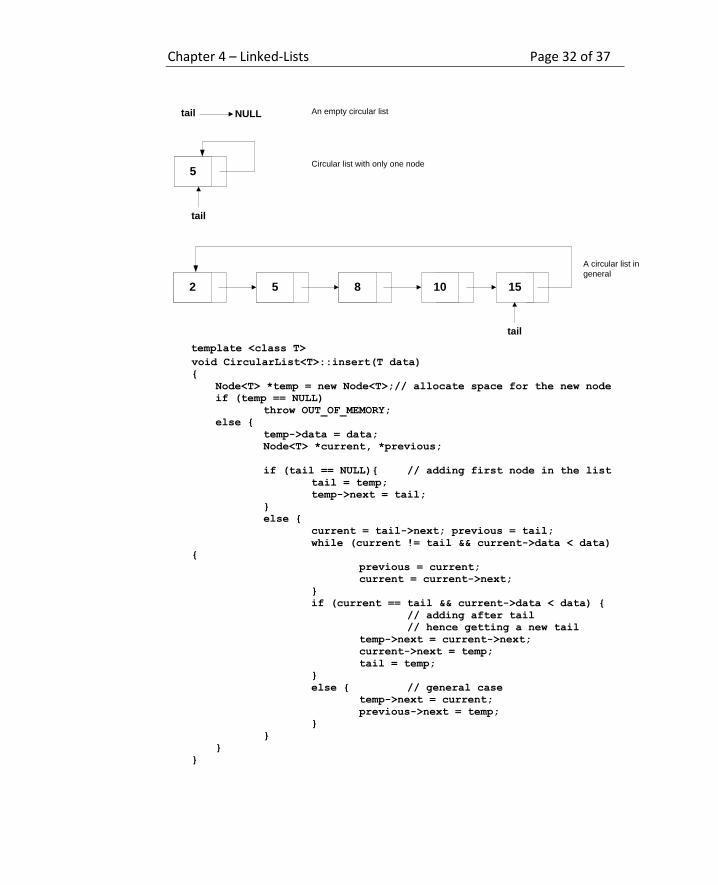
2 5 8 10 15
tail
tail NULL
5
tail
An empty circular list
Circular list with only one node
A circular list in
general
template <class T> void CircularList<T>::insert(T data)
{
Node<T> *temp = new Node<T>;// allocate space for the new node
if (temp == NULL)
throw OUT_OF_MEMORY;
else {
temp->data = data;
Node<T> *current, *previous;
if (tail == NULL){ // adding first node in the list
tail = temp;
temp->next = tail;
}
else {
current = tail->next; previous = tail;
while (current != tail && current->data < data)
{
previous = current;
current = current->next;
}
if (current == tail && current->data < data) {
// adding after tail
// hence getting a new tail
temp->next = current->next;
current->next = temp;
tail = temp;
}
else { // general case
temp->next = current;
previous->next = temp;
}
}
}
}
Chapter 4 – Linked-Lists Page 33 of 37
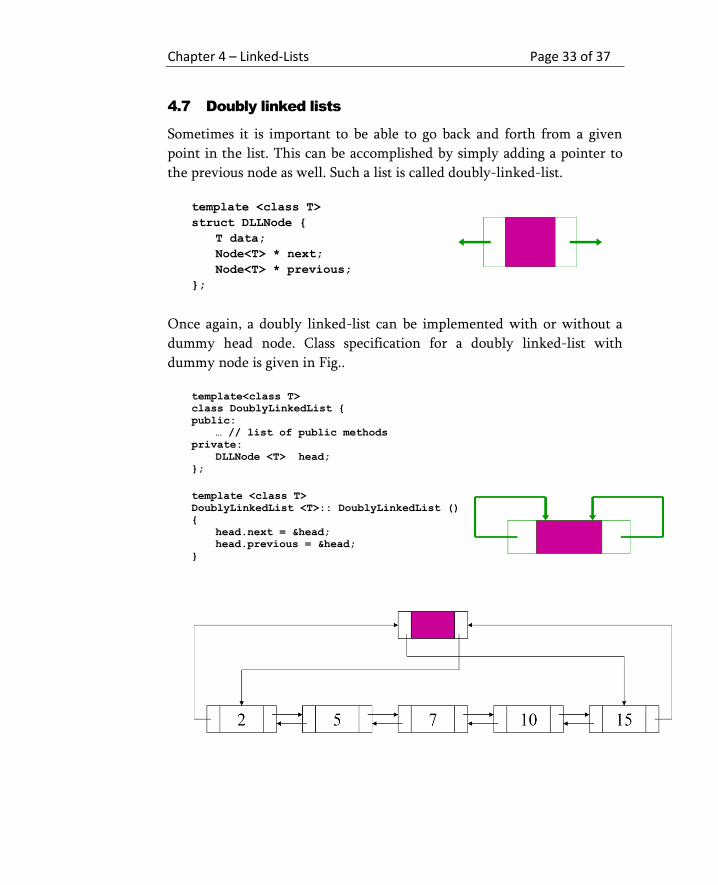
4.7 Doubly linked lists
Sometimes it is important to be able to go back and forth from a given
point in the list. This can be accomplished by simply adding a pointer to
the previous node as well. Such a list is called doubly-linked-list.
template <class T>
struct DLLNode {
T data;
Node<T> * next;
Node<T> * previous;
};
Once again, a doubly linked-list can be implemented with or without a
dummy head node. Class specification for a doubly linked-list with
dummy node is given in Fig..
template<class T>
class DoublyLinkedList {
public:
… // list of public methods
private:
DLLNode <T> head;
};
template <class T>
DoublyLinkedList <T>:: DoublyLinkedList ()
{
head.next = &head;
head.previous = &head;
}
Chapter 4 – Linked-Lists Page 34 of 37
In a doubly linked list, for any node pointed to by “p”, we have the
following:
p == p->next->previous
p == p->previous->next
Given a pointer to any node, we use this property to add/remove the node
itself or the node before or after it in O(1).
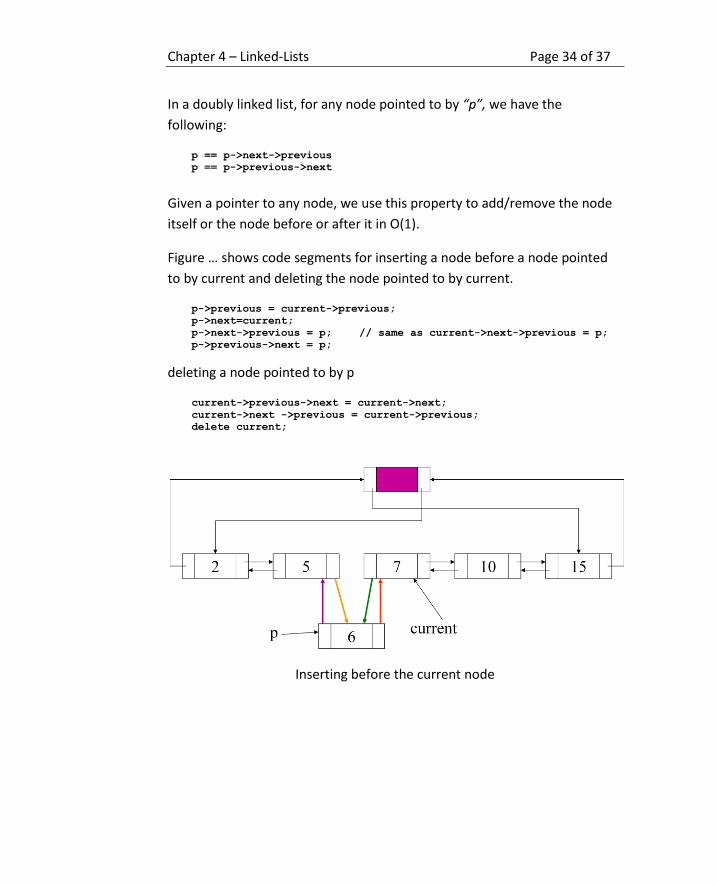
Figure … shows code segments for inserting a node before a node pointed
to by current and deleting the node pointed to by current.
p->previous = current->previous;
p->next=current;
p->next->previous = p; // same as current->next->previous = p;
p->previous->next = p;
deleting a node pointed to by p
current->previous->next = current->next;
current->next ->previous = current->previous;
delete current;
Inserting before the current node
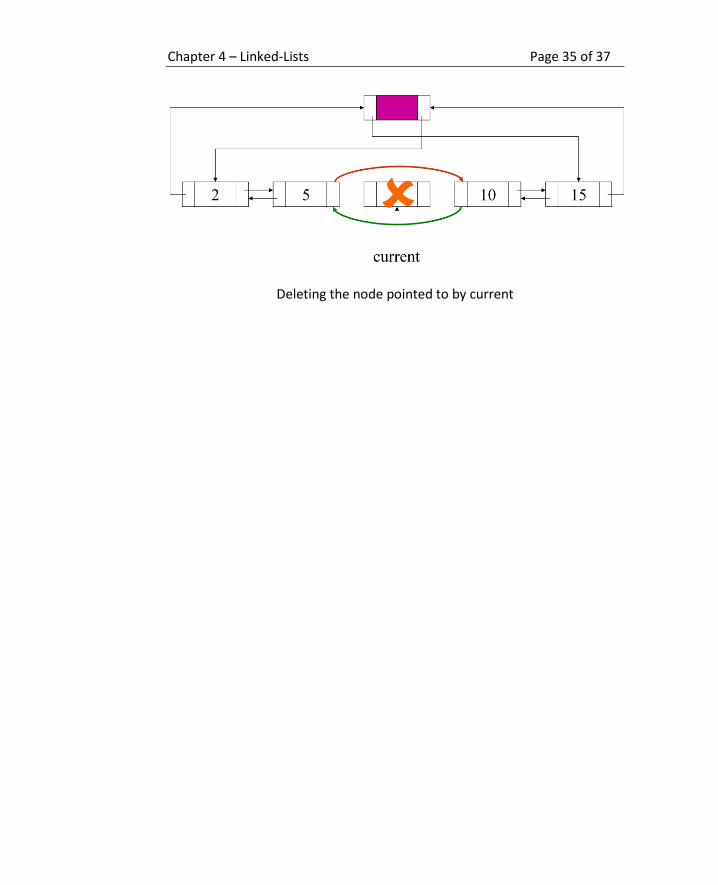
Chapter 4 – Linked-Lists Page 35 of 37
Deleting the node pointed to by current
Chapter 4 – Linked-Lists Page 36 of 37
4.8 Tradeoffs and Comparison
Like any field and application, no method of implementing lists is well
suited to all situations – there are tradeoffs that one needs to be aware of.
Following is a comparison of different data structures discussed so far.
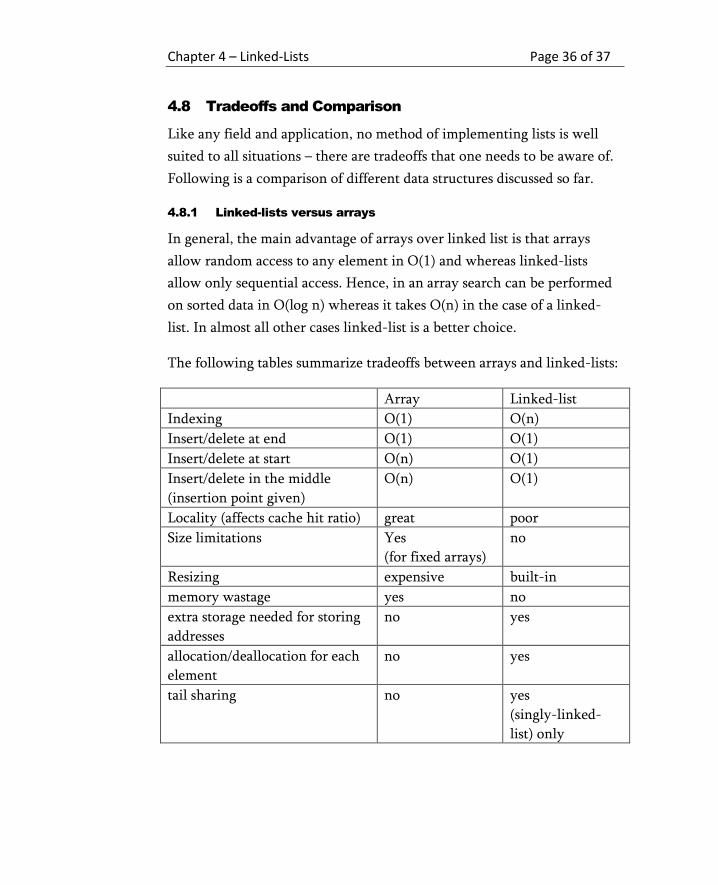
4.8.1 Linked-lists versus arrays
In general, the main advantage of arrays over linked list is that arrays
allow random access to any element in O(1) and whereas linked-lists
allow only sequential access. Hence, in an array search can be performed
on sorted data in O(log n) whereas it takes O(n) in the case of a linked-
list. In almost all other cases linked-list is a better choice.
The following tables summarize tradeoffs between arrays and linked-lists:
Array Linked-list
Indexing O(1) O(n)
Insert/delete at end O(1) O(1)
Insert/delete at start O(n) O(1)
Insert/delete in the middle
(insertion point given)
O(n) O(1)
Locality (affects cache hit ratio) great poor
Size limitations Yes
(for fixed arrays)
no
Resizing expensive built-in
memory wastage yes no
extra storage needed for storing
addresses
no yes
allocation/deallocation for each
element
no yes
tail sharing no yes
(singly-linked-
list) only
Chapter 4 – Linked-Lists Page 37 of 37
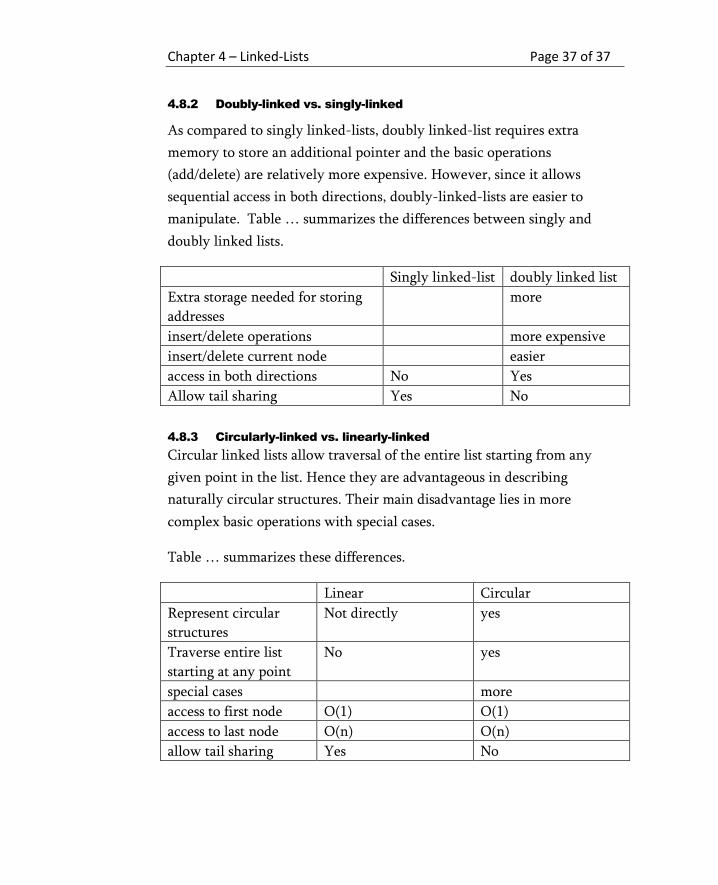
4.8.2 Doubly-linked vs. singly-linked
As compared to singly linked-lists, doubly linked-list requires extra
memory to store an additional pointer and the basic operations
(add/delete) are relatively more expensive. However, since it allows
sequential access in both directions, doubly-linked-lists are easier to
manipulate. Table … summarizes the differences between singly and
doubly linked lists.
Singly linked-list doubly linked list
Extra storage needed for storing
addresses
more
insert/delete operations more expensive
insert/delete current node easier
access in both directions No Yes
Allow tail sharing Yes No
4.8.3 Circularly-linked vs. linearly-linked
Circular linked lists allow traversal of the entire list starting from any
given point in the list. Hence they are advantageous in describing
naturally circular structures. Their main disadvantage lies in more
complex basic operations with special cases.
Table … summarizes these differences.
Linear Circular
Represent circular
structures
Not directly yes
Traverse entire list
starting at any point
No yes
special cases more
access to first node O(1) O(1)
access to last node O(n) O(n)
allow tail sharing Yes No