Embed Size (px)
Citation preview
CHAPTER 3 USING NUCLEAR TECHNIQUES
105
CHAPTER 3 A PRACTICAL GUIDE TO USING NUCLEAR TECHNIQUES IN THE
LABORATORY, GLASSHOUSE AND FIELD
3.1 GENERAL LABORATORY PRACTICE
3.1.1 CLEANING LABORATORY GLASSWARE Good laboratory practice demands clean glassware. Glassware is the basic tool in laboratory analysis and if dirty can lead to inaccurate results and wasted time. The following washing procedures are sufficient for glassware to be used in most macro- and micro-nutrient analyses.
A. General glassware
i Initial rinsing Immediately after use, rinse glassware in tap water to remove contaminants. For more stubborn stains, soil residues, etc., rinsing may not be adequate and thorough scrubbing will be needed. It is good practice to have a complete set of brushes on hand to fit large and small test tubes, funnels and various flasks and bottles for this purpose.
ii Soaking Completely immerse rinsed glassware in a 2% solution of phosphorus-free detergent and tap water. Detergent concentration may be increased depending upon contamination.
Normal contamination - 2% Heavy contamination - 5% Persistent contamination up to 20% Soaking should be for 2–24 hours; any longer than this and the glassware becomes slimy and the soaking water smelly. Soaking can be conveniently carried out in plastic tubs which are easily moved about and emptied every 2 days. Before the tubs are refilled they should be scrubbed to remove the sediment and slime which quickly builds up during use. Ideally, water used for soaking should be warm, say 50oC, though obviously this will cool after a few hours.
iii Final rinsing After soaking, the glassware must be thoroughly rinsed to remove all traces of detergent and contaminants. This is done by rinsing three times in warm tap water, followed by three rinses in distilled water.
iv Drying Non-volumetric glassware (e.g. beakers, plasticware, bottles, etc.) is dried by placing in a clean oven at temperatures of up to 140oC or by air drying. The oven shelves should be contamination-free (e.g. not rusty) and, ideally, stainless steel. The glassware can also be placed in stainless steel baskets for oven or air drying.
Volumetric glassware, e.g. volumetric flasks, cannot be dried at temperatures above 80oC. The constant expansion and contraction experienced at temperatures above this renders accurately calibrated glassware useless.
Hanging glassware on pegs to air dry should be avoided as they are a source of contamination. An alternative is to hang the glassware through holes which are large enough to fit most of the glassware through but small enough to hold the base, e.g. volumetric flasks and measuring cylinders. Glassware that is unsuitable for this method of drying, e.g. beakers, can be left in a clean, dust free area to air-dry.
v Storage Glassware should not be put into storage until completely dry otherwise fungal growth can occur. As a further precaution against contamination, glassware can be covered with plastic film or lids may be fitted.
CHAPTER 3 USING NUCLEAR TECHNIQUES
106
B. Pipettes Due to their narrow bore, pipettes require special treatment when considering cleaning methods. Cleaning can be facilitated by the use of a pipette soaker and washer which allows for the pipettes to fill and empty several times until clean.
The following procedure is used for pipette cleaning:
i Initial rinsing Rinse the pipettes in tap water immediately after use.
ii Soaking Completely immerse pipettes in a 2% solution of detergent and tap water and leave to soak for 2–24 hours. Ideally, the pipettes should be soaked vertically, with the tip up, in a pipette soaker.
iii Final rinsing The pipettes must be rinsed several times with tap water, inside and out, until all detergent is removed. Following this, rinse 3 times in distilled water. This can easily be done in a pipette washer. Alternately, connect the pipette to a water or mechanical vacuum pump, using rubber tubing of suitable bore, and suck the water through the pipette.
iv Drying Dry the pipettes with 2 or 3 quick rinses of acetone. This should be done soon after the distilled rinse but before the pipettes have air-dried and formed water marks inside the tube. This is best done by sucking through small volumes of acetone and air successively. Allow all acetone to evaporate; drain by leaving pipettes upright before storing.
C. Acid soaking Glassware, including pipettes, which is to be used for micro-nutrient analysis should be acid-washed to minimise contamination. It is important to note that acid should not be allowed to come into contact with a piece of glassware before the detergent is thoroughly removed. If this happens, a film of grease may be formed and, in the case of pipettes, this causes inaccurate delivery.
When working with acid observe the usual safety procedures by wearing protective glasses and gloves. It is important to note that coloured rubber gloves sometimes contain trace elements which may contaminate the glassware when handled. An alternative is to use disposable plastic gloves.
To acid-soak glassware, follow the washing procedures described, including Rinsing step above. Then:
i Acid soak Completely immerse the glassware in 10% nitric acid or 10% hydrochloric acid made up in distilled water. The glassware is left to soak overnight.
ii Rinsing After soaking rinse 3 times in ultrapure (i.e. distilled-deionized water).
iii Drying Dry glassware in a clean, stainless steel shelved oven or air-dry in a warm dust-free environment. Pipettes should be air-dried. Do not use acetone as it may leave trace contamination.
3.1.2 EQUIPMENT MAINTENANCE NOTE: It is essential that the Instruction Manuals supplied with laboratory equipment be read, as
they generally give a simple and concise guide to maintenance, use and problem-solving.
CHAPTER 3 USING NUCLEAR TECHNIQUES
107
A. Care of balances
Never move the balance when the power is on or if the balance has not been correctly locked.
Check that the balance is level; if not, operate the adjustable feet until the spirit level bubble is centrally located in the viewer. Adjustments to the level should only be done when the balance is turned off.
Ensure balance is clean and tared prior to use.
Ensure all doors on the weighing chamber of an analytical balance are fully closed and the reading is stable prior to recording the weight.
Never allow any liquid or solid chemical to come into contact with the pan as corrosion and incorrect weighing will result.
Ensure balance has been recently calibrated prior to use and that both accuracy and precision are good.
Cover the balance, if possible, when not in use.
Ideally, the balance should be left connected to the power supply and switched on so that thermal equilibrium is maintained. If balances must be switched off, allow for a warming-up period to achieve thermal equilibrium.
Locate all balances on a solid base in an area away from direct sunlight, air currents (e.g. fans, doors, open windows) and vibrations.
B. Care of pH meters
Locate the meter in an area of the bench which is free from other instruments to minimise electrical interference.
If possible, store the meter in a moisture-free environment. (This is important for all electrical equipment.)
Standardise the pH meter daily before carrying out pH measurements.
Always calibrate with a buffer which is as close as possible to the unknown pH range.
i Maintenance of pH electrodes After measurement, remove electrode(s) from sample, wash and blot dry.
When an electrode is used intermittently, disconnect and leave in an upright position immersed in pH buffer 4. The salt bridge should not be allowed to dry out.
Keep reference chamber topped up with electrolyte when not in use for short periods of time.
For long term storage, drain electrolyte and wash reference chamber several times with distilled water. Stand electrode(s) in distilled water for 12 hours to remove potassium chloride from the salt bridge. Dry and store in a box. Before use, rinse and fill with electrolyte solution, then, soak in pH buffer 4.
ii Cleaning of pH electrodes Both the membrane and salt bridge must be clean at all times. Do not allow fats, oil, proteins, soil, etc. to dry on the membrane or salt bridge.
The membrane may be cleaned with solvents, detergents or acid. Place a small amount of acetone, ethanol, etc. on cotton wool and gently wipe the membrane. Abrasive materials must not be used. For acid cleaning, use 20% sulfuric acid initially, followed by chromic acid if this is unsuccessful. After cleaning, wash well with tap water and soak before use in pH 4 buffer.
To clean the salt bridge, apply a vacuum or immerse the salt bridge in boiling water for 5–20 seconds.
iii Rejuvenation Some improvement in the response of the aged electrodes may be obtained by the following treatment:
CHAPTER 3 USING NUCLEAR TECHNIQUES
108
Alternate the electrode between 0.1M hydrochloric acid and 0.1M ammonia for 5 min. intervals. Rinse with water.
Recalibrate using appropriate buffers.
iv Precautions with glass electrodes The sensitivity of the glass electrode will be affected by:
Continuous use; after which the electrode may need regenerating;
Protein buildup on the membrane, which must be removed;
Dehydrating agents (e.g. ethanol) or concentrated acids, which dehydrate the membranes. The presence of water in the glass is essential; pH function is impaired when the glass is dehydrated, but can be restored by subsequent immersion in distilled water for several hours or overnight.
Temperature increase will cause a fall in pH and this must be accommodated for by either (a) a temperature probe in the sample for automatic adjustment, or (b) knowing the temperature of the sample when the pH is measured, then manually correcting.
Scratching or fracturing of the glass membrane. Under these circumstances, a new glass electrode will be required. New electrodes will need conditioning by placing them in 0.lM HCl overnight.
v Sources of error The following are likely sources of error in pH measurement.
Solutions should be stirred when taking readings. This minimises the effect of gradients and reduces the response time.
For best results the standard buffers and sample should be at the same temperature. If the temperature differential is too great it may take up to 30 min for the system to regain stability.
Solutions with low conductivity, e.g. distilled H2O or non-buffered solutions, take a considerable time to equilibrate and the pH readings tend to drift.
The salt bridge (porous plug) must be completely immersed in the solution being measured.
If the porous plug clogs up, the electrolyte will not flow freely into the sample resulting in erratic readings.
The reference filling solution should occupy at least 2/3 of the chamber.
The electrode should be stored wet when not in use (except for long term storage, see previous notes).
Sensitivity to [H+] is reduced if the pH sensitive glass membrane is dirty.
3.1.3 LABORATORY SAFETY No laboratory guide can be complete without the inclusion of a segment on laboratory safety. The following notes outline general safety instructions and chemical hazards encountered in an analytical laboratory.
A. General safety instructions
i Dress and protective clothing Laboratory coats and closed shoes should be worn at all times.
Protective equipment must be worn when handling chemicals and dangerous equipment (e.g. faceshields, safety glasses, gloves, film badges, etc.)
ii Conduct in the laboratory Note location of safety showers, fire blankets, first aid boxes, fire extinguishers and fire exits at places of work.
Be aware of hazards related to working conditions.
CHAPTER 3 USING NUCLEAR TECHNIQUES
109
Smoking, eating and drinking should not be permitted in laboratories due to the presence of flammable substances and the risk of ingesting poisonous substances.
Hands must be washed after handling any chemicals.
Persons engaged in any process requiring careful attention should not be distracted.
B. Housekeeping Good housekeeping is essential. General cleanliness reduces exposure to hazards and promotes safety, efficiency and accuracy.
Fire doors must be kept closed at all times and not obstructed.
All containers must be clearly and appropriately labelled.
Chemicals to be discarded must be disposed of immediately
(i) Inorganic — down the sink with plenty of water (ii) Organic — in residue container
C. Laboratory procedures Glassware should be used with care. Clean up all breakages.
Never pipette hazardous chemicals by mouth Use a pipette filler or an automatic dispenser.
Corrosive liquids, e.g. acids, alkalis, must be handled with care.
Hazardous or toxic chemicals, particularly those which give off strong, irritating or poisonous vapours, should be handled in the fume cupboard.
Make up solutions by gradually adding solid to solvent. Always add acid to water when diluting.
Solvents, e.g. acetone, chloroform, are often highly flammable and sometimes poisonous. Avoid inhaling vapour, use in small amounts and keep away from sources of ignition.
Bunsen burners must be operated on the open bench. Do not leave unattended. Flammable chemicals must not be left near a lighted burner or hotplate. Try to eliminate "hot spots" by heating slowly and continuously stirring. Care must be taken when heating test tubes containing solution; point away from persons nearby.
Any electrical apparatus must be kept dry.
Winchester bottles and other large glass vessels must not be carried by the neck. One hand should be placed below the vessel and the other around the neck.
Ventilate the work area.
D. Safety and first aid All chemicals should be considered as potentially harmful substances. When considering the use of any chemical for an experiment, thought should be given to any possible hazard associated with its use. Where a dangerous substance is to be used, alternative safer chemicals should be contemplated.
Information regarding the hazardous nature and safe use of chemicals not mentioned in these notes may be found in one of the references given at the end of the notes. If no information is available in the reference books, then the manufacturer should be contacted. In general, the following rules for handling chemicals will minimize any hazard. Do not substitute these rules for obtaining definite information. Some chemicals are more dangerous and may require special precautions and first aid treatment.
Avoid inhaling vapour or dust.
Avoid contact of the chemical with the eyes or skin. The use of safety glasses and gloves will facilitate this.
Do not allow mouth contact with the chemical.
CHAPTER 3 USING NUCLEAR TECHNIQUES
110
The following general advice regarding first aid in the event of an accident with a chemical will be found useful.
Vapour or dust inhaled: remove patient from exposure, rest and keep warm. If necessary obtain medical attention.
Affected eyes: irrigated thoroughly with a copious supply of running water. In severe cases or where splashing has occurred, obtain medical attention.
Skin contact: remove affected clothing and thoroughly wash affected part of the body with a copious supply of running water. It may be necessary to obtain medical attention.
If swallowed: wash mouth out thoroughly with water. Obtain medical attention. ACETONE Identification: Colourless liquid with characteristic odour. Miscible in water.
Health hazard: Inhalation of the vapour may cause dizziness, narcosis and coma. The liquid irritates the eyes and may cause severe damage. If swallowed, may cause gastric irritation, narcosis and coma.
Fire hazard: Flammable. Flash point -18oC. Extinguish with water spray, dry powder, carbon dioxide or vaporising liquids.
Precaution: Avoid inhaling vapour and avoid contact with eyes. Wear safety glasses. Use in small quantities and keep well away from sources of ignition.
First aid: Vapour inhaled: remove from exposure, rest and keep warm.
Affected eyes: irrigate thoroughly with water; in severe cases or where splashing has occurred, obtain medical attention.
If swallowed: give plenty of water to drink. If a large amount has been swallowed, obtain medical attention.
Spillage disposal: Shut off possible sources of ignition. Wear face shield and gloves. Mop up with plenty of water and run to waste, diluting greatly with running water. Ventilate area well to evaporate remaining liquid and dispel vapour.
AMMONIUM HYDROXIDE (NH4OH)
Identification: Colourless liquid with a pungent small.
Health hazard: Corrosive to all tissues if inhaled, ingested or spilt on eyes or skin.
Fire hazard: None.
Precaution: Avoid breathing vapour and prevent contact with eyes and skin. Wear a face shield and gloves and use a fumehood when handling the concentrated reagent. Safety glasses may be worn instead of the face shield when handling dilute solutions.
Release the cap of bottles of concentrated reagent with care because of pressure buildup in bottle.
First aid: Vapour inhaled: remove from exposure, rest and keep warm. In severe cases, obtain medical attention.
Affected eyes: irrigate thoroughly with a copious supply of water. Obtain medical attention.
Skin contact: remove affected clothing and thoroughly wash affected part of the body with a copious supply of running water. Burns must receive immediate medical attention.
If swallowed: wash out mouth thoroughly with water. Give plenty of water to drink followed by vinegar or 1% acetic acid. Obtain medical attention.
CHAPTER 3 USING NUCLEAR TECHNIQUES
111
Spillage disposal: Wear breathing apparatus and gloves. Mop up with plenty of water. Run this to waste and dilute greatly with running water.
AMMONIUM META VANADATE (NH4VO3)
Identification: Colourless crystalline powder, soluble in water.
Health hazard: Harmful dust which may cause irritation of the respiratory system, chest constriction and coughing. Dust irritates eyes and may cause conjunctivitis. If ingested, causes vomiting, excessive salivation and diarrhoea. Large doses may damage the nervous system. The dust may cause skin irritation.
Fire hazard: None.
Precaution: Avoid inhaling dust. Wear safety glasses.
First aid: If inhaled: remove from exposure, rest and keep warm. In severe cases, obtain medical attention.
Affected eyes: irrigate thoroughly with water. Obtain medical attention.
Skin contact: wash off with a copious supply of water.
If swallowed: wash out mouth thoroughly with water. Obtain medical attention.
Spillage disposal: Dissolve in water and mop up and run to waste diluting greatly with running water.
ANTIMONY POTASSIUM TARTRATE (KSbO.C4H4O6)
Identification: White crystal, soluble in water.
Health hazard: Poisonous. Some antimony compounds cause skin irritation and dermatitis. If taken internally, antimony compounds may cause burning of the mouth and throat, choking, nausea and vomiting.
Fire hazard: None.
Precaution: Avoid eye and skin contact. Wear safety glasses.
First aid: Affected eyes: irrigate with a copious supply of water.
Skin contact: wash thoroughly with soap and water.
If swallowed: wash out mouth thoroughly with water. Obtain medical attention.
Spillage disposal: The disposal of antimony compounds in any quantity must be considered in the light of local conditions and regulations.
Burial in an isolated area can be considered, as can gradual disposal with very high dilution, into a sewage system.
BROMINE (Br) Identification: Rhombic crystals or dark red liquid with characteristic odour and toxic
fumes. Slightly soluble in water.
Health hazard: Highly toxic — even the fumes cause serious burns and blisters to the skin. Fumes cause serious irritations to the eyes of mucous membranes and to the respiratory system. Severe exposure may cause pulmonary oedema or death. Bromine substances can produce depression, emaciation and, in severe cases, psychoses and mental deterioration.
Fire hazard: Moderate in the form of liquid or vapour by spontaneous chemical reaction with reducing agents. May react violently with a number of substances, some of the more common being acetone, ammonia, copper, ethanol, phosphorus, hydrogen, potassium, sodium, lithium and mercury.
Precaution: Highly dangerous — requires special handling. When heated, emits highly toxic fumes; will react with water or steam to produce toxic and corrosive fumes; can react vigorously with reducing agents.
CHAPTER 3 USING NUCLEAR TECHNIQUES
112
Avoid breathing vapour and prevent contact with eyes and skin. Keep ammonia water on hand to neutralize any drops that contact the skin. Wear gloves and safety glasses. Work in fume hood.
First aid: Vapour inhaled: remove from exposure, rest and keep warm. In severe cases, obtain medical attention. Apply artificial respiration if breathing has stopped.
Affected eyes: irrigate thoroughly with a copious supply of running water. Obtain medical attention.
Skin contact: remove affected clothing and thoroughly wash affected part with a copious supply of running water. Burns must receive medical attention.
If swallowed: wash out mouth thoroughly with water and then give plenty of water to drink. Obtain medical attention.
Spillage disposal: Cover with a saturated solution of sodium bisulfite and 3M sulfuric acid. Mix. Spray with H2O and scoop into a large container of H2O, neutralize with sodium carbonate and flush to sewer with a large excess of H2O. Wash site with a solution of sodium bisulfite followed by soap and H2O.
CHLOROFORM (trichloromethane) Identification: Colourless volatile liquid with characteristic colour. Immiscible with water.
Health hazard: The vapour has anaesthetic properties, causing drowsiness, giddiness, headache, nausea, vomiting and unconsciousness. The vapour and liquid irritate the eyes causing conjunctivitis. The liquid is poisonous if taken by mouth.
Fire hazard: Slight when exposed to high heat, otherwise practically none.
Hazardous reactions: Vigorous reaction with acetone in the presence of KOH or Ca(OH)2; may react explosively with fluorine, N2O4, Al, Li, Na, Na/methanol, NaOH/methanol.
Precaution: Avoid breathing vapour. Avoid contact with eyes and skin. Wear safety glasses and use only in small quantities.
First aid: Vapour inhaled: remove from exposure, rest and keep warm. In severe cases, obtain medical attention. Apply artificial respiration if breathing stopped.
Affected eyes: irrigate thoroughly with water. In severe cases or where splashing has occurred, obtain medical attention.
Skin contact: drench with water and wash thoroughly with soap and water. Remove and air thoroughly any contaminated clothing.
If swallowed: wash out mouth thoroughly with water. Obtain medical attention.
Spillage disposal: Instruct others to keep at safe distance. Wear breathing apparatus and gloves. Apply dispersing agent, if available, and work to an emulsion with brush and water. Run this to waste, diluting greatly with water. If dispersant is not available, absorb onto sand, shovel into bucket(s) and transport to safe open area for atmospheric evaporation. Site of spillage should be washed thoroughly with water and detergent. Ventilate area of spillage thoroughly to dispel vapour.
CHAPTER 3 USING NUCLEAR TECHNIQUES
113
HYDROGEN PEROXIDE (H2O2)
Identification: Colourless liquid, miscible with water.
Health hazard: Corrosive to all tissues. If swallowed, sudden evolution of oxygen may cause injury by acute distension of stomach. May cause nausea, vomiting and internal bleeding.
Fire hazard: Strong oxidizing agent. Promotes fire. Avoid mixing with organic substances.
Precaution: Prevent contact with eyes and skin. Wear face shield and gloves when handling the concentrated reagent. Safety glasses may be worn instead of a face shield when handling dilute solutions.
Release the cap of bottles of concentrated reagent with care because of pressure buildup in bottle.
First aid: Affected eyes: irrigate thoroughly with copious supply of running water. Obtain medical attention.
Skin contact: remove affected clothing and thoroughly wash affected part with a copious supply of running water. Burns must receive medical attention.
If swallowed: wash out mouth thoroughly with water and then give plenty of water to drink. Obtain medical attention.
Spillage disposal: Wear face shield, gloves. Mop up with plenty of water. Run to waste, diluting greatly with running water.
HYDROCHLORIC ACID (HCl)
Identification: Colourless, fuming liquid with pungent small; miscible with water.
Health hazard: Corrosive to all tissues if inhaled or ingested or spilt on the skin.
Fire hazard: None.
Precaution: Avoid breathing vapour and prevent contact with eyes and skin. Wear face shield and gloves when handling the concentrated reagent. Safety glasses may be worn instead of a face shield when handling dilute solutions.
First aid: Vapour inhaled: remove from exposure, rest and keep warm. In severe cases, obtain medical attention.
Affected eyes: irrigate thoroughly with a copious supply of running water. Obtain medical attention.
Skin contact: remove affected clothing and thoroughly wash affected part of the body with a copious supply of running water. Burns must receive medical attention.
If swallowed: wash out mouth thoroughly with water. Give plenty of water to drink, followed by milk of magnesia. Obtain medical attention.
Spillage disposal: Instruct others to keep at a safe distance. Wear breathing apparatus and gloves. Spread soda ash liberally over spillage and mop up cautiously with of water. Run this to waste and dilute greatly with running water.
MERCURIC THIOCYANATE (Hg(SCN)2)
Health hazard: Highly toxic. Mercury is a general protoplasmic poison; it circulates in the blood and is stored in the liver, kidneys, spleen and bone. In high doses it affects the central nervous system.
Fire hazard: None.
Precaution: Dangerous when heated to decomposition or on contact with acid or acid fumes. Emits toxic fumes.
CHAPTER 3 USING NUCLEAR TECHNIQUES
114
Avoid breathing vapour when heated and avoid breathing dust. Prevent contact with eyes and skin. Wear safety glasses and gloves when handling.
First aid: Dust inhaled: remove from exposure, rest and keep warm. In severe cases, obtain medical attention.
Affected eyes: irrigate thoroughly and continuously with water until medical attention has been obtained.
Skin contact: remove affected clothing and thoroughly wash affected part of body with a copious supply of running water.
If swallowed: wash out mouth thoroughly with water. Give plenty of water to drink. Obtain medical attention.
Spillage disposal: Small quantities of the compound can be swept up, dissolved in water or acid and run to waste at very high dilution. If burial is carried out in an isolated area, the solid compound should first be diluted 10–20 times by weight with sand.
NITRIC ACID (HNO3)
Identification: Colourless or pale yellow fuming liquid, miscible with water.
Health hazard: Corrosive to all tissues if inhaled or ingested or spilt on the skin.
Fire hazard: Strong oxidizing agent. Promotes fire. Avoid mixing with organic substances.
Precaution: Avoid breathing vapour and prevent contact with eyes and skin. Wear a face shield and gloves when handling the concentrated reagent. Safety glasses may be worn instead of a face shield when handling dilute solutions.
First aid: Vapour inhaled: remove from exposure, rest and keep warm. In severe cases, obtain medical attention.
Affected eyes: irrigate thoroughly with a copious supply of running water. Obtain medical attention.
Skin contact: remove affected clothing and thoroughly wash affected part of the body with a copious supply of running water. Burns must receive medical attention.
If swallowed: wash out mouth thoroughly with water. Give plenty of water to drink, followed by milk of magnesia. Obtain medical attention.
Spillage disposal: Instruct others to keep at a safe distance. Wear breathing apparatus and gloves. Spread soda ash liberally over spillage and mop up cautiously with of water. Run this to waste and dilute greatly with running water.
PERCHLORIC ACID (HClO4)
Identification: Colourless liquid, miscible with water.
Health hazard: Corrosive to all tissues if inhaled or ingested or spilt on the skin or eyes.
Fire hazard: Strong oxidizing agent. Promotes fire. Avoid mixing with organic substances.
Precaution: Prevent contact with eyes and skin. Wear a face shield and gloves when handling the concentrated reagent. Safety glasses may be worn instead of a face shield when handling dilute solutions.
First aid: Affected eyes: irrigate thoroughly with a copious supply of running water. Obtain medical attention.
Skin contact: remove affected clothing and thoroughly wash affected part of the body with a copious supply of running water. Burns must receive medical attention.
CHAPTER 3 USING NUCLEAR TECHNIQUES
115
If swallowed: wash out mouth thoroughly with water. Give plenty of water to drink, followed by milk of magnesia. Obtain medical attention.
Spillage disposal: Instruct others to keep at a safe distance. Wear breathing apparatus and gloves. Spread soda ash liberally over spillage and mop up cautiously with of water. Run this to waste and dilute greatly with running water.
PHENOL (carbolic acid)
Identification: Colourless to pink crystals, having a distinctive odour and being somewhat soluble in water.
Health hazard: Vapour irritates the respiratory system and eyes. Skin contact causes softening and whitening followed by the development of painful burns. Its rapid absorption through the skin may cause dizziness, rapid and difficult breathing, weakness and collapse. If swallowed, it causes severe abdominal pain, nausea, vomiting and internal damage.
Fire hazard: Flammable at high temperature. Flashpoint 85oC.
Precaution: Avoid inhaling vapour. Avoid contact with eyes and skin. Wear face shield.
First aid: Vapour inhaled: remove from exposure, rest and keep warm. In severe cases, obtain medical attention.
Affected eyes: irrigate thoroughly and continuously with water until medical attention has been obtained.
Skin contact: remove affected clothing, drench with water and swab affected skin with glycerol for at least l0 minutes. If contamination is other than slight, obtain medical attention.
If swallowed: induce vomiting by placing finger far back in throat, summon medical attention immediately. After vomiting has ceased, mouth should be thoroughly washed out with water.
Spillage disposal: Wear face shield or goggles, and gloves. Mix with sand and transport to safe open area for burial. Site of spillage should be washed thoroughly with water and soap or detergent.
POTASSIUM HYDROXIDE (KOH)
Identification: White, deliquescent pieces, lumps or sticks having crystalline fracture. Soluble in water.
Health hazard: Highly toxic. Highly irritant to skin, eyes and mucous membranes. A very powerful caustic. If taken by mouth results in severe internal irritation and damage.
Fire hazard: Moderate.
Precaution: Will react with water or steam to produce caustic solution and heat.
Prevent contact with eyes and skin. Wear a face shield and gloves when handling the concentrated reagent. Safety glasses may be worn instead of a face shield when handling dilute solutions.
First aid: Affected eyes: irrigate thoroughly with a copious supply of running water. Obtain medical attention.
Skin contact: remove affected clothing and thoroughly wash affected part of the body with a copious supply of running water. Burns must receive medical attention.
If swallowed: wash out mouth thoroughly with water. Give plenty of water to drink. Obtain medical attention.

CHAPTER 3 USING NUCLEAR TECHNIQUES
116
Spillage disposal: Wear face shield or goggles and gloves. Shovel into a large volume of water in an enamel or polythene vessel and stir to dissolve; run the solution to waste diluting greatly with running water.
SODIUM HYDROXIDE (NaOH) Identification: White to colourless pellets soluble in water.
Health hazard: The solid and strong solutions of the compound are extremely corrosive to all tissues.
Fire hazard: None.
Precaution: Prevent contact with eyes and skin. Wear face shield and gloves when handling the concentrated reagent. Safety glasses may be worn instead of a face shield when handling dilute solutions.
First aid: Affected eyes: irrigate thoroughly with a copious supply of running water. Obtain medical attention.
Skin contact: remove affected clothing and thoroughly wash affected part of the body with a copious supply of running water. Burns must receive medical attention.
If swallowed: wash out mouth thoroughly with water. Give plenty of water to drink, followed by vinegar or 1% acetic acid. Obtain medical attention.
Spillage disposal: Wear face shield and gloves. Shovel solid into a polythene bucket and add a little at a time to a large volume of water. Run this to waste, diluting greatly with running water. Strong solution: mop up with water. Run this to waste, diluting greatly with running water.
SODIUM HYPOCHLORITE (bleach, NaClO) Identification: Colourless solution with strong chlorine smell.
Health hazard: Corrosive and irritant via ingestion and inhalation. Bleaches and may burn the skin.
Fire hazard: None, but anhydrous salt is highly explosive.
Precaution: Violent reaction with amines, ammonium acetate (NH4)2CO3, NH4NO3, ammonium oxalate (NH4)3PO4, cellulose.
Prevent contact with eyes and skin. Wear safety glasses and gloves when handling.
First aid: Affected eyes: irrigate thoroughly with a copious supply of running water. Obtain medical attention.
Skin contact: remove affected clothing and thoroughly wash affected part of the body with a copious supply of running water. Burns must receive medical attention.
If swallowed: wash out mouth thoroughly with water. Give plenty of water to drink. Obtain medical attention.
Spillage disposal: Wear face shield, goggles and gloves. Mop up with plenty of water and run to waste, diluting greatly with running water.
SULFURIC ACID (H2SO4)
Identification: Colourless, viscous liquid which reacts vigorously with water.
Health hazard: Corrosive to all tissues if inhaled or ingested or spilt on the skin.
Fire hazard: None.
Precaution: Prevent contact with eyes and skin. Wear face shield and gloves when handling the concentrated reagent. Safety glasses may be worn instead of a face shield when handling dilute solutions.
CHAPTER 3 USING NUCLEAR TECHNIQUES
117
Great care should be taken when diluting the acid with water. Small amounts of acid should be added cautiously with stirring to water.
First aid: Affected eyes: irrigate thoroughly with a copious supply of running water. Obtain medical attention.
Skin contact: remove affected clothing and thoroughly wash affected part of the body with a copious supply of running water. Burns must receive medical attention.
If swallowed: wash out mouth thoroughly with water. Give plenty of water to drink, followed by milk of magnesia. Obtain medical attention.
Spillage disposal: Instruct others to keep at a safe distance. Wear breathing apparatus and gloves. Spread soda ash liberally over spillage and mop up cautiously with plenty of water — remember vigorous reaction with water. Run this to waste and dilute greatly with running water.
TOLUENE (methylbenzene, phenylmethane) C6H5CH3
Identification: Colourless liquid, benzol-like odour; immiscible with water.
Health hazard: Toluene is derived from coal tar and commercial grades usually contain small amounts of benzene as an impurity (N.B. benzene is highly toxic whether inhaled as a vapour or absorbed via the skin; it is a carcinogen). Acute poisoning resulting from exposures to high concentration of vapours are rare with toluene. Depending on exposure concentration, symptoms observed can be headache, nausea, loss of appetite, a bad taste, lassitude, impairment of co-ordination and reaction time.
Fire hazard: Slight when exposed to heat, flame or oxidizers. To fight fire, use foam, CO2 or dry chemical. Flash point 4.4oC
Precaution: When heated emits toxic fumes which can react vigorously with oxidizing materials. Avoid breathing vapour and avoid contact with eyes and skin. Wear safety glasses and gloves, Work in a fume hood.
First aid: Vapour inhaled: remove from exposure, rest and keep warm. In severe cases, obtain medical attention.
Affected eyes: irrigate thoroughly and continuously with water until medical attention has been obtained.
Skin contact: remove affected clothing. Thoroughly wash affected part of body with a copious supply of running water.
If swallowed: wash out mouth thoroughly with water. Give plenty of water to drink. Obtain medical attention.
3.2 BASIC DESIGN FEATURES OF RADIATION INSTALLATIONS The following has largely been extracted from IAEA Radiation Protection Procedures (IAEA 1973) and Austrian Radiation Protection Regulations (Moser 1978)
3.2.1 INTRODUCTION. The application of radioisotopes as tracers in agricultural research requires suitable facilities to handle these nuclides safely, ensuring that radiation workers are not exposed to undue external or internal radiation hazards.
The following suggestions for the proper design of a radioisotope lab focuses on the most common radiotracer nuclides (��-emitters) used in agricultural research, i.e. 32P (�-, 1.7 MeV, t/2=14.3d), 33P (�-, 0.25 MeV, t/2=25.3d), 35S (�-, 0.17 MeV, t/2=87d) and 14C (�-, 0.15 MeV, t/2=5730a), being handled as so called “open sources”, i.e. not in closed containments.
Note: that the following features are partly based on international (FAO/IAEA) and partly on national (Austrian) safety regulations. The latter should therefore not be taken as mandatory, but as
CHAPTER 3 USING NUCLEAR TECHNIQUES
118
additional suggestions and evidence for designing a laboratory for handling radionuclides. National safety regulations have to be observed.
3.2.2 CLASSIFICATION OF LABORATORY TYPES The large range and characteristics of radionuclides makes it impossible, to give a single general safety rule for handling open sources. The basis for the classification of laboratory types is the grouping of radionuclides according to their relative radiotoxicities per unit activity as well as the intended chemical operations and treatment of the radionuclides.
The classification of isotopes according to their relative radiotoxicity results in four groups. Group No. 1 showing radio nuclides of highest radiotoxicity, group No. 4 containing the least hazardous nuclides. The quantity of radionuclede that can be handled in each laboratory type is shown in Table 3.1.
All radiotracer nuclides mentioned above, i.e. 32P , 33P, 35S and 14C, belong to radiotoxicity group No.3.
Table 3.1. Classification of laboratories for handling radionuclides.
Group of radionuclide (radiotoxicity
group)
Type of laboratory required for levels of activity specified below [1 Ci = 3.7 x 10¹⁰ Bq]
Type 1 Type 2 Type 3
1 < 10 �Ci [< 3.7·105 Bq] 10 �Ci to 1 mCi [3.7·105 - 3.7·107 Bq] > 10 mCi [> 3.7·108 Bq]
2 < 100 �Ci [< 3.7·MBq] 100 �Ci to 100 mCi [3.7 - 3.7·102 MBq] > 100 mCi [> 3.7·109 Bq]
3 < 1 mCi [< 3.7·107 Bq] 1 mCi to 1 Ci [3.7·107 –3.7·1010 Bq] > 1Ci [> 3.7·1010 Bq]
4 <10 mCi [< 3.7·108 Bq] 10 mCi to 10 Ci [3.7·108 – 3.7·1011 Bq] > 10 Ci [> 3.7·1011 Bq] Modifying conditions
Multiplication factors for activity levels
Simple storage Very simple wet operations (e.g. preparation of aliquots of stock solutions) Normal chemical operations (e.g. analysis, simple chemical preparations) Complex wet operations (e.g. manipulation of powders) and work with volatile Radioactive compounds Dry and dusty operations (e.g. grinding)
x 100a x 10
x 1 x 0.1a x 0.1a x 0.1a
a These figures could be increased by one or more orders of magnitude if operations are carried out in closed boxes
Example.
As specified in Table 3.1, very simple wet operations with radionuclides of radiotoxicity group No.3 (e.g. 32P, 33P, 14C and 35S) can be performed in a type 1-laboratory up to an activity level of 10 mCi (or 3.7x 10⁸ Bq).
3.2.3 SAFETY REQUIREMENTS FOR RADIATION INSTALLATIONS
i General considerations. When choosing open radioactive substances for specific applications, care should be taken
�� To minimise levels of radioactivity and radiotoxicity. �� To minimise external exposure to radiation and the risks of radiation workers incorporating
radioactive substances into their bodies. �� To avoid uncontrolled spreading of these substances by scattering, spillage or formation of
gases, vapours, aerosols or dust; (e.g. by training in the handling with inactive substances, blind tests).
�� Work with the risk of air contamination has to be performed in a fume hood. �� Air sucked from fume hoods, digesters, closed working chambers etc. may only be released
following the national safety regulations.

CHAPTER 3 USING NUCLEAR TECHNIQUES
119
�� Radioactive substances should only be present in the working area in such quantities necessary for the intended chemical operation.
�� Radioactive substances not needed for the chemical operation have to be stored in a fume hood or in a separate storage room following the relevant national safety regulations.
�� Equipment and used materials may only be removed from the radiation area after removal of any unacceptable level of contamination (see Table 3.2).
�� Radioactive waste has to be collected in separate containers for liquid and solid burnable, and non-burnable waste.
�� Radioactive waste may only be disposed of following the relevant national safety regulations. A(as rule of thumb 32P, 33P and 35S can be stored in appropriately labelled containers in appropriate storage facilities for a minimum shelf time of ten half-lifes and then disposed of in the normal, uncontaminated waste after the remaining activity has been checked to be negligible. Note: National safety regulations for radioactive waste disposal must be observed.
ii Responsibilities of an overall radiation safety organisation The organisation in charge of an overall radiation safety program should be responsible for
�� The formulation and implementation of appropriate protection regulations. �� The siting, location and design of radiation installations with particular reference to (i) the types
of radiation sources to be used, (ii) environmental factors related with the disposal of radioactive material and to its dispersal both under normal and emergency conditions and (iii) the presence of occupied areas in the vicinity of the installation.
�� Structural design features which would have a bearing on (i) the possible spread of contamination throughout the area and (ii) ease of decontamination.
�� The setting up of house rules and well-defined operational procedures. �� The proper instruction of personnel in these rules and procedures. �� The provision of all necessary facilities for (I) personal monitoring, (ii) area monitoring, (iii)
medical supervision and (iv) the maintenance of all relevant records. �� The drawing up of procedures for meeting emergencies and the provision of all the facilities
necessary for carrying out these procedures. �� The maintenance of proper liaison with external agencies, such as the fires, police, transport
and public health authorities. �� The maintenance of cumulative whole-body radiation exposure records covering both internal
and external exposures. �� The initiation of appropriate action in cases of excessive exposures or radiation emergencies.
iii Location of a radiation installation in a building When a radiation installation is part of a large building, the following points should be borne in mind when deciding on the location of such an installation.
�� The installation should be located in a relatively unfrequented part of the building so that access to the area can be easily controlled.
�� Fire hazard potential should be minimal in the area chosen. �� The location of the installation and the ventilation facilities provided should be such, that
possibilities for the spread of both surface and airborne contamination are minimal. �� The location should be judiciously chosen so that, with minimum expenditure on shielding,
radiation levels can be effectively maintained within permissible limits in the immediate vicinity. �� Separate ventilated radioactive waste storage facilities have to be designed depending on the
expected levels of radiation1. Where only small quantities of radioactive materials are handled, they can be conveniently stored inside a fume hood, provided they are adequately shielded.
iv General safety rules for working with radionuclides �� A health physicist familiar with emergency procedures must be on the site during working
hours. �� All operational personnel involved in radiation work should be trained by participation in
appropriate radiation safety training programs in applying principle radiation protection procedures and the use of protective devices.
�� Personnel should be furnished with written copies of radiation protection procedures. �� Personnel should be provided with all instruments and equipment (here in particular pocket
dosimeters, film badges and �-contamination monitors, e.g. GM-counters) necessary to implement these procedures.

CHAPTER 3 USING NUCLEAR TECHNIQUES
120
�� Open radioactive substances never should be touched with bare hands, i.e. sufficient amounts of disposable rubber gloves should be available.
�� Radioactive solutions never should be pipetted with the mouth, i.e. hand — or mechanical pipetting and dispensing devices should be available.
�� Objects not necessary for the intended operations should be removed from the laboratory, especially food, tobacco products, medicines, and cosmetics.
�� Foot operated radioactive waste bins (for burnable, non-burnable and liquid waste) should be provided.
�� Paper towels and handkerchiefs should be available and used appropriately. �� Used paper towels etc. have to be disposed of as radioactive waste (solid, burnable). �� Regular checks for contamination of all workbenches has to be performed. �� Radiation workers have to check for contamination of hands, clothes, shoes etc. before
leaving the radiation area. �� Relevant actions for decontamination have to be taken in when the permissible level of
contamination is exceeded (seeTable 3.2).
v Special requirements for type 1-laboratories �� Warning signs with the label “RADIOACTIVE” placed at the entrance. �� Access only for authorised persons. �� Walls, floor and lab furniture should have smooth surfaces, easy to clean and non liquid
absorbent (e.g. workbenches can be covered with disposable PVC foil, tightly fixed with tape). �� Only absolutely necessary furniture may be present. �� Portable radiation monitor (e.g. �-monitors i.e. GM-counters for 32P,33P and 35S) available. �� Laboratory well ventilated and illuminated. �� Suitable washing facilities and possibly showers available. �� Relevant shielding against radiation (e.g plexiglass or perspex shielding with 0.6 cm (0.25
inch) wall thickness for shielding of ��-radiation up to 1 MeV, 2.5 cm (1 inch) for shielding of ��-radiation up to 4 MeV ).
�� Special washbasin for decontamination of used equipment should be available (generally minimal amount of washing water should be used).
�� Depending on the nuclide and activity levels separate effluent lines leading to specially built storage/delay tanks of adequate capacity should be provided following the relevant national safety regulations.
vi Special requirements for type 2-laboratories �� All rules applying for type 1-laboratories. Additionally: �� Workbenches made of fire inhibiting materials. �� Surface of floors may not absorb liquids and must be resistant to acids, organic solvents etc. �� Walls have to be painted with washable paint up to 3 m height; if the height of the room is less
the ceiling has to be painted accordingly. �� Work where a risk of air contamination is possible have to be performed in closed
decompression chambers including continuous control measurements of the surrounding air.
vii Special requirements for type 3-laboratories �� All rules applying for type 1 and type 2 laboratories. Additionally: �� Type 3-laboratories are required to be located in special, separate buildings with continuous
surveillance monitoring. �� Low pressure conditions, air filters, air continuously monitored for contamination. �� Building constructed of fire inhibiting and walls, floors etc. �� Access restricted to authorised, specially skilled personnel. �� Special protective clothes and shoes obligatory. �� Change rooms. �� Hand- and foot monitors at the entrance to the working area. �� Specially trained radiation protection personnel and health physicists present during operation
and standby outside working hours.
CHAPTER 3 USING NUCLEAR TECHNIQUES
121
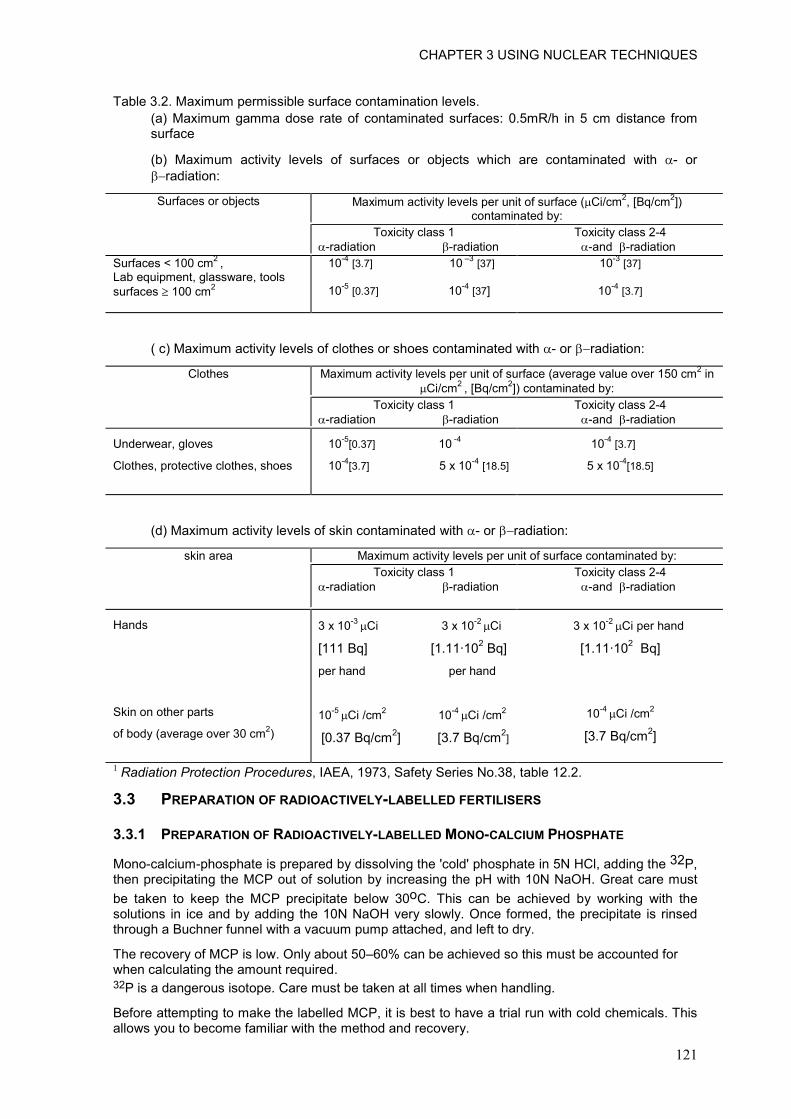
Table 3.2. Maximum permissible surface contamination levels. (a) Maximum gamma dose rate of contaminated surfaces: 0.5mR/h in 5 cm distance from surface
(b) Maximum activity levels of surfaces or objects which are contaminated with �- or ��radiation:
Surfaces or objects Maximum activity levels per unit of surface (�Ci/cm2, [Bq/cm2]) contaminated by:
Toxicity class 1 �-radiation �-radiation
Toxicity class 2-4 �-and �-radiation
Surfaces < 100 cm2 , Lab equipment, glassware, tools surfaces � 100 cm2
10-4 [3.7] 10 –3 [37] 10-5 [0.37] 10-4 [37]
10-3 [37]
10-4 [3.7]
( c) Maximum activity levels of clothes or shoes contaminated with �- or ��radiation:
Clothes Maximum activity levels per unit of surface (average value over 150 cm2 in �Ci/cm2 , [Bq/cm2]) contaminated by:
Toxicity class 1 �-radiation �-radiation
Toxicity class 2-4 �-and �-radiation
Underwear, gloves
Clothes, protective clothes, shoes
10-5[0.37] 10 -4
10-4[3.7] 5 x 10⁻⁴ [18.5]
10-4 [3.7]
5 x 10⁻⁴[18.5]
(d) Maximum activity levels of skin contaminated with �- or ��radiation:
skin area Maximum activity levels per unit of surface contaminated by: Toxicity class 1
�-radiation �-radiation
Toxicity class 2-4 �-and �-radiation
Hands
Skin on other parts
of body (average over 30 cm2)
3 x 10⁻³ �Ci 3 x 10⁻²
�Ci
[111 Bq] [1.11·102 Bq] per hand per hand
10-5 �Ci /cm2 10-4
�Ci /cm2
[0.37 Bq/cm2] [3.7 Bq/cm2]
3 x 10⁻² �Ci per hand
[1.11·102 Bq]
10-4 �Ci /cm2
[3.7 Bq/cm2]
1 Radiation Protection Procedures, IAEA, 1973, Safety Series No.38, table 12.2.
3.3 PREPARATION OF RADIOACTIVELY-LABELLED FERTILISERS
3.3.1 PREPARATION OF RADIOACTIVELY-LABELLED MONO-CALCIUM PHOSPHATE
Mono-calcium-phosphate is prepared by dissolving the 'cold' phosphate in 5N HCl, adding the 32P, then precipitating the MCP out of solution by increasing the pH with 10N NaOH. Great care must be taken to keep the MCP precipitate below 30oC. This can be achieved by working with the solutions in ice and by adding the 10N NaOH very slowly. Once formed, the precipitate is rinsed through a Buchner funnel with a vacuum pump attached, and left to dry.
The recovery of MCP is low. Only about 50–60% can be achieved so this must be accounted for when calculating the amount required. 32P is a dangerous isotope. Care must be taken at all times when handling.
Before attempting to make the labelled MCP, it is best to have a trial run with cold chemicals. This allows you to become familiar with the method and recovery.
CHAPTER 3 USING NUCLEAR TECHNIQUES
122
To ensure safety when working with the isotope, you should wear full safety gear (gloves, mask, laboratory coat, plastic apron, film badge, etc.), work behind a perspex shield and work with everything in plastic, paper lined trays.
A. Equipment/materials
�� Calcium tetrahydrogen d-orthophosphate [CaH4(PO4)2.H2O] (BDH G.P.R. chemical was found to give best results)
�� Sodium hydroxide. �� Hydrochloric acid 32%. �� Potassium dihydrogen phosphate. �� Phosphoric acid. �� Beakers. �� Stirring rods. �� Trays. �� Tub. �� Ice. �� Plastic bags. �� Plastic sheeting. �� Perspex shielding. �� Elastic bands. �� Radiation stickers. �� Geiger Muller counter. �� Buchner funnel. �� Filter paper. �� Buchner flasks. �� Vacuum pump. �� 32P, carrier free.
B. Method
�� Determine amount of MCP to be prepared. Add 40–50% to allow for sample loss during preparation.
�� Weigh MCP into a beaker. �� 5N HCl and 10N NaOH are required for the preparation of MCP. The volumes needed can be
determined from the following ratios: �� for 1g MCP - 2.5mL 5N HCl and
- 2.0mL 10N NaOH �� Add the 5N HCl to MCP, stirring continually to dissolve. This reaction is endothermic so doesn't
need to be mixed on ice. �� Prepare approximately 50mL of 5% H3PO4. This is used for rinsing the 32P into the MCP/HCl
solution. It also aids in desorbing the 32P from the glass. �� Carefully transfer the 32P into the MCP/HCl solution using a pasteur pipette. Rinse the pipette
and glass 32P stock bottle copiously with 5% H3PO4 to remove all 32P. �� Alternately, having transferred the majority of 32P to the MCP/HCl solution and rinsing the vial
several times with 50% H3PO4, the 'hot' vial can be immersed in the MCP/HCl solution. The vial can be left for approximately 30 minutes, by which time the 32P should be evenly spread through the solution. Carefully remove the 32P vial from solution and discard.
�� Place the now labelled MCP/HCl solution into a tub of ice. Add the 10N NaOH. This must be added very slowly to ensure that the MCP does not get too hot. Stir continually.
�� The pH of the solution should be around 7. Check with pH paper. As the NaOH is added, the MCP should precipitate out of solution and form a thick slurry.
�� Filter the precipitate through a buchner funnel with a vacuum pump attached. The best set-up for this procedure is as follows:
�� place a large filter paper (No. 42 Whatman) in a Büchner funnel so that the base and sides of funnel are covered by the paper. The paper should form a basin inside the funnel so that the MCP can be poured into the paper and not leak over the sides of the paper.
CHAPTER 3 USING NUCLEAR TECHNIQUES
123
�� place the funnel in a Büchner flask. The Büchner flask should be attached to another Büchner flask. This second flask should contain a saturated solution of CaOH and cottonwool to act as a 32P trap should any isotope be sucked through.
�� the vacuum pump is attached to the second flask. When the pump is operating, air should be pulled through the filter paper, through the 32P trap and then to the pump.
�� Rinse the slurry with distilled/deionised H2O as it is being drained on the filter paper. Water equivalent to about half the volume of the MCP slurry should be sufficient for rinsing.
�� Leave the precipitate to air dry. This may take several days. When dry, transfer to a labelled container stating:
(i) contents (ii) user (iii) activity (iv) date �� Due to the higher energy of the 32P the MCP should be stored in a glass dessicator to contain
the beta emission.
3.3.2 PREPARATION OF RADIOACTIVELY-LABELLED GYPSUM Gypsum (CaSO4.2H2O) is prepared by mixing calcium chloride and sulfuric acid. A thick white precipitate is formed which is dried and ground to a fine white powder.
If care is taken with precipitate transferral and rinsing, a recovery of >95% can be achieved.
Before attempting to make the labelled gypsum it is best to have a trial run with 'cold' chemicals. This allows you to become familiar with the method and recovery.
Safe working practices must be adhered to at all times.
A. Equipment/materials
�� CaCl2.2H2O. �� H2SO4 (98%). �� Beakers. �� Stirring rods. �� Evaporating dish. �� Wash bottle. �� 35S - as sulfate in aqueous solution. �� Trays. �� Geiger Muller counter. �� Pasteur pipettes and bulbs. �� Plastic bags. �� Plastic sheeting. �� Radiation stickers. �� Elastic bands.
B. Method
�� Quantities of calcium chloride and sulfuric acid required must be determined. This can be calculated from the following equation:
�� CaCl2.2H2O + H2SO4 CaSO4.2H2O + 2HCl �� Molecular weights 147.02 g + 100.08 g 172.17g �� If 6.885 g CaSO4.2H2O is to be prepared, then �� Amount of CaCl2.2H2O required =147.02 x 6.885g = 5.88 g CaCl2.2H2O
172.l7 �� Amount of H2SO4 required =100.08 x 6.885 g = 4.00 g H2SO4
172.l7 �� Weigh CaCl2.2H2O into a beaker and dissolve in a minimum amount of distilled/deionised
H2O.
CHAPTER 3 USING NUCLEAR TECHNIQUES
124
�� Weigh H2SO4 into a beaker. H2SO4 needs to be diluted approximately 1:6 with H2O otherwise the precipitate forms too quickly when mixed with CaCl2.2H2O.
�� Divide the H2SO4 into two containers, one containing the majority. Mix the 35S with the H2SO4. This can be done by adding the 35S into the larger of the two amounts of H2SO4 and then rinsing the hot vial several times with the other H2SO4 into the now labelled H2SO4.
�� Slowly add the CaCl2.2H2O to the labelled H2SO4 with gentle stirring. The precipitate should develop gradually. Rinse the CaCl2.2H2O into the H2SO4 with H2O.
�� Mix well to get a smooth, sloppy paste. �� Carefully transfer the precipitate to a preweighed evaporating dish. Precipitate can be dried at
room temperature, or can be placed in a fan-forced oven at 25–30oC to speed up drying. �� While gypsum is drying, stir regularly to prevent precipitate drying into a hard lump. As it dries,
crush up finely. �� When the gypsum is completely dry, weigh dish and contents to determine % recovery. �� Store gypsum in a clearly labelled vial stating: (i) contents (ii) user (iii) activity (iv) date The labelling is important. It should alert other persons to the content's radioactive danger.
3.3.3 PREPARATION OF RADIOACTIVELY-LABELLED ELEMENTAL SULFUR Elemental sulfur is prepared by dissolving cold crystalline elemental sulfur in toluene, adding 35S, then recrystallising the sulfur. Once dry, the sulfur is sieved to size (150 �m-250 �m). If care is taken with sulfur preparation and sieving, a recovery of >90% can be achieved. Before preparing the labelled elemental S, a trial run should be carried out.
A. Equipment/materials
�� S-free toluene �� 35S - as elemental sulfur. �� Beakers. �� Hotplate. �� Foil. �� Pasteur pipettes and bulbs. �� Trays. �� Plastic bags. �� Plastic sheeting. �� Radiation stickers. �� Elastic bands. �� Geiger-Müller counter.
B. Method
�� Determine amount of elemental S fertiliser required. Add l0–20% to allow for sample loss during preparation.
�� Weigh cold, crystalline elemental S into a small beaker. �� Take a small portion of this elemental S and transfer into another beaker. This portion will be
used for rinsing the 35S into the larger portion. �� To both beakers of elemental S add just enough toluene to dissolve crystals. Generally, 1mL
toluene/150 mg elemental S. A third container of approximately 5–10mL toluene is also required.
�� On a foil-covered hotplate, gently heat the larger elemental S portion to dissolve. Agitate gently and avoid splashing crystals up the sides of beaker.
�� When the larger portion is almost dissolved, start heating the smaller portion. This should dissolve very quickly. The extra toluene can also be heated at this stage.
�� Keep both portions warm but do not boil. Do not allow to cool, otherwise the sulfur will recrystallise.
CHAPTER 3 USING NUCLEAR TECHNIQUES
125
�� Using a pasteur pipette, transfer one addition of the warmed smaller portion to the 35S crystals. The 35S vial may be placed upon the hotplate to aid dissolution if the warmed addition is not effective. Once dissolved, transfer the 35S to the larger portion. Continue rinsing the 35S vial by adding the warmed smaller portion and transferring to the larger portion. Rinse the 35S vial several times with the third container of warmed toluene to ensure maximum transferral.
�� Mix the final solution well. Remove from heat. Crystals should start developing quickly but it may take several days for the excess toluene to evaporate. To speed up evaporation, leave sample uncovered in fume hood with fan operating.
�� When crystals are completely dry sieve to size. Any crystals which fall outside the required dimensions may be redissolved and sieved again to boost recovery.
�� Keep a check of the recovery by noting (i) final weight of elemental S liberated, and (ii) activity of the elemental S. This can be done by taking a known weight, dissolving in scintillation fluid, heating if necessary, and counting by liquid scintillation.
�� Store crystals in a clearly labelled vial stating: (i) contents (ii) user (iii) activity (iv) date
3.4 PREPARATION OF PLANT SAMPLES FOR ANALYSIS
3.4.1 INTRODUCTION Plant analysis is carried out for two basic reasons: for monitoring the nutrient status of plants or for diagnosis of a problem. It is important that the reasons for taking particular plant samples for analysis are appreciated, as they affect the way the samples are taken. However, in many respects the principles behind the collecting, handling and analysing of samples are the same irrespective of the aims of the sampling. Unless due care is taken with all these steps, the results will be unreliable and may result in misleading interpretations.
The following are broad guidelines for sampling and preparing plants for chemical analysis.
A more detailed discussion, from which much of this section is taken, is provided by Reuter et al., (1986).
3.4.2 SAMPLING
A. Collecting representative samples
The principal objectives in any sampling programme are to collect samples, which are representative of the situation being examined and which contain sufficient material for a laboratory to analyse. For a full range of tests many testing laboratories suggest they require around l00g of fresh material. With careful sampling and sub-sampling or when only a small number of analyses are required, much smaller quantities can be used.
When samples are being taken for monitoring purposes (that is, to assess management practices, such as fertiliser applications and irrigation, for comparison with previous crops), the samples must be collected to represent the average for the particular crop or pasture. When samples are being taken for diagnostic or troubleshooting purposes (that is, a problem is perceived which may be due to a nutritional imbalance), the samples should be taken from plants with the perceived problem and, where possible, nearby plants without the problem. In this "point" (for diagnostic) as opposed to "average" (for monitoring), sampling the collected samples are assumed to be representative of the healthy and the less healthy populations.
In either case, samples should be collected from plants distributed evenly throughout the particular area or areas of interest in the crop, pasture, etc. The selection strategy adopted should be systematic, repeatable and convenient.
There are various techniques for sampling large areas of crop or pasture. (These are most important when sampling for monitoring purposes but may be used for diagnostic sampling where there are large areas of affected plants.) In the most complex techniques, the area to be sampled is divided into a number of blocks (say 4), then each block is sub-sampled, either systematically throughout or from a small uniform sampling area within each block. These samples are then bulked and, if necessary, mixed and sub-sampled, before analysis. Less complex techniques
CHAPTER 3 USING NUCLEAR TECHNIQUES
126
involve collecting samples from a single strip or small area within the crop or pasture and assuming this to be representative of the whole area. Where a single sampling area is chosen as representative of a large area, this monitoring plot can be established as a permanent monitoring plot.
If the crop or pasture to be monitored is not very uniform, then the area should be divided up into sections that are more uniform, perhaps on the basis of soil type or aspect, and each area sampled and analysed separately.
Plants that are obviously poor in health because of disease, insect damage or some other non-nutritional problem, should not be sampled unless they are of particular interest. These factors influence tissue composition and so may mislead a diagnosis based on the tissue analysis.
Unless specifically required, only one species of plant should be sampled to find the nutrient status of a pasture. Pasture species can differ markedly in their nutrient composition, even when plants are growing side-by-side. Therefore, in mixed swards or crops, either one species should be sampled and analysed, or different species should be sampled and analysed separately.
B. Stage of maturity and tissue type
All plants selected for sampling should be at a similar stage of maturity. Nutrient composition of plant tissues change with maturity; for example, concentrations of nitrogen, potassium and many other nutrients are highest in very young plants. These nutrients become diluted by subsequent growth and so are lower in mature plants. Differences in the stage of maturity can, as a result, complicate the interpretation of tissue analyses. The effect is minimised by restricting sampling to a specific developmental stage, generally when tissue composition is most stable. For most crops this is usually around early flowering, although if the results of sampling are to be used for corrective fertilizing, this may be too late. For pastures, a particular stage of maturity is generally translated to a particular season. Since these results are more commonly for assessing next year's fertiliser program, samples are usually taken late in the season when the plants are still growing rapidly, but after the initial very rapid growth in early spring.
The nutrient status of whole plants changes with maturity and so does the nutrient status of the constituent parts. For most crops tissue analysis is conducted on a sample of leaves or petioles. The nutrient composition of leaves changes with physiological age, position on the plant (i.e. height, aspect) and with development of fruit or grain. For this reason most published information on plant nutrient status is only for a particular stage of maturity but, for particular tissue types, the most commonly sampled tissue is the most recently matured leaves. The nutrient composition of young leaves is usually changing very rapidly and it is therefore difficult to assess adequate, deficient or toxic levels. The nutrient levels of old leaves is largely a product of nutrient and carbohydrate re-translocation. However, very young or old tissue is sometimes sampled for particular nutrients, depending on their mobility around the plant. If the appropriate sample tissue is not known, it is customary to sample only recently mature leaves, avoiding leaves which are very young or very old.
C. Other considerations when sampling
Avoid sampling soiled, diseased and insect or mechanically-damaged plants, and exclude senescing and dead tissue from the gathered material.
Avoid sampling plants growing within areas which have unusual features (e.g. rocky areas, animal resting areas, headlands, firebreaks, etc.).
Do not sample when plants are under water or temperature stress; also avoid sampling waterlogged plants. Sampling should normally be undertaken when plants are growing vigorously.
Avoid sampling vegetative organs after flowering in non-woody determinate species since many nutrients are redistributed to developing fruits and grain.
Minimise sample contamination. Take particular care when sampling for trace element determinations. Use clean plastic gloves and stainless steel cutting implements when sampling and avoid contact with soil, copper and galvanised materials. If samples have to be washed deionised water must be used. Such things as foliar sprays, fungicides, dust, etc., which may contain trace elements, can be reduced by rinsing, but this must be done when the sample is still fresh. More refined decontamination procedures may be carried out in the laboratory, if required.
CHAPTER 3 USING NUCLEAR TECHNIQUES
127
If subsamples taken for dry weight measurement and nutrient analysis are taken to be representative of larger samples weighed in the field when fresh, then the fresh weight of the subsample must be measured at the same time, with the same balance and under the same conditions as the main sample.
Standardise sample collection during certain periods of the day for elements for which the concentration is known to vary diurnally (Reuter and Robinson, 1986).
i Sample transport Delays and adverse conditions during transport of fresh samples can cause substantial respiratory losses in weight or enhanced enzymatic activity, both of which produce corresponding errors in nutrient determinations (e.g. Bradfield and Bould 1963; Mayland, 1968; Leece 1972).
The following guidelines are aimed at reducing transport errors:
sampler should wash his/her hands before collecting samples, or use disposable gloves;
place material in labelled open paper bags and place immediately in cooled containers or car refrigerators (at 5oC) for transport from the field;
soil adhering to the plants should be removed by washing basal shoots briefly in deionised water or by brushing with tissue paper;
on return from the field, samples may be separated into appropriate parts for analysis. Roots should be washed thoroughly in several rinses of running water and placed in labelled paper bags;
if appropriate, a fresh weight measurement of shoots and roots may be done at this time, prior to drying (see "Other Considerations when Sampling").
ii Sub-sampling
Sub-sample preparation Samples harvested from field plots are generally large so as to overcome site variation and more accurately measure yield, etc. Consequently, there is usually a need to take representative sub-samples. Prior to sub-sampling and drying the fresh weight of the total sample must be recorded so that all analyses can be converted back to the original field samples.
Procedure Spread sample out on a large clear plastic sheet and mix well
Halve the sample and then quarter it
Discard 3 of the 4 quarters
Mix remaining quarter, then half and quarter it as before
Discard 3 of the 4 quarters. This "halving and quartering" procedure is continued until the desired sub-sample size is obtained (usually 20–300g)
Record the fresh weight of the final sub-sample so field fresh weights can be converted back to oven-dry (or constant moisture %) values.
NOTE: As the ratio of sub-sample weight to total sample weight decreases, greater care in sample mixing is required.
A data sheet for plant sampling and analysis procedures encourages clearly labelled and well organised data which increases efficiency.
Botanical separation Where a sub-sample contains different species (or different plant tissues), a further separation stage is often required. Examples of two methods of sample separation are given below.
METHOD l - Spread the sub-sample on a table, mix and divide in half. Place one half in a labelled bag marked "complete sample" and dry. Separate the other half on the basis of botanical species (or tissue types) into different bags for each species and dry.
CHAPTER 3 USING NUCLEAR TECHNIQUES
128
METHOD 2 - Spread the sub-sample on a table and separate out desired species (or tissue types). Place in labelled bags and dry.
Care should always be taken to make sure that labels are both complete and correct.
3.4.3 SAMPLE DRYING Normally two drying cycles are necessary before plants can be analysed chemically.
A. Initial drying cycle This rapidly de-activates all plant enzymes and removes all water from plant tissue; the sample reaches an "oven-dry" state, in which its weight remains unchanged with renewed drying.
Generally samples are dried at 65–70oC in a forced draught, stainless steel-lined oven, which allows adequate circulation of air between samples, for a minimum of 24 hours, depending on sample size. Prolonged drying or drying at temperatures in excess of 80oC can promote thermal decomposition and appreciable loss of volatile constituents.
B. Final drying cycle Following initial drying, samples may be weighed and then ground and stored for a period prior to analysis. The finely ground material may absorb moisture that will necessitate a second drying cycle (e.g. 70oC for 12 hours) immediately before sub-samples are weighed for chemical analysis. Plant concentrations can then be expressed on an oven-dry basis.
3.4.4 GRINDING AND STORAGE Dried samples are customarily ground to reduce field samples to manageable sizes for storage and to facilitate the preparation of homogeneous sub-samples for chemical analysis. However, grinding is not essential. Small samples need not be ground, instead the whole sample can be cut into small pieces or simply crushed by hand and then weighed for analysis.
Mechanical grinding can be carried out in a variety of mills. These should have stainless steel grinding surfaces to minimise contamination. Where iron is to be determined, an agate mortar and pestle or a tungsten carbide mill with teflon-coated blades should be used.
During grinding, particular care must be taken to ensure that the sample is not contaminated and that it does not separate into coarse and fine particles.
Separation on the basis of particle size can be a significant source of error, particularly with samples containing fibrous stems and succulent leaves which pulverise at different rates and contain markedly different nutrient concentrations.
It is recommended that samples be ground to a particle size of less than l mm and mixed thoroughly before sampling for analysis.
Samples should be stored in clearly labelled, airtight containers. Glass or polycarbonate containers are convenient as they can withstand the heating involved in a second drying of the sample, if required.
For convenience, the container should also be of sufficient size to enable thorough mixing of the sample prior to weighing (i.e. container should be approximately half full). Mixing is necessary since settling occurs on storage, resulting in unrepresentative samples being taken for analysis.
The samples should ideally be stored in a dark, cool and dry environment.
When weighing a sub-sample for analysis, care should be taken to ensure that the ground material is representatively sampled by taking small spatula quantities from throughout the container, with thorough mixing between sub-sampling.

CHAPTER 3 USING NUCLEAR TECHNIQUES
129
A typical sample weight sheet is as follows:
DATE: NUTRIENT DIGEST
Sample code
Sample weight
Tube # Vial # Reading Conc.
Reading Conc. Comments
3.5 PREPARATION OF SOIL SAMPLES FOR ANALYSIS
A. Sampling
Many of the principles that apply to sampling of plants (Section 3.4) also apply to the sampling of soils.
Soil sampling can be done for diagnostic or troubleshooting reasons, where poor crop or pasture growth is noted in one area, but more commonly, samples are collected to monitor current fertiliser and other management practices and to plan for future fertiliser applications.
The main aim in sampling is that the sample be truly representative of the soil in the area being sampled. Soil properties often vary markedly over short distances and with depth, and different properties vary to different extents. Sampling techniques must be used which minimise these variations.
B. Where to sample
The area to be sampled should be as homogeneous as possible. Different areas should be separated on the basis of soil type, topography, crop or pasture growth and management history. As with plants, there are various techniques for sampling large areas of soil. One approach is to divide each homogeneous area into a number of blocks, then sample these using a systematic grid or zigzag sampling system, and bulk these. Another approach is to set up a monitoring site, or several sites, within each homogeneous sample area. A number of samples are taken from these monitoring sites and bulked for analysis. Where sampling is going to continue over time, it has been argued that these monitoring plots should be set up and the same sites used over time (Friesen and Blair, 1984). This should allow more reasonable estimates to be made of soil test values with time.
When sampling, atypical sites should be avoided such as dung or urine patches, paths, waterlogged areas (unless these are the main interest), minor water courses or irrigation channels, tree stumps or their ash residue after burning, fertiliser dumps, and even fertiliser granules where recently applied.
The depth of sampling depends largely on the agricultural system. For pastures, samples are usually taken to 7.5 or 10cm, for crops to 10 or 15cm, and for deeper-rooted tree crops, samples to 1m may be required. Particularly for deeper samples, or for specific soil characteristics such as salinity or certain physical characteristics, separate samples should be taken from different depths. This can be done on the basis of fixed intervals (often smaller intervals are sampled near the surface) or, if possible, on the basis of soil horizons.
C. When to sample
Temperature, moisture, crop growth and crop residue levels will all affect soil characteristics, although different characteristics will be affected to different degrees. The result is that soil test levels will vary over time.
When samples are taken depends on the characteristics being measured and the reason for the sampling. For most annual crops, where fertiliser and other management strategies are being planned, samples are normally taken before land preparation. For pastures, an appropriate growth phase/soil organic matter turnover phase, such as the rapid growth and organic matter turnover
CHAPTER 3 USING NUCLEAR TECHNIQUES
130
period in spring, is usually selected. In either case, if soils are being monitored repeatedly, it is important that the samples are taken at the same time each year.
D. Number of samples to take As the variability of soil properties differ, so do the number of samples required to adequately characterise an area. Some studies have shown that several hundred samples may be required to adequately characterise some soil properties. This is generally impractical with around 20 samples for a 20ha area being more normal. With this sort of variability, the choice of a systematic and representative sampling technique is vital and makes the monitoring site technique attractive, where appropriate.
E. How to sample Samples are usually collected using corers (tube), augers or spades/trowels. To avoid contamination, the sampling equipment must be clean, the samples should be placed in clean containers which can be sealed as soon as possible, and handling of the samples should be avoided or kept to a minimum, especially when exchangeable sodium and potassium are being measured since perspiration can affect these.
It is also important to remember to clearly label the samples with a permanent marker and to record as much information as possible about the sample site. This information should include a detailed description of the location (perhaps including a grid reference), the date, the depth sampled, the current and past cropping programmes, including fertilisers and other soil amendments, the reasons for the analyses and which characteristics are to be measured.
3.5.1 DRYING
Once collected, soil samples must be treated with care. If contained in plastic bags, samples must be kept cool to prevent sweating, and hence chemical change, before drying and analysis. Soil samples need to be dried as quickly as possible to minimise biological, chemical and physical changes that can occur when stored moist. The amount of drying required ultimately depends on what analyses are to be determined.
If drying is carried out carefully, biological and chemical changes can be limited so that the soil characteristics remain similar to those in the field. Particular problems are experienced when working with flooded soils as obviously any degree of drying will significantly affect the soil conditions and therefore chemical and physical characteristics. Special consideration must be given to such soils.
Soil samples are usually partially air-dried (until not sticky) at a temperature of 25–35oC and a relative humidity of 20–60%. Alternatively, soils can be dried in a fan-forced oven at 40oC for at least 24 hours. The soil should be in open plastic bags, or similar containers, to minimise contamination. Once dry, soil can be stored in clearly labelled, capped vials, ideally in a cool room at <5oC.
Many determinations are not significantly affected by complete air drying for storage purposes however, there are exceptions. Some analyses must be carried out on moist samples immediately after collection. Examples are: determinations of exchangeable ferrous iron and manganese; exchangeable potassium, acid extractable phosphorus and nitrate nitrogen. Storage of soils to be analysed for these determinations is best carried out by freezing or freeze drying.
Soil samples can be dried in an oven at a higher temperature, say 105oC, for 24 hours. However, this is only recommended for limited analyses such as total element determinations. Air drying is by far the best for the majority of analyses.
3.5.2 GRINDING
Once dry, soil samples need to be ground to break up aggregates and form a homogeneous sample for many analyses. Clay soils are best crushed to pass the sieve before they reach complete air dryness, otherwise the crushing process is difficult. Crushing the primary sand and gravel particles is generally avoided. For most of the analyses outlined in this Handbook the soil samples need only be ground to pass a 2mm sieve, however, other determinations may require much finer grinding.
CHAPTER 3 USING NUCLEAR TECHNIQUES
131
3.5.3 SIEVING Some determinations call for soil fractionation, however for the analyses outlined in this Handbook, this is not necessary.
If samples are to be ground and sieved, they should be ground before sieving otherwise bias may arise from fractionating the soil portions. In most cases the whole soil sample should be passed through the sieve. The bias that arises from only sieving a portion of the soil sample usually results in increased concentrations of most elements measured to assess soil fertility. After sieving, the remaining coarse material should be re-ground and re-sieved. Continue the screening and crushing until all aggregate particles are fine enough to pass a 2mm sieve. Discard the stones and organic residues that remain.
For trace element analyses, such as copper, zinc and other heavy metals, copper and brass utensils must be avoided. Stainless steel sieves are an excellent alternative. Aluminium and iron can be used, but these are not as robust as stainless steel and may cause contamination if aluminium and iron are being studied.
3.6 CONDUCTING A FIELD EXPERIMENT USING STABLE ISOTOPES
3.6.1 INTRODUCTION
Some stable isotopes can be used under field condition. 15N is the most used isotope but other, e.g. 13C and more recently 2H, 18O and 34S are gaining importance. The main limitation to the use of isotopes is the cost, which tends to limit the size of the experiments. Therefore it may not be possible to use the same sized plots as in conventional field experiments. However, isotope measurements tend to have lower coefficient of variation as compared to yield measurements.
3.6.2 PLANNING OF THE EXPERIMENT First step before setting up an isotope field experiment is to carefully formulate the objective. It is important that the aim is clear and that only one or two questions are to be answered. An experiment with ten objectives will probably not give any answer.
The second step will be to design the treatments that are likely to give solutions to the problem being investigated. Do not include unnecessary treatments as they will only make the experiment larger. Do not forget to include control treatments.
At this stage the experimental design will have to be selected (Little and Hills, 1975) and the number of replicates determined. Will you use a completely randomised design, randomised complete block design, latin square design, split-plot design, split-split-plot design or another design. It is important to select the design based on the statistical analyses to be done. Bear in mind that you need to receive an answer to your questions, which is supported by statistics.
3.6.3 SOIL PREPARATION The land selected for the experiment should be as homogenous as possible and representative for the area or conditions to be studied. It is important to consider the history of the experimental area. What was the previous crop? Is it likely that previous crops or treatments will affect the experiment? Was an isotope experiment previously conducted in the field? Was there a crop grown on the experimental area to remove any residues of the tracer? All these questions are important when selecting an area for a field experiment. After selecting the area the land can be prepared. This may include conventional tillage or no-tillage.
3.6.4 PLOT SIZE It is difficult to give a general rule on the size of the isotope plots. Increasing the size of the plots is likely to reduce experimental error but at the same time increase the cost. In general it is sufficient to harvest about 30 plants/plot. This will be easy if the crops being grown are wheat, barley, alfalfa or any type of grass or pasture. For larger plants such as maize or any tree crops the number of harvested plants will have to be reduced which will probably increase experimental error. Figure 3.1 shows a schematic layout of an isotope plot. The 15N should be applied to the whole plot (a x b) and only the inner area (c x d) should be harvested leaving the borders. The yield should be calculated based on the harvested area.
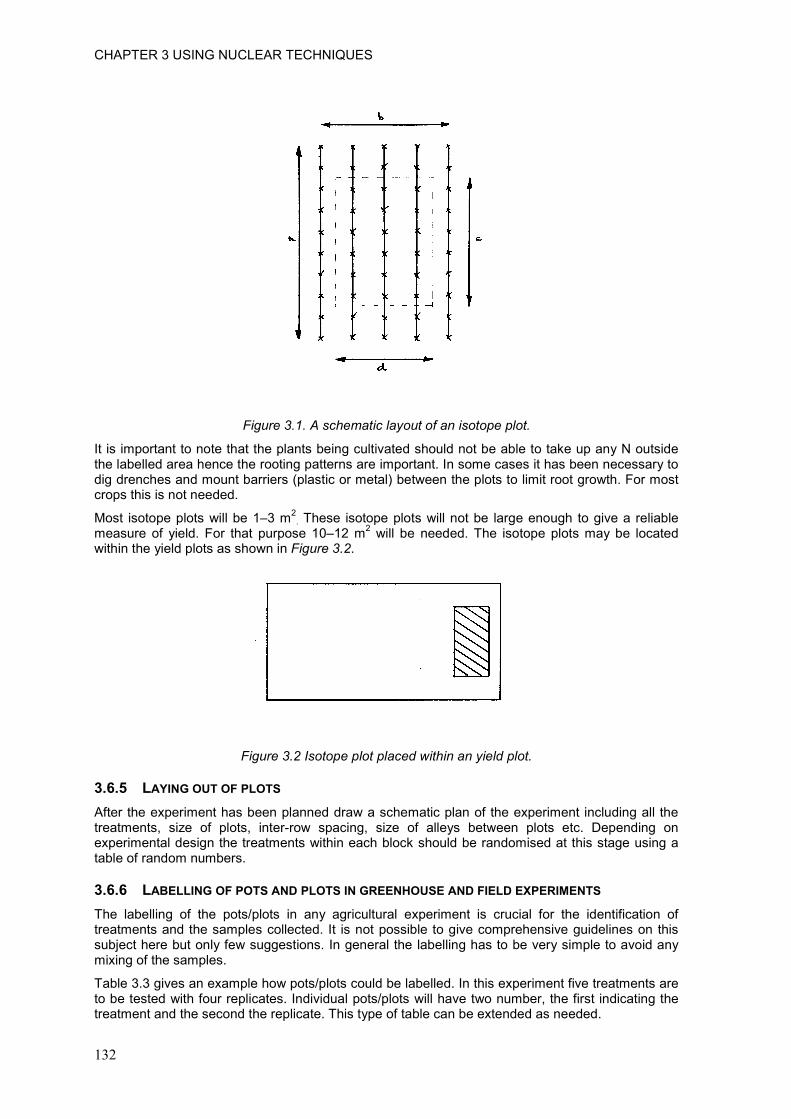
CHAPTER 3 USING NUCLEAR TECHNIQUES
132
Figure 3.1. A schematic layout of an isotope plot.
It is important to note that the plants being cultivated should not be able to take up any N outside the labelled area hence the rooting patterns are important. In some cases it has been necessary to dig drenches and mount barriers (plastic or metal) between the plots to limit root growth. For most crops this is not needed.
Most isotope plots will be 1–3 m2. These isotope plots will not be large enough to give a reliable
measure of yield. For that purpose 10–12 m2 will be needed. The isotope plots may be located within the yield plots as shown in Figure 3.2.
Figure 3.2 Isotope plot placed within an yield plot.
3.6.5 LAYING OUT OF PLOTS After the experiment has been planned draw a schematic plan of the experiment including all the treatments, size of plots, inter-row spacing, size of alleys between plots etc. Depending on experimental design the treatments within each block should be randomised at this stage using a table of random numbers.
3.6.6 LABELLING OF POTS AND PLOTS IN GREENHOUSE AND FIELD EXPERIMENTS The labelling of the pots/plots in any agricultural experiment is crucial for the identification of treatments and the samples collected. It is not possible to give comprehensive guidelines on this subject here but only few suggestions. In general the labelling has to be very simple to avoid any mixing of the samples.
Table 3.3 gives an example how pots/plots could be labelled. In this experiment five treatments are to be tested with four replicates. Individual pots/plots will have two number, the first indicating the treatment and the second the replicate. This type of table can be extended as needed.
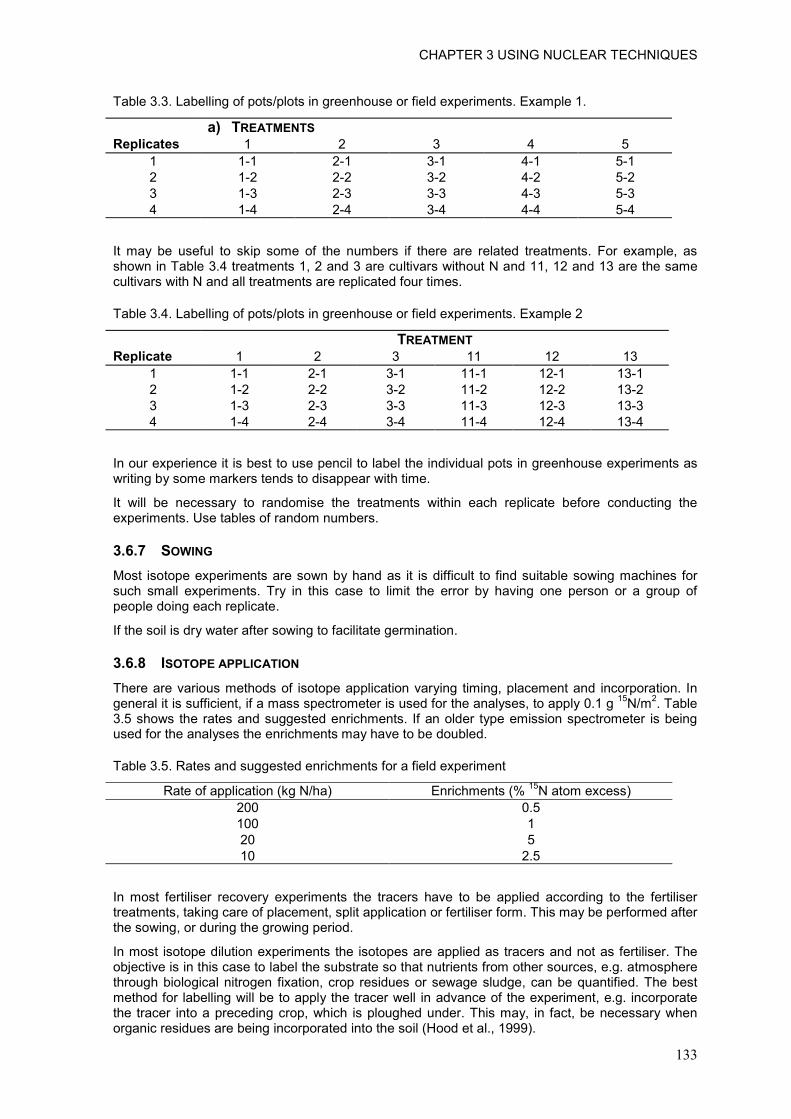
CHAPTER 3 USING NUCLEAR TECHNIQUES
133
Table 3.3. Labelling of pots/plots in greenhouse or field experiments. Example 1.
a) TREATMENTS Replicates 1 2 3 4 5
1 1-1 2-1 3-1 4-1 5-1 2 1-2 2-2 3-2 4-2 5-2 3 1-3 2-3 3-3 4-3 5-3 4 1-4 2-4 3-4 4-4 5-4
It may be useful to skip some of the numbers if there are related treatments. For example, as shown in Table 3.4 treatments 1, 2 and 3 are cultivars without N and 11, 12 and 13 are the same cultivars with N and all treatments are replicated four times.
Table 3.4. Labelling of pots/plots in greenhouse or field experiments. Example 2
TREATMENT Replicate 1 2 3 11 12 13
1 1-1 2-1 3-1 11-1 12-1 13-1 2 1-2 2-2 3-2 11-2 12-2 13-2 3 1-3 2-3 3-3 11-3 12-3 13-3 4 1-4 2-4 3-4 11-4 12-4 13-4
In our experience it is best to use pencil to label the individual pots in greenhouse experiments as writing by some markers tends to disappear with time.
It will be necessary to randomise the treatments within each replicate before conducting the experiments. Use tables of random numbers.
3.6.7 SOWING Most isotope experiments are sown by hand as it is difficult to find suitable sowing machines for such small experiments. Try in this case to limit the error by having one person or a group of people doing each replicate.
If the soil is dry water after sowing to facilitate germination.
3.6.8 ISOTOPE APPLICATION There are various methods of isotope application varying timing, placement and incorporation. In general it is sufficient, if a mass spectrometer is used for the analyses, to apply 0.1 g 15N/m2. Table 3.5 shows the rates and suggested enrichments. If an older type emission spectrometer is being used for the analyses the enrichments may have to be doubled.
Table 3.5. Rates and suggested enrichments for a field experiment
Rate of application (kg N/ha) Enrichments (% 15N atom excess) 200 0.5 100 1 20 5 10 2.5
In most fertiliser recovery experiments the tracers have to be applied according to the fertiliser treatments, taking care of placement, split application or fertiliser form. This may be performed after the sowing, or during the growing period.
In most isotope dilution experiments the isotopes are applied as tracers and not as fertiliser. The objective is in this case to label the substrate so that nutrients from other sources, e.g. atmosphere through biological nitrogen fixation, crop residues or sewage sludge, can be quantified. The best method for labelling will be to apply the tracer well in advance of the experiment, e.g. incorporate the tracer into a preceding crop, which is ploughed under. This may, in fact, be necessary when organic residues are being incorporated into the soil (Hood et al., 1999).
CHAPTER 3 USING NUCLEAR TECHNIQUES
134
It is very important that the tracer is applied uniformly to the plots. Dissolving the fertiliser in water and using aliquots for each plot can facilitate this. These aliquots may be diluted further into 3–5 litres of water that is applied uniformly to the plots. Precaution should be taken not to apply the fertiliser when the soil temperature is very high due to direct ammonia volatilization.
The experiment should be well maintained with the objective to be able to measure the effect of treatments used in the experiment. All unwanted external factors, which are not part of the treatments, should be limited as far as possible, e.g. water has to be applied if there is not enough rain; spraying has to be done if the experiment is affected by any type of infection; a fence has to be used if animals are grazing in the neighborhood etc.
3.6.9 HARVESTING Harvesting can be done sequentially, during physiological maturity or during full maturity. The time of harvest will depend on the objectives of each experiment. Sequential harvesting may be needed, if one likes to understand processes during crop growth. Most experiments measuring biological nitrogen fixation or fertiliser recovery will be harvested at physiological maturity, i.e. before senescence and loss of leaves and experiments having the objectives to measure yields will be harvested at full maturity.
Harvesting is usually done by cutting the inner area of the experimental plots leaving boarders all around. At the time of harvest, the plots of reference crop should always be harvested at the same time as the plots with N fixing crops. The pods and straw usually have very different %N and %15N a.e. Therefore it is not possible to take directly representative sub-sample from those plant parts when mixed. The plants should therefore be separated into pods and straw. These parts are then weighed and sub-sampled after chopping into small fragments. Materials with lower %15N a.e. should be chopped first to minimize contamination from one sample to another. In any case, the forage chopper, if used, has to be cleaned thoroughly between treatments. Sub-samples should be ground after drying at 700C. These samples can then be analysed for total N by the Kjeldahl procedure. The 15N/14N ratio can be analysed by either emission or mass spectrometer as described by (this volume).
3.6.10 CALCULATION After the analyses of % 15N abundance in the plant and fertiliser samples, %15N atom
excess has to be calculated by subtracting the %15N natural abundance (0.3663%) from the %15N abundance in the sample. The %15N atom excess or derived values are used for all the following calculations, e.g. recovery from various sources.
3.7 CONDUCTING A POT EXPERIMENT USING STABLE ISOTOPES
3.7.1 INTRODUCTION Only some brief guidelines on how to conduct pot experiment using stable isotopes will be mentioned in this chapter and reference made to further reading. The same guidelines will apply to any pot experiments whether they are conducted in a greenhouse or outdoors.
It is important to know that pot experiments have certain limitations and they should only be used to test hypothesis, methods or material. It is very unlikely that the results from a pot experiment can be interpolated directly to field conditions. However, it may be useful to test various isotopic methods in pots before a large scale field experiment is conducted. Also, due to environmental considerations, it may only be possible to conduct pot experiments with certain isotopes.
3.7.2 POTS There are many different possibilities in terms of material (clay or plastic) or sizes (0.5 kg to 10 or 20 kg or larger pots). It is usually better to use as large an amount of soil as possible but the space in the greenhouse is usually the limiting factor. When selecting the pots it is important to decide whether there should be drainage or not. Holes in the pots will allow drainage but it might be necessary to place saucers under each pot.
����������� �� ���������� �����
����
������ ��������
�������� ����������� ���� ��� ����� ��� ���� ������ ����� ���� �!���"�##� ������� ��� �!�� ��$����%�� �&� �!������'(������� ������#�)%�� ���#�������"��!�������*� �'����������������������������������!������������&����#����+��"�!�����#�����'���#�������)������������(,(-*(��
��'� �'��� �&� ���#.� ��������+� ��� �!�� ��$����%�� �&� �!�� ������ ���.� �'� ��� ����� &��� �� +����!����������� ���(��!�����#��!��#��������%���),�� � ��!*������ �%���!��#��+��������������+��%�#(���� �'�������&�#� ��� ����!�����#�"��!������)-/0-/*� �&� ��������������������%�����&�� ��!�����������������+�!��%���(�
�!��� ������&�����������������!�����"�##�!�%��������"��+!��(��
������ ��� �����
�!���� ���� ��� ��'�!��+� ���"���� �� �� �#���� ��������� ��#������� )���� ��������� ��#������*� ���� ��� ������&� �����+��#� �����) .��.�1���� ����2���������*����� ��� ������������������� ���&'��!'����#�����!� ���#��!��������������)���3��*(�� ��� ������!��#���#"�'����������������� +����+�4�5+����#(�6������������������������������������+�&����#����������������� ���&�5+4!�(��!����!�%�����������%��������� +45+����#������+����!����������� ���(��!����������##'�������'����� ��+��!�������!��!���,� �##����5+��&����#�)���#��(7*(��
���#��(7(���#������!������"�����������&�� ��� ��������&��#���������������� ��������� ��+��!���8�!��!���,� �##����5+��&����#(��
9��#�������� ����)5+4!�*� ���������� ����) +45+����#*�
,//� 8//�
8//� -/�
-/� ,-�
,/� 8/�
:����������5+4!��"!�����������+������&�� ����������� ����(�
������ ������������������
������� ���������!��.����&������������#�.��!�����������������&����������!����#���������������%��'����"��������� ����.��������&����!�����������������&��!������� �������(������!������.�����������&�,8�����5���#�������)���#��(;**�!�%���������%�#������'����#������#(.�),///*��!����##�"���!���� �%�#��&����������#��� ����2���� ����2���������"��!�������#���#���&&��������!�����������������&���!�����������������!����#�����(�����!���"�'.���'��&&������������������#'����������������!��� ��������&��!���������#������������!����#�%����&����#��'���������&��!�����#(�
�
�
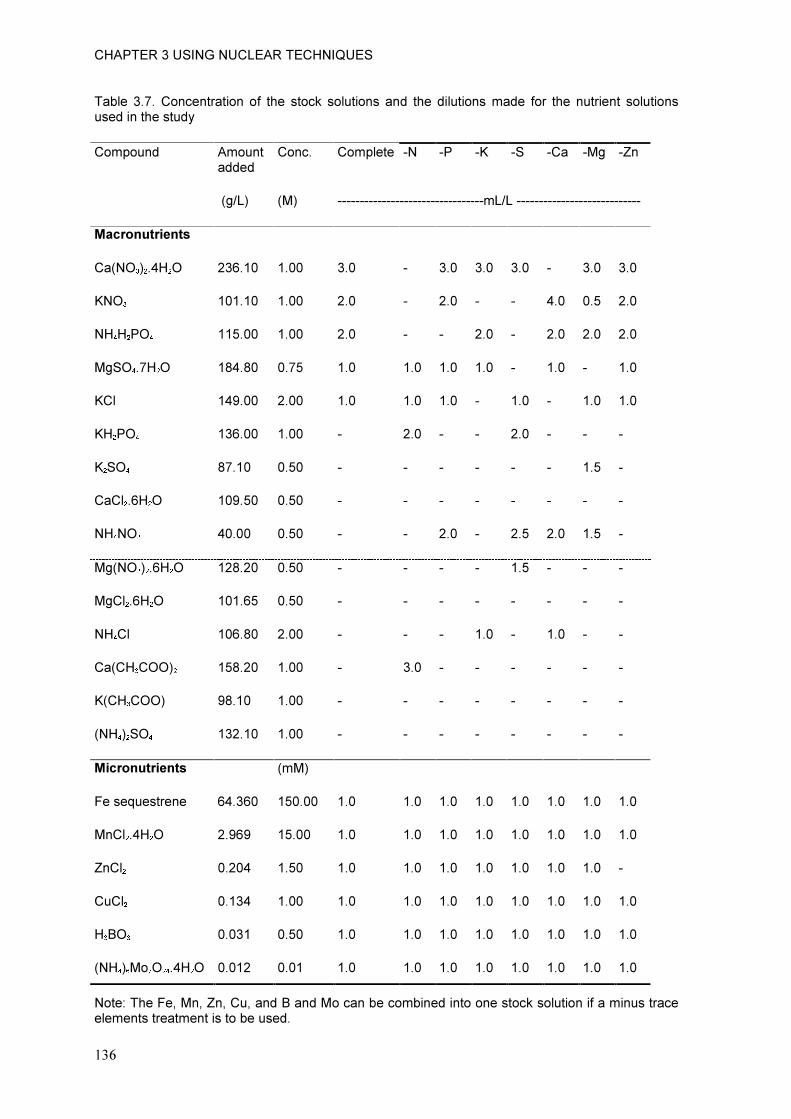
����������� �� ���������� �����
����
���#�� (;(��������������� �&� �!�� ����5� ��#������� ���� �!�� ��#������� ���� &��� �!�� ��������� ��#����������������!������'�
�� ������ � �����������
����(� �� �#���� 2 � 2�� 21� 2�� 2��� 26+� 2<��
� �)+4�*� )6*� 222222222222222222222222222222222 �4��2222222222222222222222222222�
�������������� � � � � � � � � � �
��) 3�*�(=��3� ,7(8/� 8(//� (/� 2� (/� (/� (/� 2� (/� (/�
1 3�� 8/8(8/� 8(//� ,(/� 2� ,(/� 2� 2� =(/� /(-� ,(/�
�����3�� 88-(//� 8(//� ,(/� 2� 2� ,(/� 2� ,(/� ,(/� ,(/�
6+�3�(;��3� 8>=(>/� /(;-� 8(/� 8(/� 8(/� 8(/� 2� 8(/� 2� 8(/�
1�#� 8=?(//� ,(//� 8(/� 8(/� 8(/� 2� 8(/� 2� 8(/� 8(/�
1���3�� 87(//� 8(//� 2� ,(/� 2� 2� ,(/� 2� 2� 2�
1��3�� >;(8/� /(-/� 2� 2� 2� 2� 2� 2� 8(-� 2�
���#�(7��3� 8/?(-/� /(-/� 2� 2� 2� 2� 2� 2� 2� 2�
�� 3�� =/(//� /(-/� 2� 2� ,(/� 2� ,(-� ,(/� 8(-� 2�
6+) 3�*�(7��3� 8,>(,/� /(-/� 2� 2� 2� 2� 8(-� 2� 2� 2�
6+�#�(7��3� 8/8(7-� /(-/� 2� 2� 2� 2� 2� 2� 2� 2�
���#� 8/7(>/� ,(//� 2� 2� 2� 8(/� 2� 8(/� 2� 2�
��)����33*�� 8->(,/� 8(//� 2� (/� 2� 2� 2� 2� 2� 2�
1)����33*� ?>(8/� 8(//� 2� 2� 2� 2� 2� 2� 2� 2�
) ��*��3�� 8,(8/� 8(//� 2� 2� 2� 2� 2� 2� 2� 2�
�������������� � ) 6*� � � � � � � � �
9����@��������� 7=(7/� 8-/(//� 8(/� 8(/� 8(/� 8(/� 8(/� 8(/� 8(/� 8(/�
6��#�(=��3� ,(?7?� 8-(//� 8(/� 8(/� 8(/� 8(/� 8(/� 8(/� 8(/� 8(/�
<��#�� /(,/=� 8(-/� 8(/� 8(/� 8(/� 8(/� 8(/� 8(/� 8(/� 2�
���#�� /(8=� 8(//� 8(/� 8(/� 8(/� 8(/� 8(/� 8(/� 8(/� 8(/�
��A3�� /(/8� /(-/� 8(/� 8(/� 8(/� 8(/� 8(/� 8(/� 8(/� 8(/�
) ��*�6��3��(=��3� /(/8,� /(/8� 8(/� 8(/� 8(/� 8(/� 8(/� 8(/� 8(/� 8(/�
���0��!��9�.�6�.�<�.���.�����A�����6����������� �������������������5���#�������&��� ������������#� ���������� �����������������(�
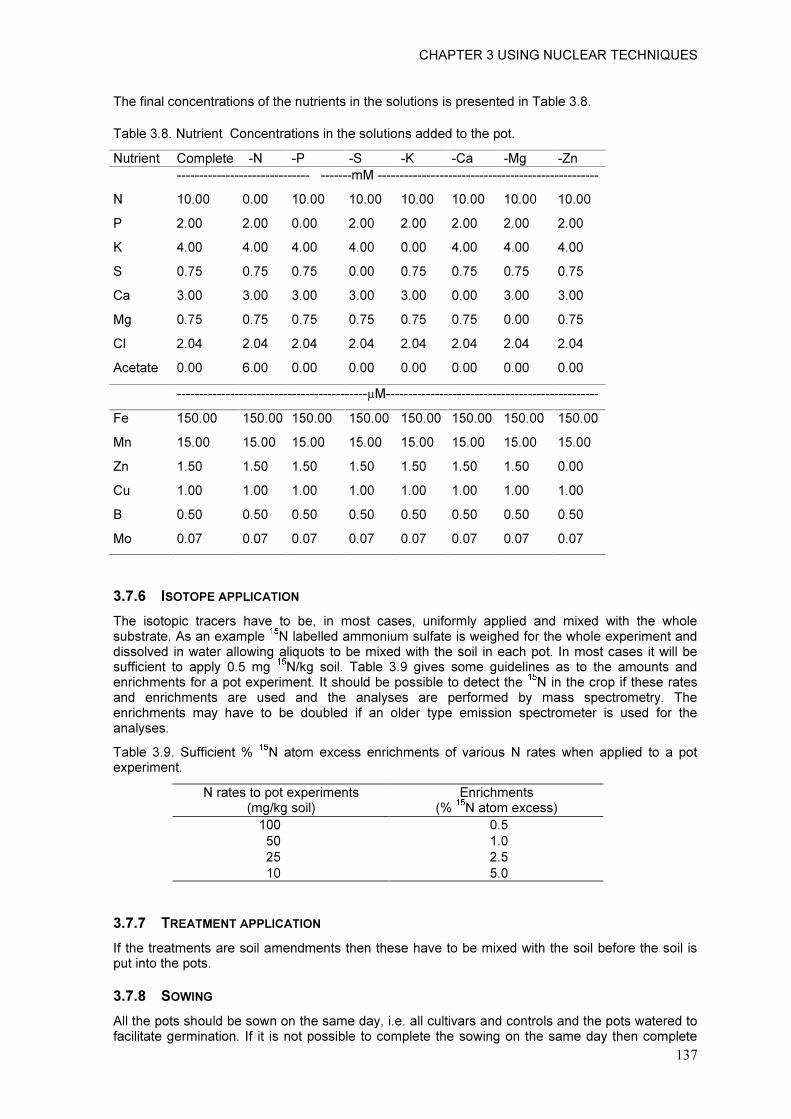
����������� �� ���������� �����
����
�!��&���#�����������������&��!����������������!����#��������������������������#��(>(�
���#��(>(� ����������������������������!����#�����������������!�����(�
�������� �� �#���� 2 � 2�� 2�� 21� 2��� 26+� 2<��� 222222222222222222222222222222���2222222 6�22222222222222222222222222222222222222222222222222�
� 8/(//� /(//� 8/(//� 8/(//� 8/(//� 8/(//� 8/(//� 8/(//�
�� ,(//� ,(//� /(//� ,(//� ,(//� ,(//� ,(//� ,(//�
1� =(//� =(//� =(//� =(//� /(//� =(//� =(//� =(//�
�� /(;-� /(;-� /(;-� /(//� /(;-� /(;-� /(;-� /(;-�
��� (//� (//� (//� (//� (//� /(//� (//� (//�
6+� /(;-� /(;-� /(;-� /(;-� /(;-� /(;-� /(//� /(;-�
�#� ,(/=� ,(/=� ,(/=� ,(/=� ,(/=� ,(/=� ,(/=� ,(/=�
�������� /(//� 7(//� /(//� /(//� /(//� /(//� /(//� /(//�
�� 2222222222222222222222222222222222222222222�6222222222222222222222222222222222222222222222222�
9�� 8-/(//� 8-/(//� 8-/(//� 8-/(//� 8-/(//� 8-/(//� 8-/(//� 8-/(//�
6�� 8-(//� 8-(//� 8-(//� 8-(//� 8-(//� 8-(//� 8-(//� 8-(//�
<�� 8(-/� 8(-/� 8(-/� 8(-/� 8(-/� 8(-/� 8(-/� /(//�
��� 8(//� 8(//� 8(//� 8(//� 8(//� 8(//� 8(//� 8(//�
A� /(-/� /(-/� /(-/� /(-/� /(-/� /(-/� /(-/� /(-/�
6�� /(/;� /(/;� /(/;� /(/;� /(/;� /(/;� /(/;� /(/;�
�
������ ������������ �����
�!�� ��������� �������� !�%�� ��� ��.� ��� ���� �����.� ���&�� #'� ���#���� ���� ����� "��!� �!�� "!�#�����������(���������� �#���� �#���##���� ���� ���#&�������"��+!���&����!��"!�#�������� �������������#%��� ���"������##�"��+��#�@����������� �����"��!� �!�����#� ������!����(� ��� ���������� ���"�##������&&������� ��� ���#'� /(-� +� �� 45+� ���#(� ���#�� (?� +�%��� �� �� +����#����� ��� ��� �!�� � ������ ���������! �����&��������������� ���(�����!��#�����������#�������������!���� �����!��������&��!�������������� �����! ����� ���� ����� ���� �!�� ���#'���� ���� ���&�� ��� �'� ���� ������� ���'(� �!�������! ����� �'� !�%�� ��� ��� ����#��� �&� ��� �#���� �'��� � ������� ������� ����� ��� ����� &��� �!�����#'���(��
���#�� (?(� ��&&�������B� �� � ��� � ������� �����! ����� �&� %������� � ������ "!��� ���#���� ��� �� ���������� ���(��
�������������������� �����) +45+����#*�
�����! �����)B��� ���� �������*�
8//� /(-�-/� 8(/�,-� ,(-�8/� -(/�
�
������ ��� �������� ������
�&��!������� ������������#�� ��� ������!����!����!�%�������� �����"��!��!�����#���&�����!�����#��������������!������(��
����!� ��"��#��
�##��!��������!��#�������"������!���� ����'.��(�(��##���#��%��������������#�������!�������"����������&���#������+�� �������(� �&� ��� �������������#�� ����� �#�����!����"��+�����!���� ����'��!����� �#����
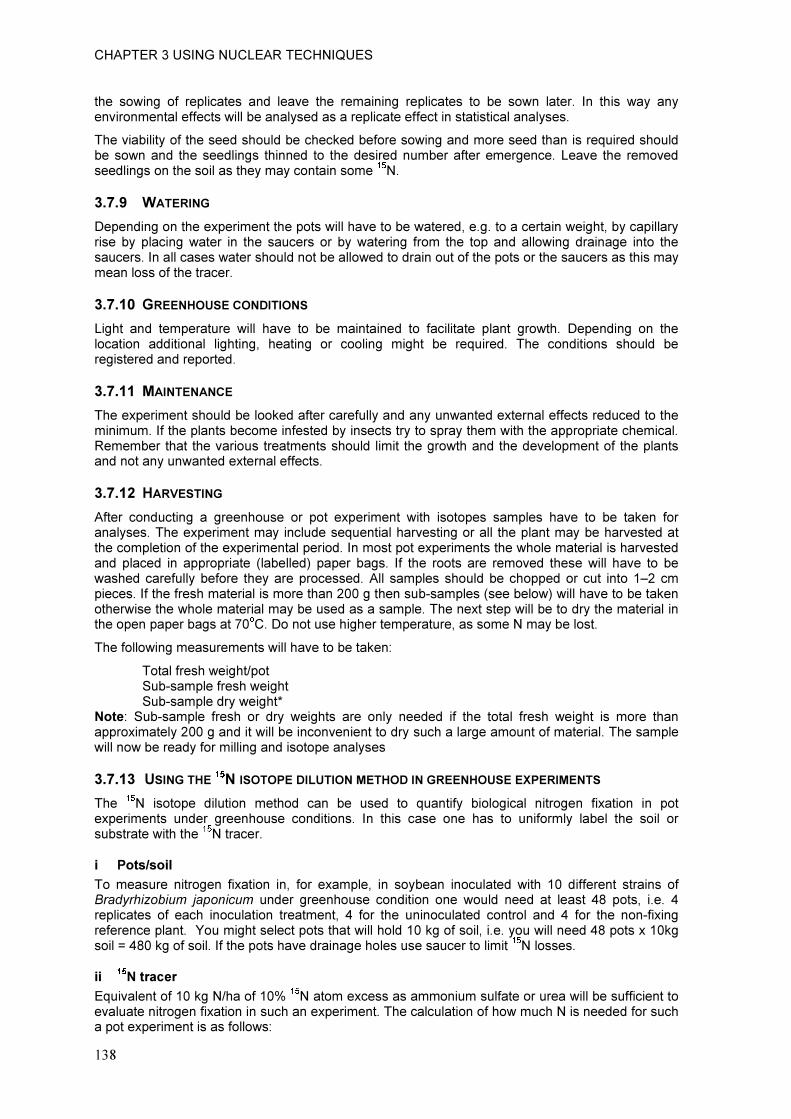
����������� �� ���������� �����
����
�!�� ��"��+� �&� ���#������� ���� #��%�� �!�� �� �����+� ���#������� ��� ��� ��"�� #����(� ��� �!��� "�'� ��'���%���� ����#��&&�����"�##�������#'������������#�������&&�����������������#����#'���(�
�!��%����#��'��&��!��������!��#������!��5�����&������"��+����� ����������!��������@�������!��#�������"������ �!������#��+�� �!������ ��� �!�� ���������� �����&����� ��+����(����%�� �!�� �� �%�������#��+������!�����#�����!�'� �'����������� ���� (��
����$� "����#�
:�������+�����!�������� �����!�������"�##�!�%��������"������.��(+(��������������"��+!�.��'�����##��'������ �'� �#����+� "����� ��� �!�� �������� ��� �'� "������+� &�� � �!�� ���� ���� �##�"��+� ������+�� ����� �!���������(�����##�������"������!��#����������##�"�����������������&��!�����������!��������������!��� �'� ����#�����&��!��������(��
����%&� #���'����� �����������
��+!�� ���� �� ��������� "�##� !�%�� ��� ��� ���������� ��� &���#������ �#���� +��"�!(� :�������+� ��� �!��#�������� ���������#� #�+!���+.� !�����+� ��� ���#��+� �+!�� ��� ��@�����(� �!�� ����������� �!��#�� �����+��������������������(��
����%%� ������ ���
�!�������� �����!��#�����#��5����&��������&�##'�������'���"�������������#��&&�����������������!�� ��� � (��&��!���#��������� ����&�������'�����������'��������'��!� �"��!��!���������������!� ���#(��� � �����!��� �!��%������������ ������!��#�� #� ��� �!��+��"�!������!����%�#�� �����&� �!���#���������������'���"�������������#��&&����(�
����%(� ')�����#��� �
�&���� ���������+� �� +����!����� ��� ���� ������ ���� "��!� ��������� �� �#��� !�%�� ��� ��� ��5��� &������#'���(��!�������� ���� �'� ���#������@������#�!��%�����+�����##� �!���#���� �'����!��%����������!���� �#�������&��!�������� ����#�������(���� �������������� ������!��"!�#�� ������#����!��%���������� �#����� ��� ������������ )#���##��*� ������ ��+�(� �&� �!�� ������ ���� �� �%��� �!���� "�##� !�%�� ��� ���"��!�������&�##'� ��&���� �!�'��������������(��##� �� �#����!��#������!��������� ���� �����8C,�� �������(��&��!��&���!� ������#���� �����!���,//�+��!������2�� �#���)������#�"*�"�##�!�%����������5�����!��"�����!��"!�#�� ������#� �'���������������� �#�(��!������������"�##���������'��!�� ������#�����!���������������+�����;/R�(�:����������!�+!����� ��������.������ �� � �'����#���(��
�!��&�##�"��+� ������ �����"�##�!�%����������5��0��
� ����#�&���!�"��+!�4������ ���2�� �#��&���!�"��+!��� ���2�� �#����'�"��+!�D�����0� ���2�� �#�� &���!� ��� ��'� "��+!��� ���� ��#'� ������� �&� �!�� ����#� &���!� "��+!�� ��� ���� �!���������� ���#'�,//�+��������"�##���������%������������'����!���#��+��� ������&� ������#(��!���� �#��"�##���"��������'�&��� �##��+����������������#'����
����%�� �����#��'����������������������� ��'������#���'������*��� �����
�!�� �� � �������� ��#������ ��!��� ���� ��� ����� ��� @�����&'� ���#�+���#� �����+��� &�������� ��� ���������� ����� ������ +����!����� ����������(� ��� �!��� ����� ���� !��� ��� ���&�� #'� #���#� �!�� ���#� �������������"��!��!���� �������(�
�� ����+���,�
��� ������� �����+��� &�������� ��.� &��� ��� �#�.� ��� ��'����� �����#����� "��!� 8/� ��&&������ �������� �&������������� ��������� ������ +����!����� ���������� ���� "��#�� ����� ��� #����� =>� ����.� �(�(� =����#������� �&� ���!� �����#������ ����� ���.� =� &��� �!�� �������#����� ������#� ���� =� &��� �!�� ���2&����+���&��������#���(��E��� �+!����#����������!���"�##�!�#��8/�5+��&����#.��(�(�'���"�##������=>��������8/5+����#�F�=>/�5+��&����#(��&��!�������!�%��������+��!�#�����������������#� ����� �#�����(�
��� �����������
�@��%�#�����&�8/�5+� 4!���&�8/B��� ���� ������������ ���� ���#&������������"�##������&&�����������%�#����������+���&��������������!���������� ���(��!����#��#�������&�!�"� ��!� �����������&������!������������� ����������&�##�"�0��
����������� �� ���������� �����
����
8�!����8-�� ��&����#�"��+!��,���8/��5+(��
�(�(�8/�5+� 4!�����8/���8/��+ 4,���8/��5+����#��
&���=>/�5+��&����#����� ���� ���������
�
�
����
�
�&�'�������� ���� ���#&���.�"!��!����������� ���#'�,8�B� .�'���"�##������88(=�+��&��(�(4=>/�5+����#(�:����#%���!��88(=�+��&��(�(� ���"�������� �5��,=//� #���������-/� #��#�@���������!�����#�&������!��������� ����!����+!#'(�����
���� �����-����+��.��/�
�!����'����������"�##�!�%�������������#�����"��!��!��%���������������������������������!�������!�%����������"�(�3����!��#�� ��5���������������������� ������ �!������������������ �������� ������ �!���������#����� ����� ���(� �!�� ���2����#����+� ��'����� )��&������� ����*� �!��#�� ���� ��� �����#����(�E��� �'���"�&��������4�������� #����� �!��� ��� �"���#����4���(��!��������!��#���������� ���������"������������#�"�&��#���������'�����%����������+�(�G������!��#��������#��������&�##'�����%��������������� ���������'����#���#��!��+(��
�0� '��0���+���,1����
�&�����!��+��"��+���������!���#������!��#�����!��%�������������#'����������#����������������(;(8,�
����%�� ����#��'����������������������� ��'������2������*��� �������
���� �#����'����&������� �������#����������������&��#������������(����##'��!���� �����&������ �������� ��� ������� "��#�� ��� #�"��� �!��� ��� �!�� +����!����� ������ ���.� �(+(� ��#���� �!�� &�%�� ���������'�!�H����#������������%����#'��������������+����!���������������(��
�� �,����
�&�����������������&��!�������� ����#�������!���#����!�%�������� ������������#�������(��������������� ��5��!����������&��#����"��!������+(���������#����� ������� ��&���������&���#�+� ������.����#����&�#�+� �� ���� ����!��� "��!� �� ���2&����+� ��&������� ����� ���� ��@�����(� 3��� ��&������� �#��� ��� ���!����#�������������&&��������&����������&�����������������+�������(���"�%��.��&������#������������� ���&�!��%�����+���������+��������.��!����&������������!������������������!���� ��"�'�����!��&����+�����(�����!�������.������#����&���&����������������������&������!��#����&�&����+�����(�8C� �����������#����"��!����#�����,/C/��#�����������!��%�����������#��.���������##'���&&������(�
��� �����33,��������
������� ���#'�/(8�+�� 4 ��.��(�(�8/�5+� 4!���&�8/�B��� ��(�(I��,/�5+� 4!���&�-B��� ��(�(����8//�5+� 4!���&�8B��� ��(�(��������##'�����+!�&������������(����.�� ���� ������������� ���� ���#&����&����#����� ����������#���� ����� ��#������ #�@���� &�� � )&����#����������#%��� ������ #�����-//� #�"����4 �*(������������ �!��#�� ��� ��5��� ���� ��� ���#'� �!�� &����#�����"!��� �!�� ���#� �� ��������� ��� !�+!� ��� �%������������ �����%�#���#�H�����(�
���� '��0���+���,1����
����!���� ���&�!��%���.��!���#�����&��!����&�������������!��#���#"�'�����!��%����������!���� ���� ����� �!���#����"��!� &����+������(��!���������������"�����##'�!�%��%��'���&&������B �����B�� ��(�(��!���&������� �������������#�����������#'���5��������������%������� �#��&�� ��!�����#����������"!��� ����(� �!�� �#����� �!��#�� �!���&���� ��� ���������� ����� ����� ���� ����"(� �!���� ������ ���� �!���"��+!��� ���� ���2�� �#��� �&���� �!�����+� ����� � �##� &��+ ����(� 6������#� "��!� #�"��� B�� � �(�(��!��#������!������ &����� ��� ��� �H������� �������� &�� ������� �#�� �������!��(� �����'�����.� �!��&���+���!�����.��&�����.�!����������#�������!����+!#'����"��������� ����(����2�� �#����!��#�����+������ �&���� ��'��+� ��� ;/��(� �!���� �� �#��� ���� �!��� ��� ���#'���� &��� ����#� � �'� �!�� 1$�#��!#����������(� �!�� �� 4�� � ������ ���� ��� ���#'���� �'� ���!��� � ������� ��� ���� ������� ����� ������������������������8((�
�0� �,��,������
�&�����!�� ������ �����&�B��� ���������������!���#��������&����#������� �#��.�B�� ���� ��������!��� ��� ��� ��#��#����� �'� ����������+� �!�� B�� � ������#� ���������� )/(77B*� &�� � �!�� B�� ���������������!���� �#�(��!��B�� ���� ��������%�#�������������&����##��!��&�##�"��+���#��#������(�B� �����%���&�� �&����#�����)B �&&*�����!��&���������%���%�#��(�
����������� �� ���������� �����
���
��!� �2��� ������2��'������#�
9�������:�1.�A#������J�)8?>=*����� ���������&����#��� �#��+�������������������� ����������#�&����#��'������� ��������������(�������#����J�����#��&����#��������!�,,.�>8C?/(�
��������.�3K��� ���1� .���+����6.�������������)8???*����� ���������&����������������������� ��������� ���!��@���� &������� ����+������ �����5�� &�� ���+����� ��������(��#�����������#�,/>.�,-?C,;/(�
�����)8?;*��������������������������������.���&��'�������� �(>.����#��8,(,(�
J��5����6���)8?7,*����#��!� ���#����#'���(����#��!����'��������#��L��� ���'����(�
���#����6.���&��'���:�A.�A#������J�),///*�6��!���&��������������� �����&��������������#'��������'��&����#�(��� �����������������#��������������#�������#'���(�8.�,7,;C,7�
����#�� ��6.���##�� 9� J� )8?;-*� ����������#�6��!���� ��� �+����#����#� �������!(���%�����'� �&���#�&�����.�,=,�(��
6����� A� )8?;>*� ����!#����!��H%��������+� 6���H��!�� ���������+���� �(� ,;�.� 6���H� ���#�+.�G���.��������(�
�������������)8??=*��+����#����#�9��#�������� ����.�:���+���������#'���(�6����#�:�55������(.� �"�E��5.�=/?�(��
���������.�:����)8?==*����#������#�������#'���(�
�������:�J��������(����������J�A�)8?>7*��#�������#'���0�������������������6����#(���5���������.�6�#������.�,8>�(�
�������:�J.����������J�A.���%���##�1� �.�����������)8?>7*� ������#����� &�����##�����+.�!���#��+��������#'���+��#���� ������#M(�����#�������#'���0�������������������6����#.��������A�J��������������.�J�A.����(.�����,/C(���5���������.�6�#������(�
�
�
�
�
�
�
�
�
�
�
�
�
�
�
�
�
�