Embed Size (px)
Citation preview
50
Chapter 3
3Configuring WindowsClients
You’ll be glad to know that configuring Windows to use your new Samba server isquite simple. SMB is Microsoft’s native language for resource sharing on a localarea network, so much of the installation and setup on the Windows client sidehas been taken care of already. The primary issues that we will cover in this chap-ter involve communication and coordination between Windows and Unix, twocompletely different operating systems.
Samba uses TCP/IP to talk to its clients on the network. If you aren’t already usingTCP/IP on your Windows computers, this chapter will show you how to install it.Then you’ll need to configure your Windows machines to operate on a TCP/IPnetwork. Once these two requirements have been taken care of, we can showhow to access a shared disk on the Samba server.
This chapter is divided into three sections. The first section covers setting up Win-dows 95/98 computers while the second covers Windows NT 4.0 machines. Thefinal section provides some prerequisite information on how SMB connections aremade from Windows clients and servers, which is useful as we move into the laterchapters of the book.
Setting Up Windows 95/98 ComputersUnfortunately, Windows 95/98 wasn’t designed for a PC to have more than oneuser; that concept is more inherent to a Unix operating system or Windows NT.However, Windows 95/98 does have limited support for multiple users: if you tellit, the operating system will keep a separate profile (desktop layout) and pass-word file for each user. This is a far cry from true multiuser security. In otherwords, Windows 95/98 won’t try to keep one user from destroying the work ofanother on the local hard drive like Unix, but profiles are a place to start.
,ch03.26970 Page 50 Friday, November 19, 1999 3:28 PM
Setting Up Windows 95/98 Computers 51
Accounts and Passwords
The first thing we need to do is to tell Windows to keep user profiles separate,and to collect usernames and passwords to authenticate anyone trying to access aSamba share. We do so via the Password settings in the Control Panel. If you arenot familiar with the Windows Control Panel, you can access it by choosing theSettings menu item from the pop-up menu of the Start button in the lower-left cor-ner of the screen. Alternatively, you’ll find it as a folder under the icon in theupper-left corner that represents your computer and is typically labeled MyComputer.
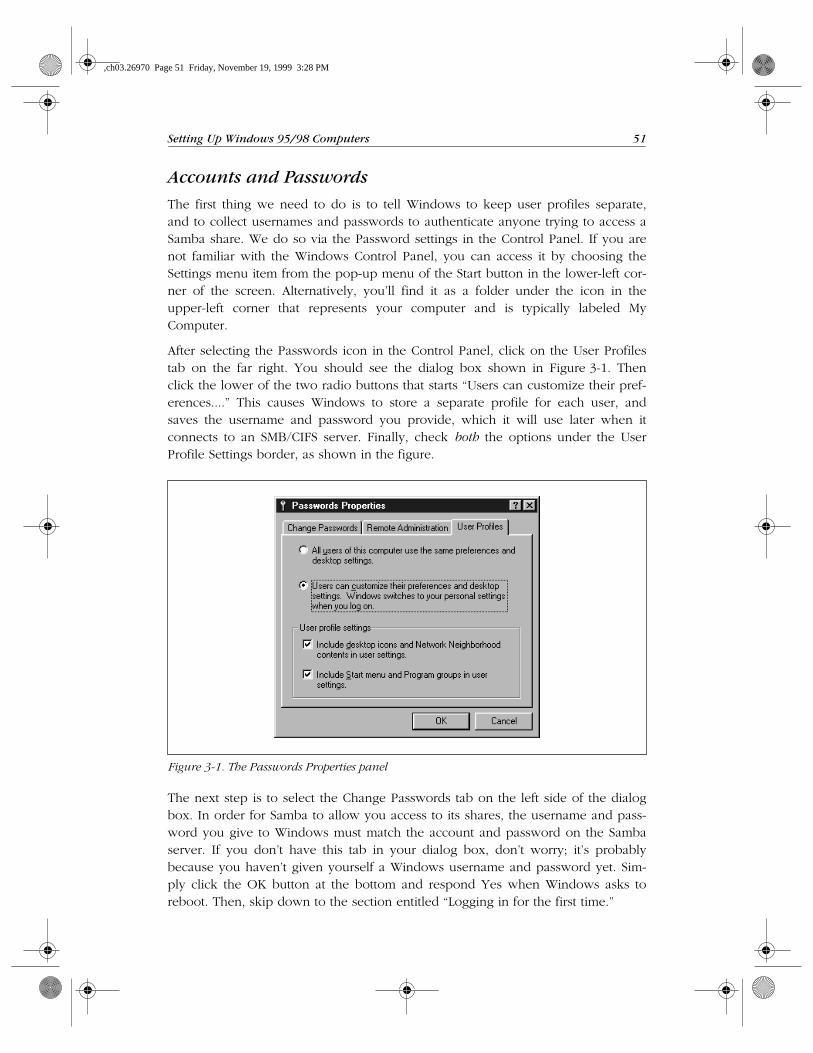
After selecting the Passwords icon in the Control Panel, click on the User Profilestab on the far right. You should see the dialog box shown in Figure 3-1. Thenclick the lower of the two radio buttons that starts “Users can customize their pref-erences....” This causes Windows to store a separate profile for each user, andsaves the username and password you provide, which it will use later when itconnects to an SMB/CIFS server. Finally, check both the options under the UserProfile Settings border, as shown in the figure.
The next step is to select the Change Passwords tab on the left side of the dialogbox. In order for Samba to allow you access to its shares, the username and pass-word you give to Windows must match the account and password on the Sambaserver. If you don’t have this tab in your dialog box, don’t worry; it’s probablybecause you haven’t given yourself a Windows username and password yet. Sim-ply click the OK button at the bottom and respond Yes when Windows asks toreboot. Then, skip down to the section entitled “Logging in for the first time.”
Figure 3-1. The Passwords Properties panel
,ch03.26970 Page 51 Friday, November 19, 1999 3:28 PM
52 Chapter 3: Configuring Windows Clients
Changing the Windows password
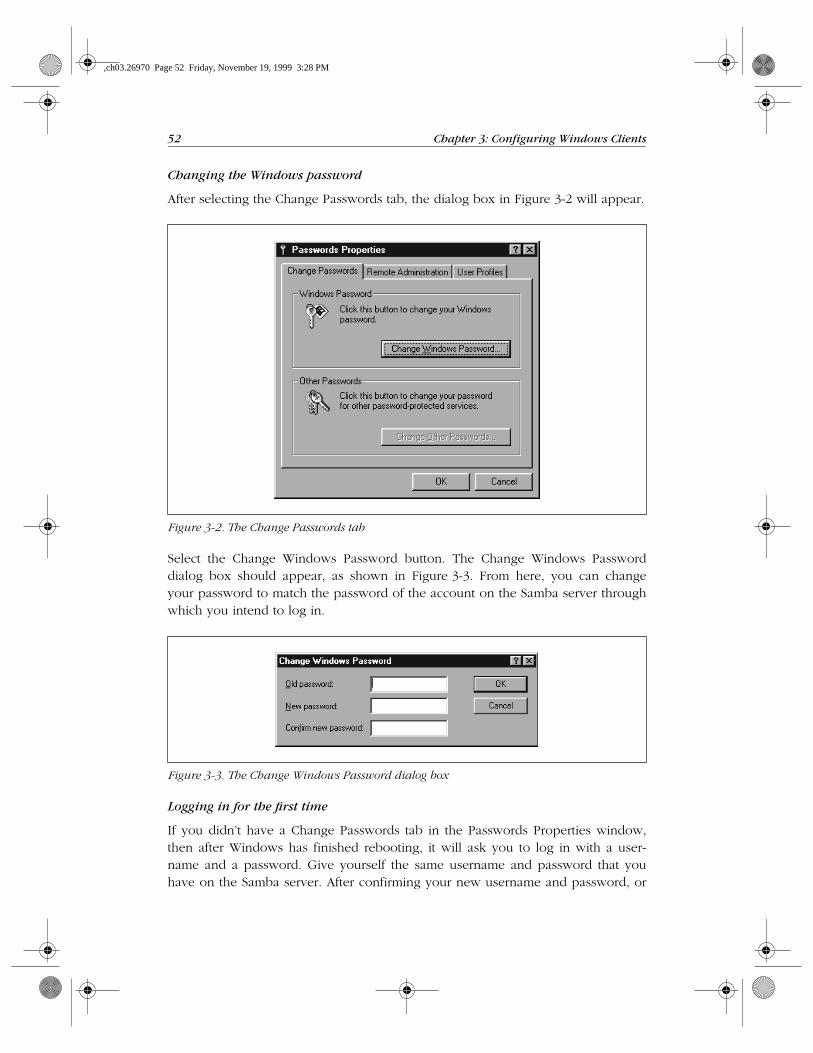
After selecting the Change Passwords tab, the dialog box in Figure 3-2 will appear.
Select the Change Windows Password button. The Change Windows Passworddialog box should appear, as shown in Figure 3-3. From here, you can changeyour password to match the password of the account on the Samba server throughwhich you intend to log in.
Logging in for the first time
If you didn’t have a Change Passwords tab in the Passwords Properties window,then after Windows has finished rebooting, it will ask you to log in with a user-name and a password. Give yourself the same username and password that youhave on the Samba server. After confirming your new username and password, or
Figure 3-2. The Change Passwords tab
Figure 3-3. The Change Windows Password dialog box
,ch03.26970 Page 52 Friday, November 19, 1999 3:28 PM
Setting Up Windows 95/98 Computers 53
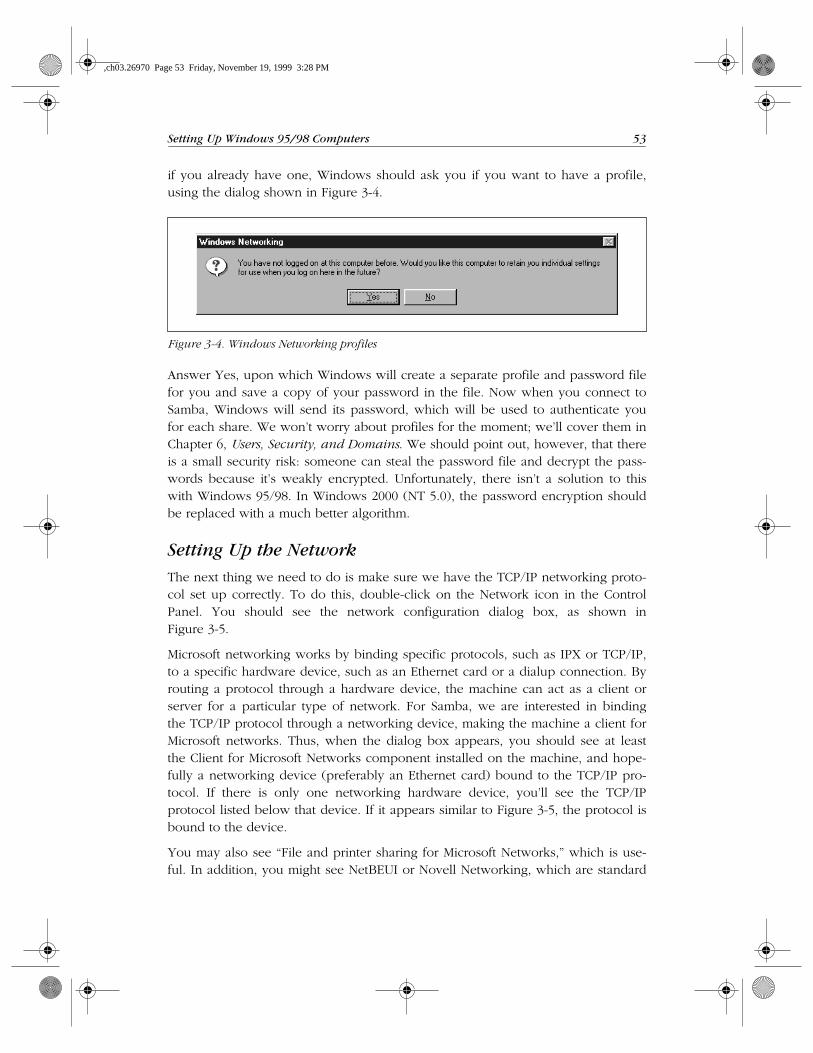
if you already have one, Windows should ask you if you want to have a profile,using the dialog shown in Figure 3-4.
Answer Yes, upon which Windows will create a separate profile and password filefor you and save a copy of your password in the file. Now when you connect toSamba, Windows will send its password, which will be used to authenticate youfor each share. We won’t worry about profiles for the moment; we’ll cover them inChapter 6, Users, Security, and Domains. We should point out, however, that thereis a small security risk: someone can steal the password file and decrypt the pass-words because it’s weakly encrypted. Unfortunately, there isn’t a solution to thiswith Windows 95/98. In Windows 2000 (NT 5.0), the password encryption shouldbe replaced with a much better algorithm.
Setting Up the Network
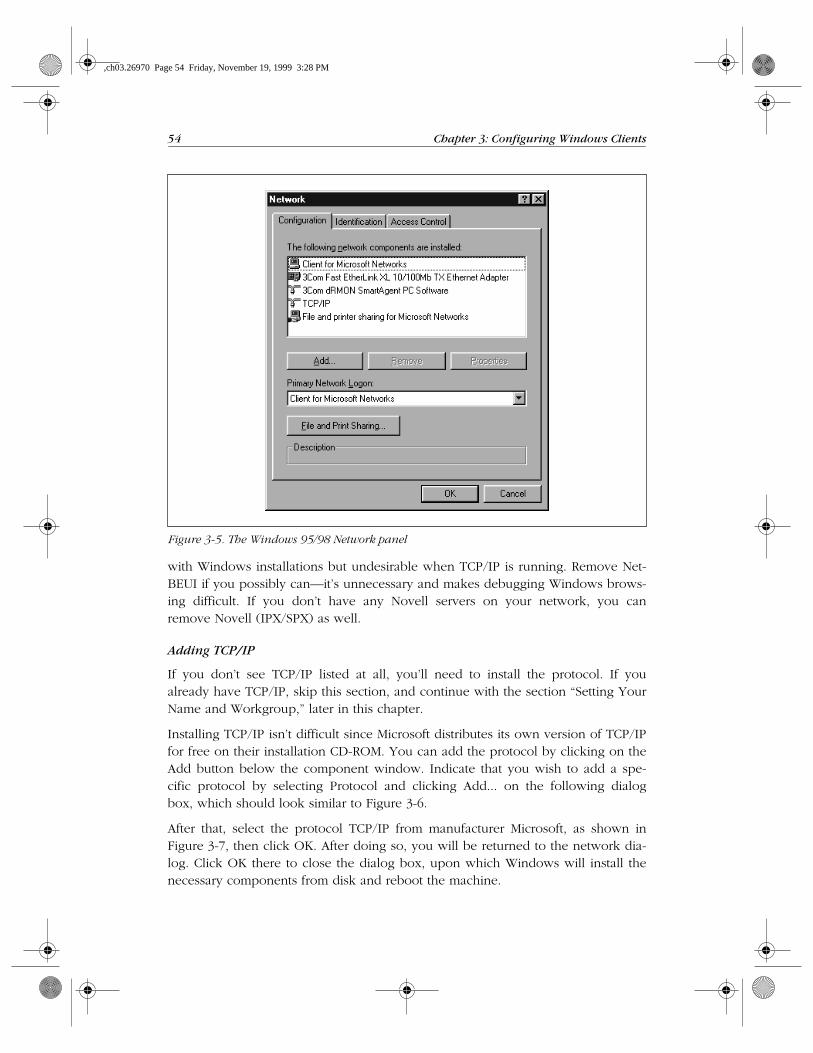
The next thing we need to do is make sure we have the TCP/IP networking proto-col set up correctly. To do this, double-click on the Network icon in the ControlPanel. You should see the network configuration dialog box, as shown inFigure 3-5.
Microsoft networking works by binding specific protocols, such as IPX or TCP/IP,to a specific hardware device, such as an Ethernet card or a dialup connection. Byrouting a protocol through a hardware device, the machine can act as a client orserver for a particular type of network. For Samba, we are interested in bindingthe TCP/IP protocol through a networking device, making the machine a client forMicrosoft networks. Thus, when the dialog box appears, you should see at leastthe Client for Microsoft Networks component installed on the machine, and hope-fully a networking device (preferably an Ethernet card) bound to the TCP/IP pro-tocol. If there is only one networking hardware device, you’ll see the TCP/IPprotocol listed below that device. If it appears similar to Figure 3-5, the protocol isbound to the device.
You may also see “File and printer sharing for Microsoft Networks,” which is use-ful. In addition, you might see NetBEUI or Novell Networking, which are standard
Figure 3-4. Windows Networking profiles
,ch03.26970 Page 53 Friday, November 19, 1999 3:28 PM
54 Chapter 3: Configuring Windows Clients
with Windows installations but undesirable when TCP/IP is running. Remove Net-BEUI if you possibly can—it’s unnecessary and makes debugging Windows brows-ing difficult. If you don’t have any Novell servers on your network, you canremove Novell (IPX/SPX) as well.
Adding TCP/IP
If you don’t see TCP/IP listed at all, you’ll need to install the protocol. If youalready have TCP/IP, skip this section, and continue with the section “Setting YourName and Workgroup,” later in this chapter.
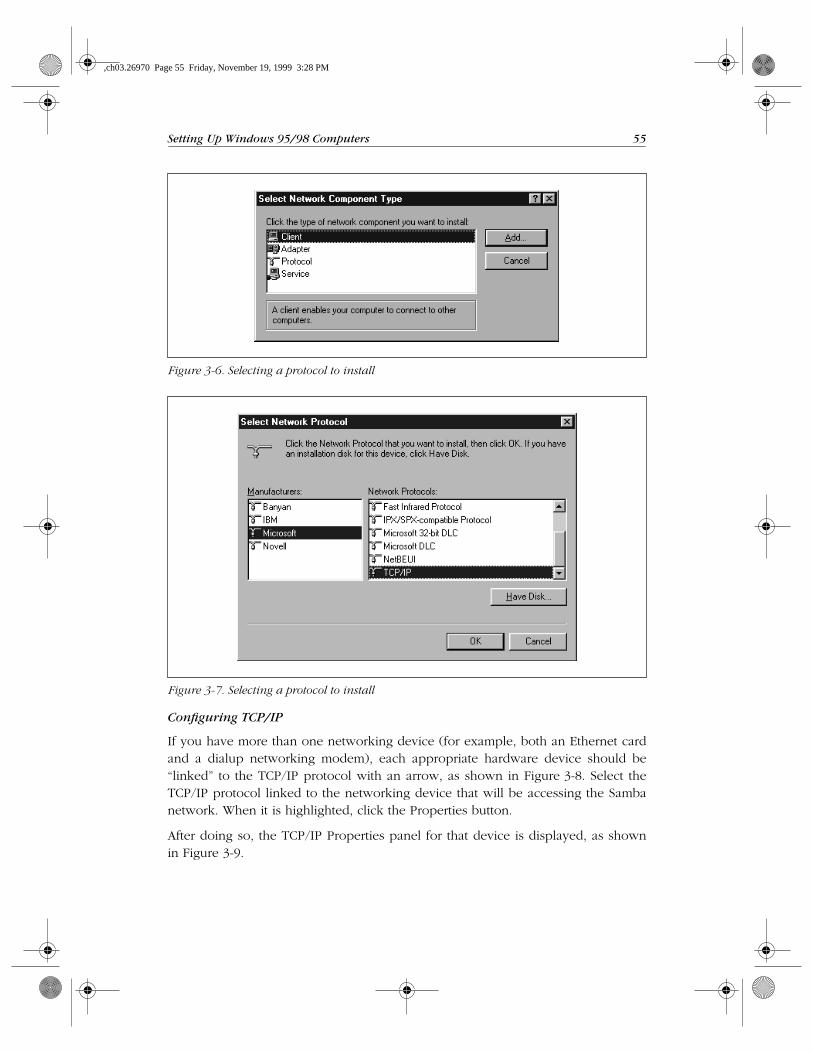
Installing TCP/IP isn’t difficult since Microsoft distributes its own version of TCP/IPfor free on their installation CD-ROM. You can add the protocol by clicking on theAdd button below the component window. Indicate that you wish to add a spe-cific protocol by selecting Protocol and clicking Add... on the following dialogbox, which should look similar to Figure 3-6.
After that, select the protocol TCP/IP from manufacturer Microsoft, as shown inFigure 3-7, then click OK. After doing so, you will be returned to the network dia-log. Click OK there to close the dialog box, upon which Windows will install thenecessary components from disk and reboot the machine.
Figure 3-5. The Windows 95/98 Network panel
,ch03.26970 Page 54 Friday, November 19, 1999 3:28 PM
Setting Up Windows 95/98 Computers 55
Configuring TCP/IP
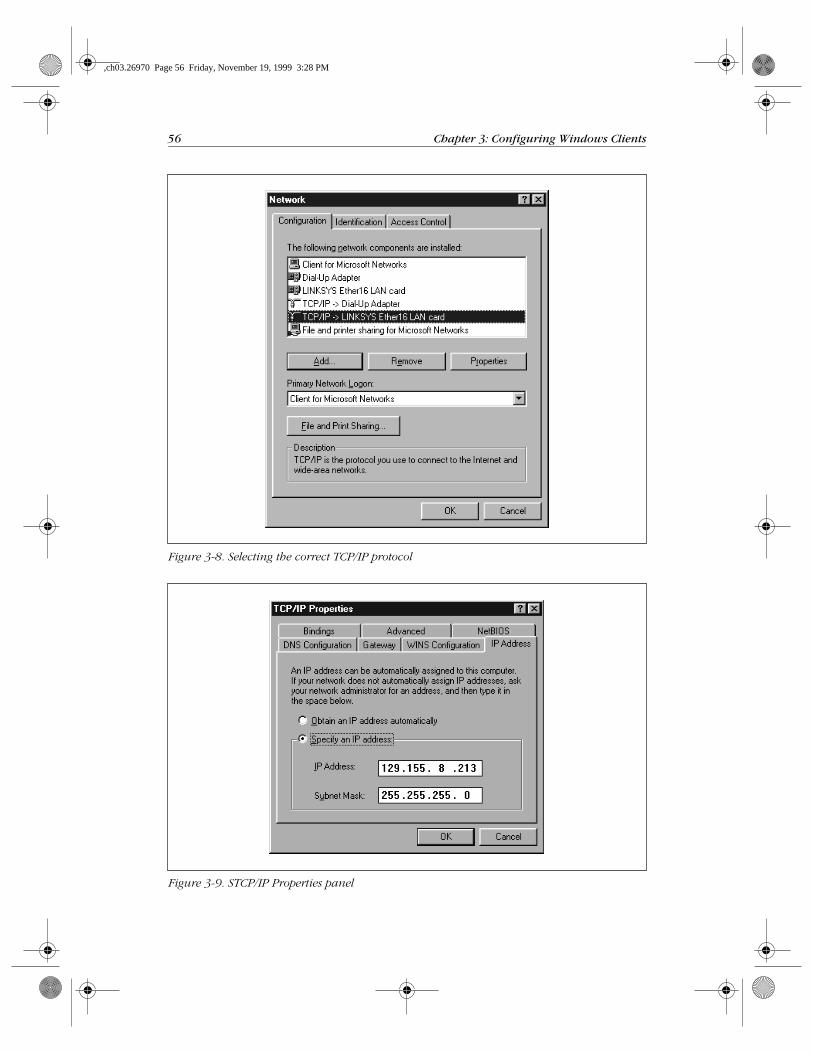
If you have more than one networking device (for example, both an Ethernet cardand a dialup networking modem), each appropriate hardware device should be“linked” to the TCP/IP protocol with an arrow, as shown in Figure 3-8. Select theTCP/IP protocol linked to the networking device that will be accessing the Sambanetwork. When it is highlighted, click the Properties button.
After doing so, the TCP/IP Properties panel for that device is displayed, as shownin Figure 3-9.
Figure 3-6. Selecting a protocol to install
Figure 3-7. Selecting a protocol to install
,ch03.26970 Page 55 Friday, November 19, 1999 3:28 PM
56 Chapter 3: Configuring Windows Clients
Figure 3-8. Selecting the correct TCP/IP protocol
Figure 3-9. STCP/IP Properties panel
,ch03.26970 Page 56 Friday, November 19, 1999 3:28 PM
Setting Up Windows 95/98 Computers 57
There are seven tabs near the top of this panel, and you will need to configurefour of them:
• IP address
• DNS configuration
• WINS configuration
• Bindings
IP Address tab
The IP Address tab is shown in Figure 3-9. Press the “Specify an IP address” radiobutton and enter the client’s address and subnet mask in the space provided. Youor your network manager should have selected an address for the machine. Thevalues should place the computer on the same subnet as the Samba server. Forexample, if the server’s address is 192.168.236.86, and its network mask 255.255.255.0, you might use address 192.168.236.10 (if it is available) for the Windows 98computer, along with the same netmask as the server. If you already use DHCP onyour network to provide IP addresses to Windows machines, select the “Obtain anIP address automatically” button.
DNS Configuration tab
Domain Name Service (DNS) is responsible for translating Internet computernames such as hobbes.example.com into machine-readable IP addresses such as192.168.236.10. There are two ways to accomplish this on a Windows 98 machine:you can specify a server to do the translation for you or you can keep a local listof name/address pairs to refer to.
Networks that are connected to the Internet typically use a server, since the hostsfiles required would otherwise be huge. For an unconnected LAN, the list of possi-ble hosts is small and well-known and might be kept on a Unix machine in the /etc/hosts file. If you are in doubt as to whether a DNS server is being used, or what itsaddress might be, look at the file /etc/resolv.conf on your Unix servers. Anymachine using DNS will have this file, which looks like:
#resolv.confdomain example.comnameserver 127.0.0.1nameserver 192.168.236.20
In the example shown, the second nameserver line in the list contains the IPaddress of another machine on the local network: 192.168.236.20. It’s a good can-didate for a DNS server.*
* We can disqualify the other address because every Unix machine has a localhost address of 127.0.0.1whether it is connected to a network or not. This address is required for some system tools to operatecorrectly.
,ch03.26970 Page 57 Friday, November 19, 1999 3:28 PM

58 Chapter 3: Configuring Windows Clients
You must type the correct IP address of one or more DNS servers (note that youcannot use its Internet name, such as dns.oreilly.com) into the appropriate field inFigure 3-10. Be sure not to use 127.0.0.1—that will never be the correct DNSserver address!
Try to select addresses on your own network. Any name servers listed in /etc/resolv.conf should work, but you’ll get better performance by using a servernearby. (If you don’t find /etc/resolv.conf files on your Unix machines, just disableDNS until you can find the address of at least one DNS server.) Let’s assume youonly have one DNS server, and its address is 192.168.236.20. Click the Enable DNSradio button, as shown in Figure 3-10, and add the server’s address to the top DNSServer Search Order field.
Also, provide the name of the Windows 95/98 machine and the Internet domainyou’re in. You can safely ignore the Domain Suffix Search Order field for any-thing related to Samba.
WINS Configuration tab
WINS is the Windows Internet Name Service, its version of a NetBIOS nameserver. If you’ve enabled WINS on Samba, you must tell Windows the Samba
Figure 3-10. The DNS Configuration tab
,ch03.26970 Page 58 Friday, November 19, 1999 3:28 PM
Setting Up Windows 95/98 Computers 59
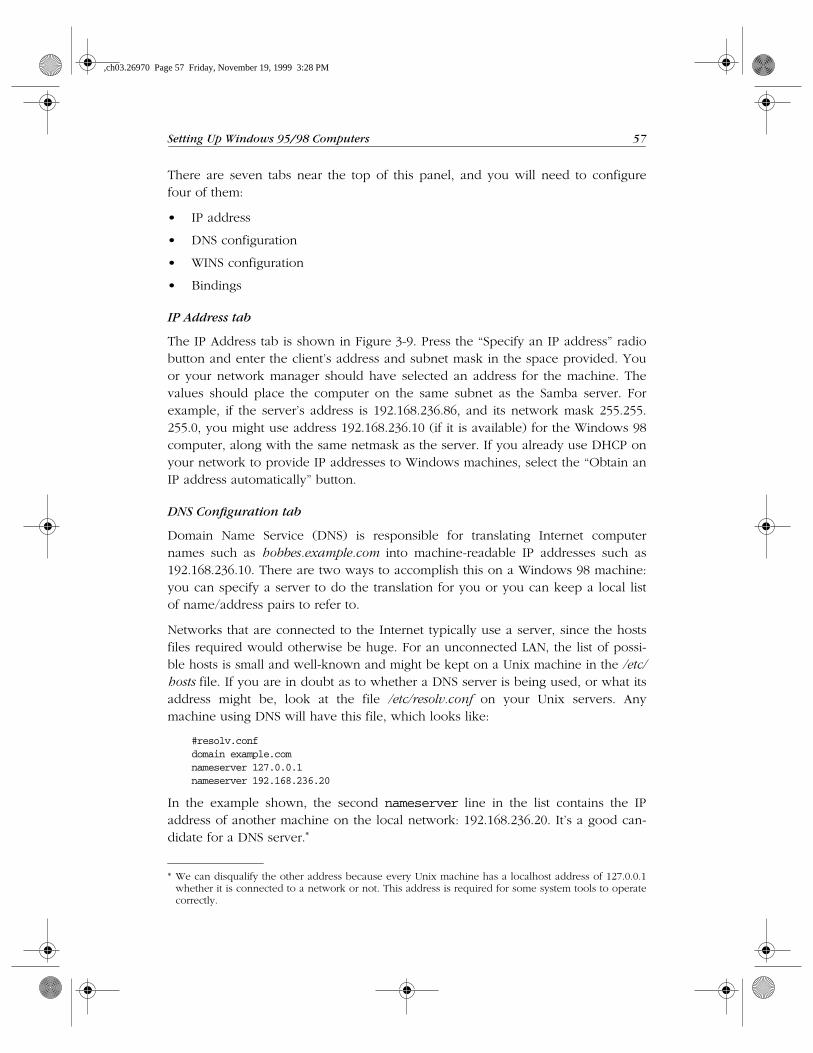
server’s address. If you are using WINS servers that are entirely Windows NT, entereach of them here as well. The dialog box shown after selecting the WINS Config-uration tab is shown in Figure 3-11.
Do not mix a Samba WINS server and a Windows NT server as a pri-mary/backup combination in the WINS dialog. Because the two can-not replicate their databases, this will cause name resolution toperform incorrectly.
From here, select Enable WINS Resolution and enter the WINS server’s address inthe space provided, then press Add. Do not enter anything in the Scope ID field.
Hosts files
If you do not have either DNS or WINS, and you don’t wish to use broadcastresolution, you’ll need to provide a table of IP addresses and hostnames, in the
Figure 3-11. The WINS Configuration tab
,ch03.26970 Page 59 Friday, November 19, 1999 3:28 PM

60 Chapter 3: Configuring Windows Clients
standard Unix /etc/hosts format. On a Windows machine, this goes in \WIN-DOWS\HOSTS under whichever drive you installed Windows on (typically C:\). Asample host file follows:
# 127.0.0.1 localhost192.168.236.1 escrime.example.com escrime192.168.236.2 riposte.example.com riposte192.168.236.3 wizzin.example.com wizzin192.168.236.4 touche.example.com touche192.168.236.10 hobbes.example.com hobbes
You can copy this file directly from any of your Unix machines’ /etc/hosts ; the for-mat is identical. However, you should only use hosts files in Windows as a lastresort for name resolution.
Check the bindings
The final tab to look at is Bindings, as shown in Figure 3-12.
You should have a check beside Client for Microsoft Networks, indicating that it’susing TCP/IP. If you have “File and printer sharing for Microsoft Networks” in thedialog, it should also be checked, as shown in the figure.
Setting Your Name and Workgroup
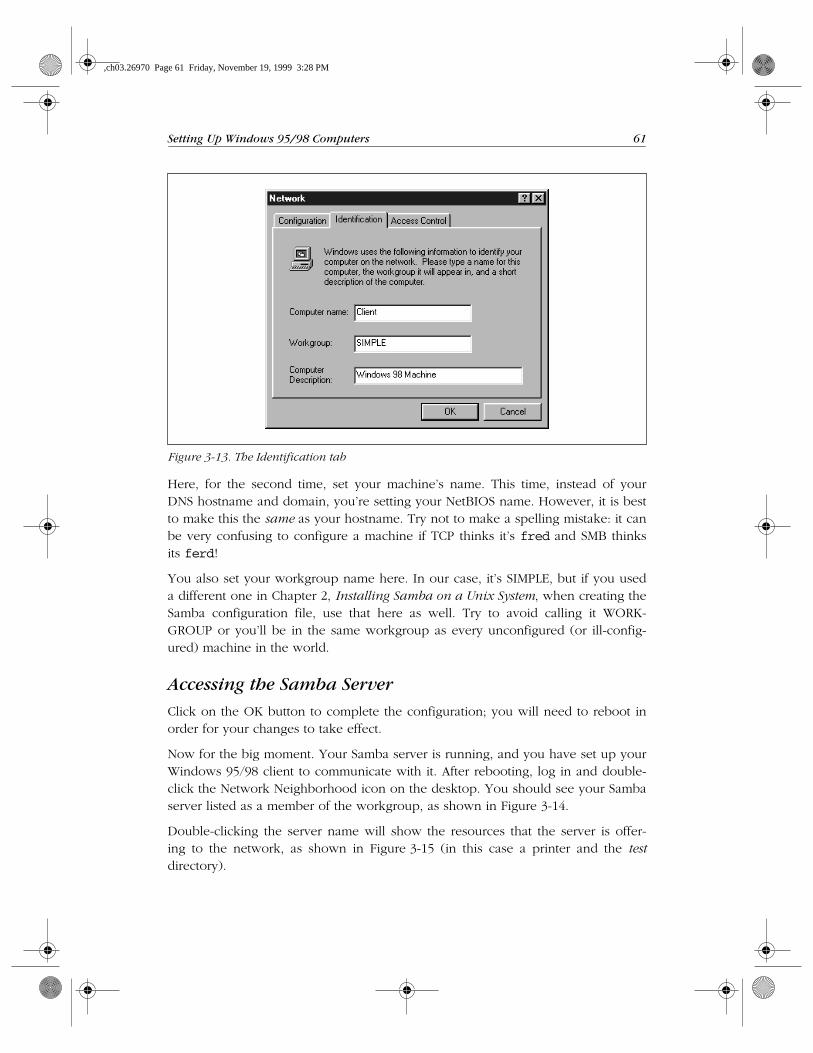
Finally, press the OK button in the TCP/IP configuration panel, and you’ll be takenback to the Network Configuration screen. Then select the Identification tab,which will take you to the dialog box shown in Figure 3-13.
Figure 3-12. The Bindings tab
,ch03.26970 Page 60 Friday, November 19, 1999 3:28 PM
Setting Up Windows 95/98 Computers 61
Here, for the second time, set your machine’s name. This time, instead of yourDNS hostname and domain, you’re setting your NetBIOS name. However, it is bestto make this the same as your hostname. Try not to make a spelling mistake: it canbe very confusing to configure a machine if TCP thinks it’s fred and SMB thinksits ferd!
You also set your workgroup name here. In our case, it’s SIMPLE, but if you useda different one in Chapter 2, Installing Samba on a Unix System, when creating theSamba configuration file, use that here as well. Try to avoid calling it WORK-GROUP or you’ll be in the same workgroup as every unconfigured (or ill-config-ured) machine in the world.
Accessing the Samba Server
Click on the OK button to complete the configuration; you will need to reboot inorder for your changes to take effect.
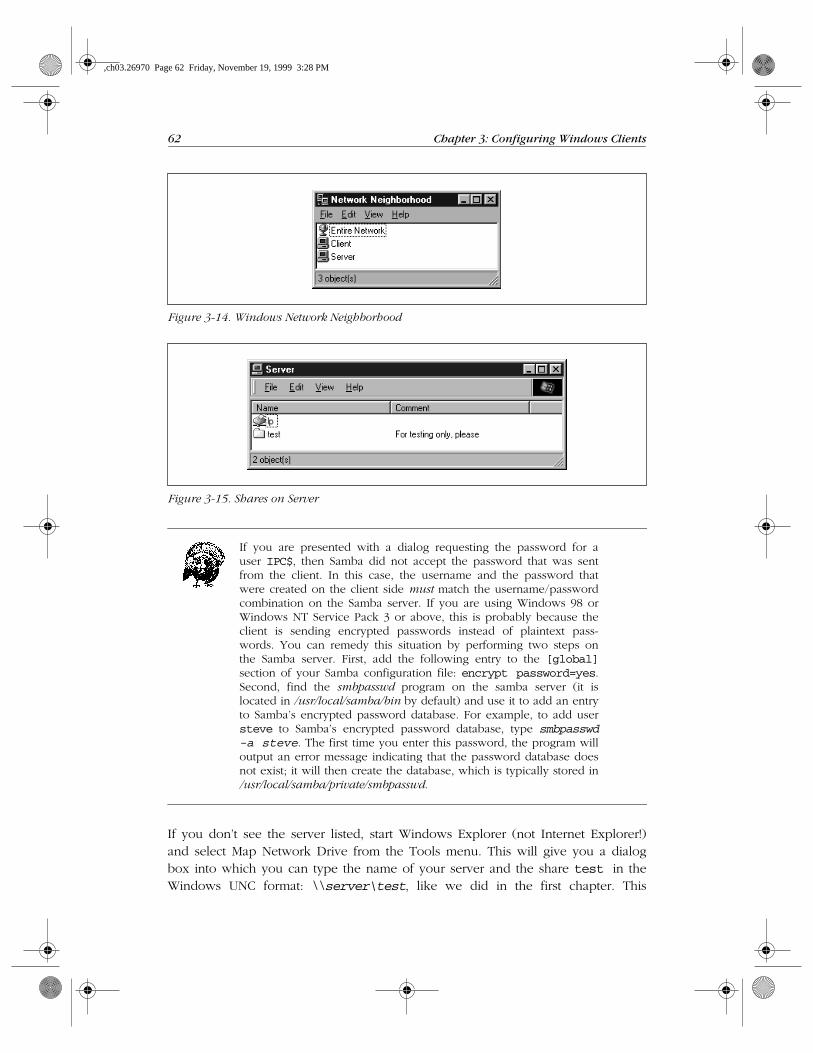
Now for the big moment. Your Samba server is running, and you have set up yourWindows 95/98 client to communicate with it. After rebooting, log in and double-click the Network Neighborhood icon on the desktop. You should see your Sambaserver listed as a member of the workgroup, as shown in Figure 3-14.
Double-clicking the server name will show the resources that the server is offer-ing to the network, as shown in Figure 3-15 (in this case a printer and the testdirectory).
Figure 3-13. The Identification tab
,ch03.26970 Page 61 Friday, November 19, 1999 3:28 PM
62 Chapter 3: Configuring Windows Clients
If you are presented with a dialog requesting the password for auser IPC$, then Samba did not accept the password that was sentfrom the client. In this case, the username and the password thatwere created on the client side must match the username/passwordcombination on the Samba server. If you are using Windows 98 orWindows NT Service Pack 3 or above, this is probably because theclient is sending encrypted passwords instead of plaintext pass-words. You can remedy this situation by performing two steps onthe Samba server. First, add the following entry to the [global]section of your Samba configuration file: encrypt password=yes.Second, find the smbpasswd program on the samba server (it islocated in /usr/local/samba/bin by default) and use it to add an entryto Samba’s encrypted password database. For example, to add usersteve to Samba’s encrypted password database, type smbpasswd-a steve. The first time you enter this password, the program willoutput an error message indicating that the password database doesnot exist; it will then create the database, which is typically stored in/usr/local/samba/private/smbpasswd.
If you don’t see the server listed, start Windows Explorer (not Internet Explorer!)and select Map Network Drive from the Tools menu. This will give you a dialogbox into which you can type the name of your server and the share test in theWindows UNC format: \\server\test, like we did in the first chapter. This
Figure 3-14. Windows Network Neighborhood
Figure 3-15. Shares on Server
,ch03.26970 Page 62 Friday, November 19, 1999 3:28 PM
Setting Up Windows NT 4.0 Computers 63
should attempt to contact the Samba server and its temporary share. If things stillaren’t right, go to Chapter 9, Troubleshooting Samba, for troubleshooting assistance.
Setting Up Windows NT 4.0 ComputersConfiguring Windows NT is a little different than configuring Windows 95/98. Inorder to use Samba with Windows NT, you will need both the Workstation ser-vice and the TCP/IP protocol. Both come standard with NT, but we’ll workthrough installing and configuring them because they may not be configuredcorrectly.
There are six basic steps:
1. Assign the machine a name.
2. Install the Workstation service.
3. Install the TCP/IP protocol.
4. Set the machine’s name and IP address.
5. Configure the DNS and WINS name services.
6. Bind the protocol and service together.
Basic Configuration
This section presents an outline of the steps to follow for getting Windows NT tocooperate with Samba. If you need more details on Windows NT network admin-istration, refer to Craig Hunt and Robert Bruce Thompsom’s Windows NT TCP/IPNetwork Administration (O’Reilly), an excellent guide. You should perform thesesteps as the “Administrator” user.
Name the machine
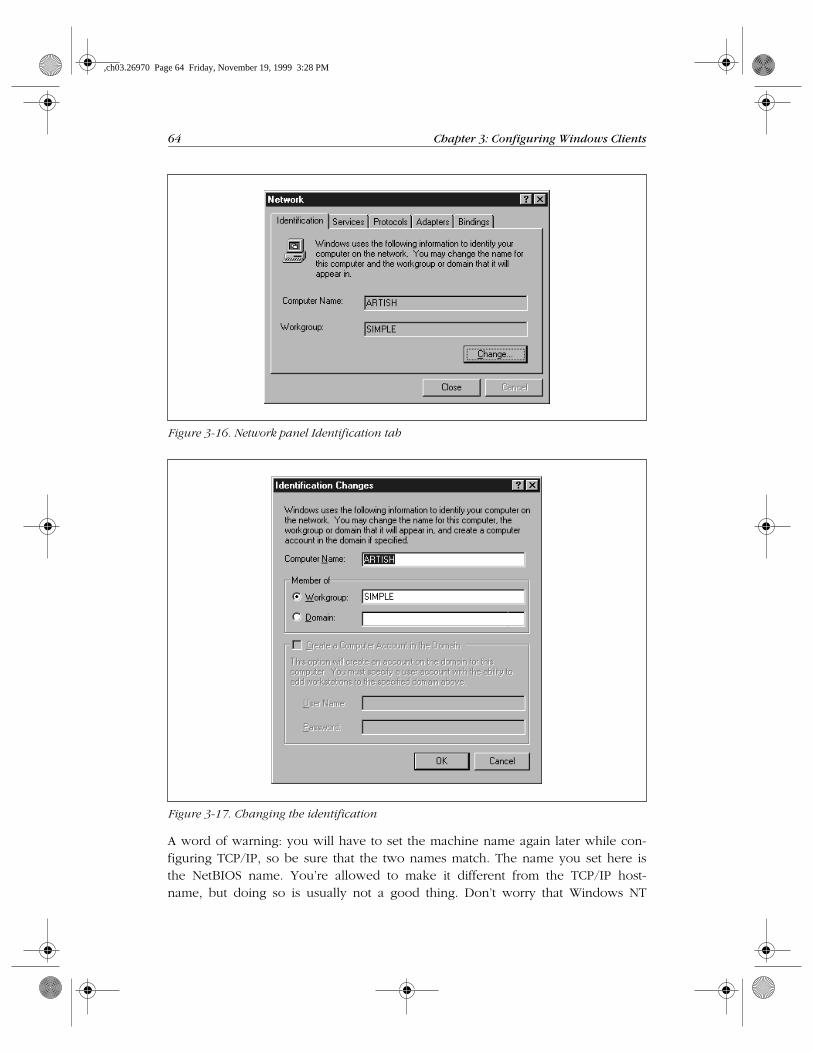
The first thing you need to do is to give the machine a NetBIOS name. From theControl Panel, double click on the Network icon. This will take you to the Net-work dialog box for the machine. The first tab in this dialog box should be theIdentification tab, as illustrated in Figure 3-16.
Here, you need to identify your machine with a name (we use the name Artishhere) and change the default workgroup to the one you specified in the smb.conffile of your Samba server. In this case, the workgroup name is SIMPLE. However,you cannot edit either name here (as you could in Windows 95/98), but insteadmust use the Change button below the two text fields. Pressing this button raisesan Identification Changes dialog box, where you can reset the workgroup and themachine name, as shown in Figure 3-17.
,ch03.26970 Page 63 Friday, November 19, 1999 3:28 PM
64 Chapter 3: Configuring Windows Clients
A word of warning: you will have to set the machine name again later while con-figuring TCP/IP, so be sure that the two names match. The name you set here isthe NetBIOS name. You’re allowed to make it different from the TCP/IP host-name, but doing so is usually not a good thing. Don’t worry that Windows NT
Figure 3-16. Network panel Identification tab
Figure 3-17. Changing the identification
,ch03.26970 Page 64 Friday, November 19, 1999 3:28 PM
Setting Up Windows NT 4.0 Computers 65
forces the computer name and the workgroup to be all capital letters; it’s smartenough to figure out what you mean when it connects to the network.
Installing the TCP/IP protocol
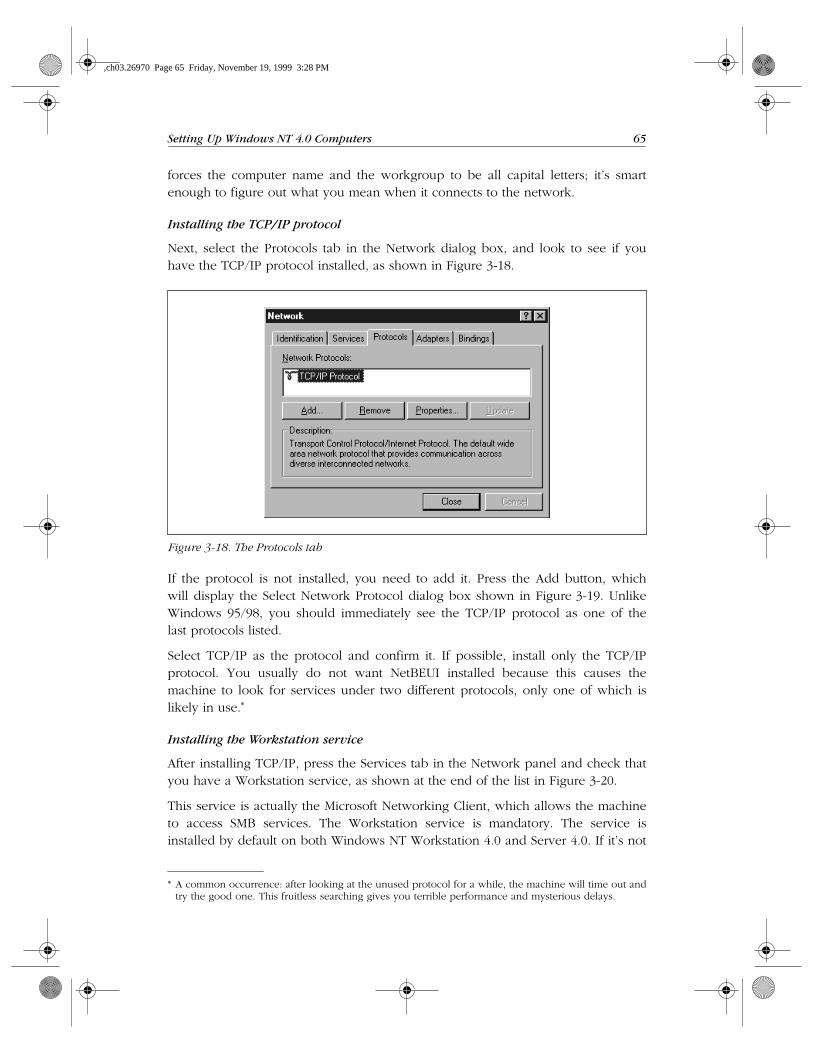
Next, select the Protocols tab in the Network dialog box, and look to see if youhave the TCP/IP protocol installed, as shown in Figure 3-18.
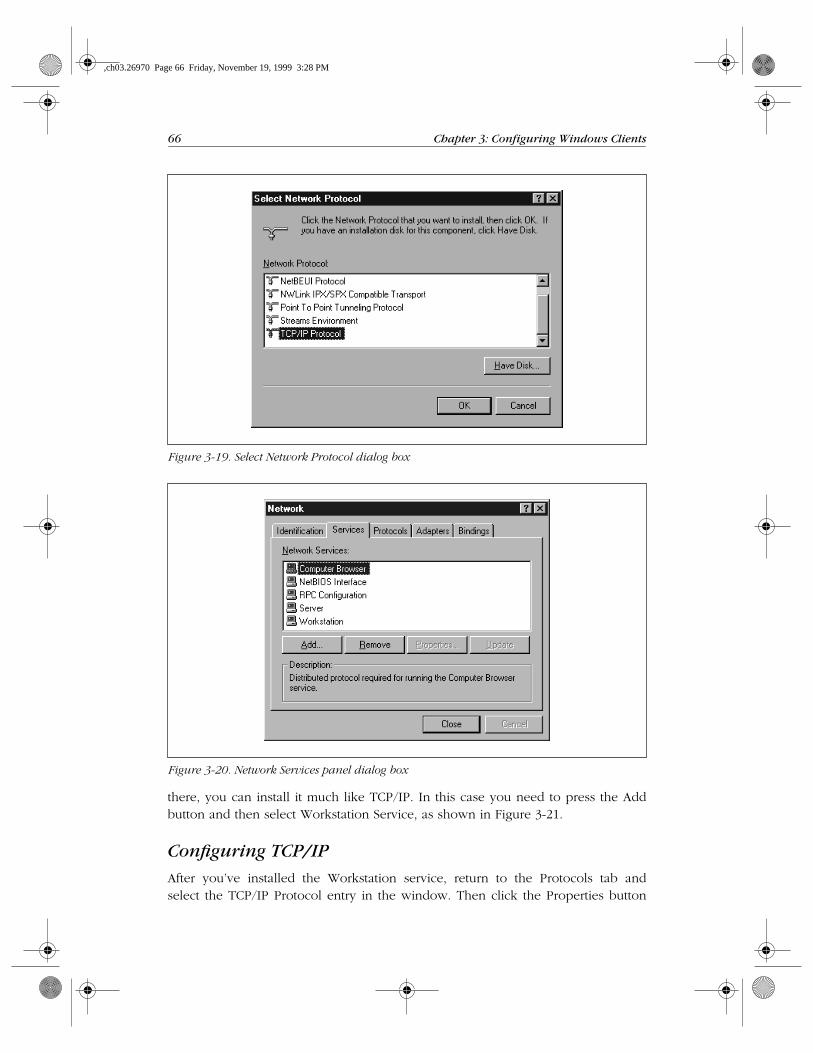
If the protocol is not installed, you need to add it. Press the Add button, whichwill display the Select Network Protocol dialog box shown in Figure 3-19. UnlikeWindows 95/98, you should immediately see the TCP/IP protocol as one of thelast protocols listed.
Select TCP/IP as the protocol and confirm it. If possible, install only the TCP/IPprotocol. You usually do not want NetBEUI installed because this causes themachine to look for services under two different protocols, only one of which islikely in use.*
Installing the Workstation service
After installing TCP/IP, press the Services tab in the Network panel and check thatyou have a Workstation service, as shown at the end of the list in Figure 3-20.
This service is actually the Microsoft Networking Client, which allows the machineto access SMB services. The Workstation service is mandatory. The service isinstalled by default on both Windows NT Workstation 4.0 and Server 4.0. If it’s not
Figure 3-18. The Protocols tab
* A common occurrence: after looking at the unused protocol for a while, the machine will time out andtry the good one. This fruitless searching gives you terrible performance and mysterious delays.
,ch03.26970 Page 65 Friday, November 19, 1999 3:28 PM
66 Chapter 3: Configuring Windows Clients
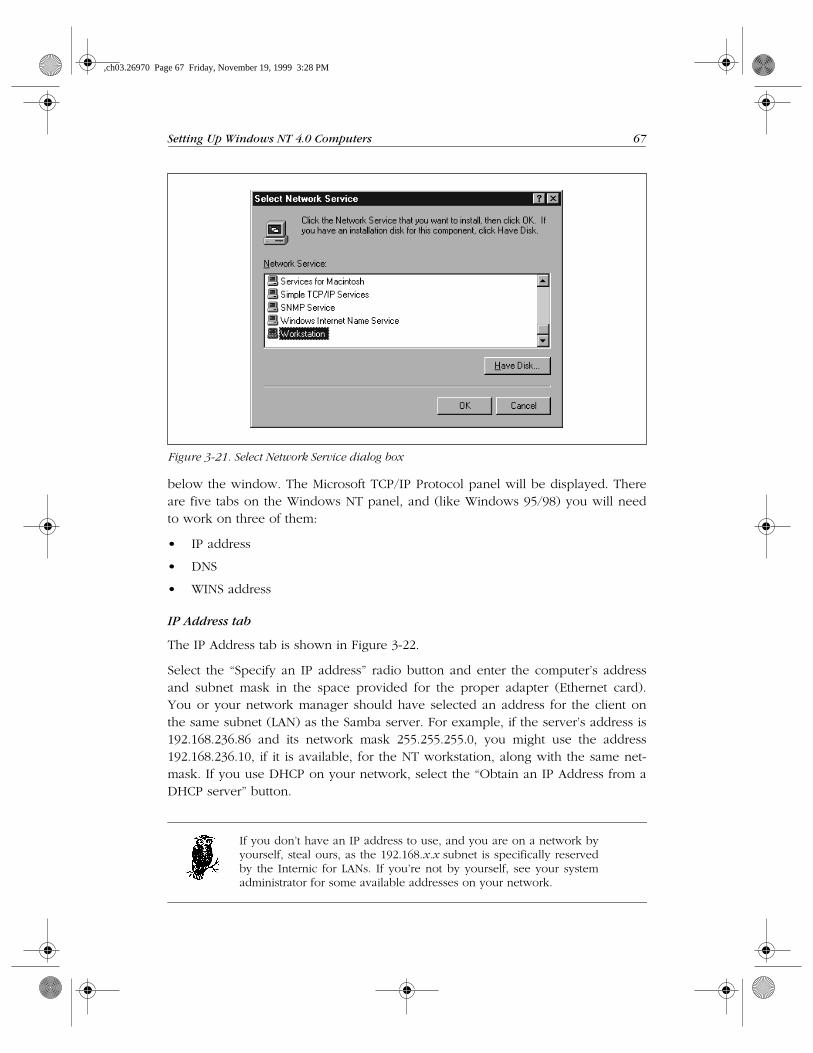
there, you can install it much like TCP/IP. In this case you need to press the Addbutton and then select Workstation Service, as shown in Figure 3-21.
Configuring TCP/IP
After you’ve installed the Workstation service, return to the Protocols tab andselect the TCP/IP Protocol entry in the window. Then click the Properties button
Figure 3-19. Select Network Protocol dialog box
Figure 3-20. Network Services panel dialog box
,ch03.26970 Page 66 Friday, November 19, 1999 3:28 PM
Setting Up Windows NT 4.0 Computers 67
below the window. The Microsoft TCP/IP Protocol panel will be displayed. Thereare five tabs on the Windows NT panel, and (like Windows 95/98) you will needto work on three of them:
• IP address
• DNS
• WINS address
IP Address tab
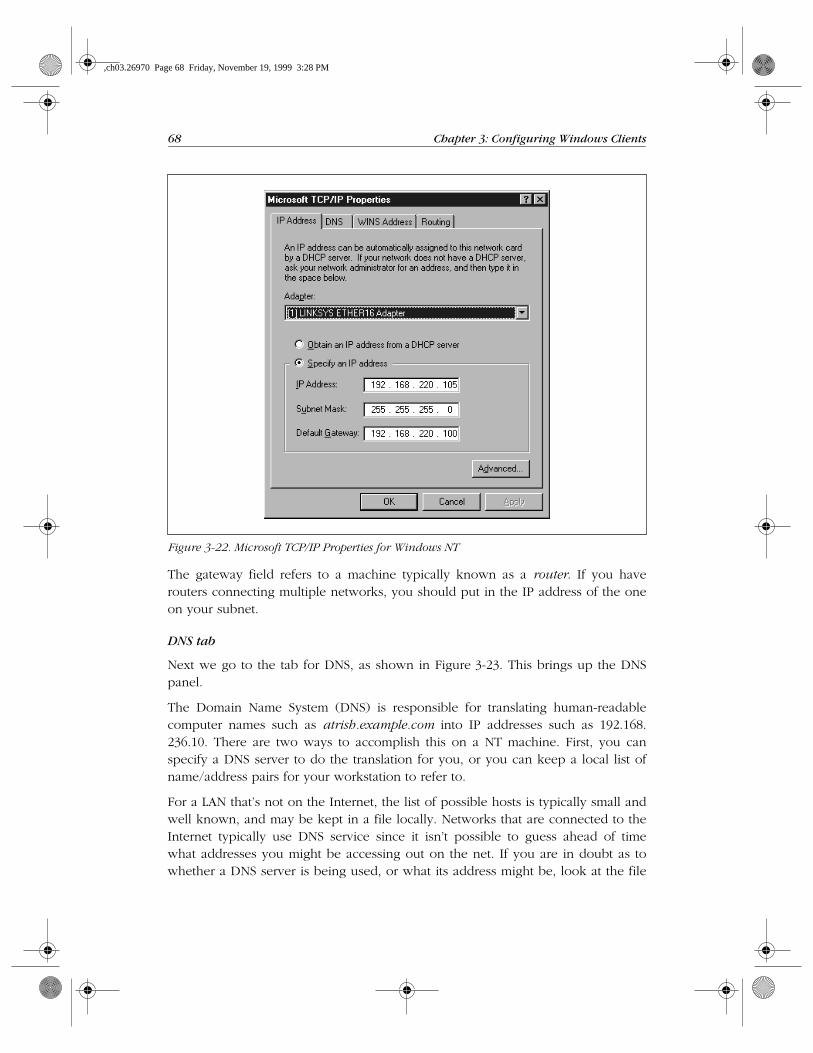
The IP Address tab is shown in Figure 3-22.
Select the “Specify an IP address” radio button and enter the computer’s addressand subnet mask in the space provided for the proper adapter (Ethernet card).You or your network manager should have selected an address for the client onthe same subnet (LAN) as the Samba server. For example, if the server’s address is192.168.236.86 and its network mask 255.255.255.0, you might use the address192.168.236.10, if it is available, for the NT workstation, along with the same net-mask. If you use DHCP on your network, select the “Obtain an IP Address from aDHCP server” button.
If you don’t have an IP address to use, and you are on a network byyourself, steal ours, as the 192.168.x.x subnet is specifically reservedby the Internic for LANs. If you’re not by yourself, see your systemadministrator for some available addresses on your network.
Figure 3-21. Select Network Service dialog box
,ch03.26970 Page 67 Friday, November 19, 1999 3:28 PM
68 Chapter 3: Configuring Windows Clients
The gateway field refers to a machine typically known as a router. If you haverouters connecting multiple networks, you should put in the IP address of the oneon your subnet.
DNS tab
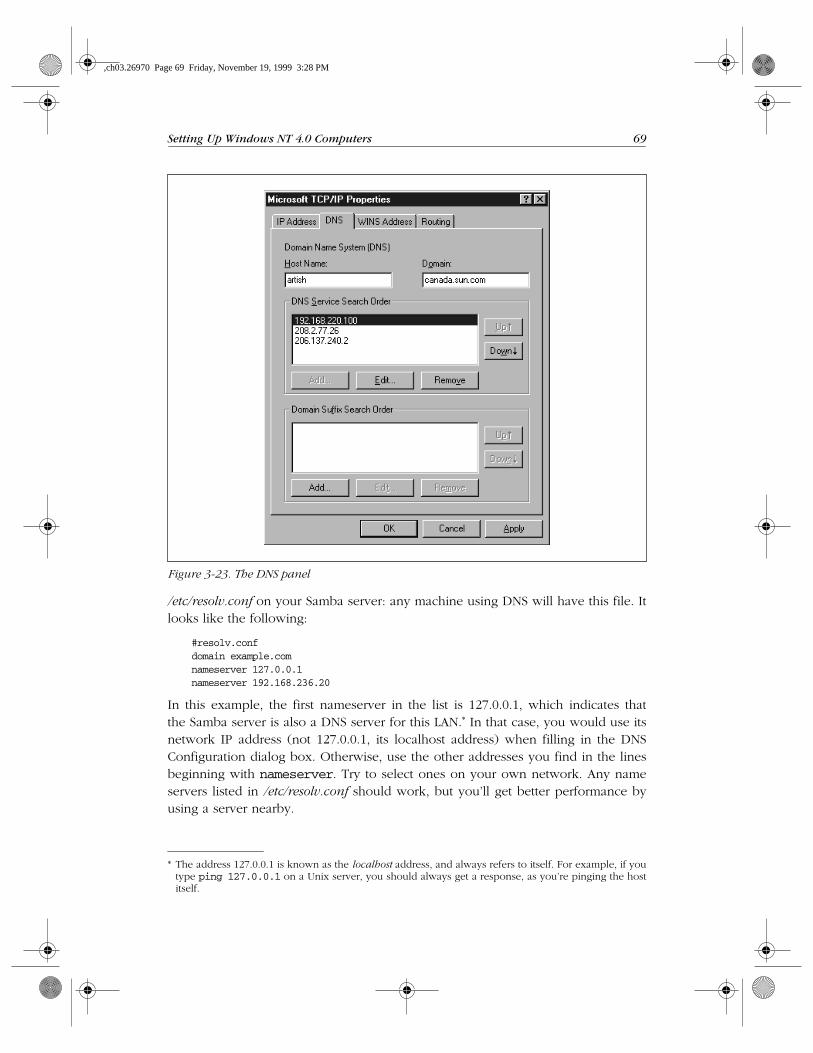
Next we go to the tab for DNS, as shown in Figure 3-23. This brings up the DNSpanel.
The Domain Name System (DNS) is responsible for translating human-readablecomputer names such as atrish.example.com into IP addresses such as 192.168.236.10. There are two ways to accomplish this on a NT machine. First, you canspecify a DNS server to do the translation for you, or you can keep a local list ofname/address pairs for your workstation to refer to.
For a LAN that’s not on the Internet, the list of possible hosts is typically small andwell known, and may be kept in a file locally. Networks that are connected to theInternet typically use DNS service since it isn’t possible to guess ahead of timewhat addresses you might be accessing out on the net. If you are in doubt as towhether a DNS server is being used, or what its address might be, look at the file
Figure 3-22. Microsoft TCP/IP Properties for Windows NT
,ch03.26970 Page 68 Friday, November 19, 1999 3:28 PM
Setting Up Windows NT 4.0 Computers 69
/etc/resolv.conf on your Samba server: any machine using DNS will have this file. Itlooks like the following:
#resolv.confdomain example.comnameserver 127.0.0.1nameserver 192.168.236.20
In this example, the first nameserver in the list is 127.0.0.1, which indicates thatthe Samba server is also a DNS server for this LAN.* In that case, you would use itsnetwork IP address (not 127.0.0.1, its localhost address) when filling in the DNSConfiguration dialog box. Otherwise, use the other addresses you find in the linesbeginning with nameserver. Try to select ones on your own network. Any nameservers listed in /etc/resolv.conf should work, but you’ll get better performance byusing a server nearby.
Figure 3-23. The DNS panel
* The address 127.0.0.1 is known as the localhost address, and always refers to itself. For example, if youtype ping 127.0.0.1 on a Unix server, you should always get a response, as you’re pinging the hostitself.
,ch03.26970 Page 69 Friday, November 19, 1999 3:28 PM
70 Chapter 3: Configuring Windows Clients
Finally, enter the machine name once more, making sure that it’s the same onelisted in the Identification tab of the Network dialog box (before the NetBIOSname). Also, enter the DNS domain on which this machine resides. For example, ifyour workstation has a domain name such as example.com, enter it here. You cansafely ignore the other options.
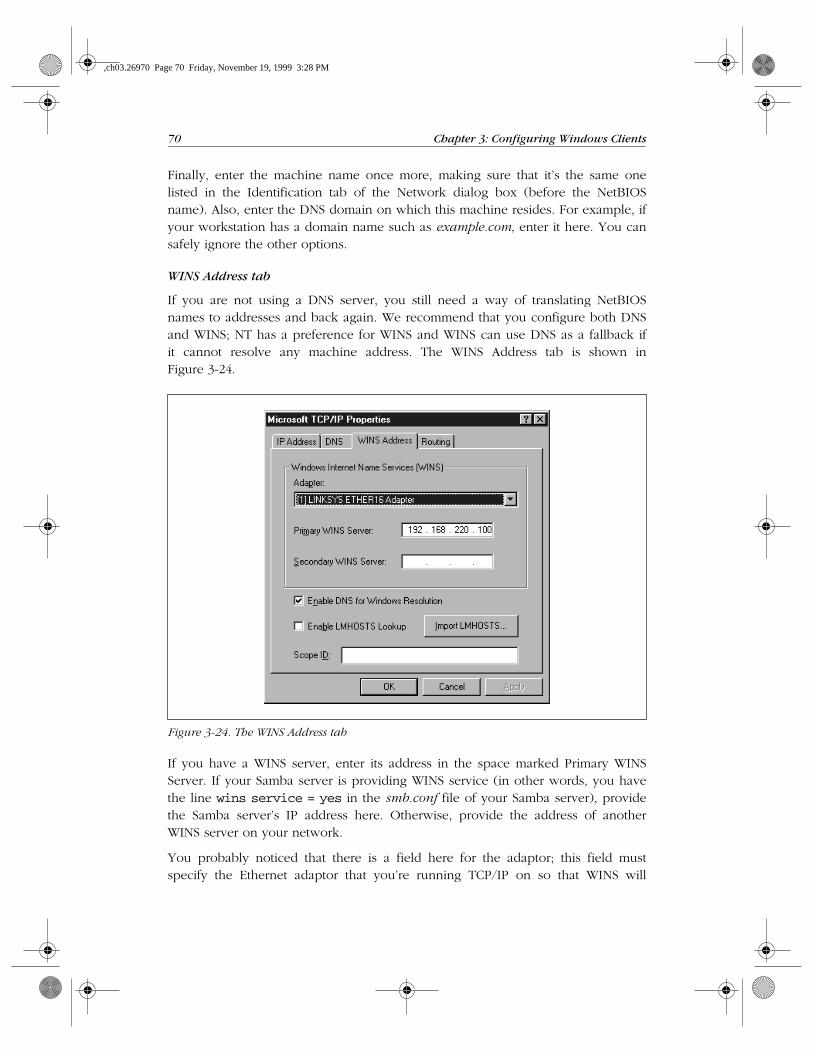
WINS Address tab
If you are not using a DNS server, you still need a way of translating NetBIOSnames to addresses and back again. We recommend that you configure both DNSand WINS; NT has a preference for WINS and WINS can use DNS as a fallback ifit cannot resolve any machine address. The WINS Address tab is shown inFigure 3-24.
If you have a WINS server, enter its address in the space marked Primary WINSServer. If your Samba server is providing WINS service (in other words, you havethe line wins service = yes in the smb.conf file of your Samba server), providethe Samba server’s IP address here. Otherwise, provide the address of anotherWINS server on your network.
You probably noticed that there is a field here for the adaptor; this field mustspecify the Ethernet adaptor that you’re running TCP/IP on so that WINS will
Figure 3-24. The WINS Address tab
,ch03.26970 Page 70 Friday, November 19, 1999 3:28 PM
Setting Up Windows NT 4.0 Computers 71
provide name service on the correct network. If you have both a LAN and a dia-lup adaptor, make sure you have the LAN’s adaptor here.
Finally, select the “Enable DNS for Windows Resolution” checkbox, so WINS willtry DNS as a fallback if it can’t find a name. You can safely ignore the otheroptions.
Hosts files
If you don’t have either DNS or WINS, and you don’t wish to use broadcast nameresolution, you’ll need to provide a table of IP addresses and hosts names, in stan-dard Unix /etc/hosts format. We recommend against this because maintenance ofthis file on any dynamic network is troublesome, but we will explain it just thesame. The Windows host file should appear in the \WINDOWS\HOSTS directoryof whatever local drive Windows is installed on. A sample follows:
127.0.0.1 localhost192.168.236.1 escrime escrime.example.com192.168.236.2 riposte riposte.example.com192.168.236.3 wizzin wizzin.example.com192.168.236.4 touche touche.example.com192.168.236.5 gurgi gurgi.example.com192.168.236.6 jessiac jessiac.example.com192.168.236.7 skyline skyline.example.com
If you wish, you can copy the contents directly from the Samba server’s /etc/hosts.The format is identical. This file will then serve the same purpose as the hosts fileon the Unix server. Again, hosts files on Windows should only be used as a lastresort.
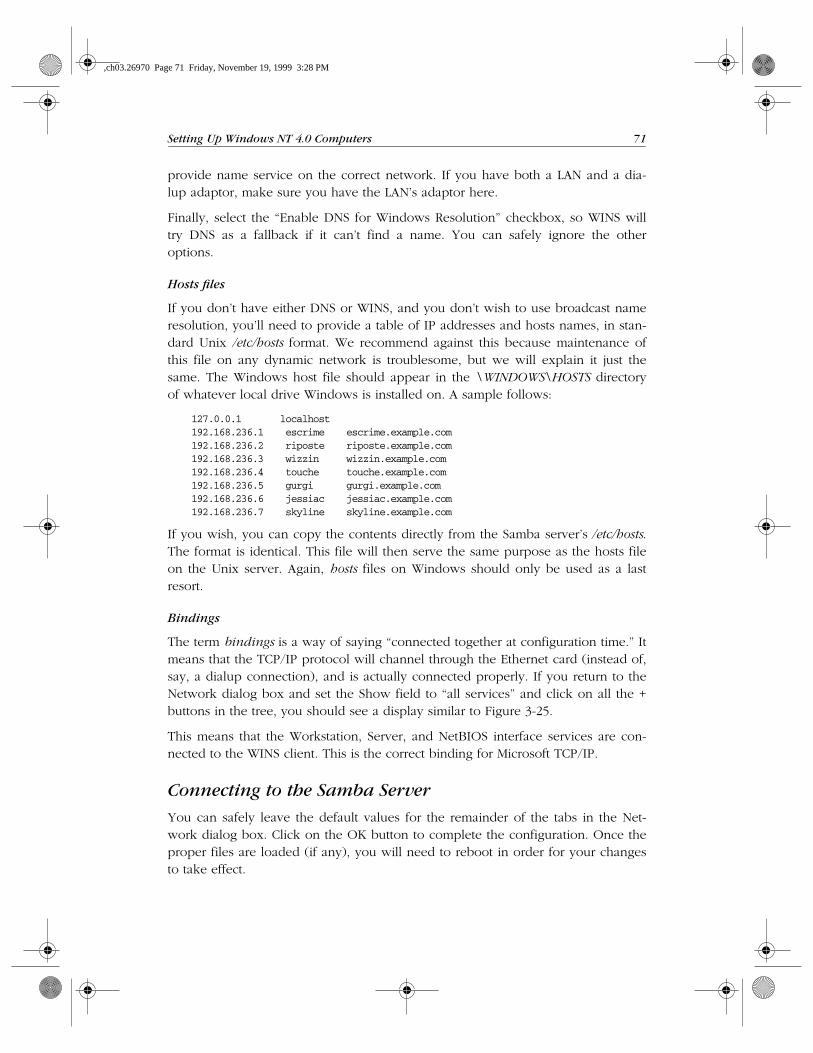
Bindings
The term bindings is a way of saying “connected together at configuration time.” Itmeans that the TCP/IP protocol will channel through the Ethernet card (instead of,say, a dialup connection), and is actually connected properly. If you return to theNetwork dialog box and set the Show field to “all services” and click on all the +buttons in the tree, you should see a display similar to Figure 3-25.
This means that the Workstation, Server, and NetBIOS interface services are con-nected to the WINS client. This is the correct binding for Microsoft TCP/IP.
Connecting to the Samba Server
You can safely leave the default values for the remainder of the tabs in the Net-work dialog box. Click on the OK button to complete the configuration. Once theproper files are loaded (if any), you will need to reboot in order for your changesto take effect.
,ch03.26970 Page 71 Friday, November 19, 1999 3:28 PM
72 Chapter 3: Configuring Windows Clients
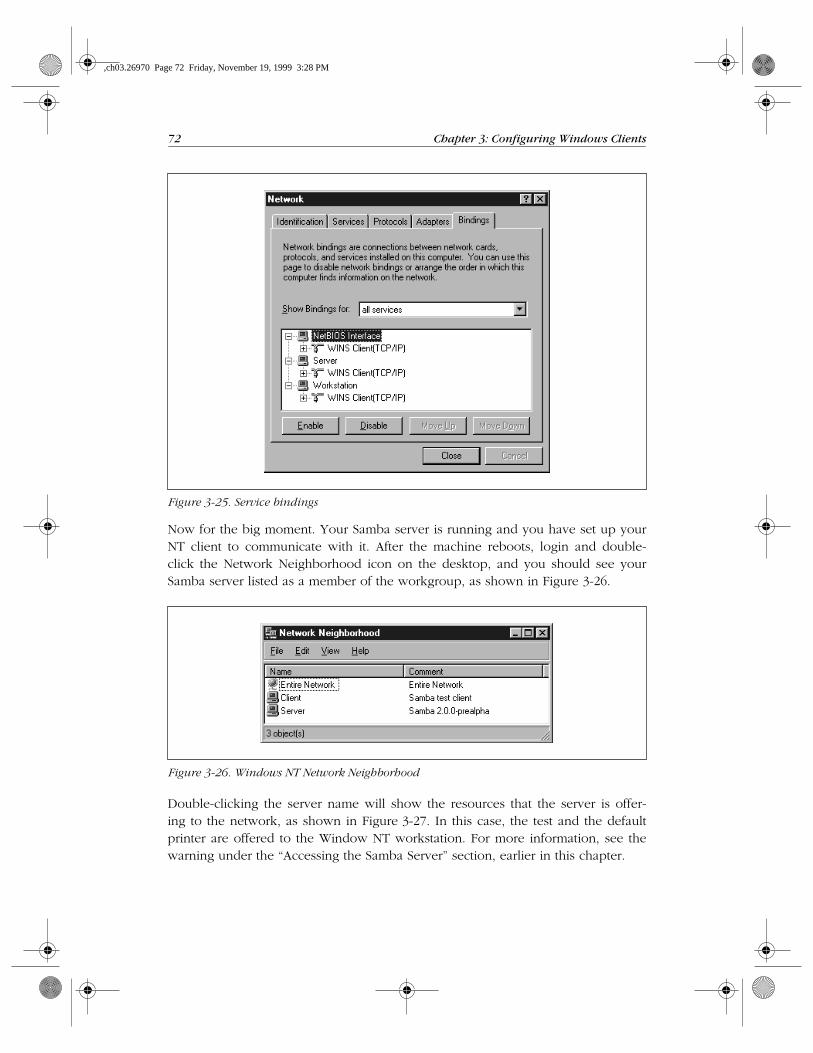
Now for the big moment. Your Samba server is running and you have set up yourNT client to communicate with it. After the machine reboots, login and double-click the Network Neighborhood icon on the desktop, and you should see yourSamba server listed as a member of the workgroup, as shown in Figure 3-26.
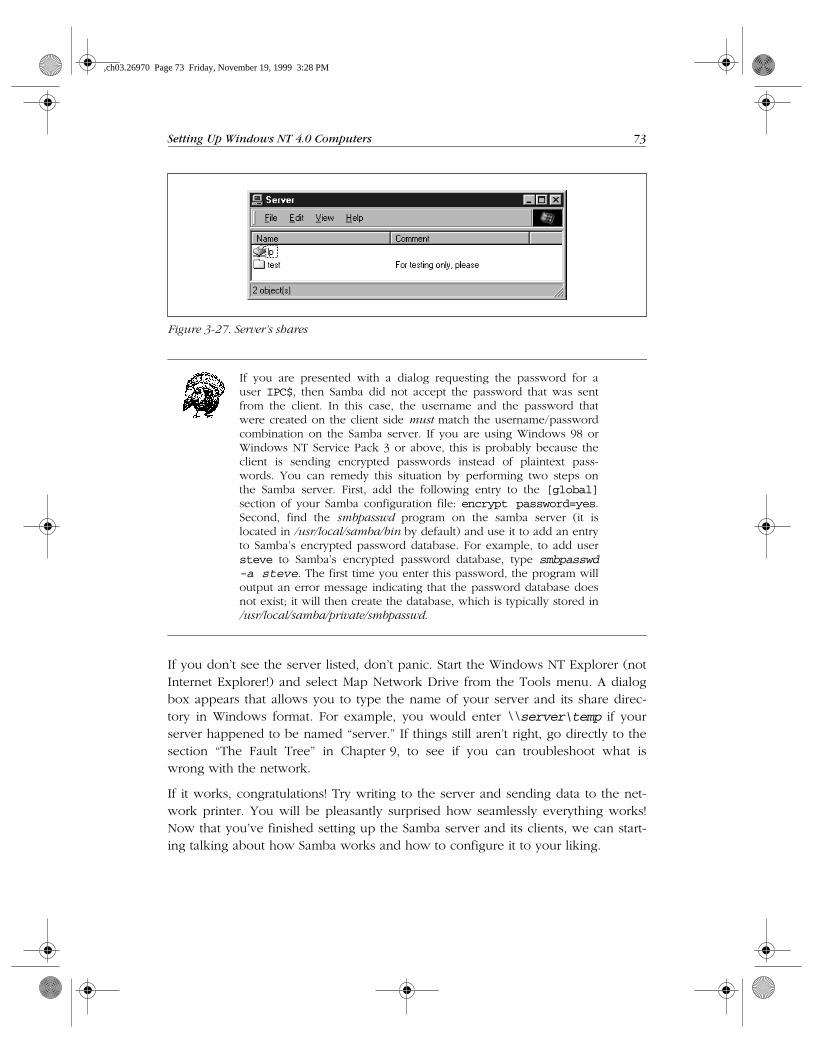
Double-clicking the server name will show the resources that the server is offer-ing to the network, as shown in Figure 3-27. In this case, the test and the defaultprinter are offered to the Window NT workstation. For more information, see thewarning under the “Accessing the Samba Server” section, earlier in this chapter.
Figure 3-25. Service bindings
Figure 3-26. Windows NT Network Neighborhood
,ch03.26970 Page 72 Friday, November 19, 1999 3:28 PM
Setting Up Windows NT 4.0 Computers 73
If you are presented with a dialog requesting the password for auser IPC$, then Samba did not accept the password that was sentfrom the client. In this case, the username and the password thatwere created on the client side must match the username/passwordcombination on the Samba server. If you are using Windows 98 orWindows NT Service Pack 3 or above, this is probably because theclient is sending encrypted passwords instead of plaintext pass-words. You can remedy this situation by performing two steps onthe Samba server. First, add the following entry to the [global]section of your Samba configuration file: encrypt password=yes.Second, find the smbpasswd program on the samba server (it islocated in /usr/local/samba/bin by default) and use it to add an entryto Samba’s encrypted password database. For example, to add usersteve to Samba’s encrypted password database, type smbpasswd-a steve. The first time you enter this password, the program willoutput an error message indicating that the password database doesnot exist; it will then create the database, which is typically stored in/usr/local/samba/private/smbpasswd.
If you don’t see the server listed, don’t panic. Start the Windows NT Explorer (notInternet Explorer!) and select Map Network Drive from the Tools menu. A dialogbox appears that allows you to type the name of your server and its share direc-tory in Windows format. For example, you would enter \\server\temp if yourserver happened to be named “server.” If things still aren’t right, go directly to thesection “The Fault Tree” in Chapter 9, to see if you can troubleshoot what iswrong with the network.
If it works, congratulations! Try writing to the server and sending data to the net-work printer. You will be pleasantly surprised how seamlessly everything works!Now that you’ve finished setting up the Samba server and its clients, we can start-ing talking about how Samba works and how to configure it to your liking.
Figure 3-27. Server’s shares
,ch03.26970 Page 73 Friday, November 19, 1999 3:28 PM
74 Chapter 3: Configuring Windows Clients
An Introduction to SMB/CIFSWe’ll wrap up this chapter with a short tutorial on SMB/CIFS. SMB/CIFS is the pro-tocol that Windows 95/98 and NT machines use to communicate with the Sambaserver and each other. At a high level, the SMB protocol suite is relatively simple.It includes commands for all of the file and print operations that you might do ona local disk or printer, such as:
• Opening and closing a file
• Creating and deleting files and directories
• Reading and writing a file
• Searching for files
• Queueing and dequeueing files to a print spool
Each of these operations can be encoded into an SMB message and transmitted toand from a server. The original name SMB comes from their data format: these areversions of the standard DOS system-call data structures, or Server Message Blocks,redesigned for transmitting to another machine across a network.
SMB Format
Richard Sharpe of the Samba team defines SMB as a “request-response” protocol.*
In effect, this means that a client sends an SMB request to a server, and the serversends an SMB response back to the client. Rarely does a server send a messagethat is not in response to a client.
An SMB message is not as complex as you might think. Let’s take a closer look atthe internal structure of such a message. It can be broken down into two parts: theheader, which is a fixed size, and the command string, whose size can vary dra-matically based on the contents of the message.
SMB header format
Table 3-1 shows the format of an SMB header. SMB commands are not required touse all the fields in the SMB header. For example, when a client first attempts toconnect to a server, it does not yet have a tree identifier (TID) value—one isassigned after it successfully connects—so a null TID (0xFFFF) is placed in itsheader field. Other fields may be padded with zeros when not used.
* See http://anu.samba.org/cifs/docs/what-is-smb.html for Richard’s excellent summary of SMB.
,ch03.26970 Page 74 Friday, November 19, 1999 3:28 PM
An Introduction to SMB/CIFS 75
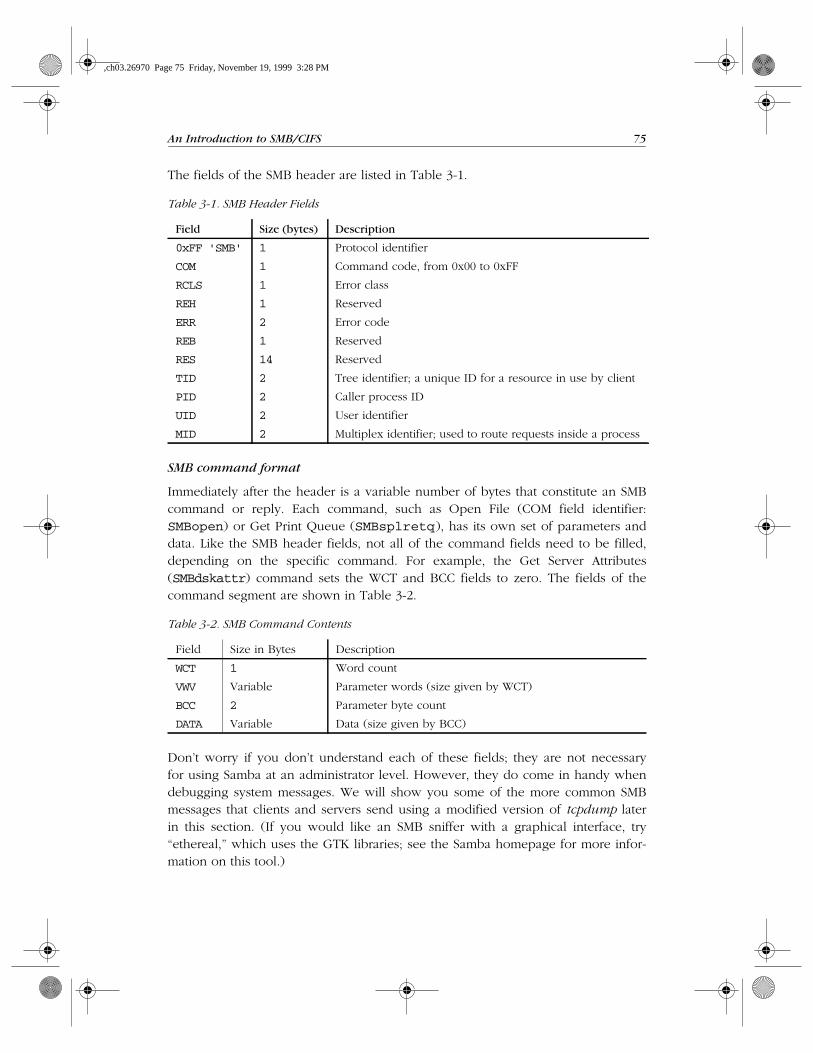
The fields of the SMB header are listed in Table 3-1.
SMB command format
Immediately after the header is a variable number of bytes that constitute an SMBcommand or reply. Each command, such as Open File (COM field identifier:SMBopen) or Get Print Queue (SMBsplretq), has its own set of parameters anddata. Like the SMB header fields, not all of the command fields need to be filled,depending on the specific command. For example, the Get Server Attributes(SMBdskattr) command sets the WCT and BCC fields to zero. The fields of thecommand segment are shown in Table 3-2.
Don’t worry if you don’t understand each of these fields; they are not necessaryfor using Samba at an administrator level. However, they do come in handy whendebugging system messages. We will show you some of the more common SMBmessages that clients and servers send using a modified version of tcpdump laterin this section. (If you would like an SMB sniffer with a graphical interface, try“ethereal,” which uses the GTK libraries; see the Samba homepage for more infor-mation on this tool.)
Table 3-1. SMB Header Fields
Field Size (bytes) Description
0xFF 'SMB' 1 Protocol identifier
COM 1 Command code, from 0x00 to 0xFF
RCLS 1 Error class
REH 1 Reserved
ERR 2 Error code
REB 1 Reserved
RES 14 Reserved
TID 2 Tree identifier; a unique ID for a resource in use by client
PID 2 Caller process ID
UID 2 User identifier
MID 2 Multiplex identifier; used to route requests inside a process
Table 3-2. SMB Command Contents
Field Size in Bytes Description
WCT 1 Word count
VWV Variable Parameter words (size given by WCT)
BCC 2 Parameter byte count
DATA Variable Data (size given by BCC)
,ch03.26970 Page 75 Friday, November 19, 1999 3:28 PM
76 Chapter 3: Configuring Windows Clients
If you would like more information on each of the commands forthe SMB protocol, see the SMB/CIFS documentation at ftp://ftp.microsoft.com/developr/drg/CIFS/.
SMB variations
The SMB protocol has been extended with new commands several times since itsinception. Each new version is backwards compatible with the previous versions.This makes it quite possible for a LAN to have various clients and servers runningdifferent versions of the SMB protocol at once.
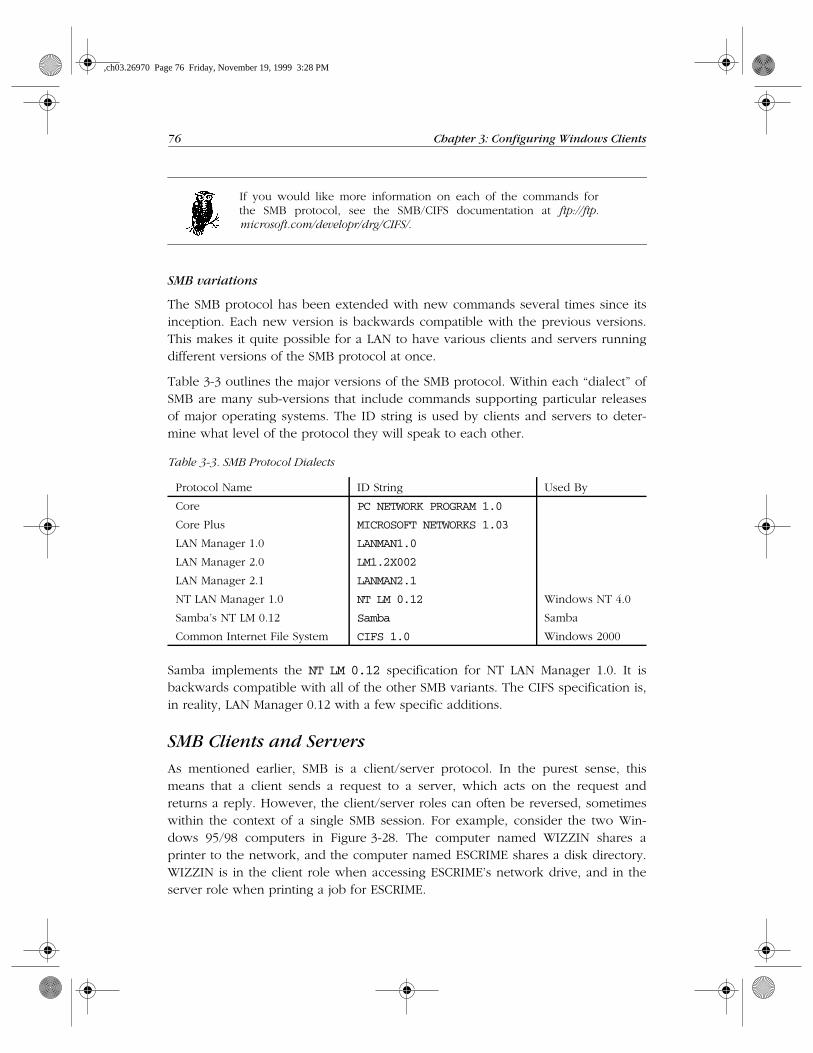
Table 3-3 outlines the major versions of the SMB protocol. Within each “dialect” ofSMB are many sub-versions that include commands supporting particular releasesof major operating systems. The ID string is used by clients and servers to deter-mine what level of the protocol they will speak to each other.
Samba implements the NT LM 0.12 specification for NT LAN Manager 1.0. It isbackwards compatible with all of the other SMB variants. The CIFS specification is,in reality, LAN Manager 0.12 with a few specific additions.
SMB Clients and Servers
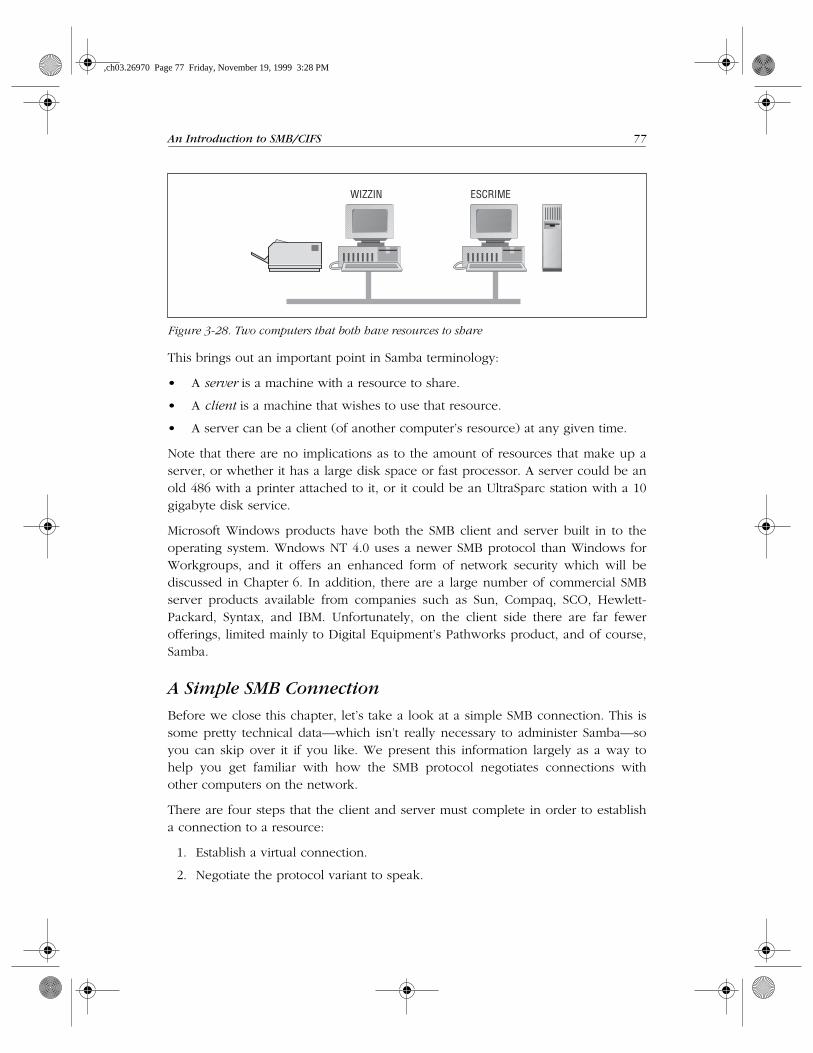
As mentioned earlier, SMB is a client/server protocol. In the purest sense, thismeans that a client sends a request to a server, which acts on the request andreturns a reply. However, the client/server roles can often be reversed, sometimeswithin the context of a single SMB session. For example, consider the two Win-dows 95/98 computers in Figure 3-28. The computer named WIZZIN shares aprinter to the network, and the computer named ESCRIME shares a disk directory.WIZZIN is in the client role when accessing ESCRIME’s network drive, and in theserver role when printing a job for ESCRIME.
Table 3-3. SMB Protocol Dialects
Protocol Name ID String Used By
Core PC NETWORK PROGRAM 1.0
Core Plus MICROSOFT NETWORKS 1.03
LAN Manager 1.0 LANMAN1.0
LAN Manager 2.0 LM1.2X002
LAN Manager 2.1 LANMAN2.1
NT LAN Manager 1.0 NT LM 0.12 Windows NT 4.0
Samba’s NT LM 0.12 Samba Samba
Common Internet File System CIFS 1.0 Windows 2000
,ch03.26970 Page 76 Friday, November 19, 1999 3:28 PM
An Introduction to SMB/CIFS 77
This brings out an important point in Samba terminology:
• A server is a machine with a resource to share.
• A client is a machine that wishes to use that resource.
• A server can be a client (of another computer’s resource) at any given time.
Note that there are no implications as to the amount of resources that make up aserver, or whether it has a large disk space or fast processor. A server could be anold 486 with a printer attached to it, or it could be an UltraSparc station with a 10gigabyte disk service.
Microsoft Windows products have both the SMB client and server built in to theoperating system. Wndows NT 4.0 uses a newer SMB protocol than Windows forWorkgroups, and it offers an enhanced form of network security which will bediscussed in Chapter 6. In addition, there are a large number of commercial SMBserver products available from companies such as Sun, Compaq, SCO, Hewlett-Packard, Syntax, and IBM. Unfortunately, on the client side there are far fewerofferings, limited mainly to Digital Equipment’s Pathworks product, and of course,Samba.
A Simple SMB Connection
Before we close this chapter, let’s take a look at a simple SMB connection. This issome pretty technical data—which isn’t really necessary to administer Samba—soyou can skip over it if you like. We present this information largely as a way tohelp you get familiar with how the SMB protocol negotiates connections withother computers on the network.
There are four steps that the client and server must complete in order to establisha connection to a resource:
1. Establish a virtual connection.
2. Negotiate the protocol variant to speak.
Figure 3-28. Two computers that both have resources to share
WIZZIN ESCRIME
,ch03.26970 Page 77 Friday, November 19, 1999 3:28 PM
78 Chapter 3: Configuring Windows Clients
3. Set session parameters.
4. Make a tree connection to a resource.
We will examine each of these steps through the eyes of a useful tool that wementioned earlier: the modified tcpdump that is available from the Samba website.
You can download this program at samba.org in the samba/ftp/tcpdump-smb directory; the latest version as of this writing is 3.4-5.Use this program as you would use the standard tcpdump applica-tion, but add the -s 1500 switch to ensure that you get the wholepacket and not just the first few bytes.
Establishing a virtual connection
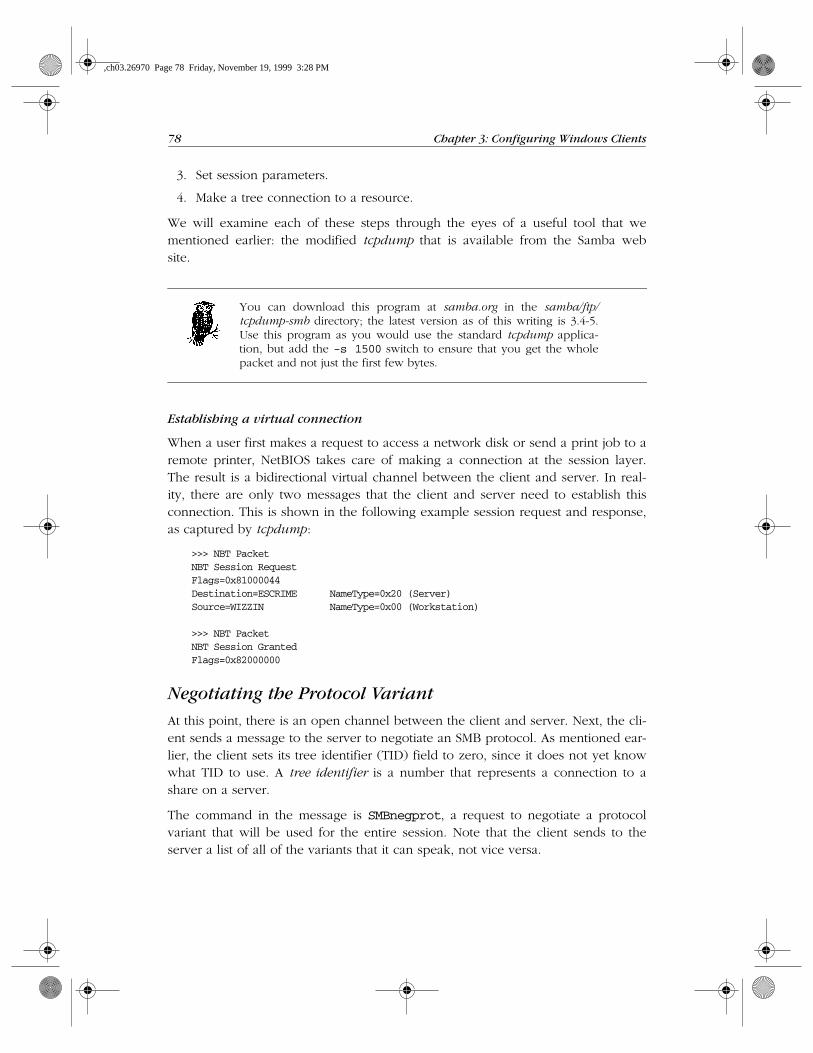
When a user first makes a request to access a network disk or send a print job to aremote printer, NetBIOS takes care of making a connection at the session layer.The result is a bidirectional virtual channel between the client and server. In real-ity, there are only two messages that the client and server need to establish thisconnection. This is shown in the following example session request and response,as captured by tcpdump :
>>> NBT PacketNBT Session RequestFlags=0x81000044Destination=ESCRIME NameType=0x20 (Server)Source=WIZZIN NameType=0x00 (Workstation)
>>> NBT PacketNBT Session GrantedFlags=0x82000000
Negotiating the Protocol Variant
At this point, there is an open channel between the client and server. Next, the cli-ent sends a message to the server to negotiate an SMB protocol. As mentioned ear-lier, the client sets its tree identifier (TID) field to zero, since it does not yet knowwhat TID to use. A tree identifier is a number that represents a connection to ashare on a server.
The command in the message is SMBnegprot, a request to negotiate a protocolvariant that will be used for the entire session. Note that the client sends to theserver a list of all of the variants that it can speak, not vice versa.
,ch03.26970 Page 78 Friday, November 19, 1999 3:28 PM
An Introduction to SMB/CIFS 79
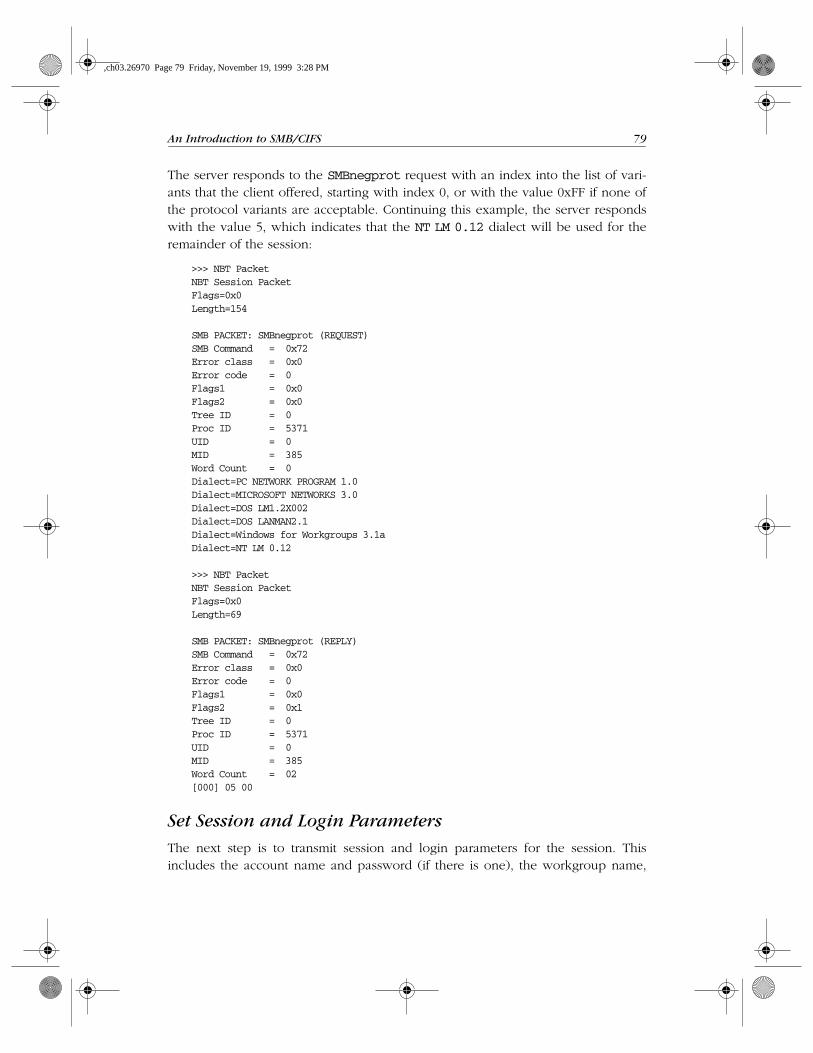
The server responds to the SMBnegprot request with an index into the list of vari-ants that the client offered, starting with index 0, or with the value 0xFF if none ofthe protocol variants are acceptable. Continuing this example, the server respondswith the value 5, which indicates that the NT LM 0.12 dialect will be used for theremainder of the session:
>>> NBT PacketNBT Session PacketFlags=0x0Length=154
SMB PACKET: SMBnegprot (REQUEST)SMB Command = 0x72Error class = 0x0Error code = 0Flags1 = 0x0Flags2 = 0x0Tree ID = 0Proc ID = 5371UID = 0MID = 385Word Count = 0Dialect=PC NETWORK PROGRAM 1.0Dialect=MICROSOFT NETWORKS 3.0Dialect=DOS LM1.2X002Dialect=DOS LANMAN2.1Dialect=Windows for Workgroups 3.1aDialect=NT LM 0.12
>>> NBT PacketNBT Session PacketFlags=0x0Length=69
SMB PACKET: SMBnegprot (REPLY)SMB Command = 0x72Error class = 0x0Error code = 0Flags1 = 0x0Flags2 = 0x1Tree ID = 0Proc ID = 5371UID = 0MID = 385Word Count = 02[000] 05 00
Set Session and Login Parameters
The next step is to transmit session and login parameters for the session. Thisincludes the account name and password (if there is one), the workgroup name,
,ch03.26970 Page 79 Friday, November 19, 1999 3:28 PM
80 Chapter 3: Configuring Windows Clients
the maximum size of data that can be transferred, and the number of pendingrequests that may be in the queue at any one time.
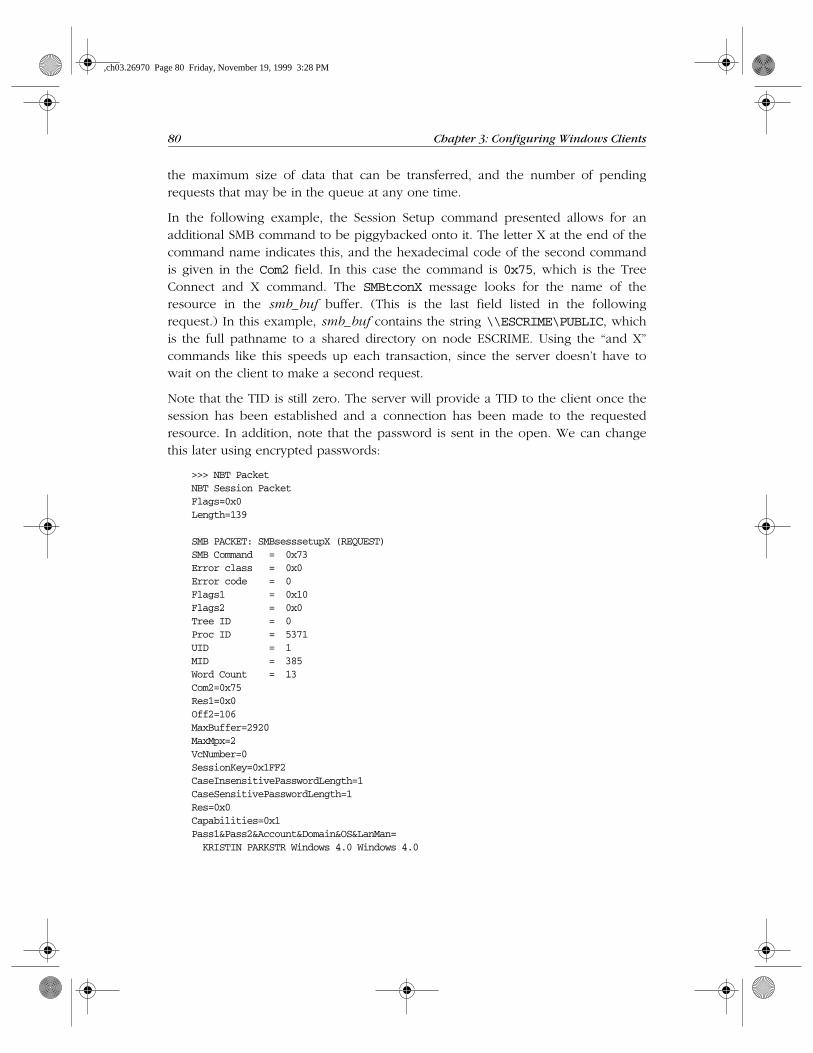
In the following example, the Session Setup command presented allows for anadditional SMB command to be piggybacked onto it. The letter X at the end of thecommand name indicates this, and the hexadecimal code of the second commandis given in the Com2 field. In this case the command is 0x75, which is the TreeConnect and X command. The SMBtconX message looks for the name of theresource in the smb_buf buffer. (This is the last field listed in the followingrequest.) In this example, smb_buf contains the string \\ESCRIME\PUBLIC, whichis the full pathname to a shared directory on node ESCRIME. Using the “and X”commands like this speeds up each transaction, since the server doesn’t have towait on the client to make a second request.
Note that the TID is still zero. The server will provide a TID to the client once thesession has been established and a connection has been made to the requestedresource. In addition, note that the password is sent in the open. We can changethis later using encrypted passwords:
>>> NBT PacketNBT Session PacketFlags=0x0Length=139
SMB PACKET: SMBsesssetupX (REQUEST)SMB Command = 0x73Error class = 0x0Error code = 0Flags1 = 0x10Flags2 = 0x0Tree ID = 0Proc ID = 5371UID = 1MID = 385Word Count = 13Com2=0x75Res1=0x0Off2=106MaxBuffer=2920MaxMpx=2VcNumber=0SessionKey=0x1FF2CaseInsensitivePasswordLength=1CaseSensitivePasswordLength=1Res=0x0Capabilities=0x1Pass1&Pass2&Account&Domain&OS&LanMan= KRISTIN PARKSTR Windows 4.0 Windows 4.0
,ch03.26970 Page 80 Friday, November 19, 1999 3:28 PM
An Introduction to SMB/CIFS 81
PassLen=2Passwd&Path&Device=smb_bcc=22smb_buf[]=\\ESCRIME\PUBLIC
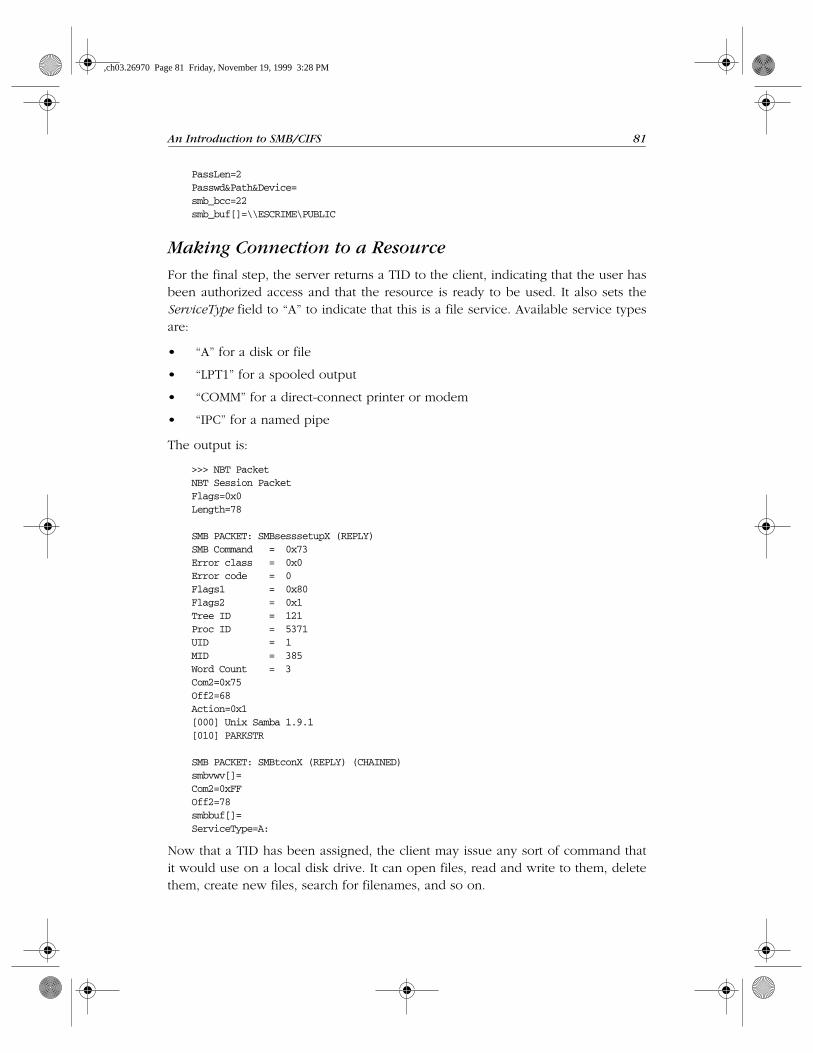
Making Connection to a Resource
For the final step, the server returns a TID to the client, indicating that the user hasbeen authorized access and that the resource is ready to be used. It also sets theServiceType field to “A” to indicate that this is a file service. Available service typesare:
• “A” for a disk or file
• “LPT1” for a spooled output
• “COMM” for a direct-connect printer or modem
• “IPC” for a named pipe
The output is:
>>> NBT PacketNBT Session PacketFlags=0x0Length=78
SMB PACKET: SMBsesssetupX (REPLY)SMB Command = 0x73Error class = 0x0Error code = 0Flags1 = 0x80Flags2 = 0x1Tree ID = 121Proc ID = 5371UID = 1MID = 385Word Count = 3Com2=0x75Off2=68Action=0x1[000] Unix Samba 1.9.1[010] PARKSTR
SMB PACKET: SMBtconX (REPLY) (CHAINED)smbvwv[]=Com2=0xFFOff2=78smbbuf[]=ServiceType=A:
Now that a TID has been assigned, the client may issue any sort of command thatit would use on a local disk drive. It can open files, read and write to them, deletethem, create new files, search for filenames, and so on.
,ch03.26970 Page 81 Friday, November 19, 1999 3:28 PM