Embed Size (px)
Citation preview
Slide 24-1
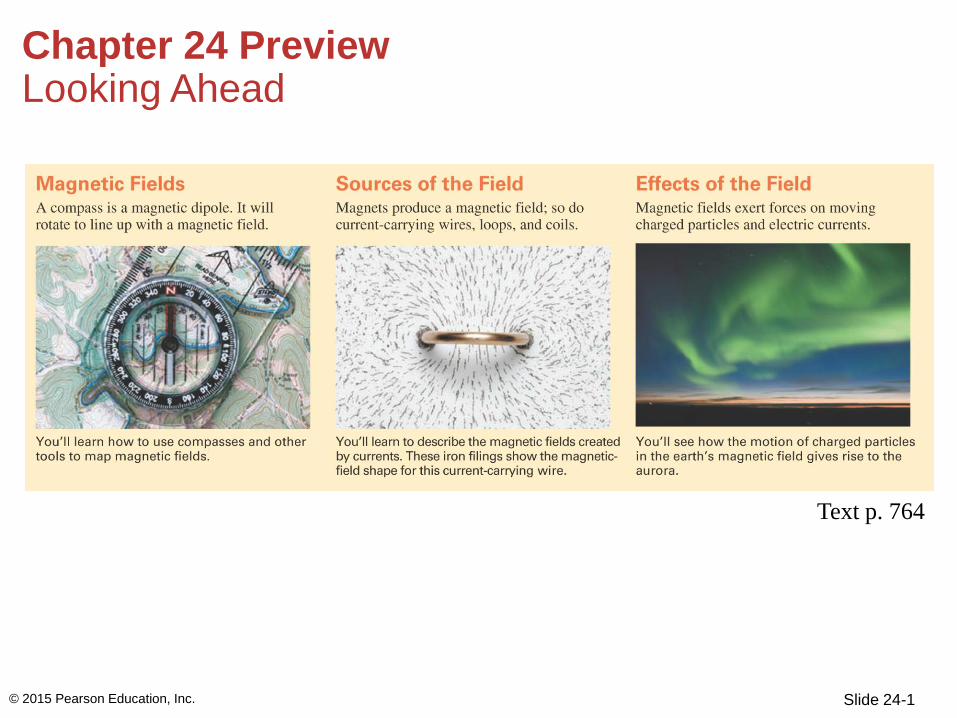
Chapter 24 Preview Looking Ahead
© 2015 Pearson Education, Inc.
Text p. 764
Slide 24-2
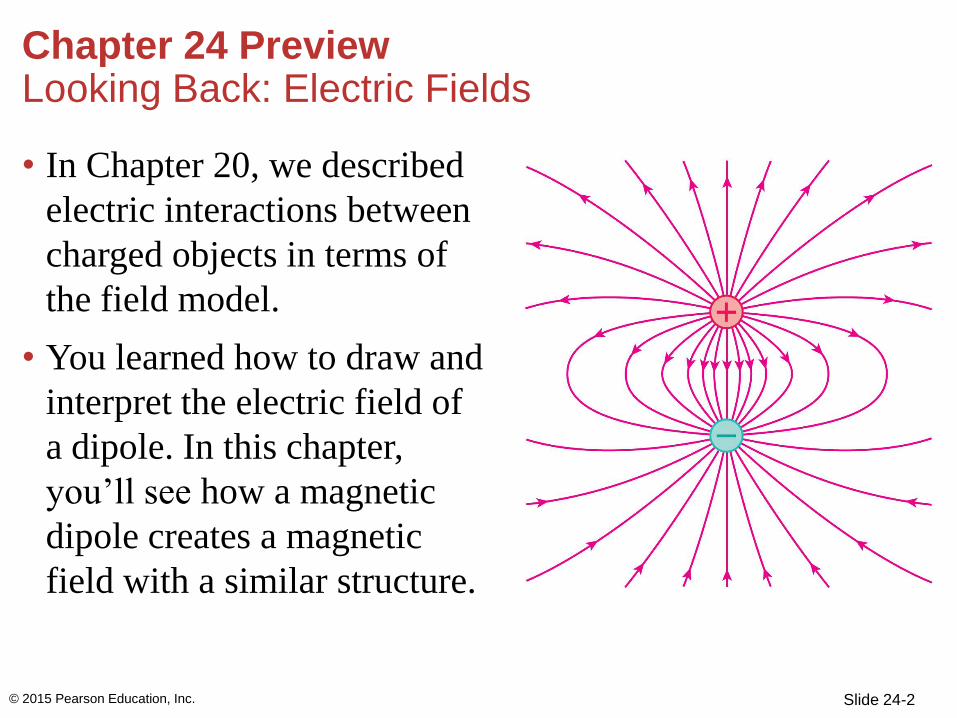
• In Chapter 20, we described
electric interactions between
charged objects in terms of
the field model.
• You learned how to draw and
interpret the electric field of
a dipole. In this chapter,
you’ll see how a magnetic
dipole creates a magnetic
field with a similar structure.
Chapter 24 Preview Looking Back: Electric Fields
© 2015 Pearson Education, Inc.
Section 24.1 Magnetism
© 2015 Pearson Education, Inc.
Slide 24-4
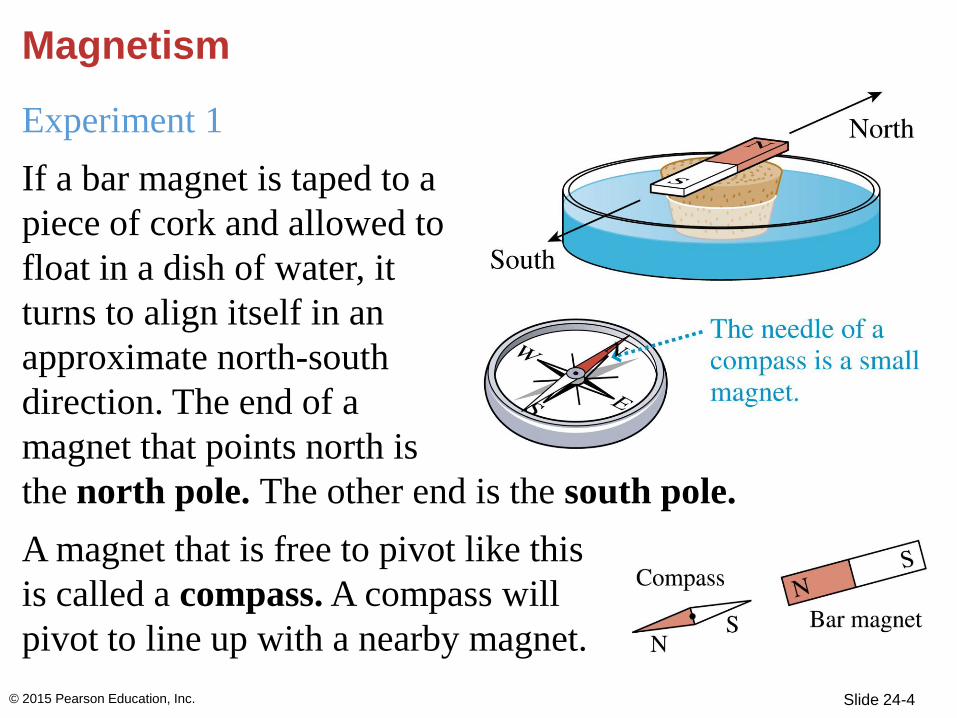
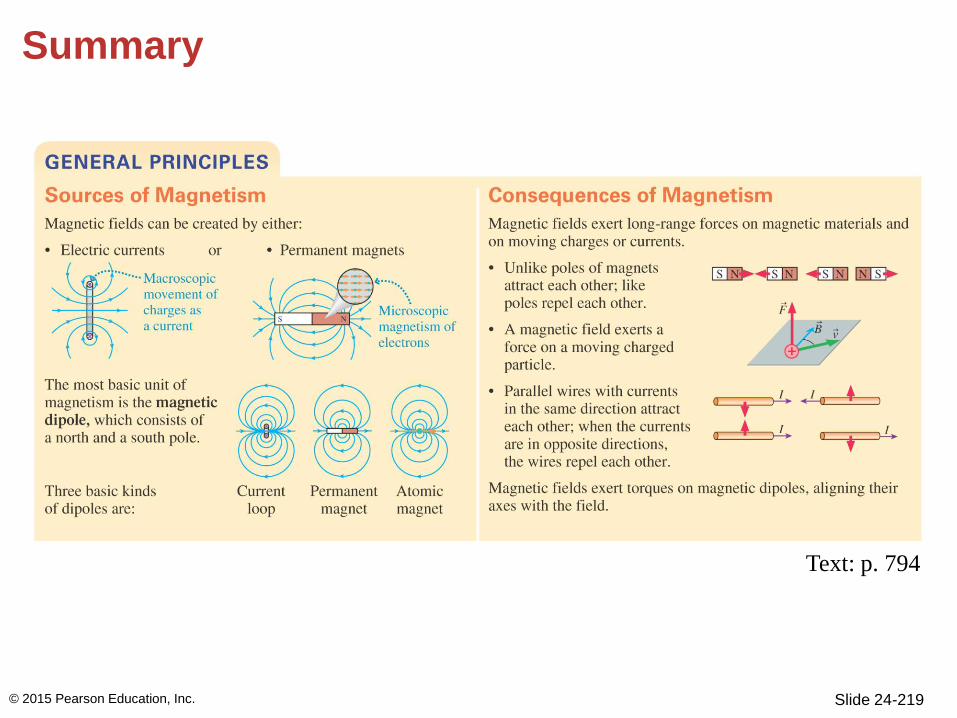
Magnetism
Experiment 1
If a bar magnet is taped to a
piece of cork and allowed to
float in a dish of water, it
turns to align itself in an
approximate north-south
direction. The end of a
magnet that points north is
the north pole. The other end is the south pole.
A magnet that is free to pivot like this
is called a compass. A compass will
pivot to line up with a nearby magnet.
© 2015 Pearson Education, Inc.
Slide 24-5
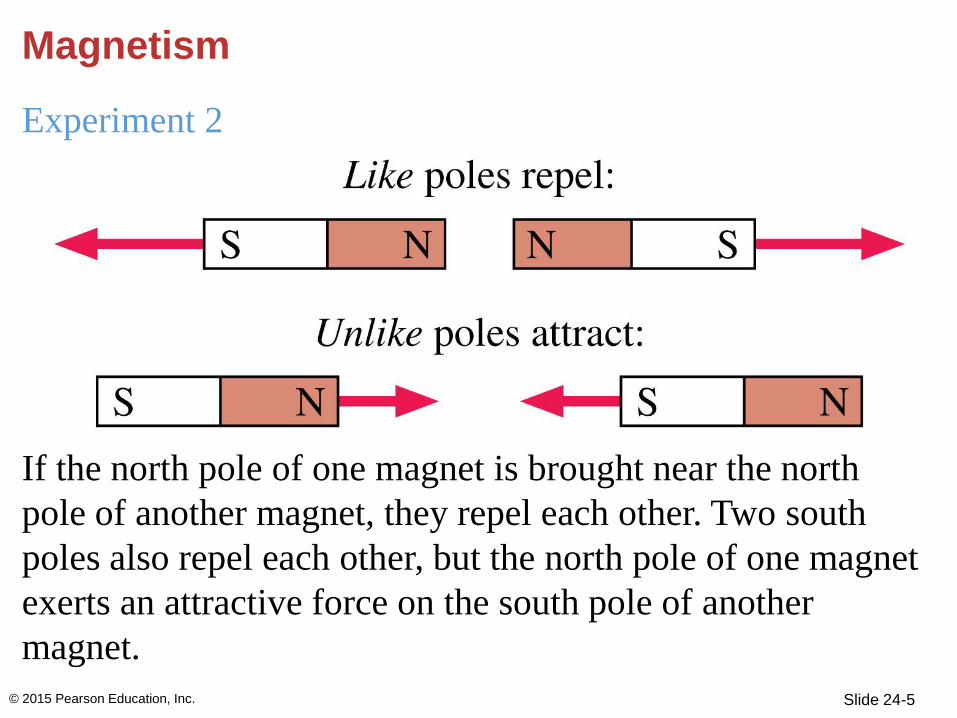
Experiment 2
If the north pole of one magnet is brought near the north
pole of another magnet, they repel each other. Two south
poles also repel each other, but the north pole of one magnet
exerts an attractive force on the south pole of another
magnet.
Magnetism
© 2015 Pearson Education, Inc.
Slide 24-6
Magnetism
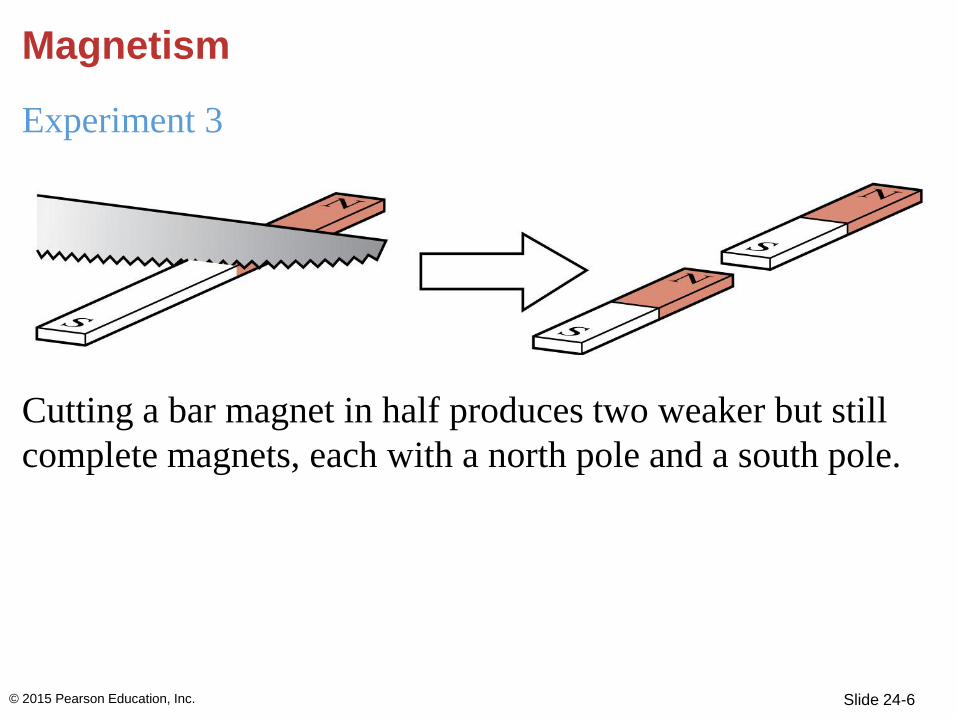
Experiment 3
Cutting a bar magnet in half produces two weaker but still
complete magnets, each with a north pole and a south pole.
© 2015 Pearson Education, Inc.
Slide 24-7
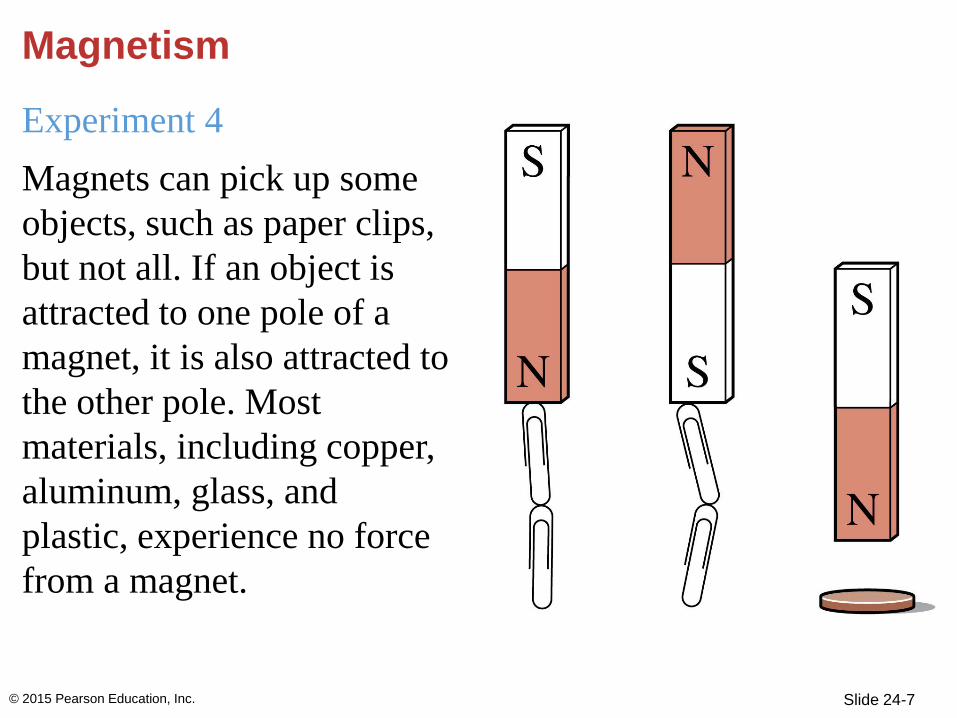
Magnetism
Experiment 4
Magnets can pick up some
objects, such as paper clips,
but not all. If an object is
attracted to one pole of a
magnet, it is also attracted to
the other pole. Most
materials, including copper,
aluminum, glass, and
plastic, experience no force
from a magnet.
© 2015 Pearson Education, Inc.

Slide 24-8
Magnetism
Experiment 5
When a magnet is brought
near an electroscope, the
leaves of the electroscope
remain undeflected. If a
charged rod is brought near
a magnet, there is a small
polarization force like the
ones we studied in Chapter
21, as there would be on any
metal bar, but there is no
other effect.
© 2015 Pearson Education, Inc.
Slide 24-9
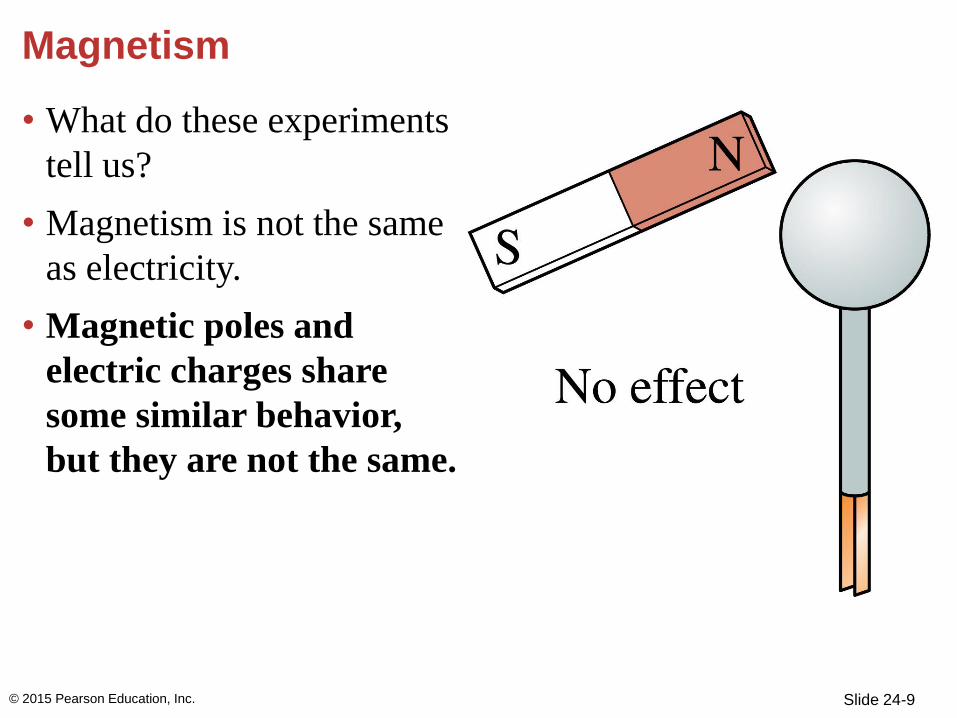
Magnetism
• What do these experiments
tell us?
• Magnetism is not the same
as electricity.
• Magnetic poles and
electric charges share
some similar behavior,
but they are not the same.
© 2015 Pearson Education, Inc.
Slide 24-10
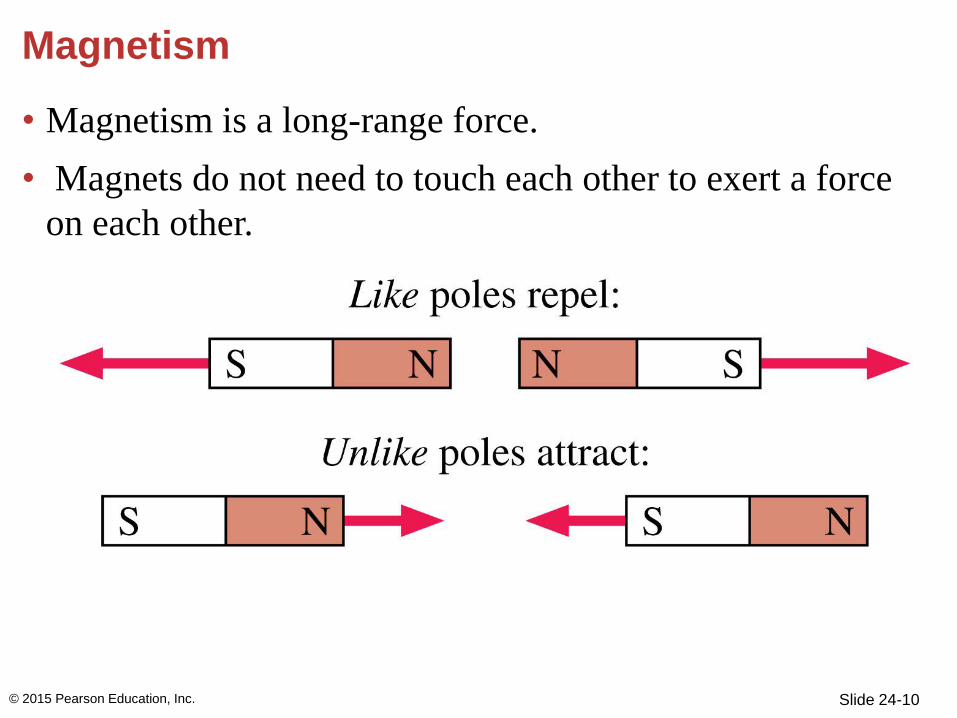
Magnetism
• Magnetism is a long-range force.
• Magnets do not need to touch each other to exert a force
on each other.
© 2015 Pearson Education, Inc.
Slide 24-11
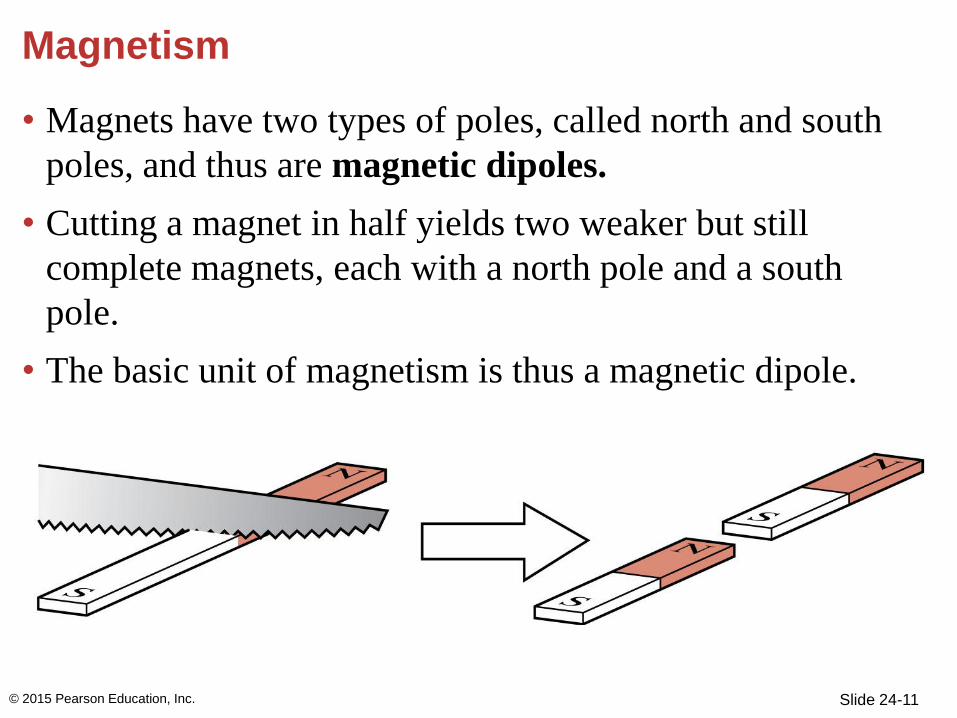
Magnetism
• Magnets have two types of poles, called north and south
poles, and thus are magnetic dipoles.
• Cutting a magnet in half yields two weaker but still
complete magnets, each with a north pole and a south
pole.
• The basic unit of magnetism is thus a magnetic dipole.
© 2015 Pearson Education, Inc.
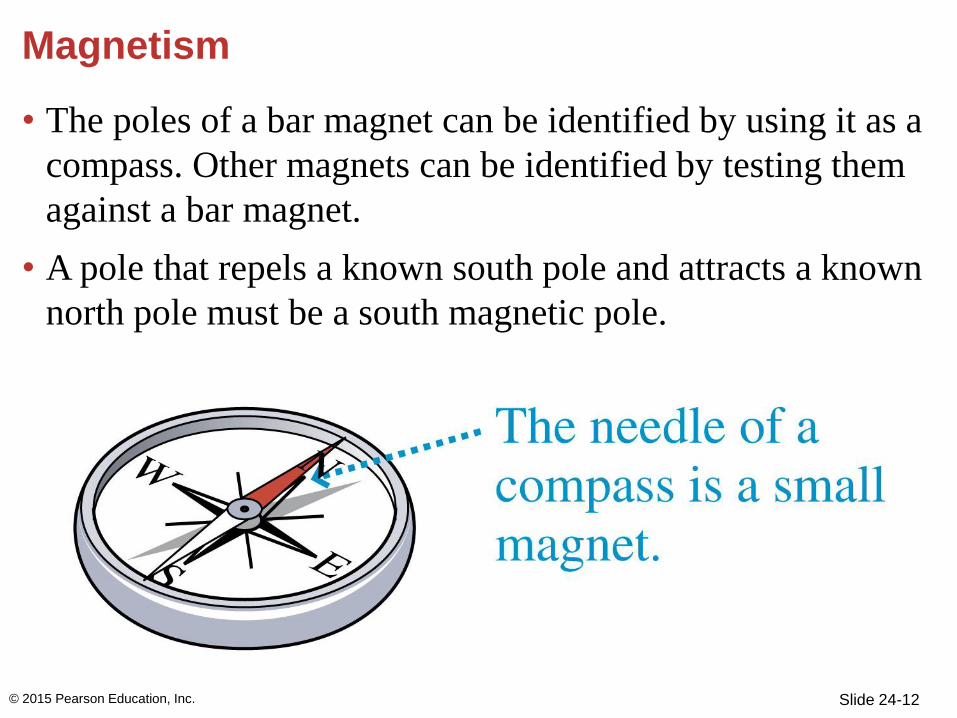
Slide 24-12
Magnetism
• The poles of a bar magnet can be identified by using it as a
compass. Other magnets can be identified by testing them
against a bar magnet.
• A pole that repels a known south pole and attracts a known
north pole must be a south magnetic pole.
© 2015 Pearson Education, Inc.
Slide 24-13
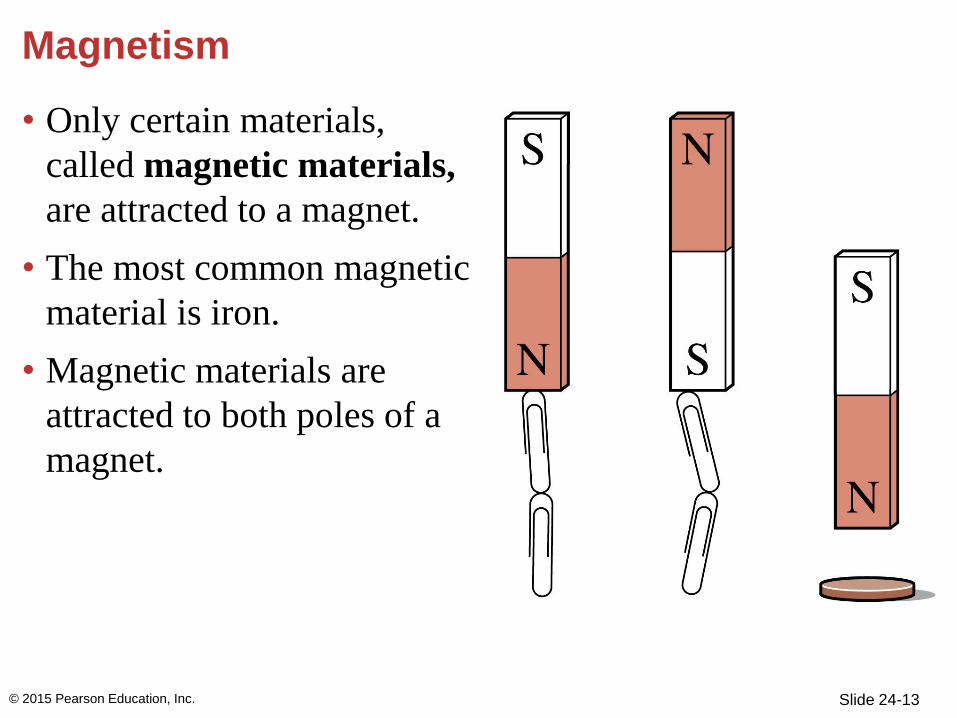
Magnetism
• Only certain materials,
called magnetic materials,
are attracted to a magnet.
• The most common magnetic
material is iron.
• Magnetic materials are
attracted to both poles of a
magnet.
© 2015 Pearson Education, Inc.
Section 24.2 The Magnetic Field
© 2015 Pearson Education, Inc.
Slide 24-15
The Magnetic Field
• Every magnet sets up a magnetic field in the space
around it.
• If another magnet, such as a compass needle, is then
brought into this field, the second magnet will feel the
effects of the field of the first magnet.
© 2015 Pearson Education, Inc.
Slide 24-16
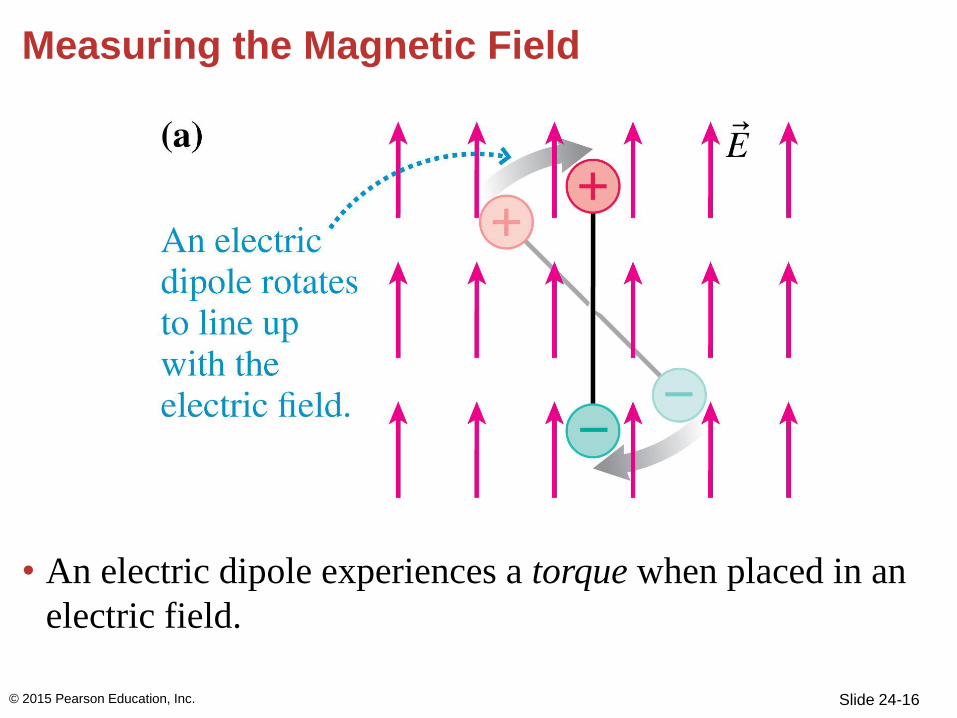
Measuring the Magnetic Field
• An electric dipole experiences a torque when placed in an
electric field.
© 2015 Pearson Education, Inc.
Slide 24-17
Measuring the Magnetic Field
• The torque caused by an electric field tends to align the
axis of the dipole with the field, so the direction of the
electric field is the same as the direction of the dipole’s
axis.
• The torque on the dipole is greater when the electric field
is stronger, hence the magnitude (or strength) of the field
is proportional to the torque on the dipole.
© 2015 Pearson Education, Inc.
Slide 24-18
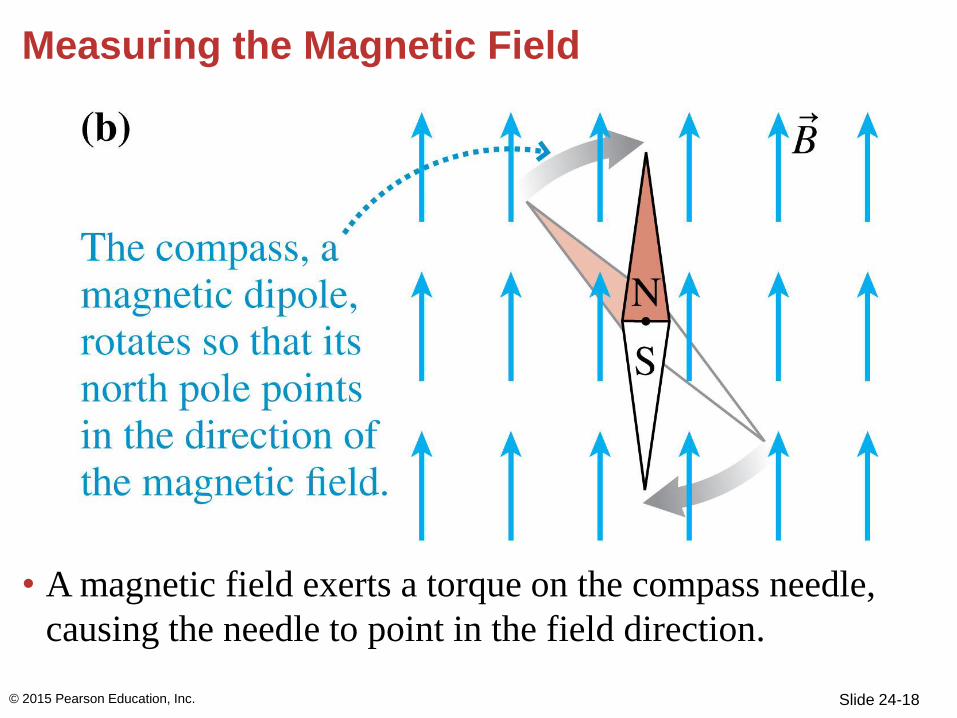
Measuring the Magnetic Field
• A magnetic field exerts a torque on the compass needle,
causing the needle to point in the field direction.
© 2015 Pearson Education, Inc.

Slide 24-19
Measuring the Magnetic Field
• Because the magnetic field has both a direction and a
magnitude, we represent it using a vector, .
• B represents the magnitude or strength of the field.
© 2015 Pearson Education, Inc.
Slide 24-20
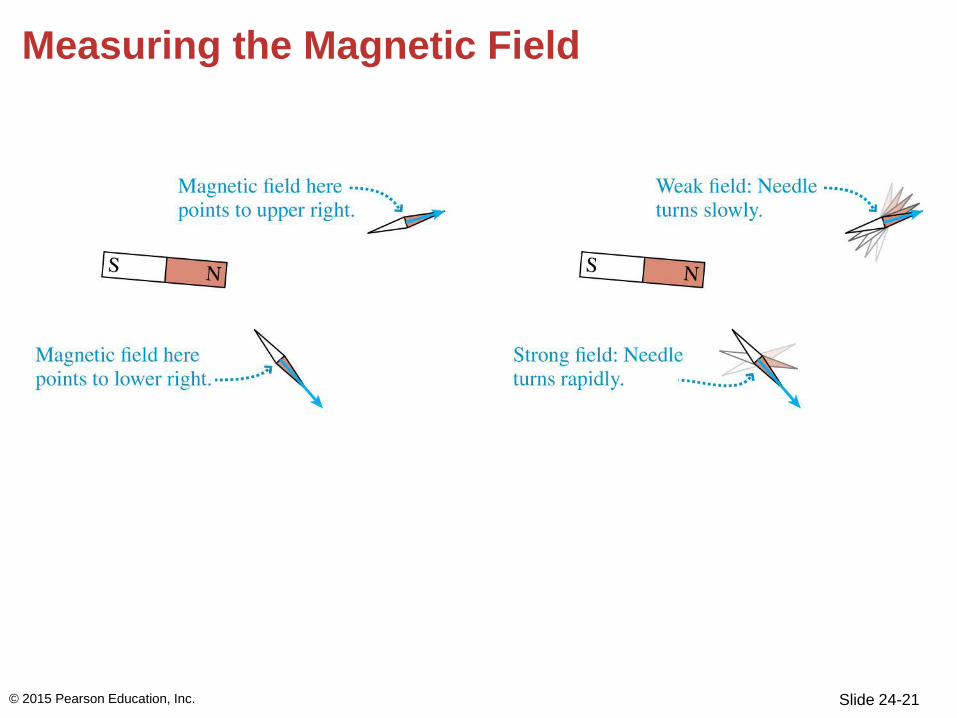
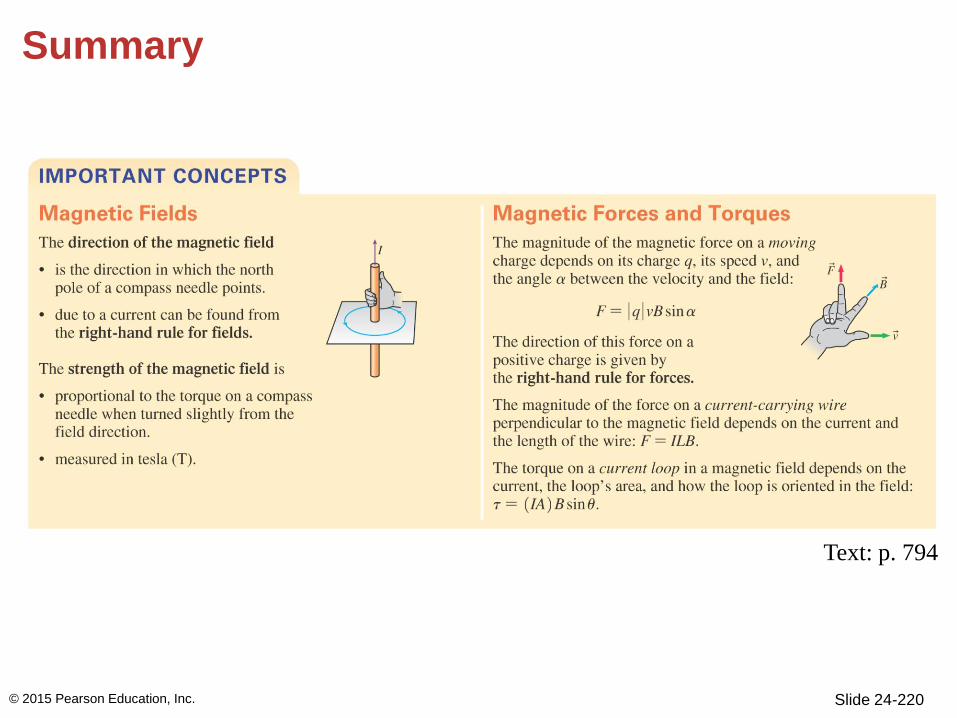
Measuring the Magnetic Field
• The direction of a magnetic field is the direction that the
north pole of a compass needle points.
• The strength of a magnetic field is proportional to the
torque felt by a compass needle as it turns to line up with
the field direction.
© 2015 Pearson Education, Inc.
Slide 24-21
Measuring the Magnetic Field
© 2015 Pearson Education, Inc.
Slide 24-22
Measuring the Magnetic Field
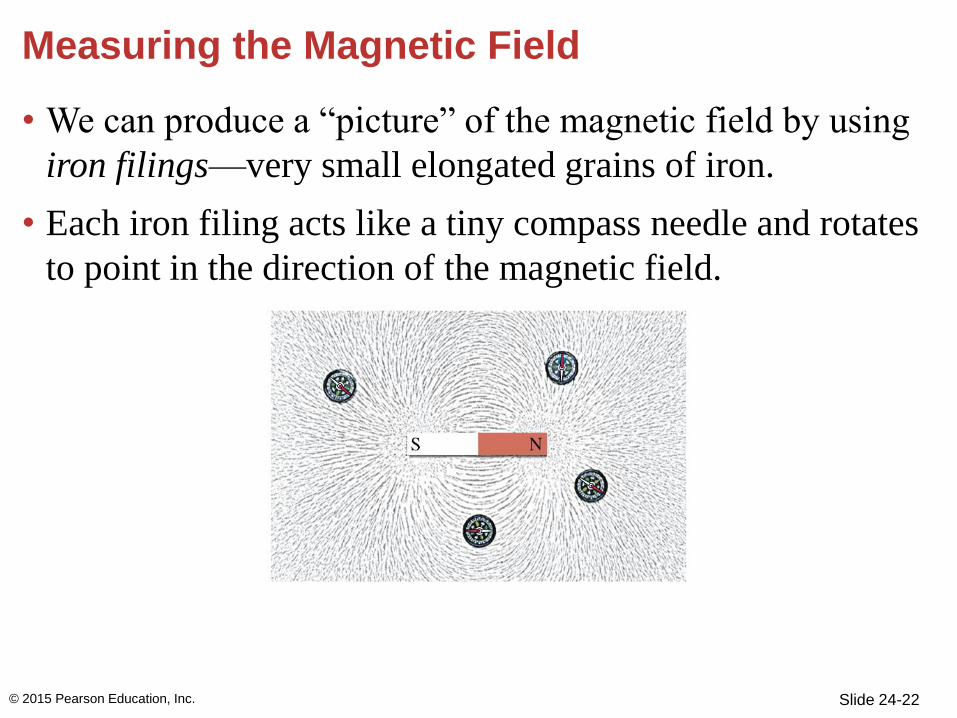
• We can produce a “picture” of the magnetic field by using
iron filings—very small elongated grains of iron.
• Each iron filing acts like a tiny compass needle and rotates
to point in the direction of the magnetic field.
© 2015 Pearson Education, Inc.
Slide 24-23
Measuring the Magnetic Field
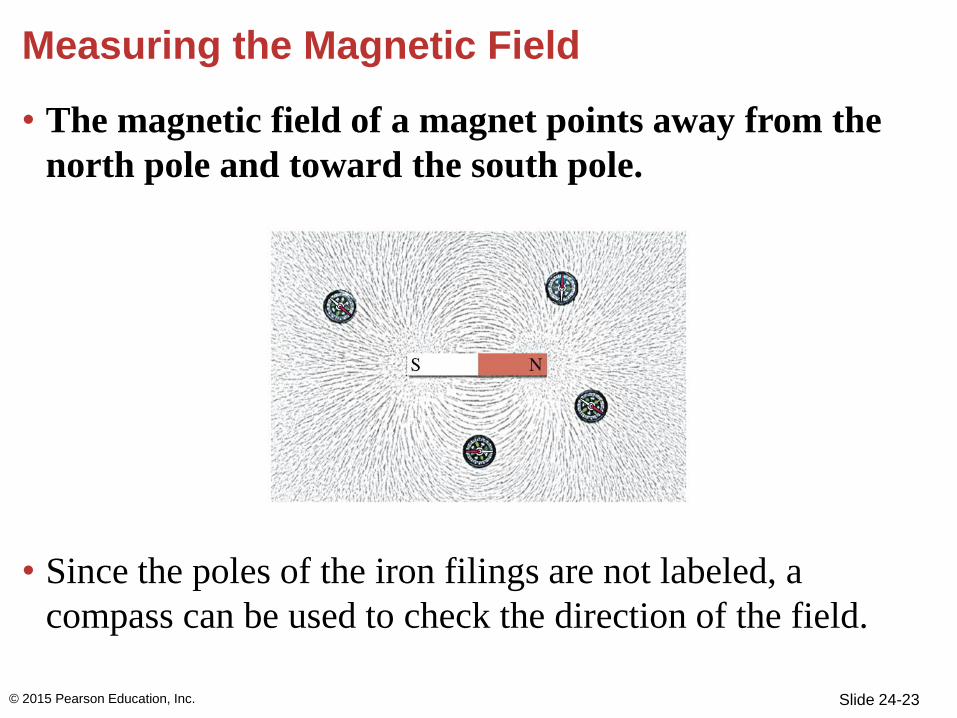
• The magnetic field of a magnet points away from the
north pole and toward the south pole.
• Since the poles of the iron filings are not labeled, a
compass can be used to check the direction of the field.
© 2015 Pearson Education, Inc.
Slide 24-24
Measuring the Magnetic Field
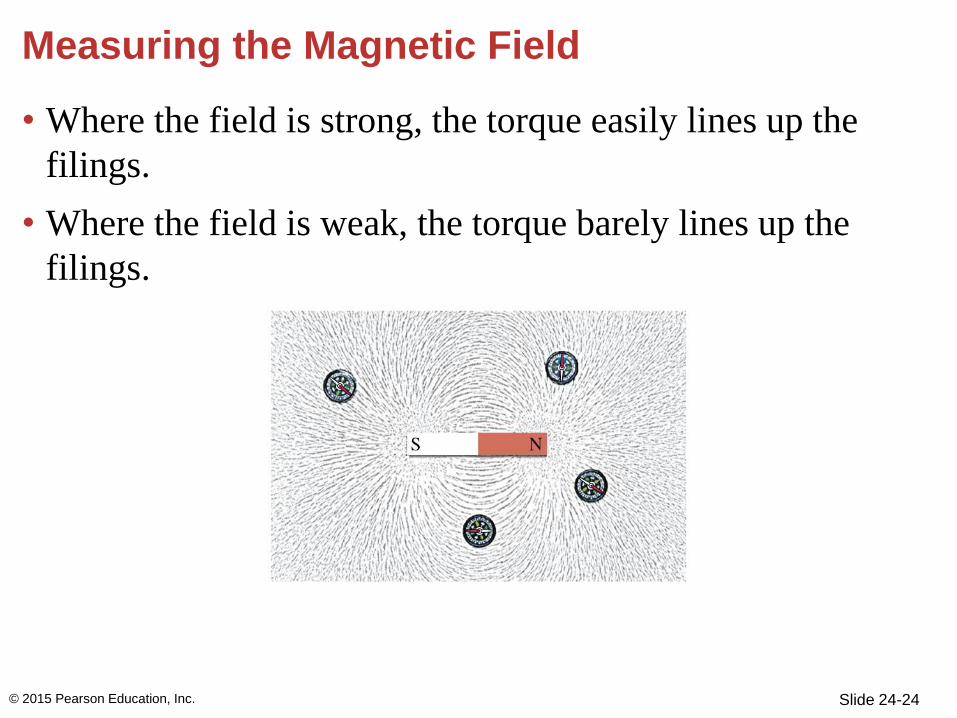
• Where the field is strong, the torque easily lines up the
filings.
• Where the field is weak, the torque barely lines up the
filings.
© 2015 Pearson Education, Inc.
Slide 24-25
Magnetic Field Vectors and Field Lines
• The magnetic field vector representation is useful if we
want to represent the magnetic field at one particular
point.
• If we want the overall representation of the field,
magnetic field lines are often simpler to use.
© 2015 Pearson Education, Inc.
Slide 24-26
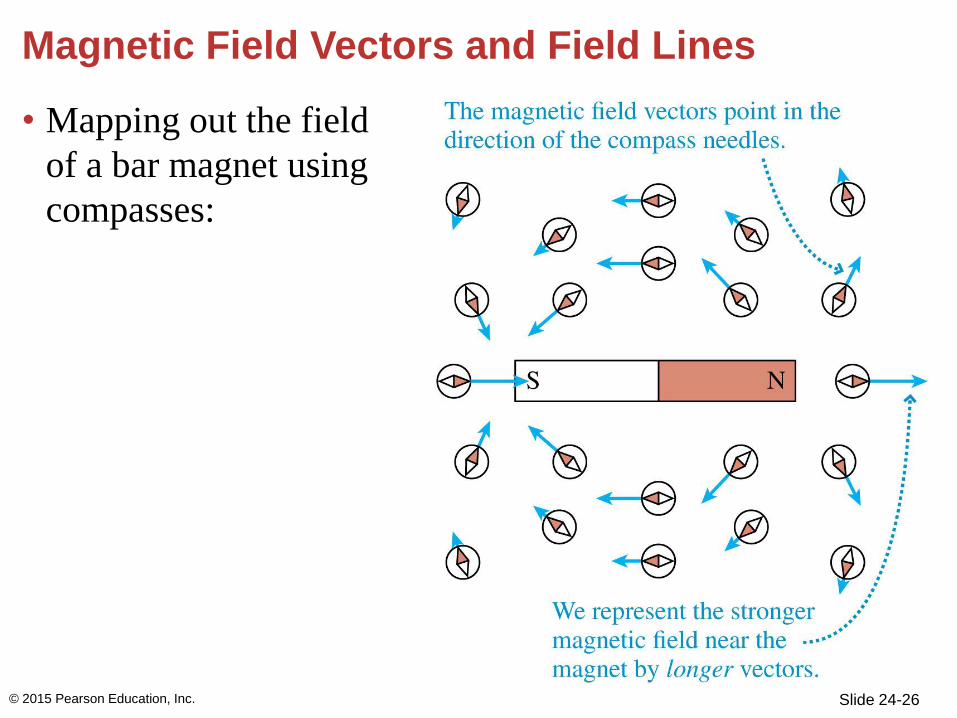
Magnetic Field Vectors and Field Lines
• Mapping out the field
of a bar magnet using
compasses:
© 2015 Pearson Education, Inc.
Slide 24-27
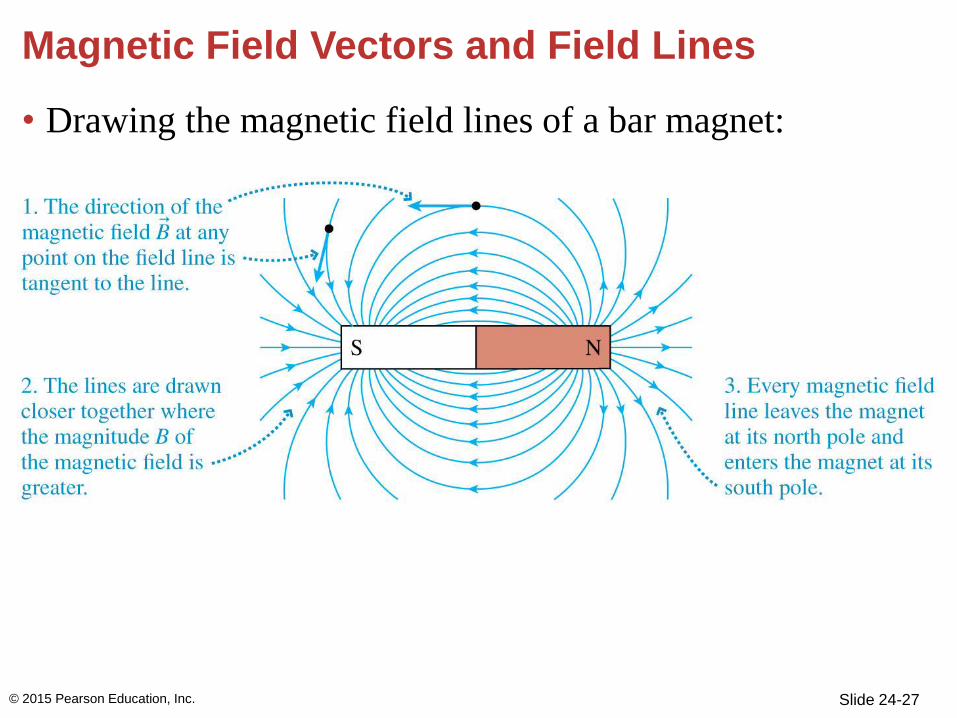
Magnetic Field Vectors and Field Lines
• Drawing the magnetic field lines of a bar magnet:
© 2015 Pearson Education, Inc.
Slide 24-28
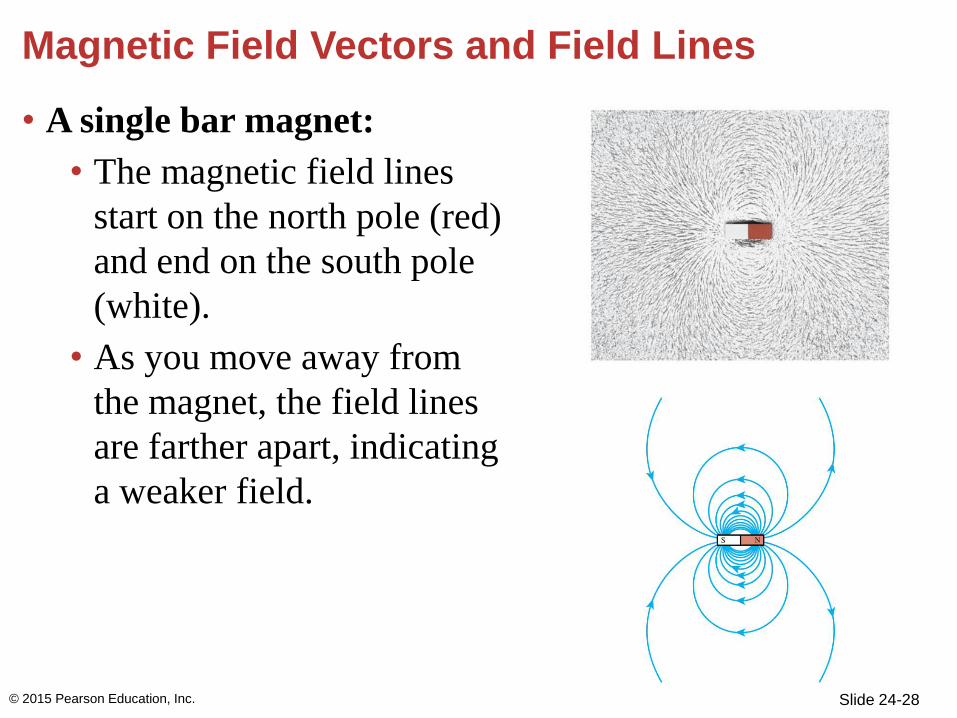
Magnetic Field Vectors and Field Lines
• A single bar magnet:
• The magnetic field lines
start on the north pole (red)
and end on the south pole
(white).
• As you move away from
the magnet, the field lines
are farther apart, indicating
a weaker field.
© 2015 Pearson Education, Inc.
Slide 24-29
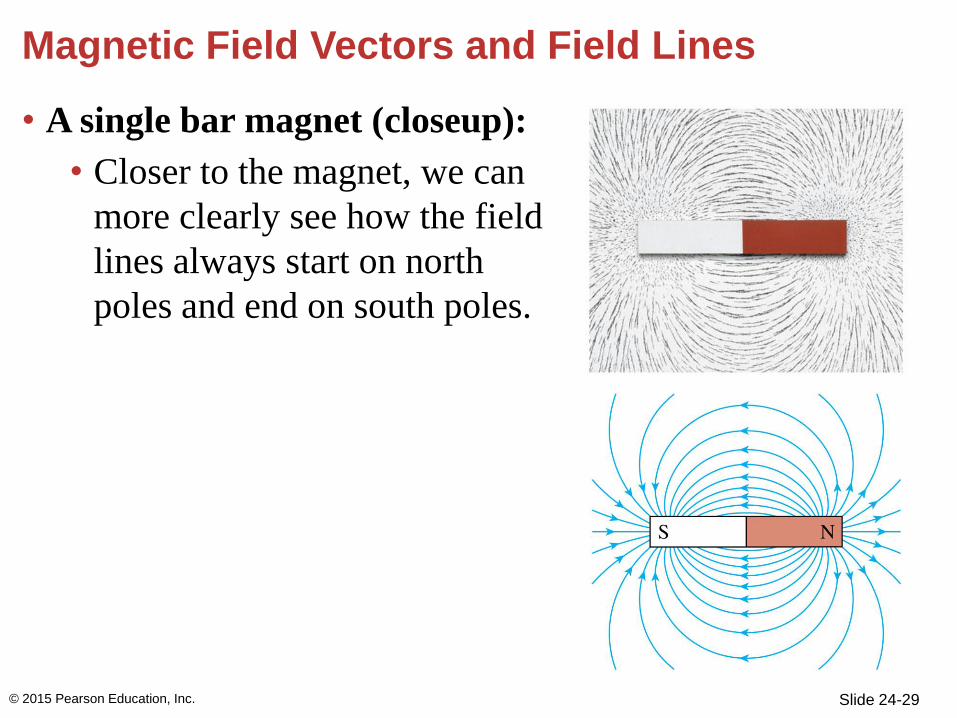
Magnetic Field Vectors and Field Lines
• A single bar magnet (closeup):
• Closer to the magnet, we can
more clearly see how the field
lines always start on north
poles and end on south poles.
© 2015 Pearson Education, Inc.
Slide 24-30
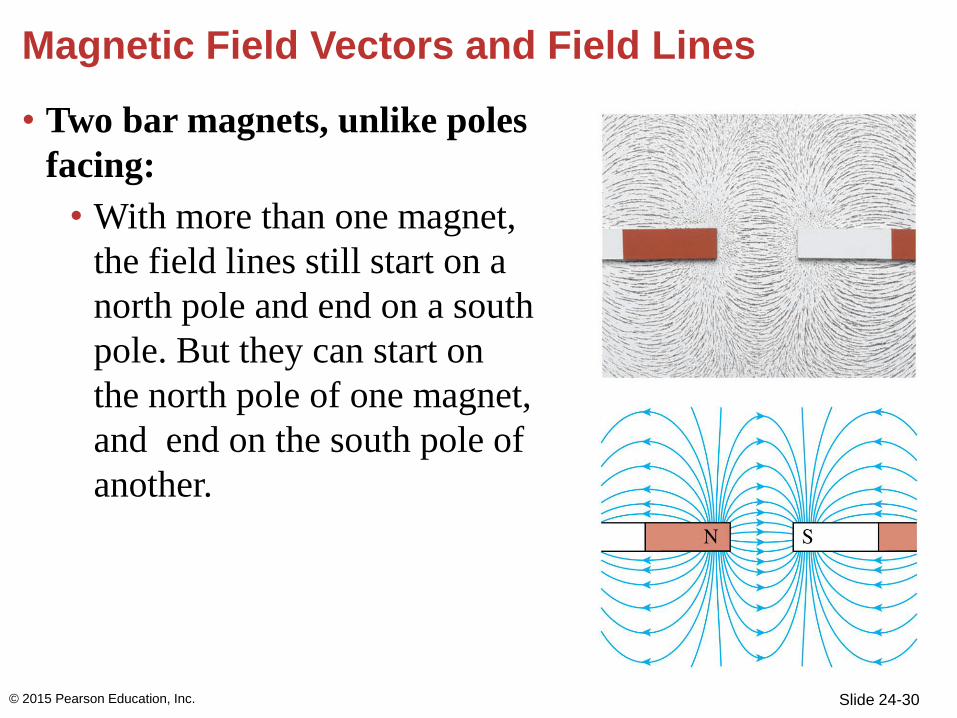
Magnetic Field Vectors and Field Lines
• Two bar magnets, unlike poles
facing:
• With more than one magnet,
the field lines still start on a
north pole and end on a south
pole. But they can start on
the north pole of one magnet,
and end on the south pole of
another.
© 2015 Pearson Education, Inc.

Slide 24-31
Magnetic Field Vectors and Field Lines
• Two bar magnets, like poles
facing:
• With two like poles placed
nearby, the field lines
starting on the north poles
curve sharply toward their
south poles in order to avoid
the north pole of the other
magnet.
© 2015 Pearson Education, Inc.
Slide 24-32
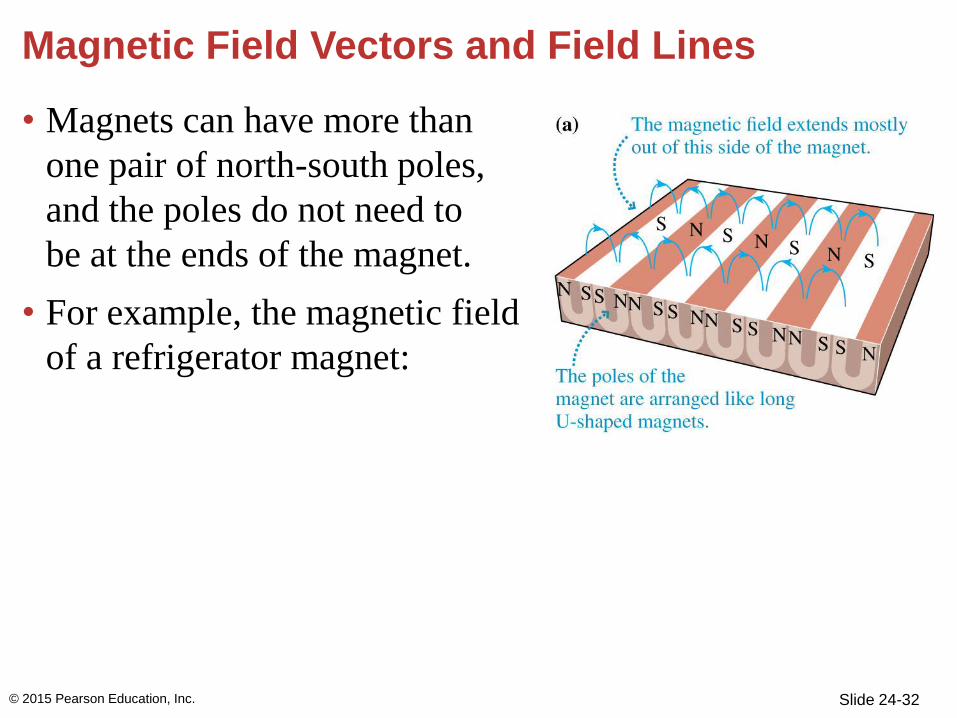
Magnetic Field Vectors and Field Lines
• Magnets can have more than
one pair of north-south poles,
and the poles do not need to
be at the ends of the magnet.
• For example, the magnetic field
of a refrigerator magnet:
© 2015 Pearson Education, Inc.
Slide 24-33
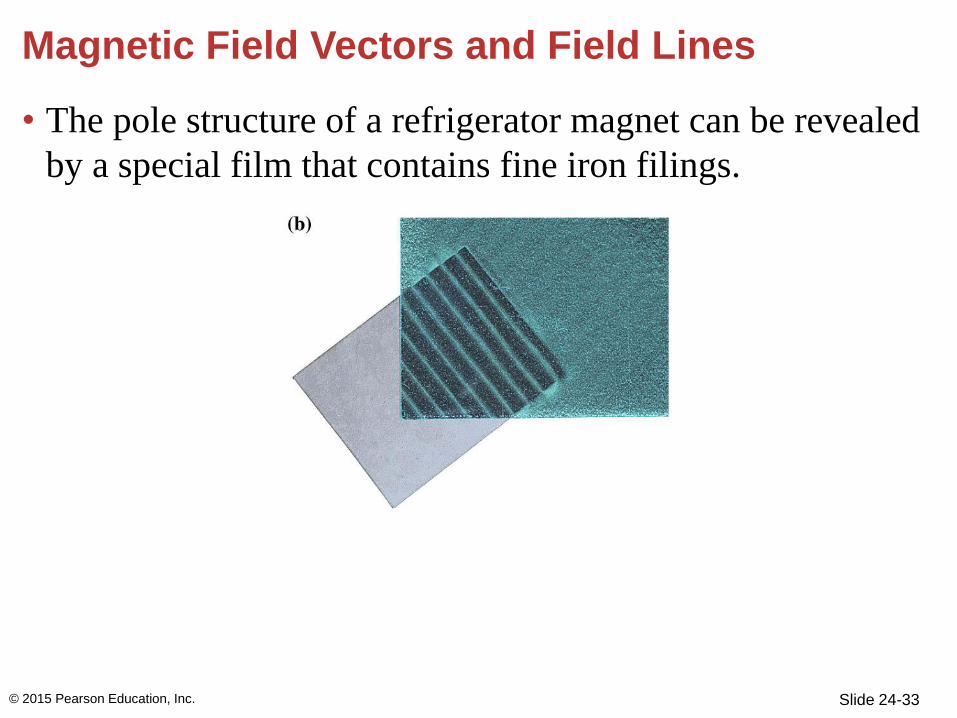
Magnetic Field Vectors and Field Lines
• The pole structure of a refrigerator magnet can be revealed
by a special film that contains fine iron filings.
© 2015 Pearson Education, Inc.
Slide 24-34
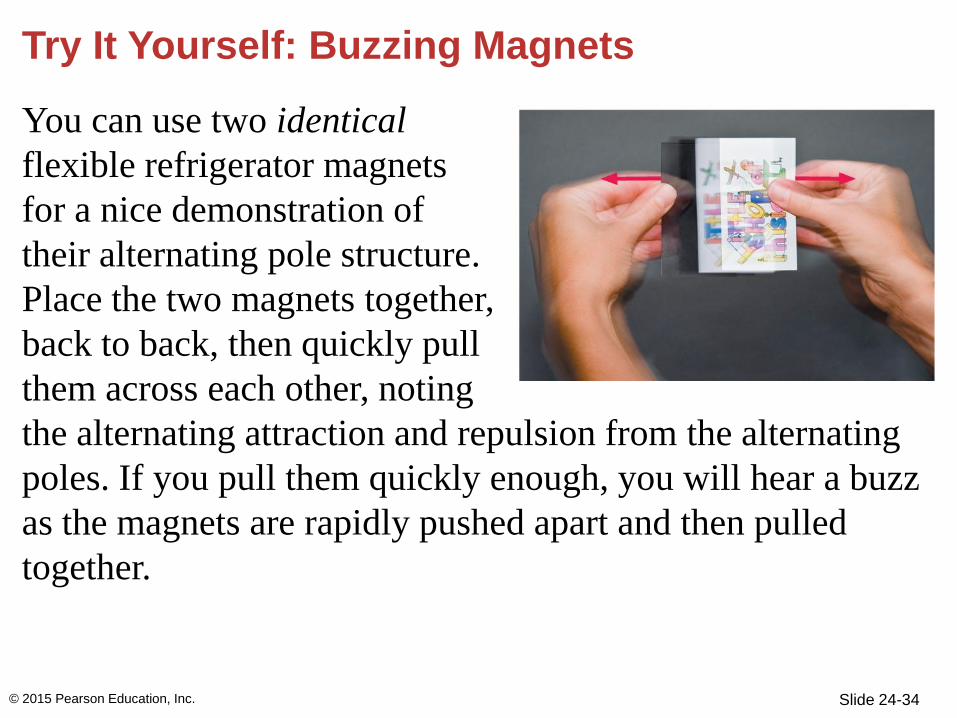
Try It Yourself: Buzzing Magnets
You can use two identical
flexible refrigerator magnets
for a nice demonstration of
their alternating pole structure.
Place the two magnets together,
back to back, then quickly pull
them across each other, noting
the alternating attraction and repulsion from the alternating
poles. If you pull them quickly enough, you will hear a buzz
as the magnets are rapidly pushed apart and then pulled
together.
© 2015 Pearson Education, Inc.
Slide 24-35
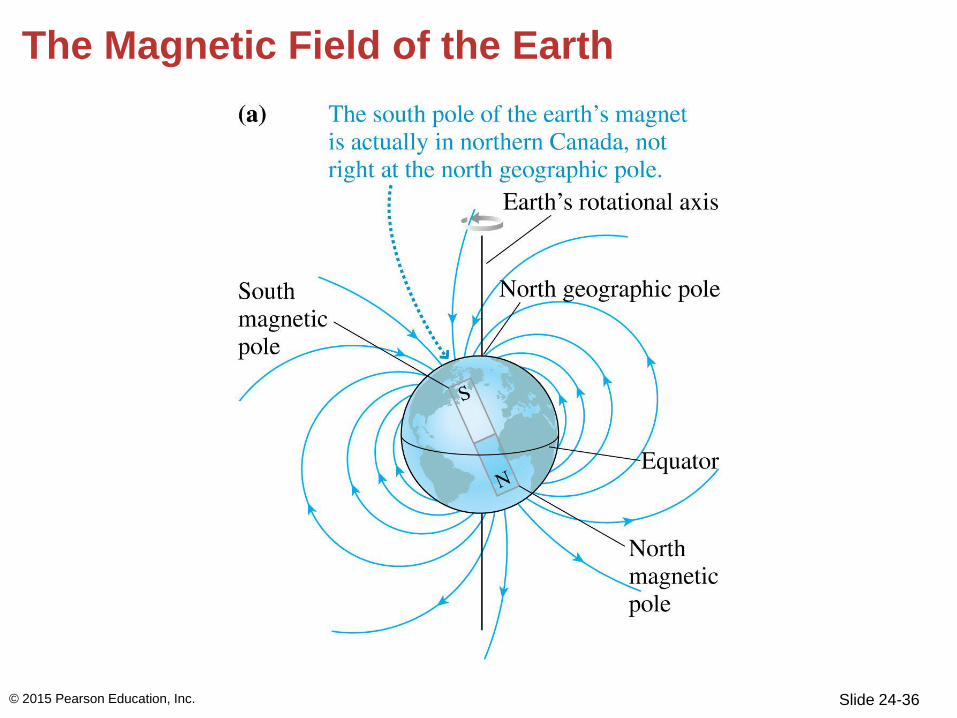
The Magnetic Field of the Earth
• The south pole of the earth’s magnet is located near—
but not exactly coincident with–the north geographic
pole of the earth.
• This is why the north pole of a compass points
geographically north.
© 2015 Pearson Education, Inc.
Slide 24-36
The Magnetic Field of the Earth
© 2015 Pearson Education, Inc.
Slide 24-37
The Magnetic Field of the Earth
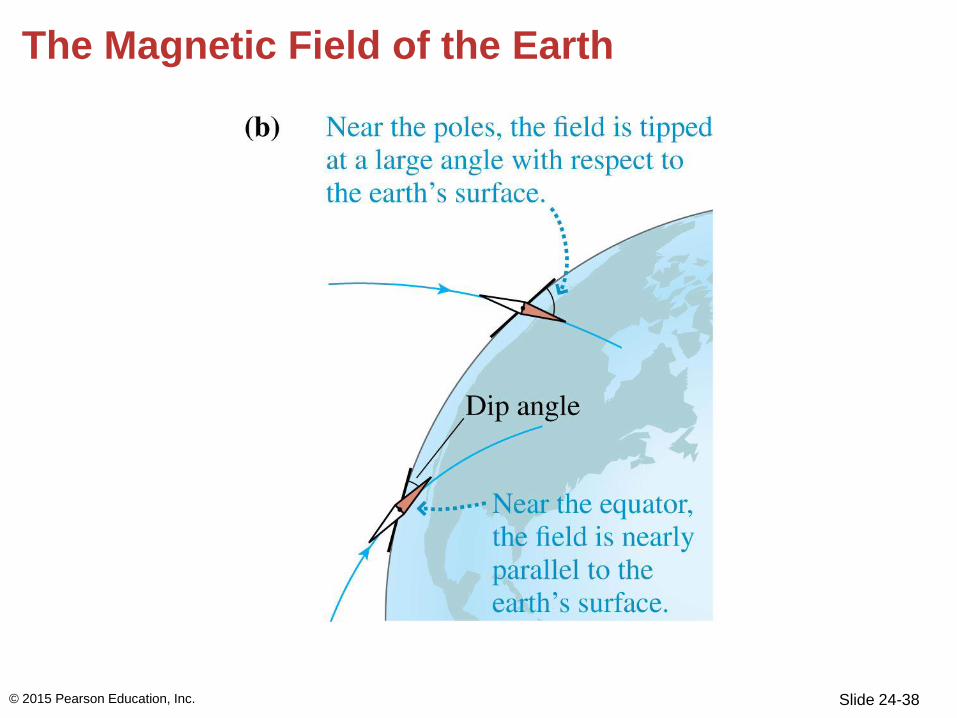
• The earth’s magnetic field has components both parallel to
the ground (horizontal) and perpendicular to the ground
(vertical).
• An ordinary, north-pointing compass responds only to the
horizontal component of the field, but a compass free to
pivot vertically will tilt downward as well.
• The dip angle is the angle from the horizontal.
© 2015 Pearson Education, Inc.
Slide 24-38
The Magnetic Field of the Earth
© 2015 Pearson Education, Inc.
Slide 24-39
Conceptual Example 24.1 Balancing a compass
Compasses made for use in northern latitudes are weighted
so that the south pole of their needle is slightly heavier than
the north pole. Explain why this is done.
© 2015 Pearson Education, Inc.
Section 24.3 Electric Currents Also Create Magnetic Fields
© 2015 Pearson Education, Inc.
Slide 24-41
Electric Currents Also Create Magnetic Fields
• A compass will react to the presence of a bar magnet.
• A compass will also deflect if you place the compass near
a wire and pass a current through the wire. When the
current stops, the compass goes back to its original
orientation.
• This means that an electric current produces a magnetic
field.
• The shape of the field lines depends on the shape of the
current-carrying wire.
© 2015 Pearson Education, Inc.
Slide 24-42
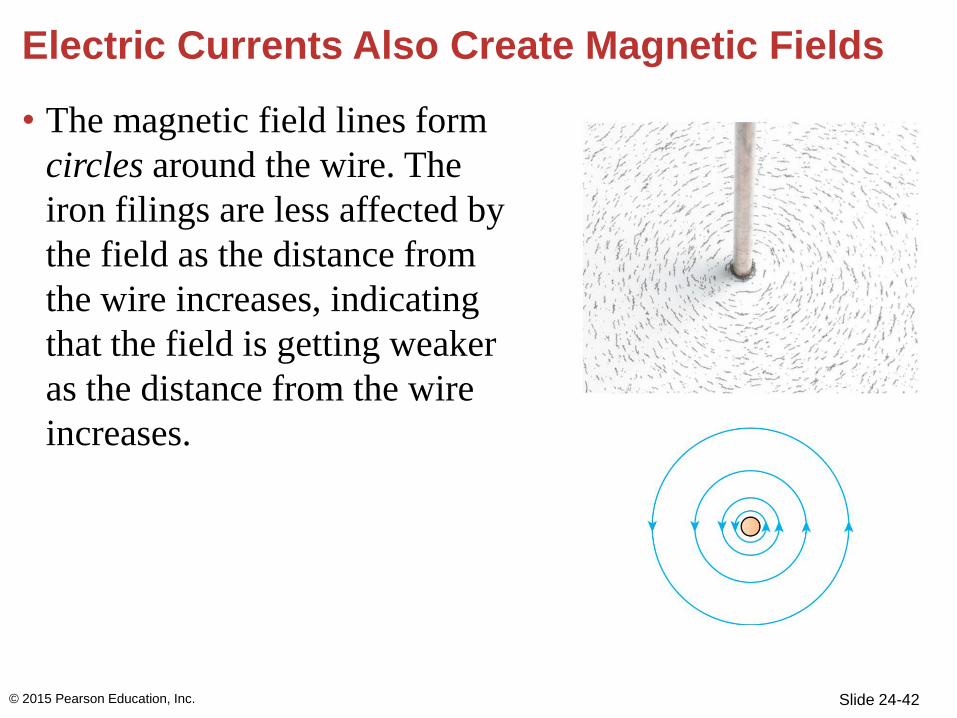
Electric Currents Also Create Magnetic Fields
• The magnetic field lines form
circles around the wire. The
iron filings are less affected by
the field as the distance from
the wire increases, indicating
that the field is getting weaker
as the distance from the wire
increases.
© 2015 Pearson Education, Inc.
Slide 24-43
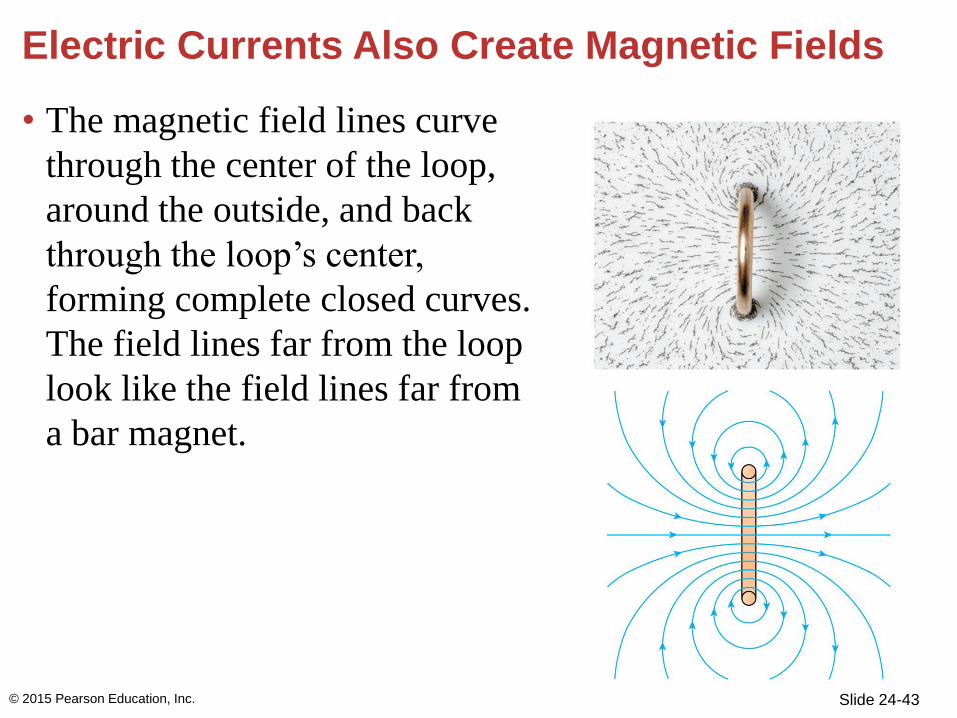
Electric Currents Also Create Magnetic Fields
• The magnetic field lines curve
through the center of the loop,
around the outside, and back
through the loop’s center,
forming complete closed curves.
The field lines far from the loop
look like the field lines far from
a bar magnet.
© 2015 Pearson Education, Inc.
Slide 24-44
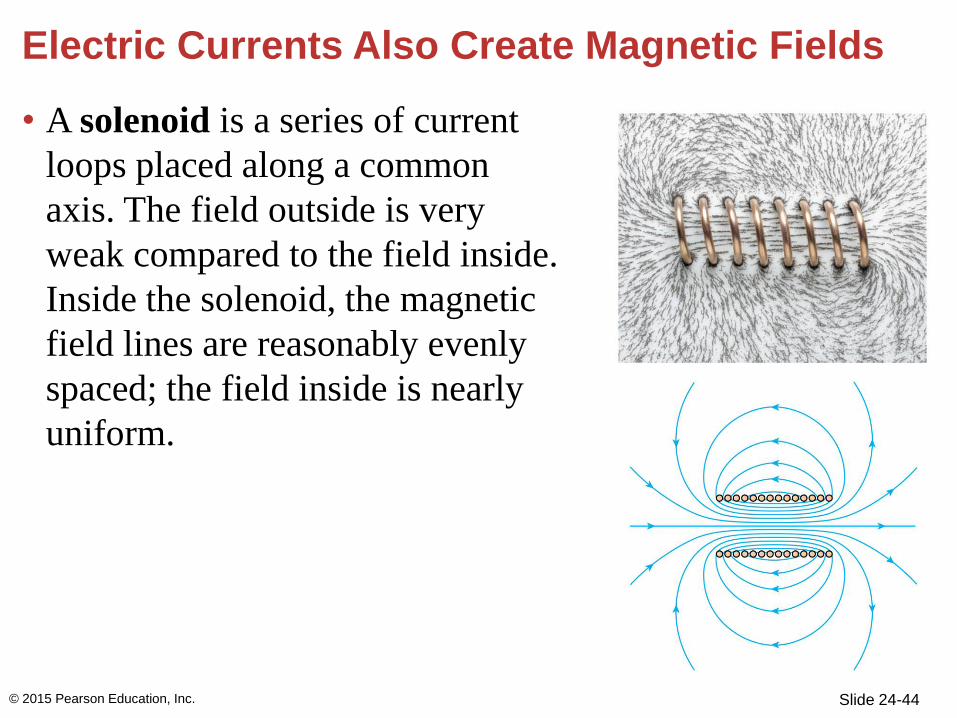
Electric Currents Also Create Magnetic Fields
• A solenoid is a series of current
loops placed along a common
axis. The field outside is very
weak compared to the field inside.
Inside the solenoid, the magnetic
field lines are reasonably evenly
spaced; the field inside is nearly
uniform.
© 2015 Pearson Education, Inc.
Slide 24-45
Electric Currents Also Create Magnetic Fields
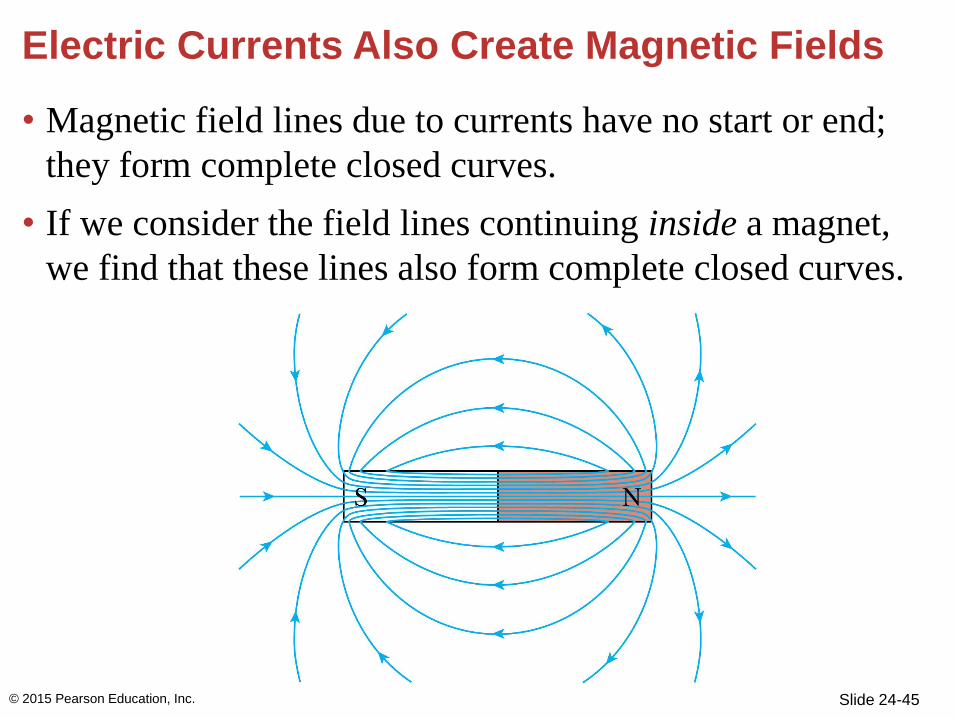
• Magnetic field lines due to currents have no start or end;
they form complete closed curves.
• If we consider the field lines continuing inside a magnet,
we find that these lines also form complete closed curves.
© 2015 Pearson Education, Inc.
Slide 24-46
Electric Currents Also Create Magnetic Fields
• Ordinary magnets are often called permanent magnets to
distinguish their unchanging magnetism from that caused
by currents that can be switched on and off.
© 2015 Pearson Education, Inc.

Slide 24-47
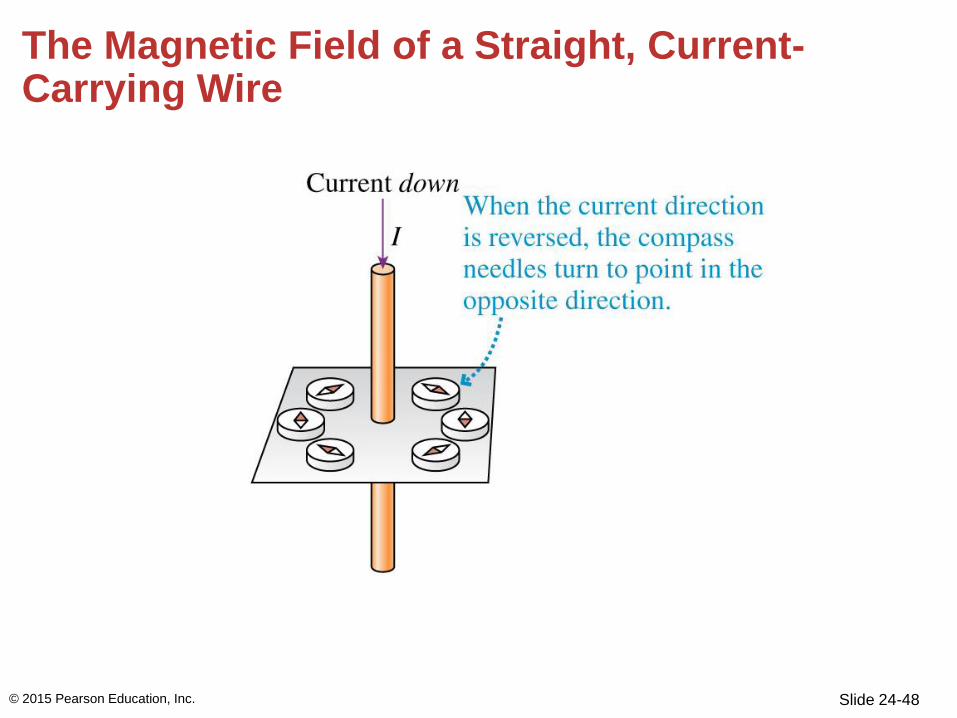
The Magnetic Field of a Straight, Current-Carrying Wire
• The iron filings line up in circles around a straight, current
carrying wire.
© 2015 Pearson Education, Inc.
Slide 24-48
The Magnetic Field of a Straight, Current-Carrying Wire
© 2015 Pearson Education, Inc.
Slide 24-49
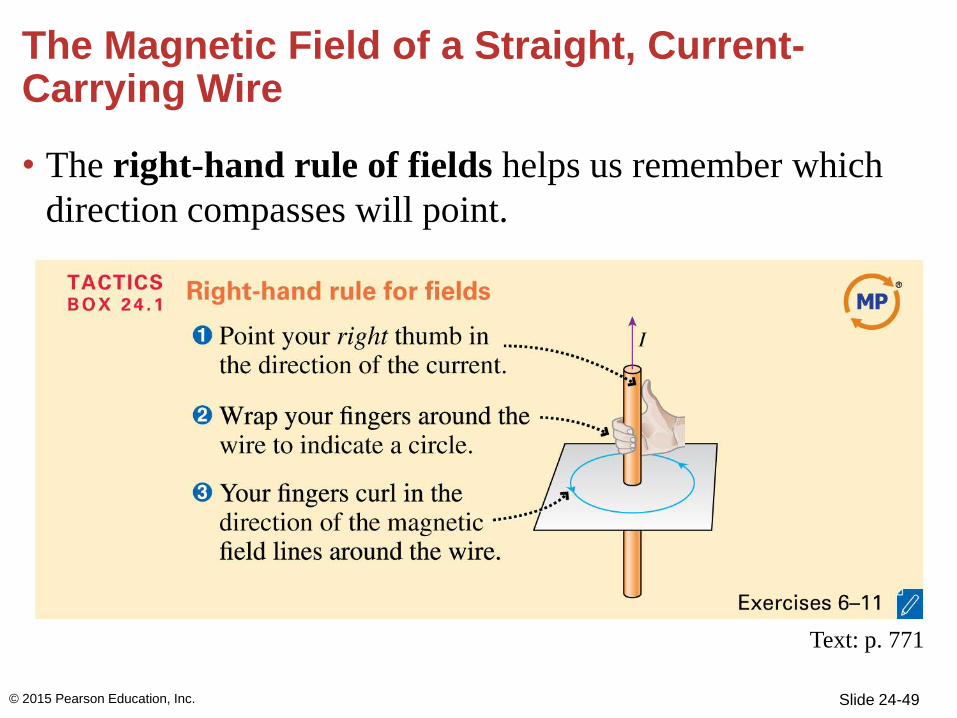
The Magnetic Field of a Straight, Current-Carrying Wire
• The right-hand rule of fields helps us remember which
direction compasses will point.
© 2015 Pearson Education, Inc.
Text: p. 771
Slide 24-50
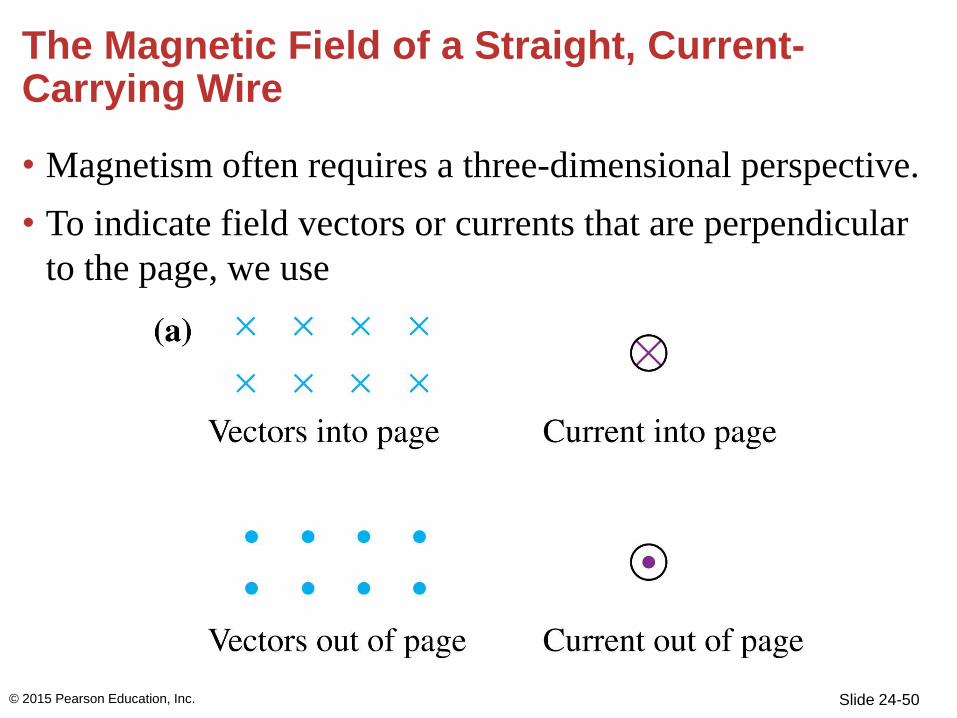
The Magnetic Field of a Straight, Current-Carrying Wire
• Magnetism often requires a three-dimensional perspective.
• To indicate field vectors or currents that are perpendicular
to the page, we use
© 2015 Pearson Education, Inc.
Slide 24-51
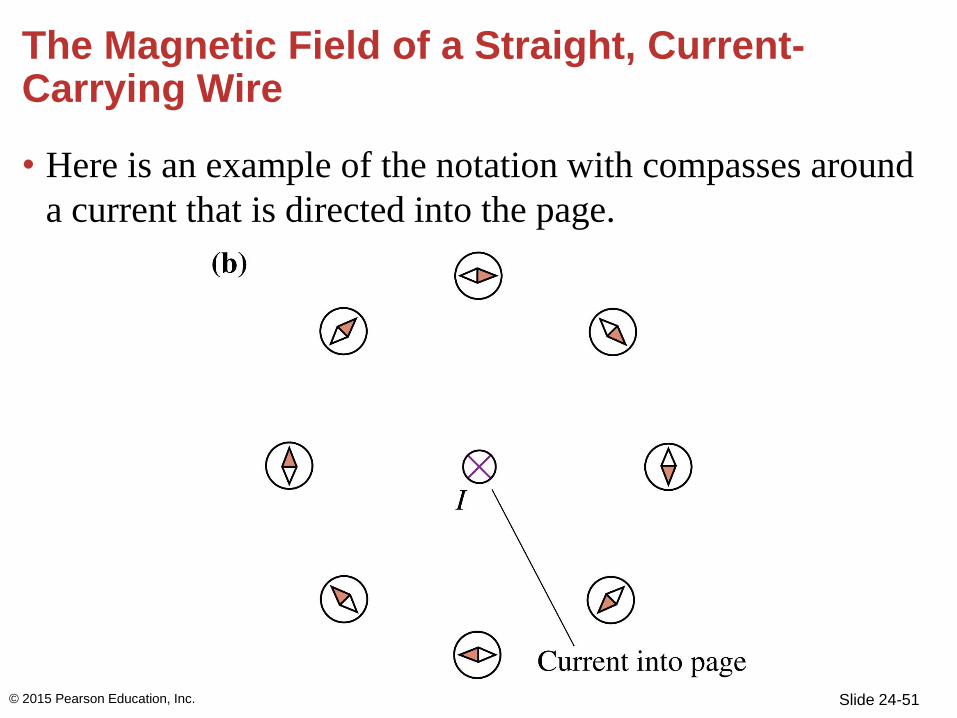
The Magnetic Field of a Straight, Current-Carrying Wire
• Here is an example of the notation with compasses around
a current that is directed into the page.
© 2015 Pearson Education, Inc.
Slide 24-52
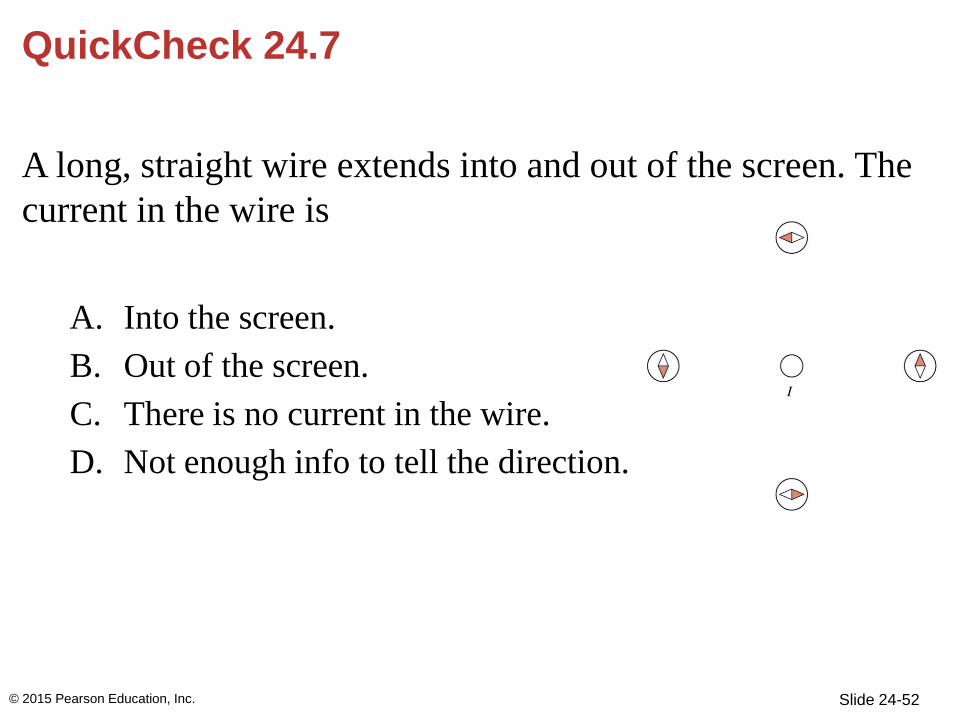
QuickCheck 24.7
A long, straight wire extends into and out of the screen. The
current in the wire is
A. Into the screen.
B. Out of the screen.
C. There is no current in the wire.
D. Not enough info to tell the direction.
© 2015 Pearson Education, Inc.
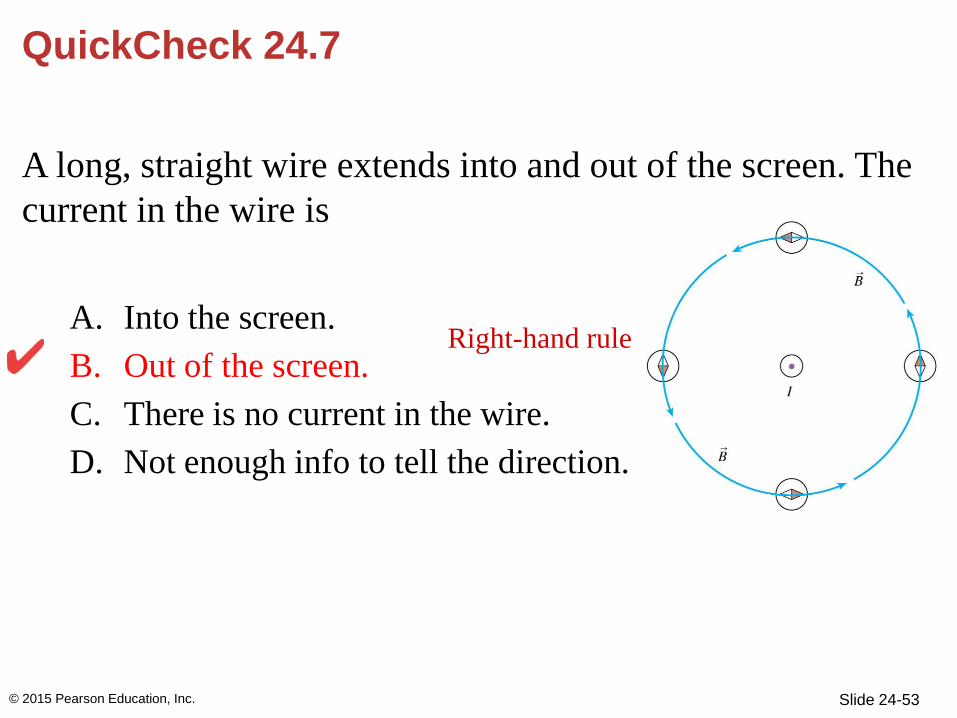
Slide 24-53
Right-hand rule
QuickCheck 24.7
A long, straight wire extends into and out of the screen. The
current in the wire is
A. Into the screen.
B. Out of the screen.
C. There is no current in the wire.
D. Not enough info to tell the direction.
© 2015 Pearson Education, Inc.
Slide 24-54
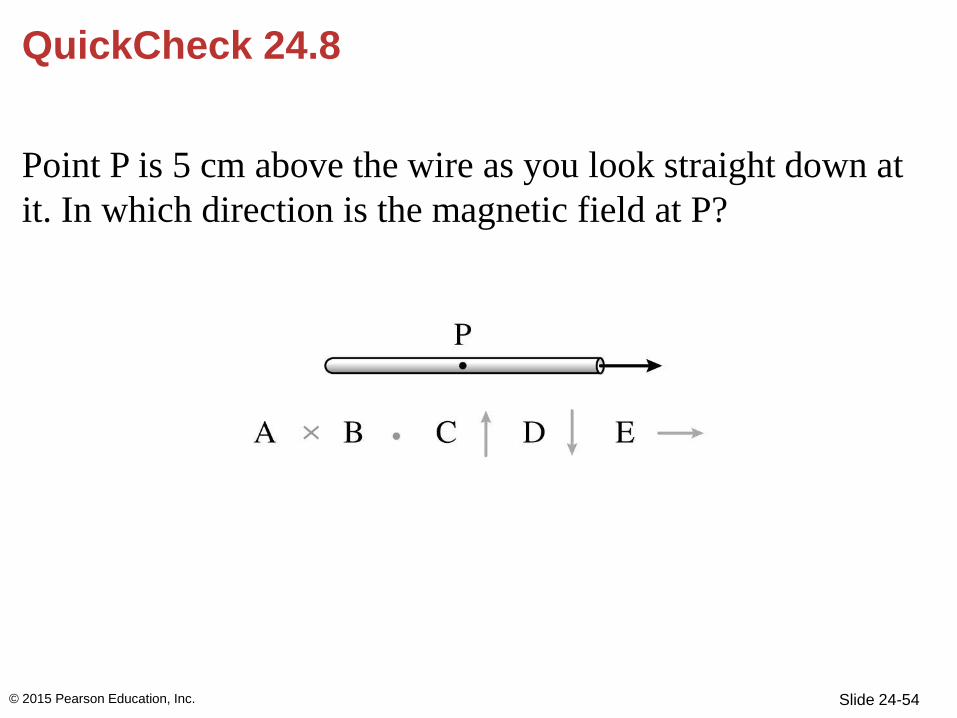
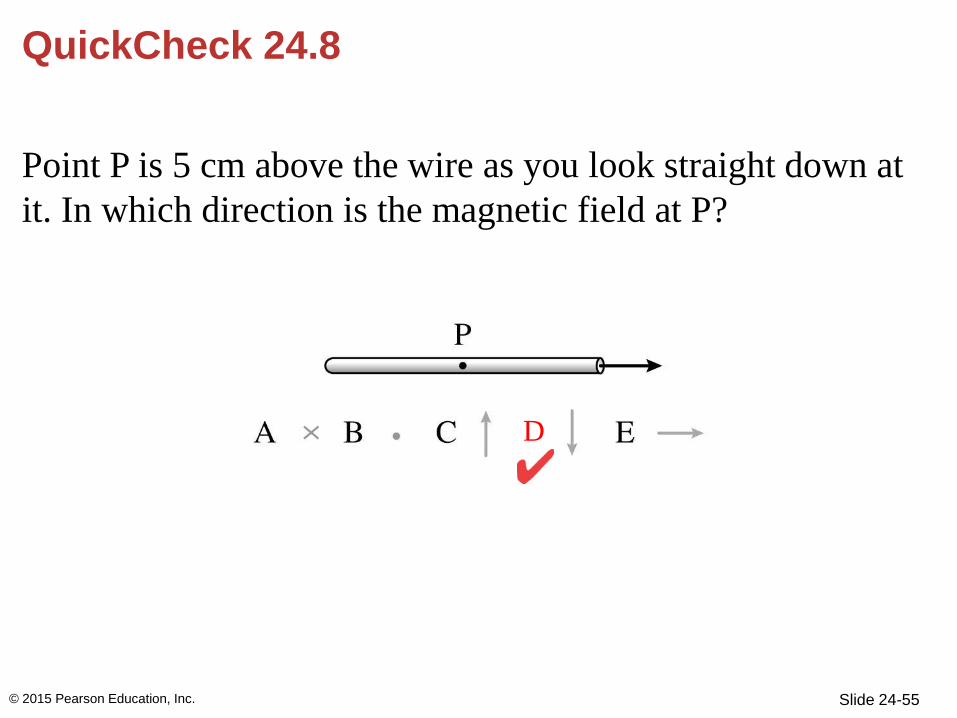
QuickCheck 24.8
Point P is 5 cm above the wire as you look straight down at
it. In which direction is the magnetic field at P?
© 2015 Pearson Education, Inc.
Slide 24-55
QuickCheck 24.8
Point P is 5 cm above the wire as you look straight down at
it. In which direction is the magnetic field at P?
© 2015 Pearson Education, Inc.
D
Slide 24-56
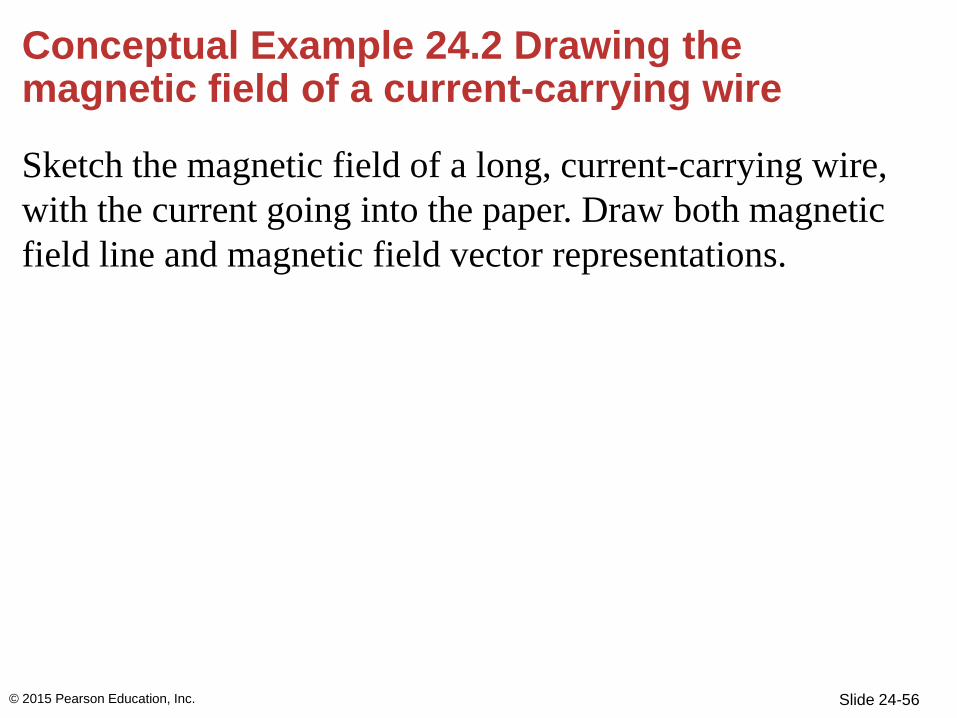
Conceptual Example 24.2 Drawing the magnetic field of a current-carrying wire
Sketch the magnetic field of a long, current-carrying wire,
with the current going into the paper. Draw both magnetic
field line and magnetic field vector representations.
© 2015 Pearson Education, Inc.

Slide 24-57
Conceptual Example 24.2 Drawing the magnetic field of a current-carrying wire (cont.)
© 2015 Pearson Education, Inc.
Slide 24-58
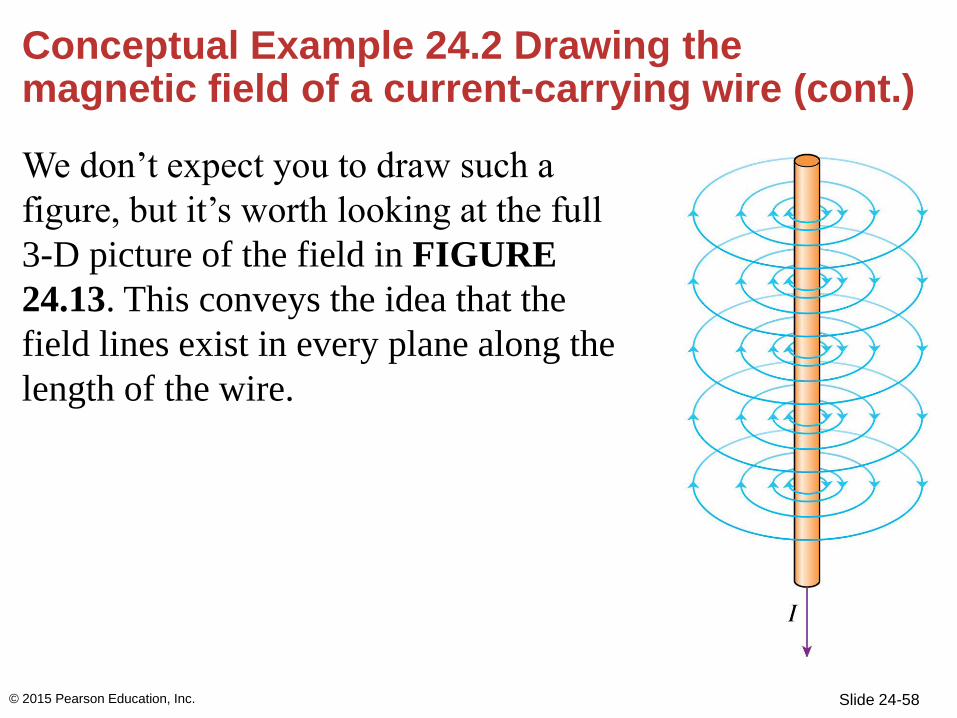
Conceptual Example 24.2 Drawing the magnetic field of a current-carrying wire (cont.)
We don’t expect you to draw such a
figure, but it’s worth looking at the full
3-D picture of the field in FIGURE
24.13. This conveys the idea that the
field lines exist in every plane along the
length of the wire.
© 2015 Pearson Education, Inc.
Slide 24-59
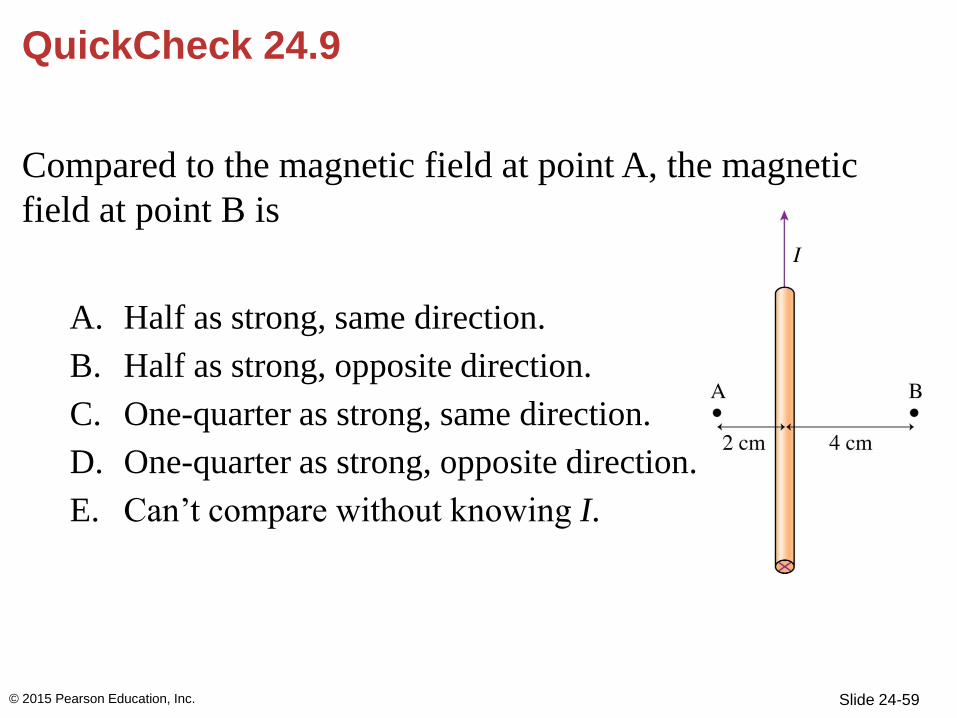
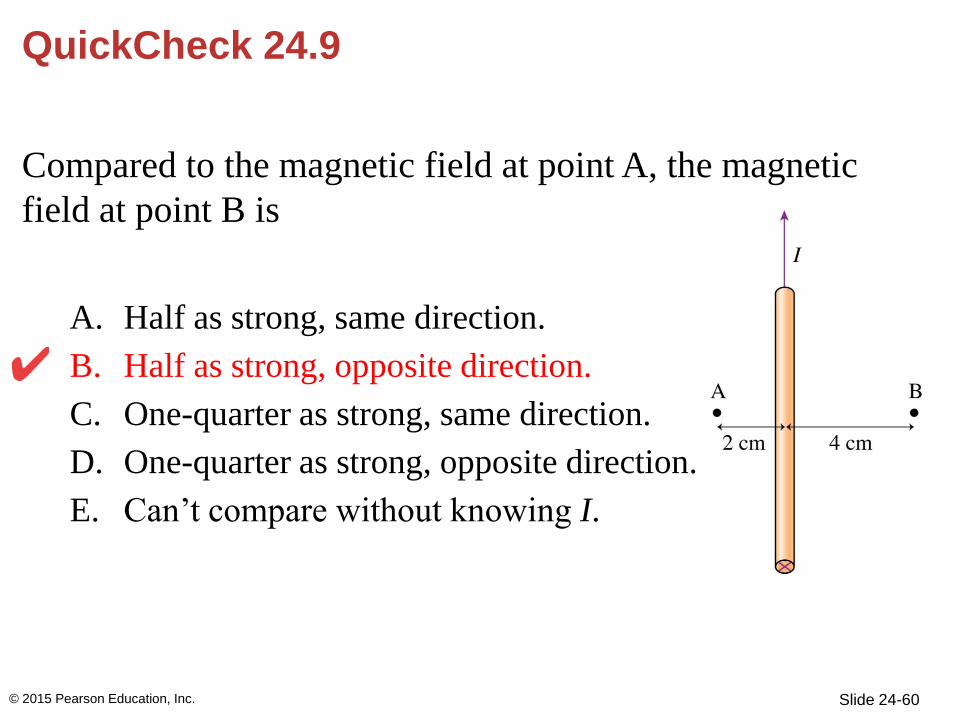
QuickCheck 24.9
Compared to the magnetic field at point A, the magnetic
field at point B is
A. Half as strong, same direction.
B. Half as strong, opposite direction.
C. One-quarter as strong, same direction.
D. One-quarter as strong, opposite direction.
E. Can’t compare without knowing I.
© 2015 Pearson Education, Inc.
Slide 24-60
QuickCheck 24.9
Compared to the magnetic field at point A, the magnetic
field at point B is
A. Half as strong, same direction.
B. Half as strong, opposite direction.
C. One-quarter as strong, same direction.
D. One-quarter as strong, opposite direction.
E. Can’t compare without knowing I.
© 2015 Pearson Education, Inc.
Slide 24-61
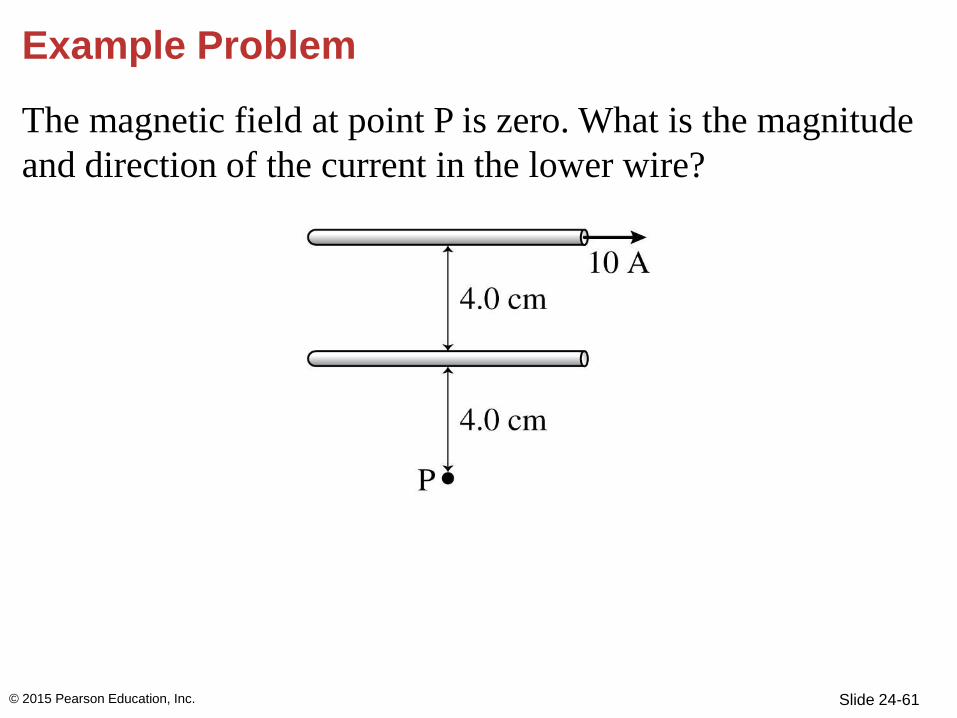
Example Problem
The magnetic field at point P is zero. What is the magnitude
and direction of the current in the lower wire?
© 2015 Pearson Education, Inc.
Slide 24-62
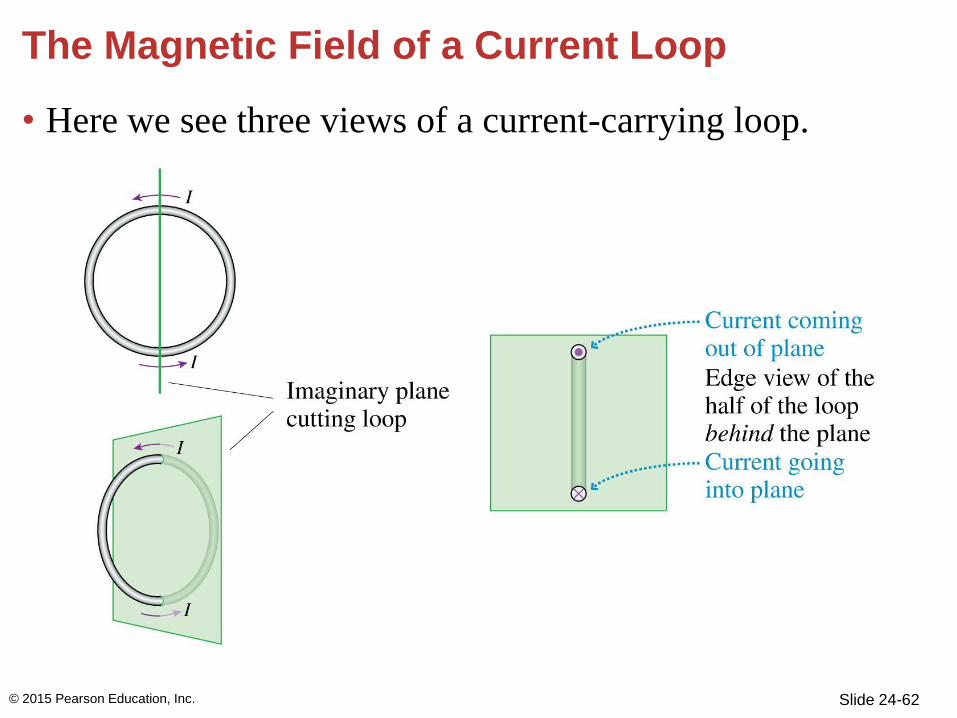
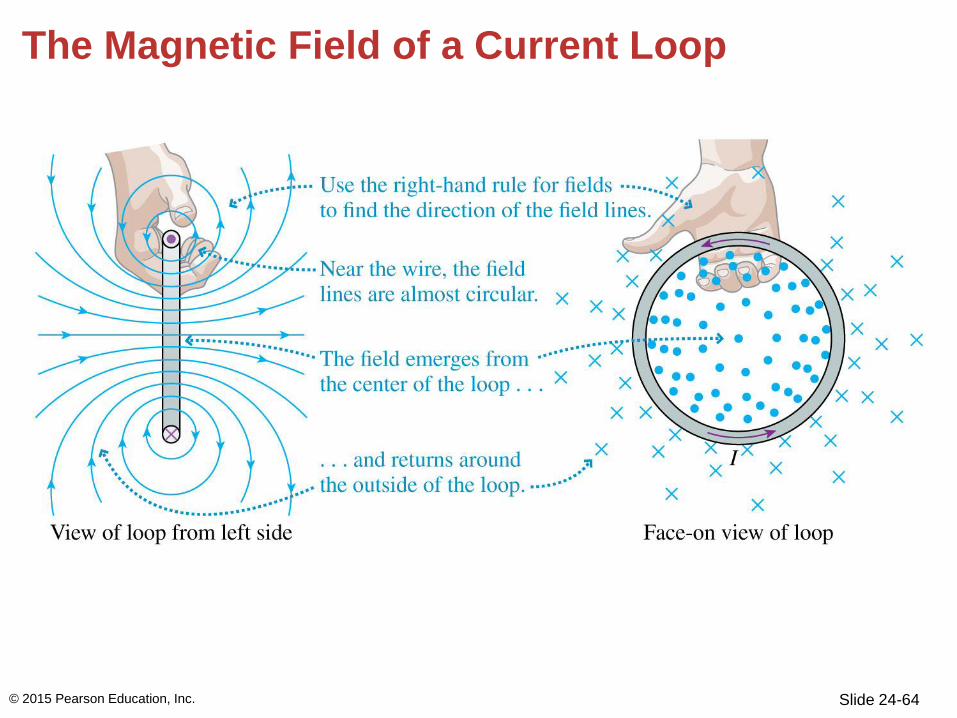
The Magnetic Field of a Current Loop
• Here we see three views of a current-carrying loop.
© 2015 Pearson Education, Inc.
Slide 24-63
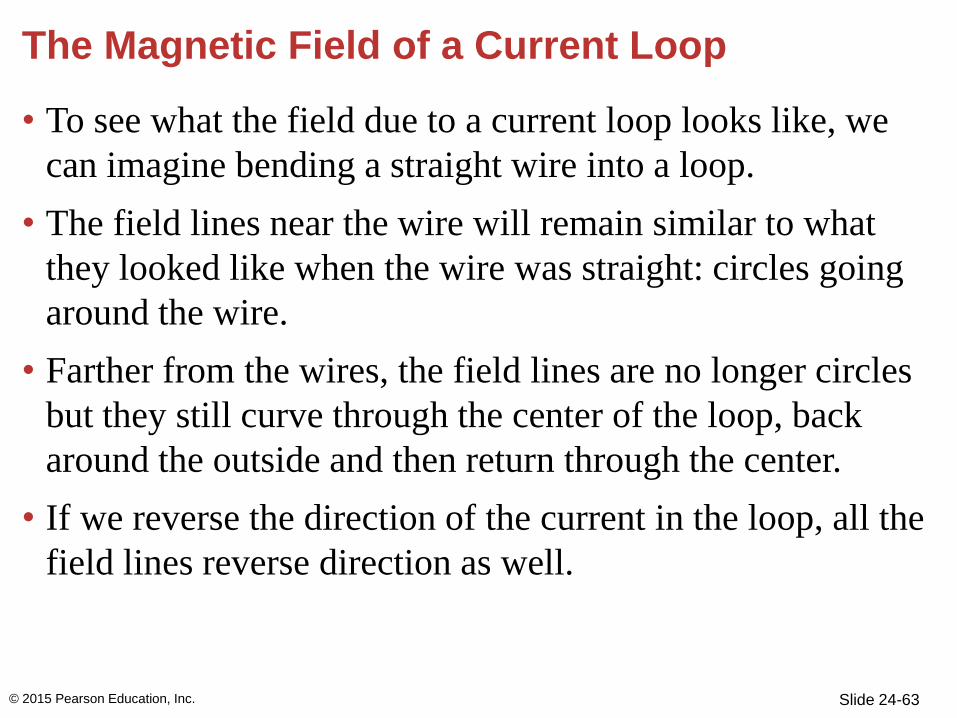
The Magnetic Field of a Current Loop
• To see what the field due to a current loop looks like, we
can imagine bending a straight wire into a loop.
• The field lines near the wire will remain similar to what
they looked like when the wire was straight: circles going
around the wire.
• Farther from the wires, the field lines are no longer circles
but they still curve through the center of the loop, back
around the outside and then return through the center.
• If we reverse the direction of the current in the loop, all the
field lines reverse direction as well.
© 2015 Pearson Education, Inc.
Slide 24-64
The Magnetic Field of a Current Loop
© 2015 Pearson Education, Inc.
Slide 24-65
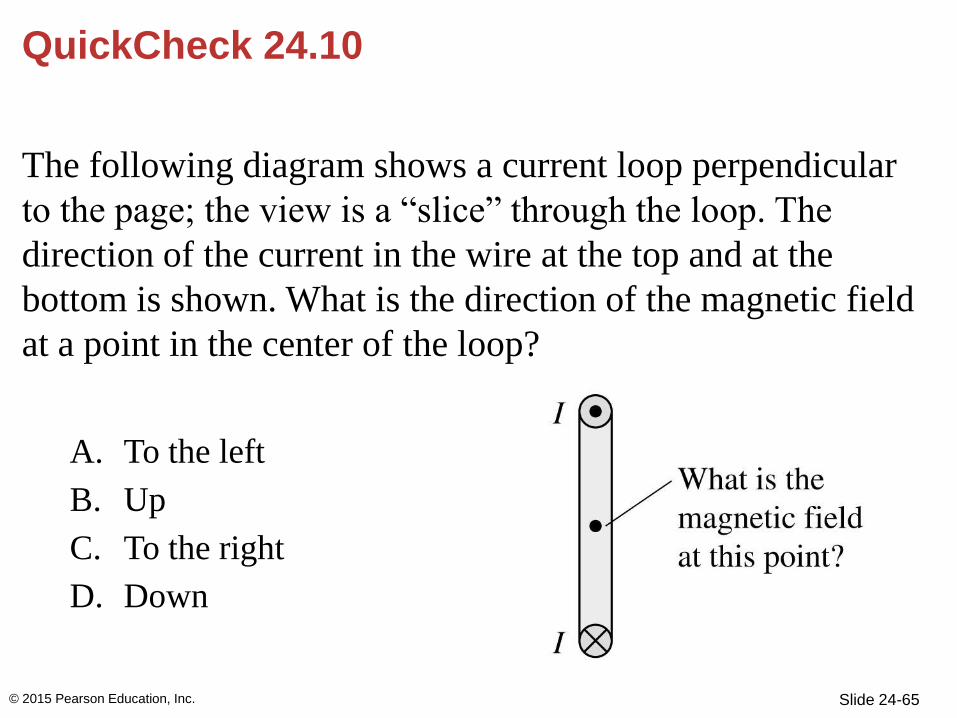
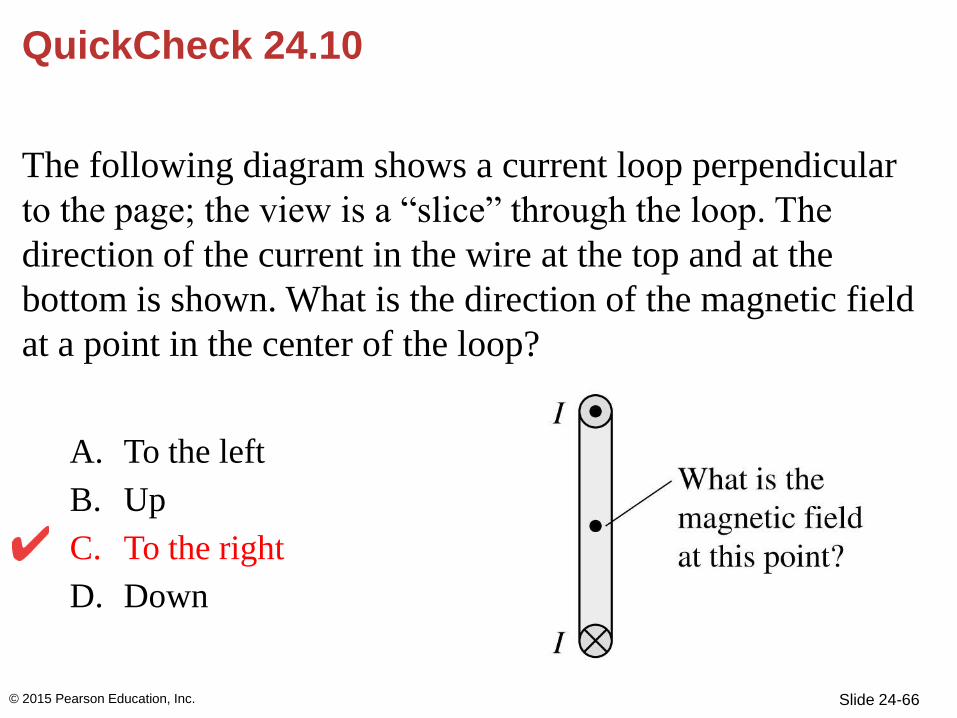
QuickCheck 24.10
The following diagram shows a current loop perpendicular
to the page; the view is a “slice” through the loop. The
direction of the current in the wire at the top and at the
bottom is shown. What is the direction of the magnetic field
at a point in the center of the loop?
A. To the left
B. Up
C. To the right
D. Down
© 2015 Pearson Education, Inc.
Slide 24-66
QuickCheck 24.10
The following diagram shows a current loop perpendicular
to the page; the view is a “slice” through the loop. The
direction of the current in the wire at the top and at the
bottom is shown. What is the direction of the magnetic field
at a point in the center of the loop?
A. To the left
B. Up
C. To the right
D. Down
© 2015 Pearson Education, Inc.
Slide 24-67
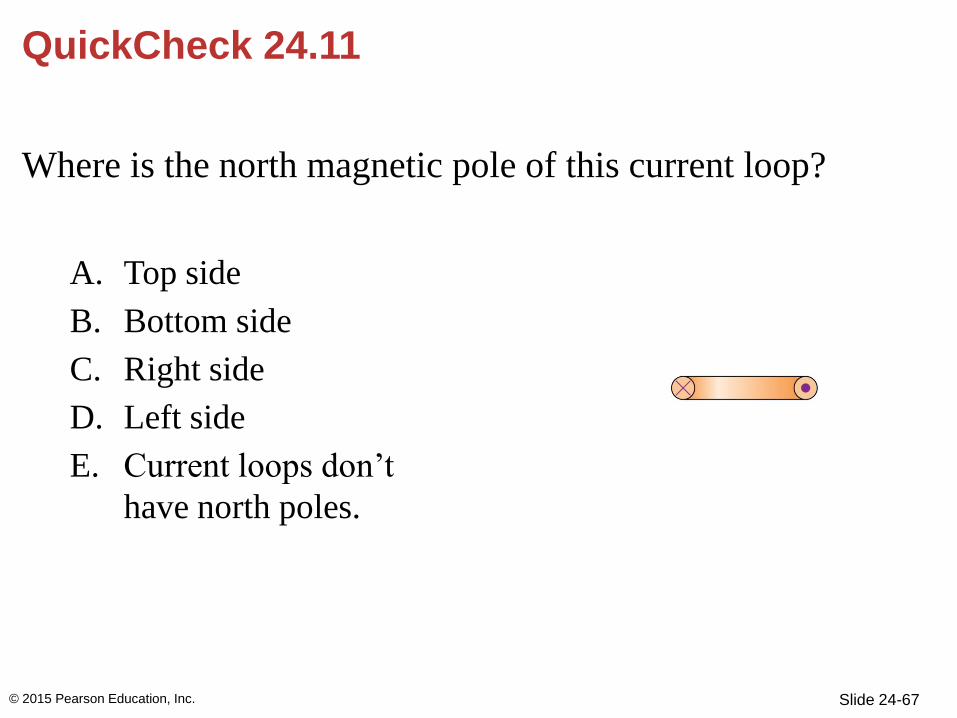
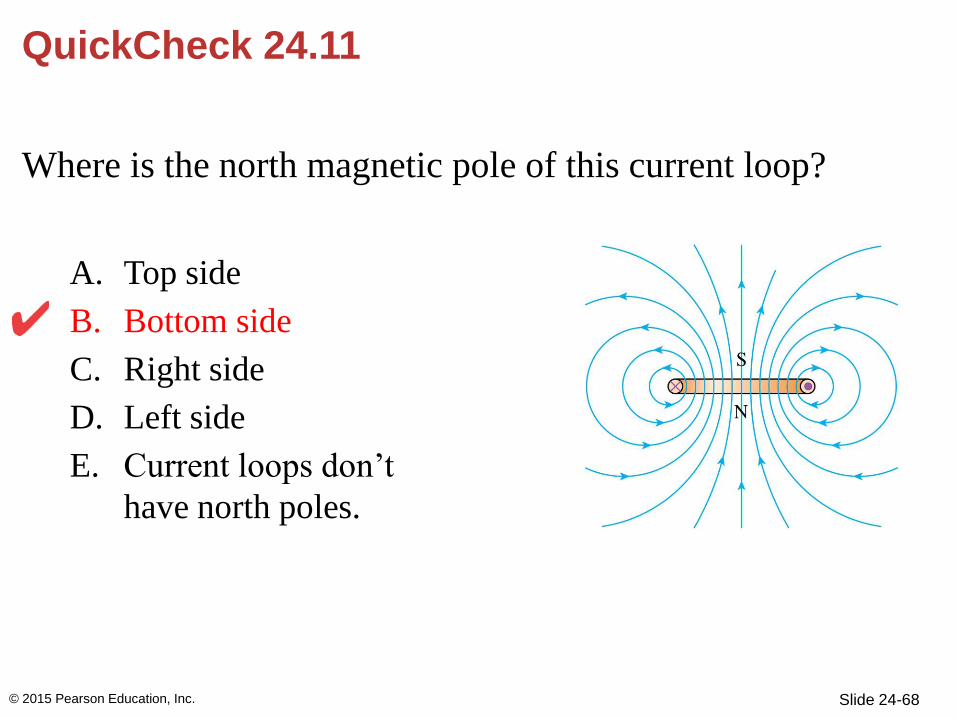
QuickCheck 24.11
Where is the north magnetic pole of this current loop?
A. Top side
B. Bottom side
C. Right side
D. Left side
E. Current loops don’t
have north poles.
© 2015 Pearson Education, Inc.
Slide 24-68
QuickCheck 24.11
Where is the north magnetic pole of this current loop?
A. Top side
B. Bottom side
C. Right side
D. Left side
E. Current loops don’t
have north poles.
© 2015 Pearson Education, Inc.
Slide 24-69
Example Problem
A physics instructor is creating a demonstration that shows
the direction of the field at the center of a current loop. He
takes a cardboard form 25 cm in diameter and wraps 20
turns of wire around it in a tight loop. He wants the field at
the loop’s center to be at least 10 times as large as the
magnetic field of the earth, so that a compass will pivot
convincingly to point in the direction of the field from the
loop. How much current is needed to provide this field?
© 2015 Pearson Education, Inc.
Slide 24-70
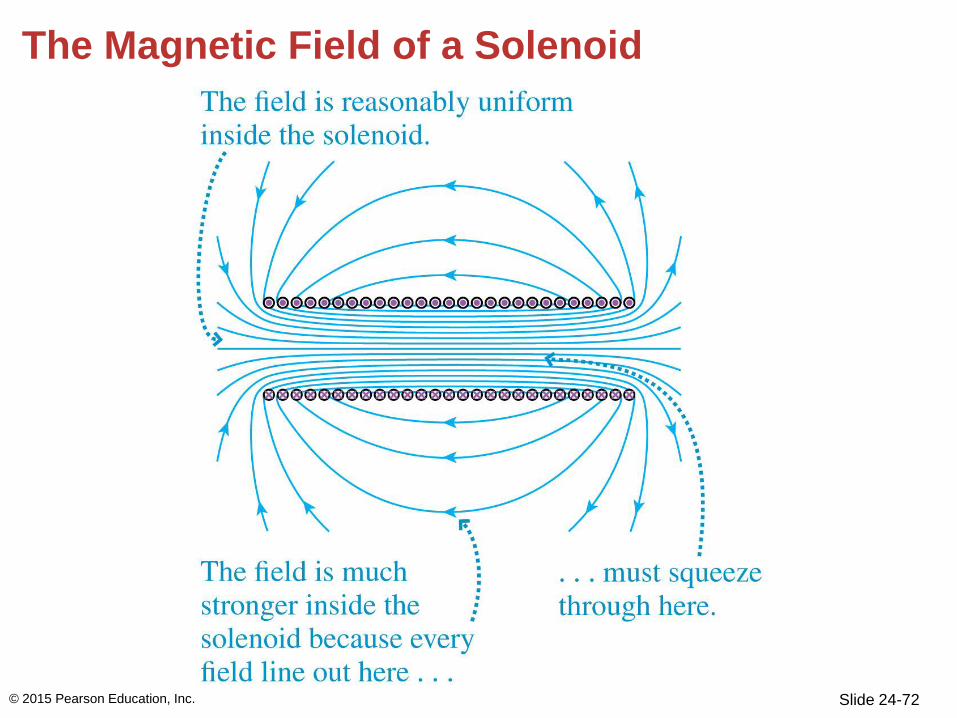
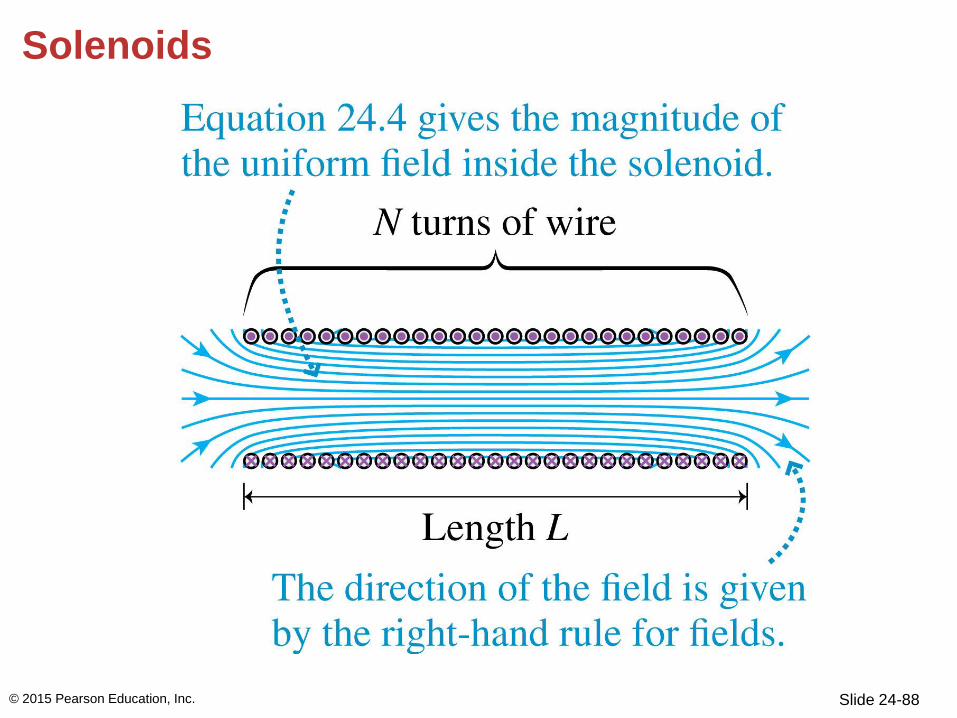
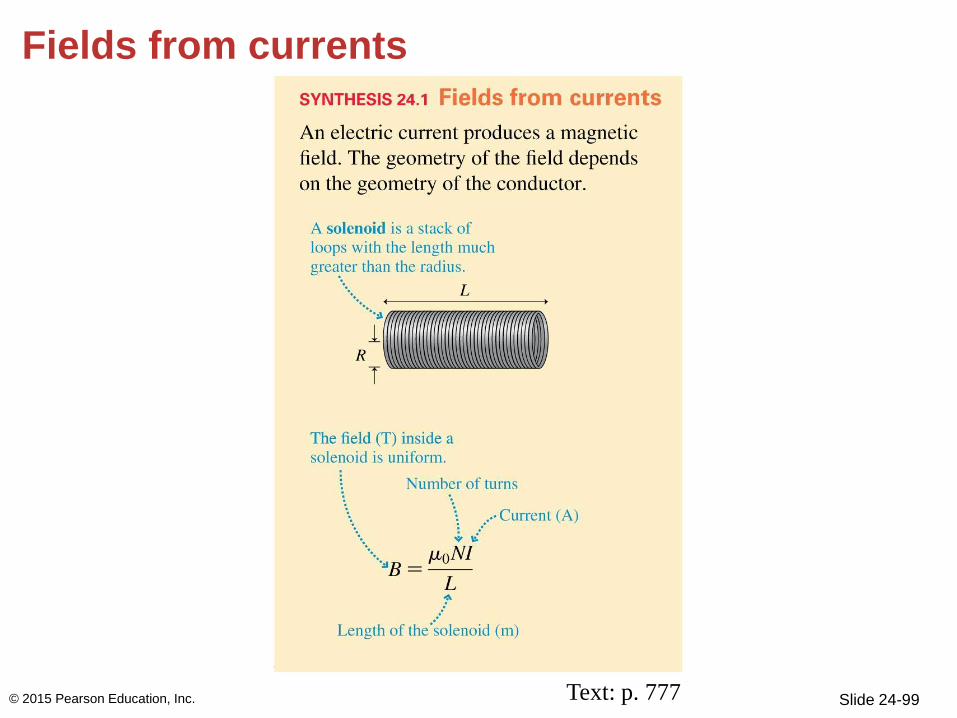
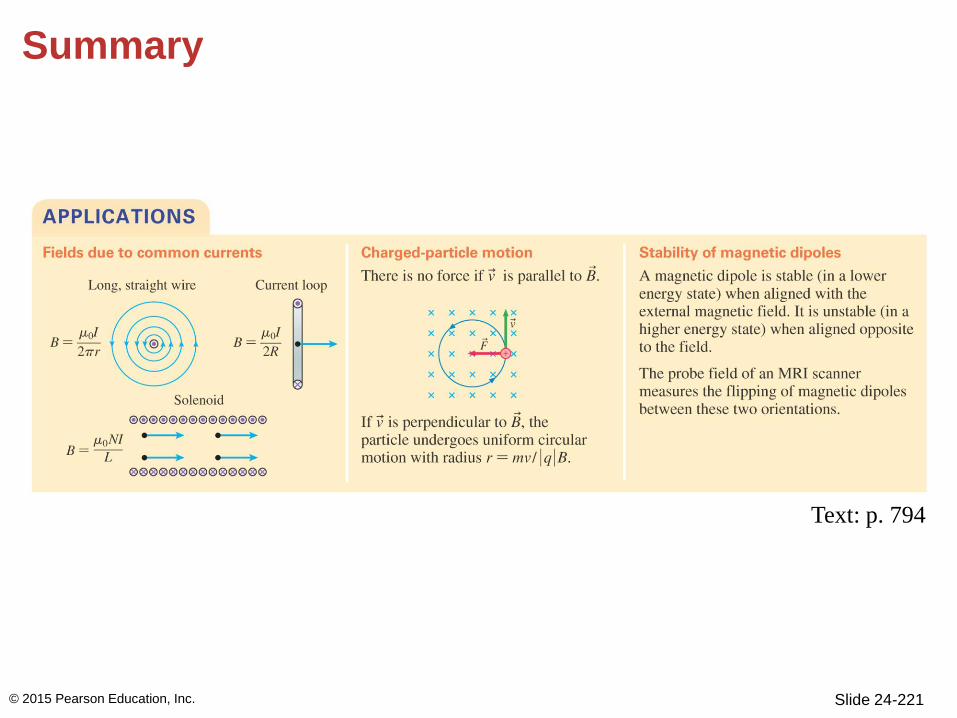
The Magnetic Field of a Solenoid
• There are many applications of magnetism for which we
would like to generate a uniform magnetic field, a field
that has the same magnitude and same direction at every
point within some region of space.
© 2015 Pearson Education, Inc.
Slide 24-71
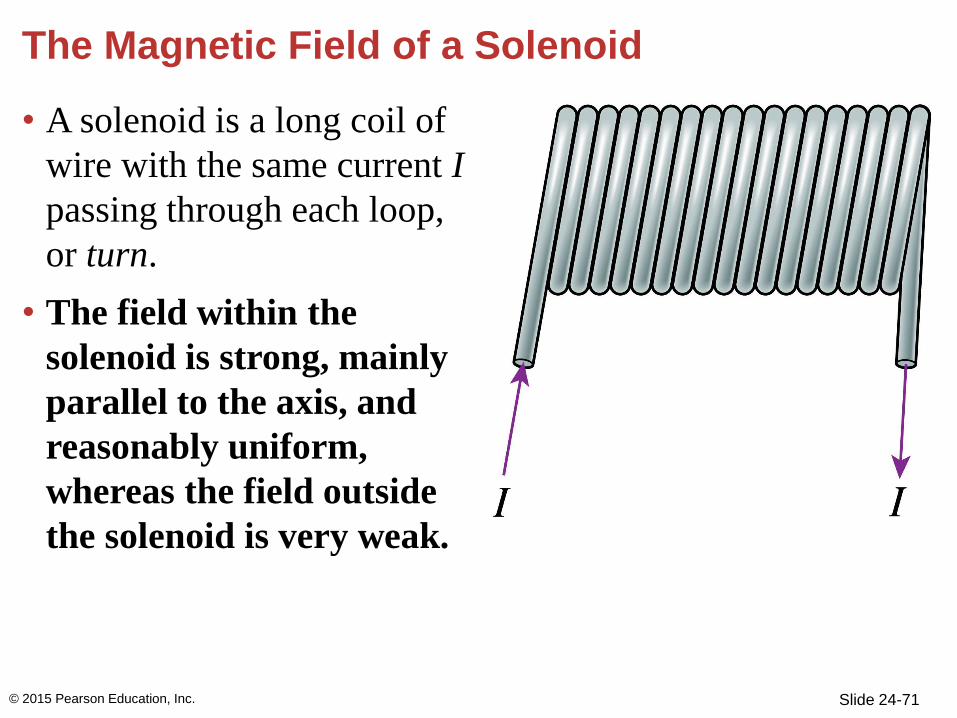
The Magnetic Field of a Solenoid
• A solenoid is a long coil of
wire with the same current I
passing through each loop,
or turn.
• The field within the
solenoid is strong, mainly
parallel to the axis, and
reasonably uniform,
whereas the field outside
the solenoid is very weak.
© 2015 Pearson Education, Inc.
Slide 24-72
The Magnetic Field of a Solenoid
© 2015 Pearson Education, Inc.
Slide 24-73
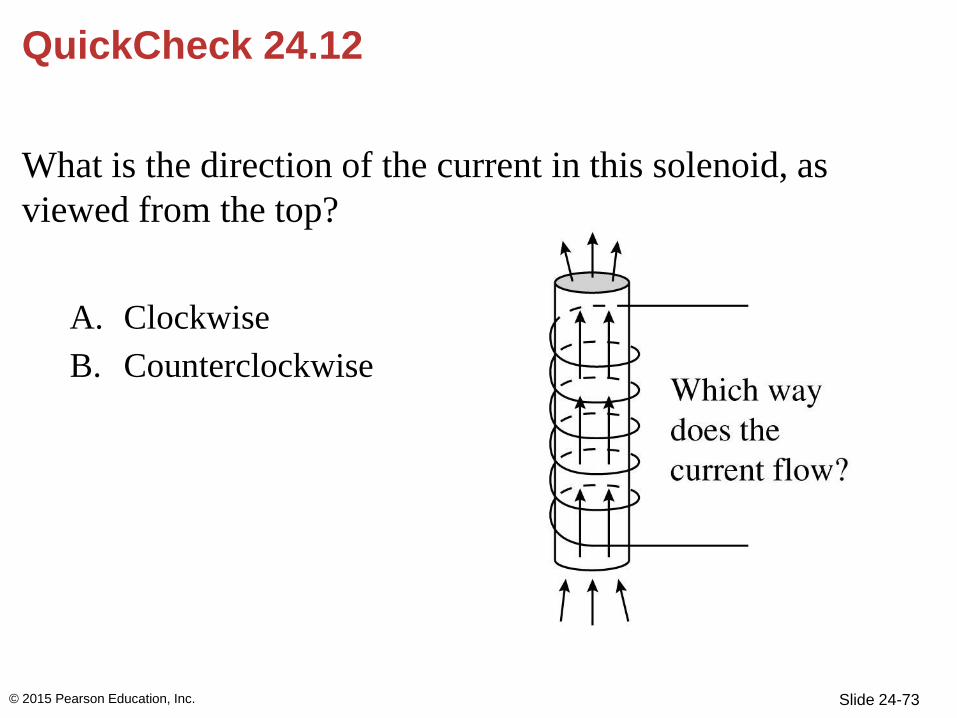
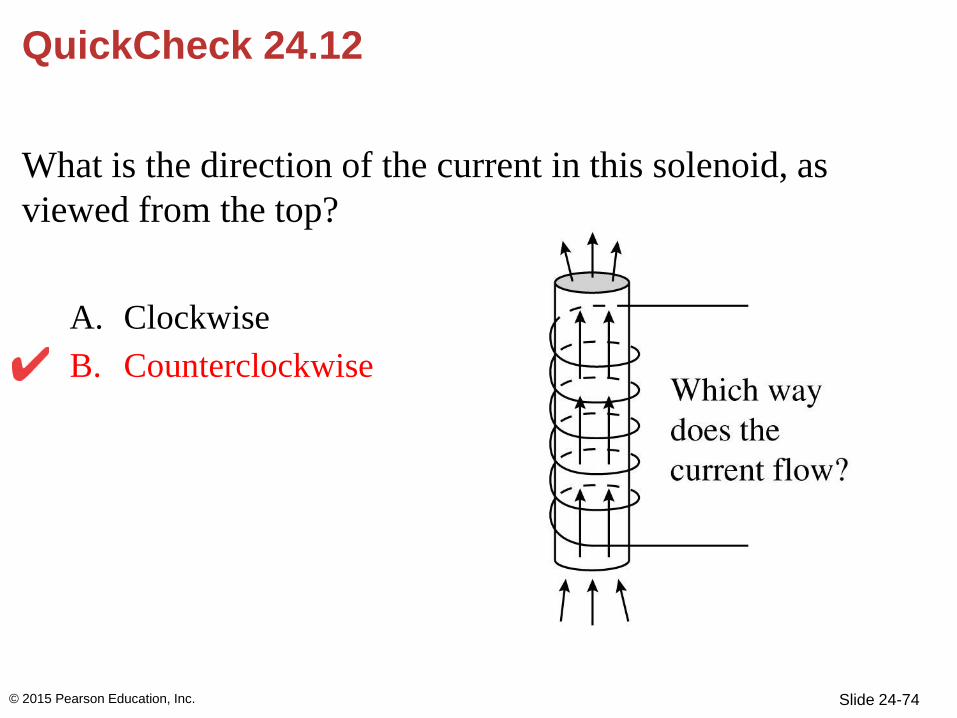
QuickCheck 24.12
What is the direction of the current in this solenoid, as
viewed from the top?
A. Clockwise
B. Counterclockwise
© 2015 Pearson Education, Inc.
Slide 24-74
QuickCheck 24.12
What is the direction of the current in this solenoid, as
viewed from the top?
A. Clockwise
B. Counterclockwise
© 2015 Pearson Education, Inc.
Slide 24-75
Example Problem
An investigator needs a uniform 30 mT field, which she
intends to produce with a solenoid. She takes a long 10-cm-
diameter tube and wraps wire along the length of it,
wrapping 1200 turns of wire along a 75 cm length of the
tube. How much current must she pass through the wire to
produce the desired field?
© 2015 Pearson Education, Inc.
Section 24.4 Calculating the Magnetic Field Due to a Current
© 2015 Pearson Education, Inc.
Slide 24-77
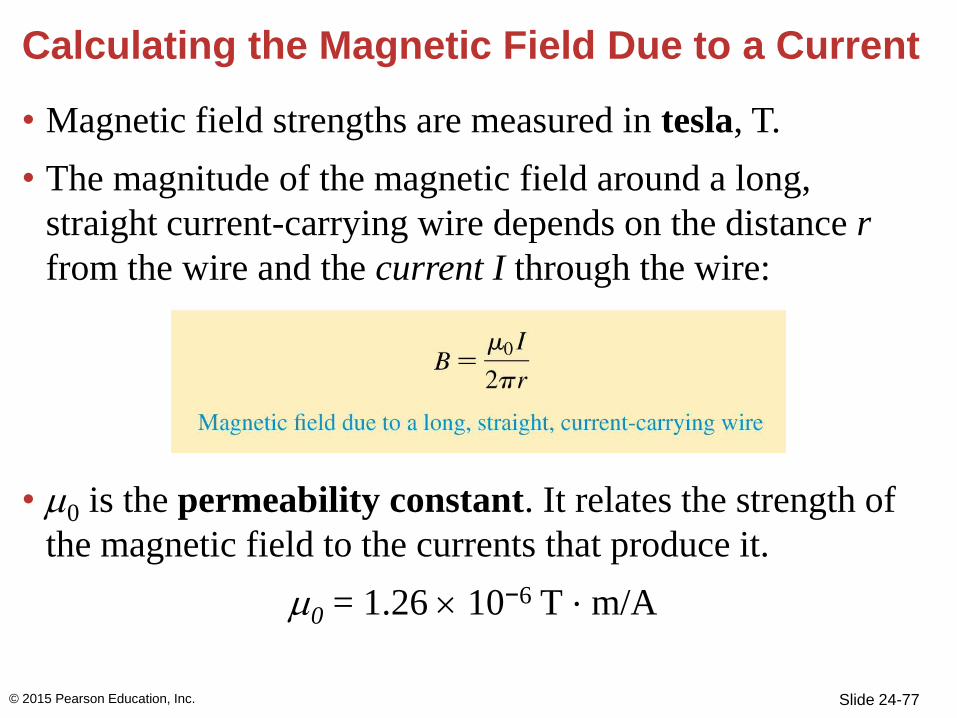
Calculating the Magnetic Field Due to a Current
• Magnetic field strengths are measured in tesla, T.
• The magnitude of the magnetic field around a long,
straight current-carrying wire depends on the distance r
from the wire and the current I through the wire:
• 0 is the permeability constant. It relates the strength of
the magnetic field to the currents that produce it.
0 = 1.26 10−6 T ⋅ m/A
© 2015 Pearson Education, Inc.

Slide 24-78
Calculating the Magnetic Field Due to a Current
© 2015 Pearson Education, Inc.
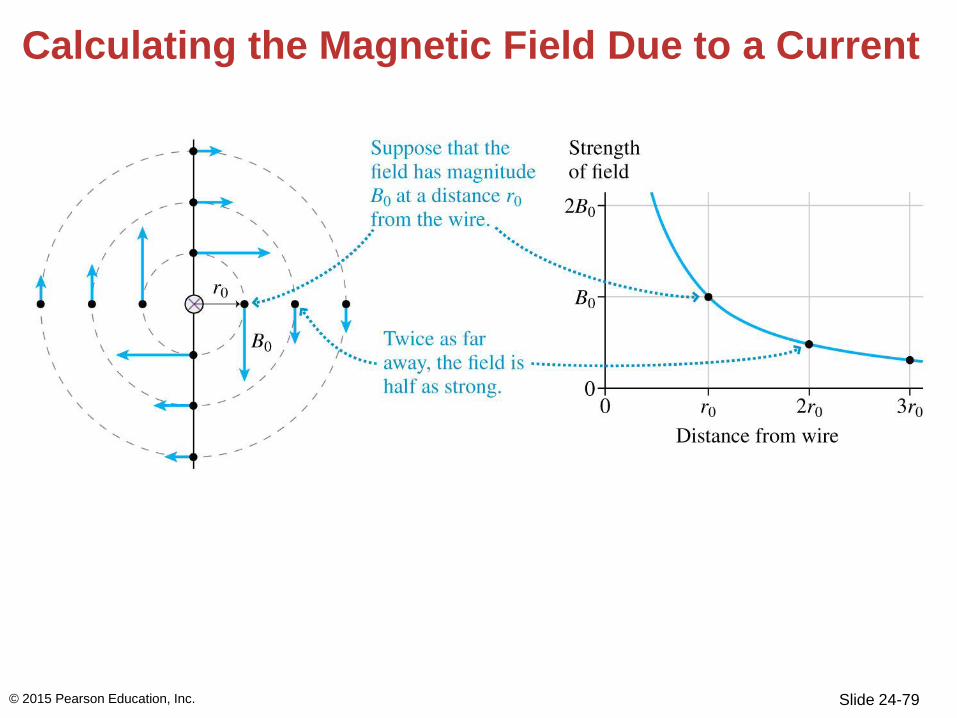
Slide 24-79
Calculating the Magnetic Field Due to a Current
© 2015 Pearson Education, Inc.
Slide 24-80
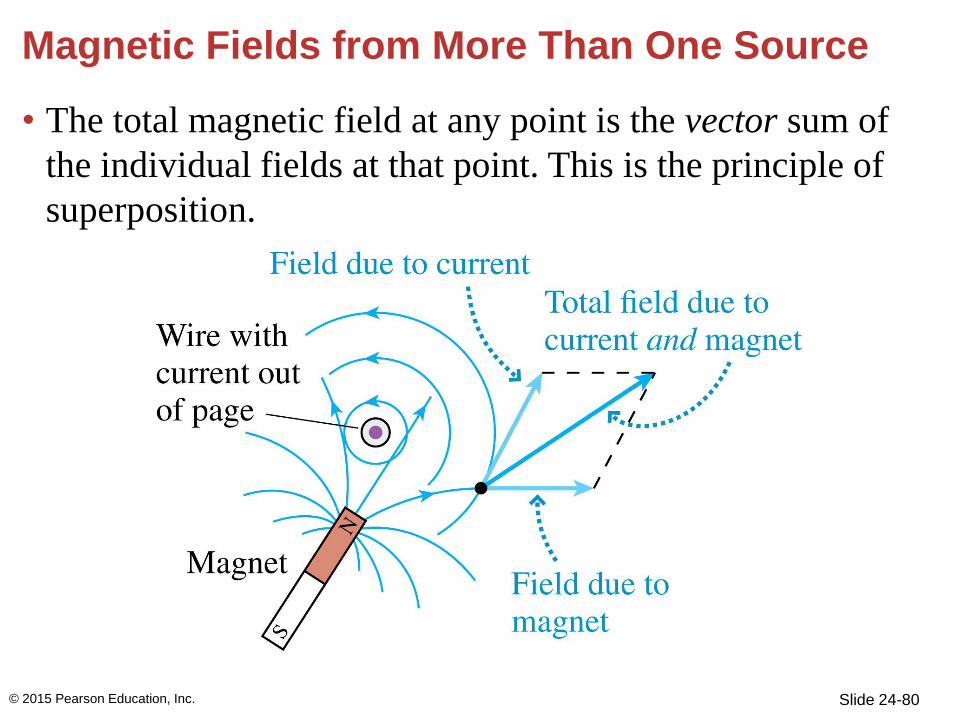
Magnetic Fields from More Than One Source
• The total magnetic field at any point is the vector sum of
the individual fields at that point. This is the principle of
superposition.
© 2015 Pearson Education, Inc.
Slide 24-81
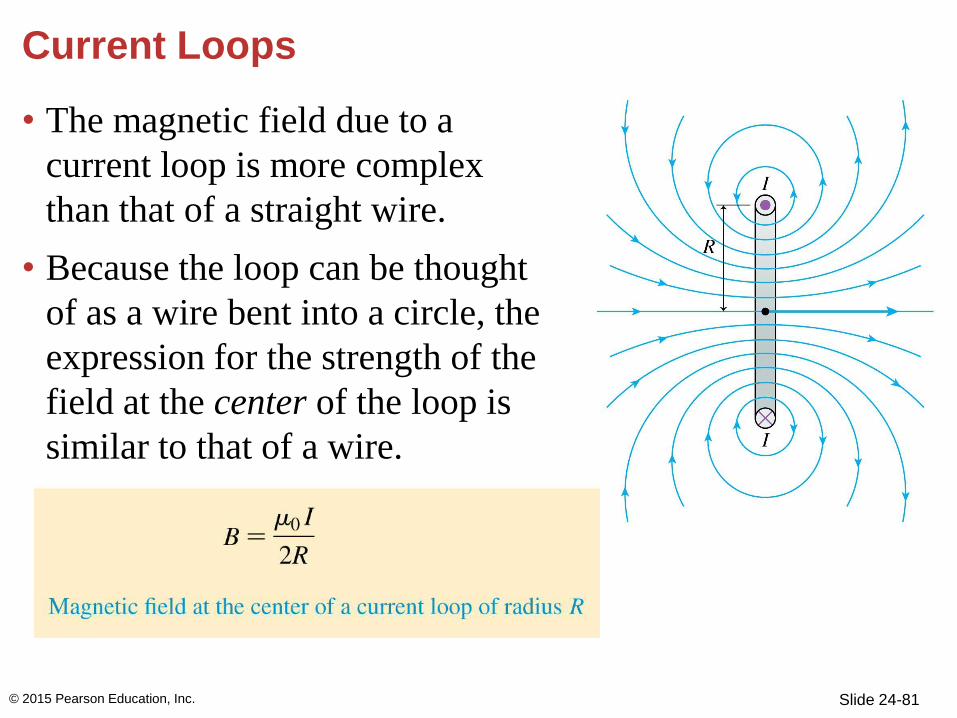
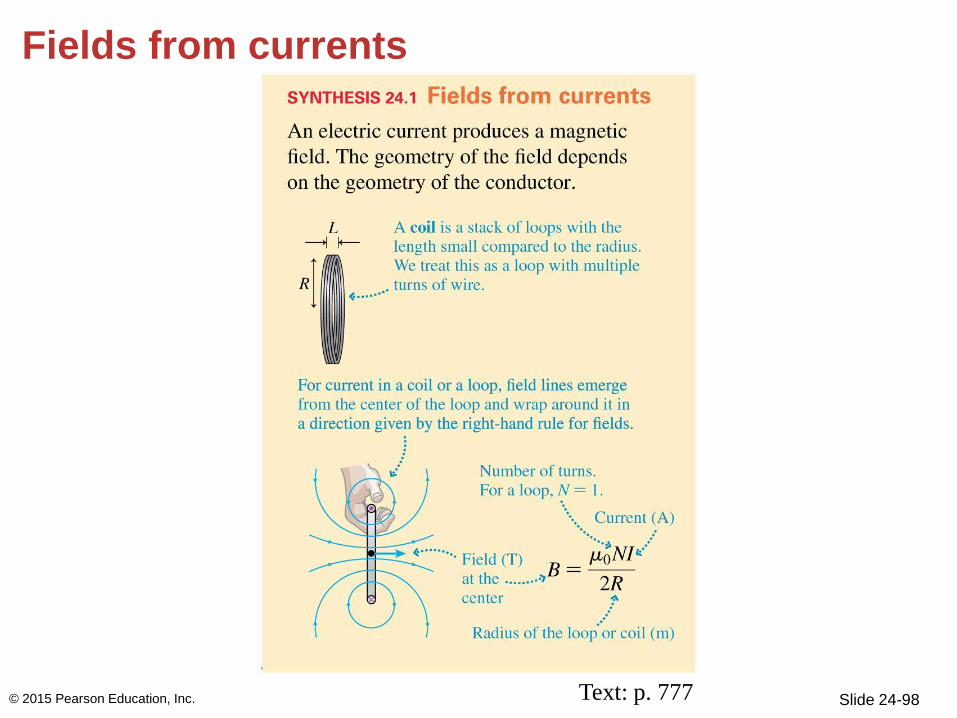
Current Loops
• The magnetic field due to a
current loop is more complex
than that of a straight wire.
• Because the loop can be thought
of as a wire bent into a circle, the
expression for the strength of the
field at the center of the loop is
similar to that of a wire.
© 2015 Pearson Education, Inc.
Slide 24-82
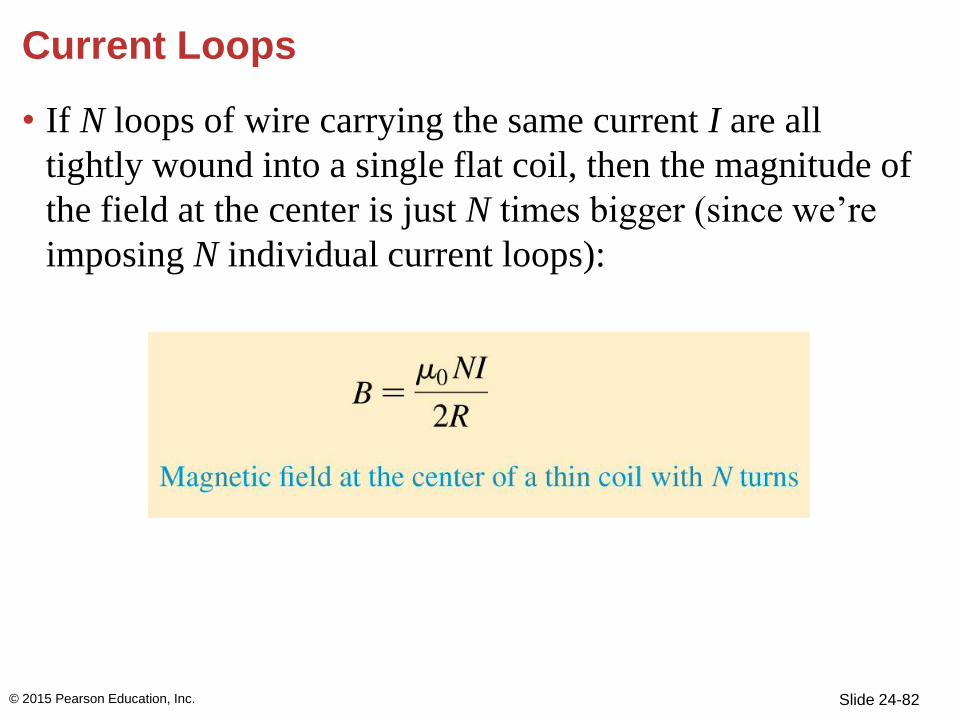
Current Loops
• If N loops of wire carrying the same current I are all
tightly wound into a single flat coil, then the magnitude of
the field at the center is just N times bigger (since we’re
imposing N individual current loops):
© 2015 Pearson Education, Inc.
Slide 24-83
Example 24.4 Cancelling the earth’s field
Green turtles are thought to navigate by using the dip angle
of the earth’s magnetic field. To test this hypothesis, green
turtle hatchlings were placed in a 72-cm-diameter tank with
a 60-turn coil of wire wrapped around the outside. A current
in the coil created a magnetic field at the center of the tank
that exactly canceled the vertical component of the earth’s
50 T field. At the location of the test, the earth’s field was
directed 60° below the horizontal. What was the current in
the coil?
© 2015 Pearson Education, Inc.

Slide 24-84
Example 24.4 Cancelling the earth’s field (cont.)
SOLVE The vertical component of the earth’s field is
The field of the coil, given by Equation 24.3, must have the
same magnitude at the center.
© 2015 Pearson Education, Inc.
Slide 24-85
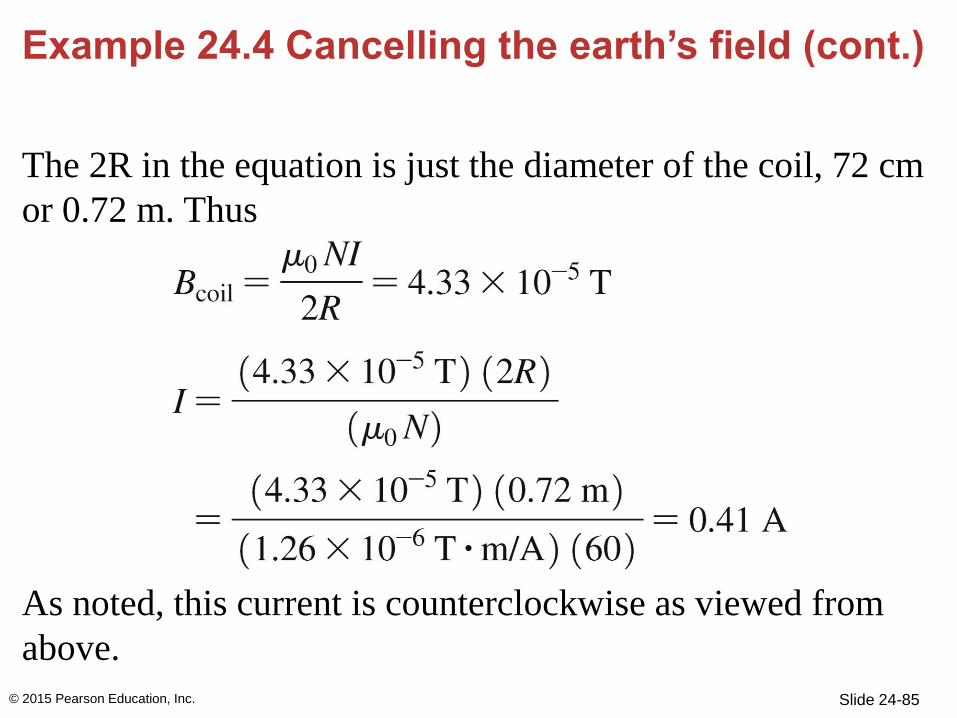
Example 24.4 Cancelling the earth’s field (cont.)
The 2R in the equation is just the diameter of the coil, 72 cm
or 0.72 m. Thus
As noted, this current is counterclockwise as viewed from
above.
© 2015 Pearson Education, Inc.
Slide 24-86
Solenoids
• The field inside a solenoid is fairly uniform.
• The field outside is quite small.
• The greater the solenoid’s length in comparison to its
diameter, the better these statements hold.
• Solenoids can be built quite large; the cylinder that
surrounds a patient undergoing magnetic resonance
imaging (MRI) contains a large solenoid.
© 2015 Pearson Education, Inc.
Slide 24-87
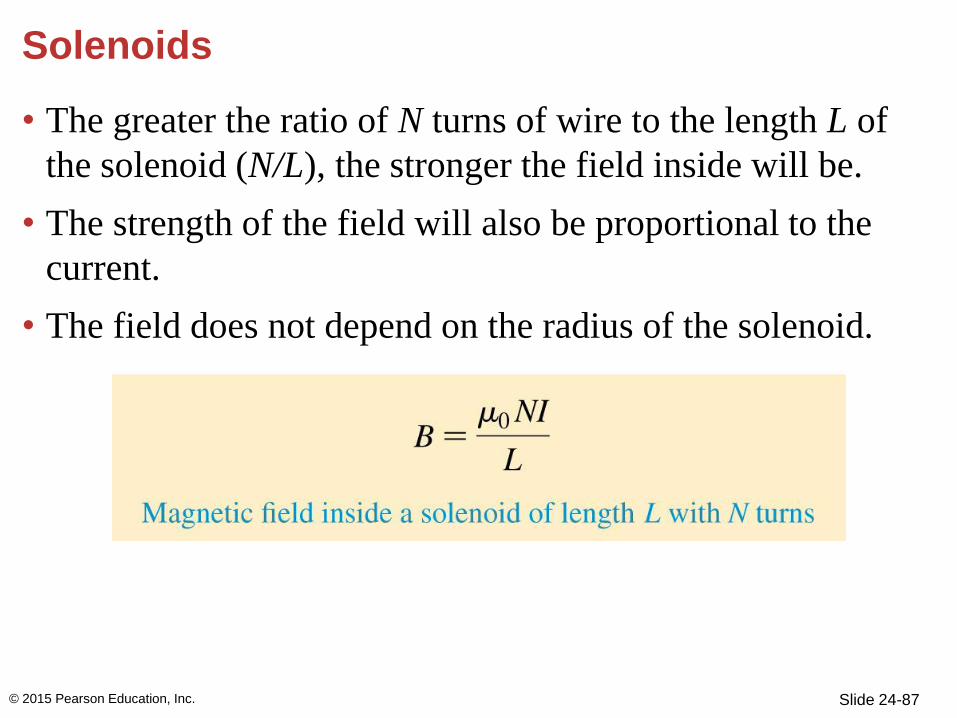
Solenoids
• The greater the ratio of N turns of wire to the length L of
the solenoid (N/L), the stronger the field inside will be.
• The strength of the field will also be proportional to the
current.
• The field does not depend on the radius of the solenoid.
© 2015 Pearson Education, Inc.
Slide 24-88
Solenoids
© 2015 Pearson Education, Inc.
Slide 24-89
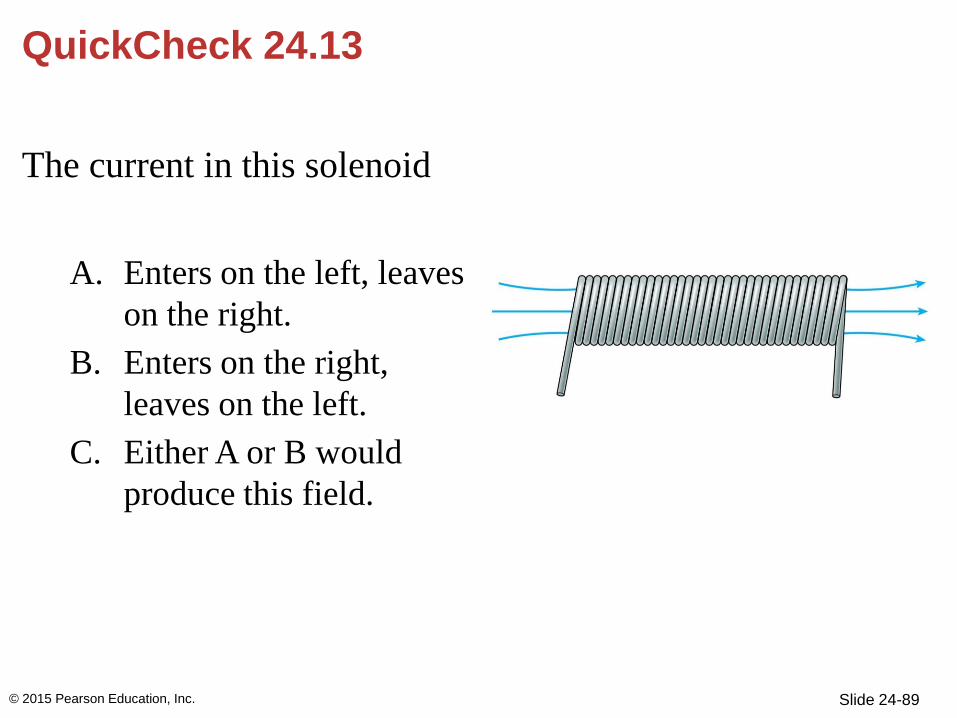
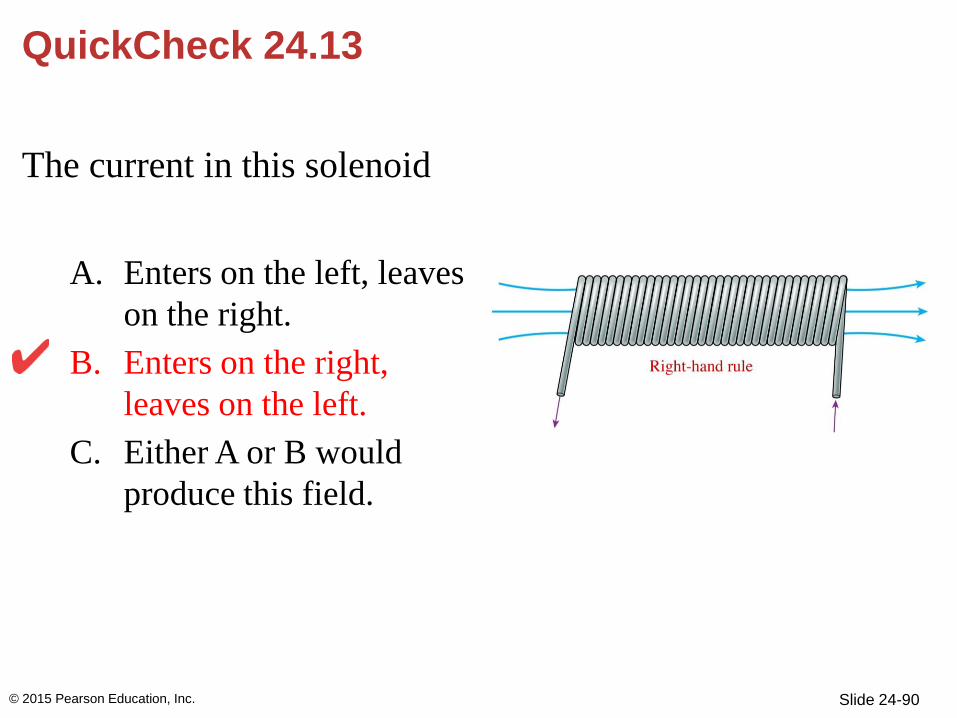
QuickCheck 24.13
The current in this solenoid
A. Enters on the left, leaves
on the right.
B. Enters on the right,
leaves on the left.
C. Either A or B would
produce this field.
© 2015 Pearson Education, Inc.
Slide 24-90
QuickCheck 24.13
The current in this solenoid
A. Enters on the left, leaves
on the right.
B. Enters on the right,
leaves on the left.
C. Either A or B would
produce this field.
© 2015 Pearson Education, Inc.
Slide 24-91
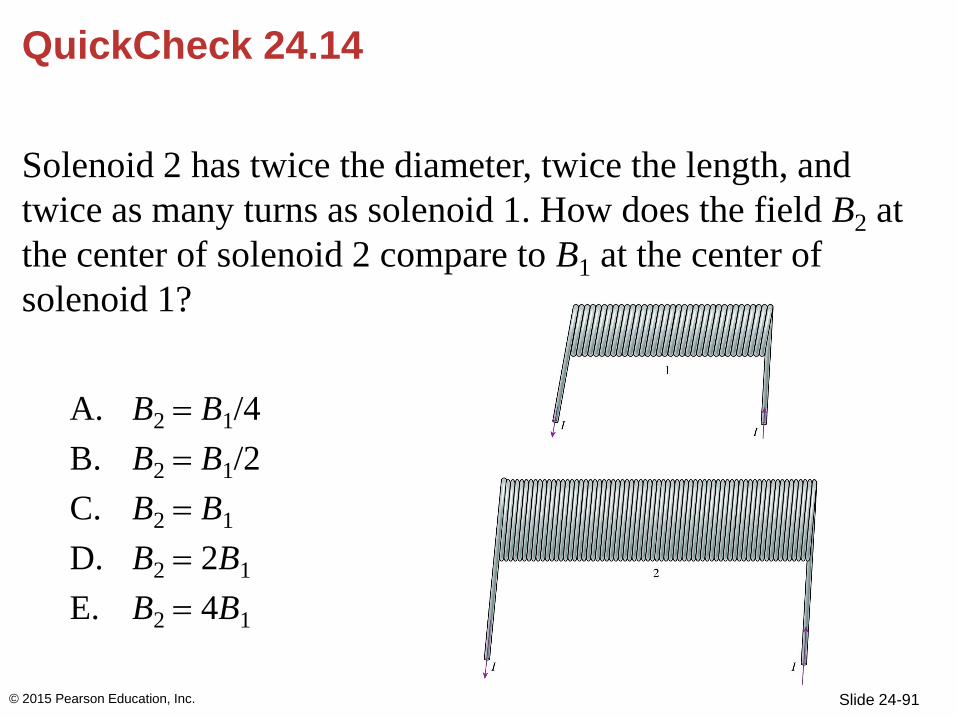
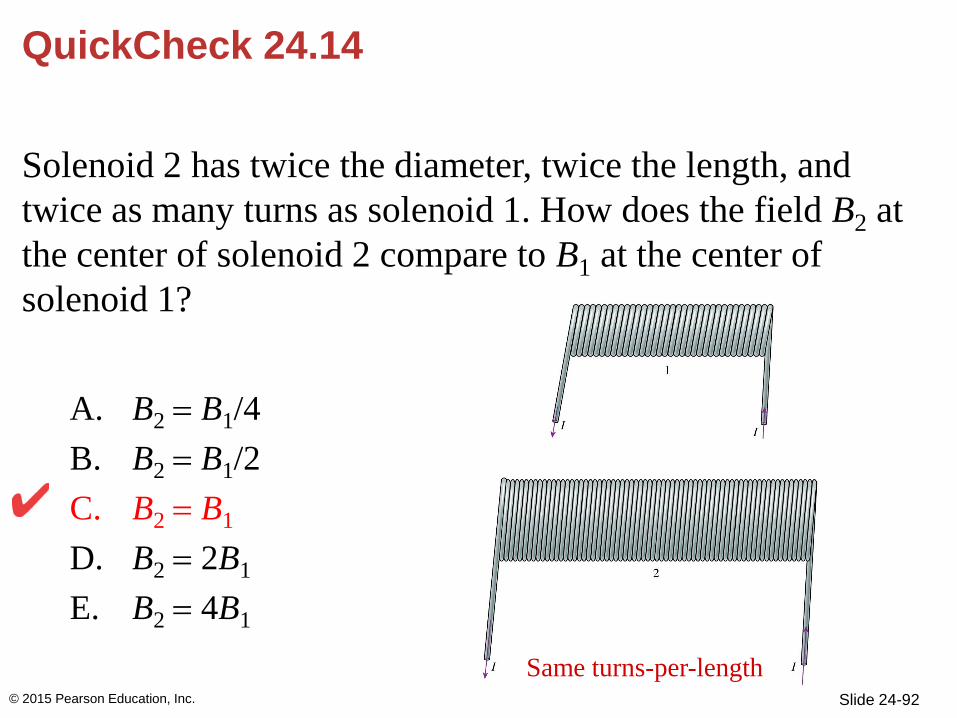
QuickCheck 24.14
Solenoid 2 has twice the diameter, twice the length, and
twice as many turns as solenoid 1. How does the field B2 at
the center of solenoid 2 compare to B1 at the center of
solenoid 1?
A. B2 B1/4
B. B2 B1/2
C. B2 B1
D. B2 2B1
E. B2 4B1
© 2015 Pearson Education, Inc.
Slide 24-92
QuickCheck 24.14
Solenoid 2 has twice the diameter, twice the length, and
twice as many turns as solenoid 1. How does the field B2 at
the center of solenoid 2 compare to B1 at the center of
solenoid 1?
A. B2 B1/4
B. B2 B1/2
C. B2 B1
D. B2 2B1
E. B2 4B1
© 2015 Pearson Education, Inc.
Same turns-per-length
Slide 24-93
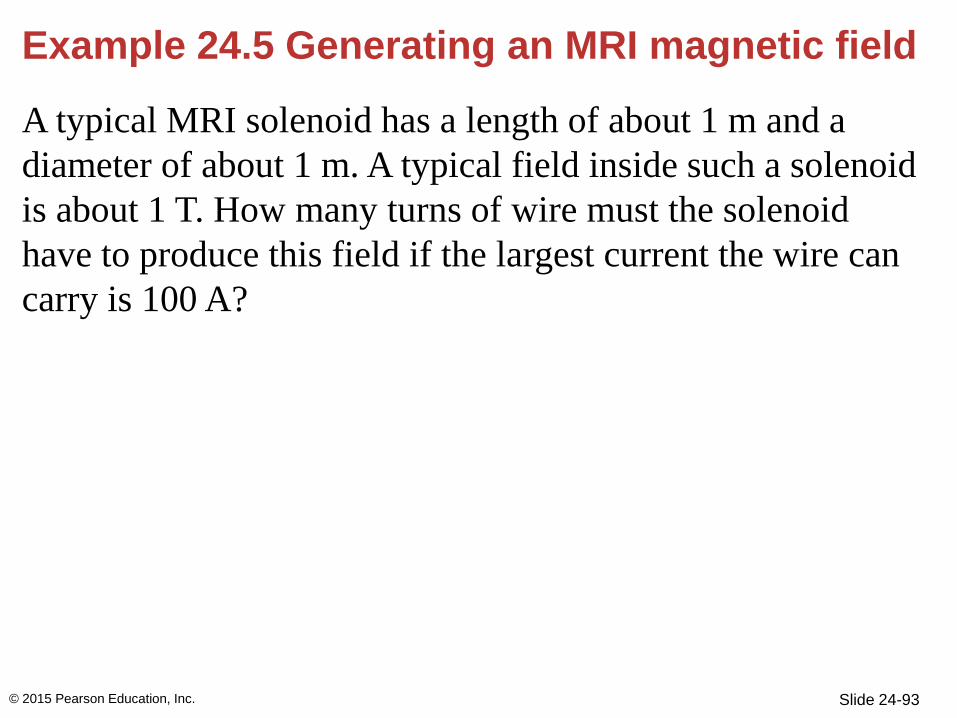
Example 24.5 Generating an MRI magnetic field
A typical MRI solenoid has a length of about 1 m and a
diameter of about 1 m. A typical field inside such a solenoid
is about 1 T. How many turns of wire must the solenoid
have to produce this field if the largest current the wire can
carry is 100 A?
© 2015 Pearson Education, Inc.
Slide 24-94
Example 24.5 Generating an MRI magnetic field (cont.)
PREPARE This solenoid is not very long compared to its
diameter, so using Equation 24.4 will give only an
approximate result. This is acceptable, since we have only
rough estimates of the field B and the length L.
© 2015 Pearson Education, Inc.
Slide 24-95
Example 24.5 Generating an MRI magnetic field (cont.)
Equation 24.4 gives the magnetic field B of a solenoid in
terms of the current I, the number of turns N, and the length
L. Here, however, we want to find the number of turns in
terms of the other variables. We’ll need B = 1 T, I = 100 A,
and L = 1 m.
© 2015 Pearson Education, Inc.
Slide 24-96
Example 24.5 Generating an MRI magnetic field (cont.)
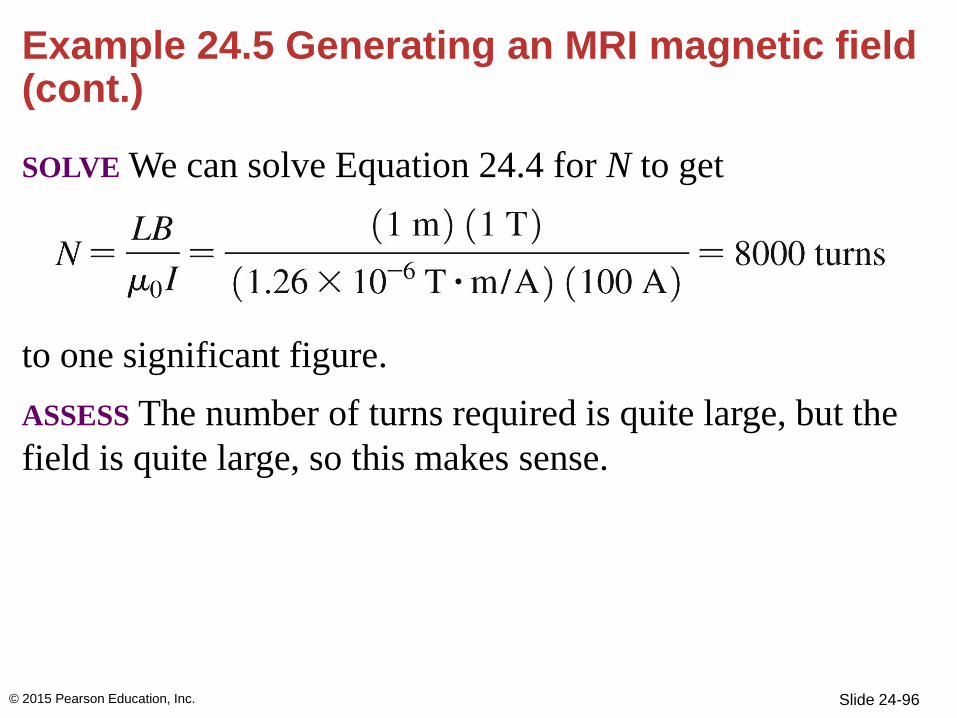
SOLVE We can solve Equation 24.4 for N to get
to one significant figure.
ASSESS The number of turns required is quite large, but the
field is quite large, so this makes sense.
© 2015 Pearson Education, Inc.

Slide 24-97
Fields from currents
© 2015 Pearson Education, Inc. Text: p. 777
Slide 24-98
Fields from currents
© 2015 Pearson Education, Inc. Text: p. 777
Slide 24-99
Fields from currents
© 2015 Pearson Education, Inc. Text: p. 777
Slide 24-100
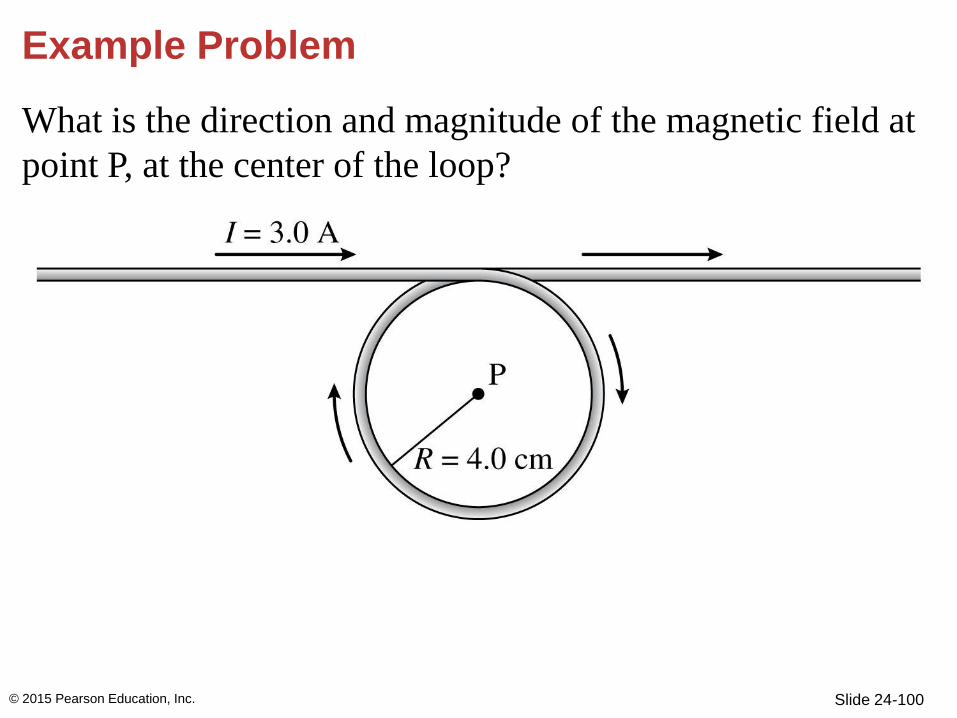
Example Problem
What is the direction and magnitude of the magnetic field at
point P, at the center of the loop?
© 2015 Pearson Education, Inc.
Section 24.5 Magnetic Fields Exert Forces on Moving Charges
© 2015 Pearson Education, Inc.
Slide 24-102
Magnetic Fields Exert Forces on Moving Charges
• Magnetic fields also exert forces on moving charged
particles and on electric currents in wires.
© 2015 Pearson Education, Inc.
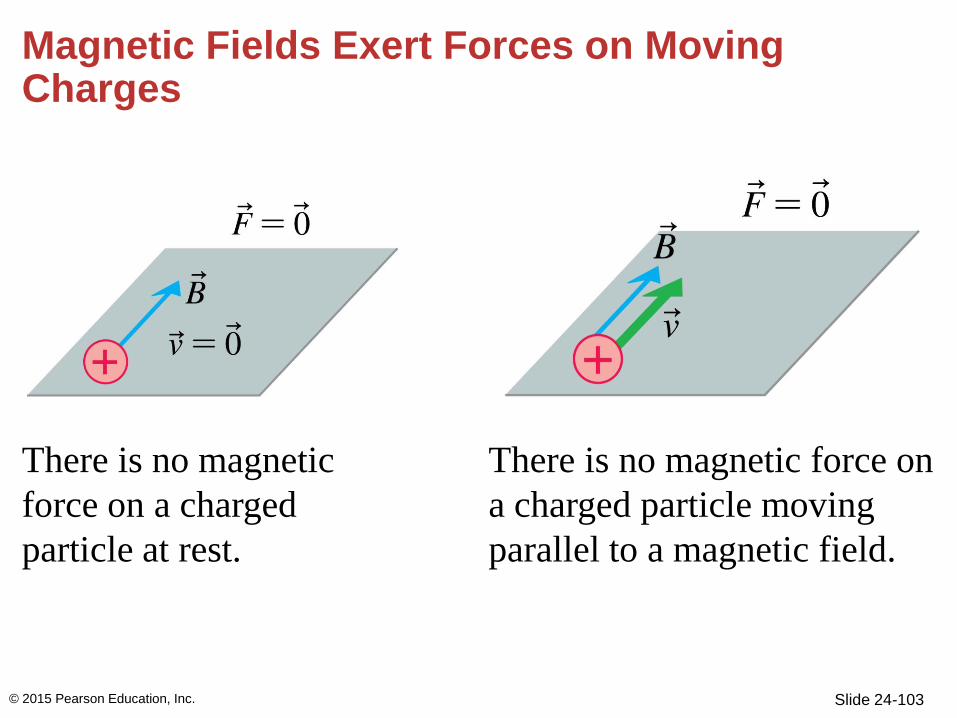
Slide 24-103
Magnetic Fields Exert Forces on Moving Charges
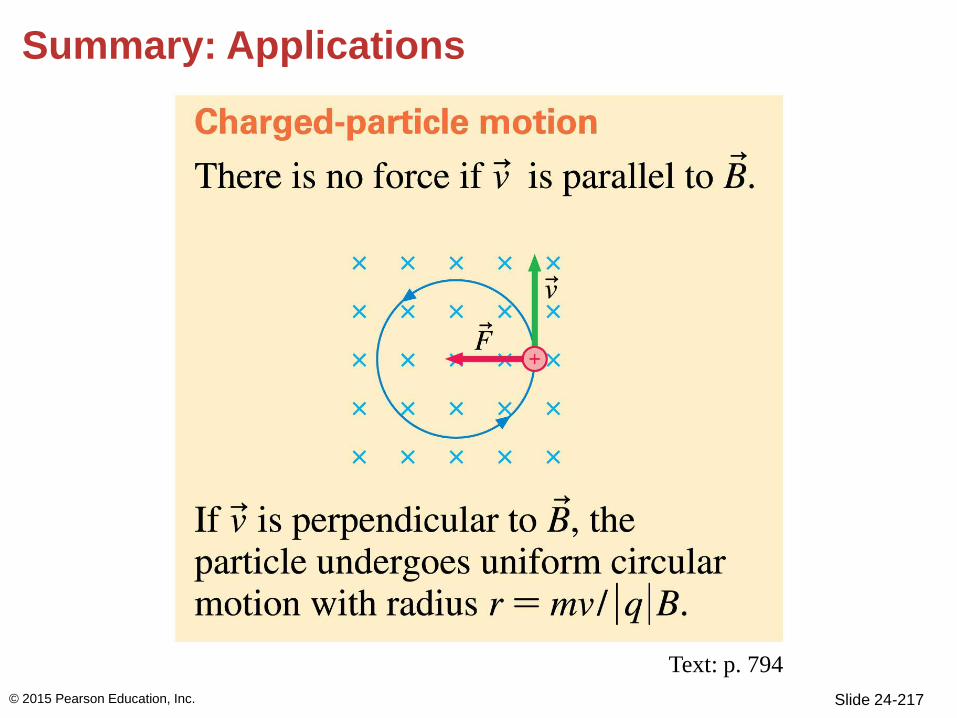
There is no magnetic
force on a charged
particle at rest.
There is no magnetic force on
a charged particle moving
parallel to a magnetic field.
© 2015 Pearson Education, Inc.
Slide 24-104
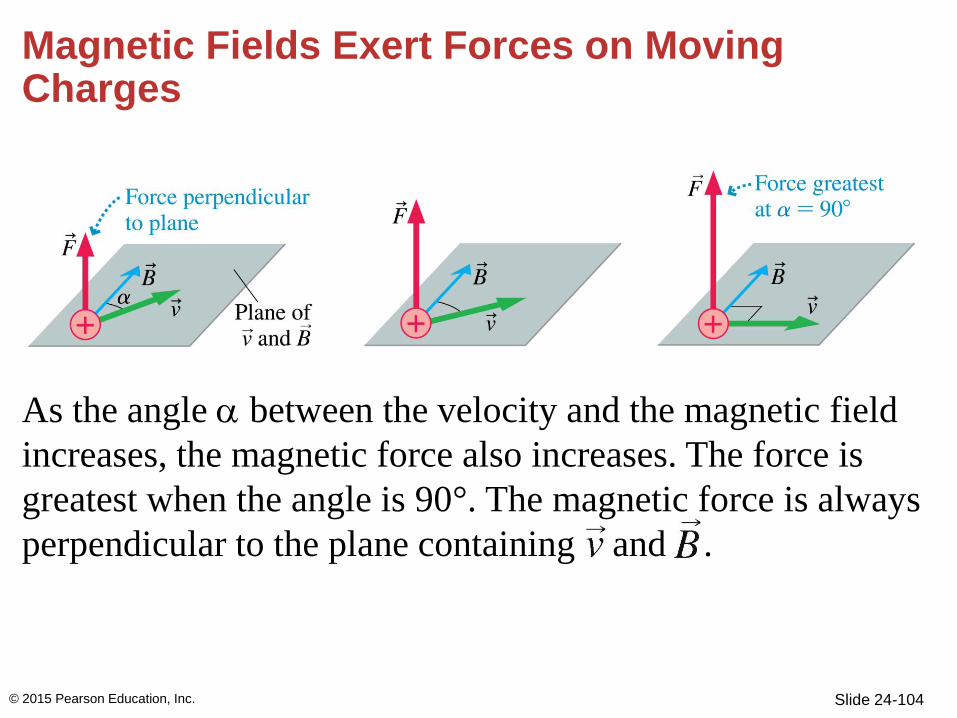
As the angle between the velocity and the magnetic field
increases, the magnetic force also increases. The force is
greatest when the angle is 90°. The magnetic force is always
perpendicular to the plane containing and .
Magnetic Fields Exert Forces on Moving Charges
© 2015 Pearson Education, Inc.
Slide 24-105
Magnetic Fields Exert Forces on Moving Charges
• The magnetic force is different from the electric force.
• There is no magnetic force if the charged particle is at rest
or if it is moving parallel to the magnetic field.
• The force is always perpendicular to the plane containing
and .
© 2015 Pearson Education, Inc.

Slide 24-106
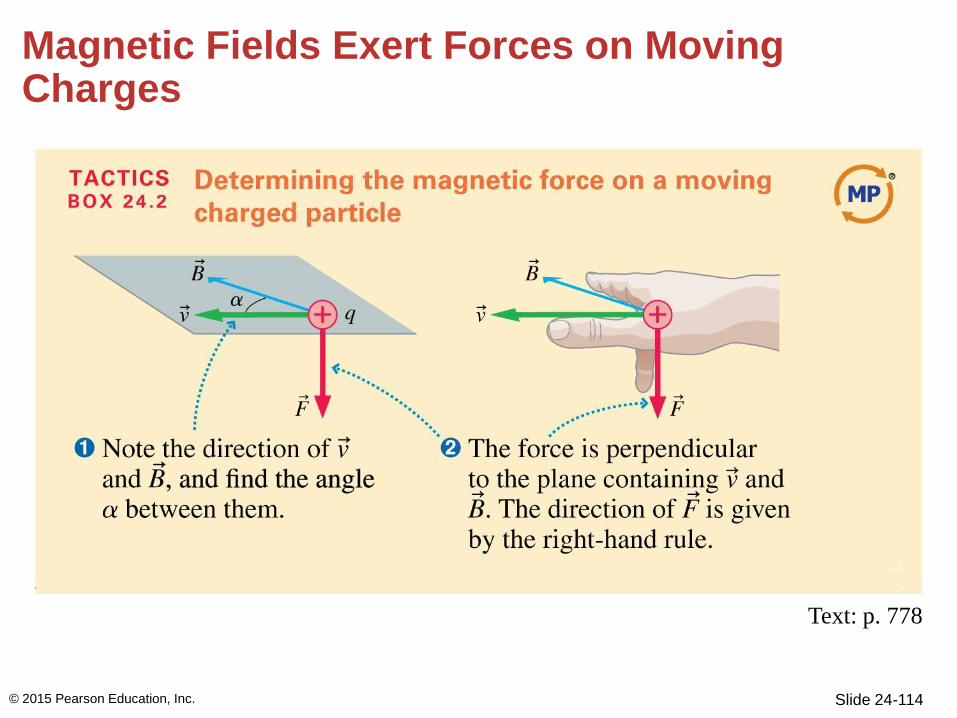
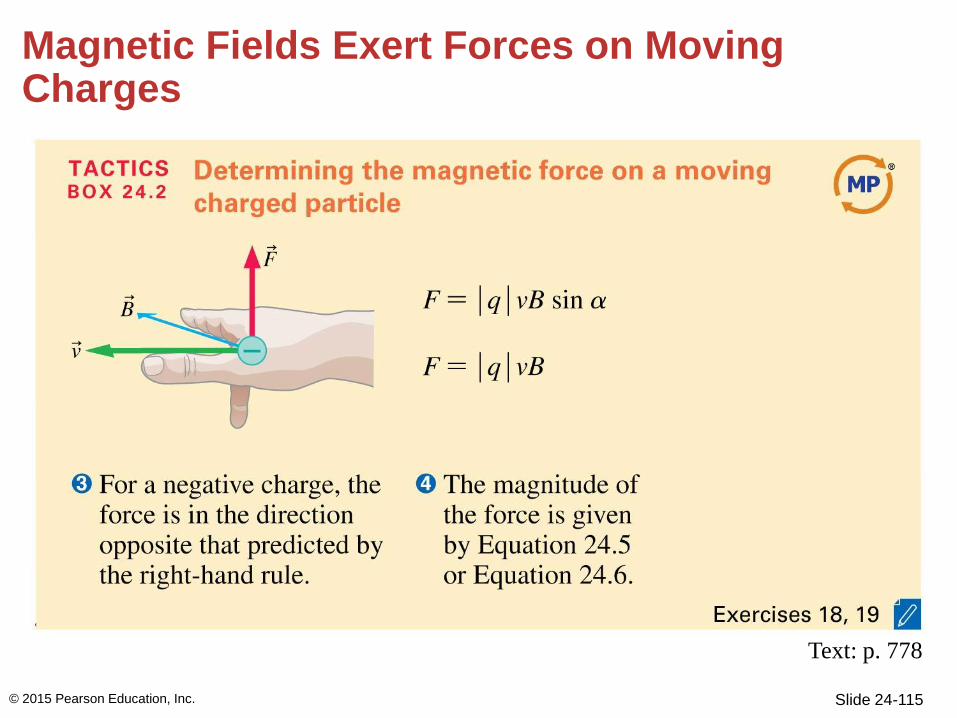
Magnetic Fields Exert Forces on Moving Charges
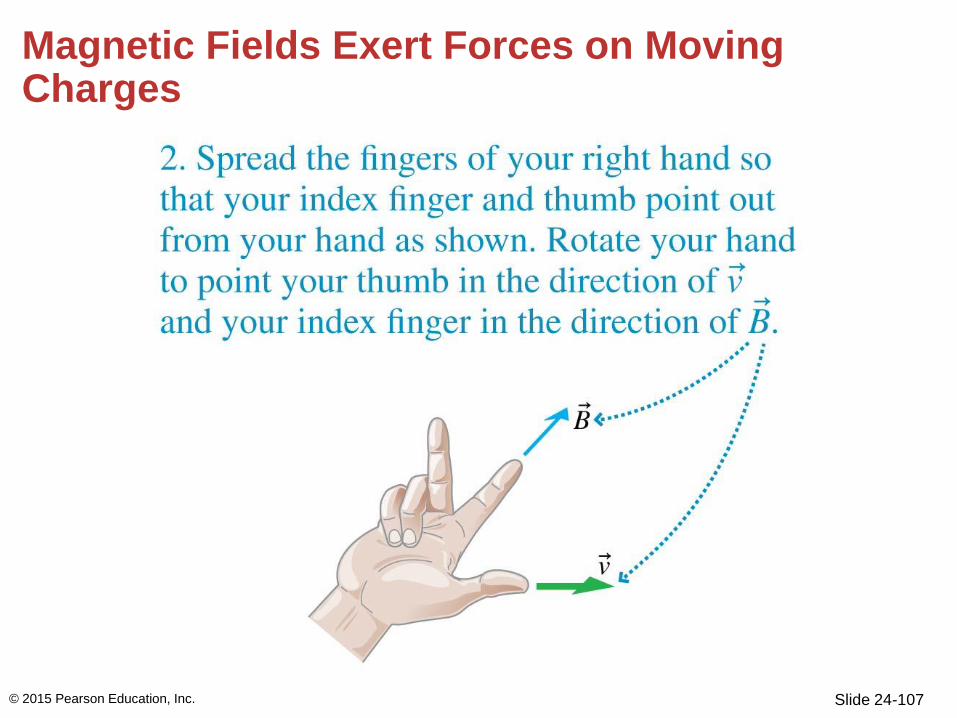
• We determine the correct direction of the force using the
right-hand rule for forces.
© 2015 Pearson Education, Inc.
Slide 24-107
Magnetic Fields Exert Forces on Moving Charges
© 2015 Pearson Education, Inc.
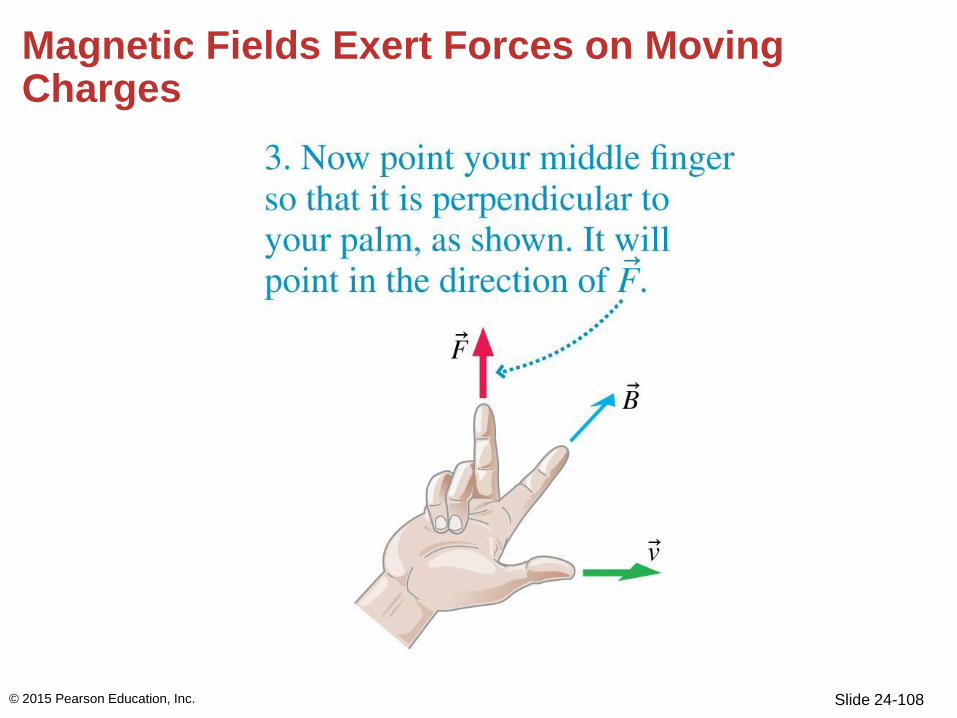
Slide 24-108
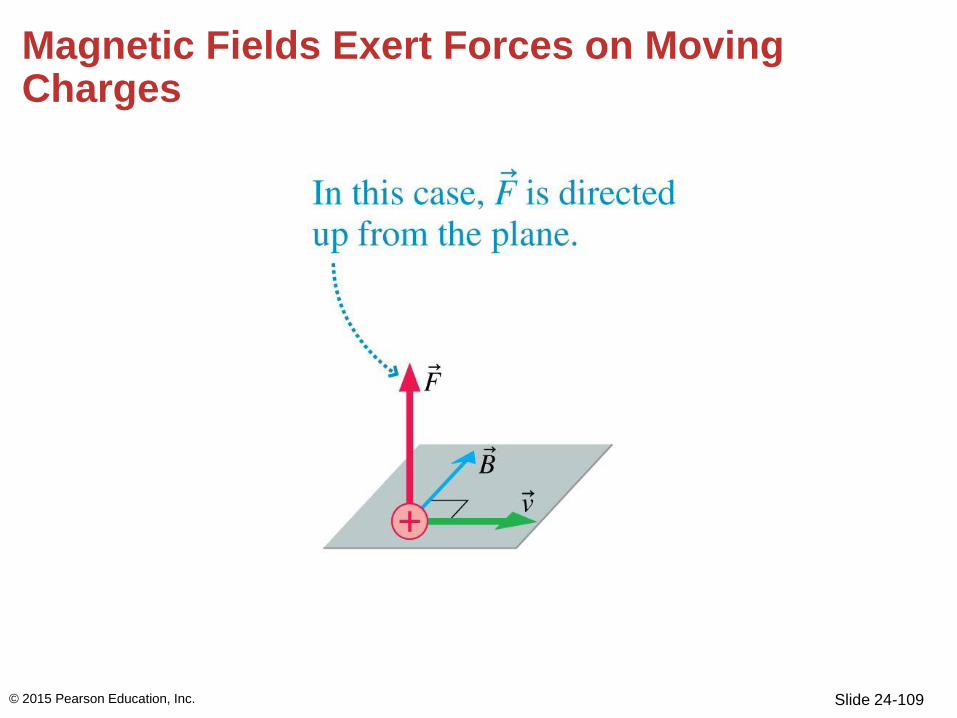
Magnetic Fields Exert Forces on Moving Charges
© 2015 Pearson Education, Inc.
Slide 24-109
Magnetic Fields Exert Forces on Moving Charges
© 2015 Pearson Education, Inc.
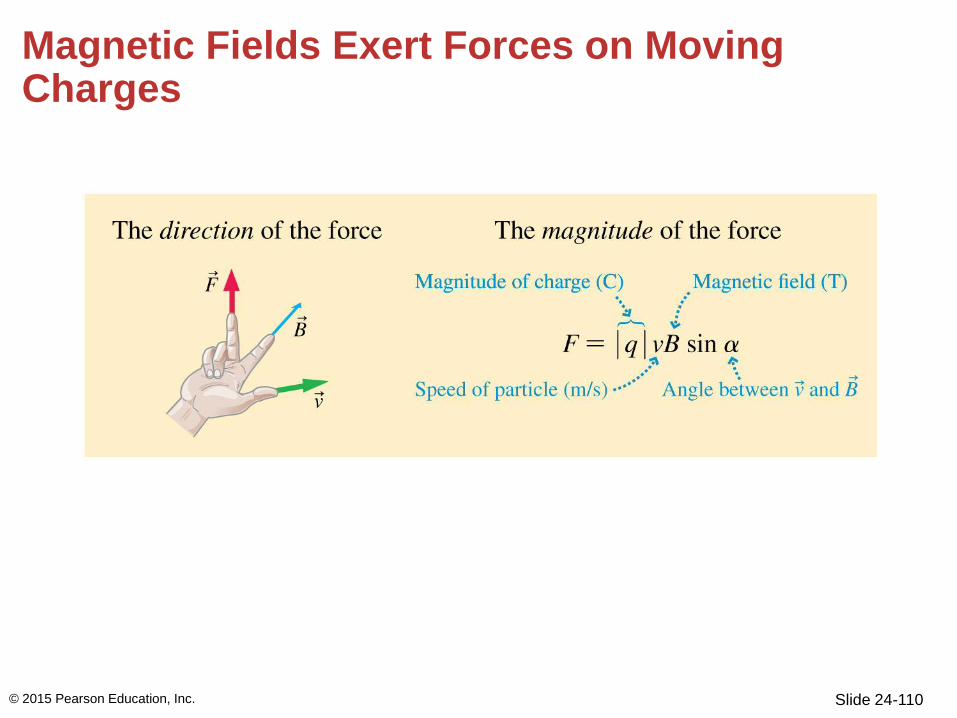
Slide 24-110
Magnetic Fields Exert Forces on Moving Charges
© 2015 Pearson Education, Inc.
Slide 24-111
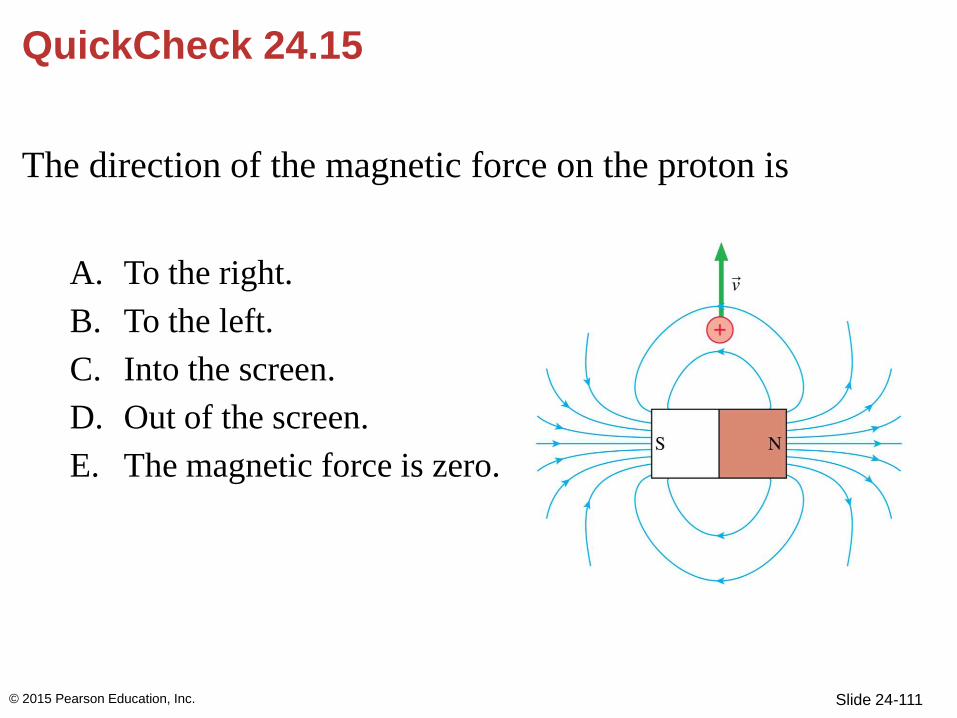
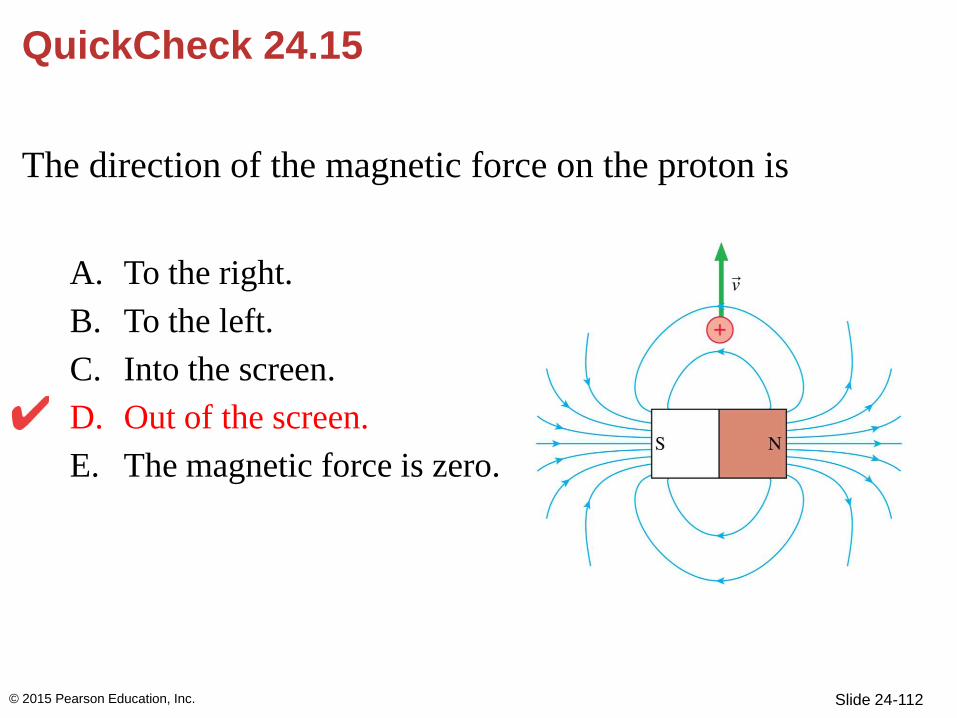
QuickCheck 24.15
The direction of the magnetic force on the proton is
A. To the right.
B. To the left.
C. Into the screen.
D. Out of the screen.
E. The magnetic force is zero.
© 2015 Pearson Education, Inc.
Slide 24-112
QuickCheck 24.15
The direction of the magnetic force on the proton is
A. To the right.
B. To the left.
C. Into the screen.
D. Out of the screen.
E. The magnetic force is zero.
© 2015 Pearson Education, Inc.
Slide 24-113
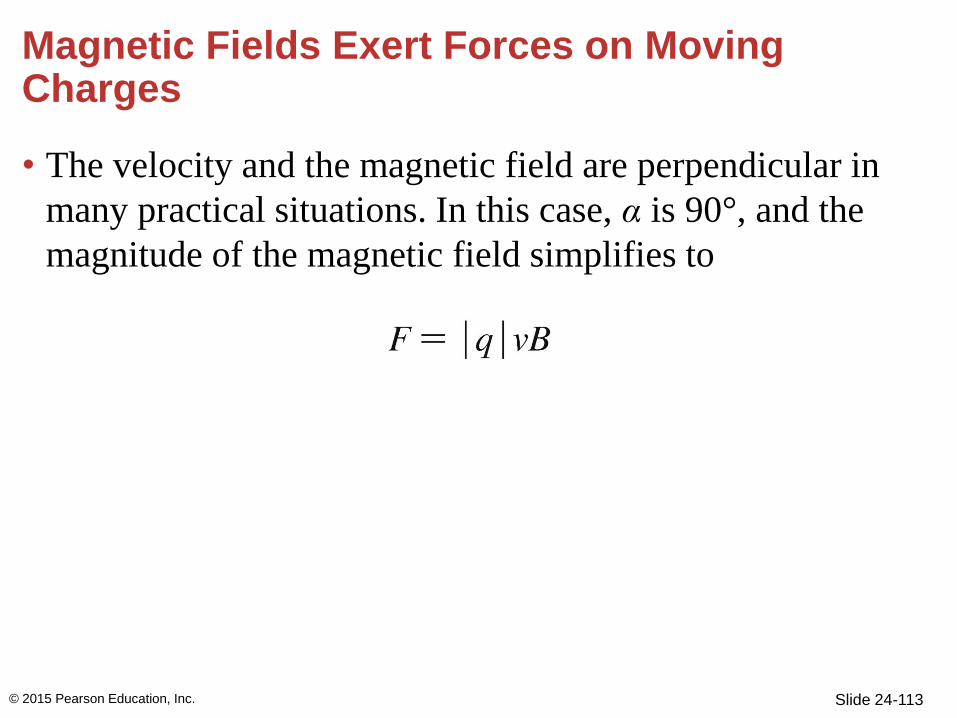
Magnetic Fields Exert Forces on Moving Charges
• The velocity and the magnetic field are perpendicular in
many practical situations. In this case, α is 90°, and the
magnitude of the magnetic field simplifies to
© 2015 Pearson Education, Inc.
Slide 24-114
Magnetic Fields Exert Forces on Moving Charges
© 2015 Pearson Education, Inc.
Text: p. 778
Slide 24-115
Magnetic Fields Exert Forces on Moving Charges
© 2015 Pearson Education, Inc.
Text: p. 778
Slide 24-116
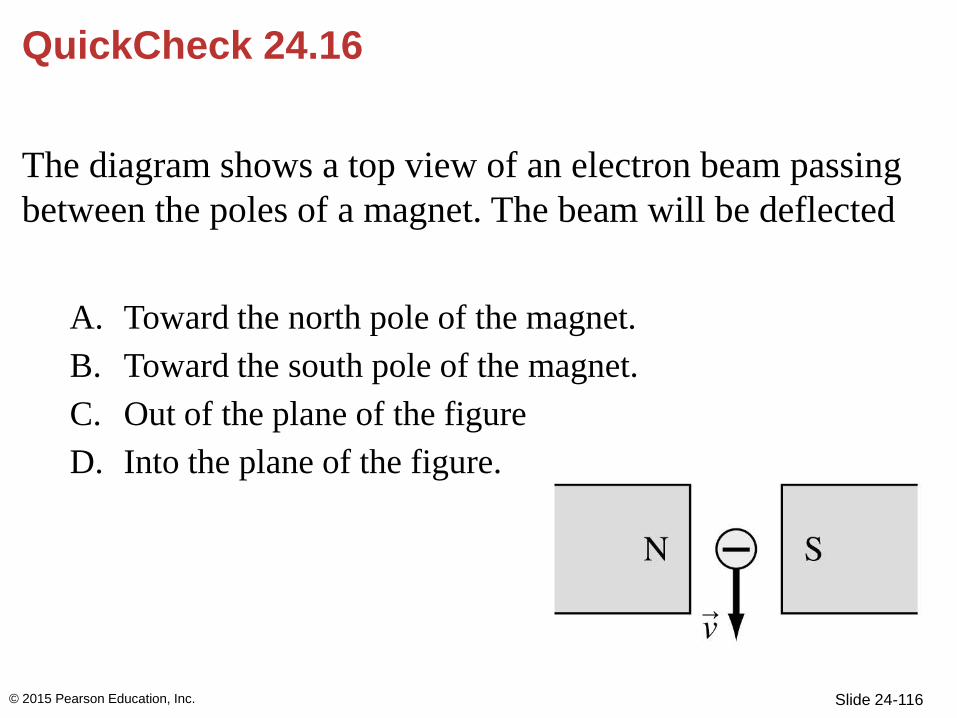
QuickCheck 24.16
The diagram shows a top view of an electron beam passing
between the poles of a magnet. The beam will be deflected
A. Toward the north pole of the magnet.
B. Toward the south pole of the magnet.
C. Out of the plane of the figure
D. Into the plane of the figure.
© 2015 Pearson Education, Inc.
Slide 24-117
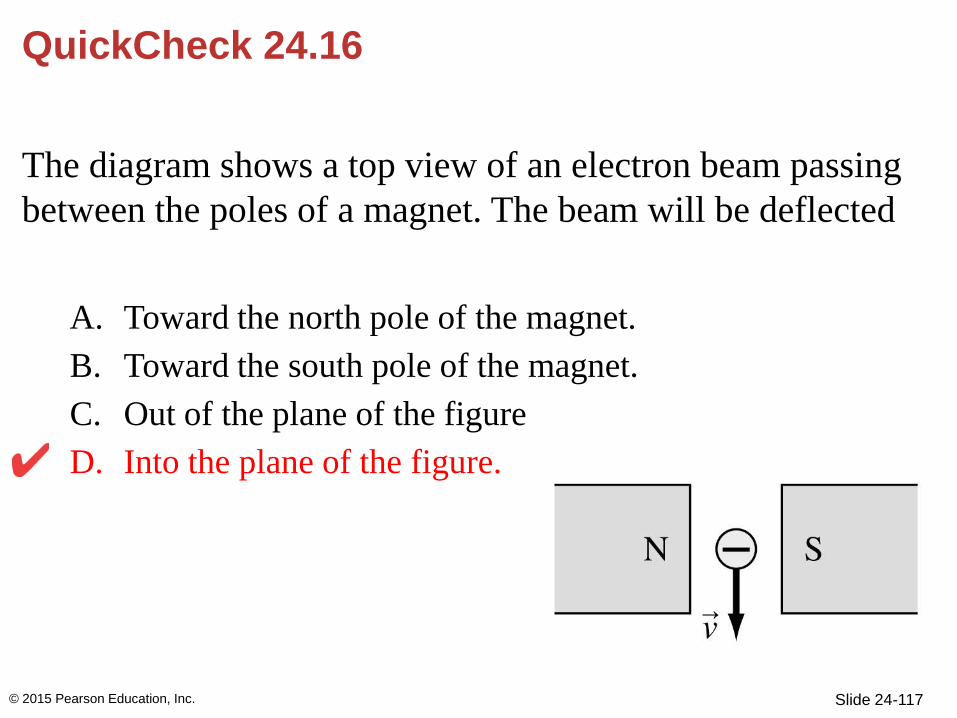
QuickCheck 24.16
The diagram shows a top view of an electron beam passing
between the poles of a magnet. The beam will be deflected
A. Toward the north pole of the magnet.
B. Toward the south pole of the magnet.
C. Out of the plane of the figure
D. Into the plane of the figure.
© 2015 Pearson Education, Inc.
Slide 24-118
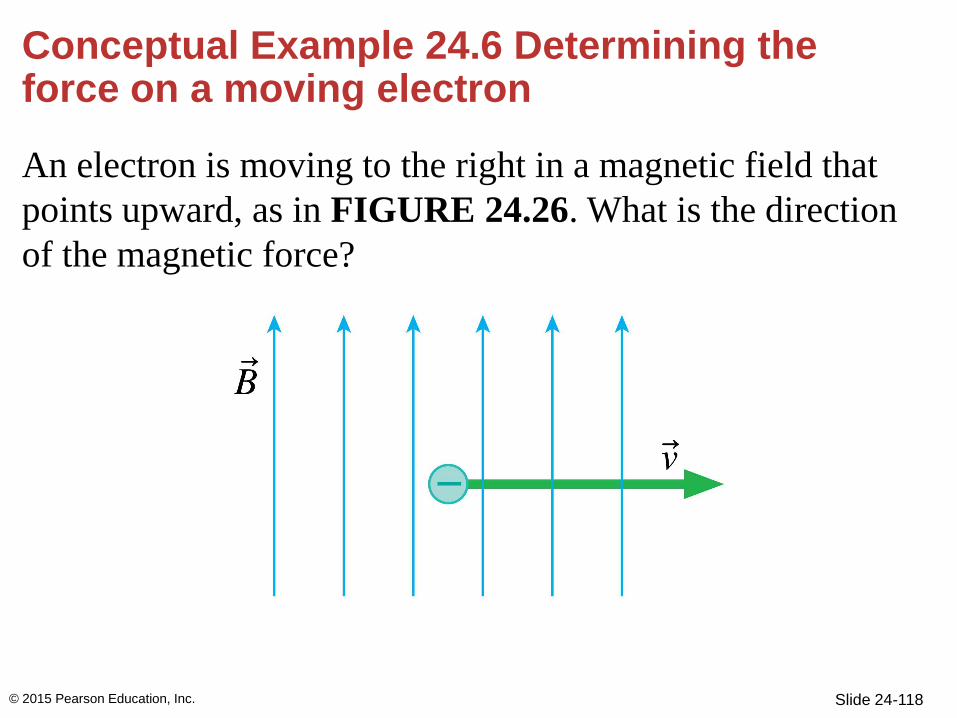
Conceptual Example 24.6 Determining the force on a moving electron
An electron is moving to the right in a magnetic field that
points upward, as in FIGURE 24.26. What is the direction
of the magnetic force?
© 2015 Pearson Education, Inc.
Slide 24-119
Conceptual Example 24.6 Determining the force on a moving electron (cont.)
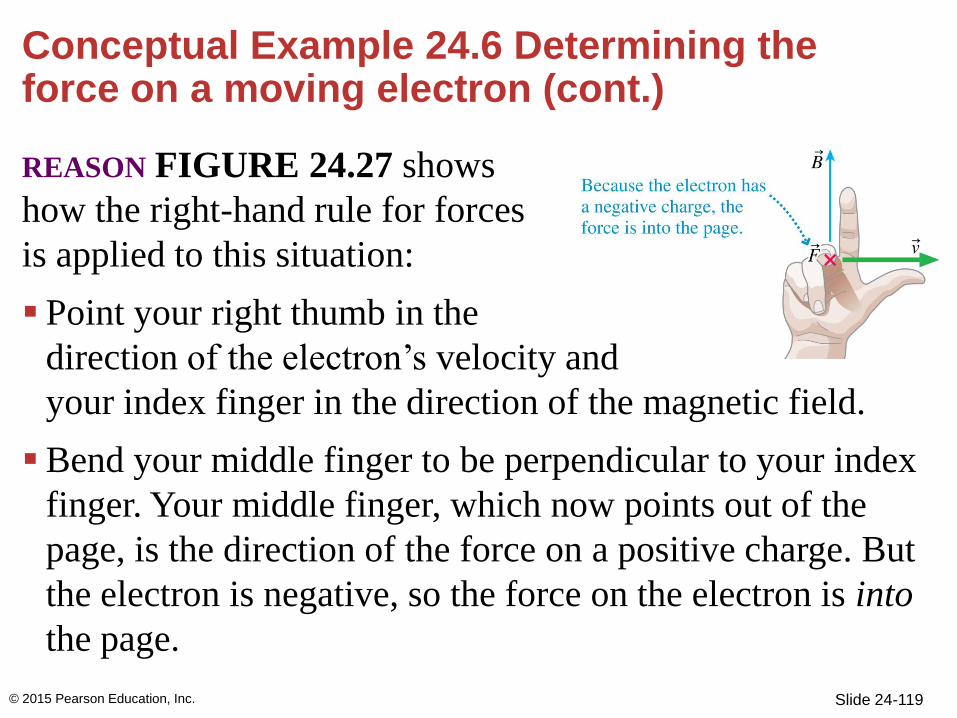
REASON FIGURE 24.27 shows
how the right-hand rule for forces
is applied to this situation:
Point your right thumb in the
direction of the electron’s velocity and
your index finger in the direction of the magnetic field.
Bend your middle finger to be perpendicular to your index
finger. Your middle finger, which now points out of the
page, is the direction of the force on a positive charge. But
the electron is negative, so the force on the electron is into
the page.
© 2015 Pearson Education, Inc.
Slide 24-120
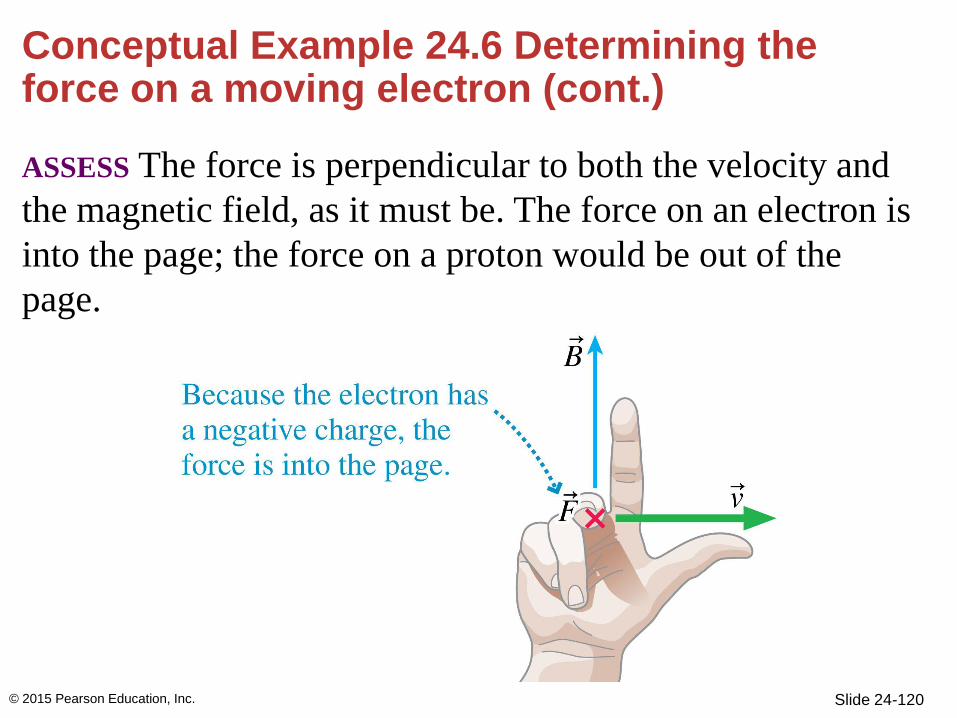
Conceptual Example 24.6 Determining the force on a moving electron (cont.)
ASSESS The force is perpendicular to both the velocity and
the magnetic field, as it must be. The force on an electron is
into the page; the force on a proton would be out of the
page.
© 2015 Pearson Education, Inc.
Slide 24-121
Paths of Charged Particles in Magnetic Fields
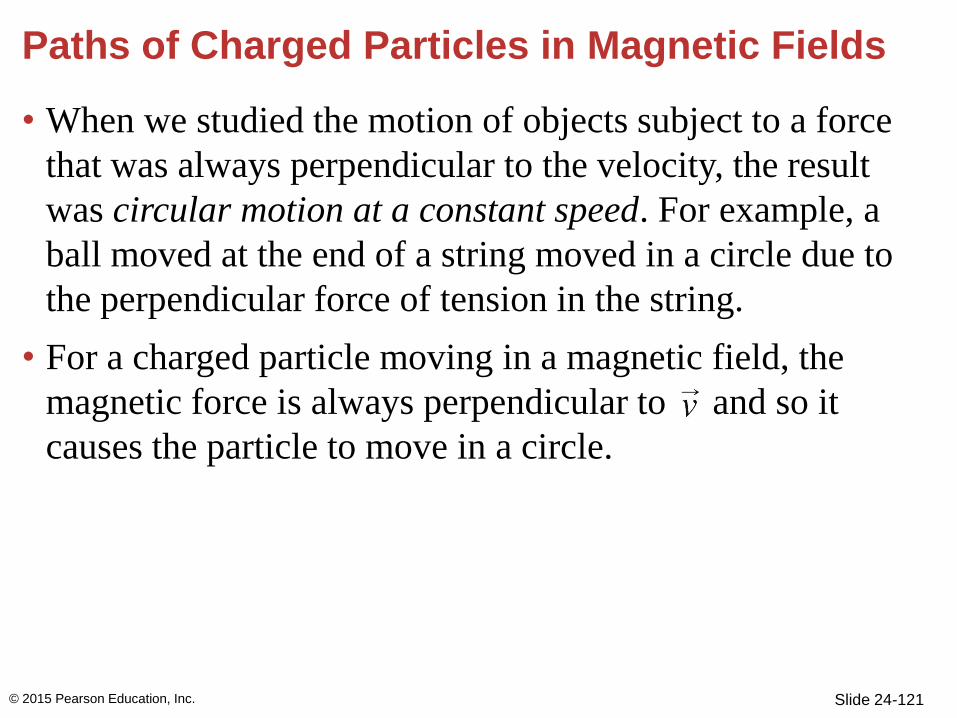
• When we studied the motion of objects subject to a force
that was always perpendicular to the velocity, the result
was circular motion at a constant speed. For example, a
ball moved at the end of a string moved in a circle due to
the perpendicular force of tension in the string.
• For a charged particle moving in a magnetic field, the
magnetic force is always perpendicular to and so it
causes the particle to move in a circle.
© 2015 Pearson Education, Inc.
Slide 24-122
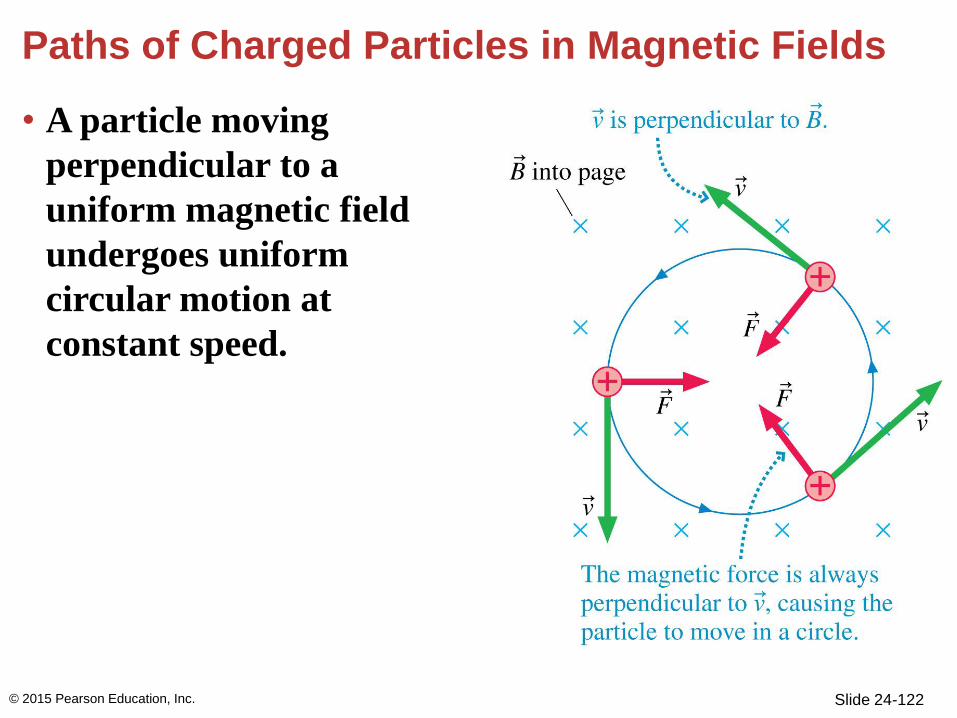
Paths of Charged Particles in Magnetic Fields
• A particle moving
perpendicular to a
uniform magnetic field
undergoes uniform
circular motion at
constant speed.
© 2015 Pearson Education, Inc.
Slide 24-123
Paths of Charged Particles in Magnetic Fields
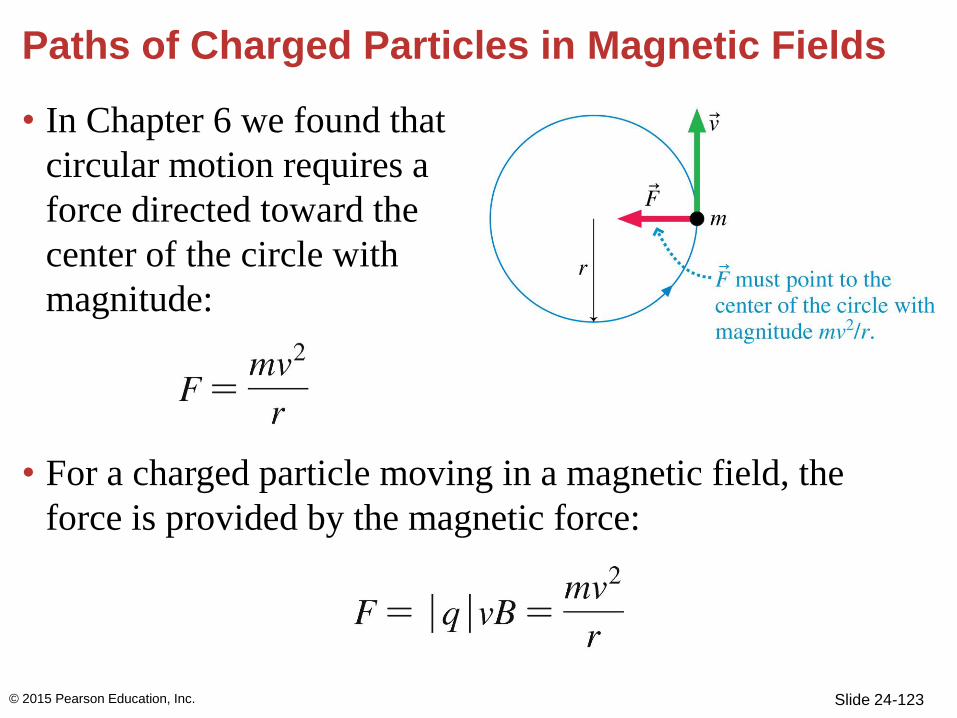
• In Chapter 6 we found that
circular motion requires a
force directed toward the
center of the circle with
magnitude:
• For a charged particle moving in a magnetic field, the
force is provided by the magnetic force:
© 2015 Pearson Education, Inc.
[Insert Figure 24.31]
Slide 24-124
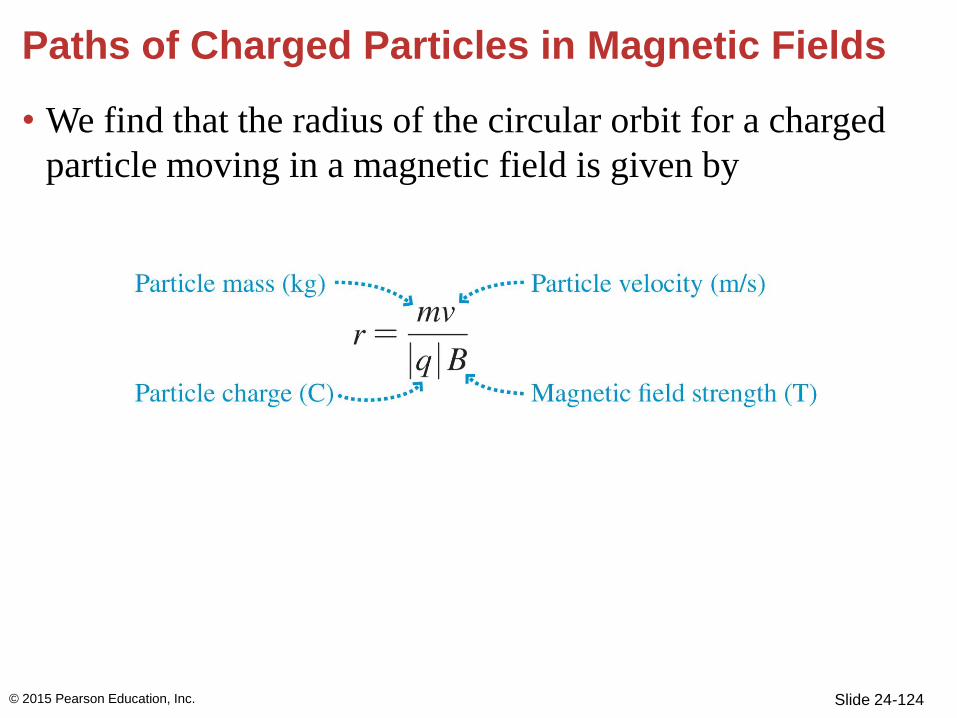
Paths of Charged Particles in Magnetic Fields
• We find that the radius of the circular orbit for a charged
particle moving in a magnetic field is given by
© 2015 Pearson Education, Inc.
Slide 24-125
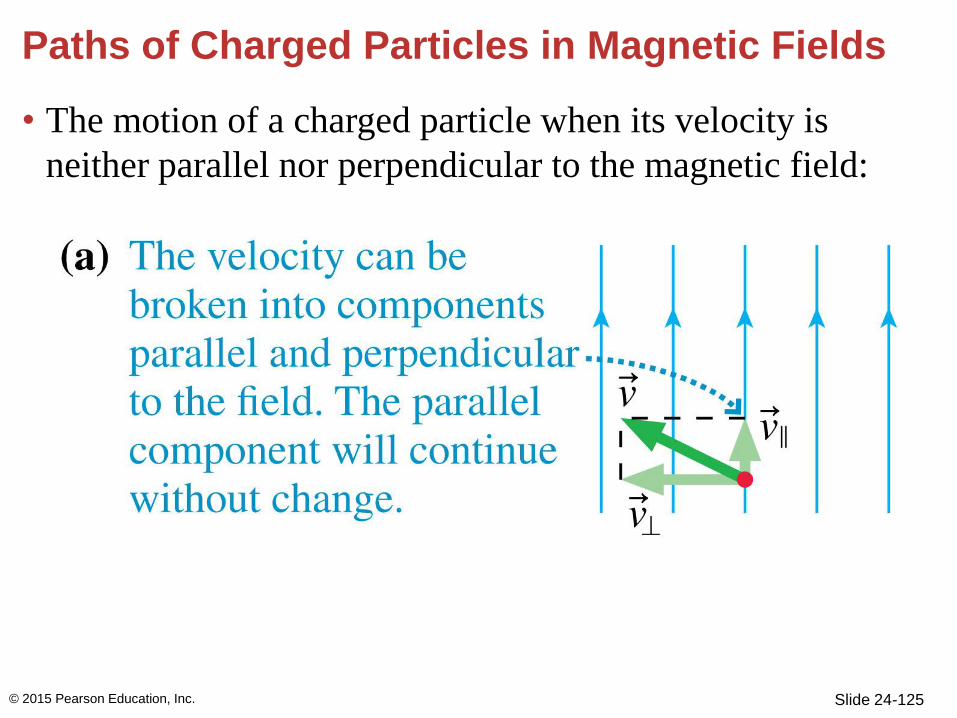
Paths of Charged Particles in Magnetic Fields
• The motion of a charged particle when its velocity is
neither parallel nor perpendicular to the magnetic field:
© 2015 Pearson Education, Inc.
Slide 24-126
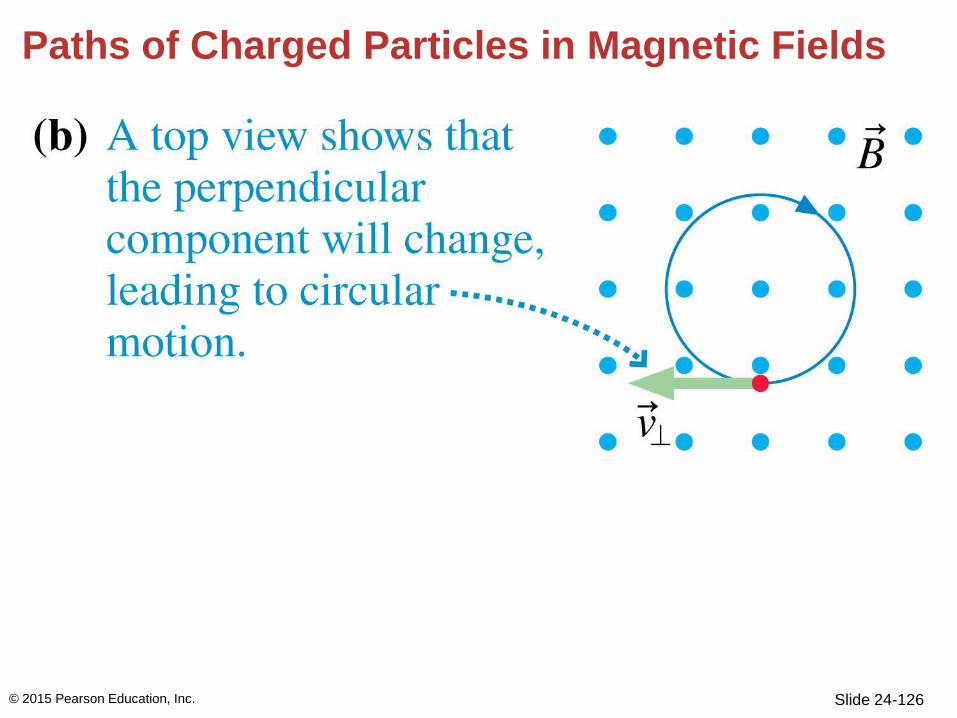
Paths of Charged Particles in Magnetic Fields
© 2015 Pearson Education, Inc.
Slide 24-127
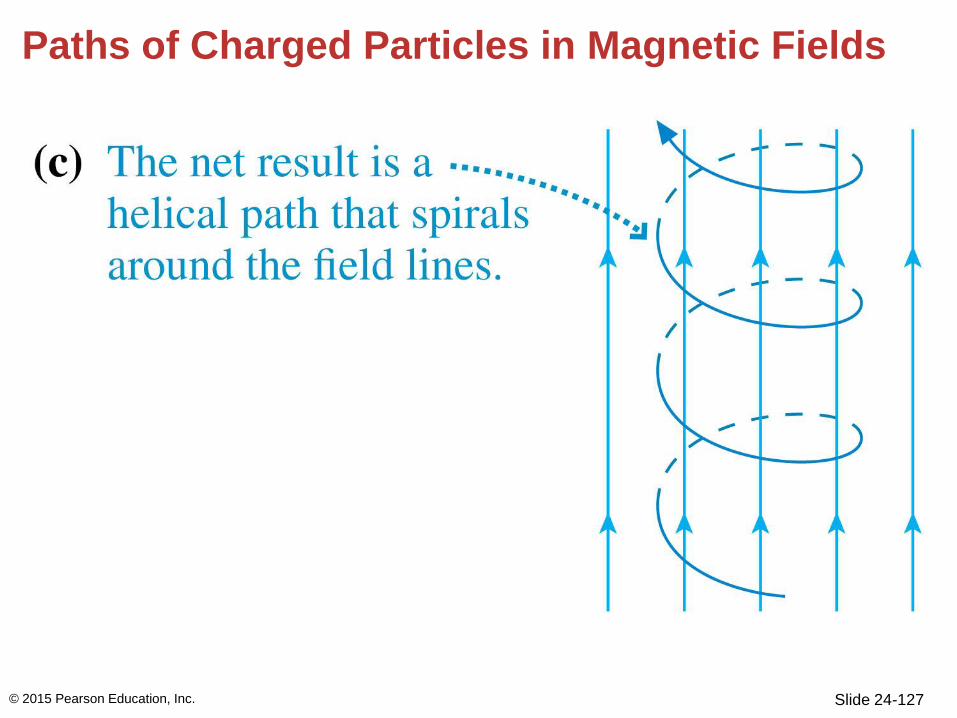
Paths of Charged Particles in Magnetic Fields
© 2015 Pearson Education, Inc.
Slide 24-128
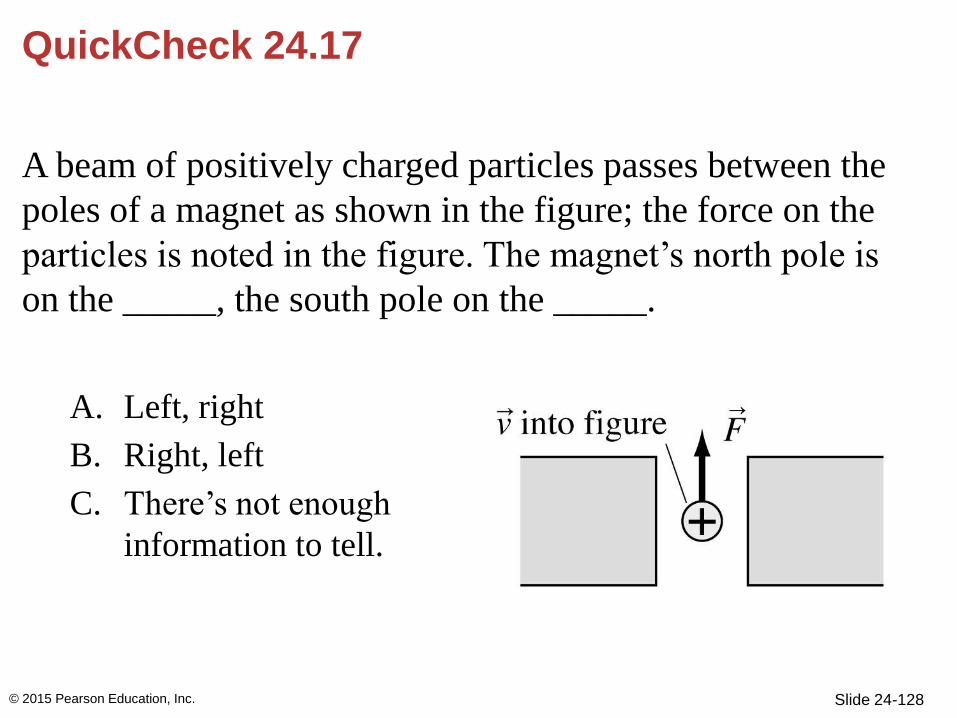
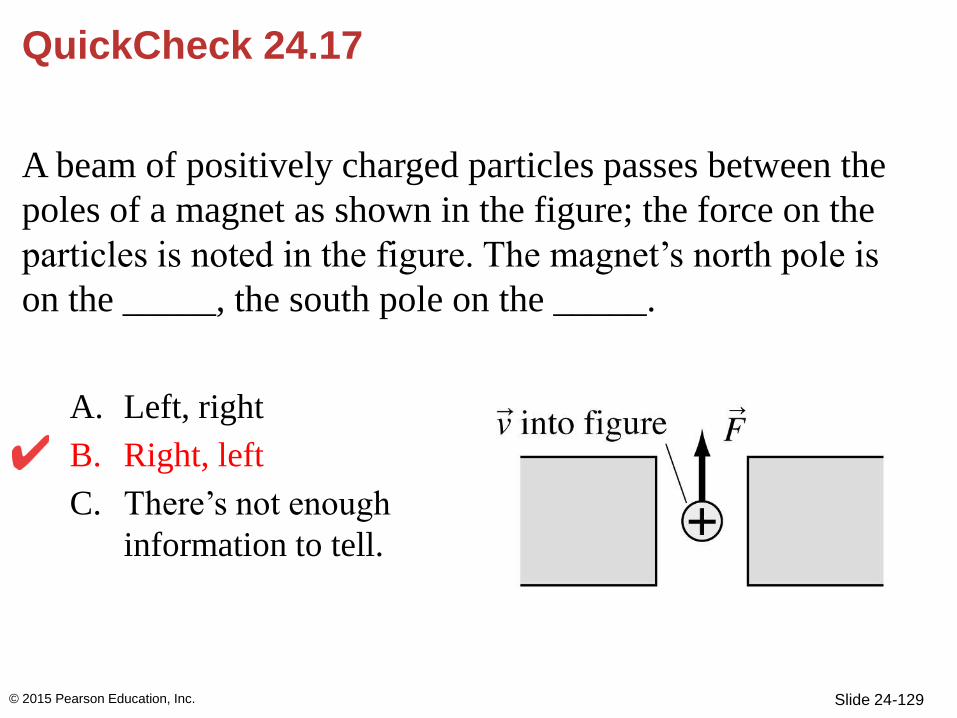
QuickCheck 24.17
A beam of positively charged particles passes between the
poles of a magnet as shown in the figure; the force on the
particles is noted in the figure. The magnet’s north pole is
on the _____, the south pole on the _____.
A. Left, right
B. Right, left
C. There’s not enough
information to tell.
© 2015 Pearson Education, Inc.
Slide 24-129
QuickCheck 24.17
A beam of positively charged particles passes between the
poles of a magnet as shown in the figure; the force on the
particles is noted in the figure. The magnet’s north pole is
on the _____, the south pole on the _____.
A. Left, right
B. Right, left
C. There’s not enough
information to tell.
© 2015 Pearson Education, Inc.
Slide 24-130
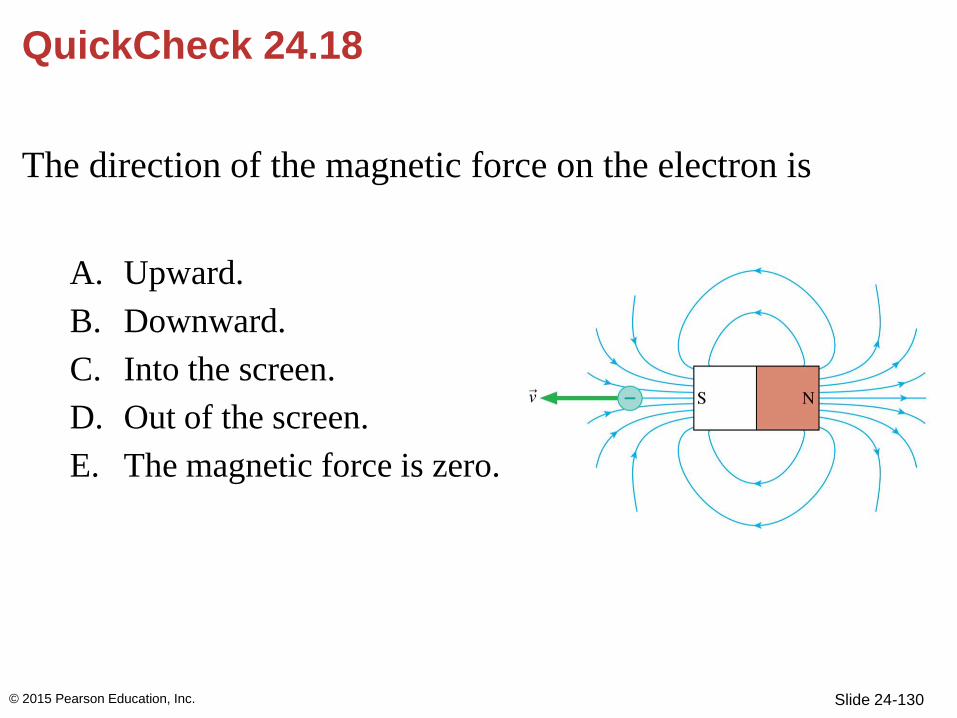
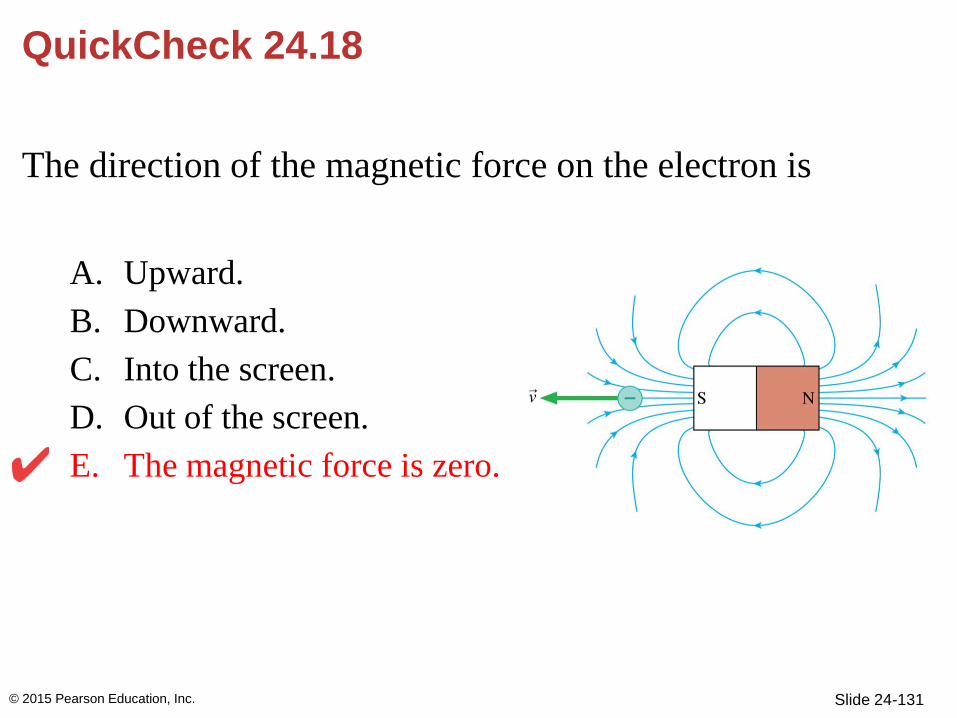
QuickCheck 24.18
The direction of the magnetic force on the electron is
A. Upward.
B. Downward.
C. Into the screen.
D. Out of the screen.
E. The magnetic force is zero.
© 2015 Pearson Education, Inc.
Slide 24-131
QuickCheck 24.18
The direction of the magnetic force on the electron is
A. Upward.
B. Downward.
C. Into the screen.
D. Out of the screen.
E. The magnetic force is zero.
© 2015 Pearson Education, Inc.
Slide 24-132
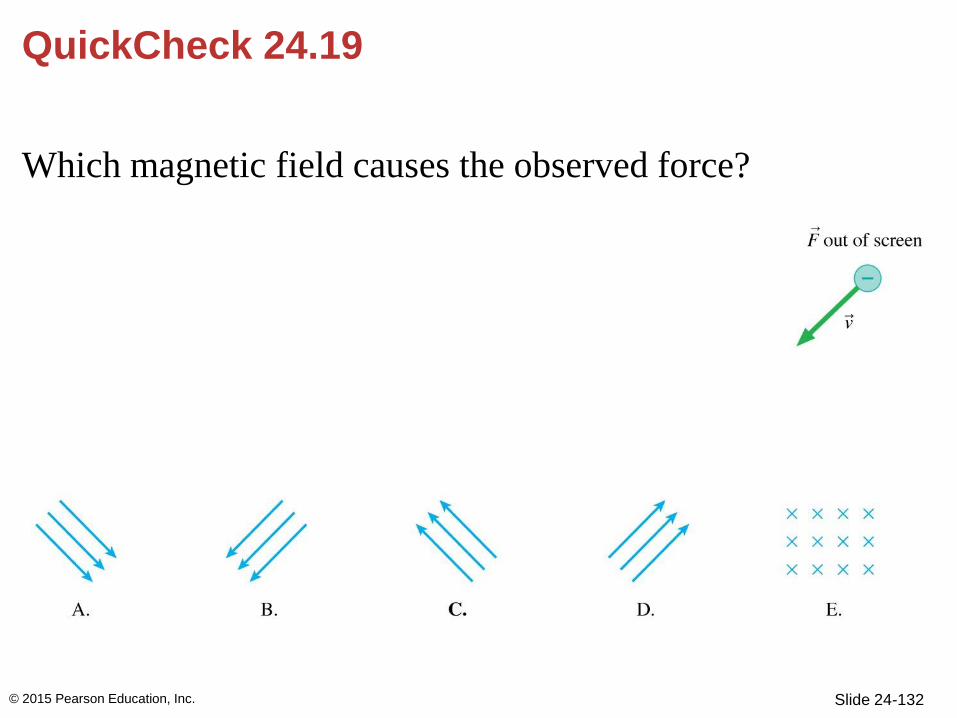
QuickCheck 24.19
Which magnetic field causes the observed force?
© 2015 Pearson Education, Inc.
Slide 24-133
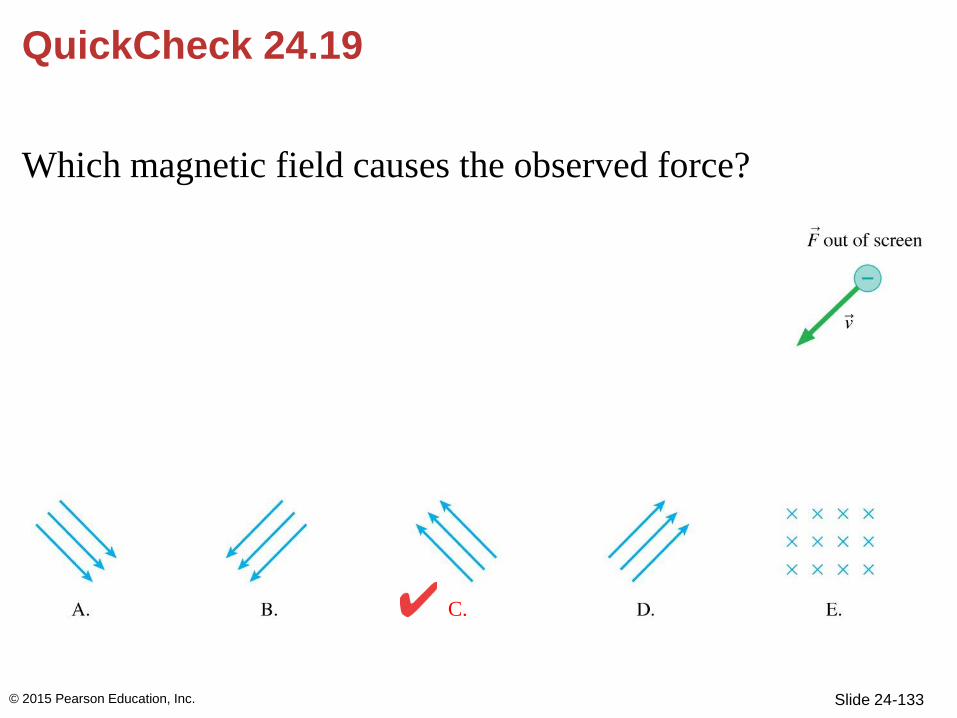
QuickCheck 24.19
Which magnetic field causes the observed force?
© 2015 Pearson Education, Inc.
C.
Slide 24-134
QuickCheck 24.20
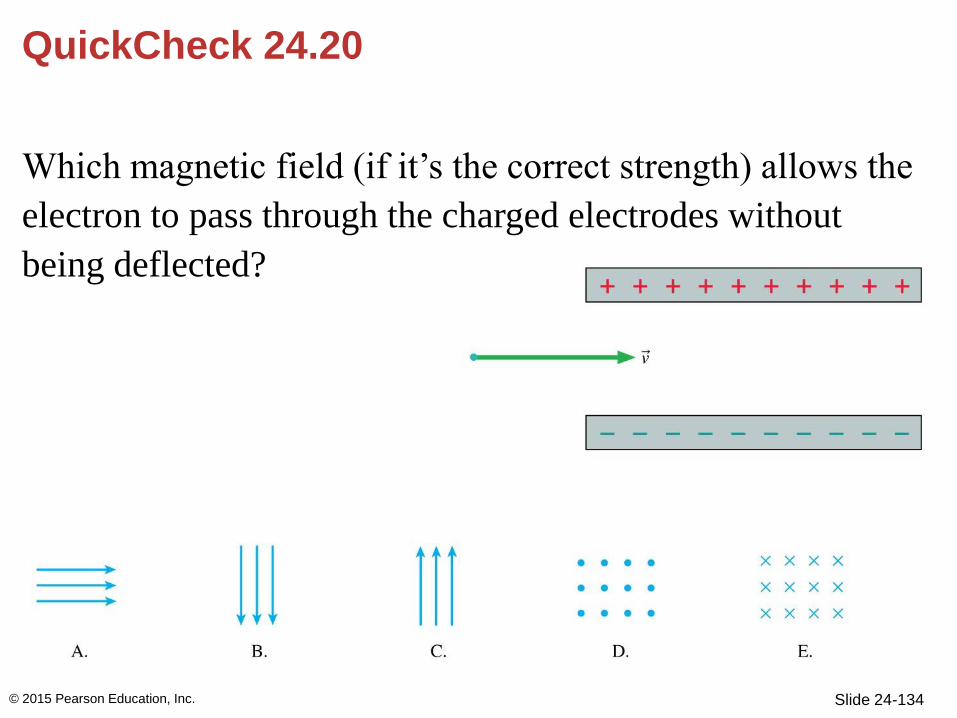
Which magnetic field (if it’s the correct strength) allows the
electron to pass through the charged electrodes without
being deflected?
© 2015 Pearson Education, Inc.
Slide 24-135
QuickCheck 24.20
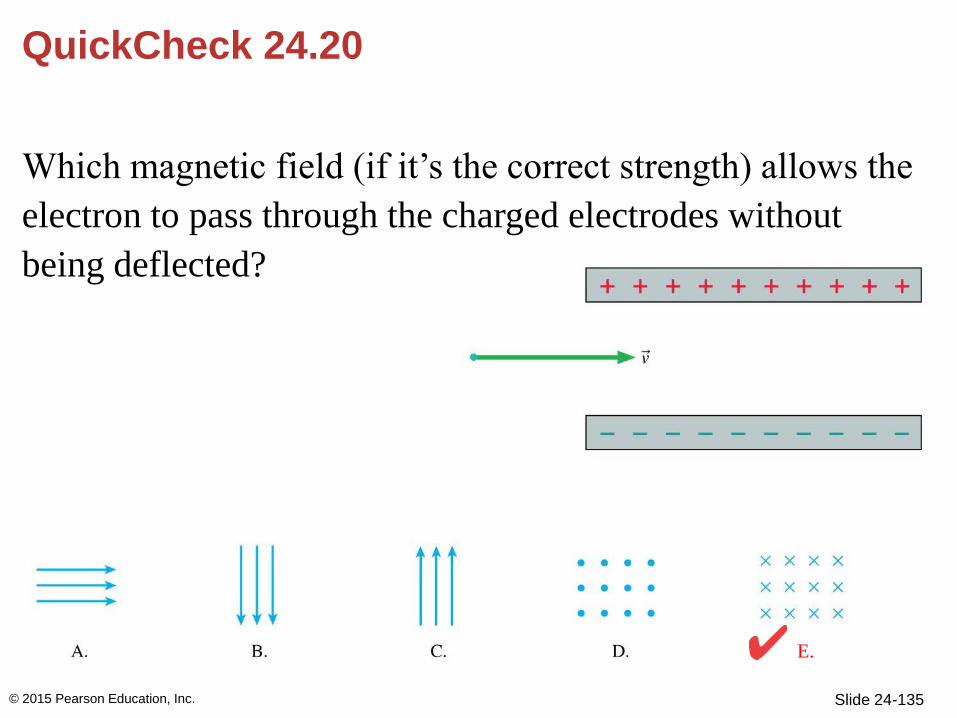
Which magnetic field (if it’s the correct strength) allows the
electron to pass through the charged electrodes without
being deflected?
© 2015 Pearson Education, Inc.
E.
Slide 24-136
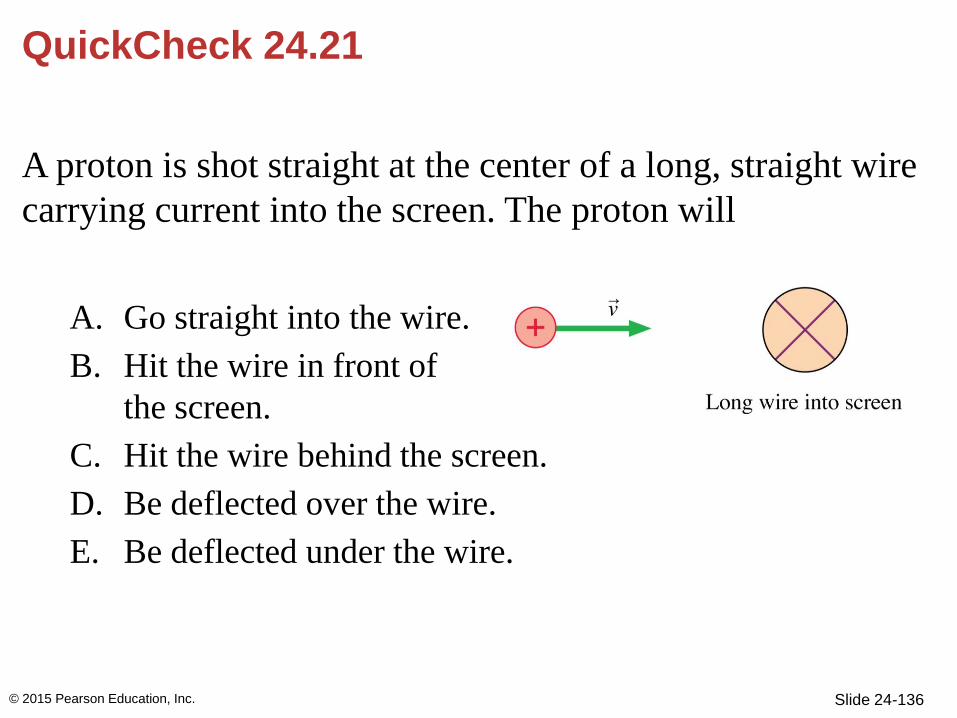
QuickCheck 24.21
A proton is shot straight at the center of a long, straight wire
carrying current into the screen. The proton will
A. Go straight into the wire.
B. Hit the wire in front of
the screen.
C. Hit the wire behind the screen.
D. Be deflected over the wire.
E. Be deflected under the wire.
© 2015 Pearson Education, Inc.
Slide 24-137
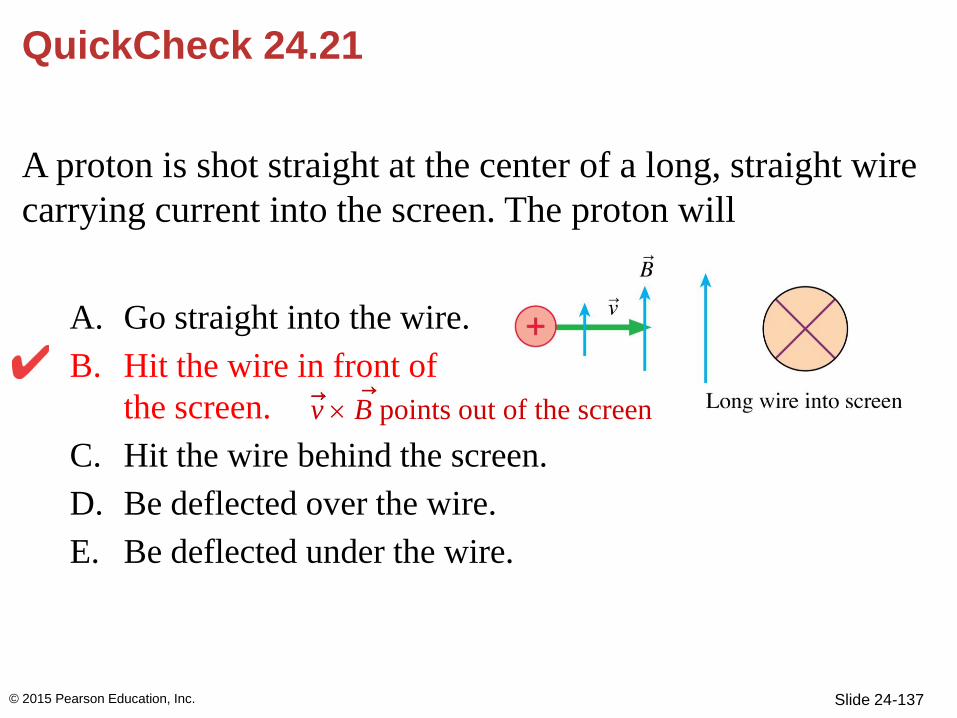
QuickCheck 24.21
A proton is shot straight at the center of a long, straight wire
carrying current into the screen. The proton will
A. Go straight into the wire.
B. Hit the wire in front of
the screen.
C. Hit the wire behind the screen.
D. Be deflected over the wire.
E. Be deflected under the wire.
© 2015 Pearson Education, Inc.
v B points out of the screen
Slide 24-138
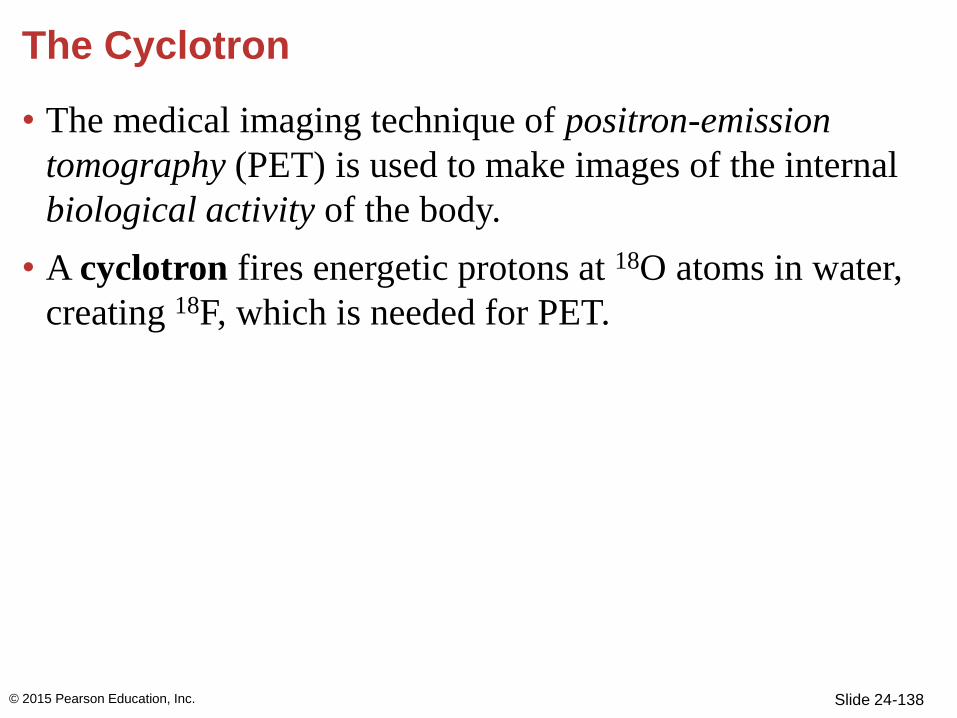
The Cyclotron
• The medical imaging technique of positron-emission
tomography (PET) is used to make images of the internal
biological activity of the body.
• A cyclotron fires energetic protons at 18O atoms in water,
creating 18F, which is needed for PET.
© 2015 Pearson Education, Inc.
Slide 24-139
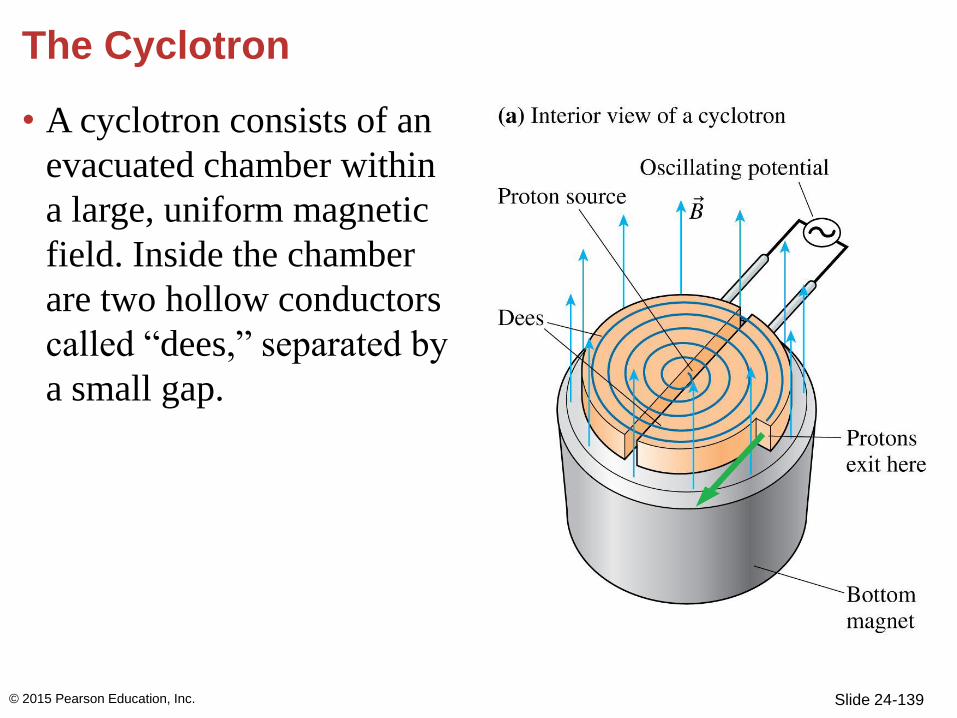
The Cyclotron
• A cyclotron consists of an
evacuated chamber within
a large, uniform magnetic
field. Inside the chamber
are two hollow conductors
called “dees,” separated by
a small gap.
© 2015 Pearson Education, Inc.
Slide 24-140
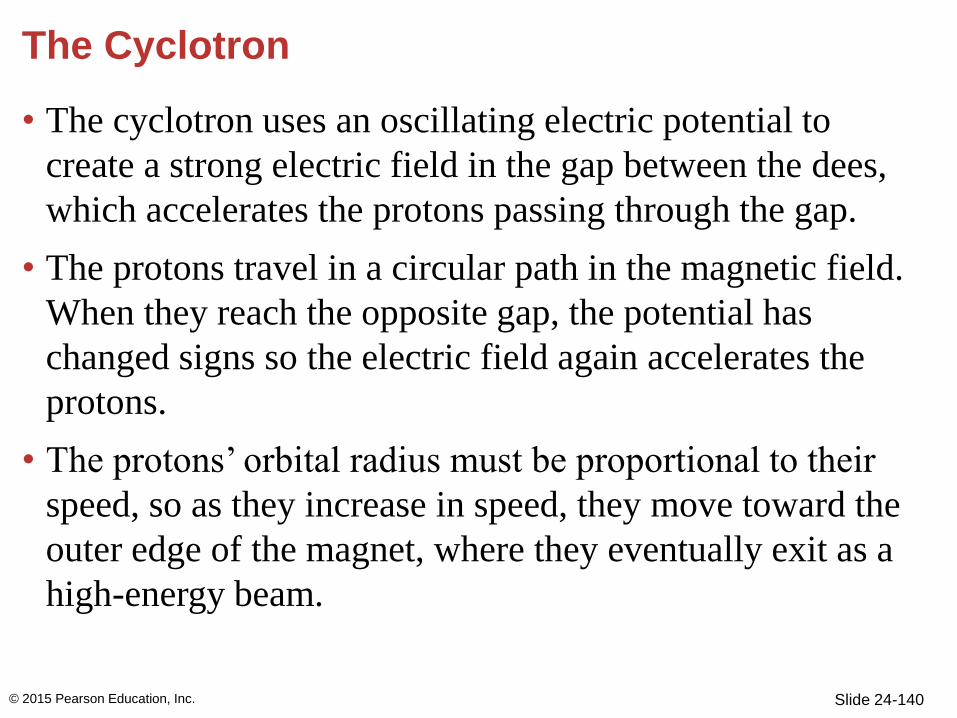
The Cyclotron
• The cyclotron uses an oscillating electric potential to
create a strong electric field in the gap between the dees,
which accelerates the protons passing through the gap.
• The protons travel in a circular path in the magnetic field.
When they reach the opposite gap, the potential has
changed signs so the electric field again accelerates the
protons.
• The protons’ orbital radius must be proportional to their
speed, so as they increase in speed, they move toward the
outer edge of the magnet, where they eventually exit as a
high-energy beam.
© 2015 Pearson Education, Inc.
Slide 24-141
Example 24.10 A medical cyclotron
It takes a proton with a kinetic energy of 11 MeV to
efficiently change 18O nuclei into 18F. If the magnetic field
inside the cyclotron is 1.2 T, what is the radius of the
protons’ orbit just before they exit the cyclotron?
PREPARE Equation 24.8 relates the radius of a charged
particle’s orbit to its speed. We can find the speed of the
protons from their kinetic energy; to do so, we’ll first need
to convert their energy from MeV to J.
© 2015 Pearson Education, Inc.
Slide 24-142
Example 24.10 A medical cyclotron (cont.)
SOLVE An 11 MeV proton’s kinetic energy in J is
The kinetic energy of a particle is K = (1/2)mv2, so the
proton’s speed is
© 2015 Pearson Education, Inc.
Slide 24-143
Example 24.10 A medical cyclotron (cont.)
We can then find the radius of the orbit corresponding to
this speed from Equation 24.8:
ASSESS The woman next to the cyclotron in FIGURE
24.35B is roughly 2 m tall, so a 0.80 m diameter for a
proton’s orbit as it exits the cyclotron seems reasonable.
© 2015 Pearson Education, Inc.
Slide 24-144
Electromagnetic Flowmeters
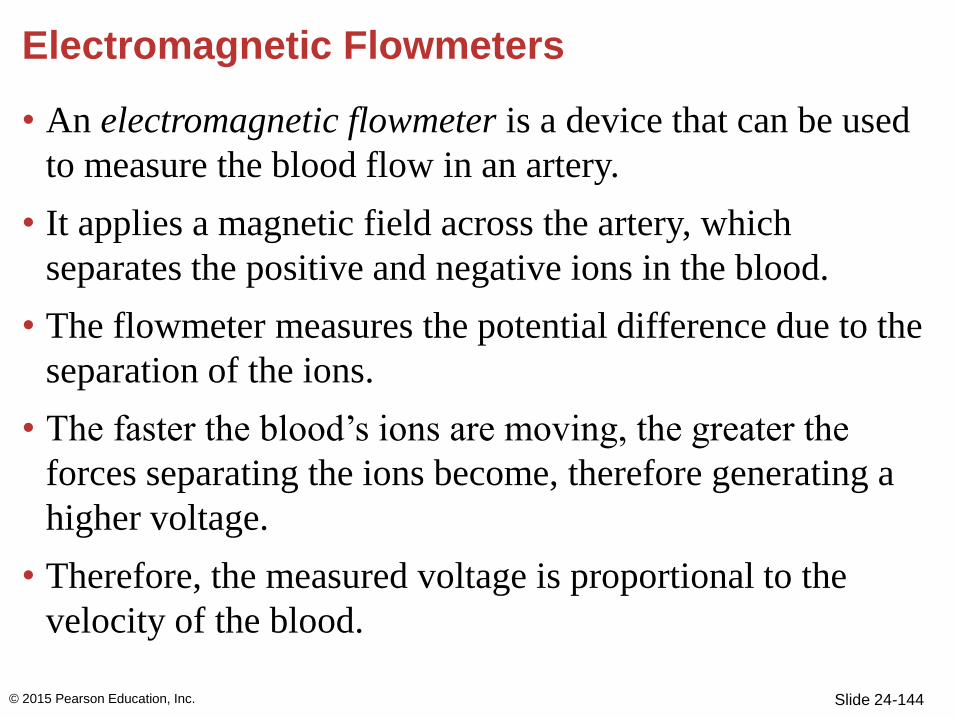
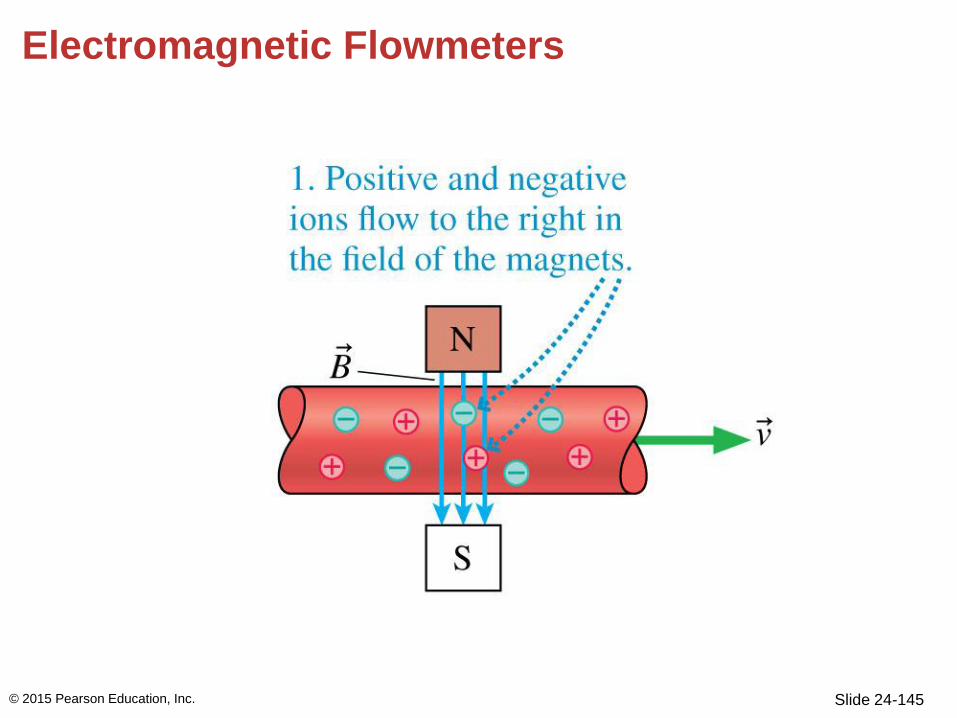
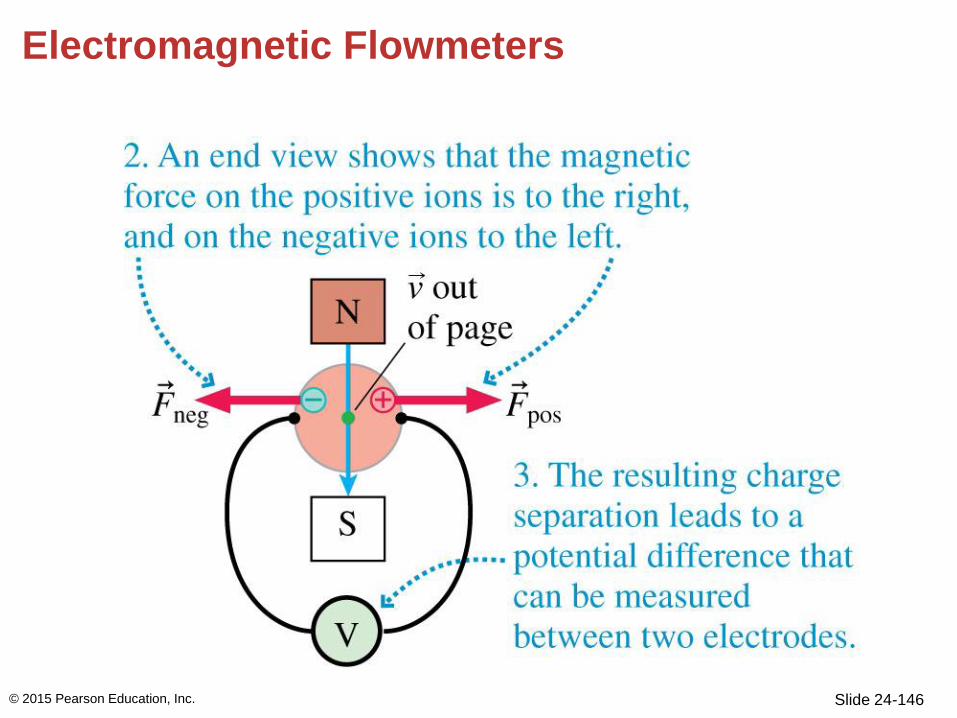
• An electromagnetic flowmeter is a device that can be used
to measure the blood flow in an artery.
• It applies a magnetic field across the artery, which
separates the positive and negative ions in the blood.
• The flowmeter measures the potential difference due to the
separation of the ions.
• The faster the blood’s ions are moving, the greater the
forces separating the ions become, therefore generating a
higher voltage.
• Therefore, the measured voltage is proportional to the
velocity of the blood.
© 2015 Pearson Education, Inc.
Slide 24-145
Electromagnetic Flowmeters
© 2015 Pearson Education, Inc.
Slide 24-146
Electromagnetic Flowmeters
© 2015 Pearson Education, Inc.
Slide 24-147
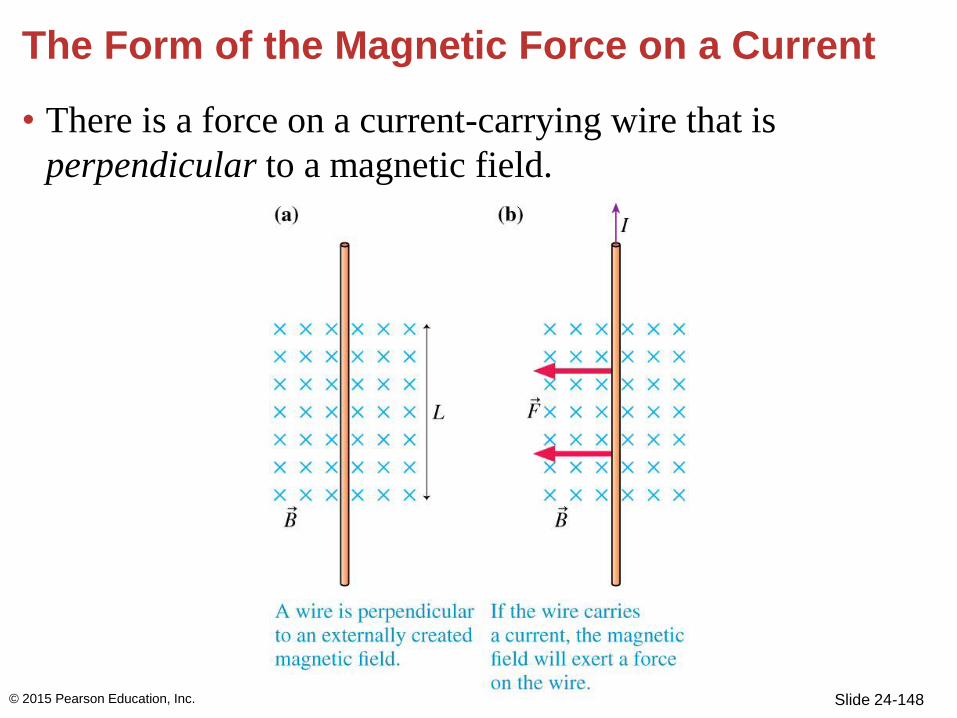
The Form of the Magnetic Force on a Current
• We learned that the magnetic field exerts no force on a
charged particle moving parallel to a magnetic field.
• If a current-carrying wire is parallel to a magnetic field,
we also find that the force on it is zero.
© 2015 Pearson Education, Inc.
Slide 24-148
The Form of the Magnetic Force on a Current
• There is a force on a current-carrying wire that is
perpendicular to a magnetic field.
© 2015 Pearson Education, Inc.
Slide 24-149
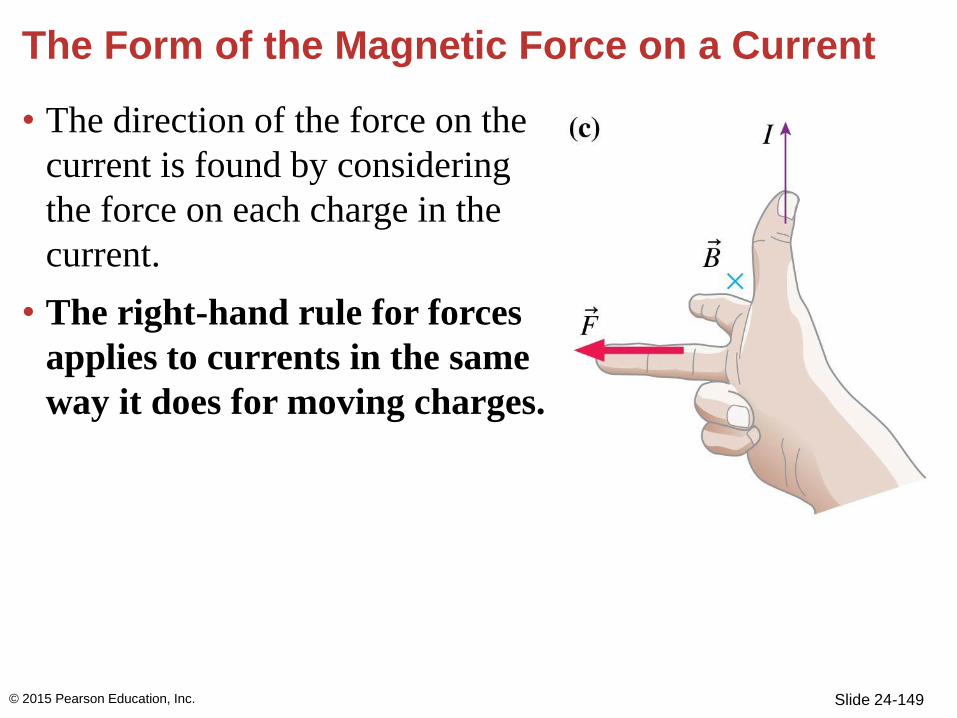
The Form of the Magnetic Force on a Current
• The direction of the force on the
current is found by considering
the force on each charge in the
current.
• The right-hand rule for forces
applies to currents in the same
way it does for moving charges.
© 2015 Pearson Education, Inc.
Slide 24-150
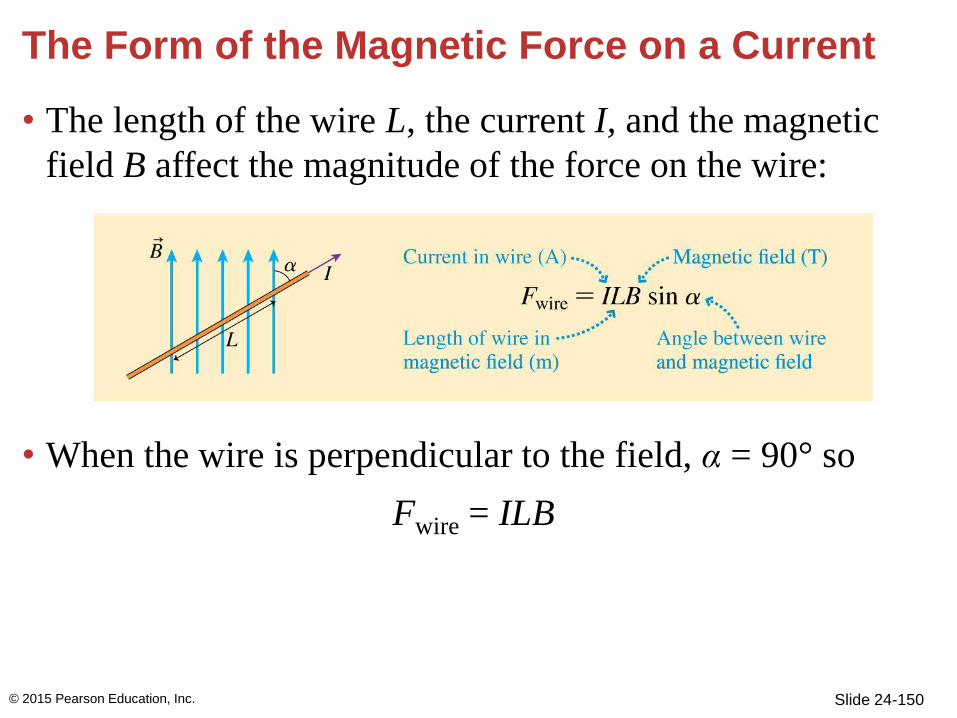
The Form of the Magnetic Force on a Current
• The length of the wire L, the current I, and the magnetic
field B affect the magnitude of the force on the wire:
• When the wire is perpendicular to the field, α = 90° so
Fwire = ILB
© 2015 Pearson Education, Inc.
Slide 24-151
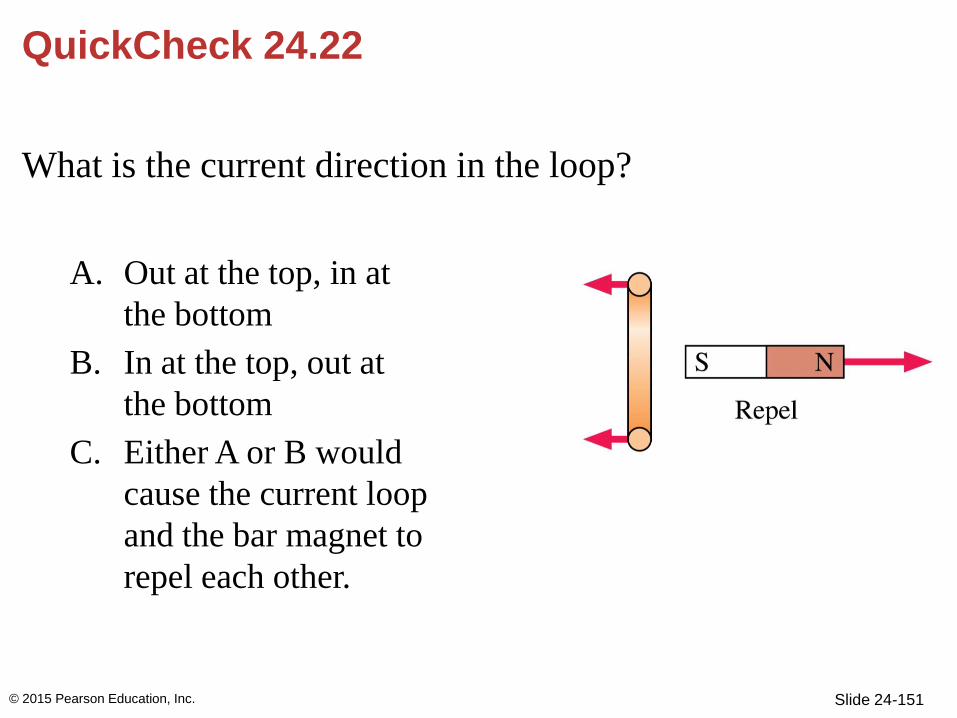
QuickCheck 24.22
What is the current direction in the loop?
A. Out at the top, in at
the bottom
B. In at the top, out at
the bottom
C. Either A or B would
cause the current loop
and the bar magnet to
repel each other.
© 2015 Pearson Education, Inc.

Slide 24-152
QuickCheck 24.22
What is the current direction in the loop?
A. Out at the top, in at
the bottom
B. In at the top, out at
the bottom
C. Either A or B would
cause the current loop
and the bar magnet to
repel each other.
© 2015 Pearson Education, Inc.
Slide 24-153
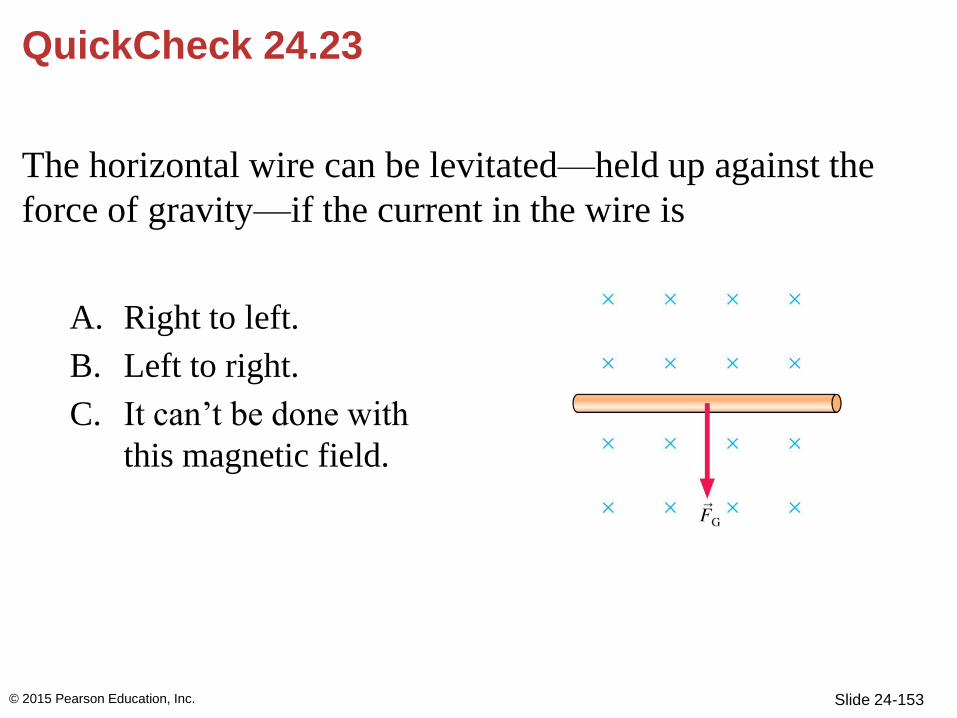
QuickCheck 24.23
The horizontal wire can be levitated—held up against the
force of gravity—if the current in the wire is
A. Right to left.
B. Left to right.
C. It can’t be done with
this magnetic field.
© 2015 Pearson Education, Inc.
Slide 24-154
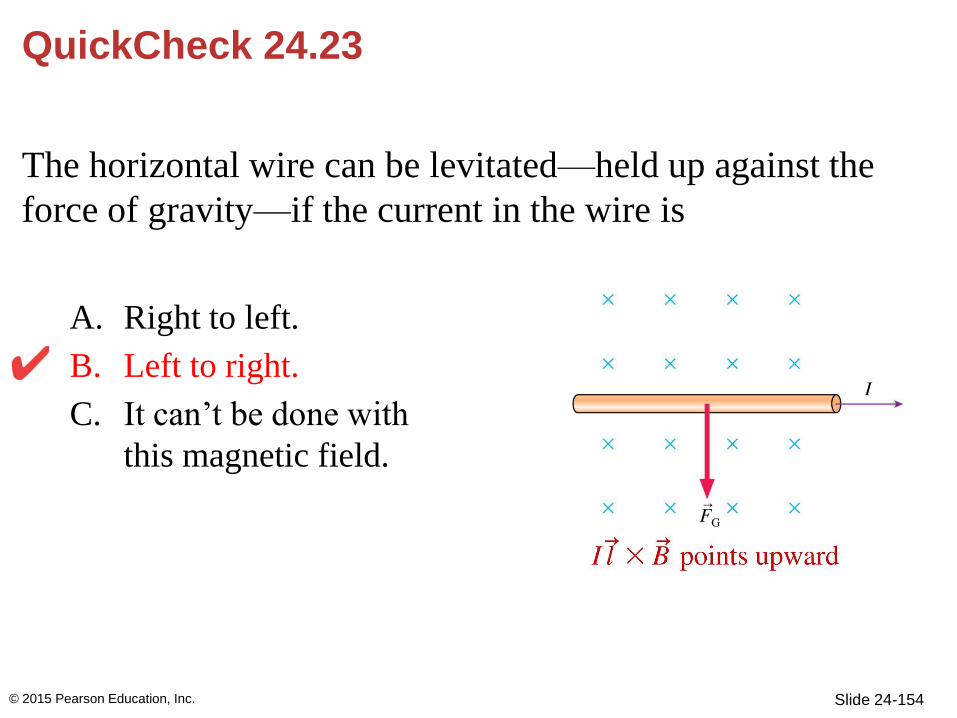
QuickCheck 24.23
The horizontal wire can be levitated—held up against the
force of gravity—if the current in the wire is
A. Right to left.
B. Left to right.
C. It can’t be done with
this magnetic field.
© 2015 Pearson Education, Inc.
Slide 24-155
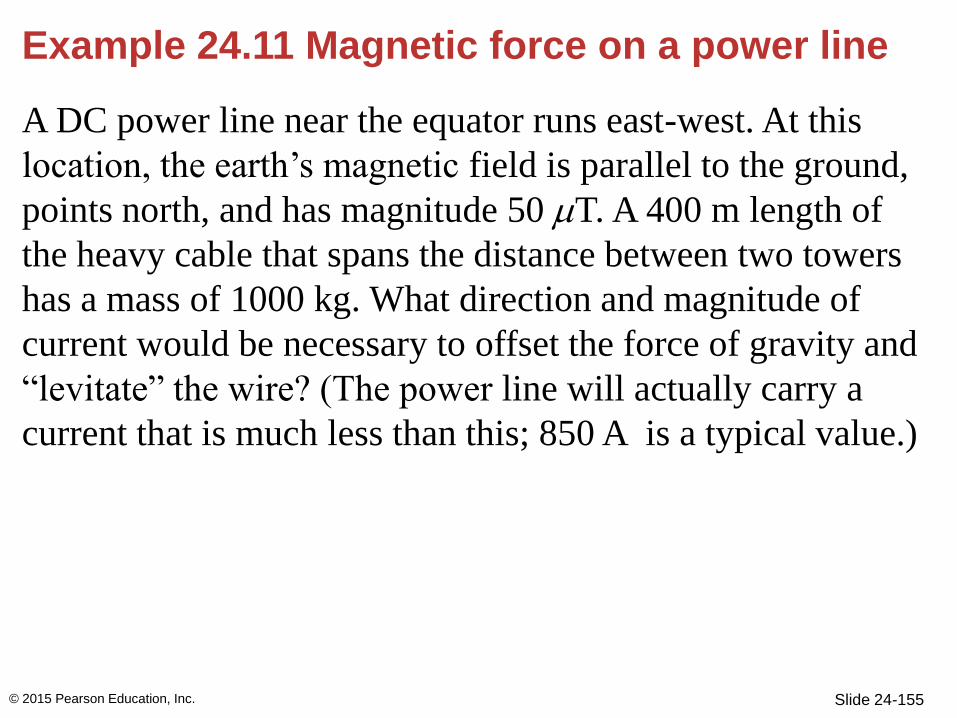
Example 24.11 Magnetic force on a power line
A DC power line near the equator runs east-west. At this
location, the earth’s magnetic field is parallel to the ground,
points north, and has magnitude 50 T. A 400 m length of
the heavy cable that spans the distance between two towers
has a mass of 1000 kg. What direction and magnitude of
current would be necessary to offset the force of gravity and
“levitate” the wire? (The power line will actually carry a
current that is much less than this; 850 A is a typical value.)
© 2015 Pearson Education, Inc.
Slide 24-156
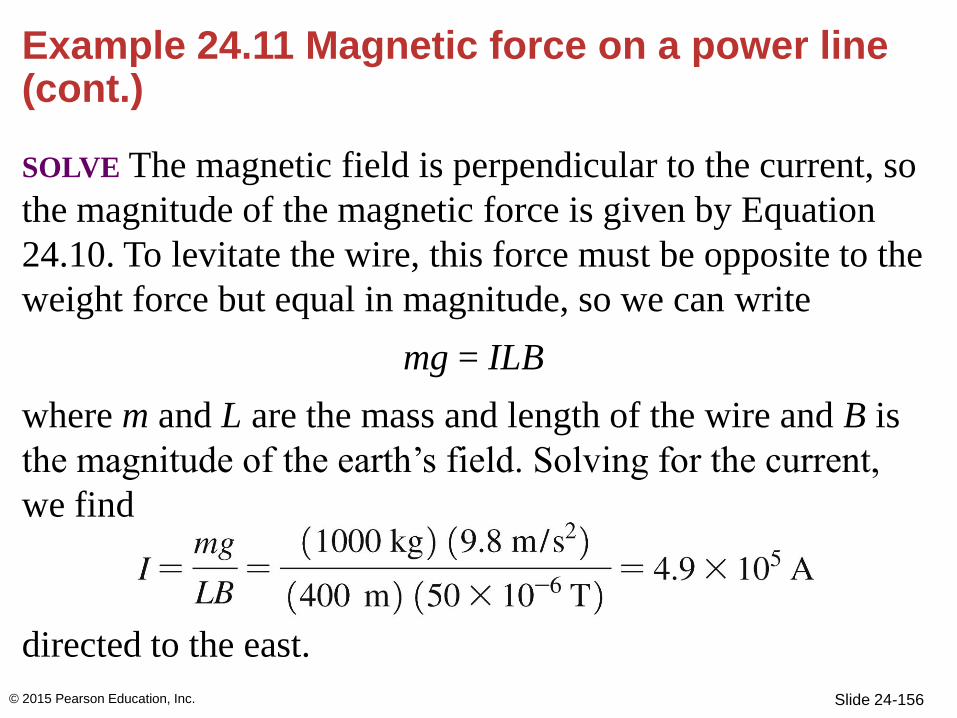
SOLVE The magnetic field is perpendicular to the current, so
the magnitude of the magnetic force is given by Equation
24.10. To levitate the wire, this force must be opposite to the
weight force but equal in magnitude, so we can write
mg = ILB
where m and L are the mass and length of the wire and B is
the magnitude of the earth’s field. Solving for the current,
we find
directed to the east.
Example 24.11 Magnetic force on a power line (cont.)
© 2015 Pearson Education, Inc.
Slide 24-157
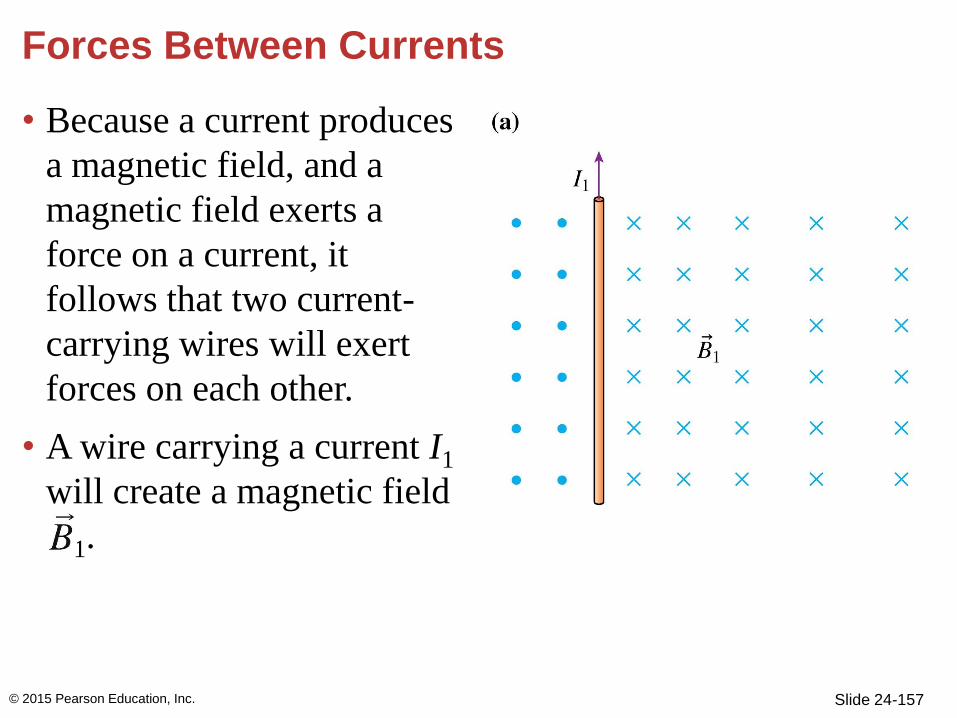
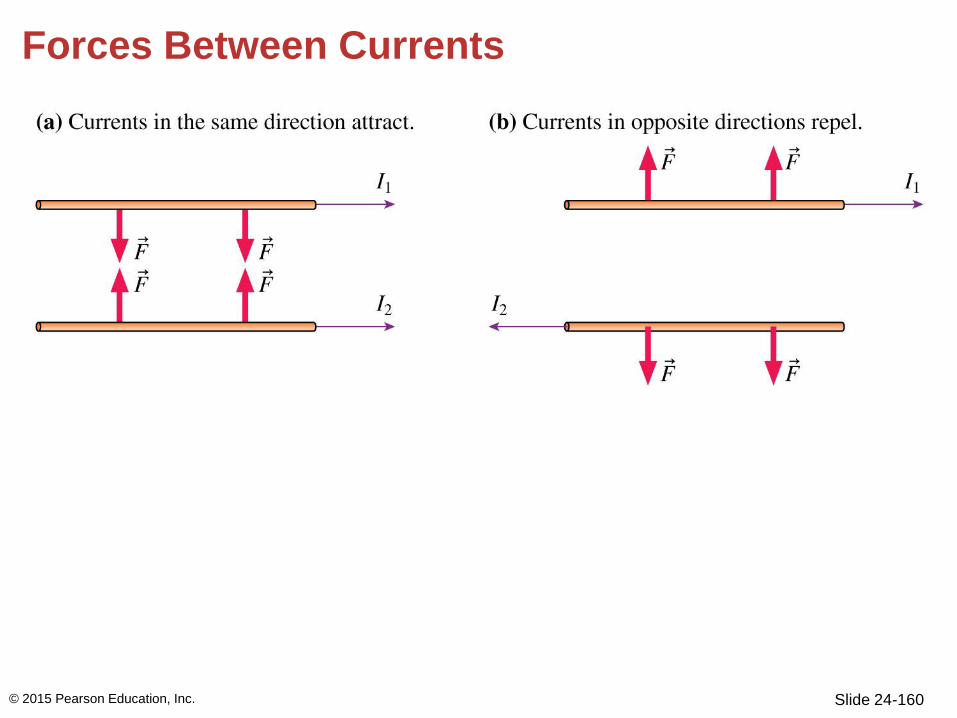
Forces Between Currents
• Because a current produces
a magnetic field, and a
magnetic field exerts a
force on a current, it
follows that two current-
carrying wires will exert
forces on each other.
• A wire carrying a current I1
will create a magnetic field
1.
© 2015 Pearson Education, Inc.
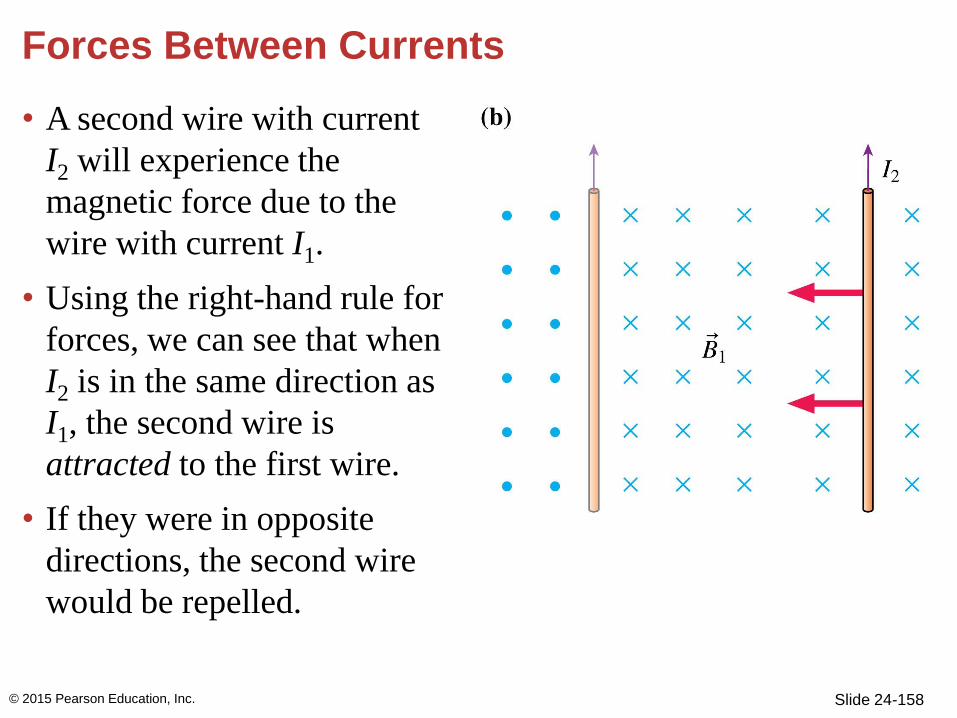
Slide 24-158
Forces Between Currents
• A second wire with current
I2 will experience the
magnetic force due to the
wire with current I1.
• Using the right-hand rule for
forces, we can see that when
I2 is in the same direction as
I1, the second wire is
attracted to the first wire.
• If they were in opposite
directions, the second wire
would be repelled.
© 2015 Pearson Education, Inc.
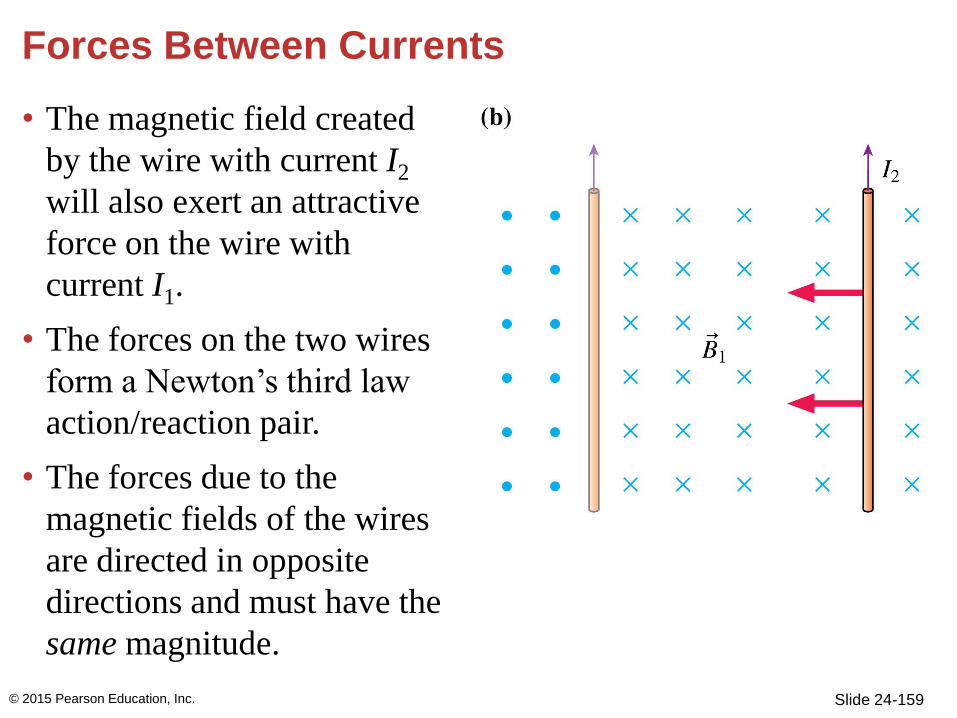
Slide 24-159
Forces Between Currents
• The magnetic field created
by the wire with current I2
will also exert an attractive
force on the wire with
current I1.
• The forces on the two wires
form a Newton’s third law
action/reaction pair.
• The forces due to the
magnetic fields of the wires
are directed in opposite
directions and must have the
same magnitude.
© 2015 Pearson Education, Inc.
Slide 24-160
Forces Between Currents
© 2015 Pearson Education, Inc.
Slide 24-161
Example 24.12 Finding the force between wires in jumper cables
You may have used a set of jumper cables connected to a
running vehicle to start a car with a dead battery. Jumper
cables are a matched pair of wires, red and black, joined
together along their length. Suppose we have a set of jumper
cables in which the two wires are separated by 1.2 cm along
their 3.7 m (12 ft) length. While starting a car, the wires
each carry a current of 150 A, in opposite directions. What
is the force between the two wires?
© 2015 Pearson Education, Inc.
Slide 24-162
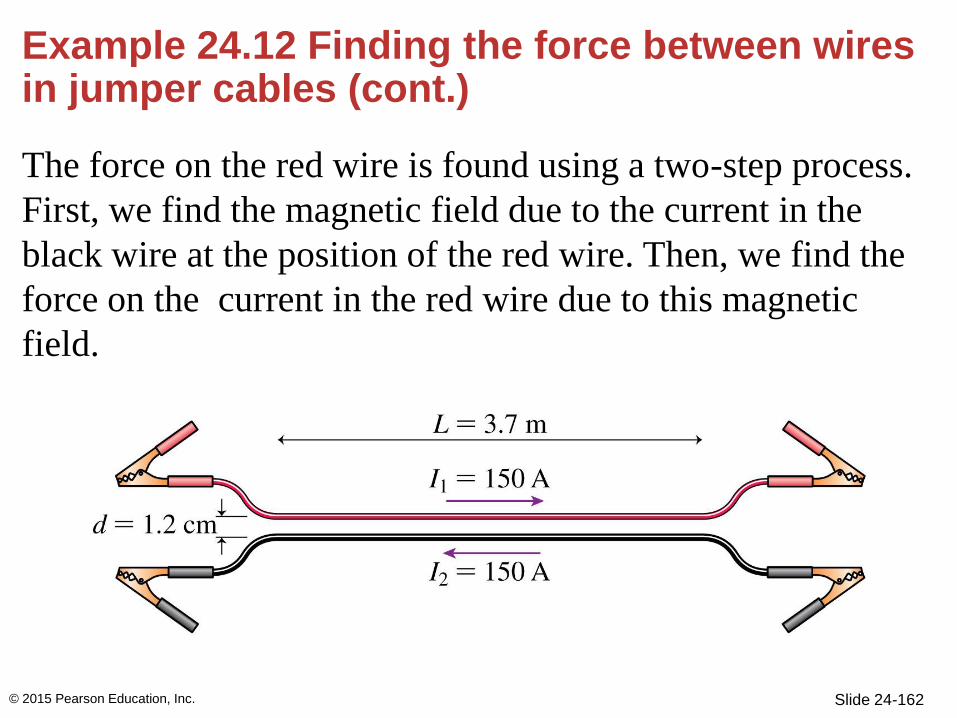
Example 24.12 Finding the force between wires in jumper cables (cont.)
The force on the red wire is found using a two-step process.
First, we find the magnetic field due to the current in the
black wire at the position of the red wire. Then, we find the
force on the current in the red wire due to this magnetic
field.
© 2015 Pearson Education, Inc.
Slide 24-163
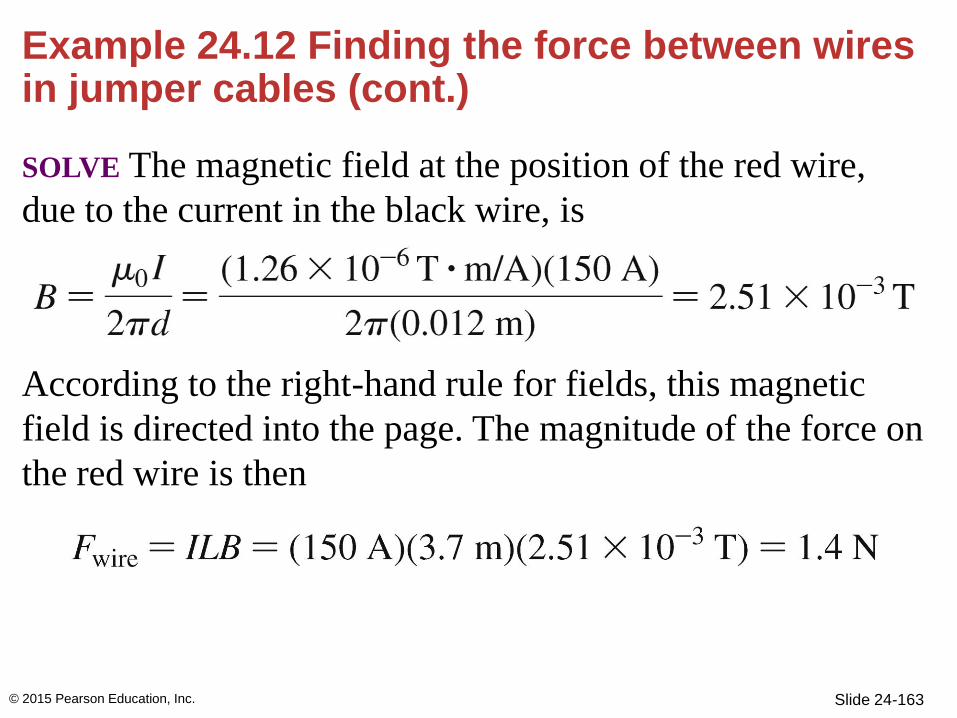
Example 24.12 Finding the force between wires in jumper cables (cont.)
SOLVE The magnetic field at the position of the red wire,
due to the current in the black wire, is
According to the right-hand rule for fields, this magnetic
field is directed into the page. The magnitude of the force on
the red wire is then
© 2015 Pearson Education, Inc.
Slide 24-164
Example 24.12 Finding the force between wires in jumper cables (cont.)
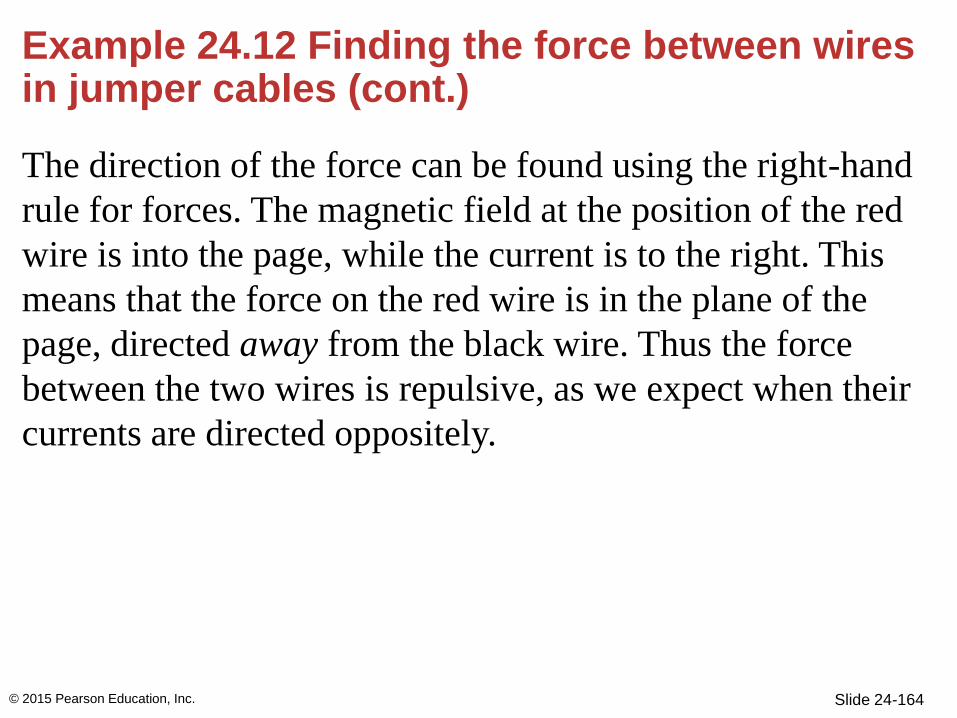
The direction of the force can be found using the right-hand
rule for forces. The magnetic field at the position of the red
wire is into the page, while the current is to the right. This
means that the force on the red wire is in the plane of the
page, directed away from the black wire. Thus the force
between the two wires is repulsive, as we expect when their
currents are directed oppositely.
© 2015 Pearson Education, Inc.
Slide 24-165
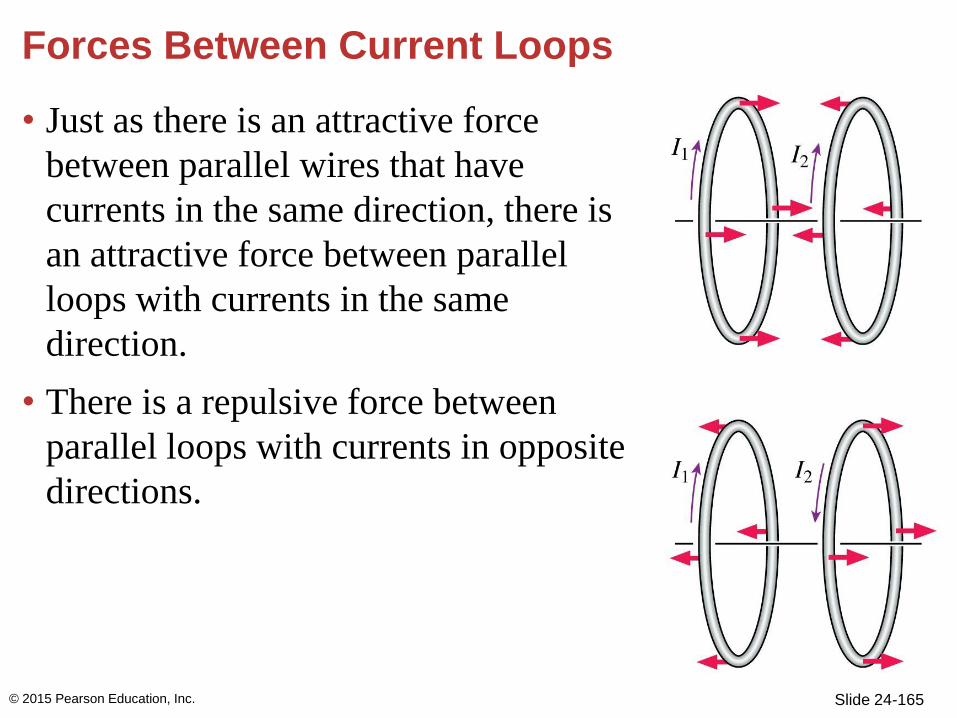
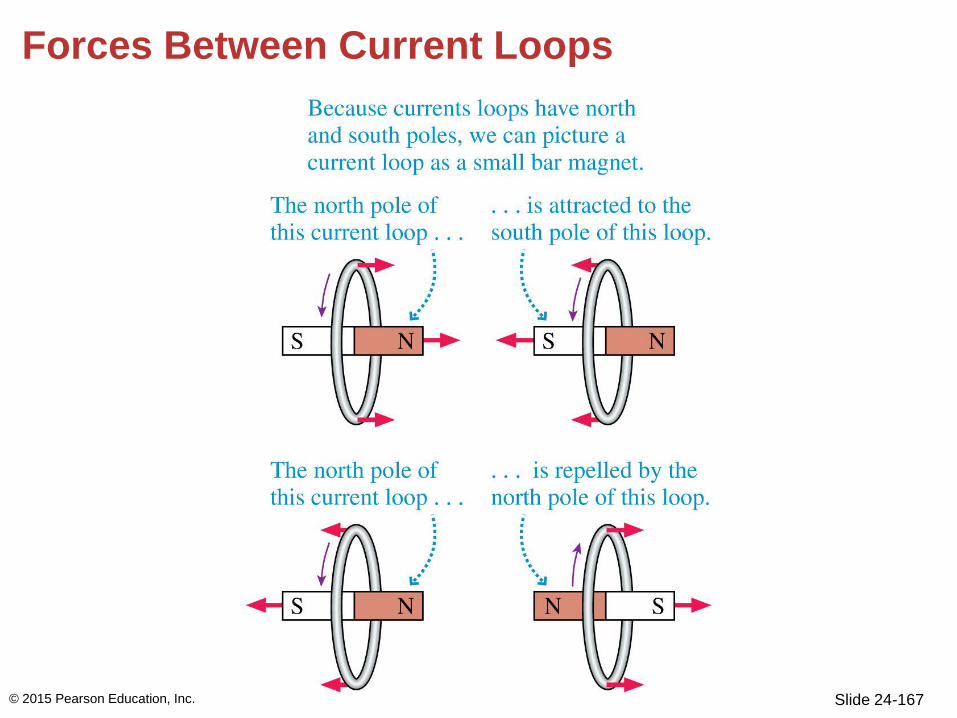
Forces Between Current Loops
• Just as there is an attractive force
between parallel wires that have
currents in the same direction, there is
an attractive force between parallel
loops with currents in the same
direction.
• There is a repulsive force between
parallel loops with currents in opposite
directions.
© 2015 Pearson Education, Inc.
Slide 24-166
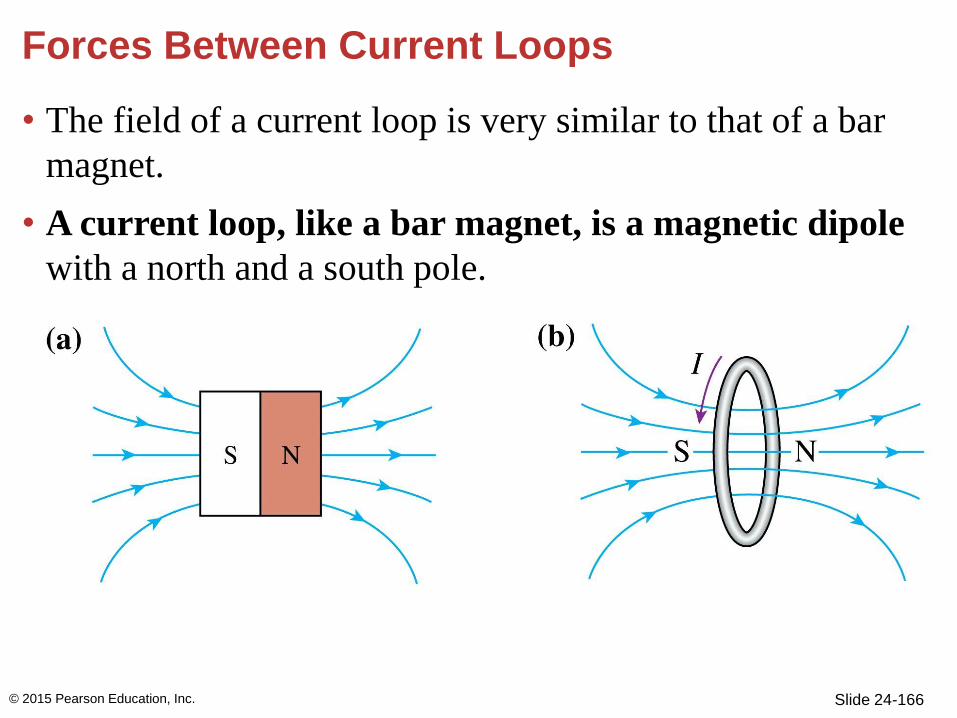
Forces Between Current Loops
• The field of a current loop is very similar to that of a bar
magnet.
• A current loop, like a bar magnet, is a magnetic dipole
with a north and a south pole.
© 2015 Pearson Education, Inc.
Slide 24-167
Forces Between Current Loops
© 2015 Pearson Education, Inc.
Slide 24-168
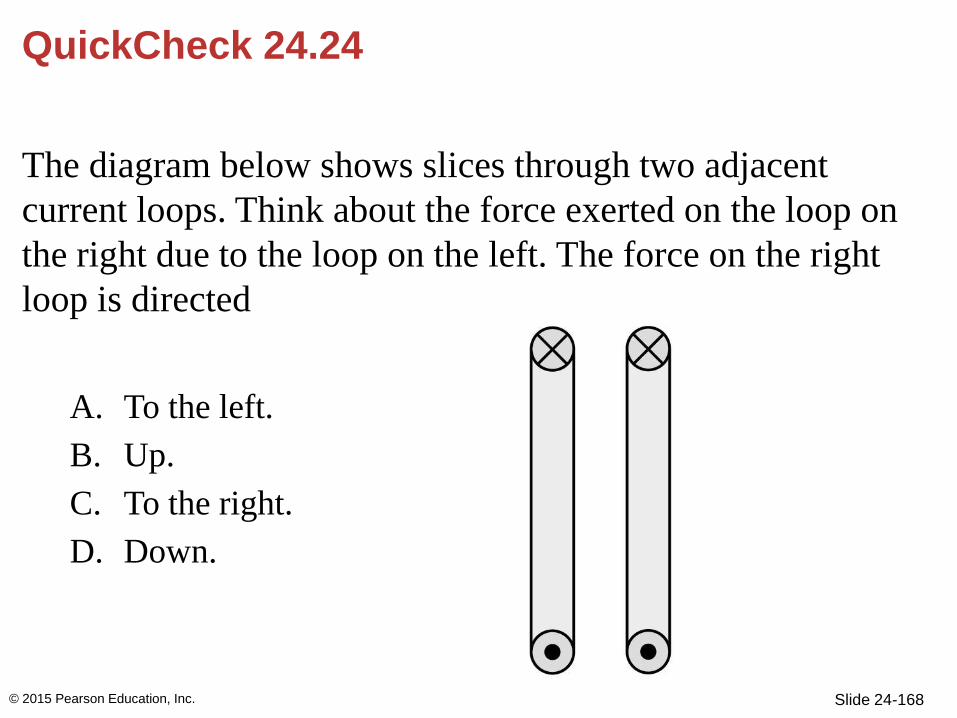
QuickCheck 24.24
The diagram below shows slices through two adjacent
current loops. Think about the force exerted on the loop on
the right due to the loop on the left. The force on the right
loop is directed
A. To the left.
B. Up.
C. To the right.
D. Down.
© 2015 Pearson Education, Inc.

Slide 24-169
QuickCheck 24.24
The diagram below shows slices through two adjacent
current loops. Think about the force exerted on the loop on
the right due to the loop on the left. The force on the right
loop is directed
A. To the left.
B. Up.
C. To the right.
D. Down.
© 2015 Pearson Education, Inc.
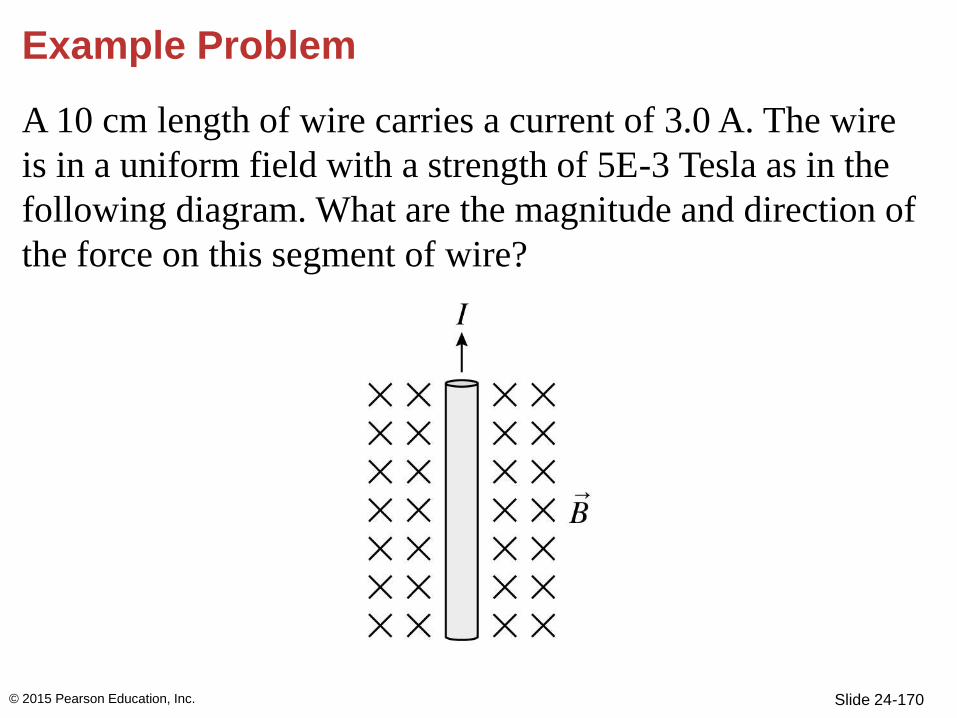
Slide 24-170
Example Problem
A 10 cm length of wire carries a current of 3.0 A. The wire
is in a uniform field with a strength of 5E-3 Tesla as in the
following diagram. What are the magnitude and direction of
the force on this segment of wire?
© 2015 Pearson Education, Inc.
Slide 24-171
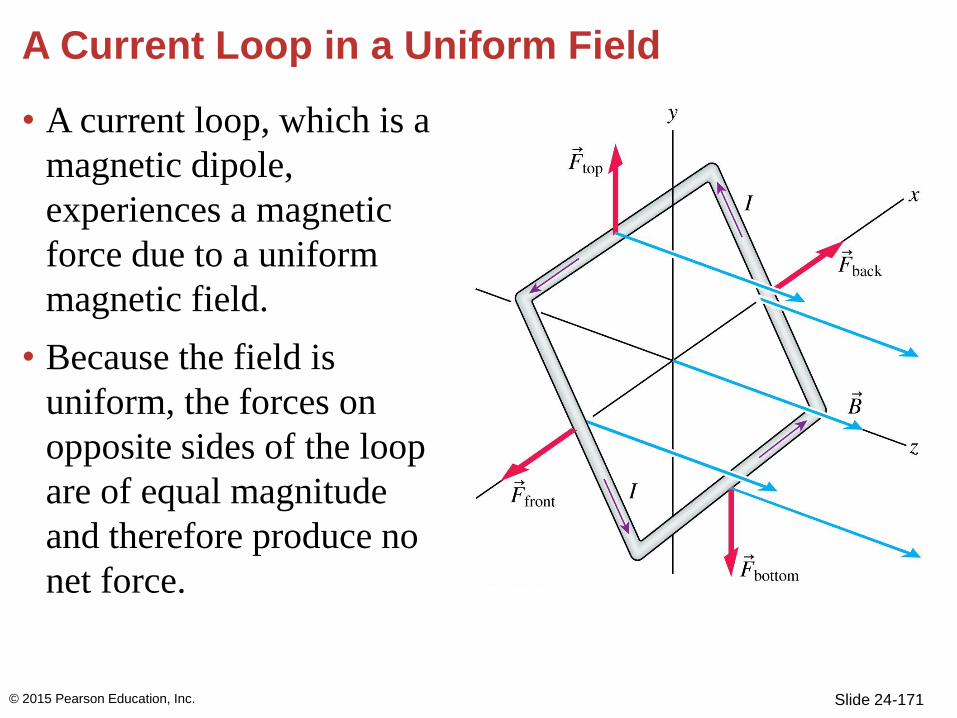
A Current Loop in a Uniform Field
• A current loop, which is a
magnetic dipole,
experiences a magnetic
force due to a uniform
magnetic field.
• Because the field is
uniform, the forces on
opposite sides of the loop
are of equal magnitude
and therefore produce no
net force.
© 2015 Pearson Education, Inc.
Slide 24-172
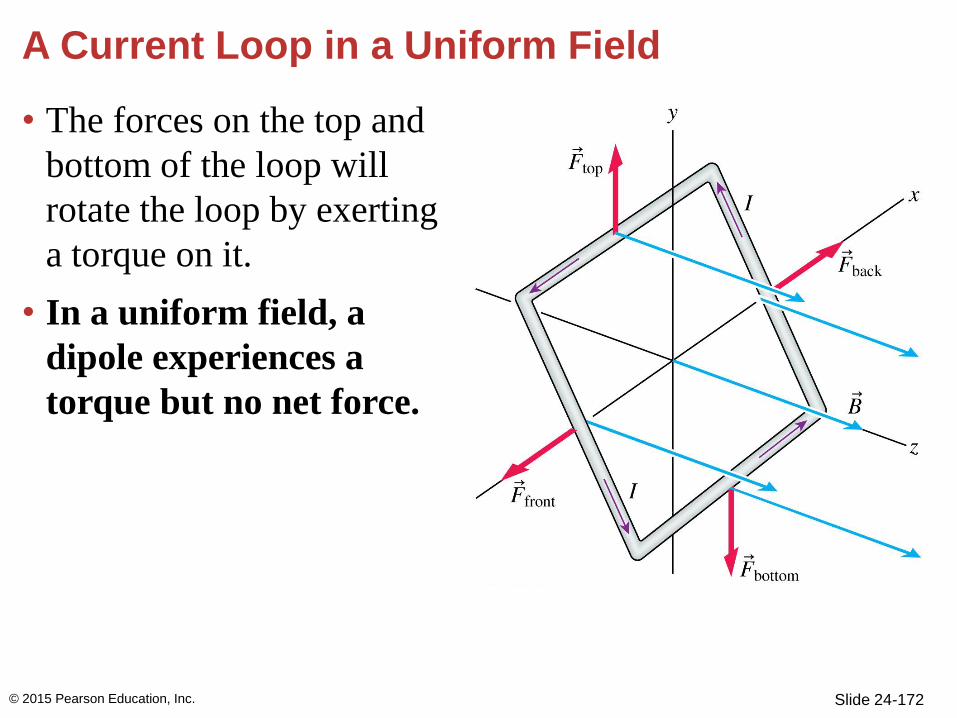
A Current Loop in a Uniform Field
• The forces on the top and
bottom of the loop will
rotate the loop by exerting
a torque on it.
• In a uniform field, a
dipole experiences a
torque but no net force.
© 2015 Pearson Education, Inc.
Slide 24-173
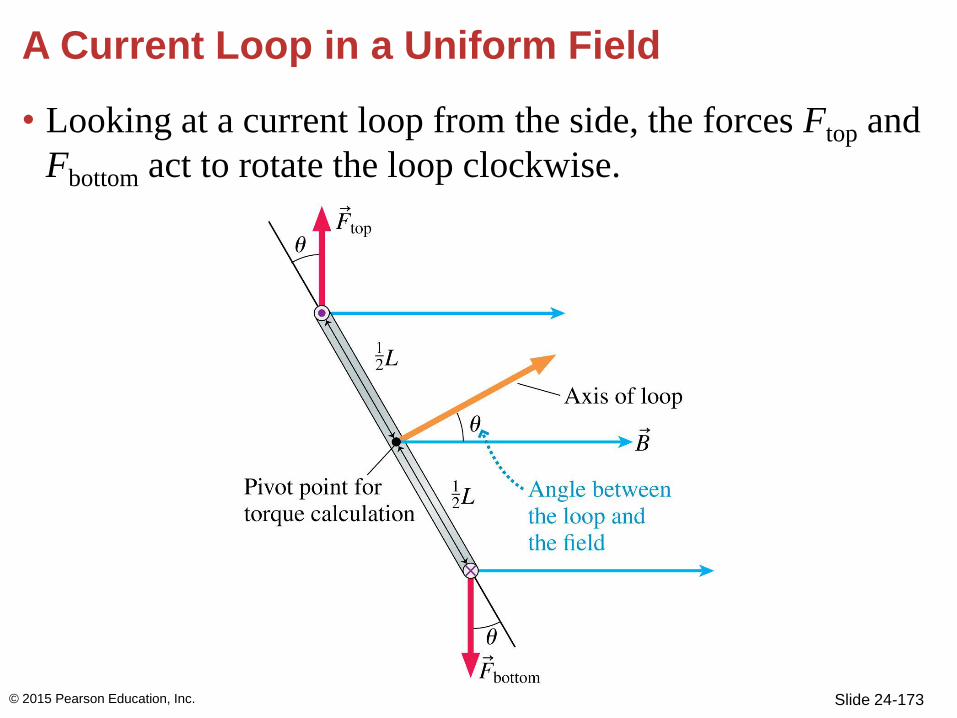
A Current Loop in a Uniform Field
• Looking at a current loop from the side, the forces Ftop and
Fbottom act to rotate the loop clockwise.
[Insert Figure 24.46]
© 2015 Pearson Education, Inc.
Slide 24-174
A Current Loop in a Uniform Field
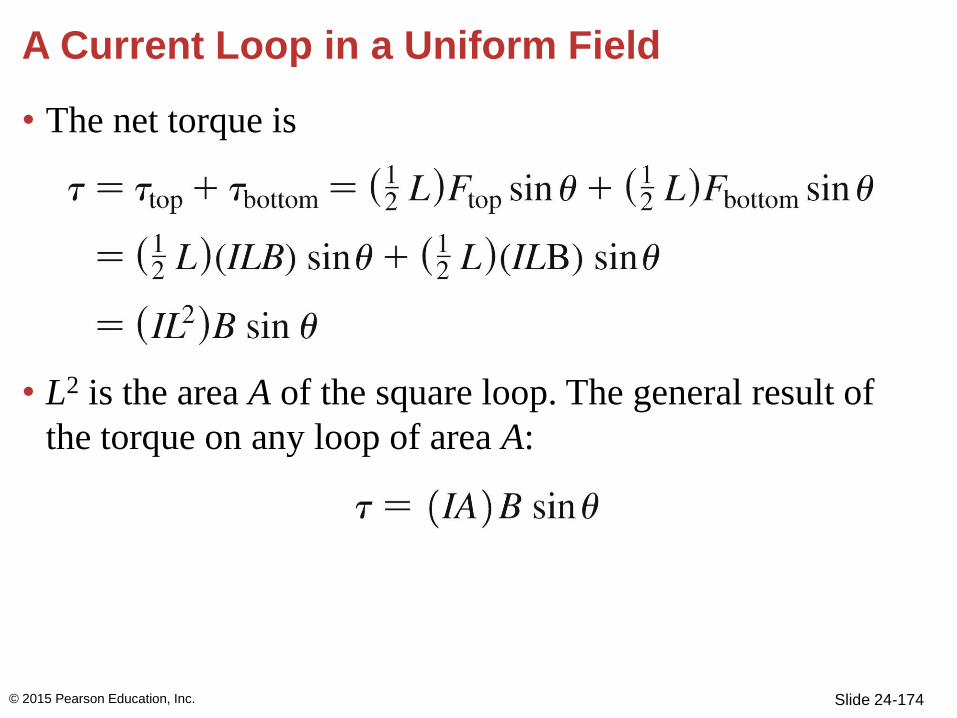
• The net torque is
• L2 is the area A of the square loop. The general result of
the torque on any loop of area A:
© 2015 Pearson Education, Inc.
Slide 24-175
A Current Loop in a Uniform Field
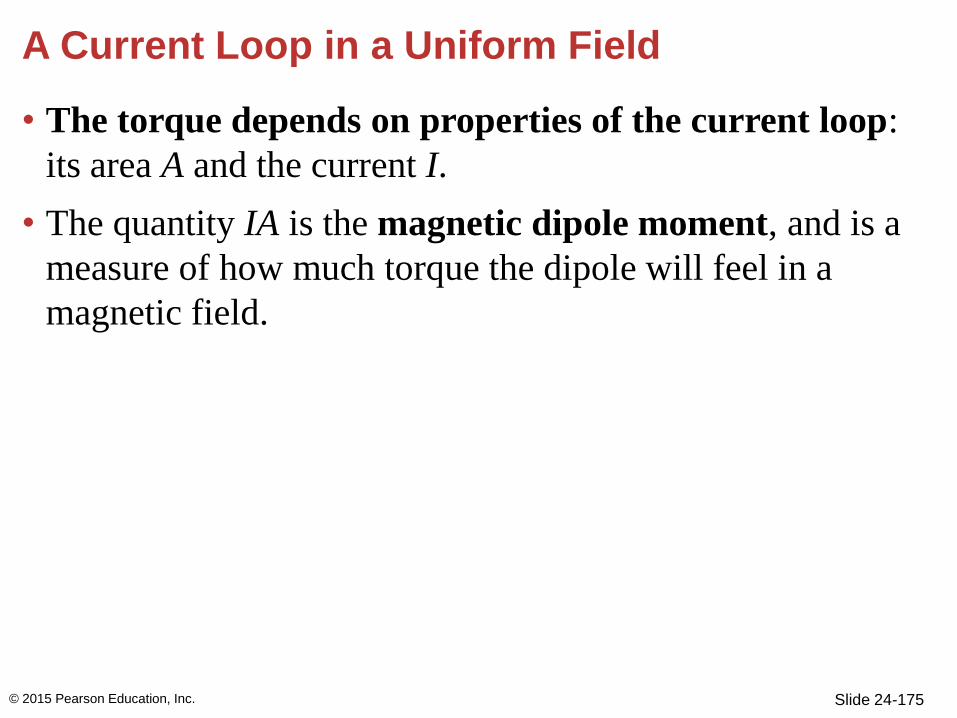
• The torque depends on properties of the current loop:
its area A and the current I.
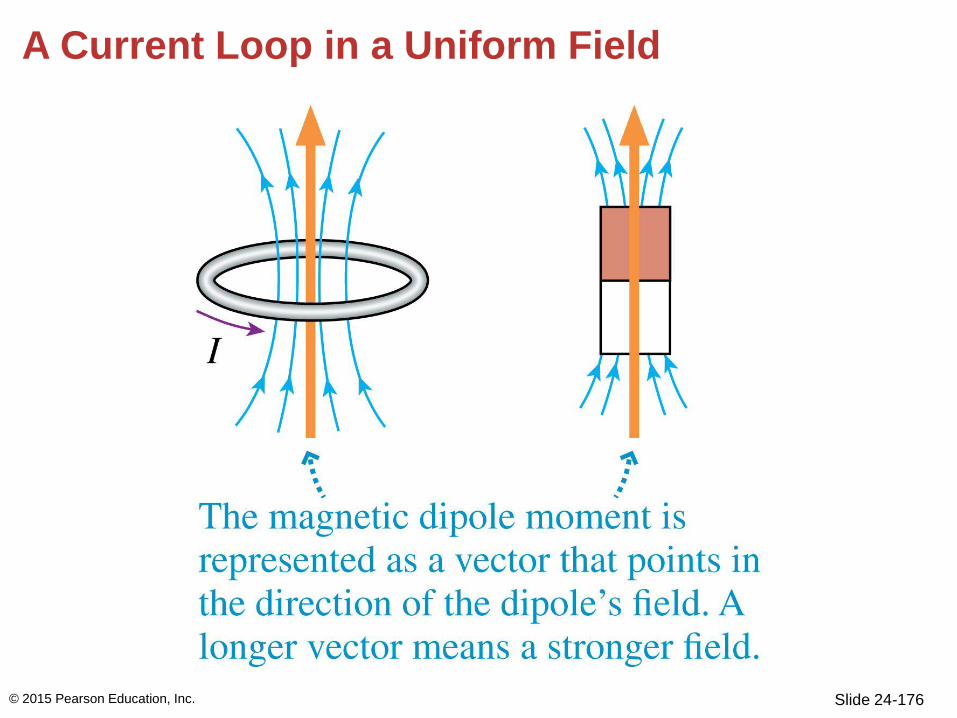
• The quantity IA is the magnetic dipole moment, and is a
measure of how much torque the dipole will feel in a
magnetic field.
© 2015 Pearson Education, Inc.
Slide 24-176
A Current Loop in a Uniform Field
© 2015 Pearson Education, Inc.
Slide 24-177
A Current Loop in a Uniform Field
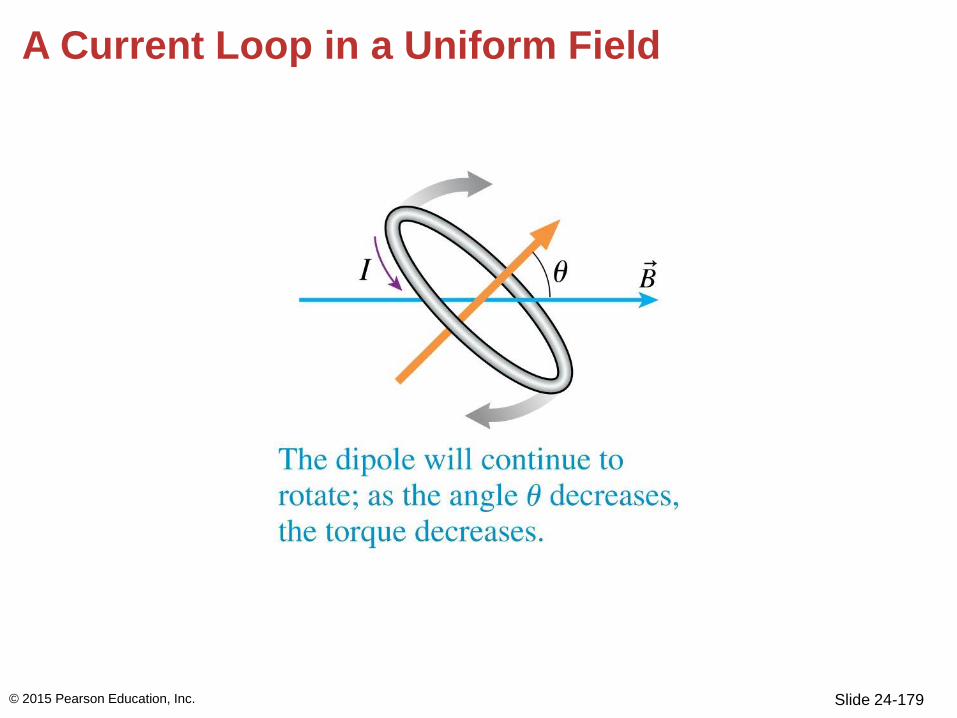
• The torque depends on the angle between the magnetic
dipole moment and the magnetic field.
• The torque is maximum when θ = 90°, when the magnetic
moment is perpendicular to the field. The torque is zero
when θ = 90°, when the magnetic moment is parallel to the
field.
• A magnetic dipole will rotate to line up with a magnetic
field just as an electric dipole will rotate to line up with an
electric field.
© 2015 Pearson Education, Inc.
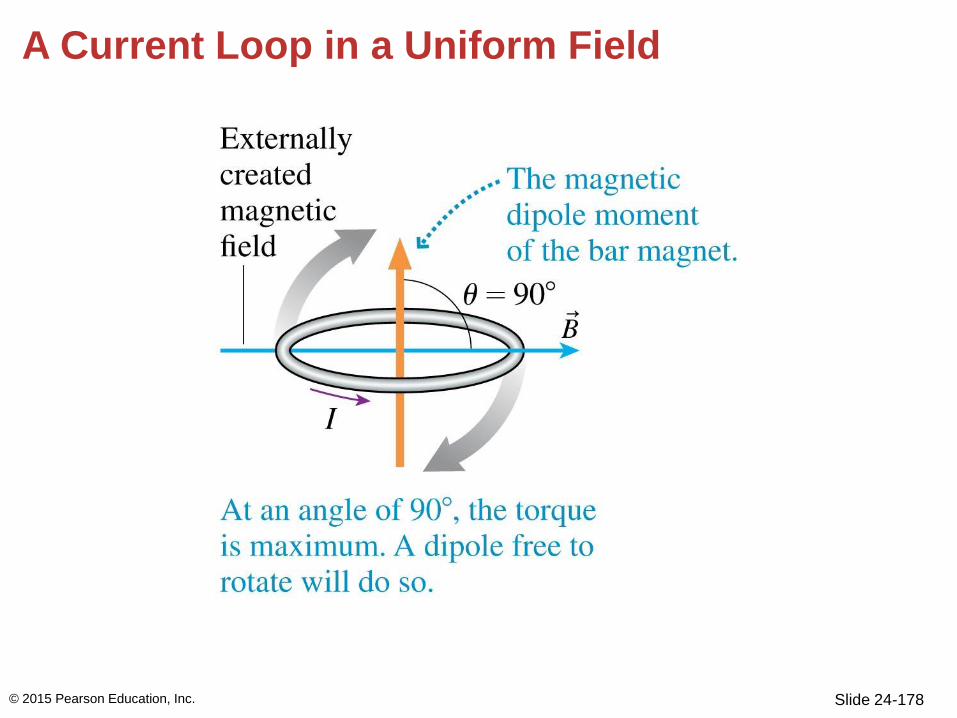
Slide 24-178
A Current Loop in a Uniform Field
© 2015 Pearson Education, Inc.
Slide 24-179
A Current Loop in a Uniform Field
© 2015 Pearson Education, Inc.
Slide 24-180
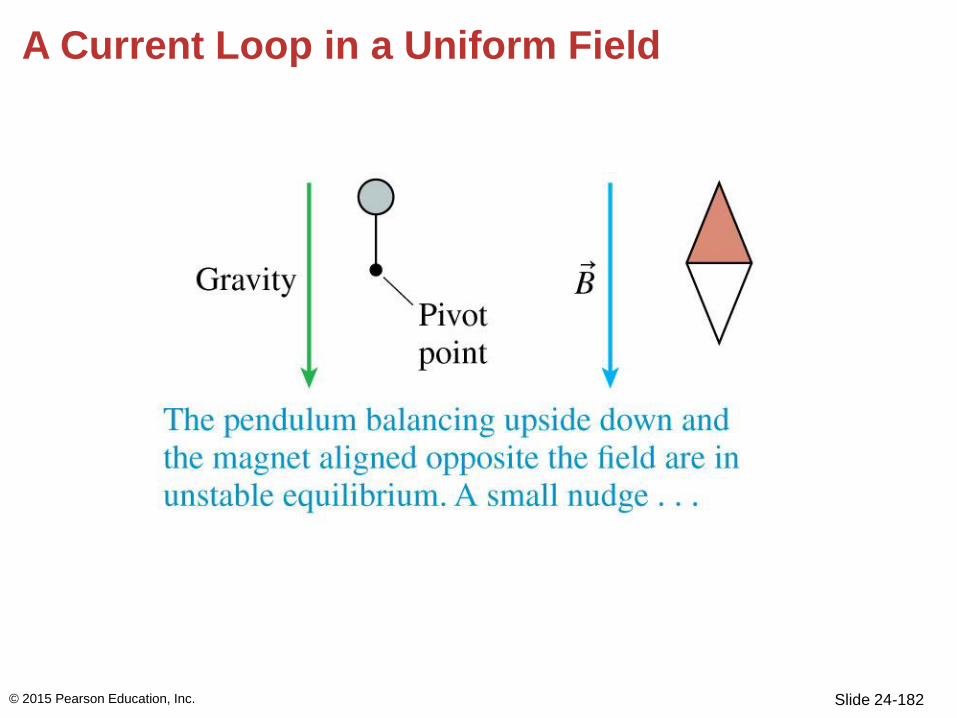
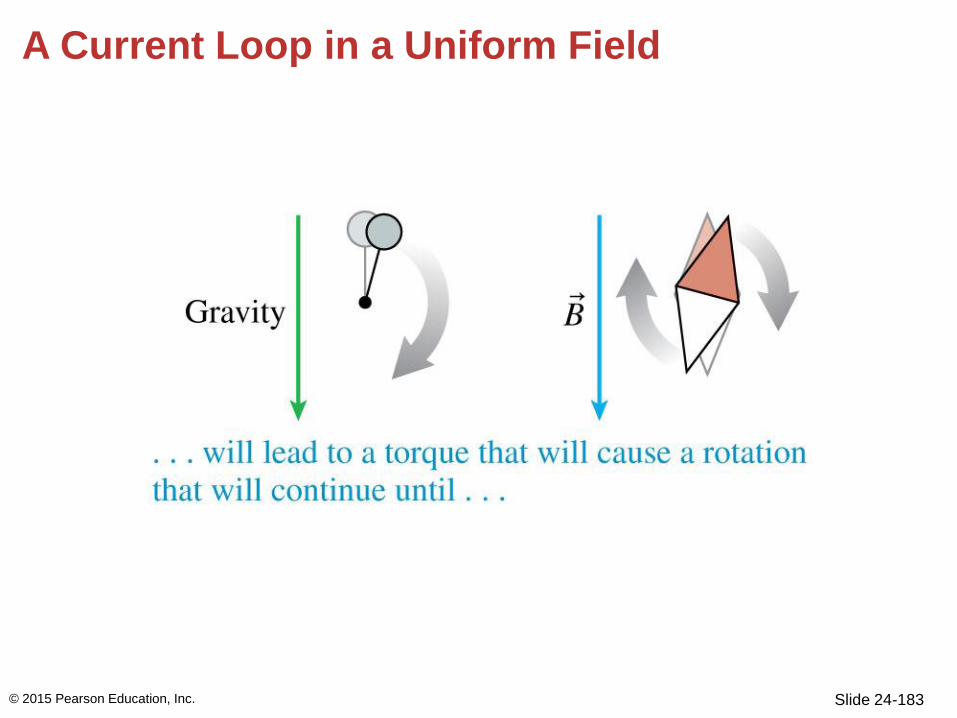
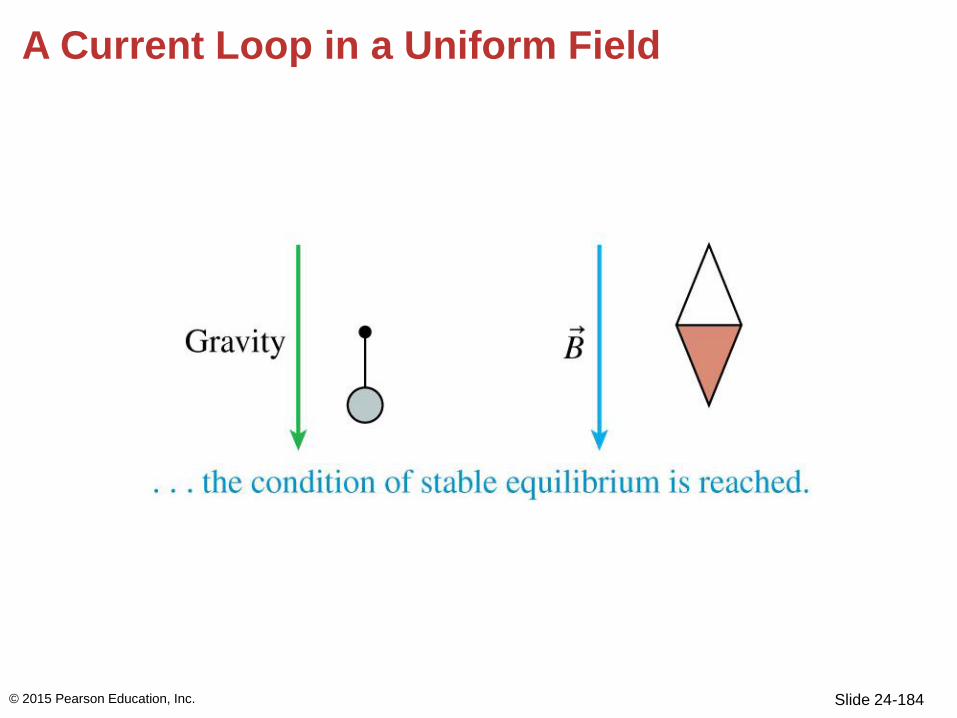
A Current Loop in a Uniform Field
© 2015 Pearson Education, Inc.
Slide 24-181
A Current Loop in a Uniform Field
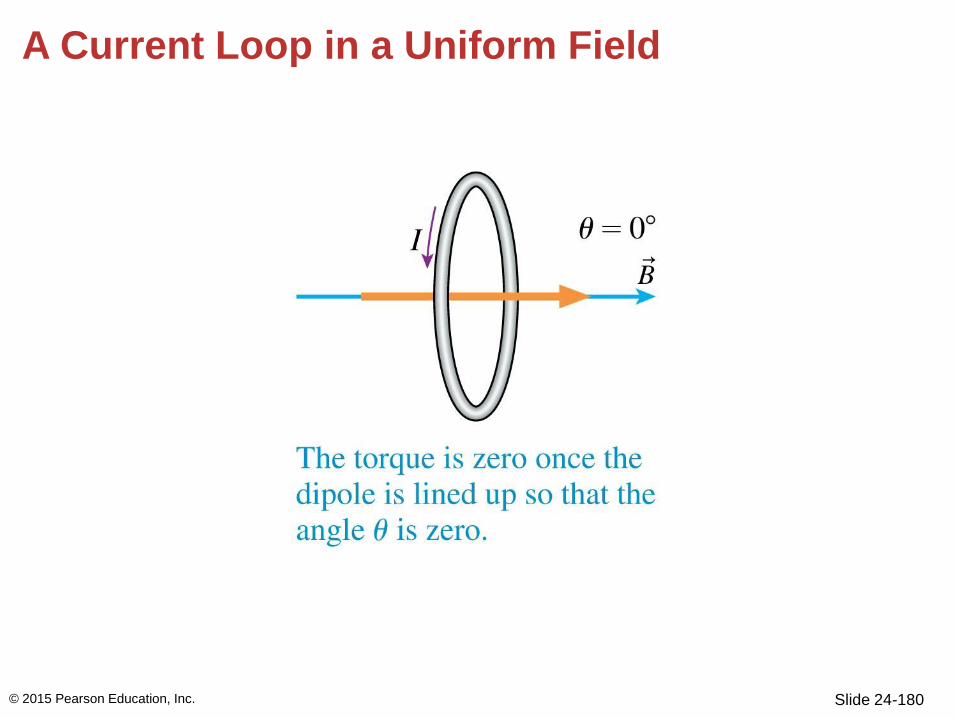
• For any dipole in a field, there are two angles for which
the torque is zero, θ = 0° and θ = 180°.
• θ = 0° is stable: The dipole will stay in this configuration.
• θ = 180° is unstable. The slightest rotation will result in a
torque and rotate the dipole until it reaches θ = 0°.
• This situation has a gravitational analogy: an upside-down
pendulum.
• The unstable alignment of the dipole has a higher energy
and will rotate “downhill” to the stable equilibrium of
lower energy.
© 2015 Pearson Education, Inc.
Slide 24-182
A Current Loop in a Uniform Field
© 2015 Pearson Education, Inc.
Slide 24-183
A Current Loop in a Uniform Field
© 2015 Pearson Education, Inc.
Slide 24-184
A Current Loop in a Uniform Field
© 2015 Pearson Education, Inc.
Slide 24-185
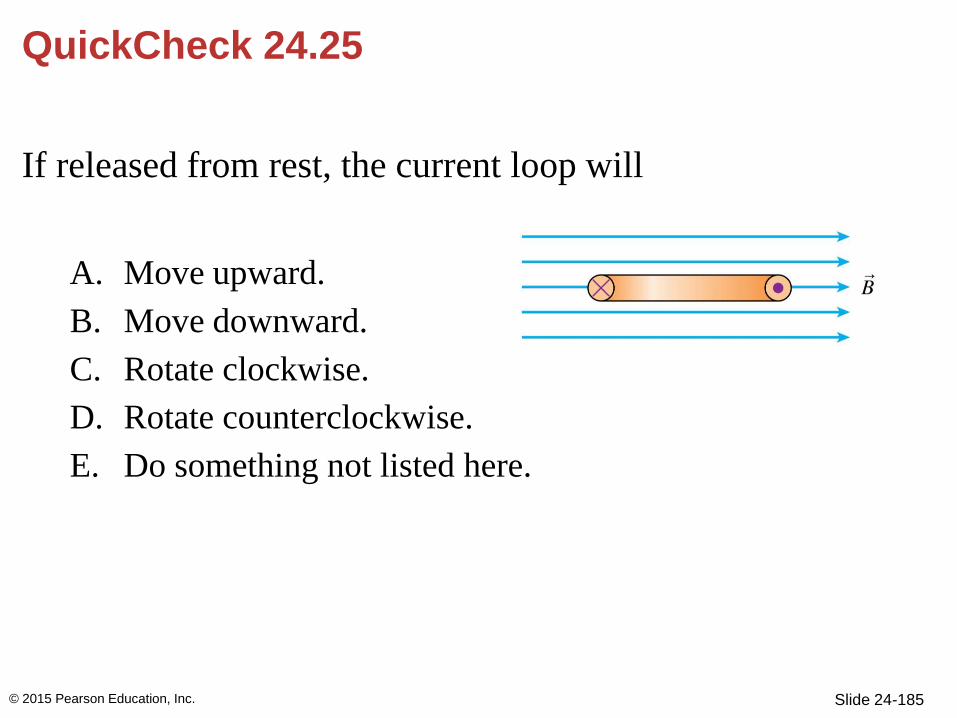
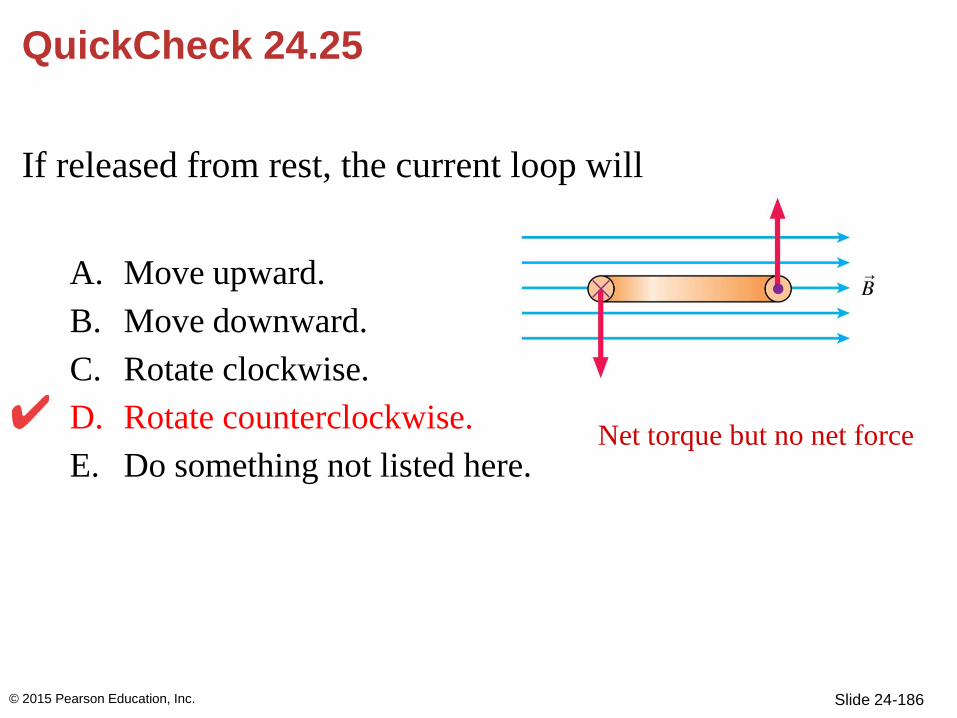
QuickCheck 24.25
If released from rest, the current loop will
A. Move upward.
B. Move downward.
C. Rotate clockwise.
D. Rotate counterclockwise.
E. Do something not listed here.
© 2015 Pearson Education, Inc.
Slide 24-186
Net torque but no net force
QuickCheck 24.25
If released from rest, the current loop will
A. Move upward.
B. Move downward.
C. Rotate clockwise.
D. Rotate counterclockwise.
E. Do something not listed here.
© 2015 Pearson Education, Inc.
Slide 24-187
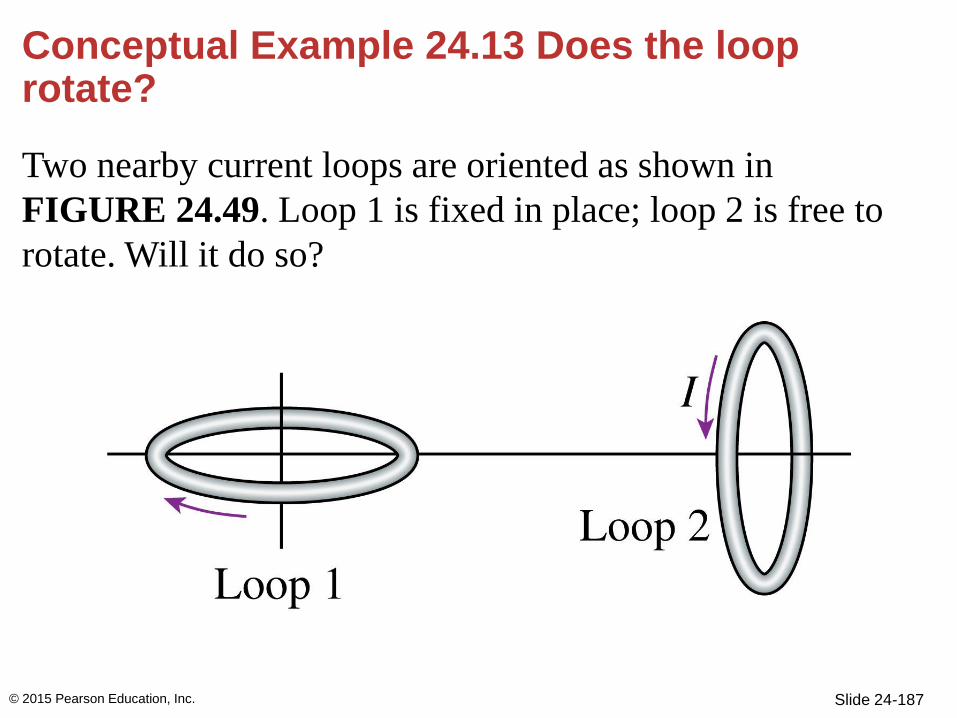
Conceptual Example 24.13 Does the loop rotate?
Two nearby current loops are oriented as shown in
FIGURE 24.49. Loop 1 is fixed in place; loop 2 is free to
rotate. Will it do so?
© 2015 Pearson Education, Inc.
Slide 24-188
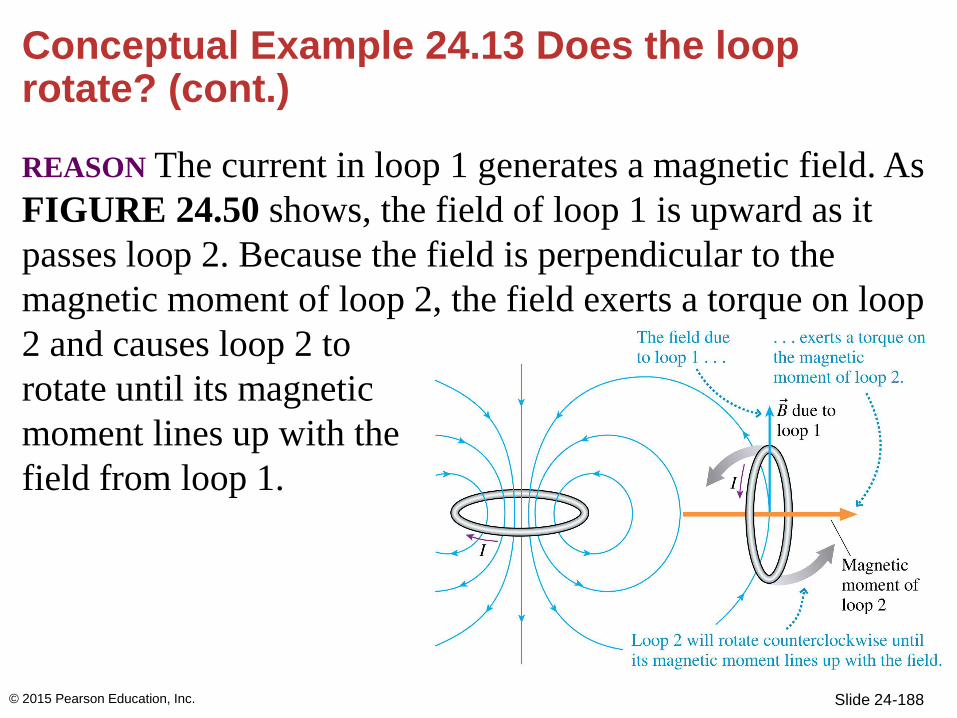
Conceptual Example 24.13 Does the loop rotate? (cont.)
REASON The current in loop 1 generates a magnetic field. As
FIGURE 24.50 shows, the field of loop 1 is upward as it
passes loop 2. Because the field is perpendicular to the
magnetic moment of loop 2, the field exerts a torque on loop
2 and causes loop 2 to
rotate until its magnetic
moment lines up with the
field from loop 1.
© 2015 Pearson Education, Inc.
Slide 24-189
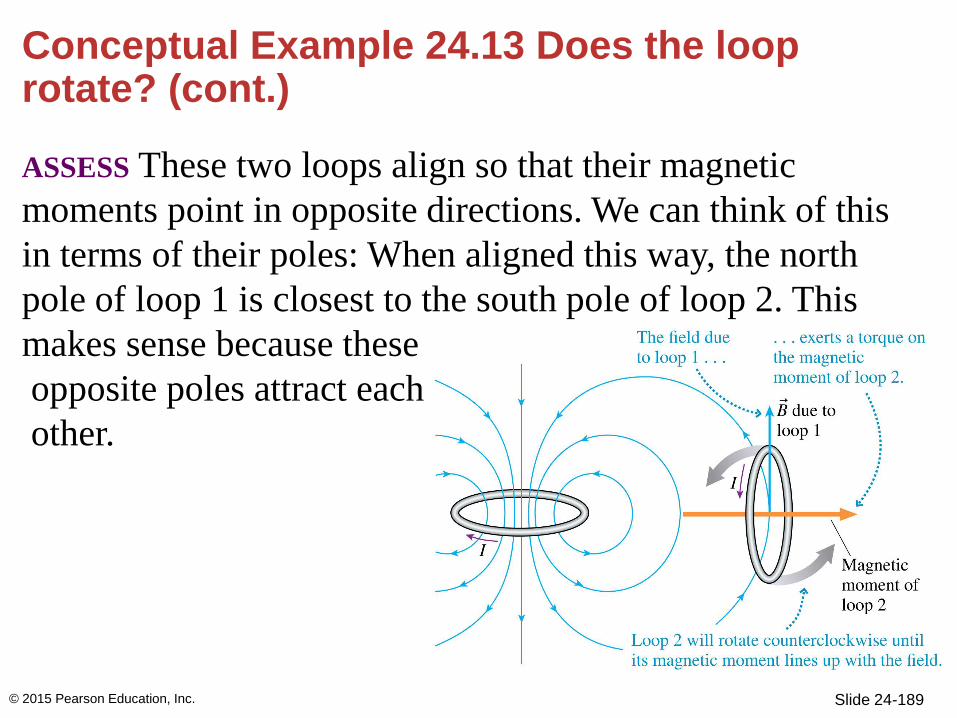
Conceptual Example 24.13 Does the loop rotate? (cont.)
ASSESS These two loops align so that their magnetic
moments point in opposite directions. We can think of this
in terms of their poles: When aligned this way, the north
pole of loop 1 is closest to the south pole of loop 2. This
makes sense because these
opposite poles attract each
other.
© 2015 Pearson Education, Inc.
Slide 24-190
Magnetic Resonance Imaging (MRI)
• Magnetic resonance imaging is a modern diagnostic tool
that provides detailed images of tissues and structures in
the body with no radiation exposure.
• The key to the imaging technique is the magnetic nature of
atoms.
• The nuclei of individual atoms have magnetic moments
and behave like magnetic dipoles.
• Atoms of different elements have different magnetic
moments. A magnetic field exerts different torques on
different kinds of atoms.
© 2015 Pearson Education, Inc.
Slide 24-191
Magnetic Resonance Imaging (MRI)
• If we consider only the hydrogen atoms in a person’s body,
the single proton of each hydrogen atom will align either
with the field (the low-energy state) or opposed to the field
(the high-energy state).
© 2015 Pearson Education, Inc.
Slide 24-192
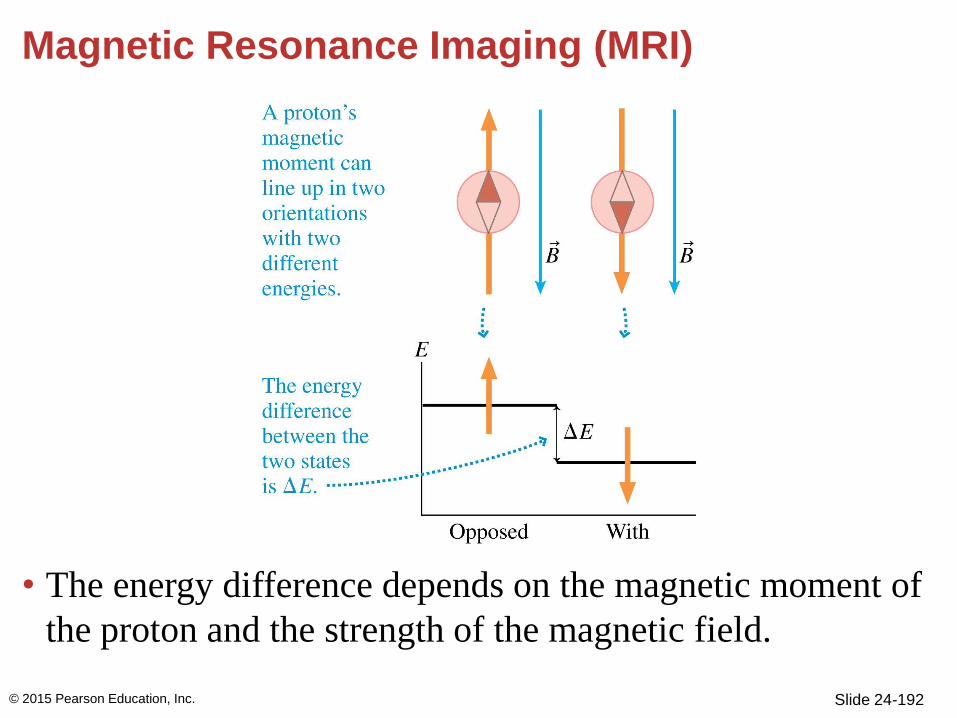
Magnetic Resonance Imaging (MRI)
• The energy difference depends on the magnetic moment of
the proton and the strength of the magnetic field.
© 2015 Pearson Education, Inc.
Slide 24-193
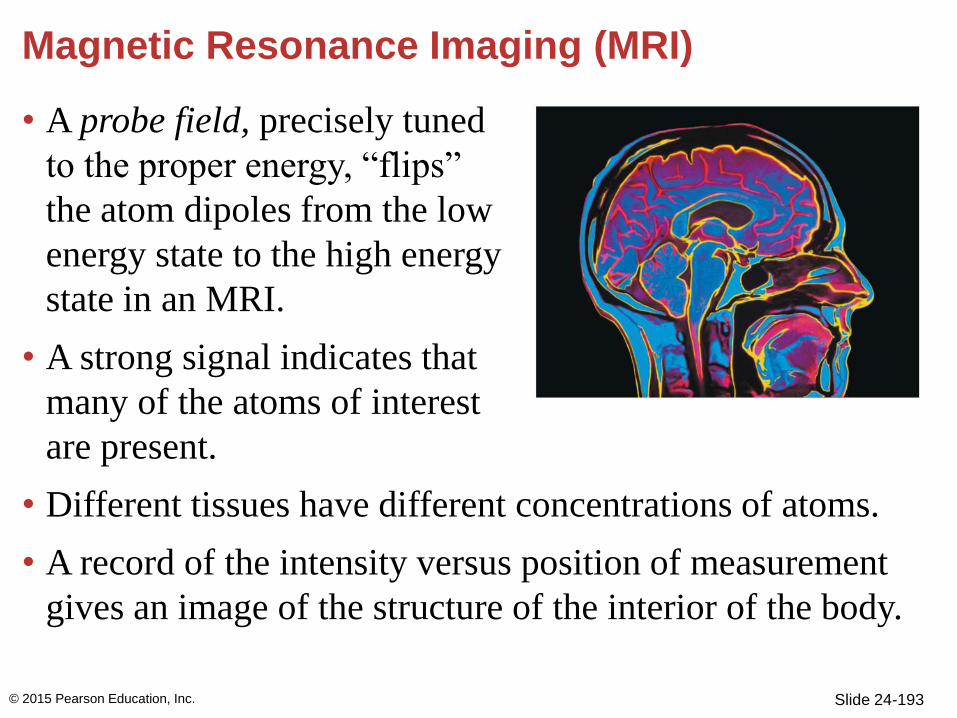
Magnetic Resonance Imaging (MRI)
• A probe field, precisely tuned
to the proper energy, “flips”
the atom dipoles from the low
energy state to the high energy
state in an MRI.
• A strong signal indicates that
many of the atoms of interest
are present.
• Different tissues have different concentrations of atoms.
• A record of the intensity versus position of measurement
gives an image of the structure of the interior of the body.
© 2015 Pearson Education, Inc.
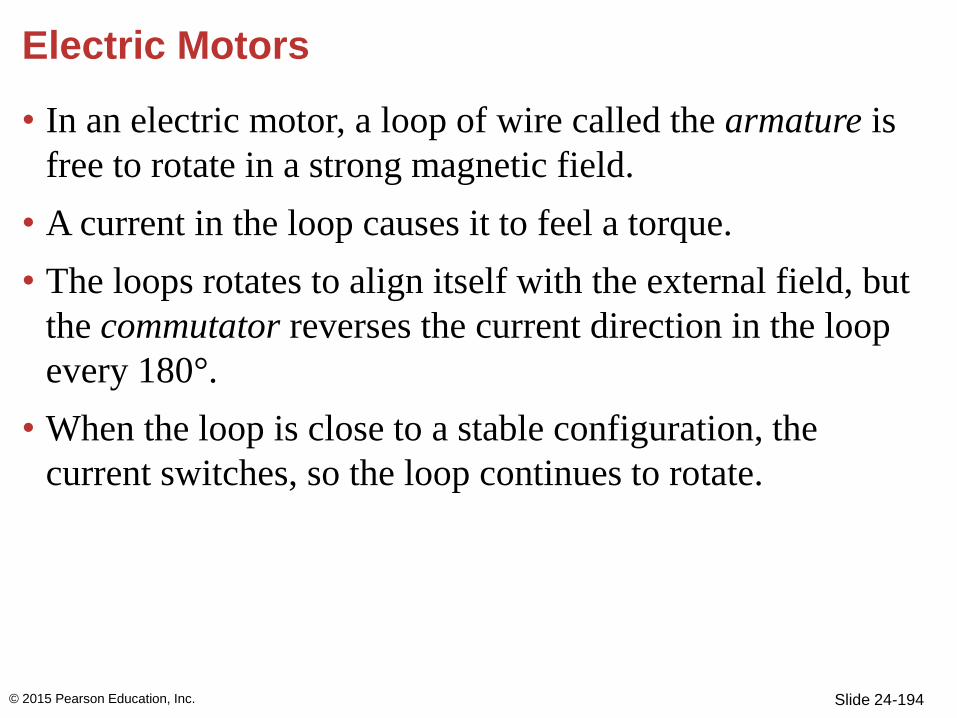
Slide 24-194
Electric Motors
• In an electric motor, a loop of wire called the armature is
free to rotate in a strong magnetic field.
• A current in the loop causes it to feel a torque.
• The loops rotates to align itself with the external field, but
the commutator reverses the current direction in the loop
every 180°.
• When the loop is close to a stable configuration, the
current switches, so the loop continues to rotate.
© 2015 Pearson Education, Inc.
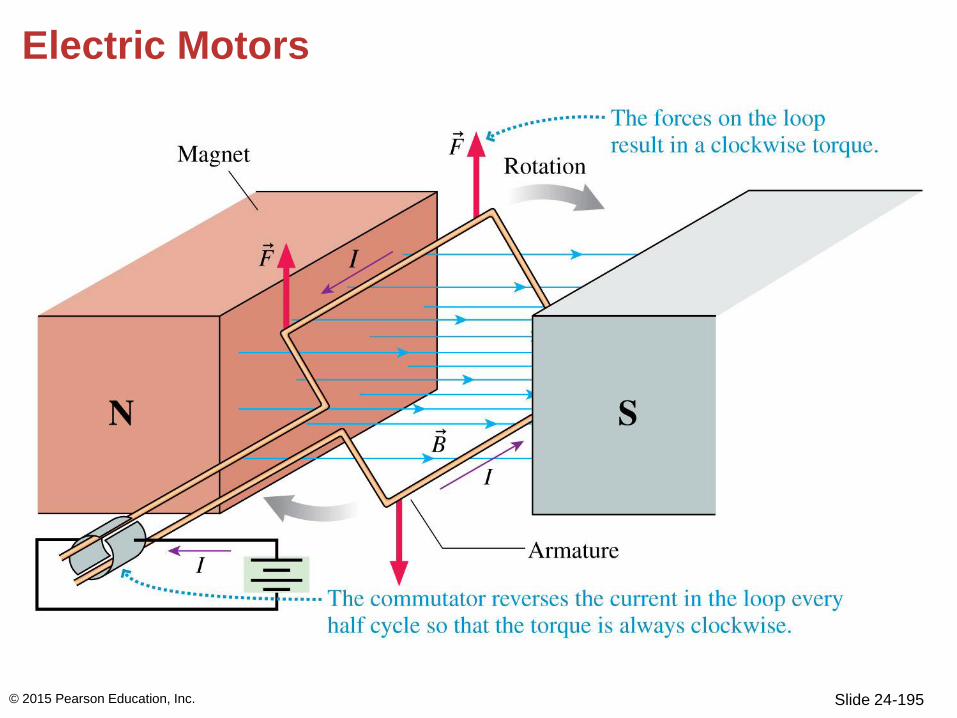
Slide 24-195
Electric Motors
© 2015 Pearson Education, Inc.
Slide 24-196
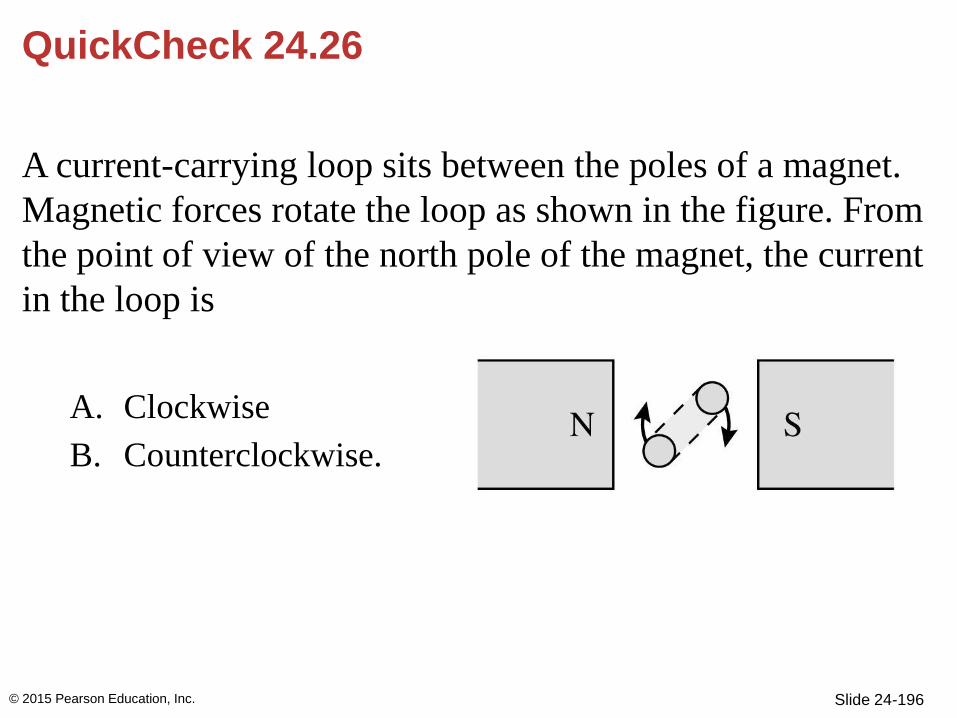
QuickCheck 24.26
A current-carrying loop sits between the poles of a magnet.
Magnetic forces rotate the loop as shown in the figure. From
the point of view of the north pole of the magnet, the current
in the loop is
A. Clockwise
B. Counterclockwise.
© 2015 Pearson Education, Inc.
Slide 24-197
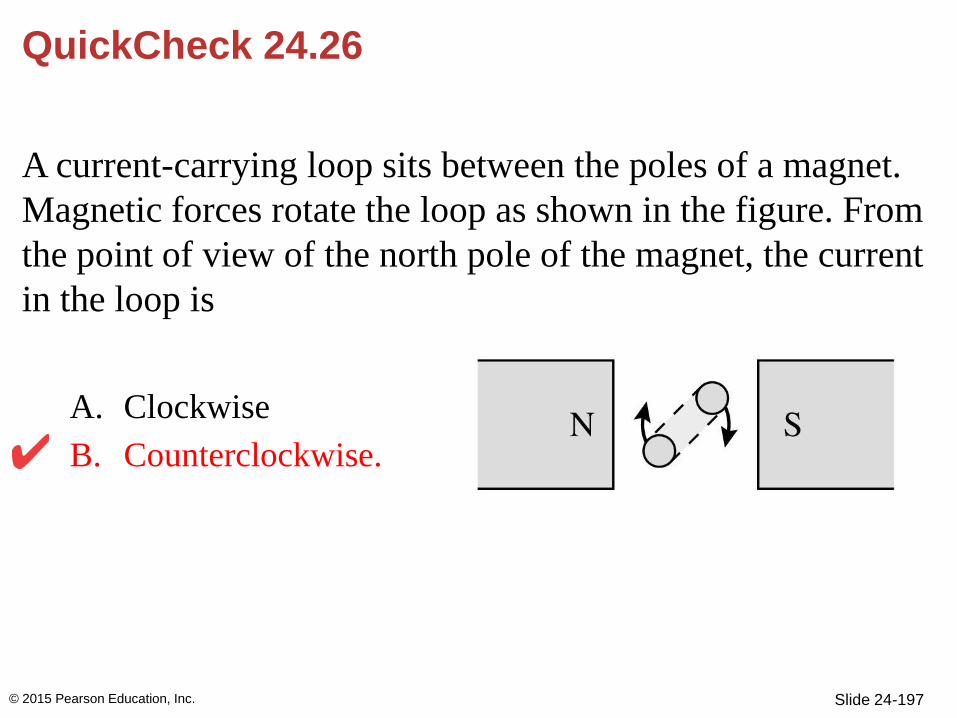
QuickCheck 24.26
A current-carrying loop sits between the poles of a magnet.
Magnetic forces rotate the loop as shown in the figure. From
the point of view of the north pole of the magnet, the current
in the loop is
A. Clockwise
B. Counterclockwise.
© 2015 Pearson Education, Inc.
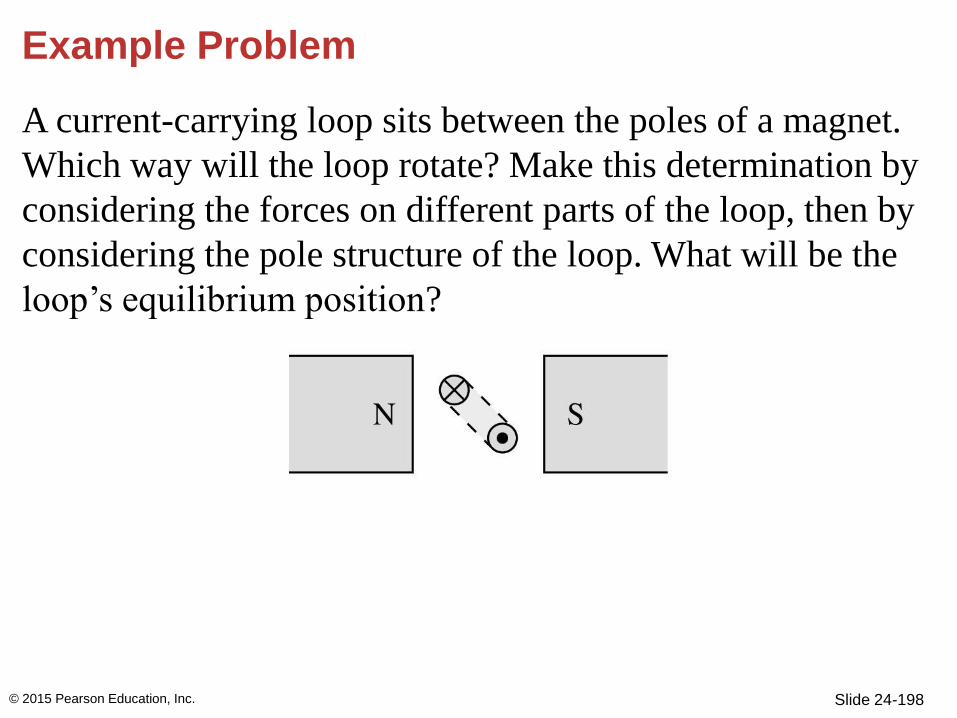
Slide 24-198
Example Problem
A current-carrying loop sits between the poles of a magnet.
Which way will the loop rotate? Make this determination by
considering the forces on different parts of the loop, then by
considering the pole structure of the loop. What will be the
loop’s equilibrium position?
© 2015 Pearson Education, Inc.
Slide 24-199
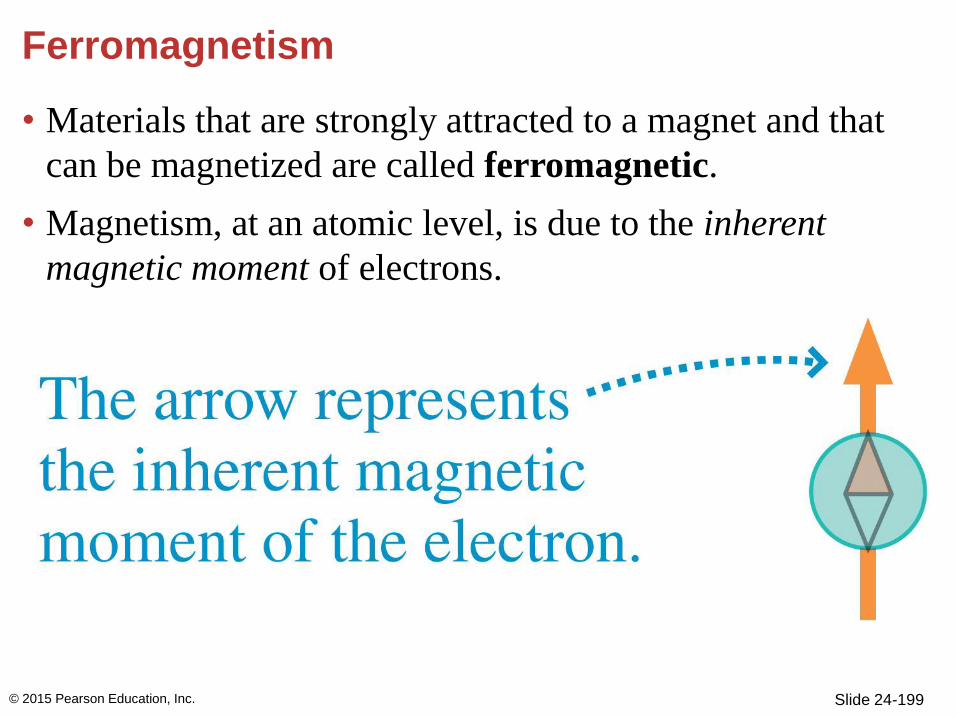
Ferromagnetism
• Materials that are strongly attracted to a magnet and that
can be magnetized are called ferromagnetic.
• Magnetism, at an atomic level, is due to the inherent
magnetic moment of electrons.
© 2015 Pearson Education, Inc.
Slide 24-200
Ferromagnetism
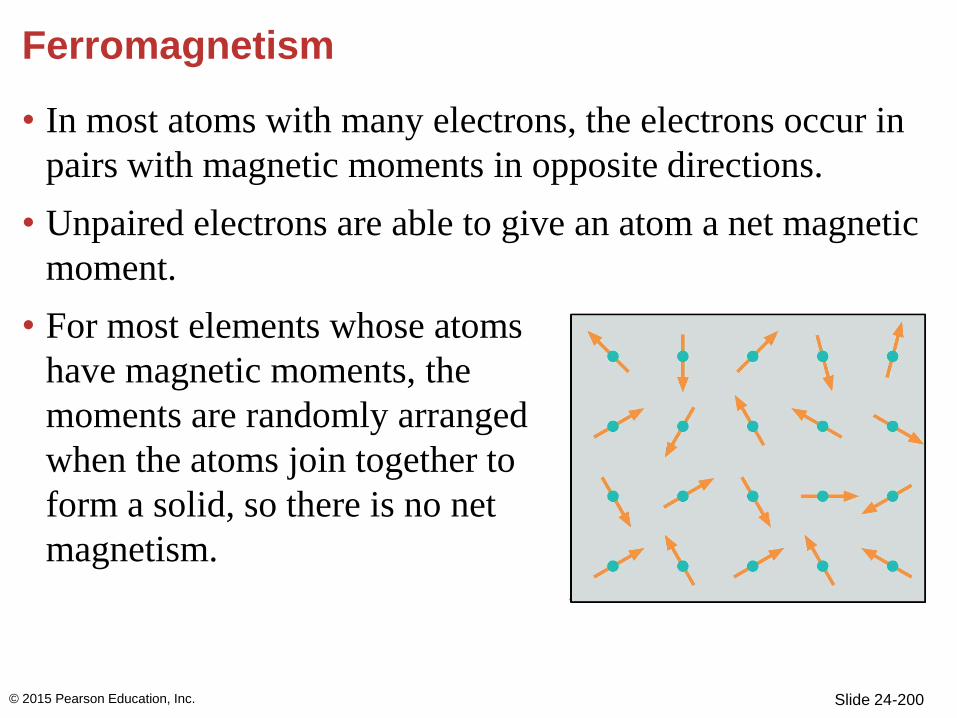
• In most atoms with many electrons, the electrons occur in
pairs with magnetic moments in opposite directions.
• Unpaired electrons are able to give an atom a net magnetic
moment.
• For most elements whose atoms
have magnetic moments, the
moments are randomly arranged
when the atoms join together to
form a solid, so there is no net
magnetism.
© 2015 Pearson Education, Inc.
Slide 24-201
Ferromagnetism
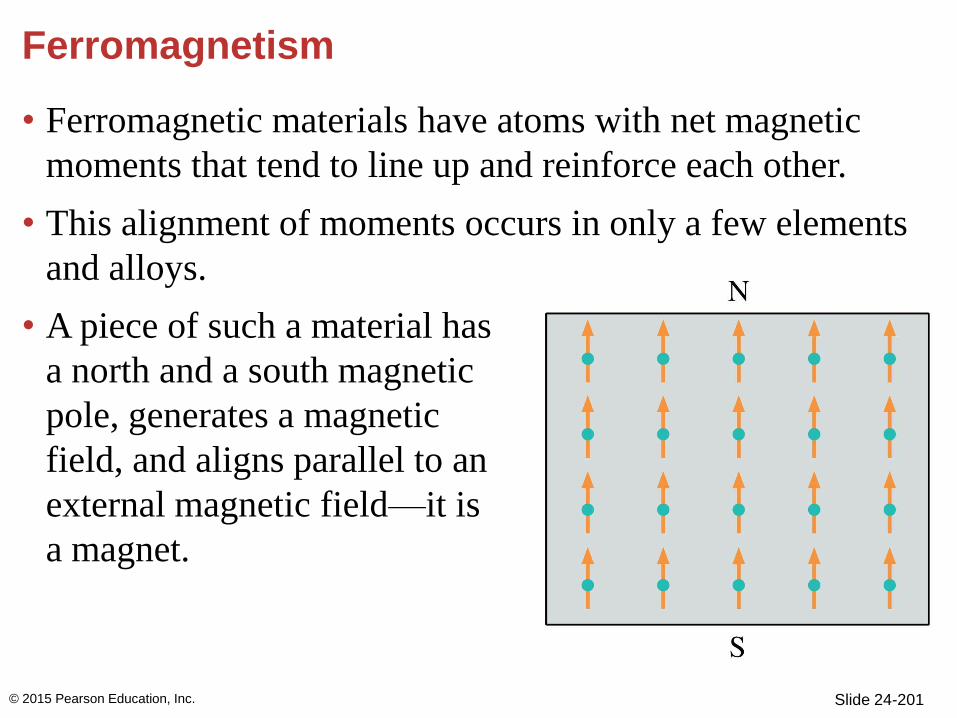
• Ferromagnetic materials have atoms with net magnetic
moments that tend to line up and reinforce each other.
• This alignment of moments occurs in only a few elements
and alloys.
• A piece of such a material has
a north and a south magnetic
pole, generates a magnetic
field, and aligns parallel to an
external magnetic field—it is
a magnet.
© 2015 Pearson Education, Inc.
Slide 24-202
Ferromagnetism
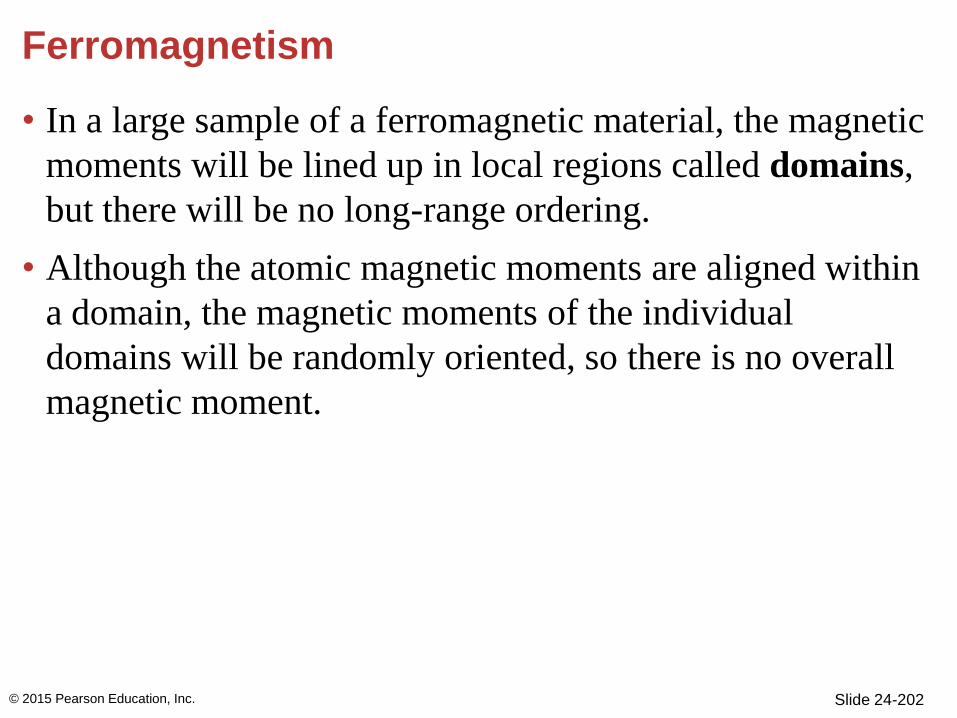
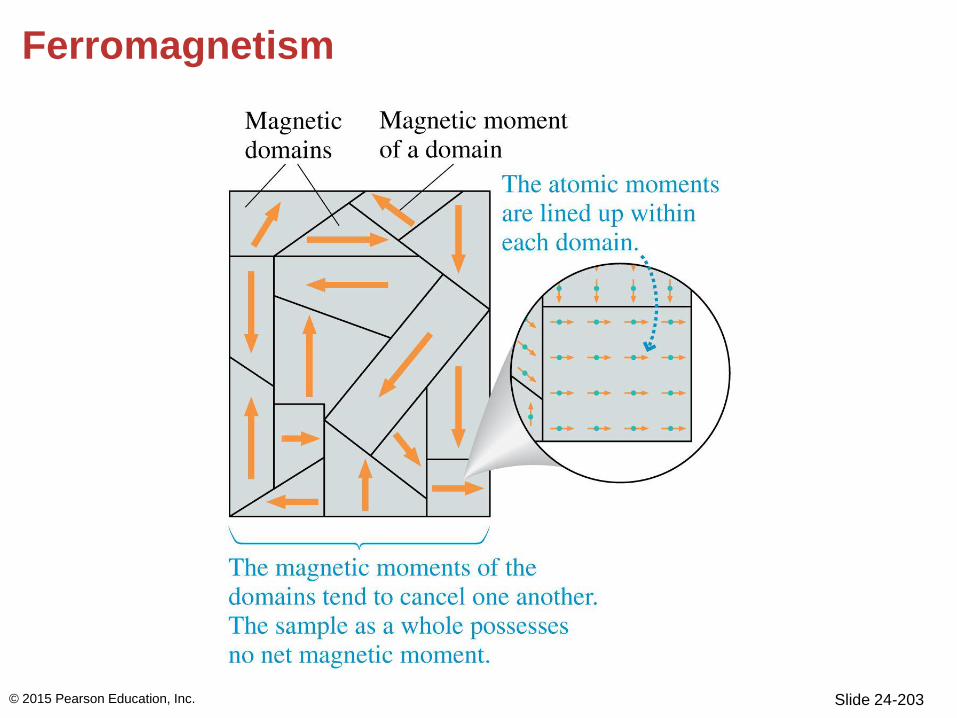
• In a large sample of a ferromagnetic material, the magnetic
moments will be lined up in local regions called domains,
but there will be no long-range ordering.
• Although the atomic magnetic moments are aligned within
a domain, the magnetic moments of the individual
domains will be randomly oriented, so there is no overall
magnetic moment.
© 2015 Pearson Education, Inc.
Slide 24-203
Ferromagnetism
© 2015 Pearson Education, Inc.

Slide 24-204
Induced Magnetic Moments
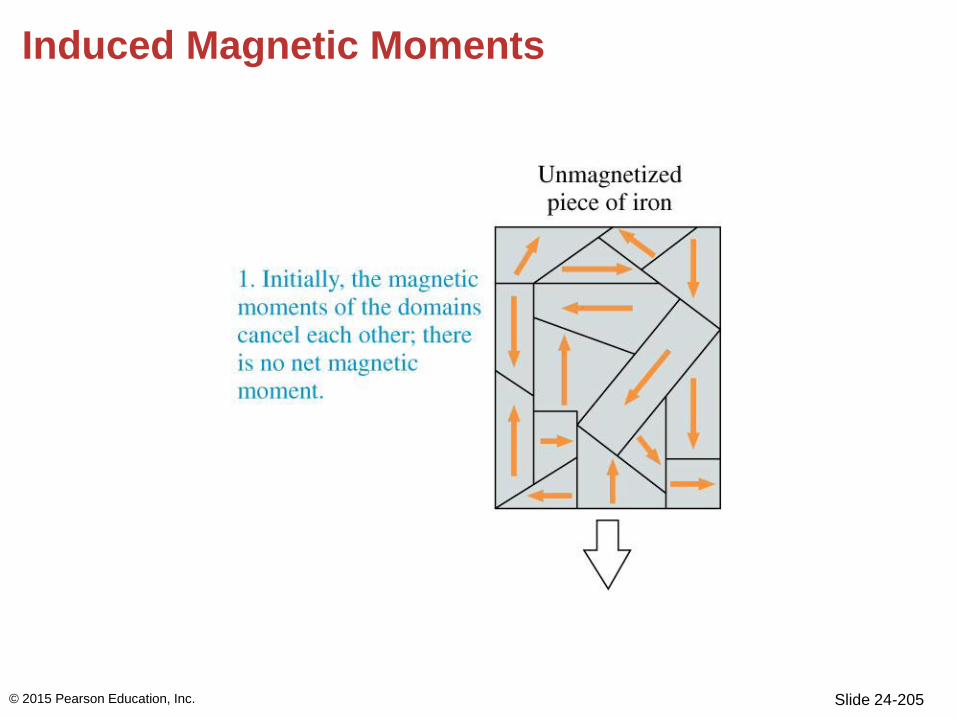
• A ferromagnetic material can develop an induced magnetic
moment when a magnet is nearby.
© 2015 Pearson Education, Inc.
Slide 24-205
Induced Magnetic Moments
© 2015 Pearson Education, Inc.

Slide 24-206
Induced Magnetic Moments
© 2015 Pearson Education, Inc.
Slide 24-207
Induced Magnetic Moments
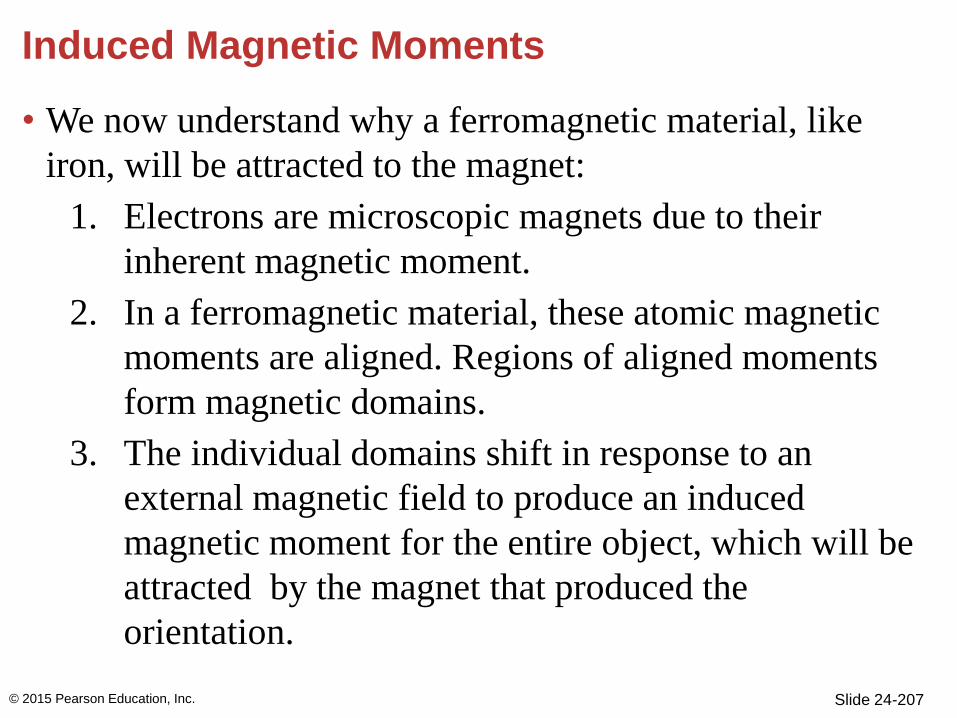
• We now understand why a ferromagnetic material, like
iron, will be attracted to the magnet:
1. Electrons are microscopic magnets due to their
inherent magnetic moment.
2. In a ferromagnetic material, these atomic magnetic
moments are aligned. Regions of aligned moments
form magnetic domains.
3. The individual domains shift in response to an
external magnetic field to produce an induced
magnetic moment for the entire object, which will be
attracted by the magnet that produced the
orientation.
© 2015 Pearson Education, Inc.
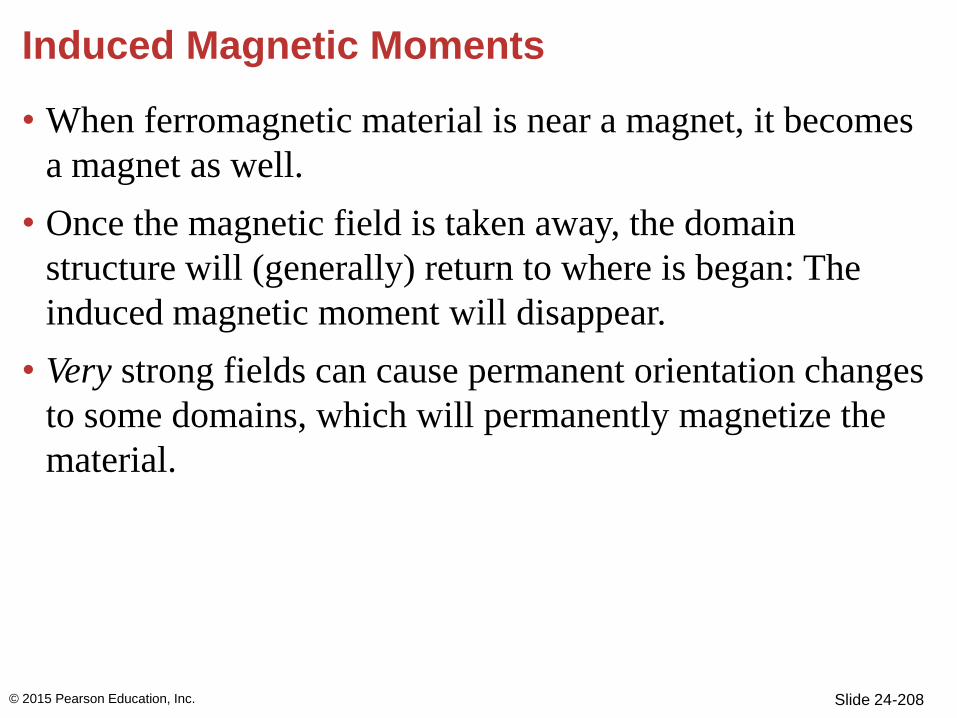
Slide 24-208
Induced Magnetic Moments
• When ferromagnetic material is near a magnet, it becomes
a magnet as well.
• Once the magnetic field is taken away, the domain
structure will (generally) return to where is began: The
induced magnetic moment will disappear.
• Very strong fields can cause permanent orientation changes
to some domains, which will permanently magnetize the
material.
© 2015 Pearson Education, Inc.
Slide 24-209
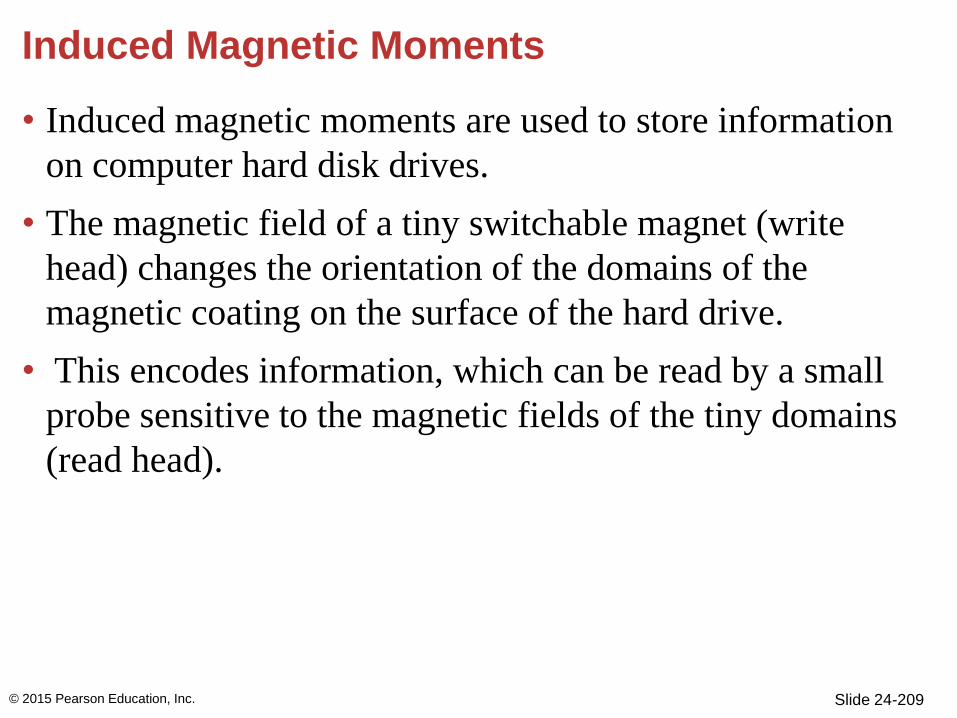
Induced Magnetic Moments
• Induced magnetic moments are used to store information
on computer hard disk drives.
• The magnetic field of a tiny switchable magnet (write
head) changes the orientation of the domains of the
magnetic coating on the surface of the hard drive.
• This encodes information, which can be read by a small
probe sensitive to the magnetic fields of the tiny domains
(read head).
© 2015 Pearson Education, Inc.
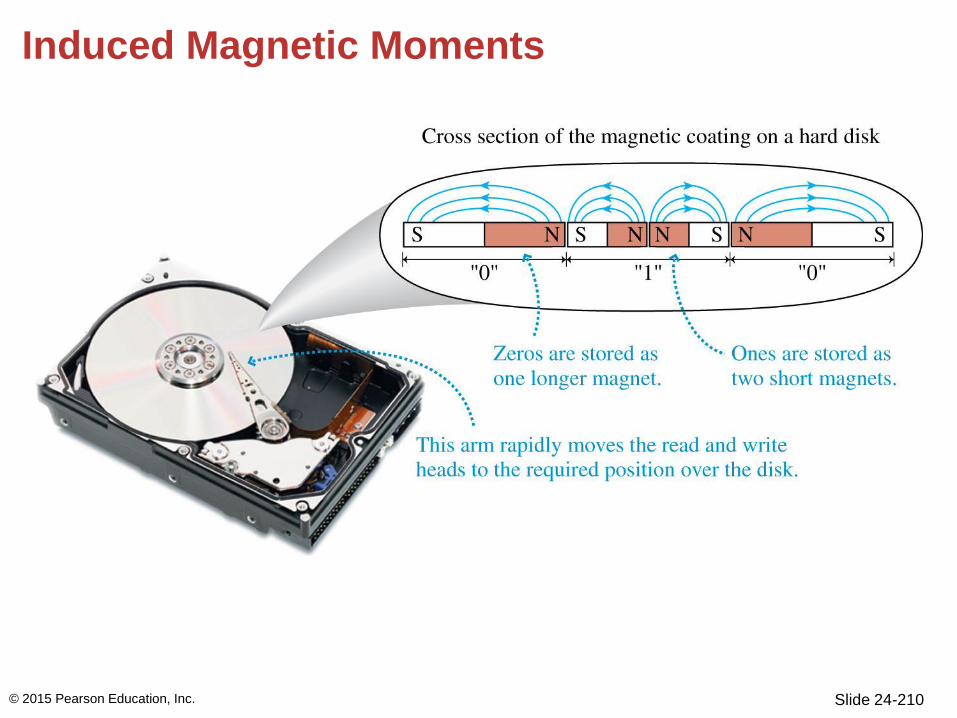
Slide 24-210
Induced Magnetic Moments
© 2015 Pearson Education, Inc.

Slide 24-211
Electromagnets
• The magnetic domains in a ferromagnetic material have a
strong tendency to line up with an applied magnetic field.
• A ferromagnetic material can be used to increase the
strength of the field from a current-carrying wire.
• A solenoid wound around a piece of iron will be
magnetized when a current is passed through the wire,
creating an electromagnet.
• An electromagnet can produce a field that is hundreds of
times stronger than the field due to the solenoid itself.
© 2015 Pearson Education, Inc.
Slide 24-212
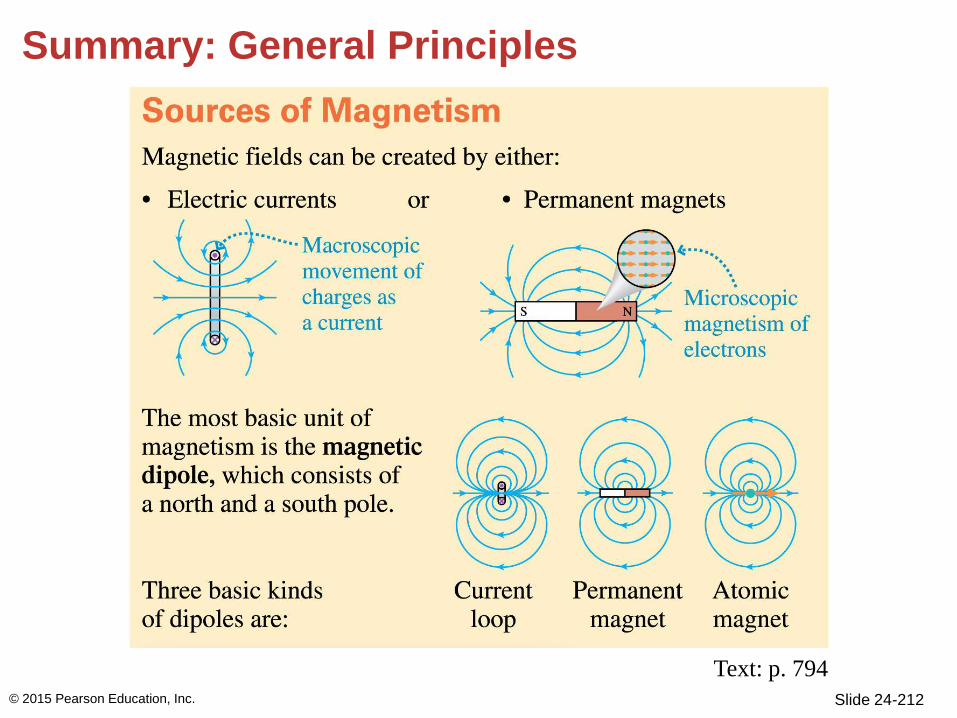
Summary: General Principles
© 2015 Pearson Education, Inc.
Text: p. 794
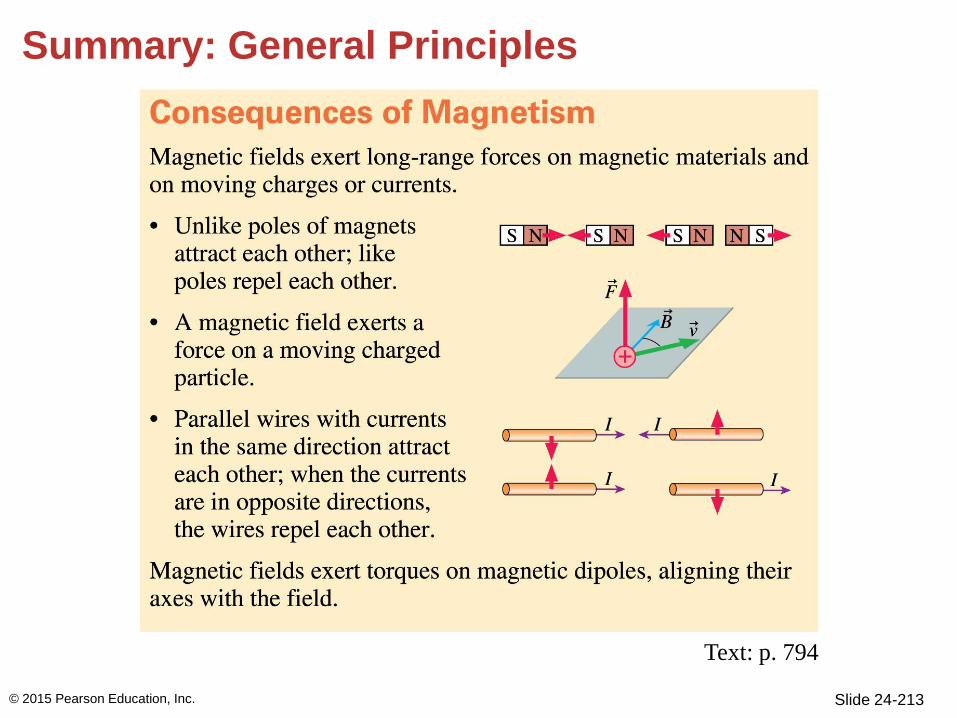
Slide 24-213
Summary: General Principles
© 2015 Pearson Education, Inc.
Text: p. 794
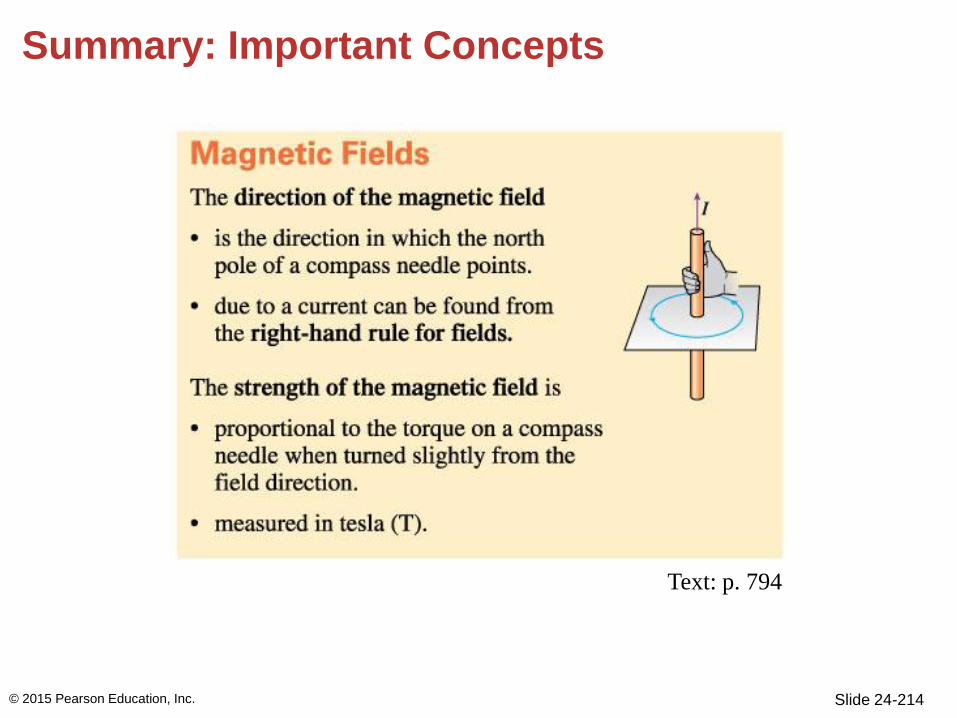
Slide 24-214
Summary: Important Concepts
© 2015 Pearson Education, Inc.
Text: p. 794
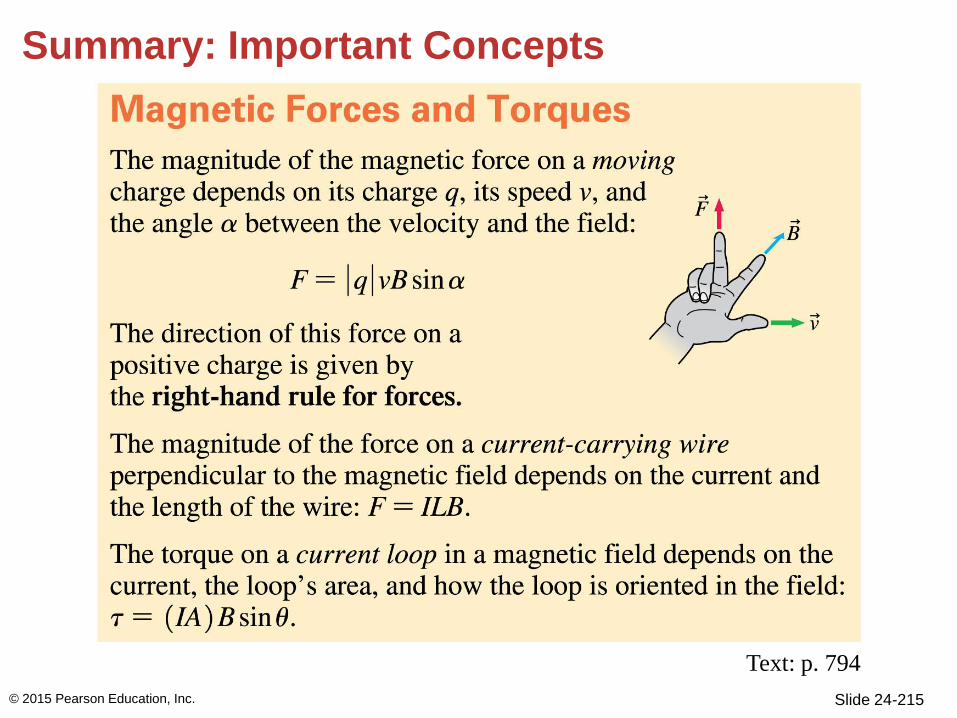
Slide 24-215
Summary: Important Concepts
© 2015 Pearson Education, Inc.
Text: p. 794
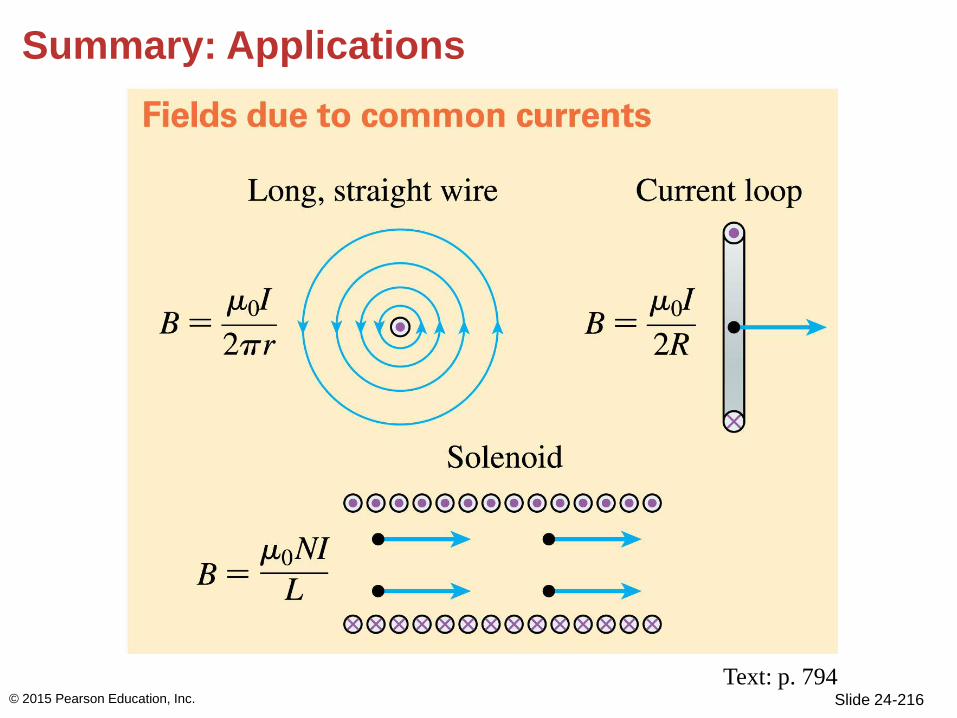
Slide 24-216
Summary: Applications
© 2015 Pearson Education, Inc.
Text: p. 794
Slide 24-217
Summary: Applications
© 2015 Pearson Education, Inc.
Text: p. 794

Slide 24-218
Summary: Applications
© 2015 Pearson Education, Inc.
Text: p. 794
Slide 24-219
Summary
© 2015 Pearson Education, Inc.
Text: p. 794
Slide 24-220
Summary
© 2015 Pearson Education, Inc.
Text: p. 794
Slide 24-221
Summary
© 2015 Pearson Education, Inc.
Text: p. 794