Embed Size (px)
Citation preview

NC SOP Ver 1.15v2 Chpt 2 POS CAD Kiosk.docx 2-1 10-Oct-17
Chapter 2 POS, CAD, & Kiosk Operating Procedures 2.1 Background ................................................................................................................. 2-2
2.1.1 Applications ......................................................................................................... 2-2
2.1.2 Planned Maintenance System .............................................................................. 2-2
2.2 Navy Cash Point of Sale Device (POS) ...................................................................... 2-2
2.2.1 General ................................................................................................................. 2-3
2.2.2 Admin Mode — Setting Up the POS ................................................................... 2-4
2.2.3 Error Messages................................................................................................... 2-20
2.2.4 POS Administrative and Troubleshooting Tasks ............................................... 2-22
2.2.5 POS Operations .................................................................................................. 2-23
2.2.6 Normal Mode – Purchases ................................................................................. 2-25
2.2.7 Proxy Mode ........................................................................................................ 2-32
2.2.8 Proxy Mode–Disbursing Application Interaction .............................................. 2-34
2.2.9 Proxy Mode–ROM Application Interaction ...................................................... 2-40
2.3 Navy Cash Card Accepting Device (CAD) ............................................................. 2-44
2.3.1 General ............................................................................................................... 2-44
2.3.2 Messages. ........................................................................................................... 2-44
2.3.3 Administrative Functions ................................................................................... 2-47
2.3.4 CAD Operations................................................................................................. 2-52
2.3.5 CAD Maintenance and Set Up ........................................................................... 2-54
2.4 Navy Cash Kiosk ....................................................................................................... 2-56
2.4.1 General ............................................................................................................... 2-56
2.4.2 Admin Mode ...................................................................................................... 2-57
2.4.3 Administrative Functions ................................................................................... 2-60
2.4.4 Messages ............................................................................................................ 2-66
2.4.5 General Maintenance and Troubleshooting ....................................................... 2-67
2.4.6 Severe Troubleshooting ..................................................................................... 2-69
2.5 Navy Cash Equipment Checklist ............................................................................. 2-69

NC SOP Ver 1.15v2 Chpt 2 POS CAD Kiosk.docx 2-2 10-Oct-17
2.1 Background This chapter of the SOP describes the operation of the Navy Cash Point-Of-Sale device
(POS), Card Accepting Device (CAD), and Kiosk.
2.1.1 Applications There are three applications loaded on each of the devices, the Navy Cash Shell, Navy Cash
Application, and Remote Update Tuner. These three applications are installed on the devices as part of the initial operating system image.
(1) Navy Cash Shell. The NavyCashShell is a background monitoring application that ensures the Navy Cash application is always running and serves as a status indicator during Navy Cash Application updates. The NavyCashShell also ensures that users do not have access to the Windows operating system on the device if the Navy Cash Application is not running.
(2) Navy Cash Application. Navy Cash is the primary application on each of the devices. The Navy Cash POS Application, CAD Application, and Kiosk Application run on top of the NavyCashShell monitoring application. The Navy Cash POS, CAD, and Kiosk Applications are always running, unless they are being remotely updated. In that case, the NavyCashShell displays a “Please Wait…Navy Cash System Update in Progress” message to the user until the POS, CAD, or Kiosk Application is installed and restarted.
(3) Remote Update Tuner. The Remote Update Tuner allows for remote updates to the NavyCashShell, POS, CAD, and Kiosk Applications, and Remote Update Tuner as well as some other remote application capabilities.
2.1.2 Planned Maintenance System Preventive maintenance for the Navy Cash Financial System is covered through the Planned
Maintenance System (PMS). PMS information for Navy Cash is available from the ship’s Maintenance and Material Management (3-M) Coordinator. Maintenance Index Page (MIP) number 6541/080-14 applies to Navy Cash. In particular, proper cleaning of the card readers can significantly reduce the incidents of card readers failing to read the Navy Cash card.
2.2 Navy Cash Point of Sale Device (POS) The POS is a portable, handheld device that is used to record sales transactions in the Navy
Cash system. It can be operated on line or off line and has a battery backup for use in the portable mode or in the event of power failure in order to continue to operate and protect data. The disbursing office has POSs that may be checked out when required. Since a limited number of these devices are available, they must be returned to the disbursing office as soon as possible after use.
NC SOP Ver 1.15v2 Chpt 2 POS CAD Kiosk.docx 2-3 10-Oct-17
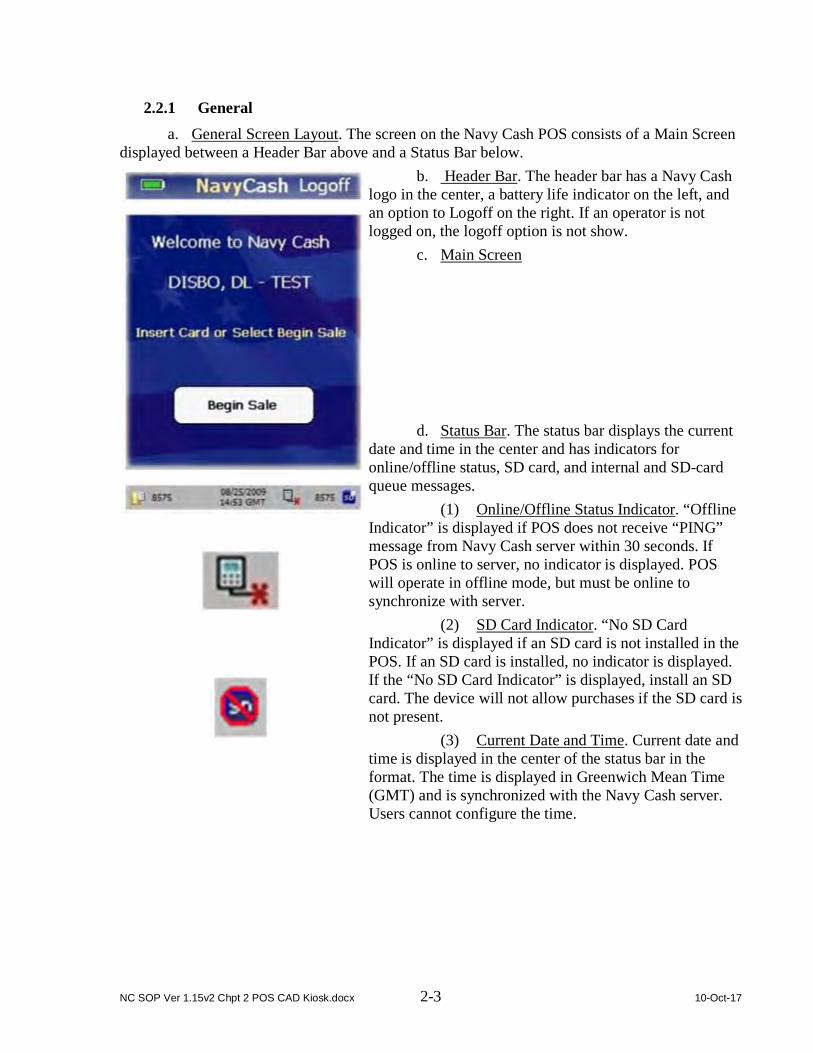
2.2.1 General a. General Screen Layout. The screen on the Navy Cash POS consists of a Main Screen
displayed between a Header Bar above and a Status Bar below.
b. Header Bar. The header bar has a Navy Cash logo in the center, a battery life indicator on the left, and an option to Logoff on the right. If an operator is not logged on, the logoff option is not show.
c. Main Screen
d. Status Bar. The status bar displays the current date and time in the center and has indicators for online/offline status, SD card, and internal and SD-card queue messages.
(1) Online/Offline Status Indicator. “Offline Indicator” is displayed if POS does not receive “PING” message from Navy Cash server within 30 seconds. If POS is online to server, no indicator is displayed. POS will operate in offline mode, but must be online to synchronize with server.
(2) SD Card Indicator. “No SD Card Indicator” is displayed if an SD card is not installed in the POS. If an SD card is installed, no indicator is displayed. If the “No SD Card Indicator” is displayed, install an SD card. The device will not allow purchases if the SD card is not present.
(3) Current Date and Time. Current date and time is displayed in the center of the status bar in the format. The time is displayed in Greenwich Mean Time (GMT) and is synchronized with the Navy Cash server. Users cannot configure the time.
NC SOP Ver 1.15v2 Chpt 2 POS CAD Kiosk.docx 2-4 10-Oct-17
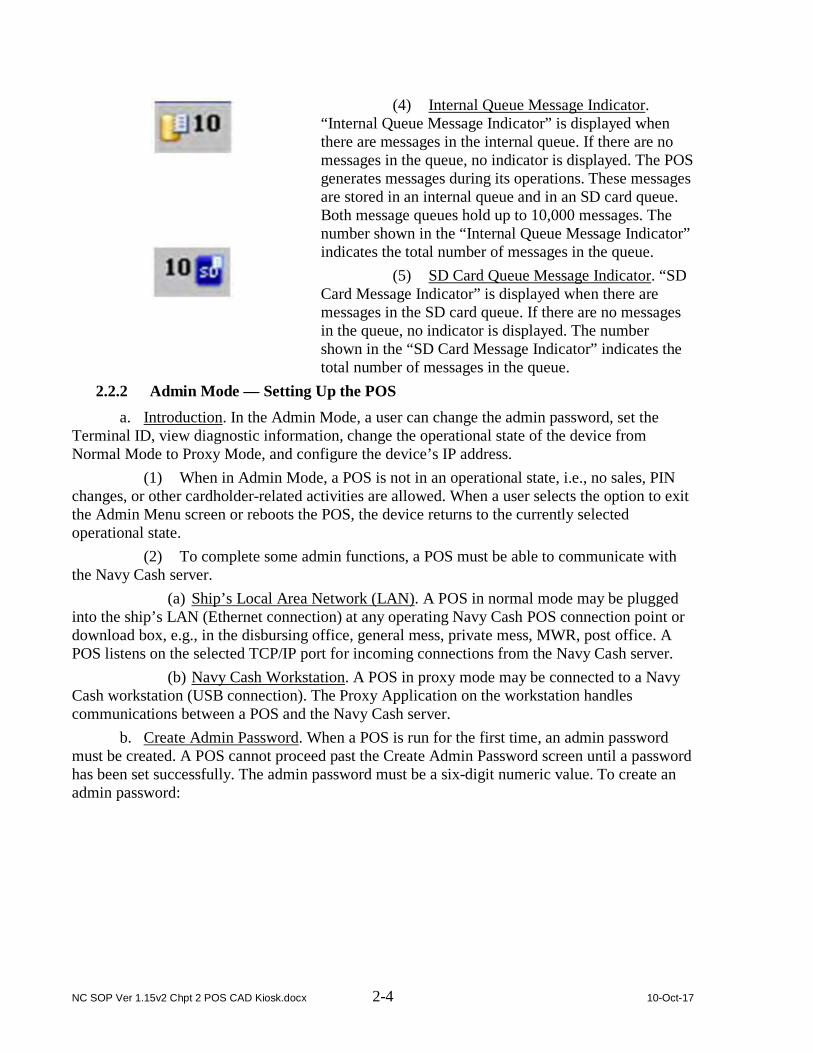
(4) Internal Queue Message Indicator. “Internal Queue Message Indicator” is displayed when there are messages in the internal queue. If there are no messages in the queue, no indicator is displayed. The POS generates messages during its operations. These messages are stored in an internal queue and in an SD card queue. Both message queues hold up to 10,000 messages. The number shown in the “Internal Queue Message Indicator” indicates the total number of messages in the queue.
(5) SD Card Queue Message Indicator. “SD Card Message Indicator” is displayed when there are messages in the SD card queue. If there are no messages in the queue, no indicator is displayed. The number shown in the “SD Card Message Indicator” indicates the total number of messages in the queue.
2.2.2 Admin Mode — Setting Up the POS a. Introduction. In the Admin Mode, a user can change the admin password, set the
Terminal ID, view diagnostic information, change the operational state of the device from Normal Mode to Proxy Mode, and configure the device’s IP address.
(1) When in Admin Mode, a POS is not in an operational state, i.e., no sales, PIN changes, or other cardholder-related activities are allowed. When a user selects the option to exit the Admin Menu screen or reboots the POS, the device returns to the currently selected operational state.
(2) To complete some admin functions, a POS must be able to communicate with the Navy Cash server.
(a) Ship’s Local Area Network (LAN). A POS in normal mode may be plugged into the ship’s LAN (Ethernet connection) at any operating Navy Cash POS connection point or download box, e.g., in the disbursing office, general mess, private mess, MWR, post office. A POS listens on the selected TCP/IP port for incoming connections from the Navy Cash server.
(b) Navy Cash Workstation. A POS in proxy mode may be connected to a Navy Cash workstation (USB connection). The Proxy Application on the workstation handles communications between a POS and the Navy Cash server.
b. Create Admin Password. When a POS is run for the first time, an admin password must be created. A POS cannot proceed past the Create Admin Password screen until a password has been set successfully. The admin password must be a six-digit numeric value. To create an admin password:

NC SOP Ver 1.15v2 Chpt 2 POS CAD Kiosk.docx 2-5 10-Oct-17
(1) The POS prompts the user to enter an admin password. The “OK” button is disabled until six digits are entered.
(2) Use the keypad to enter a six-digit numeric password.
(3) If any digits are entered incorrectly, touch the “CLR” button to clear the entry textbox, and re-enter the password.
(4) After six digits are entered, the entry textbox turns green, and the “OK” button is enabled. Touch the “OK” button to continue.
(5) The device prompts you to confirm the admin password.
(6) Confirm the admin password by using the keypad to re-enter it.
(7) If any digits are entered incorrectly, touch the “CLR” button to clear the entry textbox, and re-enter the password.
(8) If you choose not to set the admin password, touch the “Cancel” button to return to the Create Admin Password screen. You will not be able to proceed any further until an admin password is set.
(9) After six digits are entered, the entry textbox turns green, and the “OK” button is enabled. Touch the “OK” button to continue.
(10) POS verifies both passwords match. (a) If the passwords do not match, the
entry textbox turns red, and a “Password Mismatch. Re-enter.” message is displayed. You must enter and confirm the admin password again or cancel.
(b) If the passwords match, the admin password is set, and the Admin Menu screen is displayed.
c. Entering Admin Mode. You may enter admin mode at any time a POS is idle, and a POS is considered to be idle when no card is inserted and a transaction is not in progress. To enter admin mode:

NC SOP Ver 1.15v2 Chpt 2 POS CAD Kiosk.docx 2-6 10-Oct-17
(1) Touch Navy Cash logo on header bar.
(2) An Admin Password Entry screen displays, prompting you to enter the admin password. Enter the six-digit password.
(3) If any digits are entered incorrectly, touch the “CLR” button to clear the entry textbox, and re-enter the password.
(a) If the admin password is entered incorrectly more than three consecutive times, you will be locked out of Admin Mode for one hour.
(b) After one hour, you may try to enter Admin Mode again. The lockout period is maintained even if the device is rebooted.
(4) After six digits are entered, the entry textbox turns green, and the “OK” button is enabled. Touch the “OK” button to continue.
(5) The POS verifies the password entered matches the password stored on the device.
(a) If the password is not valid, the entry textbox turns red, and a “Password Invalid. Re-enter.” message is displayed on the Admin Password Entry screen instead of “Enter Admin Password”.
(b) If the password is valid, the Admin Menu screen is displayed.
(c) If you touch the “Cancel” button on the Admin Password Entry screen, the device will return to the current operational state.
d. Admin Menu Screen. The Admin Menu screen allows a user to view and configure POS settings. The buttons on the screen depict the options available:
• “Change Password” (admin password) • View and set “Terminal ID” • View “Diagnostic” information, • View and change operational “State”
(from Normal Mode to Proxy Mode) • Set “IP Address”

NC SOP Ver 1.15v2 Chpt 2 POS CAD Kiosk.docx 2-7 10-Oct-17
e. Change POS Admin Password. To change the admin password for the POS:
(1) On the Admin Menu screen, touch the “Change Password” button.
(2) When Enter Old Password screen is displayed, enter the old password. The entry textbox turns green and the “OK” button is enabled when six digits have been entered.
(3) If any digits are entered incorrectly, touch the “CLR” button to clear the entry textbox, and re-enter the password.
(4) If you decide not to change the password, touch the “Cancel” button to return to the Admin Menu screen.
(5) After six digits are entered, the entry textbox turns green, and the “OK” button is enabled. Touch the “OK” button to continue.
(6) The device verifies the old password entered matches the password stored on the device.
(a) If the old password is not valid, the entry textbox turns red, and a “Password Invalid. Re-enter.” message is displayed.
(b) If the password is valid, the Enter New Password screen is displayed.
(7) Enter the new password. (8) If any digits are entered incorrectly,
touch the “CLR” button to clear the entry textbox, and re-enter the new password.
(9) If you decide not to change the password, touch the “Cancel” button to return to the Admin Menu screen.
(10) After six digits are entered, the entry textbox turns green, and the “OK” button is enabled. Touch the “OK” button to continue.

NC SOP Ver 1.15v2 Chpt 2 POS CAD Kiosk.docx 2-8 10-Oct-17
(11) A Confirm New Password screen is displayed. Re-enter the new password to confirm it.
(12). If any digits are entered incorrectly, touch the “CLR” button to clear the entry textbox, and re-enter the new password again to confirm it.
(13) If you decide not to change the password, touch the “Cancel” button to return to the Admin Menu screen.
(14) The entry textbox turns green and the “OK” button is enabled when six digits are entered. Touch the “OK” button.
(15) POS verifies both passwords match. (a) If the passwords do not match, the
entry textbox turns red, and a “Password Mismatch. Re-enter.” Message is displayed. You must enter and confirm the new admin password again, or touch the “Cancel” button to return to the Admin Menu screen.
(b) If the passwords match, the new password is set, and the Admin Menu screen is displayed.
f. View and Set POS Terminal ID. To view and set the terminal ID for the POS:
(1) On the Admin Menu screen, touch the “Terminal ID” button.
(2) If a Terminal ID is already set, a Terminal ID screen is displayed. If a Terminal ID is not set, a Terminal ID Entry screen displays.
(3) From the Terminal ID screen, touch the “Update” button to display the Terminal ID Entry screen and set a new Terminal ID. If you do not want to change the Terminal ID, touch the “Cancel” button to return to the Admin Menu screen.
NC SOP Ver 1.15v2 Chpt 2 POS CAD Kiosk.docx 2-9 10-Oct-17
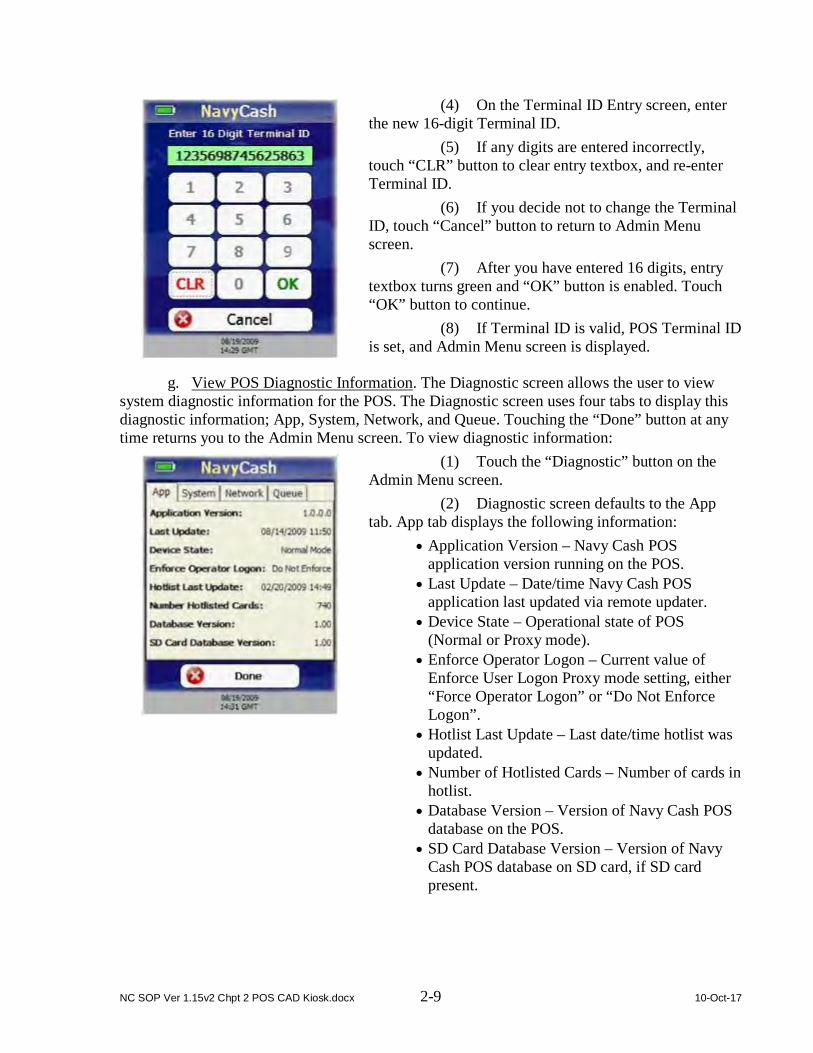
(4) On the Terminal ID Entry screen, enter the new 16-digit Terminal ID.
(5) If any digits are entered incorrectly, touch “CLR” button to clear entry textbox, and re-enter Terminal ID.
(6) If you decide not to change the Terminal ID, touch “Cancel” button to return to Admin Menu screen.
(7) After you have entered 16 digits, entry textbox turns green and “OK” button is enabled. Touch “OK” button to continue.
(8) If Terminal ID is valid, POS Terminal ID is set, and Admin Menu screen is displayed.
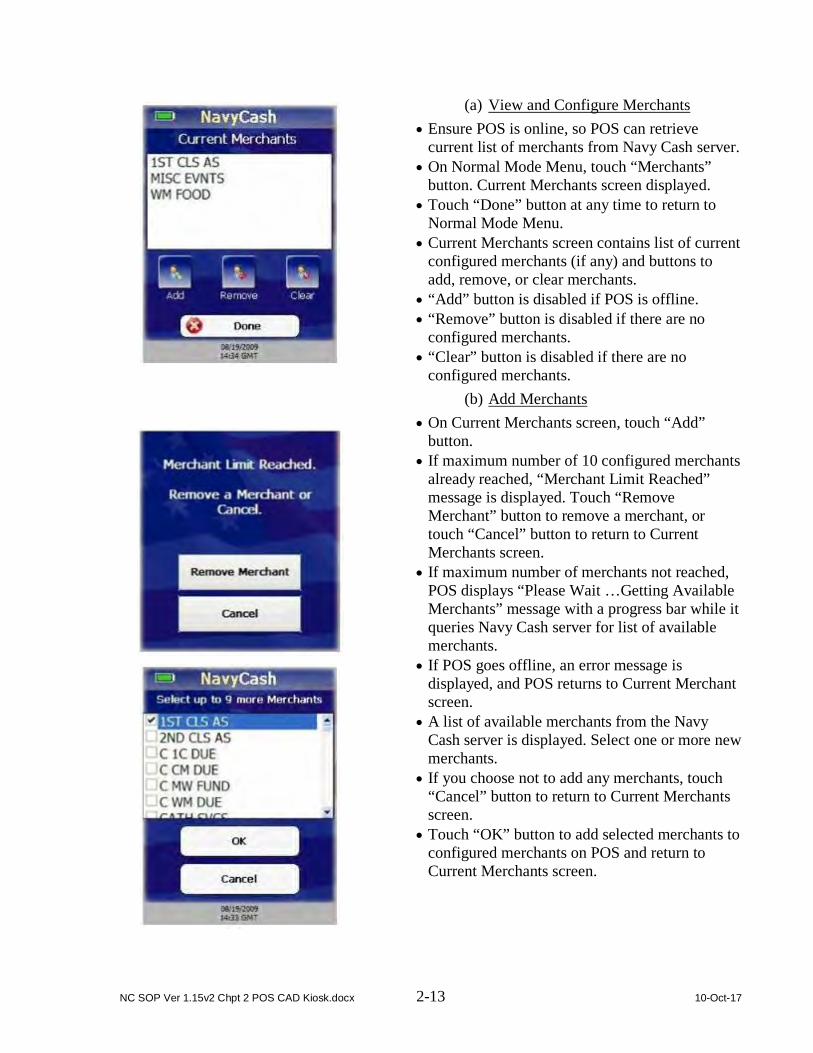
g. View POS Diagnostic Information. The Diagnostic screen allows the user to view system diagnostic information for the POS. The Diagnostic screen uses four tabs to display this diagnostic information; App, System, Network, and Queue. Touching the “Done” button at any time returns you to the Admin Menu screen. To view diagnostic information:
(1) Touch the “Diagnostic” button on the Admin Menu screen.
(2) Diagnostic screen defaults to the App tab. App tab displays the following information:
• Application Version – Navy Cash POS application version running on the POS.
• Last Update – Date/time Navy Cash POS application last updated via remote updater.
• Device State – Operational state of POS (Normal or Proxy mode).
• Enforce Operator Logon – Current value of Enforce User Logon Proxy mode setting, either “Force Operator Logon” or “Do Not Enforce Logon”.
• Hotlist Last Update – Last date/time hotlist was updated.
• Number of Hotlisted Cards – Number of cards in hotlist.
• Database Version – Version of Navy Cash POS database on the POS.
• SD Card Database Version – Version of Navy Cash POS database on SD card, if SD card present.

NC SOP Ver 1.15v2 Chpt 2 POS CAD Kiosk.docx 2-10 10-Oct-17
(3) Touch the System tab to proceed to next tab. System tab displays following information:
• Operating System – POS Windows operating system version.
• Main Battery – Percent of life remaining in main battery.
• Backup Battery – Percent of life remaining in backup battery.
• SAM Status – Status of SAM, i.e., Present, Not Present, or Error Code.
• Chip Version –Chip version number if a card is inserted or “No Card Inserted.” if no card is inserted.
• Chip Date –Chip manufacturing date if card inserted or “No Card Inserted.” if no card inserted.
• SD Card Status – Status of SD card, i.e., Present, Not Present, or Full.
(4) Touch the Network tab to proceed to next tab. Network tab displays following information:
• Network Connectivity – If POS has not received “PING” message from Navy Cash server in over 30 seconds, “Offline” is displayed. Otherwise, “Online” is displayed.
• Server Logon – If POS is online and has logged on to Navy Cash server, “Logged On” is displayed. If POS is Offline or has not logged on to Navy Cash server, “Not Logged On” is displayed.
• IP Address –IP Address of POS. • Port –Port POS listens on for incoming
connections from Navy Cash server. • Operator – Name or ID of operator currently
logged on. If no operator logged on, “No Operator Logged On” is displayed.
• Terminal ID –Terminal ID of POS.

NC SOP Ver 1.15v2 Chpt 2 POS CAD Kiosk.docx 2-11 10-Oct-17
(5) Touch the Queue tab to proceed to next tab. Queue tab displays following information about messages waiting to be uploaded to Navy Cash server from internal message queue and, if installed, SD card message queue:
• Total Messages – Total number of all messages in internal and SD card queues.
• Transactions – Number of EFT transaction messages.
• Errors – Number of error messages. • Reversals – Number of EFT reversal messages. • Card Burns – Number of card burn messages
generated after insertion of hotlisted cards. • Capacity Left – Percent of message capacity
remaining. Note: Messages are cleared from message queues
when successfully uploaded to Navy Cash server.
(6) Touch the “Done” button at any time to return to Admin Menu screen. h. Set IP Address. The POS may be set to Dynamic Host Configuration Protocol
(DHCP) or to a Static IP address. To set the IP Address configuration:
(1) On the Admin Menu screen, touch the “IP Address” button.
(2) The IP Address screen is displayed. (3) If you decide not to change the IP
Address, touch the “Cancel” button to return to the Admin Menu screen.
(4) Select either the DHCP or Static IP radio button.
(5) If you select Static IP, then you may change only the last two octets of the IP address.
(6) If you select DHCP, then you must enter the “secret” key, 999.999, for the last two octets so the first two octets and the Port become editable.
(7) Use the keypad to enter the desired IP setting and/or Port and touch the “OK” button.
(8) If Static IP is selected, the POS validates the IP address. If DHCP is selected, the POS will ensure the port is in the range 1-65,535. The device IP and/or port configuration is set accordingly. If any part of the IP address is invalid, including the port, then an “IP Address Invalid” message displays, and the invalid items are highlighted in red.

NC SOP Ver 1.15v2 Chpt 2 POS CAD Kiosk.docx 2-12 10-Oct-17
i. View and Change POS Operational State. In the Normal Mode operational state, the POS is connected to the ship’s LAN via Ethernet connection to communicate with the Navy Cash server. In the Proxy Mode operational state, to communicate with the Retail Operational Management (ROM) application in the Ship’s Store/Sales Office and with the Navy Cash Disbursing Application in the Disbursing Office, the POS is connected to a workstation via a USB connection. The Navy Cash Proxy installed on the workstations handles communications with the applications and the Navy Cash server. To change the operational state of the POS:
(1) From the Admin Menu screen, touch the “State” button.
(2) The Device State screen is displayed. (3) If you do not want to change the
operational state, touch the “Cancel” button to return to the Admin Menu screen.
(4) Select the desired state, Normal Mode or Proxy Mode, and touch the “OK” button.
(a) If Normal Mode was selected, the Device State is set to Normal Mode, and the Normal Mode Menu is displayed.
(b) If Proxy Mode was selected, the Device State is set to Proxy Mode, and the Enforce User Logon screen is displayed.
j. Normal Mode Menu. The Normal Mode Menu is displayed after selecting Normal Mode on the Device State screen. A user may configure Merchants, Events, and Amounts from the Normal Mode Menu.
(1) Merchants. The term merchant describes the location of the POS.
• Normal Mode requires that at least one merchant has been configured on the POS.
• At startup, the POS checks to make sure settings are correct.
• If there is not at least one configured merchant, an “Error Initializing Device State, No Configured Merchants.” message is displayed.
• You must add at least one merchant to the POS. You can view and configure up to ten merchants on the POS.
NC SOP Ver 1.15v2 Chpt 2 POS CAD Kiosk.docx 2-13 10-Oct-17
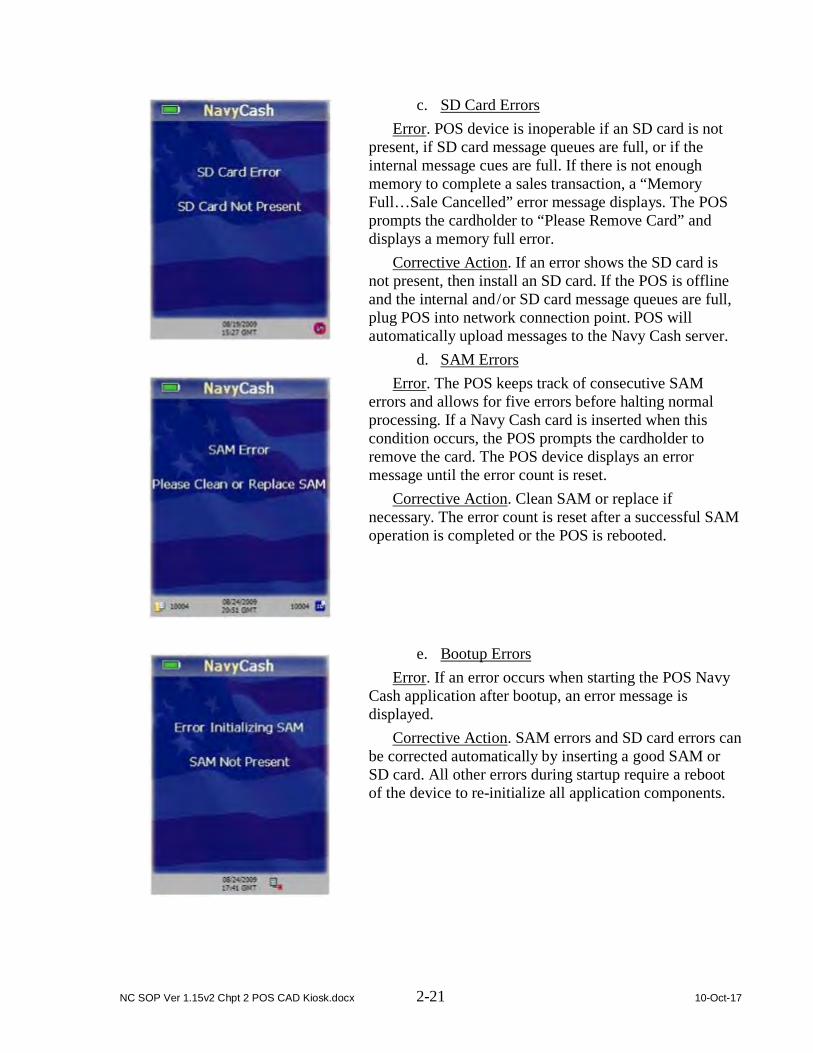
(a) View and Configure Merchants • Ensure POS is online, so POS can retrieve
current list of merchants from Navy Cash server. • On Normal Mode Menu, touch “Merchants”
button. Current Merchants screen displayed. • Touch “Done” button at any time to return to
Normal Mode Menu. • Current Merchants screen contains list of current
configured merchants (if any) and buttons to add, remove, or clear merchants.
• “Add” button is disabled if POS is offline. • “Remove” button is disabled if there are no
configured merchants. • “Clear” button is disabled if there are no
configured merchants. (b) Add Merchants
• On Current Merchants screen, touch “Add” button.
• If maximum number of 10 configured merchants already reached, “Merchant Limit Reached” message is displayed. Touch “Remove Merchant” button to remove a merchant, or touch “Cancel” button to return to Current Merchants screen.
• If maximum number of merchants not reached, POS displays “Please Wait …Getting Available Merchants” message with a progress bar while it queries Navy Cash server for list of available merchants.
• If POS goes offline, an error message is displayed, and POS returns to Current Merchant screen.
• A list of available merchants from the Navy Cash server is displayed. Select one or more new merchants.
• If you choose not to add any merchants, touch “Cancel” button to return to Current Merchants screen.
• Touch “OK” button to add selected merchants to configured merchants on POS and return to Current Merchants screen.

NC SOP Ver 1.15v2 Chpt 2 POS CAD Kiosk.docx 2-14 10-Oct-17
(c) Remove Merchants • On Current Merchants screen, touch “Remove”
button. • A list of configured merchants is displayed. • If you choose not to remove any merchants,
touch “Cancel” button to return to Current Merchants screen.
• Select one or more merchants to remove. • Touch “OK” button to remove selected
merchants from configured merchants on POS and return to Current Merchants screen.
(d) Clear merchants • On Current Merchants screen, touch “Clear”
button. • Warning message, “Are you sure you want to
remove all merchants and events?”, is displayed. • To remove all configured merchants and their
events from POS, touch “Yes” button. • If you do not want to remove all configured
merchants and events, touch “No” button. • Current Merchants screen is then displayed.
(2) Events. Events are merchant sale items, goods, or services.
• A merchant is not required to have an event set up in order to complete a sale.
• If merchant conducts a sale with no events configured, Event Selection screen is not displayed during the sale.
• To display the Event Selection screen during a sale, there must be at least one event configured for the selected merchant.
• You can view and configure up to ten events for each merchant on the POS.

NC SOP Ver 1.15v2 Chpt 2 POS CAD Kiosk.docx 2-15 10-Oct-17
(a) View and Configure Events • On Normal Mode Menu, touch “Events” button.
Select Merchant screen is displayed. • If you do not want to view or configure an event,
touch “Cancel” button to return to Normal Mode Menu.
• Select a merchant, and touch “OK” button.
• The events menu for the selected merchant is displayed.
• Touch “Done” button at any time to return to Normal Mode Menu.
• Events menu contains list of current configured events (if any) and buttons to add, remove, and clear amounts.
• Expired events appear in red font. • “Add” button disabled if POS is offline. • “Remove” button disabled if there are no
configured events. • “Clear” button disabled if there are no
configured events.
(b) Add Events • On events menu, touch “Add” button. • If maximum number of 10 configured events per
merchant already reached, “Event Limit Reached” message displayed. Touch “Remove Event” button to remove an event or “Cancel” button to return to events menu.
• If maximum number of 10 configured events per merchant not reached, “Please Wait …Getting Available Events” message displayed with progress bar while Navy Cash server is queried for list of available events.

NC SOP Ver 1.15v2 Chpt 2 POS CAD Kiosk.docx 2-16 10-Oct-17
• A list of available events and their expiration dates from the Navy Cash server is displayed.
• The list defaults to “No Event”. Select one or more events, or select “No Event” if no event is to be specified for the merchant.
• If you choose not to select any events, touch “Cancel” button to return to events menu.
• Touch “OK” button to add selected events to the configured events for the merchant and return to event menu.
(c) Remove Events • On events menu, touch “Remove” button. • List of configured events and their expiration
dates for the merchant is displayed. • If you choose not to remove any events, touch
“Cancel” button to return to events menu. • Select one or more events to remove. • Touch “OK” button to remove selected events
from configured events for the merchant and return to event menu.
(d) Clear Events • On events menu, touch “Clear” button. • Warning message, “Are you sure you want to
remove all events for this merchant?”, is displayed.
• To remove all configured events for this merchant, touch “Yes” button.
• If you do not want to remove all configured events for this merchant, touch “No” button.
• Events menu is then displayed.

NC SOP Ver 1.15v2 Chpt 2 POS CAD Kiosk.docx 2-17 10-Oct-17
(3) Amounts. The POS can be configured with up to ten pre-defined amounts for each event.
(a) View and Configure Amounts • On Normal Mode Menu, touch “Amounts”
button. • Current Amounts menu is displayed showing list
of configured amounts on the POS, and buttons to add, remove, and clear amounts.
• Touch “Done” button at any time to return to Normal Mode Menu.
• “Remove” button disabled if there are no configured amounts.
• “Clear” button disabled if there are no configured amounts.
(b) Add Amounts • On Current Amounts menu, touch “Add” button. • If maximum number of 10 configured amounts
per event already reached, “Amount Limit Reached” message displayed.
• Touch “Remove Amount” button to remove an amount, or touch “Cancel” button to return to Current Amounts menu.

NC SOP Ver 1.15v2 Chpt 2 POS CAD Kiosk.docx 2-18 10-Oct-17
• If maximum number of 10 configured amounts per event not reached, Enter New Amount screen is displayed.
• If you choose not to enter any amounts, touch “Cancel” button to return to Current Amounts menu.
• If you want to enter an amount, touch the “keypad” button to enter amount on numeric keypad.
• If any digits are entered incorrectly, touch “CLR” button to clear entry textbox.
• If you choose not to enter an amount, touch “Cancel” button to return to Enter New Amount screen.
• Entry textbox turns green and “OK” button is enabled when at least 0.01 is entered. Touch “OK” button to add entered amount.
• If amount already exists, entry textbox turns red, and “Amount Exists. Re-Enter.” message displayed. Re-enter an amount or touch “Cancel” button to return to Enter New Amount screen.
• If amount does not already exist, new amount added to configured amounts on POS, and Current Amounts menu displayed.
(c) Remove Amounts
• Touch “Remove” button on Current Amounts menu.
• List of configured amounts is displayed. • If you chose not to remove any amounts, touch
“Cancel” button to return to Current Amounts menu.
• Select one or more amounts to remove. • Touch “OK” button to remove selected amounts
from configured amounts on POS and return to the Current Amounts menu.

NC SOP Ver 1.15v2 Chpt 2 POS CAD Kiosk.docx 2-19 10-Oct-17
(d) Clear Amounts • On Current Amounts menu, touch “Clear”
button. • Warning message, “Are you sure you want to
remove all amounts?”, is displayed. • To remove all configured amounts, touch “Yes”
button. • If you do not want to remove all configured
amounts, touch “No” button. • Current Amounts menu is displayed.
k. Proxy Mode – Enforce User Logon. After setting the operational state of the POS to Proxy Mode, you can determine whether or not successful operator logon is required before any other action can be taken by setting either “Force Operator Logon” or Do Not Force Logon”. To set the Enforce User Logon option:
(1) On Device State screen, select “Proxy Mode” and touch “OK” button.
(2) Enforce User Logon screen is displayed. (3) If you do not want to change the current
setting, touch the “Cancel” button to return to the Admin Menu screen. POS will remain set to Proxy Mode operational state.
(4) Select desired operational mode, “Do Not Force Logon” or “Force Operator Logon”, and touch “OK” button to apply changes and return to the Admin Menu screen.
(5) In the ship’s store, when ROM and Navy Cash are integrated, "Enforce User Logon" must be set to "Force Operator Logon". ROM and Navy Cash operator IDs must match for sales receipts to be reported properly, and the “Force Operator Logon” setting prevents Navy Cash sales in the ship’s store unless a successful operator logon occurs.

NC SOP Ver 1.15v2 Chpt 2 POS CAD Kiosk.docx 2-20 10-Oct-17
l. Exit Admin Mode. To exit Admin Mode: (1) On the Admin Menu screen, touch the
“Done” button. (2) If the Terminal ID is set, the device
returns to the current operational state, either Normal Mode or Proxy Mode.
(3) If the Terminal ID is not set, a “Terminal ID Required” message is displayed, followed by the Terminal ID Entry screen.
(4) If a Navy Card is inserted, a “Please Remove Card” message is displayed.
2.2.3 Error Messages The POS device uses a common error screen to display messages with descriptions and
details of errors that may occur during POS operations.
a. Error Initializing SAM Error. May occur during POS initialization and shows
there was an error initializing the SAM because the SAM was not present.
Corrective Action. Install SAM in POS device.
b. Error Authenticating Card Error. May occur when authenticating a Navy Cash
card after it is inserted in POS. The card is blocked and cannot be authenticated. While this error is displayed on POS to the Navy Cash cardholder, additional error information is also sent to the Navy Cash server.
Corrective Action. Have cardholder report to Disbursing to correct problem with Navy Cash card.
NC SOP Ver 1.15v2 Chpt 2 POS CAD Kiosk.docx 2-21 10-Oct-17
c. SD Card Errors Error. POS device is inoperable if an SD card is not
present, if SD card message queues are full, or if the internal message cues are full. If there is not enough memory to complete a sales transaction, a “Memory Full…Sale Cancelled” error message displays. The POS prompts the cardholder to “Please Remove Card” and displays a memory full error.
Corrective Action. If an error shows the SD card is not present, then install an SD card. If the POS is offline and the internal and / or SD card message queues are full, plug POS into network connection point. POS will automatically upload messages to the Navy Cash server.
d. SAM Errors Error. The POS keeps track of consecutive SAM
errors and allows for five errors before halting normal processing. If a Navy Cash card is inserted when this condition occurs, the POS prompts the cardholder to remove the card. The POS device displays an error message until the error count is reset.
Corrective Action. Clean SAM or replace if necessary. The error count is reset after a successful SAM operation is completed or the POS is rebooted.
e. Bootup Errors Error. If an error occurs when starting the POS Navy
Cash application after bootup, an error message is displayed.
Corrective Action. SAM errors and SD card errors can be corrected automatically by inserting a good SAM or SD card. All other errors during startup require a reboot of the device to re-initialize all application components.

NC SOP Ver 1.15v2 Chpt 2 POS CAD Kiosk.docx 2-22 10-Oct-17
2.2.4 POS Administrative and Troubleshooting Tasks a. Reboot POS Device. Rebooting the device should always be the first step in
troubleshooting the POS. To reboot the POS device: (1) Touch small RESET button on the upper right-hand side of the POS with stylus. (2) Rebooting re-initializes all POS operating system and Navy Cash components.
b. Hard-Reset POS Device. If the POS device becomes unstable or stops functioning correctly and you have exhausted all other troubleshooting options, then you should perform a hard-reset on the device. A hard-reset clears device memory and returns the operating system on the device to its original state. Review the POS Navy Cash application documentation prior to performing a hard-reset. To hard-reset the POS device:
(1) Hold down small RESET button on the upper right-hand side of the POS. (2) While holding down the RESET button, hold down the number ‘4’ key on the
numeric keypad. (3) Release the RESET button while continuing to hold down the number ‘4’ key.
After a few seconds, a screen briefly appears that says “Memory Clear” and a few other status messages as the hard-reset re-flashes the device.
(4) Release the number ‘4’ key. The device then continues to boot normally. (5) Configure the Time Zone. (6) Either click “Recover Now” to perform application recovery immediately or let
applications recovery start on its own automatically in a few seconds. (7) The POS Navy Cash application should start, and the device should be in its
original state. Refer to your POS Navy Cash application documentation if the Navy Cash application is not running.
c. Install SAM. To install or replace a SAM in the POS device: (1) Use a screwdriver to open the battery cover on the back of the device, towards
the bottom, where it says, “OPEN”. (2) Remove the battery pack to gain access to the SAM slots. (3) Install or replace the SAM in the bottom-left corner SAM slot. Note: this is the
only slot that works. (4) Replace the battery pack. (5) Turn the battery locking screw to lock it in place.
d. Install SD Card. To install or replace an SD card in the POS device: (1) Look on the left side of the device, towards the middle, for a slot labeled “SD”. (2) Pull back the rubber cover on the slot. (3) If an SD card is present, push in the SD card to unlock it and then pull it out. (4) Insert the new SD card until it clicks. (5) Carefully replace the rubber cover, to prevent unlocking the SD card.

NC SOP Ver 1.15v2 Chpt 2 POS CAD Kiosk.docx 2-23 10-Oct-17
2.2.5 POS Operations
a. Operator Logon. You must log on to the POS device before beginning any transactions. To log on:
(1) Ensure POS is connected to the network, and start POS device.
(2) Enter Operator ID when prompted. Operator IDs assigned at Disbursing. To be assigned Operator ID, you must be a Navy Cash cardholder.
(3) If any digits are entered incorrectly, touch “CLR” button to clear the Operator ID textbox, and re-enter Operator ID.
(4) After four digits entered, Operator ID textbox turns green, and “OK” button enabled.
(5) POS sends message to Navy Cash server to log operator on. “Please Wait…Logging Operator On” message is displayed.
(6) If the server denies the logon, POS displays an error message for a few seconds before returning to the Enter Operator ID screen.
(7) If Navy Cash server accepts Operator ID, then you are logged on, and the Normal Mode Welcome Screen is displayed.

NC SOP Ver 1.15v2 Chpt 2 POS CAD Kiosk.docx 2-24 10-Oct-17
b. Operator Logoff. You may log off from the POS device after successfully logging on and when the device is not processing messages or transactions. To log off of the POS device:
(1) Ensure POS is connected to the network. (2) Touch the Logoff option on header bar. (3) POS will prompt you to confirm logoff
with “Are you sure you want to log off?” message. (4) Touch “Yes” button to log off, or “No”
button to cancel. (5) POS sends message to Navy Cash server
to log operator off. “Please Wait…Logging Operator Off” message is displayed.
(6) If Navy Cash server accepts logoff, then you are logged off, and Enter Operator ID screen is displayed.
(7) If the server denies the logoff, POS displays an error message for a few seconds, before returning to the Normal Mode Welcome Screen.
c. Welcome Screen. In Normal Mode, the Welcome Screen is displayed after an operator has successfully logged on and when there are no pending sales.
(1) The Normal Mode Welcome Screen displays the name of the operator currently logged on the POS. The Operator ID is displayed if the operator’s name is not available from the Navy Cash server.
(2) When the Welcome Screen is displayed, you may insert a Navy Cash card or touch the “Begin Sale” button to begin a transaction.
(3) If you insert a Navy Cash card before a sale, the you must perform a Single Purchase. If you insert a card at the end of a sale, then Multiple Purchases are allowed.

NC SOP Ver 1.15v2 Chpt 2 POS CAD Kiosk.docx 2-25 10-Oct-17
2.2.6 Normal Mode – Purchases Sales transactions may be composed of one or more items or purchases. The purchase
amounts are debited from a cardholder’s Navy Cash card. Each purchase within a sale is composed of a Merchant and an Amount and optionally an Event.
a. Merchant Selection. The Merchant Selection screen is the first in the sequence of three screens in the process of entering a purchase during a sale. To start a sales transaction:
(1) On Welcome Screen, touch “Begin Sale” button.
(2) Merchant Selection screen is displayed. Choose a merchant from the “Select Merchant” pick list. Entire name of each configured merchant is visible on pick list even if merchant’s name is wider than pick list.
(3) Name at top of Merchant Selection screen updates to that of chosen merchant. POS device always maintains currently selected merchant. You do not have to repeatedly select the same merchant.
(4) Sales total displayed at bottom of screen. (5) After merchant is selected, touch “Enter
Purchase” button to continue with the sale, or touch “Cancel Sale” button to return to Welcome Screen.

NC SOP Ver 1.15v2 Chpt 2 POS CAD Kiosk.docx 2-26 10-Oct-17
b. Event Selection. The Event Selection screen is the second in the sequence of three screens in the process of entering a purchase during a sale. Events are merchant sale items, goods, or services. To select an event:
(1) A merchant is not required to have an event selected in order to complete a sale.
(2) If merchant conducts sale with no events selected, Event Selection screen is not displayed during the sale.
(3) There must be at least one event selected for POS to display Event Selection screen during sale.
(4) Select Event pick list allows operator to select an event. POS defaults to “No Event” selection. Select “No Event” if you do not want to specify an event.
(5) Choose an event from the “Select Event” pick list.
(6) Currently selected event name and expiration date are displayed below merchant name on Event Selection screen and are updated as you select events in the “Select Event” pick list.
(7) If selected event has expired, event name and expiration date are displayed in red. Enter Amount button is disabled if selected event has expired.
(8) Choose another event from “Select Event” pick list, or touch “Cancel” button to return to Merchant Selection screen.
(9) If selected event has not expired, currently selected event name and expiration date are displayed below merchant name and are updated as you select events in the “Select Event” pick list.
(10) The sales total is displayed at the bottom of the screen.
(11) Once desired event is selected and displayed, touch “Enter Amount” button. Amount Entry screen is displayed allowing you to enter an amount for the purchase.

NC SOP Ver 1.15v2 Chpt 2 POS CAD Kiosk.docx 2-27 10-Oct-17
c. Amount Entry. The Amount Entry screen is the third and last in the sequence of three screens in the process of entering a purchase during a sale. To enter an amount:
(1) You may either select a predefined amount from a pick list or enter a specific amount.
(2) If you select from the pick list of predefined amounts, then the amount textbox is automatically populated with the selected amount.
(3) If you choose to enter a specific amount, use the POS numeric keypad, or touch the “keypad” button to enter the amount using the touch-screen keypad.
(4) Touch the “Cancel” button to return to the amount entry screen without entering an amount.
(5) If you enter an incorrect amount, touch the “CLR” button to clear the amount entry text.
(6) If you use the touch-screen keypad, touch the “OK” button to apply the specific amount entered, and return to the Amount Entry screen.
(7) On the Amount Entry screen, touch the “Complete” button to add the purchase to the total sale and return to the Merchant Selection screen.
(8) For multiple purchases, select additional merchants and events, and enter additional amounts.

NC SOP Ver 1.15v2 Chpt 2 POS CAD Kiosk.docx 2-28 10-Oct-17
d. Sale Review. Once all merchants and events have been selected, and amounts entered, you may review the sale. To review the sale:
(1) Touch “Review Sale” button on Merchant Selection screen.
(2) Summary of all purchases entered during current sale is displayed, including Merchant Name, Event Name (if any), and Amount.
• Entries in list are grouped according to Merchant / Event combination.
• Each line item could consist of multiple purchases for given Merchant / Event combination.
(3) Touch “Done” button to return to Merchant Selection screen.
e. Sale Confirmation. To complete a sale, the customer (cardholder) must insert his / her Navy Cash card.
(1) Insert Navy Cash card in card slot in POS. “Please Wait…Accessing Card” message is displayed while POS authenticates the card.
(2) POS verifies card is not on hotlist—a list of negative cards maintained on Navy Cash server and downloaded to each POS that denies cards that are to be removed from operation / circulation.
(3) If card is on hotlist, “Card Blocked. Please Remove Card.” message is displayed on POS.
(4) If card is not on hotlist, sale can be completed.

NC SOP Ver 1.15v2 Chpt 2 POS CAD Kiosk.docx 2-29 10-Oct-17
(5) If card valid, POS prompts cardholder to enter his / her PIN. Cardholder enters PIN.
(6) If PIN entered incorrectly, touch “CLR” button to clear PIN entry textbox, and re-enter PIN.
(7) If there are no PIN digits entered and cardholder touches “CLR” button, PIN-entry is canceled and “Please Remove Card” message is displayed.
(8) Once PIN is entered, touch “OK” button. POS verifies that PIN entered matches PIN on card. If the PINs do not match, then an “Invalid PIN” message is displayed followed by a “Re-Enter PIN” message. The customer may re-enter their PIN up to the retry limit enforced by the card.
(9) POS verifies total sale amount does not exceed card balance. If it does, “Card Balance Exceeded by $X.XX...Sale Cancelled” error screen is displayed, and sale is canceled.
(10) After Navy Cash card authenticated, Sale Confirmation screen displays total amount of sale and list of all purchases entered during the current sale, including merchant name, event name (if any), and amount.
(11) Cardholder touches “OK” button to confirm and complete the sale.
(12) If there is not enough memory to complete the sales transaction, current sale is canceled and “Memory Full…Sale Cancelled” error message is displayed for a few seconds. POS prompts cardholder to “Please Remove Card” and then displays a memory full error screen. If POS is offline and internal and / or SD card message queues are full, plug POS into network connection point. POS will automatically upload messages to Navy Cash server.
(13) If there is enough memory to complete the sale, POS displays “Please Wait…Completing Sale” while processing the transactions.

NC SOP Ver 1.15v2 Chpt 2 POS CAD Kiosk.docx 2-30 10-Oct-17
f. Sale Results. Sale Results screen is displayed after all sales transactions are processed. Screen shows processing status of each transaction and how many were Approved or Denied.
(1) Numbers of Approved and Denied transactions are displayed at the top under Sale Results, and detailed results for each transaction are displayed under Details.
(a) It is possible for transactions to fail if Navy Cash card has enough funds to complete some, but not all of the transactions.
(b) Transactions may also fail because of errors writing to the Navy Cash card.
(2) Detailed results show which transactions were Approved and which transactions were Denied. Approved transactions are marked with “Success” and Denied transactions are marked with an error message, such as “Card Error”.
(3) If a printer is attached to the POS, the Print Receipt button will be enabled.
(4) If enabled, touch “Print Receipt” button to print sales receipt.
(5) After reviewing Sale Results and / or printing a receipt, touch “Done” button to return to Normal Mode Welcome screen.
g. Single Purchase Sale. The single purchase sale is a special case that allows cardholder to purchase only one item. To start a single purchase sale:
(1) Have the customer insert their Navy Cash card without touching the “Begin Sale” button.

NC SOP Ver 1.15v2 Chpt 2 POS CAD Kiosk.docx 2-31 10-Oct-17
(2) POS displays “Please Wait…Accessing Card” message while authenticating card and verifying it is not on hotlist. If card is on hotlist, a “Card Blocked Please Remove Card” message is displayed.
(3) When prompted, cardholder enters PIN. If PIN entered incorrectly, touch “CLR” button to clear PIN entry textbox, and re-enter PIN.
(4) If there are no PIN digits entered and cardholder touches “CLR” button, PIN-entry is canceled and “Please Remove Card” message is displayed.
(5) Once PIN entered, touch “OK” button. Card balance displays on Normal Mode Welcome screen.
(6) Touch “Begin Sale” button. (7) Select merchant from list of configured
merchants on POS, and touch “Enter Purchase” button. (8) Select event from Event Selection screen
(if applicable). (9) Enter amount on Amount Entry screen. (10) POS device verifies total sale amount
does not exceed card balance. If total sale amount exceeds card balance, error screen displayed and sale canceled.
(11) POS displays Sale Confirmation screen. Cardholder touches “OK” button to complete the sale.
(12) If there is not enough memory to complete transaction, current sale is canceled and “Memory Full…Sale Cancelled” error message is displayed for a few seconds. POS prompts cardholder to “Please Remove Card” and then displays a memory full error screen.
(13) If there is enough memory to complete the sale, POS displays “Please Wait…Completing Sale” while processing the transaction.
(14) POS displays the Sale Results screen. To print receipt for the transaction (if a printer is attached to the device), touch “Print Receipt” button.
(15) When finished reviewing Sale Results, touch “Done” button to return to Normal Mode Welcome screen.

NC SOP Ver 1.15v2 Chpt 2 POS CAD Kiosk.docx 2-32 10-Oct-17
2.2.7 Proxy Mode In order to communicate with the Navy Cash Disbursing Application, or with the Retail
Operations Management (ROM) application in the Ship’s Store / Sales Office, the POS device must be connected to a workstation / laptop via a USB connection and must be set up in the Proxy Mode operational state (see paragraph 2.2.2.k above). The Navy Cash Proxy application installed on the workstations / laptops handles communications between the POS and the ROM or Disbursing Application and between the POS and the Navy Cash server.
a. Proxy Mode Welcome Screen. The Proxy Mode Welcome Screen is displayed when the POS is started or running idle, i.e., when no card is inserted, and no transactions are pending.
(1) If the POS is operating offline, the Proxy Mode Welcome Screen is displayed with an “Offline” message.

NC SOP Ver 1.15v2 Chpt 2 POS CAD Kiosk.docx 2-33 10-Oct-17
(2) The POS device cannot operate in Proxy Mode if an SD Card is not present or if either the internal message queue or SD card message cue is full. An “Internal Memory Full” or SD Card Memory Full” error message will display in red. Notify the Disbursing Officer of any error messages displayed in red.
b. Card Entry. A cardholder may insert his / her Navy Cash card when the POS is idle or when the POS displays a message requiring card insertion.
(1) If the POS is idle, a “Waiting for Command” message is displayed. No card validation is done until a command is received from the ROM Application or Navy Cash Disbursing Application.
(2) If no card is inserted and the ROM or Disbursing Application sends a command that requires the card to be inserted, a “Please Insert Navy Cash Card,” message is displayed.

NC SOP Ver 1.15v2 Chpt 2 POS CAD Kiosk.docx 2-34 10-Oct-17
(3) When cardholder inserts Navy Cash card, “Please Wait…Accessing Card” message displayed.
(4) POS verifies card is not on hotlist. If card is on hotlist, POS displays “Card Blocked. Please Remove Card.” message.
(5) If card not on hotlist, cardholder prompted to enter his / her PIN.
(6) If PIN is entered incorrectly, touch “CLR” button to clear PIN entry textbox.
(7) If there are no PIN digits entered and cardholder touches “CLR” button, PIN-entry is canceled and “Please Remove Card” message is displayed.
(8) Once PIN is entered correctly and verified, POS displays card’s closed-loop account balance.
2.2.8 Proxy Mode–Disbursing Application Interaction In order to communicate with the Navy Cash Disbursing Application, the POS device must
be connected to a workstation / laptop via a USB connection and must be set up in the Proxy Mode operational state. The Navy Cash Proxy application installed on the workstations / laptops handles communications between the POS and the Disbursing Application and between the POS and the Navy Cash server. The POS and Disbursing Application provide for the transfer of funds to and from the card and for various card maintenance functions, such as changing or unblocking a cardholder’s PIN. The POS device must be online to send and receive all message requests to and from the Disbursing Application.
In the ship’s store, when ROM and Navy Cash are integrated, "Enforce User Logon" must be set to "Force Operator Logon". ROM and Navy Cash operator IDs must match for sales receipts to be reported properly, and the “Force Operator Logon” setting prevents Navy Cash sales in the ship’s store unless a successful operator logon occurs (see paragraph 2.2.2.k above).

NC SOP Ver 1.15v2 Chpt 2 POS CAD Kiosk.docx 2-35 10-Oct-17
c. Get Chip Information. The Disbursing Application has a “Get Chip Info” button that is used throughout the application to request the card ID and closed-loop account balance. Chip information may be obtained when the POS is in the Proxy Mode operational state, not processing messages, and online. To get chip information:
(1) Touch “Get Chip Info” button on Disbursing Application (see Chapter 8 of SOP for additional information).
(2) Disbursing Application sends message to POS. If no card is inserted, “Please Insert Navy Cash Card” message is displayed to prompt cardholder.
(3) If card not already inserted, cardholder inserts his / her card.
(4) POS displays “Please Wait…Accessing Card” while it authenticates the card.
(5) POS verifies card is not on hotlist. If card is on hotlist, then POS “burns” the chip, sends an error message to the Navy Cash server, and displays “Card Blocked. Please Remove Card.” message.
(6) If card is not on hotlist, POS reads card ID and closed-loop balance from card and sends message back to Disbursing application with card ID and closed-loop account balance.
(7) POS displays “Waiting for Command” message and continues to wait for commands from Disbursing Application.
(8) If errors occur when accessing the card, POS sends failure response message back to Disbursing Application, and the card must be removed. POS returns to Proxy Mode Welcome Screen after card is removed.
d. Funds Transfer to Chip. The POS supports funds transfer requests from the Disbursing Application that credit an amount to the closed-loop account on the Navy Cash card. To complete a funds transfer credit transaction:
(1) Enter the amount of the transfer in the Disbursing Application and initiate the funds transfer (see Chapter 8 of SOP for additional information).

NC SOP Ver 1.15v2 Chpt 2 POS CAD Kiosk.docx 2-36 10-Oct-17
(2) Disbursing Application sends funds transfer message to POS.
(3) If no card inserted, “Please Insert Navy Cash Card” message displayed to prompt cardholder.
(4) Cardholder inserts Navy Cash card. (5) POS displays “Please Wait…Accessing
Card” while it authenticates card. (6) POS verifies card is not on hotlist. If card
is on hotlist, then POS “burns” the chip, cancels the transaction, and displays “Card Blocked. Please Remove Card.” message.
(7) If card is not on hotlist, POS prompts cardholder to enter his / her PIN.
(8) Cardholder enters PIN and touches “OK” button. “Please Wait…Verifying PIN” message displays.
(9) POS verifies PIN entered matches PIN on card. If PINs don’t match, “Invalid PIN” message displayed, followed by “Re-Enter PIN” message. Cardholder may re-enter PIN up to the retry limit enforced by card.
(10) Confirm Credit screen is displayed. Touch “OK” button to confirm transaction, or touch “Cancel” button to cancel transaction.
(11) If credit amount is confirmed, “Please Wait…Querying Network” message is displayed.
(12) Navy Cash server will approve the transaction, unless the amount is over soft limit on closed loop, in which case Navy Cash server will deny the transaction. If transaction is denied, then it is canceled, and POS sends failure message to Disbursing Application.
(13) If transaction approved by Navy Cash server, POS credits the amount to the card.

NC SOP Ver 1.15v2 Chpt 2 POS CAD Kiosk.docx 2-37 10-Oct-17
(14) If transaction was successful, “Success” message is displayed for a few seconds. If transaction failed, a descriptive error message followed by an error code is displayed for a few seconds.
(15) If Navy Cash card still inserted, POS displays “Waiting for Command” message followed by closed-loop account balance on card and continues to wait for commands from Disbursing Application. If card is not inserted, POS returns to Proxy Mode Welcome Screen.
e. Funds Transfer from Chip. The POS supports funds transfer requests from the Disbursing Application that debit an amount from the closed-loop account on the Navy Cash card, e.g., in exchange for cash. To complete a funds transfer debit transaction:
(1) Enter the amount of the transfer in the Disbursing Application and initiate the funds transfer (see Chapter 8 of SOP for additional information).
(2) Disbursing Application sends funds transfer message to POS.
(3) If no card inserted, “Please Insert Navy Cash Card” message displayed to prompt cardholder.
(4) Cardholder inserts Navy Cash card. (5) POS displays “Please Wait…Accessing
Card” message while it authenticates card. (6) POS verifies card is not on hotlist. If card
is on hotlist, then POS “burns” the chip, cancels the transaction, and displays “Card Blocked. Please Remove Card.” message.
(7) If card is not on hotlist, POS prompts cardholder to enter his / her PIN.
(8) Cardholder enters PIN and touches “OK” button. “Please Wait…Verifying PIN” message displays.
(9) POS verifies PIN entered matches PIN on card. If PINs don’t match, “Invalid PIN” message displayed, followed by a “Re-Enter PIN” message. Cardholder may re-enter PIN up to the retry limit enforced by card.
NC SOP Ver 1.15v2 Chpt 2 POS CAD Kiosk.docx 2-38 10-Oct-17
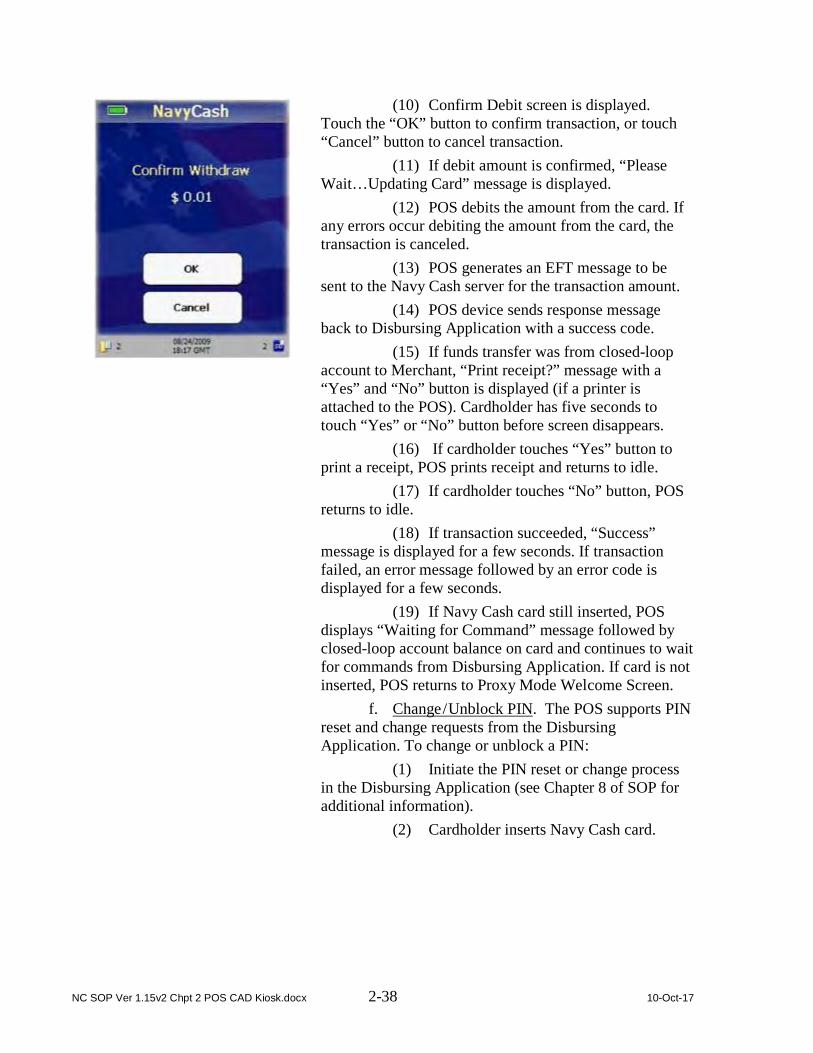
(10) Confirm Debit screen is displayed. Touch the “OK” button to confirm transaction, or touch “Cancel” button to cancel transaction.
(11) If debit amount is confirmed, “Please Wait…Updating Card” message is displayed.
(12) POS debits the amount from the card. If any errors occur debiting the amount from the card, the transaction is canceled.
(13) POS generates an EFT message to be sent to the Navy Cash server for the transaction amount.
(14) POS device sends response message back to Disbursing Application with a success code.
(15) If funds transfer was from closed-loop account to Merchant, “Print receipt?” message with a “Yes” and “No” button is displayed (if a printer is attached to the POS). Cardholder has five seconds to touch “Yes” or “No” button before screen disappears.
(16) If cardholder touches “Yes” button to print a receipt, POS prints receipt and returns to idle.
(17) If cardholder touches “No” button, POS returns to idle.
(18) If transaction succeeded, “Success” message is displayed for a few seconds. If transaction failed, an error message followed by an error code is displayed for a few seconds.
(19) If Navy Cash card still inserted, POS displays “Waiting for Command” message followed by closed-loop account balance on card and continues to wait for commands from Disbursing Application. If card is not inserted, POS returns to Proxy Mode Welcome Screen.
f. Change / Unblock PIN. The POS supports PIN reset and change requests from the Disbursing Application. To change or unblock a PIN:
(1) Initiate the PIN reset or change process in the Disbursing Application (see Chapter 8 of SOP for additional information).
(2) Cardholder inserts Navy Cash card.

NC SOP Ver 1.15v2 Chpt 2 POS CAD Kiosk.docx 2-39 10-Oct-17
(3) “Please Wait…Accessing Card” message displayed while POS authenticates the card.
(4) POS verifies card is not on hotlist. If card is on hotlist, then POS “burns” the chip, cancels the transaction, and displays “Card Blocked. Please Remove Card.” message.
(5) If card is not on hotlist, Enter PIN screen is displayed prompting cardholder to enter his / her PIN.
(6) If any digits entered incorrectly, touch “CLR” button to clear PIN textbox, and re-enter PIN.
(7) After four digits entered, PIN textbox turns green, and “OK” button enabled. Touch “OK” button. “Please Wait…Verifying PIN” message displays.
(8) POS verifies PIN entered matches PIN on card. If PINs don’t match, “Invalid PIN” message displayed, followed by a “Re-Enter PIN” message. Cardholder may re-enter PIN up to the retry limit enforced by card.
(9) If PINs match, Enter New PIN screen is displayed prompting cardholder to enter his / her new PIN. New PIN must contain four digits.
(10) If any digits entered incorrectly, touch “CLR” button to clear PIN textbox, and re-enter PIN.
(11) After four digits entered, PIN textbox turns green, and “OK” button enabled. Touch “OK” button.
(12) Re-Enter PIN screen is displayed prompting cardholder to re-enter and confirm new PIN.
(13) POS verifies both PIN entries match. If they don’t match, “PIN Mismatch…Try Again” message is displayed. The customer must again enter and confirm new PIN.

NC SOP Ver 1.15v2 Chpt 2 POS CAD Kiosk.docx 2-40 10-Oct-17
(14) If PINs match, POS displays “Please Wait…Changing PIN” message.
(15) POS sends message to Navy Cash server requesting unblock PIN for PIN change. Server sends response back to POS with unblock PIN. If transaction is denied by Navy Cash server, then transaction is canceled.
(16) POS uses unblock PIN from server to unblock the card and sets the new PIN on the card.
(17) If transaction successful, “Success…PIN Changed” message is displayed for a few seconds.
(18) If Navy Cash card still inserted, POS displays “Waiting for Command” message followed by closed-loop account balance on card and continues to wait for commands from Disbursing Application. If card is not inserted, POS returns to Proxy Mode Welcome Screen.
2.2.9 Proxy Mode–ROM Application Interaction In order to communicate with the Retail Operations Management (ROM) application in the
Ship’s Store / Sales Office, the POS device must be connected to a workstation via a USB connection and must be set up in the Proxy Mode operational state (see paragraph 2.2.2.k above). The Navy Cash Proxy application installed on the workstation handles communications between the POS and the ROM Application and between the POS and the Navy Cash server.
In the ship’s store, when ROM and Navy Cash are integrated, "Enforce User Logon" must be set to "Force Operator Logon". ROM and Navy Cash operator IDs must match for sales receipts to be reported properly, and the “Enforce User Logon” setting prevents Navy Cash sales in the ship’s store unless a successful operator logon occurs (see paragraph 2.2.2.k above).
a. Operator Logon. An operator may log on to the POS device from the ROM application. The Navy Cash server must approve the logon. The POS must be in the Proxy Mode operational state, have no pending transactions, and online. Consult ROM application documentation for information about ROM operations. To logon to the POS from the ROM application:
(1) From ROM application, initiate logon. (2) ROM application sends message to POS. (3) If Enforce User Logon setting is set to
Force Operator Logon, then the POS verifies that an operator is not already logged on to the POS.
(4) If an operator is already logged on to the POS, the POS sends a failure message back to the ROM application, and the operator is not logged on to the POS.

NC SOP Ver 1.15v2 Chpt 2 POS CAD Kiosk.docx 2-41 10-Oct-17
(5) If an operator is not already logged on to the POS, the POS displays a “Please Wait…Logging Operator On” message.
(6) POS sends message to Navy Cash server to log on the operator.
(7) POS sends a success / failure message back to the ROM application.
(8) If successful, a “Success…” message is displayed for a few seconds, the operator is logged on, and the POS returns to the screen displayed before the logon request.
(9) If unsuccessful, an error message is displayed for a few seconds, the operator is not logged on, and the POS returns to the screen displayed before the logon request.
b. Operator Logoff. An operator may log off the POS device from the ROM application. The Navy Cash server must approve the logoff. The POS must be in the Proxy Mode operational state, have no pending transactions, and online. Consult ROM application documentation for information about ROM operations. To logoff the ROM ES application using the POS device:
(1) From ROM application, initiate log off. (2) ROM application sends message to POS. (3) If Enforce User Logon setting is set to
Force Operator Logon and an operator is already logged on, then the POS verifies that the Operator IDs match.
(4) If the Operator IDs do not match, the POS sends a failure message back to the ROM application, and the operator is not logged off of the POS.
(5) If the operator IDs match, POS displays a “Please Wait…Logging Operator Off” message.
(6) POS sends message to Navy Cash server to log off the operator.
(7) POS sends a success / failure message back to the ROM application.
NC SOP Ver 1.15v2 Chpt 2 POS CAD Kiosk.docx 2-42 10-Oct-17
(8) If logoff is successful, a “Success…” message is displayed for a few seconds, the operator is logged off, and the application returns to the screen displayed before the logoff request.
(9) If logoff is unsuccessful, an error message is displayed for a few seconds, the operator is not logged off, and the application returns to the screen displayed before the logoff request.
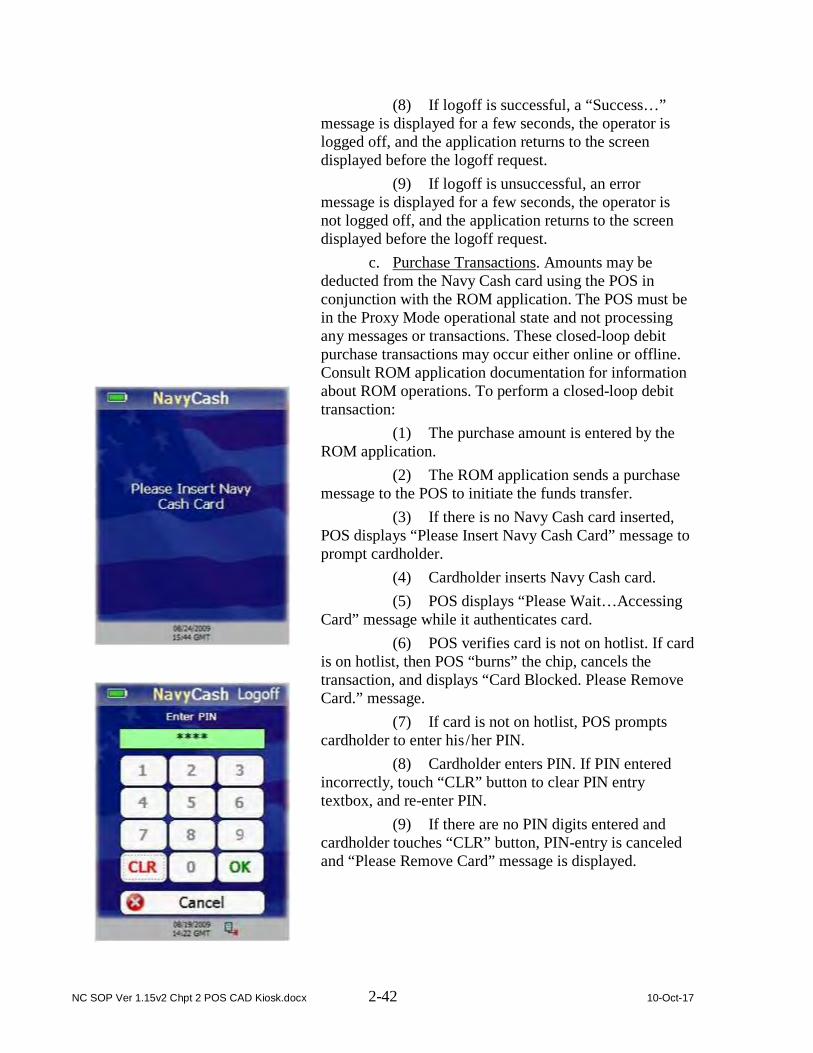
c. Purchase Transactions. Amounts may be deducted from the Navy Cash card using the POS in conjunction with the ROM application. The POS must be in the Proxy Mode operational state and not processing any messages or transactions. These closed-loop debit purchase transactions may occur either online or offline. Consult ROM application documentation for information about ROM operations. To perform a closed-loop debit transaction:
(1) The purchase amount is entered by the ROM application.
(2) The ROM application sends a purchase message to the POS to initiate the funds transfer.
(3) If there is no Navy Cash card inserted, POS displays “Please Insert Navy Cash Card” message to prompt cardholder.
(4) Cardholder inserts Navy Cash card. (5) POS displays “Please Wait…Accessing
Card” message while it authenticates card. (6) POS verifies card is not on hotlist. If card
is on hotlist, then POS “burns” the chip, cancels the transaction, and displays “Card Blocked. Please Remove Card.” message.
(7) If card is not on hotlist, POS prompts cardholder to enter his / her PIN.
(8) Cardholder enters PIN. If PIN entered incorrectly, touch “CLR” button to clear PIN entry textbox, and re-enter PIN.
(9) If there are no PIN digits entered and cardholder touches “CLR” button, PIN-entry is canceled and “Please Remove Card” message is displayed.

NC SOP Ver 1.15v2 Chpt 2 POS CAD Kiosk.docx 2-43 10-Oct-17
(10) Once PIN entered, touch “OK” button. POS verifies PIN entered matches PIN on card.
(11) If PINs don’t match, “Invalid PIN” message displayed, followed by a “Re-Enter PIN” message. Cardholder may re-enter PIN up to the retry limit enforced by card.
(12) POS displays Confirm Withdraw screen. Cardholder touches “OK” button to confirm purchase transaction (withdraw) amount or “Cancel” button to cancel purchase transaction.
(13) If cardholder touches “Cancel” button, transaction is canceled, and POS sends failure message back to ROM application.
(14) If cardholder touches “OK” button, POS displays “Please Wait…Updating Card” message.
(15) The POS debits the amount from the cardholder’s Navy Cash card and generates an EFT message to be sent to the Navy Cash server for the transaction amount.
(16) If transaction succeeded, “Success …Purchase Succeeded” message is displayed for a few seconds. If the transaction failed, then an error message followed by an error code is displayed for a few seconds.
(17) If Navy Cash card still inserted, POS displays a “Waiting for Command” message followed by closed-loop account balance and continues to wait for commands from ROM application. If card is not inserted, POS returns to Proxy Mode Welcome Screen.
NC SOP Ver 1.15v2 Chpt 2 POS CAD Kiosk.docx 2-44 10-Oct-17
2.3 Navy Cash Card Accepting Device (CAD) 2.3.1 General
a. The CAD is installed in vending machines and can read the closed-loop account on the Navy Cash card and interact with the Navy Cash server. The CAD allows cardholders to purchase items from the vending machines and records the sales transactions in the Navy Cash system. Because the transactions in vending machines are small in value, CADs don’t support entry of Personal Identification Numbers (PINs).
b. Interfaces (1) Ship’s Local Area Network (LAN). The CAD connects to the Navy Cash server
through the ship’s LAN (Ethernet), e.g., the Integrated Shipboard Network System (ISNS). The CAD requires a network connection to the Navy Cash server to initially log in to the Navy Cash server and to send messages after any transactions. The CAD can support transactions when it is off line. Transaction messages are saved if the CAD is off line. Once the CAD is back on line, the stored messages are sent to the Navy Cash server.
(2) Navy Cash Card. The chip on the Navy Cash card provides a means of user authentication and a Secure Authenticated Counter (SAC), or closed-loop account, to and from which funds can be transferred. The CAD recognizes two types of cards, cardholder cards and vending merchant cards. Cardholder cards are synonymous with Navy Cash cards. Vending merchant cards are used to activate the End-Of-Month (EOM) message at the CADs. Each CAD can be associated with only one vending merchant. Vending merchant cards are used only for EOM reporting and must never be funded or used to purchase products.
(3) Secure Access Module (SAM). The CAD uses a SAM (chip) to interact with the chip on the Navy Cash card.
(4) Secure Digital (SD) Card. The SD card provides a means of storing transactions when the CAD is off line. Once the CAD is back on line, the stored transaction messages are sent to the Navy Cash server automatically. The transactions stored on the SD card can be uploaded to the Navy Cash server “manually” in the event the CAD itself fails.
(5) Multi-Drop Bus (MDB). The MDB standard enables communications between a CAD and a vending machine. The MDB interface also supplies power to the CAD.
2.3.2 Messages. The CAD displays startup, error, transaction, card, and admin messages to indicate its current
state of operation. a. Startup Messages. Prior to initially starting a CAD, an IP address must be set up in
the Navy Cash server, and the CAD must be assigned in the Disbursing Application (see paragraph 8.4.25.a).

NC SOP Ver 1.15v2 Chpt 2 POS CAD Kiosk.docx 2-45 10-Oct-17
(1) When starting up, a message is displayed to indicate the CAD is initializing.
(2) After initialization is complete, the CAD should receive a PING message from the Navy Cash server. Upon receipt of the PING, the CAD displays a message to indicate it is trying to log on to the Navy Cash server.
(3) If a PING is not received, the CAD displays a message to indicate it is unable to log on to the Navy Cash server. To correct the problem,
(a) Open the vending machine to access the CAD. Make sure all cables are plugged in, and troubleshoot network connections.
(b) Ensure CAD has an IP address set up in the Navy Cash server.
(c) Ensure CAD has been assigned in the Disbursing Application (paragraph 8.4.25.a).
(d) Restart CAD, and close vending machine.
b. Error Messages. The CAD will display error messages when the SD card is not present, the CAD is disabled, the vending machine is out of stock, or there is a system error.
(1) An “Out of Service – SD” message is displayed if there is no SD card in the CAD. An SD card must be inserted to continue CAD operations.
(a) Open the vending machine to access the CAD. The SD card slot is located on the back of the CAD.
(b) Insert an SD card. SD High-Capacity (SDHC) cards are not compatible with the CAD. SD cards should be 1 GB or greater and have a standard size form factor. A standard size adapter is required if SD-Mini or SD-Micro cards are used.
(c) Restart CAD; close vending machine. (2) A “CAD Disabled” message is displayed
if there is no communications between the CAD and the MDB interface.
NC SOP Ver 1.15v2 Chpt 2 POS CAD Kiosk.docx 2-46 10-Oct-17
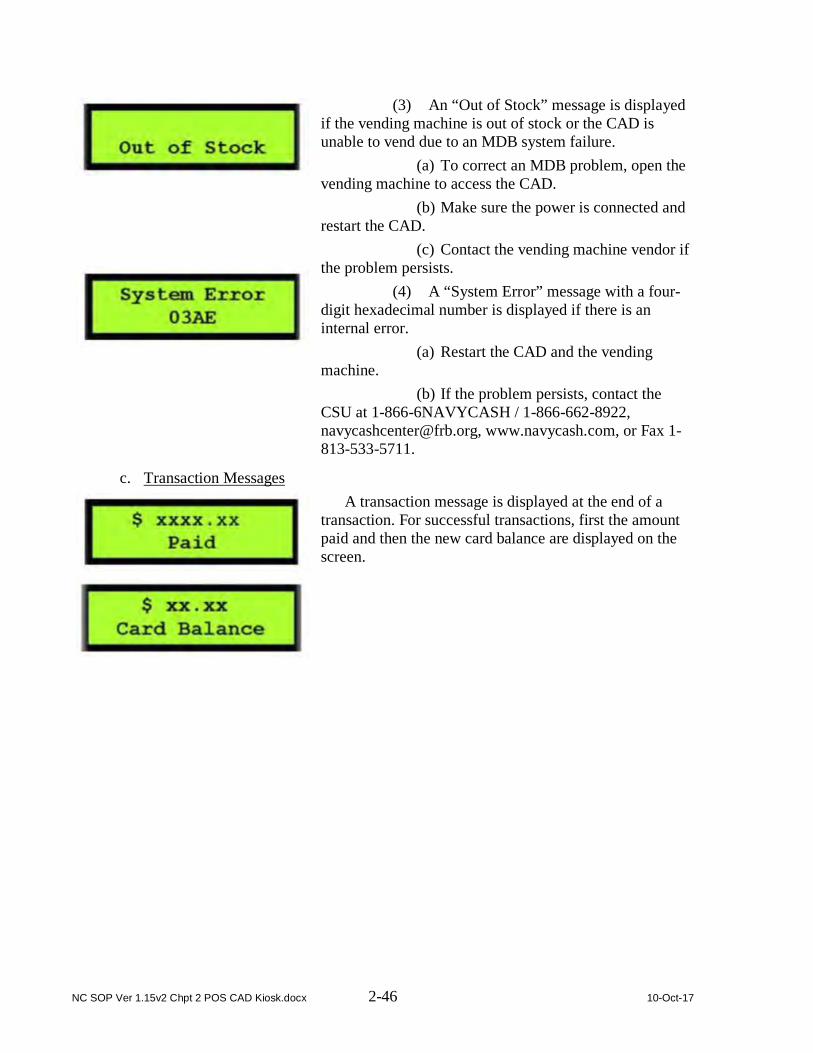
(3) An “Out of Stock” message is displayed if the vending machine is out of stock or the CAD is unable to vend due to an MDB system failure.
(a) To correct an MDB problem, open the vending machine to access the CAD.
(b) Make sure the power is connected and restart the CAD.
(c) Contact the vending machine vendor if the problem persists.
(4) A “System Error” message with a four-digit hexadecimal number is displayed if there is an internal error.
(a) Restart the CAD and the vending machine.
(b) If the problem persists, contact the CSU at 1-866-6NAVYCASH / 1-866-662-8922, [email protected], www.navycash.com, or Fax 1-813-533-5711.
c. Transaction Messages
A transaction message is displayed at the end of a transaction. For successful transactions, first the amount paid and then the new card balance are displayed on the screen.

NC SOP Ver 1.15v2 Chpt 2 POS CAD Kiosk.docx 2-47 10-Oct-17
d. Card Messages.
A “Please Remove Card” message is displayed if, at any point during the transaction, the CAD determines the card should be removed.
e. Admin Messages. If the SAM is not in the CAD, the CAD will not work, and an “Out of Order – S1” message is displayed on the screen. To insert the SAM into the CAD:
(1) Open the vending machine. (2) Insert the new SAM in the slot in the center of the CAD. (3) Restart the CAD, and close the vending machine.
2.3.3 Administrative Functions The CAD administrative functions provide tools that can be helpful in managing the
operation of the CADs and in diagnosing and solving any problems with the CADs. a. Diagnostic Information. The diagnostic screens display analytic information about the
CAD. CAD diagnostics are categorized into five groups and a restart function. The “Restart” function displays no diagnostic information; it simply restarts the CAD application.
General • Current date/time (GMT) • CAD application version • Operating system information • Application updated date/time • SAM status (present/not present) • Main battery status (%remaining) • Backup battery status (%remaining) • Database version • Backup database version
Network • Terminal ID number • Network connectivity status
(online / offline) • Server log-on status (logged on /
not logged on) • Device IP address • Port Hotlist • Hotlist size (number of entries) • Date / time of last hotlist update
(GMT mm/dd/yyyy hh:mm)
Queue • Total number of items in queue • Number of transactions in queue • Number of errors in queue • Number of reversals in queue • Number of card burn messages in
queue • Message queue capacity
remaining (percentage) Backup • Total • Number of transactions • Number of errors • Number of reversals • Number of card burn • Capacity remaining (percentage)
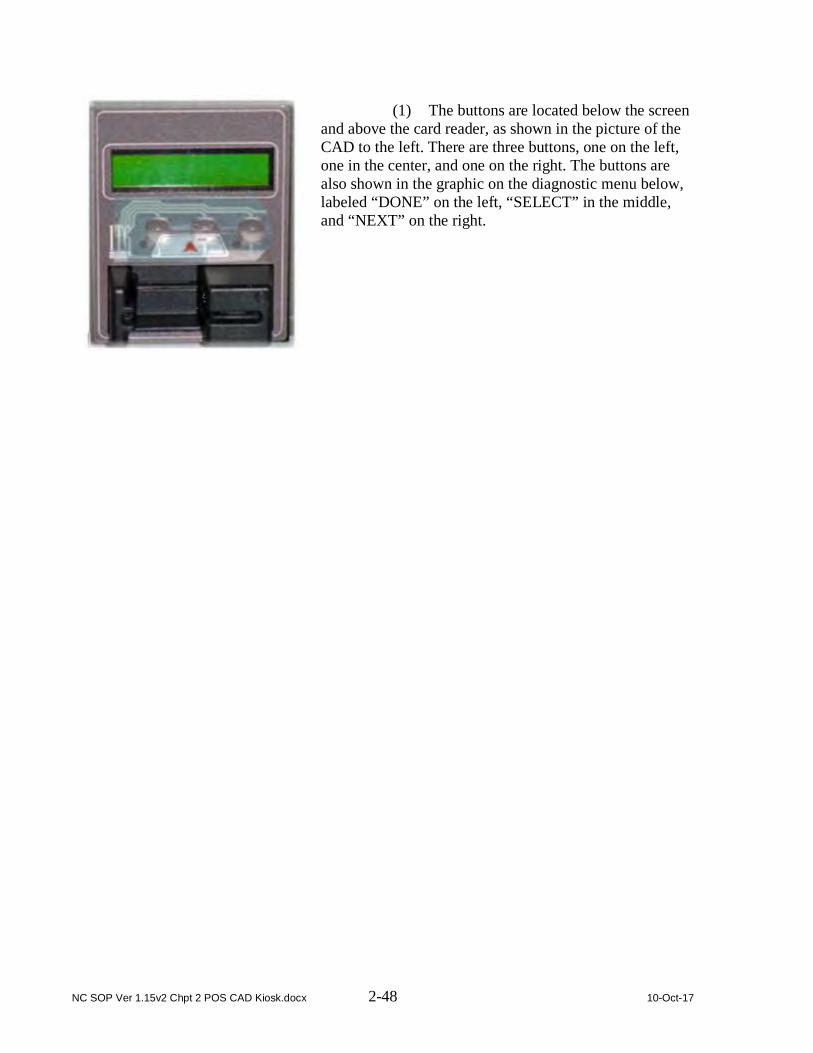
b. Accessing Diagnostic Information. Navigation of the CAD “Diagnostic Menu” is depicted in the graphic below. Diagnostic information is accessed via the “hidden” front panel buttons on the CAD.
NC SOP Ver 1.15v2 Chpt 2 POS CAD Kiosk.docx 2-48 10-Oct-17
(1) The buttons are located below the screen and above the card reader, as shown in the picture of the CAD to the left. There are three buttons, one on the left, one in the center, and one on the right. The buttons are also shown in the graphic on the diagnostic menu below, labeled “DONE” on the left, “SELECT” in the middle, and “NEXT” on the right.

NC SOP Ver 1.15v2 Chpt 2 POS CAD Kiosk.docx 2-49 10-Oct-17
(2) The diagnostic menu can be accessed when the CAD is in an idle state with no card inserted and the “Welcome Screen” is displayed. To access the diagnostic menu, press and hold the center (SELECT) button for three seconds.
(3) The CAD will display the “CAD Diagnostics” screen. Press the left (DONE) button to “Exit” and return to the “Welcome Screen”. Press the center (SELECT) button to “Start” the diagnostic menu and continue to the next screen.

NC SOP Ver 1.15v2 Chpt 2 POS CAD Kiosk.docx 2-50 10-Oct-17
(4) The CAD will then display the first diagnostic group name, i.e., “General”. Press the right (NEXT) button until the desired diagnostic group is displayed (see the CAD “Diagnostic Menu” in the graphic above for the diagnostic group names).
(5) To select the desired diagnostic group, press the center (SELECT) button.
(6) The CAD will then display the first item in the list of the selected group’s diagnostic information. Press the right (NEXT) button to view each diagnostic item in the group.
(7) After completing the review of desired diagnostic items in the group, press the left (DONE) button to return to the diagnostic group selection screen.
c. Port and IP Address Settings. A CAD’s port and IP address settings can be edited from the diagnostics screens. To edit the address settings:
(1) Navigate through the diagnostic group selection screens to the “Network” group. Press the center (SELECT) button to select the Network group.
(2) Press the right (NEXT) button several time until the “IP Address” diagnostic screen is displayed.
(3) Press and hold the center (SELECT) button for three to four seconds until the “Addressing Mode” screen is displayed.
(4) The addressing mode screen displays the current “Mode”, as well as options to “Exit” and to edit “DHCP” and “Static” IP.
(5) If you choose not to edit the address settings, press the left (DONE) button to “Exit” the addressing mode screen and return to the “Network” group screen.
(6) Edit Port Number. To edit the port number, press the center (SELECT) button to select “DHCP”.
(a) The “Port Selection” screen displays the current “Port”. If you choose not to change the port number, press the left (DONE) button to “Exit” and return to the addressing mode screen. Press the center (SELECT) button to “Change” the port number.
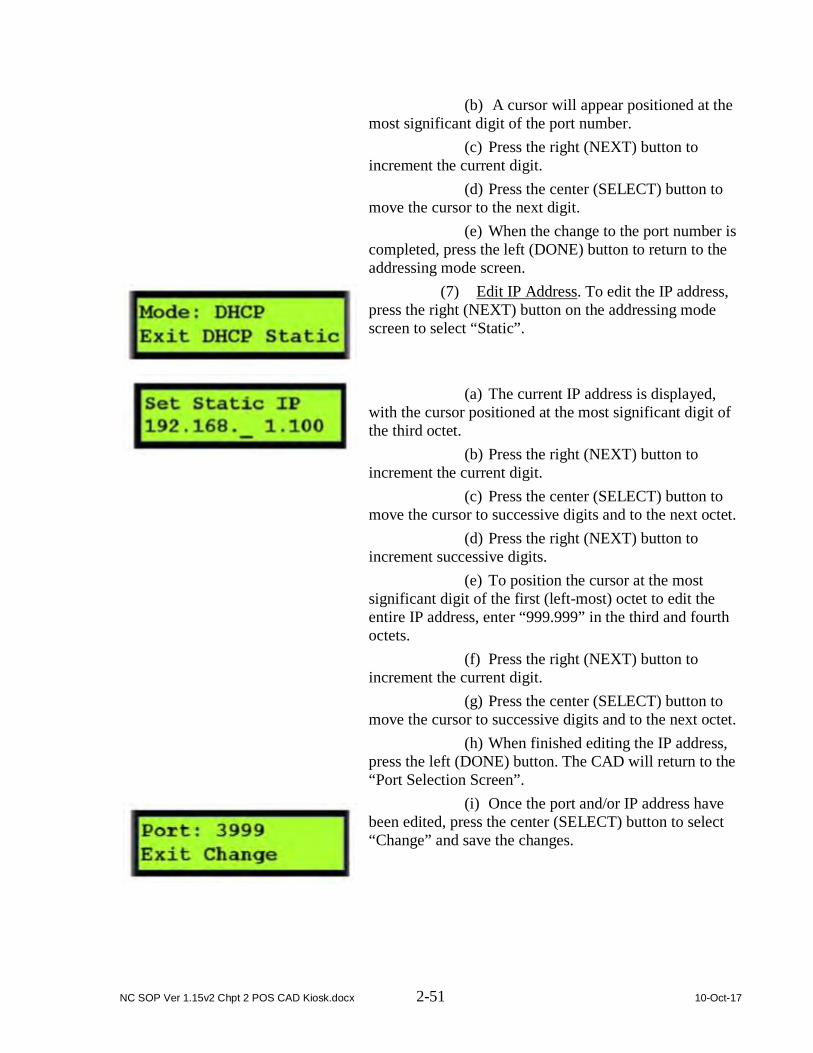
NC SOP Ver 1.15v2 Chpt 2 POS CAD Kiosk.docx 2-51 10-Oct-17
(b) A cursor will appear positioned at the most significant digit of the port number.
(c) Press the right (NEXT) button to increment the current digit.
(d) Press the center (SELECT) button to move the cursor to the next digit.
(e) When the change to the port number is completed, press the left (DONE) button to return to the addressing mode screen.
(7) Edit IP Address. To edit the IP address, press the right (NEXT) button on the addressing mode screen to select “Static”.
(a) The current IP address is displayed, with the cursor positioned at the most significant digit of the third octet.
(b) Press the right (NEXT) button to increment the current digit.
(c) Press the center (SELECT) button to move the cursor to successive digits and to the next octet.
(d) Press the right (NEXT) button to increment successive digits.
(e) To position the cursor at the most significant digit of the first (left-most) octet to edit the entire IP address, enter “999.999” in the third and fourth octets.
(f) Press the right (NEXT) button to increment the current digit.
(g) Press the center (SELECT) button to move the cursor to successive digits and to the next octet.
(h) When finished editing the IP address, press the left (DONE) button. The CAD will return to the “Port Selection Screen”.
(i) Once the port and/or IP address have been edited, press the center (SELECT) button to select “Change” and save the changes.

NC SOP Ver 1.15v2 Chpt 2 POS CAD Kiosk.docx 2-52 10-Oct-17
(j) A “Commit Change” Screen is displayed. Press the left (DONE) button to discard the changes, or press the center (SELECT) button to apply the network settings changes.
(8) The “IP Address” diagnostic screen is displayed.
d. Terminal ID. The “Terminal ID” for the CAD is set automatically using the Media Access Control (MAC) address assigned to the CAD’s Network Interface Card (NIC). Since the CAD has no user interface that allows for the entry of a terminal ID, the NIC card’s MAC address is obtained when the CAD application starts up. The MAC address is then loaded into memory, right-padded with zeroes to form a 16-digit terminal ID number, and used any time the Terminal ID is required.
e. Merchant ID. The “Merchant ID” for the CAD is set by the Navy Cash server using the Disbursing Application. The CAD receives its merchant ID with the hotlist message that is sent from the Navy Cash server.
2.3.4 CAD Operations a. End-Of-Month (EOM) Reporting
EOM reporting is initiated at each CAD using the vending merchant cards (for detailed EOM procedures see paragraphs 8.4.20.b, 8.4.25.b, Appendix A, and Appendix R). Each CAD can be associated with only one merchant. The CAD must be on line to perform EOM reporting. To activate the EOM messages at the CAD:
(1) Insert the vending merchant card associated with the appropriate merchant into the card reader on the CAD.
(2) A “Processing Please Wait” message is displayed. During processing, the merchant card is authenticated, and the CAD verifies the card is not on the hotlist.
(3) If the merchant card is valid for the CAD, but EOM has never been performed, an “EOM Not Done Yet” message is displayed. If EOM has previously been performed, the CAD displays the last EOM date and time in mm/dd/yy and hhmmss format and the CAD terminal ID.
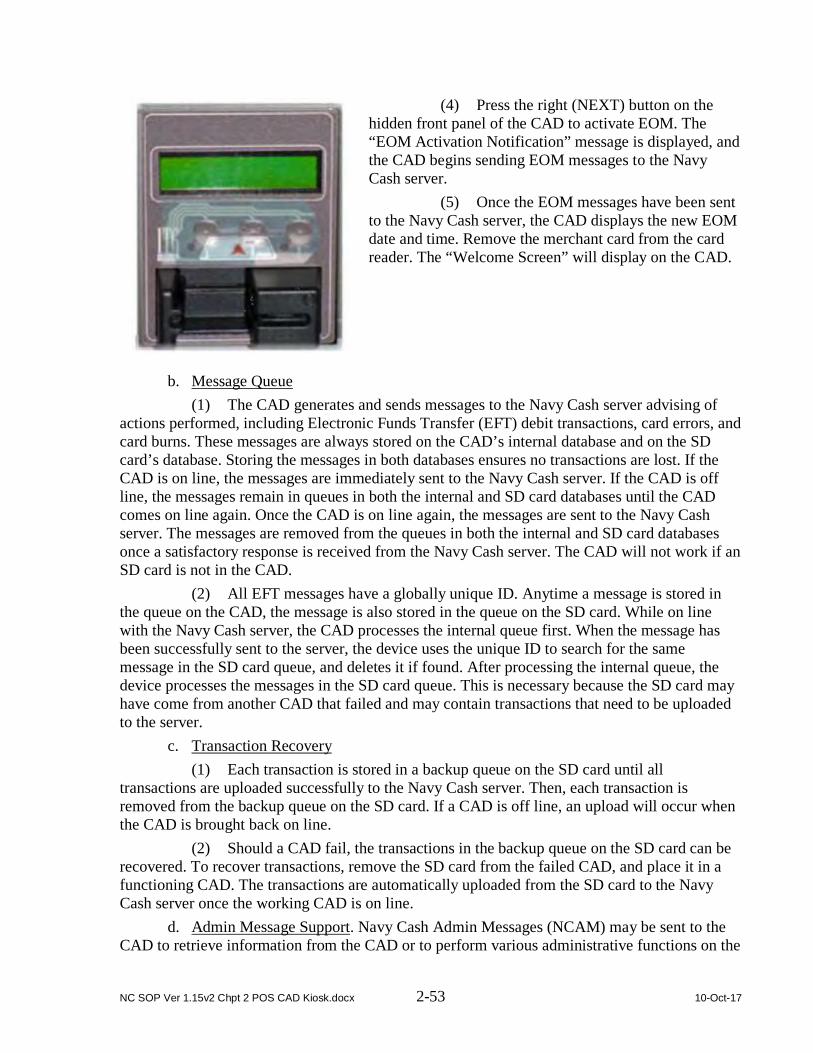
NC SOP Ver 1.15v2 Chpt 2 POS CAD Kiosk.docx 2-53 10-Oct-17
(4) Press the right (NEXT) button on the hidden front panel of the CAD to activate EOM. The “EOM Activation Notification” message is displayed, and the CAD begins sending EOM messages to the Navy Cash server.
(5) Once the EOM messages have been sent to the Navy Cash server, the CAD displays the new EOM date and time. Remove the merchant card from the card reader. The “Welcome Screen” will display on the CAD.
b. Message Queue (1) The CAD generates and sends messages to the Navy Cash server advising of
actions performed, including Electronic Funds Transfer (EFT) debit transactions, card errors, and card burns. These messages are always stored on the CAD’s internal database and on the SD card’s database. Storing the messages in both databases ensures no transactions are lost. If the CAD is on line, the messages are immediately sent to the Navy Cash server. If the CAD is off line, the messages remain in queues in both the internal and SD card databases until the CAD comes on line again. Once the CAD is on line again, the messages are sent to the Navy Cash server. The messages are removed from the queues in both the internal and SD card databases once a satisfactory response is received from the Navy Cash server. The CAD will not work if an SD card is not in the CAD.
(2) All EFT messages have a globally unique ID. Anytime a message is stored in the queue on the CAD, the message is also stored in the queue on the SD card. While on line with the Navy Cash server, the CAD processes the internal queue first. When the message has been successfully sent to the server, the device uses the unique ID to search for the same message in the SD card queue, and deletes it if found. After processing the internal queue, the device processes the messages in the SD card queue. This is necessary because the SD card may have come from another CAD that failed and may contain transactions that need to be uploaded to the server.
c. Transaction Recovery (1) Each transaction is stored in a backup queue on the SD card until all
transactions are uploaded successfully to the Navy Cash server. Then, each transaction is removed from the backup queue on the SD card. If a CAD is off line, an upload will occur when the CAD is brought back on line.
(2) Should a CAD fail, the transactions in the backup queue on the SD card can be recovered. To recover transactions, remove the SD card from the failed CAD, and place it in a functioning CAD. The transactions are automatically uploaded from the SD card to the Navy Cash server once the working CAD is on line.
d. Admin Message Support. Navy Cash Admin Messages (NCAM) may be sent to the CAD to retrieve information from the CAD or to perform various administrative functions on the
NC SOP Ver 1.15v2 Chpt 2 POS CAD Kiosk.docx 2-54 10-Oct-17
CAD. The CAD only processes NCAM messages when in an idle state, i.e., when no card is inserted, and there are no pending transactions. While processing NCAM messages, the CAD displays a “Please Wait…Under Maintenance” message to the user, and all other requests are ignored. Upon completion of the NCAM message processing, the CAD returns to an idle state, and the “Welcome Screen” is displayed.
2.3.5 CAD Maintenance and Set Up Installation of the CAD application is completed prior to delivery to the ship. Updates and
upgrades for the application are generally installed remotely. a. CAD Installation. To install a CAD:
(1) Open the vending machine door and the interior panel. (2) Attach the CAD using the four screws and secure with four nuts. (3) Carefully attach Ethernet and MDB cables to the CAD. (4) Close the interior panel and door, making sure not to pinch the cables. (5) Ensure the network settings are correct (see paragraph 2.3.3.c) and the CAD is
assigned to the vending machine in the Disbursing Application (see paragraph 8.4.25). (6) Test the CAD by inserting a Navy Cash card. The card balance will display if
the installation was successful and the CAD is operating correctly. b. SAM Installation. To install a SAM:
(1) Open the vending machine door and the interior panel to access the CAD. (2) Carefully unplug the Ethernet and MDB cables from the CAD. (3) Unscrew the four nuts securing the CAD, and remove the CAD. (4) Flip the CAD over so that you are looking at the bottom of the CAD. (5) If a SAM is already installed, it will be visible on the circuit board. (6) To install a new SAM:
(a) Slide SAM holder in the direction of the arrow; remove any existing SAM. (b) Without touching gold contact points of the new SAM, place it in the SAM
holder with the gold contacts facing the circuit board. (c) Press down on the SAM and slide it forward to lock it in place.
(7) Reattach the CAD to the vending machine, and secure it with the four nuts. (8) Carefully attach the Ethernet and MDB cables to the CAD. (9) Close the interior panel and door, making sure not to pinch the cables. (10) Test the CAD by inserting a Navy Cash card. The card balance will display if
the installation was successful and CAD is operating correctly. c. SD Card Installation. The SD card may be replaced by accessing the CAD in the
same manner described above. To install an SD card: (1) If an SD card is already installed, it will be visible on the board. (2) Depress the SD card so that it ejects from the card slot. (3) Insert the new SD card into the slot. (4) Reattach the CAD to the vending machine, and secure it with the four nuts.

NC SOP Ver 1.15v2 Chpt 2 POS CAD Kiosk.docx 2-55 10-Oct-17
(5) Carefully attach the Ethernet and MDB cables to the CAD. (6) Close the interior panel and vending machine door, making sure not to pinch the
cables and ensuring nothing is pressed against the SD card, as objects pressing against the SD card may cause it to eject from the card slot.
(7) The CAD application automatically creates and updates the database on the SD card anytime a new card is inserted into the card slot on the CAD.
d. Remote Update (1) Remote update software is used to install application updates from the Navy
Cash server onto the CAD automatically. No user intervention is required.
(2) A “System Update In Progress” message is displayed until the update is complete.
(3) If the CAD application is running before an update is installed, the CAD will gracefully finish any pending processes. Once the CAD application is idle, it shuts down and the update installs. The CAD application restarts automatically after the update is completed.
e. Technical Support. Should technical support be required, contact the Central Support Unit (CSU) at 1-866-6NAVYCASH (1-866-662-8922), [email protected], www.navycash.com, or Fax 1-813-533-5711.

NC SOP Ver 1.15v2 Chpt 2 POS CAD Kiosk.docx 2-56 10-Oct-17
2.4 Navy Cash Kiosk 2.4.1 General
a. The Navy Cash kiosk is a self-service kiosk that can read the chip on the Navy Cash card and interact with the Navy Cash server. The kiosk allows cardholders to move funds between their bank and credit union accounts ashore and their Navy Cash closed-loop and open-loop accounts, to change their Personal Identification Numbers (PINs), and to check in to the ship.
b. Interfaces (1) Secure Access Module (SAM). The kiosk uses a SAM to interact with the chip
on the Navy Cash card. If a SAM is not in the kiosk, the kiosk will not work, and an out-of-service error message is displayed on the screen.
(2) Ship’s Local Area Network (LAN) (a) The kiosk connects to the Navy Cash server through the ship’s LAN
(Ethernet), e.g., the Integrated Shipboard Network System (ISNS). The kiosk requires a continuous network connection to the Navy Cash server to process any transaction. The kiosk cannot support transactions when it is off line.
(b) The kiosk receives PING messages from the Navy Cash server every 30 seconds. If the kiosk has not received a PING message within 30 seconds, an out-of-service message is displayed on the screen.
c. Welcome Screen (1) The main screen for the kiosk is the “Welcome Screen”. Cardholders may insert
their Navy Cash card and begin a transaction anytime the “Insert Card to Begin” prompt is displayed on the screen.
(2) Status Bar. A status bar is at the bottom of every screen. The current date and
time are displayed in the lower-right corner of the status bar. The time is synchronized with the Navy Cash server. In Navy Cash, all dates and times are recorded, reported, and displayed in Greenwich Mean Time (GMT) (Coordinated Universal Time (UTC)). Do not change the time or time zone on the Navy Cash server. Changing the clock may result in errors and delays in End-Of-Day (EOD) processing. These errors can only be resolved through manual intervention guided by technical support personnel ashore.

NC SOP Ver 1.15v2 Chpt 2 POS CAD Kiosk.docx 2-57 10-Oct-17
(3) Offline Indicator. If the kiosk does not receive a “PING” message within 30 seconds, it will go off line. An offline indicator appears in the left hand corner of the status bar, and an out-of-service message is displayed on the screen.
2.4.2 Admin Mode
a. Create Admin Password. When the kiosk application is initially installed and runs for the first time, a six-digit numeric admin password must be created. The kiosk cannot proceed past the “Create Admin Password” screen until a password has been successfully set. To create an admin password:
(1) Enter the desired six-digit password using the kiosk’s touch screen or keypad.
(2) The password entry box turns green, and the “OK” button enables, when six digits are entered. Touch the “CLR” button to discard the previously entered password and enter a different one.
(3) If the password is acceptable, touch the “OK” button after the entry box turns green.
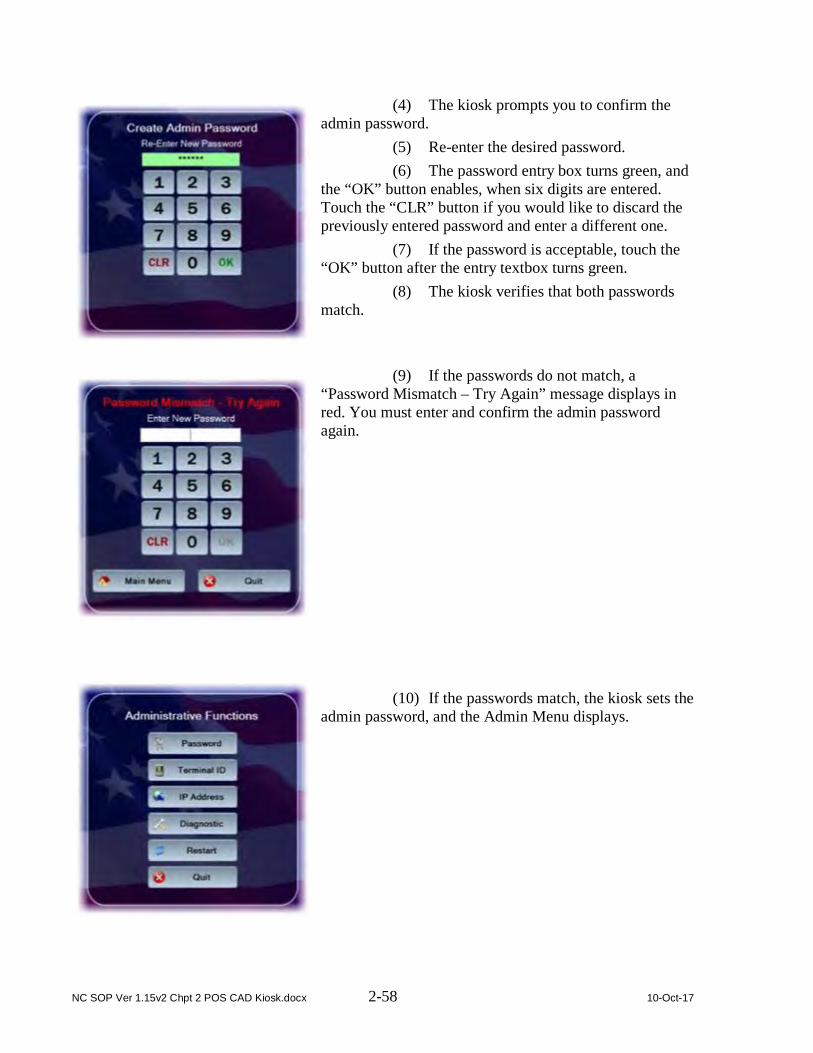
NC SOP Ver 1.15v2 Chpt 2 POS CAD Kiosk.docx 2-58 10-Oct-17
(4) The kiosk prompts you to confirm the admin password.
(5) Re-enter the desired password. (6) The password entry box turns green, and
the “OK” button enables, when six digits are entered. Touch the “CLR” button if you would like to discard the previously entered password and enter a different one.
(7) If the password is acceptable, touch the “OK” button after the entry textbox turns green.
(8) The kiosk verifies that both passwords match.
(9) If the passwords do not match, a “Password Mismatch – Try Again” message displays in red. You must enter and confirm the admin password again.
(10) If the passwords match, the kiosk sets the admin password, and the Admin Menu displays.

NC SOP Ver 1.15v2 Chpt 2 POS CAD Kiosk.docx 2-59 10-Oct-17
b. Entering Admin Mode. Admin mode is used to change device settings or view diagnostic information. To access admin mode, the “Welcome Screen” must be visible and there must not be any cards in the kiosk. To enter admin mode:
(1) Touch the middle area of the “Status Bar” below the welcome screen three times. The “Admin Mode” button itself is not labeled on the status bar.
(2) Enter the six-digit admin password when prompted. Password characters are masked with asterisks (“*”).
(3) The password entry box turns green, and the “OK” button enables, when the correct six digits are entered.
(4) If you enter an incorrect digit and would like to make a correction before submitting the password, touch the “CLR” button to discard the previously entered password and enter the correct one.
(5) If the wrong password is entered three times in a row, the admin mode is locked out for a period of one hour. The lockout remains in effect even if the system is rebooted.
(6) Touch the “OK” button. (7) The kiosk verifies the password. If the
password is not valid, a “Password Invalid – Re-enter” message displays in red. Enter the correct password, or touch the “Quit” button to return to the welcome screen without entering admin mode.

NC SOP Ver 1.15v2 Chpt 2 POS CAD Kiosk.docx 2-60 10-Oct-17
(8) If the password is valid, the Admin Menu displays.
2.4.3 Administrative Functions The Admin Menu allows you to view and configure kiosk settings. You must enter the admin
password and be in admin mode to access the Admin Menu. You may exit the Admin Menu and return to the welcome screen at any time by touching the “Quit” button.
a. Change Admin Password. The admin password may be changed whenever necessary. To change the admin password:
(1) Touch the “Password” button on the “Admin Menu”.
(2) A “Change Admin Password” screen displays prompting you to enter the current admin password.
(3) Use the touch screen or keypad to enter the six-digit password.
(4) The kiosk verifies that the current password is correct. If the current password is not correct, a “Current Password Invalid – Re-enter” message displays in red. Either re-enter the correct current password, touch the “Main Menu” button to return to the admin mode, or touch the “Quit” button to exit the admin mode.
(5) If the current password is correct, the current password entry box turns green, and you are prompted to enter the new admin password.

NC SOP Ver 1.15v2 Chpt 2 POS CAD Kiosk.docx 2-61 10-Oct-17
(6) Enter the new six-digit password in the “New Password” entry box.
(7) After six digits are entered, the “New Password” entry box turns green, and you are prompted to re-enter the new password for verification.
(8) The Admin Menu screen displays if the new password entries match.
(9) If the new password entries do not match, a “Password Mismatch – Try Again” message displays.
(10) Correctly enter and confirm the new password, then touch the “OK” button on the keypad.
(11) If you choose not to change the admin password, touch the “Main Menu” button to return to the Admin Menu, or the “Quit” button to exit admin mode.

NC SOP Ver 1.15v2 Chpt 2 POS CAD Kiosk.docx 2-62 10-Oct-17
b. Change Terminal ID. The kiosk’s terminal ID may be changed whenever necessary. To change the terminal ID:
(1) Touch the “Terminal ID” button on the “Admin Menu”.
(2) The Terminal ID screen appears showing the current terminal ID for the kiosk.
(3) If you do not wish to change the terminal ID, touch the “Main Menu” button to return to the Admin Menu screen.
(4) Touch the “Update” button to continue.
(5) The “Set Terminal ID” screen is displayed. Use the touch screen keypad to enter the new 16-digit terminal ID.
(6) After 16 digits are entered, the terminal ID entry box turns green, and the “OK” button is enabled.
(7) Touch the “Quit” button to return to the Terminal ID screen.
(8) Touch the “OK” button to initiate the change.
(9) The kiosk’s terminal ID is updated, and the “Change Successful” screen is displayed. Touch the “Main Menu” button to go to the Admin Menu. Touch the “Quit” button to return to the welcome screen.

NC SOP Ver 1.15v2 Chpt 2 POS CAD Kiosk.docx 2-63 10-Oct-17
c. Set IP Address. The kiosk’s IP address configuration may be changed whenever necessary. To modify the first two octets of the IP address, you must enter “999” for the last two octets. This “999.999” key sequence also allows you to change the TCP Port that the device listens on for incoming connections from the Navy Cash server. To change the IP address configuration:
(1) Touch the “IP Address” button on the “Admin Menu”.
(2) The “IP Address” screen displays the current IP address configuration for the kiosk.
(3) Select either the “DHCP” or “Static IP” radio button.
(4) If you choose “Static IP”, then you may change the last two octets.
(5) Use the touch screen keypad to make the octet entries.
(6) If you enter “999” for the last two octets (999.999), the first two octets and the “Port” will become editable.
(7) If you change the port, it must be in the range between 1 and 65,535.

NC SOP Ver 1.15v2 Chpt 2 POS CAD Kiosk.docx 2-64 10-Oct-17
(8) If you do not wish to change the IP and/or port configuration, touch the “Main Menu” button to go to the Admin Menu. Touch the “Quit” button to return to the welcome screen..
(9) If you wish to set the new IP and/or port configuration, touch the “OK” button.
(10) If the port is not valid, a “Port Must Be 1 to 65,535” message displays in red. If you change the IP address, all octets must have a value. If an octet does not have a value, it highlights in red, and an “IP Address Invalid” message displays in red.
(11) The kiosk displays the “Change Successful” screen, and the kiosk’s IP address configuration is updated.
(12) Touch the “Main Menu” button to go to the Admin Menu. Touch the “Quit” button to return to the welcome screen.
d. Display Diagnostic Screen (1) The “Diagnostic Screen” displays diagnostic information about the kiosk.
General • Current date/time (GMT) • Kiosk application version • Device database version • Operating system information • SAM status (present/not present) • Chip version (if card inserted) • Chip date (if card inserted,
mm/dd/yyyy format)
Network • Terminal ID number • Device IP address • Port • Network connectivity status
(online / offline) • Server log-on status (logged on /
not logged on) Hotlist • Hotlist size (number of entries) • Date / time of last hotlist update
(GMT mm/dd/yyyy hh:mm)
Queue • Total number of items in queue • Number of transactions in queue • Number of errors in queue • Number of reversals in queue • Number of card burn messages
in queue • Number of any other messages in
queue • Message queue capacity
remaining (percentage)
(2) Any information in an “error” or “abnormal” state displays in red text. (3) To view the information on the Diagnostic Screen:
(a) Touch the “Diagnostic” button on the Main Menu to display the screen.

NC SOP Ver 1.15v2 Chpt 2 POS CAD Kiosk.docx 2-65 10-Oct-17
(b) Insert a Navy Cash card to display chip version and date information. The
card may be removed after the information is displayed. (c) When review of diagnostic information is complete, touch the “Main Menu”
button to return to the Admin Menu or touch the “Quit” button to return to the Welcome Screen. e. Restart. Touch the “Restart” button on the Admin Menu to re-initialize all kiosk
application components. Using the restart function should always be the first step in troubleshooting the kiosk to determine if a simple re-initialization of the kiosk application fixes the problem.

NC SOP Ver 1.15v2 Chpt 2 POS CAD Kiosk.docx 2-66 10-Oct-17
2.4.4 Messages a. Startup Messages. When the kiosk application starts, a series of startup screens shows
the current state of the kiosk as it starts up. Screens indicating an error during startup also display a warning symbol. The following startup messages and startup error messages are possible:
Startup Messages • “Loading Drivers” – when application is loading • “Init Connections” – when device is initializing communications • “Loading Configurations” – when the device is loading saved
configuration information Startup Error Messages • “Out of Service – C1” – when the main card reader cannot be
activated • “Out of Service – S2” – when the SAM is detected, but cannot
be activated • “Out of Service – S1” – when the SAM is not present or is
malfunctioning • “Out of Service – N1” – when network communications cannot
be established • “Out of Service – T1” – when the Terminal ID for the device
has not yet been set
b. Error Messages. When the kiosk is inoperable, it displays an “Out of Service” message. The message is followed by an error code showing the reason for the out-of-service status. Common error codes the kiosk may display are listed in the table below.
Error Code Reason for Out-of-Service Status
C1 General card reader error. D1 Error creating database. D2 Error opening database. D3 Database on device is more recent than application database version. Application needs to
be updated. D4 Error updating database. D5 Application database version does not match version of database on device. D6 Error getting database version. D7 General database error. DF Database capacity has been exceeded. B1 Error creating backup database. B2 Error opening backup database. B3 Backup database on SD card is more recent than application backup database version.
Application needs to be updated. B4 Error updating backup database. B5 Application database version does not match version of backup database on SD card.

NC SOP Ver 1.15v2 Chpt 2 POS CAD Kiosk.docx 2-67 10-Oct-17
Error Code Reason for Out-of-Service Status
B6 Error getting backup database version. B7 General backup database error. BF Backup database capacity has been exceeded. S1 SAM not present. S2 Error powering on SAM. S3 Maximum number of allowed SAM errors reached. Please clean or replace SAM. N1 Network initialization error. NN Network down. No response from Navy Cash server. P1 General PIN pad error. SD SD card not present. T1 Terminal ID has not been set.
C21 Chip-to-chip failure after first card entered. Message being sent to server. C2D Chip-to-chip failure after second card entered. Message being sent to server. C2E Chip-to-chip failure after first card reentered. Message being sent to server. CP Change PIN – shown during a PIN change. GT General transfers – shown during transfers. CR Card removal error
c. Message Queue. The kiosk generates and sends messages to the Navy Cash server advising of actions performed, including Electronic Funds Transfers (EFTs), Card Errors, Reversals, and Card Burns. These messages are always stored on the kiosk’s internal database. If the kiosk is on line, the messages are immediately sent to the Navy Cash server. If the kiosk loses its connection to the Navy Cash server during a transaction, the messages remain in the internal database until the kiosk comes on line. Once the kiosk is on line again, the messages are sent to the Navy Cash server. The messages are removed from the queue once a satisfactory response is received from the Navy Cash server. The number and types of messages in the message queue can be displayed on the Diagnostic Screen (see paragraph 2.4.3.d).
d. Admin Message Support. Navy Cash Admin Messages (NCAM) may be sent to the kiosk to retrieve information from the kiosk or to perform various administrative functions on the kiosk. The kiosk only processes NCAM messages when in an idle state, i.e., when no card is inserted, and there are no pending transactions. While processing NCAM messages, the kiosk displays a “Please Wait…Under Maintenance” message to the user, and all other requests are ignored. Upon completion of the NCAM message processing, the kiosk returns to an idle state, and the “Welcome Screen” is displayed.
2.4.5 General Maintenance and Troubleshooting a. Installation of the kiosk application is completed prior to delivery to the ship. Updates
and upgrades for the application are generally installed remotely.
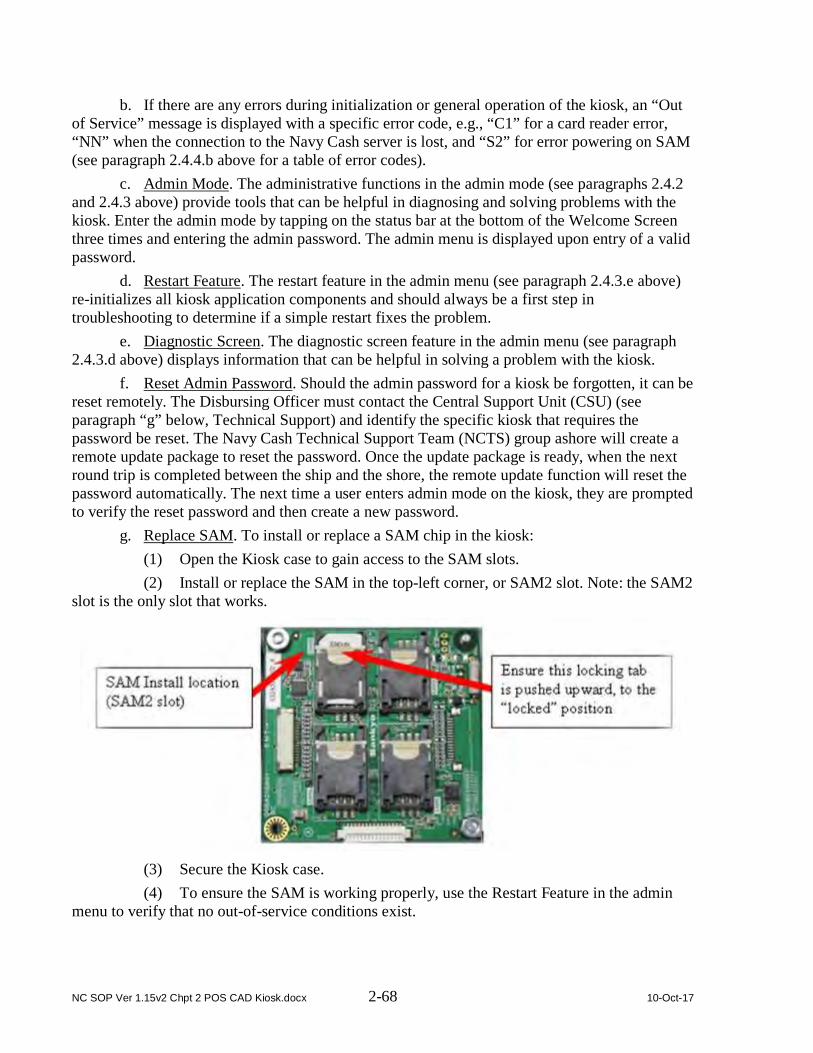
NC SOP Ver 1.15v2 Chpt 2 POS CAD Kiosk.docx 2-68 10-Oct-17
b. If there are any errors during initialization or general operation of the kiosk, an “Out of Service” message is displayed with a specific error code, e.g., “C1” for a card reader error, “NN” when the connection to the Navy Cash server is lost, and “S2” for error powering on SAM (see paragraph 2.4.4.b above for a table of error codes).
c. Admin Mode. The administrative functions in the admin mode (see paragraphs 2.4.2 and 2.4.3 above) provide tools that can be helpful in diagnosing and solving problems with the kiosk. Enter the admin mode by tapping on the status bar at the bottom of the Welcome Screen three times and entering the admin password. The admin menu is displayed upon entry of a valid password.
d. Restart Feature. The restart feature in the admin menu (see paragraph 2.4.3.e above) re-initializes all kiosk application components and should always be a first step in troubleshooting to determine if a simple restart fixes the problem.
e. Diagnostic Screen. The diagnostic screen feature in the admin menu (see paragraph 2.4.3.d above) displays information that can be helpful in solving a problem with the kiosk.
f. Reset Admin Password. Should the admin password for a kiosk be forgotten, it can be reset remotely. The Disbursing Officer must contact the Central Support Unit (CSU) (see paragraph “g” below, Technical Support) and identify the specific kiosk that requires the password be reset. The Navy Cash Technical Support Team (NCTS) group ashore will create a remote update package to reset the password. Once the update package is ready, when the next round trip is completed between the ship and the shore, the remote update function will reset the password automatically. The next time a user enters admin mode on the kiosk, they are prompted to verify the reset password and then create a new password.
g. Replace SAM. To install or replace a SAM chip in the kiosk: (1) Open the Kiosk case to gain access to the SAM slots. (2) Install or replace the SAM in the top-left corner, or SAM2 slot. Note: the SAM2
slot is the only slot that works.
(3) Secure the Kiosk case. (4) To ensure the SAM is working properly, use the Restart Feature in the admin
menu to verify that no out-of-service conditions exist.
NC SOP Ver 1.15v2 Chpt 2 POS CAD Kiosk.docx 2-69 10-Oct-17
h. Technical Support. Should technical support be required, contact the Central Support Unit (CSU) at 1-866-6NAVYCASH (1-866-662-8922), [email protected], www.navycash.com, or Fax 1-813-533-5711.
2.4.6 Severe Troubleshooting a. Severe troubleshooting may be necessary when there is question of the status of a
physical component, such as the PIN pad, network card, or smart-card reader, or when access to the underlying Windows Operating System (OS) is required. The secure case protecting the kiosk must be removed to access the physical components.
b. Technical Support. Should technical support be required, contact the Central Support Unit (CSU) at 1-866-6NAVYCASH (1-866-662-8922), [email protected], www.navycash.com, or Fax 1-813-533-5711.
2.5 Navy Cash Equipment Checklist A sample Navy Cash Equipment Checklist is included at Appendix G. This checklist will be
tailored for each ship as a part of the Navy Cash installation. The checklist provides an aid to assist in troubleshooting any equipment or software problems and should also be used to review the status of all the ship’s Navy Cash devices on a periodic basis.

NC SOP Ver 1.15v2 Chpt 2 POS CAD Kiosk.docx 2-70 10-Oct-17