Embed Size (px)
Citation preview
13-1
Chapter 13. Inheritance and Polymorphism
Objects are often categorized into groups that share similar characteristics. To illustrate:
• People who work as internists, pediatricians, surgeons, gynecologists, neurologists, general
practitioners, and other specialists have something in common: they are all doctors.
• Vehicles such as bicycles, cars, motorcycles, trains, ships, boats and airplanes are all mobile
machines.
• The elements helium, neon, argon, krypton, xenon, and radon are known as the inert (or noble)
gasses because each has the full complement of eight electrons in its outermost atomic shell, and
thus does not react readily with other elements.
These are just a few of the many situations in which we organize objects into groups because of their
common characteristics. When two or more objects have some characteristic in common, those objects
are said to be related by virtue of sharing that characteristic.
Much of the history of science has involved the classification of objects by identifying their common
characteristics. For example, when biologists discover a new species, they study all of its characteristics
to determine where it fits into their elaborate classification scheme.
One of the aims of object-oriented programming is to simplify the process of building software models of
real-world objects. Since real-world objects may be related to one another, an object-oriented language
must provide some mechanism for modeling such relationships. In Java, the keyword extends serves
this purpose. In this chapter, we study Java’s extends mechanism, and see how it can be used to save
coding effort in a carefully designed system.
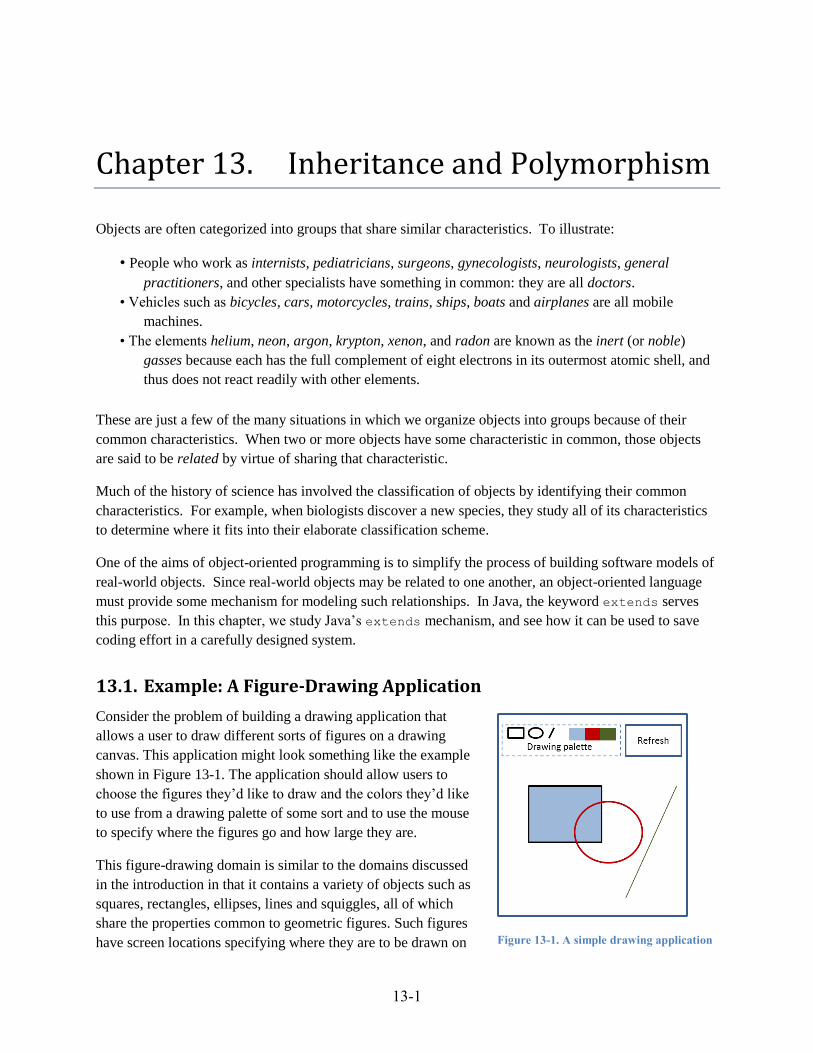
13.1. Example: A Figure-Drawing Application
Consider the problem of building a drawing application that
allows a user to draw different sorts of figures on a drawing
canvas. This application might look something like the example
shown in Figure 13-1. The application should allow users to
choose the figures they’d like to draw and the colors they’d like
to use from a drawing palette of some sort and to use the mouse
to specify where the figures go and how large they are.
This figure-drawing domain is similar to the domains discussed
in the introduction in that it contains a variety of objects such as
squares, rectangles, ellipses, lines and squiggles, all of which
share the properties common to geometric figures. Such figures
have screen locations specifying where they are to be drawn on
Figure 13-1. A simple drawing application
13-2
the canvas, fill settings specifying whether they are to be filled with color or merely outlined, and color
settings specifying the colors to use. There are also interesting relationships between the different figure
types. Squares are also rectangles but not the reverse. Ellipses can be filled, but not lines.
A programmer could build different classes to model each figure type, e.g., Rectangle, Ellipse,
Line, etc., but that would likely lead to considerable amounts of redundant code. For example, every
figure class would have to store an instance variable specifying their color and provide largely identical
constructors, accessors and mutators for initializing and managing that variable’s value. Redundancy such
as this is rarely a good programming practice.
This chapter introduces the techniques offered by object-oriented programming for implementing
applications such as this in a more concise and consistent manner.
13.2. Modeling Objects and Relationships
The object-oriented programming (OOP) paradigm is based on three fundamental mechanisms:
Encapsulation
Inheritance
Polymorphism
Encapsulation, the focus of Chapter 9, is the language construct that bundles data and methods into a
single class specification. Inheritance and polymorphism are addressed in the following sections. As we’ll
see, inheritance is a mechanism for sharing common features amongst classes while polymorphism is a
mechanism for designating unique features for each class.
13.2.1. Revisiting the Example
Before discussing inheritance and polymorphism, this section presents a first iteration of the figure-
drawing application introduced in Section 13.1, which we will call Simpledraw. It is not difficult to
implement a rectangle-drawing version of Simpledraw using mechanisms covered earlier in the text.
13-3
Rectangle.java 1
2
3
4
5
6
7
8
9
10
11
12
13
14
15
16
17
18
19
20
21
22
23
24
25
26
27
28
29
30
31
32
33
34
35
36
37
38
39
/**
* A simple rectangle-drawing class
*
* @author kvlinden
* @version Fall, 2009
*/
public class Rectangle {
private Point myStart;
private int myColor;
private int myWidth, myHeight;
private boolean myFilled;
public Rectangle(Point start, int width, int height,
int color, boolean filled) {
myStart = start;
myColor = color;
myWidth = width;
myHeight = height;
myFilled = filled;
}
public int getColor() {
return myColor;
}
public void setColor(int color) {
myColor = color;
}
public void render(PApplet p) {
p.stroke(myColor);
if (myFilled) {
p.fill(myColor);
} else {
p.noFill();
}
p.rect(myStart.x, myStart.y, myWidth, myHeight);
}
}
The class models a rectangle by encapsulating:
instance variables representing the rectangle’s starting point (its upper left point), its color,
width, height and a boolean indicating whether it is to be filled with color or simply outlined
methods specifying how to construct and draw the figure, and an accessor and mutator for the
color attribute.
As has been our practice since Chapter 11, the render() method receives the drawing context from its
calling object, which must be a PApplet, and uses Processing-based drawing methods to render the
rectangle on the canvas.
As it stands, this class is a perfectly appropriate model of a rectangle, but when we consider adding
support for ellipses, lines and other figure types, it’s clear that they too will need to represent a color
13-4
attribute and provide support for that attribute in the constructor, draw methods, accessors and mutators.
As mentioned in the previous section, we’d like to avoid reproducing this amount of redundant code;
redundant code is time-consuming to produce and can lead to inconsistencies, say, in the way color is
handled for each of the figure types. We would prefer to specify the color attribute in one place and allow
all the figure objects to share that attribute.
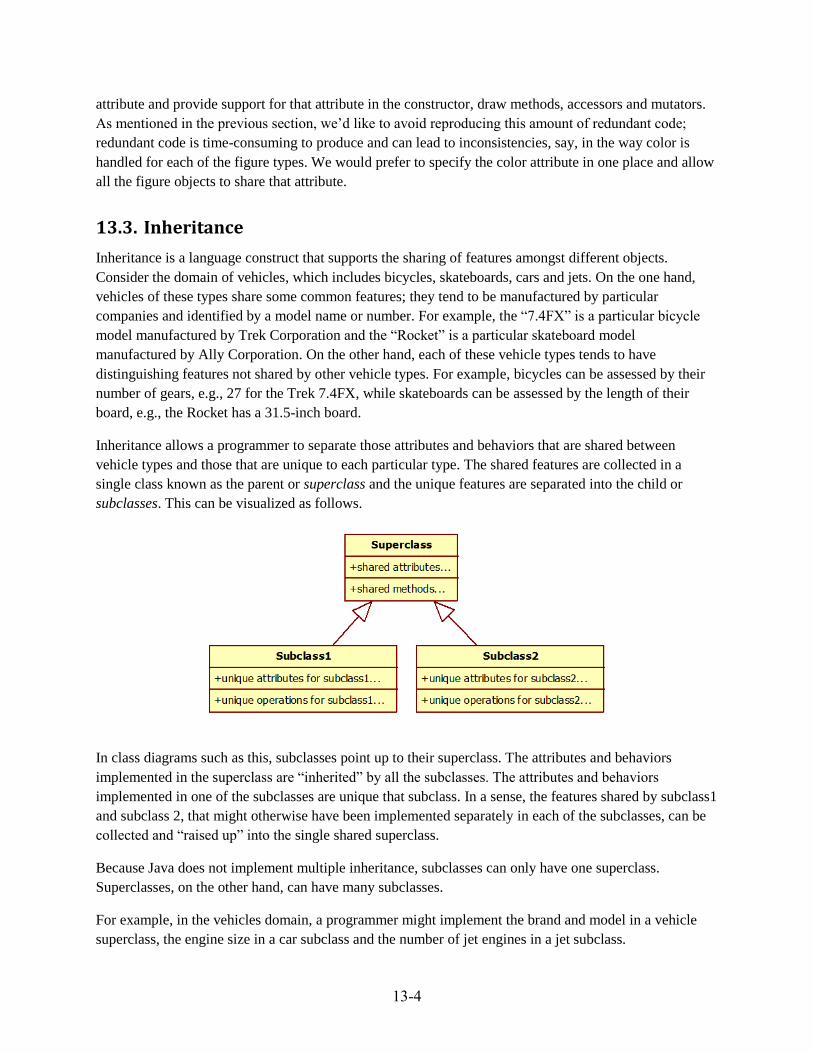
13.3. Inheritance
Inheritance is a language construct that supports the sharing of features amongst different objects.
Consider the domain of vehicles, which includes bicycles, skateboards, cars and jets. On the one hand,
vehicles of these types share some common features; they tend to be manufactured by particular
companies and identified by a model name or number. For example, the “7.4FX” is a particular bicycle
model manufactured by Trek Corporation and the “Rocket” is a particular skateboard model
manufactured by Ally Corporation. On the other hand, each of these vehicle types tends to have
distinguishing features not shared by other vehicle types. For example, bicycles can be assessed by their
number of gears, e.g., 27 for the Trek 7.4FX, while skateboards can be assessed by the length of their
board, e.g., the Rocket has a 31.5-inch board.
Inheritance allows a programmer to separate those attributes and behaviors that are shared between
vehicle types and those that are unique to each particular type. The shared features are collected in a
single class known as the parent or superclass and the unique features are separated into the child or
subclasses. This can be visualized as follows.
In class diagrams such as this, subclasses point up to their superclass. The attributes and behaviors
implemented in the superclass are “inherited” by all the subclasses. The attributes and behaviors
implemented in one of the subclasses are unique that subclass. In a sense, the features shared by subclass1
and subclass 2, that might otherwise have been implemented separately in each of the subclasses, can be
collected and “raised up” into the single shared superclass.
Because Java does not implement multiple inheritance, subclasses can only have one superclass.
Superclasses, on the other hand, can have many subclasses.
For example, in the vehicles domain, a programmer might implement the brand and model in a vehicle
superclass, the engine size in a car subclass and the number of jet engines in a jet subclass.
13-5
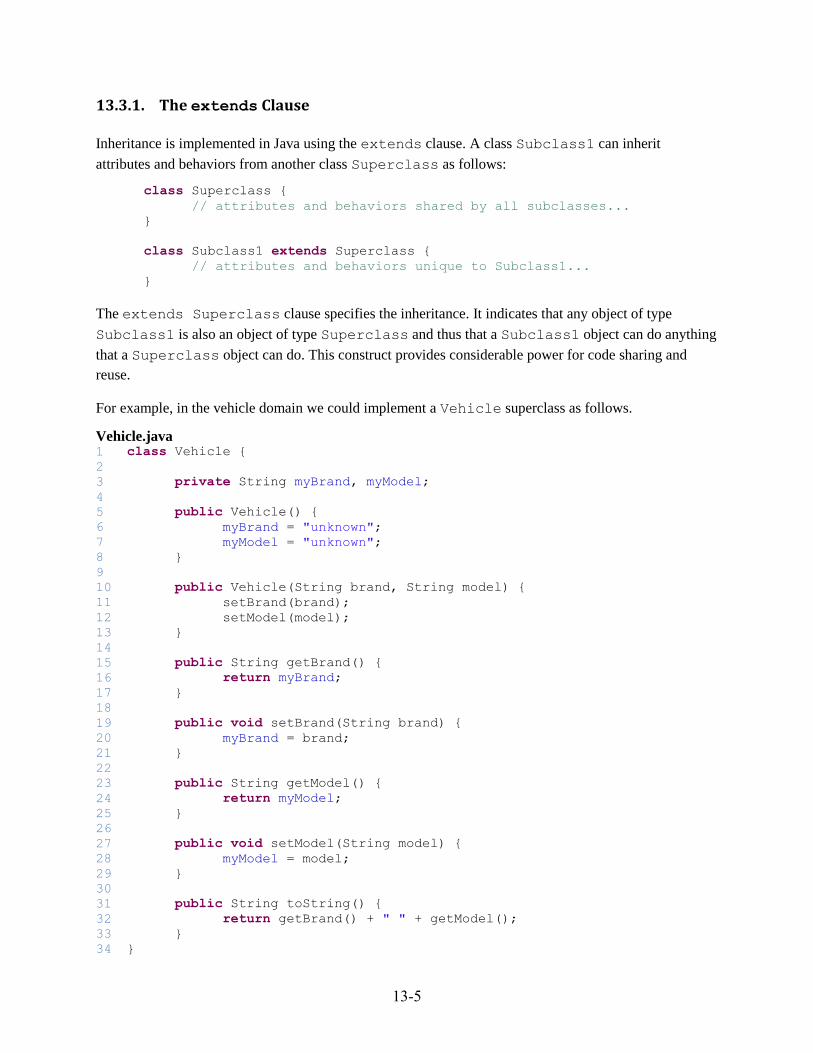
13.3.1. The extends Clause
Inheritance is implemented in Java using the extends clause. A class Subclass1 can inherit
attributes and behaviors from another class Superclass as follows:
class Superclass {
// attributes and behaviors shared by all subclasses...
}
class Subclass1 extends Superclass {
// attributes and behaviors unique to Subclass1...
}
The extends Superclass clause specifies the inheritance. It indicates that any object of type
Subclass1 is also an object of type Superclass and thus that a Subclass1 object can do anything
that a Superclass object can do. This construct provides considerable power for code sharing and
reuse.
For example, in the vehicle domain we could implement a Vehicle superclass as follows.
Vehicle.java 1
2
3
4
5
6
7
8
9
10
11
12
13
14
15
16
17
18
19
20
21
22
23
24
25
26
27
28
29
30
31
32
33
34
class Vehicle {
private String myBrand, myModel;
public Vehicle() {
myBrand = "unknown";
myModel = "unknown";
}
public Vehicle(String brand, String model) {
setBrand(brand);
setModel(model);
}
public String getBrand() {
return myBrand;
}
public void setBrand(String brand) {
myBrand = brand;
}
public String getModel() {
return myModel;
}
public void setModel(String model) {
myModel = model;
}
public String toString() {
return getBrand() + " " + getModel();
}
}
13-6
This class models a vehicle object by storing the brand and model attributes for that object and providing
constructors, accessors and mutators for maintaining those attributes. This class is implemented in the
same manner that we implemented classes in Chapter 9. Given this (super)class, we can now implement
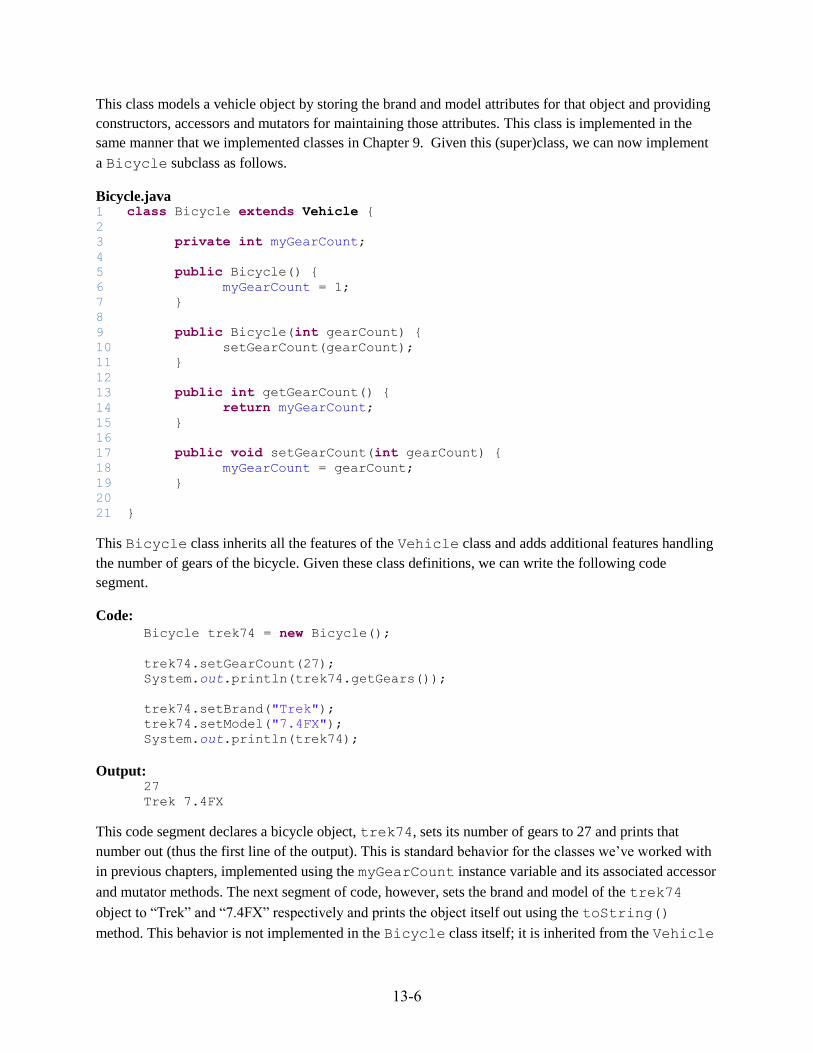
a Bicycle subclass as follows.
Bicycle.java 1
2
3
4
5
6
7
8
9
10
11
12
13
14
15
16
17
18
19
20
21
class Bicycle extends Vehicle {
private int myGearCount;
public Bicycle() {
myGearCount = 1;
}
public Bicycle(int gearCount) {
setGearCount(gearCount);
}
public int getGearCount() {
return myGearCount;
}
public void setGearCount(int gearCount) {
myGearCount = gearCount;
}
}
This Bicycle class inherits all the features of the Vehicle class and adds additional features handling
the number of gears of the bicycle. Given these class definitions, we can write the following code
segment.
Code:
Bicycle trek74 = new Bicycle();
trek74.setGearCount(27);
System.out.println(trek74.getGears());
trek74.setBrand("Trek");
trek74.setModel("7.4FX");
System.out.println(trek74);
Output: 27
Trek 7.4FX
This code segment declares a bicycle object, trek74, sets its number of gears to 27 and prints that
number out (thus the first line of the output). This is standard behavior for the classes we’ve worked with
in previous chapters, implemented using the myGearCount instance variable and its associated accessor
and mutator methods. The next segment of code, however, sets the brand and model of the trek74
object to “Trek” and “7.4FX” respectively and prints the object itself out using the toString()
method. This behavior is not implemented in the Bicycle class itself; it is inherited from the Vehicle
13-7
class. Thus, we can say that a Bicycle object is a Vehicle object in that it can do anything that a
Vehicle object can do.
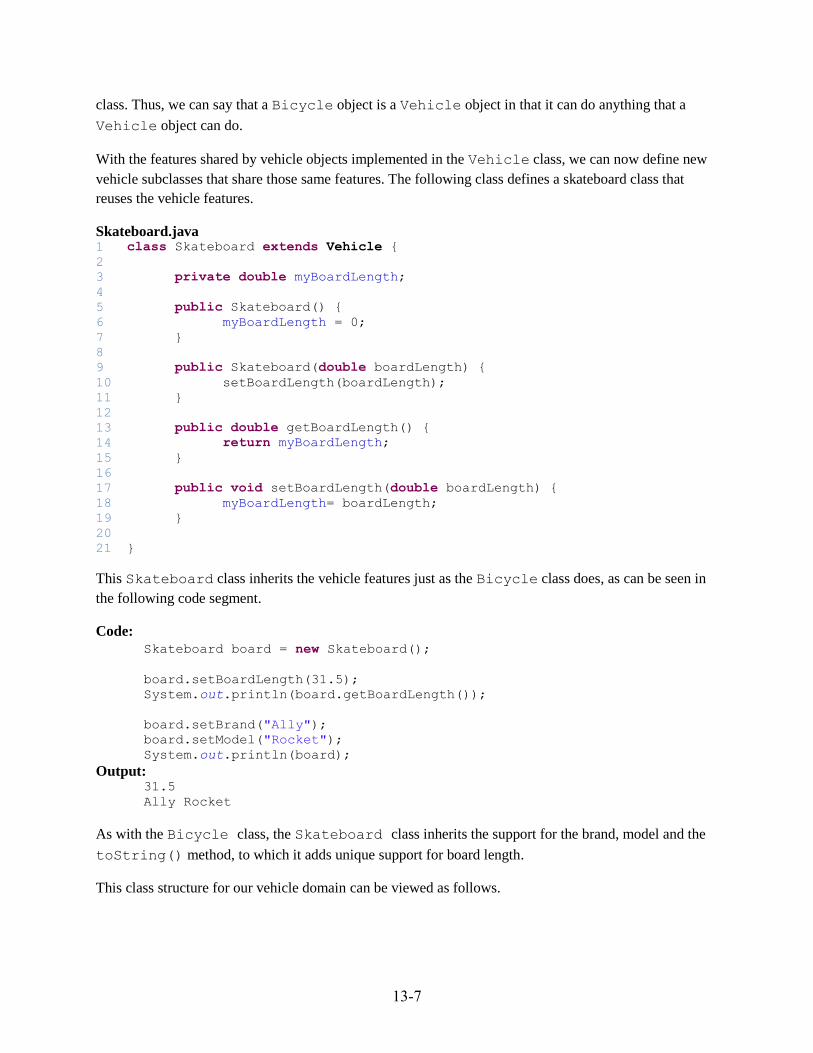
With the features shared by vehicle objects implemented in the Vehicle class, we can now define new
vehicle subclasses that share those same features. The following class defines a skateboard class that
reuses the vehicle features.
Skateboard.java 1
2
3
4
5
6
7
8
9
10
11
12
13
14
15
16
17
18
19
20
21
class Skateboard extends Vehicle {
private double myBoardLength;
public Skateboard() {
myBoardLength = 0;
}
public Skateboard(double boardLength) {
setBoardLength(boardLength);
}
public double getBoardLength() {
return myBoardLength;
}
public void setBoardLength(double boardLength) {
myBoardLength= boardLength;
}
}
This Skateboard class inherits the vehicle features just as the Bicycle class does, as can be seen in
the following code segment.
Code:
Skateboard board = new Skateboard();
board.setBoardLength(31.5);
System.out.println(board.getBoardLength());
board.setBrand("Ally");
board.setModel("Rocket");
System.out.println(board);
Output: 31.5
Ally Rocket
As with the Bicycle class, the Skateboard class inherits the support for the brand, model and the
toString() method, to which it adds unique support for board length.
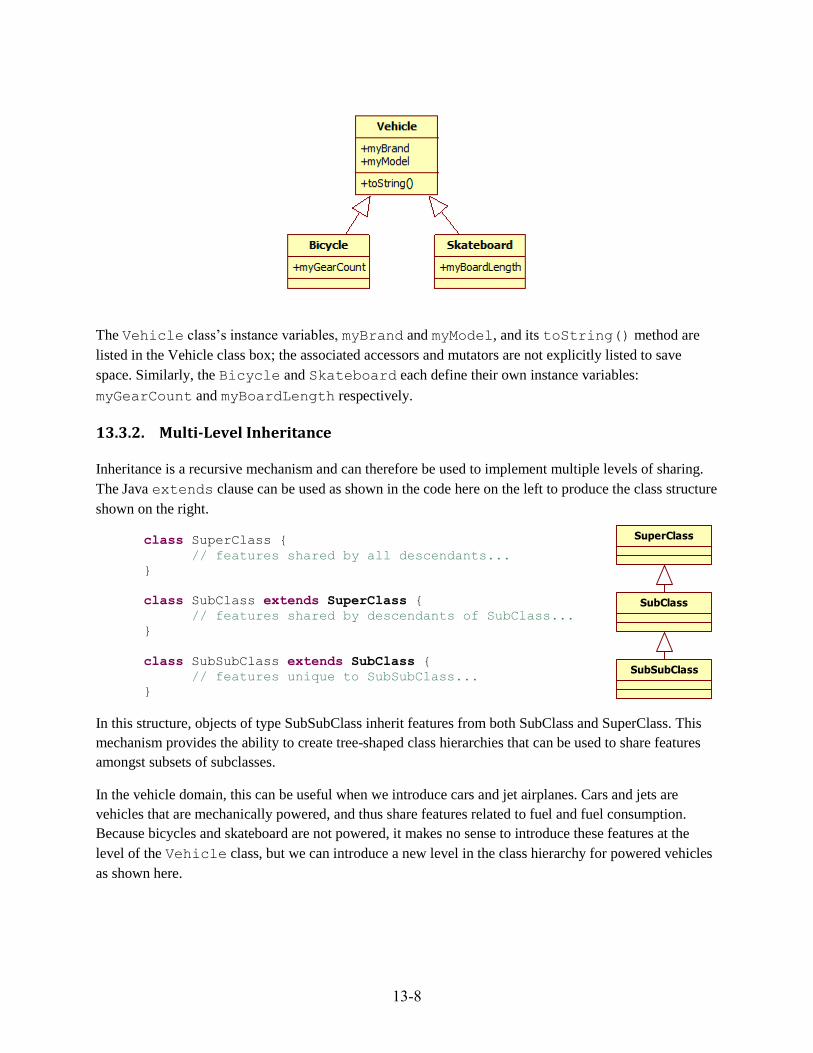
This class structure for our vehicle domain can be viewed as follows.
13-8
The Vehicle class’s instance variables, myBrand and myModel, and its toString() method are
listed in the Vehicle class box; the associated accessors and mutators are not explicitly listed to save
space. Similarly, the Bicycle and Skateboard each define their own instance variables:
myGearCount and myBoardLength respectively.
13.3.2. Multi-Level Inheritance
Inheritance is a recursive mechanism and can therefore be used to implement multiple levels of sharing.
The Java extends clause can be used as shown in the code here on the left to produce the class structure
shown on the right.
class SuperClass {
// features shared by all descendants...
}
class SubClass extends SuperClass {
// features shared by descendants of SubClass...
}
class SubSubClass extends SubClass {
// features unique to SubSubClass...
}
In this structure, objects of type SubSubClass inherit features from both SubClass and SuperClass. This
mechanism provides the ability to create tree-shaped class hierarchies that can be used to share features
amongst subsets of subclasses.
In the vehicle domain, this can be useful when we introduce cars and jet airplanes. Cars and jets are
vehicles that are mechanically powered, and thus share features related to fuel and fuel consumption.
Because bicycles and skateboard are not powered, it makes no sense to introduce these features at the
level of the Vehicle class, but we can introduce a new level in the class hierarchy for powered vehicles
as shown here.
SubClass
SubSubClass
SuperClass
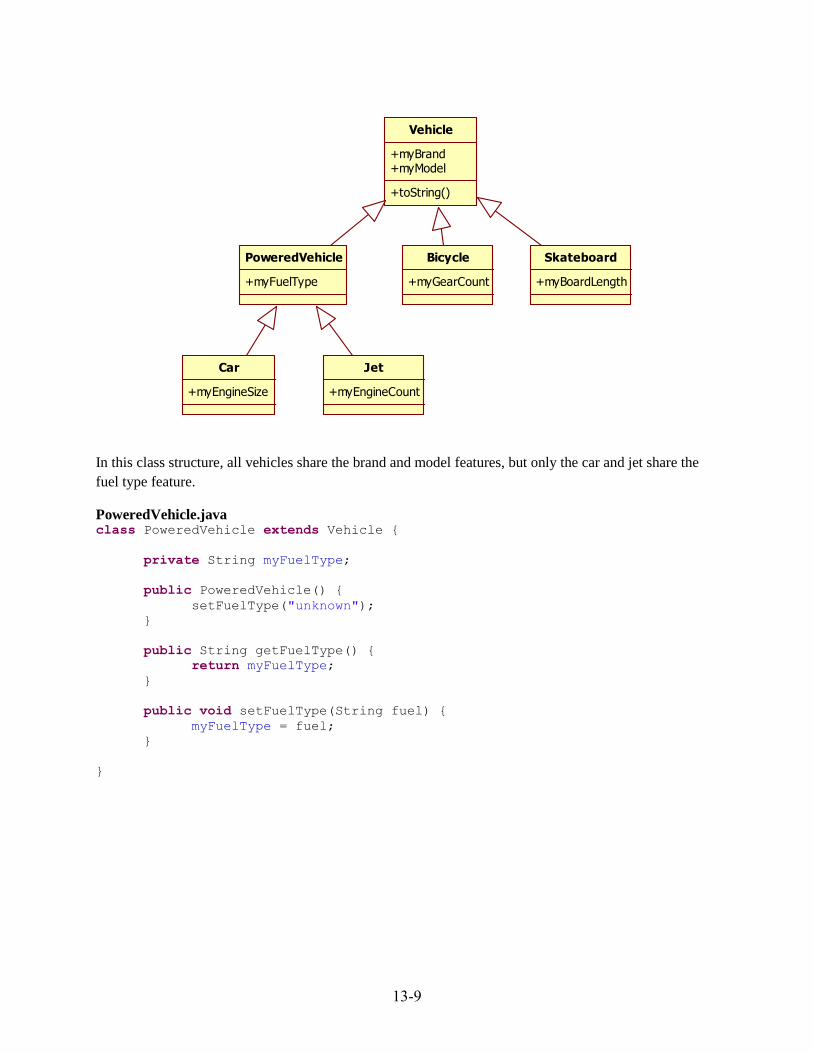
13-9
In this class structure, all vehicles share the brand and model features, but only the car and jet share the
fuel type feature.
PoweredVehicle.java class PoweredVehicle extends Vehicle {
private String myFuelType;
public PoweredVehicle() {
setFuelType("unknown");
}
public String getFuelType() {
return myFuelType;
}
public void setFuelType(String fuel) {
myFuelType = fuel;
}
}
Vehicle
+myBrand+myModel
+toString()
Bicycle
+myGearCount
Skateboard
+myBoardLength
PoweredVehicle
+myFuelType
Car
+myEngineSize
Jet
+myEngineCount
13-10
Car.java class Car extends PoweredVehicle {
private String myEngineSize;
public Car() {
myEngineSize = "unknown";
}
// accessors/mutators for engine // size...
}
Jet.java class Jet extends PoweredVehicle {
private int myEngineCount;
public Jet() {
myEngineCount = 0;
}
// accessors/mutators for engine
// count...
}
Given these classes we can write the following code segments.
Code: Car vw = new Car();
vw.setEngineSize("1.8 liter");
System.out.println(vw.getEngineSize());
vw.setFuelType("gasoline");
System.out.println(vw.getFuelType());
vw.setBrand("Volkswagon");
vw.setModel("Golf");
System.out.println(vw);
Output: 1.8 liter
gasoline
Volkswagon Golf
Code: Jet lear45 = new Jet();
lear45.setEngineCount(2);
System.out.println(lear45.getEngineCount());
lear45.setFuelType("jet fuel"); System.out.println(lear45.getFuelType());
lear45.setBrand("Learjet");
lear45.setModel("LJ45");
System.out.println(lear45);
Output: 2 jet fuel
Learjet LJ45
Note how both the Car object, vw, and the Jet object, lear45, manage their own unique features:
engine size and engine count respectively, but share the fuel type feature from PoweredVehicle and
the brand and model features from Vehicle.
When a method is called on an object, Java looks for a definition of the method in the object’s class first,
and continues up the class hierarchy until it finds a definition. It uses the first definition it finds. For
example, when the setModel() method is called on the vw object (i.e., vw.setModel("Golf")),
Java looks first in the Car class, then proceeds to the PoweredVehicle class and finally to the
Vehicle class, where it finds a definition.
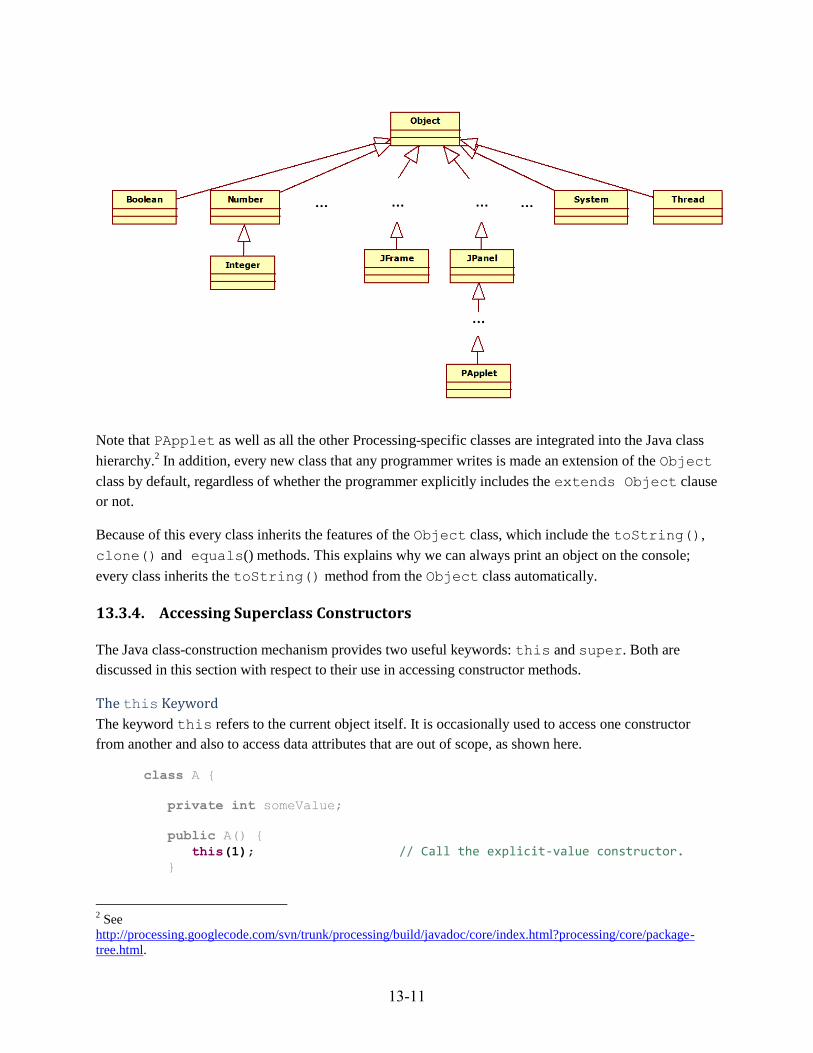
13.3.3. The Java Class Hierarchy
We have actually been taking advantage of inheritance all along because Java structures its entire API
hierarchically1. There are far too many classes – more than 4000 in Java 7 – to show, but the root of this
hierarchy is the Object class, making it the common ancestor for all Java classes, as shown here.
1 See http://docs.oracle.com/javase/7/docs/api/index.html.
13-11
Note that PApplet as well as all the other Processing-specific classes are integrated into the Java class
hierarchy.2 In addition, every new class that any programmer writes is made an extension of the Object
class by default, regardless of whether the programmer explicitly includes the extends Object clause
or not.
Because of this every class inherits the features of the Object class, which include the toString(),
clone() and equals() methods. This explains why we can always print an object on the console;
every class inherits the toString() method from the Object class automatically.
13.3.4. Accessing Superclass Constructors
The Java class-construction mechanism provides two useful keywords: this and super. Both are
discussed in this section with respect to their use in accessing constructor methods.
The this Keyword
The keyword this refers to the current object itself. It is occasionally used to access one constructor
from another and also to access data attributes that are out of scope, as shown here.
class A {
private int someValue;
public A() {
this(1); // Call the explicit-value constructor. }
2 See
http://processing.googlecode.com/svn/trunk/processing/build/javadoc/core/index.html?processing/core/package-
tree.html.
13-12
public A(int someValue) {
this.someValue = someValue;// Access the class instance variable. }
}
In this code, the default constructor uses this to access the explicit-value constructor, passing a default
value for the instance variable. The explicit-value constructor must use this to access the class instance
variable because the parameter of the same name overrides the global definition in the scope of the
explicit-value constructor.
The super Keyword
The keyword super refers to the superclass of the current object. It performs a similar function, but it
refers to the immediate superclass of the current class. This is useful when a class needs to access: (1) its
superclass’s constructor, discussed in this section; and (2) its superclass’s methods, discussed in the next
section.
While subclasses inherit the attributes and methods of their superclass, they do not inherit their
superclass’s constructors. To invoke a superclass’s constructor, a subclass must use the super keyword
as shown here.
super(argumentList);
The argument list provides the arguments required by the superclass’s constructor and may be empty for
the default constructor. Note that this call to the superclass’s constructor must be the first statement in a
subclass’s constructor.
For the vehicle domain, a programmer will likely want to improve the current implementation of the
Bicycle class by providing an explicit-value constructor that specifies all the instance variables. This
constructor would be invoked as follows.
Bicycle feltAR5 = new Bicycle("Felt", "AR5", 30);
The current version of the Bicycle class does not provide a constructor with this signature because it
cannot access the myBrand and myModel variables it inherits from the Vehicle class. They are
declared as private data items and cannot, therefore, be accessed by any class other than Vehicle,
even Vehicle’s own subclasses.3
Instead, a programmer can use the super keyword to access the features of the superclass’s constructor
method. Given the definition of the Vehicle class shown in Section 13.3.1, which includes an explicit-
value constructor that receives two strings representing the brand and model respectively, we can revise
the Bicycle class as shown here.
3 We could declare those instance variables as public, but that would lay them open to access from any class,
which violates the principle of information hiding. As an alternative, Java provides a protected designation,
which indicates that the instance variables be accessible to this class and all its descendants. This text does not adopt
the practice of using protected data items, but rather implements subclasses to access and manipulate inherited data
items through the inherited accessor and mutator methods.
13-13
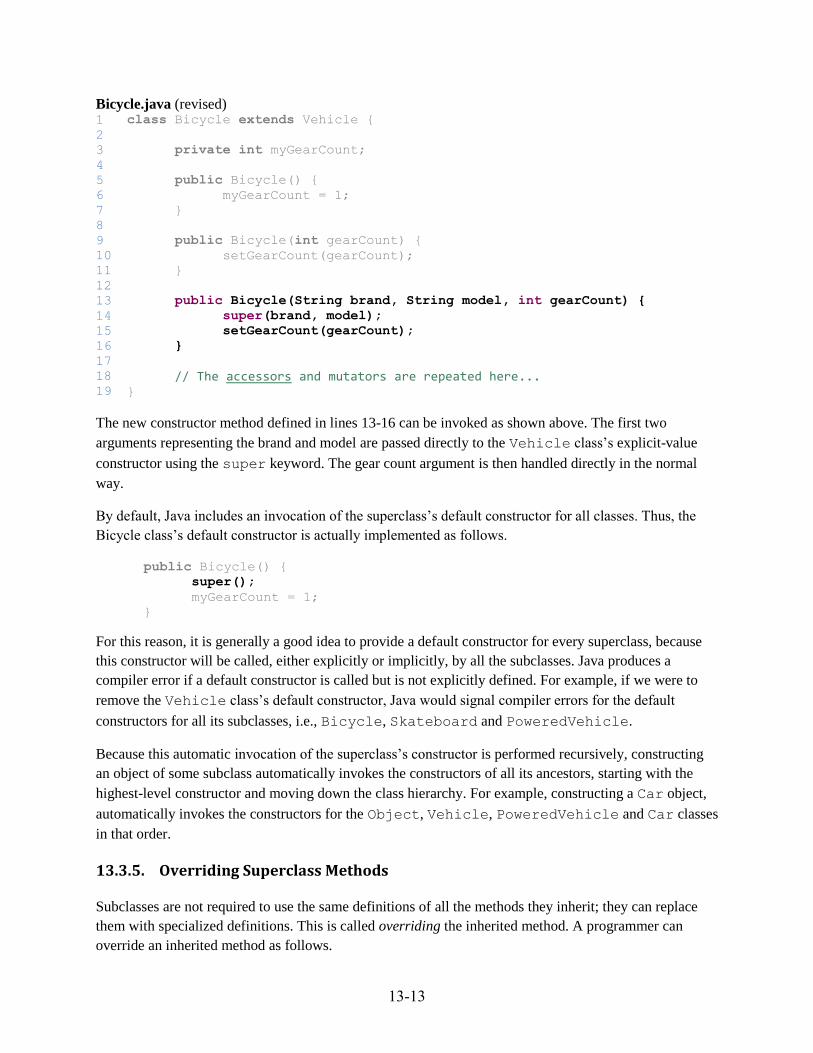
Bicycle.java (revised) 1
2
3
4
5
6
7
8
9
10
11
12
13
14
15
16
17
18
19
class Bicycle extends Vehicle {
private int myGearCount;
public Bicycle() {
myGearCount = 1;
}
public Bicycle(int gearCount) {
setGearCount(gearCount);
}
public Bicycle(String brand, String model, int gearCount) {
super(brand, model);
setGearCount(gearCount);
}
// The accessors and mutators are repeated here... }
The new constructor method defined in lines 13-16 can be invoked as shown above. The first two
arguments representing the brand and model are passed directly to the Vehicle class’s explicit-value
constructor using the super keyword. The gear count argument is then handled directly in the normal
way.
By default, Java includes an invocation of the superclass’s default constructor for all classes. Thus, the
Bicycle class’s default constructor is actually implemented as follows.
public Bicycle() {
super();
myGearCount = 1;
}
For this reason, it is generally a good idea to provide a default constructor for every superclass, because
this constructor will be called, either explicitly or implicitly, by all the subclasses. Java produces a
compiler error if a default constructor is called but is not explicitly defined. For example, if we were to
remove the Vehicle class’s default constructor, Java would signal compiler errors for the default
constructors for all its subclasses, i.e., Bicycle, Skateboard and PoweredVehicle.
Because this automatic invocation of the superclass’s constructor is performed recursively, constructing
an object of some subclass automatically invokes the constructors of all its ancestors, starting with the
highest-level constructor and moving down the class hierarchy. For example, constructing a Car object,
automatically invokes the constructors for the Object, Vehicle, PoweredVehicle and Car classes
in that order.
13.3.5. Overriding Superclass Methods
Subclasses are not required to use the same definitions of all the methods they inherit; they can replace
them with specialized definitions. This is called overriding the inherited method. A programmer can
override an inherited method as follows.
13-14
class Superclass {
// other features of the superclass...
public int superClassMethod() {
// do something...
return 1;
}
}
class Subclass extends Superclass {
// other features of the subclass...
public int superClassMethod() {
// do something different...
return 2;
}
}
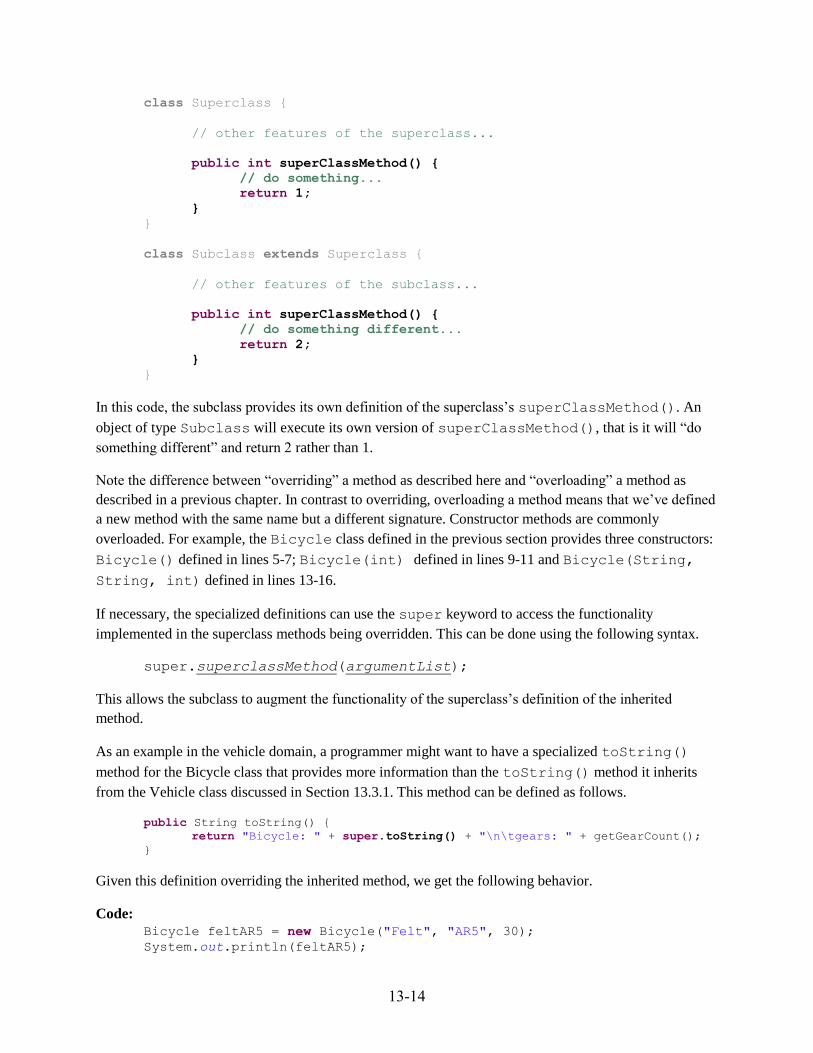
In this code, the subclass provides its own definition of the superclass’s superClassMethod(). An
object of type Subclass will execute its own version of superClassMethod(), that is it will “do
something different” and return 2 rather than 1.
Note the difference between “overriding” a method as described here and “overloading” a method as
described in a previous chapter. In contrast to overriding, overloading a method means that we’ve defined
a new method with the same name but a different signature. Constructor methods are commonly
overloaded. For example, the Bicycle class defined in the previous section provides three constructors:
Bicycle() defined in lines 5-7; Bicycle(int) defined in lines 9-11 and Bicycle(String,
String, int) defined in lines 13-16.
If necessary, the specialized definitions can use the super keyword to access the functionality
implemented in the superclass methods being overridden. This can be done using the following syntax.
super.superclassMethod(argumentList);
This allows the subclass to augment the functionality of the superclass’s definition of the inherited
method.
As an example in the vehicle domain, a programmer might want to have a specialized toString()
method for the Bicycle class that provides more information than the toString() method it inherits
from the Vehicle class discussed in Section 13.3.1. This method can be defined as follows.
public String toString() {
return "Bicycle: " + super.toString() + "\n\tgears: " + getGearCount();
}
Given this definition overriding the inherited method, we get the following behavior.
Code:
Bicycle feltAR5 = new Bicycle("Felt", "AR5", 30);
System.out.println(feltAR5);
13-15
Output: Bicycle: Felt AR5
gears: 30
As you recall, the original toString() method inherited the Vehicle class would have simply printed
out “Felt AR5”. That toString() method couldn’t possibly add the string “Bicycle:” as shown here
because it can’t know which of the subclasses it is working for. It could be a bicycle, or it could be a
skateboard, car, jet or some new descendant that a programmer has chosen to implement. Only the
Bicycle class can make this assumption. On the other hand, the Bicycle class would like to reuse the
basic features provided by the Vehicle class’s toString() in combination with additional, bicycle-
specific information. To access this functionality, the overridden version of toString() calls the
method it is overriding by saying super.toString().
This feature works recursively as well. Rewriting the Car and PoweredVehicle toString()
methods to take advantage of this approach is left as an exercise for the reader.
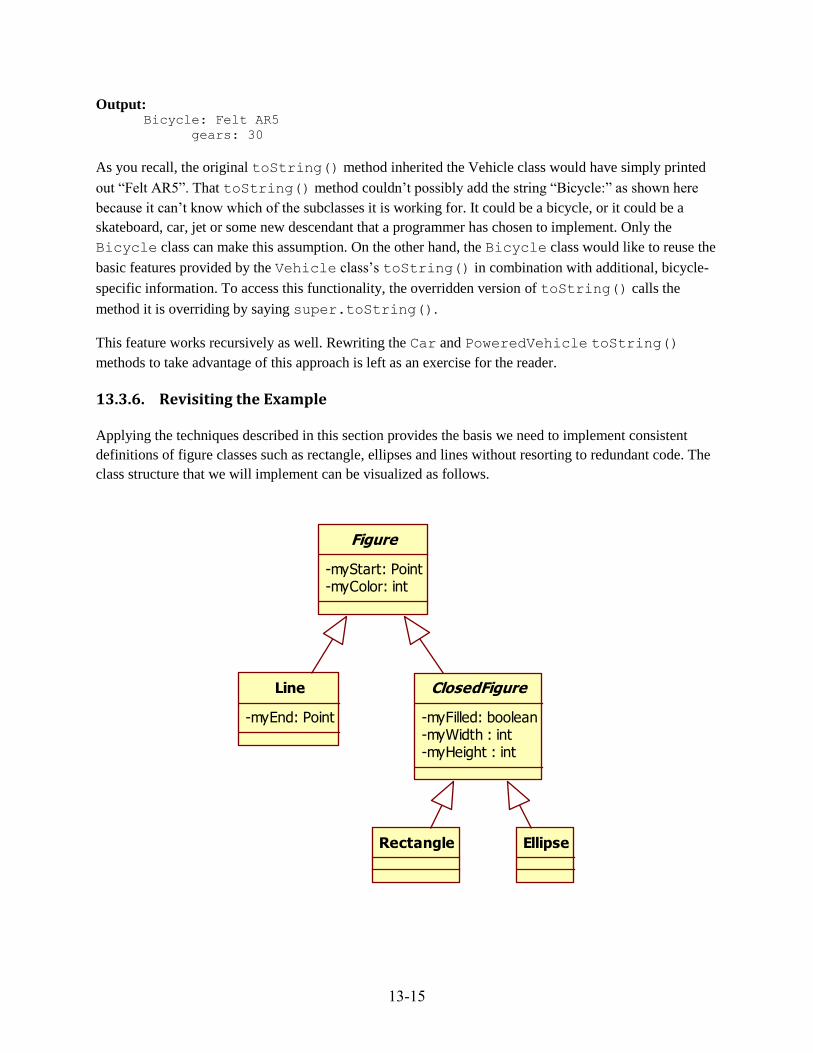
13.3.6. Revisiting the Example
Applying the techniques described in this section provides the basis we need to implement consistent
definitions of figure classes such as rectangle, ellipses and lines without resorting to redundant code. The
class structure that we will implement can be visualized as follows.
Figure
-myStart: Point-myColor: int
Line
-myEnd: Point
ClosedFigure
-myFilled: boolean-myWidth : int-myHeight : int
Rectangle Ellipse
13-16
Figure will be the root class and will provide features supporting the figure’s color and its “start” point,
where the start point for a line is its first point, for a rectangle is it upper left point and for an ellipse is its
center point. Closed figures have a width and height, and can be either filled or unfilled. Definitions for
these classes are as follows.
Figure.java 1
2
3
4
5
6
7
8
9
10
11
12
13
14
15
16
17
18
19
20
21
22
23
24
25
26
27
28
29
30
31
32
class Figure {
private Point myStart;
private int myColor;
public Figure() {
myStart = new Point(0, 0);
myColor = 0;
}
public Figure(Point start) {
myStart = start;
myColor = 0;
}
public Figure(Point start, int color) {
myStart = start;
myColor = color;
}
public Point getStart() {
return myStart;
}
public int getColor() {
return myColor;
}
public void setColor(int color) {
myColor = color;
}
}
Figure is a basic class providing features for a starting point and color.
Line.java 1
2
3
4
5
6
7
8
9
10
11
12
13
14
class Line extends Figure {
private Point myEnd;
public Line(Point start, int color) {
super(start, color);
myEnd = start;
}
public Line(Point start, Point end, int color) {
super(start, color);
myEnd = end;
}
}
13-17
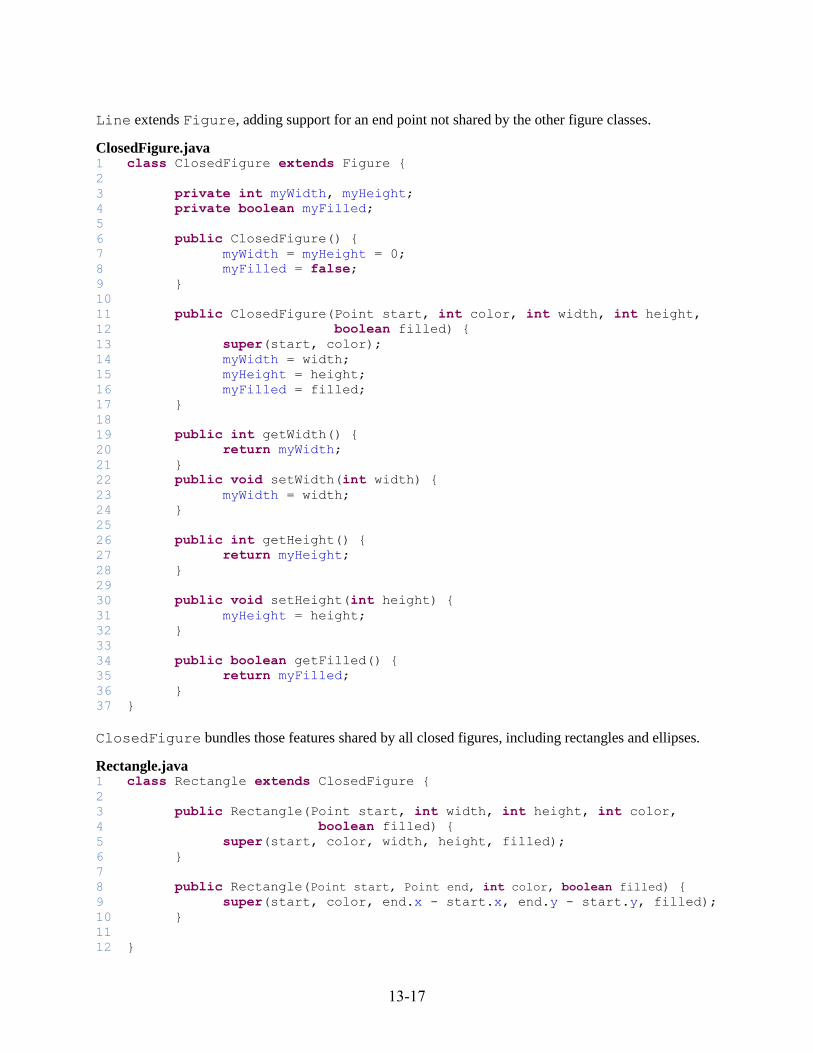
Line extends Figure, adding support for an end point not shared by the other figure classes.
ClosedFigure.java 1
2
3
4
5
6
7
8
9
10
11
12
13
14
15
16
17
18
19
20
21
22
23
24
25
26
27
28
29
30
31
32
33
34
35
36
37
class ClosedFigure extends Figure {
private int myWidth, myHeight;
private boolean myFilled;
public ClosedFigure() {
myWidth = myHeight = 0;
myFilled = false;
}
public ClosedFigure(Point start, int color, int width, int height,
boolean filled) {
super(start, color);
myWidth = width;
myHeight = height;
myFilled = filled;
}
public int getWidth() {
return myWidth;
}
public void setWidth(int width) {
myWidth = width;
}
public int getHeight() {
return myHeight;
}
public void setHeight(int height) {
myHeight = height;
}
public boolean getFilled() {
return myFilled;
}
}
ClosedFigure bundles those features shared by all closed figures, including rectangles and ellipses.
Rectangle.java 1
2
3
4
5
6
7
8
9
10
11
12
class Rectangle extends ClosedFigure {
public Rectangle(Point start, int width, int height, int color,
boolean filled) {
super(start, color, width, height, filled);
}
public Rectangle(Point start, Point end, int color, boolean filled) {
super(start, color, end.x - start.x, end.y - start.y, filled);
}
}

13-18
Rectangle extends ClosedFigure with a constructor that automatically converts from a start-point-
end-point characterization of a rectangle to the start-point-width-height characterization required by
ClosedFigure. This isn’t a particularly exciting at this point; the interesting part comes later in the
chapter when we add a render() method that draws the rectangle on the canvas.
With these basic figure classes in place, we can write code as follows:
Code:
Rectangle myRectangle = new Rectangle(new Point(10, 10),
new Point(280, 280),
false);
System.out.println(myRectangle);
System.out.println(myRectangle.getFilled());
System.out.println(myRectangle.getColor());
Output: c13oop.text.simpledraw.simpledraw1.Rectangle@9304b1
false
0
This code segment declares a non-filled Rectangle object, myRectangle, with the given start and
end point. It then prints the myRectangle object, which uses the default toString() method from
the Object class, and the filled and color settings. Note how the default toString() method prints
the class name (and package) and an unintelligible memory address value. We could have improved this
point, but these figure classes are designed to be drawn on a canvas, not printed to a console, so we won’t
bother to override the toString() method. Doing so is left as an exercise for the reader, as is the
implementation of the Ellipse class, which is very similar to the Rectangle class.
13.4. Polymorphism
Where inheritance allows subclasses to share features, polymorphism allows subclasses to distinguish
themselves from one another. Given that in Greek, poly means “many” and morph means “form”, the
term polymorphism is used to describe the situation in which a single statement can take on different
definitions. This chapter describes how to implement polymorphic behavior in Java.
13.4.1. Declarations and Inheritance
Suppose that we write
Vehicle aVehicle = new Bicycle();
Because aVehicle is declared as a Vehicle and a Bicycle object is a Vehicle, this is a legal
statement. A variable declared as an object of class C can store a reference to any object whose class is a
descendant of C.
In contrast, the opposite statement
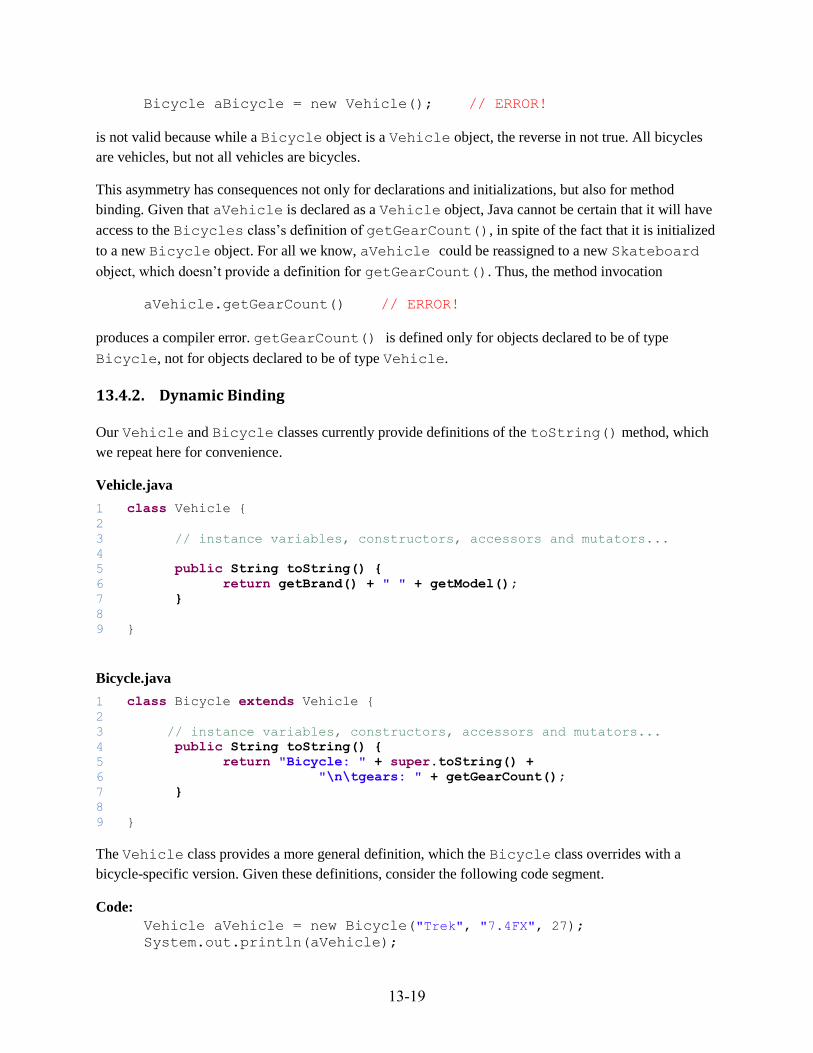
13-19
Bicycle aBicycle = new Vehicle(); // ERROR!
is not valid because while a Bicycle object is a Vehicle object, the reverse in not true. All bicycles
are vehicles, but not all vehicles are bicycles.
This asymmetry has consequences not only for declarations and initializations, but also for method
binding. Given that aVehicle is declared as a Vehicle object, Java cannot be certain that it will have
access to the Bicycles class’s definition of getGearCount(), in spite of the fact that it is initialized
to a new Bicycle object. For all we know, aVehicle could be reassigned to a new Skateboard
object, which doesn’t provide a definition for getGearCount(). Thus, the method invocation
aVehicle.getGearCount() // ERROR!
produces a compiler error. getGearCount() is defined only for objects declared to be of type
Bicycle, not for objects declared to be of type Vehicle.
13.4.2. Dynamic Binding
Our Vehicle and Bicycle classes currently provide definitions of the toString() method, which
we repeat here for convenience.
Vehicle.java
1
2
3
4
5
6
7
8
9
class Vehicle {
// instance variables, constructors, accessors and mutators...
public String toString() {
return getBrand() + " " + getModel();
}
}
Bicycle.java
1
2
3
4
5
6
7
8
9
class Bicycle extends Vehicle {
// instance variables, constructors, accessors and mutators...
public String toString() {
return "Bicycle: " + super.toString() +
"\n\tgears: " + getGearCount();
}
}
The Vehicle class provides a more general definition, which the Bicycle class overrides with a
bicycle-specific version. Given these definitions, consider the following code segment.
Code:
Vehicle aVehicle = new Bicycle("Trek", "7.4FX", 27);
System.out.println(aVehicle);
13-20
Output:
Bicycle: Trek 7.4FX
gears: 27
In this case, Java cannot be certain at compile time which definition of the toString() method should
be invoked. Both the Vehicle class and the Bicycle class provide one. In cases like this, Java
determines the appropriate definition to invoke at run time based not on the declared type of aVehicle
but rather on the actual type of the object referred to by aVehicle. If aVehicle refers to a Bicycle
object, then the Bicycle version is invoked; if aVehicle refers to a Vehicle object, then the
Vehicle version is invoked. In this case, the specialized Bicycle version is invoked and we get the
bicycle-specific output shown above.
This determination is known as binding, that is, choosing a particular definition of toString() to
invoke. Bindings made at run time are known as dynamic bindings. This is an example of polymorphic
behavior because the invocation of toString() in this situation can invoke any one of potentially
many definitions of that method.
Java’s dynamic binding mechanism works as follows. Given a method m() invoked on an object of class
C, if there is a definition of m() in C, then invoke that method definition. Otherwise, move to C’s parent
class and search there, proceeding up the class hierarchy until a definition is found.
13.4.3. Abstract Methods and Classes
Imagine now that rather than overriding an existing method like toString(), you wanted to add a new
method definition for Vehicle objects, say a method that returns the sort of movement that the vehicle
object implements. For example, bicycles “cycle” and skateboards “skate”. We could do this by defining
a getLocomotion() method for each of the Vehicle subclasses. For Bicycle, this method could
be implemented as follows:
public String getLocomotion() {
return "cycle";
}
Given similar definitions for Skateboard, Car and Jet, suppose that we would like to implement an
array of Vehicle objects and print their forms of motion as follows.
Vehicle[] vehicles = new Vehicle[2];
vehicles[0] = new Bicycle("Trek", "7.4FX", 27);
vehicles[1] = new Skateboard("Ally", "Rocket", 31.5);
for (int i = 0; i < vehicles.length; i++) {
System.out.println(vehicles[i].getLocomotion());
}
This code declares an array of two Vehicle objects and initializes each entry to a different subclass of
Vehicle. It then loops through those vehicle objects printing the form of motion for each. The logic
seems fine, but, unfortunately, the invocation of getLocomotion() produces a compiler error
indicating that the locomotion method is not defined for the Vehicle class.
13-21
We could consider implementing a generic version of getLocomotion() in the Vehicle class that
the subclasses can override as appropriate – we’ve seen this approach work with toString – but Java
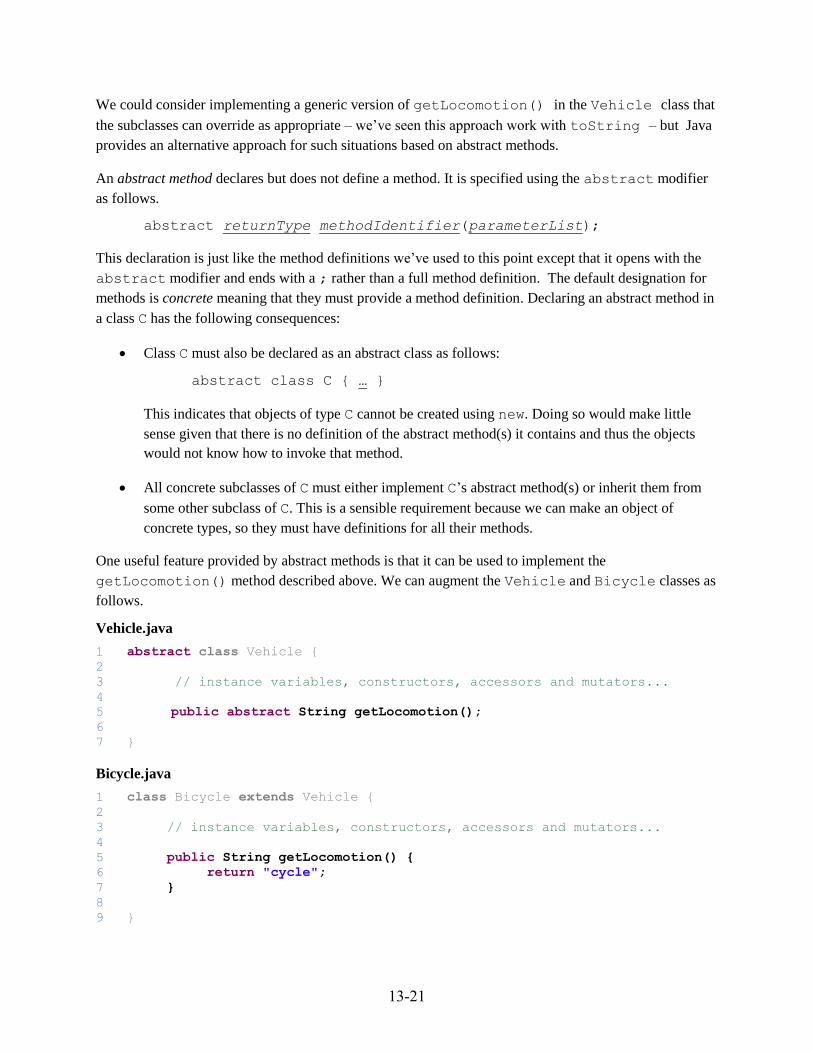
provides an alternative approach for such situations based on abstract methods.
An abstract method declares but does not define a method. It is specified using the abstract modifier
as follows.
abstract returnType methodIdentifier(parameterList);
This declaration is just like the method definitions we’ve used to this point except that it opens with the
abstract modifier and ends with a ; rather than a full method definition. The default designation for
methods is concrete meaning that they must provide a method definition. Declaring an abstract method in
a class C has the following consequences:
Class C must also be declared as an abstract class as follows:
abstract class C { … }
This indicates that objects of type C cannot be created using new. Doing so would make little
sense given that there is no definition of the abstract method(s) it contains and thus the objects
would not know how to invoke that method.
All concrete subclasses of C must either implement C’s abstract method(s) or inherit them from
some other subclass of C. This is a sensible requirement because we can make an object of
concrete types, so they must have definitions for all their methods.
One useful feature provided by abstract methods is that it can be used to implement the
getLocomotion() method described above. We can augment the Vehicle and Bicycle classes as
follows.
Vehicle.java
1
2
3
4
5
6
7
abstract class Vehicle {
// instance variables, constructors, accessors and mutators...
public abstract String getLocomotion();
}
Bicycle.java
1
2
3
4
5
6
7
8
9
class Bicycle extends Vehicle {
// instance variables, constructors, accessors and mutators...
public String getLocomotion() {
return "cycle";
}
}
13-22
Note that Vehicle now includes an abstract definition of getLocomotion() in line 5. This can be
read as a sort of “promissory note” indicating that all concrete subclasses of Vehicle must implement
the getLocomotion() method. Note also that Vehicle is now declared to be an abstract class,
which means that programmers can no longer create new Vehicle objects using new Vehicle().
This not a sacrifice because it doesn’t really make any sense to declare a “generic” Vehicle object that
isn’t going to be initialized to either a Car, Jet or other subclass of Vehicle.
We can make similar modifications to the other subclasses of Vehicle: Skateboard, Car and Jet
will get their own concrete definitions of getLocomotion(), Skateboard returning “skate”, Car
returning “drive”, etc. PoweredVehicle must become an abstract class like Vehicle but otherwise
remains unchanged; it cannot define getLocomotion() and thus simple inherits the abstract definition
from Vehicle. Given these modifications, which are left as an exercise for the reader, we can execute
this expanded version of the code segment shown above.
Code:
Vehicle[] vehicles = new Vehicle[4];
vehicles[0] = new Bicycle("Trek", "7.4FX", 27);
vehicles[1] = new Skateboard("Ally", "Rocket", 31.5);
vehicles[2] = new Car("Volkswagon", "Golf", "gasoline", "1.8 Liter");
vehicles[3] = new Jet("Lear", "LJ45", "jet fuel", 2);
for (int i = 0; i < vehicles.length; i++) {
System.out.println(vehicles[i].getLocomotion());
}
Output:
cycle
skate
drive
fly
The polymorphic call to getLocomotion() no longer produces a compiler error. There is an abstract
declaration of the getLocomotion() method in the Vehicle class so all its concrete subclasses are
required to have access to a full definition of that method, either by defining one themselves or by
inheriting one from a superclass.
As the for loop executes, Java will bind the appropriate definition of getLocomotion() based on
the actual type of the object in the vehicles array. In this output, the Bicycle version returns
“cycle”, the Skateboard version returns “skate”, the Car version returns “drive” and the Jet version
returns “fly”.
13.4.4. Revisiting the Example
For the next iteration of the chapter example, we’d like to actually be able to draw the figures on a canvas,
which requires that we implement a render() method for each of the concrete figure classes, i.e.,
Line, Rectangle and Ellipse. There will be a unique definition of render() for each concrete
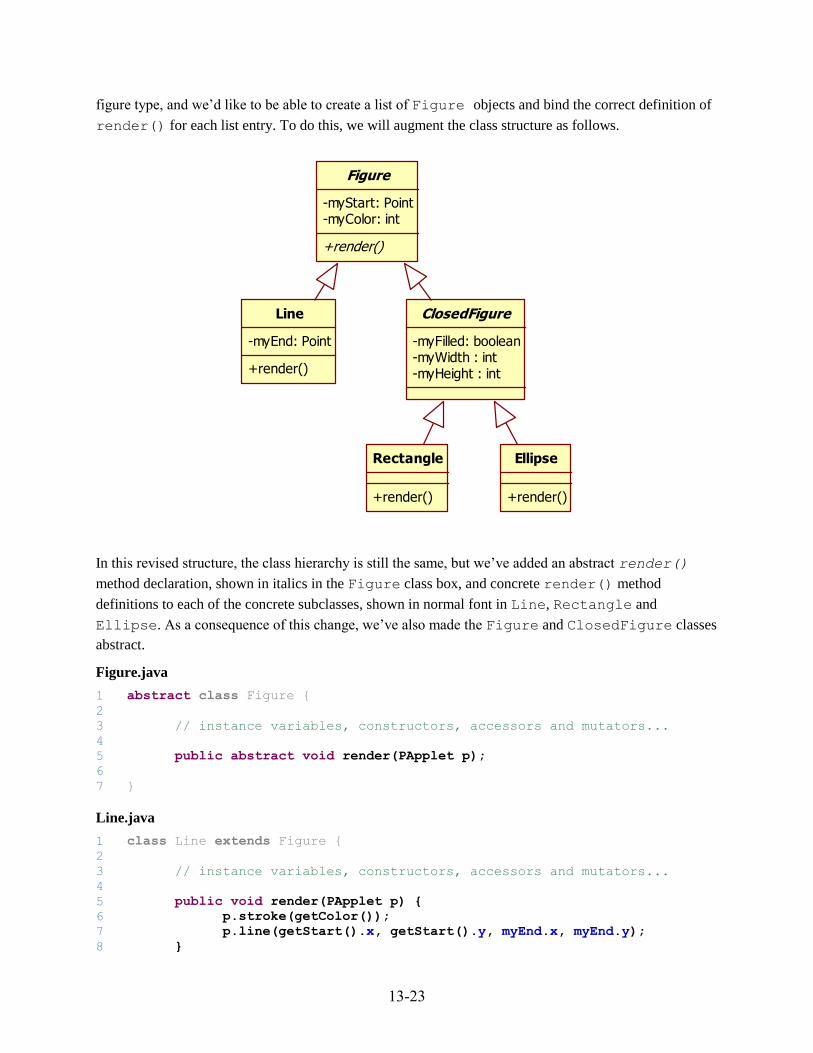
13-23
figure type, and we’d like to be able to create a list of Figure objects and bind the correct definition of
render() for each list entry. To do this, we will augment the class structure as follows.
In this revised structure, the class hierarchy is still the same, but we’ve added an abstract render()
method declaration, shown in italics in the Figure class box, and concrete render() method
definitions to each of the concrete subclasses, shown in normal font in Line, Rectangle and
Ellipse. As a consequence of this change, we’ve also made the Figure and ClosedFigure classes
abstract.
Figure.java
1
2
3
4
5
6
7
abstract class Figure {
// instance variables, constructors, accessors and mutators...
public abstract void render(PApplet p);
}
Line.java
1
2
3
4
5
6
7
8
class Line extends Figure {
// instance variables, constructors, accessors and mutators...
public void render(PApplet p) {
p.stroke(getColor());
p.line(getStart().x, getStart().y, myEnd.x, myEnd.y);
}
Figure
-myStart: Point-myColor: int
+render()
Line
-myEnd: Point
+render()
ClosedFigure
-myFilled: boolean-myWidth : int-myHeight : int
Rectangle
+render()
Ellipse
+render()
13-24
ClosedFigure.java
1
2
3
4
5
abstract class ClosedFigure extends Figure {
// This remains unchanged.
}
Rectangle.java
1
2
3
4
5
6
7
8
9
10
11
12
13
14
public class Rectangle extends ClosedFigure {
// instance variables, constructors, accessors and mutators...
public void render(PApplet p) {
p.stroke(getColor());
if (getFilled()) {
p.fill(getColor());
} else {
p.noFill();
}
p.rect(getStart().x, getStart().y, getWidth(), getHeight());
}
}
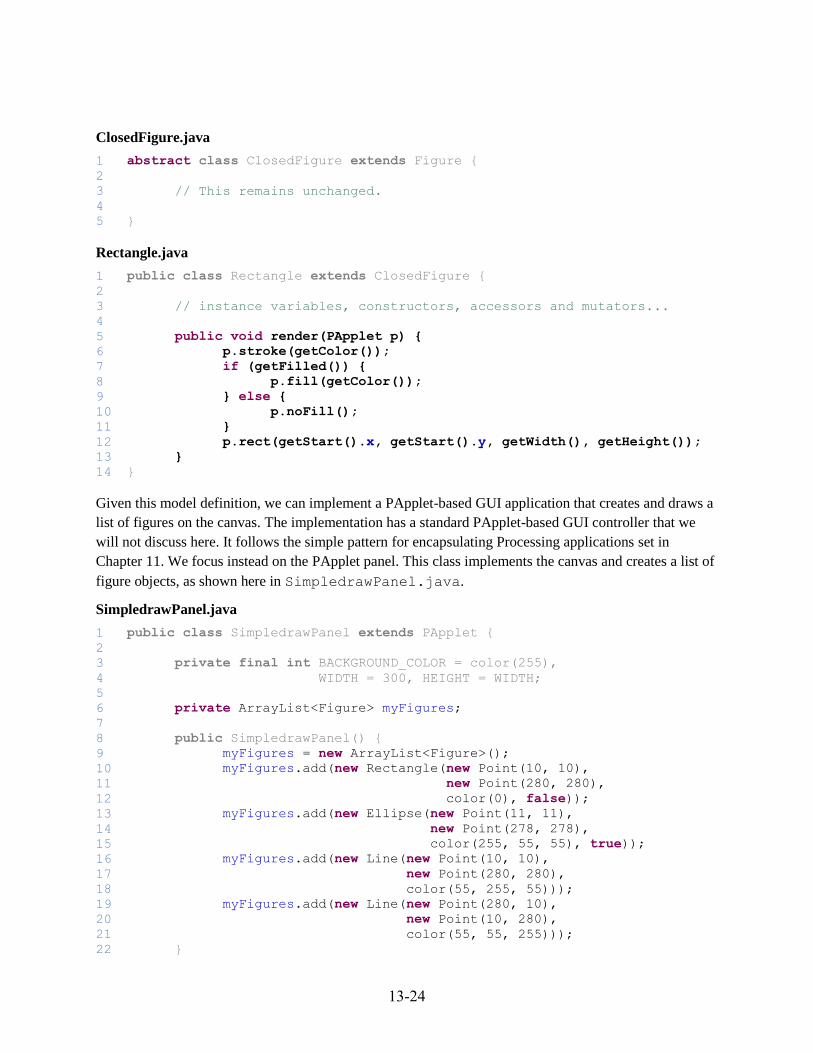
Given this model definition, we can implement a PApplet-based GUI application that creates and draws a
list of figures on the canvas. The implementation has a standard PApplet-based GUI controller that we
will not discuss here. It follows the simple pattern for encapsulating Processing applications set in
Chapter 11. We focus instead on the PApplet panel. This class implements the canvas and creates a list of
figure objects, as shown here in SimpledrawPanel.java.
SimpledrawPanel.java
1
2
3
4
5
6
7
8
9
10
11
12
13
14
15
16
17
18
19
20
21
22
public class SimpledrawPanel extends PApplet {
private final int BACKGROUND_COLOR = color(255),
WIDTH = 300, HEIGHT = WIDTH;
private ArrayList<Figure> myFigures;
public SimpledrawPanel() {
myFigures = new ArrayList<Figure>();
myFigures.add(new Rectangle(new Point(10, 10),
new Point(280, 280),
color(0), false));
myFigures.add(new Ellipse(new Point(11, 11),
new Point(278, 278),
color(255, 55, 55), true));
myFigures.add(new Line(new Point(10, 10),
new Point(280, 280),
color(55, 255, 55)));
myFigures.add(new Line(new Point(280, 10),
new Point(10, 280),
color(55, 55, 255)));
}
13-25
23
24
25
26
27
28
29
30
31
32
33
34
35
36
public void setup() {
size(WIDTH, HEIGHT);
background(BACKGROUND_COLOR);
smooth();
noLoop();
}
public void draw() {
for (int i = 0; i < myFigures.size(); i++) {
myFigures.get(i).render(this);
}
}
}
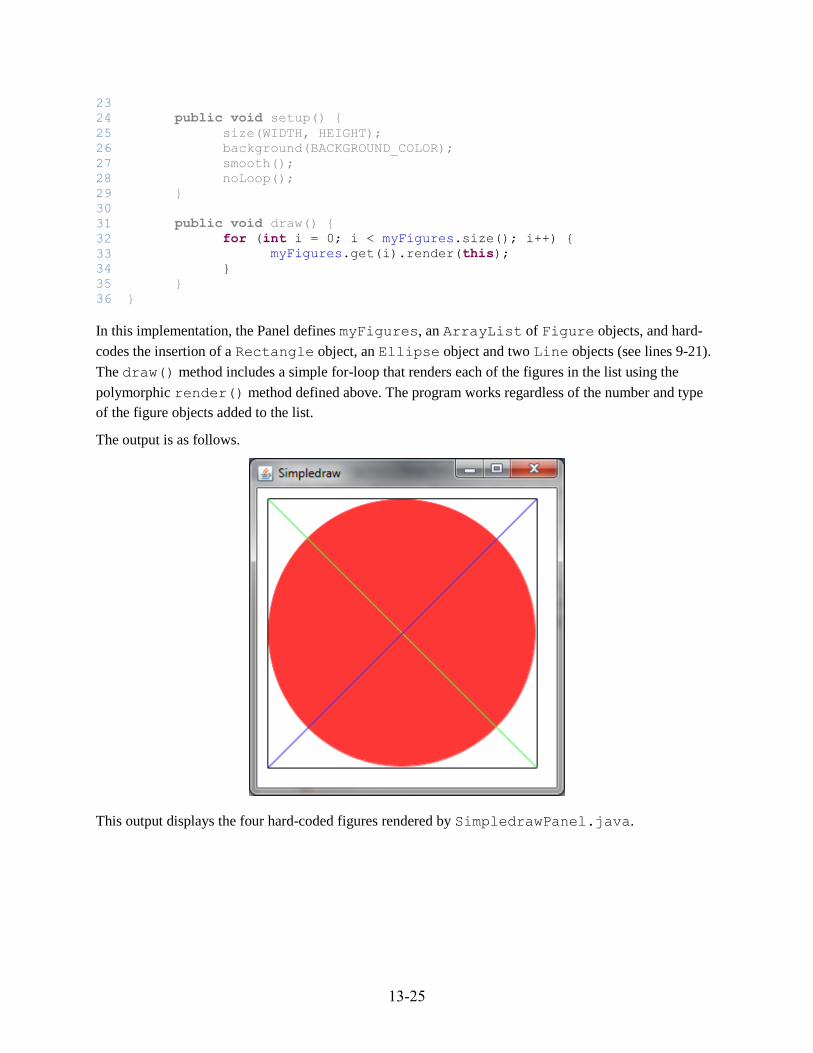
In this implementation, the Panel defines myFigures, an ArrayList of Figure objects, and hard-
codes the insertion of a Rectangle object, an Ellipse object and two Line objects (see lines 9-21).
The draw() method includes a simple for-loop that renders each of the figures in the list using the
polymorphic render() method defined above. The program works regardless of the number and type
of the figure objects added to the list.
The output is as follows.
This output displays the four hard-coded figures rendered by SimpledrawPanel.java.
13-26
13.5. The Example Revisited
As a final enhancement to the Simpledraw application, we will upgrade the system to support user-
directed figure-drawing as described in Section 13.1. The changes to support this application are largely
centered in the GUI code but there are some changes to the Figure hierarchy as well. A sample output
of the program is shown here.
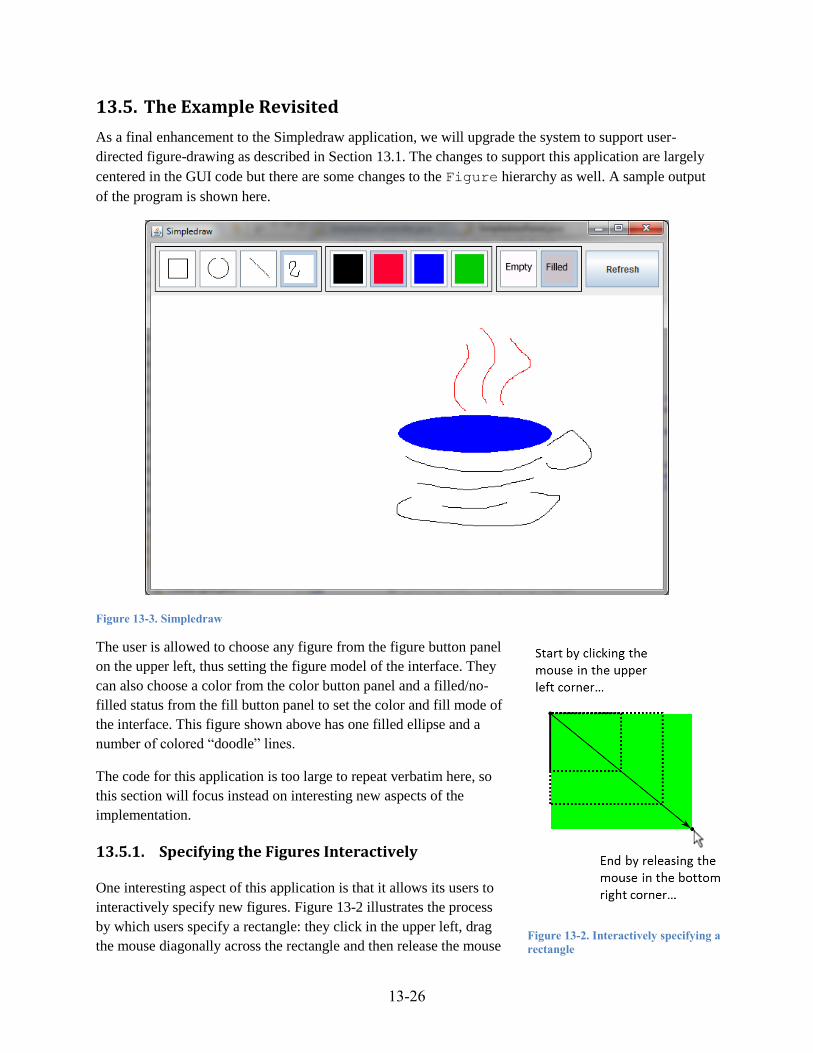
Figure 13-3. Simpledraw
The user is allowed to choose any figure from the figure button panel
on the upper left, thus setting the figure model of the interface. They
can also choose a color from the color button panel and a filled/no-
filled status from the fill button panel to set the color and fill mode of
the interface. This figure shown above has one filled ellipse and a
number of colored “doodle” lines.
The code for this application is too large to repeat verbatim here, so
this section will focus instead on interesting new aspects of the
implementation.
13.5.1. Specifying the Figures Interactively
One interesting aspect of this application is that it allows its users to
interactively specify new figures. Figure 13-2 illustrates the process
by which users specify a rectangle: they click in the upper left, drag
the mouse diagonally across the rectangle and then release the mouse
Figure 13-2. Interactively specifying a
rectangle
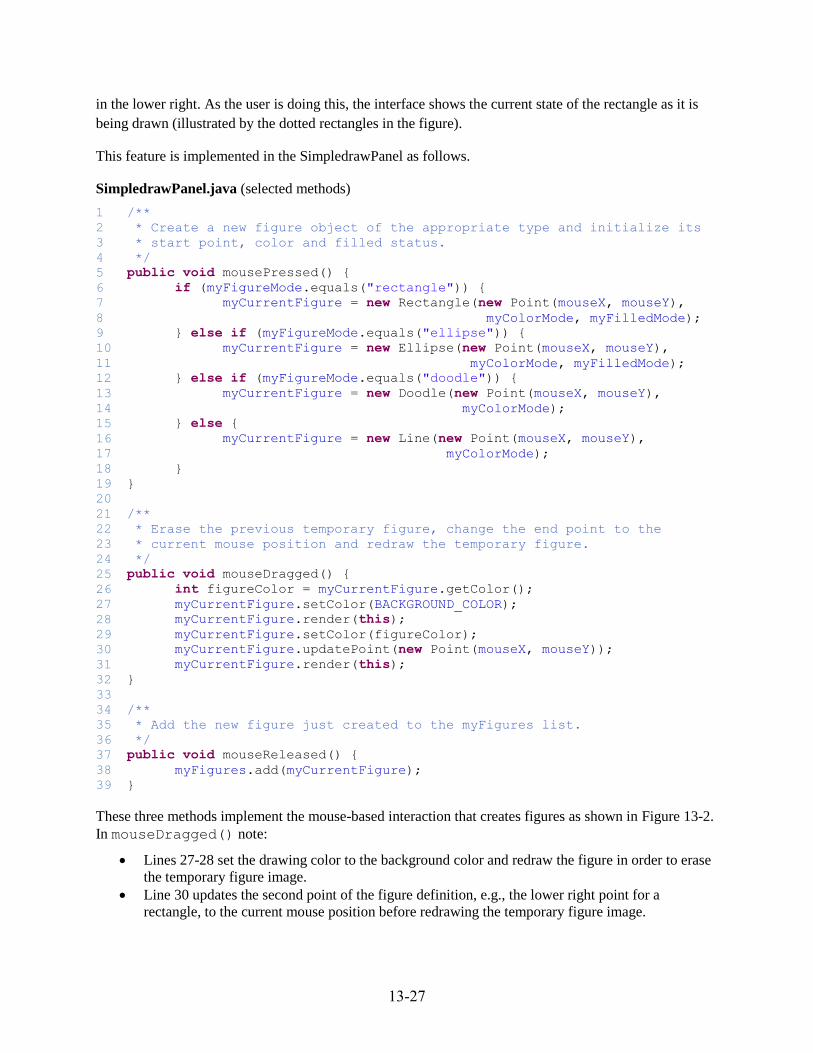
13-27
in the lower right. As the user is doing this, the interface shows the current state of the rectangle as it is
being drawn (illustrated by the dotted rectangles in the figure).
This feature is implemented in the SimpledrawPanel as follows.
SimpledrawPanel.java (selected methods)
1
2
3
4
5
6
7
8
9
10
11
12
13
14
15
16
17
18
19
20
21
22
23
24
25
26
27
28
29
30
31
32
33
34
35
36
37
38
39
/**
* Create a new figure object of the appropriate type and initialize its
* start point, color and filled status.
*/
public void mousePressed() {
if (myFigureMode.equals("rectangle")) {
myCurrentFigure = new Rectangle(new Point(mouseX, mouseY),
myColorMode, myFilledMode);
} else if (myFigureMode.equals("ellipse")) {
myCurrentFigure = new Ellipse(new Point(mouseX, mouseY),
myColorMode, myFilledMode);
} else if (myFigureMode.equals("doodle")) {
myCurrentFigure = new Doodle(new Point(mouseX, mouseY),
myColorMode);
} else {
myCurrentFigure = new Line(new Point(mouseX, mouseY),
myColorMode);
}
}
/**
* Erase the previous temporary figure, change the end point to the
* current mouse position and redraw the temporary figure.
*/
public void mouseDragged() {
int figureColor = myCurrentFigure.getColor();
myCurrentFigure.setColor(BACKGROUND_COLOR);
myCurrentFigure.render(this);
myCurrentFigure.setColor(figureColor);
myCurrentFigure.updatePoint(new Point(mouseX, mouseY));
myCurrentFigure.render(this);
}
/**
* Add the new figure just created to the myFigures list.
*/
public void mouseReleased() {
myFigures.add(myCurrentFigure);
}
These three methods implement the mouse-based interaction that creates figures as shown in Figure 13-2.
In mouseDragged() note:
Lines 27-28 set the drawing color to the background color and redraw the figure in order to erase
the temporary figure image.
Line 30 updates the second point of the figure definition, e.g., the lower right point for a
rectangle, to the current mouse position before redrawing the temporary figure image.
13-28
The update point method is another abstract method defined in the Figure class and implemented in all the
concrete subclasses. For the Rectangle class, the definition is as follows:
public void updatePoint(Point p) {
myWidth = p.x - myStart.x;
myHeight = p.y - myStart.y;
}
This method receives a point from the calling program and computes the width and height of the rectangle
based on the start and end coordinates.
The user is allowed to create as many figures and they would like, in any order. Thus, myFigures is
implemented as an ArrayList, and the event-handler for the “Refresh” button is implemented as
follows.
public void refresh() {
for (int i = 0; i < myFigures.size(); i++) {
myFigures.get(i).render(this);
}
}
This redraws all the figures using the polymorphic behavior described in the previous section.
The implementation of the Doodle figure constructed in lines 12-14 is left as an exercise for the reader.
It is implemented as an ArrayList of points signaled by the mouseDragged() method.
13.5.2. Implementing Modal Button Panels
One interesting aspect of the interface is the use of button groups. Figure 13-3 shows three button groups:
the figure buttons (i.e., rectangle, ellipse, line and doodle); the color buttons (i.e., black, red, blue and
green); and the fill status buttons (i.e., unfilled and filled). These groups are implemented so that only one
button is shown to be pressed at any time. This is used to indicate the interface’s current figure mode.
The figure button group is implemented using the following code in
SimpledrawController.java.
SimpledrawController.java
1
2
3
4
5
6
7
8
9
10
11
12
13
14
15
16
17
public class SimpledrawController extends JFrame {
// constants...
private JPanel buttonPanel, figureButtonPanel;
private JButton refreshButton;
private JToggleButton rectangleButton;
private ButtonGroup figureButtonGroup;
// other buttons, panels and groups...
public SimpledrawController() throws Exception {
setTitle("Simpledraw");
setDefaultCloseOperation(EXIT_ON_CLOSE);
figureButtonGroup = new ButtonGroup();
figureButtonPanel = new JPanel();
13-29
18
19
20
21
22
23
24
25
26
27
28
29
30
31
32
33
34
35
36
37
38
39
40
41
42
43
44
45
46
47
48
49
50
51
52
53
54
55
56
57
58
59
60
61
62
63
64
65
66
67
68
69
70
71
72
73
74
figureButtonPanel.setBorder(
BorderFactory.createLineBorder(Color.black));
// other buttons and button groups...
buttonPanel = new JPanel();
buttonPanel.add(figureButtonPanel);
rectangleButton = makeButton("Rectangle", figureButtonGroup,
figureButtonPanel,
new RectangleButtonListener());
rectangleButton.setSelected(true);
drawingPanel = new SimpledrawPanel("rectangle", "black", false);
drawingPanel.init();
add(buttonPanel, BorderLayout.NORTH);
add(drawingPanel, BorderLayout.CENTER);
}
/**
* This method constructs a new button.
*
* @param buttonType
* the type of the button (e.g., "Rectangle", "Ellipse")
- This is used to get the button's icon.
* @param group
* the button group in which the button should be placed
* @param panel
* the panel in which the button should be placed
* @param listener
* the action listener for the button
* @return the new button object
*/
private JToggleButton makeButton(String buttonType,
ButtonGroup group, JPanel panel,
ActionListener listener) {
JToggleButton result = new JToggleButton(
new ImageIcon(PATH + buttonType + ".jpg"));
result.addActionListener(listener);
result.setActionCommand(buttonType);
result.setPreferredSize(DEFAULT_BUTTON_DIMENSION);
result.setBackground(Color.white);
group.add(result);
panel.add(result);
return result;
}
class RectangleButtonListener implements ActionListener {
@Override
public void actionPerformed(ActionEvent e) {
drawingPanel.setFigureMode("rectangle");
}
}
// other action listener classes and main() method here...
}
13-30
Note the following in this code:
All the figure buttons are constructed by makeButton() (lines 53-65), which combines the
button-creation code that is used for each of the buttons.
makeButton() adds each button to the appropriate button group (line 62), which ensures that only
one button is shown as selected.
makeButton() adds each button to the appropriate button panel (line 63), which ensures that the
button is displayed in the appropriate place.
Each button listener, e.g., the RectangleButtonListener shown in lines 67-72, sets the
appropriate mode in the SimpledrawPanel class.


![Lec 07 [1. inheritance, polymorphism]](https://img.pdfslide.us/doc/110x75/55c2eab5bb61eb9a708b464a/lec-07-1-inheritance-polymorphism.jpg)

