Embed Size (px)
Citation preview
Chapter 1: Acidified, Fermented, and Salted Fish and
Fishery Products
Updated:
Potential Food Safety Hazard
o Clostridium botulinum
o Pathogens other than C. botulinum
Control Measures
o C. botulinum control during processing and storage
o C. botulinum control in the finished product
o Control of pathogens other than C. botulinum
FDA Guidelines
State Guidelines
Process Establishment
Critical Aspects of Processes
Analytical Procedures
o Moisture analysis
Drying oven procedure
Microwave oven method
o pH analysis
Colorimetric methods
pH meter method
o Salt (NaCl) analysis
Conductivity method
Quantabâ method
Determination of sodium chloride in foods and other samples by
QuantabTM chloride titrators (HC)
o Water activity
Determining water activity using the Decagon AquaLab CX2 meter
Measuring water activity using the Novasina aw Center (HC)
Determination of water activity using the Decagon Aqualab CX-2 (HC)
o Water phase salt calculation
o Other analytical procedures
Commercial Test Products
o Moisture
o Salt
o Water activity
Acidifying, Fermenting, and Salting Processes
o Acidifying (pickling) processes
o Fermenting processes
o Salting processes
References
Potential Food Safety Hazard Top
Clostridium botulinum Top
Clostridium botulinum toxin formation can result in consumer illness and death. When C.
botulinum grows it can produce a potent toxin, which can cause death by preventing breathing. It
is one of the most poisonous naturally occurring substances known. The toxin can be destroyed
by heat (e.g. boiling for 10 minutes), but processors cannot rely on this as a means of control.
There are two major groups of C. botulinum, the proteolytic group (i.e. those that break down
proteins) and the nonproteolytic group (i.e. those that do not break down proteins). The
proteolytic group includes C. botulinum type A and some of types B and F. The nonproteolytic
group includes C. botulinum type E and some of types B and F.
The vegetative cells of all types are easily killed by heat. C. botulinum is able to produce spores.
In this state the pathogen is very resistant to heat. The spores of the proteolytic group are much
more resistant to heat than are those of the nonproteolytic group. Table A-4 provides guidance
about the conditions under which the spores of the most heat resistant form of nonproteolytic C.
botulinum, type B, are killed. However, there are some indications that substances that may be
naturally present in some products, such as lysozyme, may enable nonproteolytic C. botulinum to
more easily recover after heat damage, resulting in the need for a considerably more aggressive
process to ensure destruction.
Temperature abuse occurs when product is exposed to temperatures favorable for C. botulinum
growth for sufficient time to result in toxin formation. Table A-1 provides guidance about the
conditions under which C. botulinum and other pathogens are able to grow.
Packaging conditions that reduce the amount of oxygen present in the package (e.g. vacuum
packaging) extend the shelf life of product by inhibiting the growth of aerobic spoilage bacteria.
The safety concern with these products is the increased potential for the formation of C.
botulinum toxin before spoilage makes the product unacceptable to consumers.
C. botulinum forms toxin more rapidly at higher temperatures than at lower temperatures. The
minimum temperature for growth and toxin formation by C. botulinum type E and nonproteolytic
types B and F is 38°F (3.3°C). For type A and proteolytic types B and F, the minimum
temperature for growth is 50°F (10°C). As the shelf life of refrigerated foods is increased, more
time is available for C. botulinum growth and toxin formation. As storage temperatures increase,
the time required for toxin formation is significantly shortened. Processors should expect that at
some point during storage, distribution, display or consumer handling of refrigerated foods,
proper refrigeration temperatures will not be maintained (especially for the nonproteolytic
group). Surveys of retail display cases indicate that temperatures of 45-50°F (7-10°C) are not
uncommon. Surveys of home refrigerators indicate that temperatures can exceed 50°F (10°C).
C. botulinum can enter the process on raw materials. The spores of C. botulinum are very
common in nature. They have been found in the gills and viscera of finfish, crabs, and shellfish.
C. botulinum type E is the most common form found in freshwater and marine environments.
Types A and B are generally found on land, but may also be occasionally found in water. It
should be assumed that C. botulinum will be present in any raw fishery product, particularly in
the viscera (FDA, 2001a).
Pathogens other than C. botulinum Top
Pathogen growth and toxin formation as a result of time/temperature abuse of fish and fishery
products can cause consumer illness. This hazard is limited to bacterial pathogens since human
viral pathogens (viruses) are not able to grow in food. Temperature abuse occurs when product is
allowed to remain at temperatures favorable to pathogen growth for sufficient time to result in
unsafe levels of pathogens or their toxins in the product. Table A-1 provides guidance about the
conditions under which certain pathogens are able to grow. The pathogens listed are those of
greatest concern in fish and fishery products.
Pathogens can enter the process on raw materials. They can also be introduced into foods during
processing from the air, unclean hands, insanitary utensils and equipment, unsafe water, and
sewage, and through cross contamination between raw and cooked product (FDA, 2001b).
Control Measures Top
C. botulinum control during processing and storage Top
There are a number of strategies to prevent C. botulinum toxin formation during the processing
and storage of fishery products. They include:
Managing the amount of time that food is exposed to temperatures that are favorable for
C. botulinum growth and toxin formation during finished product storage.
Note: FDA guidance emphasizes preventive measures for the control of C. botulinum in products
that are contained in reduced oxygen packaging. This is because such an environment extends
the shelf life of the product in a way that favors C. botulinum growth and toxin formation over
aerobic spoilage. It is also possible for C. botulinum to grow and produce toxin in unpackaged or
aerobically packaged product. This is because of the development within the product of
microenvironments that support its growth. However, toxin formation under these circumstances
requires the type of severe temperature abuse that is not reasonably likely to occur in most food
processing environments. Nonetheless, the Good Manufacturing Practice Regulations, 21 CFR
110, require refrigeration of foods that support the growth of pathogenic microorganisms.
Evisceration of fish before processing. Because spores are known to be present in the
viscera of fish, any product that will be preserved by salting, drying, pickling, or
fermentation must be eviscerated prior to processing (see Compliance Policy Guide sec.
540.650). Without evisceration, toxin formation is possible during the process even with
strict control of temperature. Evisceration must be thorough and performed to minimize
contamination of the fish flesh. If even a portion of the viscera or its contents is left
behind, the risk of toxin formation by C. botulinum remains. Small fish, less than 5
inches in length (e.g. anchovies and herring sprats), that are processed in a manner that
prevents toxin formation, and that reach a water phase salt content of 10 percent in
refrigerated products, or a water activity of below 0.85 (Note: this value is based on the
minimum water activity for growth of S. aureus) or a pH of 4.6 or less, in shelf-stable
products are exempt from the evisceration requirement (FDA, 2001a).
C. botulinum control in the finished product Top
There are a number of strategies to prevent C. botulinum toxin formation during storage and
distribution of finished fishery products. They include:
For products that do not require refrigeration (i.e. shelf-stable products):
Heating the finished product in its final container sufficiently by retorting to destroy the
spores of C. botulinum types A, B, E, and F (e.g. canned fish) (covered by the low acid
canned foods regulations, 21 CFR 113). Note: these controls are not required to be
included in your HACCP plan;
Controlling the level of acidity (pH) in the finished product sufficient to prevent the
growth of C. botulinum types A, B, E, and F (4.6 or below) (e.g. shelf-stable acidified
products) (covered by the acidified foods regulations, 21 CFR 114). Note: these controls
are not required to be included in your HACCP plan;
Controlling the amount of moisture that is available in the product (water activity)
sufficient to prevent the growth of C. botulinum types A,B,E, and F and other pathogens
that may be present in the product (i.e. 0.85 or below) (e.g. shelf-stable dried products);
Controlling the amount of salt in the product sufficient to prevent the growth of C.
botulinum types A, B, E, and F and other pathogens that may be present in the product
(i.e. 20% salt or more) (e.g. shelf-stable salted products).
For products that require refrigeration:
Heating the finished product in its final container sufficiently by pasteurization to destroy
the spores of C. botulinum type E and nonproteolytic types B and F; and then controlling
the growth of the surviving C. botulinum type A and proteolytic types B and F in the
finished product with refrigerated storage (e.g. pasteurized crabmeat, some pasteurized
surimi-based products);
Heating the product sufficiently to destroy the spores of C. botulinum type E and
nonproteolytic types B and F; and then minimizing the risk of recontamination by hot
filling the product into the final container in a continuous filling system; and then
controlling the growth of the surviving C. botulinum type A and proteolytic types B and F
and other pathogens that may be present in the finished product with refrigerated storage;
Controlling the amount of moisture that is available in the product (water activity)
sufficient to inhibit the growth of C. botulinum type E and nonproteolytic types B and F
by drying; and then controlling the growth of C. botulinum type A, and proteolytic types
B and F, and other pathogens that may be present in the finished product through
refrigerated storage;
Controlling the level of acidity (pH), salt, moisture (water activity), or some combination
of these barriers, in the finished product sufficiently to prevent the growth of C.
botulinum type E and nonproteolytic types B and F by formulation (i.e. pH 5 or below;
salt 5% or more; or water activity below 0.97); and then controlling the growth of C.
botulinum type A and proteolytic types B and F and other pathogens that may be present
in the finished product with refrigerated storage (e.g. refrigerated acidified ["pickled"]
products);
Controlling the amount of salt and preservatives, such as sodium nitrite, in the finished
product, in combination with other barriers, such as smoke, heat damage and competitive
bacteria, sufficient to prevent the growth of C. botulinum type E and nonproteolytic types
B and F; and then controlling the growth of C. botulinum type A and proteolytic types B
and F and other pathogens that may be present in the finished product with refrigerated
storage (e.g. salted, smoked, or smoke-flavored fish);
Controlling the amount of salt in the finished product, in combination with heat damage
from pasteurization in the finished product container, sufficient to prevent the growth of
C. botulinum type E and nonproteolytic types B and F; and then controlling the growth of
C. botulinum type A and proteolytic types B and F and other pathogens that may be
present in the finished product with refrigerated storage (e.g. some pasteurized surimi-
based products) (FDA, 2001a).
Control of pathogens other than C. botulinum Top
There are a number of strategies for the control of pathogens in fish and fishery products. They
include:
Managing the amount of time that food is exposed to temperatures that are favorable for
pathogen growth and toxin production;
Killing pathogens by cooking, pasteurizing, or retorting;
Controlling the amount of moisture that is available for pathogen growth, water activity,
in the product by drying;
Controlling the amount of moisture that is available for pathogen growth, water activity,
in the product by formulation;
Controlling the amount of salt or preservatives, such as sodium nitrite, in the product;
Controlling the level of acidity, pH, in the product.
Note: The use of irradiation for fish or fishery products has not been approved by FDA.
Irradiated fish and fishery products may not be distributed in the U.S. (FDA, 2001b).
FDA Guidelines Top
Shelf-stable products must be:
Heated in the final container to destroy the spores of C. botulinum types A, B, E, and F,
Acidified to pH 4.6 or below,
Dried to a water activity of 0.85 or below, or
Salted to contain 20% salt or more.
Refrigerated products must be:
Dried sufficient to inhibit the growth of C. botulinum type E and nonproteolytic types B
and F by drying; and then stored at or below 40°F (4.4°C) to control the growth of C.
botulinum type A, and proteolytic types B and F, and other pathogens that may be present
in the finished product;
Acidified, salted, or dried to control the level of acidity (pH), salt, moisture (water
activity), or some combination of these barriers, in the finished product sufficiently to
prevent the growth of C. botulinum type E and nonproteolytic types B and F by
formulation (i.e., pH 5 or below; salt 5% or more; or water activity below 0.97); and then
stored at or below 40°F (4.4°C) to control the growth of C. botulinum type A and
proteolytic types B and F and other pathogens that may be present in the finished
product;
Stored and distributed at 40ºF (4.4°C) or below (FDA, 2001a).
State Guidelines Top
New York Requirements For Shelf Stable Processing and Packaging of Caviar
(Corby, 1999)
1. Minimum of 9% water phase salt
2. Pasteurization
3. Company must utilize a scheduled process developed by a qualified individual having
extensive knowledge of thermal processing requirements of low-acid foods. This
scheduled process must have FDA approval.
New York Requirements For Refrigerated Caviar (Corby, 1999)
1. 38°F storage minimum for products less than 5% water phase salt
2. 50°F storage minimum for products 5% or greater water phase salt
New York Guidelines for Processed fish (includes pickled, fermented and salted
fish and fishery products) (Corby, 1999)
All processed fish shall be produced pursuant to a scheduled process established by a competent
processing authority. A copy of said scheduled process shall be available for examination in each
fish processing establishment. Each scheduled process shall identify the name and address of the
competent processing authority by whom it was established. The scheduled process shall include
processing methods, procedures and controls for each product, as well as packaging and labeling
requirements. Whenever a deviation in a scheduled process occurs, as disclosed by records,
processor check or otherwise, the processor shall destroy all product affected by said deviation or
hold it for a determination as to whether it is adulterated within the meaning of Section 200 of
the Agriculture and Markets Law.
Process Establishment Top
Process establishment (except where finished product water phase salt, pH, or water activity
analysis is the monitoring procedure): The adequacy of the pickling/brining/formulation process
should be established by a scientific study. For refrigerated, reduced oxygen packaged products
it should be designed to consistently achieve: a water phase salt level of at least 5 percent; a pH
of 5.0 or below; a water activity of below 0.97; a water phase salt level of at least 2.5% in
surimi-based products, when combined with a pasteurization process in the finished product
container of 185°F (85°C) for at least 15 minutes; or, a combination of salt, pH, and/or water
activity that, when combined, prevent the growth of C. botulinum type E and nonproteolytic
types B and F (established by scientific study). For unrefrigerated (shelf-stable), reduced oxygen
packaged products, it should be designed to consistently achieve: a water phase salt level of at
least 20% (based on the maximum water phase salt level for growth of S. aureus); a pH of 4.6 or
below; or a water activity of 0.85 or below (based on the minimum water activity for growth of
S. aureus. Expert knowledge of pickling/brining/formulation processes is required to establish
such a process. Such knowledge can be obtained by education or experience or both.
Establishment of pickling/ brining/formulation processes requires access to adequate facilities
and the application of recognized methods. In some instances, pickling/ brining/formulation
studies will be required to establish minimum processes. In other instances, existing literature,
which establish minimum processes, are available. Characteristics of the process and/or product
that affect the ability of the established minimum pickling/brining/ formulation process should be
taken into consideration in the process establishment. A record of the process establishment
should be maintained (FDA, 2001a).
Critical Aspects of Processes Top
Critical aspects of pickling, brining, or formulation processes may include:
Brine/acid strength;
Brine/acid to fish ratio;
Brining/pickling time;
Brine/acid temperature;
Thickness, texture, fat content, quality, and species of fish;
Water phase salt, pH, and/or water activity of the finished product;
Accuracy of thermometers, recorder thermometer charts, high temperature alarms,
maximum indicating thermometers, and/or digital data loggers;
Accuracy of other monitoring and timing instruments (FDA, 1998a).
Analytical Procedures Top
Moisture Analysis Top
Drying oven procedure (Woyewoda et al., 1986c; Hilderbrand, 1992) Top
Precautions
1. Samples must be protected from water loss before weighing. After grinding or blending,
material for analysis should be stored in filled containers with close fitting lids. Freeze
samples for long term storage and after defrosting, mix thoroughly to re-distribute water,
which may have drained to the bottom.
2. If an oven is unavailable when samples are received or for excessive numbers of samples,
materials may be weighed into dishes and stored frozen until oven space becomes

available. Prolonged drying time (over the weekend, etc.) may result in degradation and
volatile loss.
3. Oven dried material readily absorbs moisture from the atmosphere. Samples should be
cooled in a desiccator after removal from the oven and weighed immediately upon
cooling.
4. Lipids absorb oxygen from the air and increase in weight on standing. High fat samples
should be dried for the minimum time required.
5. Drying of high moisture or fat samples may be expedited by placing a disc of oven dried
filter paper on the bottom of the drying dish before sample addition to spread and absorb
the excess fluid and reduce splattering. Sometimes draping a pre-weighed filter paper
disc over the sample will reduce loss by absorbing excess fluid and splattering fat.
6. Samples must be homogeneous and spread thinly (0.7 cm [1/4 inch] maximum) and
evenly over the bottom of the drying dish.
7. If severe crusting is evident, drying time should be extended and in extreme cases the
sample mixed with a small amount of weighed pre-dried sand.
8. When dealing with atypical or new products, the weight should be checked during the
drying process to determine optimum drying time (to constant weight).
Sample preparation
Remove superfluous water (if not part of sample) by gently and briefly patting material with
tissue or paper towel. Select representative specimens and comminute thoroughly. Homogeneity
is absolutely necessary; if particles are present sample number should be increased. Comminuted
samples that cannot be portioned immediately should be stored in filled closely covered
containers. Freeze if storage of more than 24 h is required. Before portioning, mix each sample
thoroughly.
Apparatus
1. Drying dishes, disposable aluminum moisture pans.
2. Drying oven set at 103° ± 1°C (217.4° ± 1.8°F), maintain good ventilation.
3. Balance capable of weighing 0.001 g.
Procedure
1. Place 3 pre-numbered empty moisture pans for each sample in drying oven at 103°C for 1
h. Cool in desiccator for 20 min.
2. Weigh each pan to the nearest 0.001 g.
3. Mix comminuted sample well. Add 2-10 g to pan and spread evenly over bottom. Weigh
pan and contents.
4. Dry in oven overnight, cool in desiccator, and weigh again. Samples may be checked for
constancy of weight by returning to oven for 1 h and reweighing.
Calculation
Moisture content of the sample, expressed as %, is:
Where:
M = moisture content
W1 = weight of dish and sample before drying
W2 = weight of dish and sample after drying
W0 = weight of empty dish (and filter paper, if any)
Microwave oven method (Hilderbrand, 1991) Top
1. Select a piece of fish that is most likely to have the lowest water phase salt (WPS). This
will usually be the largest and thickest piece.
2. Cut a slice from the center of the piece big enough to blend evenly (1-1.5 pounds [0.5-0.7
kg]). Avoid bones.
3. Blend the sample until it is evenly ground into a fine particle size.
4. Dry 2 glass fiber sample pads (C.E.M. Corp., Matthews, NC) and 2 microwave-safe
paper plates to constant weight in the microwave oven (about 1 min).
5. Zero the balance (use balance accurate to 0.1 g). Place 1 predried glass pad on the
balance (use forceps). Place 1 paper plate containing the second glass pad on top of the
first pad. Weigh and record weight.
6. Weigh and record weight of about 10 g (± 0.1 g) ground sample on the glass pad that is
nested in the paper plate. Spread sample and cover with second pad and a second paper
plate (inverted). Mark the top plate because it will not be weighed.
7. Remove sample, pads, and plates from balance then compress sample by pressing firmly
on top plate (do not contaminate the sample with grease from fingers or other foreign
matter).
8. Microwave for 30 s; lift top plate and pad using forceps, and blot moisture from the lower
plate with paper towel.
9. Replace top plate and pads. Microwave for another 60 s. Record weight.
10. Invert the 2 pads on the lower plate, replace upper plate and microwave for an additional
30 s. Record weight. Repeat step 10 if necessary until no further weight loss is observed.
Do not "overheat or burn" sample. 11. Record weight, compute weight loss (wtl), and calculate % moisture (%m) as weight loss
divided by sample weight (wts):
Note: Several trial runs need to be made to calibrate procedure to requirements of sample and
microwave oven. Vary oven heat level and dwell time to optimize drying rate. Be sure to dry to
constant weight and do not burn sample.
pH Analysis Top
Colorimetric methods for the determination of pH (21CFR114.90(b)) Top
This method may be used in lieu of the pH meter method if the pH is 4.0 or lower.
Principle
The colorimetric method for pH involves the use of solutions of indicator dyes that gradually
change color over limited pH ranges. An indicator that has the greatest color change at
approximately the pH of the sample being tested is selected. The pH is determined by the color
of the indicator when exposed to the sample under test.
Indicator solutions
Most indicator solutions are prepared as a 0.04 % solution of the indicator dye in alcohol. In
testing, a few drops of indicator solution are added to 10 ml portions of the sample solution.
Colors should be compared using a bright background. Approximate determinations can be made
on white porcelain spot plates and the test colors compared to a set of color standards. More
accurate colorimetric tests can be made using a comparator block fitted with sets of tubes of
standard indicator solutions of known pH.
Indicator paper
A paper tape treated with indicator dye is dipped into the sample solution. Depending upon the
pH of the solution, the tape will change color and an approximate pH can be determined by
comparison with a standard color chart.
pH meter method (Woyewoda et al., 1986a) Top
Precautions
1. The pH meter must be allowed sufficient time for warm-up.
2. The electrode must be kept clean and free of occluded protein. A weak base or a mild
detergent solution may be used to clean the electrode. Soaking in 8M urea for 2 h may
also help. At no time should abrasion be used since this will lead to permanent damage.
3. The pH meter must be standardized carefully 1 pH unit on either side of the anticipated
pH to ensure linearity in the pH range being measured. Commercially available pH
standards are available for this purpose.
4. All standardization solutions and samples should be at room temperature (or at a common
temperature) when being measured. The effect of temperature variation on pH of
standards is noted on their label.
5. When drying the pH electrode, the lip should be patted with tissue rather than wiped to
prevent build up of static electricity in the electrode.
6. Use good quality fresh pH standards. Some standards change pH with age or on extended
exposure to air.
7. Electrode should be stored immersed in distilled water between readings.
8. When the electrode is removed from a solution the meter should be placed on "standby."
9. All electrodes age resulting in a slower speed of response. Reconditioning may help
restore electrode response. Reconditioning by immersing electrode tip 15 s in 0.1 N HCl
rinsing in tap water, immersing for 15 s in 0.1 N NaOH, rinsing and repeating each step
several times. If this does not restore electrode, immerse in a 20% solution of NH4F·HF
(ammonium bifloride) for 2-3 min, rinse and check.
10. Some magnetic stirrers may influence readings. Check during standardization. It is not
necessary to use a stirrer for routine pH checks of homogeneous sample.
11. Several samples should be used to compensate for biological variation among samples.
12. Sample pH must be determined immediately after maceration or blending of sample.
13. Samples should not be allowed to remain at room temperature for extended periods of
time since bacterial activity will raise pH.
14. If using method B (without water addition) ensure good flesh/electrode contact.
Sample preparation
Representative samples should be rendered homogeneous by comminuting in a food processor
and then immediately analyzed. Several samples should be used.
Apparatus
1. pH meter equipped with combination pH electrode.
2. Blender or food processor.
3. Glassware: 25 ml and 50 ml beakers.
4. Thermometer.
Reagents
Commercial buffers 1 pH unit on either side of anticipated pH, usually pH 6 and pH 8 for flesh.
Method A - with water addition
1. After sufficient warm-up time of the pH meter (about ½ h) set the "temperature" dial to
25ºC (77ºF).
2. Using pH 6 and pH 8 buffers in 25 ml beakers, standardize the meter to these values with
the "buffer" and "temperature" adjustments. Depending on model of the pH meter,
procedures for standardization may vary slightly. The instruction manual should be
consulted. To take a reading, vigorously stir the electrode in the sample and allow the
electrode to rest against the beaker's wall. Allow time for the reading to stabilize. Rinse
electrode with distilled water and pat dry with tissue between readings.
3. Repeat the standardization (step 2) until the meter provides accurate readings. A final
check may be made with pH 7 buffer. Failure to achieve standardization may indicate
electrode failure; recondition or replace.
4. Blend 20 g comminuted fish with 40 ml distilled water (at room temperature) for 1 min in
a blender. Note: AOAC method uses CO2 free water.
5. Pour some of the slurry into a 50 ml beaker. Check temperature to ensure its proximity to
that of the buffers.
6. Immediately insert rinsed and patted dry electrode. Stir the slurry vigorously with the
electrode and allow the electrode to rest against the beaker's wall. After stabilization
record the reading.
7. Place meter on "standby" and rinse electrode with distilled water.
8. Between readings store electrode in distilled water.

Method B - without water addition
Follow method A, but in step 4 omit water addition using comminuted sample directly. Good
electrode/flesh contact must be ensured.
Salt (NaCl) analysis Top
Conductivity method (Woyewoda et al., 1986b) Top
The conductivity method for salt determination is applicable to all fishery products with salt
content greater than approximately 0.5%.
Principle The resistance offered by an aqueous medium to the flow of electricity varies in a manner
inversely proportional to the concentration of dissociating inorganic salts. This principle forms
the basis of the conductivity procedure for measurement of salt content in fishery products.
The method involves blending a sample with water, measuring the electrical conductivity in
milli-mho units of the solution by means of a conductivity meter and interpreting the results from
standard curves.
Precautions
Temperature control is critical for the measurements; all measured solutions must be at the same
temperature as standards used for the preparation of the standard curve.
For samples of low salt content the proportion of water must be decreased. However, in the
extreme, some errors may be encountered from the presence of natural salts since the procedure
is not specific for sodium but rather takes into account all inorganic ionizable salts. For low
concentrations, the silver nitrate titration procedure may be preferable.
Sample preparation
1. With a sharp knife cut sample into portions of approximately ½" x ½" (1.3 x 1.3 cm).
2. Comminute sample:
a. For lean fish (salt cod), place several portions into a dry blender jar and blend for
10 s intervals until material is shredded.
b. For fatty fish (herring, mackerel), comminute sample in a food processor until a
homogeneous paste has been produced. If portions are very dry a blender may be
used for comminution.
3. Pre-weigh portions of fish according to anticipated salt content, i.e., 10, 20, or 40 g
portions for 18, 8, and 4% NaCl (wet weight) respectively.
4. Save some material for moisture determination.
Apparatus
1. Conductivity meter equipped with conductivity cell. For example, Radiometer CDM2
meter with CDC-114 flow cell (Radiometer Analytical Group, Westlake, OH) is
appropriate.
2. Blender, Waring or equivalent.
3. Water bath, constant temperature, maintained at 20 or 25 ± 0.5ºC.
4. Glass wool or filter paper, Whatman #4.
5. Glassware: 100 ml measuring cylinders, funnels (glass or plastic), test tubes (18 x 150
mm), 100 ml beaker, 100 ml volumetric flasks.
Reagents
1. Sodium chloride: dry 30 g ACS grade NaCl at 110ºC overnight in 100 ml beaker and
store in desiccator.
2. Sodium chloride standards: To 100 ml volumetric flasks add 0.1, 0.2, 0.4, 0.6, 0.8, 1.0,
1.2, 1.4, 1.6 and 1.8 g portions (accurately weighed) of NaCl with 80 ml distilled water.
Swirl to dissolve and make up to volume. Standards represent 0.1, 0.2, 0.4, 0.6, 0.8, 1.0,
1.2, 1.4, 1.6, and 1.8% w/v solutions.
Procedure
1. Calibration of meter.
a. Add standard solutions to clean test tubes and equilibrate in constant temperature
bath - allow at least 15 min.
b. With attached bulb rinse cell with distilled water. Cell should be stored filled with
distilled water or soaked for at least 30 min before use.
c. With function switch on "calibrate" and range at 5 milli-mho, set pointer to red
calibration mark on meter.
d. Partially fill cell with standard solution of lowest salt concentration and dispel
into waste container.
e. Fill and empty (back into test tube) cell several times with standard solution to
ensure temperature equilibration of cell. Allow cell to rest in test tube (in bath).
f. Record reading from meter.
g. Proceed (without rinsing) to solution of next higher concentration, discarding first
aliquot drawn. If meter goes off scale switch to 15 milli-mho range.
2. Salt in sample
a. Determine moisture of samples.
b. Blend preweighed samples of fish with 200 ml distilled water for 1-2 min until
homogeneity is achieved.
c. Filter a portion of the blend through glass wool or Whatman #4 filter paper into a
glass test tube to remove particles.
d. Place test tube in water bath at set temperature and allow at least 15 min for
equilibration.
e. Rinse cell with distilled water at temperature of water bath; cell should always be
stored partially filled with distilled water.
f. On conductivity meter set output to 5 milli-mho and function switch to
"calibrate." With calibration knob adjust meter so that needle rests on red
calibration mark. Set switch to "measure."
g. With rubber bulb attached to cell partially fill cell chamber with filtered sample
solution to rinse. Dispel into waste beaker.
h. Refill chamber with new solution ensuring that coil in cell is immersed in
solution. Leave cell in the test tube (in water bath) and fill and empty cell several
times to ensure constancy of and homogeneity of solution. Record reading from
meter. If reading is off scale set meter to 15 milli-mho. Dispel solution.
Calculations
1. Standard Curve.
On graph paper plot meter reading vs. g NaCl/100 ml.
2. Salt Concentration in Samples
From the meter reading obtained for each solution determine from the calibration graph a
final NaCl concentration. Salt in sample may be calculated as:
Where:
C = concentration of NaCl in sample expressed as % on a wet weight base
M = moisture as % by weight
R = %NaCl reading determined from graph
V = volume (ml) distilled water added
W = weight (grams) of sample used.
Quantab® method (Hilderbrand, 1991; ETS, 1998) Top
1. Select a piece of fish that is most likely to have the lowest salt content. This will usually
be the largest and thickest piece.
2. Cut a slice from the center of the piece big enough to blend evenly (1-1.5 pounds [0.5-0.7
kg]). Avoid bones.
3. Blend the sample until it is evenly ground into a fine particle size.
4. Place exactly 10 g of sample in a 250 ml beaker.
5. Add 90 ml (or 90 g) of boiling distilled water. Use boiling tap water only if a test with a
Quantab® (Hach Company, Loveland, CO) shows the tap water to be salt free.
6. Stir for 30 s, wait 1 min (or longer if particles are large), and stir another 30 s to insure all
salt is extracted from sample.
7. Place lower end of salt titrator into sample solution. Do not allow solution to reach
yellow completion string at top of titrator.
8. Wait for solution to saturate titrator and turn yellow string dark blue. Note where the tip
of the yellow/white peak on reacted titrator falls on the numbered scale in Quantab®
units.
9. Determine salt concentration from calibration table on Quantab® container. Multiply by
dilution factor of 10.
10. Note: Filtration of the sample solution may be needed to prevent obstruction of the
titrator.
Determination of sodium chloride in foods and other samples by QuantabTM
chloride
titrators (HC MFLP-45) Top
Water Activity Top
Determining water activity using the Decagon AquaLab CX2 meter (Decagon,
1997) Top
1. Place AquaLab (Decagon Devices, Inc., Pullman, WA) on a level surface and in a
location where the temperature remains fairly stable.
2. Plug in AquaLab and turn on power switch. The display will show all zeros in about 15 s.
The instrument requires a warm up time depending on the ambient temperature.
3. Verify the calibration against a known salt standard before and after each sample run. For
batch processing, calibration should be verified more frequently.
4. Make sure sample to be measured is homogeneous. Spread the sample material in the
bottom of the disposable sample cup, covering the bottom of the cup if possible.
5. Place a sample in the sample drawer. Close the drawer and turn the knob from
"Open/Load" to "Read." When the reading is complete, the instrument will beep
continuously and the decimal points will blink.
6. The display will show a final aw and temperature of the sample in degrees Celsius. The
drawer can be opened at this time and the reading will be retained until the next sample is
started. Most readings take less than 5 min.
Measuring water activity using the Novasina aw Center (HC MFLP-63) Top
Determination of water activity using the Decagon Aqualab CX-2 and Series 3 (HC
MFLP-66) Top
Water phase salt calculation</ Top
Calculate water phase salt (WPS) as % salt (%S) divided by % salt + % moisture (%M)
multiplied by 100 (Hilderbrand, 1992).
Other analytical procedures</ Top
pH of acidified foods (AOAC, 1995a).
Potentiometric method for the determination of pH (21CFR114.90(a)).
Titratable acidity (21CFR114.90(c)).
Salt (chlorine as sodium chloride) in seafood: Potentiometric method(AOAC, 1995c).
Salt (chlorine as sodium chloride) in seafood: Volumetric method(AOAC, 1995b).

Commercial Test Products Disclaimer Clause
Top
Moisture Top
Commercial test products for moisture.
Test Kit
Analytic
al
Techniq
ue
Approx.
Total
Test
Time Supplier
Halogen
moisture
analyzers
Drying
lamp Mettler Toledo, Inc.
1900 Polaris Parkway Columbus, OH 43240-2020 Phone: 800 METTLER E-mail: [email protected] Web:
http://us.mt.com/us/en/home.
html
Moisture
analyzer Quartz
coil
infrared
heating
element
Denver Instrument
5 Orville Dr.
Suite 200 Bohemia, NY
11716 Phone: 800-321-1135 Fax: 303-423-4831 E-mail:
[email protected] Web:
http://www.denverinstrument
.com
Salt Top
Commercial test products for salt.
Test Kit
Analytical
Techniqu
e
Approx.
Total
Test
Time Supplier
Conductivity
Meter Conductiv
ity Radiometer Analytical Group
A division of Struers Inc. 810 Sharon Drive Westlake, Ohio 44145-1598 Phone: 440/ 871-5975 Phone: 1 800/998-8110 Fax: 440/899-1139 E-mail: [email protected] Web:
http://www.radiometer.tm.fr/i
ndex.html
Quantab® 20-45 Hach Company
chloride titrators min P.O. Box 389 Loveland, CO 80539 Phone: 1-800-227-4224 or
970-669-3050 Web: http://www.hach.com/
Salt
Measurement
System
Ion
selective
electrode
5-15 min Lazar Research Laboratories,
Inc. 509 N. Fairfax Avenue, Suite
219
Los Angeles, CA, 90036 Phone: 213/931-1433 Fax: 213/931-1434 E-mail: [email protected] Web:
http://www.lazarlab.com
Water Activity Top
Commercial test products for water activity.
Test Kit
Analytical
Techniqu
e
Approx.
Total
Test
Time Supplier
AquaLab water
activity meter Cooled
mirror
condensati
on
dewpoint
sensor
3-4 min Decagon Devices, Inc. 2365 NE Hopkins Ct.
Pullman, WA 99163 USA Phone: 509-332-2756 Fax: 509-332-5158 E-mail: [email protected] Web:
http://www.decagon.com
Water Activity
Meter Relative
humidity
sensor
4-6 min Rotronic Instrument Corp. Rotronic Instrument Corp.
135 Engineers Rd Suite 150
Hauppauge NY,11788
Phone: 631-427-3898
Fax: 631-427-3902 Web: http://www.rotronic-
usa.com
Acidifying, Fermenting, and Salting Processes Top
Examples of seafood processes are provided for information only. The National Seafood
HACCP Alliance does not endorse or recommend specific seafood processes. Some of the
referenced processes are of historical interest and may not reflect current best management
practices. Processes should not be followed as written without validation.
Acidifying "pickling" processes Top
Bismarck herring
Use herring of uniform size. Wash the fish in a special washing machine consisting of a large
revolving drum equipped with a spray of water. Clean, behead, and bone the washed and scaled
fish. Rinse with water and brush the inside to remove the black lining of the belly cavity. Place
fish in salt brine for 2-3 h and then into a vinegar pickle (from 5-6% acetic acid) containing a
moderate amount of salt. After 2 d in the pickle, pack the fish tightly in boxes with slices of
onion, and some pepper and mustard seed. A vinegar sauce (from 2.2-2.4% acetic acid)
containing some sugar is added and the box is closed and wrapped for marketing. Ship
immediately or store in cool dry rooms (Long et al., 1982).
Cut spiced herring I
Ingredients
10 pounds (4.5 kg) salt herring, 2 quarts (946 ml) 6% acidity vinegar, 2 quarts (1.89 L) water, 2½
ounces (70.9 g) sugar, 4 ounces (113.4 g) sliced onion, 2 ounces (56.7 g) mustard seed, 1 ounce
(28.3 g) bay leaves, 1 ounce (28.3 g) whole allspice, 1 ounce (28.3 g) whole black peppers, 1
ounce (28.3 g) whole white peppers, 1 ounce (28.3 g) whole red chili peppers, ½ ounce (14.2 g)
whole cloves.
Procedure
Cut herring across the body in pieces 1-2 inches (2.5-5.1 cm) long. Pack pieces in wooden tubs
holding 10-20 pounds (4.5-9.1 kg), or in kegs holding 100 pounds (45.4 kg). Mix together the
dry spices. Place a few spices, 1-2 bay leaves, and several slices of onion in the bottom of the tub
or keg, then a layer of cut herring, over which are laid onion slices and a sprinkling of spices.
Repeat until tub or keg is filled. Dissolve sugar in the water and mix with vinegar. Cover cut
herring with sugar-vinegar mixture. Store at 4.4ºC (40ºF) for 10 d to cure. At the end of this
time, if the fish are to be repacked, fill cut pieces into 8, 16, or 32 ounce (237, 474, or 947 ml)
glass containers. Use the curing vinegar to fill containers but strain it before reuse. Some packers
prefer to use fresh vinegar diluted to 3% acidity. Place a few spices, 1-2 bay leaves, and a little
chopped onion in each jar. Vacuum seal the containers, wipe containers clean and label (Long et
al., 1982).
Cut spiced herring II
Use 10 pounds (4.5 kg) vinegar-salt cured herring. Cut herring across the body in pieces 1-2
inches (2.5-5.1 cm) long. Pack into 8, 16, or 32 ounce (237, 474, or 947 ml) glass containers with
whole mixed spices, using the spice ingredients given in "Cut spiced herring I." Use 1 teaspoon
(10 ml) spices to 8 ounce (237 ml) jar, 2 teaspoons (20 ml) to 16 ounce (474 ml) jar, and 1
tablespoon (30 ml) to 32 ounce (947 ml) jar. Also add to each jar a slice or 2 of onion, 1-2 bay
leaves, and, if desired for color, a strip of canned pimento placed around the side of the
container. Make the following vinegar-spice mixture and fill each container: To 1 gallon (3.79 L)
vinegar (diluted to 2½% acidity) add ½ pound (227 g) sugar, ¼ pound (113 g) salt, and 10 drops
each of oil of cloves, allspice, and cardamom. The spice oils are usually added to the sugar
before dissolving the sugar in the vinegar; this distributes the spice flavor more evenly. The
amount and variety of spice flavors may be altered to suit the taste and preference of the packer
and the market. Vacuum seal the containers, wipe containers clean, and label.
The shelf life of this product depends upon the care in manufacture and temperature of storage. If
held at 4.4ºC (40ºF), the product should remain in good condition for at least 6 months. Exposure
to light causes deterioration more rapidly even if held under refrigeration, as in a refrigerated
showcase (Long et al, 1982).
Escabeche
Ingredients
Ten pounds (4.5 kg) mackerel, kingfish (king mackerel), tuna, or corvina, 1 quart (946 ml)
distilled vinegar, 1 tablespoons (30 ml) bay leaves, 1 tablespoon (30 ml) whole black peppers, 1
pint (0.5 L) olive oil, 1 clove garlic, 1 tablespoon (30 ml) red chili peppers, ½ tablespoon (15 ml)
cumin seed, and ½ tablespoon (15 ml) marjoram.
Procedure
Cut fish into small serving portions. Wash thoroughly, drain, and place in 90° salimeter brine for
½ h. Wipe the fish dry. Heat a minced clove of garlic, 6 bay leaves, and a few red peppers in
olive oil until they are light brown, and then cool. Cook onions in the oil until they are yellow.
Add black peppers, cumin seed, marjoram, and vinegar. Cook slowly for 15-30 min and cool.
Pack cold fish into sterilized jars with the rest of the bay leaves and red peppers. Fill the jars with
sauce and close immediately. Store in a cool place for at least 24 h before use (Jarvis, 1987).
Fish pickled in wine
This method is for sturgeon, pike, pickerel, salmon, herring, trout, and other fish. Wash 10
pounds (4.5 kg) of fish well and cut in small individual serving size portions, 2-4 ounces (57-113
g) each. Dredge pieces in fine salt and let stand 1-3 h. Rinse off salt, dry the pieces, and brush
them with good cooking oil. Lay pieces on a grill and broil over a hot fire until both sides are
light brown. Brush with cooking oil during the process. Allow fish to cool, then pack in glass
containers with 1-2 slices of lemon, bay leaves, onion, and a scattering or rosemary, whole black
peppers, and whole cloves between the layers of fish. Fill jars with a marinade made of white
wine, vinegar and water, seal immediately, and store in a dry cool place.
Thyme may be substituted for rosemary, and the spice combination may be otherwise altered to
suit the individual preference (Long et al., 1982).
Gabelbissen
Ingredients
220 pounds (99.8 kg) fresh herring, 22-35 pounds (10-15.9 kg) salt, 4 pounds (1.8 kg) sugar, 2.2
pounds (1 kg) black peppers, 2.2 pounds (1 kg) white peppers, 18 ounces (510 g) allspice, 11
ounces (312 g) coriander, 4 ounces (113 g) cardamom, 2 ounces (57 g) ginger, 6 ounces (170 g)
hops, 2 ounces (57 g) cloves, 2 ounces (57 g) cinnamon, 3 ounces (85 g) sodium nitrate.
Procedure
Use fresh fat herring. Cure round herring 30-40 h in 90º salimeter brine. In some instances,
however, this preliminary brine cure is omitted and the fresh fish are packed directly into barrels.
Scatter a special curing mixture on the bottom of the barrel between the fish and over each layer.
Pack the herring with bellies straight up and tails overlapping. Pack layers of fish in rather
loosely. Head up the barrels and put them in cold storage at about 4.4ºC (40ºF), for several
months to cure and ripen.
At the end of about 3 months, remove the herring from storage, drain well, head, bone, and skin.
Cut the fillets into sections and pack in glass containers, or pack whole fillets in oval or oblong
flat cans. If desired, lay a bay leaf and a thin slice of lemon in each can. Fill the containers with
the original curing brine diluted ½ with distilled vinegar or pack in wine sauce, dill sauce, or
curry sauce. Seal the containers and hold under refrigeration until sold (Long et al., 1982).
Gaffelbiter
Ingredients
16 pounds (7.3 kg) mild-cure herring, 1 quart (946 ml) vinegar (6% distilled), 1 quart (946 ml)
water, 8 ounces (227 g) chopped onions, ¼ ounce (7 g) whole black peppers, ¼ ounce (7 g)
whole white peppers, ¼ ounce (7 g) whole cloves, ¼ ounce (7 g) mustard seed, 1/8 ounce (4 g)
bay leaves.
Procedure
Cut fat, mild-cure salt herring into fillets and skin. Freshen in running water 2-3 h depending
upon size of the herring, whether mild or heavy cure, and local market preference. Cut fillets into
1 inch (2.5 cm) sections; pack into tubs or crocks and mix in the chopped onions and spices;
cover with distilled vinegar. Store in a cool place (about 4.4ºC [40ºF]) and allow to cure for 48 h.
Then repack herring pieces in sterilized containers. Fill containers with either fresh vinegar or
the vinegar used for curing, but strain before using. Seal containers and pack for market
distribution (Long et al, 1982).
German delicatessen anchovies
Wash anchovies and small herring thoroughly and pack round or eviscerate, behead, and
thoroughly wash fish before packing. Use only the fatter fish as lean fish produce and inferior
product.
The following preservation and spicing mixtures are given for 1-liter tins:
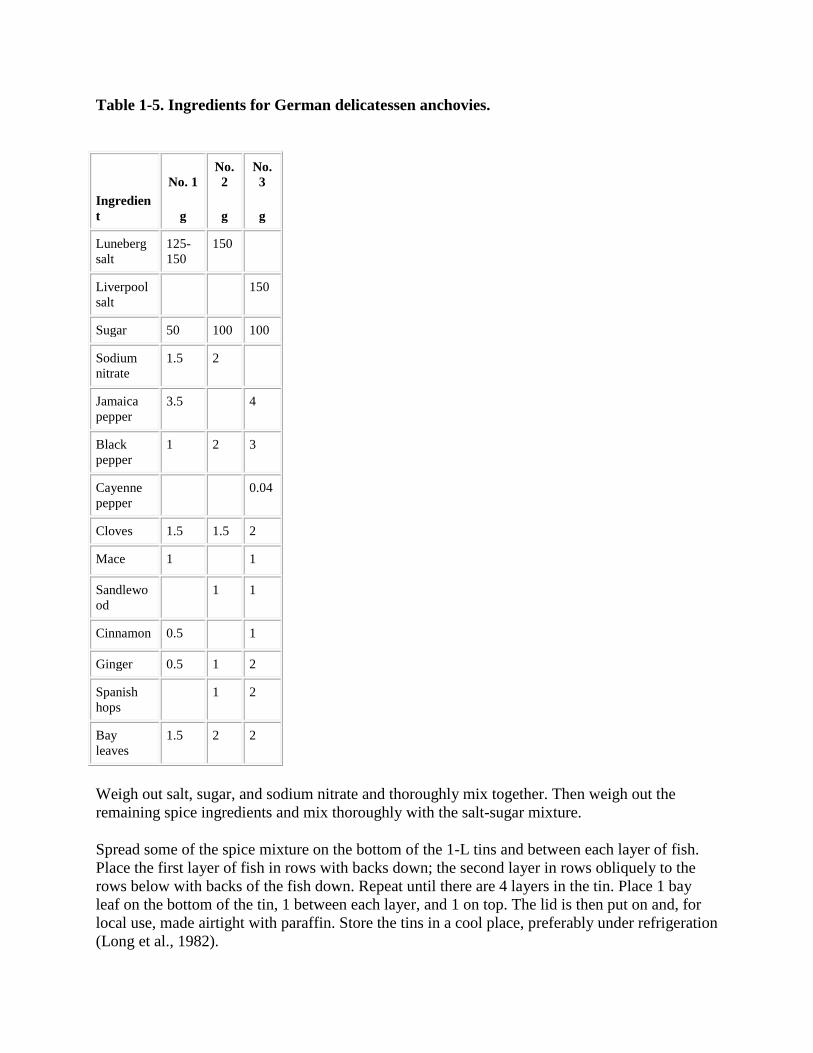
Table 1-5. Ingredients for German delicatessen anchovies.
Ingredien
t
No. 1
g
No.
2
g
No.
3
g
Luneberg
salt 125-
150 150
Liverpool
salt 150
Sugar 50 100 100
Sodium
nitrate 1.5 2
Jamaica
pepper 3.5 4
Black
pepper 1 2 3
Cayenne
pepper 0.04
Cloves 1.5 1.5 2
Mace 1 1
Sandlewo
od 1 1
Cinnamon 0.5 1
Ginger 0.5 1 2
Spanish
hops 1 2
Bay
leaves 1.5 2 2
Weigh out salt, sugar, and sodium nitrate and thoroughly mix together. Then weigh out the
remaining spice ingredients and mix thoroughly with the salt-sugar mixture.
Spread some of the spice mixture on the bottom of the 1-L tins and between each layer of fish.
Place the first layer of fish in rows with backs down; the second layer in rows obliquely to the
rows below with backs of the fish down. Repeat until there are 4 layers in the tin. Place 1 bay
leaf on the bottom of the tin, 1 between each layer, and 1 on top. The lid is then put on and, for
local use, made airtight with paraffin. Store the tins in a cool place, preferably under refrigeration
(Long et al., 1982).
Herring in sour cream sauce
For a 1-gallon (3.79 L) keg of Holland-style herring use the following ingredients: 1 pint (0.5 L)
dry white wine, 1 pint (0.5 L) sour cream, 1 pint (0.5 L) sweet cream, ½ pint (237 ml) distilled
vinegar, ½ ounce (14 g) mixed spices, 2 cups (474 ml) thinly sliced onions.
Use the mild-cured herring (Holland style). Fillet and save the milts. Soak fillets in cold water
for 2 h. Rub the milts through a fine sieve. Drain fillets of surplus moisture. Boil together the
vinegar, wine, and mixed spices for 3-5 min; cool and remove spices. Blend together the sour
cream, sweet cream, milts, and cooled vinegar. Pack fillets in a large container with sliced
onions, cover with the cream-vinegar sauce, and marinate in a cool place for 1 week. Pack fish
and onion slices in glass jars with the sauce (Long et al., 1982).
Herring in wine sauce
Ingredients
10 pounds (4.5 kg) fish, 1 quart (946 ml) white wine, 1 pint (0.5 L) distilled white vinegar, 4
ounces (113 g) chopped onion, 2½ ounces (71 g) sugar, ¼ ounce (7 g) whole cloves, ¼ (7 g)
ounce mustard seed, ¼ ounce (7 g) chili peppers, 1/8 ounce (4 g) bay leaves, 1/8 ounce (4 g)
whole black peppers, 1/8 ounce (4 g) whole white peppers, ¼ ounce (7 g) whole allspice, 1/16
ounce (2 g) ground nutmeg, 1/16 ounce (2 g) cracked cinnamon, 1/16 ounce (2 g) cracked
ginger, 1/16 ounce (2 g) cardamom.
Procedure
Put all the ingredients into a large jar with cover. Place jar in a large enough cooking pot to
which water can be added to the depth of the ingredients in the jar. Bring water to a boil and boil
for 2 h. Then allow jar to stand overnight. When sauce is ready to be used, strain to remove the
spices.
If vinegar-salt cure herring are used, cut the fillets in pieces of suitable size, rinse in freshwater,
drain, and pack in sterilized jars with a few fresh spices and a slice of lemon. Fill jars with wine
sauce. Seal.
If ordinary salt herring are used, fillet and freshen in water. Drain the fillets; pack in a stoneware
crock; cover with 1 quart (946 ml) distilled vinegar (3% acidity) and let stand for 48 h. Remove
the fillets from the vinegar and cut into pieces of suitable size; pack into sterilized jars and fill
with wine sauce (Long et al., 1982).
Matjeshering
This is a spiced-herring product considered very choice in northern Europe. It is prepared from
fresh, full herring (herring with milt or roe). The formula given is for the European unit quantity,
a small keg of 75 herring.
Wash the herring and scale. Remove the gills and pull the intestines out through the gill opening
so that the throat or belly walls are not cut open. Soak the cleaned fish in a 7% white wine
vinegar solution for 12-18 h (they must be removed from this solution before the skin becomes
soft and flabby). Wipe fish dry. Roll in a curing mixture of: 2.2 pounds (1 kg) salt, 1.1 pound
(0.5 kg) brown sugar, and 4 ounces (113 g) sodium nitrate.
Pack herring in a small keg in straight layers with backs up. Scatter some of the curing mixture
between the fish as they are packed and sprinkle some over each layer. Allow to stand 24-48 h.
Then repack fish, using the original brine that has collected. If not enough brine has formed,
make up additional brine to cover herring by boiling together 1 part salt-sugar mixture (as above)
to 4 parts water. Cool and filter before using. Close kegs and store at 4.4ºC (40ºF) for at least 1
month before using (Long et al., 1982).
Mustard or Kaiser-Friedrich herring
Prepare herring exactly the same manner as Bismarck herring. Replace the sweetened vinegar
sauce with a mustard sauce when the fish are packed. The mustard sauce is usually prepared in
special factories and is merely thinned preparatory to use in the marinating factory (Long et al.,
1982).
Pickled and spiced mackerel fillets
Ingredients
Ten pounds (4.5 kg) fresh mackerel fillets, 2 quarts (1.89 L) distilled vinegar, 3 pints (1.4 L)
water, 1 pint (0.5 L) chopped onions, 2 ounces (57 g) sugar, 1 clove of garlic chopped, 1
tablespoon (30 ml) each of the following: allspice, cloves, black peppers, bay leaves, and crushed
nutmeg.
Procedure
Clean fish and wash thoroughly, and cut into fillets, removing the backbone. Divide the fillets
into 2 inch (5.1 cm) lengths and dredge with fine salt. Pick up pieces with as much salt as will
cling to the flesh and pack in a crock or tub. Let the fish stand for 1-2 h, then rinse in freshwater.
Cook the vinegar, water and other ingredients slowly and gently for 10 min after reaching boiling
point. Add the fish and cook slowly for 10 min longer, counting from the time at which the
solution again begins to boil after the fish has been put in. Remove the fish and allow the pieces
to drain, then pack them in sterilized jars, adding some chopped onion, a bay leaf, a few spices,
and a slice of lemon to each jar. Strain the spice vinegar sauce and bring to a boil. Fill the
containers with hot sauce and seal immediately. Store in a cool, dry place (Long et al., 1982).
Pickled eels
Clean and skin the eels and cut them into pieces about ¾ inch (1.9 cm) thick. Wash and drain the
pieces, then dredge in fine salt and allow to stand for 30 min to 1 h. Rinse off the salt, wipe the
pieces dry, and rub them with a cut clove of garlic. Brush the eel with melted butter and broil
until both sides are light brown. As an alternative, pieces may be sautéed in olive oil or other
good salad oil. Place the pieces of cooked eel on absorbent paper. When the pieces are cool, pack
them in layers in a crock with a scattering of sliced onion, allspice, bay leaves, mustard seed,
whole cloves, peppers, and mace between the layers of fish. Weight the mixture down to keep it
compressed. Cover the fish with a cold vinegar sauce made of vinegar, water, onions, and a few
bay leaves cooked for 15-20 min. After standing for 48 h in a cool place pack the eels in glass
tumblers with a thin slice of lemon, a bay leaf, a slice of onion, and a few fresh whole spices for
decoration. Fill the tumblers with sauce used in curing, which has been filtered. Seal the
containers immediately. Store in a cool, dry place (Long et al., 1982).
Pickled haddock fillets
Ingredients
Ten pounds (4.5 kg) haddock fillets, 2 quarts (1.89 L) distilled vinegar (6% acidity), 1 quart (946
ml) water, ½ ounce (14 g) white peppers, ½ ounce (14 g) red chili peppers, ½ ounce (14 g)
allspice, ¼ ounce (7 g) cloves, ¼ ounce (7 g) mustard seed, ¼ ounce (7 g) bay leaves, ¼ pound
(113 g) sliced onions.
Procedure
The fish are covered with a solution of 2 parts vinegar and 1 part water, adding a small piece of
alum about the size of a walnut. Boil slowly until the fish may be pierced easily with a fork.
After cooling, the product is packed in glass containers, adding a few fresh spices, a bay leaf, and
a slice of lemon around the side of the jar for decoration. A few slices of onion may also be
packed with the fish. Strain the vinegar sauce, heat it, and pour over the fish until the top is well
covered. Seal the containers immediately. For maximum preservation, store under refrigeration
(Long et al., 1982).
Pickled herring for rollmops, cut spiced, or Bismarck herring
Behead and eviscerate dressed herring. Clean thoroughly herring that are cut across the body in
pieces. Pay special cleaning attention to removal of the kidney, which is the dark streak along the
backbone in the rib cage. Rinse fish in freshwater; place in a curing tank and cover with a brine
testing 80º-90º salimeter that contains 120 grain distilled vinegar with acidity of about 2½%.
Allow fish to remain in the brine until the salt has struck through and completely penetrated the
flesh. Remove the fish before the skin starts to wrinkle or lose color. The length of cure depends
on temperature conditions and freshness and size of fish. The average length of cure is 5 d, but
may range from 3-7 d. Pack cured herring into barrels. Head the barrels and fill with 70º
salimeter salt-vinegar brine.
For final manufacture, repack herring in kegs and fill with a solution of distilled vinegar diluted
with water to a 3% acidity and containing sufficient salt to test 35º salimeter. Dressed herring
may be cut into fillets or the backbone may be removed leaving the fish otherwise whole before
repacking. Store repacked kegs in cold storage at 1.1ºC (34ºF).
Begin the final process by soaking the herring in a tank of cold water 8-10 h. Remove the herring
and drain. Place the fish in a solution of vinegar, salt and water for 72 h. Make up the solution in
the following proportions: 1 gallon (3.79 L) of 6% white distilled vinegar to 1 gallon (3.79 L) of
water, and 1 pound (454 g) of salt. Be certain the fish are well covered with the solution. Then
make them up into cut spiced herring, rollmops, or Bismarck herring (Long et al., 1982).
Pickled mussels I
Wash mussels then steam until open. Remove meats from shells and pull off beards (byssal
threads). Place mussel meats in a container and cover with spiced vinegar, containing onions,
black peppers, cloves, salt, allspice, olive oil, garlic, etc. (Long et al., 1982)
Pickled mussels II
Scrub shells well and steam just enough to open. Remove meats from shells and cut off beard
(byssal threads). Cool meats and cooking liquor separately. Pack meats in sterilized glass jars
adding a bay leaf, a few whole cloves, and a thin slice of lemon to each jar. Strain the cooking
liquor and add to each quart (946 ml) of liquor: ½ pint (237 ml) distilled vinegar, ½ tablespoon
(15 ml) allspice, ½ tablespoon (15 ml) cloves, ½ tablespoon (15 ml) red pepper, and ¼ teaspoon
(2 ml) cracked whole mace. Simmer ingredients in liquor for 45 min, cool, and pour into jars and
seal. Cure for 2 weeks in cool dark place (Long et al., 1982).
Pickled octopus meat
Remove octopus tentacles and viscera. Cut tentacles into 2-4 blocks. Boil body and tentacle
blocks in freshwater for 30 min. Cool rapidly. Cut cooled meat into small pieces. Pickle 50 kg
octopus meat with 500 g acetic acid, 10-12 kg water and 500 g salt (Tanikawa et al., 1985).
Pickled oysters I
Ingredients
Four quarts (3.79 L) shucked oysters, 3 pints (1.4 L) oyster liquor, 1 pint (0.5 L) distilled
vinegar, 1 pint (0.5 L) dry white wine, 2 tablespoons (59 ml) ground onion, 2 tablespoons (59
ml) crushed garlic cloves, 2 tablespoons (59 ml) crushed bay leaves, 1 tablespoon (30 ml)
chopped parsley stems, 1 tablespoon (30 ml) crushed fennel, 1 tablespoon (30 ml) crushed
fennel, 1 tablespoon (30 ml) crushed allspice, 1 tablespoon (30 ml) crushed black peppers, 1
tablespoon (30 ml) crushed cloves, 1 tablespoon (30 ml) crushed stick cinnamon, ¼ tablespoon
(7 ml) crushed mace, and ¼ tablespoon (7 ml) crushed thyme.
Procedure
Remove oysters from liquor. Strain liquor and add sufficient salted water to make 3 pints (1.4 L).
Simmer liquor over low heat. When it is near the boiling point, add a few oysters at a time and
cook until fringe curls. Cool. Make a sauce of the cooking liquor, vinegar, wine, and spices.
Simmer for 30-45 min then cool and strain. Pack oysters in glass jars with a bay leaf, slice of
lemon, and a few fresh spices in each jar. Fill jars with strained sauce. Seal jars and cure for 10-
14 d in a cool, dark place (Long et al., 1982).
Pickled oysters II
Ingredients
Four quarts (3.79 L) shucked oysters, 2 quarts (1.89 L) oyster liquor, 1 quart (946 ml) vinegar, ½
ounce (14 g) cloves, ½ ounce (14 g) whole allspice, ½ ounce (14 g) whole black peppers, and 1
blade mace.
Procedure
Blanch oysters in their own liquor until fringe curls. Remove and cool oysters. Bring the oyster
liquor to a boil, then cool. Cook vinegar and spices over low heat for 5 min. Strain vinegar to
remove spices. Combine oyster liquor and spiced vinegar and cool. Pack the oysters in glass jars
with a bay leaf and thin slice of lemon in each jar. Fill containers with the cool sauce and seal
immediately. Store under refrigeration (Long et al., 1982).
Pickled salmon I
Ingredients
1 quart (946 ml) distilled vinegar, 1 quart (946 ml) water, ½ cup (118 ml) olive oil, 1 cup (118
ml) thinly sliced onions, ½ tablespoon (15 ml) bay leaves, 1 tablespoon (30 ml) whole white
peppers, 1 tablespoon (30 ml) mustard seed, ½ tablespoon (15 ml) cloves, ½ tablespoon (15 ml)
whole black peppers, 10 pounds (4.5 kg) fresh salmon.
Procedure
Cut salmon into individual serving portions. Wash well in cold water, drain, and dredge in fine
salt. Allow to stand for 30 min, drain off leakage, and slowly simmer salmon until done. Place
the warm fish pieces in an earthenware crock. Cover with a vinegar-spice sauce made as follows:
Sauté onions in olive oil slowly until they are yellow and soft. Add remainder of ingredients and
simmer gently for 45 min. Cool sauce, then pour it over the fish making sure that all pieces are
covered. Let fish stand in sauce for 48 h then repack in pint (0.5 L) jars with a slice of lemon,
slice of onion, and 1 bay leaf inserted around sides of jar for decoration. Filter the spice sauce
before pouring it over the fish; fill container with sauce, then seal. This product should be held
under refrigeration at 4.4ºC (40ºF) (Long et al., 1982).
Pickled salmon II
Use only strictly fresh salmon. Wash it well. Remove backbone and trim sides of the very thin
belly flesh. Cut salmon in pieces of about ¼-pound (113 g) each. Simmer in well-salted water
until they are done but not soft. Remove fish and filter cooking water. Make a sauce of the
filtered cooking water and equal parts of white wine and vinegar. Pack salmon pieces in wide-
mouth glass jars with 2-3 thin slices of lemon, 2 bay leaves, 4 cloves, and 4 whole black peppers
to each jar. Pour warm sauce over fish, making sure that all pieces are covered in the jar, and
then pour in a top layer of olive oil (¾ inch [1.9 cm] thick). Seal jars and store in a cool, dry
place.
Some mild-cure salmon is cut into 2 inch (5.1 cm) cubes, freshened in cold water, and packed in
spiced vinegar sauce or in wine sauce (Long et al., 1982).
Pickled spiced shrimp
Ingredients One gallon (3.79 L) water, ½ cup (118 ml) salt, 1 pint (0.5 L) distilled vinegar, 1
tablespoon (30 ml) red peppers, ½ tablespoon (15 ml) cloves, ½ tablespoon (15 ml) allspice, ½
tablespoon (15 ml) mustard seed, 6 bay leaves. Procedure Peel and wash shrimp. Simmer
ingredients for 30 min, bring to a boil, and add shrimp. Cook 5 min. Remove shrimp from brine
and cool. Pack in sterilized jars with a bay leaf, a few fresh spices, and a slice of lemon in each
jar. Fill containers with a solution made from: 2 pints (0.9 L) water, 1 pint (0.5 L) distilled
vinegar, and 1 tablespoon (30 ml) sugar. Seal jars tightly and store in a cool, dark place (Long et
al., 1982).
Pickled sturgeon, pike, pickerel, salmon, herring, trout, and other fish
Ingredients
Ten pounds (4.5 kg) fish, ½ pound (227 g) lemon slices, ½ pound (227 g) sliced onions, 1 ounce
(28 g) whole black peppers, ½ ounce (14 g) whole cloves, 1 quart (946 ml) white wine, 1 quart
(946 ml) distilled vinegar, 1 pint (0.5 L) water, ¼ ounce (7 g) rosemary.
Procedure
Wash fish well and cut into small, 2-4 ounce (57-113 g), individual serving size portions. Dredge
pieces in fine salt and store for 1-3 h. Rinse off salt, dry the pieces, and brush with cooking oil.
Broil the pieces over a hot fire until both sides are light brown, brushing with cooking oil during
the process. Cool fish and pack in glass containers with 1-2 slices of lemon, bay leaves, onion,
and a scattering of rosemary, whole black peppers, and whole cloves between layers of fish. Fill
jars with a marinade made of white wine, vinegar and water, and seal immediately. Store in a
dry, cool place (Jarvis, 1987).
Rollmops
Ingredients
10 pounds (4.5 kg) salt herring, 4 ounces (113 g) chopped onions, 2½ ounces (71 g) sugar, ¼
ounce (7 g) whole cloves, ¼ ounce (7 g) mustard seed, ¼ ounce 7 g) chili peppers, 1/8 (4 g)
ounce bay leaves, 1/8 ounce (4 g) whole black peppers, 1/8 ounce (4 g) whole white peppers, ¼
ounce (7 g) whole allspice, 1/16 ounce (2 g) powdered nutmeg, 1/16 ounce (2 g) cracked
cinnamon, 1/16 ounce (2 g) cracked ginger, 1/16 ounce (2 g) crushed cardamom, 2 quarts (1.89
L) distilled vinegar (5% acidity), 8 quarts (7.57 L) dill pickles.
Procedure
Put the bay leaves and chili peppers in a small cloth bag so they can be easily separated for later
use. Place this bag together with the balance of the spices and ¾ quart (710 ml) of the vinegar in
a covered receptacle. Bring to boil and allow to simmer for 1½-2 h. Violent boiling causes loss
of the volatile acetic acid. A very simple way is to put the spices in a common fruit jar and place
in boiling water for 2 h. Allow to stand 1-2 weeks after boiling to ensure still greater extraction
of the spicing materials. Remove the chili peppers and bay leaves, which will be used for
decorative purposes. Strain the pickle through a cloth bag to remove the spices. These should be
well mixed, ready for adding to the jars before packing. Slightly less than ¾ quart (710 ml) of the
pickle will be obtained.
Preparation of the fish
Remove heads, scale, and wash. Split into 2 fillets and trim. Freshen 2½ h in running water, and
then drain. Ten pounds (4.5 kg) of medium size herring should give about 6 pounds (2.7 kg)
drained weight.
Preliminary vinegar cure
Pack the fillets skin down in a stone crock. Cover with 1¼ quart (1.18 L) of vinegar. If
necessary, put a lightweight on top to keep the fillets well covered. Allow to cure in a cool place
for 40-48 h. Remove and drain. The vinegar should now test about 2% acid and show a salimeter
reading of about 30º. The fish have absorbed much of the acid and have lost some salt.
Packing
Cut each dill pickle lengthwise into 4 parts, then each of these across the center, making 8 pieces
in all.
Roll the fillets around a piece of pickle and fasten with a fresh clove. A clove serves the purpose
just as well as a toothpick and adds to the attractiveness of the pack.
Place 1 teaspoon (10 ml) of mixed used spices on the bottom of the jar, then pack the fish. With a
medium sized herring, 3 rolls will pack nicely into a No. 306 jar (6 fluid ounces [178 ml]
capacity) if placed on end. Decorate around the sides with a couple of chili peppers and a bay
leaf. Add sufficient pickle to fill (from 25 to 30 ml) (this is about equivalent to 2 level
tablespoonful). The net weight should be 5½ ounces (156 g) or over. Seal the jars immediately
after packing. Vacuum sealing is preferable.
Store is a cool place. Cold storage at about 1.7ºC (35ºF) is advisable to ensure longest
preservation.
Note: If vinegar-salt-cured herring are used, the preparation and preliminary vinegar-cure steps
will be unnecessary. (It is believed that a better product will be obtained if the vinegar-salt-cure
herring are used.) In this case, the spice-vinegar sauce should be diluted to 3% acidity and the
rollmops should be cured in the spice sauce for 10 d. They should then be repacked in jars with a
few spices and the jars filled with fresh 3% vinegar to which are added 2 tablespoons (59 ml)
sugar and 1 tablespoon (30 ml) salt per quart (946 ml). Store at 1.1-4.4ºC (34º-40ºF) (Long et al.,
1982).
Russian sardines
Ingredients
120 pounds (54.4 kg) fresh herring, 2 gallons (7.57 L) vinegar, 1.8 ounces (51 g) allspice, 1
ounce (28 g) bay leaves, 8 ounces (227 g) cloves, 8 ounces (227 g) ginger, 4 pounds (1.8 kg)
sliced onions, 2 pounds (0.9 kg) horseradish, 8 ounces (227 g) chili peppers, 8 ounces (227 g)
coriander seed, 2.5 ounces (71 g) capers.
Procedure
Pack fresh small herring (5-7 inches [12.7-17.8 cm]) in 90-100º salimeter brine as soon as
possible after catching. Hold in the brine about 10 d until they are thoroughly salt-cured or struck
through. After salting, remove heads, pulling out the viscera with the same stroke of the knife
without tearing the belly open. Wash in clean water and place on wire trays for draining. Allow
to drain for several h. Sort for size and pack each size separately in small kegs holding about 7
pounds (3.2 kg) of fish. For packing, mix all spices and flavorings together. Scatter a thin layer
of these ingredients in the bottom of the keg and a layer of herring with backs up. Lightly press
down layer, scatter another thin layer of spice ingredients over fish, and add a little vinegar.
Repeat this process until keg is filled. Pour in as much vinegar as the keg will hold and head up
the keg. The fish is ready for the market in from 4-5 d (summer) to 3-4 weeks (winter).
Refrigerate at about 4.4ºC (40ºF) for a 1-year shelf life (Long et al., 1982).
Scandinavian anchovies
Use bristling or sprat (Clupea sprattus) in these products.
Formula 1
Cure 25-30 pounds (11.3-13.6 kg) of bristling for 12 h in brine made of 4½ pounds (2.0 kg) of
Liverpool salt and 7 quarts (6.62 L) of water. Drain the fish on a wire screen. Make up a spice
mixture with all spices well pulverized and the ingredients thoroughly blended: 2¼ pounds (1.0
kg) Luneberg salt, 3 ounces (85 g) black pepper, 3 ounces (85 g) allspice, 3 ounces (85 g) sugar,
½ ounce (14 g) cloves, ½ ounce (14 g) nutmeg, ½ ounce (14 g) cayenne.
Use half of the spice mixture and mix well with the sprats. Pack them in a large container and
cure for 14 d. Repack in individual containers in layers, bellies up. Scatter some of the remaining
spice mixture between each layer with pieces of chopped bay and cherry leaves. On the bottom
and top of each container, lay 2 whole bay leaves. The brine formed in the original spice cure is
filtered and used to fill the small containers after packing. During the first few d after the
containers are closed, roll them about and invert them at least every other day.
Tin containers are preferred to wooden kegs which are often leaky and the airtight seal of a tin
container permits a longer period of preservation.
Formula 2
For 40 pounds (18.1 kg) of bristling prepare the following spice mixture well pulverized and
thoroughly blended: 2¼ pounds (1 kg) Luneberg salt, 7 ounces (198 g) black pepper, 7 ounces
(198 g) allspice, 7 ounces (198 g) sugar, 1-1/8 ounce (32 g) cloves, 1-1/8 (32 g) ounce nutmeg,
1-1/8 ounce (32 g) Spanish hops.
Place fresh bristling in strong salt brine from 12-24 h. Drain on a screen, and pack in layers in
small kegs after being rolled in a spice-curing mixture. Scatter some of this mixture between the
layers of fish. At the top, bottom, and in the middle of the keg, lay several bay leaves. Pack the
kegs tightly and roll them about or invert them for 14 d. Repack the anchovies in tins in 14 d in
summer or after 4-8 weeks in winter.
Formula 3
Wash brine-salted bristling in light brine testing 40º salimeter. Drain and pack loosely in new
barrels with some of the following spice mixture scattered between each layer of fish. This
quantity of spice mixture is for 1 barrel original weight: 2 pounds (0.9 kg) black peppers, 1
pound (0.5 kg) allspice, 1½ pounds (0.7 kg) sugar (best raw), 1 pound (0.5 kg) sodium nitrate, 1
pound (0.5 kg) bay leaves, 6 ounces (170 g) Spanish hops, 2 ounces (57 g) mace, 2 ounces (57 g)
cloves, 2 ounces (57 g) cinnamon, 2 ounces (57 g) ginger.
Filter the brine used for washing and the original brine and pour into the barrels after filling.
Place the barrels in cool storage for several months for the fish to ripen or acquire and aromatic
flavor. Roll the barrels about daily or at the least, at intervals of 2-3 d. When the fish have
completely absorbed the spice flavor, repack in small individual containers, small kegs holding
about 7 pounds (3.2 kg), cans holding from 2-5 pounds(0.9-2.3), and glass jars. Filter the brine
used in curing and fill into the containers when they have been packed with fish. In summer
0.5% benzoic acid may be added to the brine (Long et al., 1982).
"Scotch-cured" herring
Do not wash herring, but "pip" them immediately after they are unloaded; i.e., remove the gills
and gib (gall, liver, intestines, etc.) by means of a small knife. After gutting, sort for size and
content of roe or milt. Sort for size as follows:
Table 1-6. Sizes for Scotch-cured herring.
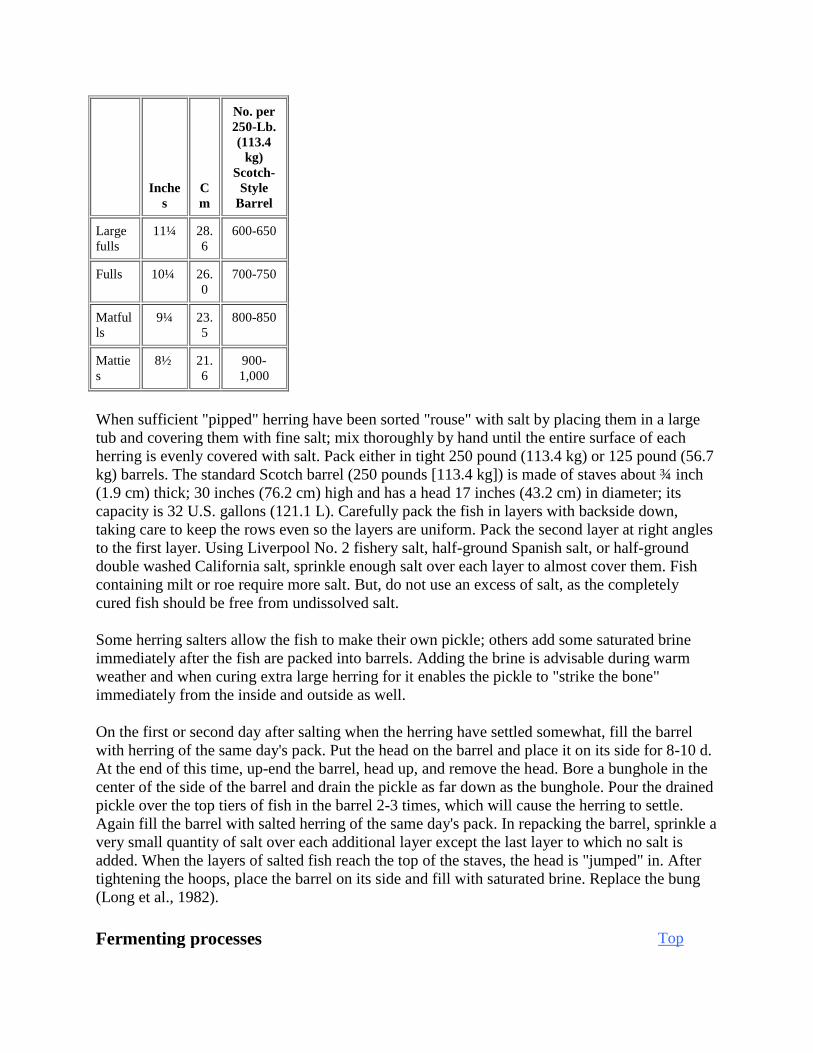
Inche
s C
m
No. per
250-Lb.
(113.4
kg)
Scotch-
Style
Barrel
Large
fulls 11¼ 28.
6 600-650
Fulls 10¼ 26.
0 700-750
Matful
ls 9¼ 23.
5 800-850
Mattie
s 8½ 21.
6 900-
1,000
When sufficient "pipped" herring have been sorted "rouse" with salt by placing them in a large
tub and covering them with fine salt; mix thoroughly by hand until the entire surface of each
herring is evenly covered with salt. Pack either in tight 250 pound (113.4 kg) or 125 pound (56.7
kg) barrels. The standard Scotch barrel (250 pounds [113.4 kg]) is made of staves about ¾ inch
(1.9 cm) thick; 30 inches (76.2 cm) high and has a head 17 inches (43.2 cm) in diameter; its
capacity is 32 U.S. gallons (121.1 L). Carefully pack the fish in layers with backside down,
taking care to keep the rows even so the layers are uniform. Pack the second layer at right angles
to the first layer. Using Liverpool No. 2 fishery salt, half-ground Spanish salt, or half-ground
double washed California salt, sprinkle enough salt over each layer to almost cover them. Fish
containing milt or roe require more salt. But, do not use an excess of salt, as the completely
cured fish should be free from undissolved salt.
Some herring salters allow the fish to make their own pickle; others add some saturated brine
immediately after the fish are packed into barrels. Adding the brine is advisable during warm
weather and when curing extra large herring for it enables the pickle to "strike the bone"
immediately from the inside and outside as well.
On the first or second day after salting when the herring have settled somewhat, fill the barrel
with herring of the same day's pack. Put the head on the barrel and place it on its side for 8-10 d.
At the end of this time, up-end the barrel, head up, and remove the head. Bore a bunghole in the
center of the side of the barrel and drain the pickle as far down as the bunghole. Pour the drained
pickle over the top tiers of fish in the barrel 2-3 times, which will cause the herring to settle.
Again fill the barrel with salted herring of the same day's pack. In repacking the barrel, sprinkle a
very small quantity of salt over each additional layer except the last layer to which no salt is
added. When the layers of salted fish reach the top of the staves, the head is "jumped" in. After
tightening the hoops, place the barrel on its side and fill with saturated brine. Replace the bung
(Long et al., 1982).
Fermenting processes Top
Ayu-sushi
Split bodies of ayu (Plecoglossus altivelis) at the ventral side and remove viscera, backbone, and
gills. Wash split bodies thoroughly and cure with about 30-35% salt by weight. Press cured fish
bodies under a weight for 10 d. Remove water, resalt, and store under a weight. Freshen cured
fish in freshwater for 10-18 h. Soak in vinegar for 15 min and cure for 10 d in a barrel alternating
layers of fish with boiled rice (Tanikawa et al., 1985).
Black fermented squid meat
Separate mantle from head and skin mantle with a knife. Split mantle and body into 2 layers and
cut each layer into strips. Mix strip meat with 2-4% of the black ink and liver and 20% salt by
weight in a barrel. Store the mixture for a week and stir 2-3 times a day Tanikawa et al., 1985).
Cured ayu in koji
Cure round ayu with about 20% good quality salt by weight for 1 d. Remove liquid and add 50-
60% koji by weight and ferment (Tanikawa et al., 1985).
Cured Atka mackerel or flat-fish
Remove head, viscera and fins. Cut fish bodies diagonally in small pieces about 1 cm thick.
Sprinkle boiled rice on the bottom of a barrel and alternate layers of finely cut vegetables and
desalted salmon, bamboo leaves, and rice. Koji may be added between layers of fish. The
amount of boiled rice is 30% of the weight of the fish and the amount of koji is 10-15% of the
weight of the fish. Store mixture under a weight for 30 d (Tanikawa et al., 1985).
Cured fermented ayu in sake-lees
Split ayu on the backside and remove viscera. Wash fish thoroughly and drain. Cure with 20%
salt by weight for 10 d. Wash fish with freshwater and cure (1:1) with sake-lees (Tanikawa et al.,
1985).
Cured fermented abalone in sake-lees
Remove meat from shell. Cure with 10% salt by weight for 1 d in a covered barrel with a weight
on top. Wash cured meat with dilute salt solution and drain. Cure drained meat (1:1) with sake-
lees for 20 d (Tanikawa et al., 1985).
Cured herring in koji
Soak dried herring in rice-washing water for 1 d. Cut fish into 6-7 cm long pieces. Sprinkle 2
parts salt and 1 part koji salt on the bottom of a barrel. Spread small cut pieces of radishes,
carrots or cabbage on the layer of salt and koji. Spread herring pieces in the layer of vegetables.
Use a ratio of 1:2 for herring and vegetables. Repeat the layers until barrel is full. The total
amount of salt is about 15-20% of the weight of the herring and vegetables. Cover, press with a
weight, and cure for 2 months (Tanikawa et al., 1985).
Cured herring in rice bran
For raw herring, head the herring and split the ventral side to remove viscera. Remove tail. Cure
dressed herring in 20-22% salt and 6% bran by weight. After 5 d, add 8% salt and 4% rice bran
again. Cover, add a weight on top, cover with parchment paper, and store.
For dried herring meat, soak in freshwater for 2-3 d. Wash thoroughly and drain. Make a paste of
rice bran and saturated salt solution and cure softened herring and rice bran paste in a barrel
(Tanikawa et al., 1985).
Cured mackerel in koji
Remove head from mackerel and split body at the backside to remove viscera and backbone.
Wash, drain, and cut into 4-6 pieces. Cure in about 20% salt by weight for 2-3 d. Remove liquid
and cure in 40-50% koji by weight saturated with "shoyu." Cover mixture and press under a
weight (Tanikawa et al., 1985).
Cured mackerel roe in koji
Remove roe from split mackerel and cure with 30% salt by weight under a weight for 2 d. Wash
roe thoroughly in freshwater and drain. Sprinkle koji in the bottom of a barrel and alternate
layers of roe and koji. The amount of koji is about 30-40% of the weight of the roe. Press under a
weight and cure for 4 d. Add rice-washing water and cure for 50 d total (Tanikawa et al., 1985).
Cured octopus or squid meat in koji
Split fresh octopus to remove viscera. Boil body and tentacles together in a dilute salt solution.
Cut body and tentacles into small pieces. Separate head and mantle. Boil mantle and cut into
small pieces. Cure pieces with salt and koji using 20-30% respectively of the weight of the fish
(Tanikawa et al., 1985).
Cured puffer fish meat in rice bran
Cure dressed puffer fish with 30-40% rice bran by weight in a barrel. Pour liberated liquid from
other salted fish into the barrel. Cover and place a weight on top. Cure for 4-5 years (Tanikawa et
al., 1985).
Cured puffer fish roe in rice bran
Wash roe thoroughly in freshwater and cure for 1 d. Dry on bamboo blind for 3-4 d. Cure half-
dried roe with 50% rice bran by weight in a barrel. Add liquid from other salt fish. Cure for 4-6
months (Tanikawa et al., 1985).
Cured salmon or cod meat in sake-lees
Cure salted salmon or cod fillet (1:1) with sake-lees (Tanikawa et al., 1985).
Cured salmon-"sushi"
Freshen hard-salted salmon in cold water and remove head and fins. Cut fish bodies diagonally
in small pieces about 1 cm thick. Sprinkle boiled rice on the bottom of a barrel and alternate
layers of finely cut vegetables and desalted salmon, bamboo leaves, and rice. Koji may be added
between layers of fish. The amount of boiled rice is 30% of the weight of the fish and the amount
of koji is 10-15% of the weight of the fish. Store mixture under a weight for 30 d (Tanikawa et
al., 1985).
Cured sardine in rice bran
Head and eviscerate sardines. Wash and drain bodies. Cure with 30% salt by weight for 1-3 d.
Wash with freshwater and dry outside for 1 d. Cure sardines in a barrel with rice bran (30-50%
by weight) and koji (15-25% by weight). Sprinkle rice bran and koji on the bottom, add a layer
of sardines, and pour about 150 ml of Japanese sake on the sardine layer. Repeat layers until
barrel is full, cover and place a weight on top. After 5 d, pour a saturated salt solution into the
barrel, cover and place a weight on top. Cure for about 4 months (Tanikawa et al., 1985).
Cured sea bream in koji
Split fresh sea bream at the backside and wash thoroughly. Drain and cure with 20% salt by
weight. Slice salted fish in 1 cm thick pieces. Cure in 30-40% koji by weight (Tanikawa et al.,
1985).
Cured squid meat
Remove head with viscera from the mantle. Wash mantle thoroughly and boil in dilute salt
solution. Remove skin from mantle. Cure mantle with 15-20% salt by weight for several d.
Freshen mantle moderately in freshwater. Sprinkle boiled, cooled rice on the bottom of a barrel
and alternate layers of mantle, cut vegetables, "koji," and rice. Cover last layer of rice with
parchment paper, press mixture with a weight, and ferment for 20-30 d (Tanikawa et al., 1985).
Fermented ayu milt
Mix 1 part ayu milt with 0.3 parts good quality salt in a barrel. Stir the mixture several times
each day (Tanikawa et al., 1985).
Fermented ayu roe
Mix 1 part ayu roe with 0.3 parts good quality salt in a barrel. Stir the mixture several times each
day (Tanikawa et al., 1985).
Fermented bonito meat
Mix cut meat of low-fat bonito with 20-30% salt by weight and ferment (Tanikawa et al., 1985).
Fermented bonito stomach
Split stomach with a knife and remove the contents. Soak in freshwater to remove fatty
substances and other materials. The stomach may be cut in 3 cm pieces. Drain and place in a
barrel with 20-30% salt by weight. Stir mixture 2-3 times a day during the first week and then
once per day. Remove water liberated from the viscera and ferment (Tanikawa et al., 1985).
Fermented bonito viscera
Remove gall bladder from viscera of bonito. Split pyloric appendage and alimentary canal with a
knife and remove the contents. Soak viscera in freshwater to remove fatty substances and other
materials. The viscera may be cut in 3 cm pieces. Drain and place viscera in a barrel with 20-
30% salt by weight. Stir mixture 2-3 times a day during the first week and then once per day.
Remove water liberated from the viscera and ferment (Tanikawa et al., 1985).
Fermented meat and viscera of ayu
Remove head and fins from ayu. Cut body finely. Remove viscera from body, wash thoroughly
with freshwater to remove the contents of the alimentary canal, and cut finely. Cut body finely.
Mix 1 part body meat and viscera with 0.3 parts good quality salt in a barrel. Stir the mixture
several times each day (Tanikawa et al., 1985).
Fermented mixture of ayu roe and milt
Mix 1 part ayu roe and milt with 0.3 parts good quality salt in a barrel. Stir the mixture several
times each day (Tanikawa et al., 1985).
Fermented sea-cucumber viscera
Split sea cucumber at the ventral side and remove viscera. Remove yellowish respiratory organ
from viscera with a knife. Wash viscera thoroughly in seawater squeeze out the contents of the
alimentary canal without breaking the canal. Drain the washed viscera in a bamboo basket with
the addition of 1/3 of the total amount of fine ground salt. After draining, add the remaining 2/3
of the salt. The total amount of salt used is 10-15% of the weight of the raw viscera. Stir the
mixture frequently for 5½ h. When the drained water stops dripping, put the mixture into a barrel
and cover with a lid. Continue stirring for a week during storage (Tanikawa et al., 1985).
Fermented viscera of ayu
Remove viscera from body of ayu and wash thoroughly with freshwater to remove the contents
of the alimentary canal. Mix 1 part ayu viscera with 0.3 parts good quality salt in a barrel. Stir
the mixture several times each day (Tanikawa et al., 1985).
Fermented "sushi"
Remove viscera from fish and cure with 20-30% by weight of salt. Store under a weight for 1-2
months. Freshen the fish in freshwater and drain. Sprinkle boiled rice and koji on the bottom of a
barrel and then alternate layers of desalted fish bodies and boiled rice and koji. The amount of
boiled rice is about 40-50% of the fish weight and the amount of koji is about 20-25% of the fish
weight. Press filled barrel with a weight and ferment for 10 d to 2 months (Tanikawa et al.,
1985).
Liquid fermented sand fish (Arctoscopus japonicus) sauce
Remove head and fins with a knife and take out viscera. Wash fish body thoroughly with
freshwater and drain. Cure fish body with salt and koji in a barrel and press mixture under a
weight. Store in a cold place for about 1 year. After a year, store with occasional mixing for
about 6 months without a weight. After fermentation is complete, filter the mixture, boil, and
store. Filter the liquid again before bottling for sale (Tanikawa et al., 1985).
Ordinary fermented squid meat
Split the belly side of the mantle with a knife. Remove ink sac and liver without damage.
Separate mantle and head and thoroughly wash in dilute salt solution. Drain and cut mantle in
rectangular strips (3-4 cm x 0.5 cm) by hand or machine. Split head at the central line to remove
jaws and eyes. Rub head with salt by hand to remove horny rings in the suckers. Cut head in 2-3
cm lengths at right angles to the podium.
Mix together 100 parts of meat strips, 4-8 parts liver, and 20 parts salt in summer (15 parts salt in
winter) in a barrel and store. Stir the mixture 2-3 times a day during the first week, then seal the
barrel tightly and store (Tanikawa et al., 1985).
Pasty fermented sea urchin
Split shell with a hammer; remove reproductive organs and place in a small tub or open bamboo
basket. Shake container slowly in a water tank to wash the organs. Remove floating extraneous
material. Drain organs and spread over a dressing table sprinkled with salt. Cover organs with
salt using about 20-30% salt by weight. Drain organs on a bamboo blind for several h. Place
drained organs in a barrel or container closed with a lid. Before sale, knead carefully with a
bamboo spatula or in a mixer. Season with sugar, sake-lees or sweet sake and continue
fermentation (Tanikawa et al., 1985).
Pulpy fermented sea urchin
Split the shell and remove reproductive organs. Wash organs with diluted alcohol and drain. Mix
organs with 25-30% salt by weight. Store in a cold place (Tanikawa et al., 1985).
Red fermented squid meat
Remove the head from the mantle and cut into small pieces. Mix cut meat with 2-4% liver and
20% salt by weight and ferment for 1 week (Tanikawa et al., 1985).
Watery fermented sea urchin
Split sea urchin shell in two at the equatorial line with a knife. Remove the yellow ovary or
yellowish white testes and body fluid and place in a small wooden tub. Carefully remove pieces
of spines, blood vessels, and extraneous material. Add salt to each layer of roe spread on the
bottom of the tub. The total amount of salt added is 30-40% by weight. Close tub tightly and
store in a cool place to ferment slowly (Tanikawa et al., 1985).
White fermented squid meat
Skin mantle cartilage and cut into strips. Cure with salt and a small amount of liver (Tanikawa et
al., 1985).
Salting processes Top
Alaska Scotch-cure herring
Gut fish by sticking a knife through the gills, just under the gill cover, and twisting the knife
upward and outward. If properly done, this removes the throat and pectoral fins with the main
gut, heart, liver and gills. Mix fish with salt so that every part of the herring contacts the salt.
Shake the fish gently to remove excess salt and pack backside down in a barrel, sprinkling salt
over each layer. Use about 1 part salt to 3 parts herring. Place cover on barrel, lay barrels on their
side, and fill with saturated brine through a hole bored in the bilge. Cure for 10-14 d, rolling
barrels halfway round occasionally. To refill barrels, set the barrels on end, remove the head, and
allow the pickle to drain out. Fill barrel with herring of the same day's cure, scattering a little salt
between layers. Fill the barrel with 80-100° salimeter brine and store under refrigeration (Jarvis,
1987).
Anchovies, Spanish style
Gut and head freshly caught fish. Drop anchovies in ¾ or ½ ground salt and thoroughly mix.
Pack in salting tanks or large butts. Use 25-30 pounds (11.3-13.6) of salt per 100 (45.4 kg)
pounds of fish.
Hold tanks at 26.7-32.2ºC (80-90°F) for about 4 months. The anchovies are ready when the flesh
is red from skin to backbone and has a strong, sharp flavor.
Remove anchovies from tank, drain, and pack in round tins holding 8, 14, or 28 pounds (3.6, 6.4,
or 12.7 kg). Press fish to remove excess moisture and oil. Seal cans and store (Jarvis, 1987).
Appetitslid
Head and fillet large anchovies cured according to the process described under "Scandinavian
anchovies, Formula 3." Pack the fillets into oblong flat cans flesh side up, with a bay leaf and a
thin slice of lemon in each can. Pour filtered curing brine into the cans and seal. Store at 4.4ºC
(40° F) (Jarvis, 1987).
Brine packed cod
Dress, split and wash fish. Scatter salt on the bottom of a barrel. Rub salt into the flesh of the fish
and pack flesh side up. Scatter salt over each layer. Pack the top layer skin side up. Use about 35
pounds (15.9 kg) of salt for 100 pounds (45.4 kg) of fish. Cover and place a weight on top. Cure
for at least a week (Jarvis, 1987).
Brine-salted mackerel
Split fish down the back as close to the backbone as possible, and on the left side. This allows
the fish to lie flat after the viscera are removed. Remove viscera and gills. Wash in clean salt
water and remove all traces of blood. Soak for no more than 2 h in freshwater to remove blood.
Change the water 3 times for each batch of fish. Rinse and drain fish. Scatter salt on the bottom
of a barrel. Rub fish in salt and pack in a circular fashion with the tails toward the center of the
barrel. Pack the first 2-3 layers with skin side down and the remaining layers flesh side down.
Scatter a thin layer of salt between layers. Put head on barrel and fill with 90-100° salimeter
brine through a bunghole in the side. Cure in a cool place for 10-12 d. Before shipping, empty
barrels, cull and grade fish, and repack in barrels. Scatter salt on the bottom and between each
layer of fish. Pack the first 2 layers skin side down and the remaining layers skin side up. Use
about 36 pounds (16.3 kg) of salt in repacking each 200 pounds (90.7 kg) of cured mackerel. Fill
barrels with at least 95° salimeter brine (Jarvis, 1987).
Brine-salted mullet
Rinse fish thoroughly and remove head. Split down the back from head to tail so fish will lay flat
in 1 piece. Make a cut under the backbone to aid in salt penetration. On fish weighing more than
1 pound (0.5 kg), remove about 3/5 of the backbone, leaving only the tail section in the flesh. On
larger mullet, score the flesh to a depth of about ½ inch (1.3 cm) in lines parallel to the
backbone. Eviscerate and remove black membrane lining belly. Trim and wash in clean seawater
or in 50° salimeter brine. Soak fish in brine from 30 min to an h to remove diffused blood. Drain
for about 10 min and salt in vats or barrels. Scatter a thin layer of salt on the bottom. Dredge fish
in salt and rub salt into the flesh and cuts made on the surface. Use about 1 part salt per 3 parts
fish. For large and fat mullet, use about 1 part salt per 2 parts fish. Lay fish in container skin side
down and sprinkle salt over each layer. Each layer is laid at right angles to the preceding layer.
Pack the last layer skin side up. Cover and place a weight on top. Cure for 72 h for smaller fish
to 10 d for large fish. Before shipping, remove fish from containers and scrub in clear brine to
remove slime, undissolved salt and extraneous material. Drain 1-2 h and repack flesh side up,
scattering salt over each layer, and packing each layer at right angles to the previous layer. Use
about 10 pounds (4.5 kg) of salt per 100 pounds (45.4 kg) of fish. Fill container with 90-95°
salimeter brine seal and store at 4.4ºC (40° F) (Jarvis, 1987).
Brine-salted sablefish
Cut head off of fish, retaining the collarbones. Split open belly and remove viscera. Split fish
into 2 sides and remove backbone. Wash thoroughly and drain. Scatter salt on the bottom of the
container. Dredge fish in salt and pack flesh side up. Pack each layer at right angles to the
previous layer. Scatter salt over each layer until no flesh is exposed. Pack top layer skin side up.
Use about 40 pounds (18.1 kg) of salt per 100 pounds (45.4 kg) of fish. Cover container and
place a weight on top. Cure for about 3 weeks. Before shipping, remove fish from containers and
scrub in brine to remove slime, dirt, and excess salt. Repack scattering salt over each layer, using
about 15 pounds (6.8 kg) of salt to a barrel. Fill container with 90-95° salimeter brine (Jarvis,
1987).
Brine-salted salmon roe
Soak lobes of roe in a saturated salt solution with frequent stirring. Pack salted lobes of roe in a
box and sprinkle with 3% salt by weight of the raw roe (Tanikawa et al., 1985).
Caviar, cod
Free fresh cod roe from all bits of gall bags or viscera, discarding any bloody or dark roe. Mix
roe with 20% salt by weight and pack into barrels. Fill barrels with 80° salimeter brine. Cure
until salt has penetrated entirely through the roe. Drain the roe and soak in running freshwater for
6-10 h to remove excess salt. Grind roe and mix with water, or rub roe through a sieve, to
remove membrane. Soak in a solution of 98 L of water and 2.2 kg sodium carbonate for 15 h. Fill
roe into a bag and hang to drain. While in bag, wash roe several times in freshwater. Add 1.5 kg
pulverized gelatin soaked in 80 L water to 78 L hot water and stir until gelatin dissolves. When
the temperature cools to below 25° C (77ºF), add 1 kg sodium benzoate and 400 g black dye.
Pour enough of this solution over roe to cover, mix thoroughly, and allow to stand 6 h. Remove
caviar from solution. Cover grated lemon peel with 60% grain alcohol and let stand for 10 d.
Filter solution and mix a small amount of the extract with the caviar to taste. Pulverize 500 g
each of cloves, allspice, and coriander with 250 g each of mace and ginger. Cover with 25 L of
30% alcohol for several d. Filter extract and add a small amount to the caviar to taste. Pack in
small vacuum-sealed jars or cans and store refrigerated (Jarvis, 1987).
Caviar, fresh grain, Russian
Remove sturgeon roe by splitting the belly. Rub roe carefully through a coarse mesh screen over
a tub. After collecting all eggs, dry salt using 1 pound (0.5 kg) salt per 9 pounds (4.1 kg) roe.
Mix salt and roe thoroughly and gently for 5-8 min. Place roe on a fine mesh screen to drain.
Pack in containers and store at 5-8.1ºC (41-46.5° F) (Long et al., 1982).
Caviar, grain in barrels (Russia)
Split open sturgeon belly and remove roe. Rub roe through a metal sieve that has a mesh large
enough to permit the eggs to pass through without breaking, but will retain membranes. Wash
eggs in a pan with a perforated bottom and force water from the bottom of the pan up through the
eggs, carrying off waste materials. Drain. Shake salt, and preservatives if used, over eggs
through a 1 mm mesh sieve. Carefully mix eggs and salt by hand for 5-8 min. Stop salting when
the maximum amount of moisture has been formed, but before any appreciable amount of
soluble protein is extracted. Use about 3-5% salt by weight. Drain for 2-4 h. Pack caviar into
barrels lined with linen cloth or parchment paper. Allow barrels to stand in chill storage 24-48 h
to allow caviar to settle. Fill and head barrels. Store under refrigeration (Jarvis, 1987).
Caviar, lake whitefish
Flush lake whitefish (Coregonus clupeaformis) roe sacs with a low-pressure spray of cold water
or by immersing briefly in continuously changing cold water. Press roe through a 7 mm mesh-
separating screen to separate individual eggs. Wash eggs using 8 parts water to 1 part roe in
clean cold chlorinated water. Stir the roe, allow to settle, and decant off water. Repeat until
decanted water is clear. Pass roe through 2.5 mm mesh intermediate separating screen to remove
scales and remaining roe sac membrane. Drain roe on a 950 micron mesh dewatering screen for
about 1 h, under refrigeration and covered with plastic film Thoroughly mix salt and roe to give a
final salt concentration of 5-10% salt. Transfer salted roe to dewatering screen to cure. Pack in
airtight containers with the container lid in direct contact with the surface of the salted roe. Store
at -4° to 4°C (24.8-39.2ºF) depending on salt content (Iredale and York, 1983).
Caviar, lumpfish
Lumpfish caviar with the following salt-pH combinations effectively inhibited C. botulinum
growth and toxin formation at abusive temperature (30°C [86°F]) during 4 weeks of storage:
Water phase salt >3.95%, aw <0.978, pH <5.2
Water phase salt >4.67%, aw <0.974, pH <5.6
Water phase salt >5.56%, aw <0.968
pH <5.0
(Hauschild and Hilsheimer, 1979)
Caviar, pickled grainy
Remove sturgeon roe by splitting the belly. Rub roe carefully through a coarse mesh screen over
a tub. After collecting all eggs, pour a saturated salt solution over the roe. Stir mixture until the
individual eggs make a slight "bumping" sound. Drain roe on a screen. Pack into containers
(Long et al., 1982).
Caviar, pressed (Russia)
Split open belly and remove roe. Rub roe through a metal sieve that has a mesh large enough to
permit the eggs to pass through without breaking, but will retain membranes. Place eggs in a
strong brine (density 1.192 at 40° C [104ºF]). Use 4-5 times as much brine as eggs and place a
thin layer of salt crystals on the bottom of the tank. Stir gently for 2-2½ min. Scoop caviar up in
a sieve and pack in a long linen bag. Place bag under a press and press until desired consistency
is obtained. Allow caviar to stand 2-3 h. Pack pressed caviar in lined barrels or in hermetically
sealed cans. Store under refrigeration (Jarvis, 1987).
Caviar, salmon
Split egg sac and rub over a ½ inch (1.3 cm) mesh screen. Cure 15-30 min in a 90° salimeter
brine, stirring occasionally. Drain overnight to 12 h. Pack in small kegs lined with parchment
paper and allow kegs to stand until eggs settle. Fill headspace, head kegs, and store at 1.1-2.2ºC
(34-36° F). Repack into 2-4 ounce (59-118 ml) jars and store at -1.7 to 4.4ºC (29° to 40° F)
(Jarvis, 1987).
Caviar, salmon Russian method
Slit roe sacs and rub over a screen to separate eggs from membrane. Mix eggs in a concentrated
brine (sp. gr. 1.200), previously boiled and cooled to 13-18° C (55.4-64.6° F). Use 3 parts brine
to 1-part eggs. Brine from 8-14 min. Drain for 12 h. Add dry borax and urotropin and mix
thoroughly. Add a small amount of olive or cottonseed oil. Pack in barrels coated inside with a
mixture of paraffin and wax and lined with parchment soaked in concentrated brine and cotton
cloth impregnated with vegetable oil. Store under refrigeration (Jarvis, 1987).
Caviar, sturgeon (U.S.)
Slit egg sack carefully so that individual eggs are not damaged. Rub portions of the roe through a
¼ inch (0.6 cm) wire mesh screen. Separate foreign material from the eggs. Sift ½ pound (227 g)
mild-cure or packers fine salt over each 12½ pounds (5.7 kg) of roe. Thoroughly mix eggs and
salt by hand 5-8 min until foam or slime appears on the top of the egg mass. Allow mass to stand
about 10 min. Mix again until a slight noise (small pieces of glass rubbing against each other) is
perceptible when the mass is stirred. Drain eggs in 1/32 inch (1 mm) mesh trays for 2-4 h. Pack
caviar into small kegs, wooden tubs, or large tin cans with tight fitting covers. Allow the
containers to set in a cool place for a few d until the caviar has settled. Fill headspace with
additional caviar so that no air space is left and place lid tightly on container. Store at 1.1-2.2ºC
(34-36° F) (Jarvis, 1987).
Caviar, sturgeon in jars (Russia)
Split open belly and remove roe. Rub roe through a metal sieve that has a mesh large enough to
permit the eggs to pass through without breaking, but will retain membranes. Wash eggs in a pan
with a perforated bottom and force water from the bottom of the pan up through the eggs,
carrying off waste materials. Drain. Shake salt, and preservatives if used, over eggs through a 1
mm mesh sieve. Carefully mix eggs and salt by hand for 2-3 min and drain. Stop salting when
the maximum amount of moisture has been formed, but before any appreciable amount of
soluble protein is extracted. Use about 3-5% salt by weight. Pack caviar into jars, slightly
overfilling the jars, and press on covers. Allow containers to stand for about 1 h to allow
additional free liquid to run off. Force covers completely down, leaving no air between the caviar
and the cover. Wipe jars clean and seal cover/body juncture with a rubber band. Store under
refrigeration (Jarvis, 1987).
Corned herring
Wash herring in wire-mesh drum to remove scales. Cut off head, gills, viscera, and belly flaps.
Wash in a tank for about 10 min with stirring. Cure in a 95-98° salimeter brine for 12-48 h. Drain
5-24 h and pack in baskets (Jarvis, 1987).
Dry-salted mullet roe
Clean roe from blood, gall bags, bits of intestines, and black skin. Wash thoroughly and drain.
Roll roe in fine salt, using about 2 pounds (0.9 kg) of salt per 10 pounds (4.5 kg) of roe. Pack in
tubs or boxes with a scattering of salt over each layer and cure for at least 48 h. Store under
refrigeration (Jarvis, 1987).
Dry-salted salmon roe
Wash lobes of roe in water to remove blood and extraneous material. Use 12% salt by weight.
Sprinkle salt over each layer of roe and cure for 1 week. Turn lobes of roe over and sprinkle with
3% salt by weight (Tanikawa et al., 1985).
Dry-salted sardines and saury
Dry-salt sardines and saury using 20% salt by weight of the raw fish (Tanikawa et al., 1985).
Hard salted salmon I
Split salmon along the belly side and remove viscera. Remove kidney with a knife and brush.
Clean thoroughly with freshwater and drain. Sprinkle salt on straw mats. Alternate layers of fish
and salt until pile reaches 1 meter in height. Use 30-40% salt by weight of the fish. Cover with
straw mats and cure for 10 d. Wash and scrub fish in dilute brine and pack in wooden boxes with
salt added between each 2 layers 7.5 kg salt per 48.6 kg weight of box contents (Tanikawa et al.,
1985).
Hard-salted salmon II
Wash, slime, and head fish without removing the napes or collarbone. Split the fish into 2 fillets.
Scrape out blood clots and kidneys, and remove membranes, loose bones or other extraneous
material. Carefully scrub the fish thoroughly inside and out, wash, and drain. Scatter salt on the
bottom of the salting container. Pack layers of fish flesh side up, scattering salt between layers to
cover each fish completely with salt. Fill the container above the top to allow for shrinkage and
pack the top layer skin side up. Use 25-30 pounds (11.3-13.6 kg) of salt per 100 pounds (45.4 kg)
of fish. Cover the fish and place a weight on top. Cure 10-14 d. For repacking, wash the fish in
brine and scrub well. Repack into a barrel, sprinkling a liberal amount of salt at the ends and only
a little between layers. Seal barrels and fill with a saturated salt solution (Jarvis, 1987).
Matje cure herring
Gut fish, dredge in salt, and shake to remove excess salt and pack in barrels. Use about 1 part salt
to 6 parts fish. Pour a water bucket full of about 90° salimeter brine into the barrel. Let barrels
stand on end for 2 nights, pour off some of the brine, and refill with fish. Seal barrels, fill with
brine and store under refrigeration (Jarvis, 1987).
Mild cure salmon
Remove head, leaving as much as possible of the bony structure just above and below the gills.
Score the fish with 3-4 cuts, just through the skin, along the lateral line. Split the fish down the
belly to the vent and remove viscera and most of the belly membranes. Cut on either side of the
kidney and scrape away the kidney as completely as possible. Split fillets away from backbone.
Wash thoroughly in cold water and trim off blood clots, loose membranes and fragments of
bone. Gently squeeze out blood remaining in veins along abdominal cavity. Soak the sides in ice
water or iced brine for ½-2 h and drain. Place each side of salmon in a salt box, skin side down,
and scoop salt over the side. Pick up the side by the tips and allow excess salt to fall back into the
box. Pack the sides, skin side down, in large barrels (tierces) after throwing a few handfuls of salt
in the bottom of the barrel. Scatter a little salt over each layer and lay each layer at right angles to
the previous layer. Pack the top layer skin side up. Use 85-120 pounds (38.6-45.4 kg) of salt to
each 800-900 pounds (362.9-408.2 kg) of fish (tierce). The barrel can be filled with 90-95°
salimeter brine or held for 24-48 h and then filled with saturated brine. Seal barrels and cure at 0-
1.1ºC (32-34° F) for 20-90 d. Keep barrels full during the curing time. After curing, remove
salmon sides from barrels, wash the sides, and weigh and grade the sides. Repack the sides in
barrels, seal the barrels, and fill with ice cold 90-95° salimeter brine. Store at -2.2 to 1.1ºC (28-
34° F) (Jarvis, 1987).
Norwegian-cure herring
Remove a small triangular piece, including the pectoral fins and heart, from the herring with a
scissors. Remove gills from full or spawning fish. Scatter salt on the bottom of a barrel and pack
the fish on their backs, scattering a thin layer of salt between fish and between layers. Use about
1 part salt to 3 parts fish. Pack the uppermost layers with backs up. Either add 2 gallons (7.57 L)
saturated brine to each barrel and seal or wait 1 d and fill the space created by shrinkage with
additional fish. Cure 10-14 d. To repack, drain and save some of the brine, add additional fish
from the same day's cure to fill the container, scattering salt between layers, seal the barrels, and
fill with strained original brine (Jarvis, 1987).
Round cure herring
Wash fish to remove scales, blood, slime, and extraneous material. Drain and pack in vats or
tanks. Mix 200 pounds (90.7 kg) of fish thoroughly with 60-80 pounds (27.2-36.3 kg) of salt and
cover with saturated brine. Cure 8-10 d. Before shipping, remove fish from containers and drain
for several h. Repack in barrels, placing the fish belly side up and laying each layer at a right
angle to the previous layer. Scatter salt between the fish and over each layer. Pack the top layer
back sides up. Seal barrel and fill with 100° salimeter brine through bunghole (Jarvis, 1987).
Salted Atka Mackerel
Split the belly of the fish and remove viscera. Soak in freshwater or dilute brine for 1 h. Remove
kidney, wash thoroughly, and drain. Dry salt with 15-20% salt by weight. Scatter salt on the
bottom of a barrel. Rub salt inside belly cavity and head, and lay fish close together in the barrel.
Sprinkle salt over the layer and add the next layer crosswise to the previous one. Cover and put a
weight on top. Cure in a cool place 10-14 d. After the preliminary cure, drain fish and resalt in a
separate barrel, using 10% salt by weight in the fall and winter and 15% in the spring and
summer (Tanikawa et al., 1985).
Salted cod or Alaska pollock roe
Wash lobes of roe carefully in freshwater. Cure with 15% salt by weight in a round tank by
sprinkling salt on the bottom and over each layer of roe. Cover and cure for 20 h. Wash off
excess salt, drain, and pack into small barrels (Tanikawa et al., 1985).
Salted cod tongues
Wash thoroughly in clean seawater and trim. Drain and mix with salt in barrels, using 25 pounds
(11.3 kg) of salt for 100 pounds (45.4 kg) of tongues. Cure for about 10 d. Rinse in light brine,
repack in barrels, and fill barrels with 100° salimeter brine (Jarvis, 1987).
Salted herring roe
Soak lobes of roe in a dilute salt solution 2-3 d, changing the solution once a day. Strip
membrane off of roe and soak in freshwater 2-3 d. Drain and cure in a small barrel using 10%
salt by weight for slack salting or 20% for hard salting. The layers of roe are packed about 6-9
cm higher than the top of the barrel. Place a lid on the barrel and a weight on top. When the
cover has sunk to the level of the rim, pour saturated salt into the barrel and seal (Tanikawa et al.,
1985).
Salted lake herring
Head and eviscerate fish. Wash thoroughly and drain. Rub fish with salt. Pack first layer back to
belly and remaining layers belly side up, scattering a thin layer of salt over each layer. Pack to a
level of 4 inches (10.2 cm) above the barrel top and cure 12-24 h. Cover barrel and cure 7-10 d.
Fill barrels with 100° salimeter brine and store refrigerated (Jarvis, 1987).
Salted jellyfish
Soak jellyfish in cold water for 8-10 h and drain. Rub surface with 20% by weight of a mixture
of salt (about 14 kg) and alum (about 75 g). Cure in a barrel 2-3 d. Wash and drain jellyfish. Add
a mixture of salt and alum (about 80% by weight of the original mixture added) and pack in
barrels (Tanikawa et al., 1985).
Salted mackerel fillets
Fillet fish and trim fillets. Soak in clean water for a short time to remove blood. Scatter salt on
the bottom of a barrel. Rub fillets in salt and pack in barrels, using about 30 pounds (13.6 kg) of
salt per barrel. Put head on barrel and fill with brine, and cure. Before shipping, empty barrels,
cull and sort for size, and repack in kegs or tubs (Jarvis, 1987).
Salted pressed pilchard
Salt pilchards (Sardinops caerulea) in the round in tanks using about 35 pounds (15.9 kg) of
California half-ground salt per 100 pounds (45.4 kg) of fish. Cure 3 weeks or longer. After
curing, drain the fish and wash off excess salt with brine. Pack drained pilchards in small tubs
with heads to the outside. Cover tubs and press out liquid with a jackscrew. About 200 pounds
(90.7 kg) of salted fish produce about 75 pounds (34 kg) of salted pressed pilchard (Jarvis,
1987).
Salted river herring
Wash herring in wire-mesh drum to remove scales. Cut off head, gills, viscera, and belly flaps.
Wash in a tank for about 10 min with stirring. Cure in a 95-98° salimeter brine for about 9 d,
stirring daily. Drain 4-7 d, and pack into barrels in wheel-like tiers with the first layer packed
backs down and the remaining layers with backs up. Scatter salt over each layer (Jarvis, 1987).
Salted salmon bellies
Cut off pectoral fins and remove head. Cut through belly behind gill flaps to backbone and then
backwards toward vent. Wash bellies in clear, cold water, or in iced brine. Salt as for "hard-
salted salmon II" (Jarvis, 1987).
Salted yellowtail
Split fish on belly side and remove viscera. On both sides, cut lines of notches from head to tail.
Wash fish thoroughly with freshwater, then with dilute brine, and drain. Rub salt in the belly
cavity, mouth, notches, and over all the surface of the fish. Use 2-2.8 kg salt per fish. Pile fish on
straw matting, cover with straw mats, and store for about 10 d. During storage, rotate fish from
top to bottom (Tanikawa et al., 1985).
Salting salmon
In dressing salmon for pickling, first remove the head; then split the fish along the back ending
the cut with a downward curve at the tail. Remove the viscera and 2/3 of the backbone; scrape
away the blood, gurry, and black stomach membrane. Thoroughly scrub and wash the dressed
fish in cold water. Place them in pickling butts with about 15 pounds (6.8 kg) of half-ground salt
to every 100 pounds (45.4 kg) fish. Lay fish in a tier, flesh side up, sprinkle salt evenly over each
tier and repeat until tank is full. Several boards are then laid across the fish with the boards
weighted down in order to keep the fish submerged in the pickle, which will form. Allow the fish
to stand in the pickle about 1 week, holding the brine at about 90º salimeter. Remove the fish
from the pickle, rub clean with a scrub brush, and repack in market barrels, using 1 sack of salt to
every 3 barrels of 200 pounds (90.7 kg) fish. About 40-52 red salmon, 25-35 coho salmon, 70-80
humpback salmon, 10-14 king salmon, and 25-30 dog salmon will be required to fill each when
packing a market barrel of dressed, salted salmon (Long et al., 1982).
Scotch cure herring
Gut fish by cutting from behind the pectoral fins upward to the gills. Stir fish and salt in a tub
until every fish is in contact with the salt. Shake fish to remove excess salt and pack in a barrel.
Fill the barrel to above the rim. On the following or second morning, fill barrel to the top with
additional fish from the same day's cure. Place cover on barrel and lay it on it's side for 8-10 d.
Bore a bunghole in the bilge, set the barrels on end, remove the head, and allow the pickle to
drain out. Fill barrel with herring of the same day's cure, scattering a little salt between layers.
Rinse the top layer of fish with a little clear brine and fill the barrel with a strong brine (Jarvis,
1987).
Slack-salted cod
Remove head from fish and eviscerate without splitting belly. Wash to remove blood and other
extraneous material and drain. Add salt to the belly cavity and rub salt on the surface. Use 12-
13% salt by weight of fish from October to November, 7-8% from December to February, and
15% from March to April. Pack in a box (Tanikawa et al., 1985).
Slack-salted herring
Wash fresh herring thoroughly. Scatter 10-20% salt by weight over fish on a concrete floor or
straw mat. Pack salted fish in flat wooden containers (Tanikawa et al., 1985).
Slack-salted salmon
Wash and head salmon. Split along belly and remove viscera. Clean thoroughly in freshwater
and drain. Salt belly cavities. Scatter salt over bottom of wooden box, add a layer of salmon
backside upward, and scatter salt over fish. Add layers of fish and salt until box is slightly
overfilled. Place lid on box and put a weight on top. When fish have been compressed below the
level of the side of the box, nail on cover and store under refrigeration. Use 20% salt by weight
of the raw fish. The ratio of salt put in the gill cavity and belly cavity to that which is added
between layers of fish is 3:7 (Tanikawa et al., 1985).
Slack-salted salmon eggs
Wash lobes of roe thoroughly in a freshwater tank. Rub roe through cotton gauze to separate
eggs from membrane and drain. Soak eggs in a saturated salt solution, containing an additional
3% salt by weight of the drained eggs, for 17-19 min. Remove eggs from brine and drain for 24
h. Pack in a barrel or box and store under refrigeration (Tanikawa et al., 1985).
Split cure herring

Soak fish in brine for a few min to set scales. Split herring down the belly to the vent. Remove
viscera and gills. Soak in salt water or light brine for 2-3 h to remove blood and slime, and drain.
Pack in large barrels, backside down, and fill belly cavities with salt. Scatter salt over each layer,
using 30-40 pounds (13.6-18.1 kg) of salt per 100 pounds (45.4 kg) of fish. Cure for about 1
week. Before shipping, remove fish from containers and drain for several h. Repack in barrels,
placing the fish belly side up and laying each layer at a right angle to the previous layer. Scatter
salt between the fish and over each layer. Pack the top layer back sides up. Seal barrel and fill
with 100° salimeter brine through bunghole (Jarvis, 1987).
References Top
21CFR114.90(a). 1997. Potentiometric method for the determination of pH. Title 21, part 114,
sec. 90(a), Code of Federal Regulations, U.S. Government Printing Office, Washington, DC.
21CFR114.90(b). 1997. Colorimetric methods for the determination of pH. Title 21, part 114,
sec. 90(b), Code of Federal Regulations, U.S. Government Printing Office, Washington, DC.
21CFR114.90(c). 1997. Titratable acidity. Title 21, part 114, sec. 90(c), Code of Federal
Regulations, U.S. Government Printing Office, Washington, DC.
AOAC. 1995a. pH of acidified foods. Sec. 42.1.04, Method 981.12. In Official Methods of
Analysis of AOAC International, 16th ed., P.A. Cunniff (Ed.), p. 2-4. AOAC International,
Gaithersburg, MD.
AOAC. 1995b. Salt (chlorine as sodium chloride) in seafood: Volumetric method. Sec. 35.1.18,
Method 937.09. In Official Methods of Analysis of AOAC International, 16th ed., P. Cunniff
(Ed.), p. 7. AOAC International, Gaithersburg, MD.
AOAC. 1995c. Salt (chlorine as sodium chloride) in seafood: Potentiometric method. Sec.
35.1.19, Method 976.18. In Official Methods of Analysis of AOAC International, 16th ed., P.
Cunniff (Ed.), p. 8. AOAC International, Gaithersburg, MD.
Corby, J. 1999. Personal communication, Director, Division of Food Safety and Inspection,
Department of Agriculture and Markets, State of New York, Albany, NY.
Decagon. 1997. AquaLab operator's manual, revision 2. Decagon Devices, Inc., Pullman, WA.
ETS. 1998. Instructions for Quantab® chloride titrators. Environmental Test Systems, Elkhart,
IN.
FDA. 2001a. Clostridium botulinum toxin formation. Ch. 13. In Fish and Fishery Products
Hazards and Controls Guidance, 3rd
ed., p. 167-190. Food and Drug Administration, Center for
Food Safety and Applied Nutrition, Office of Seafood, Washington, DC.
FDA. 2001b. Pathogen growth & toxin formation (other than Clostridium botulinum) as a result
of time/temperature abuse. Ch. 12. In Fish and Fishery Products Hazards and Controls
Guidance, 3rd
ed., p. 145-166. Food and Drug Administration, Center for Food Safety and
Applied Nutrition, Office of Seafood, Washington, DC.
Hauschild, A.H.W. and Hilsheimer, R. 1979. Effect of salt content and pH on toxigenesis by
Clostridium botulinum in caviar. J. Food Protect. 42(3):245-248.
Hilderbrand, K. S. 1992. Fish smoking procedures for forced convection smokehouses. Special
Report 887, Oregon State University Extension Service, Corvallis, OR.
Hilderbrand, K.S. 2000. Quick determination of water phase salt content of smoked fish,
Microwave Oven Procedure. ORESU-I-00-003 (was Special Report 883), Oregon State
University Extension Service, Corvallis, OR. Web:
http://seagrant.orst.edu/sgpubs/onlinepubs/QuickSalt.pdf (Acrobat Reader required)
Jarvis, N.R. 1987. Curing of Fishery Products. Teaparty Books, Kingston, MA.
Long, L., Komarik, S.L., and Tressler, D.K. 1982. Food Products Formulary, Volume 1: Meats,
Poultry, Fish, Shellfish, 2nd
ed. AVI Publishing Co., Westport, CT.
Tanikawa, E., Motohiro, T. and Akiba, M. 1985. Marine Products in Japan, revised ed. Koseisha
Koseikaku Co., Ltd., Tokyo.
Woyewoda, A.D., Shaw, S.J., Ke, P.J., and Burns, B.G. 1986a. Measurement of pH. In
Recommended Laboratory Methods for Assessment of Fish Quality. p. 1-5. Canadian Technical
Report of Fisheries and Aquatic Sciences No. 1448. Fisheries and Oceans, Halifax, Nova Scotia.
Woyewoda, A.D., Shaw, S.J., Ke, P.J., and Burns, B.G. 1986b. Salt content. In Recommended
Laboratory Methods for Assessment of Fish Quality. p. 28-31. Canadian Technical Report of
Fisheries and Aquatic Sciences No. 1448. Fisheries and Oceans, Halifax, Nova Scotia.
Woyewoda, A.D., Shaw, S.J., Ke, P.J., and Burns, B.G. 1986c. Moisture determination. In
Recommended Laboratory Methods for Assessment of Fish Quality. p. 6-8. Canadian Technical
Report of Fisheries and Aquatic Sciences No. 1448. Fisheries and Oceans, Halifax, Nova Scotia.