Embed Size (px)
Citation preview

IFMAP MANUAL CHAPTER 10 PAGE 1 02/27/12
Chapter 10 - Developing Treatments
Introduction
This chapter covers the methods used to develop and input Treatment proposals
into the database. At this point in the Inventory Year, Areas of Interest have
been identified, and all the available information and guidance has been
analyzed in preparation for drafting treatment prescriptions. Examiners or other
Co-Managers are now ready to develop treatments they plan to sponsor and
present at the Unit Pre-Review Meeting.
This chapter will also cover how to make modifications to proposals that are
given local approval at the Pre-Review and make final preparations for
presenting them at the Open House and Compartment Review.
This chapter is divided into 6 sections:
• Definition of terms
• Developing Treatment Proposals
• Editing the Treatment Boundary
• Creating “Out of YOE” Treatments
• After the Pre-Review Meeting
• Treatment Approval Status
Definition of terms
Treatment – Any commercial or non-commercial activity resulting from the
Compartment Review decision making process. Treatments usually originate
from AOIs, but can also come from ‘Disturbance’ features (to be discussed in
later chapters).
Treatments Layer (or Database) – Consists of the database records
(attributes) and the polygon(s) associated with each record. The layer displays
the polygon associated with the treatment, while the database contains the
details about that Treatment. While the layer shows up on the map, the
database shows up in the reports and attribute editor.
Treatment Sponsor – Just as with AOIs, all Treatments have sponsors.
These are the individuals that are directly responsible for developing the

IFMAP MANUAL CHAPTER 10 PAGE 2 02/27/12
treatment proposal. Co-Managers should agree who will be the Treatment
Sponsor. At a minimum, this includes the writing of the treatment prescription,
but could also include initiating the Forest Treatment Proposal (FTP), tracking the
Treatment status in the GDSE, closing the Treatment, and updating the
Inventory database. Local agreements clearly identify who will handle the
various steps of the Treatment Tracking process for the different Treatment
Types.
Treatment Approval Status – This is an attribute of each Treatment in the
database. It is used to describe the status of the development and
implementation of a Treatment. There are 13 different possible Approval
Status’s that describe the progress of a Treatment. Appendix F describes the
entire process in detail.
Treatment Sequence – In many cases a series of treatments is required to
achieve a cover type objective and associated silvicultural objective. For
example, to convert an old red pine sawlog AOI to a young jack pine AOI, the
Treatment Sequence may be ‘Harvest / Site Preparation / Planting / Stocking
Survey’. Each of these steps is an individual treatment; together they comprise
a treatment sequence.
Step – each treatment in a treatment sequence is considered a ‘step’. Activity
Tracking facilitates creation of next step treatments as well as mechanisms to
track whether a ‘next step’ is required to complete a sequence.
Developing Draft Treatment Proposals
During the Inventory Year, Treatments are derived from Areas of Interest (AOIs)
nominated following Stage 1, or those that are proposed at the Pre-Review
Meeting.
Treatment proposals are developed based upon analysis of field data that was
collected (Stage 1 and OFS), as well as other available data (GDSE data layers,
other relevant data, etc.), and considered in the context of guidance from the
Inventory Preview meeting, in the Eco-regional Plans, or other operational
guidance. These treatments are designed to further the desired management
goals and objectives that have been identified.

IFMAP MANUAL CHAPTER 10 PAGE 3 02/27/12
Each AOI has a “sponsor”, the DNR staff which determined an Area was “Of
Interest”. Unless other arrangements are made, this individual is responsible for
developing the Treatment Proposal.
Creating a Treatment
Step 1 - The Treatment Management Notes tool
The Treatment Management Notes tool is the primary mechanism for creating a
Treatment during the Inventory Year. Assuming the area proposed for
treatment is within the compartment boundary (if not, see “Out of YOE”
Treatments later in this chapter), and is already an AOI (if not, see chapter 9),
follow the steps below for adding a Treatment to a compartment:
• Start editing the Treatments layer
• In the Activity Tracking Toolkit,
click on the “Management Notes”
tool button.
• The Management Notes tool will open
up. Enter the FMU, YOE, and the
‘Type’ of Management Note (AOI,
Treatment, or Compartment Review).
In this case, the Type is ‘Treatment’.
• Next choose the Compartment you are
working with. If you are the
Examiner, pick your name in the
Examiner list.
• Next, click the “Add” button at the
bottom of the tool.
• Select the appropriate AOI. The rest
of the information in the first box will
be populated.
• Select ‘Apply Treatment’ Yes.
Selecting ‘No’ takes this AOI out of consideration.
• If a limiting factor is appropriate for this treatment, make sure the Site
Conditions layer is digitized and attributed correctly. See Chapter 16 for
digitizing instructions and Appendix O for a listing of Site Conditions.

IFMAP MANUAL CHAPTER 10 PAGE 4 02/27/12
Remember, placing a limiting factor on a harvest means that a harvest is
managerially desirable, but will likely not occur due to constraints –
limiting factors. When coding Treatments with a limiting factor/site
condition, add comments to
help clarify this decision.
• Indicate whether or not the
commercial harvest will cover
the entire AOI. Will you be
making spatial edits to the
boundary?
• Proceed to the “General” tab of
the interface below.
“General” Tab:
General information
outlines what is
proposed for the
treatment –type,
method, purpose, and
start date, as well as
the treatment’s
sponsor. Refer to the
“Treatment Type and
Treatment Method”
descriptions in
Appendix B for
guidance on which
Treatment Type and
Method should be
selected to describe
your Treatment.

IFMAP MANUAL CHAPTER 10 PAGE 5 02/27/12
Treatment Name: For the sake of labeling maps and developing
treatment reports, it is important to keep Treatment names as short as
possible. Be sure to maintain the necessary identifying characteristics
(e.g.-stand number and treatment type, such as “cut”), especially in the
case where multiple treatments are proposed for a single stand. Each
treatment in an FMU for a given YOE has to be unique, so even in
separate compartments, you can’t have the same treatment name (e.g.-
‘15-cut’). If prompted that a treatment already exists with the name you
choose, add the compartment to the name (e.g.- ‘124015-cut’).
Treatment Purpose: Identify the purpose that best describes what the
goal of this treatment is. It’s recognized that many treatments serve
multiple purposes. Use your judgment to choose the most appropriate
purpose for a treatment.
Proposed Start: The start date that is selected will determine which
Fiscal Year this treatment will be placed upon the Plan-of-Work. Note that
start date defaults to 10/1 of the current year of entry (e.g. 2007 YOE
compartments will default to 10/1/2006), but in this case a start date 5
years in the future was selected. If you are unsure when a treatment will
be implemented, just choose
the beginning of the YOE FY.
“Treatment Type” Tab:
Depending upon which “Treatment
Type” is chosen on the General
Tab, a second tab for that
Treatment Type will appear.
Harvests, Tree Planting, Tree
Seeding, Prescribed Burns, and
Pesticide Application all have
unique attributes to be coded on
this second tab. In each case,
completely fill out the information on
this tab to the best of your abilities.
If you are unsure of details for a
specific treatment (tree planting
‘spacing’ or pesticide application rates, for example) consult an appropriate
specialist. Remember, this is the initial prescription. As this treatment gets
Harvests, Tree Planting, Tree Seeding, Prescribed
Burns, and Pesticide Application all have unique
attributes to be coded on this second tab.
IFMAP MANUAL CHAPTER 10 PAGE 6 02/27/12
implemented, whoever is executing it will edit the data as necessary to reflect
what was done on the ground (actual pesticide application rate for example).
“Objectives & Prescription” Tab:
Comments are important to
capture the full intent of our
management decisions and
objectives. It’s unlikely that a
situation exists where
treatment prescriptions could
contain blank fields in the
Prescription Specifications. In
many cases, there are
important notes to capture in
the ‘Other Comments’, as well
as the “Recommended Next
Steps”. Always be sure to
include complete descriptions in
your comments. Don’t assume
you will be the only one
interpreting your comments, or
that others will know what you
mean. These comments will be
attached to the Treatment
Reports that are included in our Internet postings, so be aware of how broad
your audience is.
• Objectives
Short-Term Covertype: This field designates what the covertype
management objective is for this treatment area for the 10-year
treatment period. It is also the field that specifies what covertype is
acceptable when certifying that a stand is successfully regenerated.
Examiners should specify a covertype objective that is appropriately
specific. Realize that in some cases, a Level 4 covertype may be
overly specific for our management goals, while in others the detail of
a Level 4 call is necessarily appropriate. For example, in an aspen
regeneration harvest, any level 4 aspen type may be acceptable.
While in the case of natural pine, specifying the difference between
jack pine and red pine is necessary.

IFMAP MANUAL CHAPTER 10 PAGE 7 02/27/12
Treatment Objective: This field should be used to describe the
primary goal and objective of the Treatment. Similar to the Treatment
Purpose, it is recognized that many treatments serve multiple
purposes. Use your judgment to choose the most appropriate purpose
for a treatment. Note that “multiple – specify in comments” is a
choice that is available.
Age Method: Select the Age Method that coincides with the
Treatment Method that was selected on the “General” tab. This should
reflect the desired age structure being promoted by this Treatment for
the treatment area.
• Prescriptions
Prescription Specifications: This is where the Sponsor writes a
detailed prescription for the treatment. It should include information
about residual BA targets, retention areas within the stand, species to
favor, and specific cutting specifications to use for a sale. These
specifications should be sufficient for someone that is unfamiliar with
the treatment area to be able to read, understand, and carry-out what
is proposed. For this reason, all treatments require Prescription
Specifications.
Example for a clearcut with reserves:
Example for a yellow birch/hemlock single tree selection:

IFMAP MANUAL CHAPTER 10 PAGE 8 02/27/12
Other Comments:
The Other comment field
is meant to capture
information that isn’t
DIRECTLY a part of the
treatment prescription.
Stand level comments
that those reviewing or
preparing this treatment
need to be aware of
should be captured here.
Many times this will be
comments made from
co-managers other than
the Treatment Sponsor.
Recommended Next Steps: In this comment field, the treatment
sponsor must identify what subsequent treatments may be required to
carry out the objectives of management on this treatment area during
this entry cycle.
For example, if a regeneration harvest is prescribed, with artificial
regeneration through tree planting planned, then the ‘Next Step’ field
should describe the Treatment Sequence (sequence of follow up
treatments that will be put on FTP) that will achieve the desired
outcome. In this case that would be Site Prep and Planting, and any
pertinent details relating to how this should be carried out.
For situations with natural regeneration, this comment field should
capture a description of the acceptable regeneration mixture (per
Work Instruction 2.1).

IFMAP MANUAL CHAPTER 10 PAGE 9 02/27/12
AOI Accounting in the Management
Notes:
There is a counter at the bottom of the tool that tally’s status of all
Forested AOIs. A compartment isn’t complete until all “Unspecified
Forested AOI’s” have been accounted for. Remember: If a Treatment is
being proposed, select “Apply Treatment - Yes”, and follow the standard
procedures described above.
If for some reason a treatment is not desirable for an AOI, select “Apply
Treatment – No”, and if the parent stand meets Silvicultural Criteria (age
or BA) then also digitize the appropriate Site Condition/Limiting Factor in
the Site Conditions layer (refer to Chapter 16 and Appendix O).
In the end, all AOI’s need to be accounted for in the Management Notes,
regardless of whether a treatment is proposed on that AOI or not.
Repeat the steps described above until all AOIs are accounted for and
Management Notes have been written for each Treatment being
proposed. Then proceed to the next step. Note: some editing tasks can
cause errors with the counter. Don’t be overly concerned with this. If
you have questions, contact an Inventory Specialist or the RAU.
Step 2 - Populating the Treatment layer
Once the Management Notes are complete, treatment polygons can be
created. To do this, use the ‘Create Treatment’ tool on the Activity
Tracking toolkit.
o The ‘Create Treatment’ tool appears.
o Select ‘Meeting Notes’ as the source. The other choice,
Disturbances, creates treatments from the Disturbance Layer.
o Select the appropriate forest and compartment.

IFMAP MANUAL CHAPTER 10 PAGE 10 02/27/12
o All Management Notes that were specified for Treatment are
available in this list.
o Check the box next to all Treatments you wish to load into
the Treatments layer at this time., then click ‘Create Treatments’.
A message stating that “…‘X’ number of Treatments were successfully created…” appears. Save the edits, and proceed to the next step
Editing the Treatment Boundary.
What if there are two (or more) Treatments within one AOI?
If multiple AOIs were created from the same “parent” stand (as discussed
in Chapter 9) and AOI shape edits already made, then follow the
directions listed above.
But, if after pre-review, a decision is made to treat an AOI with two or
more separate prescriptions, follow these instructions below to create the
treatments.
Step 1 – Within the Management Notes tool, add notes for the parent
AOI for EACH prescription that will fall within the boundary. For example
if AOI 63148012 has an area to be proposed for thinning and a separate
area for clearcut with reserves, add it once and code the thinning harvest.
Then add 63148012 a second time and code the clearcut harvest. When

IFMAP MANUAL CHAPTER 10 PAGE 11 02/27/12
naming the separate Treatments, use names that are easy to identify
between the two treatments (148012-clearcut vs. 148012-thinning).
Step 2 – Use the Create Treatments tool to load these into the
Treatments layer. Both Treatments will appear in the list. Be sure they
are both checked. Click “Create Treatments”. A message will appear
saying the Treatments were successfully created, but if you look at the
original AOI, you will only see one Treatment shape.
Step 3 – Select the Treatment shape for the area where the multiple
prescriptions should be mapped. Using the “IFMAP Split” tool, digitize a
break in the treatment shape at the approximate location where the
prescription changes from thinning to clearcut with reserves.
Step 4 - Once the split is finished, the attribute editor window will pop up.
At the top of the window, there is a drop down list where the Treatment
Name is displayed on the right, and all of the selected Treatments will
show up in the list on the left.
Click once on the first name on the list of Treatments. Then right-click on
the first name on the list and choose the “highlight” command. This will
make one of the shapes on the map “flash” red. Identify which treatment
this shape should be (the clearcut with reserves or the thinning).
Step 5 - Next, click on the “Treatment Name” drop down arrow. You will
see the name for each Treatment coded in the Management Notes.

IFMAP MANUAL CHAPTER 10 PAGE 12 02/27/12
Choose the Management Note that corresponds to the proper Treatment
shape.
Essentially this task is about attaching the correct prescription from the
Management Notes to the correct shape in the Treatments layer. Repeat this
process for each separate shape in the layer. If a treatment is a multi-part
shape (more than one separate polygon), use the “merge” tool (Appendix G) to
join them together.
Editing the Treatment Boundary
While many Treatments will follow stand lines, it is not uncommon for deviations
to occur. One of the strengths of this Inventory system is that in separating
Treatment boundaries from Stand boundaries (in Stage 1) it allows the flexibility
to more accurately represent intended Treatment areas on our maps and
acreage totals. This allows for better communication between co-managers and
external stakeholders. It also allows for better planning for resource allocations
to implement the approved treatments.
Treatment sponsors should make every reasonable effort to accurately represent
both the extent and location of acres that are being proposed for Treatment.
The Treatment boundary in the field often times doesn’t “match” what was
prescribed at the Review. While some of the imagery and data available in the
GDSE will allow us to better predict some Treatment boundaries, this difference
will continue to exist, and is understood.
That said, when a Treatment will not cover an entire AOI, reasonable efforts to
edit the Treatment boundary must be made at the time the treatment is being
developed and proposed.
Often times this can be accomplished in just a few mouse clicks. Reshaping an
edge to buffer a creek bluff, leaving a two chain-wide vortices running southwest
to northeast through a jack pine clearcut, or leaving a specific 3 acre retention
area strategically placed for visual effects; these can all be accomplished in less
than a minute’s time.
Sometimes the edits may be more complex. But even the situation described
below can be accomplished in a matter of a few minutes.
IFMAP MANUAL CHAPTER 10 PAGE 13 02/27/12
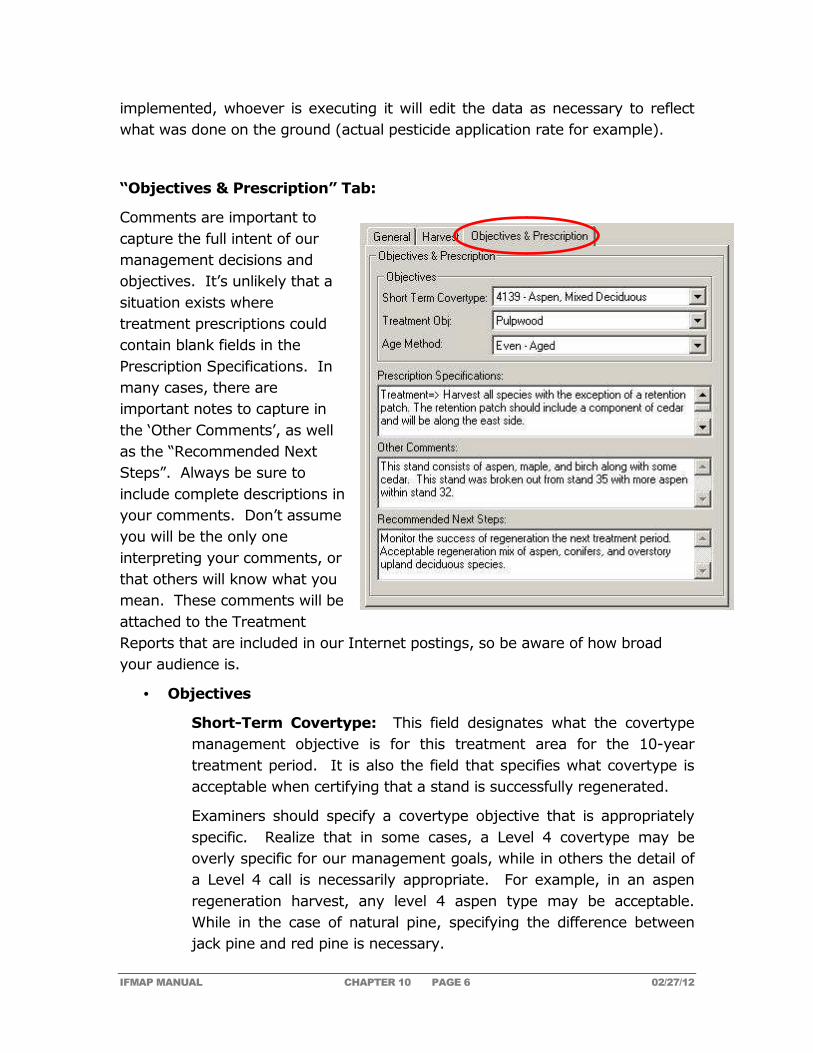
Example- a proposal may be to harvest 60 acres of a 160 acre aspen AOI, in
three (discontinuous) 20 acre blocks, buffering drainages, and establishing the
private line on the west side the
stand.
While on the surface, this may
seem like a complex prescription
that should just sort itself out
once the boundary lines are in, it
is actually quite simple to
represent on the map.
In three steps, taking just a few
minutes, the examiner was able
to edit the shape from the
original boundary (highlighted in
blue) to the area shaded in pink.
By simply using the “Cut
Feature” tool (Appendix G), and
then selecting and hitting the
“delete” key on the areas that
aren’t likely to be treated, then
selecting all three treatment areas and using the “Merge” feature, the above
shape was created.
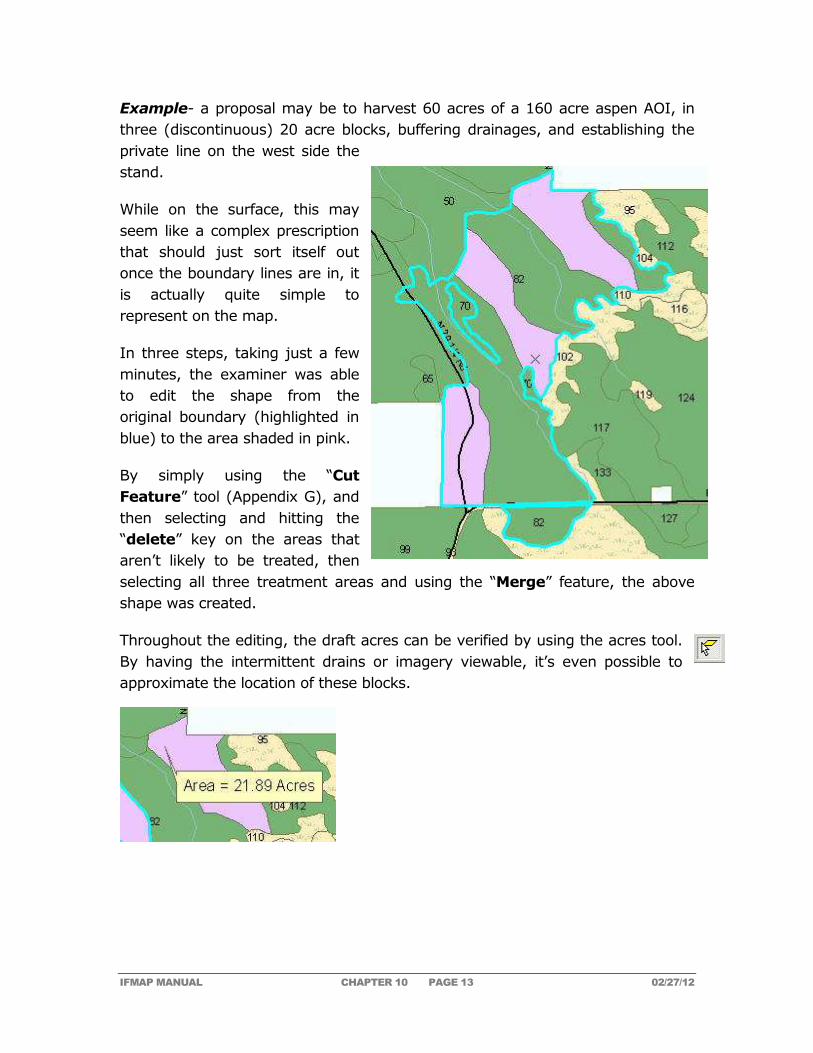
Throughout the editing, the draft acres can be verified by using the acres tool.
By having the intermittent drains or imagery viewable, it’s even possible to
approximate the location of these blocks.

IFMAP MANUAL CHAPTER 10 PAGE 14 02/27/12
Whenever editing is being done to the Treatments layer, it’s best to use the
native ESRI ArcMap tools described in Appendix G, unless specifically directed
otherwise.
Remember, the two main goals of spatial editing is to accurately reflect the
acreage amounts you expect to treat, and to place them as near as possible to
where you expect the treatment to occur on the ground. Be sure to use the
“Other Comments” section to describe to what degree of accuracy the treatment
shape on the map is placed in the expected location.
It is important to understand that in being this apparently specific with the
delineating of the treatment boundary, we still have the flexibility to place
that treatment area where it belongs once we are in the field. As long as
the acreage is within our normal guidelines for significant change, and the
location ends up within the description of the comments, the actual Field
Treatment Boundary can look entirely different from what is being originally
proposed, without the need for submitting Post Review modification requests.
Creating ‘Out of YOE’ Treatments
Because our Compartment and YOE boundaries are often arbitrarily drawn with
respect to stand or other natural boundaries, it is often logical to operate “Out-
of-YOE” in compartments and carry out treatments.
Through use of the Out-of-YOE treatment tool, the IFMAP system allows users to
code these treatments in adjacent OI compartments. Traditional Treatments in
IFMAP originate from AOI’s, which originate from Forest or Nonforest Stands.
Where the adjacent Compartment is in IFMAP, code these treatments just as you
would code any IFMAP treatment. In the case of OI compartments with Out-of-
YOE treatments, new data has not been generated for the AOI or Stands layers
during this Inventory Year. The “Out-of-YOE” polygon serves as a
substitute for an AOI.
The instructions below will describe when and how to code the Treatments in
adjacent OI compartments so that they can be approved at the Compartment
Review.

IFMAP MANUAL CHAPTER 10 PAGE 15 02/27/12
Step 1- Identify which OI Compartment the Out-of-YOE Treatment lies within.
Contact an IFMAP FMFM system administrator (the Resource Assessment Unit or
the State Inventory Specialist) and have them enable this compartment for you
to edit it.
Step 2 – Be sure the “Management Notes Group” layer is in your .mxd project.
Start an edit session. In the Task bar, select “Create New Feature”, and choose
a Target of “Out of YOE”.
Step 3 – Click on the Editing Pen, and use it to digitize the proposed Treatment
shape in the Out of YOE area. Be sure to keep the digitized area COMPLETELY
WITHIN the Out-of-YOE compartment.
Step 4 – Once the shape appears as it should, save the edits.
Step 5 – Open up the Management Notes tool for the original Compartment that
is WITHIN the normal YOE. For the example above, that would be the
Management Notes for Compartment 140, 2008 YOE.
IFMAP MANUAL CHAPTER 10 PAGE 16 02/27/12
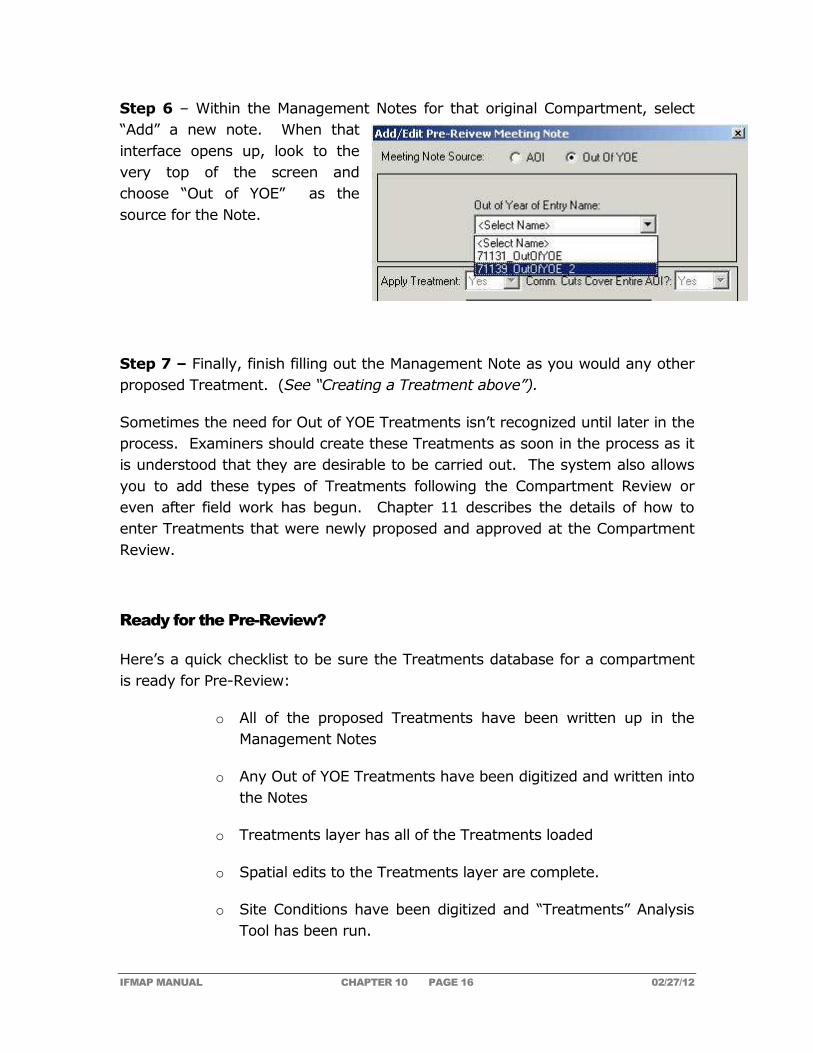
Step 6 – Within the Management Notes for that original Compartment, select
“Add” a new note. When that
interface opens up, look to the
very top of the screen and
choose “Out of YOE” as the
source for the Note.
Step 7 – Finally, finish filling out the Management Note as you would any other
proposed Treatment. (See “Creating a Treatment above”).
Sometimes the need for Out of YOE Treatments isn’t recognized until later in the
process. Examiners should create these Treatments as soon in the process as it
is understood that they are desirable to be carried out. The system also allows
you to add these types of Treatments following the Compartment Review or
even after field work has begun. Chapter 11 describes the details of how to
enter Treatments that were newly proposed and approved at the Compartment
Review.
Ready for the Pre-Review?
Here’s a quick checklist to be sure the Treatments database for a compartment
is ready for Pre-Review:
o All of the proposed Treatments have been written up in the
Management Notes
o Any Out of YOE Treatments have been digitized and written into
the Notes
o Treatments layer has all of the Treatments loaded
o Spatial edits to the Treatments layer are complete.
o Site Conditions have been digitized and “Treatments” Analysis
Tool has been run.

IFMAP MANUAL CHAPTER 10 PAGE 17 02/27/12
After the Pre-Review
At the Pre-Review, the decisions are made about what proposals should be
posted for public review at the Open House and presented for formal approval at
the Compartment Review. The Stand Examiner and other Treatment Sponsor’s
draft proposals are reviewed. Proposals are agreed upon, some may be
discarded, and also new proposals may be made and agreed to.
It is the examiner’s responsibility to see that what is agreed to at the Pre-Review
is updated in the Treatments database. If there are Treatment Sponsors other
than the Stand Examiner, the Examiner needs to coordinate and collaborate with
them to be sure the changes and updates are made.
These changes may include:
Updating Existing Treatments – Making changes to the prescription or
the other attributes for a Treatment, or spatial editing of the boundary of
the proposed Treatment area.
Attributes are updated through the Attribute Editor interface. To launch
that interface, make the Treatment layer selectable, select your
Treatment(s) and click on this button
Deleting Existing Treatments – Removing the decision to “Apply
Treatment” to a Treatment area. This is must be done in the
Management Notes Tool, by selecting “Update Treatment” and switching
the “Apply Treatment?” attribute from ‘Yes’ to ‘No’. This will remove the
Treatment from the layer as well. Be sure to code Limiting Factors/Site
Conditions as appropriate using the Site Conditions layer. Use the
comment field if you want to capture the fact that a treatment was
proposed but dropped at the Pre-Review.
Adding a newly Proposed Treatment – Any new Treatments must first
be an AOI. Follow the instructions in Chapter 9 for creating an AOI (using
the Stage 1 Management Notes). Then follow the steps above for
creating a new treatment.
Adding a newly proposed Area of Interest – There may be a need for
a new AOI after the Pre-Review. Whether it’s for Treatment

IFMAP MANUAL CHAPTER 10 PAGE 18 02/27/12
Development, or SCA coding (see Appendix H), follow the instructions in
Chapter 9 for creating AOIs.
Adding an Out-of-YOE Treatment – See the instructions above.
Updating Site Conditions layer – digitize new Site Conditions as
needed and/or update existing Site Conditions. Be sure to run the
Treatments Analysis Tool after changes are made. Refer to Chapter 16
and Appendix O for details.
Treatment Approval Status
The Treatments database is the backbone of the Activity Tracking Module. The
way that this Module “tracks” Treatments is through the Approval Status. At
different milestones throughout the implementation, the Treatment Approval
Status needs to be updated. The posting of data for the Open House is the first
of those events.
Advancing the Status
After all Pre-Review changes have been made, the Treatment Approval Status
must be advanced. When treatments are initially drafted, they start at the first
status:
“Compartment Review Proposal – Incomplete” (a.k.a. CRP-I)
Whenever a Treatment Status is labeled as “……- Incomplete”, the
Treatment is open for editing. At status CRP-I, a treatment is being
drafted and presented at Pre-Review. It’s also at this status that edits
are made to reflect agreements from Pre-Review. Once these edits
are complete, the status should be advanced to:
“Compartment Review Proposal” (a.k.a. CRP)
To advance the status, follow these steps:
Step 1 - select the Treatment(s) that are ready to be updated,
using the selection tool.
IFMAP MANUAL CHAPTER 10 PAGE 19 02/27/12
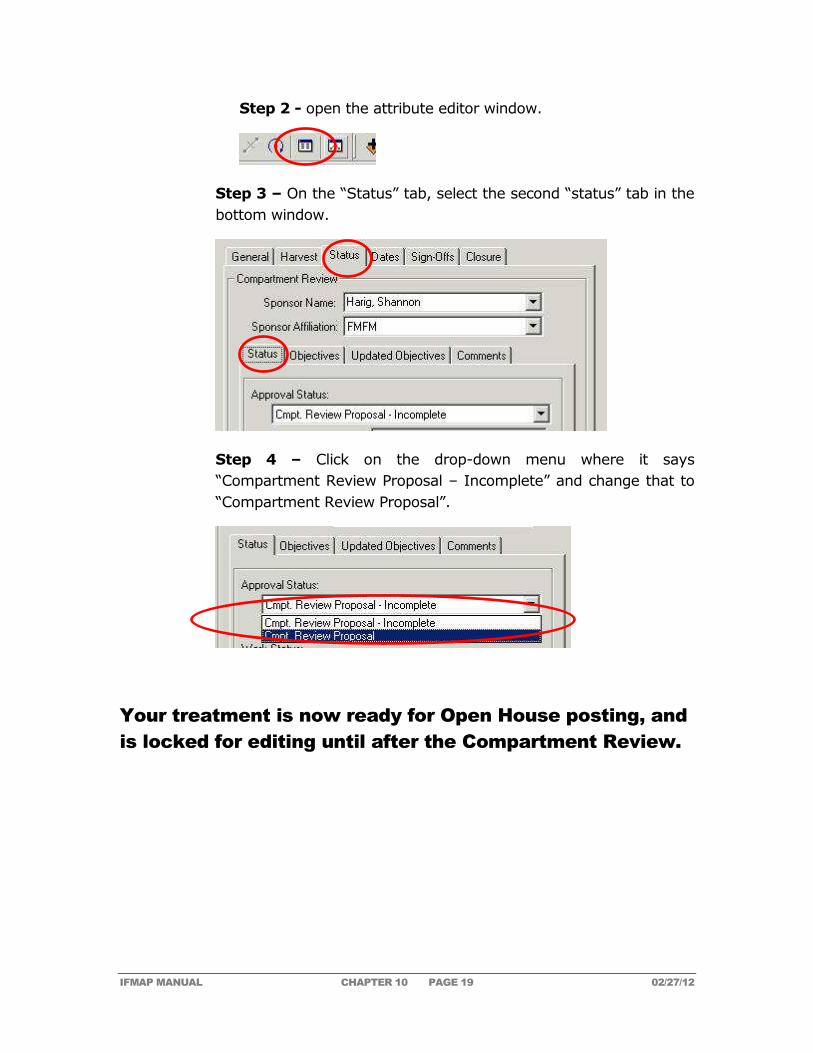
Step 2 - open the attribute editor window.
Step 3 – On the “Status” tab, select the second “status” tab in the
bottom window.
Step 4 – Click on the drop-down menu where it says
“Compartment Review Proposal – Incomplete” and change that to
“Compartment Review Proposal”.
Your treatment is now ready for Open House posting, and
is locked for editing until after the Compartment Review.