Embed Size (px)
Citation preview

O R L D I N O T I O NA
T H E D E S I G N E X P E R I E N C ETM
O R L D I N O T I O NA
T H E D E S I G N E X P E R I E N C ETM
CHALLENGE 1
JetToy Activity

Lesson Plans are not included in this document.
Check out the sample lesson plan located in the curriculum
resources.

SSOOCCIIEETTYY OOFF AAUUTTOOMMOOTTIIVVEE EENNGGIINNEEEERRSS IINNTTEERRNNAATTIIOONNAALL
The Society of Automotive Engineers International (SAE) is a nonprofit scientific organizationdedicated to the advancement of mobility technology in order to better serve humanity. A globalsociety of approximately 80,000 members, SAE is the leading professional organization for engineers and scientists involved with land, sea, air, and space mobility. Its members come fromall branches of engineering, science, and technology. SAE creates and distributes informationthrough meetings, books, technical papers, magazines, standards, reports, continuing educationprograms, and electronic databases.
SSAAEE FFOOUUNNDDAATTIIOONN
Established in 1986 as an operating foundation, the SAE Foundation secures funding from corporations, grant-making foundations, SAE members and other sources in order to develop and sustain its educational programs.
With programs that span from K-12 through college and beyond, the Foundation works to be the internationally recognized leader in the promotion and expansion of the mobility engineering profession. To lend your support to these efforts, please contact the SAE Foundation at (724) 776-4841.
Copyright © 2000 by the Society of Automotive Engineers International.All rights reserved. Permission to reproduce the teacher manual and
student reproducibles is hereby granted by the Society ofAutomotive Engineers to teachers for classroom use.
for Science and Technology Education

ACKNOWLEDGEMENTS
This program is supported by contributions to the Society of AutomotiveEngineers International, and the SAE Foundation, Warrendale, Pennsylvania.Kathleen O’Connor Byrnes, K-12 Education Program AdministratorCyndi Braun, Development/Marketing SpecialistJames G. Cook, Senior Advisor, VISION 2000Veronica Meury, Foundation ManagerRobert Sechler, Division Manager, Educational Relations
Written and Developed by Education Development Center, Inc., Newton, MassachusettsDan Dick, Jan Ellis, Charlie H. R. Hutchison, Ken Schopf, and Anne Shure
Graphic Design and Production by Education Development Center, Inc.,Newton, Massachusetts Kay Baker, Jeanine Reed, Jennifer Roscoe
Advisors, Consultants, and ReviewersWilliam Agnew, Elizabeth Bjork, Diane Brancazio, Cindy Char, Denise Ciotti, Kellee Condra, Jess Comer, Ed Debler, Joseph Dick, Steve Gadzinski, Marie-Elena Moloney, Valerie Poppe, Frank Rapisardi, Jonah Sakala, Leah Sakala, Daniel Lynn Watt, Wayne Wheelock, Jim Woods, and Bernie Zubrowski
Field TestingFrank Rapisardi, South Elementary School, Andover, Massachusetts
The revision of A World in Motion, Challenge 1 is made possible through agrant from the American Iron and Steel Institute.
A World in Motion program development and expansion has been made possible through the generous contributions of General Motors Corporationand major support from:The Boeing CompanyRobert Bosch CorporationCaterpillar, Inc.Continental TevesDeere & Company
Ford Motor CompanyGenCorpGoodyear Tire & Rubber CompanyHonda North AmericaLear CorporationMascoTechRockwellTRWToyota Motor Company

INTRODUCTIONEducating Children for Tomorrow’s World .............iOverview of the Curriculum .................................. iiThe Engineering Design Experience .................... ivCurriculum Content, National Standards, and Local Frameworks ............................................... vi
Teaching the Design Challenges ........................ viiiMaterials Order Form .......................................... xixIndustry Volunteer Guide .............................. IVG 1
TTAABBLLEE OOFF CCOONNTTEENNTTSSReproducible materials are shown in italics.
CHALLENGE 1
JETTOY DESIGN CHALLENGE Introduction
Overview .................................................... 121Objectives ................................................. 124Correlation with National Science
Benchmarks and Standards ................. 124Materials ................................................... 127Calendar ....................................................129Glossary ..................................................... 130Science Notes ............................................ 131
1. Introducing the JetToy Challenge ............... 139Letter from EarthToy Designs .................. 143
2. Building and Testing a JetToy Chassis......... 145Design Team Roles and Badges ............... 155JetToy Challenge Design Log
Guidelines ...................................................... 157
JetToy Chassis Pattern.................................. 159Building the JetToy Chassis ...................... 161Assembling the Axles and Wheels .......... 163JetToy Features (pretest) ............................ 165
3. Adding a Balloon Motor................................ 167JetToy Data........................................................ 175Design Team Evaluation ........................... 177
4. Sharing First Results ...................................... 1795. Revising the Vehicle ...................................... 183
JetToy Data Table 1 ...................................... 1896. Designing Experiments ................................. 191
JetToy Data Table 2 ..................................... 199JetToy Graph ................................................... 201
7. Formal Testing................................................ 2038. Reviewing Experimental Data ...................... 2079. Designing a JetToy ..........................................211
JetToy Design Specifications .................... 21510. Building and Testing a JetToy .................... 217
JetToy Data Table 3 ...................................... 221JetToy Presentation Planner ...................... 223JetToy Presentation Rubric ........................ 225JetToy Design Log Evaluation .................. 227
11. Presenting JetToy Designs........................... 229JetToy Challenge Summary (posttest) .... 233JetToy Challenge Summary (answers) ... 235

Introduction i
INTRODUCTION TOA WORLD IN MOTION
To succeed in the society of tomorrow, all children need an educationthat prepares them to understand and apply concepts in science, mathematics, and technology. In addition to becoming literate in thesedisciplines, students must also learn to solve complex problems, to communicate clearly, to raise and resolve questions, to assimilate information, and to work cooperatively toward common goals.
Today’s educators can no longer succeed by presenting students with scientific information and teaching them rote processes. To help themacquire a deep understanding of scientific, mathematical, and technologicalphenomena, teachers must provide students with abundant opportunitiesfor direct, hands-on experience with materials and tools. In this way, students become competent and feel confident in their abilities toexplore, conjecture, and reason logically, and to gather and manipulateinformation to arrive at useful knowledge about the world aroundthem. These abilities are nourished and nurtured when school activitiesgrow out of real problem situations, and they are further stimulated anddeveloped through the interactive, cooperative processes of discussing,reading, and writing about direct experiences.
The Society of Automotive Engineers has developed A World in Motion:The Design Experience, Challenge 1 as an opportunity for students andteachers to explore science, mathematics, and technology by taking onthree separate challenges in an engineering design context.
Educating Children for Tomorrow’s World

Introductionii
Overview of the Curriculum
A World in Motion: The Design Experience, Challenge 1 consists ofthree challenges suitable for grades 4–6. Each of these challenges can betaught over a three-week period or, with suggested extensions, over alonger period.• Skimmer Challenge (Grade 4). Students make paper sailboats that are
propelled by fans across the floor. They test the effect of different sail shapes, sizes, and construction methods on the performance of their skimmers. The goal of this challenge is to design a set of skimmers that reliably meet specific performance criteria. Friction, forces, and the effect of surface area are some of the physical phenomena students encounter in this challenge.
• JetToys Challenge (Grade 5). Students make balloon-powered toy cars. Their challenge is to design an appealing toy that performs in a specific way, such as travels far, carries weight, or goes fast. Students experiment with different chassis designs and nozzle sizes to determine their effect on the JetToy’s performance. Jet propulsion, friction, and air resistance are the core scientific concepts students explore in this challenge.

The three challenges give young students many opportunities to explore and test the performance of a vehicle they have designedand constructed.
As students strive to optimize the performance of their toy vehicles, theyexpress their ideas, test their hypotheses, and draw their own conclusionsbased on the evidence they gather. In this way, their experience resemblesthe work of scientists and engineers. The science notes that accompanyeach challenge describe concepts associated with the performance of thevehicles students design and build.
Introduction iii
Introductioniv
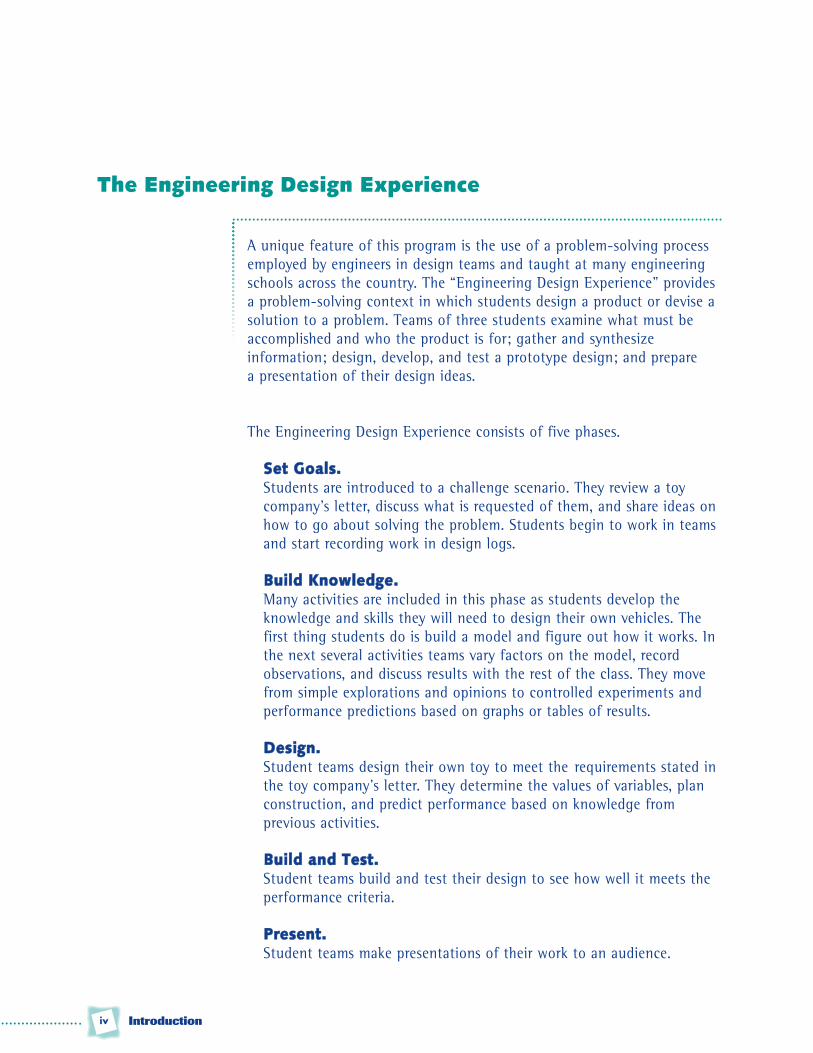
A unique feature of this program is the use of a problem-solving processemployed by engineers in design teams and taught at many engineeringschools across the country. The “Engineering Design Experience” providesa problem-solving context in which students design a product or devise asolution to a problem. Teams of three students examine what must beaccomplished and who the product is for; gather and synthesize information; design, develop, and test a prototype design; and prepare a presentation of their design ideas.
The Engineering Design Experience consists of five phases.
SSeett GGooaallss..Students are introduced to a challenge scenario. They review a toy company’s letter, discuss what is requested of them, and share ideas onhow to go about solving the problem. Students begin to work in teamsand start recording work in design logs.
BBuuiilldd KKnnoowwlleeddggee..Many activities are included in this phase as students develop the knowledge and skills they will need to design their own vehicles. The first thing students do is build a model and figure out how it works. Inthe next several activities teams vary factors on the model, record observations, and discuss results with the rest of the class. They move from simple explorations and opinions to controlled experiments and performance predictions based on graphs or tables of results.
DDeessiiggnn..Student teams design their own toy to meet the requirements stated inthe toy company’s letter. They determine the values of variables, plan construction, and predict performance based on knowledge from previous activities.
BBuuiilldd aanndd TTeesstt..Student teams build and test their design to see how well it meets the performance criteria.
PPrreesseenntt..Student teams make presentations of their work to an audience.
The Engineering Design Experience

Introduction v
The Engineering Design Experience provides a meaningful and motivatingcontext for the following:• an exploratory approach to science and technology education• the development of skills in scientific inquiry (experimentation,
thinking and analyzing in terms of systems, reasoning logically, and drawing conclusions)
• an understanding of forces and motion
The Engineering Design Experience embodies principles of design technology. These principles are used by engineers and others who designnew products and systems—anything from coffee pots to computer networks. In schools, “using technology” often refers to integrating computers into the curriculum. Design technology is much broader andinvolves developing models, evaluating materials, and thinking criticallyto design a solution to a problem. It requires the following processes: • identify problems or design ideas based on needs or wants• generate and evaluate ideas• plan and implement solutions• evaluate solutions• communicate results
Like design engineers and technologists, students design prototypes, testand modify designs in response to constraints and side effects, and com-municate their design ideas and plans both orally and in writing.
Going through the Engineering Design Experience helps students learnfirsthand about the following aspects of design technology:• Developing a prototype helps determine the effectiveness of a design.• Optimizing a design involves adjusting interdependent variables in
order to achieve a desired outcome.• A variety of problem-solving strategies can be used, depending on the
problem posed.

Introductionvi
Curriculum ContentThe Engineering Design Experience is an applied process, which enablesstudents to see how the field of engineering integrates knowledge andskills from science, mathematics, and technology. In using this process,the design challenges provide contexts in which students can apply content and concepts from their previous learning experiences. The challenges also embrace the direction of national standards in scienceand mathematics education. Indeed, A World in Motion: The DesignExperience is one of the few curriculum programs to conform specificallywith both the National Research Council standards that promote educating students to develop products and solutions to problems usingengineering design, and the National Council of Teachers of Mathematicsstandards that emphasize teaching students to see mathematical connections to the real world through mathematical thinking, modeling, and problem solving.
National StandardsThe learning objectives of each design challenge correlate strongly withnational standards in science and technology education. Both theNational Research Councils’ National Science Education Standards(1996) and the American Association for the Advancement of Science’sBenchmarks for Scientific Literacy (1993) were used to complete the correlations. Each document recommends that students have manyopportunities to do the following:• explore materials and ideas• ask questions• propose their own explanations• test their explanations• communicate their ideas
A World in Motion: The Design Experience embodies the above processes.The Engineering Design Experience provides a meaningful context forstudents to do scientific research in order to gain knowledge that theyneed for developing a successful design. Student understanding of forcesand motion develops from their interpretation of the observations theymake as they develop and test vehicles.
Curriculum Content, National Standards, and Local Frameworks

Introduction vii
Local Curriculum FrameworksTeachers and administrators can easily correlate A World in Motion to district and state science curriculum frameworks. Strands most related tothis curriculum include those in design and problem solving.
Some local curriculum frameworks include topics related to the sciencecontent of A World in Motion, such as forces and motion or using thescientific method. Teachers may supplement the design challenges withactivities that address these topics.

Introductionviii
To facilitate student learning, use the information in this section to organizeyour classroom. You will find techniques and tips for student designteams, design logs, assessment, industry volunteers, implementation ideas,and information for obtaining basic sets of construction materials.
For each of the three challenges, this guide includes day-by-day activities, science notes for teachers, and reproducible masters to supportstudent learning. Three attractive posters that illustrate concepts of thescience of motion are also included.
Also refer to the Industry Volunteer Guide. This reproducible guide willhelp introduce volunteers to the curriculum and suggest ways for them towork most productively in the classroom.
Student Design TeamsFFoorrmmiinngg TTeeaammssBefore teaching any of the challenges, plan how to divide the class intoteams of three students. If teams of three are not feasible for the entireclass, group some students in pairs. Encourage female students to participatein the hands-on construction activities. Studies show that girls often stayin the role of notetaker, particularly in science activities. Watch to seethat girls participate equally in the hands-on construction and testing. Insome cases, same-sex design team groupings may be appropriate toencourage equal participation and discussion. Another reason for you toassign students to the teams is to ensure a good mix of talents and abilities.
Discuss with students the importance of working in teams, especially ifthey are not accustomed to working in cooperative groups. Here are somesuggested roles three students can have in their design teams:
PPrroojjeecctt EEnnggiinneeeerr.. Responsible for helping members understand the team’s task, leading team discussions, checking for safety at all times, and checking whether the team’s task is complete.
FFaacciilliittiieess EEnnggiinneeeerr.. Responsible for collecting materials, directing model construction, directing cleanup, and storing materials.
TTeesstt EEnnggiinneeeerr. Responsible for recording and organizing data in the Team Design Log.
Teaching the Design Challenges

Introduction ix
Students who are working in pairs can assume the roles of FacilitiesEngineer and Test Engineer, and share the responsibilities of the ProjectManager.
Assign roles to the members of each design team at the start, or ask students to decide which roles they will take. Be sure students changeroles at least every few days. This way, each student will be able to develop and practice the variety of skills that are needed if a design teamis to be effective.
Use the Design Team Roles and Badges reproducible master (found inActivity 2 of each challenge) to make team-role badges for you, yourindustry volunteer, and your students. When students change roles, theyalso exchange badges. Ask students to keep a separate record in theirTeam Design Log of the role that each team member performed eachday.
Students need to understand that each team member is responsible forthe team’s work. Team members are jointly accountable for the work ofthe whole team and should be able to explain any aspect of the teamsdesign or the design process.
TTeeaamm BBuuiillddiinnggIf your schedule permits, consider adding team-building activities to thechallenge. This will increase students’ enjoyment of the design challengeexperience. Invite students to design a team name, logo, and slogan.Discuss with students examples of familiar corporate icons, such as the“golden arches,” clothing designer logos, or other popular company slogans or emblems. Discuss how companies use icons, logos, or sloganssuch as these to project an easily recognized and attractive image.
Let students use a procedure like the following one to design their ownteam name, logo, and slogan:• Brainstorm a variety of ideas before evaluating them.• Sketch several ideas.• Choose your best idea.• Draw a small, color version of the logo.• Make a large poster that displays the name, logo, and slogan.

Introductionx
While the teams are working on their own names and logos, encouragestudents to brainstorm and be open to all suggestions. Encourage all students to draw logo ideas, even if they believe they are not artisticallyinclined. If some teams are less inspired, suggest that they think abouttechniques that real companies use, such as combining the initials ornames of the owners or developers.
Ask each design team to share its name, logo, and slogan with the rest ofthe class. Here are sample questions:• In what ways do your designs reflect your team?• What makes them effective?• How did you make decisions and come to consensus?
Use a copying machine with a reduction feature to make several copies ofeach team’s name and logo for use on their letters, memos, and othercommunications.
MMaannaaggiinngg SSttuuddeenntt DDeessiiggnn TTeeaammssIn addition to the suggestions given earlier, consider the following ideaswhen planning how to organize and manage the student design teams.
• Small teams of two or three students generally work better than largergroups on a project like this. Four students on a team are almost always too many.
• Design the teams so that each member brings something different. Forexample, try to balance computer skills, ability to get along with otherstudents, and reliability in getting work completed.
• Post job descriptions for team roles (project engineer, facilities engineer, test engineer) and ask students to apply in writing by listingtheir skills for the position they want.
• Instead of assigning roles, have the students try each role and then in their teams decide what each person will do.
• Help students develop teamwork skills. Be prepared to rearrange teamsas necessary. As you circulate among the teams as they work, remind students of their responsibilities as team members by asking them about their roles in the teams.

Introduction xi
• Make one student on each team responsible for communicating with an absent team member about missed work. If the class has done a worksheet, this student should put a copy in the team folder for the absent team member. When the team member returns to class, this student should help the team member do the worksheet.
• Post a chart of cooperative skills and refer to it often. Accent the positive by commending students whenever you see them demonstratingone or more of the skills.
• Build in opportunities for teams to share what they have learned. Students can learn a lot from one another and begin to use each other as resources.
• Visit each team every day and make notes on your conversations.Having regular, substantial conversations with students about the Engineering Design Experience and their efforts to meet the challenge can be a rewarding exchange for both you and your students.
• Motivate students to be accountable for their teamwork by giving eachstudent a sheet to record and rate their own contributions to the team. For this purpose, use or adapt the Design Team Evaluation, a reproducible master in both the Skimmer Challenge and the JetToy Challenge.
Team Design LogsRRoollee ooff TTeeaamm DDeessiiggnn LLooggssDesign logs are notebooks in which students record their work throughout the challenge. Students may use both written descriptionsand drawings in their design logs to record the following:• the design decisions they make• the prototypes they build• the knowledge or assumptions upon which they base their design
decisions• the tests they make on their prototypes• the results of those tests and calculations• additional test data they want to record• questions they have for other students, the teacher, or an
industry volunteer• ideas and discoveries they want to share with the class

Introductionxii
Decide how students will organize their written work. Here are twooptions:
• Three-ring binder. Test Engineers use a section of the loose-leaf binder to keep records of their team’s daily work in the Team Design Log. Each team member also has a personal section in the binder for saving individual work. Have a three-hole punch available so students can easily store activity worksheets in the binder.
• Bound composition notebooks. Test Engineers write design log entries in their team’s notebook. Team members keep individual work, including activity worksheets, in separate notebooks or folders.
Tell students that you will be reviewing their design logs on a regularbasis and making comments on the entries. Also let them know they willbe expected to share excerpts from their design logs during class discus-sions as evidence for their observations and conclusions.
Discuss the fact that real engineers need to document their work.Students may not appreciate the need to document designs that are notsuccessful. Yet, unsuccessful designs often provide valuable informationthat engineers can use to improve their designs. Sometimes they see pat-terns when they look at a series of tests, not just at individual results. If ateam does not record all of its designs and data, the team might losevaluable information that could help it improve its design.
MMaannaaggiinngg TTeeaamm DDeessiiggnn LLooggssAlthough students often have difficulty remembering to record observationsand data in their design logs, they will find that these are critical forkeeping track of the work done by individual teams. Help students seethe value of recording and referring to daily work as well as using thelogs as a way to reflect on work throughout the design process. Designlogs can be especially helpful as students move from the BuildKnowledge phase to designing, testing, and building their own toys.
In addition to the suggestions given earlier, consider the following ideaswhen planning how to organize and manage the team design logs.

Introduction xiii
• Early in the challenge, discuss with the class a model of a “good” design log entry. Determine the kinds of information that are helpful and how a less complete description will not give students the same understanding.
• Facilitate looking at previous design log entries by asking questions during class discussions that prompt students to refer to data in their team design logs.
• Consider providing regular feedback to students on their use of design logs as a way to motivate them to keep clear, concise records.
• Set clear guidelines for keeping a design log, using the Design Log Guidelines (a reproducible master included in each challenge). Have regular check-in points when you review students’ use of design logs. Emphasize the importance of the design log early on.
• Make sure students sketch their designs before building them. Talk with them about their sketches and notes to get an idea of their level of understanding and the progress they are making.
• Assign one design log task every day. For example, have students write at least one thing their team discovered, make a sketch, or write a reflection. Whenever a team is the first to come up with an idea, let the students apply for a patent or copyright it. Students will like including patents and copyrights in their team portfolio.
Student Assessment The exploratory nature of the challenges invites the use of a variety ofassessment techniques. A pretest and posttest are included in each challenge.
Other assessment opportunities and strategies that you may want toadopt are suggested here.
• During the Build Knowledge and the Build and Test phases, observe how students design and carry out their testing of the models. Daily monitoring can reveal how careful students were in taking measure-ments, how attentive they were to keeping good records, and how theymade major or minor adjustments to their designs.

Introductionxiv
• Gauge students’ understanding through their participation in class discussions and the work of their team. Sample rubrics and other reproducible masters found in each challenge can help you to assess design logs, teamwork, and the final presentations. For example, all three challenges contain a Design Log Evaluation reproducible master correlated to the Design Log Guidelines.
• Develop rubrics for assessing teamwork, the final models, and team presentations. Decide as a class how to weight scores for their final grade. The students’ participation in creating the rubrics will be important in establishing expectations for the quality of their work. A presentation rubric is provided at the end of each challenge.
• As you assign each piece of student work, add it to a list of portfolio items on the board. Students will know exactly what you expect them to have in their folders as the challenge progresses.
• At the end of the challenge, ask students to write letters to their parents or guardians about what they did and what they could have done to make their experience better. Ask students to think especially about what improvements they would make to their design, their role as a team member, and their effort to learn. This activity will give them an opportunity to reflect on their experience as well as on their responsibilities as students. Parents will appreciate getting such thoughtful letters from their children.
Industry Volunteers in the ClassroomUsing engineers and other industry volunteers in the classroom is animportant aspect of this program. Industry volunteers can support youand your students in a variety of ways. They may visit your class at thebeginning and end of the challenge or work regularly with studentsthroughout a challenge. Volunteers can help students understand theengineering design process as well as some of the concepts developed inthe challenge. Having one or more industry volunteers come to the class-room a number of times to work with the design teams will help supportstudents’ work. They will also learn more about how the volunteer’s workrelates to what they are doing in their challenge. For example, beforestudents design their vehicles, ask an industry volunteer to talk to the

Introduction xv
class about the Engineering Design Experience and how it relates to hisor her work. This can lead to a good discussion about how students couldapply what they have learned so far to the design of their vehicle. It canalso help students consolidate their knowledge as well as let you knowwhere there are still gaps in their understanding.
Be sure to read the Industry Volunteer Guide. Make a photocopy to giveto your industry volunteer a week or two before your first meeting.
Find industry volunteers well in advance of teaching the unit so they cancoordinate their schedules with the class schedule. Scheduling volunteerscan be a big job. To reduce confusion, ask someone in your school officeto help coordinate plans. Since last minute cancellations are always apossibility, consider involving more than one volunteer in the classroomactivities.
Working in the classroom may be a new experience for industry volunteers. Be sure to communicate the goals you have for the studentsand explain the roles you want volunteers to play in your classroom.
Implementation IdeasRefer to this section for ideas on interdisciplinary team teaching opportunities, materials management, classroom management, and classroom discussions.
IInntteerrddiisscciipplliinnaarryy TTeeaamm TTeeaacchhiinngg OOppppoorrttuunniittiieessThe three challenges are inherently interdisciplinary. In many activitiesstudents explore materials and generate hypotheses that arise from theirobservations. In other activities, students collect and organize data tobetter understand the vehicles with which they are working. Informationfrom one discipline is analyzed with tools from another discipline. Thisintegration offers a rich opportunity for the collaboration of teachersfrom different disciplines.
The teaching team for the challenges can include teachers who specializein science, mathematics, technology education and art. Initially, teachersin the team will need to read the curriculum thoroughly, devote preparation time to developing an implementation plan and strategy. Theteachers will need to decide how to work together as co-teachers, or to

Introductionxvi
divide up the activities by disciplines. It is recommended that teachers inthe team meet regularly to decide how best to communicate informationabout activities that are closely integrated reassess the schedule, troubleshoot any existing problems, and plan activities.
MMaatteerriiaallss MMaannaaggeemmeennttStudents’ engagement and interest in designing and building toys oftentempt them to use materials liberally. Remind students about the limitedamount of materials. Develop systems for tracking the inventory of materials, including organizing materials in containers, creating inventorychecklists, and giving responsibility for materials to individual teams.
Consider the following ideas when planning how to organize and managethe materials students will be using.
• Plan ahead so that each team will have a place to work on its design and sufficient space to store the materials.
• Give each team a shoe box or plastic tub to store materials.
• Emphasize that materials are limited. Students need to plan their designs carefully so that they do not waste supplies.
• Set up a repair area in one corner of the classroom to save materials and provide students with an additional opportunity to develop and practice manipulative and problem-solving skills.
CCllaassssrroooomm MMaannaaggeemmeenntt Most of the classroom management issues in challenges like these typically center on student involvement, grouping issues, and organization. One of the biggest considerations is finding a place wherestudents can safely test their prototypes. If there is insufficient space inthe classroom, corridors outside classrooms, the cafeteria, and the gymare good testing areas when not being used by other students. Alwayskeep safety in mind when students are doing independent work.
Consider the following ideas when planning how to organize and managethe classroom.

Introduction xvii
• Include students in making rules for working on the challenge and working in teams. List expectations in the classroom and keep them visually accessible at all times.
• Establish clear rules for testing outside the classroom to avoid disturbing other classes.
• Provide ample room for testing—a hallway, cafeteria, or another large room is ideal. If practical, schedule testing during times when the space is not being used.
• Facilitate students’ efforts and help them maintain focus on clearly stated expectations.
CCllaassssrroooomm DDiissccuussssiioonnssStudents need frequent whole-class discussions to help them see the relationship between specific activities and the larger goals of the challenge. Such discussions allow both students to share their findingsand relate more abstract concepts to practical applications and teachersto assess student understanding.
Consider the following ideas when planning how to organize and managediscussions.
• Hold many whole-group discussions in the Build Knowledge phase.Some teams may be unable to come up with solutions or they may have difficulty describing what is happening. Ask students to explain what they mean when, for example, they say their model “doesn’t workwell.” Such discussions can bring some teams up to the knowledge level of the rest of the class and help develop a common vocabulary using students’ own words.
• Avoid answering any of the students’ questions directly. Encourage them to learn from their peers or from their own experience. When they ask, “How do I do this?” ask them, “How could you figure this outfor yourself?” In some cases, you may really not know the answers. If you find that students are really struggling, refer them to another student who you know will be able to help them. They will then learn how to rely on themselves and one another.

Introductionxviii
Look for opportunities to discuss real-world applications of the skillsbeing developed in class.
Use sheets of chart paper to record the student findings discussed inclass. Post these in the room for future reference.
When a team is reporting to the class, make sure that each member ofthe team contributes to the discussion.
Videotape students as they work on this challenge. Start a new day byshowing students a tape of the previous day’s work and ask them tocomment on what they are seeing. This can be a great way to get students to practice their problem-solving skills as well as their skills ofobservation.
If you lack the time for a thoughtful discussion at the end of a classperiod involving building, start the next class with a discussion of theprior day’s experiences so that this important part of the experience isnot lost.
Obtaining Materials for the ChallengesThe Society of Automotive Engineers (SAE) offers a Classroom MaterialsKit for each of the three challenges in A World in Motion: The DesignExperience, Challenge 1. Each classroom kit contains most of the materials needed for a classroom of 27 students. Additional materials arelisted in the introduction to each challenge.
Most of the materials in the kits can be purchased at hardware and officesupply stores. If you prefer to purchase the materials yourself, use theMaterials List in the Introduction to each activity. You will have to modify some parts. These procedures are described in the Introduction toeach activity.

Industry Volunteer Guide IVG 1
Soci
ety
of A
utom
otiv
e En
gine
ers,
Inc.
© 2
000
INDUSTRYVOLUNTEER GUIDE
Welcome!A World in Motion: The Design Experience, Challenge 1 is a dynamic curriculum focusing onthe engineering design process. Volunteering in a classroom using this curriculum can be ahighly rewarding experience for you, the students, and the teacher. Not only will you havefun working with young people in a hands-on activity, but you will find yourself inspired bythe students’ creativity and the fresh perspective they bring to engineering design. You willalso have the satisfaction of contributing to and sharing in their discoveries and success—andyou may even spark a new interest for some students.
Rationale and Goals of the CurriculumThe curriculum is a set of three challengesdesigned to provide students in grades 4–6with an Engineering Design Experience, as well as promote an interest in mathematics, science, and technology by giving them oppor-tunities to work with materials that embodyscientific and technical phenomena. The chal-lenge put forth in each of these experiencesinvolves student design of a toy vehicle.Engaging scenarios provide a context in whichstudents develop problem-solving, science, andmath skills. As student design teams work toget their toy vehicles to meet specified perfor-mance criteria, they wrestle with authenticscience and engineering problems.
An important focus is the quality of students’experience. Fostering positive attitudes towardscience, mathematics, and technology is of major importance, as is encouraging athoughtful approach to problem solving.Students are not required to master certain scientific concepts or mathematical methods,nor create a “winning” design. Instead, theobjective is to facilitate the design of a varietyof vehicles and help students understand whatmakes the vehicles perform differently.
A World in Motion: The Design Experience,Challenge 1 embodies the current nationalstandards for teaching and learning. In particular, it meets the National ResearchCouncil standards to educate students to develop products and solutions to problemsusing technological design, and the NationalCouncil of Teachers of Mathematics standardsemphasizing that students should see mathematical connections to the real worldthrough mathematical thinking, modeling, and problem solving.
The Engineering Design Experience draws onthe problem-solving process frequently used byengineers in design teams and taught at manyengineering schools across the country. As students step through the process, they haveample opportunities to develop science andmath skills. Below are activities specifically recommended in the national standards that arepresent throughout the challenges:
• Students explore materials and ideas.• They ask questions.• They propose their own explanations.• They test their explanations.• They communicate their ideas.

In each of the three challenges students arepresented with a request from a fictitious toycompany. They are given an interesting technology and an idea for using it in a build-it-yourself toy. Following the EngineeringDesign Process, students start by assembling astandard prototype and finish with their owncustomized toys.
The Design Challenges
Student ChallengesA World in Motion: The Design Experience,Challenge 1 consists of three design challenges suitable for grades 4–6. Each challenge takes approximately 15 class periodsof about 45 minutes each. If students work onthe challenge five periods a week, a challengewill take about three weeks to complete.
Skimmer Challenge (Grade 4).Students make paper sailboats that are propelled by fans and glide along the floor.They test the effect of different sail shapes,sizes, and construction methods on the performance of their skimmers. The goal ofthis challenge is to design aset of skimmers that reliablymeet specific perfor-mance criteria. Friction,forces, and the effect ofsurface area are some ofthe physical phenom-ena studentsencounter in thischallenge.
JetToy Challenge (Grade 5). Students make balloon-powered toy cars. Theirchallenge is to design an appealing toy thatperforms in a specific way (travels far, carriesweight, goes fast, etc.). Students experimentwith different chassisdesigns and nozzle sizesto determine their effecton the JetToy’s perform-ance. Jet propulsion,friction, and air resistanceare the core scientific conceptsstudents explore in this challenge.
Industry Volunteer GuideIVG 2
Soci
ety
of A
utom
otiv
e En
gine
ers,
Inc.
© 2
000

Industry Volunteer Guide IVG 3
Soci
ety
of A
utom
otiv
e En
gine
ers,
Inc.
© 2
000
The Engineering DesignExperienceThe curriculum presents the EngineeringDesign Experience in a manner that aligns withthe engineering practices of the real world.The design process that students undertakeincludes the following five phases:
• Set Goals.Students are introduced to the challenge scenario. They review the toy company's letter, discuss what is requested of them, and share ideas about how to go about solving the problem. Students begin to workin teams and start recording work in design logs.
• Build Knowledge.Many activities are included in this phase as students develop the knowledge and skills they will need to design their own vehicles. The first thing students do is build a model and figure out how it works. In the next several activities teams vary factors on the model, record observations, and discuss results with the rest of the class. They move from simple explorations and opinions to controlled experiments and performance predictions based on graphs or tables of results.
• Design.Student teams design their own toy to meet the requirements stated in the toy company's letter. They determine the values of variables, plan construction, and predict performance based on knowledge from previous activities.
• Build and Test.Students build their design and test it to see how well it meets the performance criteria.
• Present. Student teams make presentations of their work to an audience.
Volunteering in theClassroomYour Role as a VolunteerA key element in A World in Motion is theuse of industry volunteers in the classroom.Volunteers who are engineers are especiallyvaluable as they can provide students with anawareness of the engineering profession aswell as be a support for the teacher. Whetheryou can only visit the class once or twice, oryou are able to visit more frequently, yourpresence in the classroom will make a difference to the class and improve theEngineering Design Experience for students.
Note that you are not being asked to demonstrate the scientific and technical expertise you have developed over the years.The exploratory nature of this experiencerequires that teachers and volunteers facilitatestudent learning by providing materials andpresenting an engaging challenge. Thisapproach takes more time, but it leaves students with a deep understanding and helps them develop the ability to frame questions and seek solutions.
General Guidelines forVolunteersThere are many ways volunteers can contribute. Simply by being present in theclassroom, you will lend importance to thecurriculum program and raise students' interest.
The following guidelines will help you be acomfortable and effective contributor.
• Let the teacher introduce you to the class. Give the teacher and students information that will let them get to know you as a person and as a professional.
• Invite students to ask you questions. Prime the pump, if necessary, by suggesting some questions that you think might interest them.

Industry Volunteer GuideIVG 4
Soci
ety
of A
utom
otiv
e En
gine
ers,
Inc.
© 2
000
• Ask the teacher about the math and science level of the class so that you can speak at an appropriate level and not refer to concepts that will be unfamiliarto students. Also ask the teacher for generaltips on how to talk effectively to students.
• Try to visit during the presentation of final designs. This event provides an opportunity for you to give students positive feedback and recognition for the work they have done. Having an audience of invited guests may also make the presentations moresignificant to the students.
Suggestions for Sharing Your WorkTo help students put their challenges in thelarger context of engineering, the teacher mayask you to do a short presentation on engineering at the beginning or end of theunit. Depending on your background and theneeds of the particular teacher and students,you may want to do some of the following:
• Talk with the students about your professional work. Bring demonstrations, pictures, or samples of your work, if possible.
• Relate what they are doing to what an engineer (or science professional) actually does. Help students recognize that an engineer's work is highly creative and that an engineer draws upon information from math, science, and other fields in order to create a good design.
• Discuss how teamwork is important in today's work environment. Give examples ofhow members of a design team often have different backgrounds, and how they are allimportant in making a design successful.
• Discuss the importance of keeping design logs and documenting all efforts, whether or not they are successful. If appropriate, bring in examples of the kinds of records you keep of the work you do.
• Describe some of the work that goes into successful designs, such as research, testing, prototyping, and creative thinking.
• Discuss how design specifications and drawings are used. Show examples from your own work, if appropriate.
• Discuss the value of testing and revising designs to make sure they are successful.
Suggestions for Supporting Students’ WorkYou can have a lot of fun when you assist students during a build-and-test activity. Anextra set of hands is always useful duringexperimental trials. Here are some tips for facilitating a build-and-test activity:
• Try not to be overly concerned about the correctness or precision of students’ efforts. Instead, encourage their enthusiasm and helpthem generate more ideas.
• Be careful not to build for the students, or tell them what to do, even if they ask you to.When they ask, "How do I do this?," ask them, "Where would you start?" or "What materials might you use?" Suggest materials or techniques, or make your own prototype to show, but do not build for the students.
• When students make mistakes, help them make sense of what went wrong.
• Use thought-provoking questions to focus their attention on potential problems or possible solutions.

Industry Volunteer Guide IVG 5
Soci
ety
of A
utom
otiv
e En
gine
ers,
Inc.
© 2
000
• Be interested in what they are doing and provide a sounding board for their ideas. Ask thoughtful questions and listen closely to their answers. Give students an opportunity to develop and express their thoughts.
• Listen for the hypotheses they create to explain the performance of their toy vehicle. Support them in conducting experiments to test these hypotheses.
Logistics for Successful VolunteeringTo ensure that your own experience will beenjoyable and productive, give consideration tothe following managerial and organizationaldetails:
• Get directions to the school, information on where to park your car, and instructions on the school’s procedure for signing in.
• Review the description of the challenge the class will be doing and become familiar with the content of the unit as muchas possible.
• Leave sufficient time to meet or talk with the teacher to go over the curriculum and proposed scheduling.
• Find out how the teacher prefers to communicate with you. If you rely on phone calls, be sure to exchange school and/or home numbers and best times to call. If you plan to communicate by e-mail, let each other know how often you check your mail.
• Schedule your visits in advance and check with the teacher a day or two ahead of each planned visit to confirm your arrangements.
How to Promote theCurriculum to TeachersAlthough some teachers may learn about A World in Motion:The Design Experience,Challenge 1 at national conferences, theSociety of Automotive Engineers relies onindustry professionals to promote the curriculumin their local communities. Here are some waysyou can raise awareness of this program:
• Talk to your child's teacher about possibly doing one of the challenges and offer to assist the teacher.
• Ask the teacher for names of other teachers who may be interested in doing a challenge.
• Call schools or central administration offices and get contact information for math and science coordinators.
• Go to school events such as Family Night to meet teachers.
• Put flyers describing the program inschool offices.
• Network with educators, parents, engineering professionals, and others in your community.
Good luck and
happy volunteering!


What Is a JetToy? The JetToy is a balloon-powered vehicleinvolving a simple rolling chassis(vehicle body) and a balloon motor.The motor consists of a balloon with apiece of tubing that serves as a nozzle.To prepare the JetToy for operation,the balloon is inflated through the nozzle,and the nozzle is sealed bycovering the openingwith a finger. Then theJetToy is placed on thefloor and the nozzle sealis released. The JetToyrolls forward as air isexpelled through the nozzle.
The JetToy is a simple and fun toy, easily constructed from commonmaterials. It can be made to look and perform in different ways to createa variety of moving toys that represent vehicles, animals, or whimsicalmachines.
What Is the Challenge? The fictitious toy company EarthToy Designs presents the challenge inthe form of a letter. The company wants students to provide a variety ofinteresting designs for a new line of balloon-powered vehicles made frominexpensive, common materials that will appeal to other children.Working in design teams, students will build and test model JetToys usingdifferent nozzles, and collect and analyze data to understand the effectof nozzle size on the performance of the toys. They will create otherdesigns and test them, then give a formal presentation of their finalJetToy designs.
JETTOY DESIGN CHALLENGE
INTRODUCTION
JetToy Design Challenge Introduction 121121
Overview

In the JetToy Design Challenge, students will acquire and apply theirknowledge of balloon-powered vehicles to a toy design. To make a toythat looks good and performs as planned, students will need an under-standing of how the various factors affect performance and how theseinteract. The hands-on experimentation, the graphs made during experi-mentation, and the classroom discussions interpreting these graphsprovide the basis for their understanding.
After learning how to control the performance of this toy through a seriesof exploratory tests and controlled experiments, student design teams createtheir own customized toys. The set of toys students design will constitutea fleet of JetToys that they present at the end of this challenge.
What Is the Engineering DesignExperience? The JetToy Design Challenge allows students to experience engineeringdesign much the way engineers in a real company would. For engineers,design requires gaining enough knowledge and understanding of a systemto plan out what they are going to build, before they build it. Studentshave the same need to learn before jumping to a solution, and here theywill have an opportunity to review the problem and learn how a balloon-powered vehicle works. Experimentation is a key part of building knowledge,and students will plan, execute, and reflect on the results of their experiments.From this solid basis they can design a solution to the challenge. Thedesign process is completed when the results are written up, comparedwith the original goals, and shared with the class.
Throughout the Build Knowledge phase of this challenge, students willfocus on understanding what makes a vehicle roll straight and smoothly,and how the energy stored in a balloon can be used to propel a vehicle.In doing so, they will work with and discuss factors that affect the perform-ance of their JetToys: friction, air resistance, weight, and air propulsionforce, duration, and direction. The activities of this phase also provide anengaging way to introduce students to controlled experiments and theneed to record data.
In the Design phase, students will have an opportunity to be creativewith the look of the JetToy as well as its mechanical features. Balancingthe effects of these many factors while striving to create an appealingtoy offers a rich challenge in critical thinking and provides an enjoyable“vehicle” for learning experimental methods and a process for tacklingan open-ended challenge.
JetToy Design Challenge Introduction122

As they work with the JetToy, students will be asked to• understand its construction• observe its behavior• reflect on its behavior• develop hypotheses about how it works• formulate experiments to test the hypotheses• carry out the tests they come up with and/or the activities described• design a system for a given performance requirement• build, test, revise• present to the class and explain their choices
In completing these steps, students will have experienced design in anengineering context and gained some understanding of the design processand how the products they use have come to be.
JetToy Design Challenge Introduction 123

Because the JetToy Design Challenge is inherently interdisciplinary, itaddresses content and skills across the curriculum. Objectives for scienceand technology education, which are the primary focus of the designchallenge, are listed here.
The Engineering Design Experience• Using the Engineering Design Experience as a context for teaching
and learning
• Using the Engineering Design Experience to fulfill a specified goal
Science• Formulating appropriate questions for scientific investigation
• Conducting scientific research using appropriate methods
• Interpreting scientific evidence
• Analyzing the interrelationships of several variables
• Communicating the results of scientific investigation
• Understanding forces acting on a moving object
• Understanding simple machines
• Understanding the difference between science and technology and use of design process and skills
Technology Education • Applying scientific understanding to a design problem
• Designing to optimize one or more variables
• Creating design specifications, drawings, and models
• Testing and evaluating a design
• Exploring properties of materials
The objectives of the JetToy Design Challenge correlate strongly with theNational Science Education Standards of the National Research Council(NRC) and the Benchmarks for Science Literacy of the American Associationfor the Advancement of Science (AAAS). The following two charts indicatethe areas of correlation.
JetToy Design Challenge Introduction124
Correlation with National Science Standards andBenchmarks
Objectives for the JetToy Design Challenge

JetToy Design Challenge Introduction 125
The
Engi
neer
ing
Des
ign
Expe
rien
ceU
sing
the
EDE
asa
cont
extf
orte
achi
ngan
dle
arni
ngU
sing
the
EDE
tofu
lfill
asp
ecifi
edgo
alSc
ienc
eFo
rmul
atin
gap
prop
riate
ques
tions
for
scie
ntifi
cin
vesti
gatio
nC
ondu
ctin
gsc
ient
ific
rese
arch
usin
gap
prop
riate
met
hods
Inte
rpre
ting
scie
ntifi
cev
iden
ceA
nalyz
ing
the
inter
rela
tion-
ship
sofs
ever
alva
riabl
esC
omm
unic
atin
gth
ere
sults
ofsc
ient
ific
inve
stiga
tion
Und
ersta
ndin
gfo
rces
actin
gon
am
ovin
gob
ject
Und
ersta
ndin
gsim
ple
mac
hine
sU
nder
stand
ing
the
diffe
renc
ebe
twee
nsc
ienc
ean
dte
chno
logy
and
use
ofde
sign
proc
ess
and
skill
s
Tech
nolo
gyEd
ucat
ion
App
lyin
gsc
ient
ific
unde
rsta
ndin
gto
ade
sign
prob
lem
Des
igni
ngto
optim
ize
one
orm
ore
varia
bles
Cre
atin
gde
sign
spec
ifica
tions
,dr
awin
gs,a
ndm
odel
sTe
sting
and
eval
uatin
ga
desig
nEx
plor
ing
prop
ertie
sof
mat
eria
ls
Obj
ectiv
es
JetTo
yDe
sign
Chal
leng
e
Benc
hmar
k1:Natu
reof
Scien
ce
(a)Sc
ientifi
cWorl
dView
Benc
hmar
k1:Natu
reof
Scien
ce
(b)Sc
ientifi
cInquir
y
Benc
hmar
k2:Natu
reof
Mathem
atics
(b)Math
emati
cs,Sc
ience
&Tec
hnolo
gy
Benc
hmar
k2:Natu
reof
Mathem
atics
(c)Sc
ientifi
cInquir
y
Benc
hmar
k3:Natu
reof
Techn
ology
(a)Tec
hnolo
gy&
Scien
ce
Benc
hmar
k3:Natu
reof
Techn
ology
(b)Desi
gn&
Syste
ms
Benc
hmar
k4:Th
ePhysi
calS
etting
(f)Moti
onBe
nchm
ark8:
TheDesi
gned
Worl
d
(b)Mate
rials
&Man
ufactu
ring
Benc
hmar
k9:Th
eMathem
atica
lWorl
d
(a)Num
bers Be
nchm
ark9:
TheMath
emati
calW
orld
(b)Sy
mbolic
Relat
ionshi
ps
Benc
hmar
k9:Th
eMathem
atica
lWorl
d
(e)Re
ason
ing Benc
hmar
k11:Com
monTh
emes
(a)Sy
stems Be
nchm
ark11
:Common
Them
es
(b)Mod
elsBe
nchm
ark12
:Habits
ofMind
(a)Va
lues&
Attitud
es
Benc
hmar
k12:Hab
itsof
Mind
(c)Man
ipulat
ion&
Observ
ation
Benc
hmar
k12:Hab
itsof
Mind
(d)Com
munica
tionSk
ills
Benc
hmar
k12:Hab
itsof
Mind
(e)Criti
calR
espon
seSk
ills
Correlation of JetToy Design Challenge Objectives
with the AAAS Benchmarks for Science Literacy

JetToy Design Challenge Introduction126
Scien
tificinq
uiry&
techn
ologic
al
desig
nhave
simila
rities
&dif
feren
ces
Develo
pdescr
iption
s,ex
plana
tions,
predic
tions
&mod
elsusi
ng
evide
nce
The
Engi
neer
ing
Des
ign
Expe
rien
ceU
sing
the
EDE
asa
cont
extf
orte
achi
ngan
dle
arni
ngU
sing
the
EDE
tofu
lfill
asp
ecifi
edgo
alSc
ienc
eFo
rmul
atin
gap
prop
riate
ques
tions
for
scie
ntifi
cin
vesti
gatio
nC
ondu
ctin
gsc
ient
ific
rese
arch
usin
gap
prop
riate
met
hods
Inte
rpre
ting
scie
ntifi
cev
iden
ceA
nalyz
ing
the
inter
rela
tion-
ship
sofs
ever
alva
riabl
esC
omm
unic
atin
gth
ere
sults
ofsc
ient
ific
inve
stiga
tion
Und
ersta
ndin
gfo
rces
actin
gon
am
ovin
gob
ject
Und
ersta
ndin
gsim
ple
mac
hine
sU
nder
stand
ing
the
diffe
renc
ebe
twee
nsc
ienc
ean
dte
chno
logy
and
use
ofde
sign
proc
ess
and
skill
s
Tech
nolo
gyEd
ucat
ion
App
lyin
gsc
ient
ific
unde
rsta
ndin
gto
ade
sign
prob
lem
Des
igni
ngto
optim
ize
one
orm
ore
varia
bles
Cre
atin
gde
sign
spec
ifica
tions
,dr
awin
gs,a
ndm
odel
sTe
sting
and
eval
uatin
ga
desig
nEx
plor
ing
prop
ertie
sof
mat
eria
ls
Obj
ectiv
es
JetTo
yDe
sign
Chal
leng
e
Useap
propri
atetoo
lsan
dmachin
es
toga
ther,an
alyze
&int
erpret
data
Identi
fyqu
estion
sthatc
anbe
answ
eredthr
ough
scien
tific
invest
igatio
ns
Cont
entS
tand
ard
A:
Scie
nce
asIn
quir
yCo
nten
tSta
ndar
dB:
Phys
ical
Scie
nce
Cont
entS
tand
ard
E:Sc
ienc
e&
Tech
nolo
gy
Think
critic
ally&
logica
llyto
make
therel
ation
ships
betw
een
evide
nce&
expla
natio
n
Commun
icate
scien
tific
proce
dures
&ex
plana
tions
Motion
&for
ces
Transf
erof
energ
y Design
asolut
ionor
produ
ct
Imple
menta
propo
sedde
sign
Evalu
ateco
mpleted
techn
ologic
al
desig
nsor
produ
cts
Commun
icate
thepro
cess
of
techn
ologic
alde
sign
Perfe
ctlyde
signe
dsolut
ions
dono
texis
t Techn
ologic
alde
sign
hasco
nstrai
nts
Correlation of JetToy Design Challenge Objectives
with the NRC National Science Education Standards

JetToy Design Challenge Introduction 127
The Society of Automotive Engineers offers a JetToy Materials Kit thatcontains items for a classroom of 27 students.
The JetToy Materials Kit consists of the following items:
25 JetToy Chassis Pattern Sheets
50 push-up sticks
50 push-up platforms
50 drinking straws
100 9-inch balloons
3 balloon pumps
12 5/16-inch inner-diameter clear vinyl tubing, 10 cm long
12 3/16-inch inner-diameter clear vinyl tubing, 10 cm long
12 1/2-inch inner diameter clear vinyl tubing, 10 cm long
100 #31 rubber bands
If You Do Not Have the KitThe push-up sticks and platforms come with “push-up” ice cream novelties,and can be purchased at a grocery store. Each design team of three studentswill need four platforms and sticks. Buy four feet of each size of the clearvinyl tubing at a hardware store.
Preparation and Additional MaterialsThe JetToy Materials Kit includes poster board JetToy Chassis Patternsthat students use to assemble their JetToy Chassis. If you do not have thematerials kit, each design team can glue a copy of the JetToy ChassisPattern, Reproducible Master 4, to a small sheet of poster board. Theteam can then cut out the poster board, following the directions onBuilding a JetToy Chassis, Reproducible Master 5.
JetToy Design Challenge Materials

JetToy Design Challenge Introduction128
These additional materials are required for the challenge:
• Team Design Log notebook• shoe box (for team materials)• poster board• 12- x 18-inch heavy cardboard (for ramp)• 200 pennies• overhead projector (optional)• overhead transparencies (optional)• meter stick • masking tape• rulers• chart paper• colored markers• stopwatch• scissors• ballpoint pens• pencils

JetToy Design Challenge Introduction 129
JetToy Design ChallengeActivity Calendar
Monday Tuesday Wednesday Thursday FridayWeek
1Introducing the JetToyChallenge
One
Two
Three
2
Building and Testing aJetToy Chassis
3
Adding aBalloon Motor
4
SharingFirst Results
5
Revising the Vehicle
6
DesigningExperiments
7
Formal Testing
8
ReviewingExperimental
Data
9
Designinga JetToy
10
Building and Testing
a JetToy
11Presenting
JetToyDesigns

JetToy Design Challenge Introduction130
acceleration an increase or decrease in the speed of an object, or a change in its direction of motion, caused by a force
air resistance friction due to collision of moving object with air molecules
alignment wheels are positioned so that the vehicle travels straight
balanced forces when forces act on an object such that they are in equal and opposite directions and “cancel out,” they produce no net effect to change the object’s motion (i.e., accelerate)—these forces are said tobe balanced (Compare unbalanced forces.)
balloon motor a balloon with an attached piece of tubing that serves as a nozzle; used to power a balloon-powered vehicle
circumference the distance around a circle
chassis the body of a vehicle to which the other vehicle parts are attached
diameter the distance across a circle measured through its center
friction rubbing between two surfaces that causes energy loss
force a push or a pull on an object
kinetic energy the energy an object has due to its motion
m meter
nozzle the piece of plastic tubing that controls the escape of the air from the balloon
pressure the amount of force distributed over a given area
potential energy energy stored in an object
propulsion a force that acts to speed up an object
prototype an experimental version of a design or product
unbalanced forces forces that are not in equal and opposite directions cancel each other out so that there is a net push or pull on an object, changing its current state of motion (Compare balanced forces.)
JetToy Design ChallengeGlossary

How Does the JetToy Work?
TThhee BBaalllloooonn MMoottoorrThe balloon and nozzle together make up a “balloon motor.”
You may be familiar with electric motors (as in toys, fans, householdappliances) or gasoline motors (as in cars, buses, lawnmowers), but theterm motor can be used to describe a device that transforms energy andproduces motion. The balloon motor works by storing compressed air inthe inflated balloon and releasing it through the nozzle. When the airleaves through the nozzle, a force is created that propels the vehicle forward.
EEnneerrggyyAn inflated balloon stores energy in the form of compressed air andstretched rubber. As you have probably experienced from blowing up balloons,it takes a good effort to blow air into the balloon and stretch the rubber.The air in the balloon exerts a force against the balloon material andkeeps it inflated (stretched). The balloon material contains the air andkeeps it under pressure. The compressed air in the balloon is the “fuel”for the balloon motor.
TThhee FFoorrwwaarrdd PPuusshhiinngg FFoorrcceeObjects are set in motion by unbalanced forces. Newton’s Second Law(net force = mass k acceleration) states that if an object is acted on byan unbalanced (net) force, it will undergo an acceleration (which is achange to the object’s motion in the form of speeding up, slowing down, orturning). The amount of acceleration depends on the force and the massof the object. More massive objects require greater forces than less mas-sive ones to change their motion. This is why a truck has a larger enginethan a car.
To understand the concept of “balanced” vs. “unbalanced” forces, considerthe example of a car. A car sitting at rest requires an unbalanced forwardforce from the engine to start it moving. Otherwise, nothing will happen.Once it is moving, the driver can maintain a constant speed by pushing
JetToy Design Challenge Introduction 131
JetToy Design Challenge Science Notes

on the gas pedal just the right amount. In this case, although the engineis supplying a forward force on the car, air resistance and friction createa drag force of equal value that acts in the opposite direction of theengine's force. So, although two forces act on the car (the engine’s forwardforce and the backward drag force), there is no unbalanced or net forceacting—so the car’s current state of motion does not change.
Pushing harder on the gas pedal creates a little extra forward force, causingthe car to speed up (accelerate).
Removing the foot from the gas pedal removes the engine’s forward force,leaving only the backward drag force, and the car slows down, also changingits motion. Turning the steering wheel supplies another force to the carthat causes it to change its direction. Speeding up and slowing down andturning are all examples of “acceleration,” which is a change to an object’scurrent state of motion. So, technically, the gas pedal, the brake, and thesteering wheel are all “accelerators.”
JetToy Design Challenge Introduction132

JetToy Design Challenge Introduction 133
A sealed, inflated balloon experiencesforces from the compressed air on allof its inside surfaces. The balloon is aclosed chamber, and all the forces arebalanced, so the balloon does not move.
When a hole is created in the wall of the balloon (the nozzle is opened),the forces inside the balloon are no longer “balanced.” Air pressure pushingon a piece of the balloon wall directly across from the nozzle is no longerbalanced by air pressure pushing on the opposite wall. Air near the nozzleopening escapes through the nozzlewithout pushing on any surface of theballoon. The result of this unbalanced forceis a small push on the inside of the balloon, like having a finger inside theballoon pushing continually until all theair has escaped and the air pressureinside and outside of the nozzle equalizes.
How much pushing force does the balloon experience as air escapesthrough the nozzle? Pressure is defined as force per unit area (typicalunits are “pounds per square inch”) and can be written as
Therefore you can calculate force from pressure as
The forward pushing (propulsion) force will be proportional to the area ofthe hole in the balloon (the area of the nozzle). Therefore, for larger nozzleopenings, the forward pushing force is greater. The forward pushing forcecontinues until the balloon is deflated and the air pressure inside the balloonis equal in all directions.
FFrriiccttiioonn aanndd AAiirr RReessiissttaanncceeFriction is a force that exists between all objects that slide against eachother—it uses up energy and resists the sliding motion. Friction is increasedif the two objects are pushed harder against each other. Think of slidinga box along the floor. Give it a push and it will slide some distance untilall the energy you gave it is used up. When you put weight in the boxyou push the box harder against the floor, and it will slide a shorter dis-tance. If there were no friction between the box and the floor, the boxwould never slow down or stop, like a puck gliding on an air hockeytable.

JetToy Design Challenge Introduction134
There are two main sources of friction in the JetToy: friction due to therotating wheels and friction due to air resistance. When the vehicle isrolling, there will always be some friction from the axle turning inside thedrinking straw, and the hubs of the wheels rubbing against the ends ofthe straw. Friction changes kinetic energy into heat (thermal energy). Thetemperature rise due to friction in your car is too small to feel, but couldbe measured with sensitive instruments.
Friction can also be caused by parts of the body, or the balloon, rubbingagainst the wheels, causing the JetToy to slow down more quickly andnot travel as far.
Air resistance is another type of friction. It results from the JetToy slidingagainst air particles. Air resistance increases with the frontal area of theJetToy because more air particles have to “get out of the way.” When theballoon is fully inflated and the JetToy begins to roll, the air resistanceforce is at its greatest. The effect of air resistance can be observed if theballoon is not centered (flops over to one side) when it is still inflatedand propelling the JetToy. If the balloon falls over to the right, the airresistance on that side of the JetToy is greater, and it slows that side ofthe JetToy down. This causes the JetToy to steer to the right until theballoon is deflated. The effect of air resistance is less noticeable when theballoon is centered on the JetToy.
Performance and Control of the JetToySo far you have looked at how the JetToy stores energy, the forces thatmake it move, and the forces that bring it to a stop. This helps youunderstand why the JetToy moves. Now you will examine the featuresthat affect how the JetToy moves. Here are the characteristics that studentsare asked to observe and record in these activities:
Distance: how far the JetToy travels (measured in a straight line, straight ahead)
Speed: slow, medium, or fast (relative speed will suffice)
Time: the duration of travel

JetToy Design Challenge Introduction 135
CCoonnssttrruuccttiioonn FFeeaattuurreessConstruction methods influence the performance of the JetToys in severalways. Poor construction may increase friction or air resistance, causingthe JetToy to go slower or stop sooner. Heavy construction will have thesame effect as adding weights. (See Weight below.)
NNoozzzzllee SSiizzeeThe size of the nozzle affects the performance of the JetToy in severalways: duration of travel, travel distance, and speed. As discussed earlier,the nozzle size determines how much pushing force the balloon creates.The forward pushing force is proportional to the area of the nozzle opening;therefore, a larger nozzle will produce a greater pushing force. However,more air can leave through a larger hole than a smaller one; so a balloonwith a larger nozzle will deflate sooner and will push the vehicle for ashorter time. The air escapes from the balloon more slowly with a smallnozzle, and the pushing force exists for a longer time. A JetToy with asmall nozzle accelerates more gradually, but may roll for a longer timethan a JetToy with a large nozzle. The effects of both nozzle size andweight are too complicated for us to predict, so let’s find out by experi-ence.
Will the JetToy travel farther with a large nozzle or a small one? Thelarger force produced by a larger nozzle is better able to overcome rollingfriction and accelerate the vehicle more effectively. You will find that themedium (5/16-inch) and large (1/2-inch) nozzle both propel the JetToysignificantly farther than the small (3/16-inch) nozzle, and that the largenozzle propels the JetToy a small amount farther than the medium one.You can imagine that if the small nozzle produced a force smaller thanthe friction force, then it would not move the car at all even though itpushed it for a very long time.
Another effect from different nozzle sizes is the speed of the vehicle.Greater force means that a JetToy with a larger diameter nozzle will havea greater acceleration, but for a shorter time, and will therefore reach ahigher speed more quickly than a JetToy with a smaller diameter nozzle.

WWeeiigghhttStudents may add weight to the JetToy by building heavy structures orattaching decorations, or by adding weights for the JetToy to carry.Adding weight to the JetToy affects the performance by increasing frictionbetween sliding parts and by making it harder for the motor’s pushingforce to accelerate the vehicle. This means that any added weight willmake the JetToy go slower and roll a shorter distance.
A JetToy with a medium or large nozzle can carry significantly moreweight than a JetToy with a small nozzle. With the small nozzle, even asmall amount of added weight (a few pennies) may make the JetToy tooheavy for the balloon to move.Note that JetToys with medium and large nozzles are affected differentlyby the addition of weight. You will see that added weight shortens thetravel distance of a JetToy with a medium nozzle more than a JetToywith a large nozzle.
BBaalllloooonn IInnffllaattiioonnThe amount of energy stored in the balloon increases as the balloon isinflated more. Larger balloons make the car go faster and/or farther. Thisfactor is not emphasized in the activities, but students should be able toidentify it as a major factor in determining travel distance, speed, andduration. Since the balloon inflation effect may overshadow the effects ofmotor size and added weight, students will need to keep balloon inflationconstant if they are testing other variables. Here are two ways to make aballoon inflation guide:
• Hole template method. Cut a hole of the desired size out of stiffpaper (an 8-inch diameter works well). When the widest part of the balloon just fits in this hole, the balloon is ready.
• String method. Cut a piece of string to the desired circumferencesize. Hold it around the widest part of the balloon. When the endsof the string just touch, the balloon is ready. The circumference ispi x the diameter; for an 8-inch balloon the circumference is 25 inches.
QQuuaalliittaattiivvee SSuummmmaarryy TTaabblleeHere is a qualitative summary of the variable factors and the characteris-tics they control.
JetToy Design Challenge Introduction136
construction features friction speed, distance, durationadded weight friction speed, distance, durationnozzle size propulsion force speed, distance, duration
Factors to Vary Forces Affected Performance Affected

JetToy Design Challenge Introduction 137
What Difficulties Might Students Have?Following are some common construction problems and possible solutions:
1. The balloon rubs against the wheels as it deflates, causing friction, and stops the car prematurely. If this happens, students can try to design these body features that keep the balloon away from the wheels:
• Fenders that go up and over the wheels.
• A higher mounting platform for the nozzle so the balloon falls down instead of to the side.
• A wider or longer car so the balloon cannot reach the wheels.
2. The inflated balloon flops to one side when the car is traveling, increasing air resistance on one side, and causing the car to veer off to the side. If this happens, students can add one of these structures to keep the balloon in the center of the car:
• A ring that goes around the balloon.
• Walls that keep the balloon from going side to side.
3. The nozzle is not mounted straight and makes the car veer off to the side. If this happens, students may do the following:
• Be careful to point the nozzle directly backward. Since the tubing tends to have a natural bend, fasten it so the tube curves up or down, not to the side.
• Make a straight groove or V-shaped “nozzle guide” for the nozzle to rest in. Use tape or twist-ties to hold it in place.
4. The body is not flat and the wheels are not squarely on the ground, causing the car to veer to the side. If this happens, students should try to get all four wheels back on the ground:
• Re-tape the corners so the bottom of the body is flat.
• Add stiffeners to hold the body flat.
• Add weight over the front and/or back wheels that are not on the ground.
5. The axles are not parallel, causing the car to veer to the side. If this happens, students should remount the straws on the bottom of the body until they are aligned and parallel to each other.
6. The wheels rub against the side of the car, causing the car to stop pre-maturely. If this happens, students should remount the straws on the bottom of the body, making sure the straws overhang the body on each end but do not rub the hubs of the wheels.

Lesson Plans are not included in this document.
Check out the sample lesson plan located in the curriculum
resources.