Embed Size (px)
Citation preview
10Configuring XFree86
Configuration of XFree86 is done through the configuration file /etc/X11/XF86Config. Anumber of tools are available to help you do the configuration. We describe these tools inthis chapter; they all attempt to automate the process, although some do so more thanothers. You can also edit XF86Config manually with a text editor and we show you whatthe file looks like, so you can do this. Even if you used a configuration tool when youinstalled XFree86, you might find it simpler to edit the file directly if you just need totweak it a bit later.
As this is being written, the current version of XFree86 is version 4.2. The version 4releases have significant enhancements over the previous version, 3.3.6. Theseenhancements include changes to the server architecture and the addition of new features,including:
Introduction of a new configuration utility, xf86cfg, and the addition of a new option,-configure, to the XFree86 command. These features are described in the sectionstitled “Graphical Configuration Using xf86cfg” and “Automatic Configuration Using XFree86–configure.”
Reduced size of the configuration file (XF86Config).
Improved font support, font rasterizers, and international keyboard support.
Incorporation of X11R6.4 features, such as support for multiple monitors (known asmultihead displays), including the Xinerama extension, which allows multiplemonitors to be treated as one display. These features are covered in the “Multiheaded Displays” section at the end of this chapter.
Support for more than 500 video cards and 30 types of graphics chipsets using asingle server, XFree86; older versions include multiple chipset-based servers. Thisuse of a single server is achieved by using loadable modules and drivers. Note,though, that support for some (usually older) video cards has been removed.
Incorporation of standard Video Graphics Array (VGA) timing modes into theserver. This means that you no longer need to add mode lines to XF86Config.
If you are already running XFree86, you can easily determine which version you haveinstalled by running X with the–version option:
X -version
When you run the command, you’ll see something like this:
XFree86 Version 4.2.0 / X Window System(protocol Version 11, revision 0, vendor release 6600)Release Date: 23 January 2002
If the server is older than 6-12 months, or if your card isnewer than the above date, look for a newer version beforereporting problems. (See http://www.XFree86.Org/FAQ)
Operating System: SuSE Linux [ELF] SuSEModule Loader present
This output tells you that you are running version 4.2.0, released on January 23, 2002,and that you are running it on a SuSE Linux system. Notice that the server suggestslooking for a newer version if this one is older than 6 to 12 months. As with any software,improvements are made to XFree86, particularly in its support for graphic hardwaredevices. Notice also that you can run this command even if X is already running on yoursystem.
Configuration PlanningWhile most of the configuration tools do their best to probe the system for the informationthey need, there are pieces of information you should have available before you beginDoing some initial planning and information gathering will help the configuration processgo smoothly..
The Video CardThe choice of video card has the most influence on your success with XFree86. XFree86supports a large array of graphics hardware. You can find an up-to-date list of supportedcards and chipsets at http://www.xfree86.org/current/Status.html. XFree86 video driversare written for graphic chipsets, not for the video cards they’re installed on. Determine the make, model, and chipset of your video cardand compare this information with the list.You should also know how much video memory is available on the card. The list ofsupported video cards includes cards for each of the possible bus types, including ISA,VLB, and PCI.
XFree86 v4 does not support all the video cards supported by XFree86 v3.3.6. This isespecially the case with older video cards. In that case, you must consider replacing yourolder video card or using XFree86 v3.3.6. On the other hand, if you have a very recentvideo card, support is likely to exist only in v4.
Be aware that it’s not sufficient to know what video card you have; you also need to know what chipset it uses in order to determine whether XFree86 supports the card.
Using SuperProbe to identify installed graphics hardware
In order to configure X, you need to know the details about your graphics hardware. Youcan find that information from various sources. Some of the possibilities are your videocard manual, the card manufacturer’s web site, or opening up the system and inspecting the card. But the easiest way, assuming you have Linux already installed and just need toconfigure XFree86, is to run the program SuperProbe. Included with the XFree86software and living in /usr/X11R6/bin, this program attempts to determine the type ofgraphics hardware installed in your system by checking for known registers in variouscombinations at various memory locations.
When you run SuperProbe, it first pauses for five seconds before probing your hardware.This gives you a chance to abort execution if you’re concerned that it might get confused with your graphics hardware and hang itself and/or your system.
Running SuperProbe with no options reports on your graphics hardware. For example:
SuperProbe. . . initial messages omitted
First video: Super-VGAChipset: ATI 264GT-IIc (3D Rage IIc) (Port Probed)Memory: 4096 KbytesRAMDAC: ATI Mach64 integrated 15/16/24/32-bit DAC w/clock
(with 6-bit wide lookup tables (or in 6-bit mode))(programmable for 6/8-bit wide lookup tables)
Attached graphics coprocessor:Chipset: ATI Mach64Memory: 4096 Kbytes
The information gained from the report can be helpful when using manual configurationtools such as xf86config or when directly editing the XF86Config file. SuperProbe alsohas a -verbose option that provides detailed status messages as it probes.
If you want to check before you run SuperProbe to see if it supports your graphicshardware, use the -info option as follows:
SuperProbe -infoSuperProbe Version 2.22 (2000 March 6)
SuperProbe can detect the following standard video hardware:MDA, Hercules, CGA, MCGA, EGA, VGA
SuperProbe can detect the following SVGA chipsets/vendors:WD, Video7, MX, Genoa, UMC, Trident, SiS, Matrox, ATI, Ahead, NCR,S3, AL, Cirrus54, Cirrus64, Epson, Tseng, RealTek, Rendition, Primus,Yamaha, Oak, Cirrus, Compaq, HMC, Weitek, ARK Logic, Alliance,SigmaDesigns, Intergraphics, CT,
SuperProbe can detect the following graphics coprocessors/vendors:ATI_Mach, 8514/A, I128, GLINT,
SuperProbe can detect the following RAMDACs:Generic, ALG1101, SS2410, Sierra15, Sierra16, Sierra24, MU9C4870,MU9C4910, ADAC1, 68830, 68860, 68875, ATIMisc, Cirrus8, Cirrus24B,Cirrus24, 20C490, 20C491, 20C492, 20C493, 20C497, Bt485, 20C504,20C505, TVP3020, TVP3025, EDSUN, 20C498, 22C498, STG1700, S3_GENDAC,S3_SDAC, TVP3026, RGB524, RGB514/525, RGB528, STG1703, 20C409,20C499, TKD8001, TGUIDAC, Integrated, MU9C1880, IMSG174, STG1702,CH8398, 20C408, TVP3030, ET6000, w30C516, PM642x, ICS5341, ICS5301,MGA1064SG, MGAG100, MGAG200, SiS,

If you find that it is unfamiliar with your graphics hardware, do not run SuperProbebecause it could hang your system.
The DisplayThe display, often referred to as the monitor, has two critical parameters. They are thevertical refresh rate (in Hz), which is the rate at which the whole screen is refreshed, andthe horizontal sync rate (in kHz), which is the rate at which scanlines are displayed. Thesetwo items can usually be found in your monitor’s documentation. Though XFree86 can be configured to handle just about any monitor, it’s good to know these two values, especially if you have a nonstandard monitor.
If you are running XFree86 v3.3.6 or earlier, you also need to determine the appropriatemodelines for your display. The modelines describe in detail the specifics of yourmonitor’s capabilities for different video modes. When you configure X, the configuration tool attempts to generate a set of modelines for you. If there are problems,you may be able to find the appropriate modelines on your monitor manufacturer’s web site. See the section “Modes” for more information.
The Pointer and KeyboardYou should know what type of pointer you have: the model if possible, but at least howmany buttons it has and whether it uses a PS/2, USB, or serial connection. You also needto know what style of keyboard you have and what language layout you want.
Configuration ToolsConfiguration tools can be used for a first-time installation of your XFree86 X server, andthey can later be used to fine-tune your server for both visual quality and graphicshardware optimization. You may also need to reconfigure your server if you add orreplace any hardware.
The choice of a configuration tool is normally a personal preference. Every XFree86software configuration tool has a common goal: to generate an accurate and properlyworking XF86Config file. This file, explained later in detail, is parsed when XFree86 isstarted. It contains information about your system’s graphics hardware, keyboard, pointer, installed fonts, and screen resolutions and sync rates. The major differences are in howmuch manual effort they require and the type of interface (i.e., whether it’s graphical or text-based).
Automatic Configuration Using XFree86 -configureXFree86 version 4.0.1introduced the ability for the server to configure itself from thecommand line with the -configure option. To do this, you need to be logged in as root andbe certain that no X server is already running. A sample output using this option follows:
# XFree86 -configureXFree86 Version 4.0.1a / X Window System(protocol Version 11, revision 0, vendor release 6400)Release Date: 2 August 2000
If the server is older than 6-12 months, or if your card is newer

than the above date, look for a newer version before reportingproblems. (see http://www.XFree86.Org/FAQ)
Operating System: Linux 2.2.5-22smp i686 [ELF]Module Loader present(==) Log file: "/var/log/XFree86.0.log", Time: Mon Sep 10 20:49:29 2001(--) using VT number 7
... [uninteresting output omitted]
(++) Using config file: "/root/XF86Config.new"Markers: (--) probed, (**) from config file, (==) default setting,
(++) from command line, (!!) notice, (II) informational,(WW) warning, (EE) error, (??) unknown.
(==) ServerLayout "XFree86 Configured"(**) |-->Screen "Screen0" (0)(**) | |-->Monitor "Monitor0"(**) | |-->Device "Card0"(**) |-->Input Device "Mouse0"(**) |-->Input Device "Keyboard0"(WW) The directory "/usr/X11R6/lib/X11/fonts/100dpi/" does not exist.
Entry deleted from font path.(==) FontPath set to"/usr/X11R6/lib/X11/fonts/misc/,/usr/X11R6/lib/X11/fonts/Speedo/,/usr/X11R6/lib/X11/fonts/Type1/,/usr/X11R6/lib/X11/fonts/CID/,/usr/X11R6/lib/X11/fonts/75dpi/"(==) RgbPath set to "/usr/X11R6/lib/X11/rgb"(==) ModulePath set to "/usr/X11R6/lib/modules"(II) Loading /usr/X11R6/lib/modules/linux/libint10.a(II) Module int10: vendor="The XFree86 Project"
compiled for 4.0.1a, module version = 1.0.0(II) ATI(0): Primary V_BIOS segment is: 0xc000(II) Loading /usr/X11R6/lib/modules/libddc.a(II) Module ddc: vendor="The XFree86 Project"
compiled for 4.0.1a, module version = 1.0.0(II) Loading /usr/X11R6/lib/modules/libvbe.a(II) Module vbe: vendor="The XFree86 Project"
compiled for 4.0.1a, module version = 1.0.0(II) ATI(0): VESA Bios detected(II) ATI(0): VESA VBE DDC supported
XFree86 detected your mouse at device /dev/mouse.Please check your config if the mouse is still notoperational, as by default XFree86 tries to autodetectthe protocol.
Your XF86Config file is /root/XF86Config.new
To test the server, run 'XFree86 -xf86config /root/XF86Config.new'
This output shows that running XFree86 with the -configure option loads all video drivermodules, probes the hardware, and then writes an initial configuration file,/root/XF86Config.new, using the information it detected. You can directly test thisconfiguration file by running XFree86 with the -xf86config option:
# XFree86 -xf86config /root/XF86Config.new
This starts the XFree86 X server using the newly made configuration file. If thisconfiguration works and its result is pleasing, you can copy or move the configuration fileto /etc/X11/XF86Config.

If there is a problem with the configuration, you can check the file/var/log/XFree86.0.log. This contains the configuration output as it appeared on yourscreen, but which will have disappeared when you tested the configuration. This oftengives you a hint as to what is wrong. In addition, newsgroups such ascomp.os.linux.hardware and comp.os.linux.x can be sources of help. If the problem seemsto be with the video card, the XFree86 web site at http://wwww.xfree86.org may tell youwhether the video card is or will soon be supported.
The following sections describe the configuration tools. For more information on thespecifics of the configuration file itself, see the section “The XF86Config File” later in this chapter.
Graphical Configuration Using xf86cfgAnother configuration tool introduced with XFree86 v4.0.1 is the graphical client namedxf86cfg. Its opening screen is shown in Figure 10-1. This shows a typical system with amonitor, video card, keyboard, and a mouse.
Figure 10-1: XFree86 v4’s xf86cfg
xf86cfg is a tool for configuring XFree86 v4. You can use xf86cfg either to write theinitial configuration file or to customize the current configuration.

Because it is a graphical tool, xf86cfg runs inside X. In order to allow you to use xf86cfgto create the initial configuration file, therefore, the program first checks to see if X isrunning.If X is not running, xf86cfg simply runs the command XFree86 -configure toallow the X server to detect your computer system’s hardware and write an initial XF86Config file to your home directory. Then xf86cfg starts XFree86 and displays theconfiguration window, allowing you to customize the configuration.
If the X server is already running, xf86cfg reads the default XF86Config (which may notbe the one that is in use by the current X server) and allows you to customize it.
xf86cfg is easy to use. Moving the pointer over a hardware item displays the item’s current configuration. Clicking the left pointer button closes that display. Clicking on theitem with the right mouse button pops up a menu that lets you configure it, change itsoptions, enable or disable it, or even remove it (actually, remove its entries from theconfiguration file). When you select an item from the menu, a new window is displayed;you can make any changes or set options in that window. If the window has an “Apply changes” button, you can apply the changes immediately. Otherwise, changes take effect the next time XFree86 is started.
To add a new device, select the appropriate button on the second row of the screen (withpictures of a mouse, a keyboard, a video card, and a monitor). xf86cfg displays a menuwith two options: add a new device or configure the existing device or devices.
You can also move an icon around in the window by clicking the left pointer button anddragging the icon to a new location.
Text-based Configuration Using xf86configxf86config is an interactive, text-based program for generating an XF86Config file. Itswelcome screen, shown in Figure 10-2, introduces xf86config and lets you know whatinformation you should have available.
To determine if X is running, xf86cfg checks to see if the DISPLAY environment variable is set.The X server requires that this variable be set to indicate the default host and display, so it is agood indicator that X is running.

Figure 10-2: xf86config welcome screen
Even with the help of SuperProbe’s report we don’t yet have enough information to use xf86config. Namely, xf86config will ask us for the monitor’s horizontal sync rate, as shown in Figure 10-3 and its vertical refresh rate, as shown in Figure 10-4. Though itgives us suggestions and warns us to use a conservative rate when in doubt, you should beable to find this information in the monitor’s documentation or sometimes on the manufacturer’s web site.
Figure 10-3: Horizontal sync rate question

Figure 10-4: Vertical sync rate question
If you can’t find the correct values, choose conservatively, as xf86config recommends,especially for the horizontal sync range—too high a value can damage your monitor. Ifyou have problems with your screen image later, such as flickering or snow, you mayneed to adjust the sync rates.
xf86config is run from the console or an xterm window. It prompts you for theinformation it needs. One type of prompt is shown in the figures above, where theprogram presents a numbered list of possibilities and a prompt at the bottom of the screenwaits for you to enter one of the numbers. In some cases, as in the two examples above,the final choice is to enter your own value. Selecting that option results in another screenthat prompts for your entry. Other screens ask a question that can be answered with yes orno; enter “y” for yes or “n” for no in response to those questions.
When it’s ready to write the completed configuration file, xf86config lets you choosewhere the file should be written. It tells you that it is about to write the file and asks if youwant it written to the default location; if you answer “n”, it asks if you want it written to the current directory. If you still say “n”, it lets you enter a filename. Note that if you arenot logged in as root, you can still run xf86config, but you can only save the resulting fileto a directory where you have write privileges, such as your home directory.
Red Hat’s XconfiguratorRed Hat Linux includes a custom configuration-generator named Xconfigurator. Likexf86config, Xconfigurator is a text-based program, but unlike xf86config, you must beroot to run the program. This tool is invoked from the console if X is not yet running orfrom an xterm command line within X. The command to invoke Xconfigurator is:
Xconfigurator
You then see a window as shown in Figure 10-5.
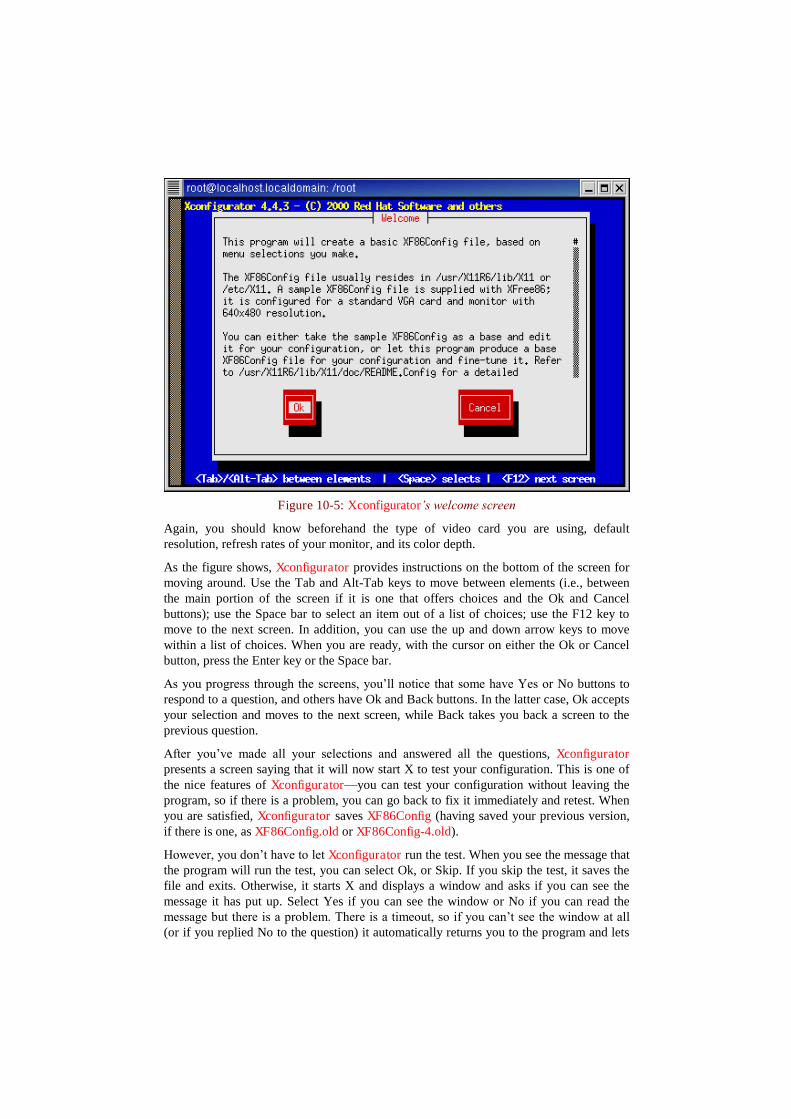
Figure 10-5: Xconfigurator’s welcome screen
Again, you should know beforehand the type of video card you are using, defaultresolution, refresh rates of your monitor, and its color depth.
As the figure shows, Xconfigurator provides instructions on the bottom of the screen formoving around. Use the Tab and Alt-Tab keys to move between elements (i.e., betweenthe main portion of the screen if it is one that offers choices and the Ok and Cancelbuttons); use the Space bar to select an item out of a list of choices; use the F12 key tomove to the next screen. In addition, you can use the up and down arrow keys to movewithin a list of choices. When you are ready, with the cursor on either the Ok or Cancelbutton, press the Enter key or the Space bar.
As you progress through the screens, you’ll notice that some have Yes or No buttons torespond to a question, and others have Ok and Back buttons. In the latter case, Ok acceptsyour selection and moves to the next screen, while Back takes you back a screen to theprevious question.
After you’ve made all your selections and answered all the questions, Xconfiguratorpresents a screen saying that it will now start X to test your configuration. This is one ofthe nice features of Xconfigurator—you can test your configuration without leaving theprogram, so if there is a problem, you can go back to fix it immediately and retest. Whenyou are satisfied, Xconfigurator saves XF86Config (having saved your previous version,if there is one, as XF86Config.old or XF86Config-4.old).
However, you don’t have to let Xconfigurator run the test. When you see the message thatthe program will run the test, you can select Ok, or Skip. If you skip the test, it saves thefile and exits. Otherwise, it starts X and displays a window and asks if you can see themessage it has put up. Select Yes if you can see the window or No if you can read themessage but there is a problem. There is a timeout, so if you can’t see the window at all (or if you replied No to the question) it automatically returns you to the program and lets

you go back to correct your configuration. If you answer Yes, it writes the configurationfile.
Finally, Xconfigurator asks if you want to configure X to start automatically when youreboot. If you say Yes, it updates the file /etc/inittab to boot to X; otherwise it sets it toboot to the command line. (See Chapter 11, X Display Managers, for more informationon /etc/inittab.)
SuSE’s SaX and SaX2SuSE Linux provides a graphical X configuration tool named SaX2 (SuSE Advanced XConfiguration Tool) for XFree86 v4. Its predecessor, SaX, is used for XFree86 v3.3. Thissection discusses SaX2.
When you install SuSE, including X, the installation process starts SaX2 to install andconfigure X. If your system is already set up with the XFree86 v4 X server, then you canrun SaX2 directly to fine-tune the configuration. Finally, if Linux is installed, but youhaven’t yet configured X, you can run SaX2 to do the configuration. If you are using XFree86 v3.3, then running SaX2 displays a message telling you to use SaX. If youcontinue with SaX2, then XFree86 v4 is set up for you and the next time the X server isstarted you’ll be running XFree86 v4.x instead of XFree86 v3.x.
Start SaX2 from the console if X is not running or from an xterm command line within Xto configure XFree86:
sax2
or choose SaX2 from the window manager’s or desktop environment’s menu. In the case of KDE3 this is via SystemConfigurationSaX2.
The first thing the program does is probe for a graphics card, keyboard, and mouse. Ituses the information it has obtained to write an initial XF86Config file, and then starts X
After SaX2 has probed your hardware and detected a video card and monitor, it sets whatit determines to be the optimal resolution, and displays a window showing what the screenwill look like at that resolution, with the question “Do you like it?” At that point you can select one of the following and then hit the Ok button:
CancelTerminates SaX2 without saving the configuration.
AlterAllows you to choose one of the following options to alter the current configuration:
Tune ModeLets you adjust the resolution and proper placement of the screen by running thexfine tool.
Change configurationContinues to run SaX2.
OkSaves the current configuration and exits.
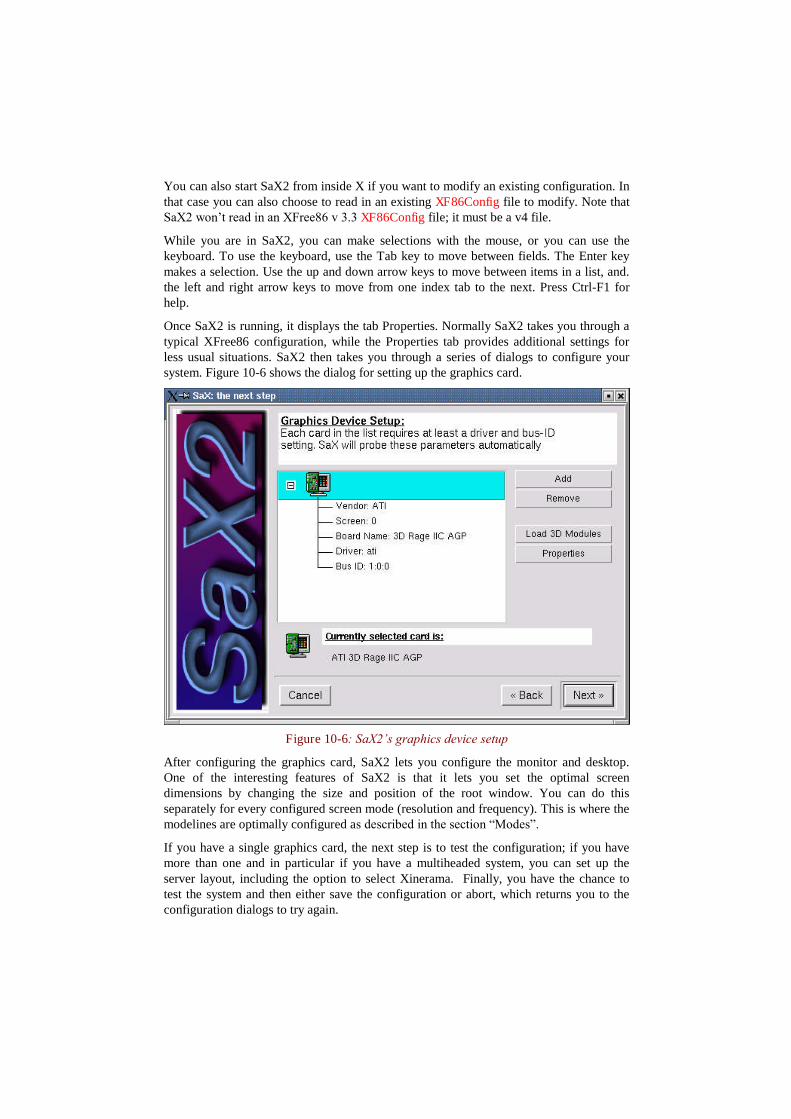
You can also start SaX2 from inside X if you want to modify an existing configuration. Inthat case you can also choose to read in an existing XF86Config file to modify. Note thatSaX2 won’t read in an XFree86 v 3.3 XF86Config file; it must be a v4 file.
While you are in SaX2, you can make selections with the mouse, or you can use thekeyboard. To use the keyboard, use the Tab key to move between fields. The Enter keymakes a selection. Use the up and down arrow keys to move between items in a list, and.the left and right arrow keys to move from one index tab to the next. Press Ctrl-F1 forhelp.
Once SaX2 is running, it displays the tab Properties. Normally SaX2 takes you through atypical XFree86 configuration, while the Properties tab provides additional settings forless usual situations. SaX2 then takes you through a series of dialogs to configure yoursystem. Figure 10-6 shows the dialog for setting up the graphics card.
Figure 10-6: SaX2’s graphics device setup
After configuring the graphics card, SaX2 lets you configure the monitor and desktop.One of the interesting features of SaX2 is that it lets you set the optimal screendimensions by changing the size and position of the root window. You can do thisseparately for every configured screen mode (resolution and frequency). This is where themodelines are optimally configured as described in the section “Modes”.
If you have a single graphics card, the next step is to test the configuration; if you havemore than one and in particular if you have a multiheaded system, you can set up theserver layout, including the option to select Xinerama. Finally, you have the chance totest the system and then either save the configuration or abort, which returns you to theconfiguration dialogs to try again.

The XF86Config FileThe XF86Config file differs substantially between XFree86 version 3.3 and 4.0. Thissection discusses the XF86Config file for XFree86 v4.0. In certain cases the differences tothe older XFree86 v3 file may be mentioned.
Because XFree86 comes with a default XF86Config file, you should not ever need tomanually create one from scratch. However, you may find that you want to edit the file tomake quick changes, either because you have modified your system hardware, you wantto enable or disable certain features of X for your session, or to take advantage of anyspecial features or options available for your system’s graphics driver.
Seasoned experts will trim down their XF86Config file to its bare minimum but still usethe full functionality of their graphics hardware. The following sections will introduce youto XF86Config.
XF86Config LocationWhen a non-root user starts XFree86, the server looks for the XF86Config file in thefollowing places:
/etc/X11/cmdline/usr/X11R6/etc/X11/cmdline/etc/X11/$XF86CONFIG/usr/X11R6/etc/X11/$XF86CONFIG/etc/X11/XF86Config-4/etc/X11/XF86Config/etc/XF86Config/usr/X11R6/etc/X11/XF86Config.hostname/usr/X11R6/etc/X11/XF86Config-4/usr/X11R6/etc/X11/XF86Config/usr/X11R6/lib/X11/XF86Config.hostname/usr/X11R6/lib/X11/XF86Config-4/usr/X11R6/lib/X11/XF86Config
where cmdline is the server configuration file specified with the -xf86config command-line option to the XFree86 command, $XF86CONFIG is the configuration file specifiedby the environment variable XF86CONFIG, and hostname is the system’s hostname as reported by the hostname command.
When the root user starts the X server, the configuration file search locations are slightlydifferent, as follows:
cmdline/etc/X11/cmdline/usr/X11R6/etc/X11/cmdline$XF86CONFIG/etc/X11/$XF86CONFIG/usr/X11R6/etc/X11/$XF86CONFIG$HOME/XF86Config/etc/X11/XF86Config-4/etc/X11/XF86Config/etc/XF86Config/usr/X11R6/etc/X11/XF86Config.hostname/usr/X11R6/etc/X11/XF86Config-4/usr/X11R6/etc/X11/XF86Config

/usr/X11R6/lib/X11/XF86Config.hostname/usr/X11R6/lib/X11/XF86Config-4/usr/X11R6/lib/X11/XF86Config
XF86Config SectionsThe XF86Config file is divided into sections. A section begins with a header that containsthe reserved word Section followed by the section title enclosed in double quotationmarks ("") and ends with a line containing only the reserved word EndSection. Theentries appropriate for each section are specified between the Section andEndSection lines, one entry to a line. An entry contains a keyword followed by one ormore values, with each value in double quotation marks. The entry lines are usuallyindented for readability, but they aren’t required to be.
The general format of a section looks like this:
Section "title"keyword "value" ["value" ...]...
EndSection
In some cases, sections can have subsections. The format of a subsection is similar to thatof a section:
SubSection "title"keyword "value" ["value" ...]...
EndSubSection
In cases where keyword values are Boolean, they can be specified as true, yes, on, or 0 forTRUE, and false, no, off, or 1 for FALSE.
The sections are listed with a short description in Table 10-1. The order in which theyappeared was significant in earlier versions of XFree86, but starting with version 4.0, theorder is no longer relevant.
Table 10-1: XF86Config sections
Section Description
Files Sets default search paths for fonts, the RGB color database, and run-time loadable modules.
ServerFlags Contains various server-wide options.
Module An optional section that specifies which run-time loadable modulesare to be dynamically loaded when the X server starts up.
InputDevice Describes an input device such as a keyboard or mouse.
Device Describes a graphics device (video adaptor).
VideoAdaptor An optional section describing an Xv video adaptor.
Monitor Describes a monitor.
Modes Optional section that describes the possible video modes.
Screen Ties together a Monitor and a Device and is specified in theServerLayout.

ServerLayout Ties together a Screen with one or more InputDevices.
DRI Provides DRI (Direct Rendering Infrastructure) configurationinformation.
Vendor Provides vendor-specific configuration information.
A more detailed description of each section, including any possible subsections, follows.The descriptions also note sections that may appear more than once.
Files
The Files section contains entries that tell the XFree86 server where to find specificfiles. Table 10-2 shows in detail the configuration keywords that can be used in theFiles section. Notice that each of these keywords takes a parameter or a list ofparameters that should be enclosed in a pair of double quotation marks ("").
Table 10-2: Files section keywords
Keyword Description
FontPath The font path. Multiple FontPath entries are allowed as well asmultiple comma-spaced entries in a single FontPath entry.
ModulePath A comma-separated search path for the X server modules to beloaded when XFree86 starts.
RGBPath The location of the RGB database.
If the RGBPath keyword is omitted, the RGB path defaults to /usr/X11R6/lib/X11/rgb.
If the FontPath keyword is omitted, the font path defaults as follows:
/usr/X11R6/lib/X11/fonts/misc//usr/X11R6/lib/X11/fonts/Speedo//usr/X11R6/lib/X11/fonts/Type1//usr/X11R6/lib/X11/fonts/CID//usr/X11R6/lib/X11/fonts/75dpi//usr/X11R6/lib/X11/fonts/100dpi/
Invalid font path elements are removed from the path when X starts.
If the ModulePath keyword is omitted, the path defaults to /usr/X11R6/lib/modules.You can specify multiple ModulePath entries; if you do, the results are concatenated tobuild a single path.
If you use all the default values, you can omit the Files section from XF86Config.
ServerFlags
Entries in the ServerFlags section begin with the word Option and are used to turnon or off certain global server options.
The entries are specified as:
Option "option" "value"
where the value is either a Boolean, or a specific value. For example, to disable mode-switching from your X session, you might specify:
Option "DontZoom" "true"
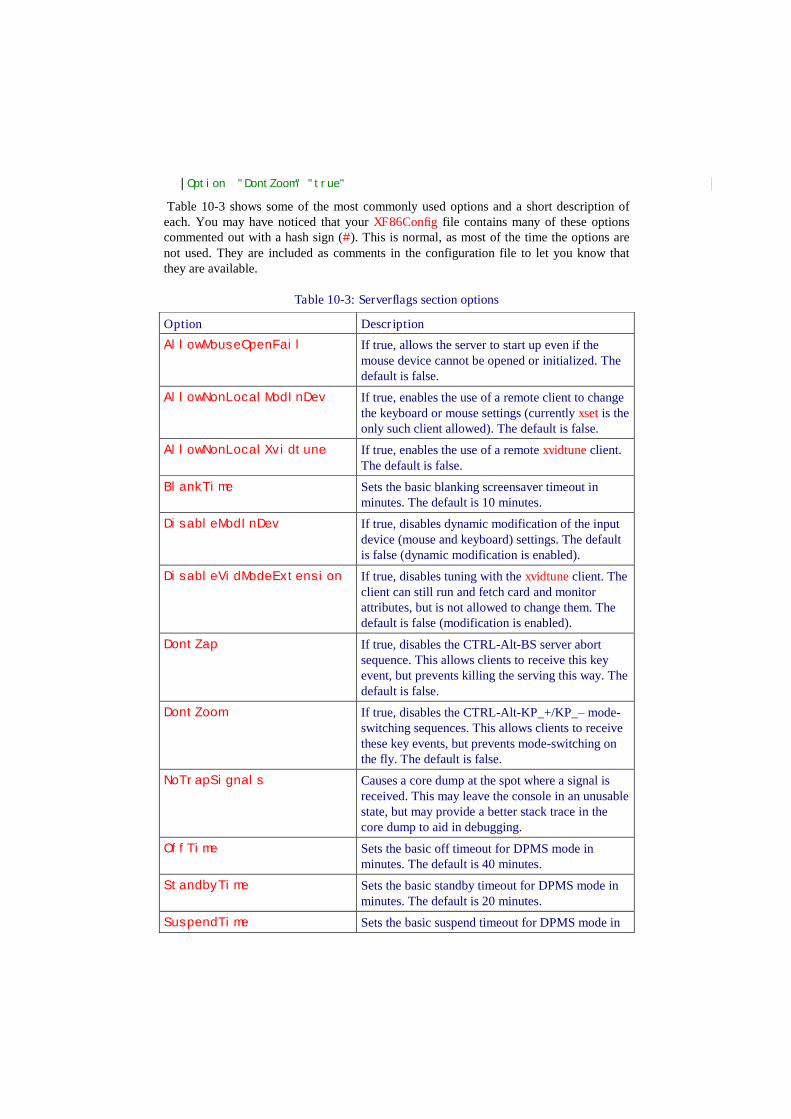
Table 10-3 shows some of the most commonly used options and a short description ofeach. You may have noticed that your XF86Config file contains many of these optionscommented out with a hash sign (#). This is normal, as most of the time the options arenot used. They are included as comments in the configuration file to let you know thatthey are available.
Table 10-3: Serverflags section options
Option Description
AllowMouseOpenFail If true, allows the server to start up even if themouse device cannot be opened or initialized. Thedefault is false.
AllowNonLocalModInDev If true, enables the use of a remote client to changethe keyboard or mouse settings (currently xset is theonly such client allowed). The default is false.
AllowNonLocalXvidtune If true, enables the use of a remote xvidtune client.The default is false.
BlankTime Sets the basic blanking screensaver timeout inminutes. The default is 10 minutes.
DisableModInDev If true, disables dynamic modification of the inputdevice (mouse and keyboard) settings. The defaultis false (dynamic modification is enabled).
DisableVidModeExtension If true, disables tuning with the xvidtune client. Theclient can still run and fetch card and monitorattributes, but is not allowed to change them. Thedefault is false (modification is enabled).
DontZap If true, disables the CTRL-Alt-BS server abortsequence. This allows clients to receive this keyevent, but prevents killing the serving this way. Thedefault is false.
DontZoom If true, disables the CTRL-Alt-KP_+/KP_–mode-switching sequences. This allows clients to receivethese key events, but prevents mode-switching onthe fly. The default is false.
NoTrapSignals Causes a core dump at the spot where a signal isreceived. This may leave the console in an unusablestate, but may provide a better stack trace in thecore dump to aid in debugging.
OffTime Sets the basic off timeout for DPMS mode inminutes. The default is 40 minutes.
StandbyTime Sets the basic standby timeout for DPMS mode inminutes. The default is 20 minutes.
SuspendTime Sets the basic suspend timeout for DPMS mode in
minutes. The default is 30 minutes.
Xinerama If true, enables the Xinerama extension. The defaultis false.
The ServerFlags options can also be set in the ServerLayout section. AServerLayout setting overrides a ServerFlags setting. Set options in theServerFlags section when you want them to apply to all server layouts. If you want anoption to apply only to a particular layout, set it in the ServerLayout section. You canalso specify an option in the ServerFlags section, to apply globally, and then overrideit in a particular ServerLayout section.
Some options also have a corresponding command-line option. Setting such an option onthe command line overrides both the ServerLayout and the ServerFlags settings.
Module
The Module section specifies X server modules to be loaded on startup; typically theseare X server extension modules and font rasterizer modules. Most other modules areloaded automatically when they are needed via other mechanisms. This section onlyapplies to XFree86 v4, and even then it is ignored if XFree86 was statically built (i.e.,with all modules compiled in).
The Module section takes either the keyword Load, described in Table 10-4, or asubsection.
Table 10-4: Module section keyword
Keyword Description
Load Loads the indicated module. This section can, and usually does, havemultiple Load options.
If a module is specified with Load, it takes a single parameter, the name of the module tobe loaded. For example:
Load "GLcore"
This is the most common form of a Modules section entry.
However, if you need to pass a parameter to the module to be loaded, you do that with asubsection. In that case, the subsection title is the name of the module, and each parameteris passed in an Option keyword entry:
SubSection "extmod"Option "omit XFree86-VidModeExtension"
EndSubSection
The system looks for modules by searching each directory specified in the ModulePathentry of the Files section, and in the drivers, input, extensions, fonts, and subdirectoriesof each of those directories. In addition to this, operating system specific subdirectories ofall the above are searched first if they exist.
To see what font and extension modules are available, check the contents of the/usr/X11R6/lib/modules/fonts and /usr/X11R6/lib/modules/extensions directories.

InputDevice
Multiple InputDevice sections are used to describe input devices such as thekeyboard and the pointer. In XFree86 v4, these sections replace the separate Keyboardand Pointer sections used by XFree86 v3.3. However, for compatibility, those sectionsare still recognized, but their use is not endorsed. InputDevice sections have thefollowing format:
Section "InputDevice"Identifier "name"Driver "inputdriver"Option "value"...
EndSection
The value specified for Identifier indicates the input device and is usually the typeof device followed by a 0 for the first occurrence of that device, 1 for the second, etc. Forexample, the first keyboard would have Identifier "Keyboard0". The two mostcommon devices are Keyboard and Mouse. Normally you’ll have two InputDevicesections, one for each of these two devices. Table 10-5 shows the keywords that can beused in this section.
Table 10-5: InputDevice section keywords
Keyword Description
Driver Specifies the device driver to use for this device, usuallykeyboard or mouse, depending on the device.
Identifier A text string that identifies this device throughout the XF86Configfile.
Option An optional keyword that can occur multiple times
Options that are valid for all drivers include CorePointer, CoreKeyboard, andSendCoreEvents. If the device is the primary pointer, the value is CorePointer; ifthe device is the primary keyboard, the value is CoreKeyboard; otherwise the value isSendCoreEvents. Each driver also has its own options. These options may bespecified in the ServerLayout section or with a command-line option instead of theInputDevice section.
The Keyboard identifier configures the X server’s keyboard handling. As can be seen inTable 10-6, which lists the possible values for the Option keyword, this includesparameters indicating the keyboard mappings that will interpret the key presses.
International keyboards are identified with the XkbLayout option. Its parameter isusually the two-character ISO country code. If a country has more than one officiallyrecognized language, the country code is capitalized and prefixed with the languagefollowed by an underbar (_). Examples are Canada (ca) with both the English (en_CA)

and French (fr_CA) languages, and Switzerland (ch) with the three languages German(de_CH), French (fr_CH), and Italian (it_CH).
Table 10-6: Keyboard options
Option Description
AutoRepeat Sets the keyboard autorepeat parameters. The first value is the lengthof time the key must be held down before it starts repeating, inmilliseconds; the second value is the number of repeats per second.
Protocol Specifies the keyboard protocol. Almost always Standard.
XkbDisable If true, disables the use of the XKEYBOARD extension. The defaultis false (the extension is enabled).
XkbKeycodes Almost always xfree86.
XkbLayout Identifies the keyboard layout such as: us for US English, fr forFrench, de for German, de_CH for Swiss-German, etc.
XkbModel Identifies the keyboard, which can one of the following: pc102,pc105, Microsoft, or pc104.
XkbOptions Options such as ctrl:swapcaps, which switches the positions ofyour Caps Lock and Control keys. Can occur multiple times.
XkbRules Almost always xfree86.
XkbVariant Specifies any keyboard variations or noDeadKeys.
Xleds Specifies which keyboard LEDs can be user-controlled (e.g., withxset), as a list of numbers from 1 to 3. The association of numbers toLEDs is keyboard-dependent. The default is for no LEDs to be user-controllable.
For example, the InputDevice section for a Swiss-German PS/2 keyboard might looklike this:
Section "InputDevice"Identifier "Keyboard0"Driver "keyboard"Option "Protocol" "Standard"Option "Autorepeat" "500 5"Option "XkbKeycodes" "xfree86"Option "XkbGeometry" "pc"Option "XkbRules" "xfree86"Option "XkbModel" "pc104"Option "XkbLayout" "de_CH"
Switzerland actually has a fourth officially recognized language, Räto-Romanisch, whose peoplealmost always also speak either German or Italian and therefore use one of these two keyboards.Actually, more Swiss speak English than Räto-Romanisch. That’s why English is considered Switzerland’s fifth, albeit unofficial, language! Dead keys are keys that are used to create characters that require two keystrokes, such ascharacters that include the German umlaut or French accents. The use of dead keys is enabled bydefault.

EndSection
The Option keyword for the Mouse identifier specifies options that have to do with themouse or other pointing device.
Table 10-7: Mouse options
Option Description
BaudRate Sets the baud rate for a serial mouse. The default is 1200.
ChordMiddle If true, enables the use of a three-button mouse where themiddle button generates left+right button events.
Device A required option that specifies the device used to accessthe pointer; commonly /dev/mouse.
Emulate3Buttons If true, used for a two-button mouse to emulate the thirdbutton by pressing both buttons simultaneously.
Emulate3Timeout If true and Emulate3Buttons is set, specifies themaximum delay in milliseconds between pressing the firstand second buttons that the driver considers simultaneous.
Protocol The mouse protocol. Some of the more common values are:Microsoft, Auto, PS/2 or Xqueue; see the mousedriver manpage for the full list of supported protocols.
SampleRate Used with some older Logitech mice to set the number ofevents the mouse sends per second.
ZAxisMapping For a wheel mouse, maps the wheel motion (the Z axis) tobuttons or to the X or Y axis. The default is to map button 4to forward wheel motion and button 5 to backward motion.
For example, the InputDevice section for a two-button PS/2 mouse with three-buttonemulation might look like this:
Section "InputDevice"# 2-button, PS/2 mouse
Identifier "Mouse0"Driver "mouse"Option "Device" "/dev/mouse"Option "Protocol" "PS/2"Option "Emulate3Buttons"Option "Emulate3Timeout" "50"
EndSection
If you are using a two-button wheel mouse, you should disable Emulate3Buttons andEmulate3Timeout as they are incompatible with this type of mouse. Adding theoption ZAxisMapping with the default value “4 5” results in the X server reporting forward wheel motion as a press of the “fourth” button and backward wheel motion as a press of the “fifth” button. Add the option as follows:
Option "ZAxisMapping" "4 5"
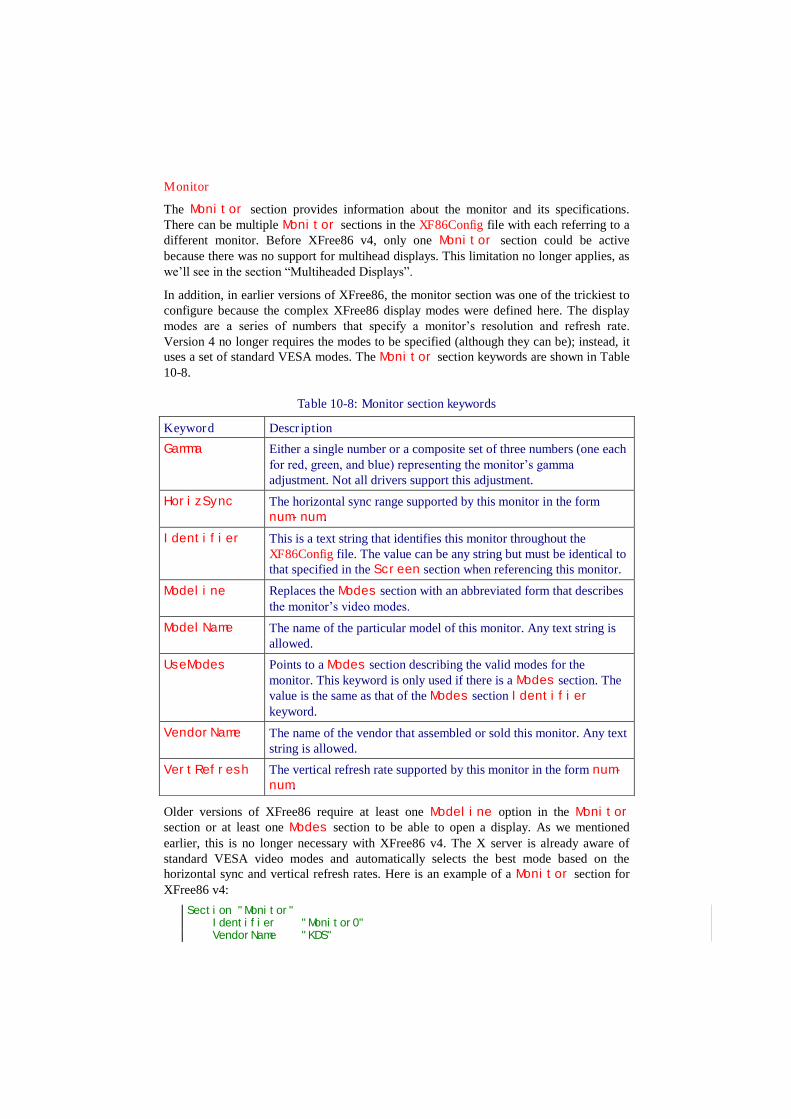
Monitor
The Monitor section provides information about the monitor and its specifications.There can be multiple Monitor sections in the XF86Config file with each referring to adifferent monitor. Before XFree86 v4, only one Monitor section could be activebecause there was no support for multihead displays. This limitation no longer applies, aswe’ll see in the section “Multiheaded Displays”.
In addition, in earlier versions of XFree86, the monitor section was one of the trickiest toconfigure because the complex XFree86 display modes were defined here. The displaymodes are a series of numbers that specify a monitor’s resolution and refresh rate. Version 4 no longer requires the modes to be specified (although they can be); instead, ituses a set of standard VESA modes. The Monitor section keywords are shown in Table10-8.
Table 10-8: Monitor section keywords
Keyword Description
Gamma Either a single number or a composite set of three numbers (one eachfor red, green, and blue) representing the monitor’s gamma adjustment. Not all drivers support this adjustment.
HorizSync The horizontal sync range supported by this monitor in the formnum-num.
Identifier This is a text string that identifies this monitor throughout theXF86Config file. The value can be any string but must be identical tothat specified in the Screen section when referencing this monitor.
Modeline Replaces the Modes section with an abbreviated form that describesthe monitor’s video modes.
ModelName The name of the particular model of this monitor. Any text string isallowed.
UseModes Points to a Modes section describing the valid modes for themonitor. This keyword is only used if there is a Modes section. Thevalue is the same as that of the Modes section Identifierkeyword.
VendorName The name of the vendor that assembled or sold this monitor. Any textstring is allowed.
VertRefresh The vertical refresh rate supported by this monitor in the form num-num.
Older versions of XFree86 require at least one Modeline option in the Monitorsection or at least one Modes section to be able to open a display. As we mentionedearlier, this is no longer necessary with XFree86 v4. The X server is already aware ofstandard VESA video modes and automatically selects the best mode based on thehorizontal sync and vertical refresh rates. Here is an example of a Monitor section forXFree86 v4:
Section "Monitor"Identifier "Monitor0"VendorName "KDS"

ModelName "6c2"HorizSync "30-70"VertRefresh "50-93"UseModes "Modes0"
EndSection
Modes
The optional Modes section provides a way of defining sets of video modesindependently of the Monitor sections. In most cases, the Modes section is notnecessary for XFree86 v4 because the built-in set of VESA standard modes suffices. TheModes section keywords are shown in Table 10-9.
Table 10-9: Modes section keywords
Option Description
Identifier This is a text string, which this mode will be identified through outthe XF86Config file. This text can be any string but must bereproduced exactly in the Monitor section when referencing thismonitor mode.
Modeline One or more Modeline options describe the monitor’s capabilities and specifications for different video modes.
If the modelines are required, your XFree86 configuration tool will create an initial set ofmodelines that roughly matches the monitor’s requirements. XFree86 automatically goes through the generated list of modelines and disables those that it determines are notsupported by your monitor, and it enables the modelines with the highest refresh ratesupported by your monitor for each available monitor resolution.
Here is an example of a Modes section:
Section "Modes"Identifier "Modes0"Modeline "800x600" 43.68 800 816 928 1072 600 600 606 626 -hsync -vsyncModeline "1024x768" 79.55 1024 1040 1216 1328 768 768 777 802 +HSync +VSync
EndSection
A modeline has the following format:
ModeLine "name" clk hdpy hst hend htot vhst vend vtot flags
These parameters are described in Table 10-10. You’ll probably never need to determine the individual values for a modeline, but seeing what they are may make the line lessmysterious.
Table 10-10: Modeline parameters
Parameter Description
name A text string describing this mode, usually the monitor’s resolution.
clk Video card clock rate in megahertz.
hdpy Horizontal display width in pixels.
hst Horizontal scan start.

hend Horizontal scan end.
htot Horizontal total (hend + (hend - hst)).
vdpy Vertical display height in pixels.
vst Vertical scan start.
vend Vertical scan end.
vtot Vertical total (vend + (vend - vst)).
flags Optional flags, which are described in Table 10-11.
Table 10-11: Modeline flags
Flag Description
Interlace Indicates that this mode is interlaced.
DoubleScan Indicates a mode where each scan line is doubled
+HSync Selects a positive horizontal sync polarity.
-HSync Selects a negative horizontal sync polarity.
+VSync Selects a positive vertical sync polarity.
-YSync Selects a negative vertical sync polarity.
Composite Sends horizontal and vertical sync together as a composite sync.
+CSync Selects a positive composite sync polarity.
-CSync Selects a negative composite sync polarity.
An example of a modeline is:
# 1024x768 @ 100Hz, 80.21 kHz hsyncModeline "1024x768" 115.5 1024 1056 1248 1440 768 771 781 802 -HSync -VSync
If you need more information on modelines see The Xfree86 Video Timings HOWTOfound at http://wwwtldp.org/HOWTO/XFree86-Video-Timings-HOWTO/.
Device
The Device section configures the graphics hardware on your video card. Like theMonitor section, there can be multiple Device sections in the XF86Config file. Thiswas already the case with XFree86 v3.3, which did not support multihead displays, and iseven more important now with XFree86 v4.0’s multihead capabilities.
Table 10-12 shows some of the most commonly used Device section keywords,followed by an example.
Table 10-12: Device section keywords
Keyword Description
BusID Specifies the bus location of the video card. This keyword is requiredfor a multiheaded system, but is optional otherwise.
ChipSet An optional text string specifically identifying the video card’s chipset.

Driver Specifies the name of the driver to be used for this graphics device.
Identifier A text string by which this video card is identified throughout theXF86Config file. The value can be any string but must be identical tothat specified in the Screen section when referencing this videocard.
VendorName An optional text string containing the name of the vendor whoassembled or sold the video card.
BoardName An optional text string containing the model name of the board.
Section "Device"Identifier "Card0"VendorName "ATI"BoardName "Mach64 GZ"Driver "ati"ChipSet "ati"BusID "PCI:1:0:0"
EndSection
Screen
The Screen section ties together a graphics device, defined in a Device section, withthe corresponding monitor, defined in a Monitor section. There must be at least oneScreen section, and there may be more than one. Table 10-13 shows some of the mostcommonly used Screen section keywords, and is followed by an example.
Table 10-13: Screen section keywords
Keyword Description
DefaultDepth Specifies color depth. The -depth line option can be used to overridethis value.
DefaultFbBpp Specifies which framebuffer layout is to be used by default. Thiskeyword is optional and usually not required.
Device Specifies the Device section to be used for this screen. This ties aspecific video card to a screen. The device-id must match theIdentifier of a Monitor section in the XF86Config file.
Identifier A text string by which this screen identified throughout theXF86Config file.
Monitor Specifies the Monitor section to be used for this screen. This ties aspecific monitor to a screen. The monitor-id must match theIdentifier of a Monitor section in the XF86Config file.
Option Numerous options can be specified, one for each occurrence of thiskeyword. For details, see the manpage for your driver or theXF86Config manpage. Setting the value to Accel enables the use ofthe X Acceleration Architecture (XAA) for 2D hardwareacceleration.
VideoAdaptor Specifies an Xv video adaptor description to be used with this screen.This keyword is optional; if it is used, the adaptor-id must match the

identifier of a VideoAdaptor section.
Section "Screen"Identifier "Screen0"Device "Card0"Monitor "Monitor0"DefaultDepth 24SubSection "Display"
Depth 24Modes "1024x768" "800x600"
EndSubSectionEndSection
Each Screen section must have at least one Display subsection and may have morethan one. If there is only one, it must match the Depth and/or FbBpp values specifiedfor the screen. The Display subsection has the following format.
Subsection "Display"Depth depthModes modes...
EndSubSection
Some of the most commonly used entries are shown in Table 10-14.
Table 10-14: Display keywords
Keyword Description
Depth Specifies the color depth, in bits per pixel, for this Displaysubsection. The range of allowable depth values depends on thedriver. Most drivers support a depth of 8, 15, 16, and 24.
Modes This entry specifies the video modes to use. Each mode-name mustbe in double quotes and must correspond to a mode specified orreferenced in the appropriate Monitor section. The first valid modein this list is used as the default display mode for startup. SpecifyingModes is recommended.
ServerLayout
This section associates a screen with one or more input devices. MultipleServerLayout sections are used for multiheaded configurations. An example of aServerLayout section follows:
Section "ServerLayout"Identifier "XFree86 Configured"Screen "Screen0"InputDevice "Mouse0" "CorePointer"InputDevice "KeyBoard0" "CoreKeyboard"Option "DontZoom" "true"
EndSection
This example defines a server layout called “XFree86 Configured” that consists of the screen known as Screen0 and two input devices, a mouse and a keyboard. Note that thescreen is described in a Screen section and each of the input devices is described in anInputDevice section. As we saw in the “Screen” section, the screen definition

associates a monitor with a video card. Thus the ServerLayout section effectivelydescribes a complete layout, with video card, monitor, mouse, and keyboard.
The keywords that can be used in the ServerLayout section are shown in Table 10-15.
Table 10-15: ServerLayout section keywords
Keyword Description
Identifier Identifies this server layout throughout the XF86Config file.
Screen Specifies the Screen section to be associated with this serverlayout. A screen-id must be specified that matches theIdentifier field of a Screen section. Other parameters arediscussedin the section “Multiheaded Displays” later in the chapter.
InputDevice Specifies an InputDevice section to be associated with thisserver layout. A device-id must be specified that matches theIdentifier field of an InputDevice section.
Option An optional keyword that can occur multiple times. The possibleoptions are those that are valid for the ServerFlags section. AServerLayout option overrides one specified in theServerFlags section.
An optional second parameter is often specified for the InputDevice keyword. If thedevice is the primary pointer, the value is CorePointer; if the device is the primarykeyboard, the value is CoreKeyboard; otherwise the value is SendCoreEvents. Ifthis parameter is not specified in the ServerLayout section, it must be included eitherin the InputDevice section or with a command-line option.
DRI
This optional DRI section is used to provide some information for the Direct RenderingInfrastructure, which is a software architecture for coordinating the Linux kernel, the XWindow System, 3D graphics hardware, and an OpenGL-based rendering engine, all toenable hardware-accelerated 3D graphics. In particular, the DRI section is used to controlaccess to the direct rendering facility. See the DRI User Guide for details about the formatof this section, on your system in the file /usr/X11R6/lib/X11/doc/README.DRI or onlineat http://www.xfree86.org/current/DRI.htm.
Vendor
The optional Vendor section may be used to provide vendor-specific configurationinformation. Multiple Vendor sections may be present, and they may contain anIdentifier entry and multiple Option flags. XFree86 currently ignores this section.
VideoAdaptor
This undocumented section describes an Xv (X video extension) adaptor; it hints atXFree86’s future plans to support video adapters allowing television capabilities.

Sample XF86ConfigThe complete sample XF86Config file for XFree86 v4.0 presented in the previoussections is shown in Example 10-1.
Example 10-1: A sample XF86Config file for XFree86 v4.0Section "ServerLayout"
Identifier "XFree86 Configured"Screen "Screen0"InputDevice "Mouse0" "CorePointer"InputDevice "KeyBoard0" "CorePointer"
EndSection
Section "InputDevice"Identifier "Keyboard0"Driver "keyboard"Protocol "Standard"Autorepeat 500 5XkbKeycodes "xfree86"XkbGeometry "pc"XkbRules "xfree86"XkbModel "pc104"XkbLayout "de_CH"
EndSection
Section "InputDevice"# 2-button, PS/2 mouse
Identifier "Mouse0"Driver "mouse"Device "/dev/mouse"Protocol "PS/2"Emulate3ButtonsEmulate3Timeout 50
EndSection
Section "Monitor"Identifier "Monitor0"VendorName "KDS"ModelName "6c2"HorizSync "30-70"VertRefresh "50-93"UseModes "Modes0"
EndSection
Section "Modes"Identifier "Modes0"Modeline "800x600" 43.68 800 816 928 1072 600 600 606 626 -hsync -vsyncModeline "1024x768" 79.55 1024 1040 1216 1328 768 768 777 802 +HSync +VSync
EndSection
Section "Device"Identifier "Card0"VendorName "ATI"BoardName "Mach64 GZ"Driver "ati"ChipSet "ati"BusID "PCI:1:0:0"
EndSection
Section "Screen"

Identifier "Screen0"Device "Card0"Monitor "Monitor0"DefaultDepth 24SubSection "Display"
Depth 24Modes "1024x768" "800x600"
EndSubSectionEndSection
Another example of a detailed XF86Config file can be found on your system as/usr/X11R6/lib/X11/XF86Config.eg. This file, with its many comments, gives you an ideaof the complexity XFree86 has to deal with to take into consideration the many variationsof PC hardware.
Multiheaded DisplaysOne of the features of XFree86 v4 is the support for multiheaded displays, includingsupport for Xinerama, an X server extension that treats multiple physical screens as asingle logical screen. With traditional multihead support in X, windows cannot spanphysical screens or be dragged from one screen to another. Xinerama removes theselimitations. Both Xinerama and traditional multihead support allow the screens to run atdifferent resolutions. Xinerama, however, requires the physical screens to have the samedepth.
If you have multiple monitors and video cards (or one or more dual-headed video cards),you can configure your system with multihead support. The video cards should be eitherPCI or AGP cards. Note that Xinerama lets you use multihead displays to enlarge yourdisplay area. It always acts as one contiguous display. If you want separate displays, use atraditional multihead setup. Another way of saying that is that Xinerama gives you onedisplay, :0.0, while multihead gives you multiple displays; e.g., :0.0 and :0.1.
Xinerama is not enabled by default. There are three ways to enable Xinerama:
Add the option +xinerama to the XFree86 command line.
Add the Xinerama option to the ServerFlags section of XF86Config.
Add the Xinerama option to the ServerLayout section of XF86Config.
This section describes each of these methods, as well as the changes required in theXF86Config file for multihead operation. The configuration changes are the same fortraditional multihead and for Xinerama; the difference is in whether or not you enableXinerama.
Before you set up a multihead configuration, it’s a good idea to make sure that each monitor/video card pair work correctly by themselves. (Save those configuration files, soyou can go back to one of them if necessary.) Sometimes video cards that work well bythemselves don’t workin combination with another card; if that is the case, you may haveto try replacing one of the cards. For more information on multihead and Xineramasupport, see the Xinerama HOWTO at http://www.tldp.org/HOWTO/Xinerama-HOWTO.
Configuring XF86Config for MultiheadFor the sake of simplicity, our multihead example uses two graphic cards and twomonitors, both of the same type. The following sections describe changes we need tomake to XF86Config for multiheaded operation.
Monitor
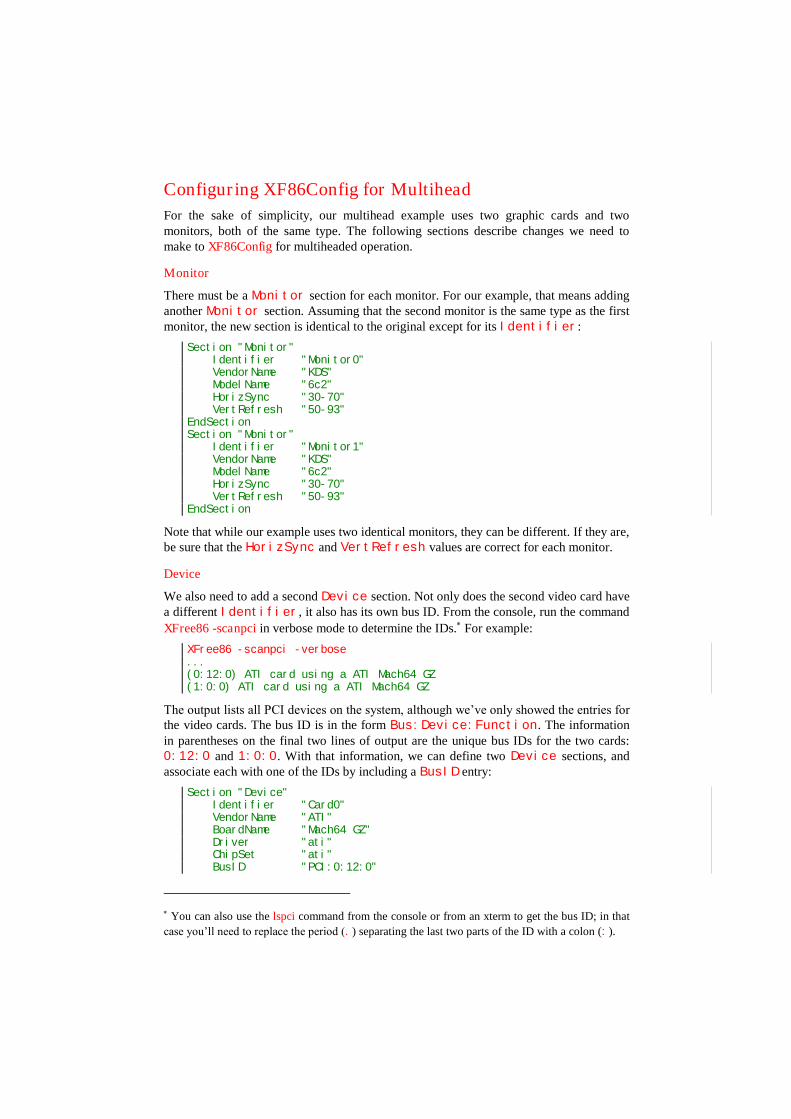
There must be a Monitor section for each monitor. For our example, that means addinganother Monitor section. Assuming that the second monitor is the same type as the firstmonitor, the new section is identical to the original except for its Identifier:
Section "Monitor"Identifier "Monitor0"VendorName "KDS"ModelName "6c2"HorizSync "30-70"VertRefresh "50-93"
EndSectionSection "Monitor"
Identifier "Monitor1"VendorName "KDS"ModelName "6c2"HorizSync "30-70"VertRefresh "50-93"
EndSection
Note that while our example uses two identical monitors, they can be different. If they are,be sure that the HorizSync and VertRefresh values are correct for each monitor.
Device
We also need to add a second Device section. Not only does the second video card havea different Identifier, it also has its own bus ID. From the console, run the commandXFree86 -scanpci in verbose mode to determine the IDs.For example:
XFree86 -scanpci -verbose...(0:12:0) ATI card using a ATI Mach64 GZ(1:0:0) ATI card using a ATI Mach64 GZ
The output lists all PCI devices on the system, although we’ve only showed the entries for the video cards. The bus ID is in the form Bus:Device:Function. The informationin parentheses on the final two lines of output are the unique bus IDs for the two cards:0:12:0 and 1:0:0. With that information, we can define two Device sections, andassociate each with one of the IDs by including a BusID entry:
Section "Device"Identifier "Card0"VendorName "ATI"BoardName "Mach64 GZ"Driver "ati"ChipSet "ati"BusID "PCI:0:12:0"
You can also use the lspci command from the console or from an xterm to get the bus ID; in thatcase you’ll need to replace the period (.) separating the last two parts of the ID with a colon (:).

EndSectionSection "Device"
Identifier "Card1"VendorName "ATI"BoardName "Mach64 GZ"Driver "ati"ChipSet "ati"BusID "PCI:1:0:0"
EndSection
Note that in this example we have two identical cards, each with a unique BusId. In thiscase, it doesn’t matter which BusId is associated with which Device section. If youhave two different graphics cards, be careful to associate the correct BusId with thecorrect card. But even then, it wouldn’t matter which card was associated with which Identifier.
Note also that if we had installed a dualhead video card, such as those made by Matrox,there would still be two Device sections but only one bus ID. In that case, the BusIDfield of both sections would have the same value.
Screen
Because we now have two monitors, we need to add a second Screen section as well.The Screen section associates the monitor with its device. This section is required. Ithas its own Identifier and refers to the Identifiers of the newly added Deviceand Monitor sections. Be sure that the video card specified as the Device for eachmonitor is the one that is physically connected to that monitor.
Section "Screen"Identifier "Screen0"Device "Card0"Monitor "Monitor0"DefaultDepth 24SubSection "Display"
Depth 24EndSubSection
EndSectionSection "Screen"
Identifier "Screen1"Device "Card1"Monitor "Monitor1"DefaultDepth 24SubSection "Display"
Depth 24EndSubSection
EndSection
ServerFlags
If you want to use Xinerama, and you want it to apply to all server layouts, you can enableXinerama in the ServerFlags section, as follows:
Option "Xinerama" "on"
Otherwise, no changes are needed in this section.
ServerLayout
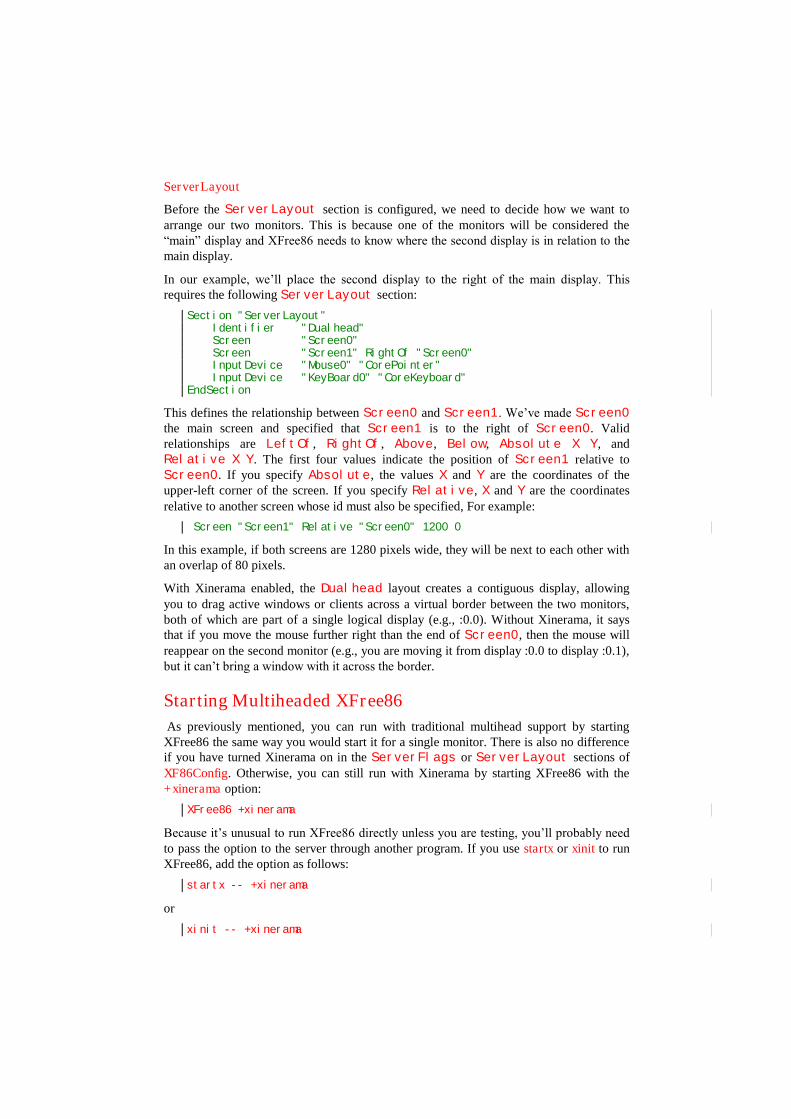
Before the ServerLayout section is configured, we need to decide how we want toarrange our two monitors. This is because one of the monitors will be considered the“main” display and XFree86 needs to know where the second display is in relation to the main display.
In our example, we’ll place the second display to the right of the main display. This requires the following ServerLayout section:
Section "ServerLayout"Identifier "Dualhead"Screen "Screen0"Screen "Screen1" RightOf "Screen0"InputDevice "Mouse0" "CorePointer"InputDevice "KeyBoard0" "CoreKeyboard"
EndSection
This defines the relationship between Screen0 and Screen1. We’ve made Screen0the main screen and specified that Screen1 is to the right of Screen0. Validrelationships are LeftOf, RightOf, Above, Below, Absolute X Y, andRelative X Y. The first four values indicate the position of Screen1 relative toScreen0. If you specify Absolute, the values X and Y are the coordinates of theupper-left corner of the screen. If you specify Relative, X and Y are the coordinatesrelative to another screen whose id must also be specified, For example:
Screen "Screen1" Relative "Screen0" 1200 0
In this example, if both screens are 1280 pixels wide, they will be next to each other withan overlap of 80 pixels.
With Xinerama enabled, the Dualhead layout creates a contiguous display, allowingyou to drag active windows or clients across a virtual border between the two monitors,both of which are part of a single logical display (e.g., :0.0). Without Xinerama, it saysthat if you move the mouse further right than the end of Screen0, then the mouse willreappear on the second monitor (e.g., you are moving it from display :0.0 to display :0.1),but it can’t bring a window with it across the border.
Starting Multiheaded XFree86As previously mentioned, you can run with traditional multihead support by startingXFree86 the same way you would start it for a single monitor. There is also no differenceif you have turned Xinerama on in the ServerFlags or ServerLayout sections ofXF86Config. Otherwise, you can still run with Xinerama by starting XFree86 with the+xinerama option:
XFree86 +xinerama
Because it’s unusual to run XFree86 directly unless you are testing, you’ll probably need to pass the option to the server through another program. If you use startx or xinit to runXFree86, add the option as follows:
startx -- +xinerama
or
xinit -- +xinerama

The double-dash (--) tells the program to pass any following parameters to the server, inthis case, +xinerama.
If you are running XDM, edit the command-line specified in the file/etc/X11/xdm/Xservers to add the +xinerama option. (See Chapter 11, X DisplayManagers, for more information about this file.)
You can also add the -layout option to indicate the desired server layout if there is morethan one:
XFree86 +xinerama -layout Dualhead
The value that you specify for the –layout option is the value of Identifier in theappropriate ServerLayout section. If you have defined multiple layouts, but do notchoose a layout on the command line, X uses the first layout defined.
If you turned Xinerama on in XF86Config, you can override it on the command line byspecifying the–xinerama option:
XFree86 –xinerama