Embed Size (px)
Citation preview

CG-Paperwars-82-01.indd 21 11.04.2016 15:00:51

22
A. THE PROLOGUE:
A1.0 The EventsWill Fight No More Forever is an attempt to portray the actions and events of the Nez Perce Campaign of 1877 in game form. The following brief historic note is to acquaint players with the events portrayed. Those familiar with the campaign may wish to skip ahead to the next rules section (A2.0).The Nez Perce Indian tribe lived along the valley of the Snake River and its major tributaries in upper Oregon and Idaho. They were well to do, as Indian tribes go, farming the valleys for grain and roots and fishing salmon for their major meat source. In ad-dition they hunted, often on trips to the prairies lasting over a year, and raised horses. They had been peaceful and friendly to the white man since he first appeared in the area in about 1805. In the 1860s this good relationship began to break down. Gold was found on parts of Indian land ceded to them in the 1855 boundary treaty and the U.S. government unilaterally changed the boundar-ies in 1863. Most of the tribe settled with the new boundaries but several tribes refused and stayed in their native valleys. This caused no real problem until white settlers began to move into the valleys in 1875. The protests of the non-treaty bands that they had not signed anyway their land were useless and in May 1877 they agreed to move to the reservation when threatened with troop ac-tion.Unfortunately, while moving the bands toward the reservation, an incident between several young braves and known Indian hating settlers lead to violence. The Indian bands halted their trek to the reservation with the idea of explaining the incident before coming under the control of the U.S. Army at the reservation. General Howard, commanding the Army forces of the district, thought the incident meant the Indians would no longer come in so he sent a cavalry detachment of two companies to bring them in at gunpoint. Through these misunderstandings the Nez Perce In-dian War began.The first battle took place at White Bird canyon (about hex 0812). The two cavalry companies came up, the Indians put up a truce flag and came forward to talk, and some volunteers with the soldiers opened fire. The Nez Perce came back in a series of coordinated assaults that split up the Army command and defeated its parts in detail. The numbers engaged on both sides had been about equal but after the Army broke off they had suffered 34 killed and half again that number wounded to Indian causalities of none killed and three wounded.The Nez Perce started heading North into the mountains and Howard began to gather forces to chase them. In the meantime Howard sent troops to round up a neutral band. Again truce flags were ignored and the village was attacked and destroyed. There were few causalities on either side and the previously neutral band joined up with the other renegades on the south fork of the Clear water (hex 0910).The tribal council decided to leave Idaho by way of the Lolo Pass (hex 1208-1308) and go to the prairies to join up with the Crows. With Looking Glass informally leading the council the Nez Perce crossed the Bitterroots section of the Rockies into Montana and then, thinking their troubles behind them in Idaho, moved slowly south, trading without hostilities with the settlers and, at Looking
Glass’s insistence, stopped for several days to rest the tribe on the Big Hole River (hex 1512).Though Howard and his forces were still far behind the delay al-lowed Gibbon and his mixed command totaling about 160 sol-diers and 50 civilians to catch up. In a surprise dawn attack, Gib-bon’s troops raked the sleeping village with rifle fire causing heavy causalities among warriors, women and children. The Indians ral-lied, however, and counterattacked strongly, penning in the Army forces while Joseph moved out the noncombatants, their posses-sions, and horses. The Nez Perce kept Gibbon under fire for a day and a half and then broke off during the night.The Nez Perce lost 89 killed, mostly women and children shot in their sleep. Gibbon’s command, after its initial rush, was outfought and lost 32 dead and 40 injured; over 30% causalities. The rest were too tired and demoralized to pursue the fleeing Indians.Howard continued to pursue some ways behind as the Indians moved southeast toward the corner of Wyoming. To keep him at at distance the Nez Perce conducted a raid trying to run off some of his herd and succeeded in getting about 150 pack mules. Meanwhile, the hard trek had started to show on Howard’s men. The Medical Staff pronounced them unfit to continue but How-ard had been receiving strident messages from his superiors and the hostile newspapers so he pressed on. With the help of Sturgjs and Merritt’s commands he devised a plan to cover all the exits of the Yellowstone Park area that the Nez Perce were entering and chase up behind them with his command.It was a good plan but the Nez Perce succeeded in decoying one of the commands out of position and broke north into the plains below the Yellowstone River. Abandoning the idea of a link up with the Crows, the Nez Perce headed for Canada, having finally realized they would be chased until they left the U.S.Sturgis’s command caught up with them north of Billings but the Nez Perce fought a skillful delaying action and broke off after their noncombatants had moved off, leaving pickets behind to delay any follow up. At the same time a messenger set out to ask Miles’ command for assistance. Miles moved out swiftly with the idea of cutting off the route to Canada.The tribe had moved swiftly north and crossed the Missouri River when Looking Glass again convinced the council to slow up to rest the people. This last delay was fatal. Miles located them and in a sharp engagement managed to run off many of the tribes horses and surround the entire encampment. The attack had been costly, however, with 30 killed and 40 wounded, Miles kept the village under siege by snipers and field gun while awaiting the arrival of Howard’s main force. The siege continued for 5 days with both sides taking occasional causalities and conditions in the Indian encampment deteriorating as the weather turned bitter and food supplies grew short. The tribal council split on a course of action with Joseph urging surrender to save the survivors and White Bird opposed. Howard and his troops arrived and all hope of fighting off the soldiers vanished due to numbers. White Bird and about 200 that wished to follow him slipped through the lines that eve-ning and entered Canada, eventually to join Sitting Bull and his people. Joseph, speaking for the other 400 Nez Perce, then sur-rendered to the mercy of the United States Government with the words “From where the sun now stands, I will fight no more, forever.” The Nez Perce Indian War was over.
I Will
Fig
ht N
o M
ore,
For
ever
CG-Paperwars-82-01.indd 22 11.04.2016 15:00:51

CG-Paperwars-82-01.indd 23 11.04.2016 15:00:53

24
of terrain and scales to 20 miles across. Each turn played on the Strategic Map represents 96 hours. The four different Tactical maps each represent a portion of the terrain located within a hex of the appropriate terrain type on the Strategic map. The Tactical maps are scaled to 25 yards per hex and a tactical turn represents about 15 seconds.
A3.2 The Playing AidsThe playing aids area a series of charts and tables that are used in conjunction with the rules, maps and playing pieces to effect the game. Some charts have been printed on unused sections of the map board and the rest are located on the back pages of the rules book so as to be easily accessible.
A3.3 The Playing PiecesThe playing pieces are the colored die cut counters. In the Stra-tegic Game they will be used to represent Army (including civil-ian) and Indian groups. In the tactical game they will represent smaller units that compose the groups represented by each of the Strategic counters. Such Strategic and Tactical counters will be referred to as units. Other counters will be used to indicate vari-ous game functions and will be referred to as markers. A Strategic unit may represent up to 500 people. A Tactical unit numbers 5 to 50 braves or soldiers and volunteers. It is important to remember that a unit used on the Strategic map may contain one or more units that will be used on the Tactical maps.
A3.4 Example CountersSee graphic on previous page.
A3.5 RandomizersSome of the functions in the game require the generation of ran-dom numbers in the range of one through six. A die may be scav-anged from an old game or the six numbered randomizers may be used. If using the randomizers, place them in a cup and draw one, read it, and replace it in the cup, each time a die roll is called for in the rules.
B. THE STRATEGIC GAME
B1.0 IntroductionIn the Strategic game portion of I Will Fight No More Forever the Indian player will manuever 7 unit counters, each represent-ing an individual Nez Perce warrior band, and a single village unit counter representing the noncombatant men, women, children, horse herds, and possessions of the combined Nez Perce bands. The Army player will start the game with 4 unit counters and by the 1st turn will have mixed force of Cavalry, Infantry, Artillery, and civilian Irregular numbering 28 unit counters in action. Army units represent 20-25 men and Indian warrior unit represent 14-66 men. The Indian Village counter represent nearly 500 old-er men, women, and children, over 3000 horses, and household goods for the tribe. The Army player must seek to coordinate his units so as to successfully locate the Indian player in situations that will prove favorable for combat in the Tactical game. The Indian
player must seek to outmanuever and outrun the U.S. Army player and when that is not possible, delay his approach by battle in the tactical game.
B2.0 Sequence of Play
B2.1 GeneralThe Strategic game is played as a series of 29 turns each of which is composed of seven sequenced phases. This sequence, outlined below, is rigid and must be strictly maintained.
B2.2 Sequence of PlayIndianA. Supply Determination PhaseIndian Movement PhaseB. Indian Combat Declaration PhaseC. Army Supply Determination PhaseD. Army Movement PhaseE. Army Search PhaseF.
If the Indian player has met the requirements and declares one or more combats in phase C the players will go to the tactical game and resolve the combat action(s). If there is more than one combat the Indian player choses the order of resolution. At its conclusion they will then return to the Strategic game and continue the still in progress turn by starting phase D. If, during phase F, the Army player makes a contact with an Indian unit (or units) the players immediately go to the Tactical game and resolve the combat ac-tion. At the conclusion of the action the players resume the Army Search Phase (F) and continue this pattern (search, if search suc-cessful, combat, back to further search) until all Army units that may do so have completed search. At that point the turn ends and the next turn begins with phase A.
B3.0 SupplySupply is determined for the Indian player in phase A and for the Army player in phase D. Indian units are considered to be in sup-ply for the entire turn if they are located in a Minor River hex or adjacent to a Major River hexside during phase A. Army units are considered to be in supply for the entire turn if they are located in a Town or Fort hex during phase D. There is no restriction on the number of Indian units that may be supplied by one hex. Towns and Forts may supply only five units of the ranks of Captain, Ma-jor, and Colonel. These five units may be of any mix within those ranks. If six or more so ranked units are present the Army player may chose which are in supply. Lieutenant, General, and Volun-teer Irregular ranked units do not count toward the five unit limit that a town or fort may supply but these units are not exempt from supply restrictions. Like all Army units they must be in a town or fort during phase D to be in supply. Units that are determined to be out of supply, whether Indian or Army, may not use the fast movement mode during their movement phase of that turn.
B4.0 Movement
B4.1 GeneralEach Strategic unit has two movement allowances, quantified into points, printed on it’s face. One is the allowance for fast move-
I Will
Fig
ht N
o M
ore,
For
ever
CG-Paperwars-82-01.indd 24 11.04.2016 15:00:53

25
ment mode and the other is the allowance for normal movement mode. Whichever movement allowance is being used a certain number of those points must be expended to enter each hex into which the unit moves. The Strategic Map Terrain Effects Chart details the movement point cost for entry into the various terrain types. A unit expands these points to enter each hex and maybe moved through a series of adjacent hexes until it lacks the points to move further or the player wishes it to move no further. If a unit does not have the number of points remaining that are required by the chart to enter a hex it may not enter that hex. Movement points may not be accumulated from turn to turn and those not used are lost. The ultimate objective of the Indian units is to enter the Canadian hexes listed in rule B4.43. At the end of any turn’s movement phase after turn 25 that all the Indian units are in these hexes the game ends and the players refer to the victory condition to determine the winner.
B4.2 Normal Movement ModeA unit may always move at the normal movement rate during its movement phase. There is no maximum number of units that may be stacked in a single hex during or at the conclusion of move-ment. Indian and Army units may move through hexes contain-ing opposing units and may stop their movement in enemy oc-cupied hexes. There are no “zones of control”. Units must move through a continuous line of hexes. They may not skip over a hex without entering it nor may they move off the map.
B4.3 Fast Movement ModeFast movement is a special form of movement during which the unit may use the larger fast mode movement allowance instead of the normal movement allowance. To use fast movement the unit must have been determined to be in supply during that turn. Army units may use fast movement any turn in which they are in supply. Indian units must be in supply for the turn and they may only use fast movement every fourth turn. That is, after using fast movement an Indian unit must use normal movement for the next three turns. To keep track of this you may note the turn number that an Indian unit uses fast movement on a piece of paper or you may use the following method. After the unit has made its fast movement turn it over and place a PI marker on it. After it com-pletes its next movement flip the P1 marker over to the P2 side. After it completes its next movement flip the counter right side up. Since there are only 8 Indian counters record keeping should be no real problem.
B4.4 RestrictionsB4.4.1 A unit must pay two (2) extra movement points to enter a hex containing opposing units.B4.4.2 During turns 1 through 11 Army units may not cross a major river hexside and Indian units may only cross by a die roll. Each Indian unit attempting to cross must stop its movement in the hex it wishes to cross at and indicate the hex it wished to cross into. The unit must nave sufficient movement points to pay one movement point to cross the river plus the required points to enter the indicated hex on the other side. Roll a die for each unit. On a die roll of one (1) the unit may cross. On any other result the unit may not cross and may move no further that turn. Dur-ing turns 12 through the end of the game Indian units may cross
major rivers by the same procedure on a die roll of one or two and Army units may cross on a die roll of one. Byway of exception to the above, Indian and Army units may always cross hexside 0509-0608 paying only the movements points needed and are not required to roll the die to cross at that point.B4.4.3 Army units may never enter hexes completely north of the Canadian border (hexes 1901,2101, 2301, 2501, 2701, 2901 & 3101).B4.4.4 During turns 1 through 9 Indian units must remain within or on border hexes of the State of Idaho. During this period the tribal council was split on what course of action to take and only after lengthy debate agreed to leave Idaho.B4.4.5 From turn 10 through turn 25 Indian units may move any-where on the map except they may not enter the hexes completely north of the Canadian border listed in rule 4.4.3. At the conclu-sion of turn 25 the Indian Village unit and at least two Warrior Band units must be somewhere south of the Yellowstone River and east of hex row 2800. At the beginning of this period the council had decided to eventually link up with the Crows in the plains but their course of travel was not fixed. If the Village and 2 Warrior Bands cannot arrive in this position by the end of turn 25, they may not enter Canada until having gone to the position on a subsequent turn.B4.4.6 Indian units entering a hex containing a town or fort must stop their movement for that turn in that hex.
B5.0 Search
B5.1 GeneralTo search for an opposing unit the units which are to conduct the search must be in the same hex as the units that are being searched for. For the Indian player searches are not required. All Indian units in the same hex as Army units will automatically con-tact those units if the Indian player so desires. During the Indian Combat Declaration Phase the Indian player decides and states which, if any, of his units that are in the same hex as Army units have contacted those Army units and wish to engage in combat. Those combats which are declared are played out in the Tactical game in any order the Indian player desires and then play of the Strategic game is resumed. For the Army player search is required. In every hex that contains both Army and Indian units a search must be made by the Army player during the Army Search Phase. All searches that are successful must be played out as a combat in the tactical game. Thus search is not requried for the Indian player and combat is voluntary while search is required for the Army player and combat is manditory.
B5.2 ProcedureFor the Indian player no procedure is involved. Any Army units in the same hex as an Indian unit are automatically contacted if the Indian player so desires and play proceeds to the tactical game if the Indian player wishes combat. For the Army player, the search values of all the units in the hex are added together and the eva-sion value of the Indian unit in the hex is subtracted from the sum. If there is more than one Indian unit in the hex subtract the value of the unit having the lowest evasion value (that is, if the Indian units in the hex have evasion values of 5,4, & 2, the value of 2 is
I Will Fight N
o More, Forever
CG-Paperwars-82-01.indd 25 11.04.2016 15:00:53

26
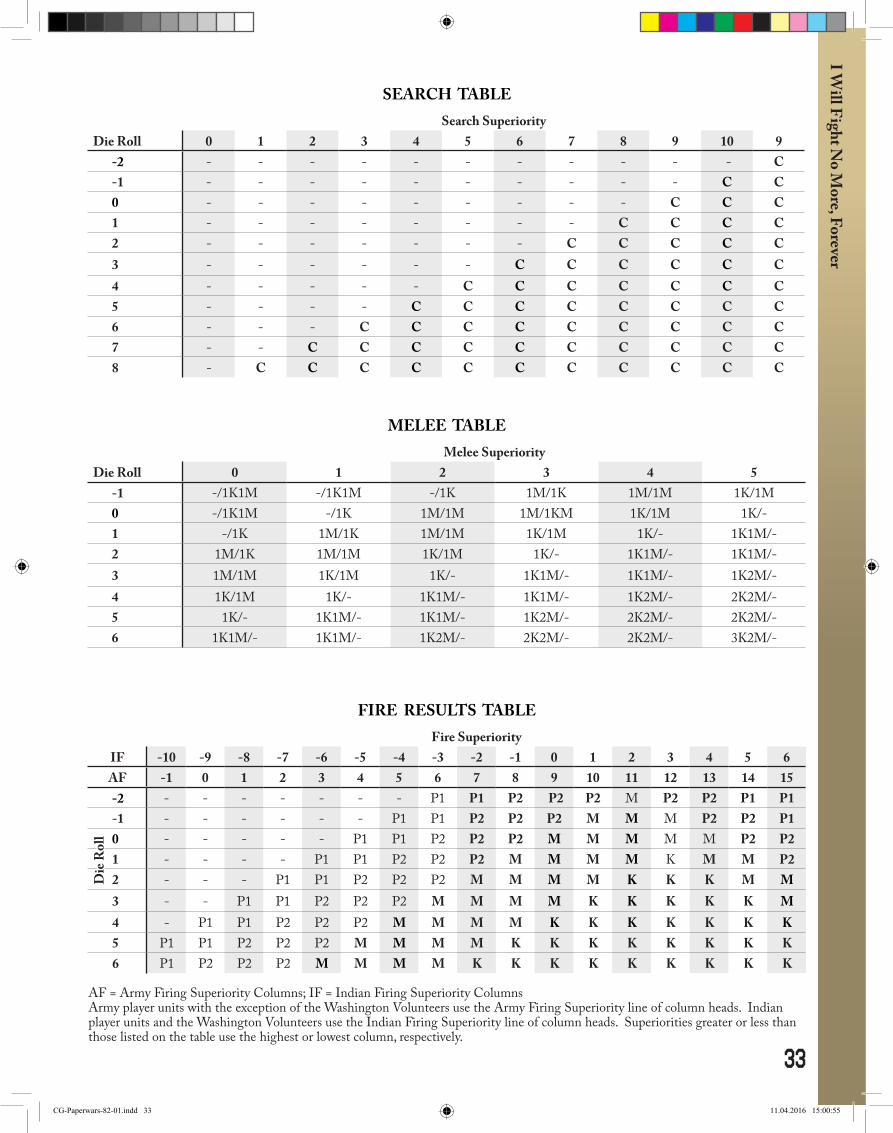
subtracted.) The result is a Search Superiority. Roll a die and consult the Terrain Effects Chart for any possible die roll modifi-cation. Next consult the Search Table and cross index the die roll (after all modification) to the Search Superiority. The result will be a’—’ or a ‘C’. If the result is a’—’no contact has been made. If the result is a ‘C’ the Army units have contacted the Indian units and proceed immediately to Tactical game.
B5.3 RestrictionsB5.3.1 During turns 1 through 9 Indian player may not declare a combat unless during any prior turn the Army player has made a contact during search. During this period the tribal council fol-lowed a policy of not attacking unless they were attacked first. Once the Army player has made a contact the Indian player is free to declare combats whenever he desires so long as the combats are in hexes within Idaho or on an Idaho border hex.B5.3.2 After turn 9 Indian units may leave Idaho. Indian units that have left Idaho and it’s border hexes again may not declare combat until after any such Indian unit is contacted by an Army unit. Then on all ensuing turns all Indian units (within or outside Idaho) may declare combats with Army units in the same hex. This rule reflects the council’s view that once they had left Ida-ho they were no longer at war with the United States and hence would again not initiate any combats.B5.3.3 All Indian units that enter a hex containing a fort or town are considered to be automatically contacted by the inhabitants of the fort of town and any Army units that might be in the hex. No search roll is needed. The Indian unit(s) must stop movement for the turn in that hex and play proceeds to the Tactical game.
B6.0 ReinforcementDuring the game the Army player will receive periodic reinforce-ments. The Reinforcement Track details when these reinforce-ments become active and the location at which they start the game. Reinforcements may become active by the game reaching their turn of activation as listed on the track, in which case they become fully functional units during the reinforcement phase of that turn, or by any Indian unit entering the location hex at which the re-inforcement unit would become active on a later turn, in which case the reinforcement is placed in the hex when the Indian unit enters and becomes fully active immediately. The Indian player receives no reinforcements during the game. The Reinforcement Track calls for the removal of one unit. During the reinforcement phase of that turn simply remove that peice from the map. It may not return to play at any later part of the game.
B7.0 Set UpUnits that start the game active are placed on the Strategic map in a front side up position. These units are: Perry & Howard in hex 0709; Whipple & Walla Walla Volunteers in hex 0309. The Indian units start the game active and are always active. They may be flipped over for record keeping purposes. The units are: Lean Elk in hex 1411; Looking Glass in hex 0910; Indian Village ( Jo-seph), Ollokot, White Bird, Red Echo, & Too Hool Hool Zote in hex 0811.Units that start the game inactive should be placed face down be-fore the start of the game on the Strategic map in the hex in which
they will activate as listed by activation turn on the following Re-inforcement Track:Turn 2: Mt. Idaho Volunteers at 0910; Rawn at 1407; Burton & Miller at 0309.Turn 3: Mason & Jackson at 0309.Turn 4: Washington Volunteers at 0709 (remove Mt. Idaho Volunteers).Turn 9: Green and Wiles at 0817.Turn 11: Browning at 2112.Turn 12: Gibbon at 2006.Turn 15: Virginia City Volunteers at 1913.Turn 16: Norwood at 2112.Turn 19: Doane at 2112; Hart at 3216; Sturgis & Merril at 2912.Turn 20: Gushing at 2112.Turn 25: Miles, Tyler, Hales, Snyder, & McHugh at 3309.Turn 27: Benton Volunteers at 2209.You are now ready to start the Strategic game but it is advisable to read the rules to the Tactical game before proceeding since the two games are interlocked and may not be played to a conclusion individually.
B8.0 The Sitting Bull Optional RulePlayers may, if they wish, continue the game to play a 30th turn. At the start of turn 30, before Indian supply determination, the Sitting Bull counter is placed in hex 2601. The Sitting Bull counter may be used in the same manner as other Indian units but is restricted in movement in that it cannot move further than three hexes from its starting position and it is re-stricted in combat in that it cannot participate in any declared combats. No Army units, however, may enter a hex containing the Sitting Bull counter so it may be used to shield other Indian units from search for the optional last turn. If the optional Sit-ting Bull counter is used the Army player automatically gains 10 victory points.
C. THE TACTICAL GAME
C1.0 IntroductionIn the Tactical Game portion of I Will Fight No More Forever the combat declarations of the Indian player and the searches that lead to contact for the Army player will be played out as “combats”. The form of these combats will be determined by the types of units involved and the results obtained on the State of Contact Table. These factors will influence the form of setup allowed and the sequence of play used for the first turn of each combat. One combat will be played for each contact and combat declaration made in each Strategic Gameturn. Each Indian Warrior unit rep-resents from 5 to 8 braves. Each Army unit represents 20 to 50 soldiers and civilian volunteers with the exception of the Wash-ington Volunteers which represent 6 or 7 Mountain Men per unit. The Indian Lodge counters each represent over 50 noncombatants and about 350 horses. The Army Camp counters represent tent and supply areas usually containing about 10 noncombatants. The objective of both players in the tactical game is to inflict as many I W
ill F
ight
No
Mor
e, F
orev
er
CG-Paperwars-82-01.indd 26 11.04.2016 15:00:53

27
casualities and capture as many opposing units as possible while reducing your own casualities and surrenders to a minimum.
C2.0 Set Up
C2.1 GeneralEach strategic counter has the name of the commanding officer or war chief of the unit printed on the front of the counter. The tactical counters that compose each strategic counter also have the name of the same commanding officer of war chief printed on them. By this means it is possible to determine which tactical counters are part of each of the strategic counters. Locate all the tactical counters that compose the strategic counters that are in the hex of the successful search or combat declaration. If any of the Strategic units have been involved in prior combats it is pos-sible that some of the tactical counters will be in the captured or killed piles. These may not be used. Next the State of Contact Table is referred to and, depending on the type of units involved, a particular column is used and the State of Contact is determined. Each contact state has a special set of setup instructions. Follow-ing these instructions the tactical units are set upon one of the four Tactical maps. The Tactical map used is determined by which type of hex the Strategic units involved in the combat are located in on the Strategic map. If they are in a Major Mountains hex the Major Mountain Tactical Map is used; if in a Wooded Mountains hex the Wooded Tactical Map is used; if in a Rolling Hills hex the Rolling Hills Tactical Map is used; if in an Open Plains hex the Open Plains Tactical Map is used. After the Set Up is completed the Players begin the first turn of the combat in accordance with the dictates of the contact state and the sequence of play.
C2.2 ProcedureLocate all the tactical counters involved in the combat. Those in the surrendered and killed piles may not be used. If the combat is the result if a successful search by the Army player refer to State of Contact table columns “A” and “B”. If only Indian Warrior Band units have been contacted in the Strategic map hex that has lead to the combat being set up use column “A”. If the Indian Vil-lage unit is one of, or the only, unit to have been contacted in the Strategic map hex that has lead to the combat being set up use column “B”. If the combat is a result of a combat declaration by the I ndian player refer to State of Contact Table columns “C”, “D” and “E”. If only the Washington Volunteers Strategic unit is in the Strategic hex that has lead to the combat being set up use column “C”. If just military units (Cavalry, Infantry, Artillery, and HQ) or military units and the Washington Volunteers unit are in the hex that has led to the combat use column “D”. If just Volun-teers units (Irregular symbol but not the Washington Volunteers) or volunteer units and any other Army player units (military and/or Washington Volunteers) are in the strategic hex that lead to the combat use column “E”. Roll one die to determine the State of Contact. There are only three possible results in these columns. The State of the units contacted may be Ambushing, Alerted, or Surprised. If the result on any of the tables is surprised roll the die again. This will determine if the contacted units were surprised while Encamped (on a 1,2 or 3) or on the Trail (on a 4,5 or 6). With the State of Contacted units determined refer to the Ap-propriate section below for the specific set up requirements. Note
that unless specifically stated Horse and Artillery units may start the combat mounted or dismounted, limbered or unlimbered, at the choice of the owning player.
C2.3 AmbushingOne half of the units that were searching or declared combat must be placed on the map. The owning player examines the Strategic counters that are in the hex that lead to the combat and chooses one out of every two to be the leading half of his column. He then takes the tactical units that compose each of the chosen strategic units (excepting those not available due to have being killed or captured) and prepares to place them on the proper tactical map. If only one strategic unit is involved all of its tactical units are used. If an odd number of strategic units is involved 1/z the units plus one additional unit are used. The tactical units corresponding to the Strategic units chosen are then placed anywhere on the map so long as they are within two hexes of a Stream hexside. The remaining (unchosen) tactical units of the searching or declared combat player are placed adjacent to, but not on, one side of the tactical map being used. The map side chosen must have a Stream hexside running through it. Next the contacted player takes the tactical units that compose the Strategic units involved and places all of them in any positions desired on the map being used. The Contacted player is the First player for the sequence of play and the searching or declaring combat player is the second player. The second player may, strictly at his option, use part or all of his turns to bring onto the map the tactical units that start the combat ad-jacent to the map. If they are brought on they must enter the map by expanding the required movement points to enter the hex within two hexes of a Stream hexside that comes to the map side to which they were placed adjacent.
C2.4 AlertedFirst the searching or combat declaring player designates one side of the map to be used as his entry side and informs the contacted player of his choice. Next, the contacted player locates the tactical units involved in the combat and places all of them on the map in any desired positions except that they may not be placed within two hexes of the designated entry side and all lodge or camp units present must be placed adjacent to a stream hexside. The search-ing or combat declaring player then places all his tactical units involved on the map within two hexes of his designated entry side. The searching or combat declaring player is the first player for the sequence of play.
C2.5 Surprised EncampedWhen surprised encamped the Indian player uses the tactical lodge counters to represent the Strategic Indian village counter. When the Army player is surprised encamped the Tactical camp counters are always used even though they are not represented by a specific Strategic counter. The Indian player must deploy all nine lodge counters (or as many as have survived previous actions) when contacted. The Army player always deploys all 5 camp counters, even if some have been killed or captured during previous com-bats. The Army player must keep a running total of camp counters killed or captured in combats by pencil and paper. The Contacted player places his lodge or camp counters adjacent to any stream hexsides on the tactical map to be used with one counter per hex.
I Will Fight N
o More, Forever
CG-Paperwars-82-01.indd 27 11.04.2016 15:00:53

28
No stacking is permitted. Next the contacted player places the remaining tactical units involved in the combat so as to have an equal number (or as close as possible) of units adjacent to each of the lodge or camp units. Again, no stacking is permitted. After all adjacent hexes have been filled, extra units may be stacked. Note that again, as close to an even number of units as possible must be stacked next to each lodge or camp unit. Units may be over-stacked if necessary when all tactical units are being placed in this manner. Contacted horse units must be placed dismounted and artillery must be placed unlimbered. Next the searching or com-bat declaring player places one half of his units (determined in the same manner as described in C2.3 Ambushing above) on the map in any locations so long as they are at least three hexes from the nearest contacted unit. The searching or combat declaring player is the first player for the turn sequence. Note, however, on the first player’s first turn he may not bring any of the other one half of his units onto the map. At the start of the first turn he must state one side of the map to be his entry side and place the units not on the map adjacent to that side. At the start of the first player second turn he may, if he desires, begin to bring those units onto the map anywhere along the designated entry side, paying the appropriate movement cost of the first hex entered. During the second play-ers turns he must first take only actions that will bring any over-stacked hexes to within the stacking limits, if there are any such hexes. After all stacking is corrected any actions are allowed.
C2.6 Surprised On TrailWhen surprised on trail, the contacted Indian or Army player lo-cates all the tactical units involved (Army camp counters are never used and Indian lodge counters are only used if the Strategic In-dian Village counter was among those contacted) and places them on the appropriate tactical map adjacent to stream hexsides and with every unit adjacent to another unit. The streams chosen and the sequence of the units is up to the contacted player’s decision. All units that it is possible to place within the stack ing limits must be placed on one side of the streams used so that the stream is only crossed where is branches. Any remaining units are then placed on the opposite side of the same stream. Contacted horse units must be placed mounted and artillery units must be placed limbered. Next the searching or combat declaring player follows the same procedure described in C2.5 (surprised Encamped) first dividing his force in half in the manner described in C2.3 Ambushing and then placing half his units and designating a side for the entry of the remaining half. Again, he may not bring the remaining half of his units on during his first turn. The searching or combat declar-ing player is the first player for the sequence of play. If the second player is overstacked, again he must only take actions that bring hexes into stacking limits until all are properly stacked.
C2.7 Forts & TownsAll forts and towns on the Strategic map are considered to contain one or more city defence units for use on the tactical map. If an Indian unit(s) enters a town or fort hex on the Strategic map its component tactical units and the city defence tactical counter(s) for that town or fort (and tactical units for any Army player stra-tegic units also in the hex) go to the appropriate tactical map. No die is rolled for the State of Contact. The Indian player is always considered to be the contacted player and to be in an alerted state of contact. Forces are set up using the C2.4 (alerted) rules. Butte,
Helena, and Boise each would have three city defence units. Vir-ginia City, Spokane, and Billings each would have two city defence units. All other towns and forts each would have one such unit. City defence units killed or captured must be recorded on paper so that the units will always be available for any fort or town entered, each time it is entered.
C3.0 Sequence of Play
C3.1 GeneralThe tactical game is played in combats, each of which is initiated by a combat declaration or a successful search. Each combat is composed of an unrestricted number of “game-turns”. During each gameturn first one player, referred to as the First player, and then the other player, referred to as the Second player, will move, or move and fire, or fire with one of more of their units. Each one of those possible events is termed an “action”. These actions may be performed in any order. After each unit that is allowed to perform an action has performed any one of those actions that the First player desires it becomes the Second players turn to choose and perform an action for each of his units that may perform that gameturn. After the second player has completed his actions the gameturn ends and the next gameturn starts with the players using the same or different units for the same or different actions. In general only a few units will be allowed to perform an action each gameturn. The combat ends when one or the other player no lon-ger has units on the map. These units may have left the map due to combat results (and as such are placed off the map in separate piles for killed and captured) or have been voluntarily moved off the map (and will thus be available for future combats). When the combat ends play goes back to the Strategic game.
C3.2 Sequence of Play1. First Player turn:1.1 On the first gameturn of all surprised and ambushing state of contact combats the First player may perform one action with each unit on the map.1.2 On the first gameturn of all Alerted State of Contact combats and on the second and subsequent gameturns of combats for all States of Contact the first player, if the Army player, may perform an action with any one unit, and if the Indian player, may perform an action with any two units. Each unit is not required to perform the same action. After all the first player’s actions have been per-formed the first player rolls the dice once for each pinned unit to attempt to remove the pin.2. Second Player Turn:2.1 On all gameturns of all combats regardless of the State of Contact the second player, if the Army player, may perform an action with any one unit, and, if the Indian player, may perform an action with any two units. Again, each unit is not required to perform the same action and after all actions have been performed the second player rolls the dice once for each pinned unit on the map to attempt to remove the pin.
I Will
Fig
ht N
o M
ore,
For
ever
CG-Paperwars-82-01.indd 28 11.04.2016 15:00:54

29
C4.0 Movement
C4.1 GeneralEach tactical unit has a movement allowance which it may use each turn, quantified into points, printed on it’s face. Horse equipped units are printed on both sides with a dismounted movement al-lowance on the front of the counter and a mounted movement al-lowance on the back. Artillery units are also printed on both sides with a zero movement allowance on the unlimbered front side and a normal movement allowance on the limbered back side. A cer-tain number of points from a unit’s movement allowance must be expanded to enter each hex into which the unit moves. TheTacti-cal Maps Terrain Effects Chart details the movement point cost for entry into the various types of terrains. A unit expands these points to enter each hex and may be moved through a series of adjacent hexes during each turn until the player desires to move it no further or it no longer has sufficient remaining movements points to enter another hex. If a unit does not have the number of points remaining that are required to enter a hex it may not enter that hex. Points may not be accumulated from previous turns and those not used in each turn are lost.
C4.2 ProcedureA unit whose action for the turn will be movement is moved through a series of adjacent hexes, expending the appropriate num-ber of movement points to enter each one. There are no “zones of control”. A unit may enter a hex containing an opposing unit but must stop its movement for the turn when it does so. The Army player may never move his units in such a manner that more than one of his units is in the same hex at the same time and may not have two of his units in any one hex at the end of the turn. The Indian player may move his units in such a manner that one unit may pass through the location hex of another of his units and may have up to 3 units in a single hex at the end of the turn.
C4.3 RestrictionsC4.3.1 Units printed on the front and back may change from the mode that they are in as indicated by the side of the counter that is showing to the mode of the face down side by having their ac-tion for that turn being the change of mode. That is, a mounted horse unit may go to the dismounted mode by flipping its counter to the proper side but that is the only action it may take that turn and such a mode change counts as an action by a unit for that turn. Similarly a horse unit could go from a dismounted to mounted, an artillery unit from limbered to unlimbered or from unlimbered to limbered.C4.3.2 Horse units in the mounted mode and artillery units at all times may not enter rocked and broken terrain hexes. A dis-mounted horse unit may not mount in such a hex but must first move to a different type of terrain.C4.3.3 The Washington Volunteers units represent a group of mountain men very skilled in living and fighting individually. When they are among the Army player units involved in a com-bat the Army player may perform an action with two Washington Volunteer units instead of with one of his other units on any or all turns in which he would only be able to perform an action with one unit.
C4.3.4 The surrender or destruction (killed) of the Indian Lodge units in the Tactical Game influences the movement of the Indian units in the Strategic game. If 1-3 lodges have surrendered or been killed there is no effect. If 4-6 lodges have been so affected only the strategic Indian Warior Band units may use fast move-ment. The Village unit must use normal movement at all times. If 7 or 8 lodges are so affected No Indian Strategic units may use fast movement. If 9 lodges are so affected the Strategic Indian Vil-lage unit is removed from the Strategic map, the Strategic Warrior band units may only move at half normal movement (dropping fractions), and the Tactical Indian units may not use the mounted mode. They must always be dismounted.
C5.0 Melee
C5.1 GeneralAny time a unit enters a hex containing an opposing unit it must stop its movement for the remainder of the turn and conduct a melee with the opposing unit. Generally only one Army unit may conduct a melee in an Indian occupied hex. Up to two Indian units may enter the hex of an Army unit to conduct a combined melee.
C5.2 ProcedureIf one unit is meleeing with one other unit by entering its hex subtract the lower Defence & Melee strength to determine a me-lee superiority. If more than one unit was originally in the hex in which the melee is to occur total the defence & melee strengths of the units originally in the hex and then subtract the lower sum from the higher to obtain a melee superiority. If more than one unit is entering an opposing unit(s) occupied hex to initiate a me-lee count the number of movement points required for each unit to move to and enter the hex. The unit requiring the least move-ment points uses its full Defence and Melee strength. For the sec-ond unit subtract the extra movement points required over that of the first unit from the Defence and Melee strength of the second unit and then add the remainder to the Defence & Melee strength of the first unit. Subtract the lower sum from the higher to obtain a melee superiority. Example: The unit(s) originally in the hex have a total defence and melee strength of 4. The first opposing unit to enter the hex expends 2 movement points to move adjacent to the hex and one to enter it and has a defence and melee strength of 3. The second opposing unit to enterthe hex expends 3 movement points to move adjacent to the hex and one to enter it and has a defence and melee strength of 4. It took one more movement point for the second unit to enter the melee hex so it subtracts one from its defence and melee strength to give 3. That is added to the 3 of the first unit for a total of 6. The 4 of the unit origi-nally in the hex is subtracted for a melee superiority of 2. Go to the Melee Results Table and roll the die. Modify the die result for the terrain the melee takes place in, if required, and cross the melee superiority with the modified die roll to a result. Results to the left of ths slash apply to the unit(s) with the lower total De-fence & Melee strength. Results to the right of the slash apply to the unit(s) with the higher total Defence & Melee strength. An explaination of the results is located in rule C6.4. Apply the results of the melee immediately.
I Will Fight N
o More, Forever
CG-Paperwars-82-01.indd 29 11.04.2016 15:00:54

30
C5.3 RestrictionsC5.3.1 Melee is the only form of combat which mounted horse equipped units may initiate. They may, however, be subjected to fire attacks while mounted.C5.3.2 The only time more than one Army unit may be used to initiate a combined melee by moving into an opposing occupied hex is if both units are Washington Volunteers.
C6.0 Fire
C6.1 GeneralUnits with a fire strength or in a mode where their fire strength is face up (dismounted horse equipped units) may use fire as the action they may perform during a turn. All such units may also use a combination fire and movement, both in reduced abilities, as their action for the turn. Fire may be directed at any opposing unit that is visible according to the rules of line of sight. Each unit fires individually and is resolved for effect individually. Each unit may fire, as its action fire, at only one opposing unit in a turn. Note that mounted horse units have no fire strength.
C6.2 Fire ProcedureA unit which will fire for its action has the defence and melee strength of any single opposing unit which is its target subtracted from its fire strength to produce a fire superiority. Refer to the Fire Results Table and roll a die. Modify the die result if necessary due to terrain and cross the result with the superiority to find the fire result. Apply the result immediately to the defending unit.
C6.3 Fire & Movement ProcedureAs its action a unit may both fire and move. To do this it first fires and then moves. For its fire the unit’s fire strength is halved. For its later movement the units movement allowance is also halved. In both cases fractions are rounded down. First conduct fire for the unit and resolve it in accordance to the normal fire rules in Sec-tion C6 and then conduct normal movement in accordance with the rules in Section C4, remembering only to halve the strengths and allowances in both before starting the other procedures. Note that by using this action it is possible for a unit to engage in fire, movement, and melee in one turn.
C6.4 Combat ResultsThere are a number of possible combat results from both fire and melee combat. They are described, along with their effects, be-low:C6.4.1 “P1” means the unit is pinned. Place a P1 marker on the unit. The unit may not move until rolling a 1,2, 3, or 4. When that result is rolled remove the mraker. If a unit that is current-ly marked with a P1 receives another P1 result replace the “P1” marker with a “P2” marker.C6.4.2 “P2” means the unit is hard pinned. Place a P2 marker on the unit. The unit may not move or fire until rolling a 1, 2 or 3. When that result is rolled remove the marker. If a unit that is cur-rently marked with a “P2” receives another P2 result the unit must roll on the Morale Table. Additional P1 results have no effect.C6.4.3 “M” means the unit must roll on the Morale Table. Locate
the proper column by what type of unit is rolling and then roll the die. A “B” result means the unit is broken. Examine the location of the unit to determine if it is completely surrounded by oppos-ing units. If every hex at any or varying distances around the unit is occupied by opposing units and there is not a single hole in the opposing line the unit surrenders. A surrendered unit is removed from the map and placed in a separate pile where it may later be counted for victory purposes. It may not be used again in a com-bat for the remainder of the game. If it was the last usable unit composing a Strategic unit the Strategic unit is removed from the Strategic map. The Indian player may voluntarily surrender units at any time in a combat during his player turn, if he so desires. If the broken unit is not surrounded it is removed from the map but it may not reenter that particular combat. The unit may be used again in later combats and is in all other respects uneffected. A result of “P2R” means the unit must fall back one hex and is then hard pinned in its new location hex. To fall back the unit must move one hex in a direction that will make it nearer to the closest friendly unit on the map. It may not enter an opposing unit occu-pied hex to do this. It may enter a friendly unit occupied hex and may overstack that hex but it may not contribute to the defence of that hex and the unit(s) in that hex are halved in their Defence & Melee strength while the unit is there. A unit that cannot fall back is considered broken and removed from the map. After the unit has fallen back one hex a P2 marker is placed on it and the normal P2 effects take place.C6.4.4 “K” means a unit is killed. Remove it immediately from the map and place it in a separate killed pile where it may be counted later for victory purposes. It may not be used again in a combat for the remainder of the game. If it was the last usable unit composing a Strategic unit the Strategic unit is removed from the Strategic map. Note that a number in front of a “K” or “M” indicates that if more than one unit is present the number of units indicated suffer the results. In all cases “K”s are taken before “M”s as results if both are present. Hence a “2M3K” result would mean that at least three units would be killed (owning players choice) and if there are still units in the hex 2 more would have to role on the Morale Table.
C6.5 RestrictionsC6.5.1 Units may only fire at targets that are in the line of sight. Tree Stand hexes, Rocked & Broken hexes, and Ridge hexsides block line of sight. Line of sight should be measured from the center of the firing hex to the centre of the target hex. If any of the previously mentioned blocking terrain is between the firing hex and the target hex the firing unit may not fire at that target. Fire may, however, be directed into or out of a hex that blocks line of sight so long as no other blocking terrain intervines between the firing and target hex. This means opposing units may see each other for fire if they are both in blocking terrain hexes and adja-cent to one another or both in blocking terrain hexes but have no other blocking terrain hexes between them or only one or the other is in blocking terrain but has no blocking terrain between it and the other unit. Units that find themselves sighting down the edge of a hex of blocking terrain are considered to have their line of sight blocked. A unit directly behind a ridge hexside may sight through that ridge hexside. No other forms of terrain in any way effect line of sight.C6.5.2 The range of fire is unlimited but fire strength decreases as I W
ill F
ight
No
Mor
e, F
orev
er
CG-Paperwars-82-01.indd 30 11.04.2016 15:00:54

31
the range to the target increases. For Army player units except the Washington Volunteers the fire strength of a unit is normal at 1 to 4 hexes, halved at 5-8 hexes, and quartered at over 8 hexes. For Indian player units and the Army player’s Washington Volunteers fire strength is normal at 1 to 6 hexes, halved at 7 to 12 hexes, and quartered at over 12 hexes. All fractions are dropped.C6.5.3 The Army player Howitzer and Hotchkiss units may use indirect fire to fire at targets that are not in their line of sight. The target hex to be fired at must be in the line of sight of at least one other friendly Cavalry unit (it may not be a horse equipped volunteer or scout unit). The Cavalry unit may be either mounted or dismounted but it must be in terrain where it could mount if it so desired. When firing by this method normal fire strength reductions for range do not apply. Instead the fire strength of the unit using indirect fire is 2/3s of normal at 1 to 9 hexes and 1/3 of normal at over 9 hexes. In addition when a unit indirect fires it attacks each unit in the target hex individually instead of attacking only one unit and each unit is attacked at the indirect fire strength for that range. Indirect fire is, however, subject to scatter. After specif ing the target hex roll a die. A1 or 2 means no scatter and the fire lands in the target hex. A 3 or 4 means one hex scatter so the fire will land in a hex adjacent to the target hex. A 5 or 6 means two hexes scatter so the fire will land in a hex two hexes from the target hex. If the fire scatters roll the die again to determine the direction of the scatter. Using the target hex as the center, a scat-ter die result of one indicates the fire impacts on the hex directly above the target hex. A two indicates the fire impacts on the hex adjacent to the upper right of the target hex. A three is the hex adjacent to the lower right, a four directly below the target hex, a five adjacent to the lower left of the target hex, and a six adjacent to the upper left of the target hex. Any units in the target hex are attacked by the fire, even if they belong to the firing player.
C7.0 Breaking Off
C7.1 Exiting The MapTo end a combat all units of one side must leave the map either in the form of killed, broken, or surrendered due to combat results or by voluntary movement. To voluntarily exit the map a unit must move to a hex at the map edge and then spend one additional movement point to leave the map. After spending the point the unit is removed from the map and may be used in later combats.
C7.2 Strategic EffectWhen a combat ends the tactical units remaining on the map are removed for use in later combats. All of the Army players Strategic units that provided tactical units that actually were on the tactical map for the combat are restricted in movement in the Strategic game for the next two Strategic turns. On the immedi-ately following Strategic turn the affected Strategic units may not move at all. On the next Strategic turn the affected Strategic units may not use fast movement, even if they would qualify for fast movement by being located in a fort or town. The Indian player’s Strategic units that are affected by having had tactical units that participated in the combat may not use fast movement for the immediately following Strategic turn. On the next Strategic turn they are no longer restricted and may move as they wish. Note that even if only one of several tactical units that compose a Stra-
I Will Fight N
o More, Forever
tegic unit was on the map (rather than adjacent to the map but did not come on or not involved at all) then the entire Strategic unit suffers movement restrictions following the combat.
D. THE EPILOGUE
D1.0 The AftermathWhen it was over no one had won. The Nez Perce had started with about 750 people, one third of which were warriors. 122 of them had been killed and 93 wounded. About 200, half warriors and half younger women and older children, escaped through Mile’s lines and made their way to refuge with Sitting Bull in Canada. The Army lost 177 killed and 147 wounded. About 50 of those killed had been civilian volunteers. After the initial incident that started the retreat the Nez Perce had been unusually civil in their dealings with whites encountered along the trail that were not part of the force hunting them and most had been either ignored or let go unharmed after a couple of days.The surrendered tribe was promised by Miles that they would be returned to their native lands but it never happened. They were shipped first to Fort Keogh and then to Indian territory. Years later they were relocated again to the Colville area in Washing-ton. Joesph died there in the early 1900’s, still pleading with the government to let his people go back to the land they never gave up. The Army commanders did no better. The chase had been too long and too bungled for there to be much glory and Howard and Miles promptly began a public fight over what little there was. Perhaps the best sum up can be found in the U.S. Army R.O.T.C. manual where it states “in 11 weeks he ( Joseph) had moved his tribe 1,600 miles, engaged 10 separate U.S. commands in 13 bat-tles and skirmishes, and in nearly every instance either defeated them or fought them to a standstill”. A remarkable testiment to human courage and endurance.
D2.0 Victory ConditionsThe game ends with the conclusion of the 29th Strategic turn (or the 30th if the Optional Sitting Bull rule is used) or on any turn after the 25th in which all strategic Indian units on the Strategic map are in all Canada hexes as detailed in rule B4.4.3. At that time both players examine the piles of killed and surrendered units. The Army player receives 5 points for each tactical brave unit in the killed pile, 2 points for each tactical brave unit in the surrendered pile, and 7 points for each tactical lodge unit in the surrendered pile. The Army player loses 8 points for each tactical lodge unit in the killed pile. The Indian player receives no points for killed and surrendered Army player units. The Indian player receives 4 points for each surviving tactical brave unit that is part of a Strategic unit in Canada and 2 points for each surviving tactical brave unit that is part of a Strategic unit in the United States. The Indian player also receives 9 points for each surviving lodge unit if the Strategic Indian Village unit is in Canada or 6 points for each surviving lodge if the Village unit is in the United States. Total the points for both sides and subtract the Indian player total from the Army player total. Compare the result to the table below to determine the outcome:
CG-Paperwars-82-01.indd 31 11.04.2016 15:00:54

32
More than 60 points: Major Army Victory41-60 points: Tactical Army Victory20-40 points: Draw0-19 points: Tactical Indian VictoryLess than 0 points: Major Indian Victory
D3.0 Design Notes and BibliographyThis has been an unusual game for me. The desire to do the title first came from reading of the long trek in Brown’s Indian view-point: “Bury My Heart At Wounded Knee”. A bit more research showed it to be a fascinating topic and one very contrary to most Indian/Cavalry tales. When I finally discovered that the retreat was longer than Xenophon’s march I knew I wanted to do a game on it. The basic concept for the design, namely a two stage affair with strategic manuever and search and tactical combat came very
easily. Actually coming up with mechanics to cover the transition was a bit more difficult. Hopefully you will find our final compro-mises acceptable. The Strategic game very much centers around the Army player getting coordinated and the Indian player trying to prevent it. The tactical games have a lot of nuance in the system. Little things we’ve put in to depict tactics that could be done and their varying chances of success. I think this is the first major at-tempt at covering an entire Indian campaign in a thorough man-ner. If you like it let me know and we will consider trying another. I wanted to put in a full bibliography but due to space limitations I have only limited suggestions. M.D. Seal’s “I Will Fight No More Forever” and M.H. Brown’s “Flight Of The Nez Perce” are excellent specific references if you wish to go into the details of the campaign and Utley’s remarkable “Frontier Regulars” is the finest general source on the Indian wars of the mid and late 1800’s.
I Will
Fig
ht N
o M
ore,
For
ever
D4.0 Charts & Tables MAND TABLE
MORALE TABLE
Die Roll Warrior Lodge Army Volunteers Wash Vol. Camp City Def.1 P2R P2R P2R P2R P2R P2R P2R2 P2R P2R P2R B P2R P2R B3 P2R P2R P2R B P2R B B4 P2R P2R B B P2R B B5 P2R B B B P2R B B6 B B B B B B B
LESTATE OF CONTACT TABLE
Die Roll A - Warrior B - Village C - Wash Vol. D - Soldiers E - Volunteers1 Ambushing Ambushing Ambushing Ambushing Alerted2 Ambushing Alerted Ambushing Alerted Alerted3 Alerted Alerted Alerted Alerted Surprised4 Alerted Alerted Alerted Surprised Surprised5 Alerted Alerted Alerted Surprised Surprised6 Alerted Surprised Surprised Surprised Surprised
If a Surprised is rolled on any table, roll again. A 1, 2, or 3 is Surprised Encamped. A 4, 5, or 6 is Surprised On Trail.
CG-Paperwars-82-01.indd 32 11.04.2016 15:00:54
33
SEARCH TABLESearch Superiority
Die Roll 0 1 2 3 4 5 6 7 8 9 10 9-2 - - - - - - - - - - - C-1 - - - - - - - - - - C C0 - - - - - - - - - C C C1 - - - - - - - - C C C C2 - - - - - - - C C C C C3 - - - - - - C C C C C C4 - - - - - C C C C C C C5 - - - - C C C C C C C C6 - - - C C C C C C C C C7 - - C C C C C C C C C C8 - C C C C C C C C C C C
MELEE TABLEMelee Superiority
Die Roll 0 1 2 3 4 5-1 -/1K1M -/1K1M -/1K 1M/1K 1M/1M 1K/1M0 -/1K1M -/1K 1M/1M 1M/1KM 1K/1M 1K/-1 -/1K 1M/1K 1M/1M 1K/1M 1K/- 1K1M/-2 1M/1K 1M/1M 1K/1M 1K/- 1K1M/- 1K1M/-3 1M/1M 1K/1M 1K/- 1K1M/- 1K1M/- 1K2M/-4 1K/1M 1K/- 1K1M/- 1K1M/- 1K2M/- 2K2M/-5 1K/- 1K1M/- 1K1M/- 1K2M/- 2K2M/- 2K2M/-6 1K1M/- 1K1M/- 1K2M/- 2K2M/- 2K2M/- 3K2M/-
FIRE RESULTS TABLEFire Superiority
IF -10 -9 -8 -7 -6 -5 -4 -3 -2 -1 0 1 2 3 4 5 6AF -1 0 1 2 3 4 5 6 7 8 9 10 11 12 13 14 15-2 - - - - - - - P1 P1 P2 P2 P2 M P2 P2 P1 P1-1 - - - - - - P1 P1 P2 P2 P2 M M M P2 P2 P10 - - - - - P1 P1 P2 P2 P2 M M M M M P2 P21 - - - - P1 P1 P2 P2 P2 M M M M K M M P22 - - - P1 P1 P2 P2 P2 M M M M K K K M M3 - - P1 P1 P2 P2 P2 M M M M K K K K K M4 - P1 P1 P2 P2 P2 M M M M K K K K K K K5 P1 P1 P2 P2 P2 M M M M K K K K K K K K6 P1 P2 P2 P2 M M M M K K K K K K K K K
AF = Army Firing Superiority Columns; IF = Indian Firing Superiority ColumnsArmy player units with the exception of the Washington Volunteers use the Army Firing Superiority line of column heads. Indian player units and the Washington Volunteers use the Indian Firing Superiority line of column heads. Superiorities greater or less than those listed on the table use the highest or lowest column, respectively.
I Will Fight N
o More, Forever
Die
Rol
l
CG-Paperwars-82-01.indd 33 11.04.2016 15:00:55

34
B y 1877 the US Army was starting to run out of Indian tribes to have wars with on the Frontiers. But the relentless expansion of settlers and their
mining and homesteading activities made it pretty certain that eventually the rest would fall into the fold. In the Northwest the first to come into conflict would be the Nez Perce, or in their language, the Nee-Me-Poo. The result of this conflict would be the longest contested retreat in military history, out distancing Xenophon and the 10,000, and some very rough handling of a number of United States Army formations by what had been, until then, a fairly peaceful tribe of Native Americans.
The start of it all was, as usual, some natives not wanting to give up land. In 1855 a treaty with the Nez Perce gave them a very large reservation, but that did not stop explo-ration on it by prospectors, so when gold was discovered on the reservation in the early 1860s a new treaty and a much reduced reservation was forced on the Nez Perce, but not all of the bands agreed to it, and some, termed the Non-Treaty bands, never moved to their new restrict-ed allotment. Some bands stayed on the lower Salmon river and others in the Wallowa valley. This latter area started attracting settlers in the early 1870s which the na-tives pointed out was nothing they had ceded, resulting in an agreement with the Grant administration that a good chunk of the valley was to be retained for them, but pres-sure f rom Oregon officials caused the President to retract his agreement and in 1875 the area was opened for settle-ment, which caused a breach with the non-treaty bands. A decision was made by the Nez Perce in council to try to live with the encroaching whites, but this did not alter the desire of the whites to have them entirely gone.
In November of 1876 a two day council produced a stale-mate between the US government and the non-treaty bands, with the result that the Indian Agency and the US Army began preparations to move them to the new reser-vation by force if need by and after another heated three day council in May of 1877 the bands were given 30 days to move, an order backed by a buildup of US Army cav-alry at Fort Walla Walla. The bands of Chief Joseph (the younger, native name Hin-mah-too-yah-lat-kekt), Too-hool-hool-zote and White Bird reluctantly agreed and began the difficult journey, pausing at the south boundary of the reservation to wait out their remaining f ree days. But in mid June a number of braves got into an altercation with a number of whites know for their bias against natives and 4 of them were killed. At this point on June 14th, the non-treaty bands began movement away f rom the reserva-tion to avoid the inevitable results of the killings.
General Howard, in charge of both the negotiations and the US Army elements in the area, heard of the events the next day and promptly sent 100 cavalry under Captain Perry to assist the settlers at around Salmon River. When they arrived further hostilities had ensued and about 17 more settlers had been killed. Armed locals and Perry with his troops moved rapidly to try to intercept, moving down White Bird Creek toward the Salmon, where at the con-fluence the Nez Perce had paused and set up their lodges. The Chiefs conferred and decided to send out a truce party under a white flag to try to get talks started, but the party was fired on by the settler volunteers and an advance guard of Perry ’s cavalry. At that point the battle of White Bird Canyon was on. Perry got his troops into line but the na-tives poured in accurate fire f rom the f ront while flanking on both sides. The settlers fled, allowing Perry ’s line to be rolled up and the entire force retreated in disorder up the canyon, making defensive stands all the way back to Mount Idaho. By the time it was over the US Army had lost 34 men dead and many others wounded while the native casu-alties were 3 wounded.
12 days after White Bird Canyon, Howard had 400 men f rom the First Cavalry, 21st Infantry, and 4th Artillery at the scene of the lost battle, though by now the Nez Perce were long gone. They had crossed the Salmon and moved into the mountains between the Salmon and the Snake River valleys. Meanwhile Howard was convinced by locals that the band of Looking Glass, was planning to join the hostilities, though there was no actual evidence of this and they in fact were not. Though the group sent to look into this, lead by Captain Whipple with two cavalry troops and a couple of Gatling guns, was supposed to talk, the set-tlers with the group instead incited conflict, spraying the village with gunfire and sending Looking Glass and his band straight into hostilities he had tried to avoid. By July 2nd a second skirmish was fought 50 miles downstream where the settlers and Whipple’s cavalry were knocked about badly and the next day an isolated detachment of 10 troops under Lt. Rains was wiped out as the Nez Perce bands united on the south fork of the Clearwater at the mouth of Cottonwood Creek, now numbering about 300 braves and 500 non-combatants.
The next day was one of both sides dug in and exchanging extended fire until Captain Miller’s 4th Artillery unexpect-edly charged, forcing the braves back across the Clearwater in haste where they abandoned lodges and started a forced march north away f rom Howard’s concentration, ending the Battle of the Clearwater. It cost the Army 15 dead and
The Retreat of the Nez PercéJune-September, 1877
by Stephen Newberg
THE RETREAT OF THE NEZ PERCE
CG-Paperwars-82-01.indd 34 11.04.2016 15:00:55

35
THE RETREAT OF THE NEZ PERCE
25 wounded with the natives losing 4 dead and 6 wounded. Howard, however, hesitated on following and as a result the bands moved away to Weippe Prairie, where the chiefs conferred and ended up following Looking Glass’s view of crossing the Bitterroot mountains to Montana to either join with the Crows or move on to join Sitting Bull in Canada. By the 16th of July the tribe was moving up the very steep Lolo trail toward the buffalo ranges of Montana.
At this point Howard felt that the natives had moved out of his area of control and he broke off pursuit, but after 2 weeks of urging f rom General Sherman and the US Presi-dent, he resumed trailing after the Nez Perce. By the time he got underway, Howard’s force was about 200 cavalry, 360 infantry, 25 Bannock scouts, 150 packers and civilians, and 350 pack mules. Meanwhile the Nez Perce had crossed into Montana, done some trading with local whites with no complications, and moved up f rom the valley to cross the Continental Divide on August the 6th, moving down then into a traditional camp site in the valley of the Big Hole river, where over the objections of most of the Chiefs, Looking Glass insisted on a rest stop.
Delaying turned out to be a very bad move. Colonel Gib-bon had concentrated elements of his command and was following much more closely than the natives anticipated. With the dawn of August 9th, Gibbon pressed a surprise assault on the Nez Perce encampment. He had about 160 troopers and another 45 citizen volunteers and they stormed down to capture the encampment with 20 minutes of gunfire. Looking Glass and White Bird rallied their braves and counter attacked so strongly that Gibbon was forced back to where he had started the assault and pinned there for the remainder of that day and all of the next as the lodges and families were retreated to the southeast. By the evening of the 10th the rest of the holding force departed, leaving Gibbon’s group badly beat up. 30 were dead and 40 wounded, with 2 more to die later. Nez Perce casualties were great, with Gibbon recovering and burying 89 natives, mainly women and children killed in their teepees during the initial assault.
The Battle of Big Hole would be the last major engagement for over a month as the Nez Perce continued to outpace their pursuers down the Bitterroot Valley, across Camus Meadows, through Yellowstone National Park, and across the Absoroka wilderness to exit the mountains north of Heart Mountain, skirmishing with various Army and civil-ian elements the entire way, before turning north, having in council decided that the only course left to them would be to run for the Canadian border and sanctuary with Sit-ting Bull.
But during this time the US Army was not idle. By the end of August Lt. Doane and Lt. Col. Gilbert had left Ft. El-lis with their groups while Col. Sturgis and his 6 troops of the Seventh Cavalry were trying to block the two outlets of Yellowstone, but the Nez Perce faked them out and slipped
past, as did Howard and his consolidated forces that were on the Nez Perce trail, though still well behind. Sturgis caught up at Canyon Creek on the 13th of September, but the war bands fought a skillful delaying action so that the lodges would escape and then followed them. Sturgis only lost 3 men in the engagement, but was widely panned for timidity and his inability to halt the natives. Meanwhile, Gen. Howard requested assistance f rom Col. Miles and his forces at Ft. Keogh, as the fast moving Nez Perce now had turned north.
Miles had been keeping track of the campaign and hop-ing for a chance to intervene. As a result, by the 18th of September he was underway with two troops of cavalry and five companies of infantry. More troops were absorbed into the force along the way as they were encountered, end-ing up with a strength of about 400 Army regulars and 30 Cheyenne and Sioux scouts plus a Napoleon gun and a Hotchkiss gun. By the 23rd of September Miles was well to the northwest and about 2 days behind the Nez Perce. Meantime, Howard had slowed his advance, hoping that the gap would induce the natives to slow their progress also, and allow time for Miles to get ahead of them.
This tactic succeeded to a degree, as Looking Glass had again convinced the chiefs that they should slow down and rest the tribe. On September 30th Miles caught up and deployed for attack, charging into the not yet broken for travel camp about mid morning. The final battle, the standoff at Bear Paw, was underway. In the initial sharp engagement the cavalry and scouts did well and managed to drive off most of the Nez Perce horse herd. But the braves then staged an ambush f rom the broken crest posi-tions to the south and east, holding out there and causing serious losses until the infantry reserve was brought up to dislodge them. The natives then fell back to positions to cover their tepees.
The attack had been very costly for the Army. 24 dead and 42 wounded, many severely, with losses particularly high among the officers. Miles halted the active offensive and shifted to surrounding the Nez Perce camp and keeping it under siege. He had his artillery keep up a slow barrage, as his ammunition was limited, while sharpshooters f rom both sides continuously plinked away at each other, with the braves generally the better shots and easily forcing the troopers to keep well distant. But all was not well for the Nez Perce. They had lost about 3 dozen braves in the ac-tion, killed and wounded, including three of the war band chiefs, and their horses were gone. Plus, the weather was deteriorating fast with snow accumulating.
The siege was into its fifth day when Gen. Howard arrived. At this point sniping killed Looking Glass and Joseph met with Miles to arrange a surrender. About 400 natives gave themselves up, less than a quarter of them warriors, on October 6th, 1877. The rest had escaped the night be-fore heading into Canada, now only 40 or so miles further
CG-Paperwars-82-01.indd 35 11.04.2016 15:00:55

CG-Paperwars-82-01.indd 36 11.04.2016 15:01:03