Embed Size (px)
Citation preview

Certificate Authority Module
lab 1 issue and revoke of certificate authority
Introduction................................................................................................................................. 2
Quick introduction to LAMP ................................................................................................. 2
Quick introduction to certificate authority............................................................................ 2
Implementation ........................................................................................................................... 2
Network topology on GENI ................................................................................................... 2
Setup LAMP on GENI ............................................................................................................ 3
Install MySQL:............................................................................................................... 4
Install Apache ............................................................................................................... 5
Install PHP .................................................................................................................... 6
Install the extension packets of PHP and MySQL ........................................................... 7
Enable SSL connection of Apache ................................................................................. 7
Install and enable browser on GENI .................................................................................... 10
For Windows operation system:.................................................................................. 11
For MacOS operation system ...................................................................................... 13
For other Linux operation system ............................................................................... 16
Test Apache service and PHP service ........................................................................... 16
Test Apache service ............................................................................................. 17
Test PHP service .................................................................................................. 17
Set up certificate authority on GENI ................................................................................... 20
Build Certificate Authority .......................................................................................... 21
On web server node ................................................................................................... 24
Issue a digital certificate ..................................................................................................... 25
Result of issued digital certificate ....................................................................................... 31
Revoke a digital certificate .................................................................................................. 39
Result of revoke a digital certificate .................................................................................... 41
Introduction
Quick introduction to LAMP
LAMP is short for the software bundle of Linux operating system, Apache
HTTP Server, MySQL database management system and PHP
programming language.
This bundle can realize the role and function of a web server, which can
drive Web applications. Although not actually designed to work together,
these open source software is comparatively simple and easy to use.
Besides this four software, this software bundle can also be combined
with many other free and open-source software packages
Quick introduction to certificate authority
Certificate Authority is a trusted third party that issues electronic
documents that verify a digital entity’s identification on the Internet.
In cryptography mean, certificate authority verifies the ownership of the
public key of the named subject of the certificate.
Implementation
Network topology on GENI
The network topology of our experiment will be the following one:
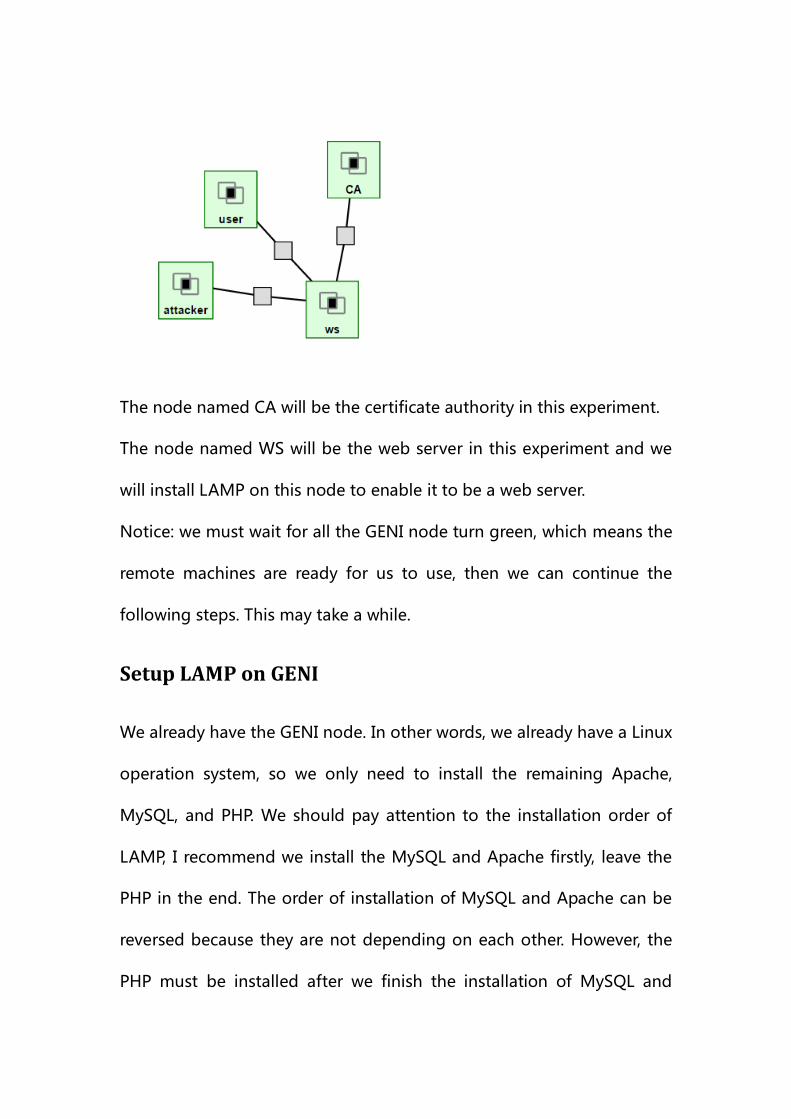
The node named CA will be the certificate authority in this experiment.
The node named WS will be the web server in this experiment and we
will install LAMP on this node to enable it to be a web server.
Notice: we must wait for all the GENI node turn green, which means the
remote machines are ready for us to use, then we can continue the
following steps. This may take a while.
Setup LAMP on GENI
We already have the GENI node. In other words, we already have a Linux
operation system, so we only need to install the remaining Apache,
MySQL, and PHP. We should pay attention to the installation order of
LAMP, I recommend we install the MySQL and Apache firstly, leave the
PHP in the end. The order of installation of MySQL and Apache can be
reversed because they are not depending on each other. However, the
PHP must be installed after we finish the installation of MySQL and
Apache because PHP server depends on the services of Apache and
MySQL.
Using SSH log onto the WS node. The following installation will be on
this node.
Before installation, we should download the package lists from the
repositories and "updates" them to get information on the newest
versions of packages and their dependencies.
Command: “sudo apt-get update”
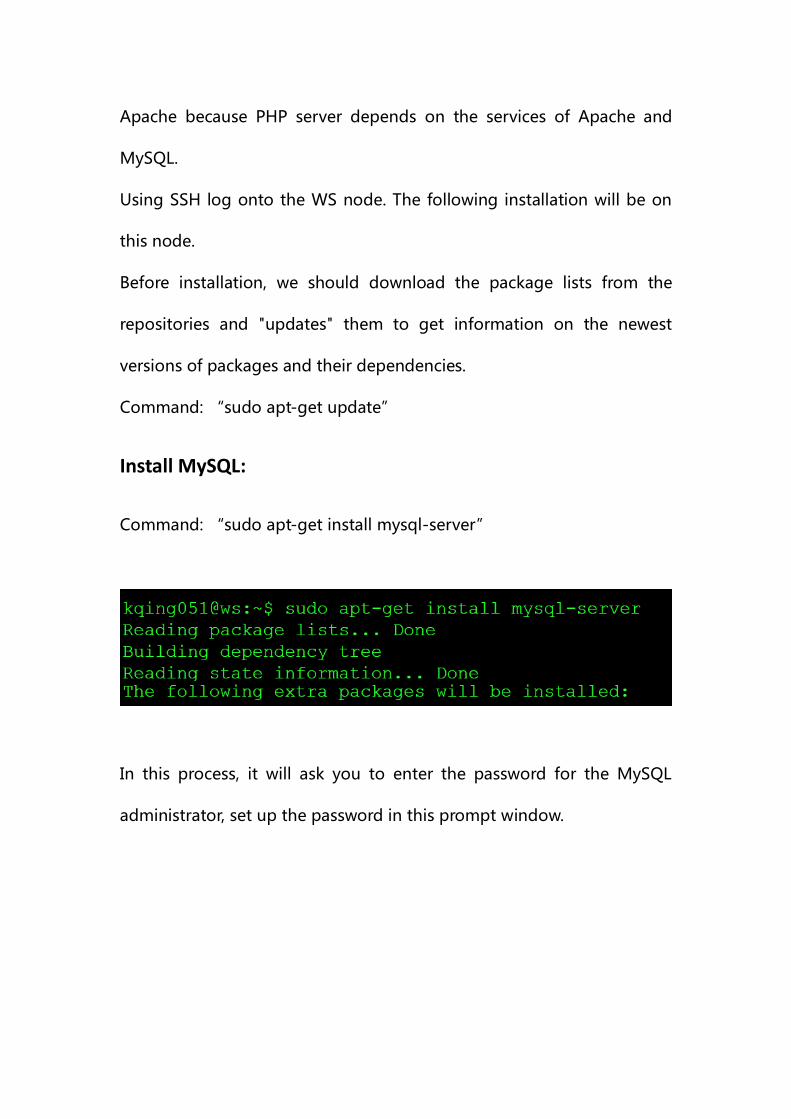
Install MySQL:
Command: “sudo apt-get install mysql-server”
In this process, it will ask you to enter the password for the MySQL
administrator, set up the password in this prompt window.
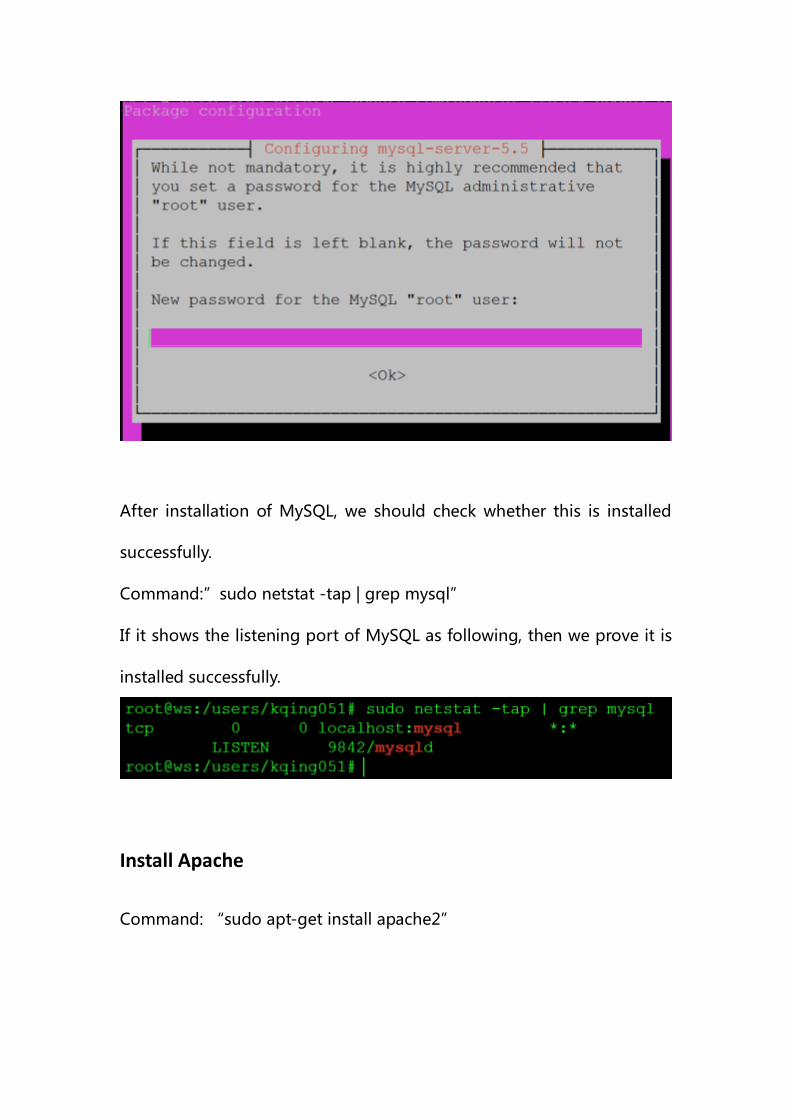
After installation of MySQL, we should check whether this is installed
successfully.
Command:”sudo netstat -tap | grep mysql”
If it shows the listening port of MySQL as following, then we prove it is
installed successfully.
Install Apache
Command: “sudo apt-get install apache2”
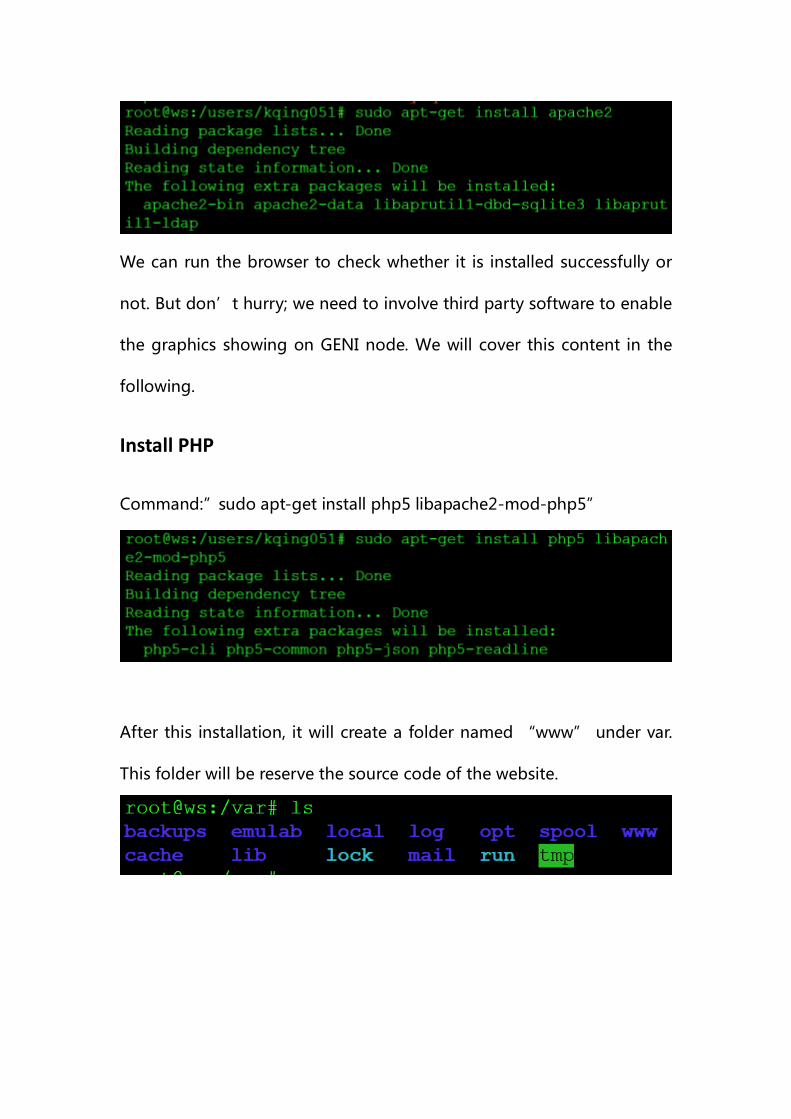
We can run the browser to check whether it is installed successfully or
not. But don’t hurry; we need to involve third party software to enable
the graphics showing on GENI node. We will cover this content in the
following.
Install PHP
Command:”sudo apt-get install php5 libapache2-mod-php5”
After this installation, it will create a folder named “www” under var.
This folder will be reserve the source code of the website.

Install the extension packets of PHP and MySQL
Command:” sudo apt-get install php5-mysql php5-curl php5-gd
php5-intl php-pear php5-imagick php5-imap php5-mcrypt
php5-memcache php5-ming php5-ps php5-pspell php5-recode
php5-snmp php5-sqlite php5-tidy php5-xmlrpc php5-xsl;”
Notice: the GENI node is initiated with an Ubuntu operation system
following its default setting. If you choose other operation systems
rather the default operation system, there might be a warning message
showing on the screen and it may be failed to initiate the GENI nodes.
Therefore there is no need to set up another operation system, but if you
do so, either it will not affect much in this experiment.
Enable SSL connection of Apache
Because we need to install the digital certificate later, so we need to
enable SSL connection of Apache.
First, just a brief introduction of Apache configuration file.
As we can see, there are several configurations in Apache folder.
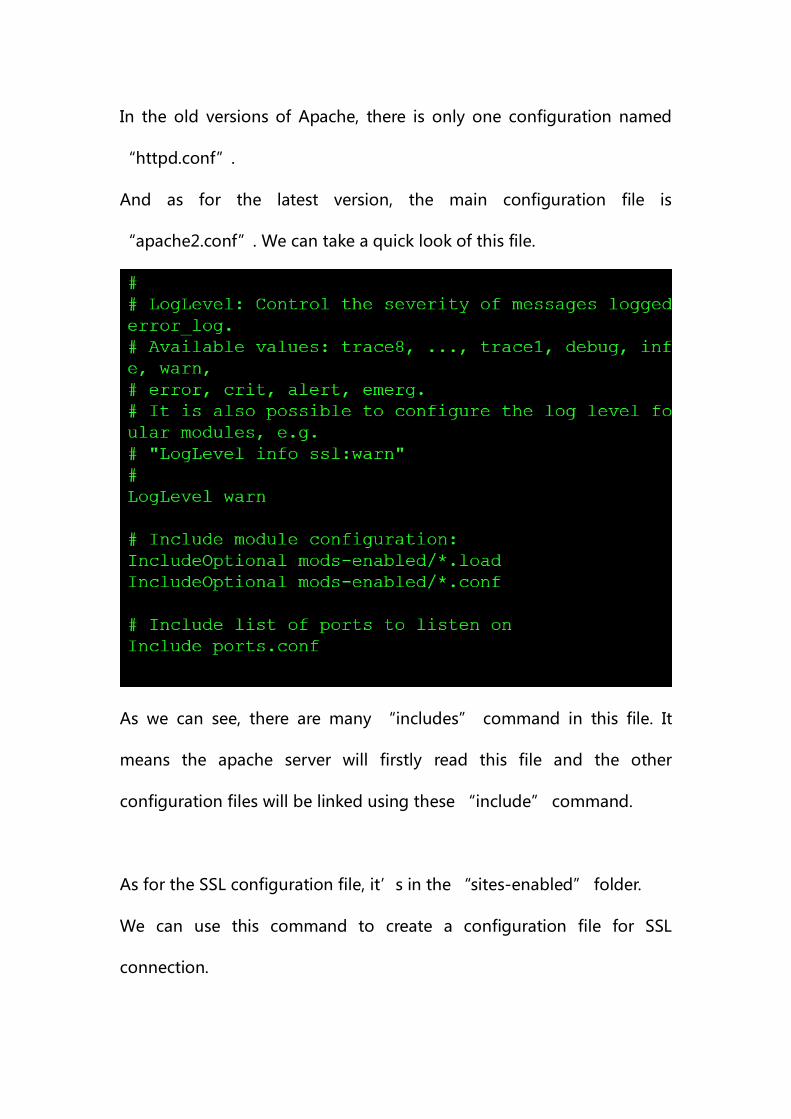
In the old versions of Apache, there is only one configuration named
“httpd.conf”.
And as for the latest version, the main configuration file is
“apache2.conf”. We can take a quick look of this file.
As we can see, there are many “includes” command in this file. It
means the apache server will firstly read this file and the other
configuration files will be linked using these “include” command.
As for the SSL configuration file, it’s in the “sites-enabled” folder.
We can use this command to create a configuration file for SSL
connection.
“sudo cp
/etc/apache2/sites-available/default-ssl.conf /etc/apache2/sites-enable
d/default-ssl.conf ”
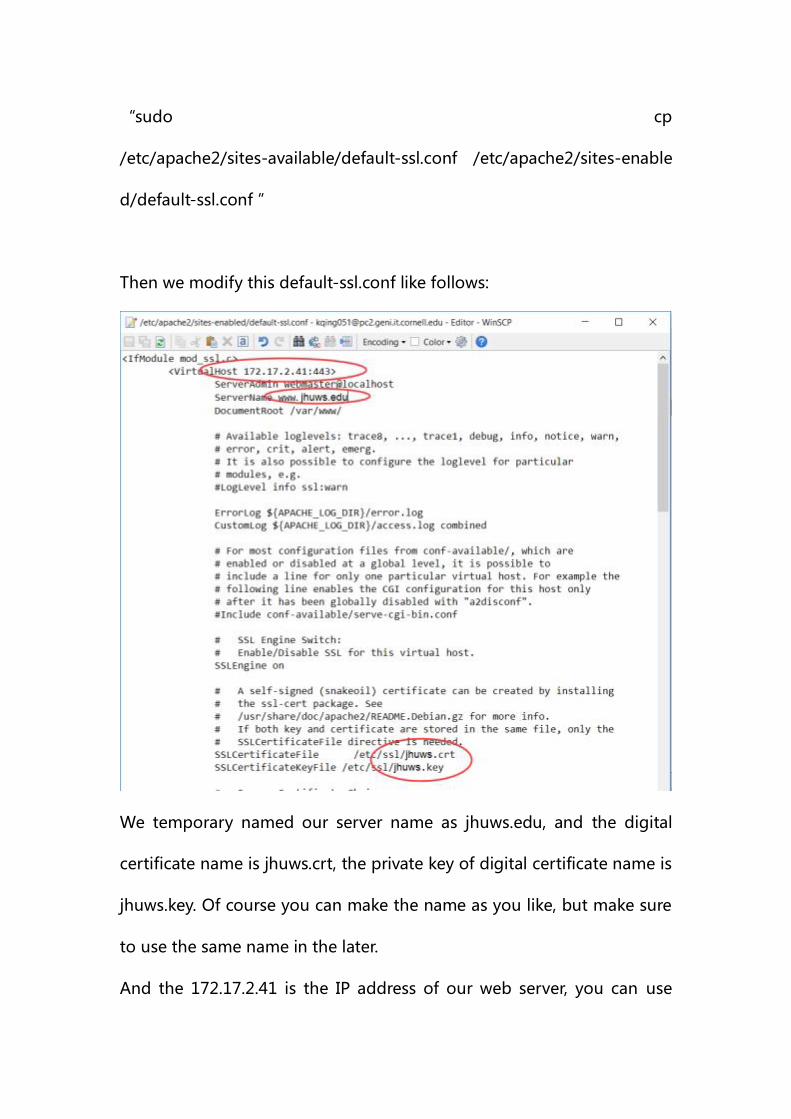
Then we modify this default-ssl.conf like follows:
We temporary named our server name as jhuws.edu, and the digital
certificate name is jhuws.crt, the private key of digital certificate name is
jhuws.key. Of course you can make the name as you like, but make sure
to use the same name in the later.
And the 172.17.2.41 is the IP address of our web server, you can use
command “ifconfig” to check it out. The “443” is the port number
for SSL connection.
You should also use this command” sudo a2enmod ssl” to enable the
SSL module of Apache2 if there prompt the problem that you try to
connect 443 port to our web server while it refuse.
Then restart the apache2 service using this command”service apache2
restart”.
Install and enable browser on GENI
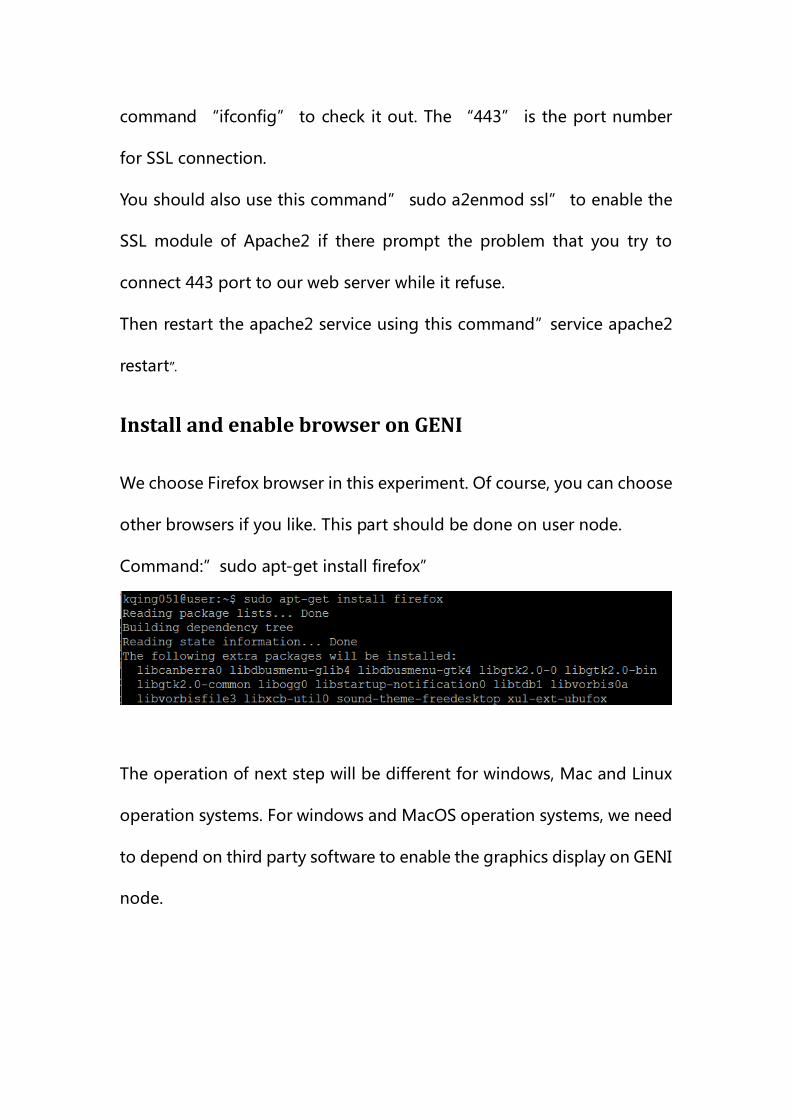
We choose Firefox browser in this experiment. Of course, you can choose
other browsers if you like. This part should be done on user node.
Command:”sudo apt-get install firefox”
The operation of next step will be different for windows, Mac and Linux
operation systems. For windows and MacOS operation systems, we need
to depend on third party software to enable the graphics display on GENI
node.
For Windows operation system:
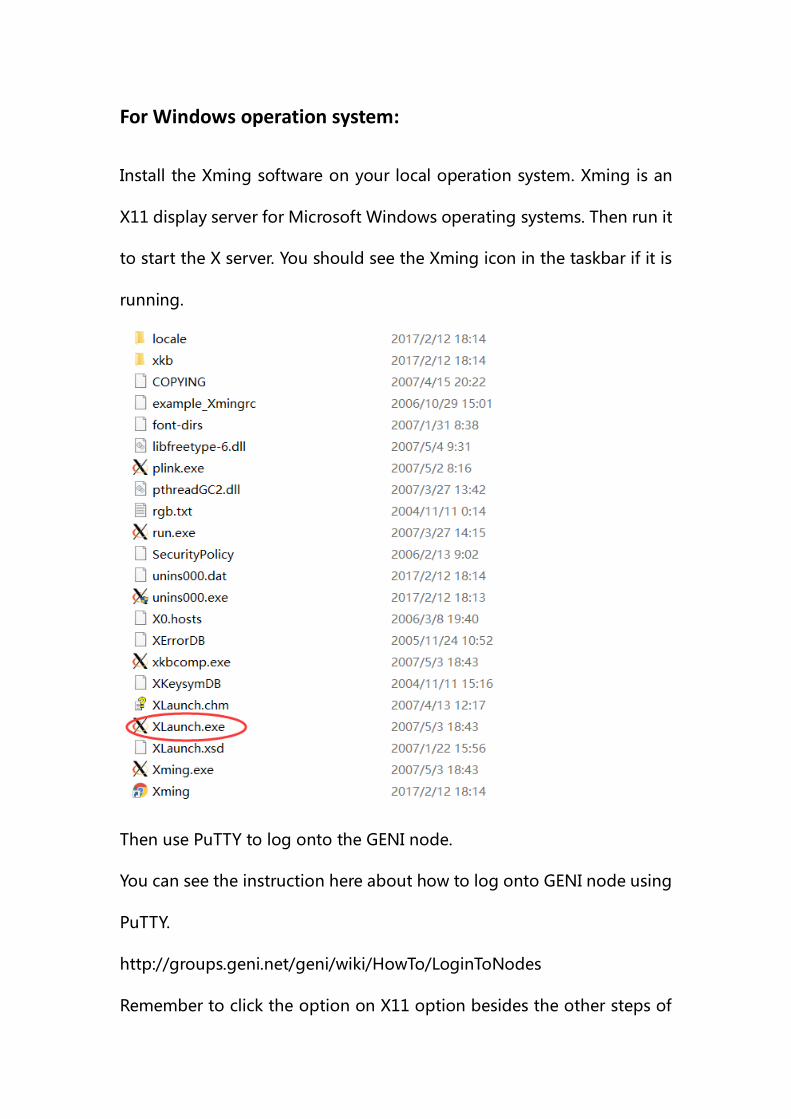
Install the Xming software on your local operation system. Xming is an
X11 display server for Microsoft Windows operating systems. Then run it
to start the X server. You should see the Xming icon in the taskbar if it is
running.
Then use PuTTY to log onto the GENI node.
You can see the instruction here about how to log onto GENI node using
PuTTY.
http://groups.geni.net/geni/wiki/HowTo/LoginToNodes
Remember to click the option on X11 option besides the other steps of

logging onto GENI node using PuTTY.
Then we can run the graphics display on GENI node on Windows
operation system.
Command:”firefox”
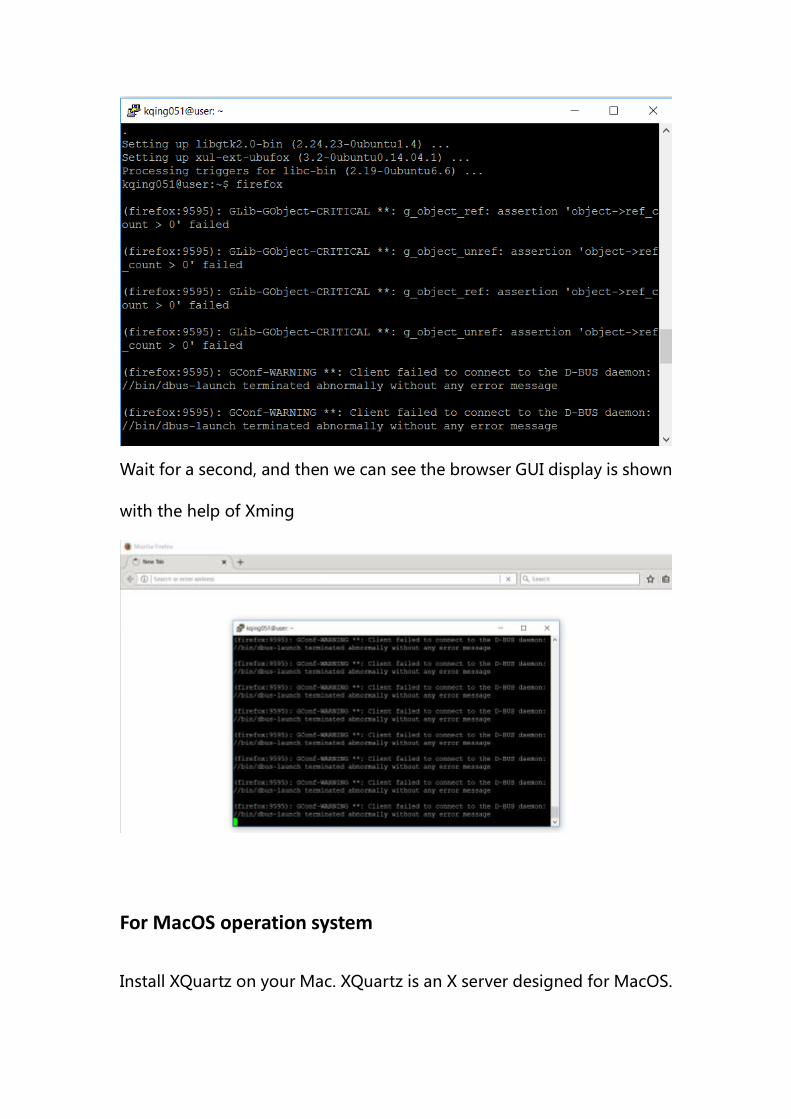
Wait for a second, and then we can see the browser GUI display is shown
with the help of Xming
For MacOS operation system
Install XQuartz on your Mac. XQuartz is an X server designed for MacOS.
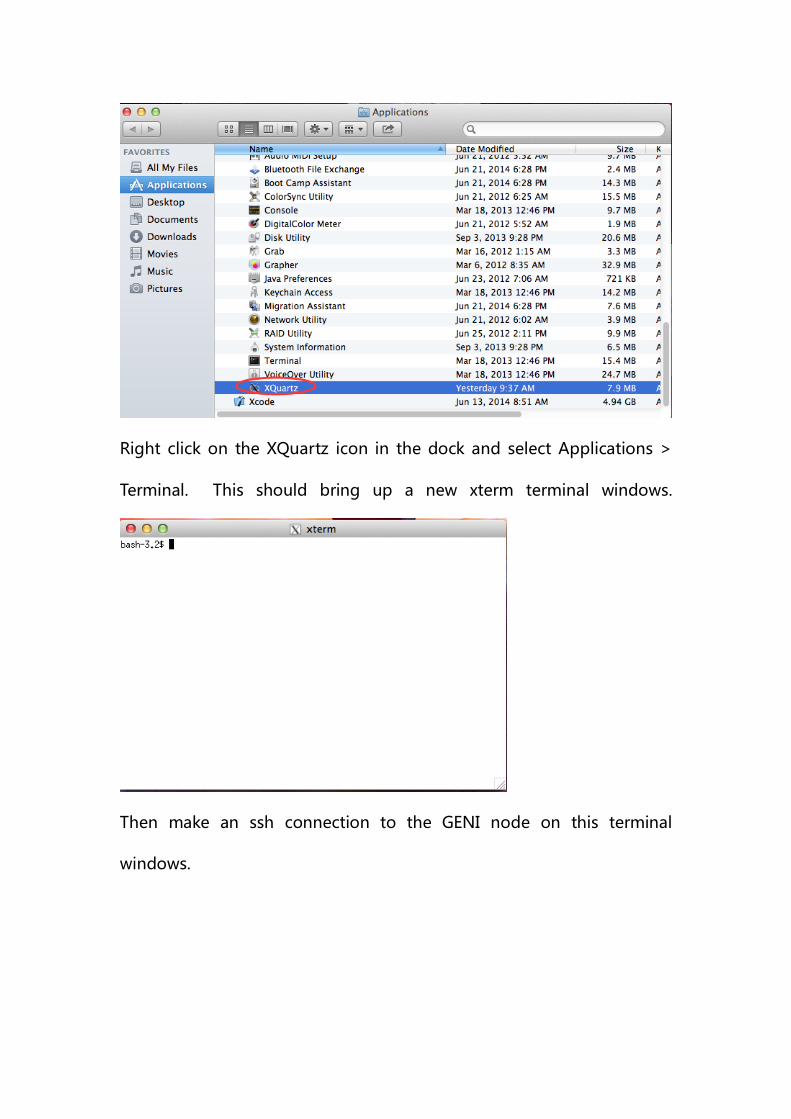
Right click on the XQuartz icon in the dock and select Applications >
Terminal. This should bring up a new xterm terminal windows.
Then make an ssh connection to the GENI node on this terminal
windows.

We can enable the graphics display of browser on GENI node with the
help of XQuartz software.
Command:”firefox”
For other Linux operation system
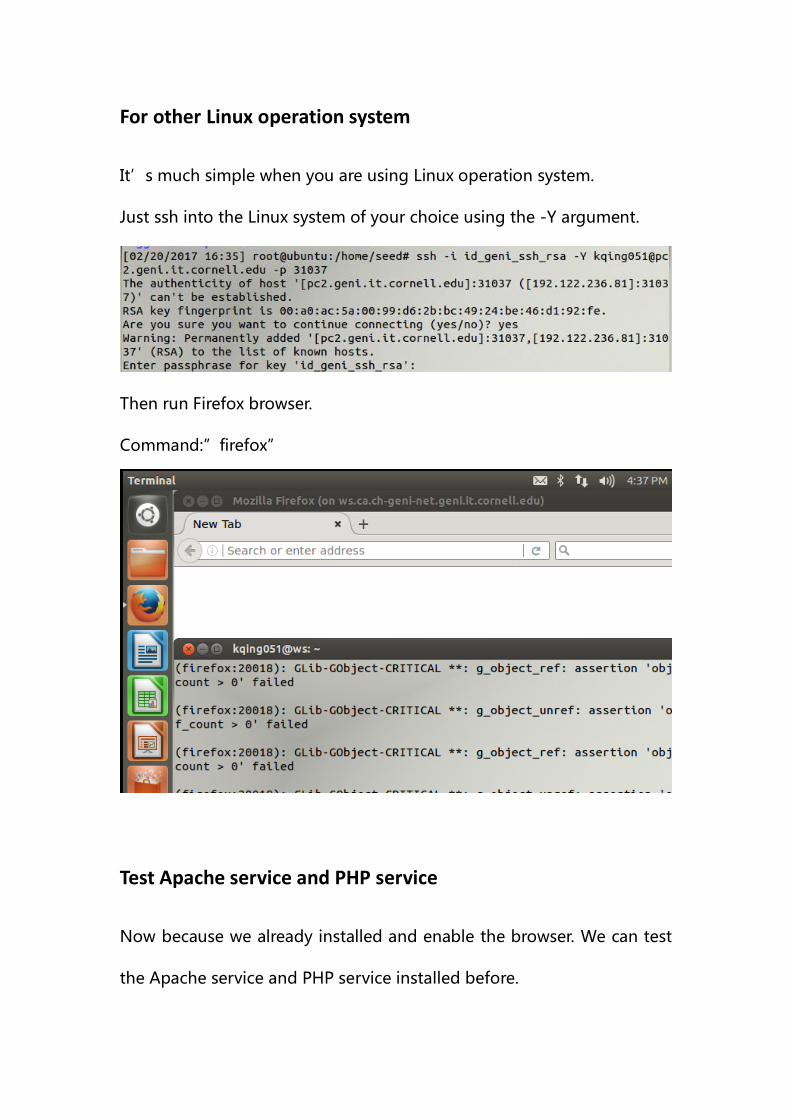
It’s much simple when you are using Linux operation system.
Just ssh into the Linux system of your choice using the -Y argument.
Then run Firefox browser.
Command:”firefox”
Test Apache service and PHP service
Now because we already installed and enable the browser. We can test
the Apache service and PHP service installed before.
Test Apache service
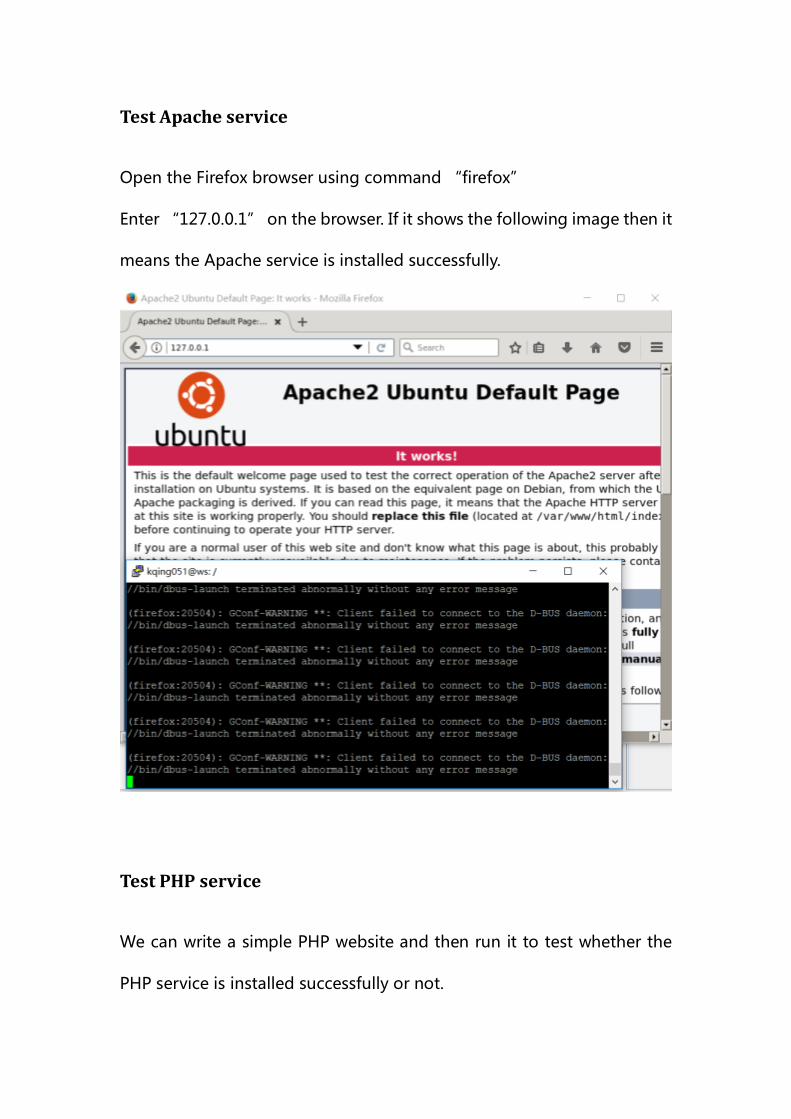
Open the Firefox browser using command “firefox”
Enter “127.0.0.1” on the browser. If it shows the following image then it
means the Apache service is installed successfully.
Test PHP service
We can write a simple PHP website and then run it to test whether the
PHP service is installed successfully or not.

For the convenience, we can use the WinSCP software to write PHP
source code. The instruction of how to log onto GENI node using
WinSCP can be found in this link:
http://mountrouidoux.people.cofc.edu/CyberPaths/winscp.html
We need to give the privilege to edit the "www" folder under the /var. As
I mentioned before, "www" folder contains the website source code.
Command:” sudo chmod 777 /var/www”
Under the “www/html”folder, create a file named “info.php” and
then write the following code into it:
<?php
phpinfo();
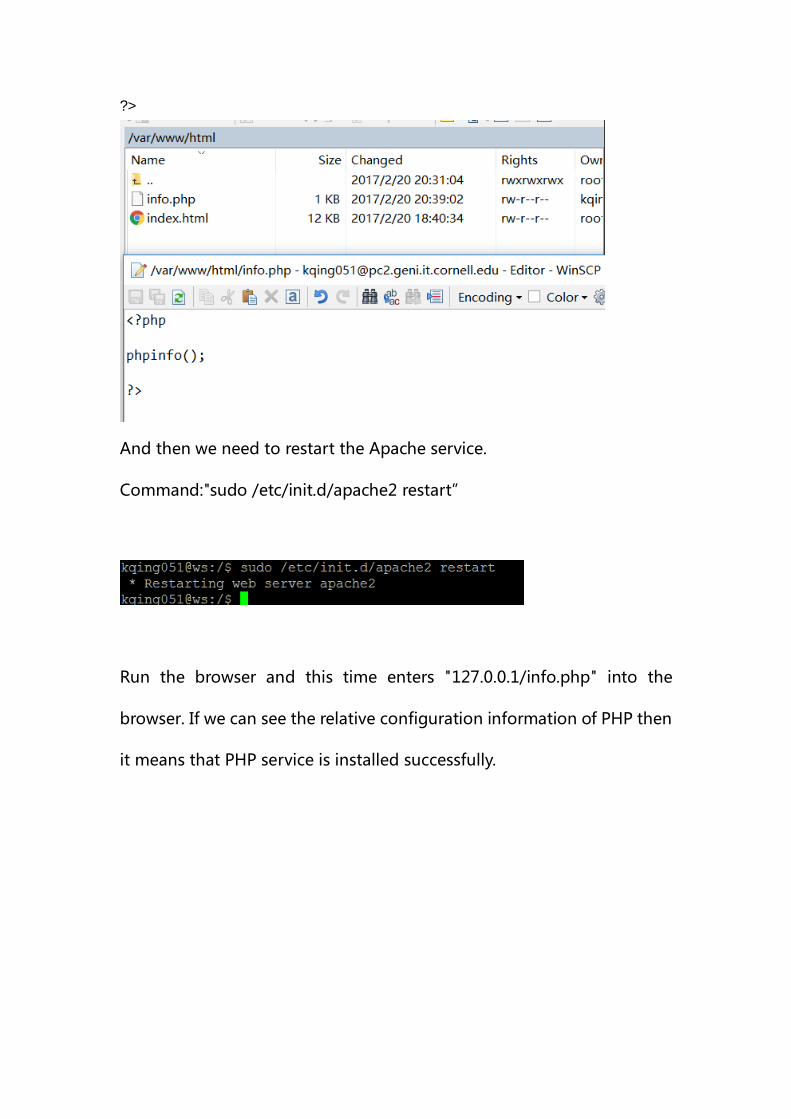
?>
And then we need to restart the Apache service.
Command:"sudo /etc/init.d/apache2 restart”
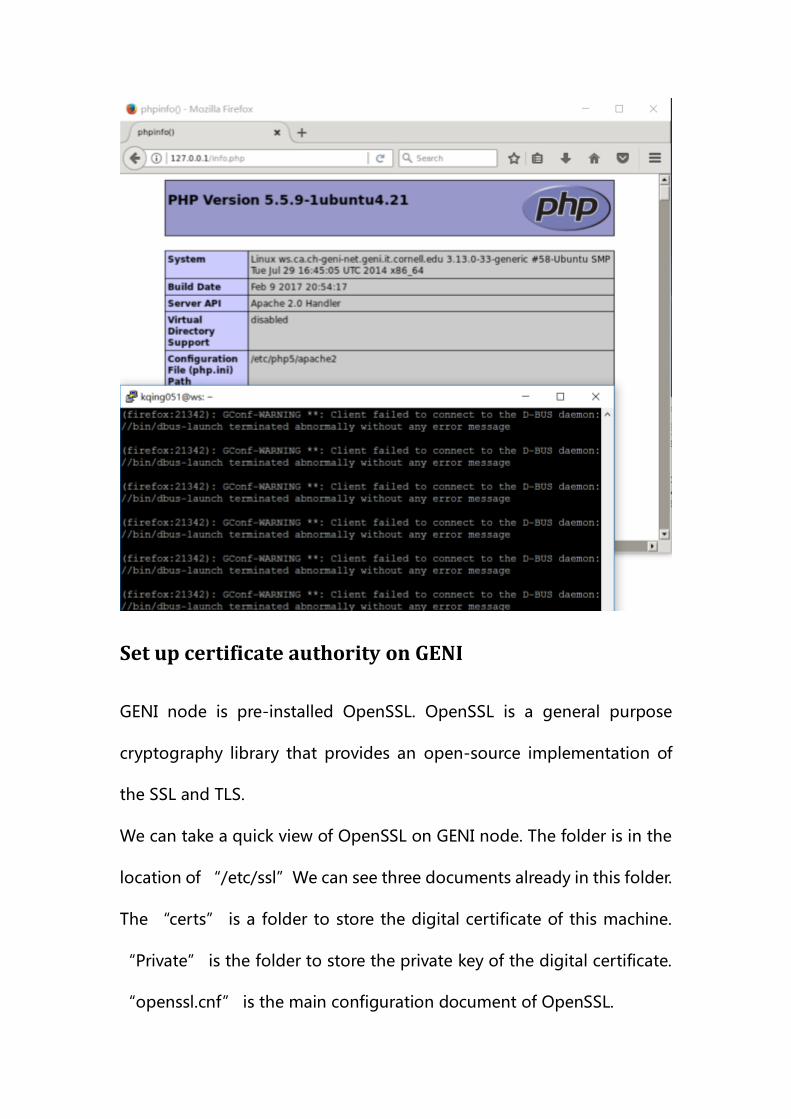
Run the browser and this time enters "127.0.0.1/info.php" into the
browser. If we can see the relative configuration information of PHP then
it means that PHP service is installed successfully.
Set up certificate authority on GENI
GENI node is pre-installed OpenSSL. OpenSSL is a general purpose
cryptography library that provides an open-source implementation of
the SSL and TLS.
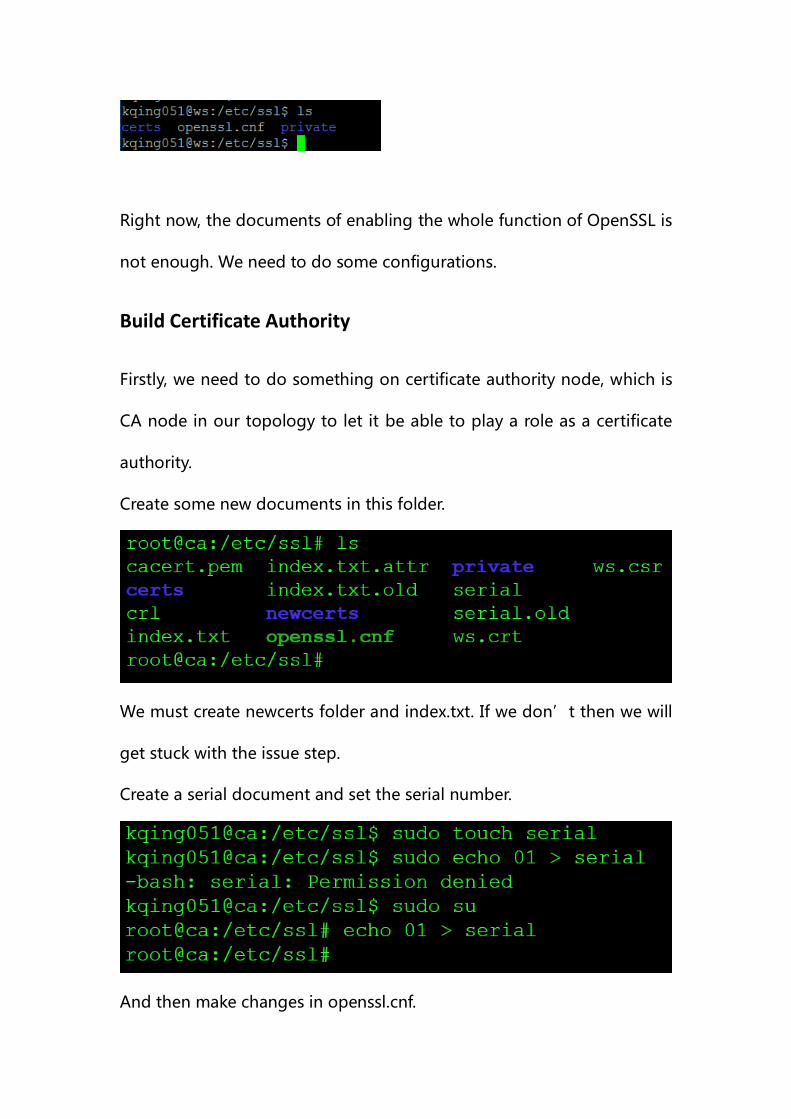
We can take a quick view of OpenSSL on GENI node. The folder is in the
location of “/etc/ssl”We can see three documents already in this folder.
The “certs” is a folder to store the digital certificate of this machine.
“Private” is the folder to store the private key of the digital certificate.
“openssl.cnf” is the main configuration document of OpenSSL.
Right now, the documents of enabling the whole function of OpenSSL is
not enough. We need to do some configurations.
Build Certificate Authority
Firstly, we need to do something on certificate authority node, which is
CA node in our topology to let it be able to play a role as a certificate
authority.
Create some new documents in this folder.
We must create newcerts folder and index.txt. If we don’t then we will
get stuck with the issue step.
Create a serial document and set the serial number.
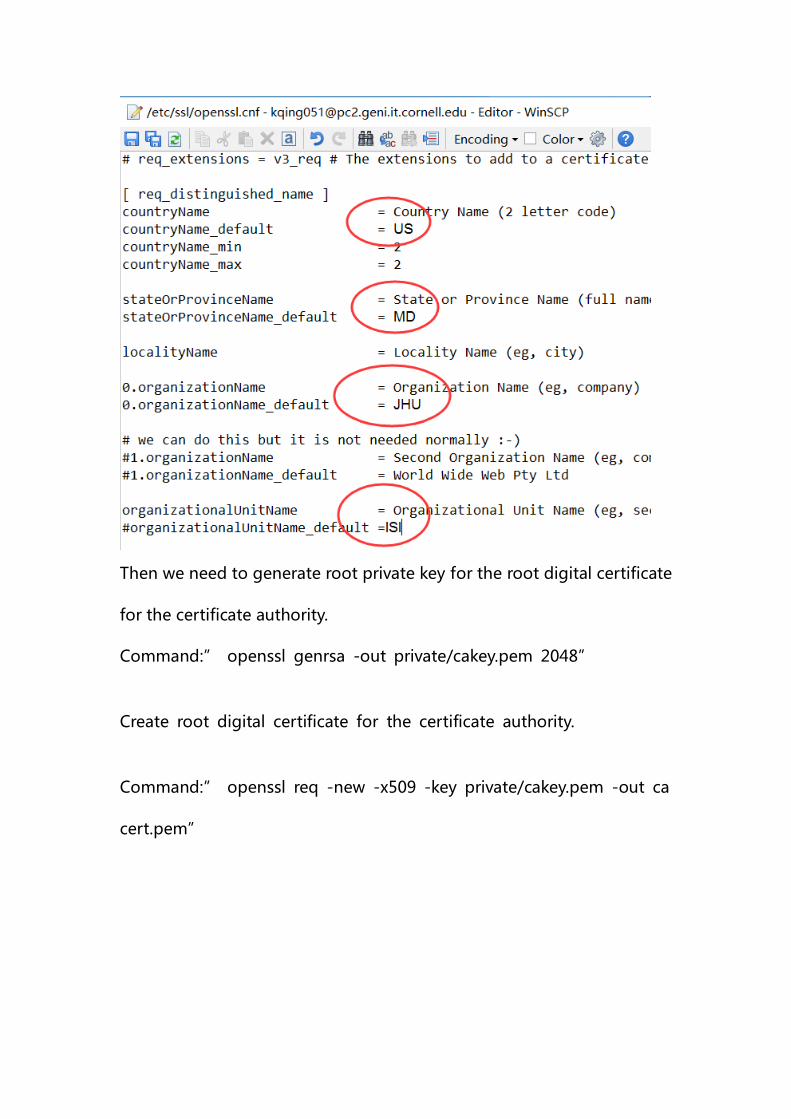
And then make changes in openssl.cnf.

To succeed it, we should give the privilege to write openssl.cnf.
Command:”sudo chmod 777 openssl.cnf”
And then using WinSCP open it and set the following values as
followings:
Then we need to generate root private key for the root digital certificate
for the certificate authority.
Command:” openssl genrsa -out private/cakey.pem 2048”
Create root digital certificate for the certificate authority.
Command:” openssl req -new -x509 -key private/cakey.pem -out ca
cert.pem”
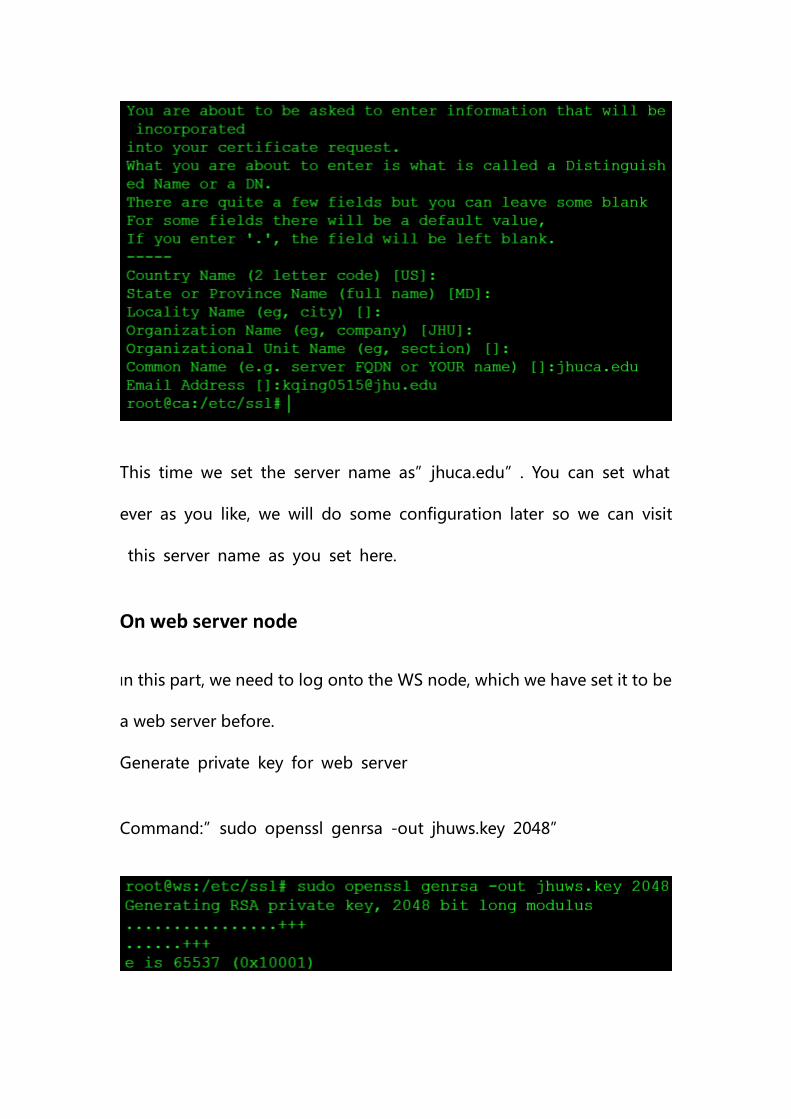
This time we set the server name as”jhuca.edu”. You can set what
ever as you like, we will do some configuration later so we can visit
this server name as you set here.
On web server node
In this part, we need to log onto the WS node, which we have set it to be
a web server before.
Generate private key for web server
Command:”sudo openssl genrsa -out jhuws.key 2048”
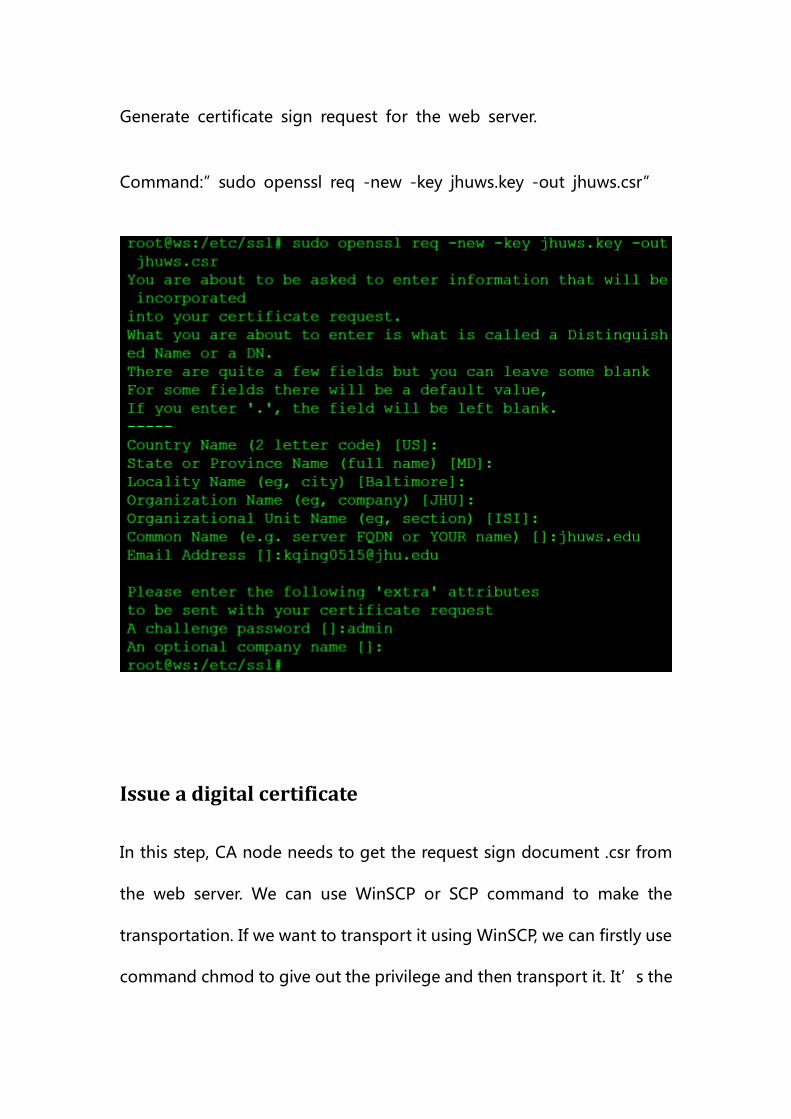
Generate certificate sign request for the web server.
Command:”sudo openssl req -new -key jhuws.key -out jhuws.csr”
Issue a digital certificate
In this step, CA node needs to get the request sign document .csr from
the web server. We can use WinSCP or SCP command to make the
transportation. If we want to transport it using WinSCP, we can firstly use
command chmod to give out the privilege and then transport it. It’s the
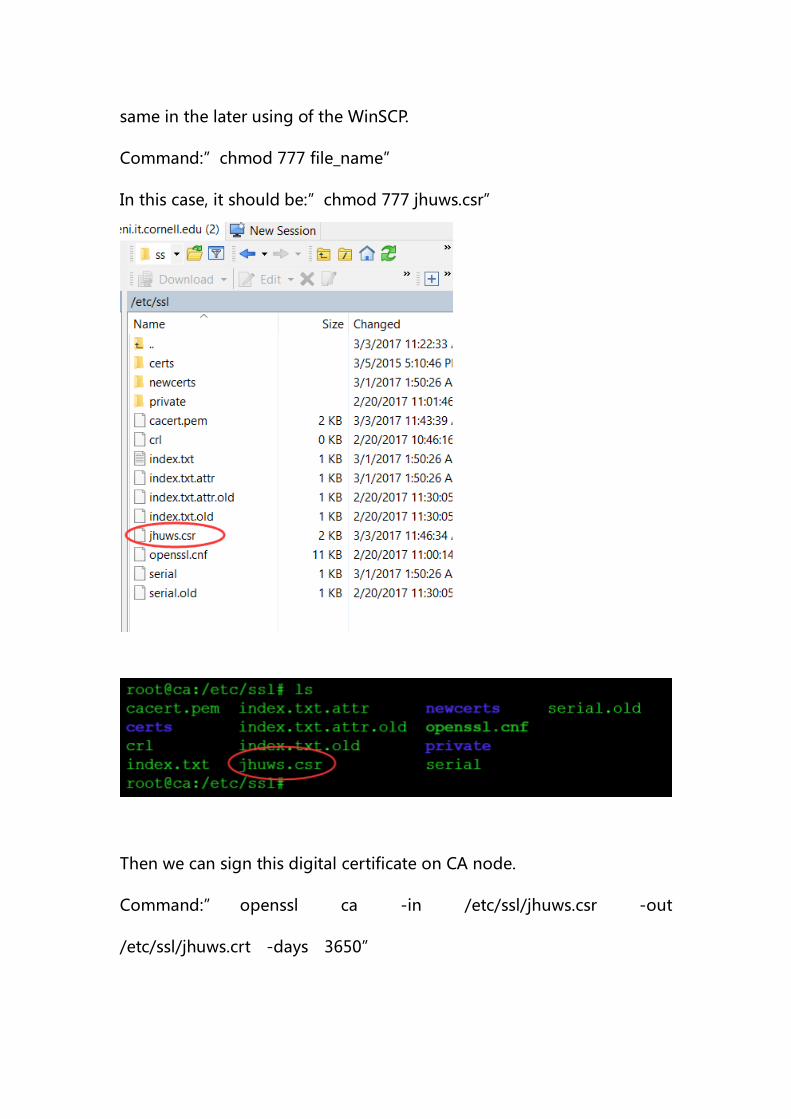
same in the later using of the WinSCP.
Command:”chmod 777 file_name”
In this case, it should be:”chmod 777 jhuws.csr”
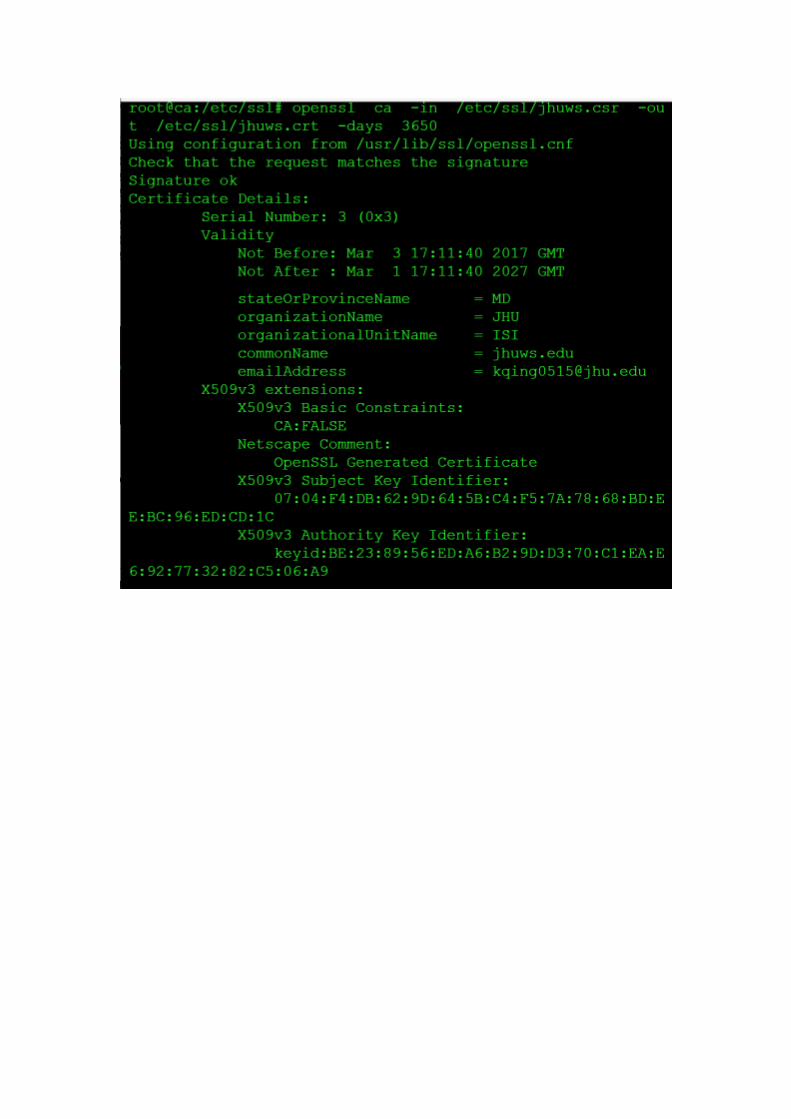
Then we can sign this digital certificate on CA node.
Command:” openssl ca -in /etc/ssl/jhuws.csr -out
/etc/ssl/jhuws.crt -days 3650”
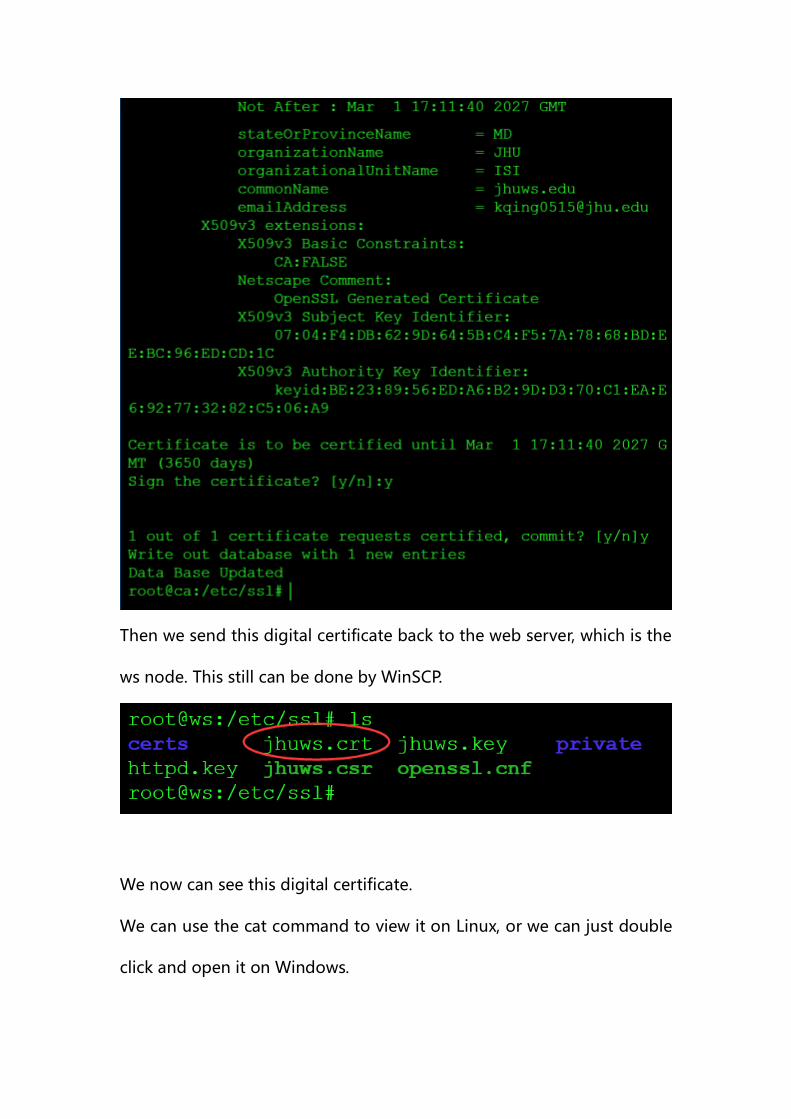
Then we send this digital certificate back to the web server, which is the
ws node. This still can be done by WinSCP.
We now can see this digital certificate.
We can use the cat command to view it on Linux, or we can just double
click and open it on Windows.
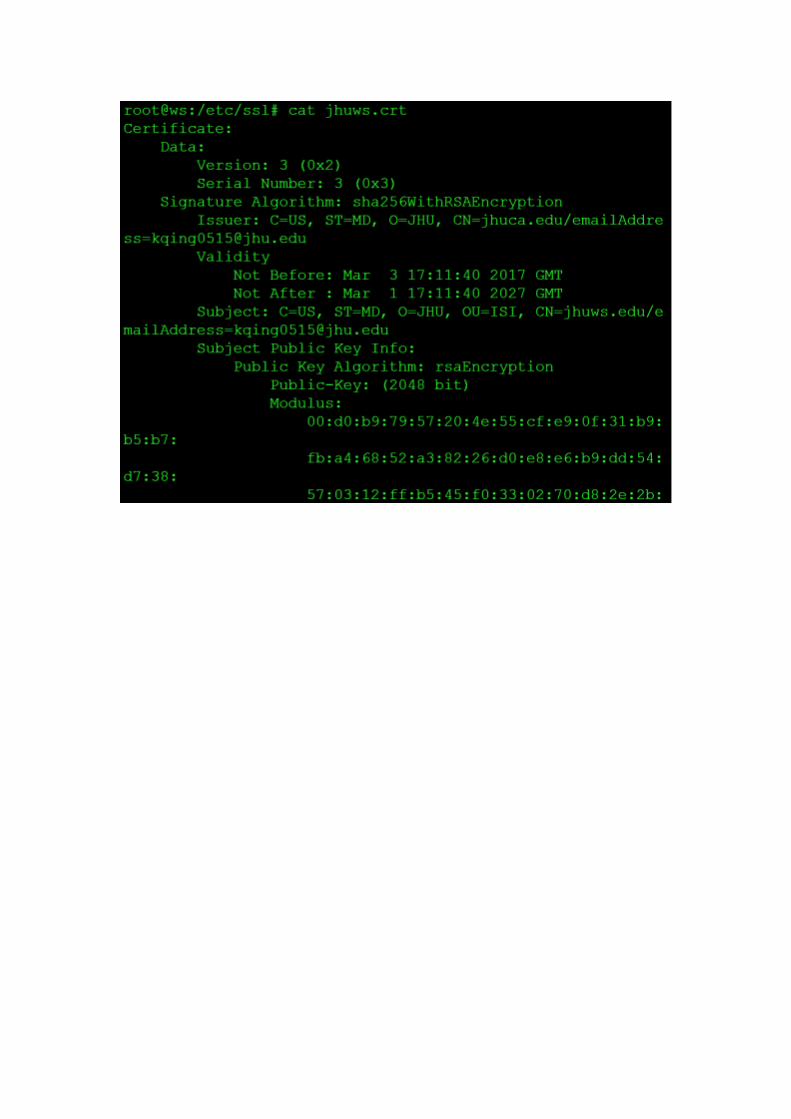
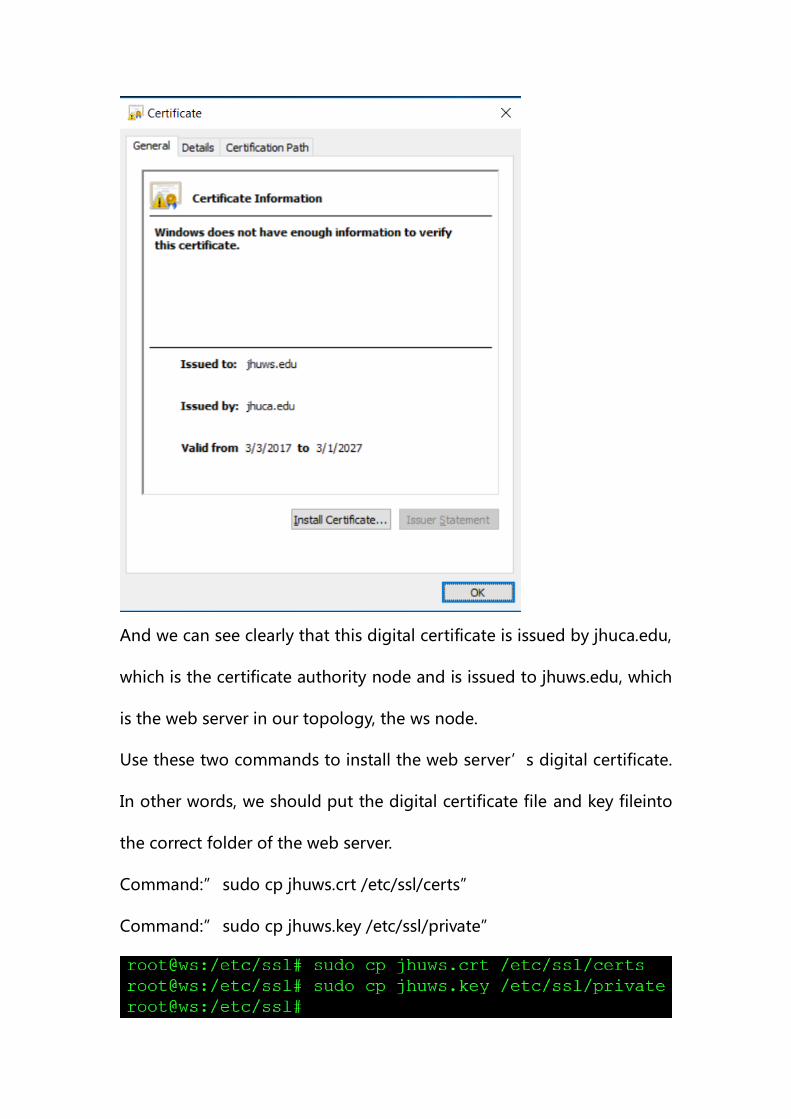
And we can see clearly that this digital certificate is issued by jhuca.edu,
which is the certificate authority node and is issued to jhuws.edu, which
is the web server in our topology, the ws node.
Use these two commands to install the web server’s digital certificate.
In other words, we should put the digital certificate file and key fileinto
the correct folder of the web server.
Command:” sudo cp jhuws.crt /etc/ssl/certs”
Command:” sudo cp jhuws.key /etc/ssl/private”
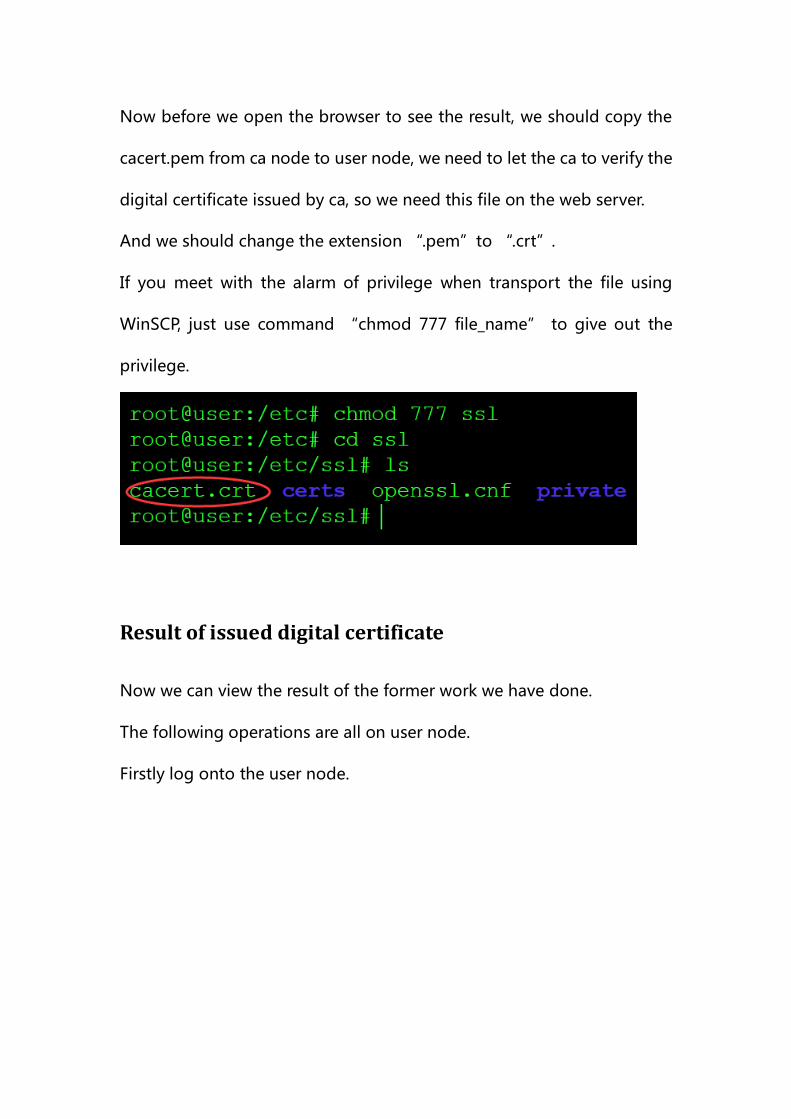
Now before we open the browser to see the result, we should copy the
cacert.pem from ca node to user node, we need to let the ca to verify the
digital certificate issued by ca, so we need this file on the web server.
And we should change the extension “.pem”to “.crt”.
If you meet with the alarm of privilege when transport the file using
WinSCP, just use command “chmod 777 file_name” to give out the
privilege.
Result of issued digital certificate
Now we can view the result of the former work we have done.
The following operations are all on user node.
Firstly log onto the user node.
Because the display of browser on GENI is kind of slow. TO quick test
whether we are right by far, we can install the “curl” to perform a quick
test.
Curl is a tool to transfer data from or to a server, using one of the
supported protocols.
Use “sudo su” to enter the root account
Use “apt-get update” to update the existed packets.
Use “apt-get install curl” to install the curl.
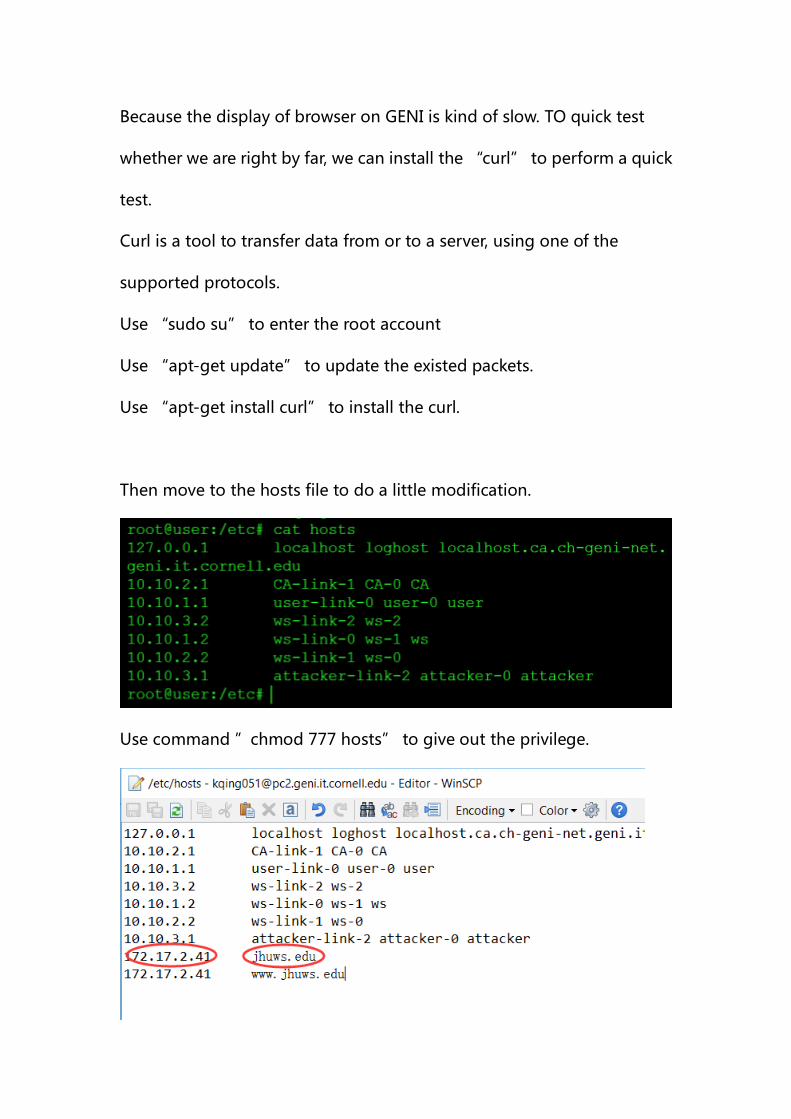
Then move to the hosts file to do a little modification.
Use command ”chmod 777 hosts” to give out the privilege.
We do these modifications on it. While the “172.17.2.41” is the IP
address of ws node, this is the web server in out topology. And jhuws.edu
is the server name we set up by ourselves before.
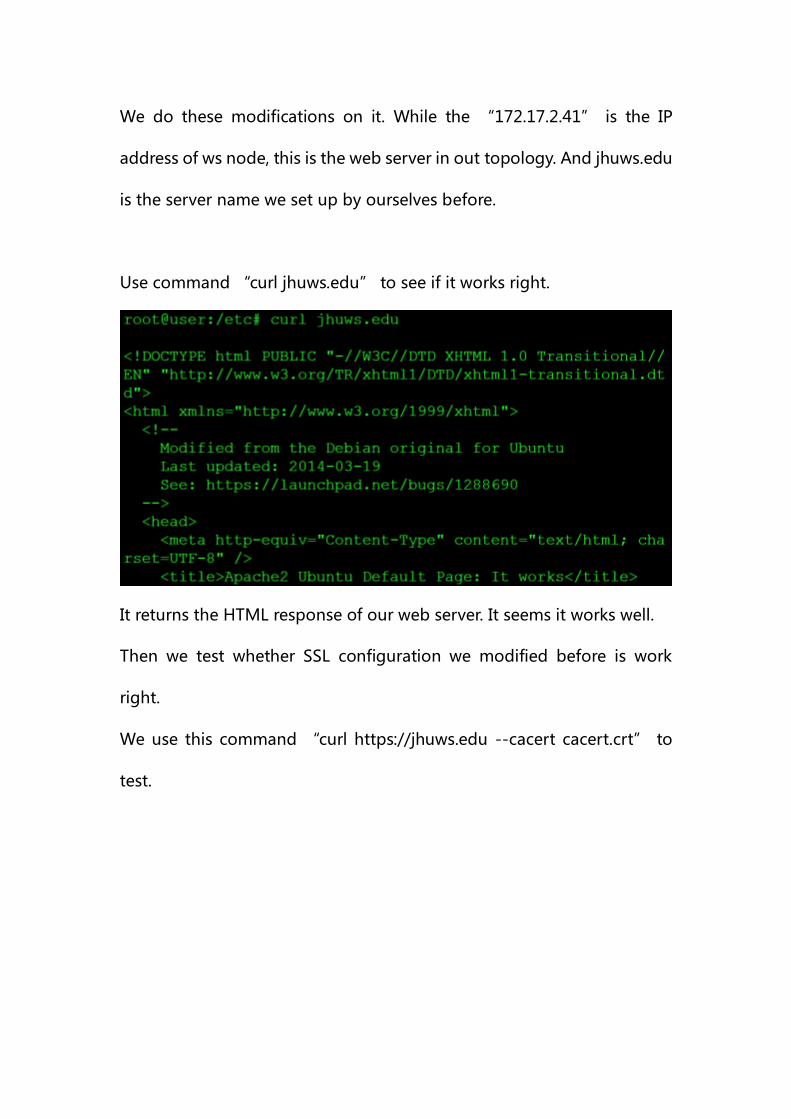
Use command “curl jhuws.edu” to see if it works right.
It returns the HTML response of our web server. It seems it works well.
Then we test whether SSL configuration we modified before is work
right.
We use this command “curl https://jhuws.edu --cacert cacert.crt” to
test.
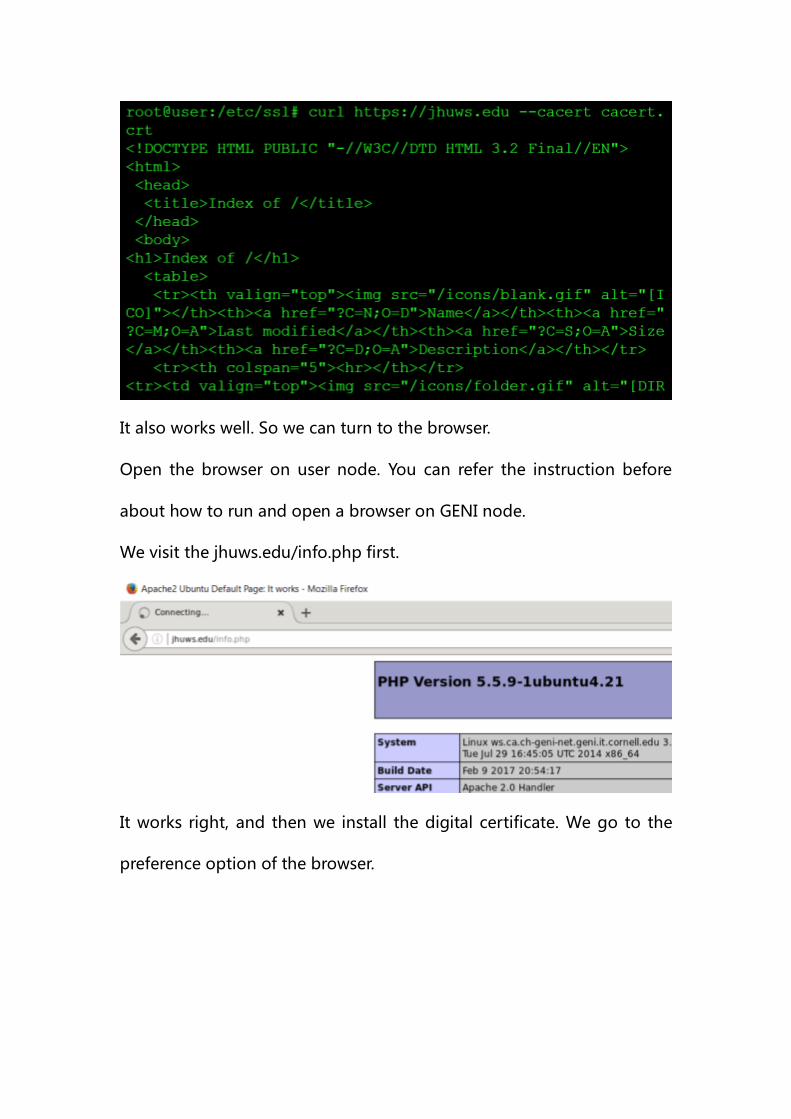
It also works well. So we can turn to the browser.
Open the browser on user node. You can refer the instruction before
about how to run and open a browser on GENI node.
We visit the jhuws.edu/info.php first.
It works right, and then we install the digital certificate. We go to the
preference option of the browser.
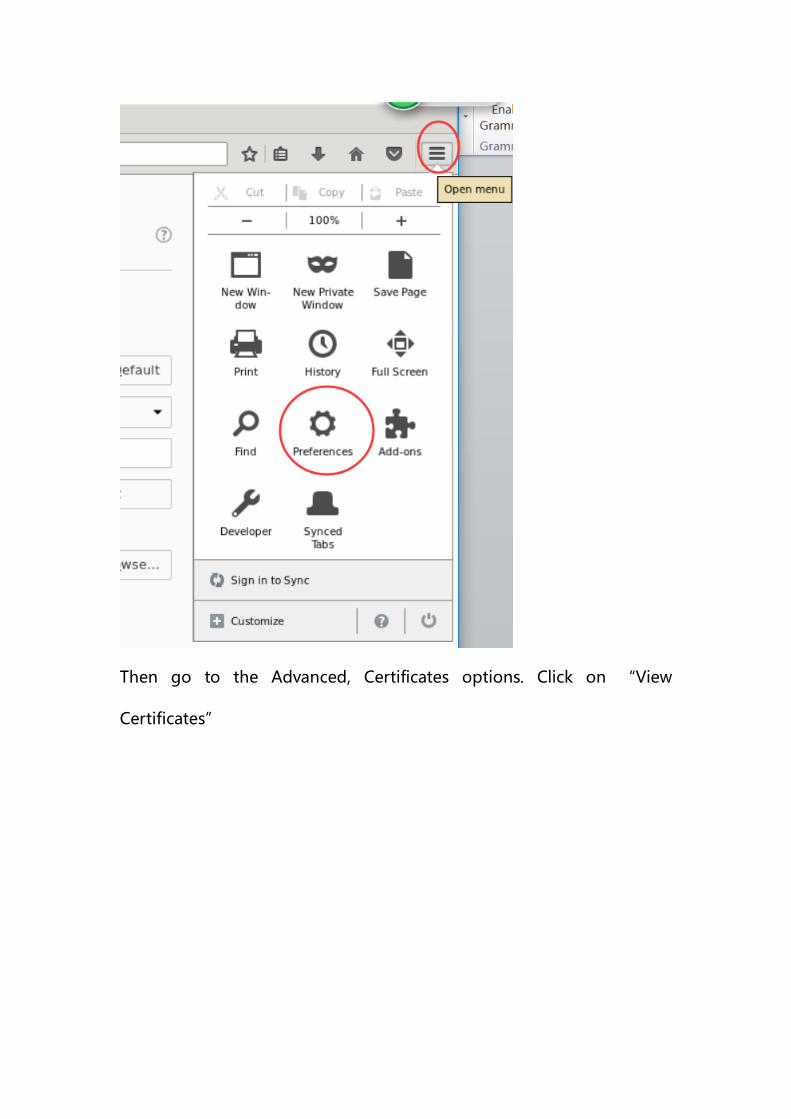
Then go to the Advanced, Certificates options. Click on “View
Certificates”
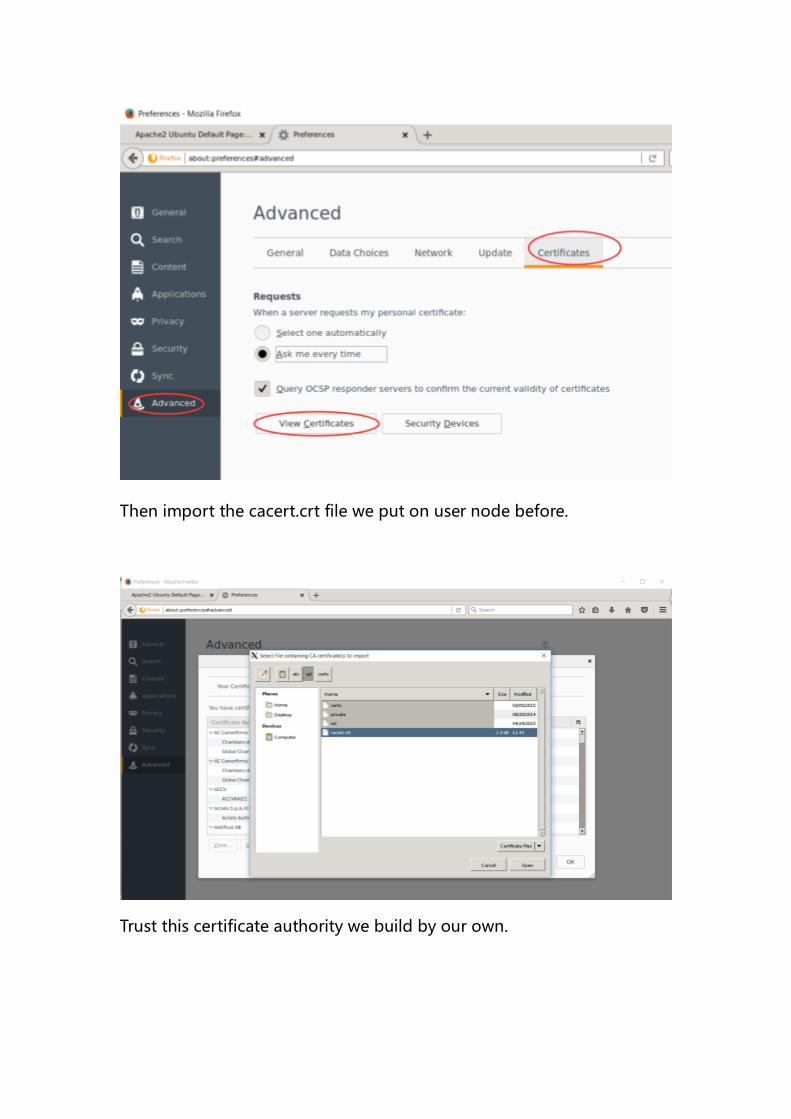
Then import the cacert.crt file we put on user node before.
Trust this certificate authority we build by our own.

Now we can see our certificate authority is in the list of certificate
authorities.
We visit jhuws.edu/info.php firstly, we can see the connection is
unsecure.
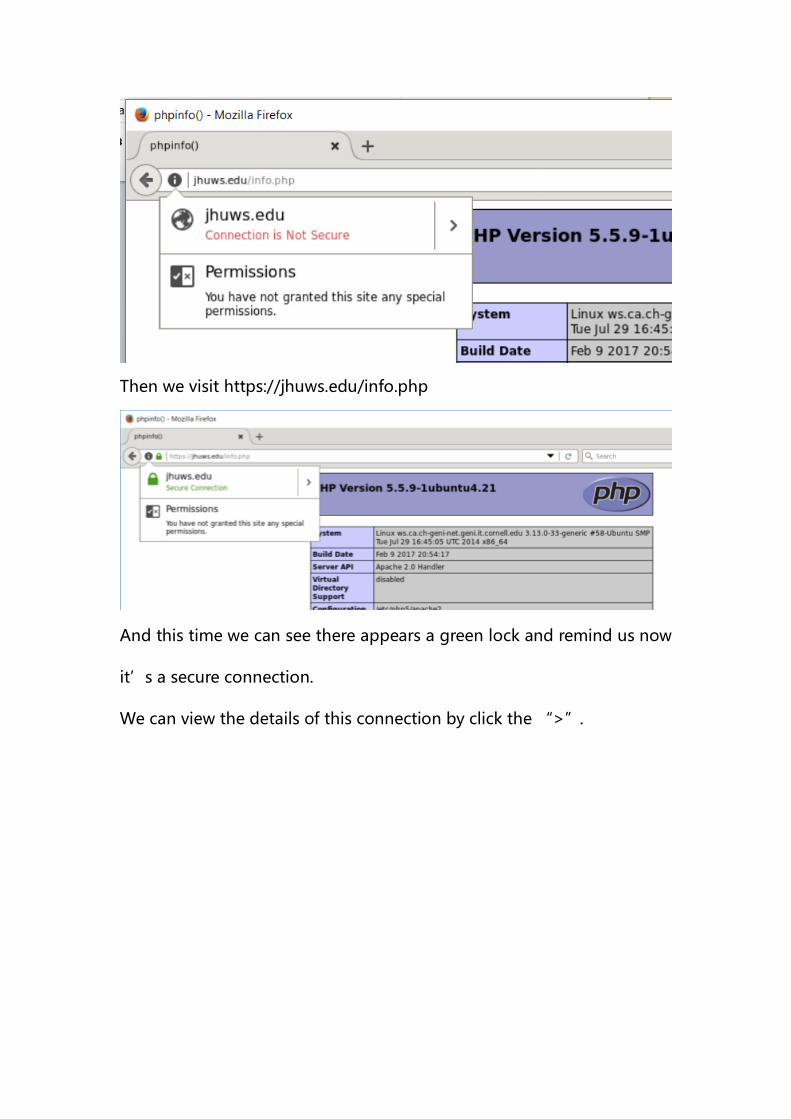
Then we visit https://jhuws.edu/info.php
And this time we can see there appears a green lock and remind us now
it’s a secure connection.
We can view the details of this connection by click the “>”.

The information we put in when making the digital certificate is shown in
this display.
By now, we have already finished the experiment of building a certificate
authority and issue a digital certificate.
Revoke a digital certificate
Then we can try to revoke the digital certificate to see how it works and
what is the result it will turn out.
To revoke the digital certificate we issue before, we should log onto the
ca node, which is the certificate authority.
Use this command to revoke the digital certificate we issued before. The
name of digital certificate we issued before is “jhuws.crt”
Command :“openssl ca -revoke jhuws.crt”
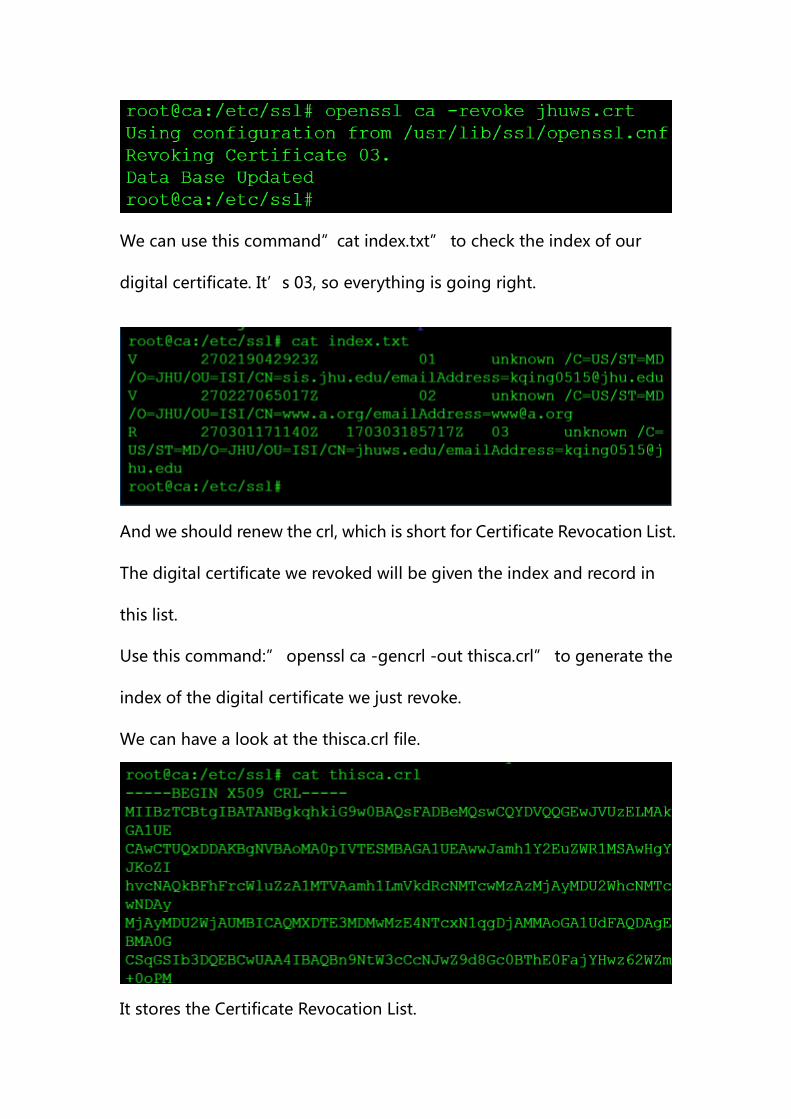
We can use this command”cat index.txt” to check the index of our
digital certificate. It’s 03, so everything is going right.
And we should renew the crl, which is short for Certificate Revocation List.
The digital certificate we revoked will be given the index and record in
this list.
Use this command:” openssl ca -gencrl -out thisca.crl” to generate the
index of the digital certificate we just revoke.
We can have a look at the thisca.crl file.
It stores the Certificate Revocation List.
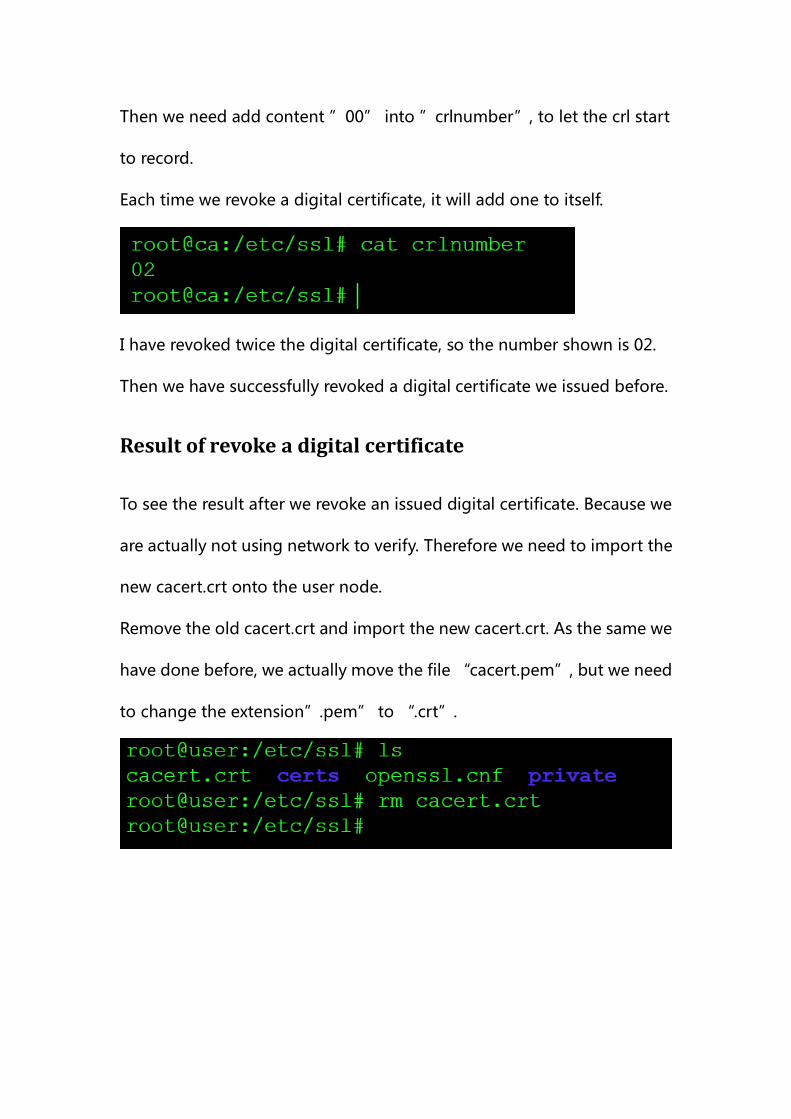
Then we need add content ”00” into ”crlnumber”, to let the crl start
to record.
Each time we revoke a digital certificate, it will add one to itself.
I have revoked twice the digital certificate, so the number shown is 02.
Then we have successfully revoked a digital certificate we issued before.
Result of revoke a digital certificate
To see the result after we revoke an issued digital certificate. Because we
are actually not using network to verify. Therefore we need to import the
new cacert.crt onto the user node.
Remove the old cacert.crt and import the new cacert.crt. As the same we
have done before, we actually move the file “cacert.pem”, but we need
to change the extension”.pem” to “.crt”.
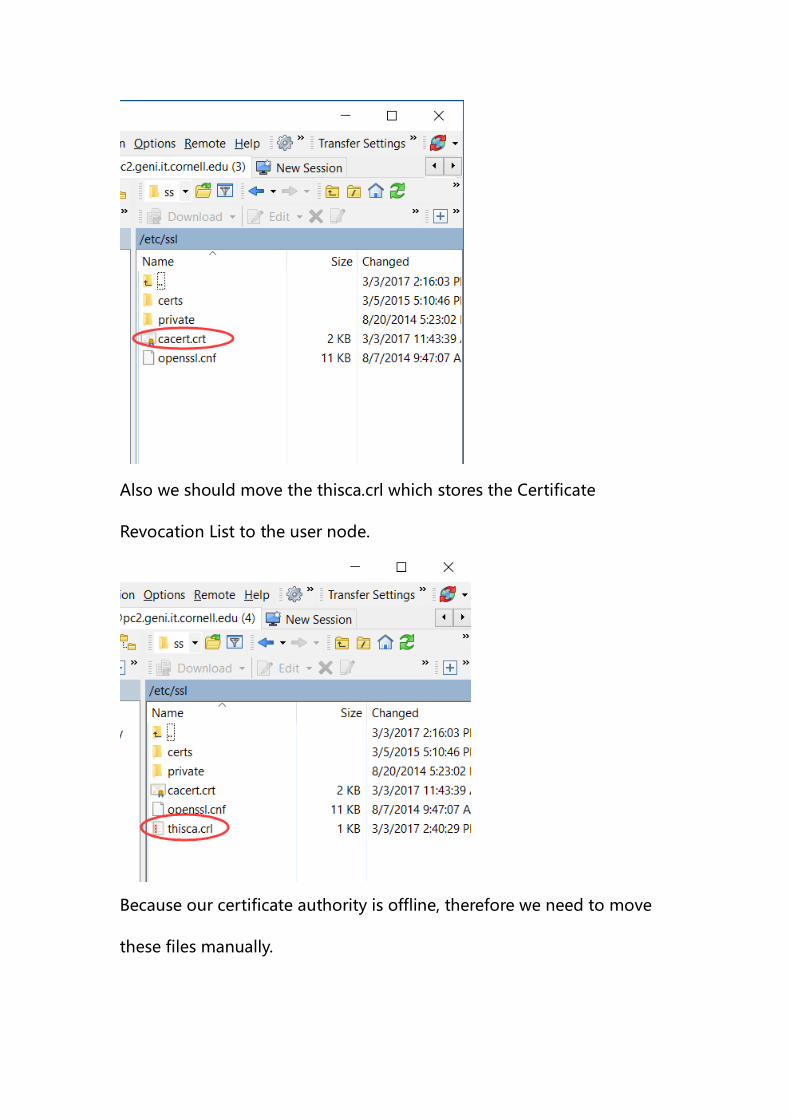
Also we should move the thisca.crl which stores the Certificate
Revocation List to the user node.
Because our certificate authority is offline, therefore we need to move
these files manually.
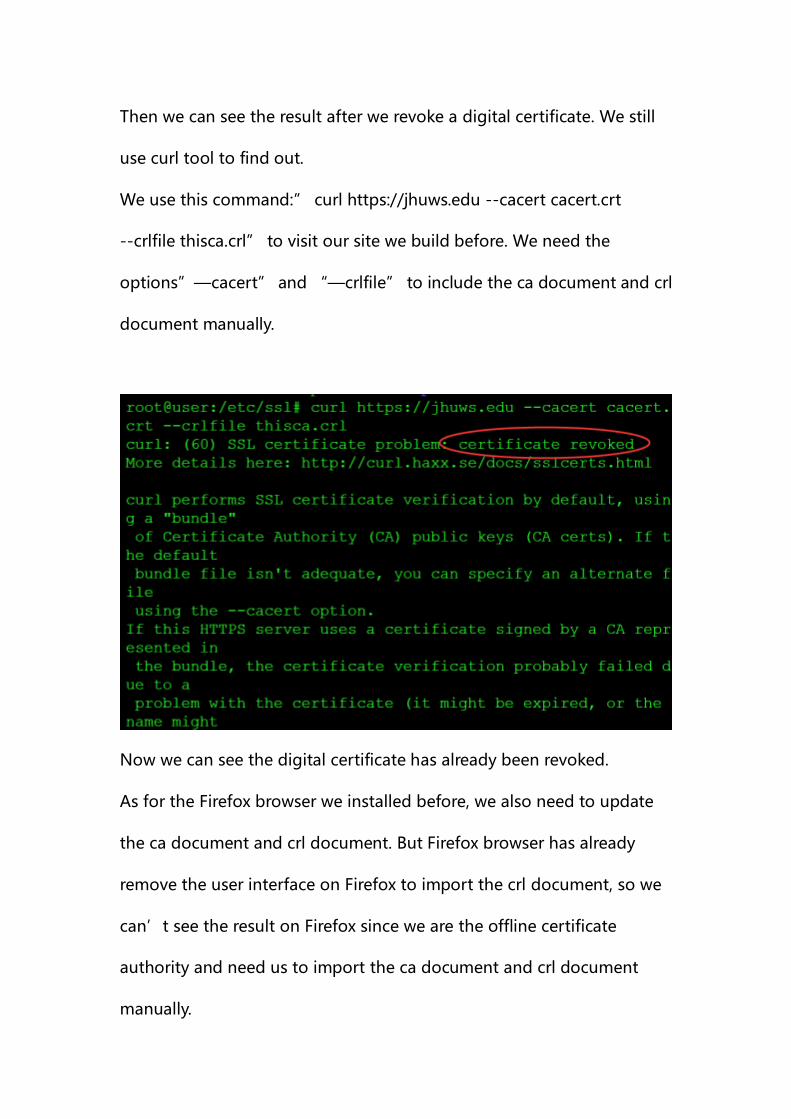
Then we can see the result after we revoke a digital certificate. We still
use curl tool to find out.
We use this command:” curl https://jhuws.edu --cacert cacert.crt
--crlfile thisca.crl” to visit our site we build before. We need the
options”—cacert” and “—crlfile” to include the ca document and crl
document manually.
Now we can see the digital certificate has already been revoked.
As for the Firefox browser we installed before, we also need to update
the ca document and crl document. But Firefox browser has already
remove the user interface on Firefox to import the crl document, so we
can’t see the result on Firefox since we are the offline certificate
authority and need us to import the ca document and crl document
manually.
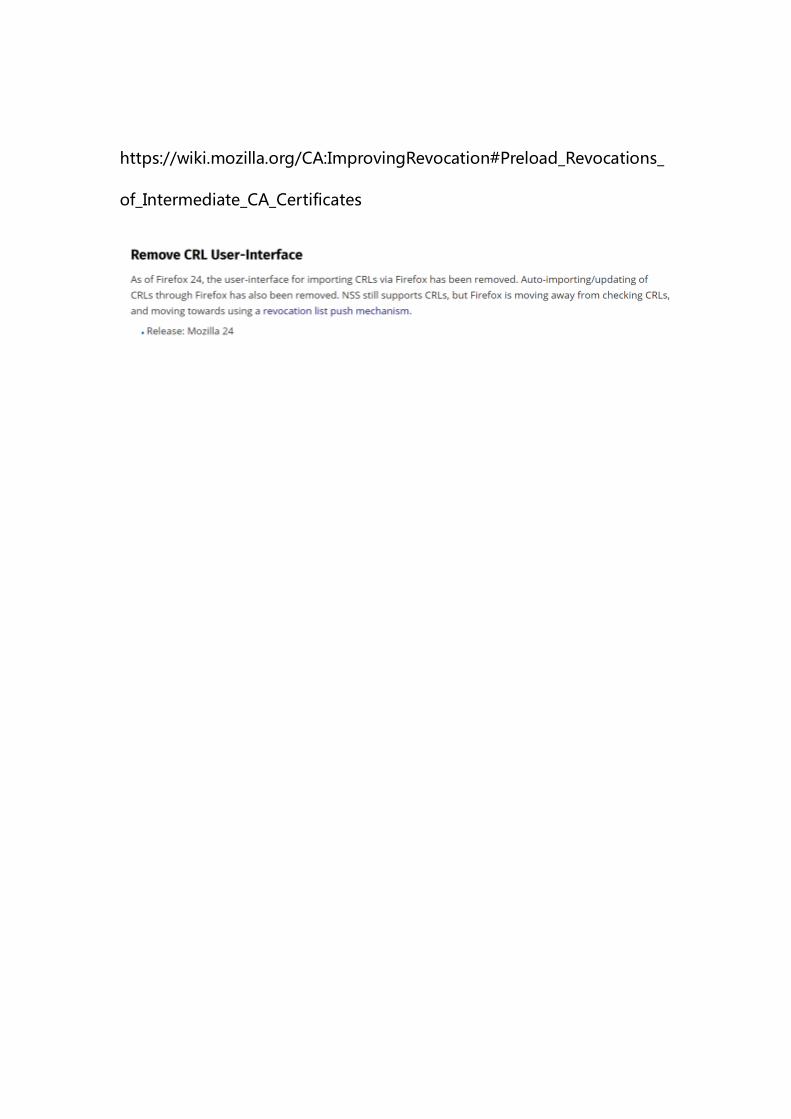
https://wiki.mozilla.org/CA:ImprovingRevocation#Preload_Revocations_
of_Intermediate_CA_Certificates