Embed Size (px)
Citation preview

CERNER MILLENNIUM Abstracting Chart Data Into Unity
This presentation reviews some strategies for moving patient data from old records into the Unity chart for the first encounter in Unity. It was originally created for use near the time of Unity Go Live. While most of the data transfer from legacy systems to Unity is now behind us, this document remains a good illustration of how to enter various types of patient data, especially when using the Table of Contents Menu. This demonstration has been updated to reflect the appearance & functionality of MPage 6.9.
This has been prepared using Millennium base code level 2015.01.21 & MPage 6.9. Subsequent updates may display cosmetic & functional changes. Any names displayed are fictitious.
Use the keyboard or mouse to advance.

Introduction
• A great deal of old documents are being migrated onto patient charts by Go Live. Old vital signs are also being migrated.
• But most structured data will not be migrated automatically. Providers & staff will need to review old records to manually populate this into the Unity patient chart.

Structured Data
• Structured data is: • Problem List
• Surgery/Procedure History
• Social History
• Family History
• Pregnancy History
• Medication List
• Allergy List
• Immunizations
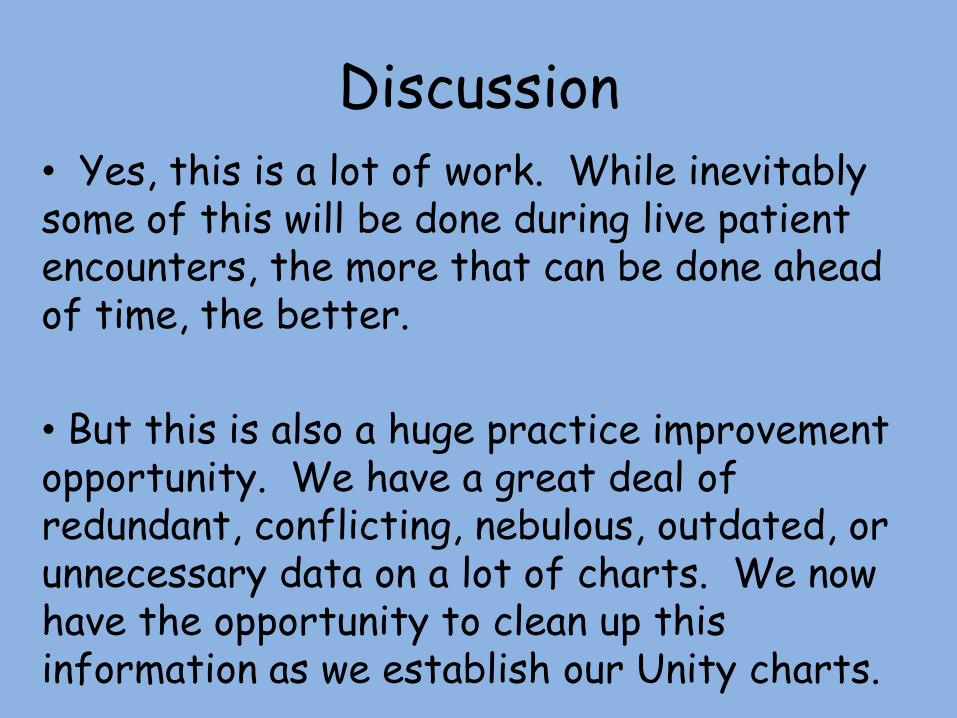
Discussion • Yes, this is a lot of work. While inevitably some of this will be done during live patient encounters, the more that can be done ahead of time, the better.
• But this is also a huge practice improvement opportunity. We have a great deal of redundant, conflicting, nebulous, outdated, or unnecessary data on a lot of charts. We now have the opportunity to clean up this information as we establish our Unity charts.

Discussion
• There are a few ways to go about this, depending upon whether your old records are primarily in NextGen, Varian, on paper, or a combination thereof.
• Everyone will need to strike the best compromise between thoroughness & efficiency when importing this information into the Unity chart, always erring on the side of including anything with a patient safety impact.

Discussion
• Regardless of how much work can be accomplished before Go Live, this information should also be further vetted at the first encounter with the patient in Unity.
• Here are some suggested strategies to employ as you approach this endeavor.

While there are a few tools to help with moving data from old records into Unity charts, in practicality the simplest approach will often just be to review your existing records & manually transfer this data to the Unity chart. In this regard, clinics on paper charts may have the most straightforward path, since it’s easy to have the paper chart open on the desk while you have Unity open.

For clinics currently using an EHR, the best approach may be to have both the old EHR & Unity open at the same time, so you can review the old EHR, then enter data into Unity. Obviously, having two monitors would make this easier.
A recent patient encounter will often have a good summary.

In NextGen, you’ll also see a document called ChartSummaryUSA that is created on every encounter. This has a very complete record summary, generally with more information than you’ll need.

You may also wish to directly review the data templates in your EHR.

Also note that document migration from various sources, such as Soarian & NextGen, is in progress. You may be able to find an Admission H&P or a recent note from the old EHR that gives you much of the medical history.

Problems When populating the Problem List, remember that a problem list from your old records may include a lot of billing diagnoses that don’t merit inclusion on the problem list. These also may be poorly worded. They may have a number of redundant entries as well.

For example, on this list, you might reword a number of these as you enter them on the Unity chart. Say after reviewing the chart, you discover that the patient has a chronic seizure disorder, which you could re-designate as Epilepsy. And contact dermatitis would be better termed Eczema. And anxiety state was just a one-time diagnosis, not a chronic problem.

On this old problem list, you see a number of synonyms for the same problem, along with a few one-time billing diagnoses. When you enter these in Unity, you’ll consolidate or omit these as appropriate.

While workflow tabs, or MPages, can be useful & efficient when seeing patients, to enter historical data it is probably best to go to the Table of Contents, or Menu on the far left. Here we’ll go to Problem List. (This can vary a bit; some users may see something like Problems and Diagnoses.)

Add problems to the Problem List at the bottom, not the Diagnosis list at the top.
Enter problems to the greatest degree of detail that you know. But if you don’t know a great deal of detail, at least add a “least common denominator” problem; it can be further revised later.
This is the easiest search field to use, not the +Add button.

The goal is to end up with the most complete, but concise, problem list possible. Again, make sure you enter these on the Problem List at the bottom, not the Billing Diagnosis List at the top.

Histories
Past Medical/Surgical history, Social History, Family History, & Pregnancy History also have to be manually added to the Unity chart.

When the Unity chart is first opened, these histories will probably be blank. Select the tab you want to begin with. We’ll start with Family History.
Click +Add.

Make your entries, & then click OK.
It’s probably best to focus on positive family histories. Many old records, especially if they come from another EHR, may be awash in negative family histories that were created automatically, & aren’t particularly useful.

Let’s skip over to Social History. You can click the +Add button to go through all the social history at once, or click on each item to do it one at a time. Record as much data as you deem appropriate, but include at least the tobacco & alcohol histories. We’ll do those one at a time. Double-click in the Tobacco details field.

The Use field is required, so at least complete that. Fill in other data as appropriate, then click OK.

The tobacco entry is saved. Now double-click in the Alcohol details field.

Make entries as desired, then click OK.

The alcohol entry displays. Let’s move to the Procedure tab.

Click +Add.

We’ll type ventricular shunt & click the search binoculars.

Some procedures are harder to find than others. You may have to think about synonyms, select Starts with vs Contains, or scroll through the list. Here we’ll select Extracranial ventricular shunt inserted & click OK.

Note that, if you just can’t find the procedure, you can click the Free Text checkbox, & just type it in. You may need to do this for non-specific surgeries when you or the patient don’t know all the details, like “low back surgery.”
Add other details as known; here we added that it was done in 1995.
Click OK to finish, or OK & Add New to add more entries.

For females, move on to the Pregnancy tab.

Unfortunately, Cerner doesn’t migrate pregnancy history, & doesn’t give us an easy way to enter summarized pregnancy history.
If there are relatively few pregnancies, & you know the basic details, you can enter them one pregnancy at a time. Click Add.

Enter all the required fields & whatever other details you know. When done, click OK, or OK & New to add another pregnancy.

But you often won’t know all of these details, so you can’t make this entry. For example, suppose all you know is the summarized pregnancy data, G8 PT5P0A3L5. It is tempting to try to type it into this section at the top. And it’ll appear to let you—but the OK button remains grayed-out, so you can’t save your entries.

Given this limitation, your best bet is probably to use the Problem List. Search for & accept Pregnancy.

Double-click the Pregnancy entry.

Add the summarized data in the Comments box.
Change Classification to Historic, & Status to Resolved.
When done click OK.

It doesn’t display all the information face-up, but at least it’s there, & the folder/paper clip icon tells you there are additional details.

An update after Go Live added two more Histories tabs: Past Medical & Implants.
Click Past Medical.

Past Medical gives you a way to enter a past history item that doesn't really need to be on the Problem List, but isn't a procedure. Enter some search terms & click the Binoculars button:

Make your selection and click OK.
If your search was unsuccessful, refine your terms, or consider changing Starts with to Contains via the dropdown list

On the following screen add details as pertinent, then click OK (or OK & Add New to make additional entries).

The entry is added to the Past Medical list.

The Implants tab works in a similar fashion. To add an item, click +Add:

Make entries as pertinent, then click OK:

In particular, note the Comments field. If a patient has a card with information about serial numbers, model numbers, or other data about the implant, it is extremely helpful to enter this here. You'll be ahead of the game in the future if & when this becomes pertinent, such as when ordering an MRI. When done, click OK.

When done, the entry will appear on the Implants list.

Medications
Review old records & enter current, ongoing medications on the Unity med list.
EHR records sometimes include a lot of outdated meds, things like antibiotics that were one-time prescriptions & should no longer be active, or duplicate entries of the same med. So make sure not to enter things like this into the Unity record.

Go to the Medication List, & click Document Medication by Hx.

Click Add.

The patient takes trazodone 50 mg at bedtime. Type trazodone. If you see an appropriate match, select it. If not, hit Enter to see the whole result list. Here, we’ll click on trazodone 50 mg 1 tab, Oral, every day at bedtime. (Don’t worry about the amount; we’re just recording the med history, not prescribing it.)
Search for more meds as necessary. When done, click Done.

Modify med details as necessary, one at a time. Understand you may not know all the details. Be as complete as possible, but just listing the medication name with no details is better than not having it at all. When done, click Document History.

The med list displays.
Remember, the goal is to get the list as complete & accurate as possible. Some med lists, especially when exported from an old EHR, may show a long list of meds, including some that have long expired. When you can recognize that, don’t put those meds on the med list in Unity. But when in doubt, add the med to err on the side of caution.

Also note that you can make generic medication class entries. For example, if you know the patient is taking a birth control pill, but don’t know the name. Search for Misc & select Misc Prescription.

Enter details to the degree you know them, then click Document History.
The entry will appear on the Medication List as Other Prescription, with the details you’ve entered.

Allergies
It’s important for patient safety to record allergies.
But often minor side effects are recorded as allergies in old records. When this is clearly recognized, take advantage of the opportunity to clarify the Unity record.

If old records reflect there are No Known Allergies or No Known Medication Allergies, click that, & you’re done.
If you need to add an allergy, click +Add.
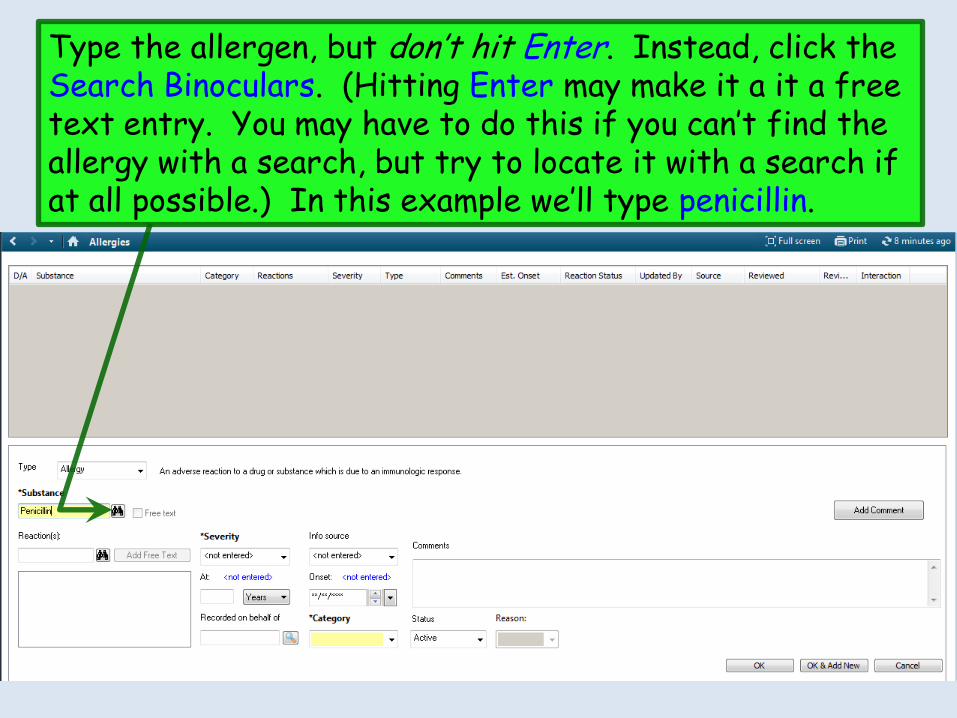
Type the allergen, but don’t hit Enter. Instead, click the Search Binoculars. (Hitting Enter may make it a it a free text entry. You may have to do this if you can’t find the allergy with a search, but try to locate it with a search if at all possible.) In this example we’ll type penicillin.

Double-click the desired result. We’ll take the top line penicillin.

The Type field defaults to Allergy. If you know no other details, keep that. If the old chart clearly indicates a mild non-allergic reaction like nausea, change to Intolerance or Side Effect. (It doesn’t matter which.)

If the old record makes it known, type the reaction, but again click the Search Binoculars instead of hitting Enter.

Double-click the desired result, Anaphylaxis.

Anaphylaxis is obviously pretty bad, so we’ll pick a Severity of Severe. (If severity is unclear, just pick Moderate.)
You also have to specify Category. Since penicillin is a drug, we’ll pick Drug.
When done click OK, or OK & Add New to enter another allergy.

The allergy displays on the list.

Immunizations
Here’s how to enter historical vaccination data. (You’ll see another approach in the Appendix at the end.)

Go to the Immunizations component of the a Workflow tab (MPage). This could be one of the specialty-specific provider workflow MPages, or a nursing workflow MPage.

Click the + Sign/Down Arrow, & you’ll see a dropdown list. Then click Document History.

Scroll through the list & click on the vaccines you want to document. You can select more than one. In this example we’ll use Measles, Mumps, Rubella.
When done click Select.

Administration Date & Source of information are required fields. Note that the dropdown list for Administration Date gives you options when you don’t know the exact date, such as just entering the year.
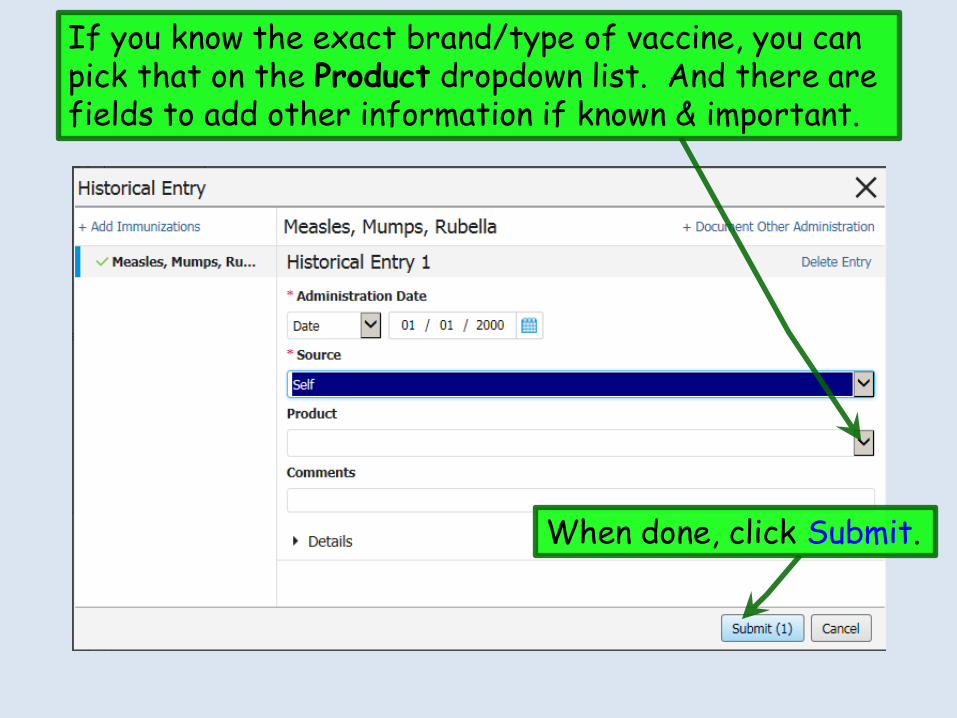
If you know the exact brand/type of vaccine, you can pick that on the Product dropdown list. And there are fields to add other information if known & important.
When done, click Submit.

Make further entries as required. As you add information, the updates appear on the Immunizations component.

Finishing
After you’ve completed abstracting data, it would be good to note that. Here’s a simple way to go about that.

An easy way to leave a note is by clicking Communicate.

Don’t pick a recipient in the To line. Change the subject to Chart Abstraction. Click Save to Chart. Then type a line indicating the chart abstraction, with your name & date. Then click Send.

You’ll be asked to confirm that you’re saving to the chart but not sending to anyone. Click Yes.

Alternatively, when using non-provider personnel to perform data transfer, you might wish to send this message to someone, such as the patient’s primary provider in your clinic, to notify them the activity is complete & ready for review.

The note displays on the Document List.