Embed Size (px)
Citation preview

CERN Mail Service Team
The Hitch Hiker’s
Guide To
Mail at CERN
The MMM companion


Credits Main Writer / Editor:
Macintosh part: Introduction:
Emmanuel Ormancey Alexandre Lossent Alberto Pace
Contributors: Christian Boissat Pierre Charrue Michel Christaller Joel Closier Frédéric Hemmer Christian Isnard Johan Karlsson Djilali Mamouzi Eva Sanchez-Corral Mena Jean Montuelle Ludwig Pregernig Frode Skaar Andreas Wagner Roger Woolnough
Document History Thursday, June 05, 2003 Initial document release, written
from scratch and MMM Website pages.
Monday, July 14, 2003 Added Macintosh documentation. Thursday, July 31, 2003 Review modifications.
Monday, September 01, 2003 French version.


http://cern.ch/mmm The MMM Companion
5
Table of contents 1. Introduction..................................................................................................................... 7 2. First Steps................................ ................................ ................................ ....................... 9
2.1. Getting started with your mail....................................................................................................................9 2.1.1. Do I have a Mailbox? ........................................................................................................................................9 2.1.2. Obtaining a Mailbox.......................................................................................................................................10 2.1.3. Mailbox deletion ...........................................................................................................................................10
2.2. Information and tools Web site................................................................................................................11 2.3. Decide which Mail client to use................................................................................................................12
3. CERN MMM Mail Servers.....................................................................................................13 3.1. Description..................................................................................................................................................13 3.2. Features.......................................................................................................................................................14 3.3. Supported Mail clients...............................................................................................................................16
4. Mailbox Configuration and Tools .........................................................................................19 4.1. Password change........................................................................................................................................19 4.2. Spam Fighting.............................................................................................................................................20
4.2.1. Configuration ...............................................................................................................................................20 4.2.2. Reporting Spam ............................................................................................................................................21 4.2.3. Tips to avoid Spam in your mailbox ...................................................................................................................22 4.2.4. How does Spam filtering work ..........................................................................................................................22
4.3. Vacation Message.......................................................................................................................................23 4.4. Email Forwarding........................................................................................................................................24
5. Outlook XP .....................................................................................................................25 5.1. Configuration..............................................................................................................................................26
5.1.1. Automatic configuration..................................................................................................................................26 5.1.2. Manual configuration .....................................................................................................................................27 5.1.3. Access mailbox from a different Nice account ......................................................................................................29
5.2. Mail ..............................................................................................................................................................31 5.2.1. Main window ................................................................................................................................................31 5.2.2. Customize views ...........................................................................................................................................32 5.2.3. Create a mail, reply or forward .........................................................................................................................36 5.2.4. Signatures ...................................................................................................................................................40 5.2.5. Contacts......................................................................................................................................................41 5.2.6. Automatic actions with rules ............................................................................................................................42 5.2.7. Deleted messages recovery..............................................................................................................................44 5.2.8. Spam Tools ..................................................................................................................................................45
5.3. Collaborative tools .....................................................................................................................................46 5.3.1. Permissions and access to shared resources ........................................................................................................47 5.3.2. Calendar......................................................................................................................................................51 5.3.3. Tasks..........................................................................................................................................................57 5.3.4. Notes..........................................................................................................................................................61
5.4. Offline Mode...............................................................................................................................................62 5.4.1. Configure Offline Mode...................................................................................................................................62 5.4.2. Work in Offline mode .....................................................................................................................................65
6. Outlook Web Access .........................................................................................................67 6.1. Configuration and Access .........................................................................................................................68 6.2. Mail ..............................................................................................................................................................69
6.2.1. Main window ................................................................................................................................................69 6.2.2. Customize views ...........................................................................................................................................70 6.2.3. Create a mail, reply or forward .........................................................................................................................71 6.2.4. Contacts......................................................................................................................................................74 6.2.5. Deleted messages recovery..............................................................................................................................75
6.3. Collaborative tools .....................................................................................................................................76 7. Mozilla ..........................................................................................................................77
7.1. Configuration..............................................................................................................................................78 7.2. Usage...........................................................................................................................................................83
7.2.1. Customize views ...........................................................................................................................................84 7.2.2. Create a mail, reply or forward..........................................................................................................................86

http://cern.ch/mmm The MMM Companion
6
7.2.3. Signatures ...................................................................................................................................................89 7.2.4. Personal address book....................................................................................................................................90 7.2.5. Filter Rules...................................................................................................................................................91
8. Pine................................ ................................ ................................ ..............................93 8.1. Configuration..............................................................................................................................................94 8.2. Usage...........................................................................................................................................................98
8.2.1. Display folders and mails ................................................................................................................................98 8.2.2. Create a mail, reply or forward ....................................................................................................................... 100 8.2.3. Signatures ................................................................................................................................................. 102 8.2.4. Personal Address Book ................................................................................................................................. 103 8.2.5. Filter Rules................................................................................................................................................. 104
9. Macintosh clients ........................................................................................................... 105 9.1. Outlook Web Access ............................................................................................................................... 105 9.2. Outlook 2001 for Mac OS Classic (8 and 9)......................................................................................... 106 9.3. Mail for Mac OS-X................................................................................................................................... 108
10. Advanced Mailbox use: WebDav..................................................................................... 111 10.1. Windows Explorer WebDav client.......................................................................................................... 111 10.2. DavFS2...................................................................................................................................................... 113
11. Instant Messaging...................................................................................................... 115 11.1. Configuration........................................................................................................................................... 115 11.2. How to use Instant Messenger .............................................................................................................. 116
Appendix: 42 reasons to use MMM Services ................................................................................. 118 12. Table of figures ......................................................................................................... 121
http://cern.ch/mmm The MMM Companion
Introduction 7
1. Introduction Every computing service at CERN has typically a lifecycle of a few years. It starts with a pilot/prototype phase through which the feasibility and production costs are evaluated. Then, after management approval, the pilot/prototype may be turned into an official service with user support, alarms, monitoring and documentation being provided. If the new service replaces an existing one, an appropriate migration phase is prepared. Once this is done, the service runs in production for several years with limited modifications, until it becomes obsolete and is replaced by the following generation of services. This approach is different from previous strategies of continuously improving existing services and it has shown its limitations: increas ing complexity of services over the years with the consequence of home grown solutions with high system management costs. The new strategy is now in place for several of the well known computing services provided by the IT division like LXPLUS, Web Services, NICE 95 / NT / 2000 and NICE XP. The Mail service is not different. The old CERN mail service was initially designed in 1994 and was improved in 1997 / 1998 and has reached the end of its lifetime. New technologies have emerged and new solutions can today be deployed which offer improved, more transparent end-user services at lower operational cost. This document fits in this strategy. It replaces the 7 year old “The CERN Electronic Mail Guide” (CERN/UCO/1997-1998) and summarizes the new generation of collaborative and messaging services provided to the CERN user community in general. As you will discover, the new services provide a superset of the functionality that were available in the old service. The vast majority of new services are available with a complete compatibility with the old ones, while for the very few where complete compatibility could not be provided; a migration path is proposed to ensure that all functionalities are retained. For the user who is reading this introduction, the number one question has not yet been answered: “Why do we need a new mail system for the organization?”. This is the first question that the majority of users have asked when being invited to migrate to the new messaging infrastructure. The question is legitimate and deserves a detailed answer which has multiple political, technical and economical facets. It is always difficult to prove to someone who has reached a certain level of productivity that more can be achieved. Several of our users expressed their opinion that no additional functionality was needed and that the previous email system was perfect. Unfortunately this cannot be true. First of all because the existing system was far from being perfect and had high maintenance and operational costs. Despite this, some users thought that the functionality offered was enough, others asked for additional functionality, which is now provided with the new service like a scalable Web-mail interface, an efficient anti-spam and antivirus filtering and a collaborative calendaring solution. Probably, we should compare the reasons for this change to similar reasons why in the year 2000, CERN moved from NICE95 to NICE2000. Why was it necessary to change the desktop environment? Or back 10/15 years, why should we use electronic mail instead of paper mail? Today the answers to these questions are obvious and it would not be easy to find a user willing to go back and use NICE95 instead of NICE XP or NICE2000. However, only three years ago, the answer to this question was not so evident for some users who could not (yet) see the increased productivity the new technologies were allowing. The situation today with the new mail services quite similar to the examples mentioned above. The information technology division has invested in a new messaging infrastructure that will boost productivity within the organization not only for electronic mail exchanges but also for collaborative work in general.

http://cern.ch/mmm The MMM Companion
Introduction 8
The detailed answer to the question “Why do we need a new mail system for CERN?” is the present book, which describes in detail the collaborative and messaging functionalities that have now been integrated in a consistent set of services. The reader who is impatient to know the list of motivations for this change can jump directly to “Appendix: 42 reasons to use the MMM services”.
http://cern.ch/mmm The MMM Companion
First Steps 9
2. First Steps
2.1. Getting started with your mail To connect to the mail server, you must have a Mailbox on MMM Services . A Mailbox is normally created in the following two possible situations:
• You requested it. • You are a new user of the CERN computer centre facilities and a MMM Mailbox was created for you
with another account. If you are using a central account (like AFS or NICE) it is recommended that your account name on the Mail Server is the same as your primary account on those services. Once done you must choose a program to read and send e-mail messages called a mail client program and you must learn how to use it.
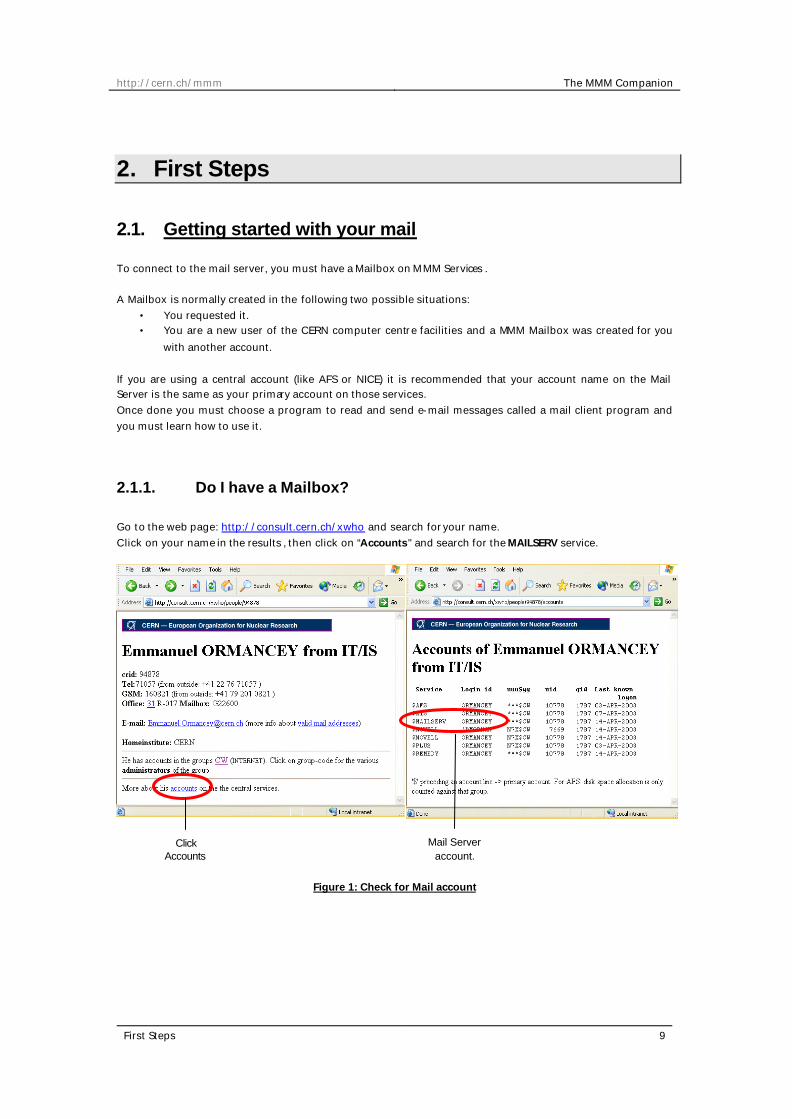
2.1.1. Do I have a Mailbox? Go to the web page: http://consult.cern.ch/xwho and search for your name. Click on your name in the results , then click on “Accounts" and search for the MAILSERV service.
Figure 1: Check for Mail account
Click Accounts
Mail Server account.

http://cern.ch/mmm The MMM Companion
First Steps 10
2.1.2. Obtaining a Mailbox If you do not have a Mailbox on MMM services, you can ask your group administrator to create one for you. To find out who is your group administrator, you can again search for your name in the page http://consult.cern.ch/xwho and, after having clicked on your name, click on the group code. The group administrators list will be displayed.
Figure 2: Group administrator
2.1.3. Mailbox deletion Your mail account will remain active as long as you are at CERN and you have another active account (NICE, AFS, etc.). When you leave CERN, your group manager may validate your account's deletion. Then your mail account (mail address at CERN, eventual forwarding of your mail outside CERN and all your mail folders) will be deleted by an automatic process. Usually this takes some months to happen after your departure. But please beware it will happen anyway, so take all necessary measures to avoid loosing any valuable data:
• Herald people of your new email address. • Archive your current mail. • Setup Email forwarding to your new address.
Click on group code
http://cern.ch/mmm The MMM Companion
First Steps 11
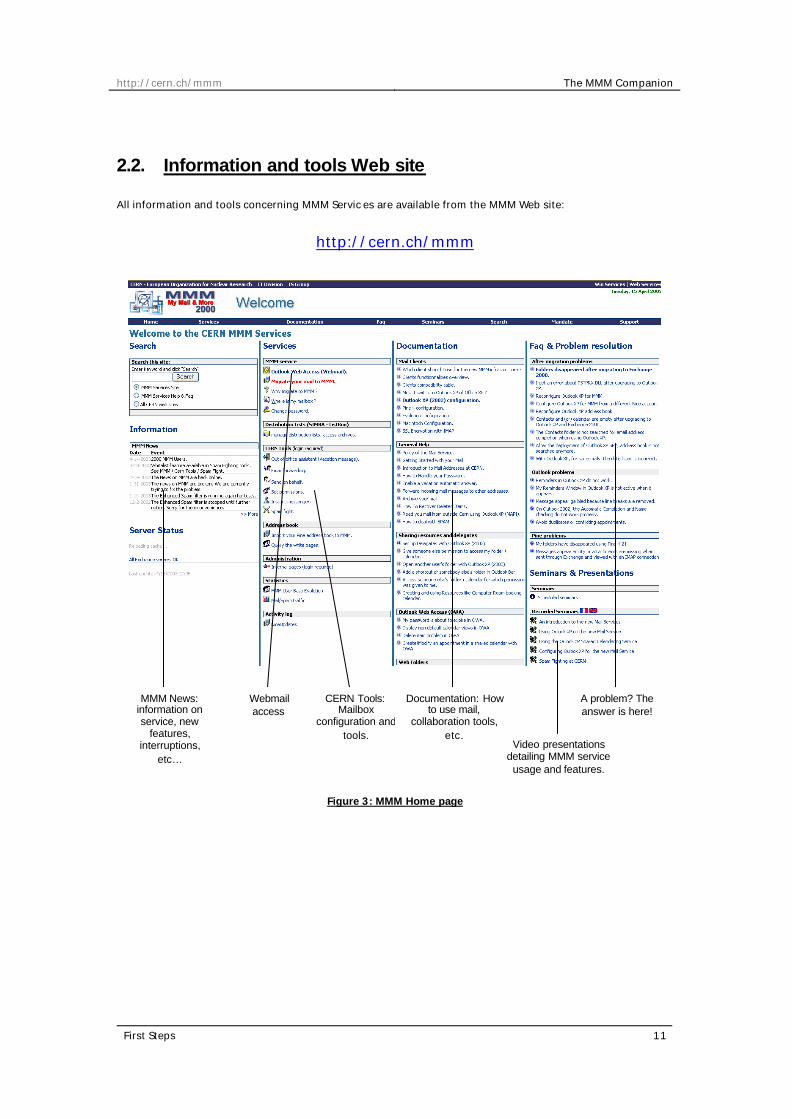
2.2. Information and tools Web site All information and tools concerning MMM Servic es are available from the MMM Web site:
http://cern.ch/mmm
Figure 3: MMM Home page
MMM News: information on service, new
features, interruptions,
etc…
Webmail access
CERN Tools: Mailbox
configuration and tools.
Documentation: How to use mail,
collaboration tools, etc.
A problem? The answer is here!
Video presentations detailing MMM service
usage and features.

http://cern.ch/mmm The MMM Companion
First Steps 12
2.3. Decide which Mail client to use Depending on the platform, usage and mobility, various solutions are available. These are the solutions we recommend, however you might use any other compliant solution.
Computer Usage Windows 2000 / XP Unix Mac Your desktop computer in your CERN office
Full MMM features Outlook XP OWA, RDC Outlook 2001, OWA, RDC
Your desktop computer in your CERN office
Mail features only Outlook XP, Outlook 2000, Mozilla
OWA, Mozilla, Pine, RDC
Outlook 2001, OWA, RDC, Mail
Any other CERN computer
All Mail or Full features
OWA OWA, RDC OWA, RDC
Laptop, work offline
Full MMM Features Outlook XP (Offline mode)
- Outlook 2001
Laptop, work offline
Mail features only Outlook XP (Offline mode), Outlook 2000, Mozilla
Mozilla, Pine Outlook 2001, Mail
Outside CERN, other institute, home, etc…
Full MMM Features OWA, Outlook XP OWA OWA
Outside CERN, other institute, home, etc…
Mail features only OWA, Outlook XP, Outlook 2000, Mozilla
OWA, Mozilla, Pine OWA, Mail
• Outlook XP (also known as Outlook 2002) is part of the Office XP suite, default suite for Windows XP
(NICEXP) machines; available as upgrade on Windows 2000 machines. • Outlook 2000 is part of the Office 2000 suite, default suite for Windows 2000 (NICE2000) machines. • Pine minimum version 4.21 required, version 4.44 or above recommended. • OWA: Outlook Web Access, the Webmail access to MMM. • RDC: Remote Desktop Connection to a Windows farm: allows Outlook XP use. • Outlook 2001: Available on Mac OS Classic (8 or 9) only. • Mail: Built-in mail client on Mac OS X.
http://cern.ch/mmm The MMM Companion
CERN MMM Mail Servers 13
3. CERN MMM Mail Servers
3.1. Description MMM Service is based on Microsoft Exchange 2000 Servers, plus some specific CERN features to fit user’s requirements. The objectives of the MMM 2000 Service are:
• Increased functionality to address user's demands • Cost reduction of running the messaging services by reducing diversity and using less expensive
hardware • Increased service coverage by leveraging on Windows 2000 technologies
Technically speaking, these objectives will be addressed by offering:
• Mail over secure IMAP, MAPI, POP3 and HTTP protocols • Calendaring using MAPI and HTTP protocols • News using NNTP and HTTP protocols
Mail and Calendaring support delegation (i.e. acting on behalf of somebody else and/or access somebody else calendar or mail folders, provided the permissions are granted). Calendar (and other folder types) sharing will be addressed through the use of public folders associated with appropriate security groups. The Exchange pilot proposal was approved by Desktop Forum in February 2002 for a 6 month period. The Exchange Service proposal was approved by Desktop Forum in September 2002.

http://cern.ch/mmm The MMM Companion
CERN MMM Mail Servers 14
3.2. Features MMM Services are available and fully operational (you must authenticate with your NICE username/password and be enrolled on the system): General
• Access o Any mail client for IMAP and POP. o Secure SSL connection. o MAPI access for Outlook on Windows, Mac & PDA and Evolution (Ximian connector) on
Linux. o Web access over SSL (Outlook Web Access). o WebDAV (RFC 2518 draft standard) for file access.
• Extra features
o Sharing folders and items. o Delegation and send on behalf. o Offline availability. o Anti Spam filtering: remove automatically spam from your inbox. o Anti virus running on server. o Personal mailbox backup for limited number of users.
Calendar
• Access o MAPI access for Outlook on Windows & Mac, PDA and soon Linux with Evolution (Ximian
connector). o Web access over SSL (Outlook Web Access).
• Extra features
o Sharing and delegation. o Resources handling (meeting rooms, etc.). o Offline availability (requires Outlook XP).
News
• Access o NNTP (any news reader). o Web access over SSL (Outlook Web Access).
Public folders
• Access o MAPI access for Outlook on Windows & Mac. o Web access over SSL (Outlook Web Access). o WebDAV (RFC 2518 draft standard) for file access.
• Features
o Can contain mails, files, contacts and calendar. o Shared folders and resources for Team shared space:
• Threaded discussion • Document repository • Team calendar • Team task list

http://cern.ch/mmm The MMM Companion
CERN MMM Mail Servers 15
• Team members contact list • Other contacts list
Changes:
• Webmail replaced by Outlook Web Access (OWA) interface: a light web version of Outlook. • Mailwww interface is replaced by “CERN Tools”, accessible from Outlook Web Access, Outlook XP and
MMM homepage. • Procmail (UNIX server side mail filtering) disappears: Outlook Rules Wizard or any client inbox filter
replaces.
http://cern.ch/mmm The MMM Companion
CERN MMM Mail Servers 16
3.3. Supported Mail clients MMM is an IMAP / POP compliant server. Any standard mail client supporting those protocols will work. In parallel a HTTP Web interface (Outlook Web Access) is also available from any Web browser. Supported Mail Clients at CERN are:
• Pine (minimum version 4.21, recommended version 4.44 or later to benefit from secure protocols). • Mozilla. • Outlook 2000 in IMAP mode only. • Outlook XP in MAPI mode only.
For the web mail (OWA) supported browsers are:
• Internet Explorer v5.5 or later. • Mozilla.
Unsupported clients:
• Outlook 2001 in MAPI Mode on MAC OS 9. • Entourage in IMAP mode on MAC OS X. • Eudora. • Evolution on Linux (Ximian connector allows collaboration tools access).

http://cern.ch/mmm The MMM Companion
CERN MMM Mail Servers 17
Figure 4: Supported protocols and clients available.
MAPI
MMM Servers
Mail Clients: • Pine (4.21 minimum) • Netscape 4.7/ Mozilla • Outlook 2000 • Any other IMAP / POP client.
IMAP / POP
Secure Mail Clients: • Pine (4.44 minimum) • Netscape 4.7 / Mozilla • Outlook 2000 • Any other IMAPs / POPs client.
MAPI Mail Clients: • Outlook XP. • Outlook 2001 for Mac.
Web browsers: • Internet Explorer (5.5 minimum). • Netscape 4.7 / Mozilla • Any other browser supporting https.
HTTP / HTTPS
WebDav Clients: • Internet Explorer. • Linux DavFS. • Dav Explorer. • See www.webdav.org
WEBDAV
IMAPS / POPS

http://cern.ch/mmm The MMM Companion
Mailbox Configuration and Tools 19
4. Mailbox Configuration and Tools
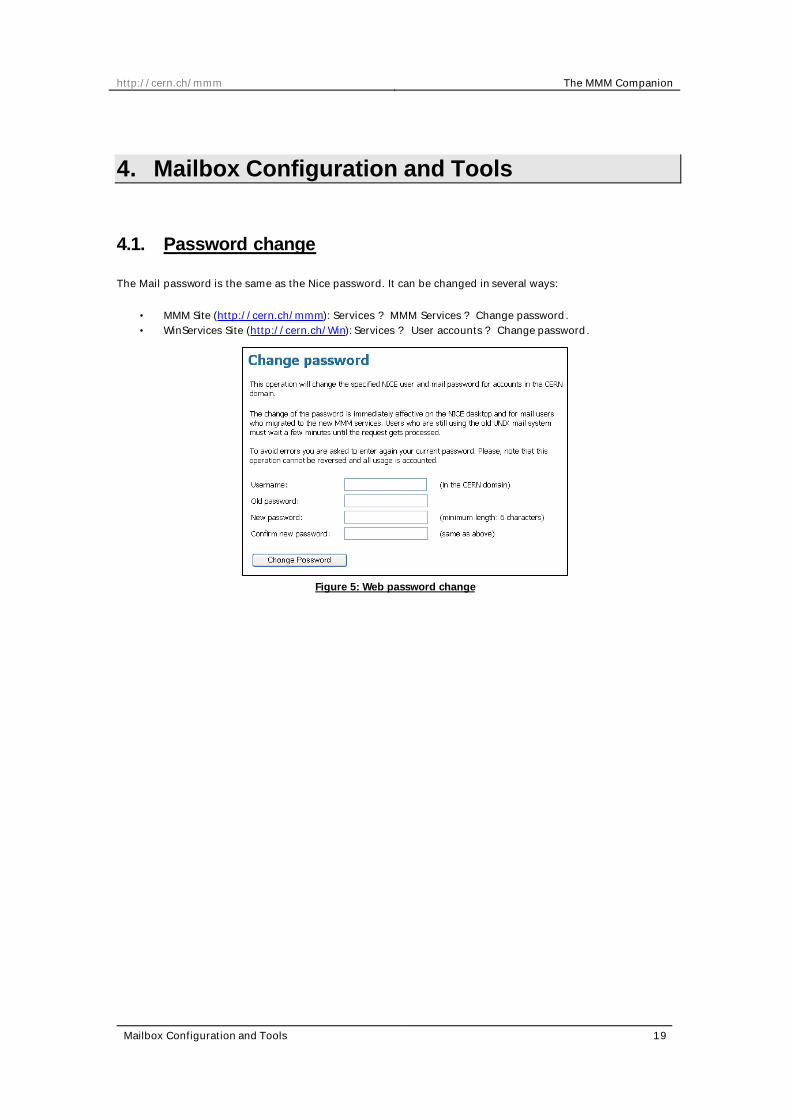
4.1. Password change The Mail password is the same as the Nice password. It can be changed in several ways:
• MMM Site (http://cern.ch/mmm): Services ? MMM Services ? Change password. • WinServices Site (http://cern.ch/Win): Services ? User accounts ? Change password.
Figure 5: Web password change
http://cern.ch/mmm The MMM Companion
Mailbox Configuration and Tools 20
4.2. Spam Fighting Spam is the “friendly name” given to unsolicited mails you can receive in you inbox. From commercial ads to links to pornographic sites, every mail user is a potential target for Spam. Publishing your email address on Web sites, in newsgroups, in chat rooms increases the risk of receiving Spam mails. Spammers use search engines and robots to crawl web sites, newsgroups, chat room s, every place where email addresses are potentially available.
Once your address has been targeted for Spam , it is IMPOSSIBLE to have it removed.
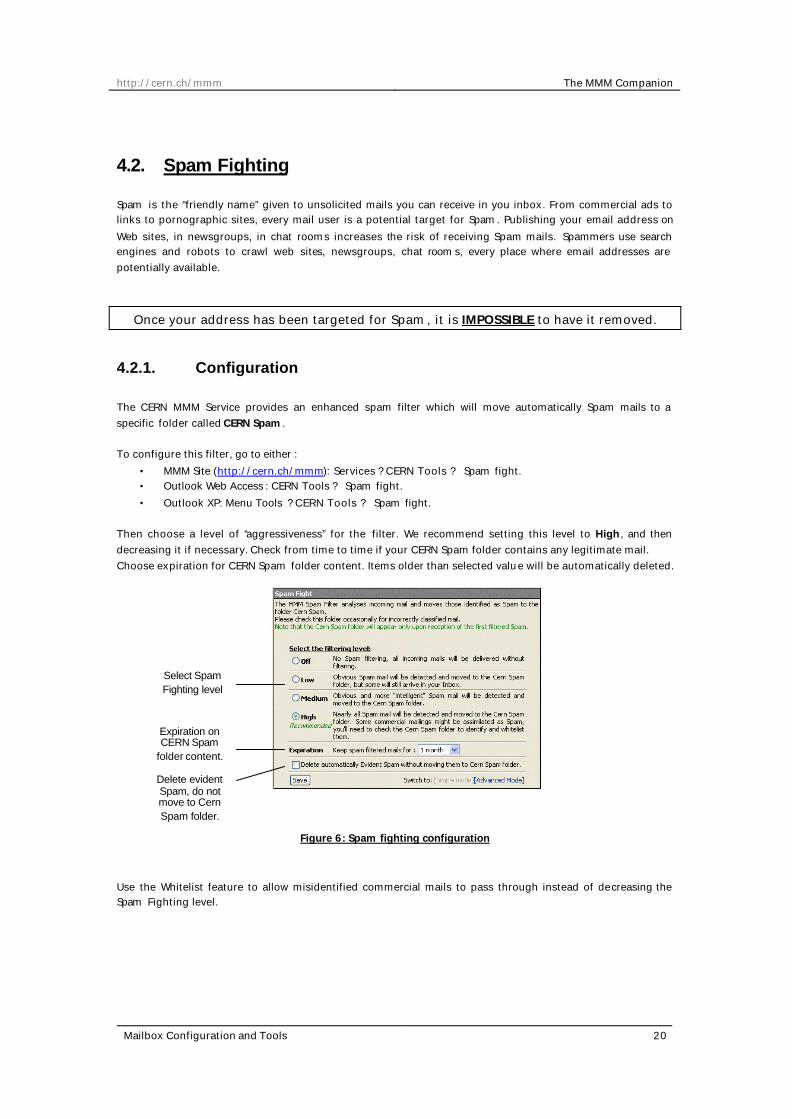
4.2.1. Configuration The CERN MMM Service provides an enhanced spam filter which will move automatically Spam mails to a specific folder called CERN Spam . To configure this filter, go to either :
• MMM Site (http://cern.ch/mmm): Services ? CERN Tools ? Spam fight. • Outlook Web Access : CERN Tools ? Spam fight. • Outlook XP: Menu Tools ? CERN Tools ? Spam fight.
Then choose a level of “aggressiveness” for the filter. We recommend setting this level to High, and then decreasing it if necessary. Check from time to time if your CERN Spam folder contains any legitimate mail. Choose expiration for CERN Spam folder content. Items older than selected value will be automatically deleted.
Figure 6: Spam fighting configuration
Use the Whitelist feature to allow misidentified commercial mails to pass through instead of decreasing the Spam Fighting level.
Select Spam Fighting level
Expiration on CERN Spam
folder content.
Delete evident Spam, do not move to Cern Spam folder.

http://cern.ch/mmm The MMM Companion
Mailbox Configuration and Tools 21
Figure 7: Spam whitelists
It is also possible to reject mails based on their language encoding, for example, if you do not read Chinese, you can assume that all Chinese written mails you will receive can be considered as Spam.
Figure 8: Spam charset rejection
4.2.2. Reporting Spam In case you received Spam mails in your INBOX despite the filter, please report it so we can improve our detection techniques. On the other hand, there is no need to report Spam located in your "CERN Spam" folder, because they are already detected. How to report a Spam:
• From Outlook XP: select the Spam mail and click button Report Spam, it will be deleted and a copy will be sent to our team.
Figure 9: Report Spam buttons in Outlook XP
• From any other mail client: please forward the mail with full headers to [email protected] and delete it.
Select the field where the string will be searched:
• Subject • From • To • Cc
Type the substring to search (wildcards are not supported). Substring are searched, it means that in the above example, if superfourmi is found anywhere in the From field, the mail will be white listed.
Automatically fills the Whitelist with emails stored in your MMM Contacts folder.
Select foreign languages
charsets you want to reject.

http://cern.ch/mmm The MMM Companion
Mailbox Configuration and Tools 22
How to forward a mail with full headers:
• Mozilla: Open the mail, view menu in the tool bar ? “headers – all”. For a permanent setting: Edit/Preferences menu ? Mail Settings ? Message, set “forward messages” to “as attachment”.
• Outlook 2000 : Select the mail, right click ? “Options”. In the lower part of the window are the headers. Select them all and copy-paste them into your message. For a permanent setting: Tools/Options menu ? Preferences tab ? E-mail Options, set "When Forwarding a message" to "Attach original message".
• Pine: When reading the mail type "H" to select the "HdrMode" and then forward it.
4.2.3. Tips to avoid Spam in your mailbox Spammers collect email addresses from Web pages, newsgroups, chat rooms, and any other places that can be searched by robots. Then to verify that the mail address is still valid, they try to make the user click on something upon Spam reception.
• In any case, never click on Unsubscribe links available in Spam Mails. The “Click here to be removed from the list” trick will ensure the spammer that you have read his Spam mail. Your email address will then be flagged as a valid email address, increasing its potential commercial value.
• Never use your email address in chat rooms; you may receive your fir st spam in less than 10 minutes (verified statistic!).
• When posting to newsgroups, try to modify your email and add strings like *nospam* somewhere: firstname.lastname@*nospam*cern.ch.
• Avoid writing your email address in Web pages, statistics show that in average you’ll receive your first spam about 39 days later. If it is really needed, display a gif picture instead of writing your mail in text. See http://spam.cern.ch ? Email encoding for Help.
4.2.4. How does Spam filtering work Incoming mails are sent to Spam detection servers, where a tool called SpamKiller will make a wide range of tests and heuristics on the mail, each giving a specific score. A header is then added to the mail, containing the total score. On delivery to the user's mailbox, the user's requested anti-spam level is compared to the score found in the mail's header. If the score is higher than the requested level, then the mail is moved to a new "CERN Spam " folder located in the user's mailbox instead of being delivered to the inbox. This allows a smoother anti-spam filter because:
• There is no rejection of legitimate m ails from the auxiliary filter. • The user can choose the anti-spam level he wants. • The multiple tests and the message body tests allow a far better recognition of Spam.
Of course some legitimate mails may be caught as well, because they look like Spam. Commercial mails for example can be trapped by the filter. User must regularly check that no "good mail" has been moved to the CERN Spam folder and whitelist these mails if appropriate.

http://cern.ch/mmm The MMM Companion
Mailbox Configuration and Tools 23
4.3. Vacation Message When you are going on vacation or you are away from CERN for a while, you may want to setup an au tomatic response which will be sent in reply to mails you’ll receive. This feature is called the Out of O ffice A ssistant. To configure the Out of Office Assistant, go to either:
• MMM Site (http://cern.ch/mmm): Services ? CERN Tools ? Vacation Message. • Outlook Web Access : CERN Tools ? Vacation Message. • Outlook XP: Menu Tools ? CERN Tools ? Vacation Message.
Figure 10: Out of Office Assistant
Activate or deactivate the automatic reply.
Text to reply: i.e.: “I’m currently out of CERN, I’ll be back on the 12 April 2003.”
Choose an alternate reply for non CERN
users.

http://cern.ch/mmm The MMM Companion
Mailbox Configuration and Tools 24
4.4. Email Forwarding If you are leaving CERN for a while, you can forward your mails to another email address. Then incoming emails to your CERN Mailbox will be redirected to the specified email, leaving a copy or not in your CERN mailbox. If you are leaving CERN but you want to be listed in CERN Phone book, simply change your Visible Email address. To configure your visible Email or a Forward, go to either :
• MMM Site (http://cern.ch/mmm): Servic es ? CERN Tools ? Visible Email address and Forwarding. • Outlook Web Access : CERN Tools ? Visible Email address and Forwarding.
Figure 11: Email forwarding configuration
Active or deactivate the forwarding.
Specify one or several email addresses where your mail will be
redirected.
Check this box to keep a copy of emails in your
CERN mailbox.
Change the Visible Email address.

http://cern.ch/mmm The MMM Companion
Outlook XP 25
5. Outlook XP
Outlook XP (also known as Outlook 2002) is part of Microsoft Office XP Professional suite. Outlook XP offers new and enhanced functionality that can improve your efficiency and make it easier to collaborate with colleagues. At CERN, if Office XP is not installed on you machine, check the Win Services page: http://cern.ch/winservices ? Documentation ? Office XP Information The following documentation is not intended to detail every Outlook XP option, but to show how to use quickly common features.

http://cern.ch/mmm The MMM Companion
Outlook XP 26
5.1. Configuration When your computer receives Office XP and Outlook XP, it is automatically preconfigured for MMM access on you mail account. However, it is possible to reconfigure it in two ways: an automatic script, writing default configuration for CERN users, and the manual way.
5.1.1. Automatic configuration Help: MMM Site ( http://cern.ch/mmm ) ? FAQ ? Reconfigure Outlook XP. First we’ll remove the existing profile if any, and then run the automatic configuration script:
• Close Outlook XP • From Control Panel, double-click Mail. • Click Show Profiles • Remove all profiles. • Click Ok.
Figure 12: Remove profile
• Run this to reconfigure your mail account:
\\cern.ch\dfs\applications\CERN\OLExchg\OLxpForCERN.vbs
http://cern.ch/mmm The MMM Companion
Outlook XP 27
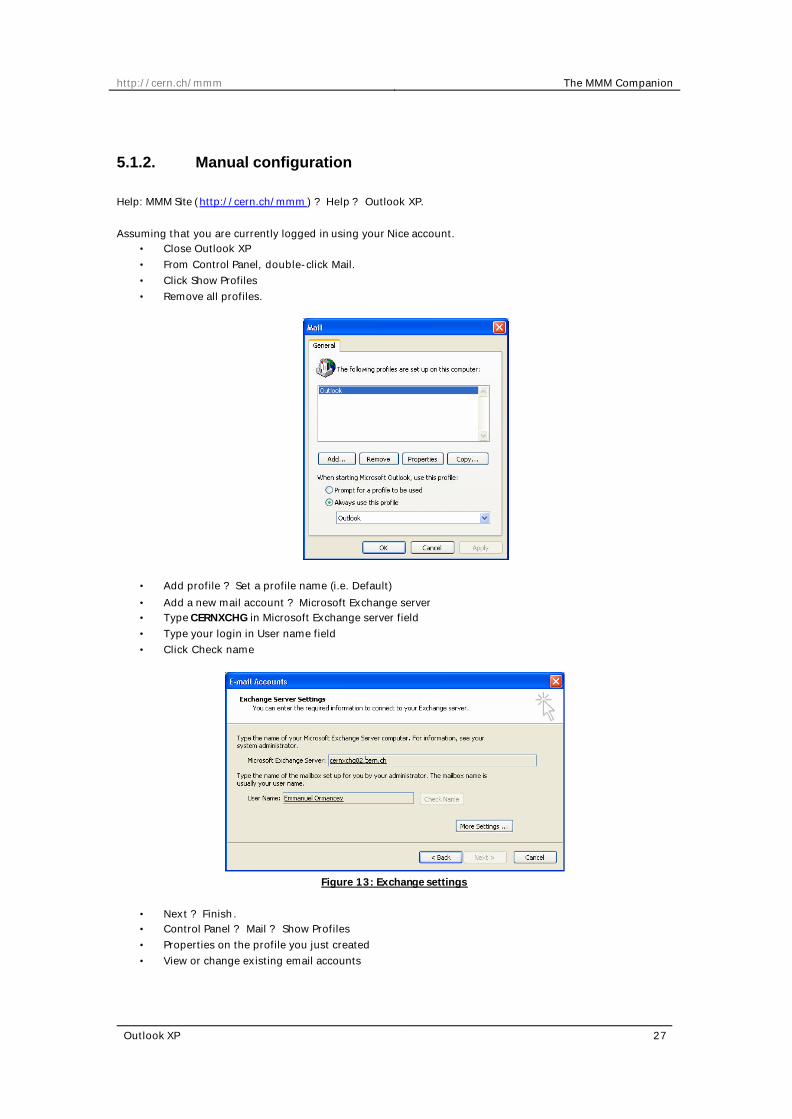
5.1.2. Manual configuration Help: MMM Site ( http://cern.ch/mmm ) ? Help ? Outlook XP. Assuming that you are currently logged in using your Nice account.
• Close Outlook XP • From Control Panel, double-click Mail. • Click Show Profiles • Remove all profiles.
• Add profile ? Set a profile name (i.e. Default) • Add a new mail account ? Microsoft Exchange server • Type CERNXCHG in Microsoft Exchange server field • Type your login in User name field • Click Check name
Figure 13: Exchange settings
• Next ? Finish. • Control Panel ? Mail ? Show Profiles • Properties on the profile you just created • View or change existing email accounts

http://cern.ch/mmm The MMM Companion
Outlook XP 28
• Verify that field: "Deliver new e-mail to the following location" is "Mailbox - Firstname Lastname". Correct if necessary.
Figure 14: Delivery location
• Close all and run Outlook XP.

http://cern.ch/mmm The MMM Companion
Outlook XP 29
5.1.3. Access mailbox from a different Nice account Help: MMM Site ( http://cern.ch/mmm ) ? FAQ ? Reconfigure Outlook XP from a different MMM Account. Assuming that you are currently logged in with your Nice account.
• Close Outlook XP • From Control Panel, double-click Mail. • Click Show Profiles • Remove all profiles.
• Add profile ? Set a profile name (i.e. Default) • Add a new mail account ? Microsoft Exchange server • Type CERNXCHG in Microsoft Exchange server field • Type your Mailbox login in User name field • Click Check name
• Click More Settings ? Advanced Tab • Set Logon network security to None.

http://cern.ch/mmm The MMM Companion
Outlook XP 30
Figure 15: Logon network security
• Click Ok. • When asked, type your Mailbox login, password and type CERN in the domain field. • Close All. • Next ? Finish. • Control Panel ? Mail ? Show Profiles. • Properties on the profile you just created. • View or change existing email accounts. • Verify that field: "Deliver new e-mail to the following location" is "Mailbox - Firstname Lastname".
Correct if necessary.
• Close all and run Outlook XP. • When asked (on Outlook XP startup), type your Mailbox login, password and type CERN in the domain
field.

http://cern.ch/mmm The MMM Companion
Outlook XP 31
5.2. Mail
5.2.1. Main window The Outlook XP main window displays all information concerning your mailbox:
• Folder list (click on ? to expand subfolders if necessary) o Bold: Folder contains unread mails (number displayed in blue). o Normal: Folder contains only read mails.
• Mails in selected folder: o Bold: Mail is unread o Normal: Mail is read.
• Displays content of selected mail in the preview pane. • The shortcuts bar displays quick links to common folders. Drag and drop folders in this bar to add
new shortcuts. • Toolbar displays buttons for common actions: New Mail, Reply, Forward, etc… • Menu bar will access to all functionalities and configuration.
Figure 16: Outlook XP Main window
Shortcuts (Outlook Bar)
Folder list Mail list: content of selected folder
Preview pane
Toolbar
Menu bar

http://cern.ch/mmm The MMM Companion
Outlook XP 32
5.2.2. Customize views
Main Window User can customize the Outlook XP Main window:
• Menu View • Check or Uncheck part described previously to display or hide.
Figure 17: Outlook XP Main window customization
By default, Folder list is not displayed. It is recommended to display it to see all your folders. It is recommended to disable the Preview Pane on the CERN Spam folder, to avoid viewing Spam content.
Mail list AutoPreview User can display an auto preview of emails in the mail list window. It can be useful if the preview pane is hidden.
• Menu View • Check AutoPreview
Figure 18: Email AutoPreview
Check / Uncheck window parts you want to display.
Check AutoPreview First lines of emails are displayed in blue.

http://cern.ch/mmm The MMM Companion
Outlook XP 33
Mail List Customize view The mail list can be customized:
• Sort by a field: Click on the field you want to sort on. Once for ascending, twice for descending. An arrow will be displayed to show the sort order.
Figure 19: Sort mails by a field
• Add or remove fields to display: o Menu View o Current View o Customize Current View. o Click Fields: Add or Remove fields to display in the Mail List.
Click on the field you want to sort on, the arrow shows the sort order.

http://cern.ch/mmm The MMM Companion
Outlook XP 34
Figure 20: Select fields to display in Mail List
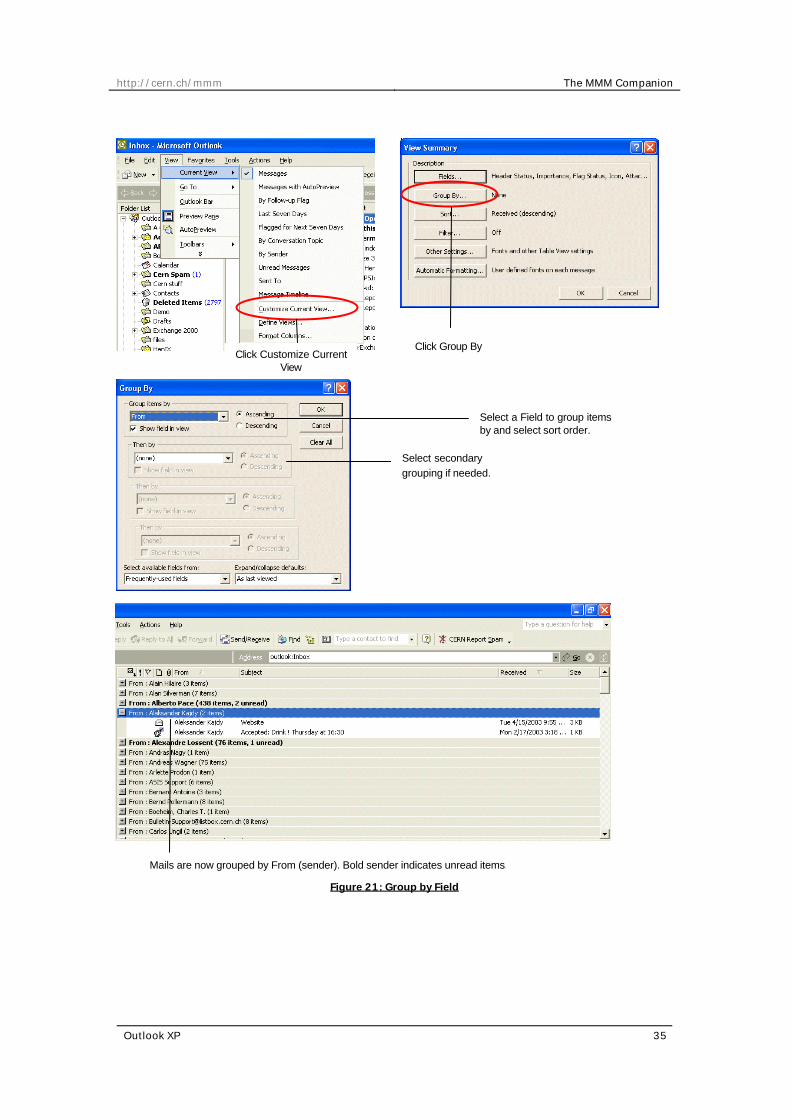
• Group by a field: the group by from feature can help to sort mails depending on the sender, without creating folders for everyone.
Click Customize Current View
Click Fields
Select Fields to display and click Add
Select Fields to remove from display and click Remove
Arrange display order by moving up or down
fields.
http://cern.ch/mmm The MMM Companion
Outlook XP 35
Figure 21: Group by Field
Click Customize Current View
Click Group By
Select a Field to group items by and select sort order.
Select secondary grouping if needed.
Mails are now grouped by From (sender). Bold sender indicates unread items.

http://cern.ch/mmm The MMM Companion
Outlook XP 36
5.2.3. Create a mail, reply or forward First, click on the corresponding button to create a new empty mail, reply or forward the selected mail.
Figure 22: Outlook Mail creation buttons
Create a new empty mail.
Reply to selected mail’s sender.
Forward selected mail and add comments.
Reply to selected mail’s sender and also to all recipients.

http://cern.ch/mmm The MMM Companion
Outlook XP 37
Mail recipients There are three ways of adding recipients to the To, Cc or Bcc fields of the mail:
• Type directly the email addresses of the recipients, separated by “;”. • Type the last name, first name or just the beginning separated by “;” in the To field then click the
Check Names button to resolve them. • Click the To button and select recipients from the displayed list.
Figure 23: Outlook XP Mail recipient resolution
Type names separated by “;”
Click Check Names.
Red underline means that resolution failed for this name.
Window popup will help to select among multiple resolutions.

http://cern.ch/mmm The MMM Companion
Outlook XP 38
Mail content and properties Recipients are selected, it is time to type the mail content itself:
Figure 24: Outlook XP Mail Compose
• Choose simple text or text with formatting (menu Format ? select Plain text or HTML (for formatted
content).
o Use the formatting icons to create formatted content. o If your recipients do not use a html compliant mail client, they will be able to see a plain
text version of your mail automatically generated.
• Insert files or images by clicking on the clip (same as menu Insert ? File) or drag and dropping items on the mail.
• Verify the spelling with the Spell Checker: menu Tools ? Spelling.
Set text formatting with these tools.
Click here to send the mail.
Attach a file to the mail.
Set an importance on the mail: Low or
High.
Set an action flag on the mail.
Choose between: • Plain Text: text without formatting. • HTML: text with formatting.

http://cern.ch/mmm The MMM Companion
Outlook XP 39
Then you can set properties on the mails, like flags or importance information:
• Set an importance level: Low or High. The recipient will instantly see that the mail is important if the red exclamation mark is displayed.
• Flag for follow up: Flagging marks an item to remind you that it needs to be followed up. o Set a flag type: Follow up, For your information, Forward, Reply, etc... o Set an optional due date.
When you have finished editing the mail, click Send.
Set a flag for Follow Up and an optional due date.
Check spelling of your mail.

http://cern.ch/mmm The MMM Companion
Outlook XP 40
5.2.4. Signatures When creating a mail, you can automatically add a signature at the end, containing your personal information, address, phone number, etc… Different signatures can be defined for new mails and for replies and forward mails. How to define signatures:
• Outlook XP: menu Tools ? Options ? Mail Format tab. • Select the signature for new messages and for replies and forward. • Click Signatures to create or edit your signatures.
Figure 25: Signatures configuration
Select signature to add to new messages and replies.
Click Signatures to edit or create signatures.
Add to your signature a contact containing your personal informations.

http://cern.ch/mmm The MMM Companion
Outlook XP 41
5.2.5. Contacts The Contacts folder is your e-mail address book and information storage for the people and businesses you want to communicate with on a regular basis . Use the Contacts folder to store the e-mail address, street address, multiple phone numbers, and any other information that relates to the contact, such as a birthday or anniversary date. From a contact in your contact list, you can click a button or menu command to have Microsoft Outlook addres s a meeting request, e-mail message, or send a task request to the contact. When you enter a name or address for a contact, Outlook separates the name or address into parts and puts each part in a separate field. You can sort, group, or filter contacts by any part of the name or any part of the address you want. You can file contact information under a last name, first name, company name, nickname, or any word that helps you find the contact quickly. You can enter up to three addresses for each contact. Designate one address as the mailing address, and use it for mailing labels, envelopes, or for creating mail merge letters. Outlook supports the use of vCards, the Internet standard for creating and sharing virtual business cards. You can save a contact as a vCard and send it in an e-mail message. You can also add a vCard to your e-mail signature.
Figure 26: Outlook XP Contact
Once your contacts are created, they are stored on MMM servers, so they are available from anywhere with Webmail, on your laptop or any other computer using Outlook XP.

http://cern.ch/mmm The MMM Companion
Outlook XP 42
5.2.6. Automatic actions with rules E-mails can be managed by using rules to automatically perform actions on messages. After a rule is created, Outlook XP applies the rule when messages arrive in your Inbox or when you send a message. For example, you can automatically:
• Move to Folder Bobby all messages sent by Bobby Ewing. • Forward to your manager all messages sent by John Doe when they arrive in your Inbox. • Assign the category Sales to all messages you send that have the word "sales" in the Subject.
You can add exceptions to your rules for special circumstances, such as when a message is flagged for follow-up action or is marked with high importance. On MMM Services , rules can be applied even if Outlook is not running. The rules must be set to be applied to messages "when you receive them in the Inbox" on the server, and the rules must be able to be completed on the server. For example, a rule cannot be applied on the server if the action requires moving a message to a folder in a personal folder file. If a rule cannot be applied on the server, it is applied when Outlook is started. Rules that cannot be run on the server have the words "client only" added to the end of the name. Rules that are marked "client only" are applied after all other rules.
Figure 27: Outlook XP Rules wizard
Click New to create a new rule. Then use the templates to create a standard rule action.
• Condition can match sender, recipient(s), subject, various flags and status. Multiple conditions are allowed.
• The action done can be a simple move to a folder, a forward, delete and various notifications. Multiple actions can be created.
• Exceptions will allow moving all mails from Michel to Michel folder, except when subject contains the word “bobby”.
Click Rules Wizard
Selected Rule overview
Sort rules processing
order.
Create new rule.

http://cern.ch/mmm The MMM Companion
Outlook XP 43
Figure 28: Outlook XP New rule creation
Tip: To quickly create simple filtering rules, i.e. messages moved to a folder based on criteria:
• Move manually a sample mail matching criteria to destination folder. • Open the mail. • Menu Action ? Create Rule • Simply check Conditions you want to match and Actions taken. All matching fields are already filled
with fields from the Mail.
Use the template: move new messages from someone .
Match the sender.
Click here to add a sender to match.
Action taken: Move to a folder.
Click here to specify a target folder.
Setup exceptions.
http://cern.ch/mmm The MMM Companion
Outlook XP 44
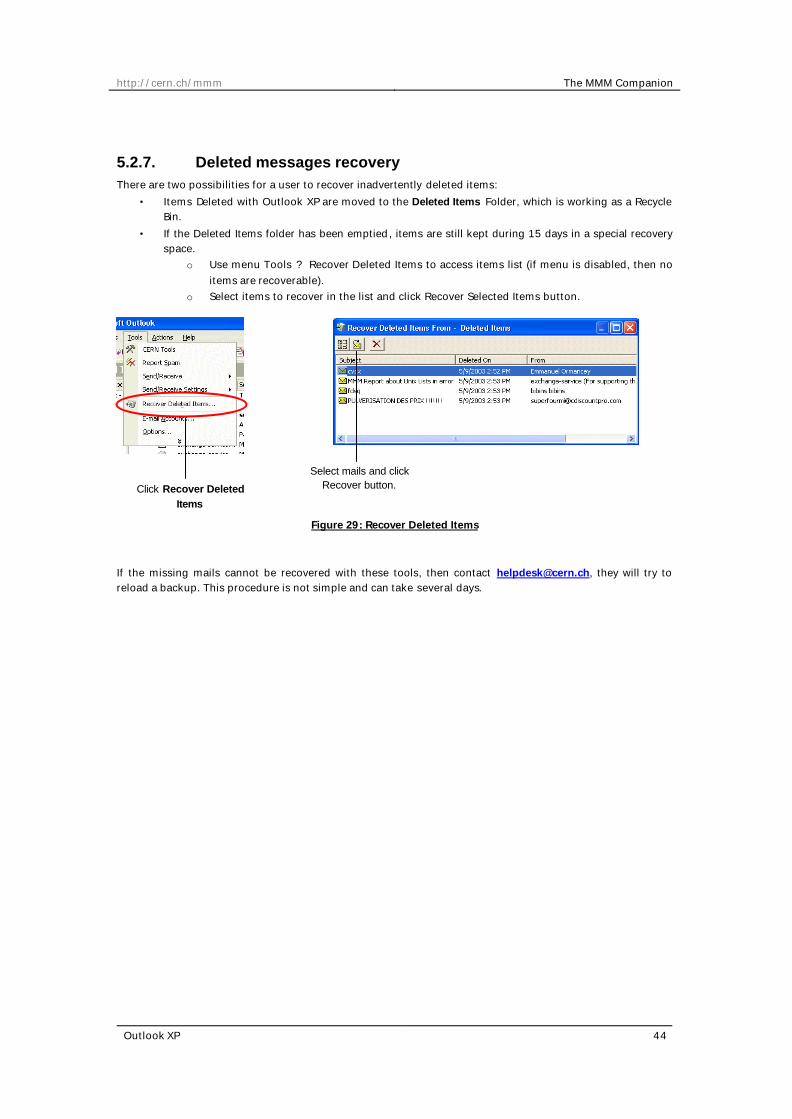
5.2.7. Deleted messages recovery There are two possibilities for a user to recover inadvertently deleted items:
• Items Deleted with Outlook XP are moved to the Deleted Items Folder, which is working as a Recycle Bin.
• If the Deleted Items folder has been emptied, items are still kept during 15 days in a special recovery space.
o Use menu Tools ? Recover Deleted Items to access items list (if menu is disabled, then no items are recoverable).
o Select items to recover in the list and click Recover Selected Items button.
Figure 29: Recover Deleted Items
If the missing mails cannot be recovered with these tools, then contact [email protected], they will try to reload a backup. This procedure is not simple and can take several days.
Click Recover Deleted Items
Select mails and click Recover button.

http://cern.ch/mmm The MMM Companion
Outlook XP 45
5.2.8. Spam Tools The Outlook XP CERN Add-in appends some items to the Tools menu bar and in a specific toolbar in Outlook XP. These buttons are designed to easily access the CERN mail tools, but also to help fighting against Spam (unsolicited mails).
Figure 30: Outlook XP CERN Add-in
CERN Tools button: allows direct access to CERN Tools: • Set a forward. • Configure Spam fighting level. • Manage your quotas.
Report Spam button: delete Spam (unsolicited mails) from your inbox and report them to the CERN Anti spam team.
Whitelist button: build your whitelist from mail fields to avoid spam filtering mistakes.
Check Spam button: send any mail to the Spam detection engine and view the check results.

http://cern.ch/mmm The MMM Companion
Outlook XP 46
5.3. Collaborative tools Outlook XP on MMM introduces several new collaborative tools, from folder sharing to group meeting organization with resources handling (conference room, car, projector, etc…). The following topics will show:
• Set permissions on folders to allow other people to view, edit folder contents. o Folders can be mail folders but also calendar, tasks or contacts folders. o Allow delegates users to send mail on your behalf.
• Use the calendar feature to organize meetings and invite participants, follow participants’ acceptance and handle resources.
• Create tasks and assign them to other people, follow the completion status. • Use the Notes : create “post-it” and stamp it on your desktop.

http://cern.ch/mmm The MMM Companion
Outlook XP 47
5.3.1. Permissions and access to shared resources There are two ways of setting permissions: one, for simple permission settings on default folders like Inbox, Calendar , Tasks, and an advanced mode, allowing everything everywhere. To access another user ’s folder, use the simple way for a quick punctual access and the advanced way for a permanent access.
Simple mode
Set permissions In Outlook XP:
• Menu Tools ? Options ? Delegates tab. • Click Add to select a MMM user • Select rights to give to this user on default folders:
o Reviewer: Can only read items. o Author: Can read and create new items. o Editor: Can read, create new items and modify any items.
• Notice the Delegate can see my private Items checkbox: o When creating items, a private flag can be set. Access will be denied to these items even if
the folder is shared. o Checking the box Delegate can see my private Items will override this feature.
Figure 31: Set permissions using the delegates feature
Add a new authorized user.
Select for each folder the permission level for this user.
Check this box to allow user to see even private items.
Select User from the Global Address List.

http://cern.ch/mmm The MMM Companion
Outlook XP 48
Open another user’s fol der In Outlook XP:
• Menu File ? Open ? Other User’s Folder • Type user login or click Name to select from the Global Address List. • Select the folder to open in the list.
Figure 32: View of other user’s Calendar folder
Type the user name or click Name to select from the Global Address List.
Select Folder to open.
The Calendar of selected user opened successfully, he had previously set the permissions for my account.
Note the private appointment: the content is not visible, despite the rights to see the calendar items.

http://cern.ch/mmm The MMM Companion
Outlook XP 49
Advanced mode
Set Permissions In Outlook XP:
• To set permissions on a specific folder: o Select this folder in the folder list o Right Click ? Properties o Permissions Tab.
• Add users • For each user, set permissions from predefined levels of by checking each authorized action.
Figure 33: Advanced permissions settings
Click here to add user.
Select a predefined permission level
Or create your own level by defining specific authorizations.

http://cern.ch/mmm The MMM Companion
Outlook XP 50
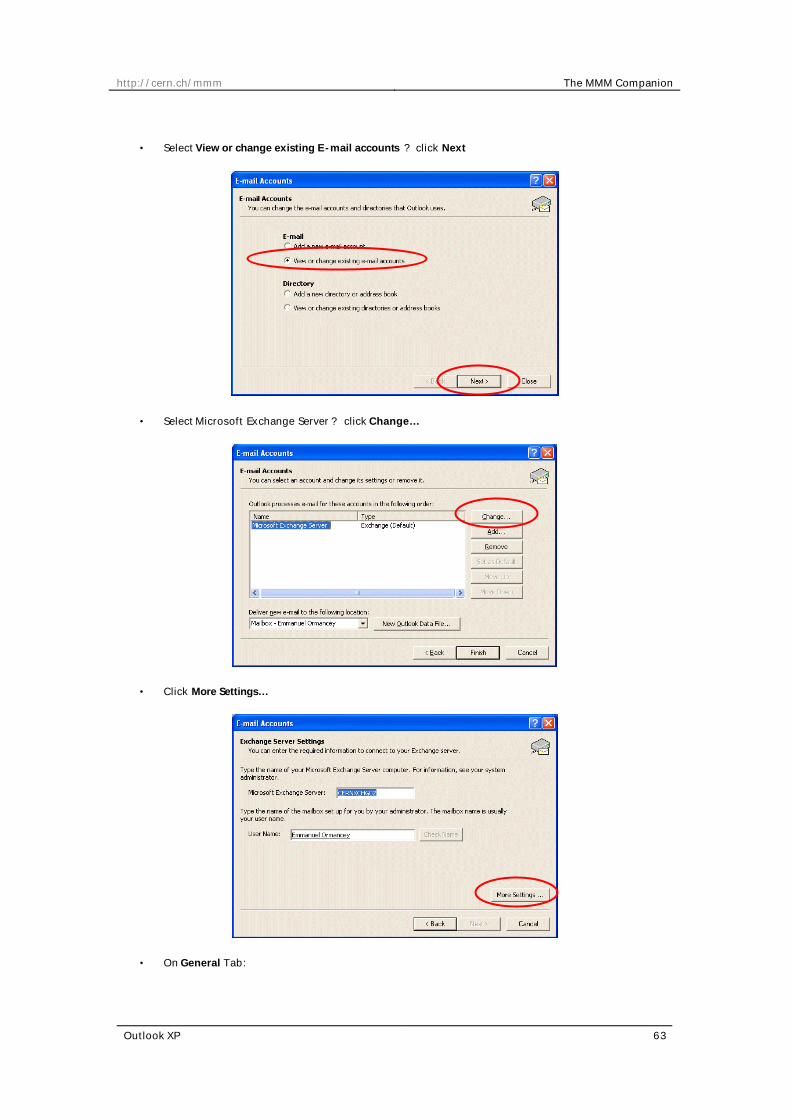
Open additional mailbox This method will permanently add another user’s mailbox entry in your Outlook XP.
• Menu Tools ? E-Mail Accounts • Select View or Change existing e-mail accounts ? Click Next • Select Microsoft Exchange Server ? Click Change • Click More Settings ? Advanced Tab • Click Add in the Open these additional mailboxes part. • Type a user full name or login to add to the list.
Then in the folder list, the other mailboxes will be displayed permanently at the top level (same level as Outlook Today).
Figure 34: Open additional mailbox
Add a mailbox to your outlook.
Type user login or full name.
Permanent view of user’s mailbox. Only folders with Visible permission are visible.

http://cern.ch/mmm The MMM Companion
Outlook XP 51
5.3.2. Calendar The Outlook XP Calendar is a calendar and scheduling component. It is fully integrated with e-mail, contacts, and other features. You can view a day, week, or month at once. With Calendar you can: Create appointments and events: Just as you would write in a paper-based organizer, you can click on any time slot in the Outlook Calendar and begin typing. You can opt to have a sound or message remind you of appointments, meetings, and events, and you can add colors to items for at-a-glance identification. Organize meetings: Simply select a time on your Calendar , create an appointment, and select people to invite. Outlook will help you find the earliest time at which all the people are free. When the meeting notice is sent to invitees by e-mail, each will receive a meeting request in Inbox. When they open it, Outlook notifies them if the meeting conflicts with an existing item in their Calendar, and they can accept, tentatively accept, or decline your meeting by clicking a single button. When an invitee (using Outlook XP) accepts a meeting request, the corresponding entry will be automatically added to his calendar . If allowed by you, as meeting organizer, invitees can counter-propose an alternate meeting time. As organizer, you can track who has accepted, declined, or counter -proposed times, simply by opening the meeting. View group schedules: You can create calendars that show the schedules of a group of people or resources simultaneously. For example, you can view the schedules of all people in your department, or all resources, such as conference rooms, in your building, to more quickly schedule meetings. Manage another user’s Calendar : With the delegate access feature, one person can use his or her own copy of Outlook to easily manage another person's Calendar . For example, an administrative assistant can manage the Calendar of a manager. When the manager designates the assistant as a delegate, the assistant can create, move, or delete appointments and can organize meetings on the manager’s behalf.

http://cern.ch/mmm The MMM Companion
Outlook XP 52
Views Views can be configured to fit user’s preferences. Basic view modes can be selected:
• Day • Work week (Monday to Friday, configurable in Tools ? Options ? Preferences Tab ? Calendar
Options) • Week • Month
Figure 35: Calendar views
Select view
New appointment
Work week view
Month view
Select day or month. Bold days indicate an appointment.

http://cern.ch/mmm The MMM Companion
Outlook XP 53
Creating an appointment Click New to create a new appointment. Then fill basic fields like Subject, time and duration. Notice the private checkbox to keep privacy on shared calendars.
Figure 36: Create new appointment
Check Private box to keep privacy on shared calendar.
Select meeting date, time and duration.
Set a reminder, to be warned bef ore meeting starts.
Click Scheduling to invite attendees to
this meeting.

http://cern.ch/mmm The MMM Companion
Outlook XP 54
Invite attendees The appointment can be scheduled with other MMM users. Outlook XP will help to determine other attendees’ availability, to schedule the meeting at a good date and time. Invitation handling and participation status is also handled.
Figure 37: Invite attendees to meeting
When a meeting with participants is created, an invitation is automatically sent to all expected attendees. This invitation will propose buttons to Accept or Decline the meeting. Upon accept or decline answer, the Appointment entry in the Calendar will be updated with responses. Check the Tracking Tab in the appointment to view answer status.
Blue boxes show periods where the user is not available.
Click Send when finished. An invitation will be sent to
every participant. Type attendees’ names or click Add Others to add users.
AutoPick Next will automatically select next period of time where all
attendees are free (non blue).
http://cern.ch/mmm The MMM Companion
Outlook XP 55
Figure 38: Attendees answer to meeting invitation
Invitation received by one attendee.
Accept receipt received by
meeting organizer.
Click Accept, Decline or Tentative for “try to attend”.
Check responses in the tracking tab of the appointment.
Answer status per user.

http://cern.ch/mmm The MMM Companion
Outlook XP 56
Add resources Resources can be handled by MMM Calendar service, such as Conference rooms, cars, video projectors. Resources can be invited in the way attendees are invited, they will automatically Accept or Decline depending on their availability.
Figure 39: Resource booking for a meeting
Click Add Others to add a resource.
Select a resource and add it to the list.
Blue boxes show periods where the
resource is not available.
AutoPick Next will automatically select next period of time where all
attendees and resources are free (non blue).
Resource booking status is known instantly when sending or saving the appointment.

http://cern.ch/mmm The MMM Companion
Outlook XP 57
5.3.3. Tasks A task is a personal or work-related entry you want to track through to completion. A task can occur once or repeatedly (a recurring task). A recurring task can be repeated at regular intervals or repeat based on the date you mark the task complete. For example, you might want to send a status report to your manager on the last Friday of every month, and get a haircut when one month has passed since your last haircut. Tasks assignments: In addition to creating your own tasks, you can create tasks that you assign to others. You do this by sending a task request to someone. The person who receives the task request becomes the temporary owner of the task. They can decline the task, accept the task, or assign the task to someone else. If they decline the task, it's returned to you. If they accept the task, they become the permanent owner. If they assign the task to someone else, the new assignee becomes the owner. The owner is the only one who can make changes to the task. When an owner updates a task, Outlook updates all copies of that task — the copy for the person who originally sent the task request and copies for any prior owners of that task. When the owner completes the task, Outlook automatically sends a status report to the person who originally assigned the task, any other prior owners, and anyone else who requested a report.
View The task list view can be customized using the View menu ? Current View.
Figure 40: Task list view
New task Current view is predefined Active Tasks, showing non closed tasks.

http://cern.ch/mmm The MMM Companion
Outlook XP 58
Create a Task Open the Tasks folder and click New to create a new task. Check the private box to prevent users with permissions to see this task. Remember to keep up-to-date the Status and Completion fields, to follow task progress and generate reports.
Figure 41: Create a new Task
Information and notes about this task.
Check Private box to keep privacy on shared tasks folder.
Status and completion of the task: update these fields to keep an up-to-date tasks overview.
Assign the task to someone.

http://cern.ch/mmm The MMM Companion
Outlook XP 59
Assign a task Task assignment is done by sending the task to the selected user. Click Assign Task to do so. This user will then have the possibility to Accept or Decline the task, and also to assign it to another user.
Figure 42: Task assignment process
When the task will be completed by the user, an automatic report will be sent to the tasks creator, containing a summary of the tasks and its completion.
Select user.
Check these boxes to receive updates and reports on task completion.
Task assignment
Task assignment received by user.
Accept, Decline or Assign Task to someone else.
Task assignment receipt.
http://cern.ch/mmm The MMM Companion
Outlook XP 60
Figure 43: Task completion report
Task report.

http://cern.ch/mmm The MMM Companion
Outlook XP 61
5.3.4. Notes Notes are the electronic equivalent of paper sticky notes. Use notes to write down questions, ideas, reminders, and anything you would write on note paper. You can leave notes open on the screen while you work. This is especially convenient when you're using notes for storing bits of information you may need later, such as directions or text you want to reuse in other items or documents. Notes can be copied to the desktop and stay on the desktop as a sticker (using Copy / Paste operations).
Figure 44: Notes
Notes can be kept open or closed as an icon.

http://cern.ch/mmm The MMM Companion
Outlook XP 62
5.4. Offline Mode Outlook XP can be configured to work in “Offline Mode” which stores mailbox contents in a local file for use when disconnected from the network. This is the best way to work with laptops on MMM. This “Offline Mode” naming is a somewhat misleading name for this mode, which should in fact be called “cached mode”. When connected to the network, the cache is filled with new information. When disconnected, you can read mails from this cache, reply and create new mails, synchronization will be made during next network connection.
5.4.1. Configure Offline Mode Assuming that you are currently logged in your Nice account:
• Close Outlook XP • From Control Panel, double-click Mail. • Click Show Profiles • Select default profile, click Properties.
• Click E-mail Accounts…
http://cern.ch/mmm The MMM Companion
Outlook XP 63
• Select View or change existing E -mail accounts ? click Next
• Select Microsoft Exchange Server ? click Change…
• Click More Settings…
• On General Tab:
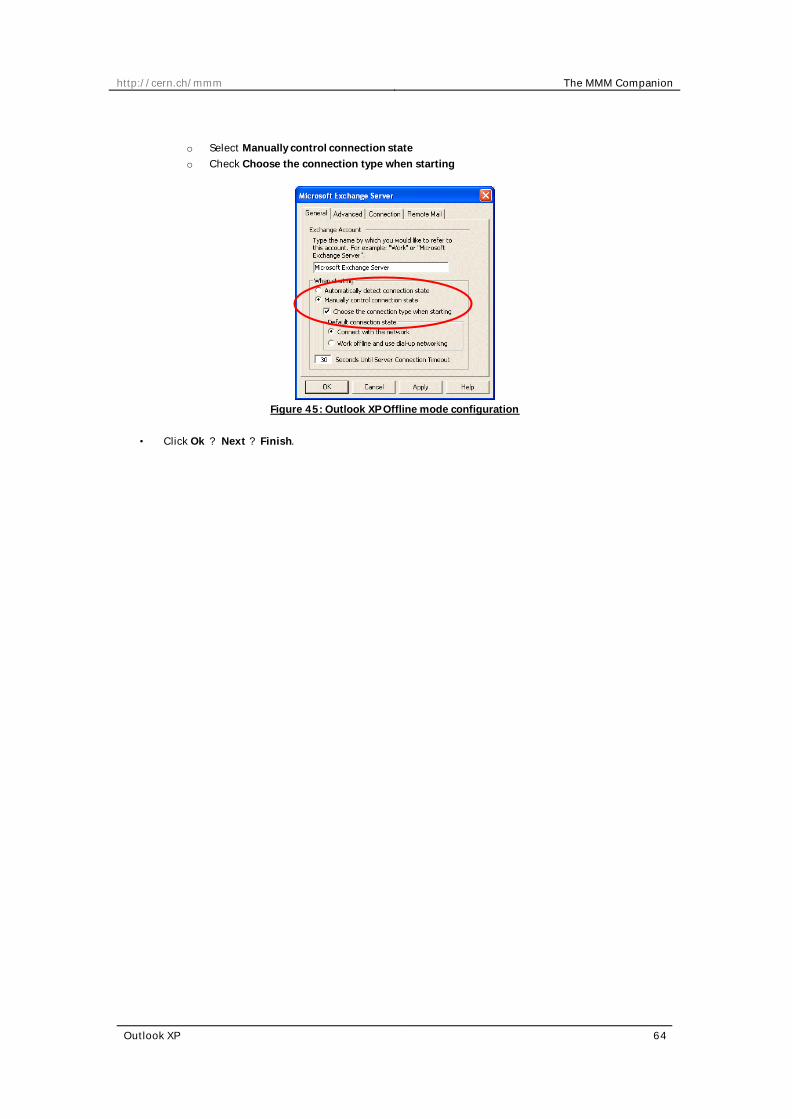
http://cern.ch/mmm The MMM Companion
Outlook XP 64
o Select Manually control connection state o Check Choose the connection type when starting
Figure 45: Outlook XP Offline mode configuration
• Click Ok ? Next ? Finish.
http://cern.ch/mmm The MMM Companion
Outlook XP 65
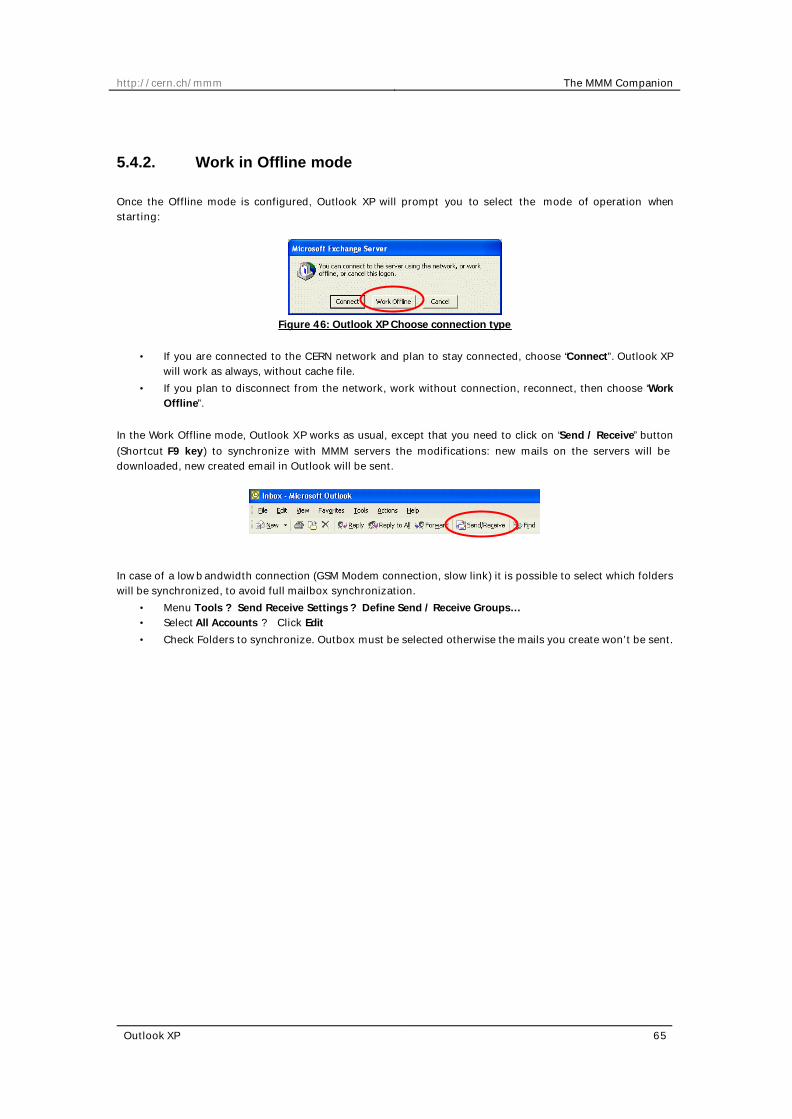
5.4.2. Work in Offline mode Once the Offline mode is configured, Outlook XP will prompt you to select the mode of operation when starting:
Figure 46: Outlook XP Choose connection type
• If you are connected to the CERN network and plan to stay connected, choose “Connect”. Outlook XP
will work as always, without cache file. • If you plan to disconnect from the network, work without connection, reconnect, then choose “Work
Offline”. In the Work Offline mode, Outlook XP works as usual, except that you need to click on “Send / Receive” button (Shortcut F9 key) to synchronize with MMM servers the modifications: new mails on the servers will be downloaded, new created email in Outlook will be sent.
In case of a low bandwidth connection (GSM Modem connection, slow link) it is possible to select which folders will be synchronized, to avoid full mailbox synchronization.
• Menu Tools ? Send Receive Settings ? Define Send / Receive Groups… • Select All Accounts ? Click Edit • Check Folders to synchronize. Outbox must be selected otherwise the mails you create won’t be sent.

http://cern.ch/mmm The MMM Companion
Outlook XP 66
Figure 47: Outlook XP Send Receive Settings
Select Folders to Synchronize. At least Inbox and Outbox should be selected.

http://cern.ch/mmm The MMM Companion
Outlook Web Access 67
6. Outlook Web Access
With Outlook Web Access you can use a Web browser to work with data stored on MMM Mail servers. The browser can run on any UNIX, Linux , Macintosh, or Microsoft Windows-based computer, and can provide Web-based access to public folders and your organization's Address Book. You can also access your personal mailbox to read e-mail, send messages, organize contacts, and schedule appointments. Outlook Web Access is a light web version of Outlook XP, and is commonly called OWA .

http://cern.ch/mmm The MMM Companion
Outlook Web Access 68
6.1. Configuration and Access Configuring Outlook Web Access to use your mailbox is relatively quick and easy, because it does not require any configuration ! To access your mailbox, simply open your favorite Web Browser and go to the MMM Web site: http://mmm.cern.ch Then click on the link: Outlook Web Access (Webmail) .
Figure 48: MMM Outlook Web Access link
When you are asked for authentication, simply type your login and password:
Click here

http://cern.ch/mmm The MMM Companion
Outlook Web Access 69
6.2. Mail
6.2.1. Main window The main window of Outlook Web Access displays by default the Inbox content and some shortcuts.
• Click Folders button to display Folder list (click on ? to expand subfolders if necessary) o Bold: Folder contains unread mails (number displayed in blue). o Normal: Folder contains only read mails.
• Mails in selected folder: o Bold: Mail is unread o Normal: Mail is read.
• Displays content of selected mail in the message pane. • Toolbar displays buttons for common actions: Compose mail, Reply, Forward, etc…
Figure 49: Outlook Web Access Main window
Shortcuts
Toolbar
Click Folders button to display Folder list.
Folder list

http://cern.ch/mmm The MMM Companion
Outlook Web Access 70
6.2.2. Customize views Outlook Web Access views can be customized, in the same way Outlook XP can be.
• The preview pane to preview selected email can be displayed.
Figure 50: OWA Preview pane
• Emails can be sorted in several ways: group by sender, show unread messages only, etc.
Figure 51: OWA Message views
Click here to Display / Hide preview pane.
Preview pane.
Select view
Group By Sender view.

http://cern.ch/mmm The MMM Companion
Outlook Web Access 71
6.2.3. Create a mail, reply or forward First, click on the corresponding button to create a new empty mail, reply or forward the selected mail.
Figure 52: OWA Mail creation buttons
Create a new empty mail.
Reply to selected mail’s sender.
Forward selected mail and add comments.
Reply to selected mail’s sender and also to all recipients.

http://cern.ch/mmm The MMM Companion
Outlook Web Access 72
Mail recipients There are 3 ways of adding recipients to the To, Cc or Bcc fields of the mail:
• Type directly the email addresses of the recipients, separated by “;”. • Type the last name, first name or substring of them separated by “;” in the To field then click the
Check Names button to resolve them. • Click the To button and select recipients from the displayed list.
Figure 53: OWA Mail recipient resolution
Type names separated by “;”
Click Check Names.
Red underline means that resolution failed for this name.
Window popup will help to select among multiple resolutions.
http://cern.ch/mmm The MMM Companion
Outlook Web Access 73
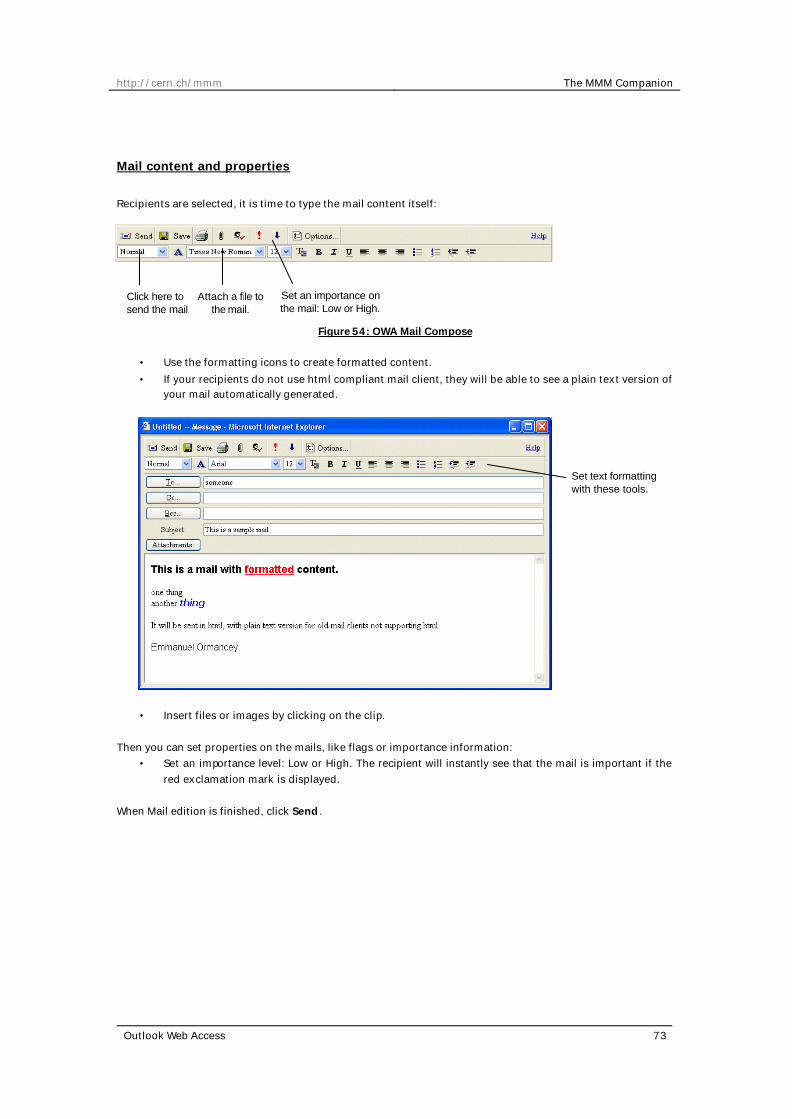
Mail content and properties Recipients are selected, it is time to type the mail content itself:
Figure 54: OWA Mail Compose
• Use the formatting icons to create formatted content. • If your recipients do not use html compliant mail client, they will be able to see a plain text version of
your mail automatically generated.
• Insert files or images by clicking on the clip. Then you can set properties on the mails, like flags or importance information:
• Set an importance level: Low or High. The recipient will instantly see that the mail is important if the red exclamation mark is displayed.
When Mail edition is finished, click Send .
Set text formatting with these tools.
Click here to send the mail.
Attach a file to the mail.
Set an importance on the mail: Low or High.

http://cern.ch/mmm The MMM Companion
Outlook Web Access 74
6.2.4. Contacts The Contacts folder is your e-mail address book and information storage for the people and businesses you want to communicate with. Use the Contacts folder to store the e-mail address, street address, multiple phone numbers, and any other information that relates to the contact, such as a birthday or anniversary date. From a contact in your contact list, you can click a button or menu command to address a meeting request or e-mail message to the contact. When you enter a name or address for a contact, Outlook Web Access separates the name or address into parts and puts each part in a separate field. You can sort, group, or filter contacts by any part of the name or any part of the address you want. You can file contact information under a last name, first name, company name, nickname, or any word that helps you find the contact quickly. You can enter up to three addresses for each contact. Designate one address as the mailing address, and use it for mailing labels, envelopes, or for creating mail merge letters.
Figure 55: OWA Contact

http://cern.ch/mmm The MMM Companion
Outlook Web Access 75
6.2.5. Deleted messages recovery Deleted items have two chances of being recovered:
• Items Deleted with Outlook Web Access are moved to the Deleted Items Folder, which is working as a Recycle Bin.
• If the Deleted Items folder has been emptied, items are still kept during 15 days in a special recovery space.
o In Shortcuts click Options then click View Items button in Recover Deleted Items to access items list (if menu is disabled, then no items are recoverable).
o Select items to recover in the list and click Recover Selected Items button.
Figure 56: OWA Recover deleted items
If the missing mails cannot be recovered with these tools, then contact [email protected], they will try to reload a backup. This procedure is not simple and can take some time.
Click View Items Select mails and click Recover button.
Click Options

http://cern.ch/mmm The MMM Companion
Outlook Web Access 76
6.3. Collaborative tools Outlook Web Access on MMM allow access to calendaring possibilities:
• Use the calendar feature to organize meetings and invite participants, follow participants acceptance and handle resources.
Please refer to Outlook XP chapter: 5.3.2 Calendar .

http://cern.ch/mmm The MMM Companion
Mozilla 77
7. Mozilla
Mozilla is a project to continue Netscape Communicator as an open project. The project is maintained by employees of Netscape (now a division of AOL), RedHat, some other companies, as well as contributors from the community. Mozilla is currently targeted for Win32, MacOS, and Unix/X systems. Mozilla also runs on MacOS X, OS/2, and BeOS, and ports exist for some other platforms. More information can be found on http://www.mozilla.org.

http://cern.ch/mmm The MMM Companion
Mozilla 78
7.1. Configuration Mozilla supports IMAP and also Secure IMAP protocols. Help: MMM Site ( http://cern.ch/mmm ) ? Help ? Mozilla.
Mailbox configuration Information overview:
• IMAP Mode • Incoming Server name (IMAP): mmm.cern.ch (port 143) • Outgoing Server name (SMTP): mmm.cern.ch (port 25) • Username is your login, email is usually [email protected].
Step by Step configuration: Start Mozilla and open Mail & Newsgroups client:
• Menu Window ? Mail & Newsgroups Add a new IMAP Account:
• Menu Edit ? Mail & Newsgroups Account Settings… • Click Add Account.
Figure 57: Mozilla MMM Account configuration
• Select Email Account • Type in your full name and your CERN email address (usually [email protected])
• Select IMAP mode, type mmm.cern.ch as Incoming server

http://cern.ch/mmm The MMM Companion
Mozilla 79
• Type your mail login in username field
• Type an account name (name of the account displayed in Mozilla), by default email is used. • Verify that all information is correct and click Finish.
• In Account Settings, add CERN in Organization field.
• In Server Settings, check Use secure connection (SSL) if you prefer encrypted mode. • Click Advanced
Type here your Mail/Nice login name.

http://cern.ch/mmm The MMM Companion
Mozilla 80
• Uncheck Show only subscribed folders, verify that IMAP server directory field is empty.
• Select Outgoing Server (SMTP) : o Set Server Name to: mmm.cern.ch o Set Port to: 25 o Check Use name and password o Fill User Name field with your login o Use secure connection (SSL): Check Always if you prefer to use encrypted mode.
Your mailbox configuration is now complete. However, here is a last tip to follow to ensure good mailbox coherence:
• Open your mailbox at least once, and expand folders. • Then go back to settings. • Menu Edit ? Mail & Newsgroups Account Settings… • Expand your mailbox configuration (click on ? ) . • Select Copies & Folders • Check Place a copy in
Click Advanced
This field should be empty. Uncheck box
Select Outgoing Server (SMTP)
http://cern.ch/mmm The MMM Companion
Mozilla 81
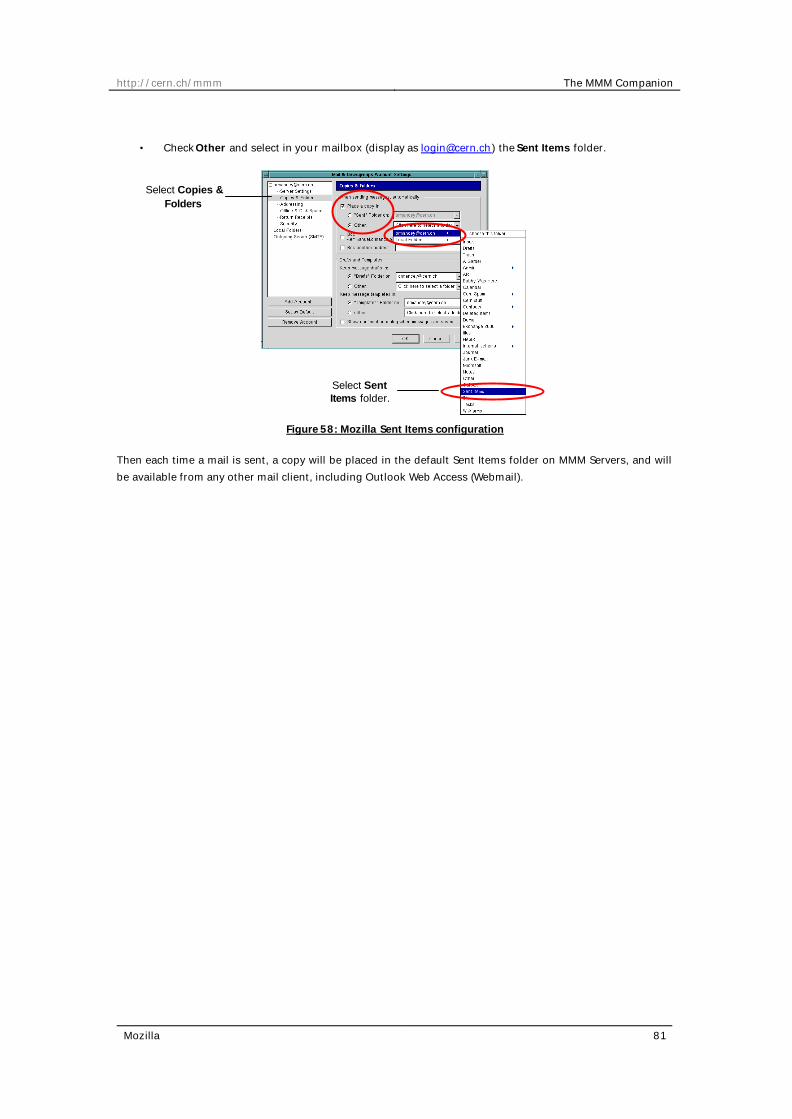
• Check Other and select in your mailbox (display as [email protected]) the Sent Items folder.
Figure 58: Mozilla Sent Items configuration
Then each time a mail is sent, a copy will be placed in the default Sent Items folder on MMM Servers, and will be available from any other mail client, including Outlook Web Access (Webmail).
Select Copies & Folders
Select Sent Items folder.

http://cern.ch/mmm The MMM Companion
Mozilla 82
Address Book configuration To facilitate email address finding, we encourage configuring the CERN Address Directory:
• Menu Edit ? Mail & Newsgroups Account Settings… • Expand your mailbox configuration (click on ? ) . • Select Addressing • Check Use a different LDAP Server • Click Edit Directories • Click Add • Type in:
o Name: CERN Directory o Hostname: ldap.cern.ch o Base DN: o=cern,c=ch o Port Number: 389
• Select newly added CERN Directory in the list.
Figure 59: Mozilla LDAP Address Book configuration
Select the newly added entry: CERN Directory

http://cern.ch/mmm The MMM Companion
Mozilla 83
7.2. Usage Mozilla main window displays all information concerning your mailbox:
• Folder list (click on ? to expand subfolders if necessary) o Bold: Folder contains unread mails (number displayed). o Normal: Folder contains only read mails.
• Mails in selected folder: o Bold: Mail is unread o Normal: Mail is read.
• Displays content of selected mail in the message pane. • Toolbar displays buttons for common actions: Compose mail, Reply, Forward, etc… • Menu bar will access to all functionalities and configuration.
Figure 60: Mozilla Main window
Menu Bar
Tool Bar
Message Pane
Mail list: Content of selected folder.
Folder list

http://cern.ch/mmm The MMM Companion
Mozilla 84
7.2.1. Customize views
Main Window User can customize Mozilla Main window:
• Menu View ? Show / Hide • Check or Uncheck part described previously to display or hide.
Figure 61: Mozilla main window customization
Message header The message header can be displayed in 3 modes :
• Short mode (subject, sender and date). • Normal mode. • Full mode (all message headers).
How to change mode: • Switch between Normal mode and Short mode using the ? and ? button displayed in header. • Switch between Normal mode and Full mode using menu View ? Headers ? Select All or Normal.
Figure 62: Mozilla Message Header display
Normal Mode
Short Mode
Full Mode
Select All for Full mode or Normal.
Switch between Short & Normal
mode.
Check / Uncheck window parts you want to display.
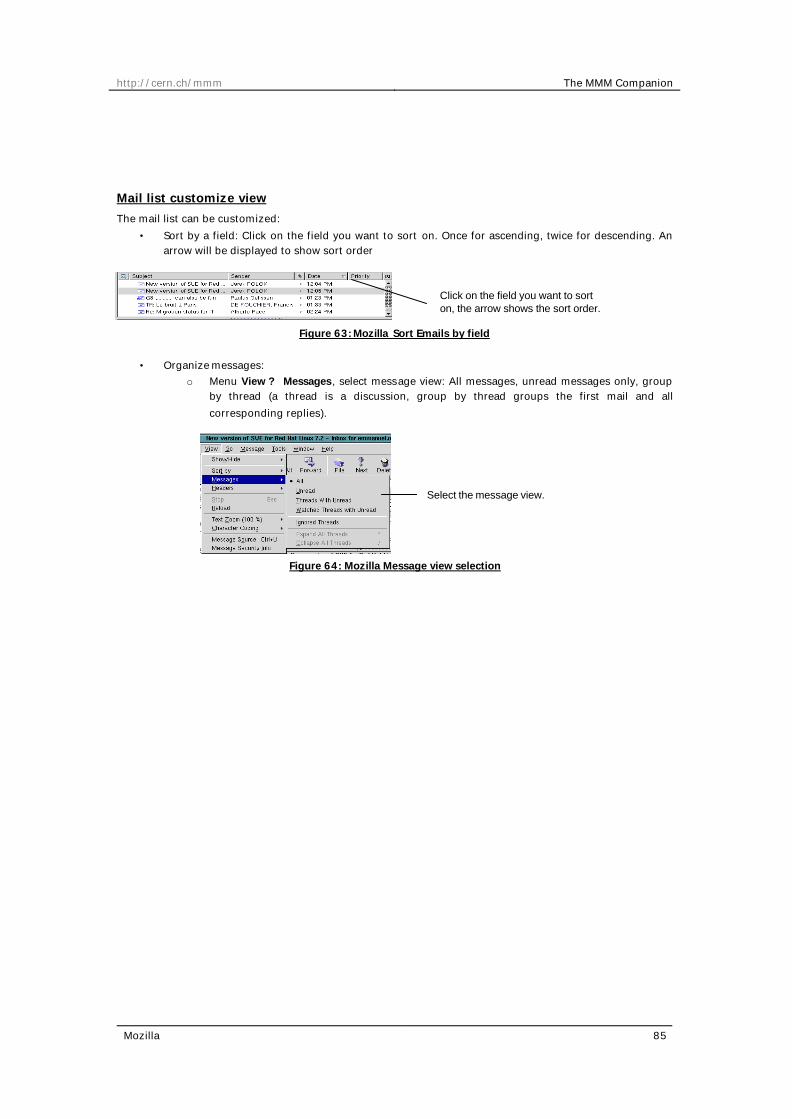
http://cern.ch/mmm The MMM Companion
Mozilla 85
Mail list customize view The mail list can be customized:
• Sort by a field: Click on the field you want to sort on. Once for ascending, twice for descending. An arrow will be displayed to show sort order
Figure 63: Mozilla Sort Emails by field
• Organize messages:
o Menu View ? Messages, select message view: All messages, unread messages only, group by thread (a thread is a discussion, group by thread groups the first mail and all corresponding replies).
Figure 64: Mozilla Message view selection
Click on the field you want to sort on, the arrow shows the sort order.
Select the message view.

http://cern.ch/mmm The MMM Companion
Mozilla 86
7.2.2. Create a mail, reply or forward. First, click on the corresponding button to create a new empty mail, reply or forward the selected mail.
Figure 65: Mozilla Mail creation buttons
Mail recipients There are 3 ways of adding recipients to the To, Cc or Bcc fields of the mail:
• Type directly the email addresses of the recipients, one per line. • Type the last name, first name or substring of them in the To field then select among propositions. • Click the Address button and select recipients from the displayed list.
Figure 66: Mozilla Mail recipient resolution
Forward selected mail and add comments.
Reply to selected mail’s sender and also to all recipients.
Reply to selected mail’s sender.
Create a new empty mail.
Type recipient email address or name or a
part of the name Select box will
propose available matching possibilities
Click Address to open address book
Select where to search: CERN
Directory or personal address book.
Select recipients from results.

http://cern.ch/mmm The MMM Companion
Mozilla 87
Mail content and properties Recipients are selected, it is time to type the mail content itself:
Figure 67: Mozilla Mail Compose
• Choose simple text or text with formatting (menu Format ? select Plain text or HTML (for formatted
content).
o Use the formatting icons to create formatted content. o If your recipients do not use html compliant mail client, they will be able to see a plain text
version of your mail autom atically generated.
• Select an optional priority for the mail, between low and high.
• Compose the mail itself, with or without formatting.
Click here to send the mail. Attachments list Attach a file to
the mail. Save as draft
Choose between: • Plain Text: text without formatting. • HTML: text with formatting.

http://cern.ch/mmm The MMM Companion
Mozilla 88
• Insert files or images by clicking on the clip (same as menu File ? Attach File). When Mail edition is finished, click Send .
Set text formatting with these tools.

http://cern.ch/mmm The MMM Companion
Mozilla 89
7.2.3. Signatures When creating a mail, you can automatically add a signature at the end, containing your personal information, address, phone number, etc… How to define a signature:
• Create a text file containing your signature with your favorite text editor and save it somewhere. • Menu Edit ? Mail & Newsgroups Account Settings… • Select your mailbox configuration. • Check Attach this signature • Click Choose to select the text file containing the signature.
Figure 68: Mozilla Email Signature
Check this box Select the signature file.

http://cern.ch/mmm The MMM Companion
Mozilla 90
7.2.4. Personal address book Use the personal address book to store contact information of users not available in the CERN Directory. To view or edit this address book:
• Menu Window ? Address Book • Select Personal Address Book • Click New Card to create a new entry.
Figure 69: Mozilla Contact

http://cern.ch/mmm The MMM Companion
Mozilla 91
7.2.5. Filter Rules E-mails can be managed by using client side rules to automatically perform actions on messages. After a rule is created, Mozilla applies the rule when messages arrive in your Inbox. For example, you can automatically:
• Move to Folder Bobby all messages sent by Bobby Ewing. • Assign a High priority flag to all messages with the word "sales" in the Subject. • Delete all messages sent to you by your boss!
Figure 70: Mozilla Message filters (rules)
Click New to create a new message filter.
• Choose a name for this new filter. • Create one or multiple matching conditions, condition can match sender, recipient(s), subject,
priority flag and status. • Select if message must match all conditions or any. • Select an action to perform: Move message, delete or and assign flags.
Figure 71: Mozilla new filter creation
Click Message Filters
Sort rules processing order.
Add new filter
Set Message filter name.
Field to matc h Action to perform


http://cern.ch/mmm The MMM Companion
Pine 93
8. Pine
Pine (Program for Internet News & Email) is a full-featured UNIX email and news client that runs in any character -cell terminal. The UNIX version of Pine does not have a graphical user interface but it is "screen-oriented", i.e., it uses the full terminal screen rather than just the command line. Most commands consist of a single keystroke or sometimes a CTRL key combination. The commands available at any time are displayed on the bottom two lines of the screen; if there are more than will fit, one of the commands will cycle through the other available commands. Pine can handle some types of attachments itself, and can be configured to hand-off others to separate applications (typically a Web browser). At CERN for MMM Usage we recommend at least Pine 4.44 to fully use all MMM possibilities (IMAP over Secure SSL). However, version 4.21 can work fine but without SSL encryption. Pine 4.44 is the default available on CERN lxplus redhat-7 cluster, start it by typing ‘pine ’ command. More information can be found on http://www.washington.edu/pine.

http://cern.ch/mmm The MMM Companion
Pine 94
8.1. Configuration Pine supports IMAP and also Secure IMAP (version 4.44 minimum) protocols. Help: MMM Site ( http://cern.ch/mmm ) ? Help ? Pine.
Mailbox configuration Information overview:
• IMAP over SSL is recommended: the password and mails will be transmitted encrypted over the network.
• Incoming Server name (IMAP): mmm.cern.ch (port 993 for SSL, 143 for standard mode) • Outgoing Server name (SMTP): mmm.cern.ch (port 25)
Step by Step configuration:
• Start Pine • Choose S (Setup) from the Main menu
Figure 72: Pine configuration
• Choose C (Config) in the Setup Menu

http://cern.ch/mmm The MMM Companion
Pine 95
• Set the following values:
o smtp-server line: mmm.cern.ch/user=yourlogin o nntp-server line: news.cern.ch o inbox-path line:
§ For Secure SSL: {mmm.cern.ch:993/ssl/user=yourlogin}inbox § For standard mode: {mmm.cern.ch:143/user=yourlogin}inbox
• When finished, type E (for Exit) , then Y (for Yes). • Back to the menu screen. Choose Setup (S), then collectionLists (L)
• Select the Mailserver entry and type C (Change): o In Nickname: type MMM (or any name) o In Server :
§ For Secure SSL: mmm.cern.ch:993/ssl/user=yourlogin § For standard mode: mmm.cern.ch:143/user= yourlogin
o Keep the Path and View lines empty.
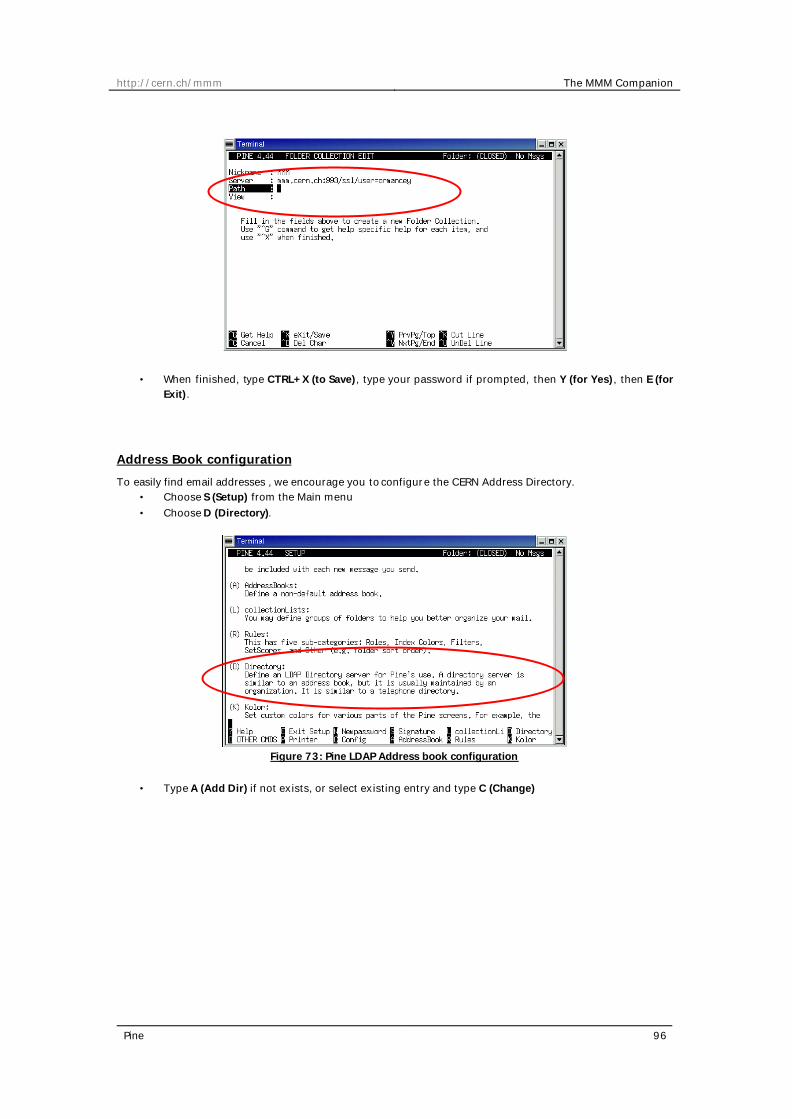
http://cern.ch/mmm The MMM Companion
Pine 96
• When finished, type CTRL+X (to Save), type your password if prompted, then Y (for Yes) , then E (for Exit).
Address Book configuration To easily find email addresses , we encourage you to configure the CERN Address Directory.
• Choose S (Setup) from the Main menu • Choose D (Directory).
Figure 73: Pine LDAP Address book configuration
• Type A (Add Dir) if not exists, or select existing entry and type C (Change)

http://cern.ch/mmm The MMM Companion
Pine 97
• Type these values: o ldap-server: ldap.cern.ch o search-base: o=cern,c=ch o port: 389 o nickname: CERN
• When finished, type E (for Exit) , then Y (for Yes).
Save password If you don't want to type your password every time Pine starts, do the following:
• Close Pine if needed. • In your home directory (cd ~) type: touch .pine.pwd . • Restar t Pine. • Type your password when needed. • Type Y (Yes) when asked to save password on disk. • Your password will be saved encrypted in the file .pine.pwd in your home directory.
Warning: if you change your mail password, empty this .pine.pwd file, or Pine will try to login with a bad password, which might lock out your account.

http://cern.ch/mmm The MMM Companion
Pine 98
8.2. Usage
8.2.1. Display folders and mails Pine main menu shows basic mailbox tools. Type M (Main menu) at any time to go back to this main menu.
Figure 74: Pine main menu
Select L (Folder List) to select a folder.
View current folder, default is Inbox.
Display folders list: Local folders including INBOX and other MMM folders.
Type your password to open your mailbox. Needed
once when pine starts.

http://cern.ch/mmm The MMM Companion
Pine 99
Figure 75: Pine Folder selection
Select Local then INBOX to view INBOX.
View other MMM folders.
Select Folder: • Enter to view the messages. • > (View Dir) to view subfolders.
Messages View
N means Unread message.

http://cern.ch/mmm The MMM Companion
Pine 100
8.2.2. Create a mail, reply or forward From the Pine main menu, press C (Compose) to create a new message. From the message list or message display, use R (Reply) or F (Forward). Sub-menus will propose to include original message and to reply to all recipients.
Mail recipients There are three ways of adding recipients to the To, Cc or Bcc fields of the mail:
• Type directly the email addresses of the recipients, separated by commas (,). • Type the last name, first name or substring of them in the To field then select among propositions. • Press CTRL+T to open Address Book and select recipients from the list.
Figure 76: Pine recipient selection
Type the full email or a part of the name
Select recipient in found proposals. CTRL+T open
Address Book.
Select Address Book and type string to search for.
Select recipient in found proposals.

http://cern.ch/mmm The MMM Companion
Pine 101
Mail content Recipients are selected, it is time to type the mail content itself:
Figure 77: Pine mail compose
Type here the text mail. CTRL+R to insert the content of a text file from disk.
Select this field to attach a file to the mail. CTRL+J to type the file name directly. CTRL+T open a file browser.
CTRL+X to send the mail.
CTRL+O to postpone the mail composition.

http://cern.ch/mmm The MMM Companion
Pine 102
8.2.3. Signatures When creating a mail, you can automatically add a signature at the end of the message, containing your personal information, address, phone number, etc… How to define a signature:
• From Pine main menu, Type S (Setup) then C (Config) . o Select line literal-signature, press Enter and edit your signature. o Or create a text file containing your signature with your favorite text editor, save it
somewhere and select that file in signature-file field.
Figure 78: Pine Email signature
• When done, E (Exit Setup) and Y (Yes) if needed.

http://cern.ch/mmm The MMM Companion
Pine 103
8.2.4. Personal Address Book Use the personal address book to store contact information of users not available in the CERN Directory. To view or edit this address book:
• From Pine Main menu: type A (Address Book) • Select .addressbook for personal address book view/edit. • Type @ (AddNew) to create a new entry.
Figure 79: Pine contact

http://cern.ch/mmm The MMM Companion
Pine 104
8.2.5. Filter Rules E-mails can be managed by using client side rules to automatically perform actions on messages. After a rule is created, Pine applies the rule when messages arrive in your Inbox. For example, you can automatically:
• Move to Folder Bobby all messages sent by Bobby Ewing. • Assign a High priority flag to all messages with the word "sales" in the Subject. • Delete all messages sent to you by your boss!
To create a new message filter:
• From Pine main menu, type S (Setup). • Then type R (Rules) then F (Filters). • Type A (Add) to add a new filter. • Create new filter:
o Select filter name. o Select message type for filter apply. o Select condition(s) to match in various fields. o Select action to be taken.
• When done, CTRL+X to save and exit.
Figure 80: Pine Message Filter creation
Set filter name
Set condition to match: i.e.: sales pattern in subject.
Set action to perform: i.e. move to folder.

http://cern.ch/mmm The MMM Companion
Macintosh clients 105
9. Macintosh clients
9.1. Outlook Web Access Configuring Outlook Web Access to use your mailbox is relatively quick and easy, because it does not require any configuration. To access your mailbox, simply open your favorite Web Browser and go to MMM Web site: http://cern.ch/mmm Then click on the First link in Services part: Outlook Web Access (Webmail).
Figure 81: MMM Outlook Web Access link
When it asks for authentication, simply type your login and password:
Click here

http://cern.ch/mmm The MMM Companion
Macintosh clients 106
9.2. Outlook 2001 for Mac OS Classic (8 and 9) Use of Outlook 2001 is recommended on Mac OS Classic (OS 8 and 9). It is possible to run Outlook 2001 on Mac OS X computers in Mac Classic compatibility mode, but this is not recommended. Note that Outlook 2001 works only with MMM. Thus you cannot use it to access other mail accounts that you may have outside CERN. Moreover, at the time of writing this document (July 2003), you cannot use Outlook 2001 to access your mail when you're outside CERN, you must use Outlook Web Access (Webmail) instead. Outlook 2001 can be downloaded for free from http://www.microsoft.com/mac. Mailbox configuration Install and then start Outlook 2001. Outlook will prompt you for the creation of a new profile.
• In the Exchange Server box, type cernxchg (depending on your network configuration, you may have to use the name cernxchg.cern.ch).
• In the Mailbox Name box, type your NICE user name. • If you want to access your MMM mailbox while your computer is not connected to a network ("Offline
mode"), select No for: Is this computer always connected to a network? (Portable and dialup users will probably want to select No). If you are using a desktop computer, select Yes.
Figure 82: Outlook 2001 for Mac configuration
• Click Test Settings. • When Outlook prompts you to log in, enter your NICE username and password, and use CERN as the
domain. Click Log in. You will be prompted again every time you start Outlook.

http://cern.ch/mmm The MMM Companion
Macintosh clients 107
Address book configuration You may want Outlook to search you personal contacts before it searches the CERN directory when resolving names to e-mail addresses (e.g. when you are writing a new mail). Go to Edit, Preferences and select Address Book. You can then set your order preference. Global Address List designates the CERN directory maintained by MMM.
Limitations You have access to almost all the features available to Outlook users on Windows; however HTML e-mail editing is not possible and you can only connect to the MMM servers (POP and IMAP protocols are not supported).

http://cern.ch/mmm The MMM Companion
Macintosh clients 108
9.3. Mail for Mac OS-X Mail is the built-in Mail client for Mac OS-X, it is a fully compliant IMAP client. Configuration guidelines: When first started, Mail will prompt you for the configuration of a new mail account. If you've used Mail before, you can edit the mail account in File ? Preferences. Enter the requested information like in this sample (the User Name and Password must correspond to your NICE account):
Figure 83: Mail for MAC OS -X Configuration
After the basic configuration of your mail account, you have to configure some additional properties in order to be able to send messages. Go to File ? Preferences:
Select your MMM account and click Edit:

http://cern.ch/mmm The MMM Companion
Macintosh clients 109
Click 'Options' below 'Outgoing Mail Server':
Select the authentication method as shown and enter your NICE User Name and Password once again.

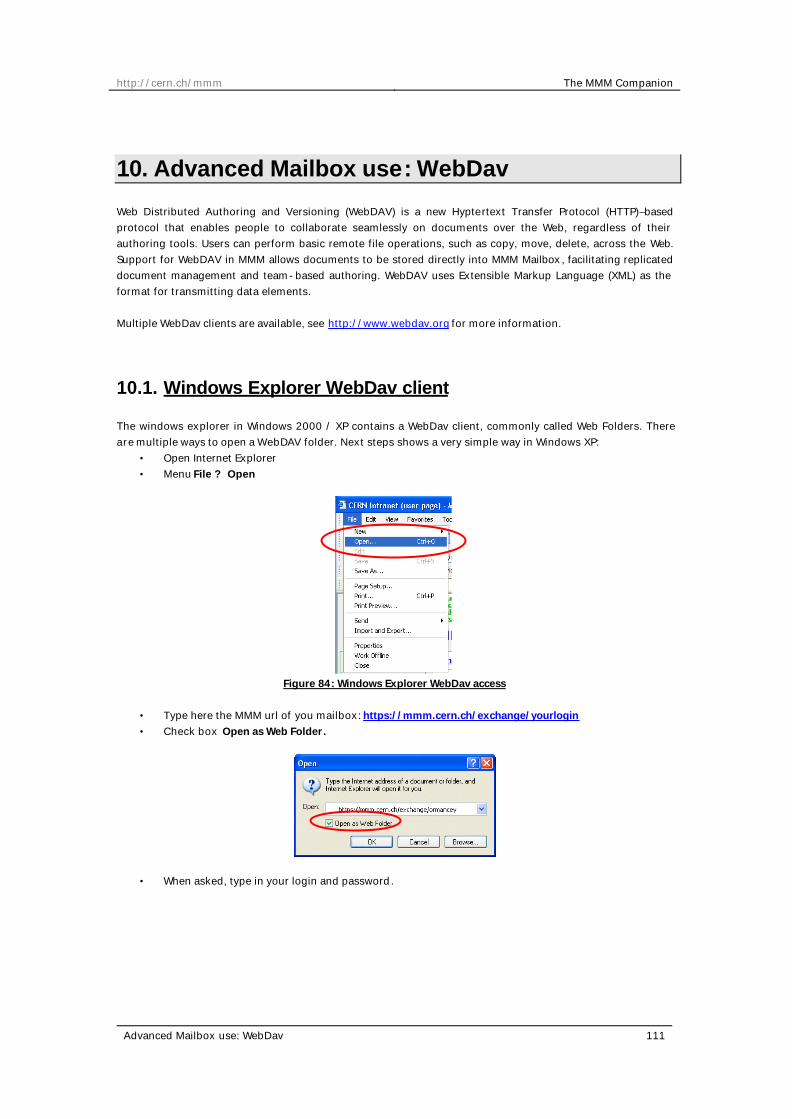
http://cern.ch/mmm The MMM Companion
Advanced Mailbox use: WebDav 111
10. Advanced Mailbox use: WebDav Web Distributed Authoring and Versioning (WebDAV) is a new Hyptertext Transfer Protocol (HTTP)–based protocol that enables people to collaborate seamlessly on documents over the Web, regardless of their authoring tools. Users can perform basic remote file operations, such as copy, move, delete, across the Web. Support for WebDAV in MMM allows documents to be stored directly into MMM Mailbox, facilitating replicated document management and team-based authoring. WebDAV uses Extensible Markup Language (XML) as the format for transmitting data elements. Multiple WebDav clients are available, see http://www.webdav.org for more information.
10.1. Windows Explorer WebDav client The windows explorer in Windows 2000 / XP contains a WebDav client, commonly called Web Folders. There are multiple ways to open a WebDAV folder. Next steps shows a very simple way in Windows XP:
• Open Internet Explorer • Menu File ? Open
Figure 84: Windows Explorer WebDav access
• Type here the MMM url of you mailbox: https://mmm.cern.ch/exchange/yourlogin • Check box Open as Web Folder.
• When asked, type in your login and password.

http://cern.ch/mmm The MMM Companion
Advanced Mailbox use: WebDav 112
• A File explorer opens on your mailbox and displays the content as a standard file system.
Folder List
Folder Content
Open File

http://cern.ch/mmm The MMM Companion
Advanced Mailbox use: WebDav 113
10.2. DavFS2 Davfs2 is a Linux file system driver that allows you to mount a WebDAV server as a local disk drive. More information on: http://dav.sourceforge.net. Next steps show how to use this mount tools to access a MMM Mailbox on Linux:
Figure 85: DavFS2 WebDav Access
DavFS2 Command line
Folder List
Folder Content

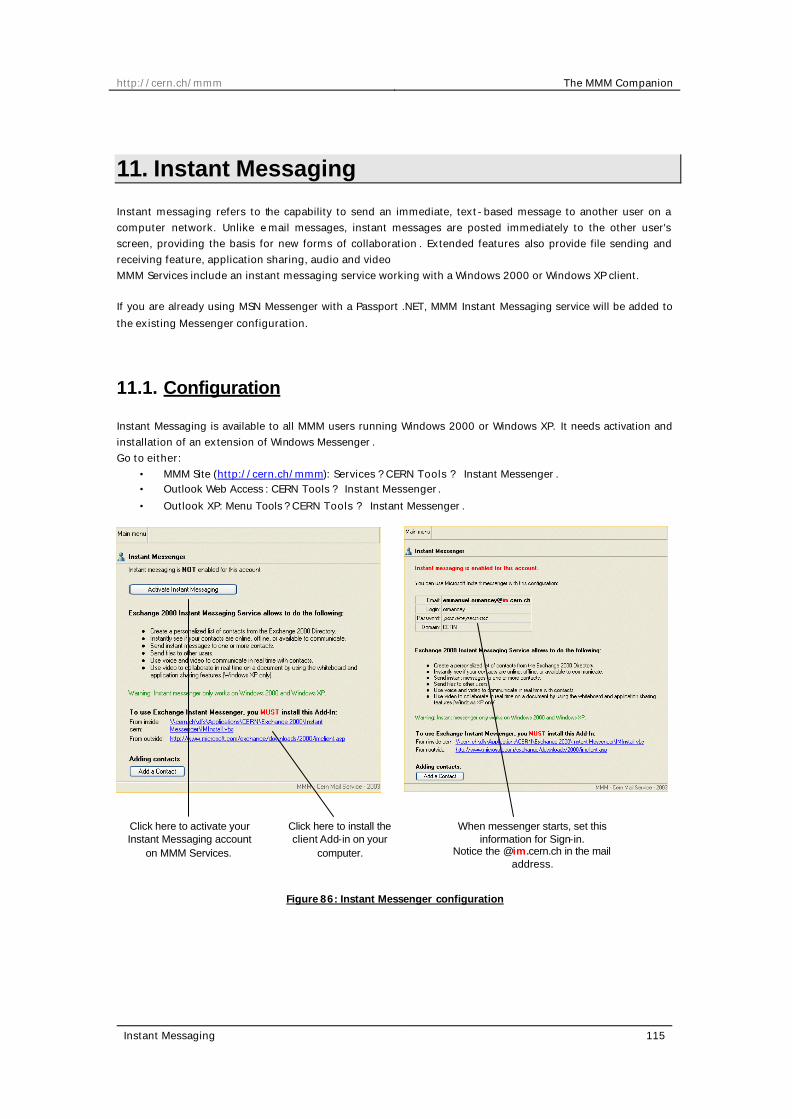
http://cern.ch/mmm The MMM Companion
Instant Messaging 115
11. Instant Messaging Instant messaging refers to the capability to send an immediate, text-based message to another user on a computer network. Unlike e-mail messages, instant messages are posted immediately to the other user's screen, providing the basis for new forms of collaboration . Extended features also provide file sending and receiving feature, application sharing, audio and video MMM Services include an instant messaging service working with a Windows 2000 or Windows XP client. If you are already using MSN Messenger with a Passport .NET, MMM Instant Messaging service will be added to the existing Messenger configuration.
11.1. Configuration Instant Messaging is available to all MMM users running Windows 2000 or Windows XP. It needs activation and installation of an extension of Windows Messenger . Go to either:
• MMM Site (http://cern.ch/mmm): Services ? CERN Tools ? Instant Messenger . • Outlook Web Access : CERN Tools ? Instant Messenger. • Outlook XP: Menu Tools ? CERN Tools ? Instant Messenger .
Figure 86: Instant Messenger configuration
Click here to activate your Instant Messaging account
on MMM Services.
Click here to install the client Add-in on your
computer.
When messenger starts, set this information for Sign-in.
Notice the @im.cern.ch in the mail address.

http://cern.ch/mmm The MMM Companion
Instant Messaging 116
11.2. How to use Instant Messenger Windows Messenger displays all the contacts you added. For each contact, an availability status is displayed.
Figure 87: Instant Messenger main window
Once a conversation has started with one of your contacts, several possibilities are offered:
• Invite someone to this conversation: add another contact and have a talk with multiple users at the same time.
• Send a file: will instantly send a file to your contact. • Remote assistance, Application sharing and whiteboard: allow running an application on your contact
computer, to show him features, solve a problem, and draw explanation on the shared whiteboard. • Start Camera or Start Talking: starts video conferencing or audio conferencing using Web Cam and
(or) Microphone only depending on your configuration. (Video conferencing is available for Windows XP only).
My status: currently Online, click here to change it.
Online contacts. Double click on a contact to start conversation.
Offline contacts. Double click on a contact to send a mail.
This contact is busy: do not disturb.
This contact is away: he may not reply to your message.
Click here to add a contact.
Messenger can display MMM contacts and also Messenger .NET contacts at the same time.

http://cern.ch/mmm The MMM Companion
Instant Messaging 117
Figure 88: Instant Messenger Video Conferencing session
Your conversation is displayed
Type your text here.
Click here to start video conferencing. An invitation is sent to your contact.
Video is displayed here, as soon as your contact has accepted the invitation. You can have a dialog with voice and video, but also in text mode at the same time.

http://cern.ch/mmm The MMM Companion
Appendix: 42 reasons to use MMM Services Page 118
Appendix: 42 reasons to use MMM Services
1. Mail servers are backed up every night. In case of hardware failure, your mailbox can be recovered, 6 months are kept.
2. Personal backups are made and kept for 3 weeks. 3. Restoring can be done very quickly through MMM site, no need to contact helpdesk. 4. Archive your old mails and folders using the Archiving facility on MMM site. 5. Use any client to read your mail, IMAP, POP or MAPI compliant. 6. Connection to mail servers can be secured, avoiding someone to steal your password. 7. Sessions can be encrypted when reading and sending emails to ensure confidentiality. 8. Web mail (Outlook Web Access) allows access to mailbox and collaboration features of MMM from any
browser on any platform from anywhere in the world. 9. Outlook Web Access is secure; all traffic is encrypted in SSL. 10. Outlook XP from outside CERN can connect to MMM in a transparent way. 11. Connect from outside CERN with any IMAP/POP client, secured or not. 12. Send mails from outside CERN to anywhere with authenticated SMTP. 13. Use your mailbox like a file repository with WebDav access. 14. Store your documents in your mailbox, to make then available from anywhere. 15. On the old system, mails stored locally in a PST file or on AFS cannot be viewed from anywhere,
especially outside CERN. 16. Using the old system, PST file size grows quickly; your profile may take long to load at Windows
login. 17. With MMM, working offline with Outlook XP uses an ost file stored in Local Settings part, which is not
copied with the roaming profile. 18. Working offline with Outlook XP allows working on your mails even when disconnected from the
CERN network. 19. Work offline and choose specific folders to synchronize, if connection is done with low bandwidth. 20. Configurable enhanced Spam filter automatically moves unsolicited mails to a specific folder. 21. White lists can be configured to disable Spam recognition on Commercial mailings you like to receive. 22. Server level Antivirus cleans infected emails before being delivered to your mailbox. 23. Collaborative tools extend mailbox to a fully corporate service, increasing productivity and
information transfer. 24. Sharing folders with permissions will allow colleagues to view some items in your mailbox without
giving them your password. 25. Send on behalf facility allows other people to send emails on your name. 26. Contacts stored in your mailbox can be available from anywhere with Outlook Web Access. 27. Send contacts as vCards to share contact information with other people and software. 28. Create appointments and invite attendees. 29. Handle automatically attendees’ answers, accepting or refusing invitation. 30. Follow up attendees answers, follow up and simplify meeting organization. 31. Calendar can handle resources (conference rooms, cars, video projectors), to simplify bookings. 32. Publish your calendar to show your availability to colleagues. 33. Create tasks to remember work to do and keep a trace. 34. Organize tasks within your team and follow their progress. 35. Forward your emails to another place, and keep an optional copy in your MMM mailbox. 36. Set up a Vacation reply, to reply automatically during absences. 37. Create filtering rules on server side to organize emails to folders. 38. Use the same password in Nice and Mail. 39. Only one place to remember: http://cern.ch/mmm 40. View quickly your Mailbox status and configuration on http://cern.ch/mmm

http://cern.ch/mmm The MMM Companion
Appendix: 42 reasons to use MMM Services Page 119
41. Help, tips, recorded seminars and step by step documentations available on http://cern.ch/mmm 42. Any trouble: Call the Helpdesk 78888, the problem will be quickly solved.


http://cern.ch/mmm The MMM Companion
Table of figures Page 121
12. Table of figures Figure 1: Check for Mail account.....................................................................................................................................9 Figure 2: Group administrator.......................................................................................................................................10 Figure 3: MMM Home page............................................................................................................................................11 Figure 4: Supported protocols and clients available...................................................................................................17 Figure 5: Web password change....................................................................................................................................19 Figure 6: Spam fighting configuration..........................................................................................................................20 Figure 7: Spam whitelists ...............................................................................................................................................21 Figure 8: Spam charset rejection...................................................................................................................................21 Figure 9: Report Spam buttons in Outlook XP.............................................................................................................21 Figure 10: Out of Office Assistant.................................................................................................................................23 Figure 11: Email forwarding configuration...................................................................................................................24 Figure 12: Remove profile..............................................................................................................................................26 Figure 13: Exchange settings.........................................................................................................................................27 Figure 14: Delivery location ...........................................................................................................................................28 Figure 15: Logon network security................................................................................................................................30 Figure 16: Outlook XP Main window.............................................................................................................................31 Figure 17: Outlook XP Main window customization....................................................................................................32 Figure 18: Email AutoPreview........................................................................................................................................32 Figure 19: Sort mails by a field......................................................................................................................................33 Figure 20: Select fields to display in Mail List..............................................................................................................34 Figure 21: Group by Field...............................................................................................................................................35 Figure 22: Outlook Mail creation buttons....................................................................................................................36 Figure 23: Outlook XP Mail recipient resolution..........................................................................................................37 Figure 24: Outlook XP Mail Compose...........................................................................................................................38 Figure 25: Signatures configuration..............................................................................................................................40 Figure 26: Outlook XP Contact......................................................................................................................................41 Figure 27: Outlook XP Rules wizard..............................................................................................................................42 Figure 28: Outlook XP New rule creation......................................................................................................................43 Figure 29: Recover Deleted Items..................................................................................................................................44 Figure 30: Outlook XP CERN Add-in.............................................................................................................................45 Figure 31: Set permissions using the delegates feature............................................................................................47 Figure 32: View of other user’s Calendar folder..........................................................................................................48 Figure 33: Advanced permissions settings ..................................................................................................................49 Figure 34: Open additional mailbox .............................................................................................................................50 Figure 35: Calendar views..............................................................................................................................................52 Figure 36: Create new appointment..............................................................................................................................53 Figure 37: Invite attendees to meeting.........................................................................................................................54 Figure 38: Attendees answer to meeting invitation ....................................................................................................55 Figure 39: Resource booking for a meeting.................................................................................................................56 Figure 40: Task list view.................................................................................................................................................57 Figure 41: Create a new Task........................................................................................................................................58 Figure 42: Task assignment process ............................................................................................................................59 Figure 43: Task completion report................................................................................................................................60 Figure 44: Notes..............................................................................................................................................................61 Figure 45: Outlook XP Offline mode configuration.....................................................................................................64 Figure 46: Outlook XP Choose connection type..........................................................................................................65 Figure 47: Outlook XP Send Receive Settings..............................................................................................................66 Figure 48: MMM Outlook Web Access link...................................................................................................................68

http://cern.ch/mmm The MMM Companion
Table of figures Page 122
Figure 49: Outlook Web Access Main window.............................................................................................................69 Figure 50: OWA Preview pane........................................................................................................................................70 Figure 51: OWA Message views .....................................................................................................................................70 Figure 52: OWA Mail creation buttons..........................................................................................................................71 Figure 53: OWA Mail recipient resolution.....................................................................................................................72 Figure 54: OWA Mail Compose......................................................................................................................................73 Figure 55: OWA Contact.................................................................................................................................................74 Figure 56: OWA Recover deleted items.........................................................................................................................75 Figure 57: Mozilla MMM Account configuration..........................................................................................................78 Figure 58: Mozilla Sent Items configuration ................................................................................................................81 Figure 59: Mozilla LDAP Address Book configuration.................................................................................................82 Figure 60: Mozilla Main window....................................................................................................................................83 Figure 61: Mozilla main window customization..........................................................................................................84 Figure 62: Mozilla Message Header display.................................................................................................................84 Figure 63: Mozilla Sort Emails by field .........................................................................................................................85 Figure 64: Mozilla Message view selection ..................................................................................................................85 Figure 65: Mozilla Mail creation buttons......................................................................................................................86 Figure 66: Mozilla Mail recipient resolution.................................................................................................................86 Figure 67: Mozilla Mail Compose..................................................................................................................................87 Figure 68: Mozilla Email Signature................................................................................................................................89 Figure 69: Mozilla Contact.............................................................................................................................................90 Figure 70: Mozilla Message filters (rules).....................................................................................................................91 Figure 71: Mozilla new filter creation ...........................................................................................................................91 Figure 72: Pine configuration.........................................................................................................................................94 Figure 73: Pine LDAP Address book configuration.....................................................................................................96 Figure 74: Pine main menu............................................................................................................................................98 Figure 75: Pine Folder selection....................................................................................................................................99 Figure 76: Pine recipient selection............................................................................................................................. 100 Figure 77: Pine mail compose..................................................................................................................................... 101 Figure 78: Pine Email signature.................................................................................................................................. 102 Figure 79: Pine contact................................................................................................................................................ 103 Figure 80: Pine Message Filter creation..................................................................................................................... 104 Figure 81: MMM Outlook Web Access link................................................................................................................ 105 Figure 82: Outlook 2001 for Mac configuration....................................................................................................... 106 Figure 83: Mail for MAC OS-X Configuration............................................................................................................ 108 Figure 84: Windows Explorer WebDav access........................................................................................................... 111 Figure 85: DavFS2 WebDav Access............................................................................................................................. 113 Figure 86: Instant Messenger configuration ............................................................................................................. 115 Figure 87: Instant Messenger main window.............................................................................................................. 116 Figure 88: Instant Messenger Video Conferencing session.................................................................................... 117