Embed Size (px)
Citation preview
AKW MediCarePARTNERS IN CARE
READ ALL INSTRUCTIONS CAREFULLY BEFORE INSTALLATION.
step 1
Ceramic Wash Basin Installation Instructions
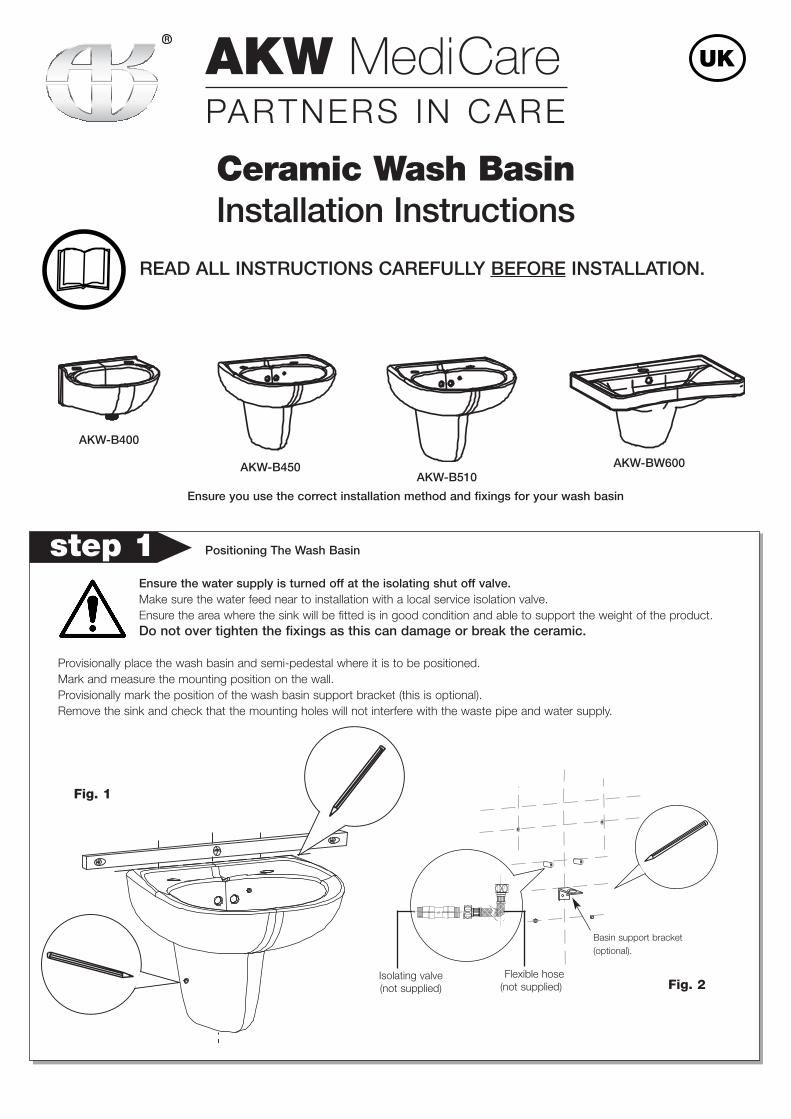
Ensure the water supply is turned off at the isolating shut off valve.Make sure the water feed near to installation with a local service isolation valve.Ensure the area where the sink will be fitted is in good condition and able to support the weight of the product.Do not over tighten the fixings as this can damage or break the ceramic.
Provisionally place the wash basin and semi-pedestal where it is to be positioned. Mark and measure the mounting position on the wall.Provisionally mark the position of the wash basin support bracket (this is optional).Remove the sink and check that the mounting holes will not interfere with the waste pipe and water supply.
Isolating valve(not supplied)
Flexible hose(not supplied) Fig. 2
Fig. 1
Positioning The Wash Basin
AKW-B400
AKW-B450AKW-B510
AKW-BW600
Basin support bracket(optional).
Ensure you use the correct installation method and fixings for your wash basin
step 2
8mm
Fig. 9Fig. 3
8mm
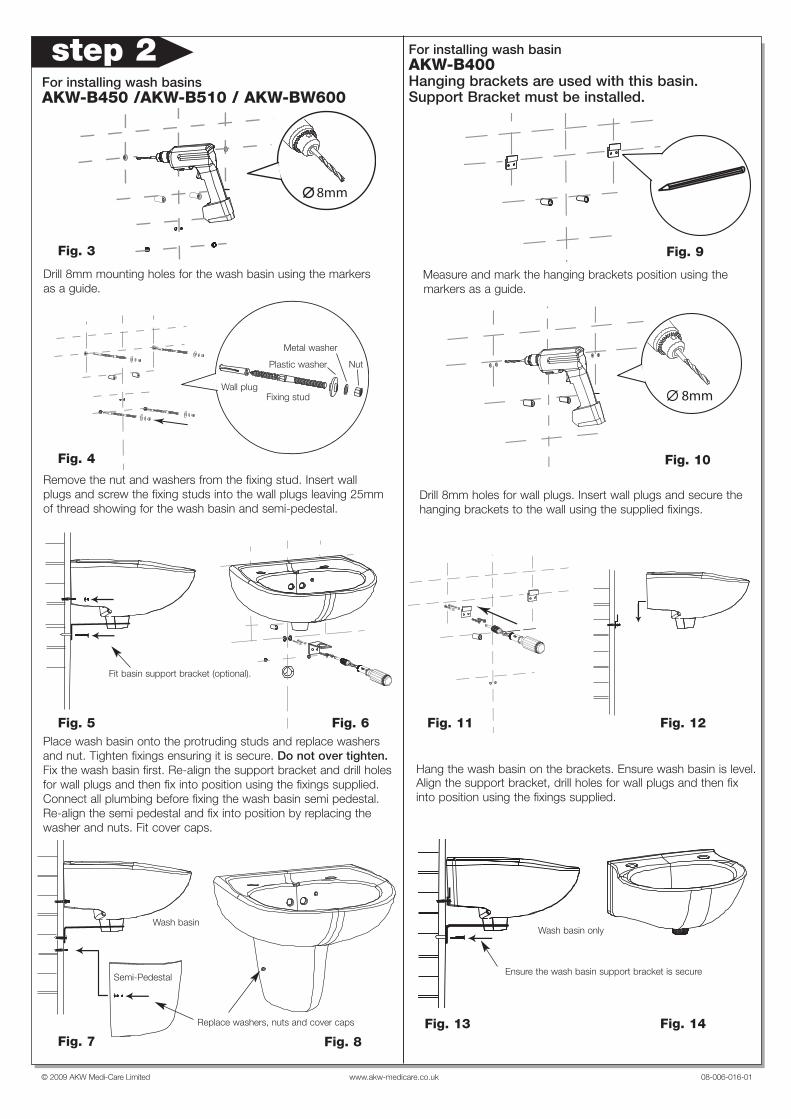
For installing wash basinAKW-B400Hanging brackets are used with this basin. Support Bracket must be installed.
For installing wash basins AKW-B450 /AKW-B510 / AKW-BW600
Measure and mark the hanging brackets position using themarkers as a guide.
Remove the nut and washers from the fixing stud. Insert wallplugs and screw the fixing studs into the wall plugs leaving 25mmof thread showing for the wash basin and semi-pedestal.
Drill 8mm holes for wall plugs. Insert wall plugs and secure thehanging brackets to the wall using the supplied fixings.
Fig. 10
Place wash basin onto the protruding studs and replace washersand nut. Tighten fixings ensuring it is secure. Do not over tighten.Fix the wash basin first. Re-align the support bracket and drill holesfor wall plugs and then fix into position using the fixings supplied.Connect all plumbing before fixing the wash basin semi pedestal.Re-align the semi pedestal and fix into position by replacing thewasher and nuts. Fit cover caps.
© 2009 AKW Medi-Care Limited www.akw-medicare.co.uk 08-006-016-01
Fig. 5
Fig. 4
Metal washer
Nut
Fixing studWall plug
Plastic washer
Drill 8mm mounting holes for the wash basin using the markersas a guide.
Semi-Pedestal
Wash basin
Replace washers, nuts and cover caps
Fig. 6
Fig. 7 Fig. 8
Fig. 11 Fig. 12
Hang the wash basin on the brackets. Ensure wash basin is level. Align the support bracket, drill holes for wall plugs and then fixinto position using the fixings supplied.
Fig. 14Fig. 13
Wash basin only
Ensure the wash basin support bracket is secure
Fit basin support bracket (optional).