Embed Size (px)
Citation preview
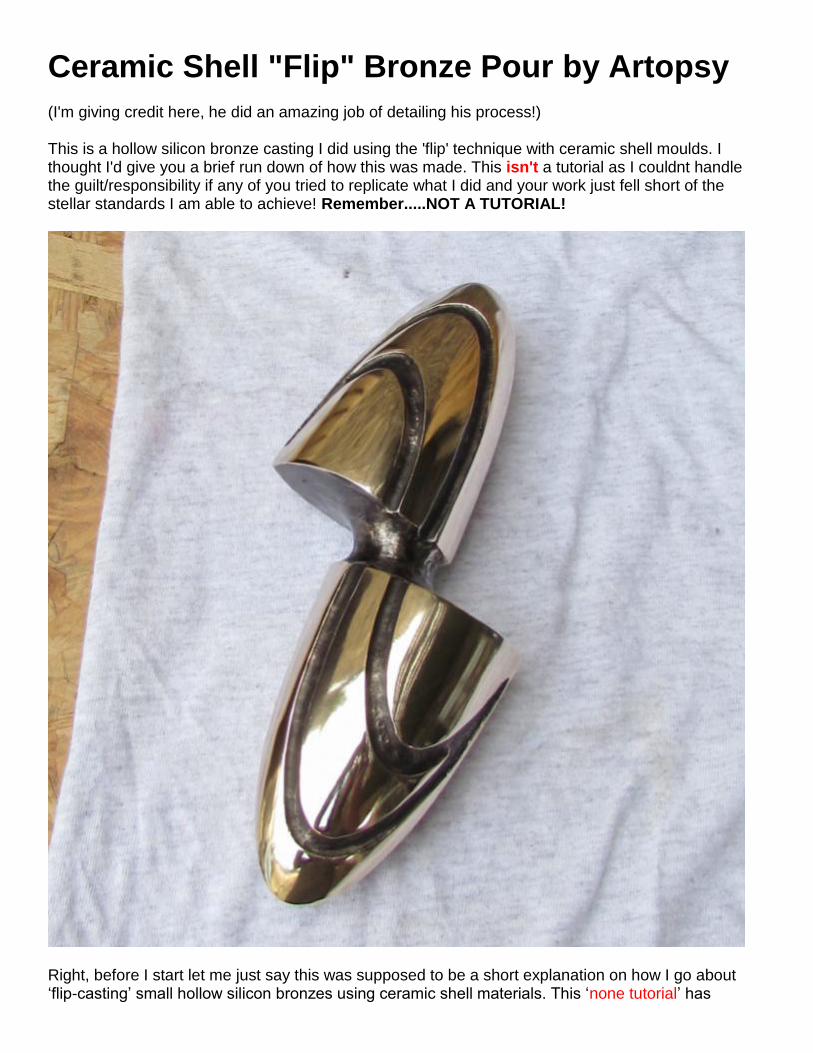
Ceramic Shell "Flip" Bronze Pour by Artopsy (I'm giving credit here, he did an amazing job of detailing his process!) This is a hollow silicon bronze casting I did using the 'flip' technique with ceramic shell moulds. I thought I'd give you a brief run down of how this was made. This isn't a tutorial as I couldnt handle the guilt/responsibility if any of you tried to replicate what I did and your work just fell short of the stellar standards I am able to achieve! Remember.....NOT A TUTORIAL!
Right, before I start let me just say this was supposed to be a short explanation on how I go about ‘flip-casting’ small hollow silicon bronzes using ceramic shell materials. This ‘none tutorial’ has
basically gotten out of hand and I can only apologize for how long it has turned out. There are no excuses, I just really enjoyed myself (I must have been one of those irritating attention seeking kids that stood up front in class and bored everybody with the sound of their voice!) waffling on with no one around to stop me. So if you would like to save yourself from wasting a major chunk of your life reading pointless drivel it is probably best to skip the words and just look at the pretty pictures (I know that’s what most of you are going to do anyways) but I have a plan to keep you reading! I am going to run one of my World Famous competitions (well, I tried it once on one of my posts and I received upwards of 2 entries! I think the final winner was so overwhelmed with his prize he was speechless or resigned from the forum or something!) Somewhere in the text there will be a question or trick or something (not really thought this through yet but it WILL be Brilliant!!!) that will require your active participation. It is then up to you to leap to your keyboard and hastily type the correct answer as a reply. I realise that with all the time-zone differences around the world this may seem unfair so I have worked on a clever algorithm to help me sort out the winner from all the correct entries. I’m going to let my girlfriend choose based on how attractive she finds your hand writing! Get creative with those fonts! And as for the prize I’m fairly sure the winner will not be wanting to return it to me! Mainly because there will be a strict returns policy (kind of like a statute of limitations thing) giving them 24 hours in which to bring it to me personally and I might not be in at the time or not answer the door or something! So on with the demo. OK, firstly let me explain why I would use this technique over others I could use. Mainly it is just great for getting fine detail in small manageable casts. Also it doesn’t need extensive clever runners and risers so the metal will flow around the mould cavity. The idea is that as the heat of the mould is the same as the metal it should flow fine and the ceramic shell mould is porous so I should get no air pockets in the metal. Another bonus is if I don’t have the right size crucible handy it doesn’t matter because I just make my own. I also don’t need to have 2 burners/gas bottles to fire separate burnout kiln and furnace at the same time as this process only needs one burner. It’s also ideal if I only need to run one or two small pieces and can’t be bothered to set up the whole furnace, sand pit, tools and other paraphernalia that goes along with my standard foundry set up. That being said, I had 5 of these pieces to cast so it’s just out of the kindness of my heart that I chose to do one of them with the flip pour method instead of just adding it to the rest of a crucible pour so I could document it and some of you that may not have seen it before can stare in wonder at my awe-inspiring techniques and casting prowess! You lucky, lucky people! So by now some of you are probably thinking ‘who is this guy and what is he going on about? (and why am I still reading this shit!) Let me answer the first two of these questions (we may get to the last one if I have time but this could take a while and as much as I like to psychoanalyze people I feel your problems are just too complicated for just the one session!). Firstly I’m an artist living in the south of France who predominantly works in bronze sculpture. I have been casting my own and other artists work for a few years and developed some casting techniques to fit my own particular needs but mostly pilfered from others who have been there before and done all the hard work.
The following demo is a hodgepodge of stuff I’ve picked up from others and given a bit of a personal twist to suit my requirements. If you’re wondering which ideas I have added to the following process it would be safe to assume that if you start to feel incredulity at the stupidity of the caster- this was probably a bit I came up with! The flip pour method I’ll be showing is similar to the ancient (Asante) technique of joining the mould to the metal filled crucible and heating the metal and the mould together until the metal melts. Then by flipping it over like a sand hour glass timer, the mould is filled with metal and the air flows out. The main difference from the ancient method is that I will be using a variety of ceramic shell casting materials (instead of blended cattle shit and straw) to make the all in one mould and crucible. Once you get the hang of how the ceramic shell process works this is quite a straight forward way to cast small detailed bronzes with little need for expensive equipment (but please don’t underestimate my skill, dexterity and overall brilliance!) . In fact I have done this same technique in a small apartment (wax burn out on the balcony!) on a kitchen table with very simple equipment, achieving excellent results. I think the most expensive equipment was a small roll of kaowool and a very cheap blow torch from amazon rigged up to a 10kg propane bottle. This being said I would like to make the following disclaimer:- In the words of someone very wise to the world of litigation………’the views and opinions expressed here are not necessarily the views and opinions of the BBC!’ (This was usually said in a distinctly nasal and annoying voice!) What I mean by this is that there may be demonstrations of techniques here that I use that I do not condone others to use. Please, if you do try any of the following ‘unorthodox’ techniques take the necessary precautions to stay safe and not burn yourself or your house down! Do bear in mind that I am a trained professional and have most of my original digits intact. Now, hopefully I have your attention enough that you will be curious to read on! I will start with a hollow wax that I want to reproduce into bronze. I haven’t shown how I got to this point because there are already tutorials/demonstrations/explanations on the forum on how to make a wax and I can’t be bothered to poorly rehash what others have done far more effectively than I could! If you really are too lazy to search for them or desperate enough for more casting porn by the end of this ‘masterclass!’ (or just a glutton for punishment....... told you I like to psychoanalyze! ) for a hollow wax demo let me know and I’ll see if I can be arsed to throw another ‘none-tutorial’ together. Brief overview of the ceramic shell process: 1) Make a wax version of the thing that you want cast in metal. 2) Cover wax in a colloidal silica mix. 3) Sprinkle molochite over still wet colloidal mix. 4) Let it dry 5) Repeat steps 2,3,4 and 5 until you have desired thickness of shell 6) Heat up shell to melt wax and vitrify the colloidal silica/molochite layers into a ceramic shell 7) Pour in molten metal 8) Let metal solidify 9) Break off ceramic shell 10) Clean up and admire your work 11) To think people have written whole books on this!?! I nailed it in 10 easy steps. What should I do next, quarks and leptons?
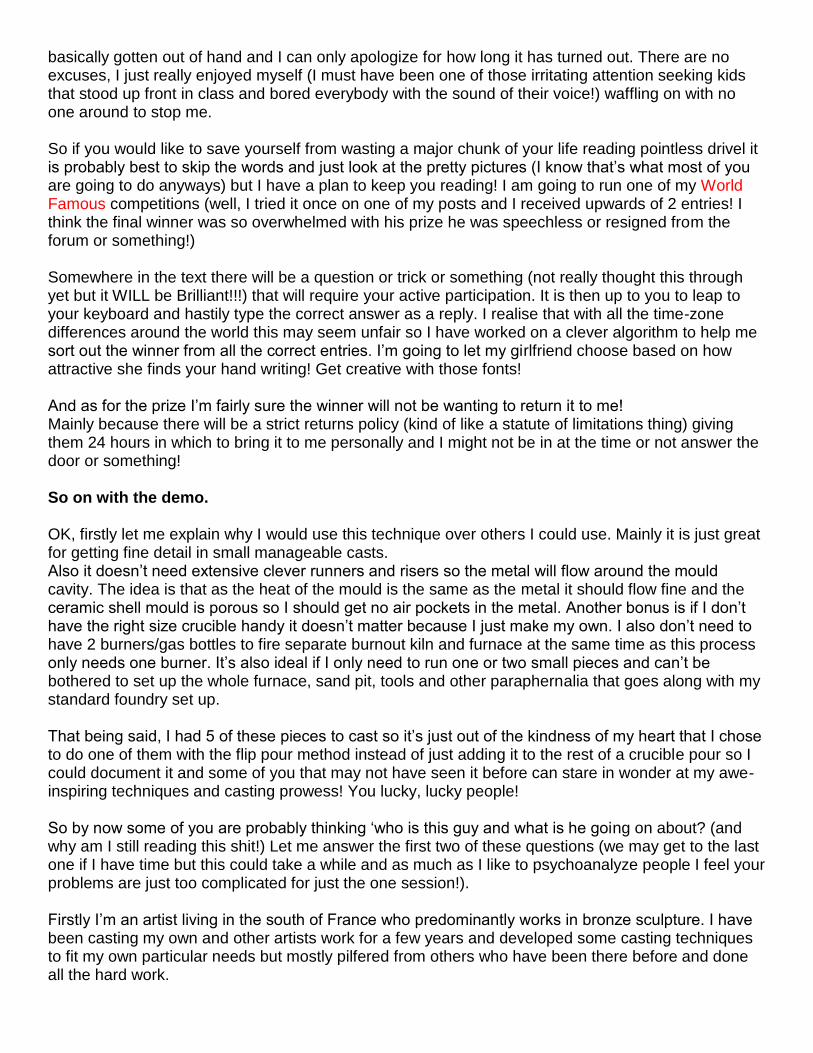
Right, down to the nitty-gritty work. The first image is of the hollow wax sculpture (here on known as the wax sculpture form) I would like to reproduce into bronze. The wax sculpture has been sectioned into three pieces (for those of you new to wax casting this is the green thingy with the sticky uppy things on stalks that look a bit like tulips) so I can easily get the ceramic ‘core’ inside and remove it again after it is cast in bronze. More on this later.
The ‘tulips’ are attached to a wax pour cup by wax rods that will give the metal somewhere to flow when the assembly is flipped. In front of the wax sculpture form in the pic is the wax to make the ceramic crucible from (here on known as the wax crucible form). This is also a green thingy but doesn’t have any rods or tulips. It is the same diameter as the pour cup on the wax sculpture form so they will be easier to join together later in the process. Before I start coating the wax bits in colloidal silica mix to make the ceramic shell I like to give the wax a coating of a shellac (French polish far left of the picture)and isopropanol alcohol (big white jug behind the wax sculpture form in pic) mix.
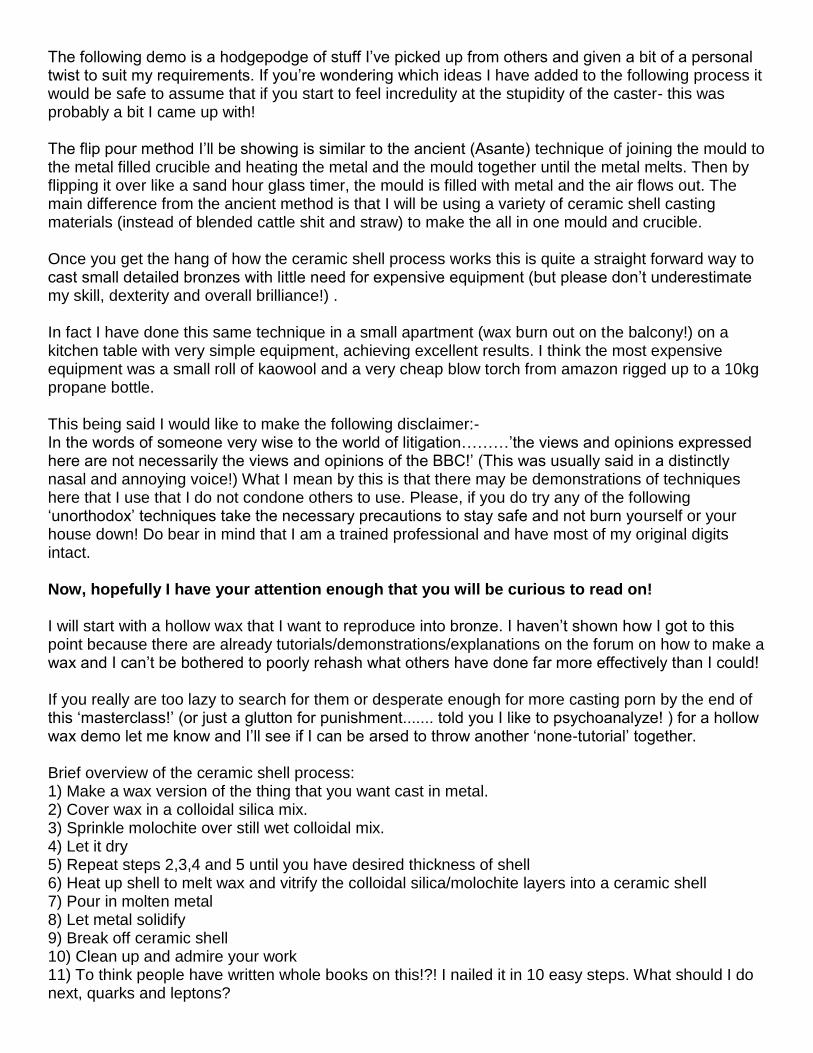
This ensures that the colloidal silica mix (here on known as slurry) gets a nice even surface to stick to by removing any grease/dirt from the wax surface. The ratio doesn’t have to be exact and I roughly measure 1 part shellac to 7-10 parts alcohol (you can see this mix in the jam/confiture/jelly jar in the pic). I just pour the shellac/alcohol mix over the wax sculpture form and the wax crucible form until the waxes are completely coated and drain and let dry.(see next pic).
Next I prepare my slurry. For this I stray from the usual strict approach recommended by the ceramic shell casting material manufacturers and fudge my own version. Several reasons but mostly because with the official mix I find it an absolute nightmare to remove the baked shell from the bronze after casting. Anybody who has tried to remove ceramic shell from a casting knows what I’m talking about.

I start with 1 measure of graphite powder (front, right of next pic). This is not normally added to ceramic shell slurry as it will weaken the fired shell but I do it for exactly this reason. I use this for the primary coats as it keeps all the detail I need but weakens the layers closest to the cast metal enough that I can remove the shell easily after casting (see later pictures after the bronze pour when I remove the shell).
And add 2 measures of molochite -200 (front right of next pic).

To this I add just enough colloidal silica binder liquid (next pic) to form a slurry with the consistency of somewhere between single and double cream. It’s difficult to describe exactly but you might get the idea from the following pictures.
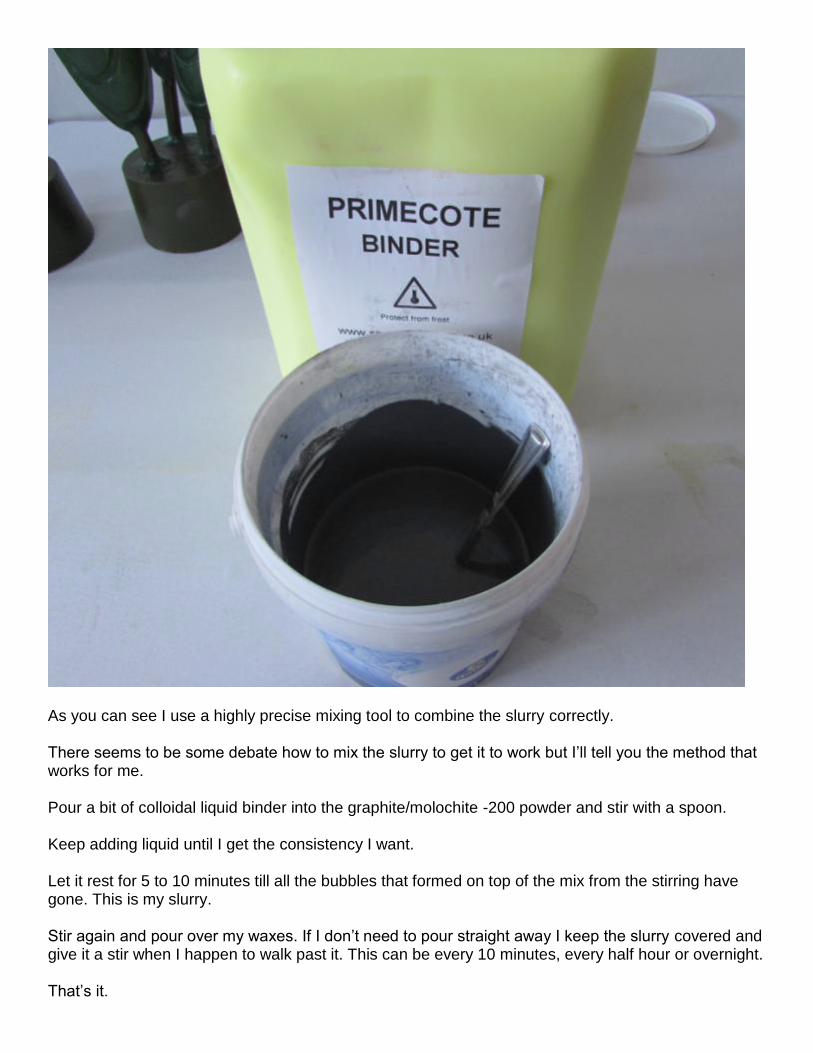
As you can see I use a highly precise mixing tool to combine the slurry correctly. There seems to be some debate how to mix the slurry to get it to work but I’ll tell you the method that works for me. Pour a bit of colloidal liquid binder into the graphite/molochite -200 powder and stir with a spoon. Keep adding liquid until I get the consistency I want. Let it rest for 5 to 10 minutes till all the bubbles that formed on top of the mix from the stirring have gone. This is my slurry. Stir again and pour over my waxes. If I don’t need to pour straight away I keep the slurry covered and give it a stir when I happen to walk past it. This can be every 10 minutes, every half hour or overnight. That’s it.
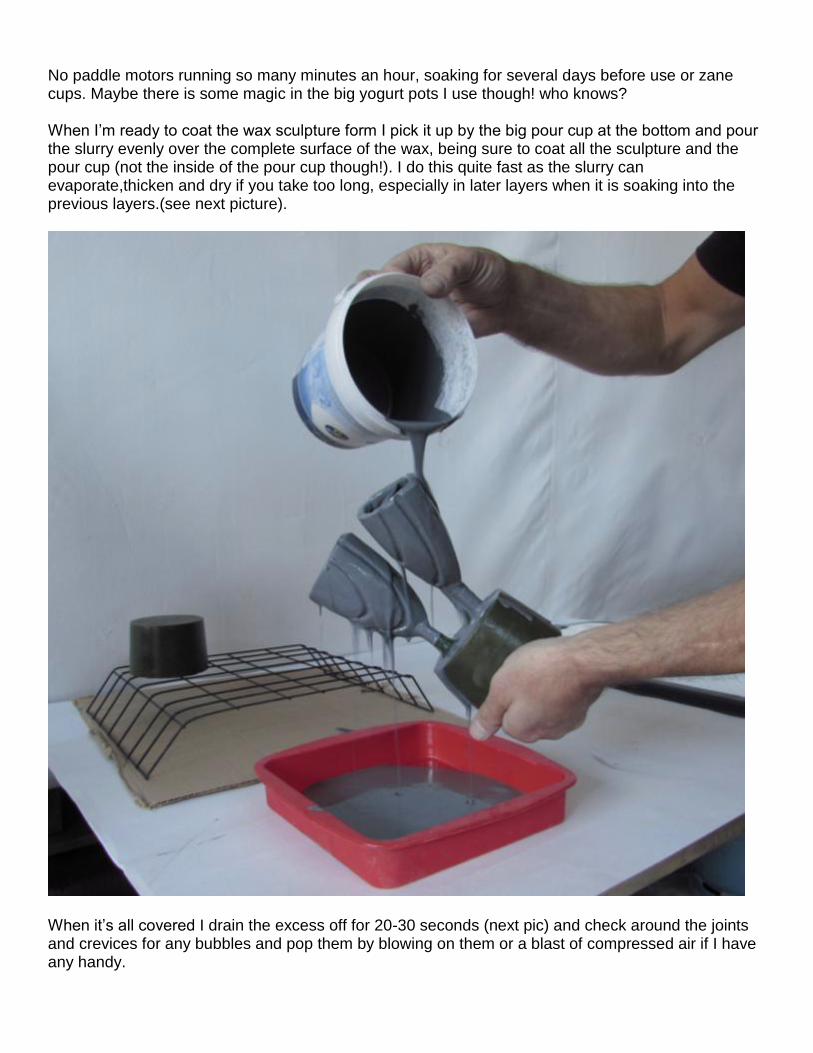
No paddle motors running so many minutes an hour, soaking for several days before use or zane cups. Maybe there is some magic in the big yogurt pots I use though! who knows? When I’m ready to coat the wax sculpture form I pick it up by the big pour cup at the bottom and pour the slurry evenly over the complete surface of the wax, being sure to coat all the sculpture and the pour cup (not the inside of the pour cup though!). I do this quite fast as the slurry can evaporate,thicken and dry if you take too long, especially in later layers when it is soaking into the previous layers.(see next picture).
When it’s all covered I drain the excess off for 20-30 seconds (next pic) and check around the joints and crevices for any bubbles and pop them by blowing on them or a blast of compressed air if I have any handy.
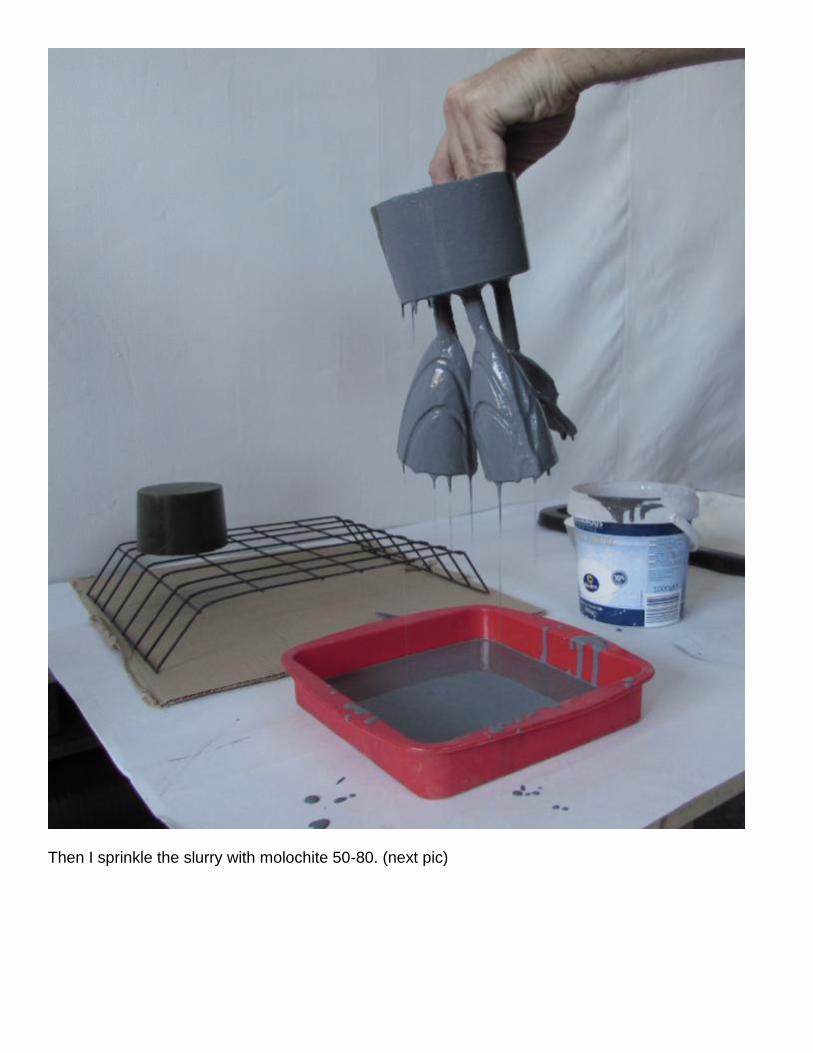
Then I sprinkle the slurry with molochite 50-80. (next pic)
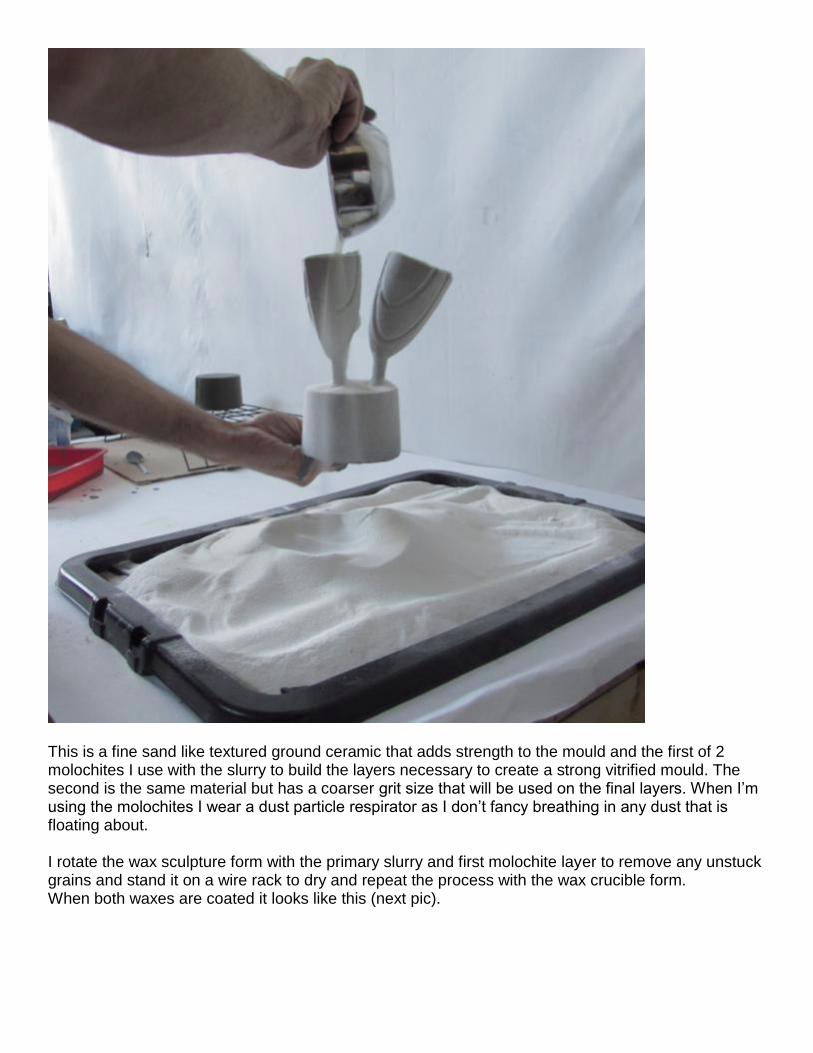
This is a fine sand like textured ground ceramic that adds strength to the mould and the first of 2 molochites I use with the slurry to build the layers necessary to create a strong vitrified mould. The second is the same material but has a coarser grit size that will be used on the final layers. When I’m using the molochites I wear a dust particle respirator as I don’t fancy breathing in any dust that is floating about. I rotate the wax sculpture form with the primary slurry and first molochite layer to remove any unstuck grains and stand it on a wire rack to dry and repeat the process with the wax crucible form. When both waxes are coated it looks like this (next pic).

Depending on the weather/temperature of my workshop I will let this first layer dry for a couple of hours or overnight. As this casting had quite a deep core going inside I placed a small fan so that air could circulate around the cavity and ensure complete drying inside as well as out. I then add a little more colloidal liquid binder to the graphite/molochite -200 slurry to make the second coat a little thinner than the first (about single cream consistency) and repeated the coating and sprinkling. (no picture I’m afraid but you can look at the last 4 pictures again if you don’t get it/think it might help!) By this point I’ve virtually run out of the graphite/molochite -200 slurry so I mix a fresh batch with just molochite -200 and the colloidal liquid binder to make a slurry the consistency of between single and double cream again. No graphite as this would weaken the shell too much, I only need it weak on the surface that contacts the metal, not all the way through which could compromise the integrity of the overall strength of the shell (NOT GOOD, as you will see later!). When the previous layers are dry and I’ve left the slurry to rest for 10 minutes to disperse the bubbles after mixing, I coat the wax sculpture form with its third layer of slurry and another sprinkle of molochite 50-80.(see next pic.)
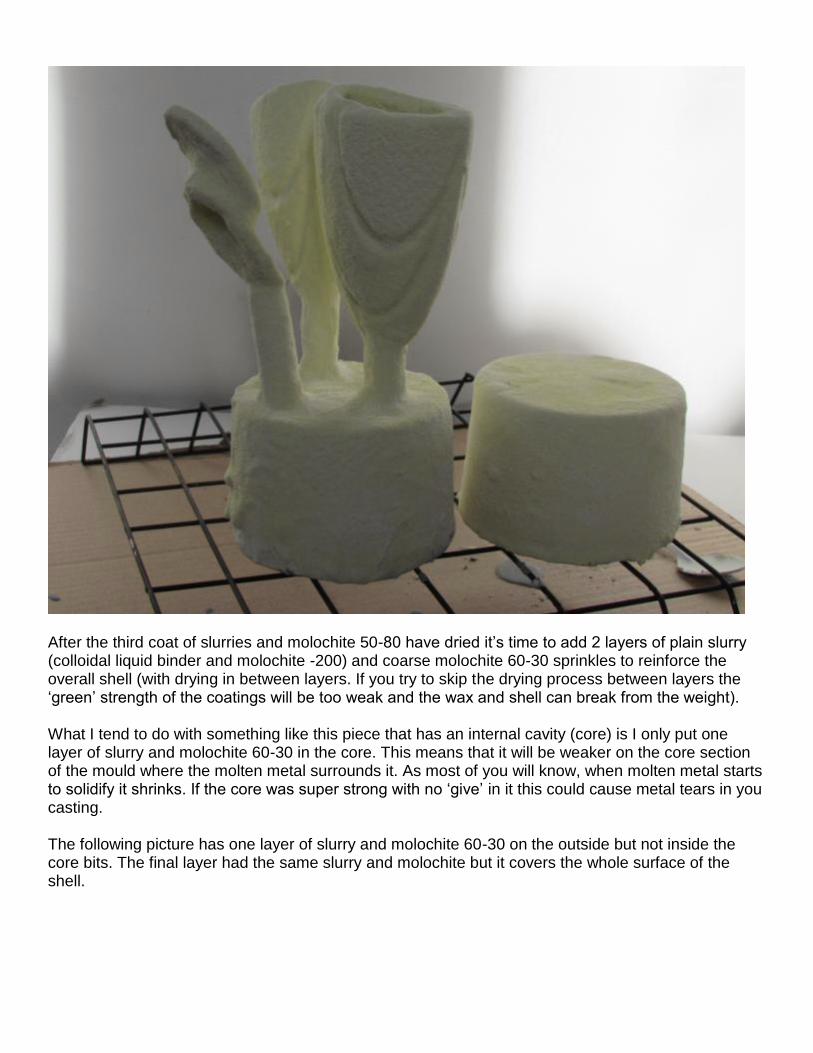
After the third coat of slurries and molochite 50-80 have dried it’s time to add 2 layers of plain slurry (colloidal liquid binder and molochite -200) and coarse molochite 60-30 sprinkles to reinforce the overall shell (with drying in between layers. If you try to skip the drying process between layers the ‘green’ strength of the coatings will be too weak and the wax and shell can break from the weight). What I tend to do with something like this piece that has an internal cavity (core) is I only put one layer of slurry and molochite 60-30 in the core. This means that it will be weaker on the core section of the mould where the molten metal surrounds it. As most of you will know, when molten metal starts to solidify it shrinks. If the core was super strong with no ‘give’ in it this could cause metal tears in you casting. The following picture has one layer of slurry and molochite 60-30 on the outside but not inside the core bits. The final layer had the same slurry and molochite but it covers the whole surface of the shell.
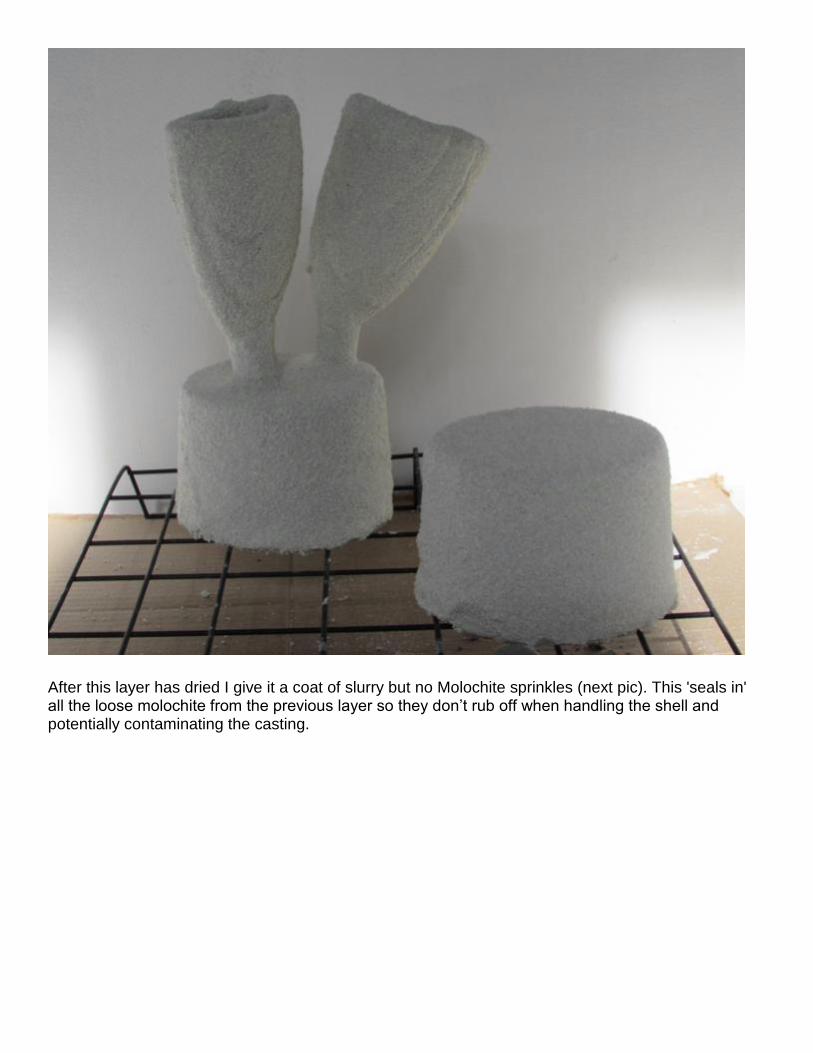
After this layer has dried I give it a coat of slurry but no Molochite sprinkles (next pic). This 'seals in' all the loose molochite from the previous layer so they don’t rub off when handling the shell and potentially contaminating the casting.

Hopefully, if you’ve been following along at home (ONLY KIDDING..................what did I say about this being a demonstration NOT a tutorial!) you would have wiped the base of the waxes after each slurry/molochite application so as not to have too much build up on the 2 surfaces you want to join together later. If like me you forgot to do this your next step is to take a craft knife and scrape off the excess build up until you can see the wax rim of the cups again (don’t forget the respirator!). As this is a 'Masterclass' I will pretend i did this deliberately so I can see how thick my shell build up is and let me know if I need to add more layers! (Next pic). For this type of flip mould I usually aim for between 6 to 10mm thick shell, depending on how much weight (metal) I'm flipping. It also conveniently allows me to show you the 1mm(ish) graphite layer between the wax and the full strength shell. Bloody hell...... it’s almost like I know what I’m doing!
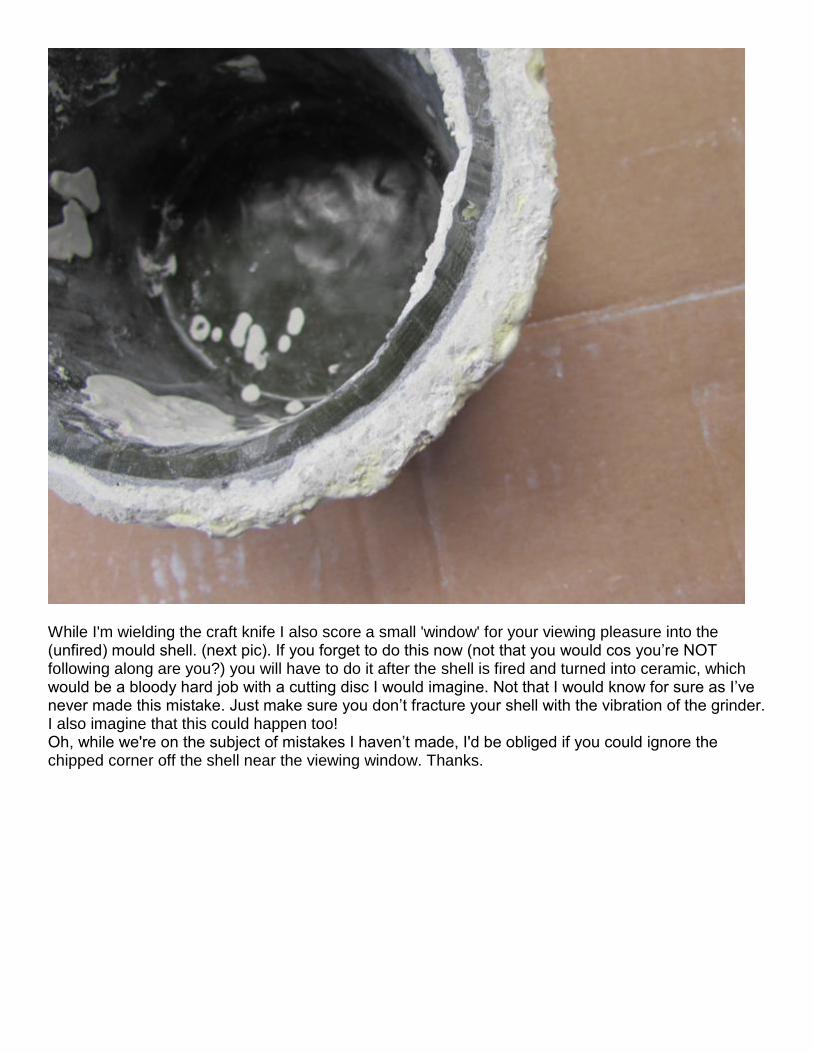
While I'm wielding the craft knife I also score a small 'window' for your viewing pleasure into the (unfired) mould shell. (next pic). If you forget to do this now (not that you would cos you’re NOT following along are you?) you will have to do it after the shell is fired and turned into ceramic, which would be a bloody hard job with a cutting disc I would imagine. Not that I would know for sure as I’ve never made this mistake. Just make sure you don’t fracture your shell with the vibration of the grinder. I also imagine that this could happen too! Oh, while we're on the subject of mistakes I haven’t made, I'd be obliged if you could ignore the chipped corner off the shell near the viewing window. Thanks.
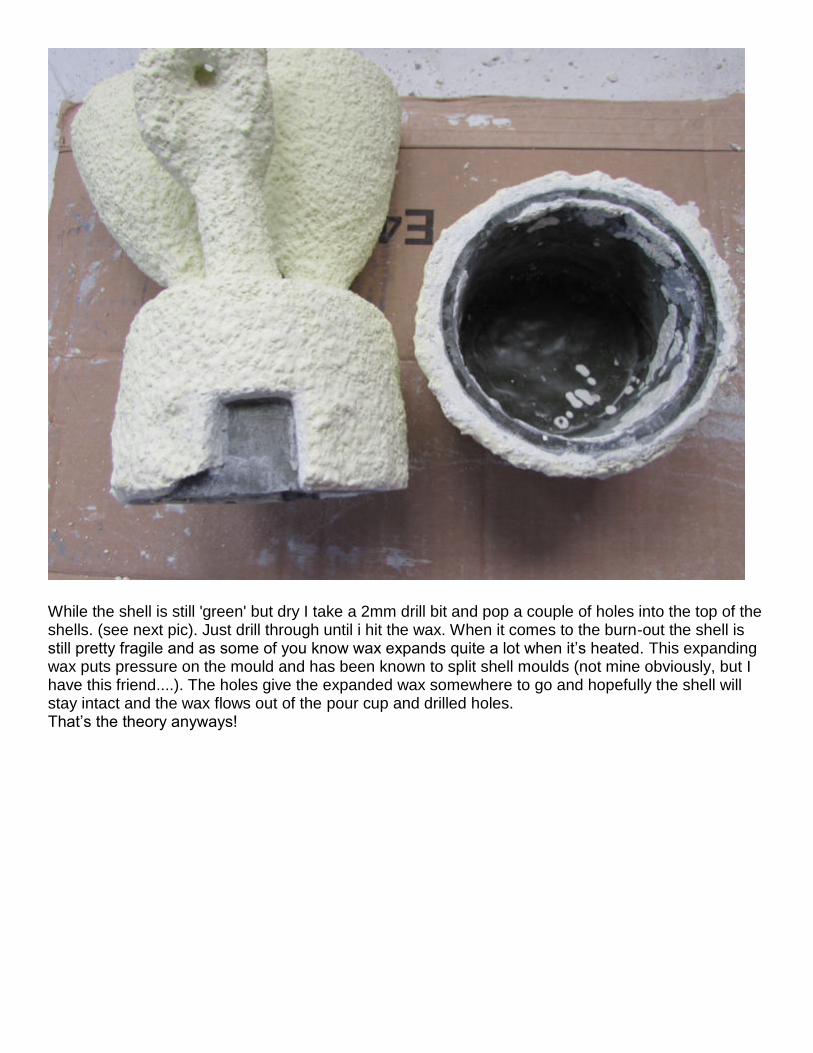
While the shell is still 'green' but dry I take a 2mm drill bit and pop a couple of holes into the top of the shells. (see next pic). Just drill through until i hit the wax. When it comes to the burn-out the shell is still pretty fragile and as some of you know wax expands quite a lot when it’s heated. This expanding wax puts pressure on the mould and has been known to split shell moulds (not mine obviously, but I have this friend....). The holes give the expanded wax somewhere to go and hopefully the shell will stay intact and the wax flows out of the pour cup and drilled holes. That’s the theory anyways!
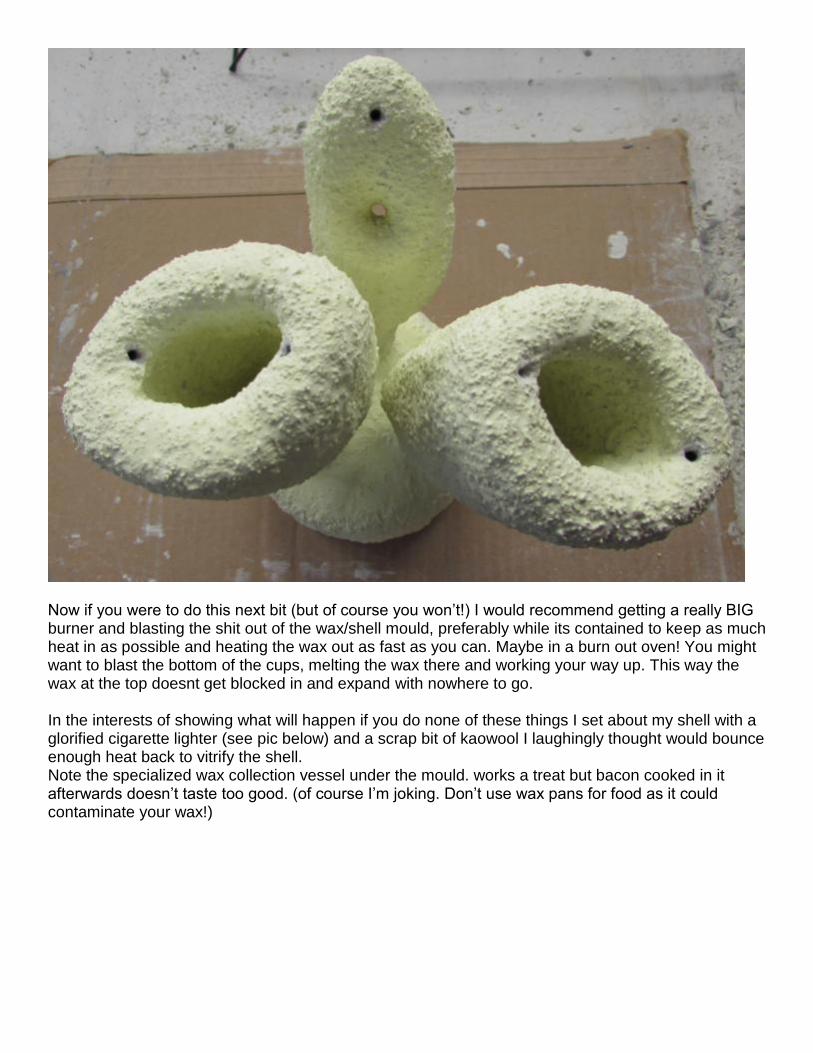
Now if you were to do this next bit (but of course you won’t!) I would recommend getting a really BIG burner and blasting the shit out of the wax/shell mould, preferably while its contained to keep as much heat in as possible and heating the wax out as fast as you can. Maybe in a burn out oven! You might want to blast the bottom of the cups, melting the wax there and working your way up. This way the wax at the top doesnt get blocked in and expand with nowhere to go. In the interests of showing what will happen if you do none of these things I set about my shell with a glorified cigarette lighter (see pic below) and a scrap bit of kaowool I laughingly thought would bounce enough heat back to vitrify the shell. Note the specialized wax collection vessel under the mould. works a treat but bacon cooked in it afterwards doesn’t taste too good. (of course I’m joking. Don’t use wax pans for food as it could contaminate your wax!)
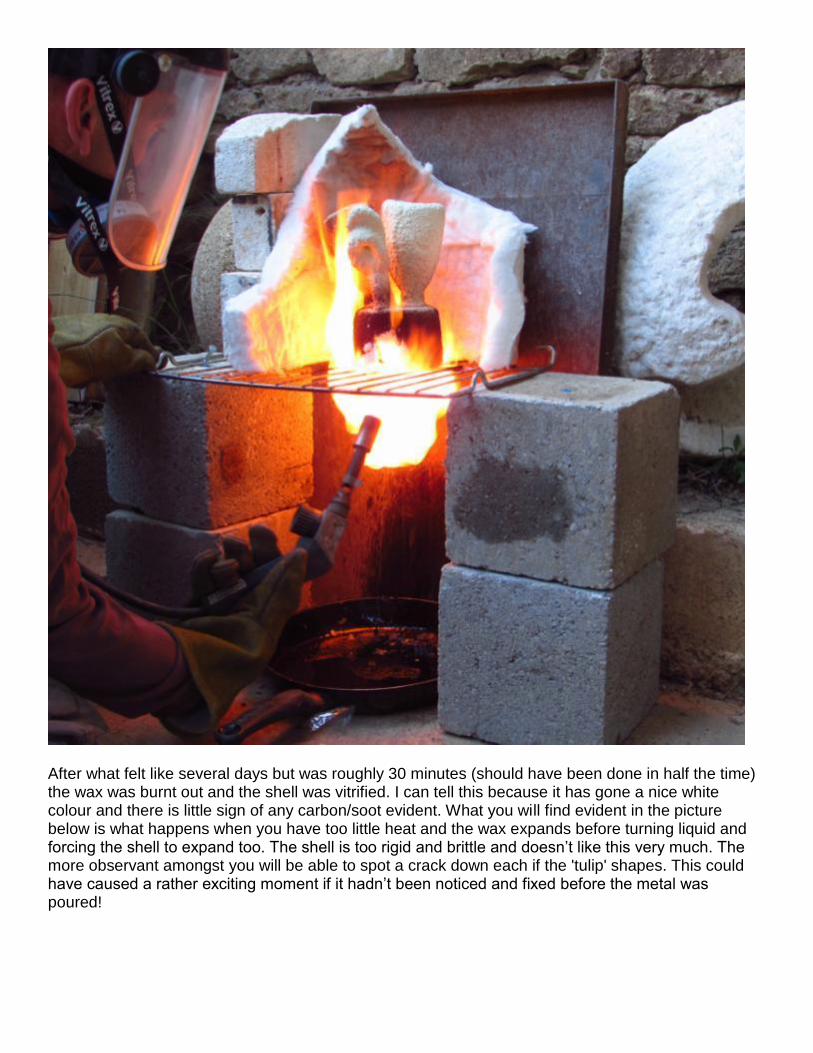
After what felt like several days but was roughly 30 minutes (should have been done in half the time) the wax was burnt out and the shell was vitrified. I can tell this because it has gone a nice white colour and there is little sign of any carbon/soot evident. What you will find evident in the picture below is what happens when you have too little heat and the wax expands before turning liquid and forcing the shell to expand too. The shell is too rigid and brittle and doesn’t like this very much. The more observant amongst you will be able to spot a crack down each if the 'tulip' shapes. This could have caused a rather exciting moment if it hadn’t been noticed and fixed before the metal was poured!
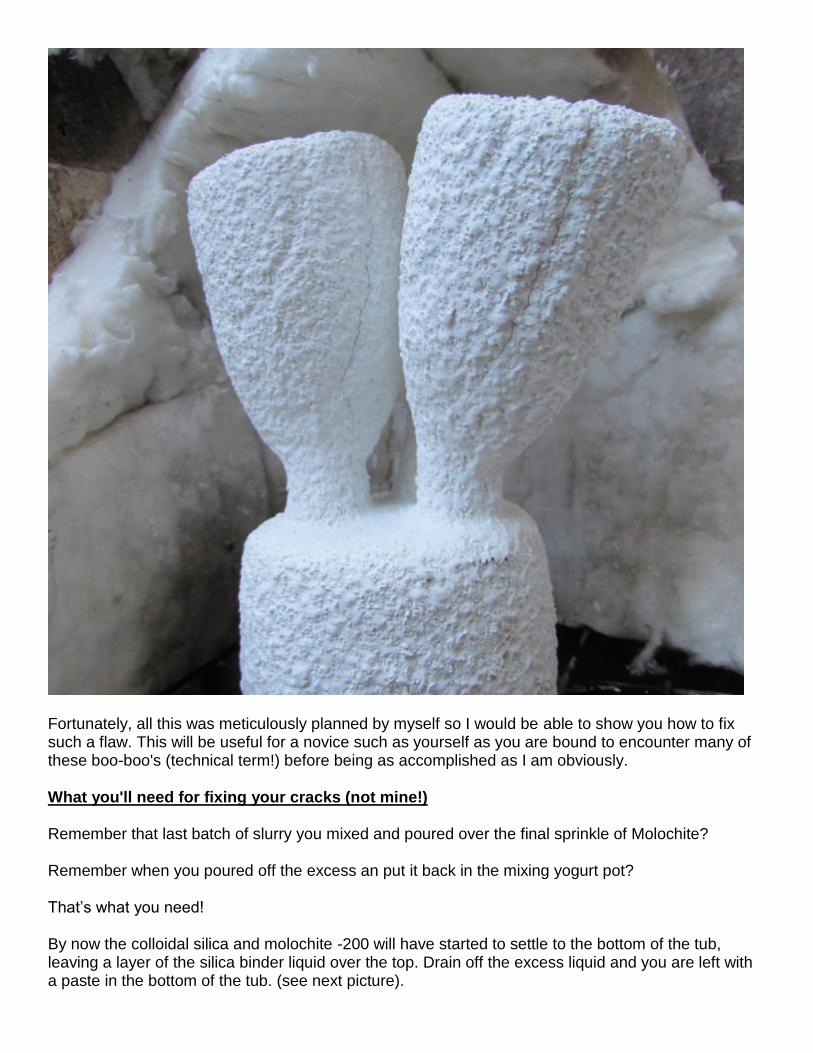
Fortunately, all this was meticulously planned by myself so I would be able to show you how to fix such a flaw. This will be useful for a novice such as yourself as you are bound to encounter many of these boo-boo's (technical term!) before being as accomplished as I am obviously. What you'll need for fixing your cracks (not mine!) Remember that last batch of slurry you mixed and poured over the final sprinkle of Molochite? Remember when you poured off the excess an put it back in the mixing yogurt pot? That’s what you need! By now the colloidal silica and molochite -200 will have started to settle to the bottom of the tub, leaving a layer of the silica binder liquid over the top. Drain off the excess liquid and you are left with a paste in the bottom of the tub. (see next picture).
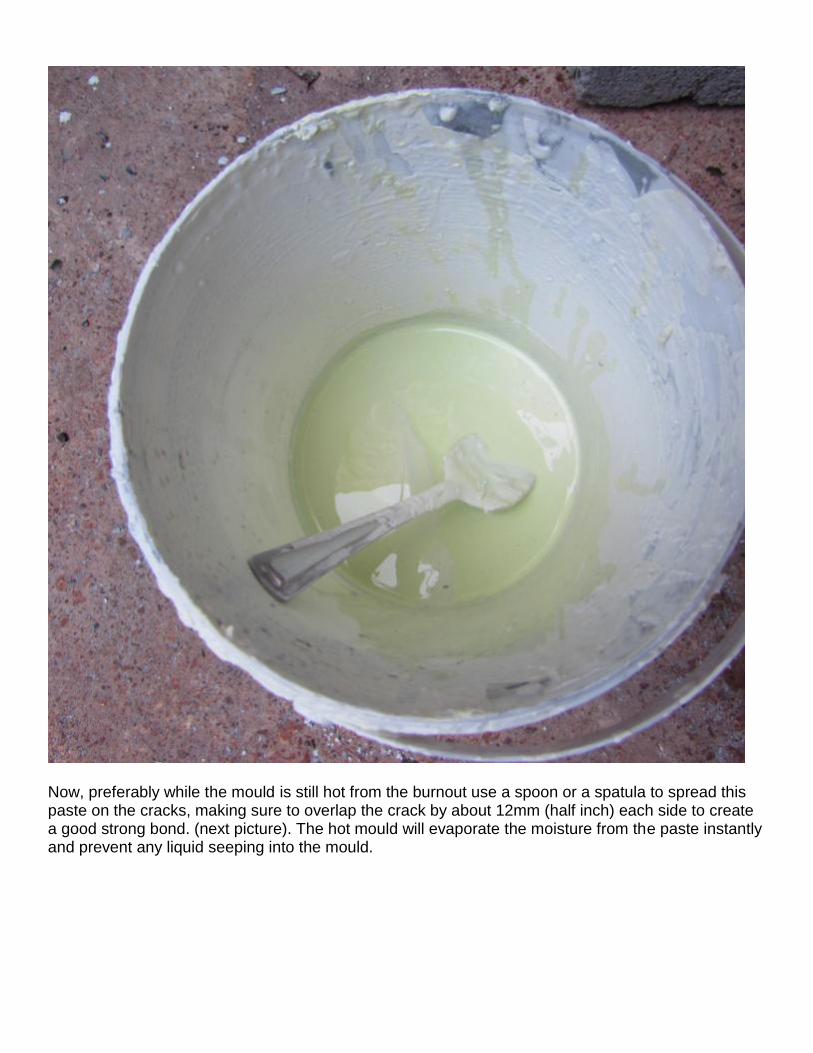
Now, preferably while the mould is still hot from the burnout use a spoon or a spatula to spread this paste on the cracks, making sure to overlap the crack by about 12mm (half inch) each side to create a good strong bond. (next picture). The hot mould will evaporate the moisture from the paste instantly and prevent any liquid seeping into the mould.
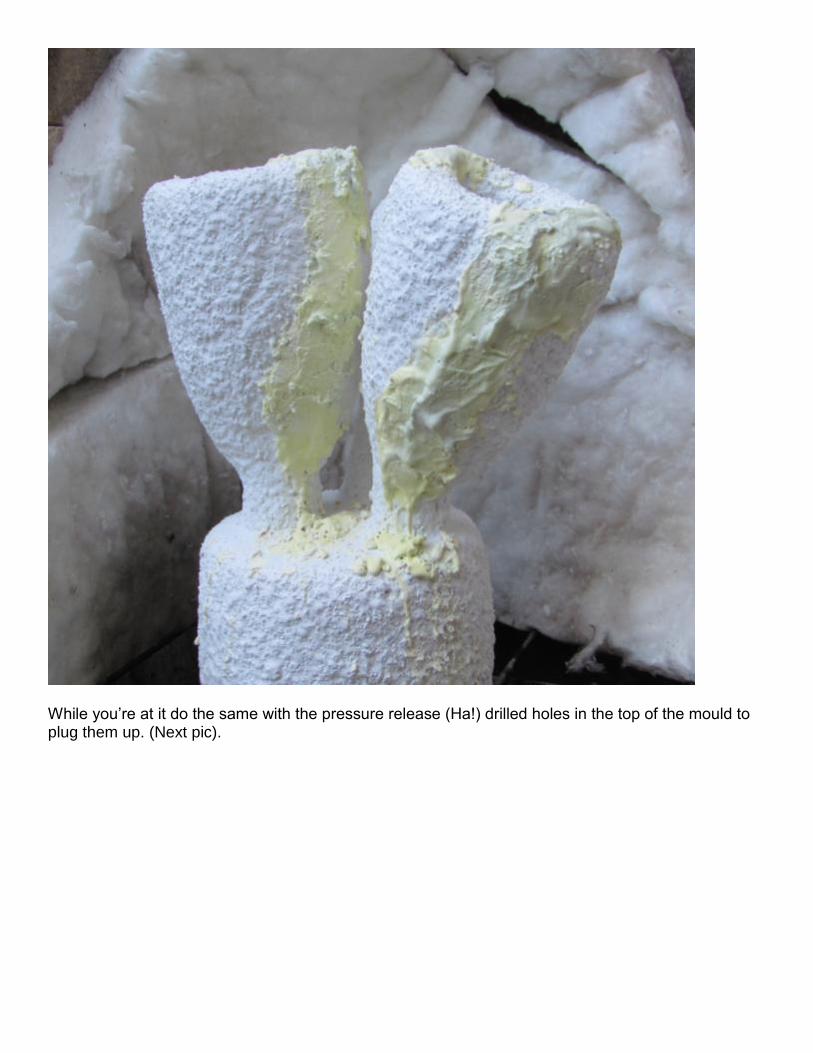
While you’re at it do the same with the pressure release (Ha!) drilled holes in the top of the mould to plug them up. (Next pic).
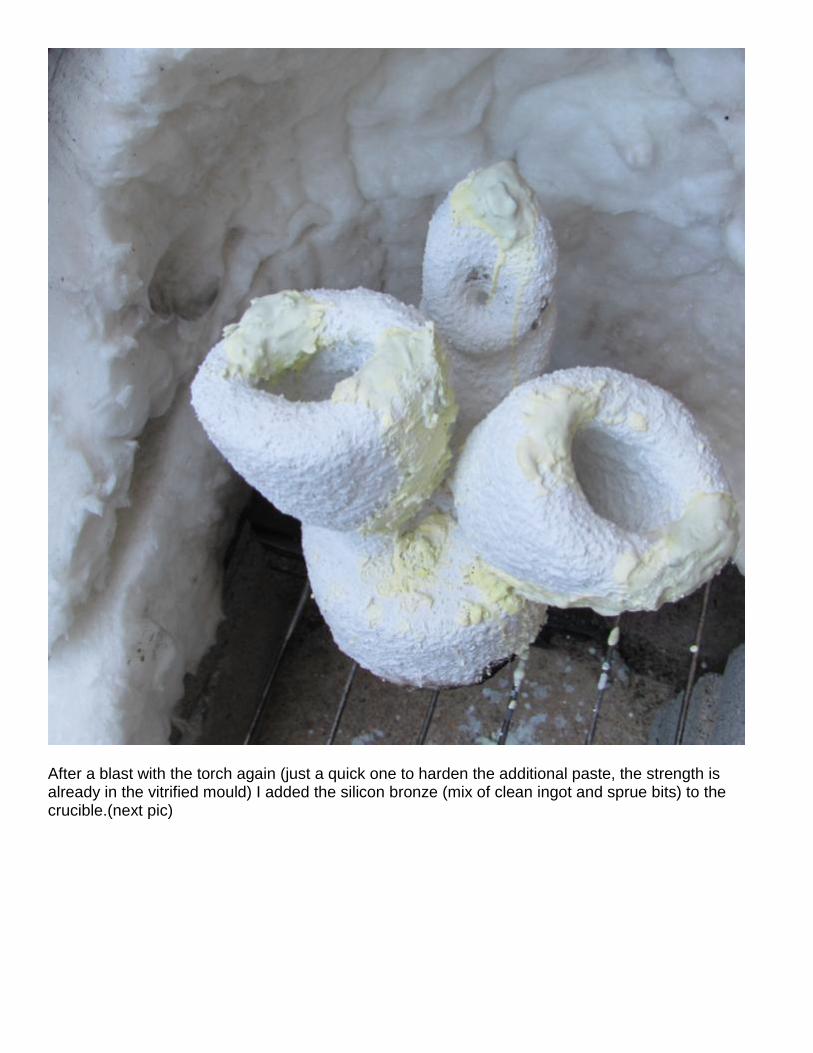
After a blast with the torch again (just a quick one to harden the additional paste, the strength is already in the vitrified mould) I added the silicon bronze (mix of clean ingot and sprue bits) to the crucible.(next pic)
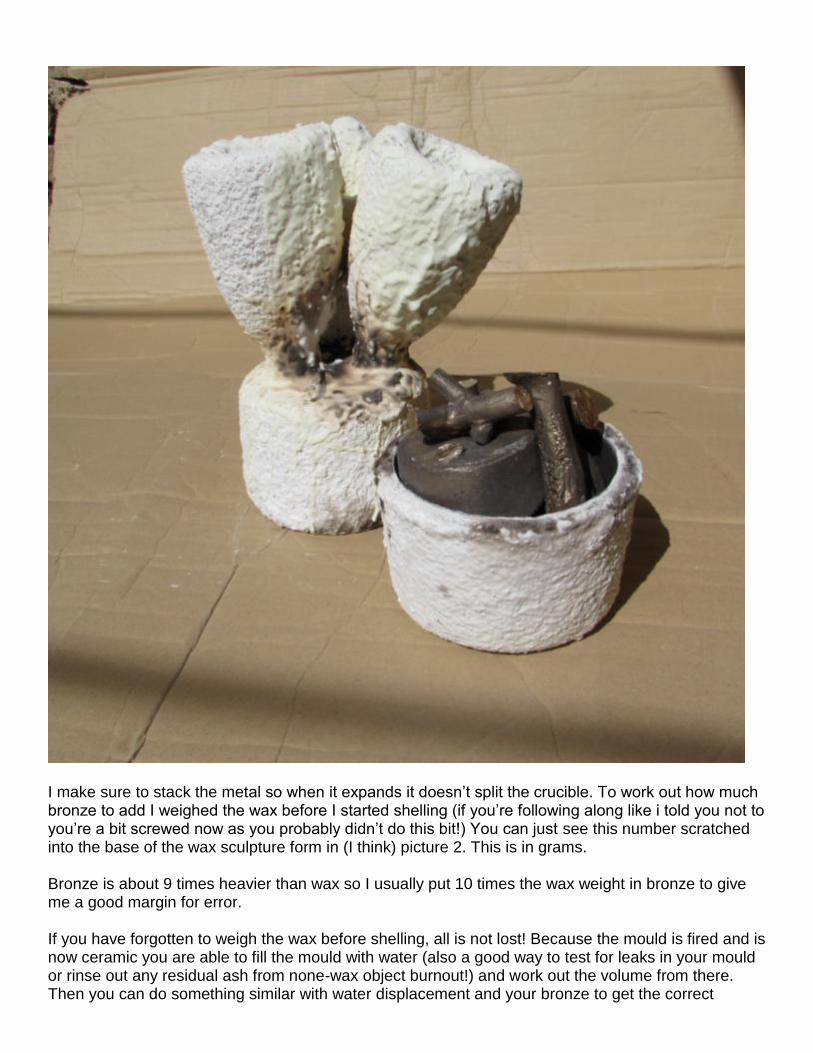
I make sure to stack the metal so when it expands it doesn’t split the crucible. To work out how much bronze to add I weighed the wax before I started shelling (if you’re following along like i told you not to you’re a bit screwed now as you probably didn’t do this bit!) You can just see this number scratched into the base of the wax sculpture form in (I think) picture 2. This is in grams. Bronze is about 9 times heavier than wax so I usually put 10 times the wax weight in bronze to give me a good margin for error. If you have forgotten to weigh the wax before shelling, all is not lost! Because the mould is fired and is now ceramic you are able to fill the mould with water (also a good way to test for leaks in your mould or rinse out any residual ash from none-wax object burnout!) and work out the volume from there. Then you can do something similar with water displacement and your bronze to get the correct
volume. You might have to look this up, what do I look like, Archimedes or something? Now I put a few blobs of the paste from the bottom of the yogurt pot onto the rim of the crucible and (carefully) place the mould on top. I try to prevent any paste from going inside as this will cause inclusions into the bronze if it breaks off and we dont want that. (next pic)
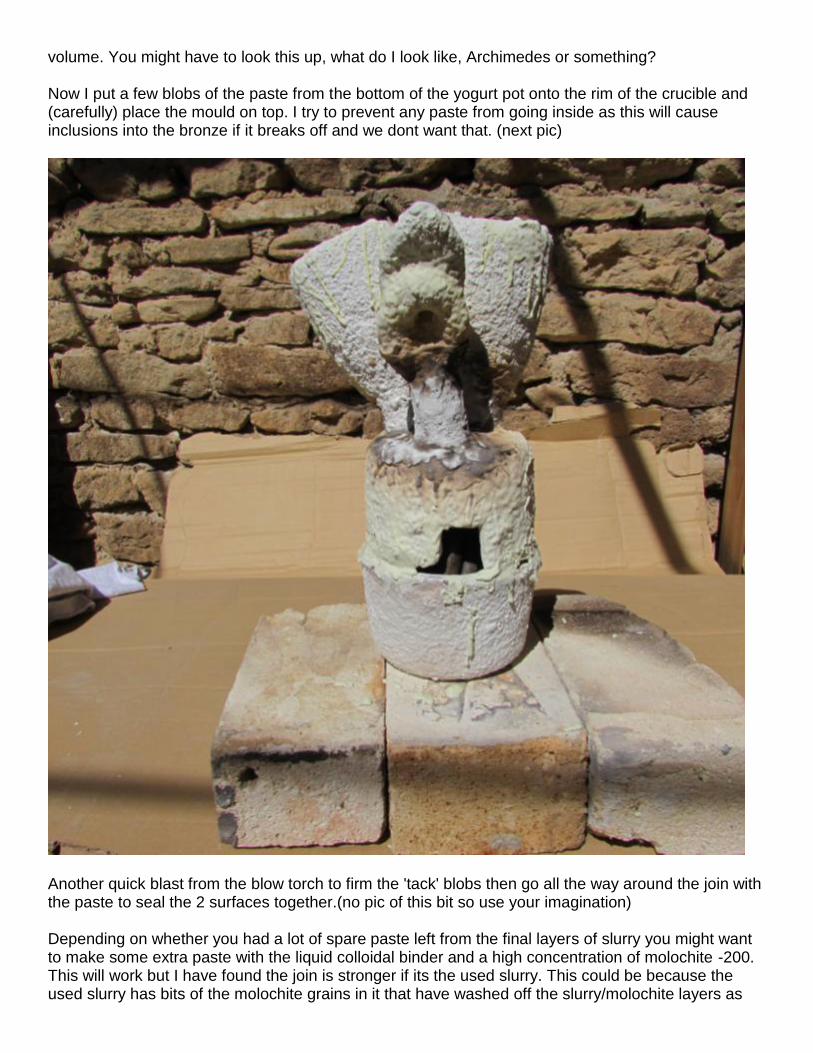
Another quick blast from the blow torch to firm the 'tack' blobs then go all the way around the join with the paste to seal the 2 surfaces together.(no pic of this bit so use your imagination) Depending on whether you had a lot of spare paste left from the final layers of slurry you might want to make some extra paste with the liquid colloidal binder and a high concentration of molochite -200. This will work but I have found the join is stronger if its the used slurry. This could be because the used slurry has bits of the molochite grains in it that have washed off the slurry/molochite layers as
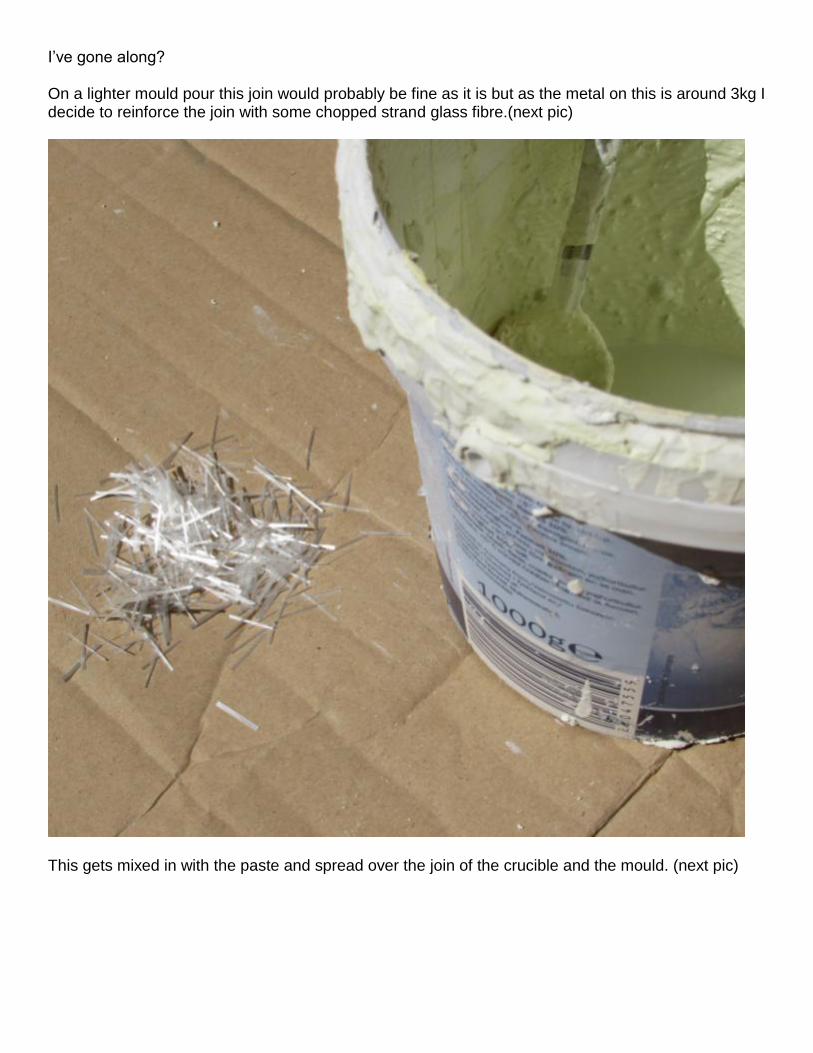
I’ve gone along? On a lighter mould pour this join would probably be fine as it is but as the metal on this is around 3kg I decide to reinforce the join with some chopped strand glass fibre.(next pic)
This gets mixed in with the paste and spread over the join of the crucible and the mould. (next pic)
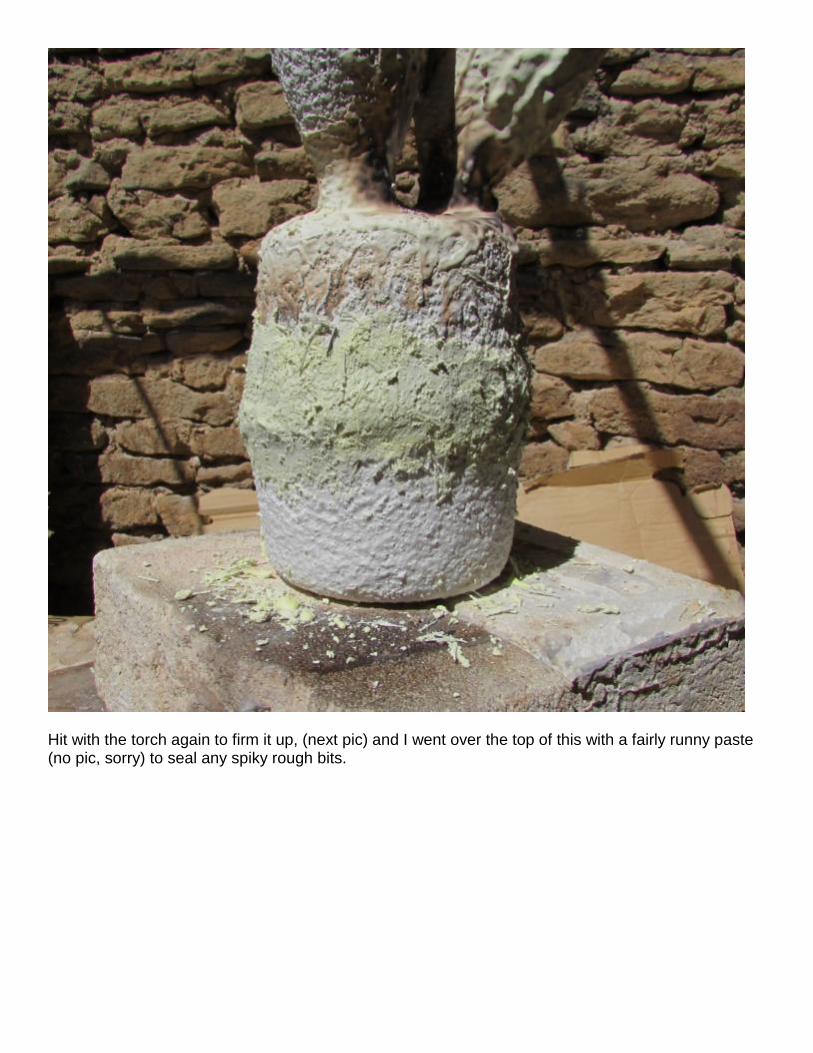
Hit with the torch again to firm it up, (next pic) and I went over the top of this with a fairly runny paste (no pic, sorry) to seal any spiky rough bits.
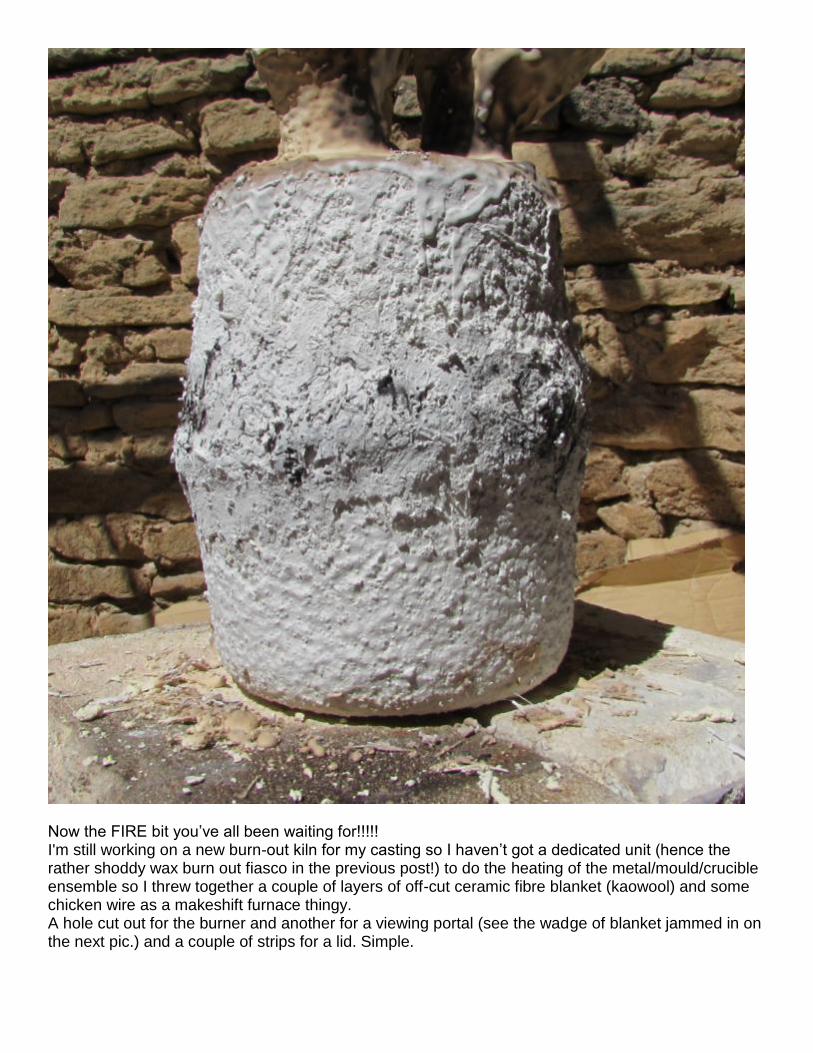
Now the FIRE bit you’ve all been waiting for!!!!! I'm still working on a new burn-out kiln for my casting so I haven’t got a dedicated unit (hence the rather shoddy wax burn out fiasco in the previous post!) to do the heating of the metal/mould/crucible ensemble so I threw together a couple of layers of off-cut ceramic fibre blanket (kaowool) and some chicken wire as a makeshift furnace thingy. A hole cut out for the burner and another for a viewing portal (see the wadge of blanket jammed in on the next pic.) and a couple of strips for a lid. Simple.

The next photo shows the inside of the artisanal hand crafted furnace/burn-out kiln. I adjust the kaowool on top to control the draft/burn. This has been going for about 5 minutes. The mould isn’t glowing like it appears in the photo but its starting to come up to slight orange and all the soot/carbon has burned off.
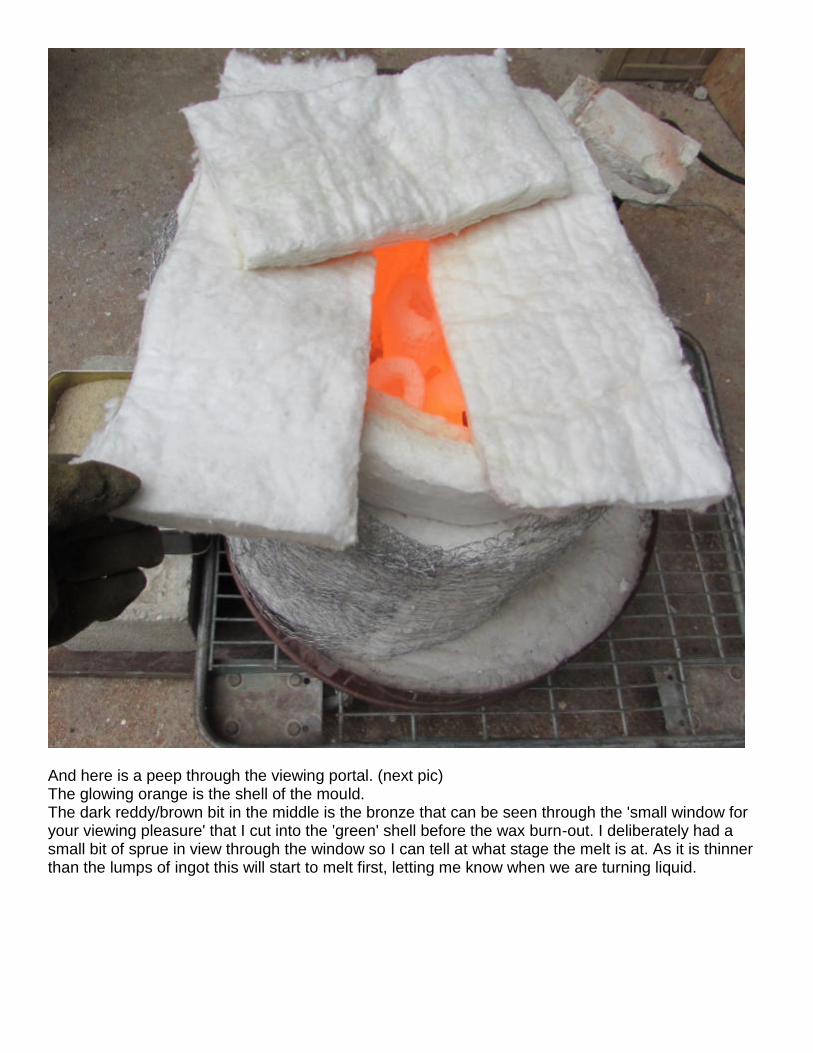
And here is a peep through the viewing portal. (next pic) The glowing orange is the shell of the mould. The dark reddy/brown bit in the middle is the bronze that can be seen through the 'small window for your viewing pleasure' that I cut into the 'green' shell before the wax burn-out. I deliberately had a small bit of sprue in view through the window so I can tell at what stage the melt is at. As it is thinner than the lumps of ingot this will start to melt first, letting me know when we are turning liquid.
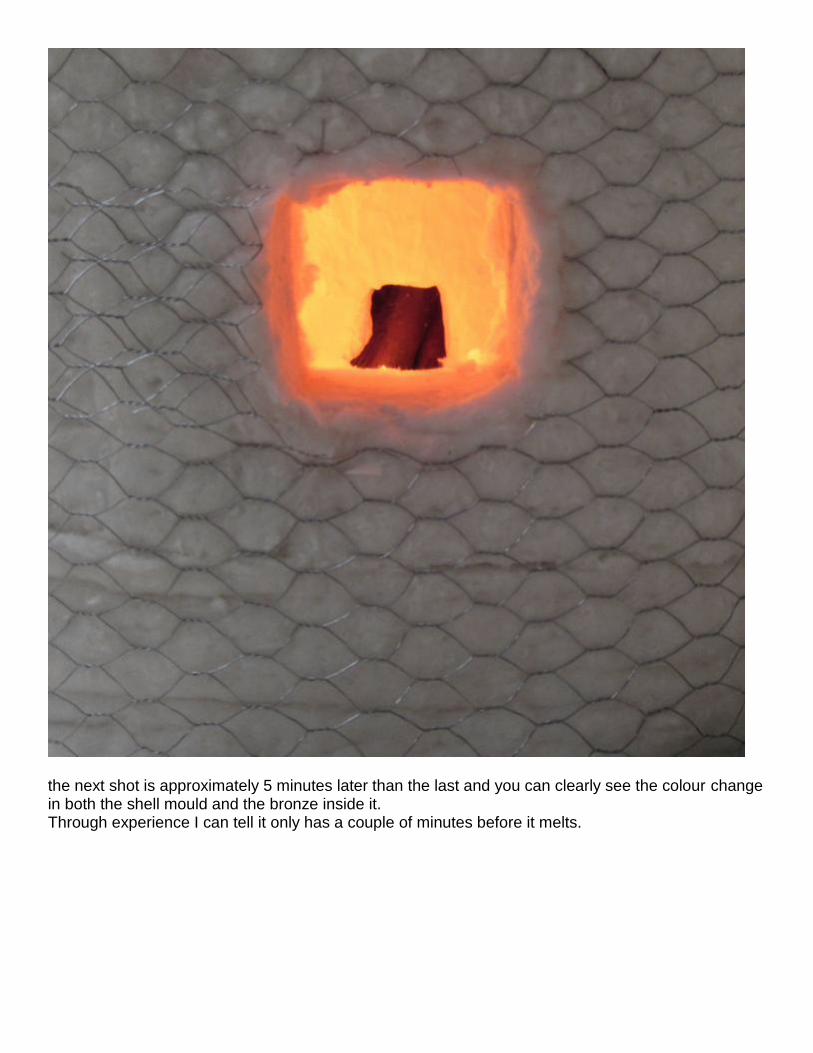
the next shot is approximately 5 minutes later than the last and you can clearly see the colour change in both the shell mould and the bronze inside it. Through experience I can tell it only has a couple of minutes before it melts.
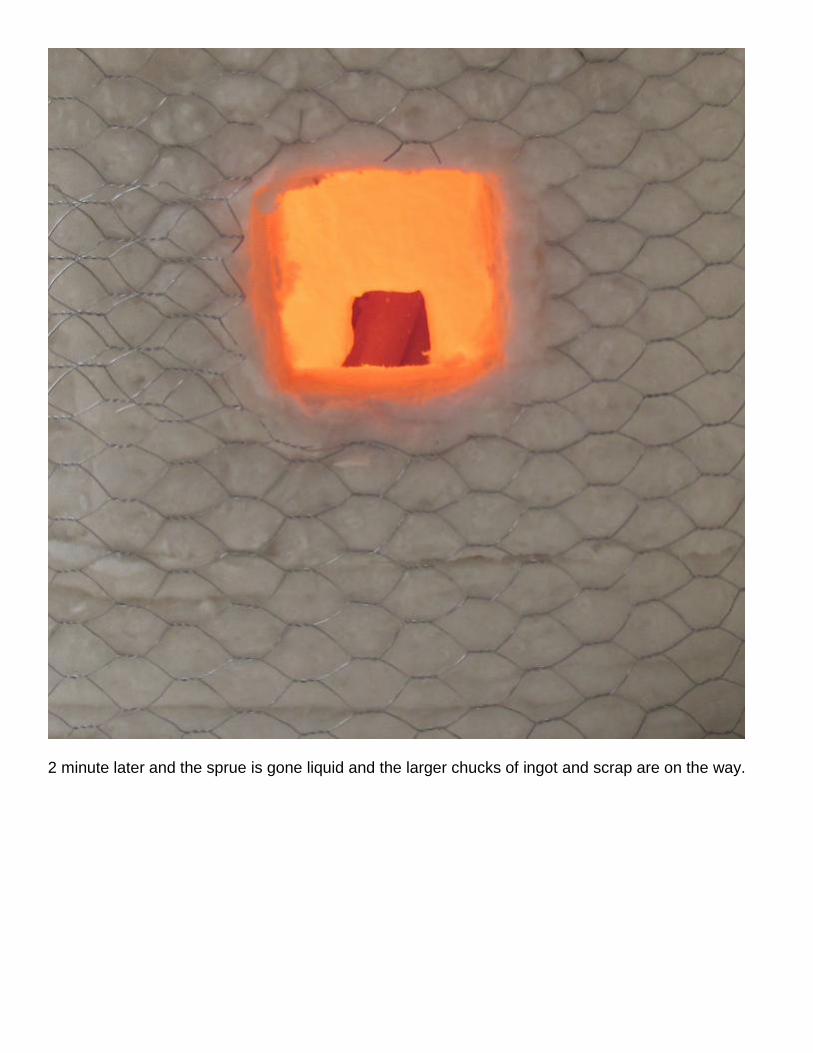
2 minute later and the sprue is gone liquid and the larger chucks of ingot and scrap are on the way.
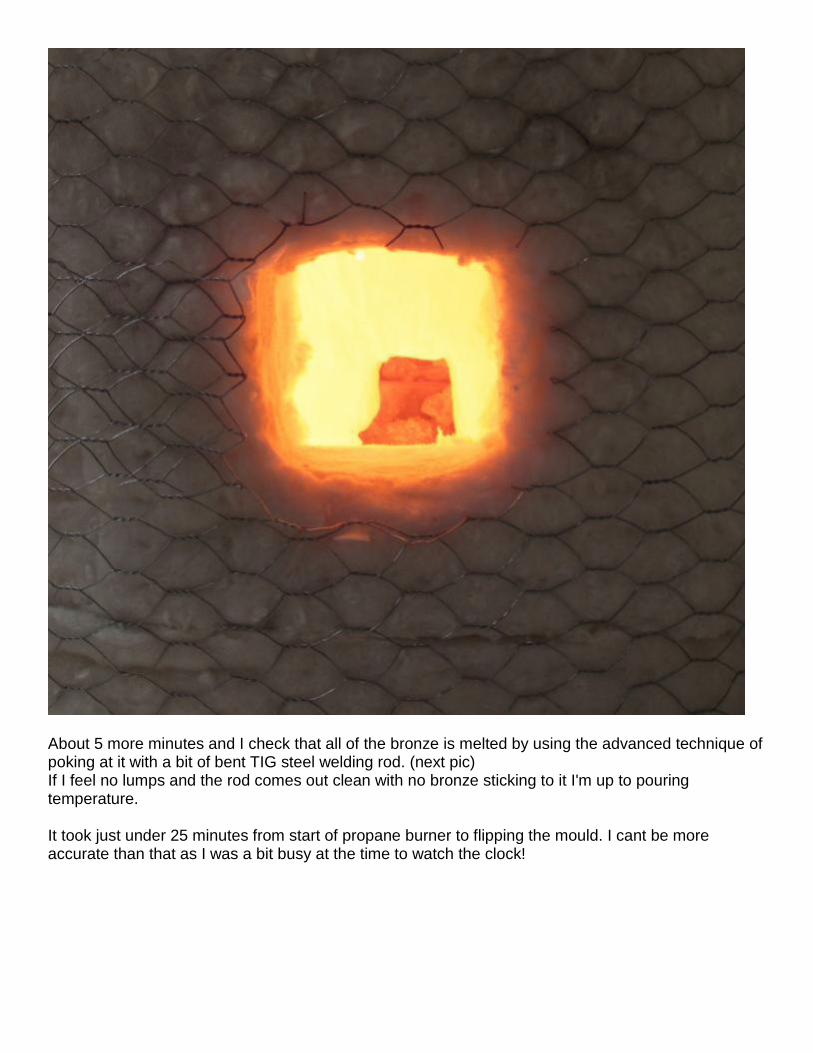
About 5 more minutes and I check that all of the bronze is melted by using the advanced technique of poking at it with a bit of bent TIG steel welding rod. (next pic) If I feel no lumps and the rod comes out clean with no bronze sticking to it I'm up to pouring temperature. It took just under 25 minutes from start of propane burner to flipping the mould. I cant be more accurate than that as I was a bit busy at the time to watch the clock!
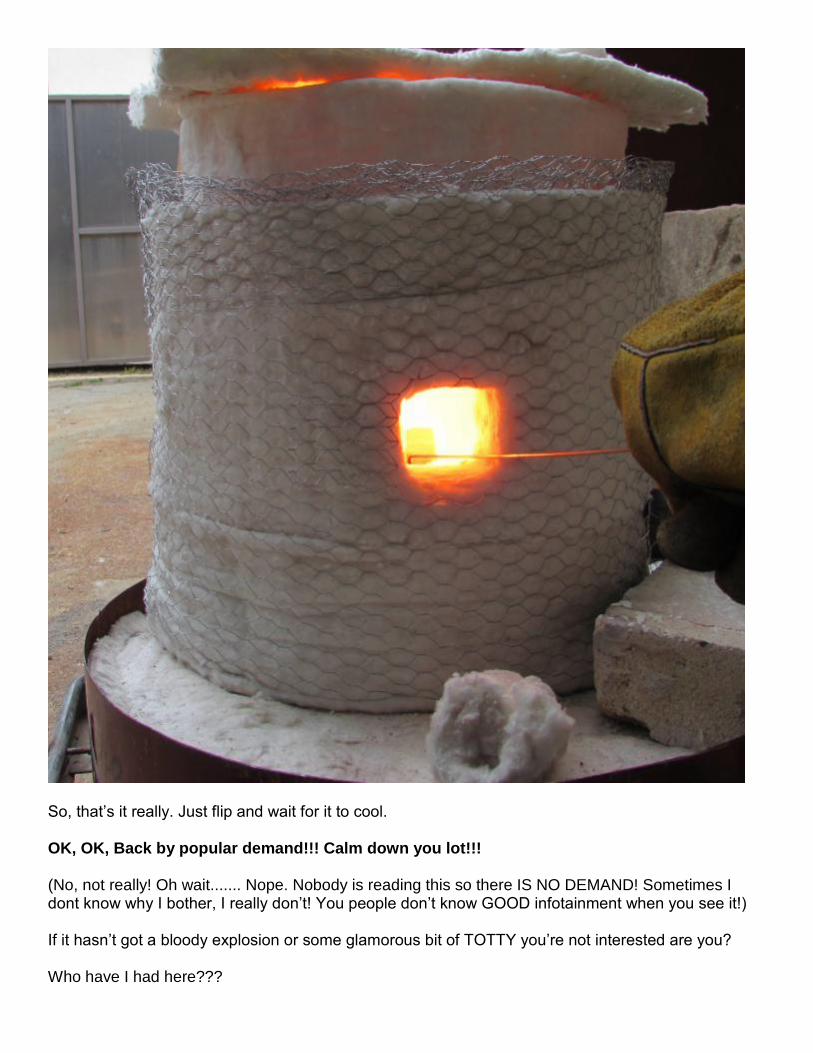
So, that’s it really. Just flip and wait for it to cool. OK, OK, Back by popular demand!!! Calm down you lot!!! (No, not really! Oh wait....... Nope. Nobody is reading this so there IS NO DEMAND! Sometimes I dont know why I bother, I really don’t! You people don’t know GOOD infotainment when you see it!) If it hasn’t got a bloody explosion or some glamorous bit of TOTTY you’re not interested are you? Who have I had here???

David H has popped in to say he'll try to have a look when he gets home after he’s cleaned his plaster bucket or de-fluffed his bellybutton or whatever. Im sure this is cos he's a nice guy and doesn’t want me to feel bad but he has to do that cos he's a moderator! And some old dude (peedee) whose using this masterpiece of a thread as some excuse to skive off work due to incontinence or something. I think I may have had another visitor but this was just a mistake due to him putting 'for your viewing pleasure' into a search engine and there being some kind of a mix-up! It’s not good enough. Just cos I'm not Grant Thomson you just don’t care! Well I've had enough!!! Sorry, I’ve calmed down now. I’ve done my meditation and I'm feeling much better. Right where was I? Oh yes, we are up to pour temperature and ready to flip it over. Now, i know I've been messing around with the jokes and things but I am going to be serious for a minute. I will try and attach a video of the flip pour so you can see how I do it. The emphasis is on I, me, how I do it. If you are going to try this I would STRONGLY recommend that you find a way to flip the mould with tongs so you are a safe distance from the molten metal. I feel confident doing it the way I do because I have been making ceramic shells for a long time and feel I know its limitations. I have tried several ways to do it safely and I feel I have the greatest control this way. This may not be the best way for you. Start small and use tongs if you are new to this. Seriously! Now, for those of you who have been thinking that that old thread 'youtube winners in metal casting' is due for an update, here you go. I've put it on photo bucket but not sure how to get it embedded. sorry.
http://vid1378.photobucket.com/album...psrjuccb2w.mp4 In my defence this wasn’t the slickest pour I've ever done. I forgot to turn the camera on until I had removed the burner from the furnace and then got a bit flustered when I realised! Number one rule kids, don’t get rushed when playing with molten metal! This led to a couple of mistakes that could have ended in tears but I was lucky on this day. I was confident that the shell was sound and I also know that there are no sudden impacts with this type of pour as all you are doing is 'rolling' the metal through the mould so there is very little weight forcing the 2 joined sections apart. Another up side to this technique is that any dross that floats while in the crucible stays on the surface when tipped over, therefore no inclusions in the cast, only on top of the pour cup. I hope this video is entertaining or of use to some of you. Ok, were on the home stretch now!
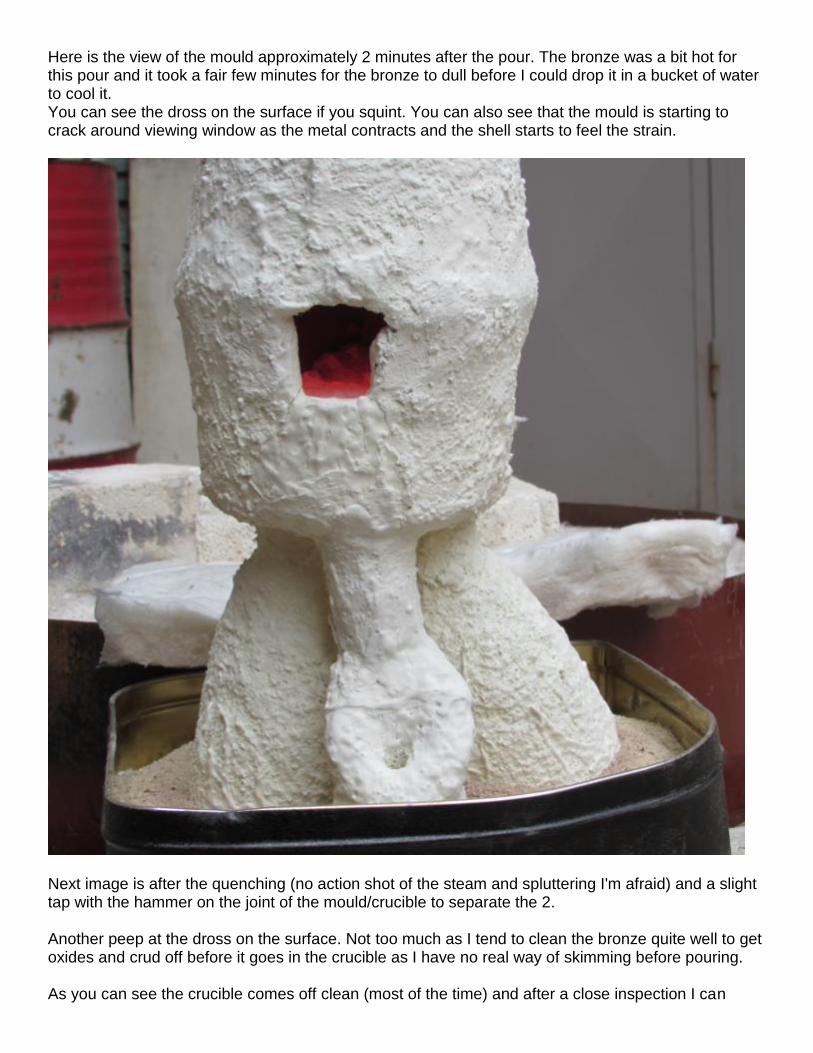
Here is the view of the mould approximately 2 minutes after the pour. The bronze was a bit hot for this pour and it took a fair few minutes for the bronze to dull before I could drop it in a bucket of water to cool it. You can see the dross on the surface if you squint. You can also see that the mould is starting to crack around viewing window as the metal contracts and the shell starts to feel the strain.
Next image is after the quenching (no action shot of the steam and spluttering I'm afraid) and a slight tap with the hammer on the joint of the mould/crucible to separate the 2. Another peep at the dross on the surface. Not too much as I tend to clean the bronze quite well to get oxides and crud off before it goes in the crucible as I have no real way of skimming before pouring. As you can see the crucible comes off clean (most of the time) and after a close inspection I can
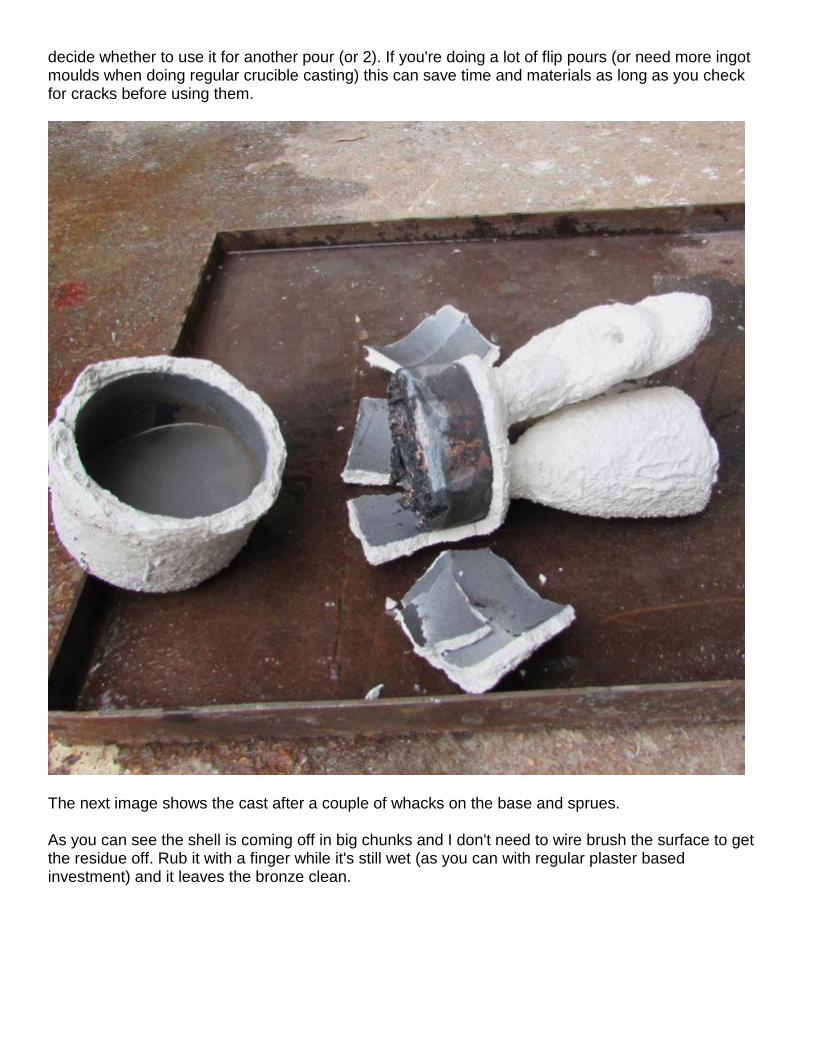
decide whether to use it for another pour (or 2). If you're doing a lot of flip pours (or need more ingot moulds when doing regular crucible casting) this can save time and materials as long as you check for cracks before using them.
The next image shows the cast after a couple of whacks on the base and sprues. As you can see the shell is coming off in big chunks and I don't need to wire brush the surface to get the residue off. Rub it with a finger while it's still wet (as you can with regular plaster based investment) and it leaves the bronze clean.
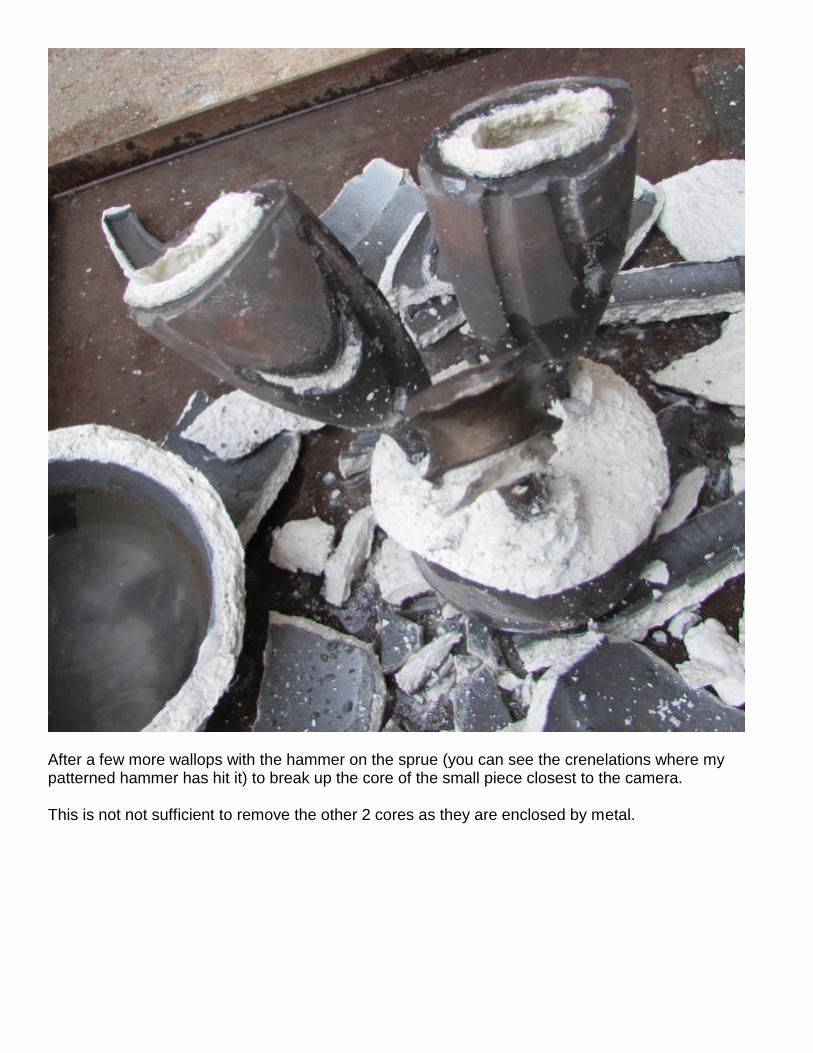
After a few more wallops with the hammer on the sprue (you can see the crenelations where my patterned hammer has hit it) to break up the core of the small piece closest to the camera. This is not not sufficient to remove the other 2 cores as they are enclosed by metal.
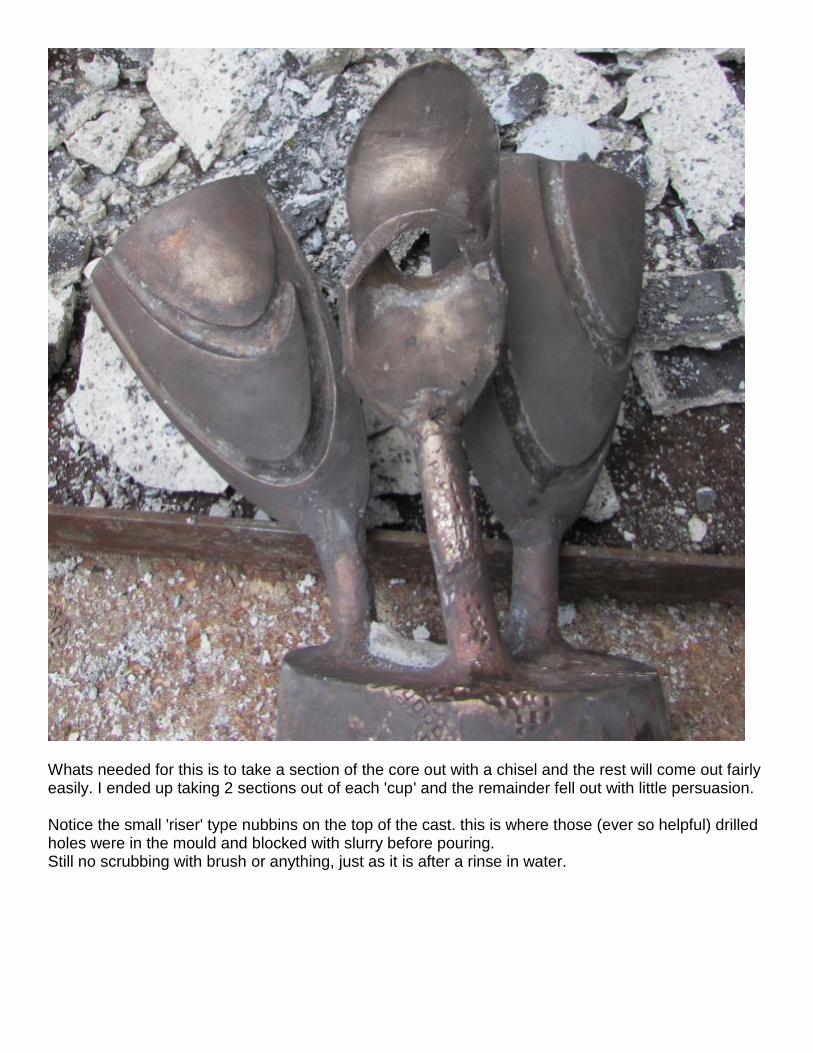
Whats needed for this is to take a section of the core out with a chisel and the rest will come out fairly easily. I ended up taking 2 sections out of each 'cup' and the remainder fell out with little persuasion. Notice the small 'riser' type nubbins on the top of the cast. this is where those (ever so helpful) drilled holes were in the mould and blocked with slurry before pouring. Still no scrubbing with brush or anything, just as it is after a rinse in water.
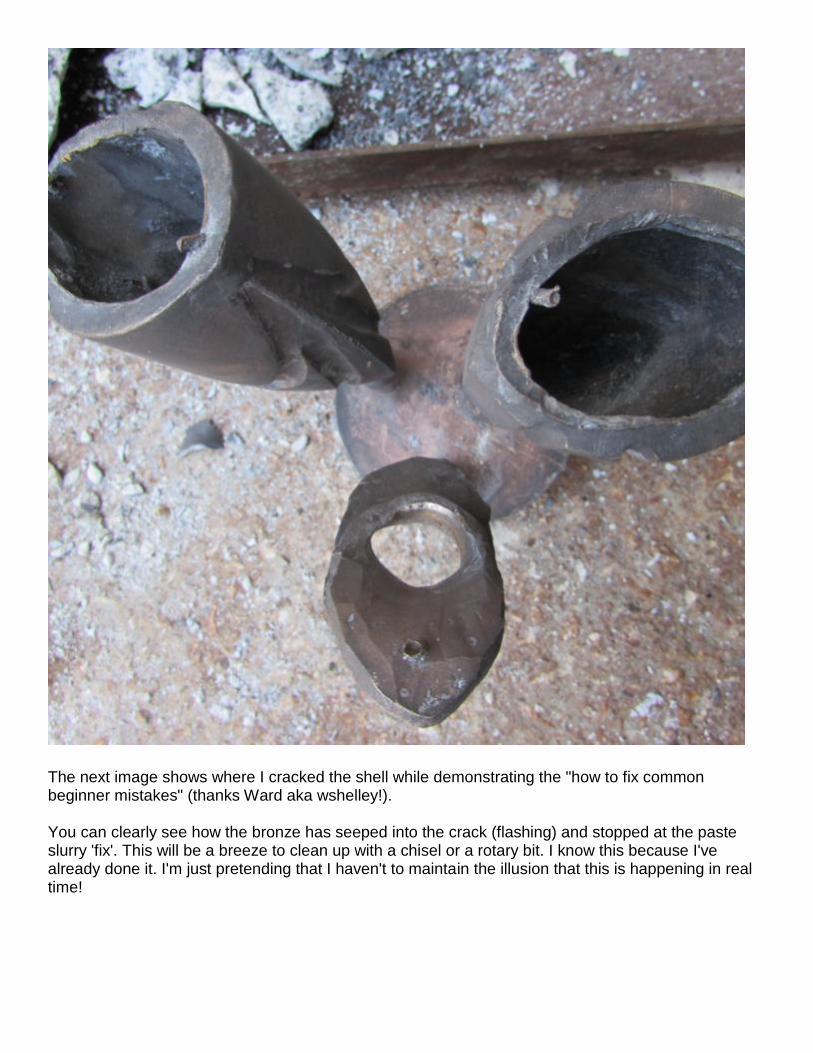
The next image shows where I cracked the shell while demonstrating the "how to fix common beginner mistakes" (thanks Ward aka wshelley!). You can clearly see how the bronze has seeped into the crack (flashing) and stopped at the paste slurry 'fix'. This will be a breeze to clean up with a chisel or a rotary bit. I know this because I've already done it. I'm just pretending that I haven't to maintain the illusion that this is happening in real time!
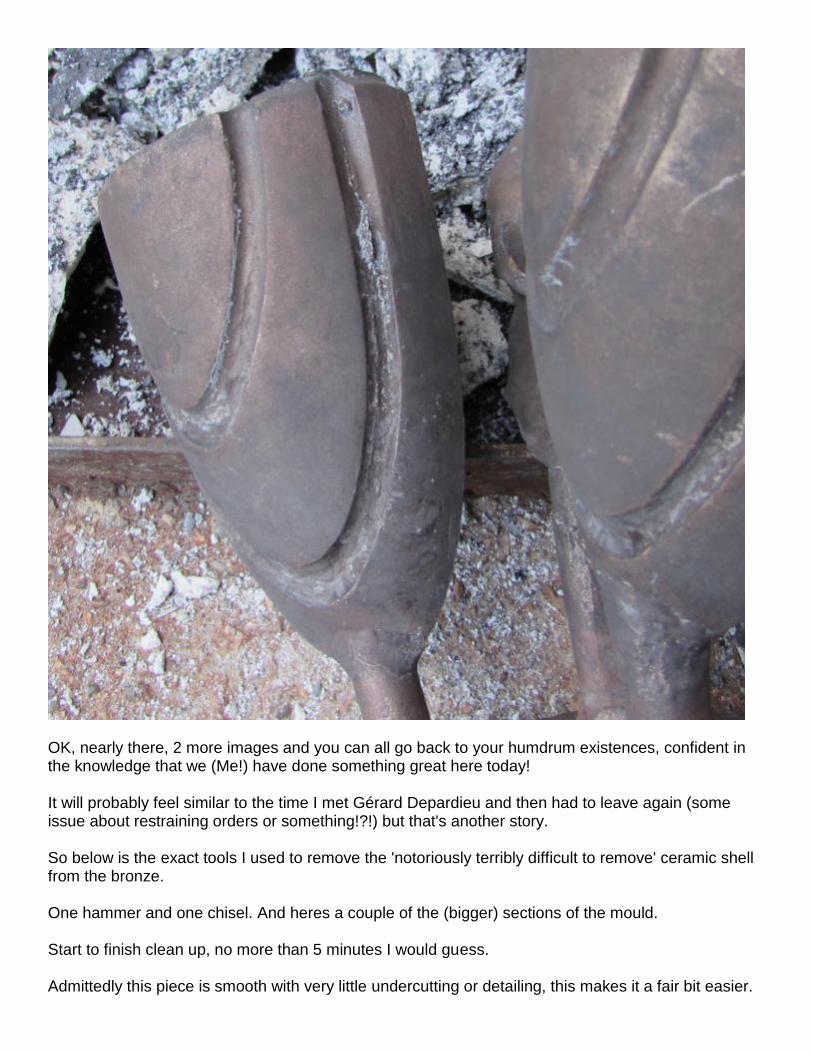
OK, nearly there, 2 more images and you can all go back to your humdrum existences, confident in the knowledge that we (Me!) have done something great here today! It will probably feel similar to the time I met Gérard Depardieu and then had to leave again (some issue about restraining orders or something!?!) but that's another story. So below is the exact tools I used to remove the 'notoriously terribly difficult to remove' ceramic shell from the bronze. One hammer and one chisel. And heres a couple of the (bigger) sections of the mould. Start to finish clean up, no more than 5 minutes I would guess. Admittedly this piece is smooth with very little undercutting or detailing, this makes it a fair bit easier.
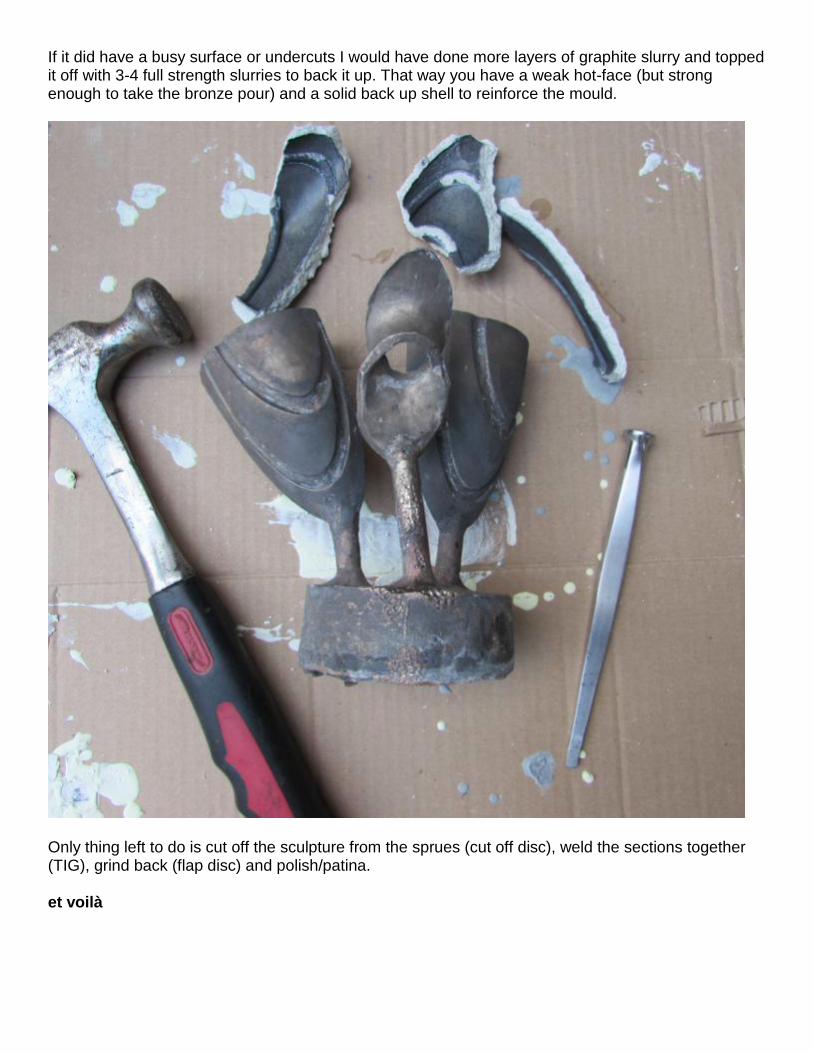
If it did have a busy surface or undercuts I would have done more layers of graphite slurry and topped it off with 3-4 full strength slurries to back it up. That way you have a weak hot-face (but strong enough to take the bronze pour) and a solid back up shell to reinforce the mould.
Only thing left to do is cut off the sculpture from the sprues (cut off disc), weld the sections together (TIG), grind back (flap disc) and polish/patina. et voilà
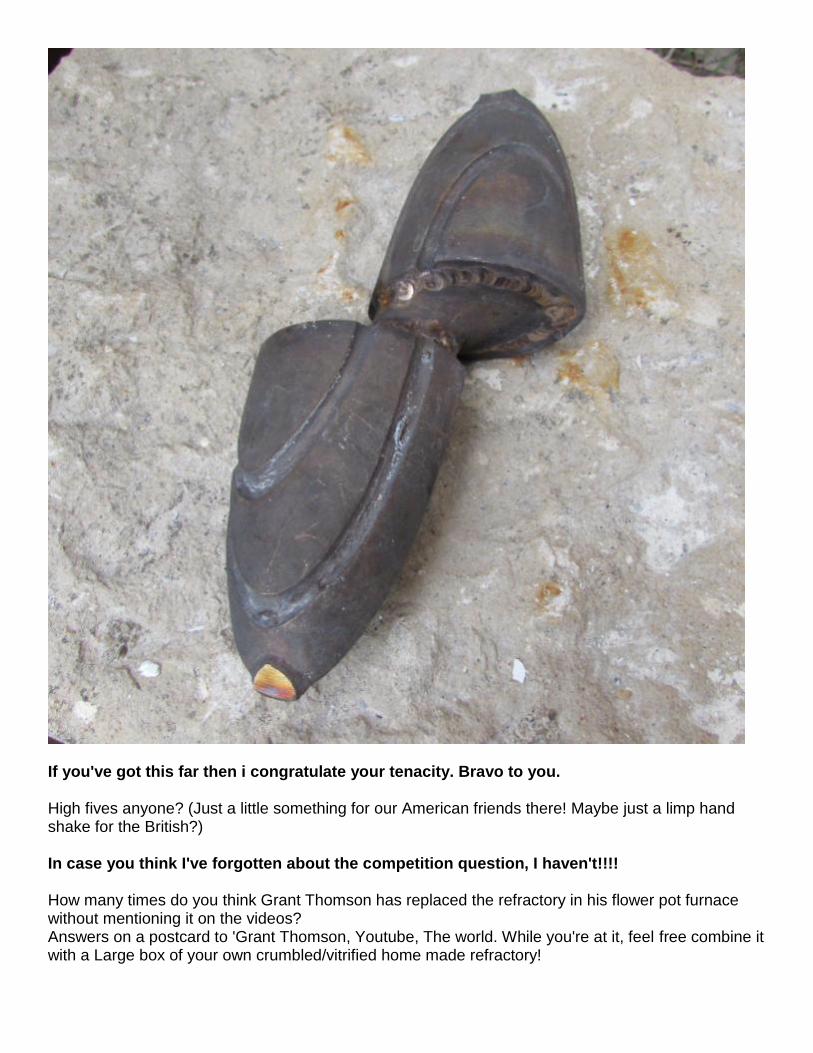
If you've got this far then i congratulate your tenacity. Bravo to you. High fives anyone? (Just a little something for our American friends there! Maybe just a limp hand shake for the British?) In case you think I've forgotten about the competition question, I haven't!!!! How many times do you think Grant Thomson has replaced the refractory in his flower pot furnace without mentioning it on the videos? Answers on a postcard to 'Grant Thomson, Youtube, The world. While you're at it, feel free combine it with a Large box of your own crumbled/vitrified home made refractory!

Ceramic Shell "Flip" Pours by Artopsy (I'm giving credit here, he did an amazing job of detailing his process!)