Embed Size (px)
Citation preview
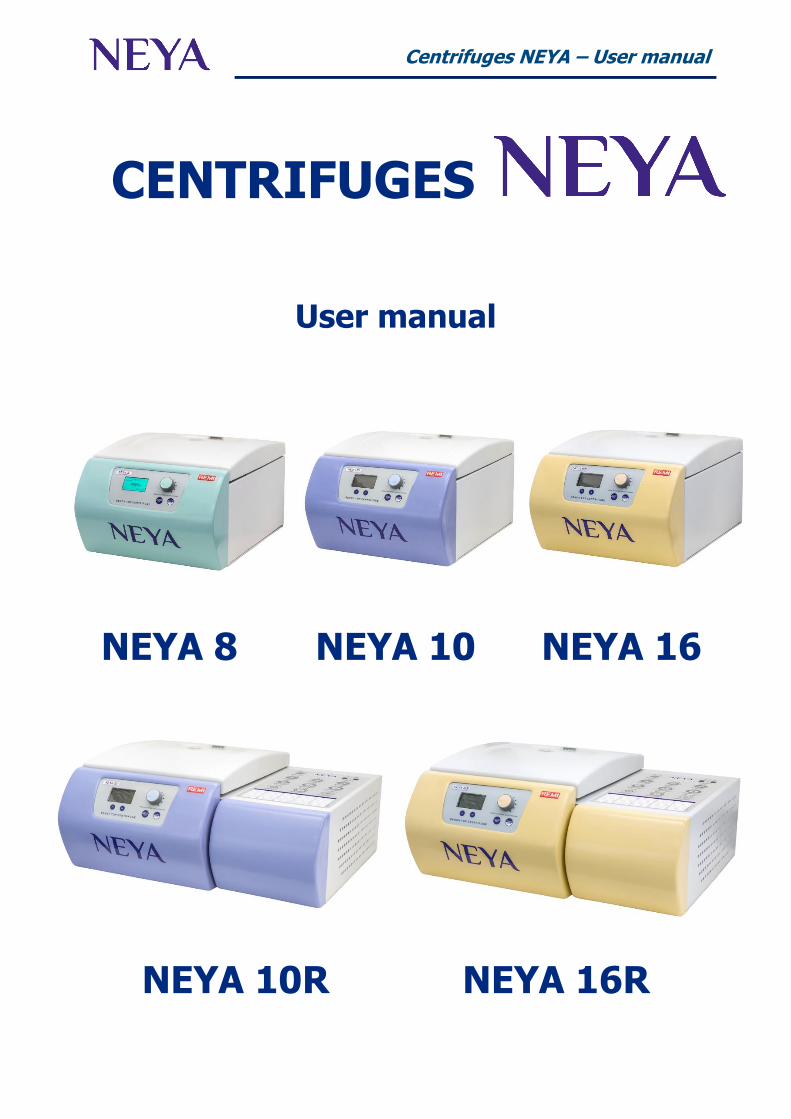
Centrifuges NEYA – User manual
CENTRIFUGES
User manual
NEYA 8 NEYA 10 NEYA 16
NEYA 10R NEYA 16R

Centrifuges NEYA – User manual
Index
1 Warranty 1
2 Unpacking of the centrifuge 2
3 Content of package 2
4 First use 2
4.1 Getting started 2
4.2 Parts of the instrument 3
5 Display e commands 4
6 Operation 6
6.1 Switching on the centrifuge 6
6.2 Opening the lid 6
6.3 Installation of the rotor 7
6.4 Load and balancing of the rotor 8
6.4.1 Automatic rotor detection 8
6.4.2 Load of the rotor 8
6.4.3 Balancing of the rotor 8
6.5 Message “Motor Imbalance” 10
6.6 Message “ERROR check imbalance switch” 10
6.7 Setting of programs (if present) 10
6.8 Setting of centrifugation cycle (only NEYA 8) 12
6.9 Selection of the program (if present) 12
6.10 Start/stop of a centrifugation cycle 12
6.11 Block/unblock of a program (if present) 14
6.12 PRECOOL function (if present) 15
6.13 SPIN function (if present) 15
7 SYSTEM menu 16
7.1.1 END cycle beep 16
7.1.2 Speed limit 16
7.1.3 Time/Date adjustment 17
7.1.4 Temperature unit 17
7.1.5 Factory reset 17
8 Clean and maintenance 18
8.1 Greasing of the motor shaft and the rotor pins 18
9 Disposal of electronic equipment 18

Centrifuges NEYA – User manual
Ver. 1.4 – 31/01/2017
1
1 Warranty
Thank you for purchasing a centrifuge NEYA. In normal use conditions, the instrument is guaranteed
for a period of 24 months from the date of purchase.
The warranty is valid only if the product is original.
It does not apply to any product or parts of it that have been damaged due to incorrect installation,
improper connections, improper use, accident or abnormal conditions of operation.
The manufacturer declines all responsibility for damage caused by failure to follow instructions, lack
of maintenance and any unauthorized modification.
Centrifuges NEYA – User manual
Ver. 1.4 – 31/01/2017
2
2 Unpacking of the centrifuge
Open the external packaging of the centrifuge and remove all the content.
Lift the centrifuge from the pack holding it from the bottom and taking care not to handle it in the front
part plastic but taking it in the metal part.
Place the centrifuge on the table as described at paragraph 4.1.
Put inside the external box all the packaging parts and conserve the total packaging.
IMPORTANT:
In case of shipment of the centrifuge to technical assistance, the user is required to pack it in its
original box to send it in for repairs. In case it is not present, pack it properly in order avoid damages
during transportation.
All eventual damages caused by improper packaging will be not covered by warranty.
3 Content of package The centrifuge is shipped complete of the below parts:
1. n. 1 wrench for fixing the rotor
2. n. 1 allen key for manual opening of the lid
3. n. 1 small bottle with maintenance grease
4. n. 1 power supply cord
5. n. 1 user manual
4 First use
4.1 Getting started The instrument has to be installed in the below conditions:
1. Dry, clean and stable work table with a flat horizontal surface
2. Respect minimum spaces around instrument 30 cm
3. Room temperature between 20 °C and 30 °C and relative humidity maximum of 80%
4. Power supply socket with earth connection
5. Power feed between 220-240 V - 50 Hz with minimum current intensity capacity of 5 A
Centrifuges NEYA – User manual
Ver. 1.4 – 31/01/2017
3
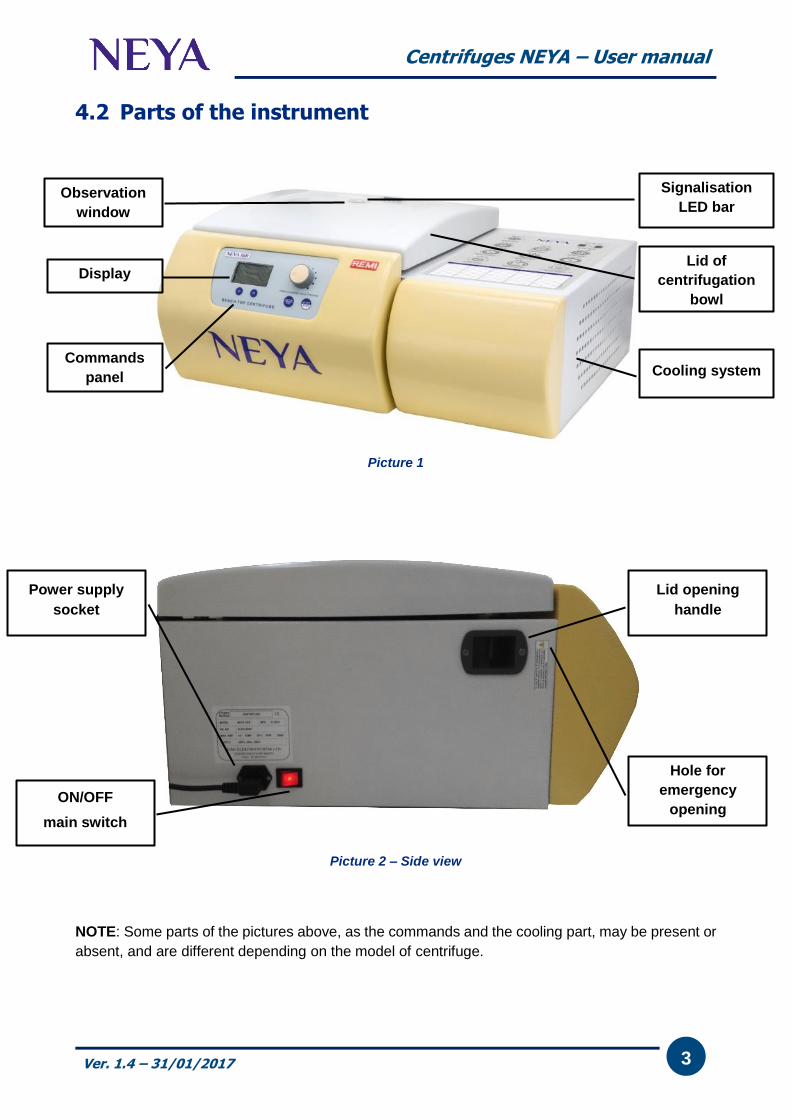
4.2 Parts of the instrument
Picture 1
Picture 2 – Side view
NOTE: Some parts of the pictures above, as the commands and the cooling part, may be present or
absent, and are different depending on the model of centrifuge.
Display
Commands
panel Cooling system
Lid of
centrifugation
bowl
Signalisation
LED bar Observation
window
Lid opening
handle
Hole for
emergency
opening
Power supply
socket
ON/OFF
main switch
Centrifuges NEYA – User manual
Ver. 1.4 – 31/01/2017
4
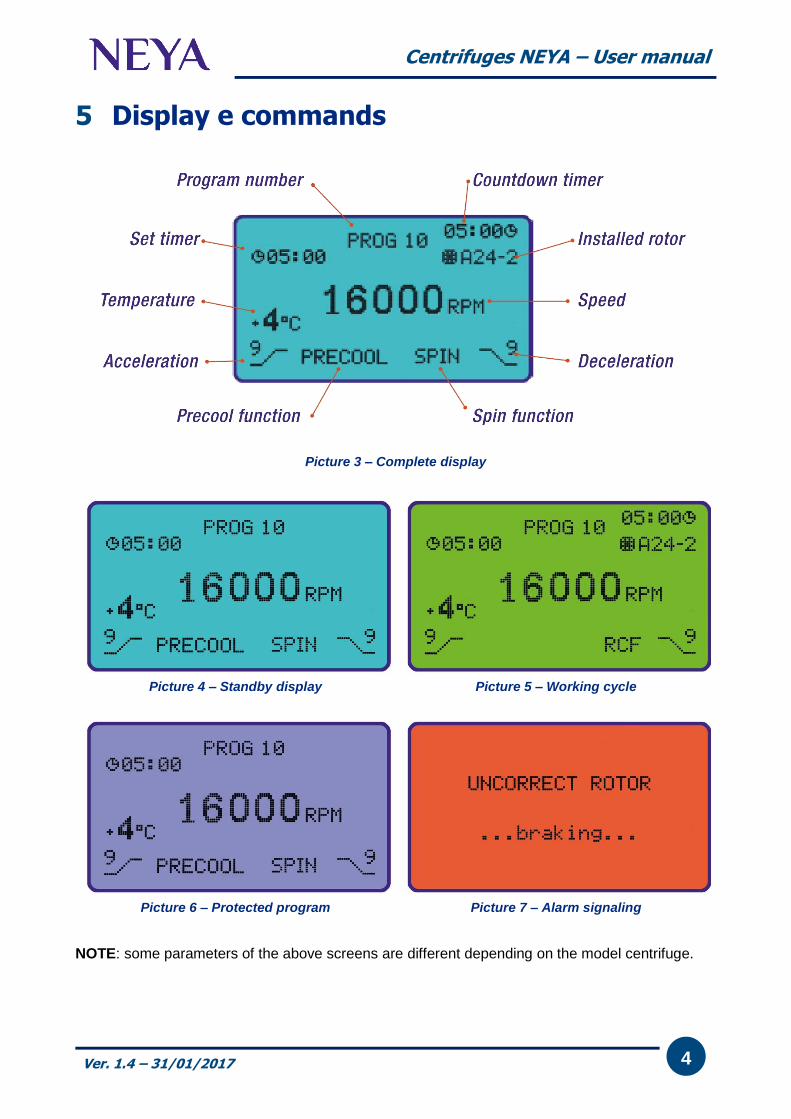
5 Display e commands
Picture 3 – Complete display
Picture 4 – Standby display Picture 5 – Working cycle
Picture 6 – Protected program Picture 7 – Alarm signaling
NOTE: some parameters of the above screens are different depending on the model centrifuge.
Centrifuges NEYA – User manual
Ver. 1.4 – 31/01/2017
5
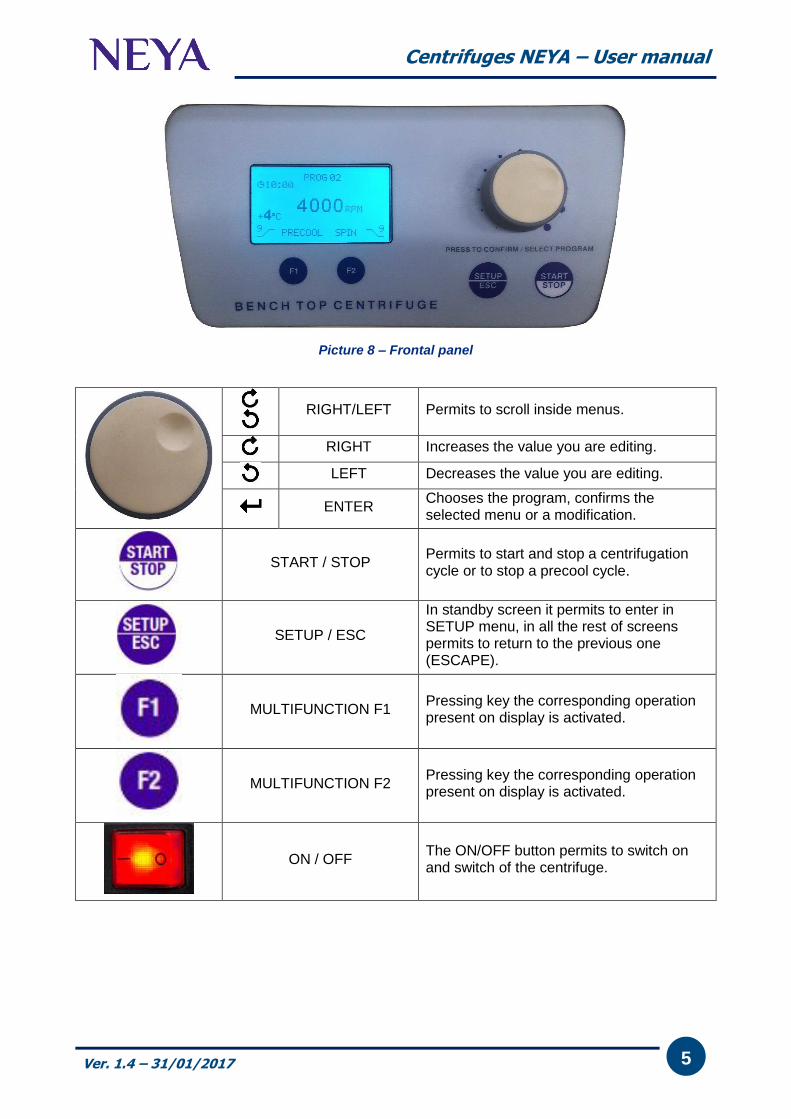
Picture 8 – Frontal panel
RIGHT/LEFT Permits to scroll inside menus.
RIGHT Increases the value you are editing.
LEFT Decreases the value you are editing.
ENTER Chooses the program, confirms the selected menu or a modification.
START / STOP Permits to start and stop a centrifugation cycle or to stop a precool cycle.
SETUP / ESC
In standby screen it permits to enter in SETUP menu, in all the rest of screens permits to return to the previous one (ESCAPE).
MULTIFUNCTION F1 Pressing key the corresponding operation present on display is activated.
MULTIFUNCTION F2 Pressing key the corresponding operation present on display is activated.
ON / OFF The ON/OFF button permits to switch on and switch of the centrifuge.
Centrifuges NEYA – User manual
Ver. 1.4 – 31/01/2017
6
6 Operation
6.1 Switching on the centrifuge Turn on the centrifuge by the button ON / OFF on the left side (front view).
The display switches on and shows for few seconds:
- centrifuge model
- software version
- date
- time
After a few seconds the standby screen is automatically displayed (see Picture 4).
6.2 Opening the lid To open the lid, the centrifuge has to be switched on and there must not be a work cycle in progress.
Move the opening lever of the lid on the left side (front view), the lid opens and rises up through the
action of the gas spring. If necessary conclude manually the opening of the lid.
IMPORTANT:
The centrifuge has a safety opening system usable in case of power supply absence.
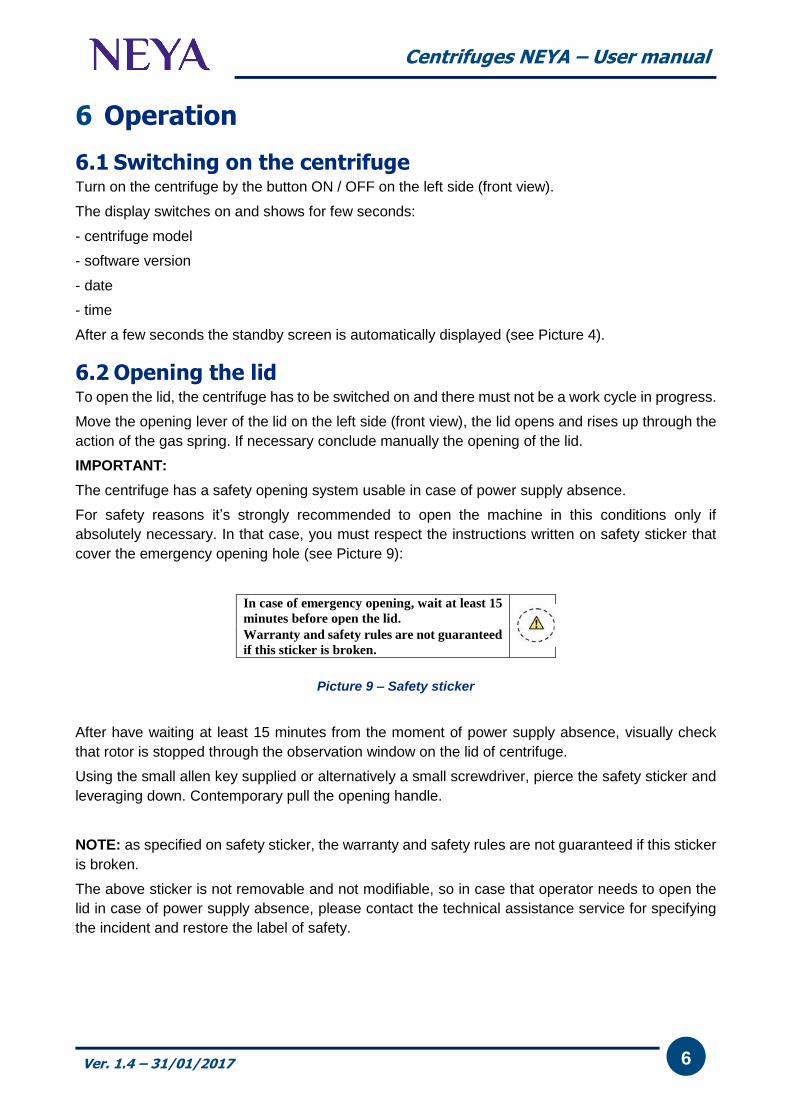
For safety reasons it’s strongly recommended to open the machine in this conditions only if
absolutely necessary. In that case, you must respect the instructions written on safety sticker that
cover the emergency opening hole (see Picture 9):
In case of emergency opening, wait at least 15
minutes before open the lid.
Warranty and safety rules are not guaranteed
if this sticker is broken.
Picture 9 – Safety sticker
After have waiting at least 15 minutes from the moment of power supply absence, visually check
that rotor is stopped through the observation window on the lid of centrifuge.
Using the small allen key supplied or alternatively a small screwdriver, pierce the safety sticker and
leveraging down. Contemporary pull the opening handle.
NOTE: as specified on safety sticker, the warranty and safety rules are not guaranteed if this sticker
is broken.
The above sticker is not removable and not modifiable, so in case that operator needs to open the
lid in case of power supply absence, please contact the technical assistance service for specifying
the incident and restore the label of safety.
Centrifuges NEYA – User manual
Ver. 1.4 – 31/01/2017
7
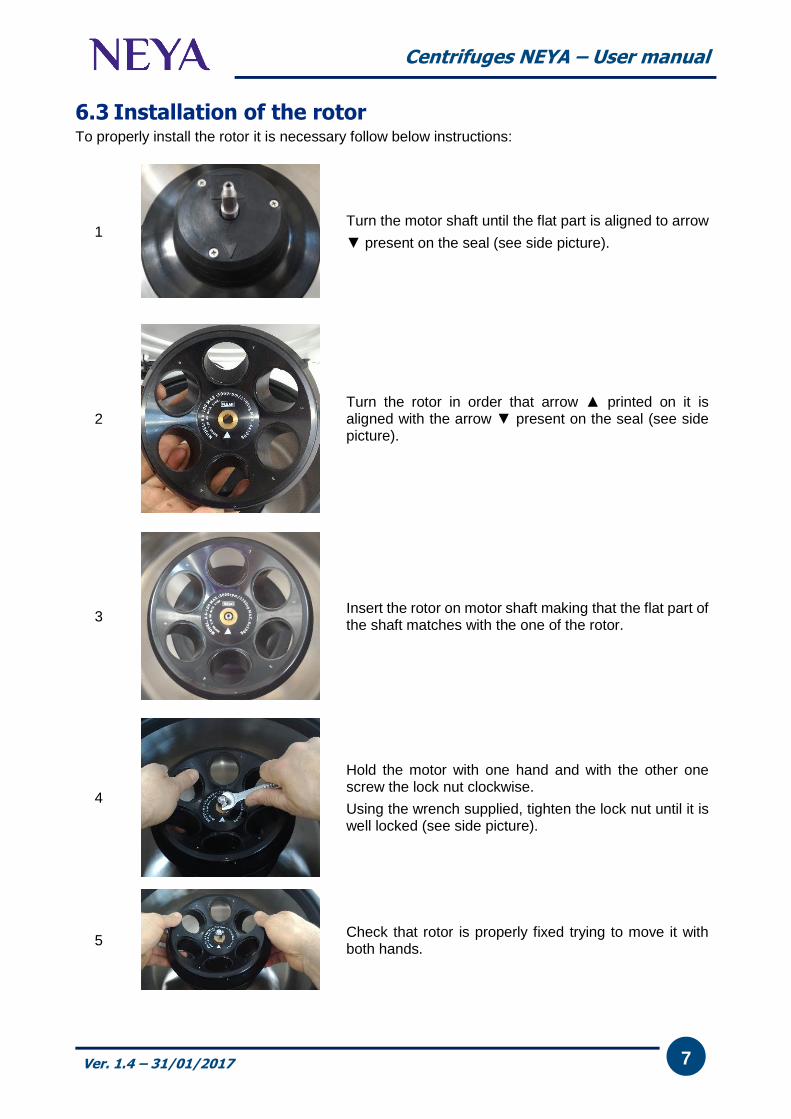
6.3 Installation of the rotor To properly install the rotor it is necessary follow below instructions:
1
Turn the motor shaft until the flat part is aligned to arrow
▼ present on the seal (see side picture).
2
Turn the rotor in order that arrow ▲ printed on it is aligned with the arrow ▼ present on the seal (see side picture).
3
Insert the rotor on motor shaft making that the flat part of the shaft matches with the one of the rotor.
4
Hold the motor with one hand and with the other one screw the lock nut clockwise.
Using the wrench supplied, tighten the lock nut until it is well locked (see side picture).
5
Check that rotor is properly fixed trying to move it with both hands.
Centrifuges NEYA – User manual
Ver. 1.4 – 31/01/2017
8
6.4 Load and balancing of the rotor 6.4.1 Automatic rotor detection
The centrifuge is equipped of an automatic rotor detection system.
This feature is very important for the safety of operator and of the machine, which prevents that:
- the centrifuge works beyond the speed limit of the rotor
- the centrifuge works without rotor installed
IMPORTANT:
Even if it’s not necessary set the rotor during programming and the automatic recognition avoids to
exceed the maximum permitted speed, it is still essential that the operator knows well the limits of
the rotor and accessories with which equips the machine.
These limits are always specified on the accessories.
6.4.2 Load of the rotor
IMPORTANT:
The centrifuge has been designed and built to centrifuge liquids or liquid samples containing
small solid particles.
It is strictly forbidden centrifuge solids of any kind. Any damage caused by the use during
centrifugation of this type of materials is not covered by warranty.
Moreover also the centrifugation of explosive materials or having dangerous chemical
reactions is strictly prohibited. Any damage caused by the use during centrifugation of this type
of materials is not covered by warranty.
It is strictly forbidden to centrifuge samples loaded directly into the metal bucket or carrier.
Samples must always be centrifuged within a container (tube or bottle with flat bottom).
Any damage caused by failure to comply with these conditions of use is not covered by warranty.
The samples to be centrifuged should never exceed the density of 1.2 g/ml. The tubes must be
realized in very good quality material. They tends to heat up during centrifugation, so before use
them check their temperature limits. Moreover check their speed limit that often is lower than the one
of rotor: for example for glass tubes. In case of the tubes have caps, seal properly them before
centrifugation, in order to avoid eventual losses of sample.
6.4.3 Balancing of the rotor
IMPORTANT:
Before to start a centrifugation cycle is essential to properly balance the rotor loads.
The load balancing should always be performed in accordance with the rule of the loads
symmetry, which must always be considered in terms of weight and not by volume
Rotors are generally used completely full: all the places are filled with tubes. If the samples are not
sufficient to fill all the places, it’s recommended to use all them filling the empty ones by tubes with
water.
This permits the correct symmetric balancing necessary for acceleration and deceleration phases
more linear.
In any case, both with complete filling or with partially filling, it is absolutely necessary to
distribute the loads symmetrically around the axis of the rotor.
Centrifuges NEYA – User manual
Ver. 1.4 – 31/01/2017
9
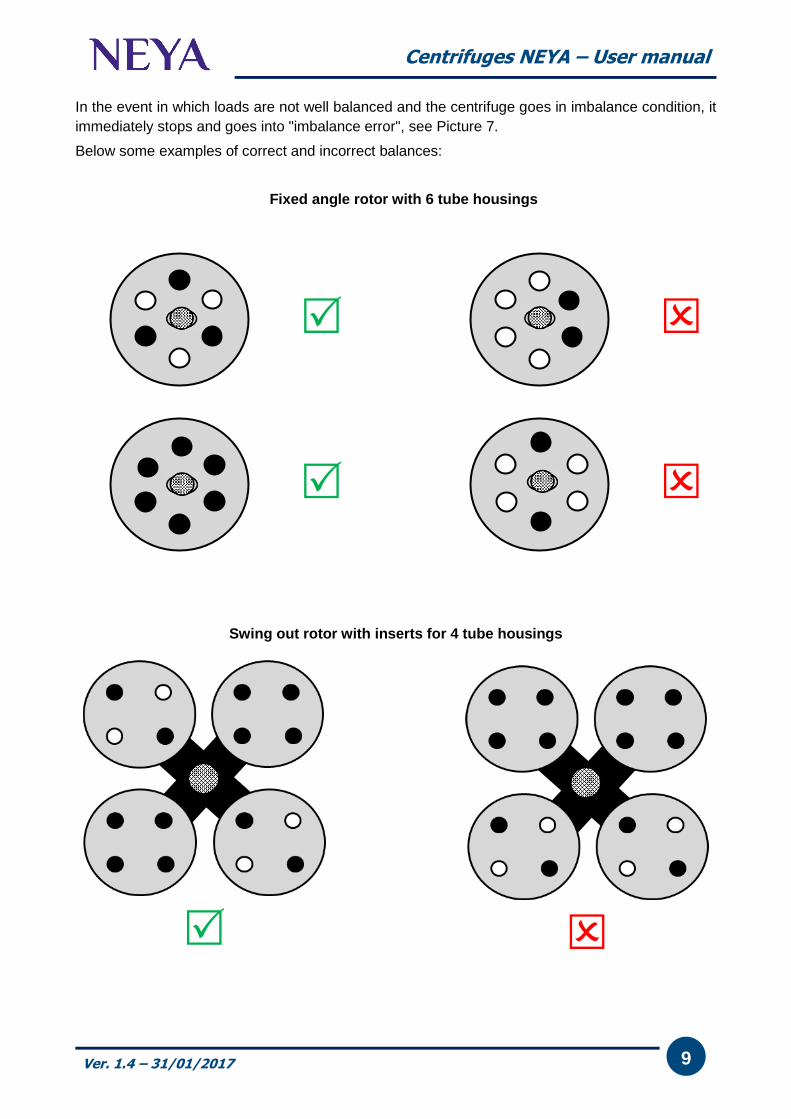
In the event in which loads are not well balanced and the centrifuge goes in imbalance condition, it
immediately stops and goes into "imbalance error", see Picture 7.
Below some examples of correct and incorrect balances:
Fixed angle rotor with 6 tube housings
Swing out rotor with inserts for 4 tube housings
Centrifuges NEYA – User manual
Ver. 1.4 – 31/01/2017
10
6.5 Message “Motor Imbalance” The centrifuge is equipped by an automatic system for imbalance detection.
In the event that it is used with a load not balanced correctly, the machine will automatically stop and
signals a fault to the operator with intermittent beep and message "Motor Imbalance" on flashing red
screen.
If this occurs, you should wait until the centrifuge stops and open the lid. Opening the lid the error
message will disappear.
Once you open the lid to check the correct load balancing as described at § 6.4
6.6 Message “ERROR check imbalance switch” IMPORTANT: The system for the imbalance detection is magnetic, so it can sometimes happen that
it remains "closed" and then the centrifuge gives the following error message "ERROR Check
imbalance switch".
To eliminate the error is sufficient to slightly push for a couple of seconds the motor shaft towards
the rear part of the centrifuge by pressing directly the rotor by the hand. If it’s necessary repeat the
operation.
IMPORTANT: when you switch on the centrifuge for the first time, it may give the above error
message. The situation is normal and is due to the transport of the machine with tabs that hold the
motor shaft. Follow the steps above to clear the error.
6.7 Setting of programs (if present) The follow instructions are valid for centrifuges NEYA 10/10R and NEYA 16/16R. To set
centrifugation parameters for NEYA 8 please refer to paragraph 6.8.
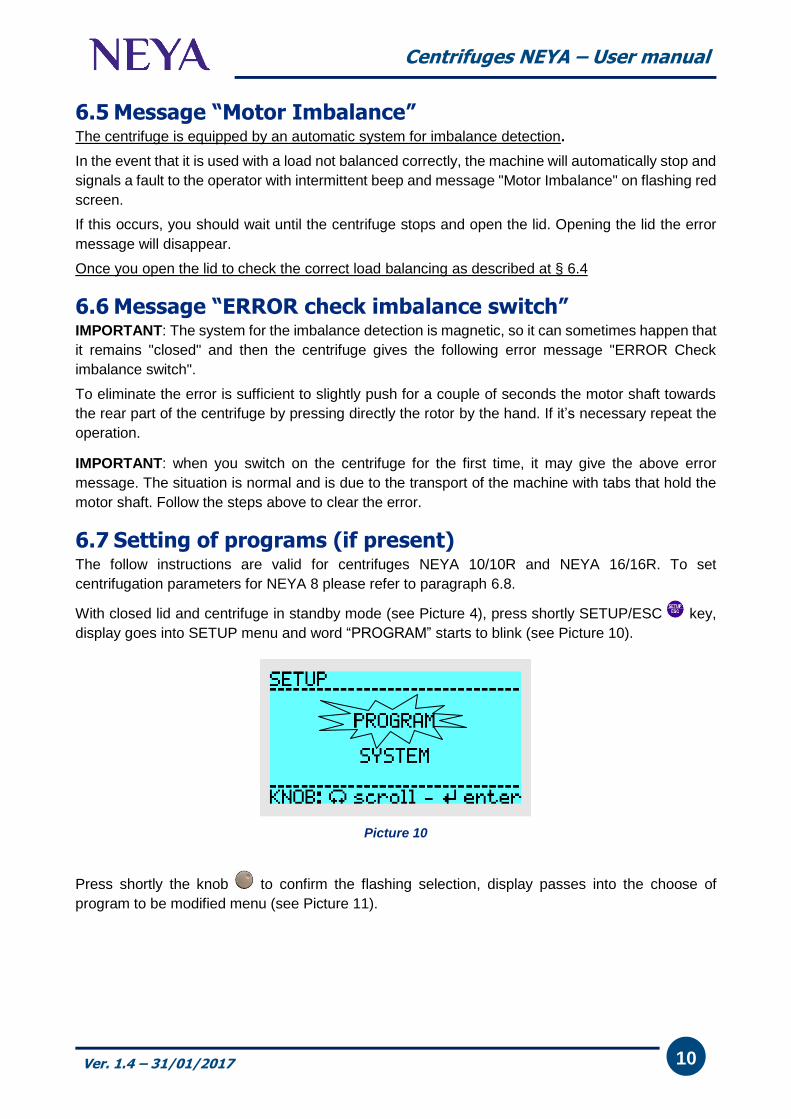
With closed lid and centrifuge in standby mode (see Picture 4), press shortly SETUP/ESC key,
display goes into SETUP menu and word “PROGRAM” starts to blink (see Picture 10).
Picture 10
Press shortly the knob to confirm the flashing selection, display passes into the choose of
program to be modified menu (see Picture 11).
Centrifuges NEYA – User manual
Ver. 1.4 – 31/01/2017
11
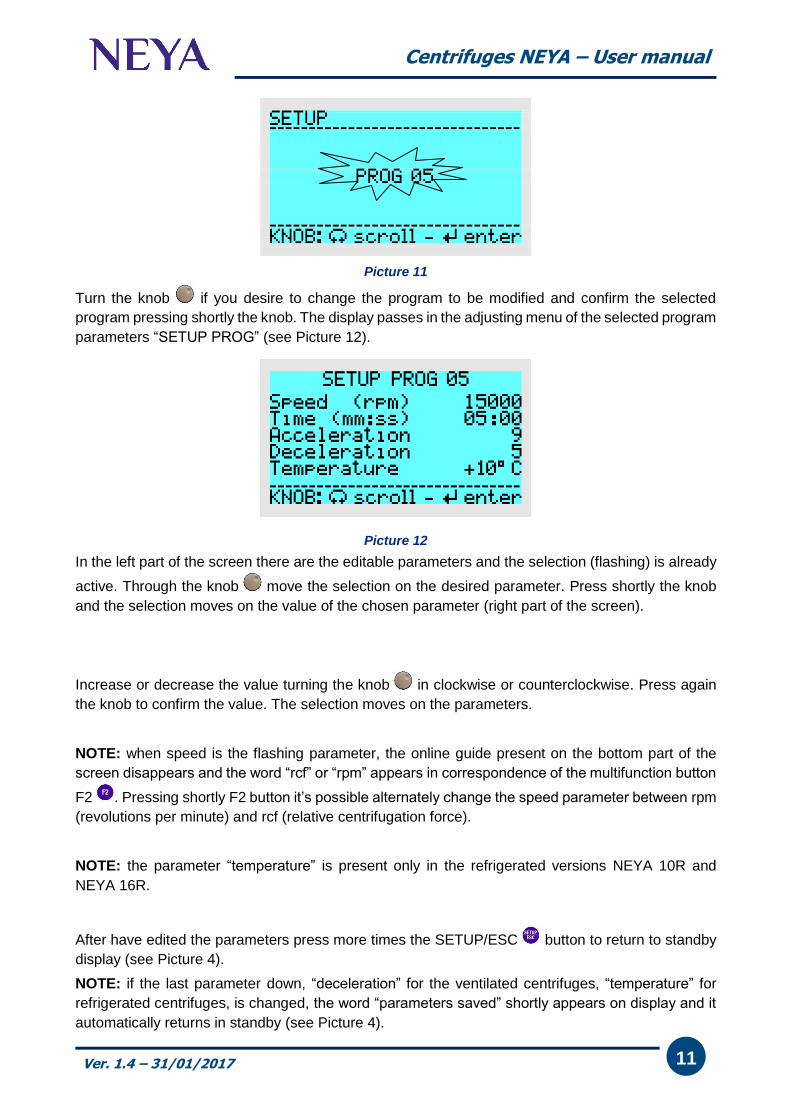
Picture 11
Turn the knob if you desire to change the program to be modified and confirm the selected
program pressing shortly the knob. The display passes in the adjusting menu of the selected program
parameters “SETUP PROG” (see Picture 12).
Picture 12
In the left part of the screen there are the editable parameters and the selection (flashing) is already
active. Through the knob move the selection on the desired parameter. Press shortly the knob
and the selection moves on the value of the chosen parameter (right part of the screen).
Increase or decrease the value turning the knob in clockwise or counterclockwise. Press again
the knob to confirm the value. The selection moves on the parameters.
NOTE: when speed is the flashing parameter, the online guide present on the bottom part of the
screen disappears and the word “rcf” or “rpm” appears in correspondence of the multifunction button
F2 . Pressing shortly F2 button it’s possible alternately change the speed parameter between rpm
(revolutions per minute) and rcf (relative centrifugation force).
NOTE: the parameter “temperature” is present only in the refrigerated versions NEYA 10R and
NEYA 16R.
After have edited the parameters press more times the SETUP/ESC button to return to standby
display (see Picture 4).
NOTE: if the last parameter down, “deceleration” for the ventilated centrifuges, “temperature” for
refrigerated centrifuges, is changed, the word “parameters saved” shortly appears on display and it
automatically returns in standby (see Picture 4).
x x x x x x x x x x x x x x x x x x x x
x x x x x x x
x x x x x x x
x x x x x x x x x x x x x x
x x x x x x
x x x x x x
x x x x x x x x x x x x x x
x x x x x x x x x x x x x x x x x x x x x x x x x x x x x x x x x x x x x x x x x x x x x x x x x x x x x x x x x x x x x x x x x x x x x x x x x x x x x x x x x x x x x x x x x x x x x x x x
x x x x x x x x x x x x x x x x x x x x x x
x x x x x x x x x x x
x x x x x x x x x x x x x x
x x x x x x x x x x x x x x x x x x
x x x x x x x x x x x
x x x x x x x x x x x
x x x x x x x x x x x x x x x x
x x x x x x x x x x x x x x x x x x x x x x x x x x x x x x x x x x x x x x x x x x x x x x x x x x x x x x x x x x x x x x x x x x x x x x x x x x x x x x x x x x x x x x x x x x x x x x x x
x x x x x x x x x x x x x x x x x x x x x x
x x x x x x x x x x x x x x x x
x x x x x x x x x x x x x x x x x x x x x x x x x x x x x x x x x x x x x x x x x x x x
x x x x x x x x x x x x x x x x x x x x x x x x x x x x x x x x x x x x
x x x x x x x x x x x x x x x x x x x x x x x x x x x x x x x x x x x x x x x x x x x x x x x
x x x x x x x x x x x x x x x x x x x x x x x x x x x x x x x x x
x x x x x x x x x x x x x x x x x x x x x x x x x x x x x x x x x x x x x x x x x x x x x x
Centrifuges NEYA – User manual
Ver. 1.4 – 31/01/2017
12
6.8 Setting of centrifugation cycle (only NEYA 8)
With closed lid and centrifuge in standby mode (see Picture 4), press shortly SETUP/ESC key,
display goes into SETUP menu of centrifugation parameters.
In the left part of the screen there are the editable parameters and the selection (flashing) is already
active. Through the knob move the selection on the desired parameter. Press shortly the knob
and the selection moves on the value of the chosen parameter (right part of the screen).
Increase or decrease the value turning the knob in clockwise or counterclockwise. Press again
the knob to confirm the value. The selection moves on the parameters.
After have edited the parameters press more times the SETUP/ESC button to return to standby
display (see Picture 4).
NOTE: if the last parameter down “deceleration” is changed, the word “parameters saved” shortly
appears on display and it automatically returns in standby (see Picture 4).
6.9 Selection of the program (if present)
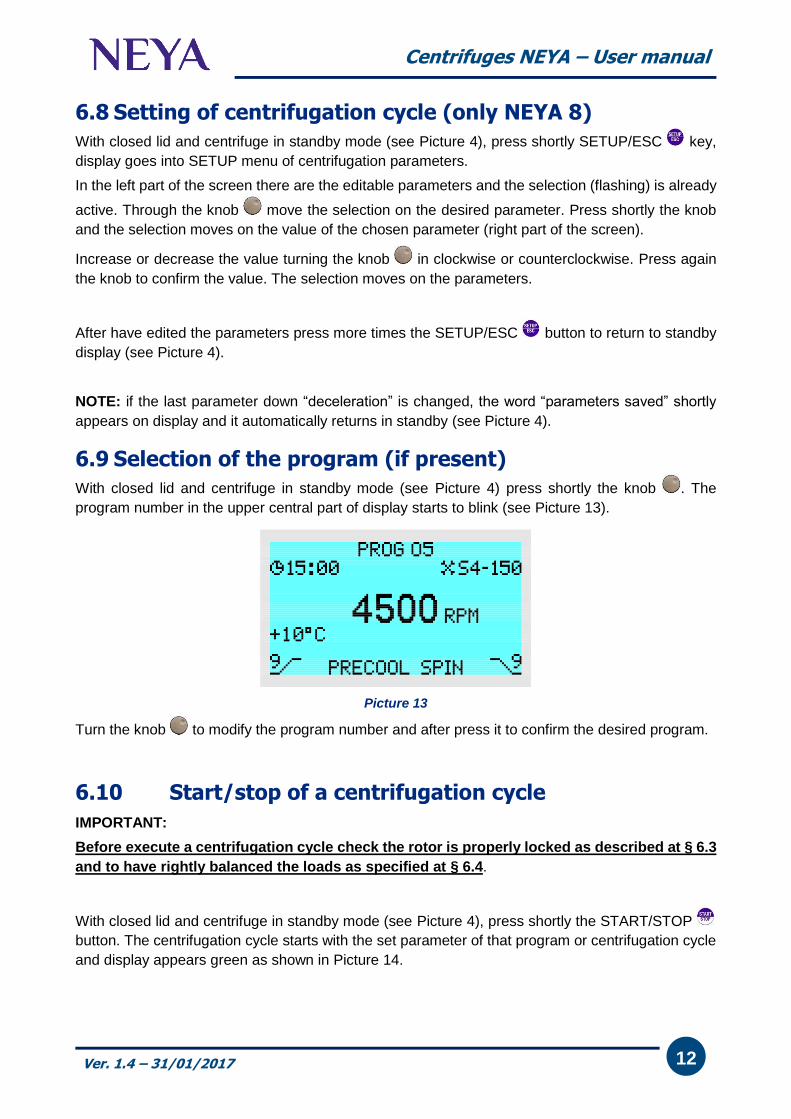
With closed lid and centrifuge in standby mode (see Picture 4) press shortly the knob . The
program number in the upper central part of display starts to blink (see Picture 13).
Picture 13
Turn the knob to modify the program number and after press it to confirm the desired program.
6.10 Start/stop of a centrifugation cycle
IMPORTANT:
Before execute a centrifugation cycle check the rotor is properly locked as described at § 6.3
and to have rightly balanced the loads as specified at § 6.4.
With closed lid and centrifuge in standby mode (see Picture 4), press shortly the START/STOP
button. The centrifugation cycle starts with the set parameter of that program or centrifugation cycle
and display appears green as shown in Picture 14.
x x x x x x x x x x x x x x x x x x x x x x
x x x x x x x x x x x
x x x x x x x x x x x x x x
x x x x x x x x x x x x x x x x x
x x x x x x x x x x
x x x x x x x x x x x
x x x x x x x x x x x x x x x
x x x x x x x x x x x x x x x x x x x x x x x x x x x x x x x
x x x x x x x x x x x x x x x x x x x x x x x x
x x x x x x x x x x x x x x x x x x x x x x x x x x x x x x x
x x x x x x x x x x x x x x x x x x x x x x x x x x x
x x x x x x x x x x x x x x x x x x x x x x x
x x x x x x x x x x x x x x x x x x x x x x
x x x x x x x x x x x x x x x x x x x x x x x x x x x x x x x x x
x x x x x x x x x x x x x x x x x x x
x x x x x x x x x x x x x x x x x x x x x x x x
x x x x x x x x x x x x x
x x x x x x x x x x x x x x
x x x x x x x x x x x x x x
x x x x x x x x x x x x x x x x x x x
x x x x x x x x x x x x x x x x x x x x
x x x x x x x x x x x x x x x x x x x x x x x x x x x
x x x x x x x x x x x x x x x x x x x x x x
x x x x x x x x x x x x x x x x x x x x x x x x x x x
x x x x x x x x x x x x x x x x x x x x x x x x x x x x x x x x x
x x x x x x x x x x x x x x x x x x x x x
x x x x x x x x x x x x x x x x x x x x x x x x x x x x
x x x x x x x x x x x x x x x x x x x x x x
x x x x x x x x x x
x x x x x x x x x
x x x x x x x x x
x x x x x x x x x x
x x x x x x
x x x x x x
x x x x x x x x x
x x x x x x
x x x x
x x x x x x x x x x x x x x
x x x x x x x x x x x x x x x x x x x x x x x x x x x x x x x x x x x x x x x x x x x x x x
x x x x x x x x x x x x x x x x x x x x x x
x x x x x x x x x x x x x x x x x x x x x x
x x x x x x x x x x x x x x x x x x x x x x x x x x x x x x x x x x x
x x x x x x x x x x x x x x x x x x
x x x x x x x x x x x x x x x x x x
x x x x x x x x x x x x x x x x x x x x x x x x x x x x x x x x x x x x x x x x x x
Centrifuges NEYA – User manual
Ver. 1.4 – 31/01/2017
13
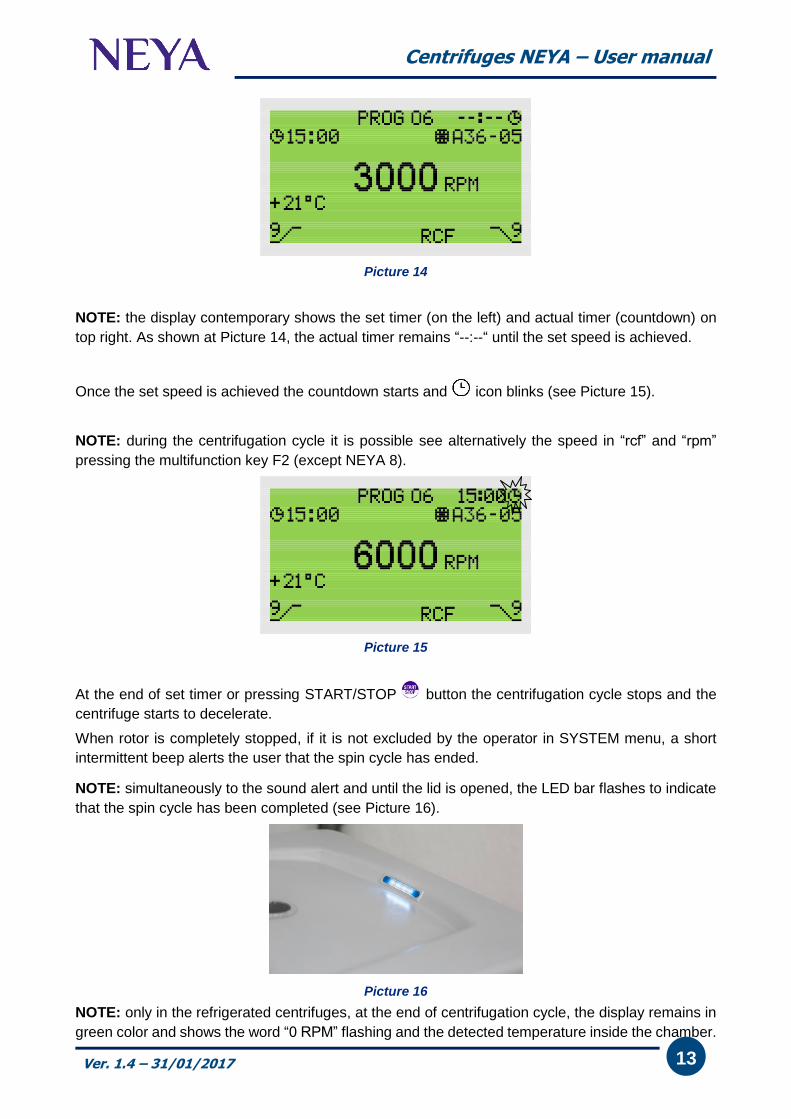
Picture 14
NOTE: the display contemporary shows the set timer (on the left) and actual timer (countdown) on
top right. As shown at Picture 14, the actual timer remains “--:--“ until the set speed is achieved.
Once the set speed is achieved the countdown starts and icon blinks (see Picture 15).
NOTE: during the centrifugation cycle it is possible see alternatively the speed in “rcf” and “rpm”
pressing the multifunction key F2 (except NEYA 8).
Picture 15
At the end of set timer or pressing START/STOP button the centrifugation cycle stops and the
centrifuge starts to decelerate.
When rotor is completely stopped, if it is not excluded by the operator in SYSTEM menu, a short
intermittent beep alerts the user that the spin cycle has ended.
NOTE: simultaneously to the sound alert and until the lid is opened, the LED bar flashes to indicate
that the spin cycle has been completed (see Picture 16).
Picture 16
NOTE: only in the refrigerated centrifuges, at the end of centrifugation cycle, the display remains in
green color and shows the word “0 RPM” flashing and the detected temperature inside the chamber.
x x x x x x x x x x x x x x x x x x x x x x
x x x x x x x x x x x x x x x x
x x x x x x x x x x x x x x x
x x x x x x x x x x x x x x x x x x x x x x x x x x x x x x x x x x x x x
x x x x x x x x x x x x x x x
x x x x x x x x x x x x x x x
x x x x x x x x x x x x x x x x x x
x x x x x x x x x x x x x x x x x x x x x x x x x x x x x x x x x x x x x x
x x x x x x x x x x x x x x x x x x x x x x x
x x x x x x x x x x x x x x x x x x x x x x x x x x x x x x x x x x x x
x x x x x x x x x x x x x x x x x x x x x x x x x x x x x x x x
x x x x x x x x x x x x x x x x x x x x x x x x x x x x x
x x x x x x x x x x x x x x x x x x x x x x x x x
x x x x x x x x x x x x x x x x x x x x x x x x x x x x x x x x x x x x
x x x x x x x x x x x x x x x x x x x
x x x x x x x x x x x x x x x x x x x x x x x x x x x
x x x x x x x x x x x x x x x x x
x x x x x x x x x x x x x x x x
x x x x x x x x x x x x x x
x x x x x x x x x x x x x x x x
x x x x x x x x x x x x x x x x x
x x x x x x x x x x x x x x x x x x x x x x x x x
x x x x x x x x x x x x x x x x x x x x x x
x x x x x x x x x x x x x x x x x x x x x
x x x x x x x x x x x x x x x x x x x x x x x x x x x
x x x x x x x x x x x x x x x x x x x x x x x
x x x x x x x x x x x x x x x x x x x x x x x x x x x x x x x x x
x x x x x x x x x x x x x x x x x x x x x x x x x
x x x x x x x x x x
x x x x x x x x x
x x x x x x x
x x x x x x x x
x x x x
x x x x x
x x x x x x x x x x x
x x x x x x
x x x x
x x x x x x x x x x x x x x
x x x x x x x x x x x x x x x x x x x x x x
x x x x x x x x x
x x x x x x x x
x x x x x x x x x x x x x x x
x x x x x x
x x x x x x x
x x x x x x x x x x x x x x x x
x x x x x x x x x x x x x x x x x x x x x x x x x x x x x x x x x x
x x x x x x x x x x x x x x x x x x x x x x x
x x x x x x x x x x x x x x x x x x x x x x x x x x x
x x x x x x x x x x x x x x x x x x x x x x x x x x x x x x x x x
x x x x x x x x x x x x x x x x x x x x x x x
x x x x x x x x x x x x x x x x x x x x x x
x x x x x x x x x x x x x x x x x x x x x x x x x x x x x x
x x x x x x x x x x x x x x x x x x x x x x x x x x x x x x x x x x x x x x
x x x x x x x x x x x x x x x x x x x x x x x
x x x x x x x x x x x x x x x x x x x x x x x x x x x x x x x x x x x x
x x x x x x x x x x x x x x x x x x x x x x x x x x x x x x x x
x x x x x x x x x x x x x x x x x x x x x x x x x x x x x
x x x x x x x x x x x x x x x x x x x x x x x x x
x x x x x x x x x x x x x x x x x x x x x x x x x x x x x x x x x x x x
x x x x x x x x x x x x x x x x x x x
x x x x x x x x x x x x x x x x x x x x x x x x x x x
x x x x x x x x x x x x x x x x x
x x x x x x x x x x x x x x x x x
x x x x x x x x x x x x x x
x x x x x x x x x x x x x x x x x x
x x x x x x x x x x x x x x x x x x x x
x x x x x x x x x x x x x x x x x x x x x x x x x x x x
x x x x x x x x x x x x x x x x x x x x x x x x
x x x x x x x x x x x x x x x x x x x x x x x
x x x x x x x x x x x x x x x x x x x x x x x x x x x
x x x x x x x x x x x x x x x x x x x x x x
x x x x x x x x x x x x x x x x x x x x x x x x x x x x x x x x x
x x x x x x x x x x x x x x x x x x x x x x x x x
x x x x x x x x x x
x x x x x x x x x
x x x x x x x
x x x x x x x x
x x x x
x x x x x
x x x x x x x x x x x
x x x x x x
x x x x
x x x x x x x x x x x x x x
x x x x x x x x x x x x x x x x x x x x x x
x x x x x x x x x
x x x x x x x x
x x x x x x x x x x x x x x x
x x x x x x
x x x x x x x
x x x x x x x x x x x x x x x x
Centrifuges NEYA – User manual
Ver. 1.4 – 31/01/2017
14
If the temperature of the chamber is higher than the set one for that program, the cooling system
remains active until the lid is opened. The possible ice on the chamber during this phase is
absolutely normal.
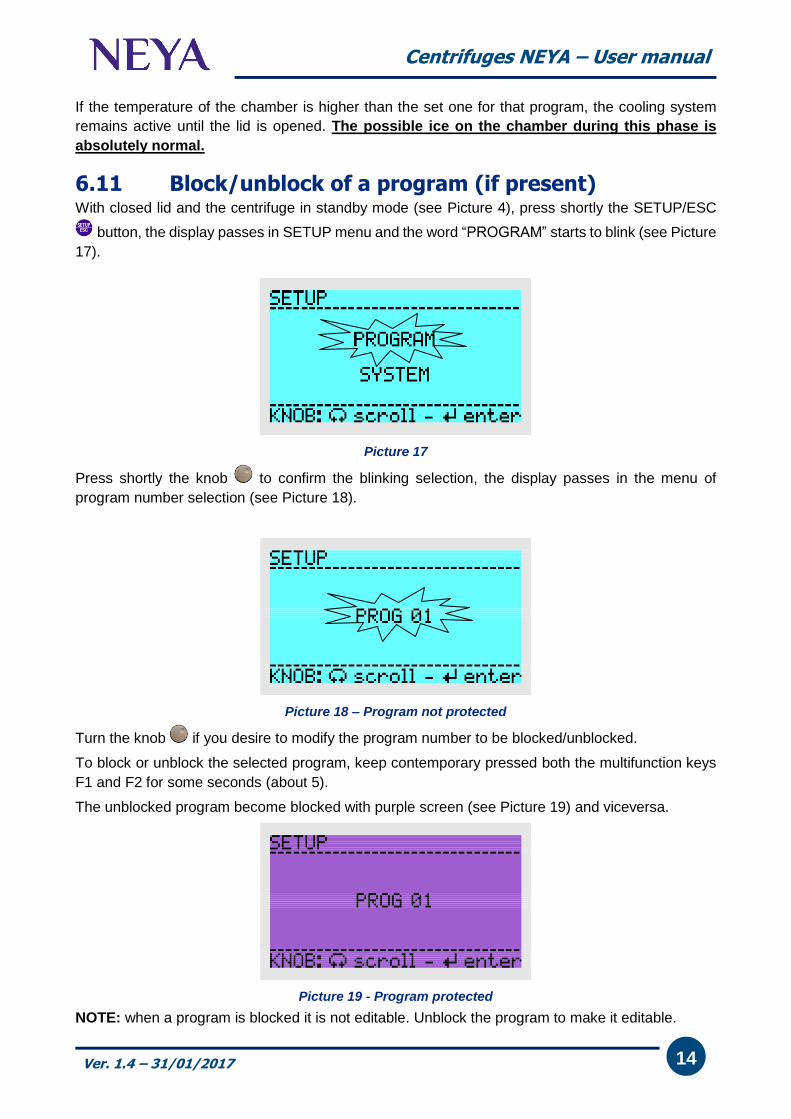
6.11 Block/unblock of a program (if present) With closed lid and the centrifuge in standby mode (see Picture 4), press shortly the SETUP/ESC
button, the display passes in SETUP menu and the word “PROGRAM” starts to blink (see Picture
17).
Picture 17
Press shortly the knob to confirm the blinking selection, the display passes in the menu of
program number selection (see Picture 18).
Picture 18 – Program not protected
Turn the knob if you desire to modify the program number to be blocked/unblocked.
To block or unblock the selected program, keep contemporary pressed both the multifunction keys
F1 and F2 for some seconds (about 5).
The unblocked program become blocked with purple screen (see Picture 19) and viceversa.
Picture 19 - Program protected
NOTE: when a program is blocked it is not editable. Unblock the program to make it editable.
x x x x x x x x x x x x x x x x x x x x
x x x x x x x
x x x x x x x
x x x x x x x x x x x x x x
x x x x x x
x x x x x x
x x x x x x x x x x x x x x
x x x x x x x x x x x x x x x x x x x x x x x x x x x x x x x x x x x x x x x x x x x x x x x x x x x x x x x x x x x x x x x x x x x x x x x x x x x x x x x x x x x x x x x x x x x x x x x x
x x x x x x x x x x x x x x x x x x
x x x x x x x x x x x x
x x x x x x x x x x x
x x x x x x x x x x x x x x x x x x
x x x x x x x x x x x
x x x x x x x x x x
x x x x x x x x x x x x x x x x
x x x x x x x x x x x x x x x x x x x x x x x x x x x x x x x x x x x x x x x x x x x x x x x x x x x x x x x x x x x x x x x x x x x x x x x x x x x x x x x x x x x x x x x x x x x x x x x x
x x x x x x x x x x x x x x x x x x x x x x
x x x x x x x x x x x x x x x x
x x x x x x x x x x x x x x x x x x x x x x x x x x x x x x x x x x x x x x x x x x x x
x x x x x x x x x x x x x x x x x x x x x x x x x x x x x x x x x x x x
x x x x x x x x x x x x x x x x x x x x x x x x x x x x x x x x x x x x x x x x x x x x x x x
x x x x x x x x x x x x x x x x x x x x x x x x x x x x x x x x x
x x x x x x x x x x x x x x x x x x x x x x x x x x x x x x x x x x x x x x x x x x x x x x
Centrifuges NEYA – User manual
Ver. 1.4 – 31/01/2017
15
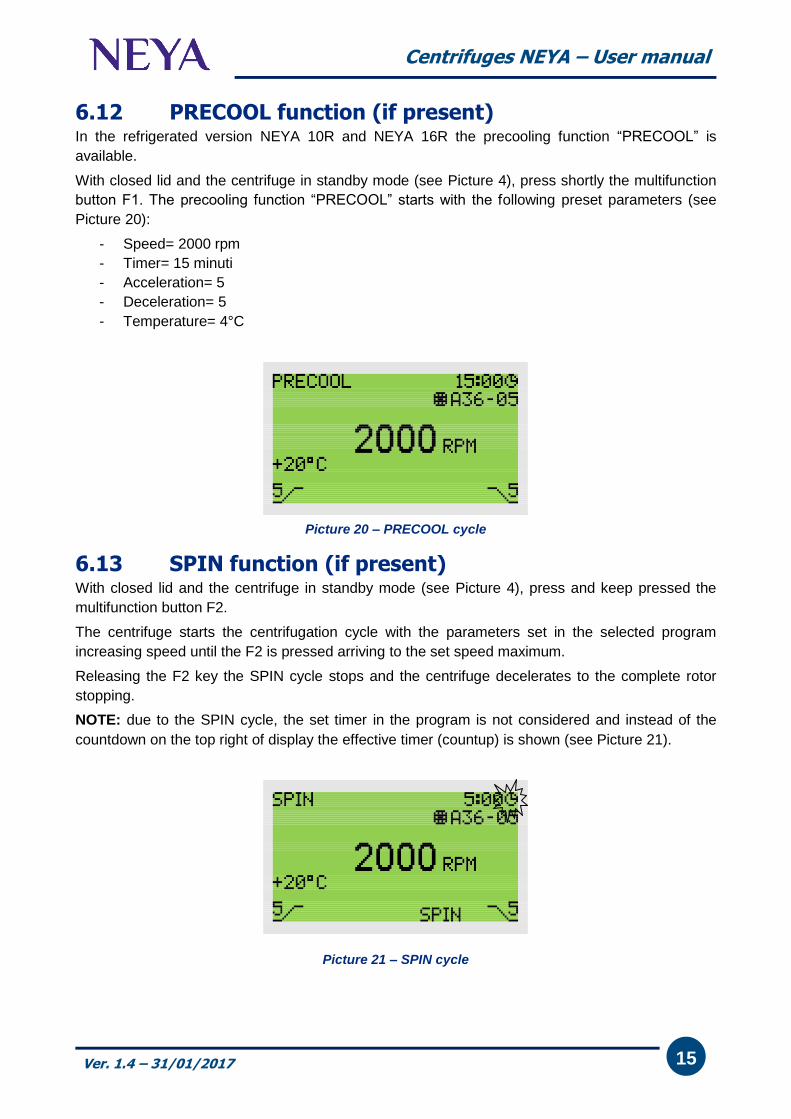
6.12 PRECOOL function (if present) In the refrigerated version NEYA 10R and NEYA 16R the precooling function “PRECOOL” is
available.
With closed lid and the centrifuge in standby mode (see Picture 4), press shortly the multifunction
button F1. The precooling function “PRECOOL” starts with the following preset parameters (see
Picture 20):
- Speed= 2000 rpm
- Timer= 15 minuti
- Acceleration= 5
- Deceleration= 5
- Temperature= 4°C
Picture 20 – PRECOOL cycle
6.13 SPIN function (if present) With closed lid and the centrifuge in standby mode (see Picture 4), press and keep pressed the
multifunction button F2.
The centrifuge starts the centrifugation cycle with the parameters set in the selected program
increasing speed until the F2 is pressed arriving to the set speed maximum.
Releasing the F2 key the SPIN cycle stops and the centrifuge decelerates to the complete rotor
stopping.
NOTE: due to the SPIN cycle, the set timer in the program is not considered and instead of the
countdown on the top right of display the effective timer (countup) is shown (see Picture 21).
Picture 21 – SPIN cycle
x x x x x x x x x x x x x x x x x x x x x x x x x x x x x x x x x x x x x x
x x x x x x x x x x x x x x x x x x x x x x x x
x x x x x x x x x x x x x x x x x x x x x x x x x x x x
x x x x x x x x x x x x x x x x x x x x x x x x x x x x x x x
x x x x x x x x x x x x x x x x x x x x x x
x x x x x x x x x x x x x x x x x x x x x x
x x x x x x x x x x x x x x x x x x x x x x x x x x x x x x x x x x x x x
x x x x x x x x x x x x x x x x x x x x x x x
x x x x x x x x x x x
x x x x x x x x x x x x x x x x x x x
x x x x x x x x x x x x x x x x x x x
x x x x x x x x x x x x x x x x x x x
x x x x x x x x x x x x x x
x x x x x x x x x x x x x x x x x x x
x x x x x x x x x x x x x x x x x x x x
x x x x x x x x x x x x x x x x x x x x x x x x x x x x
x x x x x x x x x x x x x x x x x
x x x x x x x x x x x x x x x x
x x x x x x x x x x x x x x
x x x x x x x x x x x x x x
x x x x x x x x x x x x x x
x x x x x x x x x x x x x x x x x x x x x x x x
x x x x x x x x x x x x x x x x x x x x x x
x x x x x x x x x x x x x x x x x x x x x
x x x x x x x x x x x x x x x x x x x x x x x x x
x x x x x x x x x x x x x x x x x x x
x x x x x x x x x x x x x x x x x x x x x x x x x x x x x x x x x x x
x x x x x x x x x x x x x x x x x x x x x x x x x x x x x
x x x x x x x x x x x x
x x x x x x x x x
x x x x x x x x x
x x x x x x x x x x
x x x x x x
x x x x x x
x x x x x x x x x x x
x x x x x x x x x x
x x
x x x x x x x x x x x x x x x x x x x x
x x x x
x x x x
x x x x x x
x x x x x x x x
x x
x x
x x x x x x x x x x
x x x x x x x x x x x x x x x x x x x x x x x x x x x
x x x x x x x x x x x x x x x x
x x x x x x x x x x x x x x x x x x x x x x x
x x x x x x x x x x x x x x x x x x x x x x x
x x x x x x x x x x x x x x x x x
x x x x x x x x x x x x x x x
x x x x x x x x x x x x x x x x x x x x x x
x x x x x x x x x x x x x x x x x x x x x x x
x x x x x x x x x x x
x x x x x x x x x x x x x x x x x x x
x x x x x x x x x x x x x x x x x x x
x x x x x x x x x x x x x x x x x x x
x x x x x x x x x x x x x x
x x x x x x x x x x x x x x x x x x x
x x x x x x x x x x x x x x x x x x x x
x x x x x x x x x x x x x x x x x x x x x x x x x x x x
x x x x x x x x x x x x x x x x x
x x x x x x x x x x x x x x x x
x x x x x x x x x x x x x x
x x x x x x x x x x x x x x
x x x x x x x x x x x x x x
x x x x x x x x x x x x x x x x x x x x x x x x
x x x x x x x x x x x x x x x x x x x x x x
x x x x x x x x x x x x x x x x x x x x x
x x x x x x x x x x x x x x x x x x x x x x x x x
x x x x x x x x x x x x x x x x x x x
x x x x x x x x x x x x x x x x x x x x x x x x x x x x x x x x x x x
x x x x x x x x x x x x x x x x x x x x x x x x x x x x x
x x x x x x x x x x x x
x x x x x x x x x
x x x x x x x x x
x x x x x x x x x x
x x x x x x
x x x x x x
x x x x x x x x x x x
x x x x x x x x x x
x x
x x x x x x x x x x x x x x x x x x x x
x x x x x x x x x x x x x x x x x
x x x x x x x x x x
x x x x x x x x x x x x x
x x x x x x x x x x x x x x x x x x x
x x x x x x x x
x x x x x x x
x x x x x x x x x x x x x x x x x x x x
Centrifuges NEYA – User manual
Ver. 1.4 – 31/01/2017
16
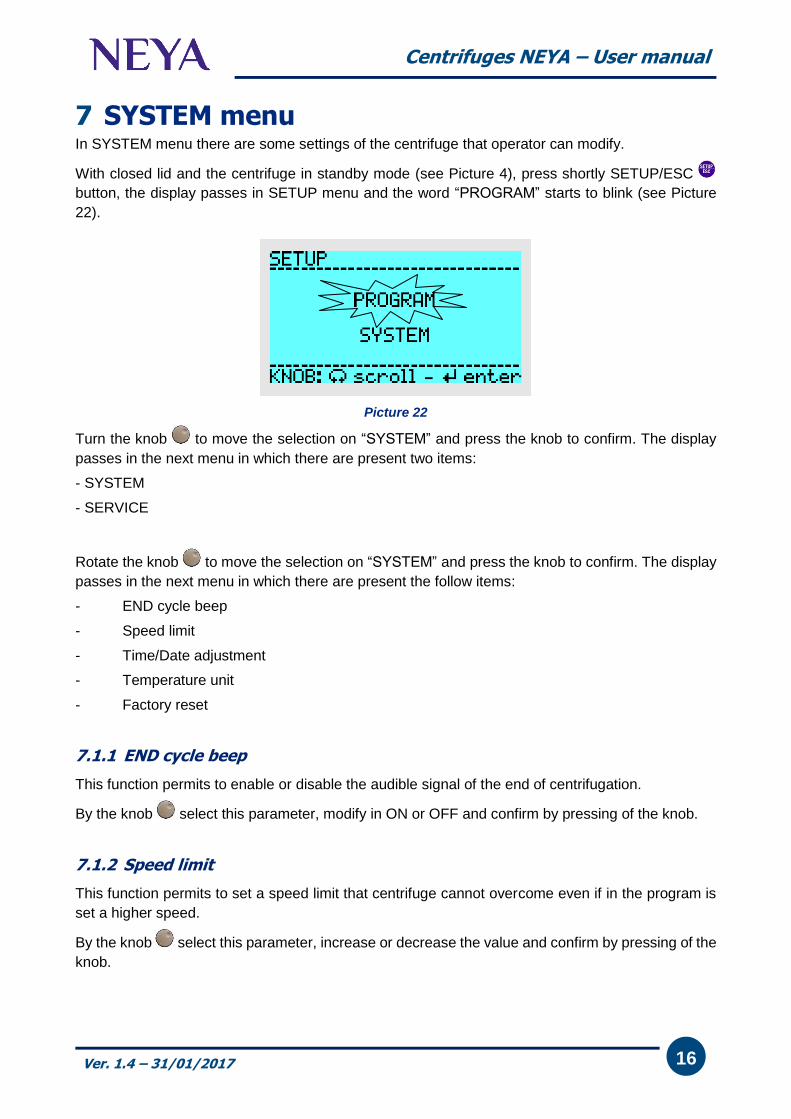
7 SYSTEM menu In SYSTEM menu there are some settings of the centrifuge that operator can modify.
With closed lid and the centrifuge in standby mode (see Picture 4), press shortly SETUP/ESC
button, the display passes in SETUP menu and the word “PROGRAM” starts to blink (see Picture
22).
Picture 22
Turn the knob to move the selection on “SYSTEM” and press the knob to confirm. The display
passes in the next menu in which there are present two items:
- SYSTEM
- SERVICE
Rotate the knob to move the selection on “SYSTEM” and press the knob to confirm. The display
passes in the next menu in which there are present the follow items:
- END cycle beep
- Speed limit
- Time/Date adjustment
- Temperature unit
- Factory reset
7.1.1 END cycle beep
This function permits to enable or disable the audible signal of the end of centrifugation.
By the knob select this parameter, modify in ON or OFF and confirm by pressing of the knob.
7.1.2 Speed limit
This function permits to set a speed limit that centrifuge cannot overcome even if in the program is
set a higher speed.
By the knob select this parameter, increase or decrease the value and confirm by pressing of the
knob.

Centrifuges NEYA – User manual
Ver. 1.4 – 31/01/2017
17
7.1.3 Time/Date adjustment
By the knob select, modify and confirm time and date.
7.1.4 Temperature unit
By the knob select this parameter, modify in °C or °F and confirm by pressing knob.
7.1.5 Factory reset
This function permits to reset all the above parameters to the factory conditions.
By the knob select this parameter, modify in ON and confirm by pressing of the knob.
Centrifuges NEYA – User manual
Ver. 1.4 – 31/01/2017
18
8 Clean and maintenance
Proper maintenance and cleaning of the instrument guarantee its good conditions.
The inner chamber of the instrument is made of stainless steel, so it can be cleaned with any
detergent provided it is not aggressive and / or corrosive.
You should clean the inside and outside surfaces with a standard all-purpose cleaner sprayed on a
soft cloth.
Before proceeding with any cleaning or decontamination, the user must ensure that the method used
does not damage the instrument.
IMPORTANT:
If the instrument must be returned for service, it is necessary to provide for proper cleaning and
possible decontamination by pathogens of the same.
It is also recommended to put the instrument in its original packaging to send it in for repairs and if
it is missed it is necessary to provide to pack it properly in order to the transport.
Any damage caused from the incorrect shipping will not be covered by warranty.
8.1 Greasing of the motor shaft and the rotor pins In order to facilitate the insertion of the rotor, the motor shaft should be regularly greased and also
in the swing out rotors the pins on which the buckets swing must be regularly greased.
The timing of these operations depends on the frequency of use, the operating temperature, the
loads centrifuged etc., so it is suggested to regularly check these parts.
Before proceeding with the greasing is essential to remove the old grease.
9 Disposal of electronic equipment
The electrical and electronic equipment marked with this symbol may not be disposed of in landfills.
In accordance with EU Directive 2002/96/EC, the European users of electrical and electronic equipment have the opportunity to give back to the distributor or manufacturer upon purchase of a new one.
The illegal disposal of electrical and electronic equipment is punished with an administrative fine.