Embed Size (px)
Citation preview

1 | P a g e
Central Provident Fund Board (CPFB)
Last updated in May 2021

2 | P a g e
What You Need to Submit via CPF EZPay:
▪ Singpass^
▪ A computer with internet access
▪ An email address
▪ Approved mode of payment via Direct Debit, PayNow, or eNETS
▪ Registered user with CPF Board for EZPay
If you are still using hardcopy submission, please Apply for CPF EZPay to start submitting your CPF contributions online. ^ To protect your confidential information, please do not reveal your password to anyone. Additional Notes on CPF EZPay:
▪ The auto-computation function is applicable to private sector employers only.
▪ It does not impose a cap on CPF contributions that exceed the additional wage ceiling.
▪ It works best with a minimum screen resolution of 1024 X 768 pixels.
▪ It is best viewed on desktop using Microsoft Edge browser and all latest 2 versions.
Definitions, Acronyms and Abbreviations
In this user guide, the following definitions apply throughout unless otherwise stated.
Term Description
CPFB Central Provident Fund Board
FTP File Transfer Protocol

3 | P a g e
1. GETTING STARTED 1.1 LAUNCH THE CPF EMPLOYER HOMEPAGE …….…...………………................................ 5
1.2 ACCESSING THE CPF EZPay MODULE …..…….……………………................... 5
1.3 MAIN MENU ………………………………………………..…….……………………................... 6
2. CPF EZPay (WITH AUTO-COMPUTATION) 2.1 SELECT MONTH PAID FOR (STEP 1) …………………………………………………………... 8
2.2 PREPARE CPF CONTRIBUTION DETAILS (STEP 2) ………………………………………….
▪ Manual Entry (applicable to first time users)
▪ Import from Microsoft Excel Template File
▪ Select Employees to Include in Submission
▪ Key in Other Payments
8
2.3 CONFIRMATION & PAYMENT (STEP 3) ………………………………………………………… 13
2.4 ACKNOWLEDGEMENT (STEP 4) ………………………………………………………………… 14
2.5 OTHER FUNCTIONS ………………………………………………………………………………...
▪ Add New Page
▪ Go to Specific Page
▪ Delete Employee Record
▪ Backup Database
▪ Search Employee Record
▪ Check CPF Amount
▪ Check Crossed Age Group/PR Year
15
3. CPF EZPay (BLANK FORM) 3.1 SELECT MONTH PAID FOR (STEP 1) …………………………………………………………… 19
3.2 PREPARE CPF CONTRIBUTION DETAILS (STEP 2) ………………………………………….
▪ Manual Entry
▪ Import from Past Submission
▪ Import from Microsoft Excel Template File
19
3.3 CONFIRMATION & PAYMENT (STEP 3) ………………………………………………………… 22
3.4 ACKNOWLEDGEMENT (STEP 4) ………………………………………………………………… 22
4. CPF EZPay (FTP) 4.1 FILE UPLOAD (STEP 1) ……………………………………………………………………………. 23
4.2 CONFIRMATION & PAYMENT (STEP 2) ………………………………………………………… 23
4.3 ACKNOWLEDGEMENT (STEP 3) ……………………………………………...…………………. 24

4 | P a g e
5. VIEW / AMEND / DELETE SUBMISSION
5.1 VIEW SUBMISSION …………………………………………………………………………………. 25
5.2 AMEND SUBMISSION (BEFORE PROCESSING) ……………………………………………… 26
5.3 DELETE SUBMISSION (BEFORE PROCESSING) ……………………………………………... 28
6. VIEW RECORD OF PAYMENT (ROP) 6.1 VIEW ROP DETAILS.……………………………………………………………………………….. 29
6.2 PRINT ROP DETAILS ………………………………………………………………………………. 29
7. EMPLOYER PARTICULARS
7.1 VIEW / UPDATE PARTICULARS (For individuals trading under own name)……………..
▪ Add / Delete Staff Access
30
7.2 VIEW / UPDATE PARTICULARS (For UEN registered entities)……………………………. 32
8. ELECTRONIC STANDING INSTRUCTION (ESI)
8.1 INTRODUCTION ……………………………………………………………………………............. 33
8.2 ACTIVATE ESI ……………………………………………………………………………………….. 34
8.3 VIEW ESI ……………………………………………………………………………………………… 36
8.4
8.5
8.6
AMEND ESI …………………………………………………………………………………..............
DE-ACTIVATE ESI ………………………………………………………………............................
MAKE ADDITIONAL SUBMISSION……………………………………………………………….
37
39
40

5 | P a g e
1.1 LAUNCH THE CPF EMPLOYER HOMEPAGE
(i) Please ensure that you have internet access.
(ii) Launch your web browser (e.g. Internet Explorer, Firefox, etc.) and go to CPF homepage at: cpf.gov.sg
1.2 ACCESSING THE CPF EZPay
(i) Before accessing the CPF EZPay module, please ensure that you have a valid
Singpass and that you have registered with CPFB to use CPF EZPay. (ii) At Member homepage, select Employer. Figure 1.
Figure 1: CPF Member Homepage
(iii) Next, select Submit CPF Contributions. Figure 2.
Figure 2: CPF Employer Homepage
1 Getting Started

6 | P a g e
(iv) Select CPF EZPay. Figure 3.
Figure 3: Select CPF EZPay (v) Select For UEN-registered entities or For individuals trading under own name and
login with your Singpass. Figure 4.
For UEN registered entities
The Corppass Admin of your company is responsible for creating and managing Corppass user accounts and digital service access. It includes updating user details, suspending, reactivating, and terminating user accounts, assigning digital service access rights to user accounts. More information on how to setup and assign CPF e-Service for CPF EZPay within Corppass, please refer to our user guide.
Figure 4: Log in with Singpass
1.3 MAIN MENU
You will now see the main menu of the CPF EZPay. On this screen, there are 2 main sections: (i) Submit Contribution and (ii) Manage Records & Particulars. Figure 5.
(i) Under Submit Contribution section, you have a choice of submitting via 3 submission modes:
• CPF EZPay
• CPF EZPay (FTP)
• Electronic Standing Instruction (ESI). Please note that the ESI option will not be displayed if you do not have an approved Direct Debit arrangement.
(ii) Under the Manage Records & Particulars section, you can:

7 | P a g e
• View / Amend / Delete submission
• View Record of Payment
• View / Update Particulars
Figure 5: Main Menu of CPF EZPay CPF EZPay auto-computes CPF and Skills Development Levy (SDL) contributions.
IMPORTANT NOTE!
There will be no auto-computation for the following types of contributions:
• Additional Wage Ceiling – CPF payable will be computed on the assumption that the Additional wage ceiling has not exceeded.
• Foreign Worker Levy (FWL)
• Self-Help Groups - Chinese Development Assistance Council (CDAC), Singapore Indian Development Association (SINDA), Mosque Building and Mendaki Fund (MBMF), Eurasian Community Fund (ECF) and Community Chest.
• Arrears payment - CPF contributions before July 2007 (submission is still possible, but there will be no auto-computation of CPF)
Under Submit Contribution section, select CPF EZPay. Figure 6.
Figure 6: Main Menu of CPF EZPay

8 | P a g e
2.1 (STEP 1) SELECT MONTH PAID FOR
You will be directed to the Month Paid For page. Figure 7.
(i) At Contribution Details for, select Month and enter Year. (ii) System auto-selects Submit via Employee Database. Click on Continue.
Figure 7: Submit via Employee Database
2.2 (STEP 2) PREPARE CPF CONTRIBUTION DETAILS
There are 2 ways to prepare the CPF contribution details of your employees Submission via Employee Database - Manual Entry and Import from Microsoft Excel Template File
Submission via Employee Database – Manual Entry (applicable to first time users)
(i) The first step is to update your Employee Database. Figure 8. The employee database will save your employee records and populate the information when you next login
2 CPF EZPay (Auto-computation)

9 | P a g e
Figure 8: Employee Database
(ii) Please key in the following information for each employee
A Account Number *
B Name of Employee (as in NRIC) *
C Ordinary Wages *
D Additional Wages*
E Agency’s Name i.e CDAC, MBMF, SINDA or ECF
F Agency Fund – required if “E” is selected
G Click on Detail * Staff information Screen will pop-up. Figure 9. Key/update your employee
information such as:
• Date of Birth i.e. click on the icon to select DD/MM/CCYY
• Citizenship – If you have selected PR Year 1 or 2. Key PR Start Date and select Type. GG for graduated rate or FG for full CPF contribution rate. System will auto-track the PR status of your employee and update the CPF contribution to be paid.
• Employment Status – If CPF contribution is payable for the month, select Left and indicate Date Left Employment. Remember to delete the employee record the following month. Please refer to Page 16 on how to delete employee record.
• Skills Development Levy (SDL) – payable for all local and foreign employees. SDL for local employee is auto computed based on their wage.
* mandatory fields

10 | P a g e
Figure 9: Detail- Staff Information screen
(i) Click on Save after updating each employee’s Staff Information. (ii) Repeat steps (i) and (ii) for each employee (iii) For more information on the options for Citizenship, PR Type and SDL payable, please
click on the information icon. (iv) Once all employees’ records have been created, click on Save Changes. A confirmation
message “Employee Database saved successfully.” will be displayed. Figure 10. Next go to Page 12 to Continue. Figure 15.
(v) You may click on Check CPF Amount to view the computation of CPF contribution. Please follow the instructions on Page 17.
Figure 10: Confirmation Message of Employee Database Saved Successfully

11 | P a g e
Import from Microsoft Excel Template File
(i) You can also import a Microsoft Excel file containing your employee details in CPF EZPay Employee Database. First, click on Import Employee Details. Figure 11
Figure 11: Import Employee Details
(ii) From the Import Employee Details page, select Import from MS Excel Template file. (iii) Click on Download Sample Template and key all the mandatory fields marked with “*” in
our sample template. You can also cut and paste the details from your existing MS Excel payroll file into the csv template. Please ensure your file is saved as a .csv file.
(iv) For more information on the Excel Template, please click on the information icon.
Figure 12: Import from MS Excel Template File
(i) Once the template is completed, click on Browse to select the template you have prepared and saved as .csv file.
(ii) Click on Import File. Figure 12. (iii) Click Confirm & Save after you have verified Preview of Imported Records. A pop-up
message “Importing this file will replace ALL employee details in your Employee Database. Do you want to continue?” will be displayed. Figure 13.
Figure 13: Preview of Imported Records

12 | P a g e
(iv) Click on OK and you will be directed to the Update Employee Database page. A confirmation message “File imported successfully. Please update the field “PR Start Date” for all your Permanent Resident (PR) employees.” will be displayed on the same page. Figure 14.
(v) Please ensure that you have keyed in the PR Start Date for any PR employees to ensure correct auto-computation of CPF contributions.
(vi) Click Save Changes. You will be prompted “Employee Database saved successfully”. Click Continue to proceed.
Figure 14: Update Employee Database
(A) Select Employees.
(i) System will auto select all employees. To exclude employees, please un-tick the
corresponding check box. (ii) Click on Continue to proceed. Figure 15.
Figure 15: Select Employees to Include in Submission
(C) Key in Other Payments
(i) You will be directed to Verify Contribution Details page. Figure 16. (ii) The column CPF To Be Paid ($) is auto computed based on the wages, citizenship and
age of the employee that was keyed in earlier. (iii) Skills Development Levy (SDL) is payable for all local and foreign employees. The
column SDL To Be Paid ($) is auto computed based on the wage of the local employee. You can use the Skills Development Levy Calculator at the SkillsFuture Singapore Agency (SSG) website to compute SDL payable for foreign employee.
(iv) The column CPF Late Payment Interest is auto computed for late submission of CPF contribution. You may click on the magnifier icon to view the computation.
(v) Please key in other payments such as Donation to Community Check etc. (i) Click on Continue to proceed.

13 | P a g e
Figure 16: Key in Other Payments
IMPORTANT NOTE!
• If you are already paying for Foreign Worker Levy (FWL) via a separate Direct Debit arrangement, please leave the FWL field blank to avoid making double payment.
2.3 (STEP 3) CONFIRMATION & PAYMENT
(i) Verify the CPF contribution details that you have keyed in. Figure 17
(ii) To print this page, click on the Printer icon. You will be prompted to download a PDF file which you can save or print.
(iii) If the submission details are correct, click on one of the payment buttons at the bottom of this page.
• If you have selected Direct Debit, the default Direct Debit deduction date will be 2 working dates after the submission date. Employers will still have the flexibility to choose their preferred deduction date up to the last working day of 14 (or the next working day if the 14th falls on a Saturday, Sunday or Public Holiday).
• If you have selected PayNow. Please scan the PayNow QR code using the ‘Scan & Pay’ function in your PayNow participating bank app and make payment before the QR code expires by 23:59 hrs on the same day of submission. If payment is not received, the application will be deemed unsuccessful. Please do not make payment using CPFB’s UEN or modify the remarks which bears a reference unique to this application upon scanning the PayNow QR code.
• eNETS, follow the online instructions to make payment.

14 | P a g e
(iv) You will be prompted a message “I understand that CPF contributions should only be paid for employees of the business entity and based on employees’ actual wages. The CPF contributions may be used for the assessment of Government grants.”
(v) You will be directed to 2.4 (STEP 4) Acknowledgment page.
Figure 17: Confirmation & Payment
IMPORTANT NOTE!
• The due date for CPF contributions is on the last day of the calendar month. Enforcement action would be taken against employers who fail to pay by the 14th of the following month (or the next working day if the 14th falls on a Saturday, Sunday or Public Holiday). This includes imposing late payment interest charged at 1.5% per month commencing from the first day after the due date.
• All bank deductions are subject to your daily deduction limit that you have set with your bank. Approach your bank to increase your daily deduction limit
• For Direct Debit deductions, you can split your CPF contributions details into multiple files and select a different deduction date for each file.
• Transaction limit of S$90 million is set in the Inter-Bank GIRO infrastructure by the Singapore Clearing House Association.
2.4 (STEP 4) ACKNOWLEDGEMENT
After you have clicked on Direct Debit or completed PayNow, or eNETS transaction, CPF
EZPay Acknowledgement page will be displayed. Figure 18. You will also receive an email acknowledgement from CPFB. Please ensure the email address(es) is/are updated at View /Update Particulars. Refer to Page 30 on how to update particulars.
(i) To print CPF EZPay Acknowledgement page, click on the Printer icon. You will be prompted to download a PDF file which you can print or save. Please check that the payment details are correct.
(ii) Your submission is completed! (iii) You may view your submission details at Click here to view your submission details.
otherwise select Logout to exit.

15 | P a g e
Figure 18: Acknowledgement Page
2.5 OTHER FUNCTIONS
(A) Add New Page
(i) Each page can display up to 20 employee records. (ii) To add more than 20 employee records, click on Add Page (Figure 19). A new page with
20 blank rows will be displayed Each page can display up to 20 employee records.
Figure 19: Add Page
(B) Go to Specific Page
(i) If you wish to go to a specific page, you can type in the page number. Alternatively, you can also use the arrow buttons next to the page number. 0.
Figure 20: Go to a Specific Page
16 | P a g e
(C) Delete Employee Record
(i) If an employee has left the company and no more CPF contribution is payable to him/her,
tick the checkbox beside the employee record to be deleted (Figure 21). (ii) Click on Delete Employee Record. The employee record will be deleted permanently.
Figure 21: Delete Employee Record
(D) Backup Database
(i) If you want to back up the existing Employee Database, click on Backup Database. Figure 22.
(ii) A pop-up box will appear, requesting you to open or save the file. (iii) If you save the file, the data will be saved into a .csv file.
Figure 22: Backup Database
(E) Search By CPF Account No.
(i) Key in the CPF Account No. of the employee you wish to find in the Employee Records
Database. Click on Go. Figure 23. (ii) If a matching employee record is found, the search screen will close. The employee record
will be highlighted.
Figure 23: Search CPF Account No
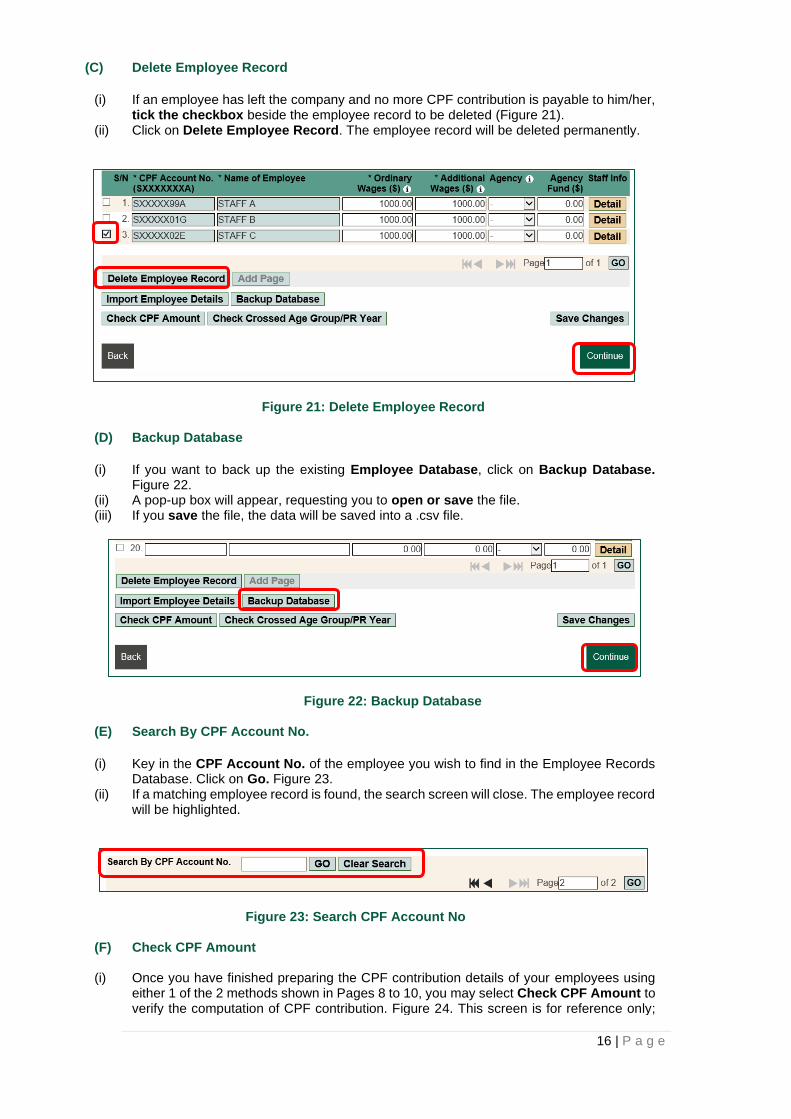
(F) Check CPF Amount
(i) Once you have finished preparing the CPF contribution details of your employees using either 1 of the 2 methods shown in Pages 8 to 10, you may select Check CPF Amount to verify the computation of CPF contribution. Figure 24. This screen is for reference only;
17 | P a g e
please remember to complete your submission after verifying the auto computed CPF contribution amount.
(ii) To print this page, click on the Printer icon. You will be prompted to download a PDF file which you can save or print. Figure 25. To return, click Close Window.
Figure 24 Check CPF Amount
Figure 25: Verification of Auto-Computation
(G) Check Crossed Age Group/PR Year
(i) When making your next submission, the system will check your employee’s Date of Birth and Citizenship (that was keyed earlier, please refer to Page 10) for crossed age group and/or citizenship and prompt “One or more of your employees have crossed age group and/or crossed PR year for the month paid for”. Click Ok. To view the list, you may click Check Crossed Age Group/PR Year or click Continue. Figure 26 and 27.

18 | P a g e
Figure 26: System Checks Crossed Age Group/PR Year
Figure 27: Employees Who Have Crossed Age Group/PR Year

19 | P a g e
Employers may use CPF EZPay Blank Form to make ad-hoc CPF payments. Please note that this option does not auto-compute the CPF to be paid, and employee details keyed via the Blank Form function are not saved in the Employee Database
3.1 (STEP 1) CONTRIBUTION DETAILS FOR
At main menu, under Submit Contribution, select CPF EZPay. You will be directed to Month Paid For page. Figure 28. Please follow these steps:
(i) Select Month and enter Year under Contribution Details for. (ii) Select Submit via Blank Form and click on Continue.
Figure 28: Submit via Blank Form
3.2 (Step 2) PREPARE CONTRIBUTION DETAILS
Similar to 2.2, page 8, there are 2 ways to prepare the CPF contribution details of your employees Manual Entry and Import from Microsoft Excel Template File
Manual Entry (i) Please key in the following information for each employee. Figure 29
A CPF Account Number *
B Name of Employee (as in NRIC) *
C CPF to be Paid *
D Ordinary Wages*
E Additional Wages
F Agency’s Name i.e. CDAC, MBMF, SINDA or ECF
G Agency Fund – Required if “F” is selected
H Employment Status*
I Last Date of Employment – required if “H” is “Left” or “New & Leaving”
* mandatory fields
(ii) Next, scroll down to key other contributions such as CPF Late Payment Interest (if applicable), Skills Development Levy (SDL) which is payable for local and foreign employees, Foreign Worker Levy (FWL) etc.
3 CPF EZPay
Blank Form (no auto-computation)

20 | P a g e
Figure 29: Manual Entry
(iii) After all your employee records are correctly keyed, click on Save Draft. The confirmation message “Draft saved successfully” will be displayed on the same page. Alternatively, you may click on Continue and follow the instructions on Page 13 for Confirmation & Payment.
IMPORTANT NOTE!
• If you are already paying for Foreign Worker Levy (FWL) via a separate Direct Debit arrangement, please leave the FWL field blank to avoid making double payment.
Import Employee Details
Click on Import Employee Details. Figure 30. There are two options: (i) Import from past submissions (ii) Import from MS Excel Template file
Figure 30: Import Employee Details

21 | P a g e
(i) Import from past Submissions If you select Import from past submissions, you may import details from any of the past six submissions and click Import File. Figure 31
Figure 31: Import from Past Submissions
(ii) Import from MS Excel Template file Before you select Import from MS Excel Template file, please backup the existing Employee Database. Click Import from MS Excel Template file and click Download Sample Template. Enter the employee details according to the format and save it as.csv file. Next click on Browse to select the csv file that you wish to import and click on Import File. A pop-up message “You will override the existing employee details with the imported employee details. Do you want to continue?” will be displayed. Click on Ok. Figure 32. A confirmation message “File imported successfully” will be displayed on the same page. If necessary, the contribution details can be amended manually.
(iv) Verify that the employee records are imported correctly. Next, scroll down to key other contributions such as CPF Late Payment Interest (if applicable), Skills Development Levy (SDL) which is payable for local and foreign employees, Foreign Worker Levy (FWL) etc. Click on Save Draft or Continue. Figure 33.
Figure 32: Confirm Import Details

22 | P a g e
Figure 33: File Imported Successfully
3.3 (Step 3) CONFIRMATION & PAYMENT and (Step 4) ACKNOWLEDGEMENT
The steps are the same as 2.3 Confirmation & Payment (Submission via Employee Database)
and Acknowledgement (Submission via Employee Database). Please follow the steps shown in Pages 13 and 14.

23 | P a g e
Employers using their own payroll software can upload their CPF contribution details at CPF EZPay (FTP). 4.1 (STEP 1) FILE UPLOAD
At main menu, under Submit Contribution, select CPF EZPay (FTP). Figure 34. You will be
directed to File Upload page. Figure 35. Please follow these steps:
(i) Click on Browse to select the file which you wish to submit. (ii) After you have uploaded the file, click on Continue and follow the instructions at 2.3 pages
13 and 14 for Confirmation & Payment.
Figure 34: Select CPF EZPay (FTP)
Figure 35: File Upload 4.2 (STEP 2) CONFIRMATION & PAYMENT
(i) Please check that the submission details are correct before clicking on one of the payment
buttons at the bottom of the page. System will prompt a message “I understand that CPF contributions should only be for employees of the business entity and based on employees’ actual wages. The CPF contributions may be used for the assessment of Governments grants.” Figure 36.
4 CPF EZPay (FTP)

24 | P a g e
Figure 36: Confirmation & Payment Page 4.3 (STEP 3) ACKNOWLEDGEMENT
After successful submission, you will be shown CPF EZPay Acknowledgement page. Figure 37.
You will also receive an email acknowledgement from CPFB. Please ensure the email address(es) is/are updated at View /Update Particulars. Refer to Page 30 on how to update particulars.
(i) To print this page, click on the Printer icon. You will be prompted to download a PDF file, which you can print or save. Please check that the payment details are correct.
(ii) Your submission is completed! (iii) You may view your submission details at Click here to view your submission detail
otherwise select Logout to exit.
Figure 37: Acknowledgement Page
25 | P a g e
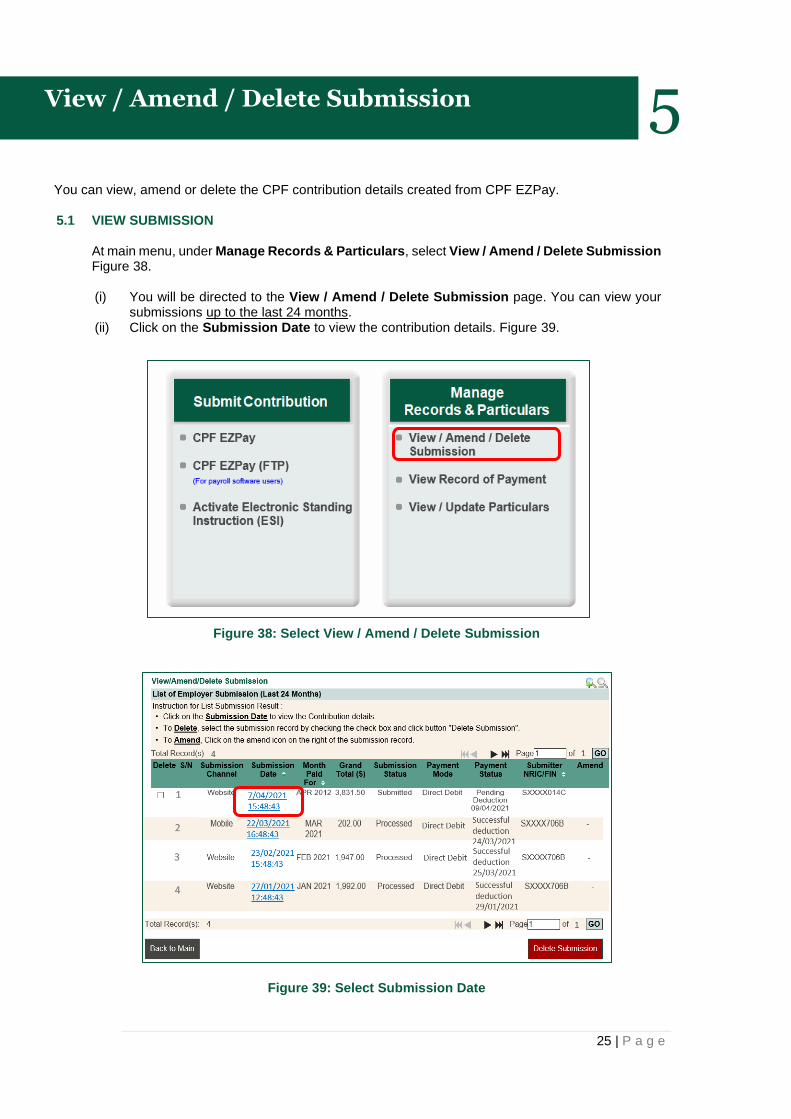
You can view, amend or delete the CPF contribution details created from CPF EZPay. 5.1 VIEW SUBMISSION
At main menu, under Manage Records & Particulars, select View / Amend / Delete Submission
Figure 38. (i) You will be directed to the View / Amend / Delete Submission page. You can view your
submissions up to the last 24 months. (ii) Click on the Submission Date to view the contribution details. Figure 39.
Figure 38: Select View / Amend / Delete Submission
Figure 39: Select Submission Date
5 View / Amend / Delete Submission

26 | P a g e
(iii) You will be directed to the View Employer Submission page. Figure 40. (iv) To print this page, click on the Printer icon. You will be prompted to download a PDF file
which you can save or print.
Figure 40: View Employer Submission 5.2 AMEND SUBMISSION (BEFORE PROCESSING)
(i) If your payment option is Direct Debit, you can amend your submission if it is done within
the same day that is before 5.15pm. The ‘Amend’ button is meant to for you to make adjustments for payment details at the summary page. This is useful for employers who only need to make minor changes to their payment details, so they do not need to go through the entire computation process again.
(ii) Click on Amend. A pop-up message “This submission will not be processed if you amend the submission record. Please re-submit the record after amendment. Do you want to continue?” will appear on the same page. Figure 41.
(iii) Click on OK to proceed. (iv) You can amend the necessary fields at the Verify Contribution Details page. Figure 42. (v) Even when there is no amendment made, please click on Continue to re-submit and click
on the payment option at the page. If the process is not completed, it will result in Draft mode and will not be sent for Direct Debit deduction.

27 | P a g e
Figure 41: Select Amend Submission
IMPORTANT NOTE! If you wish to print a copy of the contribution details only, please do not use the Amend Submission function as it will result in retrieval of your submitted file. Instead, please follow the instructions under the View Submission section on page 25.
Figure 42: Amend Contribution Details Page

28 | P a g e
IMPORTANT NOTE!
• If you have amended your submission, please remember to re-submit before the submission deadline to avoid incurring late payment interest. Otherwise, your amended submission will remain in Draft mode and will not be sent for Direct Debit deduction.
5.3 DELETE SUBMISSION (BEFORE PROCESSING)
(i) If your payment option is Direct Debit. You can delete your submission if it is done within
the same day that is before 5.15pm. (ii) Tick the checkbox to select the submission record to be deleted. Figure 43. (iii) Click on Delete Submission. A pop-up message “You are about to delete the selected
submission record. Do you want to continue?” will appear on the same page. (iv) Click on OK. You will see the confirmation message “The Submission record deleted
successfully.” Figure 44.
IMPORTANT NOTE!
• If you have deleted your submission, please remember to re-submit before the submission deadline to avoid incurring late payment interest.
Figure 43: Select Delete Submission
Figure 44: Confirmation Message of Deleted Submission

29 | P a g e
6.1 View Record of Payment (ROP Details)
(i) At main menu, under Manage Records & Particulars, select View Record of Payment. Figure 45.
(ii) You will be directed to the Enquiry of Record of Payment(s) page. (iii) Click on Statement No. Figure 46.
Figure 45: Select View Record of Payment
Figure 46: View Record of Payment Details
6.2 PRINT ROP DETAILS
(i) When you click on the Statement No, you will be prompted to open or save the PDF version of the ROP. Figure 46.
(ii) To print, click on the Printer icon on the top left-hand corner of the PDF version of the ROP.
6 View Record of Payment (ROP)
30 | P a g e
7.1 VIEW / UPDATE PARTICULARS (For individuals trading own name)
At the point of registration for CPF EZPay, employers need to appoint an authorised person to take on the roles of System Administrator and Editor.
The table below summarises the roles of the System Administrator and Editor:
Role Rights
System Administrator • Update the company’s contact information e.g email address(es)
• Add or Delete System Administrator(s) and Editor(s)
• Submit CPF contributions details on behalf of the company
• View previously submitted CPF contribution details
Editor • Submit CPF contribution details on behalf of the company
• View previously submitted CPF contribution details
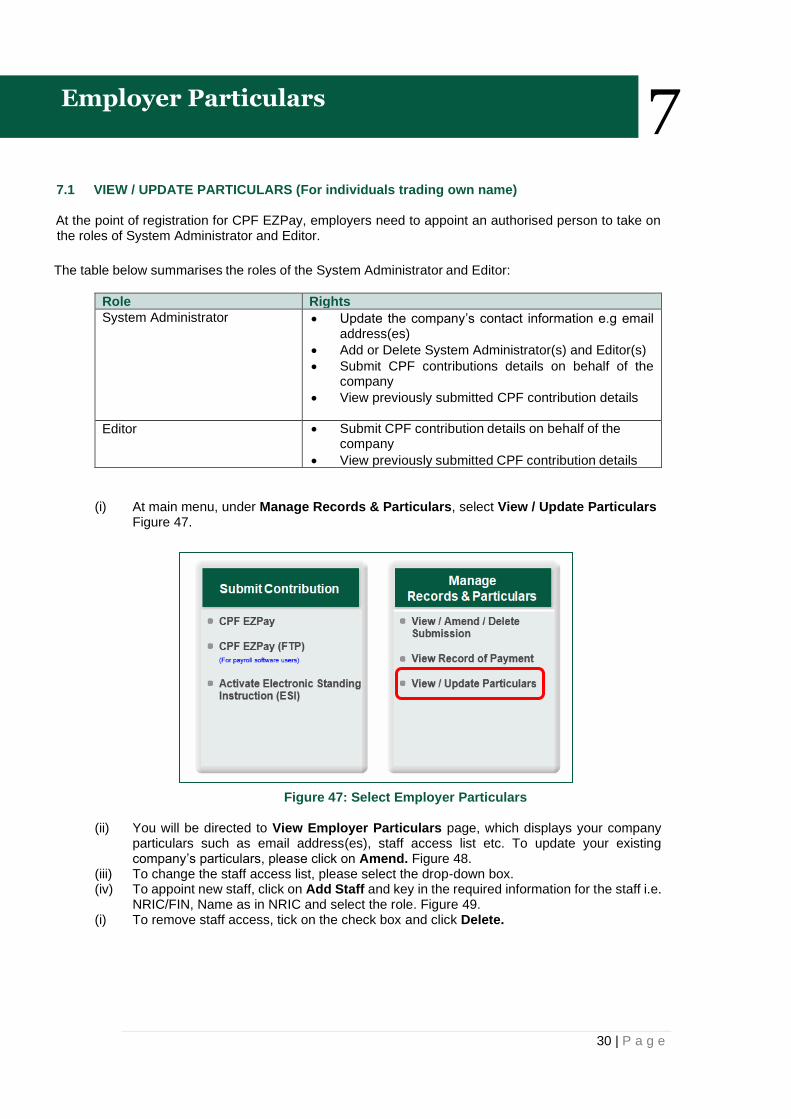
(i) At main menu, under Manage Records & Particulars, select View / Update Particulars Figure 47.
Figure 47: Select Employer Particulars
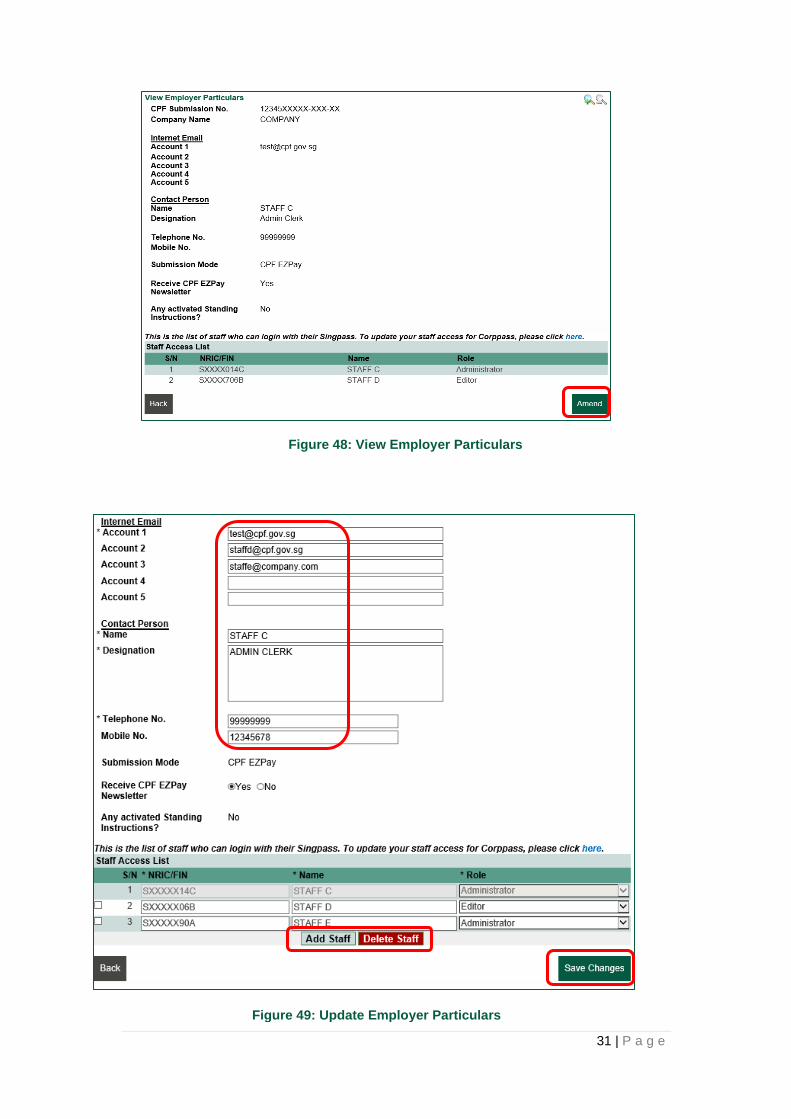
(ii) You will be directed to View Employer Particulars page, which displays your company particulars such as email address(es), staff access list etc. To update your existing company’s particulars, please click on Amend. Figure 48.
(iii) To change the staff access list, please select the drop-down box. (iv) To appoint new staff, click on Add Staff and key in the required information for the staff i.e.
NRIC/FIN, Name as in NRIC and select the role. Figure 49. (i) To remove staff access, tick on the check box and click Delete.
7 Employer Particulars
31 | P a g e
Figure 48: View Employer Particulars
Figure 49: Update Employer Particulars

32 | P a g e
(vi) Once all the necessary amendments have been completed, click on Save Changes. A confirmation message “Employer Particulars Modified Successfully” will be displayed on the same page. Figure 50
Figure 50: Confirmation Message of Updated Employer Particulars
7.2 VIEW / UPDATE PARTICULARS (For UEN-registered entities)
(i) At main menu, under Manage Records & Particulars, select View / Update Particulars.
(ii) You will be directed to the View Employer Particulars page, which displays your company particulars such as email address(es) etc. To update your existing company’s particulars, please click on Amend.
(iii) Once all the necessary amendments have been completed, click on Save Changes. A confirmation message “Employer Particulars Modified Successfully” will be displayed on the same page.
(iv) To update your staff access, please log in to http://www.corppass.gov.sg
33 | P a g e
The Electronic Standing Instruction (ESI) function is suitable for employees whose CPF contributions do not change each month. By activating the ESI arrangement, you will authorise the auto-deduction of a fixed amount via Direct Debit for your employees every month. In order to use ESI, you will need to have an active Direct Debit arrangement with the Board.
8.1 Activate Electronic Standing Instruction (ESI)
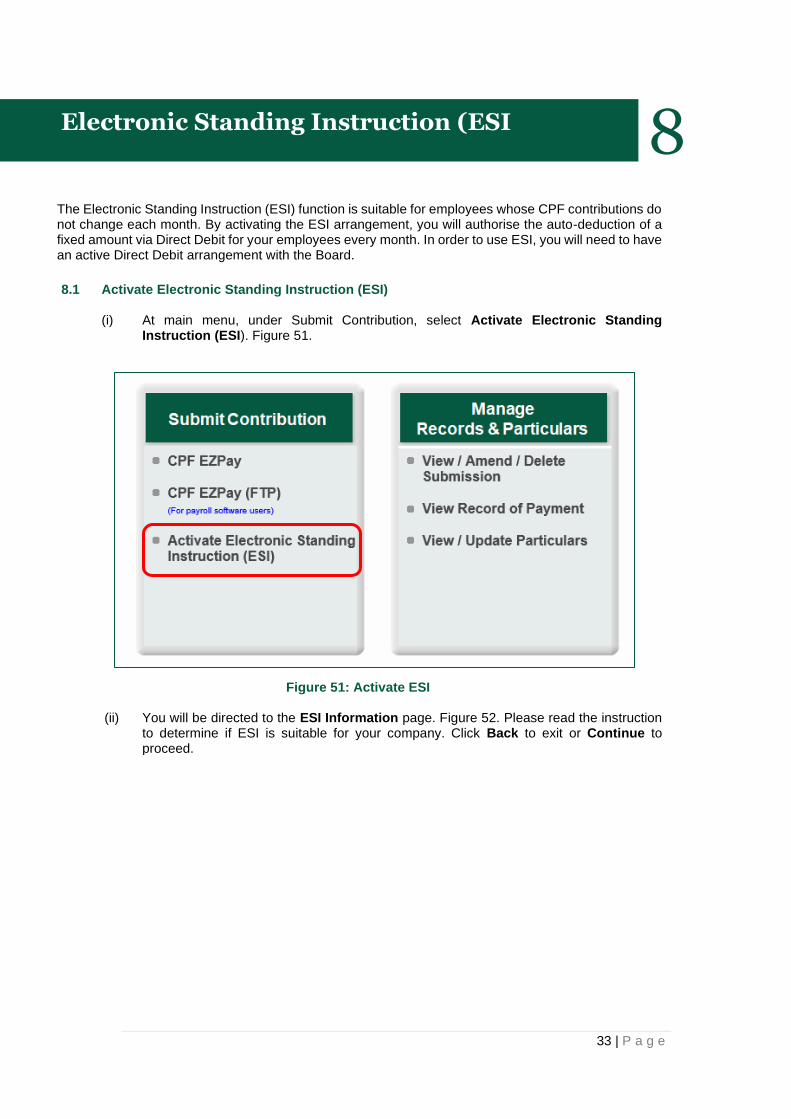
(i) At main menu, under Submit Contribution, select Activate Electronic Standing
Instruction (ESI). Figure 51.
Figure 51: Activate ESI
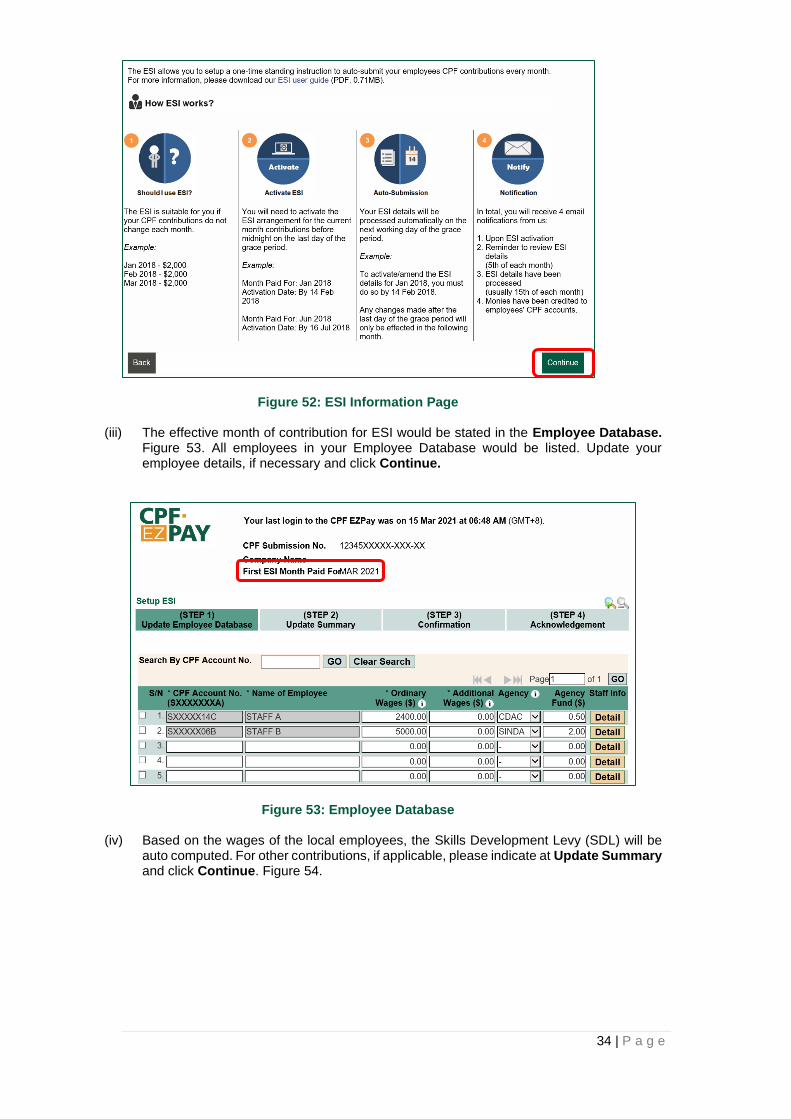
(ii) You will be directed to the ESI Information page. Figure 52. Please read the instruction to determine if ESI is suitable for your company. Click Back to exit or Continue to proceed.
8 Electronic Standing Instruction (ESI)
34 | P a g e
Figure 52: ESI Information Page
(iii) The effective month of contribution for ESI would be stated in the Employee Database. Figure 53. All employees in your Employee Database would be listed. Update your employee details, if necessary and click Continue.
Figure 53: Employee Database
(iv) Based on the wages of the local employees, the Skills Development Levy (SDL) will be auto computed. For other contributions, if applicable, please indicate at Update Summary and click Continue. Figure 54.

35 | P a g e
Figure 54: Confirmation Page
(v) Verify the details in the Confirmation page and click Activate ESI. Figure 55.
Figure 55: Activate ESI
(vi) You will see an online acknowledgement screen that your ESI has been activated. Figure 56. An email will also be sent to your email address(es) registered with the Board.
Figure 56: ESI Online Acknowledgement
(vii) You will now see the ESI main menu after your ESI arrangement is activated successfully. Figure 57.

36 | P a g e
Figure 57: ESI Main Menu 8.2 View ESI
(i) You can view the details of your ESI arrangement. Select View ESI in the ESI main menu
Figure 58.
Figure 58: View ESI
(ii) You will see your ESI details. To print the details, click the printer icon. Figure 59

37 | P a g e
Figure 59: Print Details 8.3 Amend ESI
(i) You can amend your ESI details if there are changes to your employees’ contribution
details. Select Amend ESI in the ESI main menu. Figure 60.
Figure 60: Amend ESI
(i) Update your employees’ details in the Employee Database and click Continue. Examples of amendments:
• Changes to Ordinary Wages and/or Additional Wages
• Agency and/or Agency Fund
• Addition or deletion of employees. Figure 61

38 | P a g e
• When an employee has left the company and no more CPF contribution is payable to him/her, please tick the checkbox beside the employee record and click on the button Delete Employee Record.
Figure 61: Delete Employee Record
(ii) Make the necessary changes to the Update Summary (Figure 62) and click Continue. Examples:
• Changes in Foreign Employees’ SDL (Item 2b)
• Changes in Community Chest and Donor Count
Figure 62: Update Summary
(iii) Verify the changes in the confirmation page and click Update ESI. Figure 63.

39 | P a g e
Figure 63: Update ESI
(iv) You will see an online acknowledgement screen that your ESI details have been
updated. An email will also be sent to your email address(es) registered with the Board. Figure 64.
Figure 64: ESI Updated Acknowledgement
8.4 De-activate ESI
(i) To de-activate your ESI, select De-activate ESI in ESI main menu. Figure 65.
Figure 65: De-activate ESI

40 | P a g e
(ii) The details of the existing ESI arrangement will be displayed. Click De-activate ESI to complete the de-activation process. Figure 66. You will be acknowledgment ELECTRONIC STANDING INSTRUCTION (ESI) DE-ACTIVATED”, click on Back or Logoff. Figure 67.
Figure 66: De-activate ESI
Figure 67: De-activate Acknowledgement
8.5 Perform Additional Submission
(i) To perform an additional submission when your ESI is activated, select Perform
Additional Submission in the ESI main menu. Figure 68.
IMPORTANT NOTE!
• Any additional CPF submission made for the employee will be treated as an additional payment on top of the existing ESI deduction.
Figure 68: ESI Main Menu
41 | P a g e
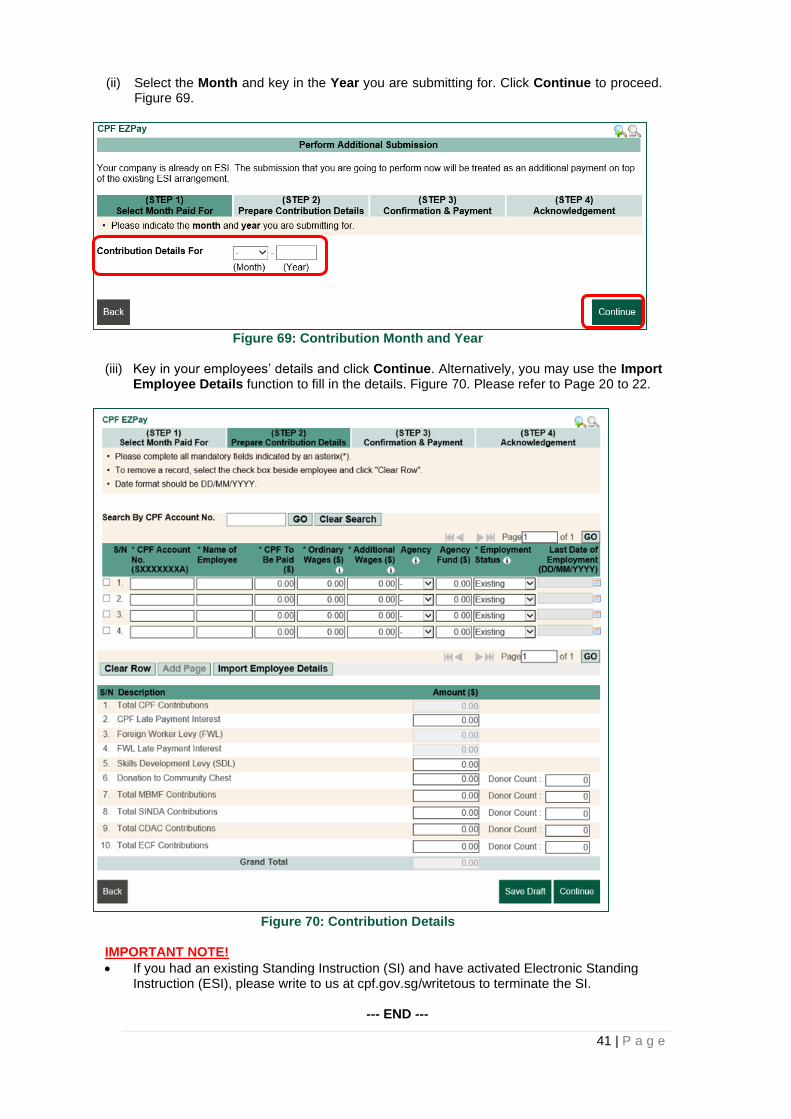
(ii) Select the Month and key in the Year you are submitting for. Click Continue to proceed.
Figure 69.
Figure 69: Contribution Month and Year
(iii) Key in your employees’ details and click Continue. Alternatively, you may use the Import
Employee Details function to fill in the details. Figure 70. Please refer to Page 20 to 22.
Figure 70: Contribution Details
IMPORTANT NOTE!
• If you had an existing Standing Instruction (SI) and have activated Electronic Standing Instruction (ESI), please write to us at cpf.gov.sg/writetous to terminate the SI.
--- END ---


![Provident Fund [1]](https://img.pdfslide.us/doc/110x75/577d29e31a28ab4e1ea82754/provident-fund-1.jpg)