Embed Size (px)
Citation preview
OPERATOR STATION PROGRAMMING MANUAL
Belanger, Inc. P.O. Box 5470
Northville, MI 48167-5470 Customer Service Phone (248) 374-4700
Fax (248) 380-9681 www.belangerinc.com
1MANUL096 REV 01
Centra™ Carwash Controller


Belanger, Inc., Centra™ Carwash Controller / E-1063

CENTRA CARWASH CONTROLLER
Belanger, Inc. * 1001 Doheny Ct. * Northville, MI 48167 * Ph (248) 349-7010 * Fax (248) 380-9681
Table of Contents Chapter 1 Introduction............................................................................................................... 1-1
Operational Warning ..................................................................................................................................1-1 Important Safety Information......................................................................................................................1-2 Safety Symbols and Signal Words.............................................................................................................1-2 IMPORTANT Safety Information – MUST READ.......................................................................................1-3 Safety Warnings.........................................................................................................................................1-3 Warranty Information .................................................................................................................................1-4
Chapter 2 System Overview ...................................................................................................... 2-1 CENTRA™ Controller ................................................................................................................................2-1 Point of Sales (POS) Connections .............................................................................................................2-1 E-1063 Overview .......................................................................................................................................2-2 E-1063 Overview .......................................................................................................................................2-3
USER ................................................................................................................................................................................................................... 2-3 FAULT ................................................................................................................................................................................................................. 2-4
Example of Usable Printer or Equivalent Printer Specifications .................................................................2-5 Printer Setup RS-232.................................................................................................................................2-5
Chapter 3 General Methods of Using Operator Interfaces..................................................... 3-1 E-1063 .......................................................................................................................................................3-1
Chapter 4 Operator Interface/Standard Wash Operation Screens........................................ 4-1 E-1063 Main Screen ..................................................................................................................................4-1 Queue........................................................................................................................................................4-2
Queue / Receipt ............................................................................................................................................................................................... 4-2 Queue / More Queue ...................................................................................................................................................................................... 4-3
Data ...........................................................................................................................................................4-4 Data / Daily......................................................................................................................................................................................................... 4-5 Data / Daily / Weekly ...................................................................................................................................................................................... 4-5
User ...........................................................................................................................................................4-6 User/Clear Wash.............................................................................................................................................................................................. 4-6 User/Wet Down ................................................................................................................................................................................................ 4-6 User / Force ....................................................................................................................................................................................................... 4-6 User / Input Bypass ......................................................................................................................................................................................... 4-7 User / Input Bypass / Enter Photo - Edit ................................................................................................................................................................ 4-7 User / Input Bypass ......................................................................................................................................................................................... 4-8 User / Input Bypass / Roller Up - Edit .................................................................................................................................................................... 4-8 User / Input Bypass / Treadle - Edit ....................................................................................................................................................................... 4-8 User / Input Bypass / Conveyor Pulse - Edit ......................................................................................................................................................... 4-8 User / Power Up Choice ................................................................................................................................................................................ 4-9 User / Monitor Inputs ...................................................................................................................................................................................... 4-9 User / Monitor Outputs ................................................................................................................................................................................... 4-9 User / Monitor Outputs / More.............................................................................................................................................................................. 4-10 User / Print ....................................................................................................................................................................................................... 4-10 User / Print / Packages ........................................................................................................................................................................................ 4-10 User / Print ....................................................................................................................................................................................................... 4-11 User / Print / Options............................................................................................................................................................................................ 4-11 User / About ..................................................................................................................................................................................................... 4-11
Faults .......................................................................................................................................................4-11
CENTRA CARWASH CONTROLLER
Belanger, Inc. * 1001 Doheny Ct. * Northville, MI 48167 * Ph (248) 349-7010 * Fax (248) 380-9681
Table of Contents Chapter 5 Operator Interface/Wash Setup Screens ................................................................5-1
Setup......................................................................................................................................................... 5-1 Setup / Packages............................................................................................................................................................................................. 5-1 Setup / Packages / Package 1 (or any of the Package buttons)........................................................................................................................... 5-1 Setup / Packages............................................................................................................................................................................................. 5-2 Setup / Packages / Goof Up .................................................................................................................................................................................. 5-2 Setup / Packages / Package Value ....................................................................................................................................................................... 5-2 Setup / Packages / Package Block........................................................................................................................................................................ 5-2 Setup / Options / Option Value .............................................................................................................................................................................. 5-4 Setup / Options / Option Block............................................................................................................................................................................... 5-4 Setup / Functions ............................................................................................................................................................................................. 5-5 Setup / Function / More.......................................................................................................................................................................................... 5-5 Setup / Function / Exit W/Go (or any of the functions) .......................................................................................................................................... 5-5 Setup / Functions ............................................................................................................................................................................................. 5-6 Setup / Functions ............................................................................................................................................................................................. 5-7 Setup / Loading ................................................................................................................................................................................................ 5-8 Setup / Loading / Factory ............................................................................................................................................................................ 5-11 Wash In Use / Wash ............................................................................................................................................................................................ 5-12 Setup / Pager .................................................................................................................................................................................................. 5-14 Setup / Misc ..................................................................................................................................................................................................... 5-15
Chapter 6 Techniques in Wash Setup ......................................................................................6-1 Additional Information................................................................................................................................ 6-1 Recommended Initial Settings................................................................................................................... 6-2
Chapter 7 Faults and Alarms .....................................................................................................7-1 Faults ........................................................................................................................................................ 7-1

Chapter 1 Introduction
Chapter 1
Introduction

CENTRA CARWASH CONTROLLER
1-1 Belanger, Inc. * 1001 Doheny Ct. * Northville, MI 48167 * Ph (248) 349-7010 * Fax (248) 380-9681 1MANUL096
Chapter 1 Introduction
Operational Warning Formulations containing the chemicals listed below are particularly dangerous and should not be used even at low concentrations:
• Hydrofluoric Acid
• Ammonium Bi-fluoride
• Bromic Acid
• Muriatic Acid
• Sulfonic Acid
• Phosphoric Acid
• Hydrogen Cyanide
• Hydrochloric Acid
• Chlorinated Solvents Belanger, Inc. does not endorse or condone the use of chemicals that are potentially dangerous to human health, the environment or property. Belanger recognizes that it is the right and sole decision of the end user operators of our equipment as to the type and dilution ratio of the chemicals used in their facilities. We strongly recommend that the end user does not select products containing any of the chemicals listed above as an ingredient in the wash solutions. The chemicals listed above are potentially dangerous to human health, and have a detrimental, deteriorating effect on the equipment and the facility. Be advised that a portion of, or all of your warranty will be voided if you determine to use any of the chemicals listed above as an ingredient in the wash solutions in conjunction with your Belanger automatic car wash equipment:
Limitation (4), of Paragraph (8), Limited Warranty, of the Belanger Terms and Conditions of Sales describes the potential limitation of warranty due to your chemical selection:
(4) This warranty shall be void for all equipment failures and premature component wear caused by the use of corrosive chemicals in the wash process. The following list includes some, but not all, of the particularly corrosive chemicals that if used in conjunction with Belanger equipment will void the warranty: Hydrofluoric Acid, Ammonium Bi-fluoride, Bromic Acid, Muriatic Acid, Sulfonic Acid, Phosphoric Acid, Hydrogen Cyanide, Hydrochloric Acid, and Chlorinated Solvents. The Purchaser also agrees to accept the responsibility and liability for the selection and use of any chemicals listed above; however, should the end user decide to use formulations containing any of the above ingredients, the end user should institute a comprehensive training program and implement detailed operational parameters within their organization for the proper handling and treatment of such products to minimize the potential dangers involved. Consult your chemical supplier for assistance in establishing operational guidelines in the use of their products. MSDS (Material Safety Data Sheet) should be obtained from the chemical supplier before using any chemical formulation.

CENTRA CARWASH CONTROLLER
1-2 Belanger, Inc. * 1001 Doheny Ct. * Northville, MI 48167 * Ph (248) 349-7010 * Fax (248) 380-9681 1MANUL096
Chapter 1 Introduction
Important Safety Information This section introduces the hazard and safety precautions associated with installing, maintaining or servicing this product. Before performing any task on this product, read this safety information and the applicable sections in this manual, where additional hazards and safety precautions for your task may be found. Electrical shock could occur and cause death or serious injury if these safe service procedures are not followed.
Safety Symbols and Signal Words
Alert Symbol This safety alert symbol is used in this manual and on warning labels to alert you to precautions, which must be followed to prevent potential personal safety hazards. Obey safety directives that follow this symbol to avoid possible injury or death.
Signal Words The signal words used in this manual and on warning labels tell you the seriousness of particular safety hazards. The precautions that follow must be followed to prevent death, injury or damage to the equipment.
DANGER This signal word is used to alert you to a hazard or unsafe practice which WILL RESULT IN
DEATH OR SERIOUS INJURY
This alerts you to a hazard or unsafe practice which COULD RESULT IN DEATH OR SERIOUS INJURY
CAUTIONThis signal word designates a hazard or unsafe practice, which MAY RESULT IN MINOR
INJURY
CAUTIONWhen used by it self, CAUTION designates a hazard or unsafe practice which MAY RESULT
IN PROPERTY OR EQUIPMENT DAMAGE
Before You Begin Only trained or authorized individuals knowledgeable in the related procedures should install, inspect, maintain or service this equipment.
Read the Manual Read, understand and follow this manual and any other labels or related materials supplied with this equipment. If you do not understand the procedure, call a Belanger, Inc. representative at 248-349-7010. It is imperative to your safety and the safety of others to understand the procedures before beginning work.
CENTRA CARWASH CONTROLLER
1MANUL096 Belanger, Inc. * 1001 Doheny Ct. * Northville, MI 48167 * Ph (248) 349-7010 * Fax (248) 380-9681 1-3
Chapter 1 Introduction
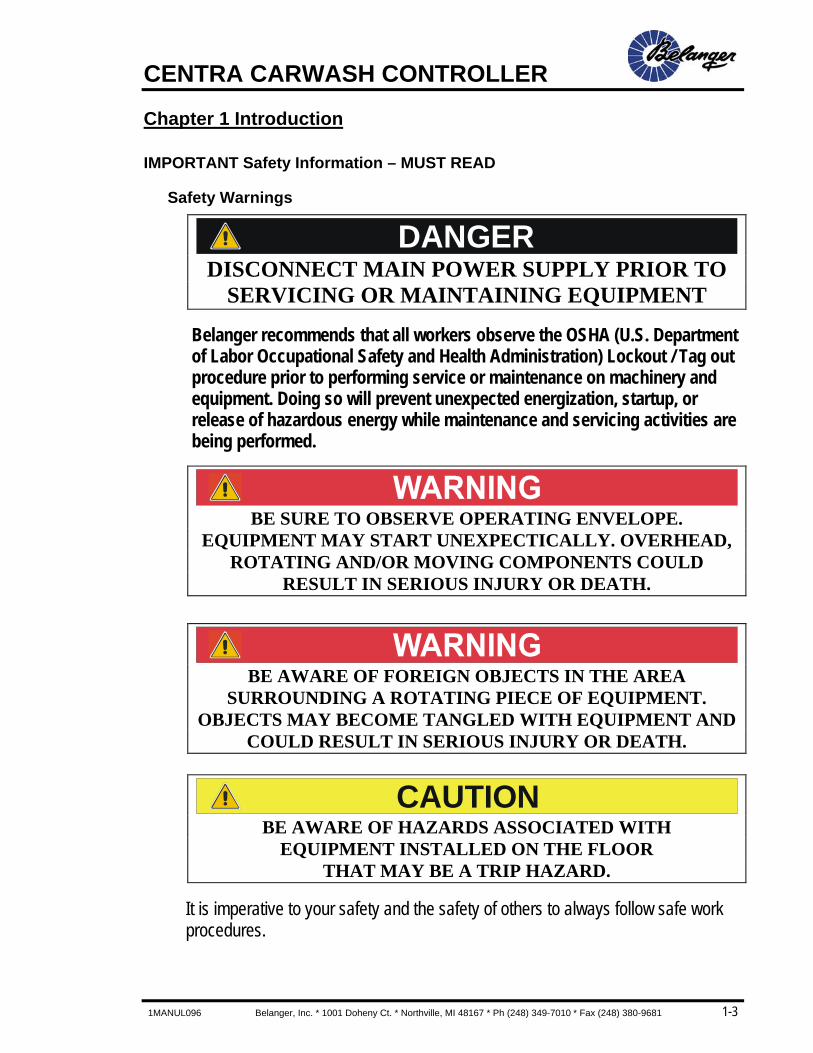
IMPORTANT Safety Information – MUST READ
Safety Warnings
DANGER DISCONNECT MAIN POWER SUPPLY PRIOR TO
SERVICING OR MAINTAINING EQUIPMENT
Belanger recommends that all workers observe the OSHA (U.S. Department of Labor Occupational Safety and Health Administration) Lockout / Tag out procedure prior to performing service or maintenance on machinery and equipment. Doing so will prevent unexpected energization, startup, or release of hazardous energy while maintenance and servicing activities are being performed.
BE SURE TO OBSERVE OPERATING ENVELOPE. EQUIPMENT MAY START UNEXPECTICALLY. OVERHEAD,
ROTATING AND/OR MOVING COMPONENTS COULD RESULT IN SERIOUS INJURY OR DEATH.
BE AWARE OF FOREIGN OBJECTS IN THE AREA SURROUNDING A ROTATING PIECE OF EQUIPMENT.
OBJECTS MAY BECOME TANGLED WITH EQUIPMENT AND COULD RESULT IN SERIOUS INJURY OR DEATH.
CAUTIONBE AWARE OF HAZARDS ASSOCIATED WITH
EQUIPMENT INSTALLED ON THE FLOOR THAT MAY BE A TRIP HAZARD.
It is imperative to your safety and the safety of others to always follow safe work procedures.
CENTRA CARWASH CONTROLLER
1-4 Belanger, Inc. * 1001 Doheny Ct. * Northville, MI 48167 * Ph (248) 349-7010 * Fax (248) 380-9681 1MANUL096
Chapter 1 Introduction
Warranty Information Belanger Incorporated Limited Warranty LIMITED WARRANTY: Seller warrants to the original purchaser that the goods sold hereunder, which are fabricated exclusively by Seller, shall be free from defects in workmanship and material under normal use and service for a period of one year from the date of shipment. Seller warrants to the original purchaser that the goods sold hereunder, which are not exclusively manufactured by Seller, shall be free from defects in workmanship and material under normal use and service for a period of 90 days from the date of shipment. This warranty is subject to the following limitations: (1) Labor to repair or replace parts is warranted to Purchaser during normal business hours through an authorized distributor or value added reseller (VAR) of Seller, or direct with Seller, for 90 calendar days from date of invoice. Labor warranty excludes all claims for warranty on labor that are determined to be nuisance service calls, misuse, lack of operational training, neglect, improper installation, repair, alteration, act of God, or accident from third party damage. Seller reserves the sole right to make determinations on the above stated limitation. All labor and service provided beyond the expiration of the labor warranty period shall be charged to the Purchaser at the rates established by the local authorized distributor or value added reseller (VAR) or direct with Seller; (2) Defective parts will be repaired or replaced through an authorized distributor or value added reseller (VAR) of Seller, or direct with Seller. This warranty does not apply to damage resulting from accident, misuse, abuse, negligence or normal wear and tear to the depreciable parts. Purchaser agrees to submit to and assist Seller or its authorized distributor or value added reseller (VAR) in conducting in-warranty inspections of the machinery and equipment including inspection of any part claimed to be defective by the Purchaser; (3) This warranty shall be void if the factory specifications for operation and maintenance are not followed, or if other than factory authorized erection, alterations or modifications are made to any parts or equipment; (4) This warranty shall be void for all equipment failures and premature component wear caused by the use of corrosive chemicals in the wash process. The following list includes some, but not all, of the particularly corrosive chemicals that if used in conjunction with Seller’s equipment will void the warranty: Hydrofluoric Acid, Ammonium Bi-fluoride, Bromic Acid, Muriatic Acid, Sulfonic Acid, Phosphoric Acid, Hydrogen Cyanide, Hydrochloric Acid, and Chlorinated Solvents. The Purchaser also agrees to accept the responsibility and liability for the selection and use of any chemicals listed above; (5) This warranty shall be void for all equipment failures and premature component wear caused by the use of reclaim water in the wash process; specifically, failure of high pressure valves, high pressure pumps, nozzles, and un-loader valves; (6) Seller makes no warranty, express or implied, with respect to the design or operation of any entire system, in which Seller’s goods sold hereunder are mere components. THIS WARRANTY IS EXPRESSLY IN LIEU OF ALL OTHER WARRANTIES, EXPRESS OR IMPLIED, WHETHER STATUTORY OR OTHERWISE, INCLUDING ANY IMPLIED WARRANTY OF MERCHANTABILITY OR FITNESS FOR A PARTICULAR PURPOSE; (7) In no event shall Seller be liable for any incidental, special, consequential or exemplary damages resulting from the furnishing, performance or use of any goods or services sold pursuant hereto, whether due to a breach of contract, breach of warranty, the negligence of Seller or to otherwise; not for loss of business; inconvenience, or property damage of any kind; or for any service not expressly provided herein related to or arising from the equipment or goods sold. This limitation of liability extends to any damages resulting in any way from purchaser’s use of any engineering recommendations, sales representations, technical assistance, advice or data supplied by Seller to purchaser in connection with the goods or services supplied, other than that information contained in Seller’s manuals, pursuant to this acknowledgment. This limitation of liability additionally extends to any damages of whatever nature resulting in any way from the purchaser’s selection and use of any chemicals not manufactured exclusively by seller but used with the purchased goods. All warranties either express, implied, or statutory, pertaining to Seller’s machinery, parts, and equipment are fully set forth herein. This limited warranty applies to the original purchaser only and is not transferable. No addition to or modification of any of the provisions of the above stated Limited Warranty shall be binding upon the Seller, unless made in writing and signed by a duly authorized employee of Seller.
Copyright © 2001 by Belanger, Inc. All rights reserved. No part of this work may be reproduced or transmitted in any form or by any means, electronic or mechanical, including photocopying and recording, or by any information storage or retrieval system, except as may be expressly permitted by the 1976 Copyright Act. Revised as of 5-30-01. Belanger reserves the right to change or modify the Belanger Inc. Limited Warranty without notice.
Chapter 2 General Machine Operations
Chapter 2
System Overview

CENTRA CARWASH CONTROLLER
1MANUL096 Belanger, Inc. * 1001 Doheny Ct. * Northville, MI 48167 * Ph (248) 349-7010 * Fax (248) 380-9681 2-1
Chapter 2 System Overview
CENTRA™ Controller This system is made up of the CENTRA™ (Controller), E-1063 (User Interface) and the Operator Station (for Attended Sites). The system can be purchased in either a 32 or 64 outputs model. Be aware that the 32 Output systems will show setup functions for the remaining 32 outputs though they are not installed. The system allows the user to set up 15 packages and 15 options. The options can select/deselect functions of the user-selected packages. Options cannot run as stand-alone washes with out first selecting a package. Package and options can be selected from a variety of different operator/customer interfaces. The possible interfaces includes the Belanger 15-15 Operator Station, any push-button or contact closures, and a variety of aftermarket point of sale terminals with contact closures for wash selection. The point of Sales can operate direct selection of packages, binary selection of packages or pulsed count selection of packages.
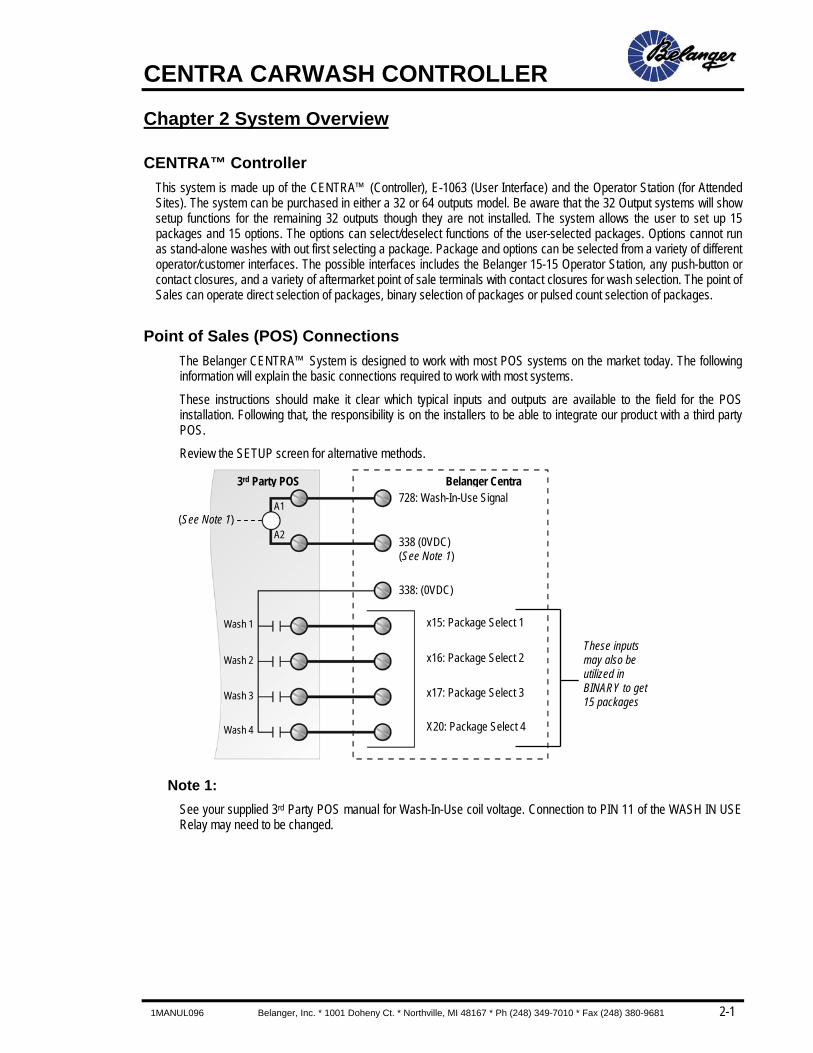
Point of Sales (POS) Connections The Belanger CENTRA™ System is designed to work with most POS systems on the market today. The following information will explain the basic connections required to work with most systems.
These instructions should make it clear which typical inputs and outputs are available to the field for the POS installation. Following that, the responsibility is on the installers to be able to integrate our product with a third party POS.
Review the SETUP screen for alternative methods.
Note 1: See your supplied 3rd Party POS manual for Wash-In-Use coil voltage. Connection to PIN 11 of the WASH IN USE Relay may need to be changed.
3rd Party POS Belanger Centra 728: Wash-In-Use Signal
338 (0VDC) (See Note 1)
338: (0VDC)
x15: Package Select 1
x16: Package Select 2
x17: Package Select 3
X20: Package Select 4
A1
A2 (See Note 1)
Wash 1
Wash 2
Wash 3
Wash 4
These inputs may also be utilized in BINARY to get 15 packages
CENTRA CARWASH CONTROLLER
2-2 Belanger, Inc. * 1001 Doheny Ct. * Northville, MI 48167 * Ph (248) 349-7010 * Fax (248) 380-9681 1MANUL096
Chapter 2 System Overview
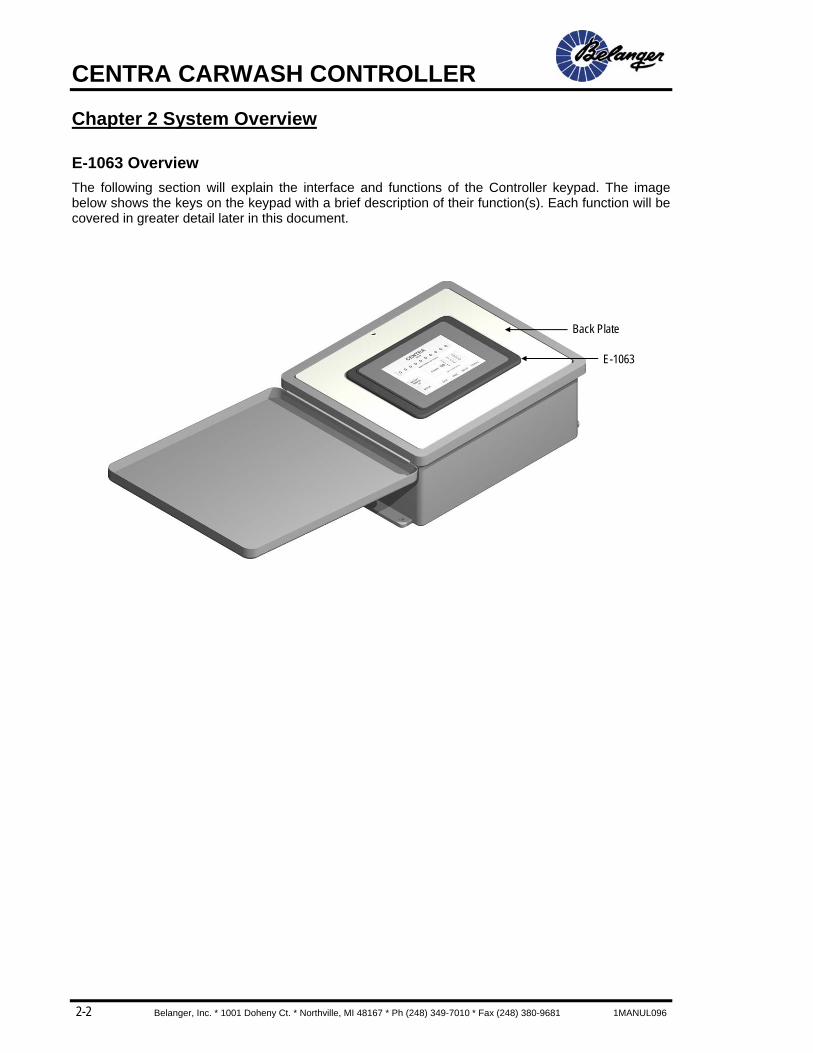
E-1063 Overview The following section will explain the interface and functions of the Controller keypad. The image below shows the keys on the keypad with a brief description of their function(s). Each function will be covered in greater detail later in this document.
Back Plate
E-1063
CENTRA CARWASH CONTROLLER
1MANUL096 Belanger, Inc. * 1001 Doheny Ct. * Northville, MI 48167 * Ph (248) 349-7010 * Fax (248) 380-9681 2-3
Chapter 2 System Overview
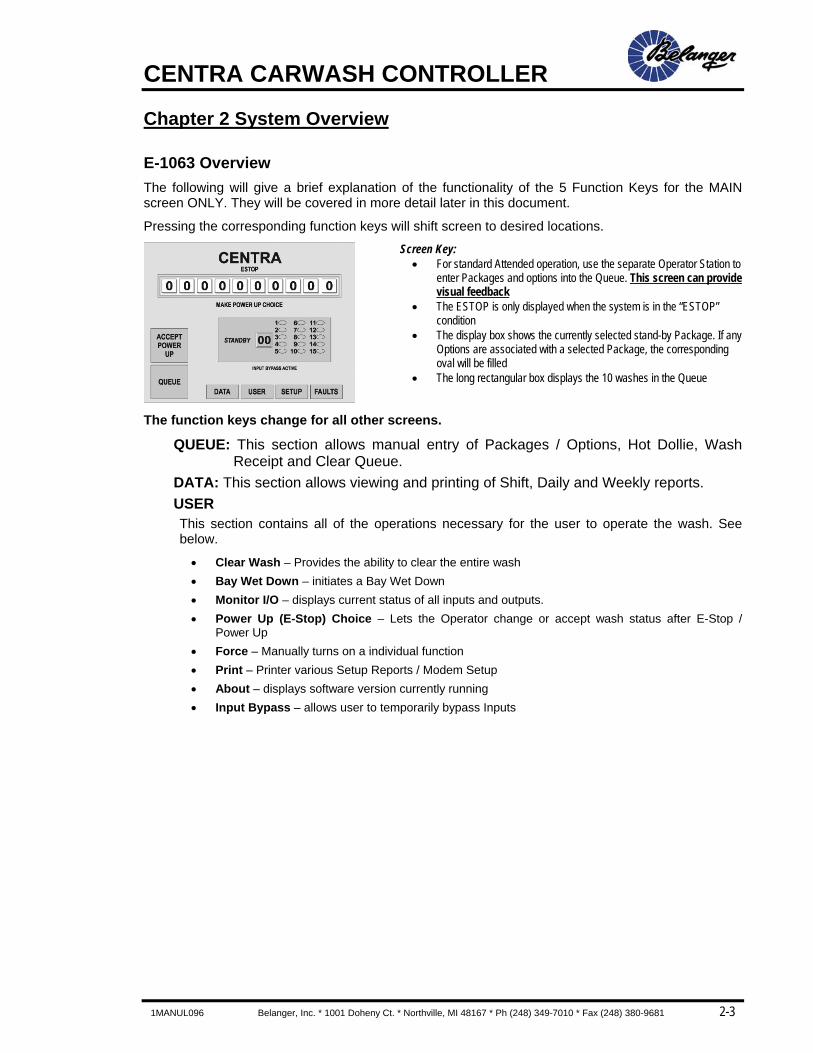
E-1063 Overview The following will give a brief explanation of the functionality of the 5 Function Keys for the MAIN screen ONLY. They will be covered in more detail later in this document.
Pressing the corresponding function keys will shift screen to desired locations.
The function keys change for all other screens.
QUEUE: This section allows manual entry of Packages / Options, Hot Dollie, Wash Receipt and Clear Queue.
DATA: This section allows viewing and printing of Shift, Daily and Weekly reports. USER This section contains all of the operations necessary for the user to operate the wash. See below.
• Clear Wash – Provides the ability to clear the entire wash • Bay Wet Down – initiates a Bay Wet Down • Monitor I/O – displays current status of all inputs and outputs. • Power Up (E-Stop) Choice – Lets the Operator change or accept wash status after E-Stop /
Power Up • Force – Manually turns on a individual function • Print – Printer various Setup Reports / Modem Setup • About – displays software version currently running • Input Bypass – allows user to temporarily bypass Inputs
Screen Key:• For standard Attended operation, use the separate Operator Station to
enter Packages and options into the Queue. This screen can provide visual feedback
• The ESTOP is only displayed when the system is in the “ESTOP” condition
• The display box shows the currently selected stand-by Package. If any Options are associated with a selected Package, the corresponding oval will be filled
• The long rectangular box displays the 10 washes in the Queue
CENTRA CARWASH CONTROLLER
2-4 Belanger, Inc. * 1001 Doheny Ct. * Northville, MI 48167 * Ph (248) 349-7010 * Fax (248) 380-9681 1MANUL096
Chapter 2 System Overview
E-1063 Overview SETUP: The Setup screen is used to program the system to your desired operation. The setup area has
many functions that will be explained in detail later in this manual. These functions include: • Options – Function select or de-select for option upgrades • POS (Point of Sales) – Package/Option and Accept input configuration • Packages – Functions for package offering • Misc • Loading – Configuration of vehicle loading and Dollie tasking • Bay Wet Down – Set up for functions to be enabled during wet-down • Wash Value – Dollar value of the package and options. • Disable – Disables the un-used packages • Functions – Configuration of wash equipment • Pager – Configuration of pager setup
FAULT Here you can view and reset current fault status. You can also view the fault history by pressing the Alarm key.
CENTRA CARWASH CONTROLLER
1MANUL096 Belanger, Inc. * 1001 Doheny Ct. * Northville, MI 48167 * Ph (248) 349-7010 * Fax (248) 380-9681 2-5
Chapter 2 System Overview
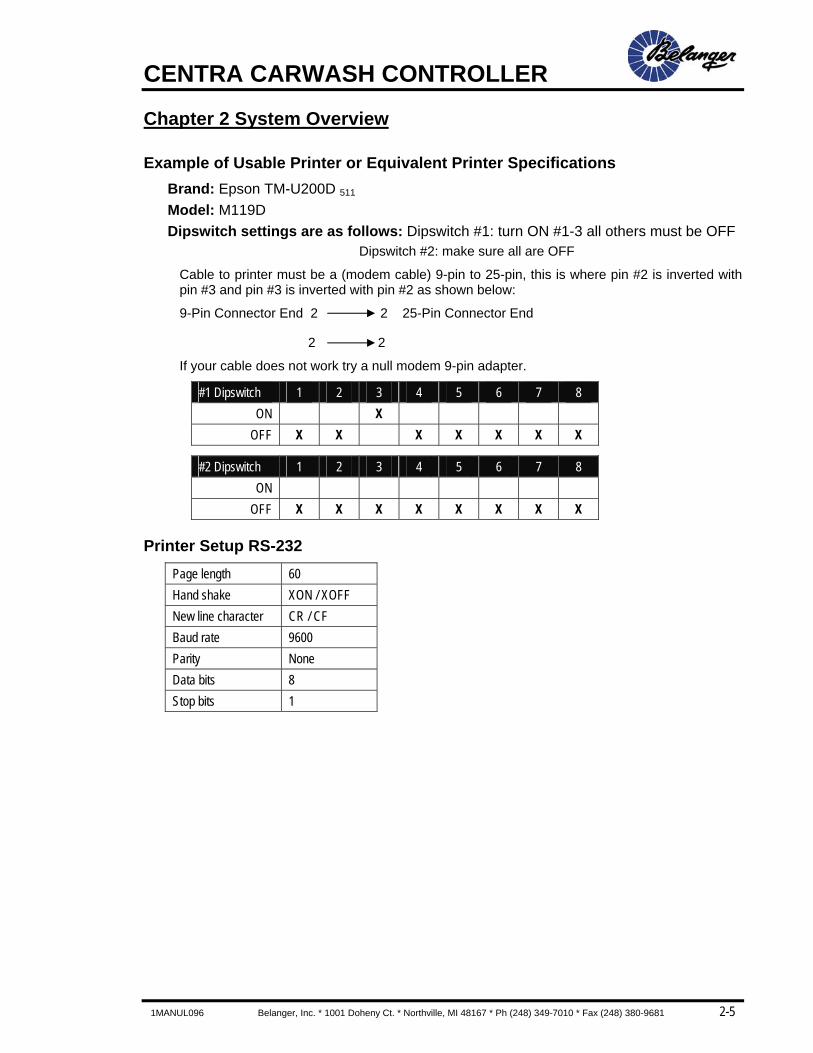
Example of Usable Printer or Equivalent Printer Specifications Brand: Epson TM-U200D 511 Model: M119D Dipswitch settings are as follows: Dipswitch #1: turn ON #1-3 all others must be OFF
Dipswitch #2: make sure all are OFF
Cable to printer must be a (modem cable) 9-pin to 25-pin, this is where pin #2 is inverted with pin #3 and pin #3 is inverted with pin #2 as shown below:
9-Pin Connector End 2 2 25-Pin Connector End
2 2
If your cable does not work try a null modem 9-pin adapter. #1 Dipswitch 1 2 3 4 5 6 7 8
ON X OFF X X X X X X X
#2 Dipswitch 1 2 3 4 5 6 7 8 ON
OFF X X X X X X X X
Printer Setup RS-232 Page length 60 Hand shake XON / XOFF New line character CR / CF Baud rate 9600 Parity None Data bits 8 Stop bits 1

Chapter 3 General Methods of Using Operator Interfaces
Chapter 3
General Methods of Using Operator
Interfaces

CENTRA CARWASH CONTROLLER
1MANUL096 Belanger, Inc. * 1001 Doheny Ct. * Northville, MI 48167 * Ph (248) 349-7010 * Fax (248) 380-9681 3-1
Chapter 3 General Methods of Using Operator Interfaces
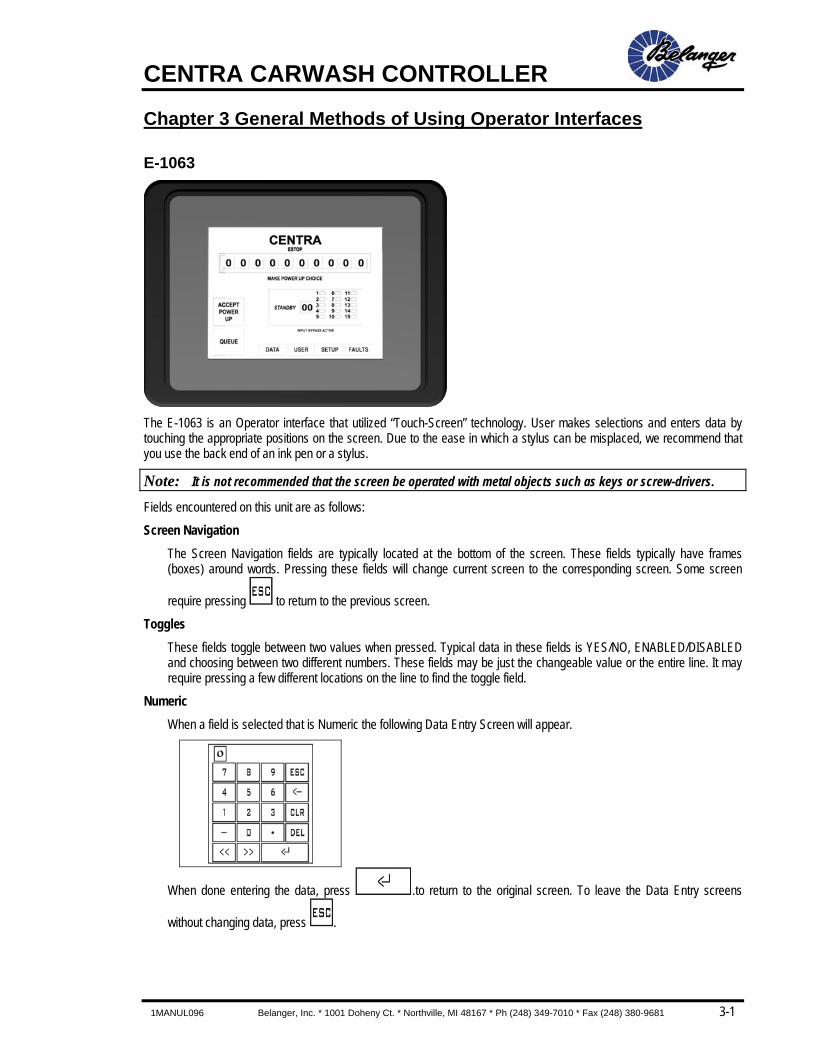
E-1063
The E-1063 is an Operator interface that utilized “Touch-Screen” technology. User makes selections and enters data by touching the appropriate positions on the screen. Due to the ease in which a stylus can be misplaced, we recommend that you use the back end of an ink pen or a stylus.
Note: It is not recommended that the screen be operated with metal objects such as keys or screw-drivers.
Fields encountered on this unit are as follows: Screen Navigation
The Screen Navigation fields are typically located at the bottom of the screen. These fields typically have frames (boxes) around words. Pressing these fields will change current screen to the corresponding screen. Some screen
require pressing to return to the previous screen. Toggles
These fields toggle between two values when pressed. Typical data in these fields is YES/NO, ENABLED/DISABLED and choosing between two different numbers. These fields may be just the changeable value or the entire line. It may require pressing a few different locations on the line to find the toggle field.
Numeric When a field is selected that is Numeric the following Data Entry Screen will appear.
When done entering the data, press .to return to the original screen. To leave the Data Entry screens
without changing data, press .
CENTRA CARWASH CONTROLLER
3-2 Belanger, Inc. * 1001 Doheny Ct. * Northville, MI 48167 * Ph (248) 349-7010 * Fax (248) 380-9681 1MANUL096
Chapter 3 General Methods of Using Operator Interfaces
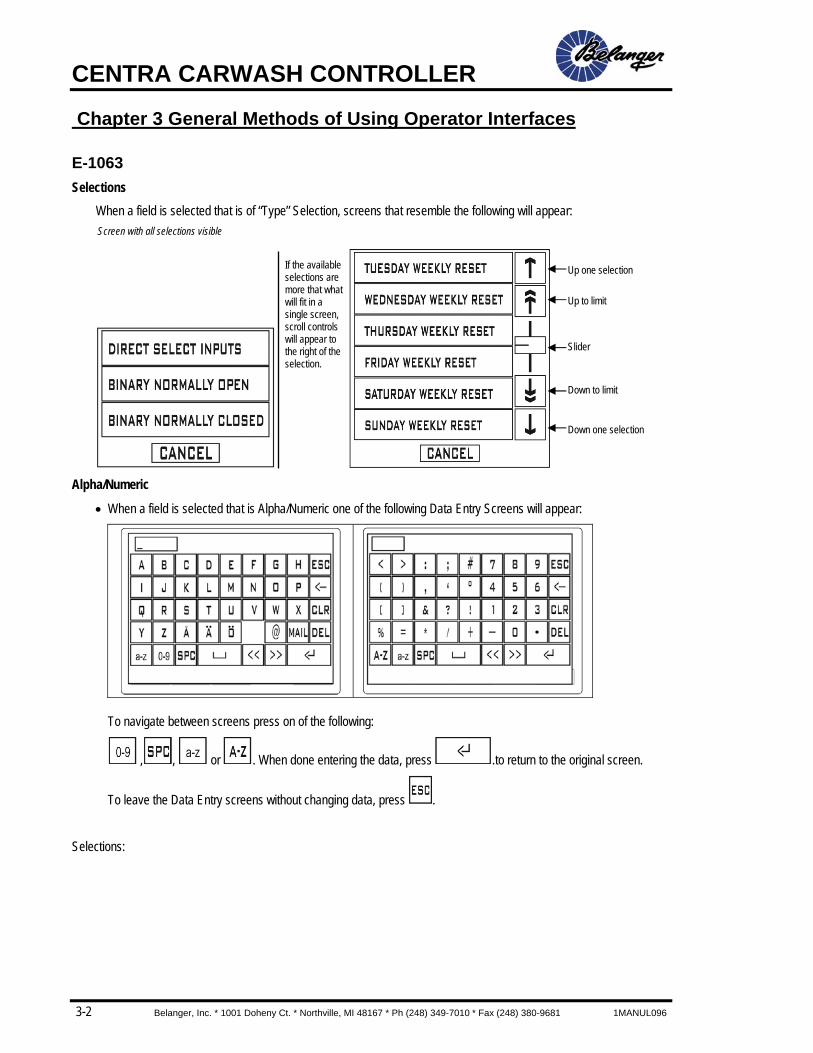
E-1063 Selections
When a field is selected that is of “Type” Selection, screens that resemble the following will appear:
Alpha/Numeric
• When a field is selected that is Alpha/Numeric one of the following Data Entry Screens will appear:
To navigate between screens press on of the following:
, , or . When done entering the data, press .to return to the original screen.
To leave the Data Entry screens without changing data, press .
Selections:
If the available selections are more that what will fit in a single screen, scroll controls will appear to the right of the selection.
Up one selection
Up to limit
Slider
Down to limit
Down one selection
Screen with all selections visible
Chapter 4 Operator interface/Standard User Screens
Chapter 4
Operator Interface/Standard
Wash Operation Screens

CENTRA CARWASH CONTROLLER
1MANUL096 Belanger, Inc. * 1001 Doheny Ct. * Northville, MI 48167 * Ph (248) 349-7010 * Fax (248) 380-9681 4-1
Chapter 4 Operator Interface/Standard Wash Operation Screens
E-1063 Main Screen
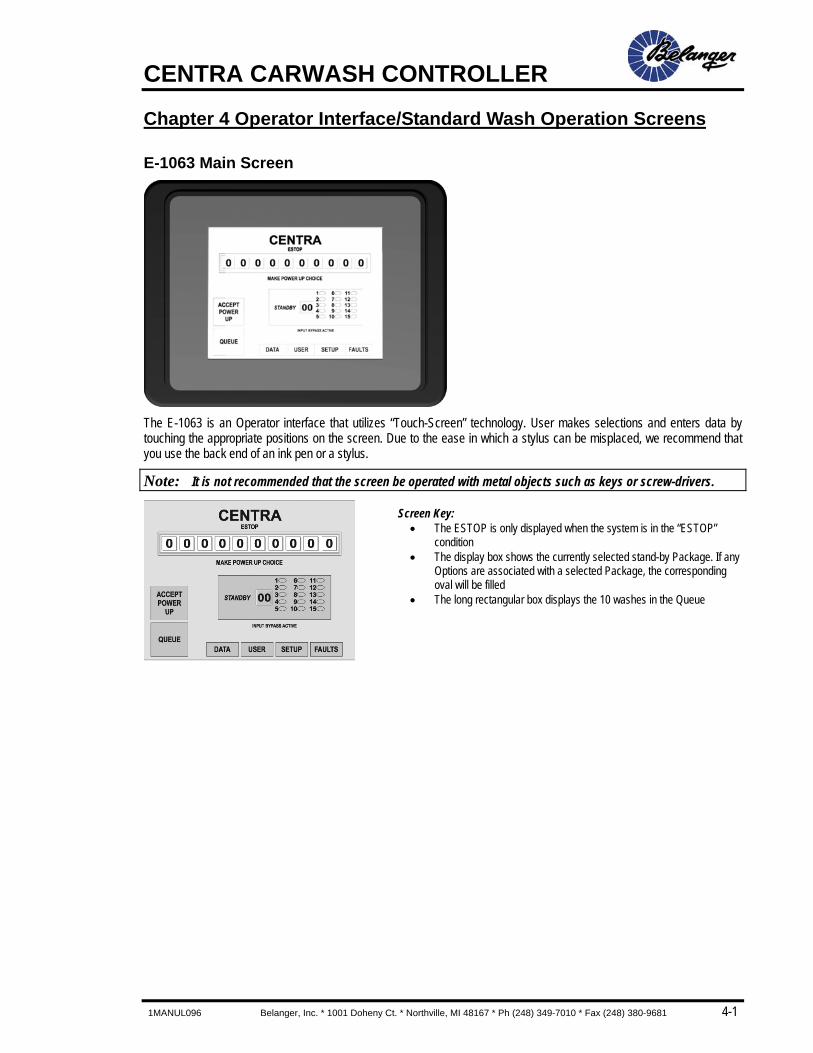
The E-1063 is an Operator interface that utilizes “Touch-Screen” technology. User makes selections and enters data by touching the appropriate positions on the screen. Due to the ease in which a stylus can be misplaced, we recommend that you use the back end of an ink pen or a stylus.
Note: It is not recommended that the screen be operated with metal objects such as keys or screw-drivers.
Screen Key:• The ESTOP is only displayed when the system is in the “ESTOP”
condition • The display box shows the currently selected stand-by Package. If any
Options are associated with a selected Package, the corresponding oval will be filled
• The long rectangular box displays the 10 washes in the Queue
CENTRA CARWASH CONTROLLER
4-2 Belanger, Inc. * 1001 Doheny Ct. * Northville, MI 48167 * Ph (248) 349-7010 * Fax (248) 380-9681 1MANUL096
Chapter 4 Operator Interface/Standard Wash Operation Screens
Queue
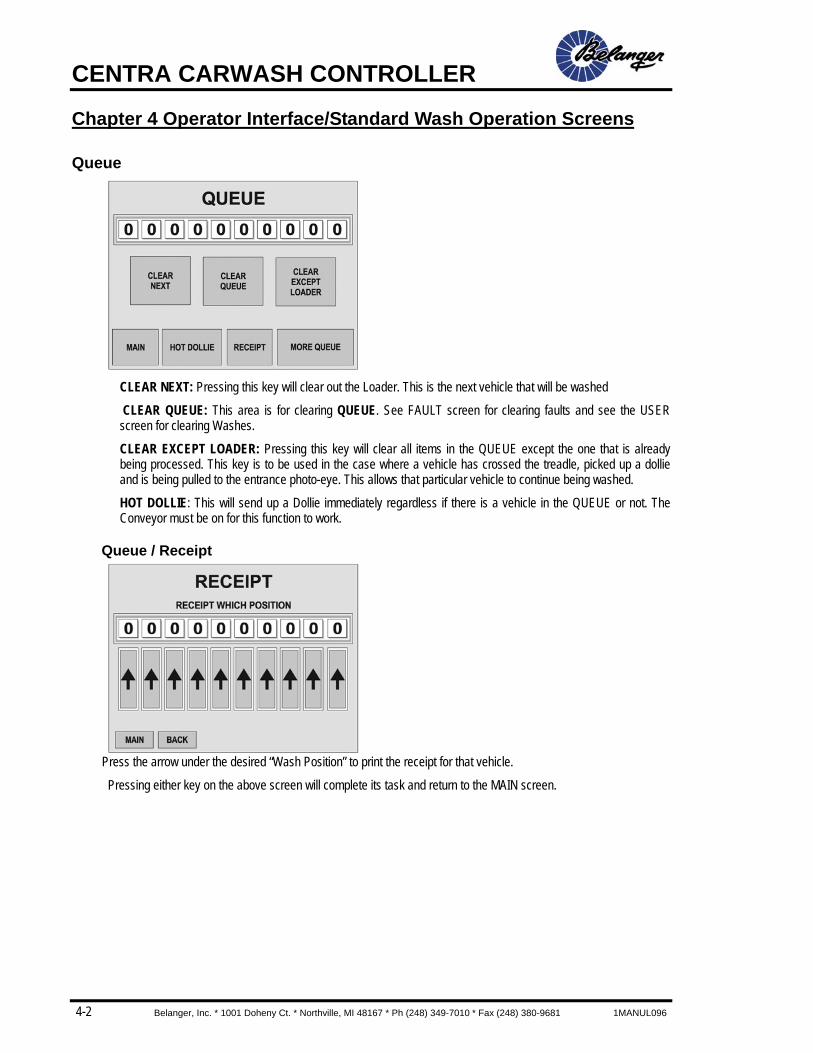
CLEAR NEXT: Pressing this key will clear out the Loader. This is the next vehicle that will be washed
CLEAR QUEUE: This area is for clearing QUEUE. See FAULT screen for clearing faults and see the USER screen for clearing Washes.
CLEAR EXCEPT LOADER: Pressing this key will clear all items in the QUEUE except the one that is already being processed. This key is to be used in the case where a vehicle has crossed the treadle, picked up a dollie and is being pulled to the entrance photo-eye. This allows that particular vehicle to continue being washed.
HOT DOLLIE: This will send up a Dollie immediately regardless if there is a vehicle in the QUEUE or not. The Conveyor must be on for this function to work.
Queue / Receipt
Press the arrow under the desired “Wash Position” to print the receipt for that vehicle.
Pressing either key on the above screen will complete its task and return to the MAIN screen.
CENTRA CARWASH CONTROLLER
1MANUL096 Belanger, Inc. * 1001 Doheny Ct. * Northville, MI 48167 * Ph (248) 349-7010 * Fax (248) 380-9681 4-3
Chapter 4 Operator Interface/Standard Wash Operation Screens
Queue
Queue / More Queue
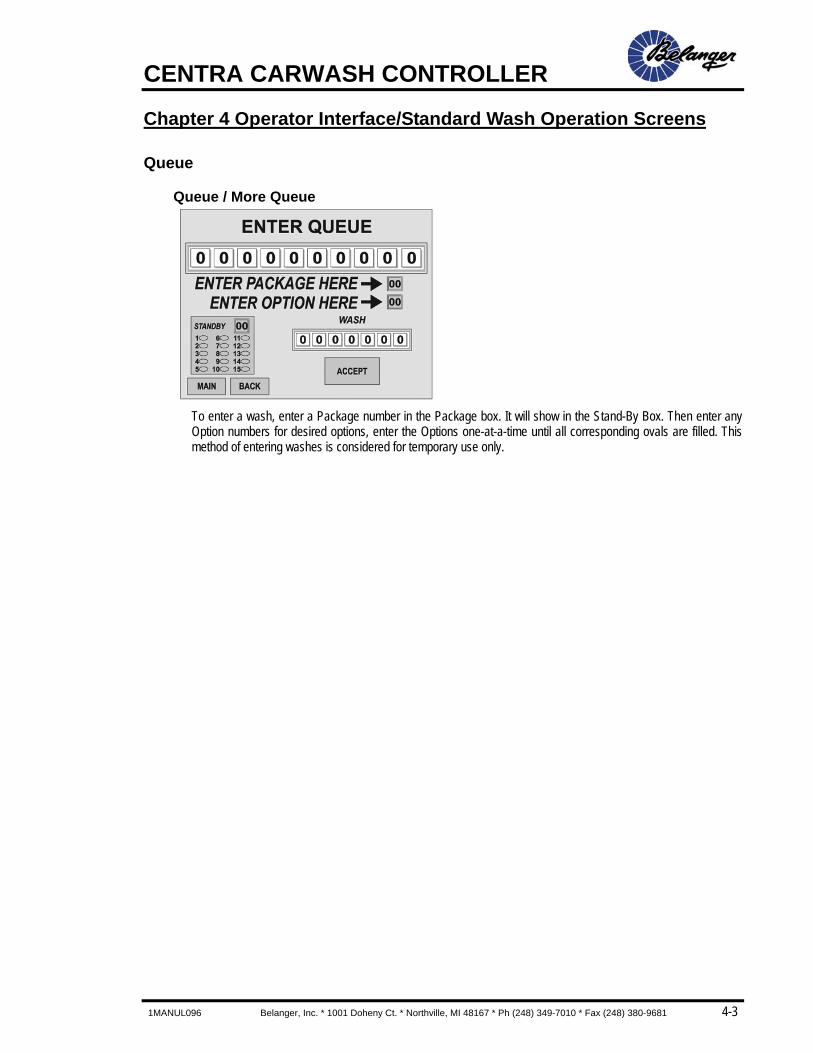
To enter a wash, enter a Package number in the Package box. It will show in the Stand-By Box. Then enter any Option numbers for desired options, enter the Options one-at-a-time until all corresponding ovals are filled. This method of entering washes is considered for temporary use only.
CENTRA CARWASH CONTROLLER
4-4 Belanger, Inc. * 1001 Doheny Ct. * Northville, MI 48167 * Ph (248) 349-7010 * Fax (248) 380-9681 1MANUL096
Chapter 4 Operator Interface/Standard Wash Operation Screens
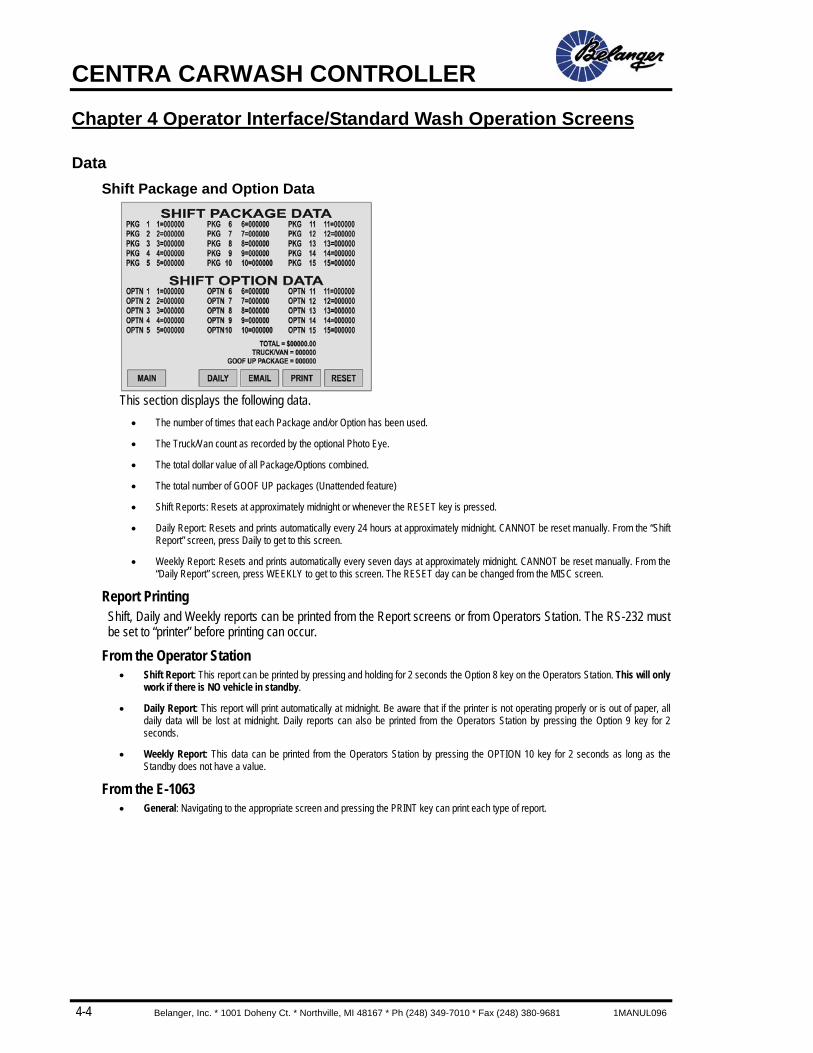
Data Shift Package and Option Data
This section displays the following data.
• The number of times that each Package and/or Option has been used.
• The Truck/Van count as recorded by the optional Photo Eye.
• The total dollar value of all Package/Options combined.
• The total number of GOOF UP packages (Unattended feature)
• Shift Reports: Resets at approximately midnight or whenever the RESET key is pressed.
• Daily Report: Resets and prints automatically every 24 hours at approximately midnight. CANNOT be reset manually. From the “Shift Report” screen, press Daily to get to this screen.
• Weekly Report: Resets and prints automatically every seven days at approximately midnight. CANNOT be reset manually. From the “Daily Report” screen, press WEEKLY to get to this screen. The RESET day can be changed from the MISC screen.
Report Printing Shift, Daily and Weekly reports can be printed from the Report screens or from Operators Station. The RS-232 must be set to “printer” before printing can occur.
From the Operator Station • Shift Report: This report can be printed by pressing and holding for 2 seconds the Option 8 key on the Operators Station. This will only
work if there is NO vehicle in standby.
• Daily Report: This report will print automatically at midnight. Be aware that if the printer is not operating properly or is out of paper, all daily data will be lost at midnight. Daily reports can also be printed from the Operators Station by pressing the Option 9 key for 2 seconds.
• Weekly Report: This data can be printed from the Operators Station by pressing the OPTION 10 key for 2 seconds as long as the Standby does not have a value.
From the E-1063 • General: Navigating to the appropriate screen and pressing the PRINT key can print each type of report.
CENTRA CARWASH CONTROLLER
1MANUL096 Belanger, Inc. * 1001 Doheny Ct. * Northville, MI 48167 * Ph (248) 349-7010 * Fax (248) 380-9681 4-5
Chapter 4 Operator Interface/Standard Wash Operation Screens
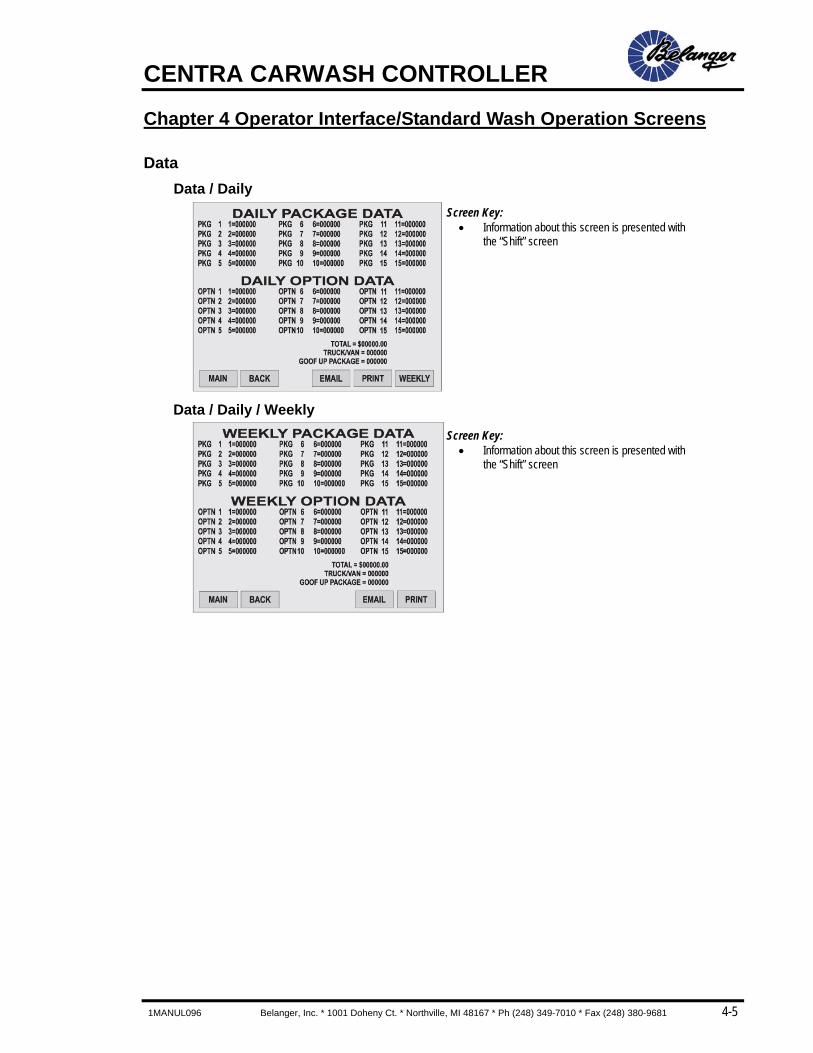
Data Data / Daily
Data / Daily / Weekly
Screen Key:• Information about this screen is presented with
the “Shift” screen
Screen Key:• Information about this screen is presented with
the “Shift” screen
CENTRA CARWASH CONTROLLER
4-6 Belanger, Inc. * 1001 Doheny Ct. * Northville, MI 48167 * Ph (248) 349-7010 * Fax (248) 380-9681 1MANUL096
Chapter 4 Operator Interface/Standard Wash Operation Screens
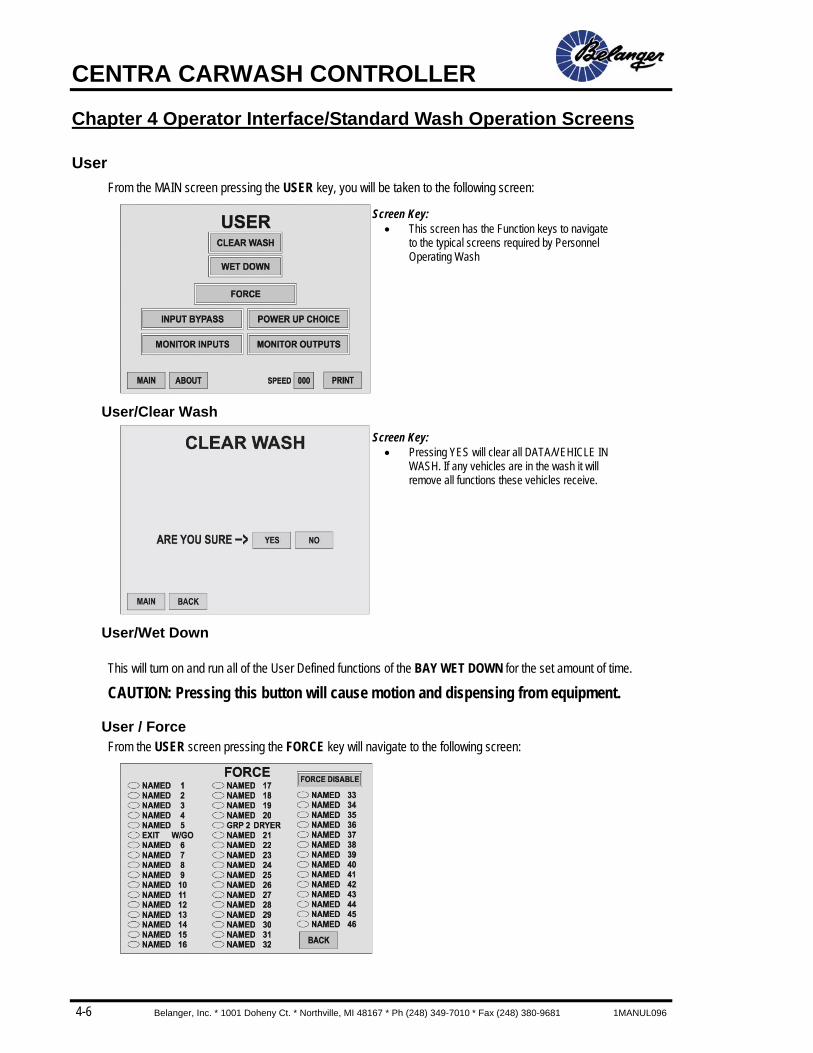
User From the MAIN screen pressing the USER key, you will be taken to the following screen:
User/Clear Wash
User/Wet Down
This will turn on and run all of the User Defined functions of the BAY WET DOWN for the set amount of time.
CAUTION: Pressing this button will cause motion and dispensing from equipment.
User / Force From the USER screen pressing the FORCE key will navigate to the following screen:
Screen Key:• This screen has the Function keys to navigate
to the typical screens required by Personnel Operating Wash
Screen Key:• Pressing YES will clear all DATA/VEHICLE IN
WASH. If any vehicles are in the wash it will remove all functions these vehicles receive.
CENTRA CARWASH CONTROLLER
1MANUL096 Belanger, Inc. * 1001 Doheny Ct. * Northville, MI 48167 * Ph (248) 349-7010 * Fax (248) 380-9681 4-7
Chapter 4 Operator Interface/Standard Wash Operation Screens
User
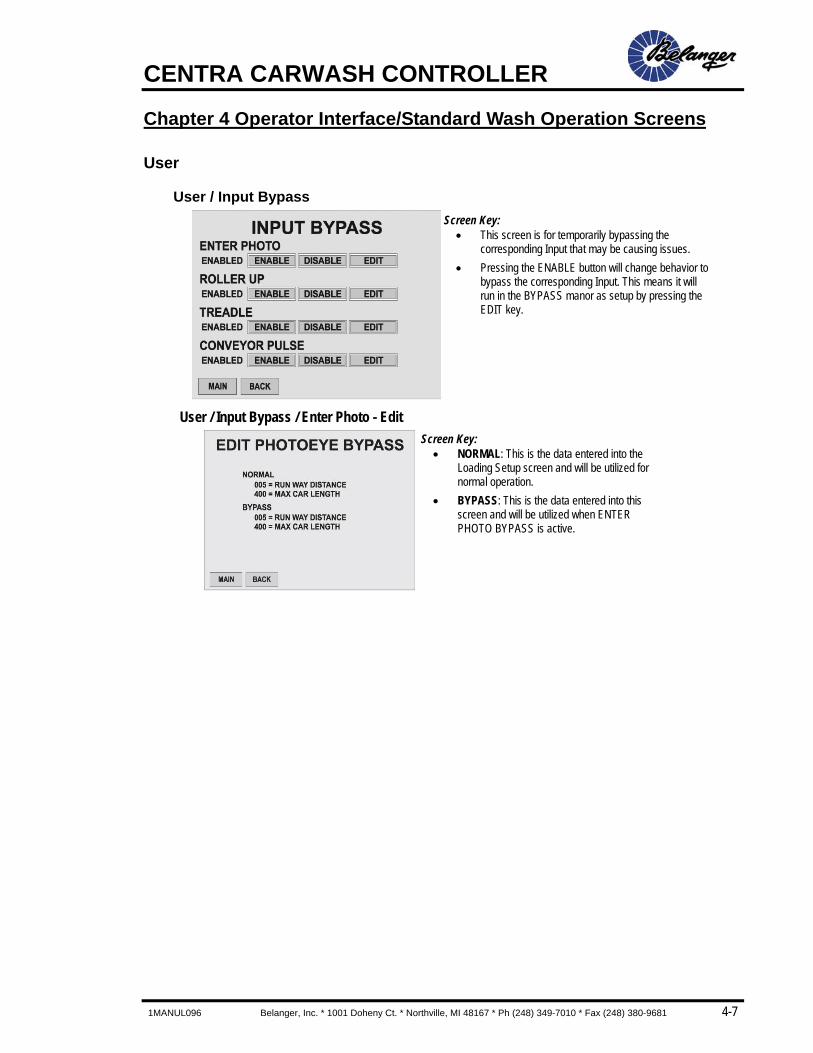
User / Input Bypass
User / Input Bypass / Enter Photo - Edit
Screen Key:• This screen is for temporarily bypassing the
corresponding Input that may be causing issues. • Pressing the ENABLE button will change behavior to
bypass the corresponding Input. This means it will run in the BYPASS manor as setup by pressing the EDIT key.
Screen Key:• NORMAL: This is the data entered into the
Loading Setup screen and will be utilized for normal operation.
• BYPASS: This is the data entered into this screen and will be utilized when ENTER PHOTO BYPASS is active.
CENTRA CARWASH CONTROLLER
4-8 Belanger, Inc. * 1001 Doheny Ct. * Northville, MI 48167 * Ph (248) 349-7010 * Fax (248) 380-9681 1MANUL096
Chapter 4 Operator Interface/Standard Wash Operation Screens
User
User / Input Bypass
User / Input Bypass / Roller Up - Edit
User / Input Bypass / Treadle - Edit
User / Input Bypass / Conveyor Pulse - Edit
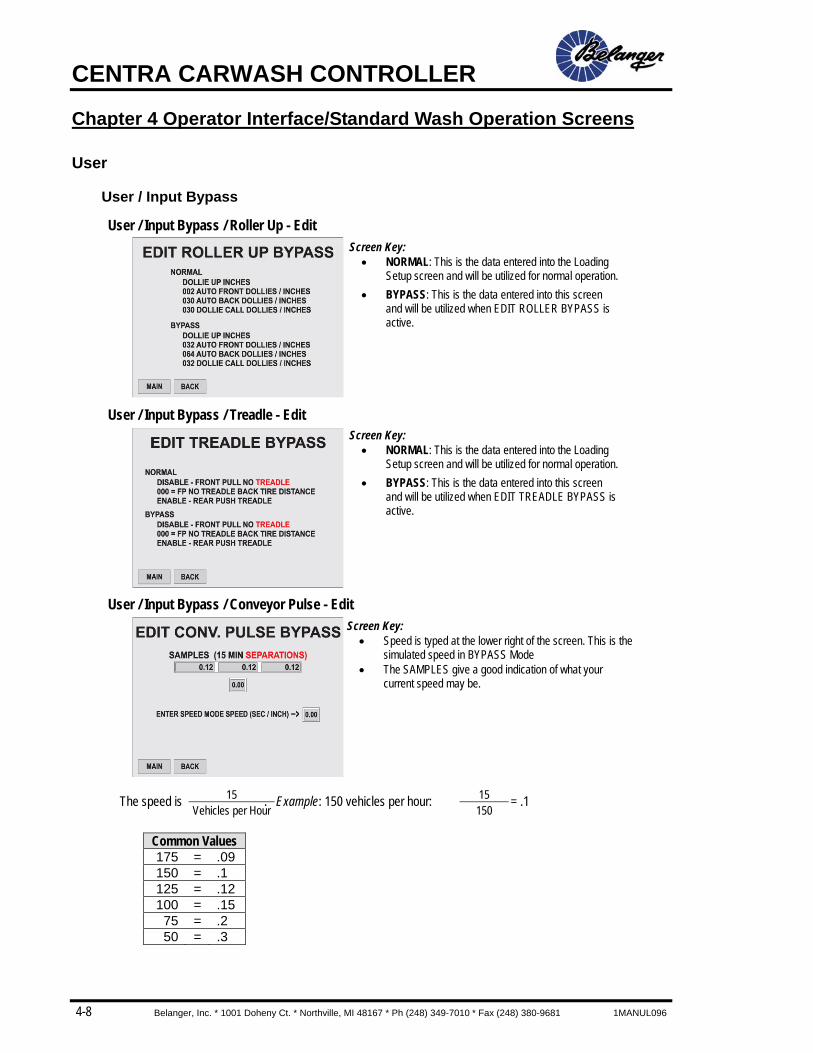
The speed is . Example: 150 vehicles per hour: = .1
Common Values 175 = .09 150 = .1 125 = .12 100 = .15
75 = .2 50 = .3
Screen Key:• Speed is typed at the lower right of the screen. This is the
simulated speed in BYPASS Mode • The SAMPLES give a good indication of what your
current speed may be.
15 Vehicles per Hour
15 150
Screen Key:• NORMAL: This is the data entered into the Loading
Setup screen and will be utilized for normal operation. • BYPASS: This is the data entered into this screen
and will be utilized when EDIT ROLLER BYPASS is active.
Screen Key:• NORMAL: This is the data entered into the Loading
Setup screen and will be utilized for normal operation. • BYPASS: This is the data entered into this screen
and will be utilized when EDIT TREADLE BYPASS is active.
CENTRA CARWASH CONTROLLER
1MANUL096 Belanger, Inc. * 1001 Doheny Ct. * Northville, MI 48167 * Ph (248) 349-7010 * Fax (248) 380-9681 4-9
Chapter 4 Operator Interface/Standard Wash Operation Screens
User
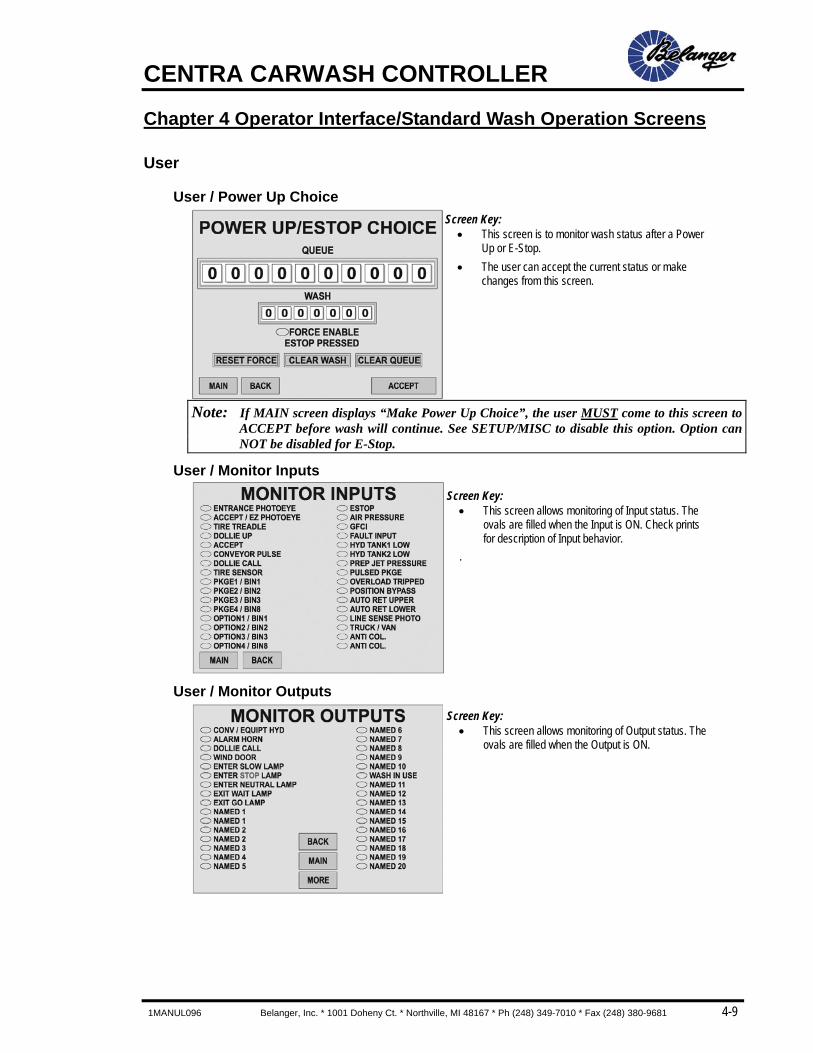
User / Power Up Choice
Note: If MAIN screen displays “Make Power Up Choice”, the user MUST come to this screen to
ACCEPT before wash will continue. See SETUP/MISC to disable this option. Option can NOT be disabled for E-Stop.
User / Monitor Inputs
User / Monitor Outputs
Screen Key:• This screen is to monitor wash status after a Power
Up or E-Stop. • The user can accept the current status or make
changes from this screen.
Screen Key:• This screen allows monitoring of Input status. The
ovals are filled when the Input is ON. Check prints for description of Input behavior.
.
Screen Key:• This screen allows monitoring of Output status. The
ovals are filled when the Output is ON.
CENTRA CARWASH CONTROLLER
4-10 Belanger, Inc. * 1001 Doheny Ct. * Northville, MI 48167 * Ph (248) 349-7010 * Fax (248) 380-9681 1MANUL096
Chapter 4 Operator Interface/Standard Wash Operation Screens
User
User / Monitor Outputs
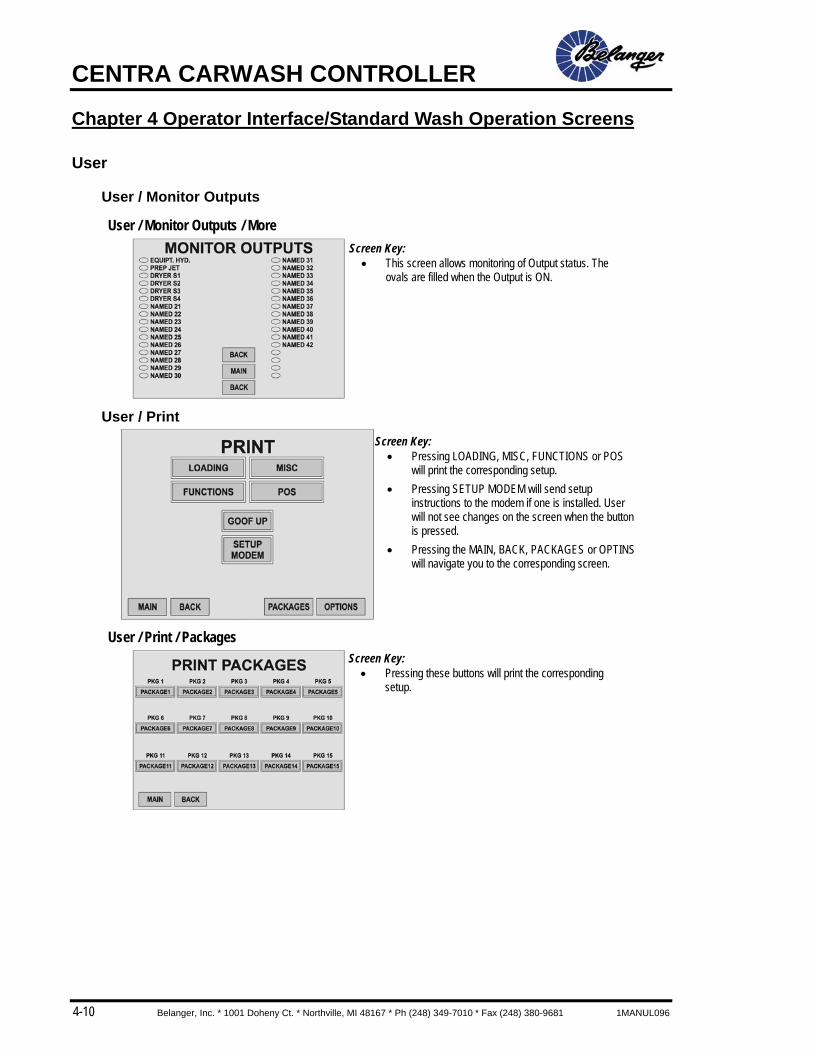
User / Monitor Outputs / More
User / Print
User / Print / Packages
Screen Key:• This screen allows monitoring of Output status. The
ovals are filled when the Output is ON.
Screen Key:• Pressing LOADING, MISC, FUNCTIONS or POS
will print the corresponding setup. • Pressing SETUP MODEM will send setup
instructions to the modem if one is installed. User will not see changes on the screen when the button is pressed.
• Pressing the MAIN, BACK, PACKAGES or OPTINS will navigate you to the corresponding screen.
Screen Key:• Pressing these buttons will print the corresponding
setup.
CENTRA CARWASH CONTROLLER
1MANUL096 Belanger, Inc. * 1001 Doheny Ct. * Northville, MI 48167 * Ph (248) 349-7010 * Fax (248) 380-9681 4-11
Chapter 4 Operator Interface/Standard Wash Operation Screens
User
User / Print
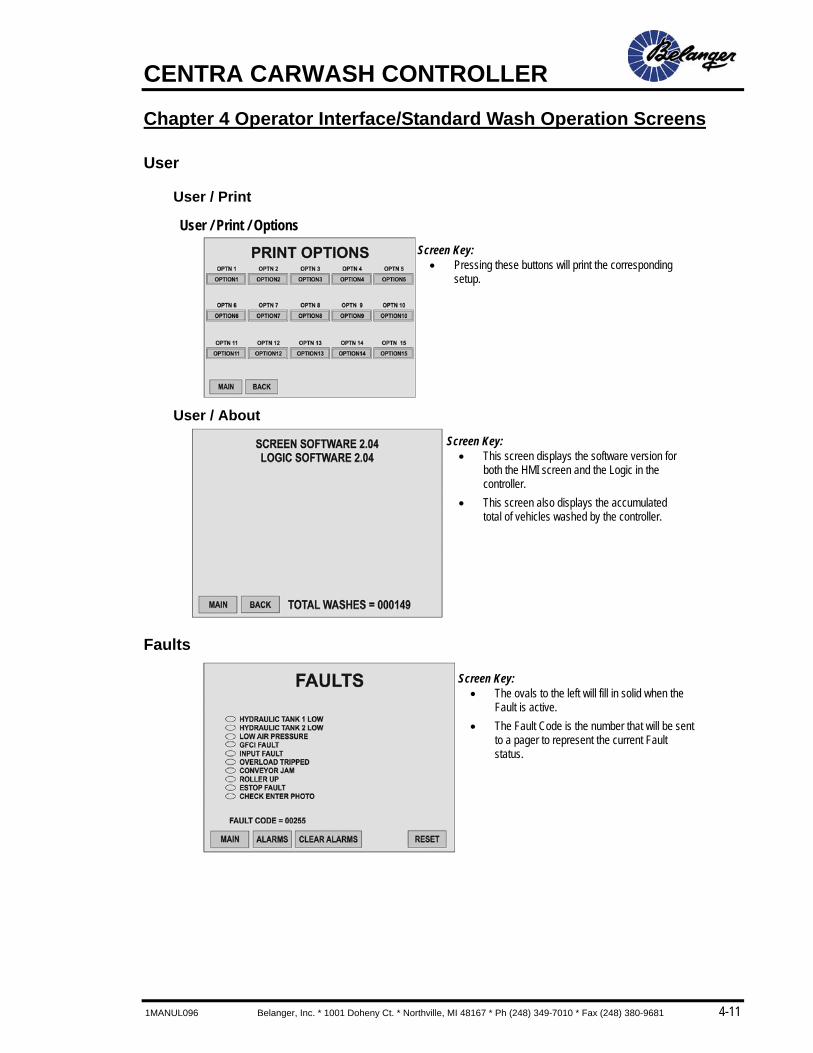
User / Print / Options
User / About
Faults
Screen Key:• Pressing these buttons will print the corresponding
setup.
Screen Key:• This screen displays the software version for
both the HMI screen and the Logic in the controller.
• This screen also displays the accumulated total of vehicles washed by the controller.
Screen Key:• The ovals to the left will fill in solid when the
Fault is active. • The Fault Code is the number that will be sent
to a pager to represent the current Fault status.
CENTRA CARWASH CONTROLLER
4-12 Belanger, Inc. * 1001 Doheny Ct. * Northville, MI 48167 * Ph (248) 349-7010 * Fax (248) 380-9681 1MANUL096
Chapter 4 Operator Interface/Standard Wash Operation Screens
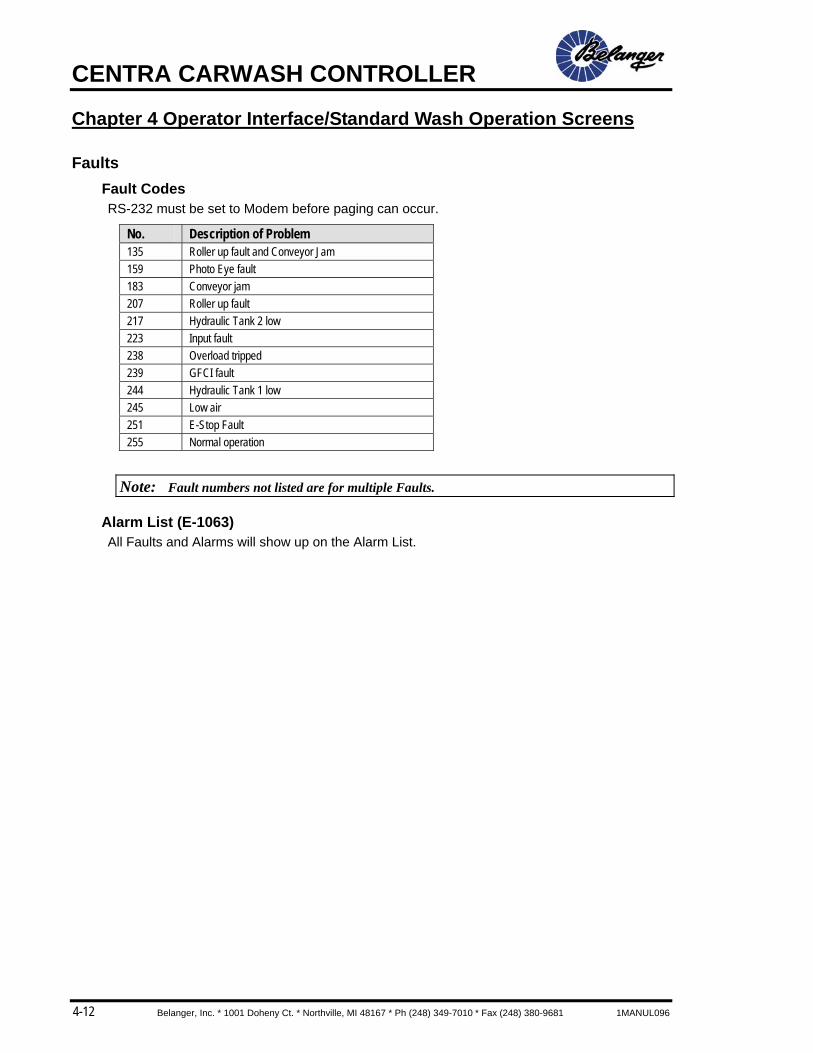
Faults Fault Codes RS-232 must be set to Modem before paging can occur.
No. Description of Problem 135 Roller up fault and Conveyor Jam 159 Photo Eye fault 183 Conveyor jam 207 Roller up fault 217 Hydraulic Tank 2 low 223 Input fault 238 Overload tripped 239 GFCI fault 244 Hydraulic Tank 1 low 245 Low air 251 E-Stop Fault 255 Normal operation
Note: Fault numbers not listed are for multiple Faults.
Alarm List (E-1063) All Faults and Alarms will show up on the Alarm List.
Chapter 5 Operator Interface/Programming
Chapter 5
Operator Interface/ Wash Setup Screens

CENTRA CARWASH CONTROLLER
1MANUL096 Belanger, Inc. * 1001 Doheny Ct. * Northville, MI 48167 * Ph (248) 349-7010 * Fax (248) 380-9681 5-1
Chapter 5 Operator Interface/Wash Setup Screens
Setup
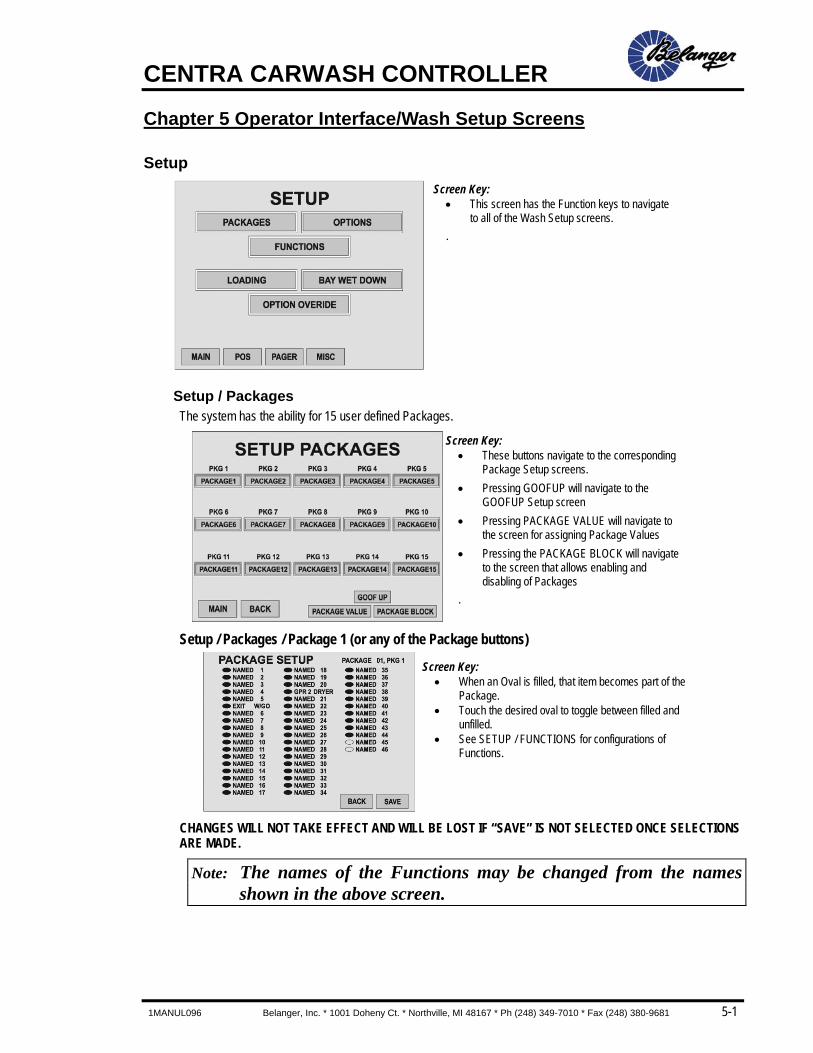
Setup / Packages The system has the ability for 15 user defined Packages.
Setup / Packages / Package 1 (or any of the Package buttons)
CHANGES WILL NOT TAKE EFFECT AND WILL BE LOST IF “SAVE” IS NOT SELECTED ONCE SELECTIONS ARE MADE.
Note: The names of the Functions may be changed from the names shown in the above screen.
Screen Key:• This screen has the Function keys to navigate
to all of the Wash Setup screens. .
Screen Key:• These buttons navigate to the corresponding
Package Setup screens. • Pressing GOOFUP will navigate to the
GOOFUP Setup screen • Pressing PACKAGE VALUE will navigate to
the screen for assigning Package Values • Pressing the PACKAGE BLOCK will navigate
to the screen that allows enabling and disabling of Packages
.
Screen Key:• When an Oval is filled, that item becomes part of the
Package. • Touch the desired oval to toggle between filled and
unfilled. • See SETUP / FUNCTIONS for configurations of
Functions.
CENTRA CARWASH CONTROLLER
5-2 Belanger, Inc. * 1001 Doheny Ct. * Northville, MI 48167 * Ph (248) 349-7010 * Fax (248) 380-9681 1MANUL096
Chapter 5 Operator Interface/Wash Setup Screens
Setup
Setup / Packages
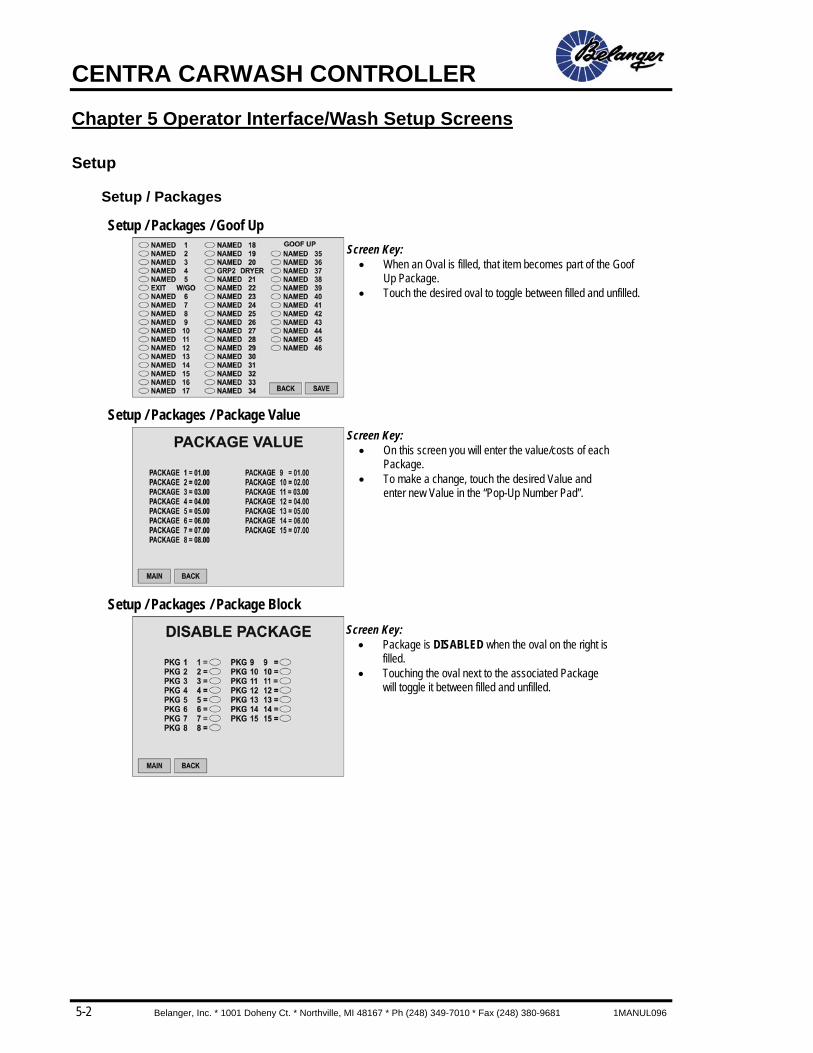
Setup / Packages / Goof Up
Setup / Packages / Package Value
Setup / Packages / Package Block
Screen Key:• When an Oval is filled, that item becomes part of the Goof
Up Package. • Touch the desired oval to toggle between filled and unfilled.
Screen Key:• On this screen you will enter the value/costs of each
Package. • To make a change, touch the desired Value and
enter new Value in the “Pop-Up Number Pad”.
Screen Key:• Package is DISABLED when the oval on the right is
filled. • Touching the oval next to the associated Package
will toggle it between filled and unfilled.
CENTRA CARWASH CONTROLLER
1MANUL096 Belanger, Inc. * 1001 Doheny Ct. * Northville, MI 48167 * Ph (248) 349-7010 * Fax (248) 380-9681 5-3
Chapter 5 Operator Interface/Wash Setup Screens
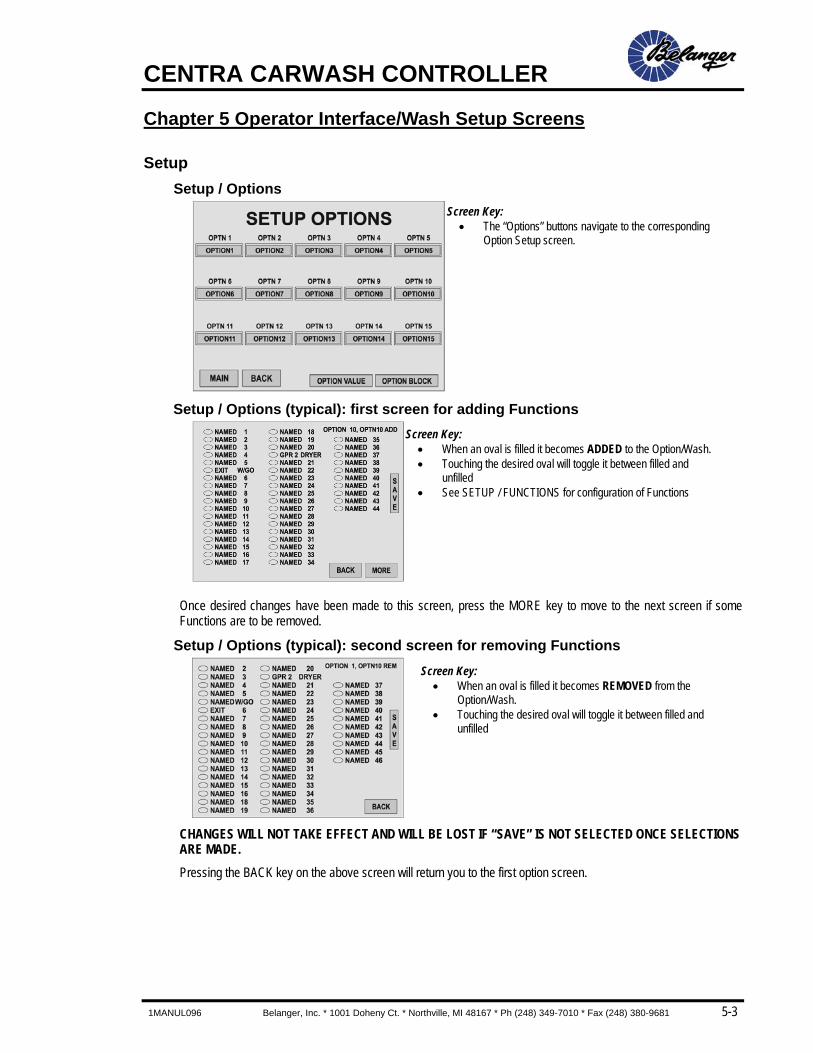
Setup Setup / Options
Setup / Options (typical): first screen for adding Functions
Once desired changes have been made to this screen, press the MORE key to move to the next screen if some Functions are to be removed.
Setup / Options (typical): second screen for removing Functions
CHANGES WILL NOT TAKE EFFECT AND WILL BE LOST IF “SAVE” IS NOT SELECTED ONCE SELECTIONS ARE MADE. Pressing the BACK key on the above screen will return you to the first option screen.
Screen Key:• The “Options” buttons navigate to the corresponding
Option Setup screen.
Screen Key:• When an oval is filled it becomes ADDED to the Option/Wash. • Touching the desired oval will toggle it between filled and
unfilled • See SETUP / FUNCTIONS for configuration of Functions
Screen Key:• When an oval is filled it becomes REMOVED from the
Option/Wash. • Touching the desired oval will toggle it between filled and
unfilled
CENTRA CARWASH CONTROLLER
5-4 Belanger, Inc. * 1001 Doheny Ct. * Northville, MI 48167 * Ph (248) 349-7010 * Fax (248) 380-9681 1MANUL096
Chapter 5 Operator Interface/Wash Setup Screens
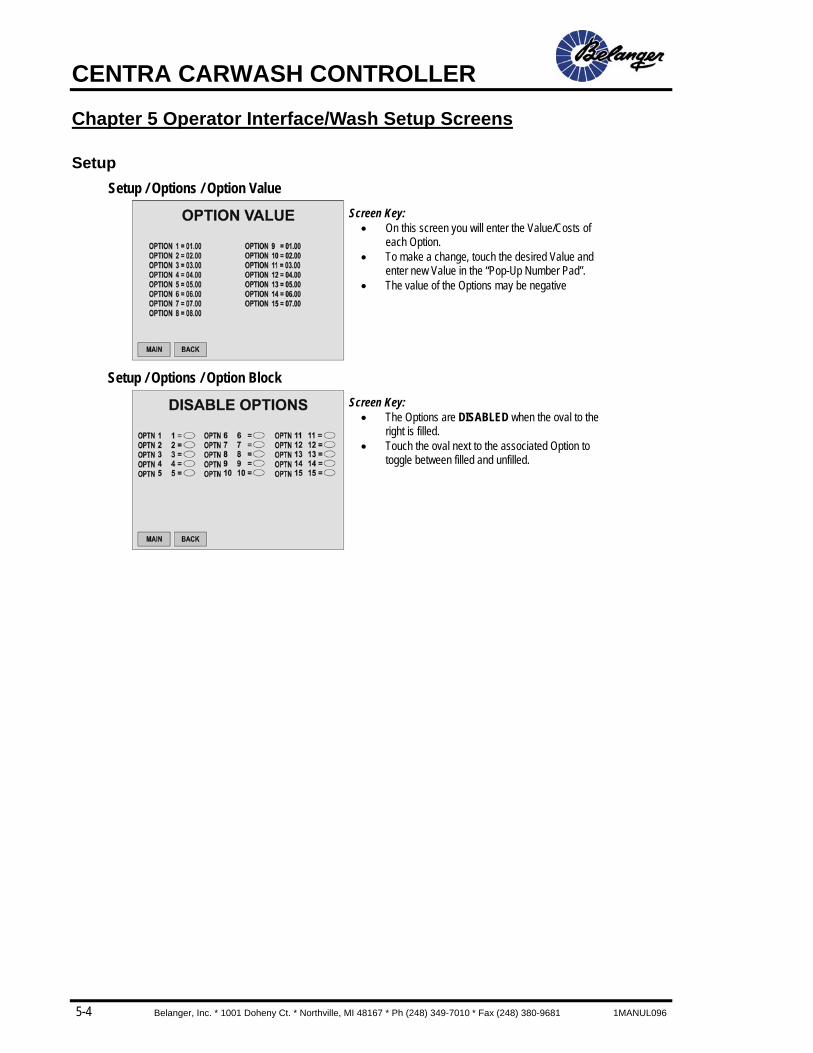
Setup Setup / Options / Option Value
Setup / Options / Option Block
Screen Key:• On this screen you will enter the Value/Costs of
each Option. • To make a change, touch the desired Value and
enter new Value in the “Pop-Up Number Pad”. • The value of the Options may be negative
Screen Key:• The Options are DISABLED when the oval to the
right is filled. • Touch the oval next to the associated Option to
toggle between filled and unfilled.
CENTRA CARWASH CONTROLLER
1MANUL096 Belanger, Inc. * 1001 Doheny Ct. * Northville, MI 48167 * Ph (248) 349-7010 * Fax (248) 380-9681 5-5
Chapter 5 Operator Interface/Wash Setup Screens
Setup
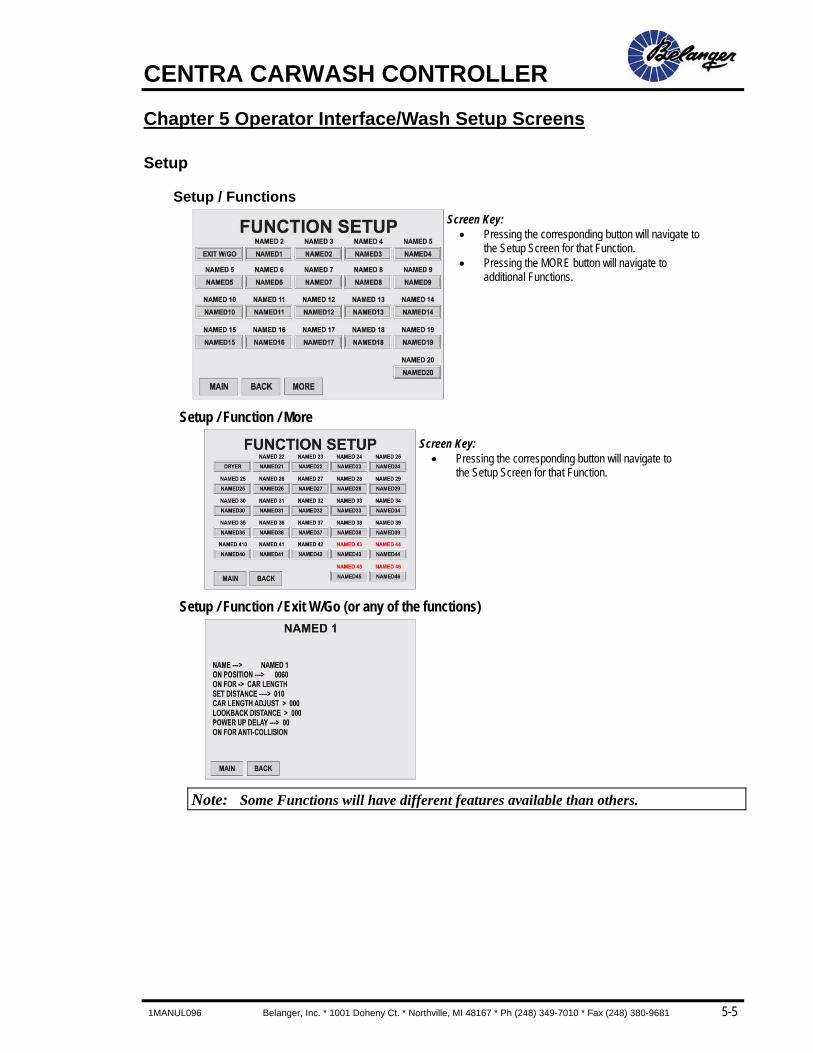
Setup / Functions
Setup / Function / More
Setup / Function / Exit W/Go (or any of the functions)
Note: Some Functions will have different features available than others.
Screen Key:• Pressing the corresponding button will navigate to
the Setup Screen for that Function. • Pressing the MORE button will navigate to
additional Functions.
Screen Key:• Pressing the corresponding button will navigate to
the Setup Screen for that Function.
CENTRA CARWASH CONTROLLER
5-6 Belanger, Inc. * 1001 Doheny Ct. * Northville, MI 48167 * Ph (248) 349-7010 * Fax (248) 380-9681 1MANUL096
Setup
Setup / Functions Functions
Functions are OUTPUTS that turn ON/OFF at positions determined by that Function’s parameters. Some functions have one output others have more. Functions are all programmed very similarly with a few different components. (Functions should be setup and named before packages or Options are setup).
Below is a summary of the User Defined settings that can be programmed in Functions.
• Name: Touch the “NAME” for the alpha/numeric pop-up to display for changing the name. Not all Functions are user namable.
• On Position: This dictates the tunnel location that a function will turn ON (from the “Entrance Photo-Eye” to the desired “ON” point). Minimum setting is 8 inches. Set to zero for off-line Functions that come on before the vehicle enters the Photo-Eye.
• On For - - - > Pressing the selection toggles between the following two options
• Set Distance: When in this mode, the function will be ON for a specified distance for each vehicle.
• Car Length: When in this mode, the Function will be ON for the car length plus the length Adjust setting. The Adjust setting can have a value of + or -. Typically “length adjust” is slightly longer than the equipment length.
• Set Distance: When using the Set Distance feature, this displays the number of inches that a given function will be ON. All have a maximum distance of 240 inches except “Named 30” which has a maximum distance of 999 inches.
• Car Length Adjust: This is to adjust the distance that the function will be ON. This can be +/- of the measured car length.
• Lookback Distance: This will keep the Function active if next vehicle is within Lookback distance. This setting does NOT work when the Function is in “Set Distance”. Set Lookback distance below “8” to disable.

CENTRA CARWASH CONTROLLER
1MANUL096 Belanger, Inc. * 1001 Doheny Ct. * Northville, MI 48167 * Ph (248) 349-7010 * Fax (248) 380-9681 5-7
Chapter 5 Operator Interface/Wash Setup Screens
Setup
Setup / Functions
Function Setup Screens (typical) • Power Up Delay: This feature is not available on all Functions This is how long the Function will wait to turn back on after
recovering from a Power Down or an E-Stop condition. Time will be 2.5 seconds longer due to the time required to sound the horn. Typically used for turning ON high current loads.
• Stagger Delay (Dryers ONLY): This Function appears only when programming Dryer Functions. It is the time between powering up the different outputs of the Dryer Function.
• Top Wheel Retract Function: Leg mounted Photo Eye tree can be purchased for the Top Wheel to automatically detect pick-up truck beds. The NAMED 6 Output (020) will need to be wired to the Top Wheel Retract pneumatic valve. This function can be “Feather-Touch” or “Retract” depending on air regulator setting. The Photo Eye Tree should be mounted with the Photo Eyes on the entrance side of the Top Wheel legs with upper Photo Eye sensor 60” off of the floor and the lower Photo Eye sensor 40” off of the floor.
• Enable Distance: Typically set to 20”. Once upper Photo Eye beam is broken it will need to be broken again after this distance in order for the system to look for pick-up truck beds.
• Active Distance: Typically set to 36”. If the system is looking for a pick-up truck bed and the upper Photo Eye beam is made for the set distance while the lower Photo Eye beam is broken, the “Retract” Output (NAMED 6) will turn ON/OFF for Anti-Collision. Toggle between ON/OFF during Anti-Collision condition.
• Top (ON/OFF) for Retract: This determines the state of the output when the Top Wheel retract function is retracting the Top Wheel.
Note: If there are two Top Wheels installed that require automatic retracting, the NAMED 7 must be utilized for the second Top Wheel. The second Top Wheel on NAMED 7 must be positioned further down the bay than the Top Wheel on NAMED 6. The Top Wheel in NAMED 7 will retract at a position determined by sensors on the NAMED 6 Top Wheel.
• ON/OFF for Anti-Collision: Toggles between ON or OFF during Anti-Collision condition.
• Package Light Value: This should be set to zero in order to disable. This feature is available on NAMED 31 – 46. When a Package Value is entered here, the function will turn ON when the next vehicle is receiving that Package and no vehicle is in the Photo-Eyes.
• Operate Normal Function / Operate vehicle Tires: When set to “Operate vehicle Tires”, the function will output twice per vehicle. Once for the front tires and once for the back tires. See the MISC screen for Tire Sensor Setup. This feature works for NAMED 19, 20, 45 and 46.
• Front Start: This is where the Output will turn ON for the front tires. This position is relative to where the sensor detected the front tires. Its typical value is negative.
• Front End: This is where the Output will turn OFF for the front tires. This position is relative to where the sensor detected the front tires. Its typical value is positive.
• Back Start: This is where the Output will turn ON for the back tires. This position is relative to where the sensor detected the back tires. Its typical value is negative.
• Back End: This is where the Output will turn OFF for the back tires. This position is relative to where the sensor detected the back tires. Its typical value is positive.
CENTRA CARWASH CONTROLLER
5-8 Belanger, Inc. * 1001 Doheny Ct. * Northville, MI 48167 * Ph (248) 349-7010 * Fax (248) 380-9681 1MANUL096
Chapter 5 Operator Interface/Wash Setup Screens
Setup
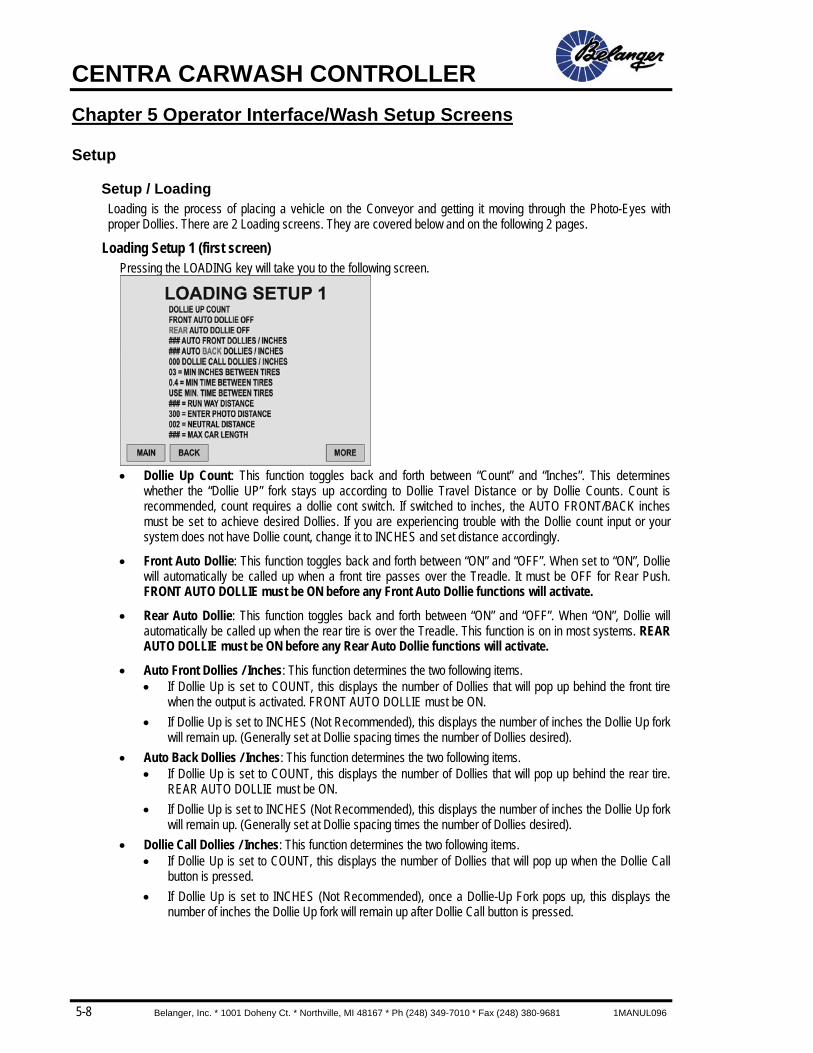
Setup / Loading Loading is the process of placing a vehicle on the Conveyor and getting it moving through the Photo-Eyes with proper Dollies. There are 2 Loading screens. They are covered below and on the following 2 pages.
Loading Setup 1 (first screen) Pressing the LOADING key will take you to the following screen.
• Dollie Up Count: This function toggles back and forth between “Count” and “Inches”. This determines
whether the “Dollie UP” fork stays up according to Dollie Travel Distance or by Dollie Counts. Count is recommended, count requires a dollie cont switch. If switched to inches, the AUTO FRONT/BACK inches must be set to achieve desired Dollies. If you are experiencing trouble with the Dollie count input or your system does not have Dollie count, change it to INCHES and set distance accordingly.
• Front Auto Dollie: This function toggles back and forth between “ON” and “OFF”. When set to “ON”, Dollie will automatically be called up when a front tire passes over the Treadle. It must be OFF for Rear Push. FRONT AUTO DOLLIE must be ON before any Front Auto Dollie functions will activate.
• Rear Auto Dollie: This function toggles back and forth between “ON” and “OFF”. When “ON”, Dollie will automatically be called up when the rear tire is over the Treadle. This function is on in most systems. REAR AUTO DOLLIE must be ON before any Rear Auto Dollie functions will activate.
• Auto Front Dollies / Inches: This function determines the two following items. • If Dollie Up is set to COUNT, this displays the number of Dollies that will pop up behind the front tire
when the output is activated. FRONT AUTO DOLLIE must be ON. • If Dollie Up is set to INCHES (Not Recommended), this displays the number of inches the Dollie Up fork
will remain up. (Generally set at Dollie spacing times the number of Dollies desired). • Auto Back Dollies / Inches: This function determines the two following items.
• If Dollie Up is set to COUNT, this displays the number of Dollies that will pop up behind the rear tire. REAR AUTO DOLLIE must be ON.
• If Dollie Up is set to INCHES (Not Recommended), this displays the number of inches the Dollie Up fork will remain up. (Generally set at Dollie spacing times the number of Dollies desired).
• Dollie Call Dollies / Inches: This function determines the two following items. • If Dollie Up is set to COUNT, this displays the number of Dollies that will pop up when the Dollie Call
button is pressed. • If Dollie Up is set to INCHES (Not Recommended), once a Dollie-Up Fork pops up, this displays the
number of inches the Dollie Up fork will remain up after Dollie Call button is pressed.
CENTRA CARWASH CONTROLLER
1MANUL096 Belanger, Inc. * 1001 Doheny Ct. * Northville, MI 48167 * Ph (248) 349-7010 * Fax (248) 380-9681 5-9
Chapter 5 Operator Interface/Wash Setup Screens
Setup
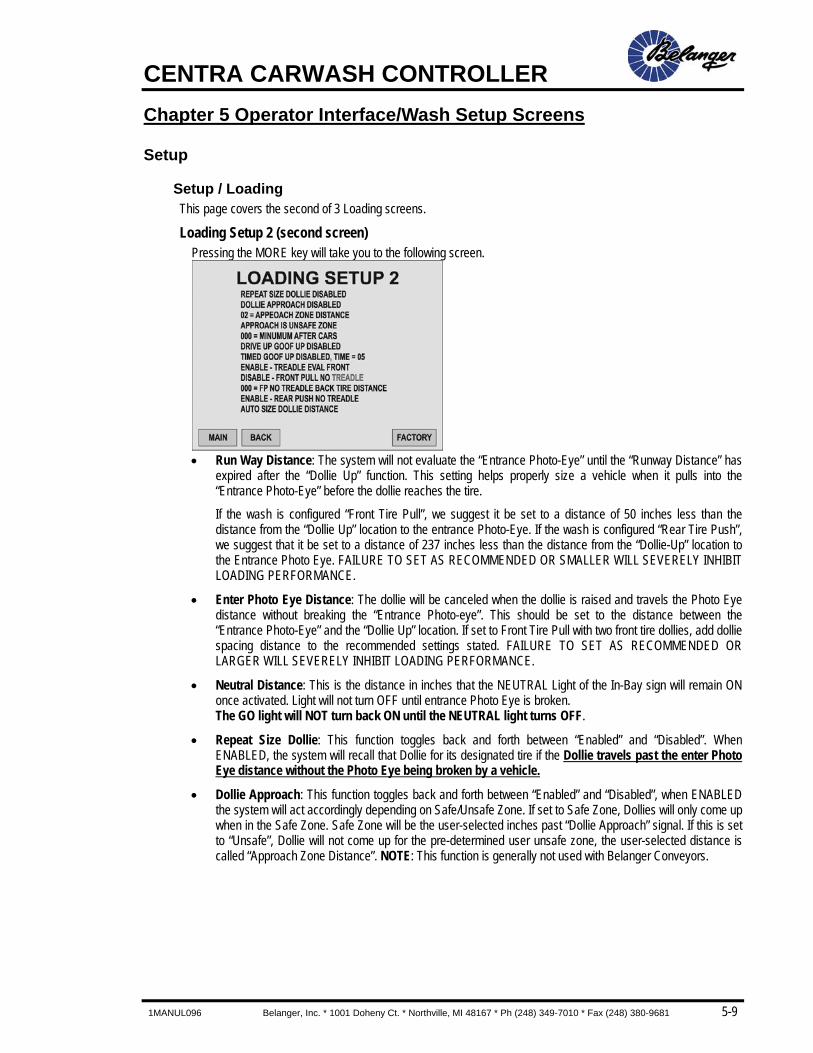
Setup / Loading This page covers the second of 3 Loading screens.
Loading Setup 2 (second screen) Pressing the MORE key will take you to the following screen.
• Run Way Distance: The system will not evaluate the “Entrance Photo-Eye” until the “Runway Distance” has
expired after the “Dollie Up” function. This setting helps properly size a vehicle when it pulls into the “Entrance Photo-Eye” before the dollie reaches the tire.
If the wash is configured “Front Tire Pull”, we suggest it be set to a distance of 50 inches less than the distance from the “Dollie Up” location to the entrance Photo-Eye. If the wash is configured “Rear Tire Push”, we suggest that it be set to a distance of 237 inches less than the distance from the “Dollie-Up” location to the Entrance Photo Eye. FAILURE TO SET AS RECOMMENDED OR SMALLER WILL SEVERELY INHIBIT LOADING PERFORMANCE.
• Enter Photo Eye Distance: The dollie will be canceled when the dollie is raised and travels the Photo Eye distance without breaking the “Entrance Photo-eye”. This should be set to the distance between the “Entrance Photo-Eye” and the “Dollie Up” location. If set to Front Tire Pull with two front tire dollies, add dollie spacing distance to the recommended settings stated. FAILURE TO SET AS RECOMMENDED OR LARGER WILL SEVERELY INHIBIT LOADING PERFORMANCE.
• Neutral Distance: This is the distance in inches that the NEUTRAL Light of the In-Bay sign will remain ON once activated. Light will not turn OFF until entrance Photo Eye is broken. The GO light will NOT turn back ON until the NEUTRAL light turns OFF.
• Repeat Size Dollie: This function toggles back and forth between “Enabled” and “Disabled”. When ENABLED, the system will recall that Dollie for its designated tire if the Dollie travels past the enter Photo Eye distance without the Photo Eye being broken by a vehicle.
• Dollie Approach: This function toggles back and forth between “Enabled” and “Disabled”, when ENABLED the system will act accordingly depending on Safe/Unsafe Zone. If set to Safe Zone, Dollies will only come up when in the Safe Zone. Safe Zone will be the user-selected inches past “Dollie Approach” signal. If this is set to “Unsafe”, Dollie will not come up for the pre-determined user unsafe zone, the user-selected distance is called “Approach Zone Distance”. NOTE: This function is generally not used with Belanger Conveyors.
CENTRA CARWASH CONTROLLER
5-10 Belanger, Inc. * 1001 Doheny Ct. * Northville, MI 48167 * Ph (248) 349-7010 * Fax (248) 380-9681 1MANUL096
Chapter 5 Operator Interface/Wash Setup Screens
Setup
Setup / Loading Loading Setup 2 (second screen) • Minimum After Cars: The system will NOT allow the Dollie up for the next vehicle until the user-defined
Minimum Distance is reached after the vehicle passes through the Photo Eye. Set to zero to disable this function. Vehicles can be closer together than this distance since the measurement is taken from the rear bumper of the lead vehicle to the back of the tire position when Dollie-Up allowed.
• Drive Up Goof Up: This function toggles back and forth between “Enabled” and “Disabled”. When ENABLED, system will evaluate if a vehicle has approached without selecting wash. If this is the case, the vehicle will receive a “Goof Up” wash. It is recommended you set this to disable unless time demonstrates a need.
• Timed Goof Up: When selected, if the entrance Photo Eye is broken for the user-selected amount of time without a vehicle loaded into the QUEUE, a “Goof-Up” wash will be issued. It is recommended you set this to disable unless time demonstrates a need.
• Treadle Eval Front: This setting should be enabled at all times except when attended front-pull systems with Treadle that wish to operate front-pull from Dollie Call only.
• Disable/Enable – Front Pull, No Treadle: When selected, the front tire dollie comes up when the “Dollie Call” is pressed. The rear tire Dollie will come up after the user-selected amount of inches after the front Dollie. The rear tire distance is “FP NO TREADLE BACK TIRE DISTANCE”. (This function can be used if you are experiencing trouble with the treadle on an attended, Front Tire Pull location).
• Front Pull No Treadle Back Tire Distance: The distance that will raise rear tire dollie when set in front pull, No Treadle. Set large enough to get dollie behind largest customers’ rear tire.
• Rear Push No Treadle: This function toggles back and forth between “Enabled” and “Disabled”. When ENABLED, the system will NOT evaluate the treadle and each dollie is assumed “Rear Tire”. (This function can be used if you are experiencing trouble with the Treadle or on a 1-Step, Unattended, Rear Tire Push system).
• Auto Size Dollie: This function toggles back and forth between “Enabled” and “Disabled”. When set to Enabled (Auto), the system will send “Auto Size Dollie” when wash is entered into queue. This option is for “1 Step Loading”.
See Recommended Initial Settings in Chapter 6 for more information.
CENTRA CARWASH CONTROLLER
1MANUL096 Belanger, Inc. * 1001 Doheny Ct. * Northville, MI 48167 * Ph (248) 349-7010 * Fax (248) 380-9681 5-11
Chapter 5 Operator Interface/Wash Setup Screens
Setup
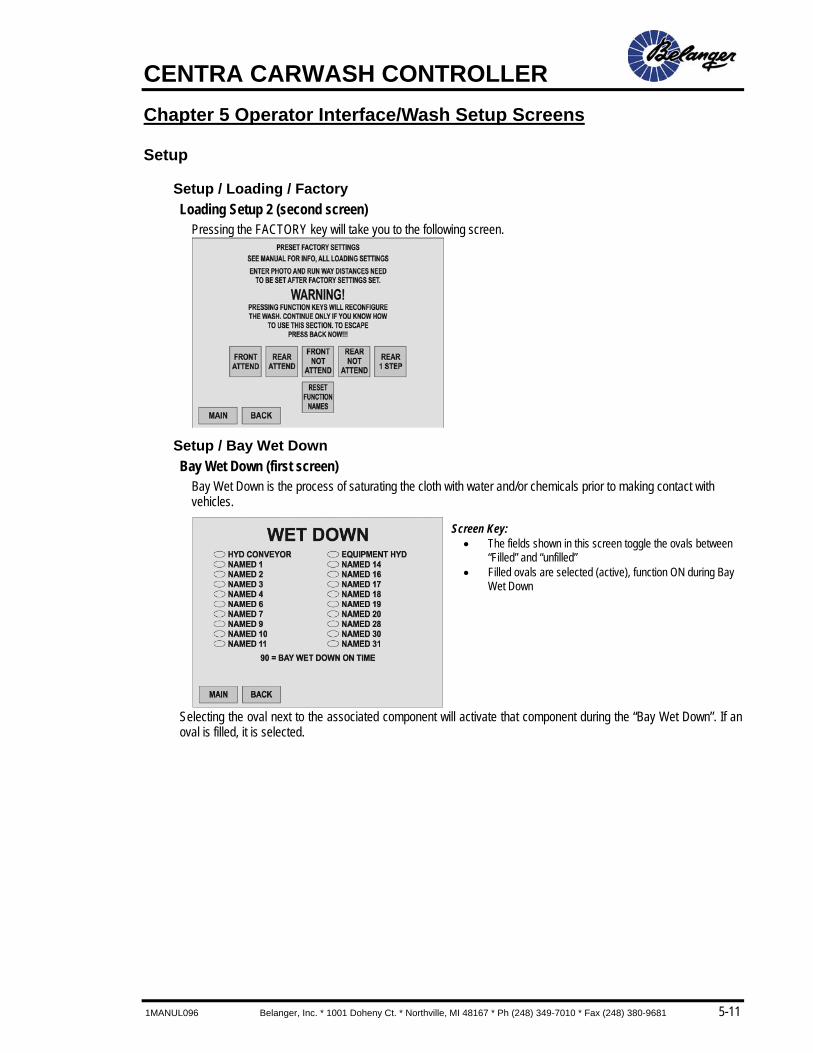
Setup / Loading / Factory Loading Setup 2 (second screen)
Pressing the FACTORY key will take you to the following screen.
Setup / Bay Wet Down Bay Wet Down (first screen)
Bay Wet Down is the process of saturating the cloth with water and/or chemicals prior to making contact with vehicles.
Selecting the oval next to the associated component will activate that component during the “Bay Wet Down”. If an oval is filled, it is selected.
Screen Key:• The fields shown in this screen toggle the ovals between
“Filled” and “unfilled” • Filled ovals are selected (active), function ON during Bay
Wet Down
CENTRA CARWASH CONTROLLER
5-12 Belanger, Inc. * 1001 Doheny Ct. * Northville, MI 48167 * Ph (248) 349-7010 * Fax (248) 380-9681 1MANUL096
Chapter 5 Operator Interface/Wash Setup Screens
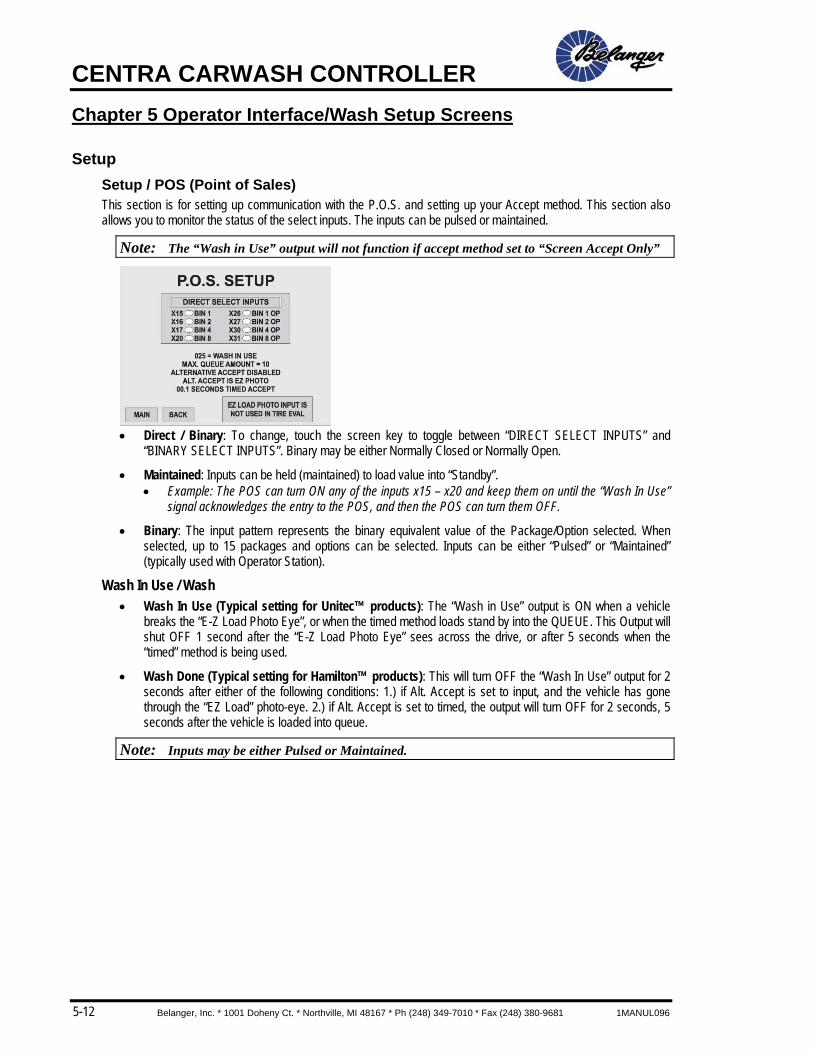
Setup Setup / POS (Point of Sales) This section is for setting up communication with the P.O.S. and setting up your Accept method. This section also allows you to monitor the status of the select inputs. The inputs can be pulsed or maintained.
Note: The “Wash in Use” output will not function if accept method set to “Screen Accept Only”
• Direct / Binary: To change, touch the screen key to toggle between “DIRECT SELECT INPUTS” and
“BINARY SELECT INPUTS”. Binary may be either Normally Closed or Normally Open.
• Maintained: Inputs can be held (maintained) to load value into “Standby”. • Example: The POS can turn ON any of the inputs x15 – x20 and keep them on until the “Wash In Use”
signal acknowledges the entry to the POS, and then the POS can turn them OFF.
• Binary: The input pattern represents the binary equivalent value of the Package/Option selected. When selected, up to 15 packages and options can be selected. Inputs can be either “Pulsed” or “Maintained” (typically used with Operator Station).
Wash In Use / Wash • Wash In Use (Typical setting for Unitec™ products): The “Wash in Use” output is ON when a vehicle
breaks the “E-Z Load Photo Eye”, or when the timed method loads stand by into the QUEUE. This Output will shut OFF 1 second after the “E-Z Load Photo Eye” sees across the drive, or after 5 seconds when the “timed” method is being used.
• Wash Done (Typical setting for Hamilton™ products): This will turn OFF the “Wash In Use” output for 2 seconds after either of the following conditions: 1.) if Alt. Accept is set to input, and the vehicle has gone through the “EZ Load” photo-eye. 2.) if Alt. Accept is set to timed, the output will turn OFF for 2 seconds, 5 seconds after the vehicle is loaded into queue.
Note: Inputs may be either Pulsed or Maintained.
CENTRA CARWASH CONTROLLER
1MANUL096 Belanger, Inc. * 1001 Doheny Ct. * Northville, MI 48167 * Ph (248) 349-7010 * Fax (248) 380-9681 5-13
Chapter 5 Operator Interface/Wash Setup Screens
Setup
Setup / POS (Point of Sales) Loading Max Queue Amount – Limits the number of washes the Queue will stack. This value is usually set to 1 when the E-1063 is not visible.
1. Screen Accept: This function toggles between “Screen Accept Only” and “Screen/Alt Accept”
• Alternative Accept Disabled: When selected, only the screen and/or the Operators Station will load the selected “stand-by” package into the QUEUE.
• Alternative Accept Only (Alternative Accept): When selected, Screen, Operators Station and alternative method will load “Stand-by” into the QUEUE. The alternative load method will be either by Input or Timed. These two methods are covered below.
2. Alt Accept: This function toggles between “Input” and “Timed”.
• Input: Typically an “E-Z Load Photo Eye”. The stand-by package will be accepted into the QUEUE when the “E-Z Load Photo Eye” is broken.
• Timed: The stand-by package will be accepted into the QUEUE according to the user defined time selected (measured in seconds). This function is typically used in Unattended, 1 Step systems.
3. E-Z Load / Tire Eval: Here you determine if the “E-Z Load Photo Eye” will be used for tire evaluation or not. The E-Z Load Photo can be selected to be involved in the Tire Evaluation of the Treadle. If the “E-Z Load Photo” is indeed used, the Treadle will only evaluate tires when the Photo Eye has been broken.
Note: See recommended initial setting for additional indication of setting per loading style in Chapter 6.
CENTRA CARWASH CONTROLLER
5-14 Belanger, Inc. * 1001 Doheny Ct. * Northville, MI 48167 * Ph (248) 349-7010 * Fax (248) 380-9681 1MANUL096
Chapter 5 Operator Interface/Wash Setup Screens
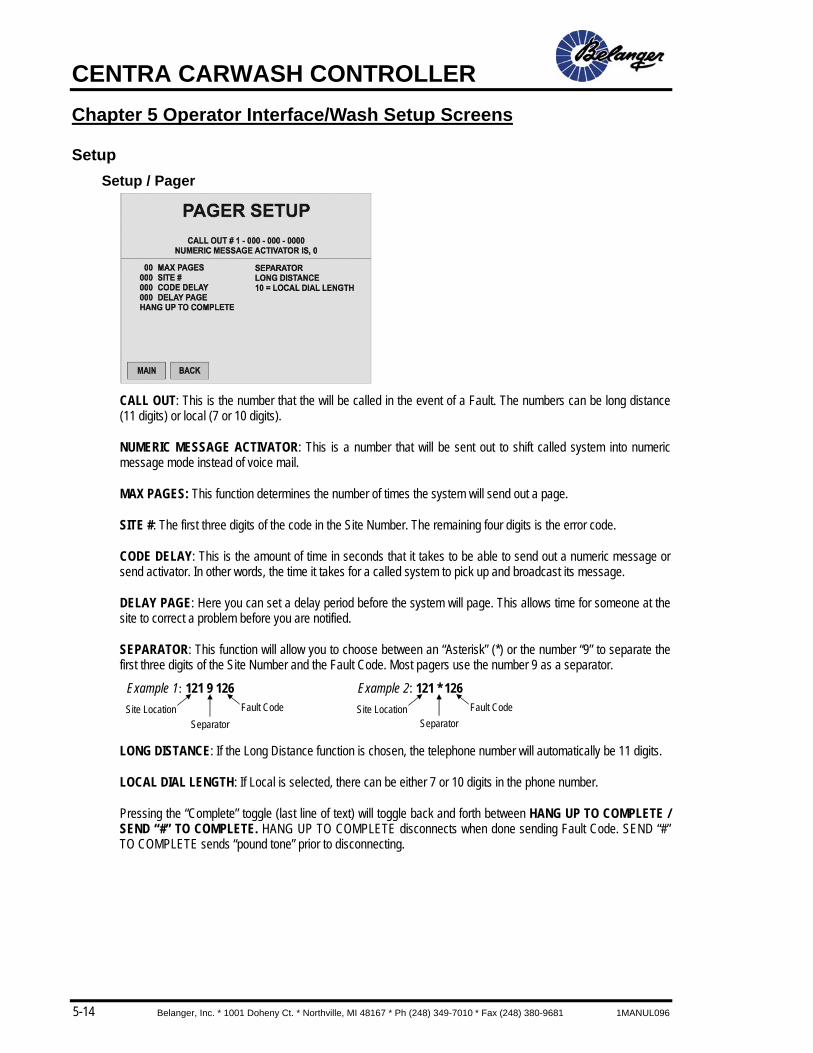
Setup Setup / Pager
CALL OUT: This is the number that the will be called in the event of a Fault. The numbers can be long distance (11 digits) or local (7 or 10 digits).
NUMERIC MESSAGE ACTIVATOR: This is a number that will be sent out to shift called system into numeric message mode instead of voice mail.
MAX PAGES: This function determines the number of times the system will send out a page.
SITE #: The first three digits of the code in the Site Number. The remaining four digits is the error code.
CODE DELAY: This is the amount of time in seconds that it takes to be able to send out a numeric message or send activator. In other words, the time it takes for a called system to pick up and broadcast its message.
DELAY PAGE: Here you can set a delay period before the system will page. This allows time for someone at the site to correct a problem before you are notified.
SEPARATOR: This function will allow you to choose between an “Asterisk” (*) or the number “9” to separate the first three digits of the Site Number and the Fault Code. Most pagers use the number 9 as a separator.
Example 1: 121 9 126 Example 2: 121 * 126
LONG DISTANCE: If the Long Distance function is chosen, the telephone number will automatically be 11 digits.
LOCAL DIAL LENGTH: If Local is selected, there can be either 7 or 10 digits in the phone number.
Pressing the “Complete” toggle (last line of text) will toggle back and forth between HANG UP TO COMPLETE / SEND “#” TO COMPLETE. HANG UP TO COMPLETE disconnects when done sending Fault Code. SEND “#” TO COMPLETE sends “pound tone” prior to disconnecting.
Fault Code Site Location Separator
Fault Code Site Location Separator
CENTRA CARWASH CONTROLLER
1MANUL096 Belanger, Inc. * 1001 Doheny Ct. * Northville, MI 48167 * Ph (248) 349-7010 * Fax (248) 380-9681 5-15
Chapter 5 Operator Interface/Wash Setup Screens
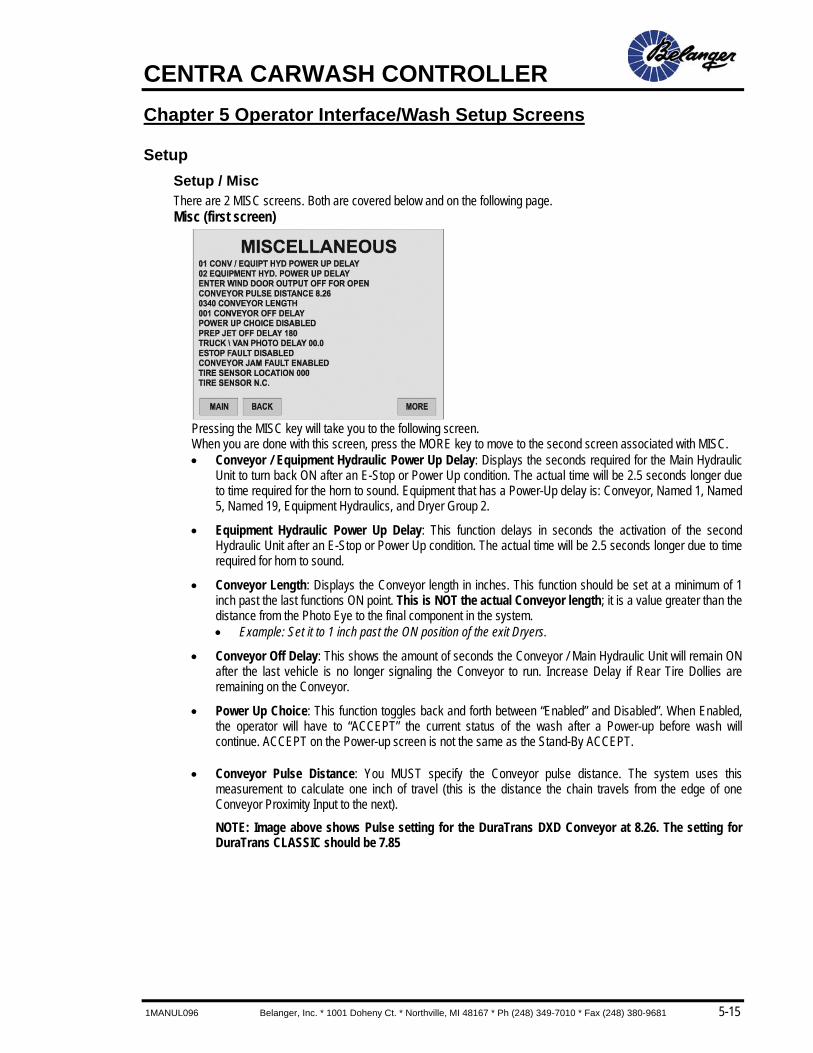
Setup Setup / Misc There are 2 MISC screens. Both are covered below and on the following page. Misc (first screen)
Pressing the MISC key will take you to the following screen. When you are done with this screen, press the MORE key to move to the second screen associated with MISC. • Conveyor / Equipment Hydraulic Power Up Delay: Displays the seconds required for the Main Hydraulic
Unit to turn back ON after an E-Stop or Power Up condition. The actual time will be 2.5 seconds longer due to time required for the horn to sound. Equipment that has a Power-Up delay is: Conveyor, Named 1, Named 5, Named 19, Equipment Hydraulics, and Dryer Group 2.
• Equipment Hydraulic Power Up Delay: This function delays in seconds the activation of the second Hydraulic Unit after an E-Stop or Power Up condition. The actual time will be 2.5 seconds longer due to time required for horn to sound.
• Conveyor Length: Displays the Conveyor length in inches. This function should be set at a minimum of 1 inch past the last functions ON point. This is NOT the actual Conveyor length; it is a value greater than the distance from the Photo Eye to the final component in the system. • Example: Set it to 1 inch past the ON position of the exit Dryers.
• Conveyor Off Delay: This shows the amount of seconds the Conveyor / Main Hydraulic Unit will remain ON after the last vehicle is no longer signaling the Conveyor to run. Increase Delay if Rear Tire Dollies are remaining on the Conveyor.
• Power Up Choice: This function toggles back and forth between “Enabled” and Disabled”. When Enabled, the operator will have to “ACCEPT” the current status of the wash after a Power-up before wash will continue. ACCEPT on the Power-up screen is not the same as the Stand-By ACCEPT.
• Conveyor Pulse Distance: You MUST specify the Conveyor pulse distance. The system uses this measurement to calculate one inch of travel (this is the distance the chain travels from the edge of one Conveyor Proximity Input to the next). NOTE: Image above shows Pulse setting for the DuraTrans DXD Conveyor at 8.26. The setting for DuraTrans CLASSIC should be 7.85
CENTRA CARWASH CONTROLLER
5-16 Belanger, Inc. * 1001 Doheny Ct. * Northville, MI 48167 * Ph (248) 349-7010 * Fax (248) 380-9681 1MANUL096
Chapter 5 Operator Interface/Wash Setup Screens
Setup
SETUP / MISC
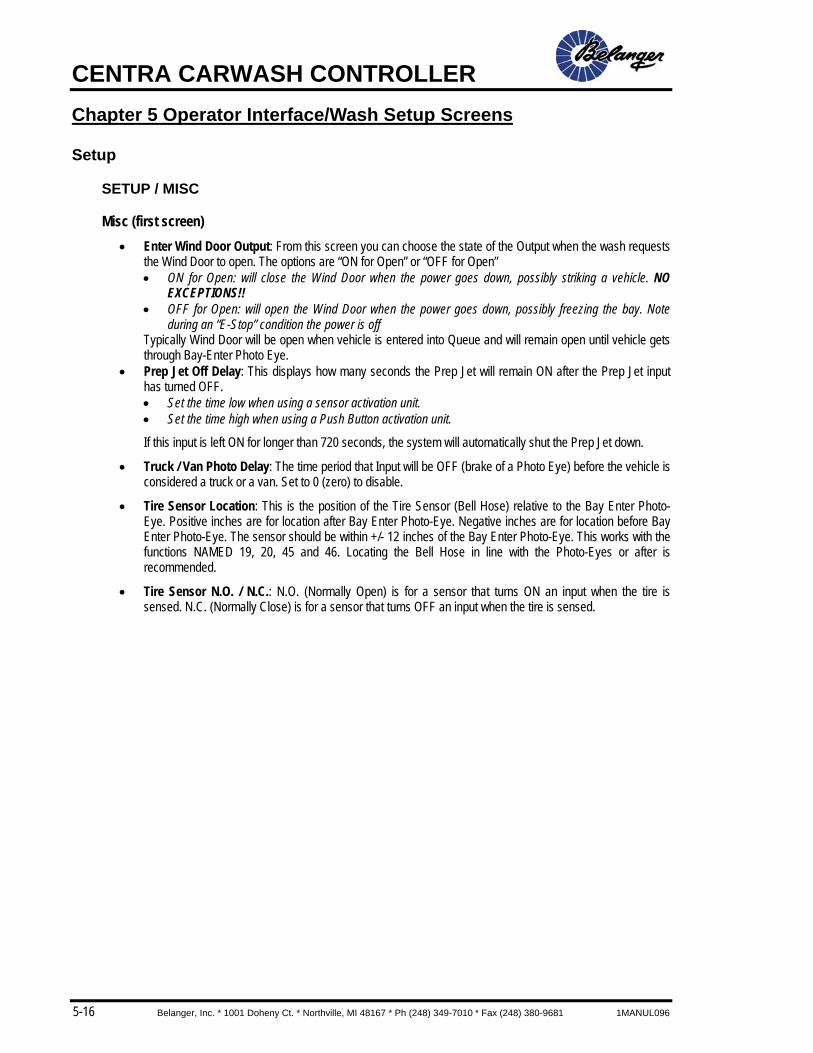
Misc (first screen) • Enter Wind Door Output: From this screen you can choose the state of the Output when the wash requests
the Wind Door to open. The options are “ON for Open” or “OFF for Open” • ON for Open: will close the Wind Door when the power goes down, possibly striking a vehicle. NO
EXCEPTIONS!! • OFF for Open: will open the Wind Door when the power goes down, possibly freezing the bay. Note
during an “E-Stop” condition the power is off Typically Wind Door will be open when vehicle is entered into Queue and will remain open until vehicle gets through Bay-Enter Photo Eye.
• Prep Jet Off Delay: This displays how many seconds the Prep Jet will remain ON after the Prep Jet input has turned OFF. • Set the time low when using a sensor activation unit. • Set the time high when using a Push Button activation unit.
If this input is left ON for longer than 720 seconds, the system will automatically shut the Prep Jet down.
• Truck / Van Photo Delay: The time period that Input will be OFF (brake of a Photo Eye) before the vehicle is considered a truck or a van. Set to 0 (zero) to disable.
• Tire Sensor Location: This is the position of the Tire Sensor (Bell Hose) relative to the Bay Enter Photo-Eye. Positive inches are for location after Bay Enter Photo-Eye. Negative inches are for location before Bay Enter Photo-Eye. The sensor should be within +/- 12 inches of the Bay Enter Photo-Eye. This works with the functions NAMED 19, 20, 45 and 46. Locating the Bell Hose in line with the Photo-Eyes or after is recommended.
• Tire Sensor N.O. / N.C.: N.O. (Normally Open) is for a sensor that turns ON an input when the tire is sensed. N.C. (Normally Close) is for a sensor that turns OFF an input when the tire is sensed.
CENTRA CARWASH CONTROLLER
1MANUL096 Belanger, Inc. * 1001 Doheny Ct. * Northville, MI 48167 * Ph (248) 349-7010 * Fax (248) 380-9681 5-17
Chapter 5 Operator Interface/Wash Setup Screens
Setup
SETUP / MISC This page covers the second of the 2 Misc. screens.
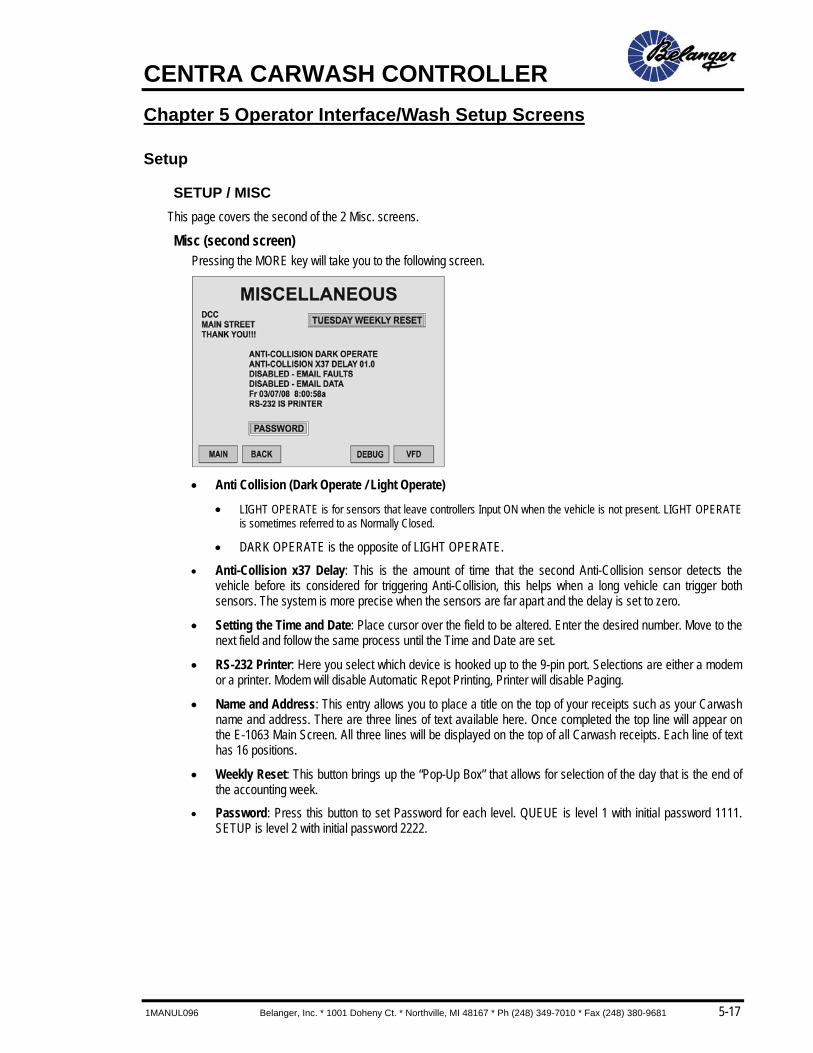
Misc (second screen) Pressing the MORE key will take you to the following screen.
• Anti Collision (Dark Operate / Light Operate)
• LIGHT OPERATE is for sensors that leave controllers Input ON when the vehicle is not present. LIGHT OPERATE is sometimes referred to as Normally Closed.
• DARK OPERATE is the opposite of LIGHT OPERATE.
• Anti-Collision x37 Delay: This is the amount of time that the second Anti-Collision sensor detects the vehicle before its considered for triggering Anti-Collision, this helps when a long vehicle can trigger both sensors. The system is more precise when the sensors are far apart and the delay is set to zero.
• Setting the Time and Date: Place cursor over the field to be altered. Enter the desired number. Move to the next field and follow the same process until the Time and Date are set.
• RS-232 Printer: Here you select which device is hooked up to the 9-pin port. Selections are either a modem or a printer. Modem will disable Automatic Repot Printing, Printer will disable Paging.
• Name and Address: This entry allows you to place a title on the top of your receipts such as your Carwash name and address. There are three lines of text available here. Once completed the top line will appear on the E-1063 Main Screen. All three lines will be displayed on the top of all Carwash receipts. Each line of text has 16 positions.
• Weekly Reset: This button brings up the “Pop-Up Box” that allows for selection of the day that is the end of the accounting week.
• Password: Press this button to set Password for each level. QUEUE is level 1 with initial password 1111. SETUP is level 2 with initial password 2222.


Chapter 6 –Techniques in Programming
Chapter 6
Techniques in Wash Setup


CENTRA CARWASH CONTROLLER
1MANUL096 Belanger, Inc. * 1001 Doheny Ct. * Northville, MI 48167 * Ph (248) 349-7010 * Fax (248) 380-9681 6-1
Chapter 6 Techniques in Wash Setup
Additional Information Auto clearing of QUEUE. This function will only be active if EZ-Load Photo-Eye is wired into the system. If a Wash is in STANDBY or in Queue for 5 minutes without either the “EZ-Load Photo-Eye” or the “Bay Enter Photo-Eye” being broken; or the E-Stop being pressed, the system will clear the queue and standby automatically.
Offline Functions: These are functions that turn on before the vehicle enters the Photo-Eye. To program a function to operate offline, change value “On Position” to Zero. See SETUP/FUNCTIONS for more information.
If wash is to be paused by personnel at the exit of the tunnel instead of using Anti-Collision Photo-Eyes: Connect a “maintained, normally closed” button to the Anti-Collision inputs. Using the E-Stop to pause the wash will require the wash condition to be accepted at the E-1063 to resume washing.
CENTRA CARWASH CONTROLLER
6-2 Belanger, Inc. * 1001 Doheny Ct. * Northville, MI 48167 * Ph (248) 349-7010 * Fax (248) 380-9681 1MANUL096
Chapter 6 Techniques in Wash Setup
Recommended Initial Settings
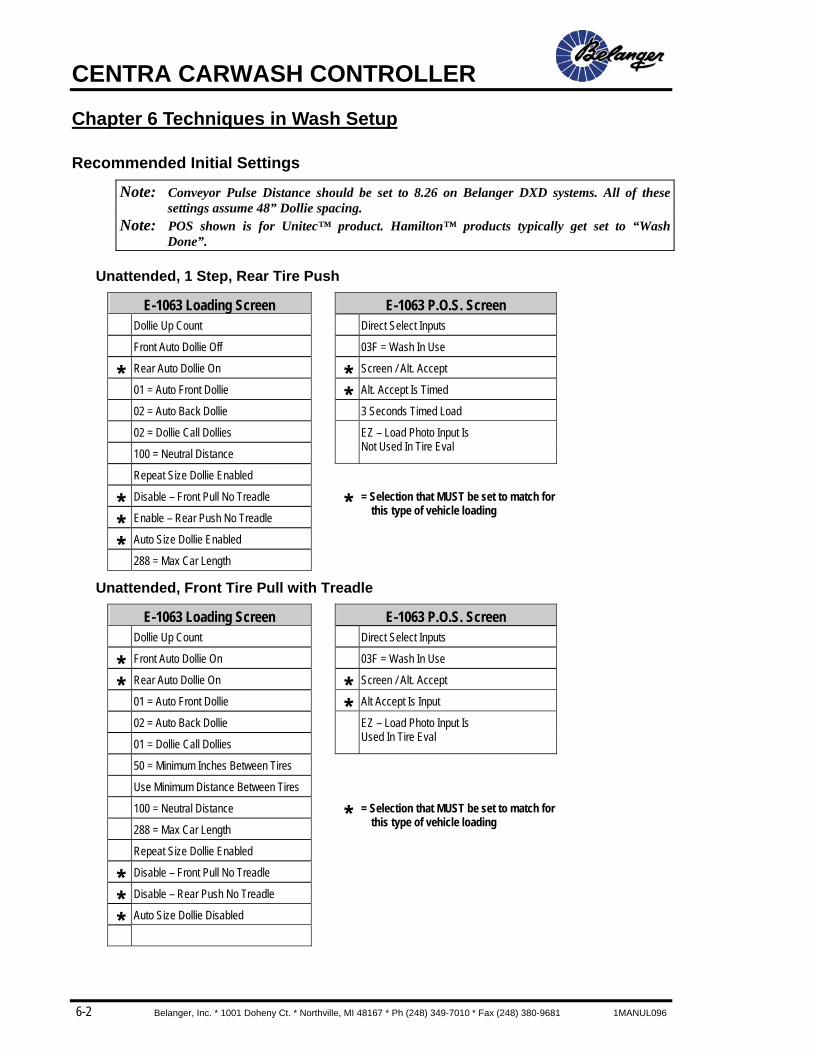
Note: Conveyor Pulse Distance should be set to 8.26 on Belanger DXD systems. All of these settings assume 48” Dollie spacing.
Note: POS shown is for Unitec™ product. Hamilton™ products typically get set to “Wash Done”.
Unattended, 1 Step, Rear Tire Push
E-1063 Loading Screen E-1063 P.O.S. Screen
Dollie Up Count Direct Select Inputs
Front Auto Dollie Off 03F = Wash In Use
* Rear Auto Dollie On * Screen / Alt. Accept
01 = Auto Front Dollie * Alt. Accept Is Timed
02 = Auto Back Dollie 3 Seconds Timed Load
02 = Dollie Call Dollies 100 = Neutral Distance
EZ – Load Photo Input Is Not Used In Tire Eval
Repeat Size Dollie Enabled
* Disable – Front Pull No Treadle * * Enable – Rear Push No Treadle
= Selection that MUST be set to match for this type of vehicle loading
* Auto Size Dollie Enabled
288 = Max Car Length
Unattended, Front Tire Pull with Treadle
E-1063 Loading Screen E-1063 P.O.S. Screen
Dollie Up Count Direct Select Inputs
* Front Auto Dollie On 03F = Wash In Use
* Rear Auto Dollie On * Screen / Alt. Accept
01 = Auto Front Dollie * Alt Accept Is Input
02 = Auto Back Dollie 01 = Dollie Call Dollies
EZ – Load Photo Input Is Used In Tire Eval
50 = Minimum Inches Between Tires
Use Minimum Distance Between Tires
100 = Neutral Distance * 288 = Max Car Length
= Selection that MUST be set to match for this type of vehicle loading
Repeat Size Dollie Enabled * Disable – Front Pull No Treadle
* Disable – Rear Push No Treadle
* Auto Size Dollie Disabled
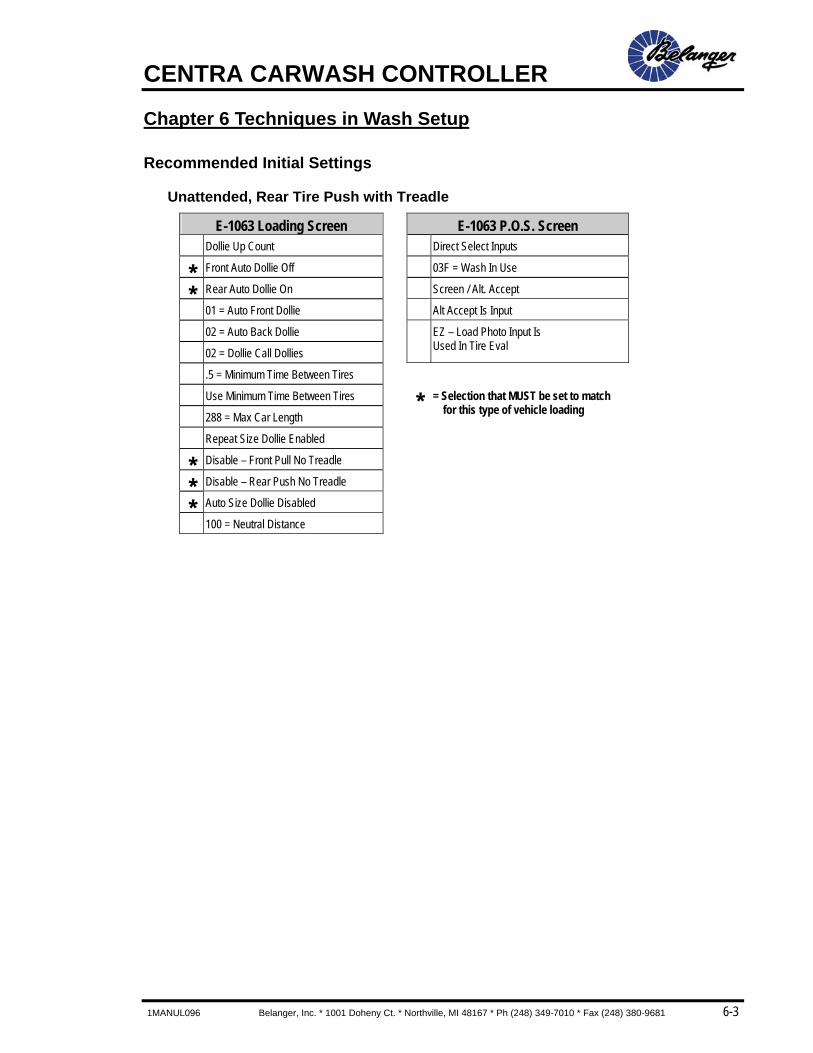
CENTRA CARWASH CONTROLLER
1MANUL096 Belanger, Inc. * 1001 Doheny Ct. * Northville, MI 48167 * Ph (248) 349-7010 * Fax (248) 380-9681 6-3
Chapter 6 Techniques in Wash Setup
Recommended Initial Settings
Unattended, Rear Tire Push with Treadle
E-1063 Loading Screen E-1063 P.O.S. Screen
Dollie Up Count Direct Select Inputs
* Front Auto Dollie Off 03F = Wash In Use
* Rear Auto Dollie On Screen / Alt. Accept
01 = Auto Front Dollie Alt Accept Is Input
02 = Auto Back Dollie 02 = Dollie Call Dollies
EZ – Load Photo Input Is Used In Tire Eval
.5 = Minimum Time Between Tires
Use Minimum Time Between Tires * 288 = Max Car Length
= Selection that MUST be set to match for this type of vehicle loading
Repeat Size Dollie Enabled * Disable – Front Pull No Treadle
* Disable – Rear Push No Treadle
* Auto Size Dollie Disabled
100 = Neutral Distance

CENTRA CARWASH CONTROLLER
6-4 Belanger, Inc. * 1001 Doheny Ct. * Northville, MI 48167 * Ph (248) 349-7010 * Fax (248) 380-9681 1MANUL096
Chapter 6 Techniques in Wash Setup
Recommended Initial Settings
Attended, Front Tire Pull with Treadle
E-1063 Loading Screen E-1063 P.O.S. Screen
Dollie Up Count Binary Select Inputs
* Front Auto Dollie On * Screen Accept ONLY
* Rear Auto Dollie On 01 = Auto Front Dollie
EZ – Load Photo Input Is Not Used In Tire Eval
02 = Auto Back Dollie
01 = Dollie Call Dollies * 50 = Minimum Inches Between Tires
= Selection that MUST be set to match for this type of vehicle loading
Use Minimum Distance Between Tires
288 = Max Car Length
Repeat Size Dollie Enabled * Disable – Front Pull No Treadle
* Disable – Rear Push No Treadle
* Auto Size Dollie Disabled
Attended, Rear Tire Push with Treadle
E-1063 Loading Screen E-1063 P.O.S. Screen
Dollie Up Count Binary Select Inputs
* Front Auto Dollie Off * Screen Accept ONLY
* Rear Auto Dollie On 01 = Auto Front Dollie
EZ – Load Photo Input Is Not Used In Tire Eval
02 = Auto Back Dollie
01 = Dollie Call Dollies
.5 = Minimum Time Between Tires * Use Minimum Time Between Tires
= Selection that MUST be set to match for this type of vehicle loading
Repeat Size Dollie Enabled
* Disable – Front Pull No Treadle * Disable – Rear Push No Treadle
* Auto Size Dollie Disabled

Chapter 7 –Faults and Alarms
Chapter 7
Faults and Alarms

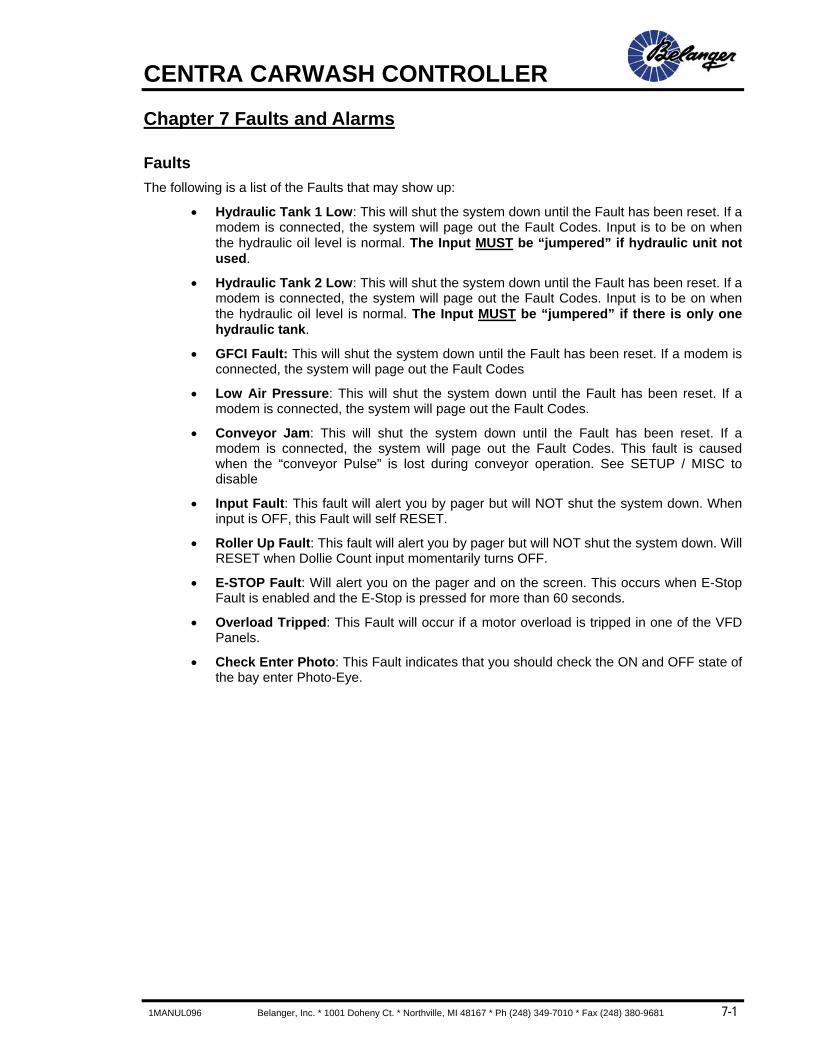
CENTRA CARWASH CONTROLLER
1MANUL096 Belanger, Inc. * 1001 Doheny Ct. * Northville, MI 48167 * Ph (248) 349-7010 * Fax (248) 380-9681 7-1
Chapter 7 Faults and Alarms
Faults The following is a list of the Faults that may show up:
• Hydraulic Tank 1 Low: This will shut the system down until the Fault has been reset. If a modem is connected, the system will page out the Fault Codes. Input is to be on when the hydraulic oil level is normal. The Input MUST be “jumpered” if hydraulic unit not used.
• Hydraulic Tank 2 Low: This will shut the system down until the Fault has been reset. If a modem is connected, the system will page out the Fault Codes. Input is to be on when the hydraulic oil level is normal. The Input MUST be “jumpered” if there is only one hydraulic tank.
• GFCI Fault: This will shut the system down until the Fault has been reset. If a modem is connected, the system will page out the Fault Codes
• Low Air Pressure: This will shut the system down until the Fault has been reset. If a modem is connected, the system will page out the Fault Codes.
• Conveyor Jam: This will shut the system down until the Fault has been reset. If a modem is connected, the system will page out the Fault Codes. This fault is caused when the “conveyor Pulse” is lost during conveyor operation. See SETUP / MISC to disable
• Input Fault: This fault will alert you by pager but will NOT shut the system down. When input is OFF, this Fault will self RESET.
• Roller Up Fault: This fault will alert you by pager but will NOT shut the system down. Will RESET when Dollie Count input momentarily turns OFF.
• E-STOP Fault: Will alert you on the pager and on the screen. This occurs when E-Stop Fault is enabled and the E-Stop is pressed for more than 60 seconds.
• Overload Tripped: This Fault will occur if a motor overload is tripped in one of the VFD Panels.
• Check Enter Photo: This Fault indicates that you should check the ON and OFF state of the bay enter Photo-Eye.
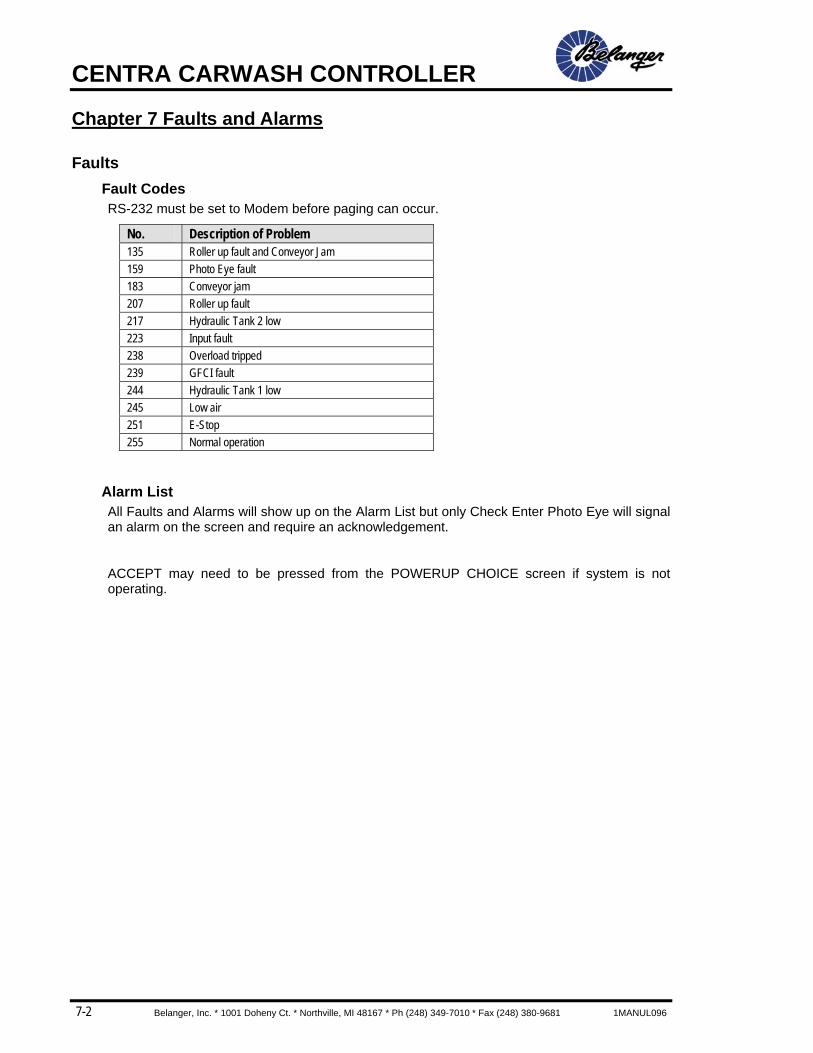
CENTRA CARWASH CONTROLLER
7-2 Belanger, Inc. * 1001 Doheny Ct. * Northville, MI 48167 * Ph (248) 349-7010 * Fax (248) 380-9681 1MANUL096
Chapter 7 Faults and Alarms
Faults Fault Codes RS-232 must be set to Modem before paging can occur.
No. Description of Problem 135 Roller up fault and Conveyor Jam 159 Photo Eye fault 183 Conveyor jam 207 Roller up fault 217 Hydraulic Tank 2 low 223 Input fault 238 Overload tripped 239 GFCI fault 244 Hydraulic Tank 1 low 245 Low air 251 E-Stop 255 Normal operation
Alarm List All Faults and Alarms will show up on the Alarm List but only Check Enter Photo Eye will signal an alarm on the screen and require an acknowledgement.
ACCEPT may need to be pressed from the POWERUP CHOICE screen if system is not operating.

CENTRA CARWASH CONTROLLER
1MANUL096 Belanger, Inc. * 1001 Doheny Ct. * Northville, MI 48167 * Ph (248) 349-7010 * Fax (248) 380-9681 7-3

Chapter 8 –E-1063 Screen Map
Chapter 8
Centra™ Programming Screen Map


Belanger Centra™ Carwash Controller 1MANUL096
Belanger, Inc. * P.O. Box 5470 * Northville, MI 48167-5470 Customer Service Phone (248) 374-4700 * Fax (248) 380-9681