Embed Size (px)
Citation preview

ITS@PennState224B Computer BuildingUniversity Park, PA [email protected]://its.psu.edu/training/
Information Technology Services
Introduction to the PC, Internet
Explorer and Penn State WebMail

Alternative Format StatementThis publication is available in alternative media upon request.
Statement of Non-DiscriminationThe Pennsylvania State University is committed to the policy that all persons shall have equal access to programs, facilities, admission, and employment without regard to personal characteristics not related to ability, performance, or qualifications as determined by University policy or by state or federal authorities. The Pennsylvania State University does not discriminate against any person because of age, ancestry, color, disability or handicap, national origin, race, religious creed, sex, sexual orientation, or veteran status. Direct all inquires regarding the nondiscrimination policy to the Affirmative Action Director, The Pennsylvania State University, 201 Willard Building, University Park, PA 16802-2801; tel. (814) 865-4700; TDD (814) 863-1150.

Table of ContentsObjectives............................................................................................................................2
Introduction to the PC..........................................................................................................3
Understanding the Basics...............................................................................................3
Windows XP Desktop....................................................................................................5
Working with Windows Programs.................................................................................7
Managing Files...............................................................................................................7
Finding Help on Your Computer...................................................................................9
Introduction to the Internet................................................................................................11
What is the World Wide Web?....................................................................................12
Using Internet Explorer................................................................................................13
Common Internet Terms.............................................................................................15
Introduction to Penn State WebMail.................................................................................16
What is WebMail?......................................................................................................16
To Use WebMail, You Must Have.............................................................................16
Accessing and Storing E-mail.....................................................................................17
Getting Started............................................................................................................17
Setting WebMail Options...........................................................................................17
Using WebMail...........................................................................................................21
Additional Resources........................................................................................................34

Objectives
Get started using Windows and viewing the Windows Desktop
Use Internet Explorer to navigate the World Wide Web
Check Penn State e-mail using Penn State WebMail
Basic Computing Skills Page 2 August 2003
Introduction to the PC
Getting StartedLog On to a Windows Computer
1. The Ctrl+Alt +Delete keys are used to log on to a Windows machine. (You must press all three keys at the same time.)
2. Type in your user name and press the Tab Key. (In the labs, this is always your Penn State Access userid, i.e. xyz123)
3. Type in your password . (To change your password, visit https://www.work.psu.edu/)
4. Click OK.
Understanding the BasicsHardware
The actual physical parts of the computer are referred to as hardware. It is composed of the central processing unit (CPU), disk drives, and output devices such as a monitor, speakers, and a printer. Your keyboard and the mouse are known as input devices.
SoftwareSoftware is a general term used to describe the instructions that tell your computer hardware what to do. There are three types of software used to make your computer function. The BIOS, operating system, and applications all work together to make your computer work.
BIOS (Basic Input/Output System)The BIOS is a type of software commonly referred to as firmware. Unlike other types of software, BIOS is only used briefly while the computer is starting. Most users see the BIOS working every time they turn on the computer but rarely, if ever, interact with it. The function of BIOS is to make the operating system start, similar to turning a key in your car to make the engine start.
Operating SystemEvery computer has an operating system. An operating system is the base level software that controls and manages your computer by translating your instructions into language that your computer hardware can understand.
Basic Computing Skills Page 3 August 2003

Some examples of operating systems used for “Windows machines” are: Microsoft Windows 95, 98, NT, 2000 and XP. The Macintosh operating system (also called the “Mac OS”) is the operating system used for all Macintosh computers.To find out what operating system you have on your computer, you can right click on the “My Computer” icon, the Properties button, and then the General tab.
ApplicationsApplications are programs that run within the operating system and are used to accomplish practical tasks. Applications can be used to complete simple tasks such as calculations or complex tasks such as writing a thesis. Commonly used applications are Microsoft Word, Internet Explorer, and PowerPoint.
Windows XP DesktopThe desktop is the workspace of your screen on which icons, desktop components, applications windows, a dialog box and other items appear. Some icons are always there and the user can add others, such as shortcuts.
Basic Computing Skills Page 4 August 2003
Desktop
Taskbar
Desktop Icons

Taskbar: The bar along the bottom of the screen that displays the “Start” button, your clock, your volume control, and various other items. This is also where the buttons of your “minimized” windows are shown.
Start button: A button on the taskbar that you can click on at any time to see the Start menu. This is the access button to your various files and programs on the computer. You can access your computer settings from this menu to change them. You also shut down the computer from the Start button.
My Computer icon: Double-clicking on this allows you to browse the contents of the various other drives you have access to such as the C: and A: drives.
My Documents icon: A folder in which you can store frequently used documents. Double-click on this icon to view the contents of this folder.
Recycle Bin icon: A folder in which deleted files are stored. Most files remain here until you empty the bin. (Note: In the labs, files dropped into the recycle bin are automatically deleted.)
Hint: Different operating systems may not automatically have these icons on the desktop. Please consult your owners’ manual for specific information on the version you have.
Using the MouseThere are three essential skills that are used with the mouse. The mouse for the Windows based computers typically has two buttons; the right and the left. For these basic functions, use the left mouse button.
Pointing – is moving the mouse so that the pointer is positioned on an object. When the pointer is an arrow, the very tip of the arrow must be exactly on the object.
Clicking – is done by pressing and quickly releasing the left mouse button while the pointer is on that object. When you click on an icon, it becomes highlighted which means that it is selected. Double-clicking will open an application. (Right-clicking the mouse give you access to various shortcuts and additional options. Different options may appear depending on where you right-click.)
Dragging – is done by pointing to an object and holding down the left mouse button while you move the mouse. When you drag the icon, an outline of the icon follows the pointer on the screen. When you release the mouse button, the icon moves.
Tip: If you run out of room on your mouse pad, pick up the mouse and put it down again in another spot. The pointer won’t move.
The mouse pointer assumes different shapes depending on the location of the pointer or the nature of the current action, For example:
Double Arrow: Allows you to change the size of a window.
I-Beam: Allows you to insert text.
Hourglass: Indicates that Windows is processing your last command and that no further commands may be issued until the action is complete.
Basic Computing Skills Page 5 August 2003

Anatomy of a WindowTitle Bar: The title bar is located at the top of each window and contains the name of the open application or software. The window may be moved around the desktop by placing the pointer on it and holding down the left mouse button. Release once it is repositioned.
Menus: Common features of menus in Window’s applications include:Pop-Out Menu Arrows indicate a submenu exists under that category. The ellipsis points (…) indicate that a dialog box will pop up and more information will be required when using this option.Dialog Box is a temporary window with a question or statement that requires your response. No other part of the program will work until you respond to the dialog box. Dimmed words indicate that the option is not currently available. This may be due to a variety of reasons.Keyboard commands (e.g. “Ctrl + A”) are displayed in these menus when an application is open.Checkmarks/Bullets indicate a toggle (on/off) feature “Defaults” are standard settings the program uses if the user does not set a value (see Print dialog box). TIP: If an option has a dark border around it, then you can simply press your computer’s “Enter” key to save you the trouble of using the mouse.
Navigating Your Desktop: Multitasking for Greater EfficiencyThe size of a window can be changed by any of the following techniques:
By placing your mouse on the edge of a window and using the double-sided arrow to drag and reshape the size of the window.By clicking on the minimize, maximize, restore, or close buttons in the upper right corner of the title bar. (When you minimize a window, the button appears on your taskbar.)
You can have multiple windows open at one time.You can move these windows manually or right-click on the taskbar to arrange them horizontally, vertically, or cascading.You can minimize all the windows at once with the “Show the Desktop” command.
This is done one of two ways: Right mouse click on task bar and select the “Show the Desktop” menu item. Using the keyboard, hold down the “Windows” button and the “M” button.
Basic Computing Skills Page 6 August 2003
Maximize RestoreMinimize
Close

You can activate a window by simply clicking on it. The color of the title bar indicates whether the window is active or inactive. A dark colored title bar indicates the active window and a light title bar is an inactive window.
Note: If you have too many windows open, Windows XP will begin to group similar windows.
Working with Windows ProgramsA Windows program (also called an application) is software designed to run on the Windows operating system. All Windows accessories are under:
Start All ProgramsAccessories
You will find simple programs that allow you to paint images, calculate numbers, and type text.
Windows allows you to have more than one application open at a time. (Alt+Tab allows you to “toggle” or move back and forth between applications that are open.) (Ctrl+C and Ctrl+V allows you to Copy and Paste between applications or within the same application).
Managing Files
Windows XP allows you to organize and keep track of files and folders. Windows has two file management programs: My Computer and Windows Explorer.
My ComputerMy Computer is the simplest file management system within Windows. It is found on the desktop (usually in the upper left corner of the desktop). My Computer may be renamed in the computer labs on campus to reflect the computer’s current location.
Double-click on My Computer to view the files in your system. Notice the organizational structure of the Files and Folders.
Basic Computing Skills Page 7 August 2003

Managing Files and FoldersA file is a collection of text or data that is saved under a specific name.
Folders are containers for files that work just like real folders.
They can contain programs, files, and other folders that are used to organize the information on your computer.
A picture of a manila folder represents a folder. Some systems call folders directories.
Creating New Files and FoldersYou can create a new folder in three ways:
Double click on My Computer, select a drive, and then go to FileNew.
Click “new folder” in a save or open command when in an application or within My Computer.
Right-click and choose NewFolder.
File StructureThe file structure is stored in a hierarchical manner.
(e.g. a:\clouds.bmp or c:\Windows\Temp\clouds.doc)
The file specification consists of the:
Device (a:\ or c:\)
Path (Windows\Temp\)
Filename (clouds)
Extension (.bmp, .doc)—This indicates the software applications that can open the file.
Finding Help on Your ComputerUsing the “Search” Function You can find files and folders using the “Search”
feature if you don’t know where they are located. To use the “Search” function, go to the “Start” menu
and select “Search” and then “Files or Folders.” Wild Cards – a symbol that takes the place of one or
more characters. For example, *.txt will return all text documents.
Basic Computing Skills Page 8 August 2003

Using Help and Support Go to the “Start” menu and select “Help and Support”. Pick a help topic or Search for a help topic.
TIP: A “?” icon on any menu bar indicates the Help button. Click to change to the help pointer and then click the item for help on its operation. The F1 key also will take you to help no matter what software package you are currently using.
Basic Computing Skills Page 9 August 2003

Introduction to the InternetWhat is the Internet?
Simply stated the Internet is a collection of interconnected networks (network= a group of linked computers) located all over the world. The Internet was formed out of research conducted by the Advanced Research Projects Agency (ARPA) in the late sixties. Although this agency played a fundamental role in developing the technologies that make the Internet possible, the Internet itself is not controlled or owned by any single entity.
For the Internet to work it was necessary to establish a standardized set of rules so that computers could communicate with each other. These rules are collectively known as protocols. Internet Protocol, or IP, is the set of rules used to make it possible for computers to communicate over the Internet. Every computer on the Internet has an IP address, which uniquely identifies that computer (example IP Address 128.118.55.555). There are other protocols used on the Internet for e-mail, chat, and the World Wide Web that share some features of Internet Protocol such as the IP address.
Essentially there are two types of computers that are part of the Internet. A server is a computer that provides information to other computers. A server can pass information to your home/office computer which is called a client as well as other servers.
Basic Computing Skills Page 10 August 2003
HOME(Client) WORK
(Client)
Mail SERVER
WWW SERVER
TheThe InternetInternet

What is the World Wide Web?The World Wide Web (WWW) is NOT the Internet, rather the WWW is part of the Internet. The WWW is made up of documents known as web pages which are stored on web servers. The WWW is accessed through hypertext transfer protocol (HTTP) which makes it possible to access the WWW server to view web pages on that server.
Anatomy of a web addressThe web address, known as the URL (Uniform Resource Locator), is used to locate web pages that you would like to view (ex. http://www.yahoo.com/). The URL is actually associated with the specific IP address of the web server that contains the information you are attempting to access. In the past, one actually needed to enter the IP
address manually to view web pages. This would be similar to sending a letter to a specific longitude and latitude instead of using the standard; street, city, and state format . The URL makes web pages easier to access.
The URL has three parts. Reading from the left to right; the first set of letters represented in the URL is the protocol used to access the resource. For most web pages the protocol is http however some secure sites use the https protocol (the s stands for “secure” not savings ).
The next set of letters is the host name, commonly www, but this can also vary from page to page (ex. http://its.psu.edu/).
The next set of letters is the domain name of which there are two levels. Level 1 domains are shared among related groups and include the .coms and .edus whereas level 2 domain names are unique names for a particular site. Some examples of level 1 and level 2 domains are given below. Additional letters in the address that are to the right of the level 2 domain refer to a document on that website (ex. http://its.psu.edu/training/ is the Training Services web page on the ITS web site).
1st Level Domains
Description 2nd Level Domains(examples)
.edu Educational institutions psu, osu, penn
.com Commercial Sites (usual US companies) yahoo, espn, cnn
.gov United States Government sites Whitehouse
.net For networks; usually assigned to Internet service providers
verizon, pennswoods
.org Non-profit organizations Cspan
.no; .po; .uk Examples of unique two letter combinations for each country (Norway, Poland, and The United Kingdom)
Parliament – for the UK Parliament page.
Basic Computing Skills Page 11 August 2003

What is a browser?A browser is an application used to interpret the programming language of web pages. The most commonly used browser is Microsoft Internet Explorer; however, other browsers such as Mozilla and Lynx are commonly used on non-Windows computers.
Using Internet ExplorerThe menu bar: Common to many applications, the menu bar can be used to perform all of the functions in Internet Explorer.
F ile: The file menu has commands for opening, saving, printing, and importing/exporting files.A commonly used command under File is New Window
E dit: The edit menu has commands for copy, cut, paste, select all, and Find. Using the Find command can help you locate particular words on the page.
V iew: The View menu has commands that change the appearance of the web page and Internet Explorer as well as commands that are commonly used to navigate the web.
Favorites: The Favorites menu contains a list of your favorite websites as well as commands to Add and manage your favorites.
T ools: The Tools menu has commands that allow you to change the way Internet Explorer operates. The Tools menu also includes commands for built-in features such as e-mail, newsgroups, and chat.
? H elp: The Help menu has information about how to use and troubleshoot Internet Explorer. The About Internet Explorer command displays information about the browser version you are using.
Address bar: The address bar is where you can enter the exact URL of the web page you would like to view. The down arrow button on the right side of the address bar can be used to view and select URLs that you have previously typed. Be cautious when selecting URLs from this list because even mistyped (ex. http://www.psu.eud/) URLs are retained.
When using the address bar, the best practice is to precisely enter the URL for the site you would like to view. Internet Explorer will accept URLs that don’t specify the protocol (ex. www.yahoo.com) and in some cases even the host name. For example if one types just the domain name “psu.edu” in the address bar you will still be directed to the Penn State web page.
Standard buttons: The standard buttons can be used to select commands quickly.
To view or hide the standard buttons: From the menu bar select View, point to Toolbars and then select Standard Buttons.
Basic Computing Skills Page 12 August 2003

Using the Search, Favorites, and History buttons from the standard buttons toolbar opens the Explorer bar on the left side of the Internet Explorer window. This is usually the best way to start using the web because you don’t need to enter precise URLs in the address bar.
Internet Options:
Setting your home page:
When we first open Internet Explorer, the program automatically displays a web page by default. This page is known as the home page. In general you should set your home page to a page that you use often or a page that has links to pages that you use most often. In the labs on campus the default homepage is the Classroom and Lab Computing web page.
To change the home page:
1. From the menu bar select “Tools”.
2. Select “Internet Options…”
3. With the “General” tab selected we see the “Home page” section of the Internet Options window.
4. To specify a new homepage type the URL for the page in the “Address” field.
5. Type: http://www.opp.psu.edu/6. Click “OK”
AutoComplete:
AutoComplete stores information about web forms, web addresses, and usernames/passwords that you have typed previously.
1. From the menu bar select “Tools”.
2. Select “Internet Options…”
3. Click the “Content” tab in the Internet Options window.
4. In the “Personal Information” section of the Internet Options window select the AutoComplete… button.
5. In the AutoComplete Settings window select the checkbox for “web addresses”.
6. Click OK.
7. Click OK.
Common Internet Terms
Basic Computing Skills Page 13 August 2003
Makes the web page that you are currently viewing your Home page.
Internet Explorer will open faster if you use a blank page for your Home page because a web page doesn’t need to be loaded on start-up.

Link a.k.a. “hyperlink” An area in a web page (can be a graphic or text) that directs your browser to a particular file such as another web page. In Internet Explorer the cursor changes to a hand when placed over a link
Typical cursor shape when over a link.
FTP File Transfer Protocol- A method for sending and receiving files to and from a remote computer.
Plug-in An application that works with your browser to view specific types of files. Common files that require a plug-in are: Adobe Acrobat, Flash, Shockwave, and QuickTime.
Search Engine A directory that can be used to search for web sites when you don’t know the specific URL. Example: http://www.google.com
Frames A combination of multiple web pages that are displayed as one page. Frames often present problems for some web browsers. Many web sites that use frames offer non-frame versions of the website as well.
Cookies Text files stored on your computer that remember details about your last visit to a particular web site.
Encryption A method of coding data sent via the Internet to conceal it from third parties.
Introduction to Penn State WebMail https://webmail.psu.edu/
Basic Computing Skills Page 14 August 2003

What is WebMail?Penn State WebMail is a Web-based e-mail client similar to Yahoo! Mail or MSN Hotmail. It provides you with secure, anytime, anywhere access to your Penn State e-mail via a Web browser. The easy-to-use interface lets you create and organize mailboxes, access Penn State directory services, create personalized signatures, and change a variety of e-mail settings.
WebMail Features Navigate from every WebMail screen
Create, empty, and delete mailboxes
Display a specific number of messages
Toggle to other mailboxes
Access Penn State directory services and add to your Address Book
Create Address Book nicknames
Create your own color schemes
Save e-mail drafts to send at another time
Leave mail on server
Spell checking
Send and receive attachments
Keyboard shortcuts
To Use WebMail, You Must Have: An active Penn State Access Account
E-mail.psu.edu or mail.psu.edu set as your e-mail server
A Web browser that supports 128-bit secure encryption
A Web browser that is JavaScript- and SSL-enabled
Basic Computing Skills Page 15 August 2003

Accessing and Storing E-mail To access your e-mail, you must authenticate using your Penn State Access Account userid and password (http://css.its.psu.edu/accounts/access.html.) Your WebMail mailboxes, messages, attachments, and other data are stored in your Penn State Access Account Storage Space also known as PASS (http://aset.its.psu.edu/ait/storagespace.html.)
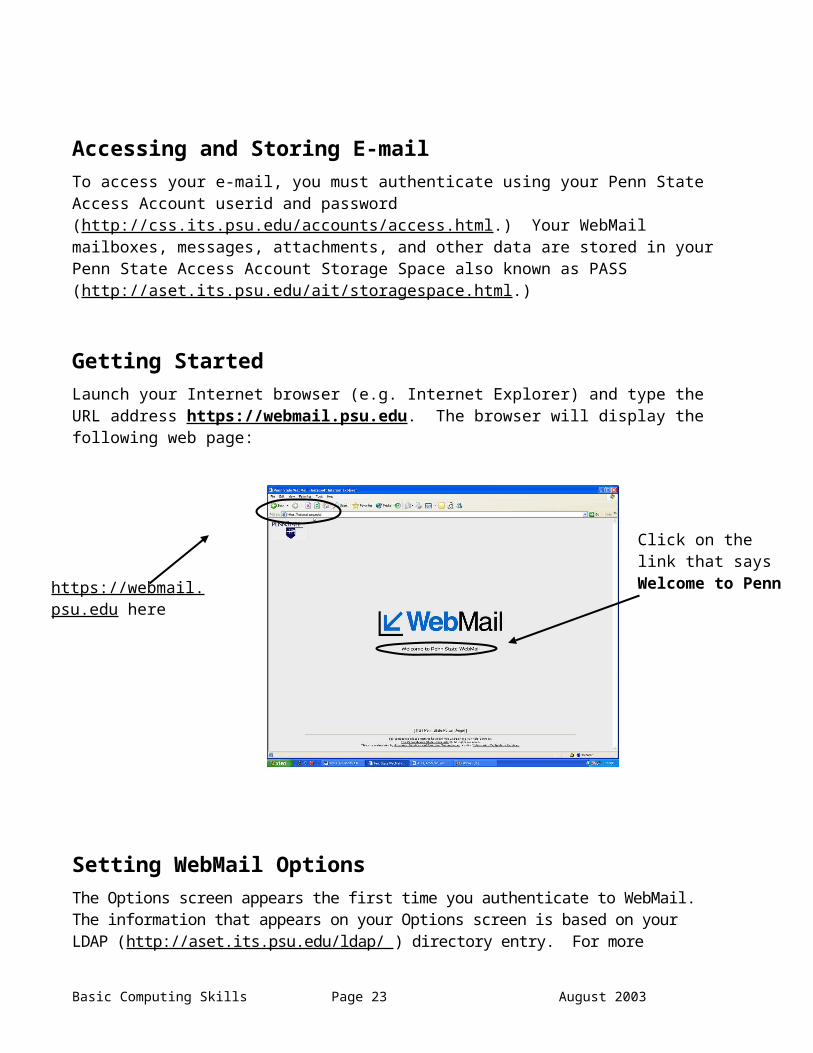
Getting StartedLaunch your Internet browser (e.g. Internet Explorer) and type the URL address https://webmail.psu.edu. The browser will display the following web page:
Setting WebMail OptionsThe Options screen appears the first time you authenticate to WebMail. The information that appears on your Options screen is based on your LDAP (http://aset.its.psu.edu/ldap/ ) directory entry. For more information about directory services at Penn State, see http://css.its.psu.edu/internet/directory.html. To change your directory entry, go to https://www.work.psu.edu/ and click on the link Edit your phone directory entry.
Basic Computing Skills Page 16 August 2003
Type https://webmail.psu.edu here
Click on the link that says Welcome to Penn State WebMail

Setting WebMail Options Continued.
Think of the Options screen as your “settings” for viewing your e-mail via WebMail. You can modify and customize the options to suit your needs. By default, the information fields are already filled in with information extracted from your LDAP directory entry.
Leaving Mail on the ServerIf you choose to leave e-mail on the server, this means that you will still be able to check your e-mail via another client on a different machine. For example, if you check mail using the e-mail client Eudora on your personal or office computer, the mail you received through WebMail will also download to the Eudora client.
Basic Computing Skills Page 17 August 2003
Check this box to leave mail on the server so you can download it to other e-mail clients.

Color CustomizationWebMail uses a default color scheme; however, you can also create a customized color scheme via the Color customization screen.
Click on the Colors link, located at the top right-hand area of the Options screen.
To change the color of an item, click on its corresponding Change button. A new window, which provides Web-safe color swatches, appears.
From this window, click on the color to set the color for the item.
A preview of the change appears on the right side of the Colors screen.
Click the Save Colors button to save your new color choices. To reset your colors to the WebMail default colors, click the Reset All Colors button. To cancel any changes, click the Cancel button.
Mailbox Display and Sort SettingsTo choose how you want your mailboxes displayed or sorted, click on the appropriate radio button.
Basic Computing Skills Page 18 August 2003
Options that can be changed
Reset All Colors back to the default colors
Change buttons Reset buttons for each option
Save Changes button
Web-safe color swatches

Respond and Delete SettingsTo choose what you want to do after responding to or deleting a message, click on the appropriate radio button.
Expand Folder in Left FrameTo expand and contract the various folders and mailboxes in WebMail, click on the appropriate check box.
Personal SignatureTo set a personal signature that will be placed at the bottom of every e-mail you send, type your information in the signature box.
Saving Your Option SettingsAfter you fill out the Options screen, click the Save Changes button to apply the changes you’ve made.
Basic Computing Skills Page 19 August 2003
Expand/Contract button
Folders/Mailboxes
Type your personal signature here.
To save your new Option settings, click on the Save Changes button.

Using WebMail
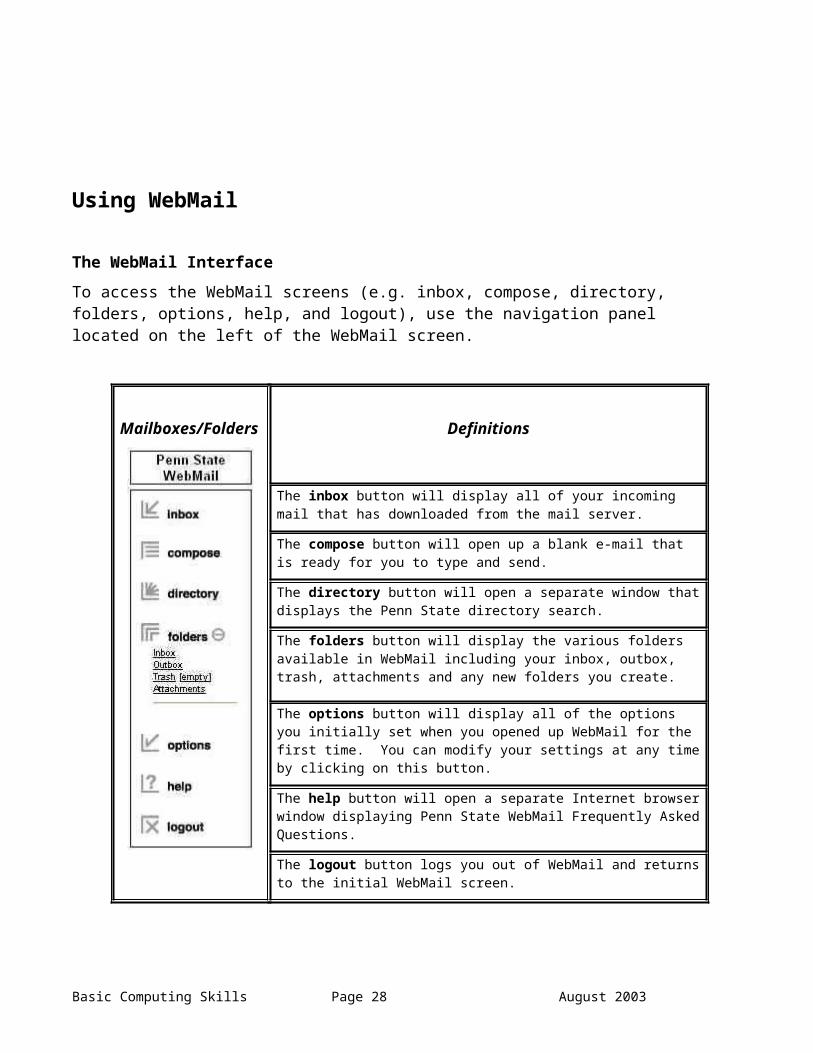
The WebMail InterfaceTo access the WebMail screens (e.g. inbox, compose, directory, folders, options, help, and logout), use the navigation panel located on the left of the WebMail screen.
Mailboxes/Folders Definitions
The inbox button will display all of your incoming mail that has downloaded from the mail server.
The compose button will open up a blank e-mail that is ready for you to type and send.
The directory button will open a separate window that displays the Penn State directory search.
The folders button will display the various folders available in WebMail including your inbox, outbox, trash, attachments and any new folders you create.
The options button will display all of the options you initially set when you opened up WebMail for the first time. You can modify your settings at any time by clicking on this button.
The help button will open a separate Internet browser window displaying Penn State WebMail Frequently Asked Questions.
The logout button logs you out of WebMail and returns to the initial WebMail screen.
The InboxTo display your incoming e-mail messages, click the inbox button on the navigation panel on the left side of the screen. The number and type of messages in your inbox will depend on your option settings. To change the number and type of messages that are displayed, click on the Change Display Filter drop-down menu and make a new selection. If you wish to change the number and types of messages in your inbox permanently, you will need to go back into your options and change your settings.
Basic Computing Skills Page 20 August 2003

Downloading/Checking MailWebMail is set to check your mail automatically. The status section of your inbox, which is located under the “Currently viewing Inbox” heading lists the last time your mail was checked, the next time your mail will be checked, and the number of messages set to display per the display setting of the filter. To manually check your mail, click the Check Mail Now link.
Reading E-mail
To read an e-mail message from your inbox, click on the Subject for the message. Note that all unread messages display with bold Subject lines. Click the Subject line. The message displays. As with any other e-mail client, the message displays header information, such as From, To, Subject, Date, and Content-type. Beneath this information is the message itself.
Each e-mail message includes a standard navigation bar. Navigation items include Reply, Reply to All, Forward, Delete, Full Headers, Printer Friendly, Previous, Next, and Index.
Basic Computing Skills Page 21 August 2003
Click on the down arrow to display the drop-down menu. Click on a different option for displaying your messages.
Click on the Check Mail Now link to manually download your mail from the server.
Click on the Subject line to open message.
Unread messages are in bold.

E-mail Navigation Button Definition
Reply Click on the Reply button or press the R key to reply to the current message. This action lets you reply to the sender only.
Reply to All Click the Reply to All button or press the A key to reply to the sender and all included recipients. To clear the original message in your reply, click the Clear Message button before you type your reply.
Forward Click the Forward button or press the F key to forward the message to another recipient.
Delete Click the Delete button or press the D key to delete the message. This function lets you delete the message without having to access your Inbox index. It's just another means by which you can delete messages to your Trash folder.
Full Headers Click the Full Headers button or press the H key to display full header information. This information can help the Security office stop spam and other malicious content from harming the network. Send malicious e-mail such as viruses with the full header information to:
Viruses (e-mails that contain suspicious files): [email protected] (i.e. unsolicited e-mail): [email protected] or threatening e-mail: [email protected]
Printer Friendly Click the Printer Friendly button to view and format the message for printing.
Previous Click the Previous button to navigate back one message in your inbox.
Next Click the Next button to navigate forward one message in your inbox.
Index Click the Index button to return to your inbox.
Basic Computing Skills Page 22 August 2003
Navigation bar
Body of message
Header information

Retrieving Attachments
The Browse Attachments directory link appears at the bottom of every message. Any attachments sent to you will be stored in this directory. To view attachments, click on this link.
Your attachments are stored on PASS in an “attach” folder and can be accessed through PASS as well as the WebMail interface.
Click on the Browse Attachments link to view any attachments. The Attachments window appears.
Click the link for the attachment you wish to view. The attachment appears for you to read/view.
To delete an attachment, click its corresponding check box and click the Delete button. To delete all attachments at once, click the Select All check box and click the Delete button.
Basic Computing Skills Page 23 August 2003
Browse Attachments directory link
Deleting and Moving E-mail
You can easily delete or move messages in WebMail to your trash or to another mailbox. Click the "Select/Unselect All" check box to select or deselect all messages that you wish to move to another mailbox or delete. Click individual message check boxes to move or delete several messages at once.
To delete the messages that are checked, simply click on the Delete Selected Messages button.
When moving messages, make sure to first choose a folder from the Choose Folder drop-down menu. Then click the Move Selected Messages button. Deleted messages are stored in the trash. The trash folder creates itself the first time a message is deleted. Messages that are deleted from the trash are deleted from your PASS.
Sorting Messages
You can sort your mail in every mailbox by sender, subject, and date. To do so, click either one of the three links (From, Subject, or Date). You can sort in ascending or descending order for each category.
Basic Computing Skills Page 24 August 2003
Select messages you would like to move. Choose a folder from the Choose Folder drop-down menu. Click the Move Selected Messages button.
Click on the From, Subject or Date link depending on how you would like to sort your messages. A little button with an arrow will appear next to the link you selected.
When the little button shows an upward facing arrow, the messages are sorted in ascending order. When the arrow is facing downwards, the messages are sorted in descending order

E-mail Quota
The Quota information, which is located beneath the navigation panel, displays the amount of space used in your PASS to store your e-mail. For example, "Quota: 1567 out of 1000000 kilobytes" (0%) means that you are only using 1567KB out of a total 1000000KB, which is nearly 0% of your disk space.If you need to increase your quota, you can either delete files are apply for additional space for a nominal fee. To apply for additional space, please see the information listed in the “Personal Web/Penn State Access Account Storage Space (PASS)” section of the Accounts Services Office Web site at http://css.its.psu.edu/accounts/personal.html.
Composing an E-mail
Just as you would compose new messages in any other e-mail client, you can also compose new messages via WebMail.
To Compose a message, click compose from the navigation panel. The Composing new message screen appears.
Type the recipient in the To: field. If applicable, also add recipients to the CC: and/or BCC: fields. To clear either field, click the Clear button.
In the message field, compose your message. Click the Spell Check button to check for any spelling errors. All sent mail will be stored in your outbox.
Basic Computing Skills Page 25 August 2003
Compose button Complete the To,
Subject, CC:, and BCC: fields as appropriate.
Type the body of your message.
Spell check for errors.
Include your signature if you wish.

Using the Directory
If you need to look up a recipient's e-mail address, click directory from the navigation panel. Use the available search criteria to search for the recipient. Search results display information from the Penn State On-line Directory.
Adding to the Address Book
Once your search is completed, you can add the recipient to your address book by clicking the Add to Address Book button.
Basic Computing Skills Page 26 August 2003
Click on the directory button.
Choose a field on which to search.
Select the criteria for the search.
Click on the Add to Address Book button to add the recipient to your address book for future reference.

The Adding New Address Book Entry screen appears. To confirm the entry, click the Save button. This saves the entry to your Address Book. Click the Close Window link to close the Address Book window. Also note that the Address Book window includes four links at the top of its window: Address Book, Add a new entry, Directory Lookup, and Close Window. Via these links, you can easily add new entries, perform directory searches, or access your address book. In addition, the first letter of each entry is represented as an an alphabetized link. The links appear at the top of your Address Book. As your Address Book begins to expand, the alphabetized links will help you to quickly "jump to" any entry, without having to scroll through your Address Book.
To select a recipient from your Address Book, click the Address button. You can also use the Quick Address Book drop-down menu to add recipients to the message you are composing. First, select the To, CC, or BCC radio buttons. Then select the recipient from the Quick Address Book. WebMail will automatically enter in the appropriate field the recipient you choose.
Basic Computing Skills Page 27 August 2003
Click the Save button to confirm the entry.
Additional links to add new entries, perform directory searches, and open your address book.

To send the message, simply click the Send button. If you wish to send the message at a later time, click the Save Draft button. The next time you return to the compose area, WebMail will notify you, as well as list, your unsent messages. Unsent messages are listed above the Composing new message area. Unsent messages are saved in a mailbox/folder called postponed-msgs.
Adding AttachmentsTo attach a file, click the Attachments button. The Attachments window appears. Click the Browse button to attach a file to the current e-mail message. Choose the file(s) from a folder on your local drive you wish to attach and click OK or in some cases Done. You must then click the Attach File button. The file then appears in the Attached Files table. Click the Done button to complete the process. NOTE: You may only attach up to 5 files per message.
Basic Computing Skills Page 28 August 2003
Click the Send button to mail your message.
Click the Save Draft button to send your message at a later time.
Accessing FoldersTo access a mailbox or folder in WebMail, locate the appropriate item on the navigation panel on the left side of the screen and click on it with your mouse. The new screen will be displayed.
Basic Computing Skills Page 29 August 2003
Click the Attachments button. The Attachments window will appear.
Click the Browse button to attach a file to the current e-mail message.
Once you’ve located the file you wish to attach, click the Attach File button.
After clicking the Attach File button, confirm that the file is actually attached by looking under File Name. To remove the attached file, click the Remove button.
Click the Done button when you are finished attaching the files.

Creating New Folders
WebMail lets you create new mail folders so that you can easily organize your e-mail messages.
To create a folder, click folders from the navigation panel. The Organizing Mailboxes screen appears. Note that all current mailboxes are listed here.
In the Create a New Mailbox area, type the name for your new mailbox in the Mailbox Name field. Then click the Create Mailbox button. The mailbox is then added to your list of mailboxes.
Basic Computing Skills Page 30 August 2003
By clicking on the folders button in the navigation panel, all existing folders will be displayed on the screen.
All existing folders
To select a particular mailbox or folder, click on the + icon to the right of the Folders button. The + symbol will change to a – symbol. Now you can view the expanded list of available folders.
Click on the particular folder or mailbox you would like to display.
To create a new folder, type the folder name, then click the Create Folder button.
To empty or delete a folder, choose the appropriate folder from the drop-down menu, then click the Empty or Delete Folder button.

If you wish to delete or empty one of your mailboxes, click either the Empty Mailbox button or the Delete Mailbox button from the Mailbox Maintenance area. Emptied messages are emptied from the mailbox and from your PASS. Deleted messages are emptied from the mailbox to the trash.
To view the contents of a mailbox, simply click on its corresponding link.
Logging Out
It's easy to logout of WebMail. Simply finish your current task and save and/or send any messages. Click logout located on the navigation panel. The Penn State WebMail home page displays. If you choose to login to WebMail again your User name will be erased and logout will be displayed in the User name field. This feature ensures that anyone using the same computer will not be able to view your e-mail.
Getting HelpFirst, try clicking on help located on the navigation panel. Read through the Penn State WebMail Frequently Asked Questions.
If you can’t locate an answer to your question, send a message to [email protected] and include the following information:
Your Access Account userid (e.g. xyz123)
The time the error occurred
The error message(s) received, if applicable
The Web browser type and version (e.g. Netscape 4.78 or Internet Explorer 5.0)
The platform (e.g. Windows or Macintosh)
Basic Computing Skills Page 31 August 2003

Additional ResourcesTraining Resourceshttp://its.psu.edu/training/resources/ ITS Training Services handouts and
resources
https://wbt.psu.edu/ ITS Training Services web-based tutorials
http://www.oak-brook.lib.il.us/resources/tutorials/default.htm New user tutorials
http://www.muskokacap.ca/tutorials.htm Computer, mouse, Windows, and Internet basics
http://www.learnthat.com/courses/computer/windows/ Free Windows basics tutorials
http://www.ckls.org/~crippel/computerlab/tutorials/index2.html Computer, Internet and e-mail tutorials
Secure Web Siteshttp://computerstore.psu.edu/ Penn State’s Computer Store
http://www.amazon.com/ Amazon’s web site
Web Site Exampleshttp://www.psu.edu/ Penn State’s homepage
http://www.psu.org/ Penn State Alumni Association
Fun Web Siteshttp://www.mapquest.com/ Driving directions
http://gopsusports.com/home/index.cfm Penn State sport schedules
http://www.bluemountain.com/ Electronic greeting cards
http://tvguide.com/ Check TV listings
http://palottery.com/ PA lottery listings
http://statecollege.com/ State College information
http://happyvalley.com/ State College information
For More Helphttp://its.psu.edu/help.html Penn State Help Sources
http://css.its.psu.edu/consulting/consult.html Penn State Help Desks
Basic Computing Skills Page 32 August 2003