Embed Size (px)
Citation preview
CeLTIE Windows Movie Maker Workshop
Instructor Materials
INDIANA UNIVERSITY
Developed by Amber Kennedy Kent, Jeff Pankin,
Kassandra Ramirez, and Suzanne Vaughan.
November 2012
Student Materials Page 2
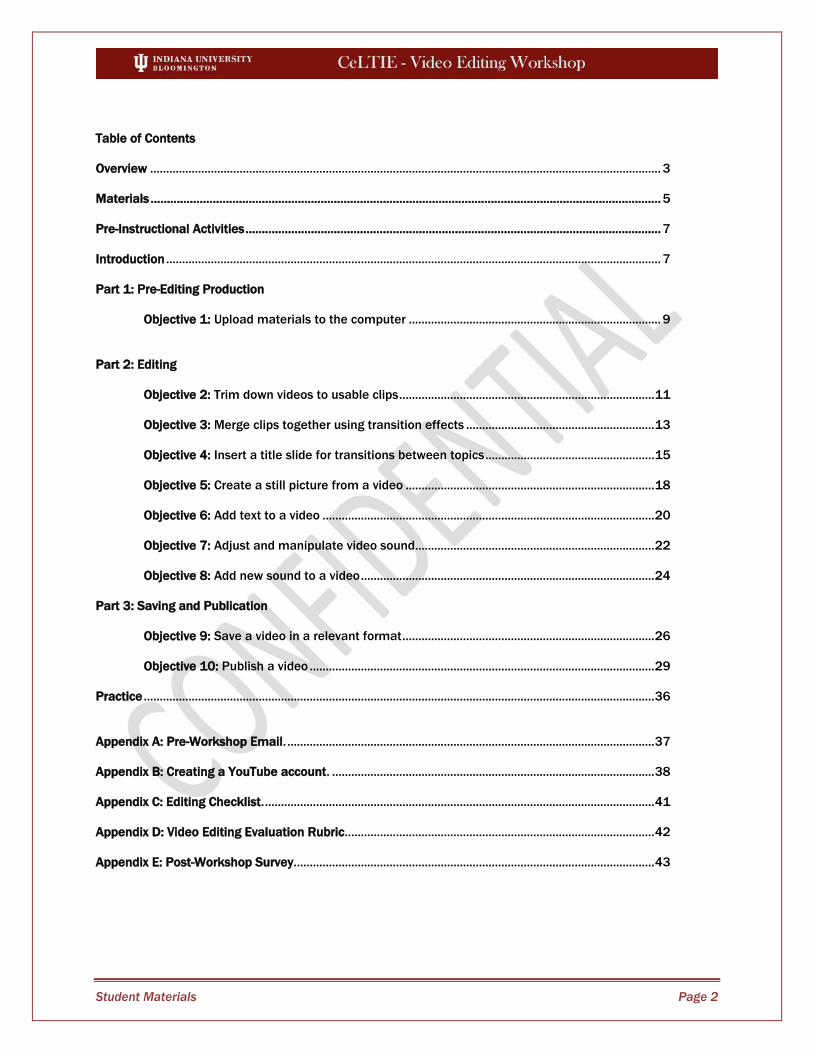
Table of Contents
Overview ................................................................................................................................................................ 3
Materials ............................................................................................................................................................ 5
Pre-Instructional Activities ............................................................................................................................... 7
Introduction ........................................................................................................................................................... 7
Part 1: Pre-Editing Production
Objective 1: Upload materials to the computer ............................................................................... 9
Part 2: Editing
Objective 2: Trim down videos to usable clips ................................................................................ 11
Objective 3: Merge clips together using transition effects ........................................................... 13
Objective 4: Insert a title slide for transitions between topics ..................................................... 15
Objective 5: Create a still picture from a video .............................................................................. 18
Objective 6: Add text to a video ........................................................................................................ 20
Objective 7: Adjust and manipulate video sound ........................................................................... 22
Objective 8: Add new sound to a video ............................................................................................ 24
Part 3: Saving and Publication
Objective 9: Save a video in a relevant format ............................................................................... 26
Objective 10: Publish a video ............................................................................................................ 29
Practice ................................................................................................................................................................ 36
Appendix A: Pre-Workshop Email. ................................................................................................................... 37
Appendix B: Creating a YouTube account. ..................................................................................................... 38
Appendix C: Editing Checklist. .......................................................................................................................... 41
Appendix D: Video Editing Evaluation Rubric.. ............................................................................................... 42
Appendix E: Post-Workshop Survey. ................................................................................................................ 43
Student Materials Page 3
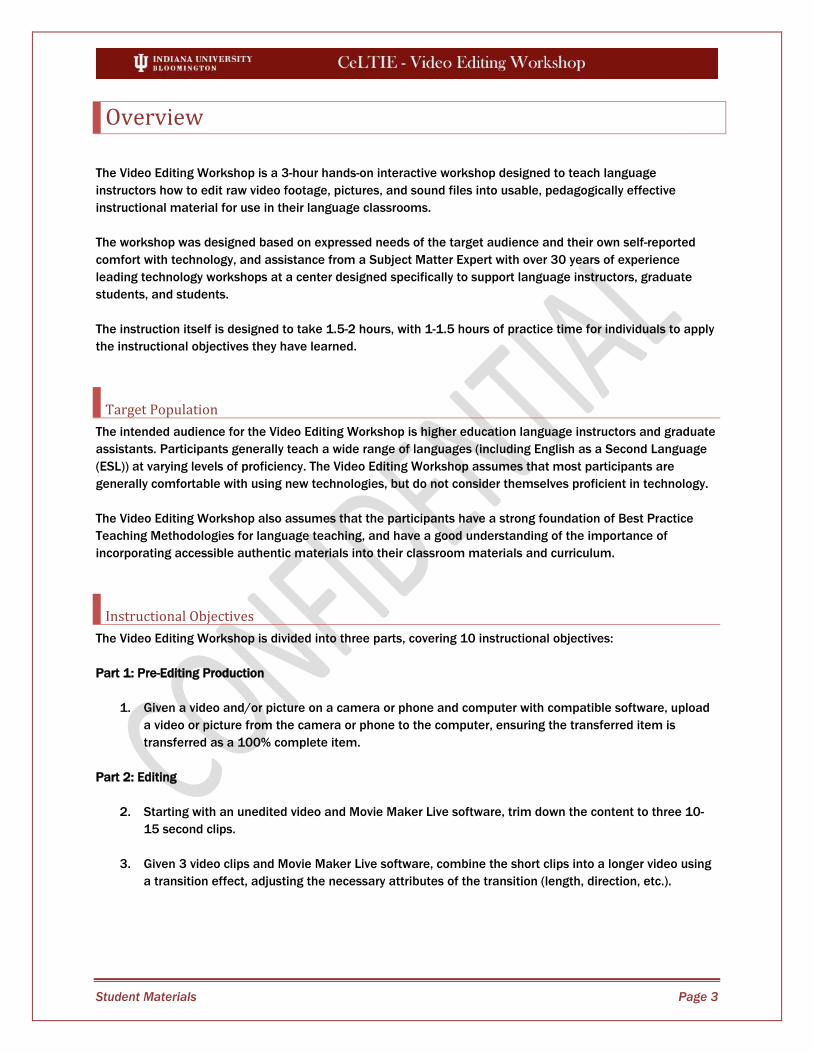
Overview
The Video Editing Workshop is a 3-hour hands-on interactive workshop designed to teach language
instructors how to edit raw video footage, pictures, and sound files into usable, pedagogically effective
instructional material for use in their language classrooms.
The workshop was designed based on expressed needs of the target audience and their own self-reported
comfort with technology, and assistance from a Subject Matter Expert with over 30 years of experience
leading technology workshops at a center designed specifically to support language instructors, graduate
students, and students.
The instruction itself is designed to take 1.5-2 hours, with 1-1.5 hours of practice time for individuals to apply
the instructional objectives they have learned.
Target Population
The intended audience for the Video Editing Workshop is higher education language instructors and graduate
assistants. Participants generally teach a wide range of languages (including English as a Second Language
(ESL)) at varying levels of proficiency. The Video Editing Workshop assumes that most participants are
generally comfortable with using new technologies, but do not consider themselves proficient in technology.
The Video Editing Workshop also assumes that the participants have a strong foundation of Best Practice
Teaching Methodologies for language teaching, and have a good understanding of the importance of
incorporating accessible authentic materials into their classroom materials and curriculum.
Instructional Objectives
The Video Editing Workshop is divided into three parts, covering 10 instructional objectives:
Part 1: Pre-Editing Production
1. Given a video and/or picture on a camera or phone and computer with compatible software, upload
a video or picture from the camera or phone to the computer, ensuring the transferred item is
transferred as a 100% complete item.
Part 2: Editing
2. Starting with an unedited video and Movie Maker Live software, trim down the content to three 10-
15 second clips.
3. Given 3 video clips and Movie Maker Live software, combine the short clips into a longer video using
a transition effect, adjusting the necessary attributes of the transition (length, direction, etc.).
Student Materials Page 4
4. Given either two video clips or two pictures, insert a slide for transitioning purposes. The transition
point must offer either: a flow between two topics, a contrast between two different images, or a
teaching point being further expounded upon.
5. Given a video clip, take a still picture from the video, ensuring the picture is in focus and not blurred.
6. Given a video clip or picture, add text to the item. This will be done by adding, at a minimum, one
caption, title, or credit.
7. Given a video clip and Movie Maker Live software, manipulate the video’s sound, by either adjusting
the volume, creating a fading volume, or by using sound to transition between scenes.
8. Given a video clip and Movie Maker Live software, and sound clip, add complementary sound to the
video, by either (1) adding music to the video, (2) adding a sound effect to the video, or (3) adding a
voiceover recording. Either choice selected must provide an enhancement to the video in some way
and not be a distraction from the video content.
Part 3: Saving and Publication
9. Given a completed draft of a video or picture(s) and Movie Maker Live software, choose the correct
format for publishing. The format chosen must include all the editing changes made and be able to
be uploaded to a website or burned to a CD or DVD as directed.
10. Given a completed and formatted draft of a movie/video, publish the video. This will be done by
uploading the media to YouTube or a DVD. The media will be published without any degradation or
loss of information to the content or format.
Additional Content Covered
The Video Editing Workshop also includes a step-by-step Job Aid for how to sign up for a YouTube account,
since participants will need a YouTube account if they do not already have one to complete Objective 10.
Organization
The Editing Video Workshop is designed to be delivered over one 3-hour long workshop. The workshop itself
includes three major parts:
Introduction: Pre-instruction discussion where participants examine the importance of using good quality
videos in their language instruction
Instruction: The instructor leads the workshop participants through each of the 10 instructional objectives.
The instructional content is split up into three categories: Pre-editing Production, Editing, and Saving and
Publication. Additionally, each instructional objective is then broken down into four parts: Observation and
Discussion, Instruction, Practice, and Feedback.
Objectives are presented in a linear order of a true production process. Since there is no true order for editing
objectives (like adding text or adding sound), those objectives are introduced based on building on prior
knowledge and increasing complexity.
Student Materials Page 5
Practice: At the completion of the instructional portion of the workshop, the instructor will ask the
participants to take what they have learned and practice editing together a 3-4 minute instructional video,
which will be evaluated by the workshop instructors using the Video Editing Evaluation Rubric.
Materials
The Video Editing Workshop includes the instructor and participant materials listed below:
Instructor Guide: This guide includes the overview and explanation of the workshop instruction. The format is
based directly on the step-by-step Student Instructional Materials, with built-in Observation and Discussion
points, opportunities for Practice, and evaluation throughout via Peer Feedback.
Appendix A: Pre-Workshop Email. Details to be sent to workshop registrants before the workshop.
This includes information about what kind of multimedia materials to bring (including the
appropriate cords if applicable), bringing a blank DVD, and a valid YouTube user ID and password.
Appendix B: Creating a YouTube account. A job aid to be supplied to participants via email upon
registration, to ensure successful creation of a valid YouTube user ID and password.
Appendix C: Editing Checklist. An item checklist of all of the objectives participants should be able to
demonstrate at the completion of the workshop.
Appendix D: Video Editing Evaluation Rubric. The assessment criteria that will be used to assess
participants’ performance of the instructional objectives.
Appendix E: Post-Workshop Survey. A survey giving participants the opportunity to evaluate their
perception of the workshop effectiveness and a self-assessment of their acquisition of instructional
objectives.
Student Guide: Contains the instructional text divided into three parts: Part 1: Pre-Editing Production, Part 2:
Editing, and Part 3: Saving and Publication.
Appendix A: Creating a YouTube account. Participants should have have completed this registration
prior to attending the workshop, but provided in case of need.
Appendix B: Editing Checklist. Providing participants with an itemized list of skills they should have
demonstrated by the completion of the workshop.
Appendix C: Video Editing Evaluation Rubric. Providing participants with the assessment criteria that
will be used to assess their performance, so that they understand how they will be evaluated.
Student Materials Page 6
Using the Instructor Guide
The Instructor Guide directly mirrors the Student Guide, however it includes the pedagogical breaks for
Observation and Discussion (with suggested responses), Practice, and Peer Feedback. Each section also
includes a Projected Time Breakdown, to give the instructor a sense of efficient pacing.
Observation and Discussion:
As part of introducing new objectives, the instructor will first call attention and then direct participants to
consider relevance and application of each objective using Observation and Discussion.
These breaks will begin with Observation, introducing examples and/or non-examples of editing techniques
via short videos. This will be followed by Discussion, leading participants in a constructive conversation about
the pedagogical implications and/or design importance of the editing techniques being observed. The
instructor can also build participant confidence and further activate prior knowledge by asking them to share
relevant anecdotes or experience with similar examples.
EXAMPLE:
OBSERVATION
Non-example of a video with no-captioning or poorly used captioning.
DISCUSSION
How would you suggest the editor make changes to this video?
Only caption the most salient terms.
Only caption using one language.
Caption in the target language instead of English subtitles.
Choose a font style and size that have a higher contrast, thus making it easier to read.
INSTRUCTION
Following Observation and Discussion, the instructor will model the steps of the instruction while the
participants watch and take notes (if needed). During this process, the instructor should feel free to narrate
while completing the tasks, and also to include any helpful tips or additional information.
PRACTICE
Following Instruction, the participants will practice the objectives on their own, using the instructors, their
peers, and the instructional materials as references as necessary.
PEER FEEDBACK
After Practice, participants will be given immediate verbal feedback on their production by workshop
instructors and/or their peers. For peer or self-evaluation, participants can use the Editing Checklist (Student
Guide: Appendix B) or for more thorough feedback, the Video Editing Evaluation Rubric (Student Guide:
Appendix C).
PROJECT TIME BREAKDOWN
Additionally, each objective will include a Project Time Breakdown. These are by no means firm times, they
are merely approximates provided for pacing purposes. Instructors may use more or less time as needed.
Student Materials Page 7
Pre-Instructional Activities
Objective: Participants will come prepared to the workshop, ready to begin uploading, editing,
and saving, and publishing.
MATERIALS
Pre-Workshop Email (Appendix A)
Creating a YouTube account (Appendix B)
PROCEDURES
A few days before the workshop, send out the Pre-Workshop Email to the participants with the Creating a
YouTube account job aid as an attachment.
Introduction
Objective: Participants will consider their knowledge about best practice teaching methods
and how that is related to editing choices when preparing instructional videos.
MATERIALS
1. Non-example videos
2. Example videos
3. Student Instructional guide (handed out)
4. Movie Maker and Photo Gallery installed from the Windows Essentials website
5. Extra USB cables (if needed)
6. Extra video clips, still images, and sound files (if needed)
PROJECTED TIME BREAKDOWN: 10 MINUTES
Observation: 5 minutes
Discussion: 5 minutes
OBSERVATION AND DISCUSSION
OBSERVATION
Show participants an non-example video (a video that uses poor and/or no editing and is therefore not a
pedagogically effective video for using in language instruction).
http://www.youtube.com/watch?v=B5aul25kSb
DISCUSSION
Ask participants to discuss elements of the video that work and elements that don’t work.
Student Materials Page 8
Too long
Lack of context (no title cards)
Jumpy (poor transitions)
Distracting elements (too much titling, too many, and/or too frequent transitions)
Poor input (bad sound quality, unclear speech)
Captions in L1 instead of target language
OBSERVATION
Show an example of a well edited video. (Insert link)
INTRODUCTION
The subject of developing language learning materials can be controversial, because there are those who
believe that developing materials in itself is not best practice language teaching, because any and all
developed materials are inherently inauthentic.
Comparatively, there are those on the other side of the authentic materials camp that believe introducing
some highly-situated videos in addition to purely authentic materials actually strengthens students’
acquisition, by providing them with materials at the exact level of appropriateness (i+1).
However, the issue of determining the right level of authenticity for use in language learning materials is not
one of the goals of this workshop.
Instead, this workshop assumes that all participants already know what level of authenticity they deem to be
appropriate for their classroom and curriculum, and therefore the goal of this workshop is to help instructors
create the best, most effective videos possible to meet their needs according to their own beliefs on the
scales of authenticity.
This workshop can be valuable to all categories of instructors, because the goal of editing videos is to take
any video (authentic or scripted) and make it more accessible to students by editing for length (make it
manageable chunks of information), adding visual aids (title cards for preparing students’ minds for the
material they will be viewing, text for bringing their attention to most important aspects, captioning for
providing them with aural and visual clues, etc.), improving audio quality (providing clear input), and
publishing their materials (making it literally accessible).
Throughout the instruction, language instructor participants should keep in mind how the technical acts they
are learning and practicing relate to the pedagogical knowledge they already know about language learning
and integrating authentic materials into the language learning curriculum.
Student Materials Page 9
Part 1: Pre-Editing Production
Objective #1: Given a video and/or picture on a camera or phone and computer with
compatible software, upload a video or picture from the camera or phone to the computer,
ensuring the transferred item is transferred as a 100% complete item.
MATERIALS
Participants should have digital camera or phone with videos and/or movies to upload.
PROJECTED TIME BREAKDOWN: 10 MINUTES
Observation: N/A
Discussion: N/A
Instruction: 5 minutes
Practice: 5 minutes
Peer Feedback: N/A
OBSERVATION AND DISCUSSION
N/A
INTRODUCTION
*Tip: Remind students NOT to delete the original clips/pictures from their source.
Move video and still pictures from your camera to your computer.
1. Open the Movie Maker program.
2. Connect your digital camera or phone to the computer using a USB cable.
3. In Movie Maker, click the Movie Maker menu button (the blue box on the top tool bar just left of
Home) and click Import from device. You may receive a message that videos and photos will be
imported to the Photo Gallery. Click OK.
4. Select the device you want to import videos or photos from then click Import.
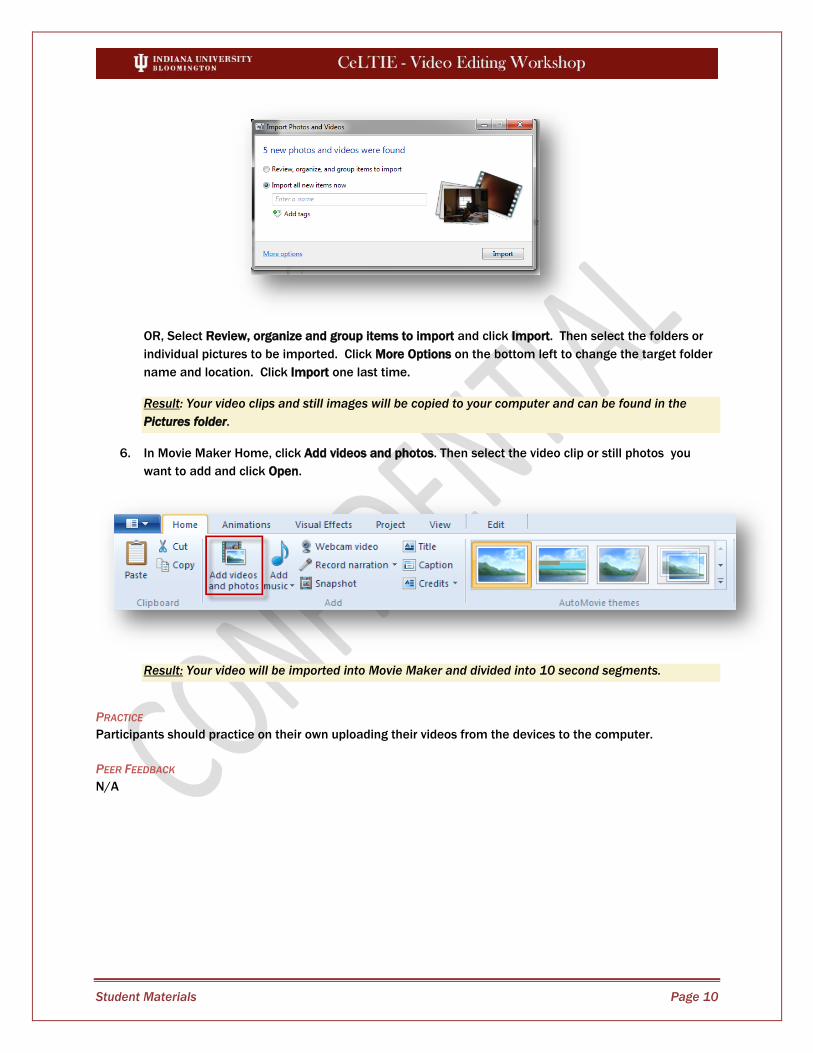
5. Select Import all new items now and enter a name for the folder to hold the imported videos. Then
click Import.
Student Materials Page 10
OR, Select Review, organize and group items to import and click Import. Then select the folders or
individual pictures to be imported. Click More Options on the bottom left to change the target folder
name and location. Click Import one last time.
Result: Your video clips and still images will be copied to your computer and can be found in the
Pictures folder.
6. In Movie Maker Home, click Add videos and photos. Then select the video clip or still photos you
want to add and click Open.
Result: Your video will be imported into Movie Maker and divided into 10 second segments.
PRACTICE
Participants should practice on their own uploading their videos from the devices to the computer.
PEER FEEDBACK
N/A
Student Materials Page 11
Part 2: Editing
Objective #2: Starting with an unedited video and Movie Maker Live software, trim down the
content to three 10-15 second clips.
PROJECTED TIME BREAKDOWN: 12 MINUTES
Observation: 2 minutes
Discussion: 2 minutes
Instruction: 3 minutes
Practice: 3 minutes
Peer Feedback: 2 minutes
OBSERVATION AND DISCUSSION
OBSERVATION
Show a video clip that has obviously been trimmed down. Example:
https://www.youtube.com/watch?v=Uarsn4ybucs&feature=related
DISCUSSION
You can tell this video has been trimmed down some. Are there other places you would trim down further?
Trim down the extended laughing break.
The video is almost 6 minutes, maybe only focus on a few exchanges and then fade out.
Ask participants why it is important to trim out excess or non-relevant information.
The longer a video, the less likely students will watch it all the way through
Manageable chunks of information
Losing students’ attention
Shorter videos have faster downloading and processing times
INSTRUCTION
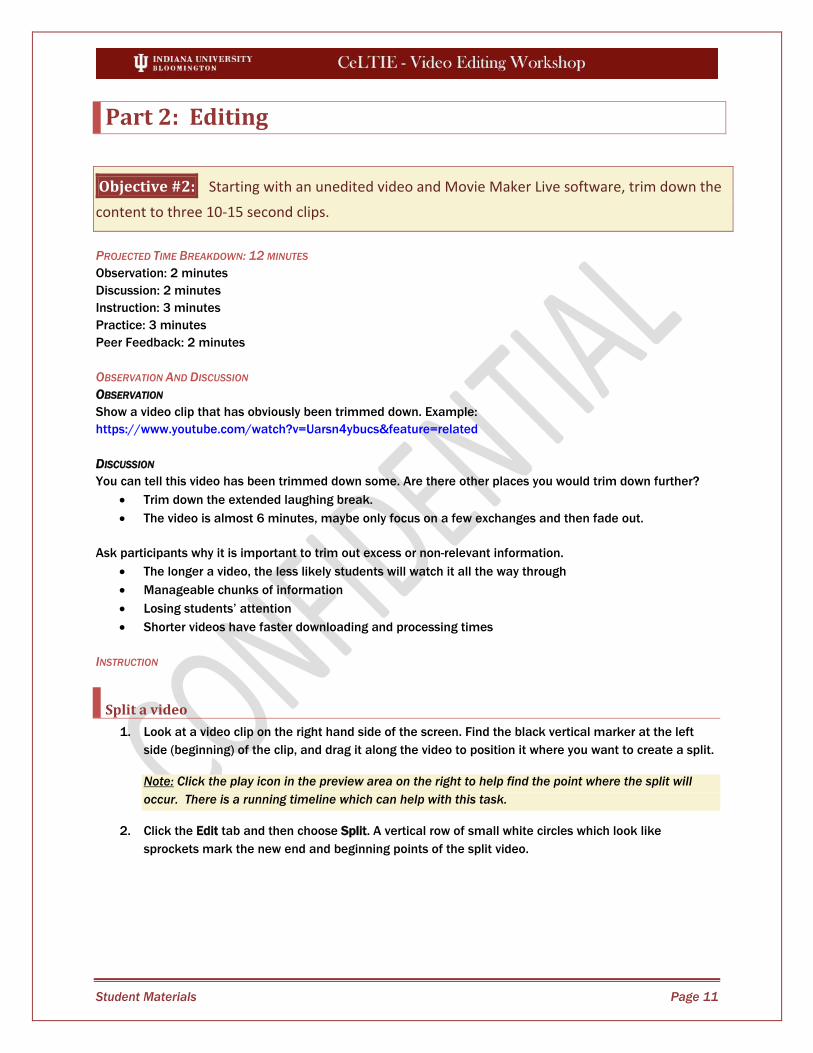
Split a video
1. Look at a video clip on the right hand side of the screen. Find the black vertical marker at the left
side (beginning) of the clip, and drag it along the video to position it where you want to create a split.
Note: Click the play icon in the preview area on the right to help find the point where the split will
occur. There is a running timeline which can help with this task.
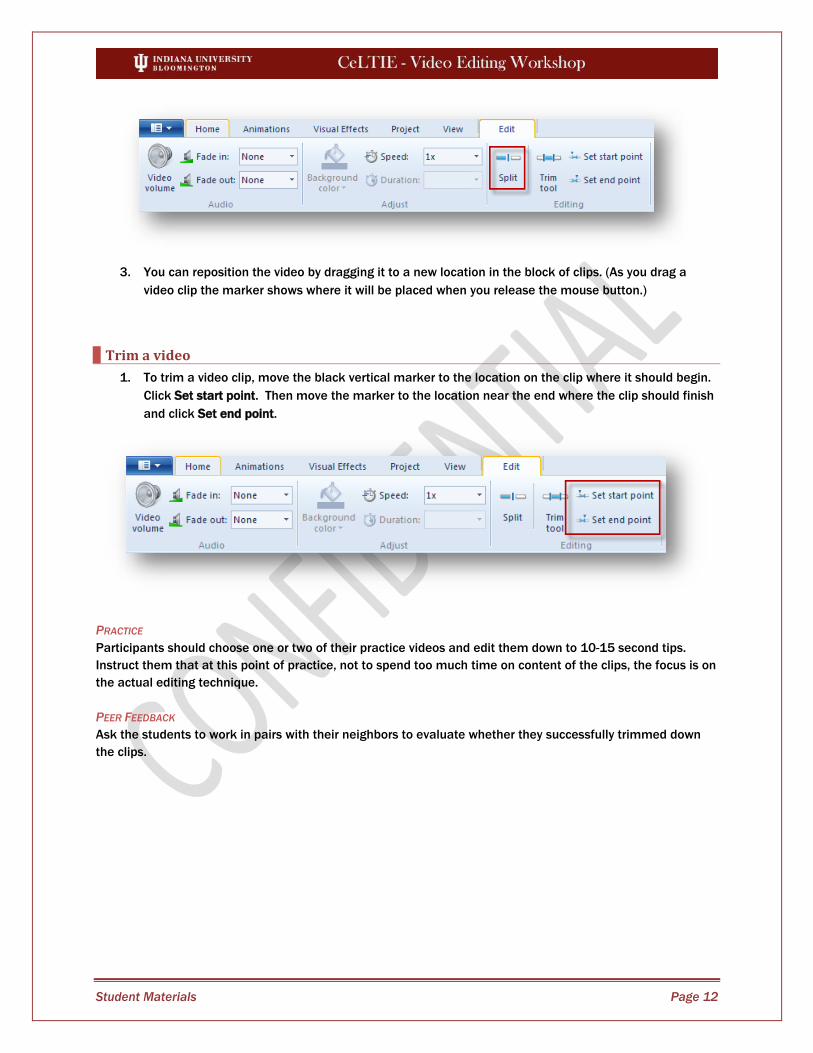
2. Click the Edit tab and then choose Split. A vertical row of small white circles which look like
sprockets mark the new end and beginning points of the split video.
Student Materials Page 12
3. You can reposition the video by dragging it to a new location in the block of clips. (As you drag a
video clip the marker shows where it will be placed when you release the mouse button.)
Trim a video
1. To trim a video clip, move the black vertical marker to the location on the clip where it should begin.
Click Set start point. Then move the marker to the location near the end where the clip should finish
and click Set end point.
PRACTICE
Participants should choose one or two of their practice videos and edit them down to 10-15 second tips.
Instruct them that at this point of practice, not to spend too much time on content of the clips, the focus is on
the actual editing technique.
PEER FEEDBACK
Ask the students to work in pairs with their neighbors to evaluate whether they successfully trimmed down
the clips.
Student Materials Page 13
Objective #3: Given 3 video clips and Movie Maker Live software, combine the short clips into
a longer video using a transition effect, adjusting the necessary attributes of the transition
(length, direction, etc).
PROJECTED TIME BREAKDOWN: 15 MINUTES
Observation: 2 minutes
Discussion: 2 minutes
Instruction: 4 minutes
Practice: 4 minutes
Peer Feedback: 3 minutes
OBSERVATION AND DISCUSSION
OBSERVATION
Show a non-example video clip where the transitions are poorly used. Example:
http://www.youtube.com/watch?v=TL1Mj3OL9ww&feature=endscreen&NR=1
DISCUSSION
Ask participants to discuss elements of the video that work and elements that don’t work.
Too many transitions and/or transactions that flip too quickly make students dizzy
Using too many kinds of transitions (instead of simple and consistent) are distracting to the viewer
INSTRUCTION
1. First reposition the clips by dragging each to the desired location in the sequence.
2. Position the black vertical marker between two clips.
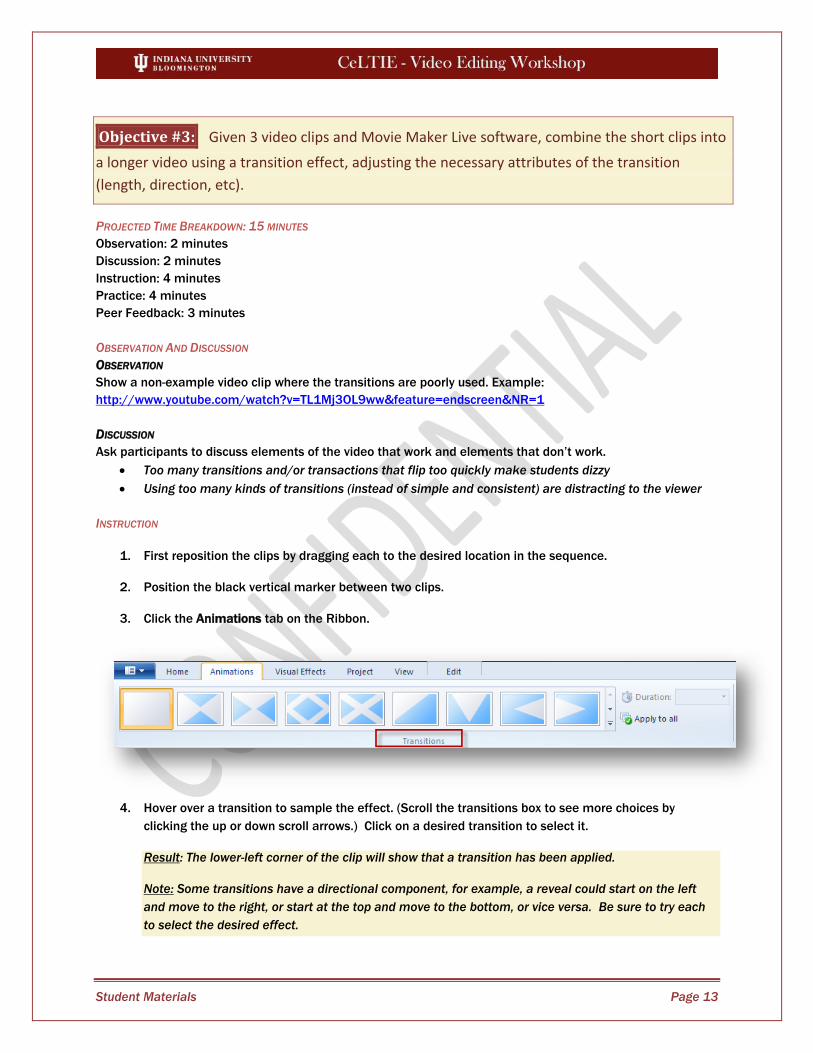
3. Click the Animations tab on the Ribbon.
4. Hover over a transition to sample the effect. (Scroll the transitions box to see more choices by
clicking the up or down scroll arrows.) Click on a desired transition to select it.
Result: The lower-left corner of the clip will show that a transition has been applied.
Note: Some transitions have a directional component, for example, a reveal could start on the left
and move to the right, or start at the top and move to the bottom, or vice versa. Be sure to try each
to select the desired effect.
Student Materials Page 14
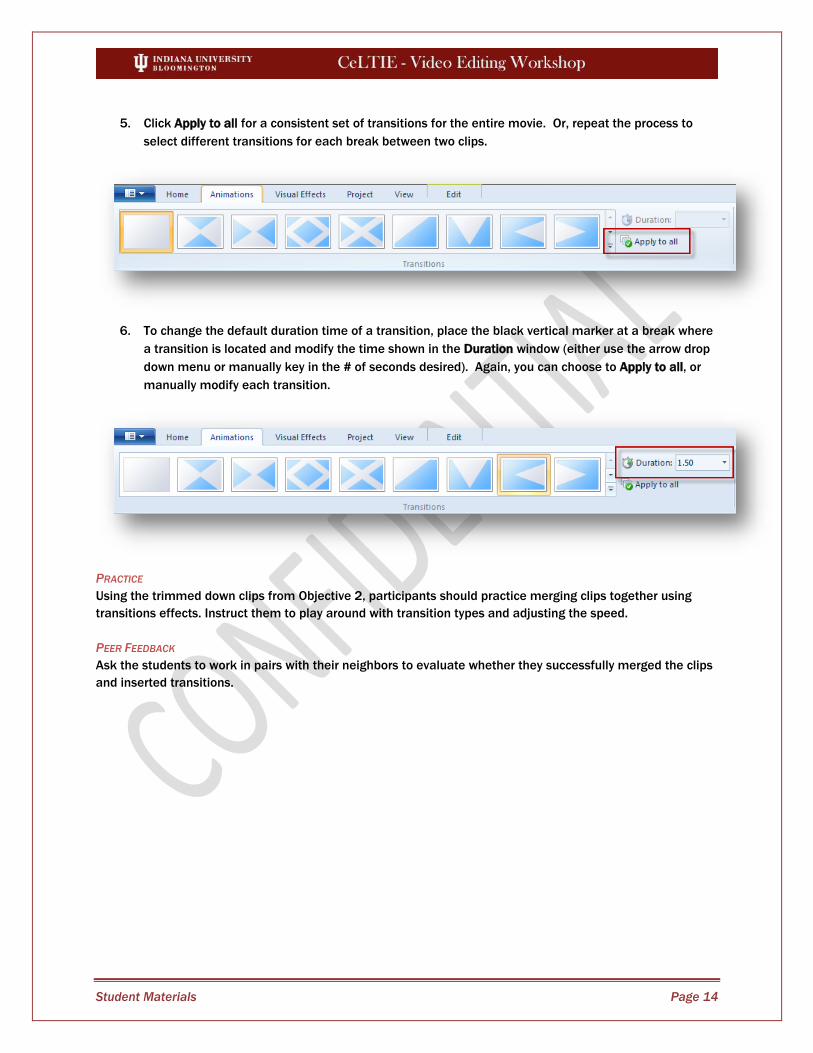
5. Click Apply to all for a consistent set of transitions for the entire movie. Or, repeat the process to
select different transitions for each break between two clips.
6. To change the default duration time of a transition, place the black vertical marker at a break where
a transition is located and modify the time shown in the Duration window (either use the arrow drop
down menu or manually key in the # of seconds desired). Again, you can choose to Apply to all, or
manually modify each transition.
PRACTICE
Using the trimmed down clips from Objective 2, participants should practice merging clips together using
transitions effects. Instruct them to play around with transition types and adjusting the speed.
PEER FEEDBACK
Ask the students to work in pairs with their neighbors to evaluate whether they successfully merged the clips
and inserted transitions.
Student Materials Page 15
Objective #4: Given either two video clips or two pictures, insert a slide for transitioning
purposes. The transition point must offer either: a flow between two topics, a contrast between
two different images, or a teaching point being further expounded upon.
PROJECTED TIME BREAKDOWN: 15 MINUTES
Observation: 2 minutes
Discussion: 2 minutes
Instruction: 4 minutes
Practice: 4 minutes
Peer Feedback: 3 minutes
OBSERVATION AND DISCUSSION
OBSERVATION
Show an example video clip where title cards make clear transitions between concepts, topics of scenarios.
Example: https://www.youtube.com/watch?v=lRDrIrbN_H4&feature=related
DISCUSSION
Ask participants to think back to what they know about the fundamentals of teaching, and to use that to
consider why using titles cards is important.
Sets a context for the learner
Prepares the learner to expect the input, allowing them to focus on the language they encounter
Activates multiple learning modalities by presenting the language visually in addition to aurally
(when given in target language)
Gives extra information, filling in the blanks the video left out
INSTRUCTION
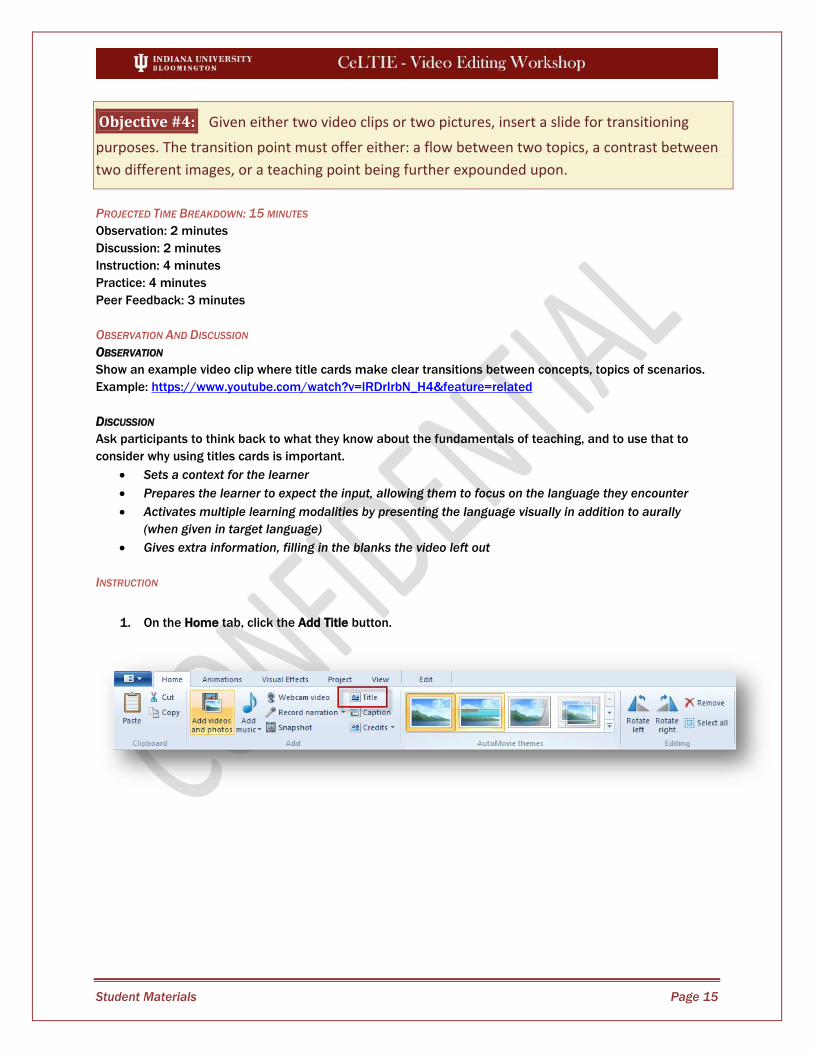
1. On the Home tab, click the Add Title button.
Student Materials Page 16
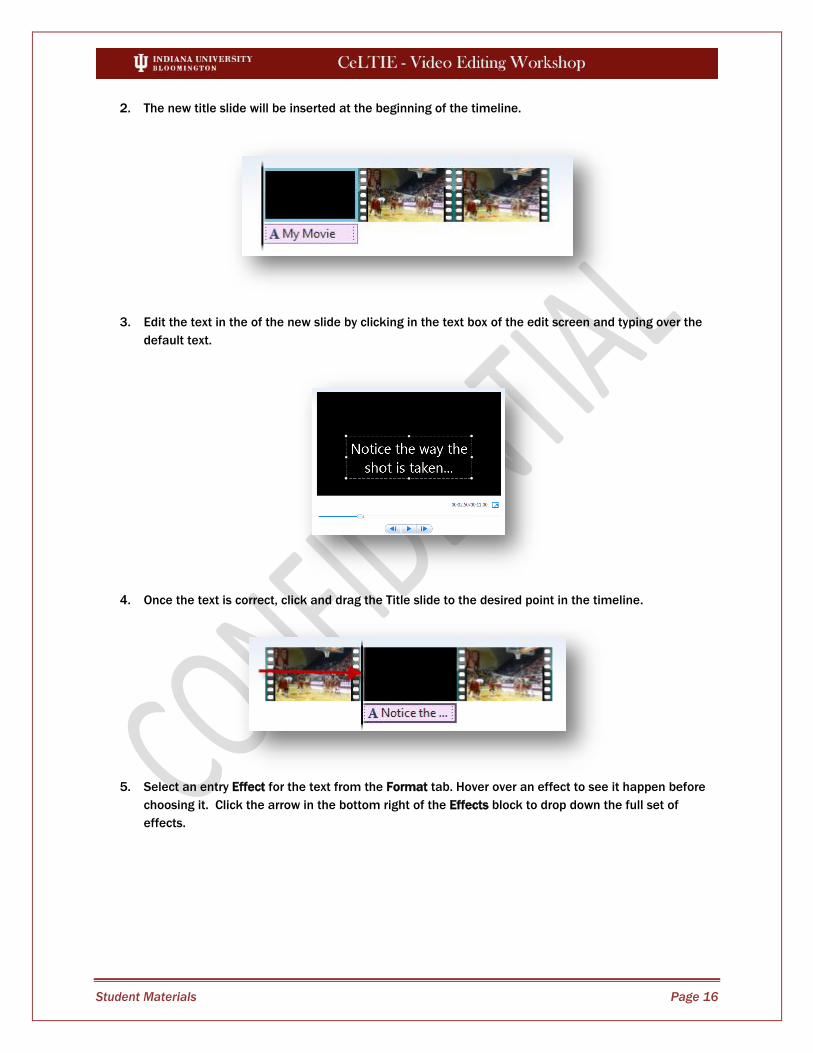
2. The new title slide will be inserted at the beginning of the timeline.
3. Edit the text in the of the new slide by clicking in the text box of the edit screen and typing over the
default text.
4. Once the text is correct, click and drag the Title slide to the desired point in the timeline.
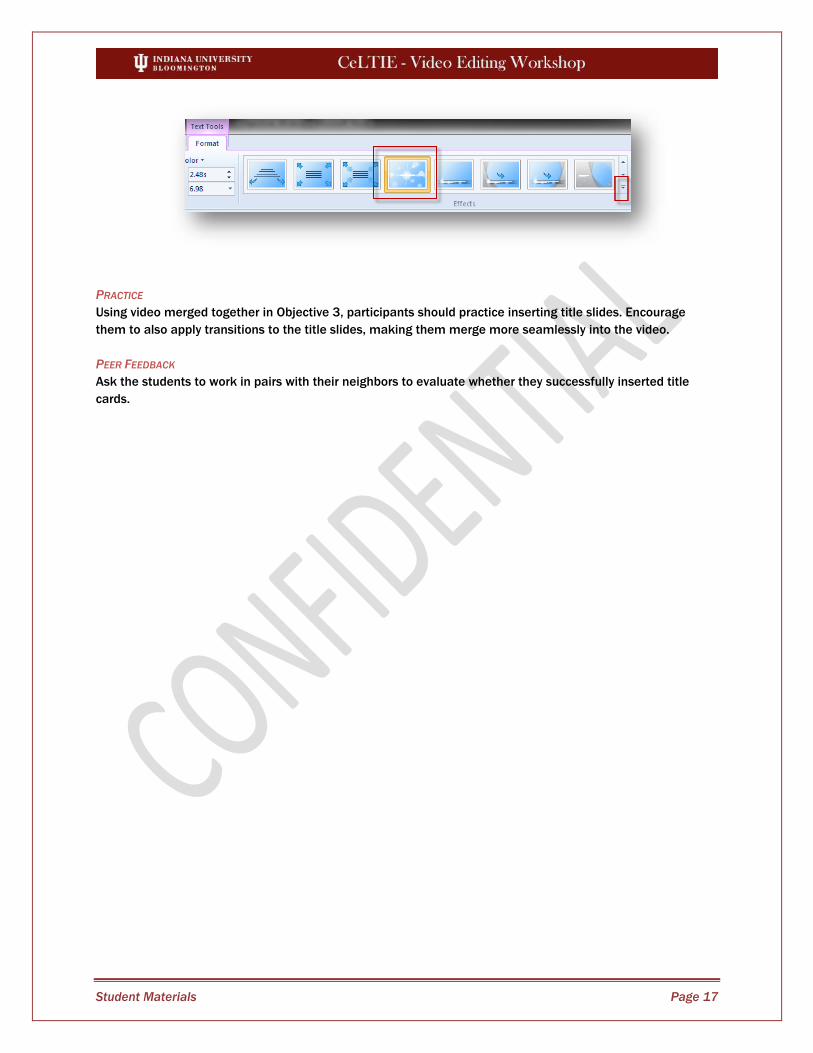
5. Select an entry Effect for the text from the Format tab. Hover over an effect to see it happen before
choosing it. Click the arrow in the bottom right of the Effects block to drop down the full set of
effects.
Student Materials Page 17
PRACTICE
Using video merged together in Objective 3, participants should practice inserting title slides. Encourage
them to also apply transitions to the title slides, making them merge more seamlessly into the video.
PEER FEEDBACK
Ask the students to work in pairs with their neighbors to evaluate whether they successfully inserted title
cards.
Student Materials Page 18
Objective #5: Given a video clip, take a still picture from the video, ensuring the picture is in
focus and not blurred.
PROJECTED TIME BREAKDOWN: 8 MINUTES
Observation: N/A
Discussion: 2 minutes
Instruction: 2 minutes
Practice: 2 minutes
Peer Feedback: 2 minutes
OBSERVATION AND DISCUSSION
OBSERVATION
N/A
DISCUSSION
What are some advantages of being able to take still pictures from a video?
To create study materials
To create test items
When creating videos from still pictures instead of live action clips
You don’t have to worry about stopping recording to take still pictures during the actual documenting
process.
INSTRUCTION
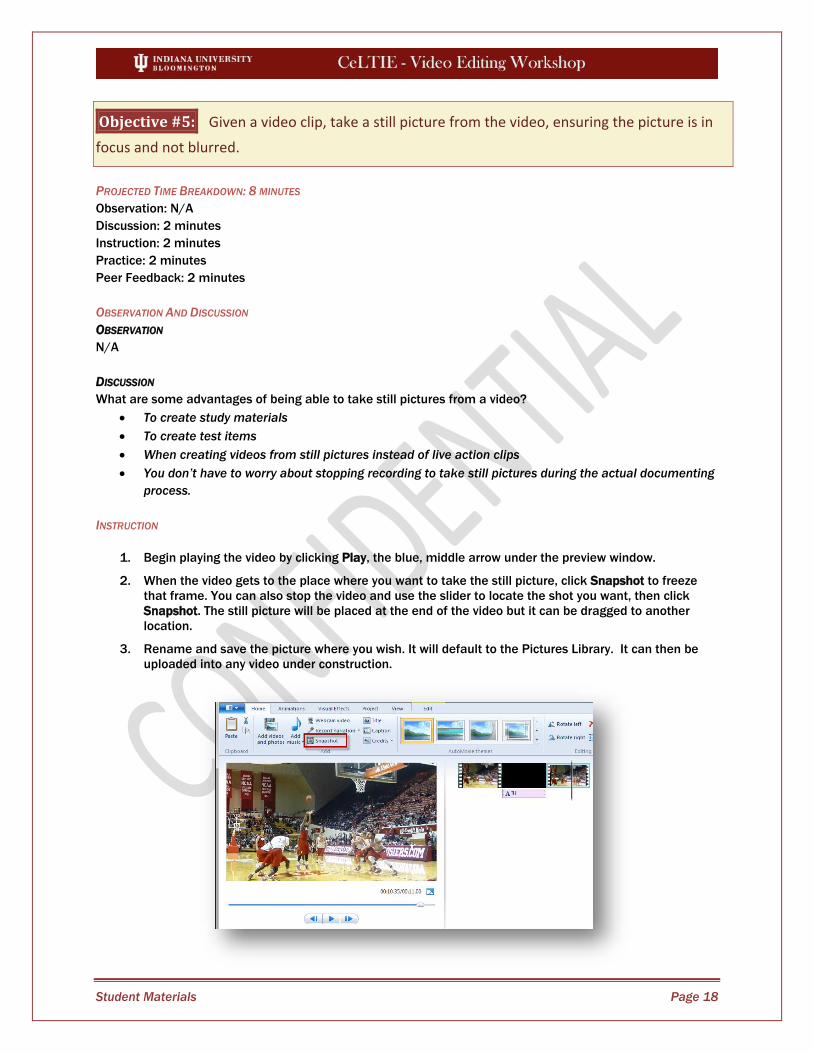
1. Begin playing the video by clicking Play, the blue, middle arrow under the preview window.
2. When the video gets to the place where you want to take the still picture, click Snapshot to freeze
that frame. You can also stop the video and use the slider to locate the shot you want, then click
Snapshot. The still picture will be placed at the end of the video but it can be dragged to another
location.
3. Rename and save the picture where you wish. It will default to the Pictures Library. It can then be
uploaded into any video under construction.
Student Materials Page 19
PRACTICE
Using any of the clips used so far, participants should practice taking still images from the video.
PEER FEEDBACK
Ask the students to work in pairs with their neighbors to evaluate whether they successfully captured still
images.

Student Materials Page 20
Objective #6: Given a video clip or picture, add text to the item. This will be done by adding, at
a minimum, one caption, title, or credit.
PROJECTED TIME BREAKDOWN: 15 MINUTES
Observation: 2 minutes
Discussion: 4 minutes
Instruction: 3 minutes
Practice: 4 minutes
Peer Feedback: 2 minutes
OBSERVATION AND DISCUSSION
OBSERVATION
Show a non-example video clip with poorly used text or no text. Example:
http://www.youtube.com/watch?v=zNOy1hA5cjQ
DISCUSSION
Ask participants to discuss what they liked and didn’t like about the use of text in the video.
The text was in the L1 instead of the target language.
Too much text will cause students to just read the input, and really listen to it.
The text wasn’t readable (crazy font, too small, not enough contrast).
Poor input: misspellings, poor grammar, etc.
From a pedagogical standpoint, what are some pros and cons of using L1 vs. using the target language in
instructional videos?
Using L1 instead of the target language is using the grammar translation approach instead of the
communicative method.
Using target language text reinforces their listening skills in the target language.
Using L1 might make a more complicated video (abstract thinking, higher degree of complexity)
more accessible to lower level students.
INSTRUCTION
1. To add a title, position the vertical bar where you wish to insert the title slide. On the Home tab, click
the Title button to add a title slide with a text box. Enter your title text.
1. To add a caption, select the video clip or still image. On the Home tab, click the Caption button to
add text that displays over the selected video or photo. Enter your caption text.
2. To add a credit, on the Home tab, click to open the Credits pop-up menu and choose the type of
credit slide to add. Credits are added at the end of the movie. Enter your credit slide text.
Student Materials Page 21
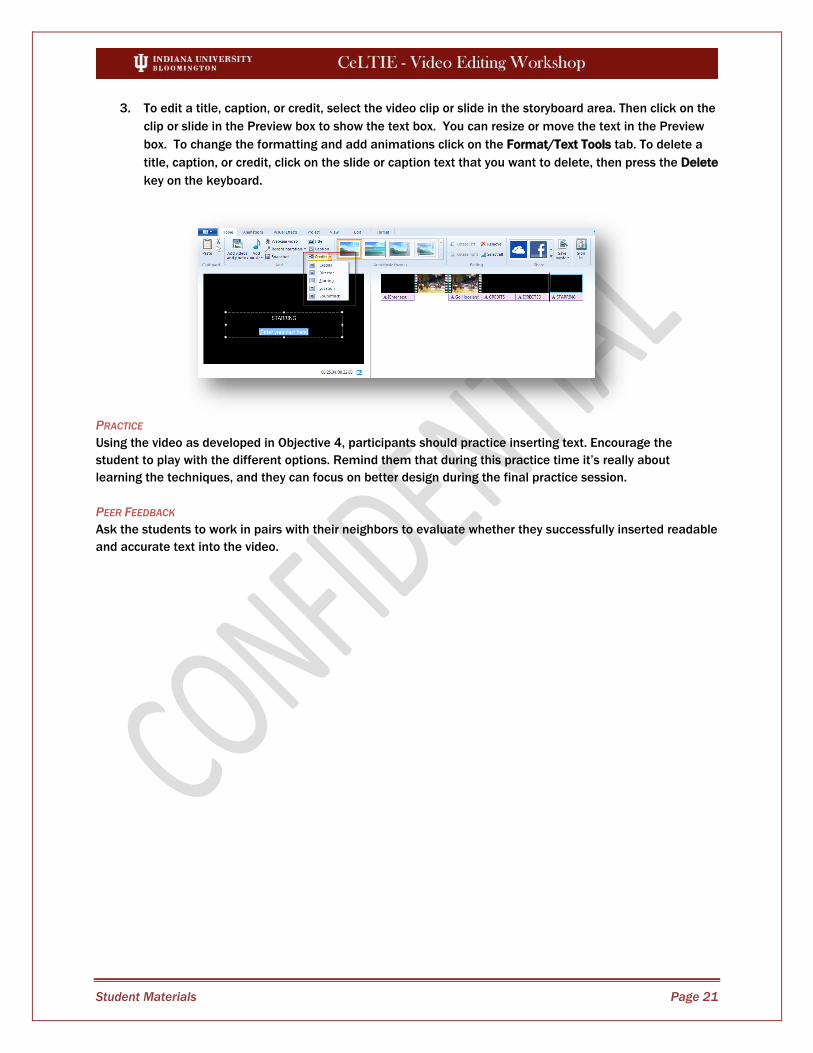
3. To edit a title, caption, or credit, select the video clip or slide in the storyboard area. Then click on the
clip or slide in the Preview box to show the text box. You can resize or move the text in the Preview
box. To change the formatting and add animations click on the Format/Text Tools tab. To delete a
title, caption, or credit, click on the slide or caption text that you want to delete, then press the Delete
key on the keyboard.
PRACTICE
Using the video as developed in Objective 4, participants should practice inserting text. Encourage the
student to play with the different options. Remind them that during this practice time it’s really about
learning the techniques, and they can focus on better design during the final practice session.
PEER FEEDBACK
Ask the students to work in pairs with their neighbors to evaluate whether they successfully inserted readable
and accurate text into the video.
Student Materials Page 22
Objective #7: Given a video clip and Movie Maker Live software, manipulate the video’s
sound, by either adjusting the volume, creating a fading volume, or by using sound to transition
between scenes.
PROJECTED TIME BREAKDOWN: 15 MINUTES
Observation: 2 minutes
Discussion: 4 minutes
Instruction: 3 minutes
Practice: 4 minutes
Peer Feedback: 2 minutes
OBSERVATION AND DISCUSSION
OBSERVATION
Show a non-example video clip with poor sound attributes. Example:
https://www.youtube.com/watch?v=cTv0hd4PciM&feature=endscreen&NR=1
DISCUSSION
Ask participants what complaints they had about the sound of the video, and what things they would do to
change it, if possible.
There was excess background noise (wind) - unfortunately this is a production problem
One person (the waitress) in the video’s speaking is not as loud as the others (the patrons)
Students have to strain to hear input
INSTRUCTION
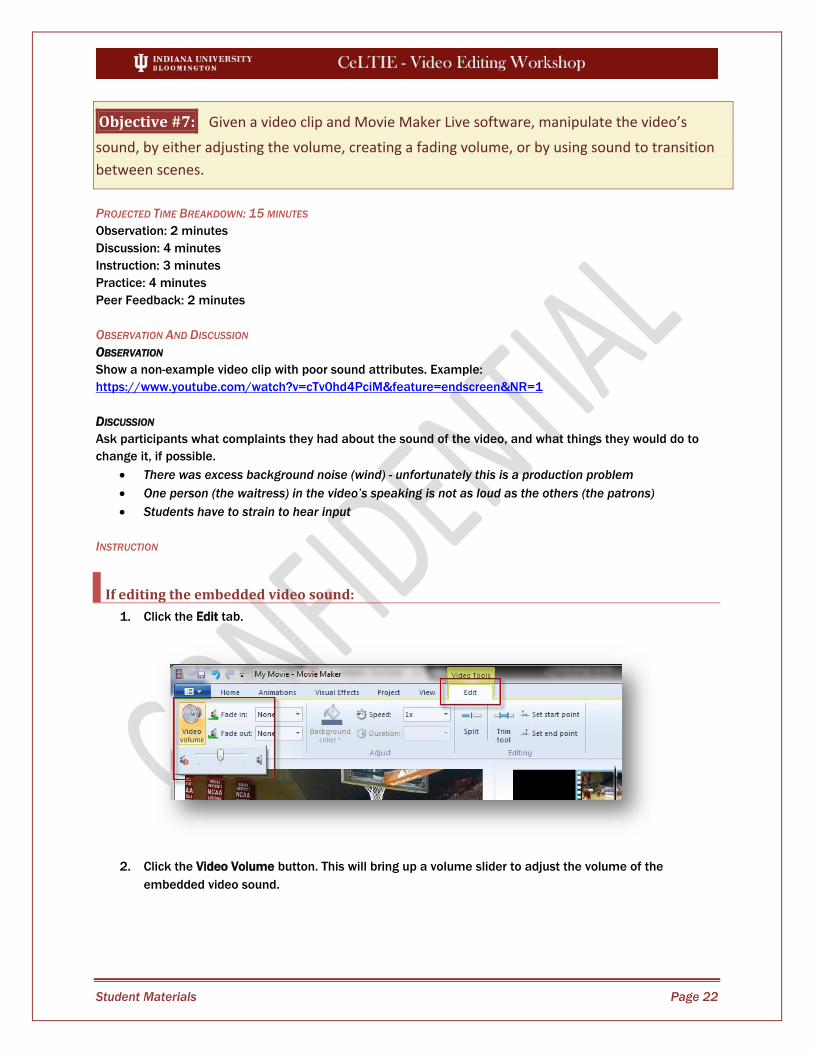
If editing the embedded video sound:
1. Click the Edit tab.
2. Click the Video Volume button. This will bring up a volume slider to adjust the volume of the
embedded video sound.
Student Materials Page 23
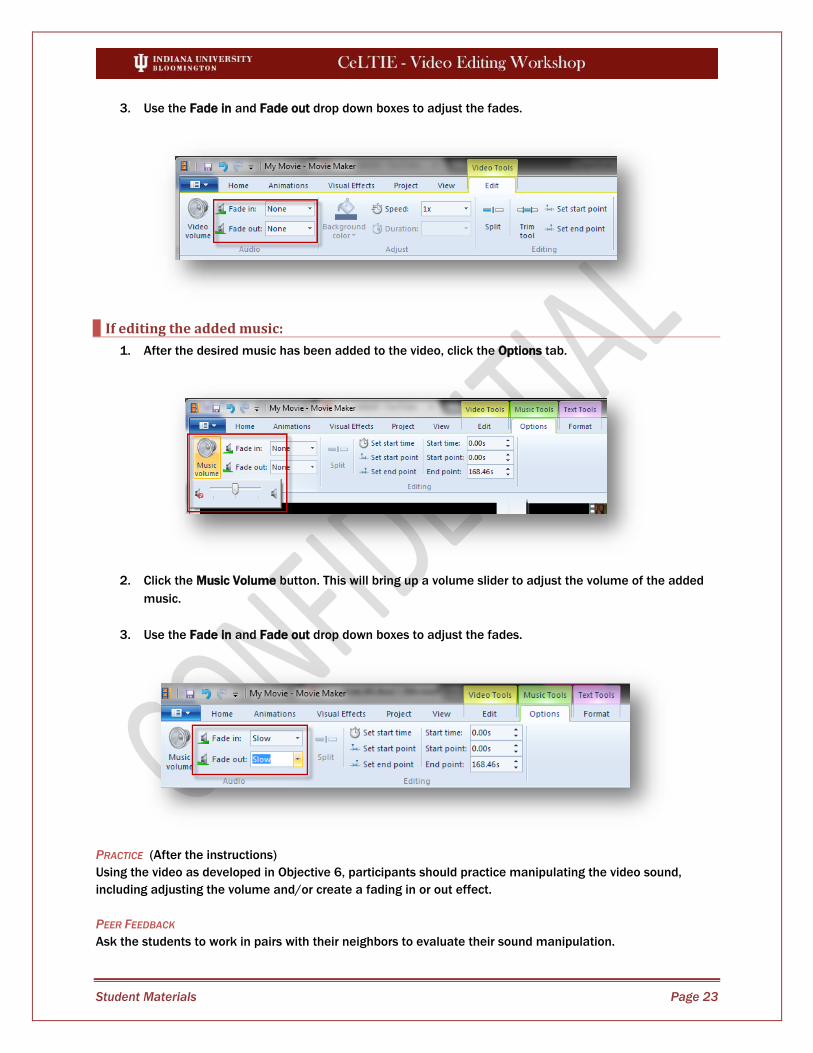
3. Use the Fade in and Fade out drop down boxes to adjust the fades.
If editing the added music:
1. After the desired music has been added to the video, click the Options tab.
2. Click the Music Volume button. This will bring up a volume slider to adjust the volume of the added
music.
3. Use the Fade in and Fade out drop down boxes to adjust the fades.
PRACTICE (After the instructions)
Using the video as developed in Objective 6, participants should practice manipulating the video sound,
including adjusting the volume and/or create a fading in or out effect.
PEER FEEDBACK
Ask the students to work in pairs with their neighbors to evaluate their sound manipulation.
Student Materials Page 24
Objective #8: Given a video clip and Movie Maker Live software, and sound clip, add
complementary sound to the video, by either (1) adding music to the video, (2) adding a sound
effect to the video, or (3) adding a voiceover recording. Either choice selected must provide an
enhancement to the video in some way and not be a distraction from the video content.
PROJECTED TIME BREAKDOWN: 10 MINUTES
Observation: 2 minutes
Discussion: 2 minutes
Instruction: 2 minutes
Practice: 2 minutes
Peer Feedback: 2 minutes
OBSERVATION AND DISCUSSION
OBSERVATION
Show an example video clip which demonstrates complementary sound that was added. Example:
http://vimeo.com/33688247
DISCUSSION
What was good or bad about the way sound was added?
The music adds ambience, however it is very light, non-distracting and does not overpower the
language input from the video.
Voiceover used on the recipe cards
Ask participants to consider what some of the pedagogical implications are of adding sound.
By adding voiceover, one could really use any images or video and make an instruction video in the
target language by turning down the original sound. Great for narrations, descriptions, storytelling,
etc.
Adding a light (non-distracting or obstructive) culturally significant music track to a video passively
adds another layer of cultural information
INSTRUCTION
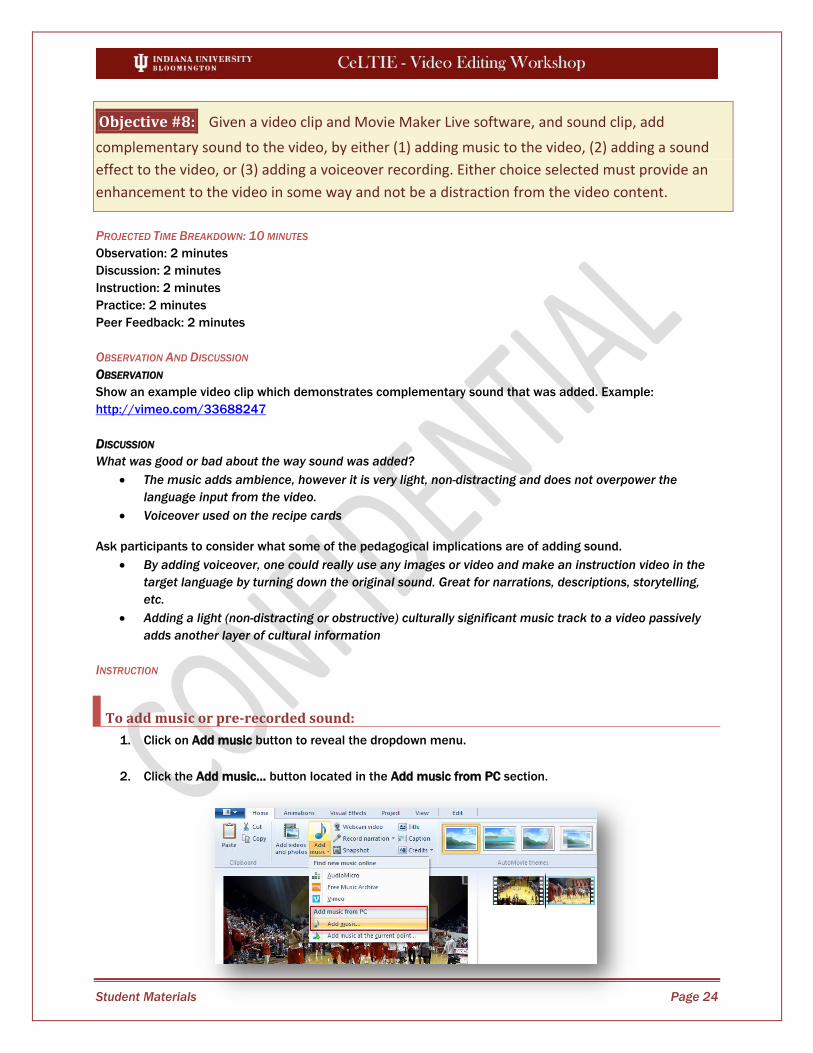
To add music or pre-recorded sound:
1. Click on Add music button to reveal the dropdown menu.
2. Click the Add music… button located in the Add music from PC section.
Student Materials Page 25
3. Navigate to the desired sound file on your hard drive. Select the sound clip and press the Open
button. The sound file will be automatically inserted into the movie. This is represented by the green
sound waves at the bottom of the active clip.
4. You can now press the Play button and hear the newly added sound with your movie clip.
PRACTICE
Using the video as developed in Objective 7, participants should practice adding a music track, a sound
effect, or a voiceover recording.
PEER FEEDBACK
Ask the students to work in pairs with their neighbors to evaluate their sound addition.
Student Materials Page 26
Part 3: Saving and Publication
Objective #9: Given a completed draft of a video or picture(s) and Movie Maker Live software,
choose the correct format for publishing. The format chosen must include all the editing changes
made and be able to be uploaded to a website or burned to a CD or DVD as directed.
PROJECTED TIME BREAKDOWN: 10 MINUTES
Observation: N/A
Discussion: 2 minutes
Instruction: 3 minutes
Practice: 5 minutes
Peer Feedback: N/A
OBSERVATION AND DISCUSSION
OBSERVATION
N/A
DISCUSSION
Why is saving properly and in the correct format important?
If not saved properly, you might not be able to use the video the way you want.
If you save with too high of resolution, it is unnecessarily slow to upload and processing speed.
If you save with too low of resolution, it will affect the quality of the video, making it pixelated or
blurry. This can affect students’ ability to read inserted text and/or make smooth transitions appear
rough and jumpy.
INSTRUCTION
When you have completed your project, and you are ready to publish it, you will need to save your work as a
Movie Maker project.
To save project:
A project is a data file used to create a movie. It’s the editable file that you will need to keep if you want to
make changes to the movie later.
1. Click on the Movie Maker Menu button, at the top left of the Ribbon, to the left of the Home tab.
Choose Save Project As in the drop down menu.
2. Type in an appropriate and descriptive name in the File name: box. Then click Save. Be sure to note
where you are saving the file.
Student Materials Page 27
To save as a movie:
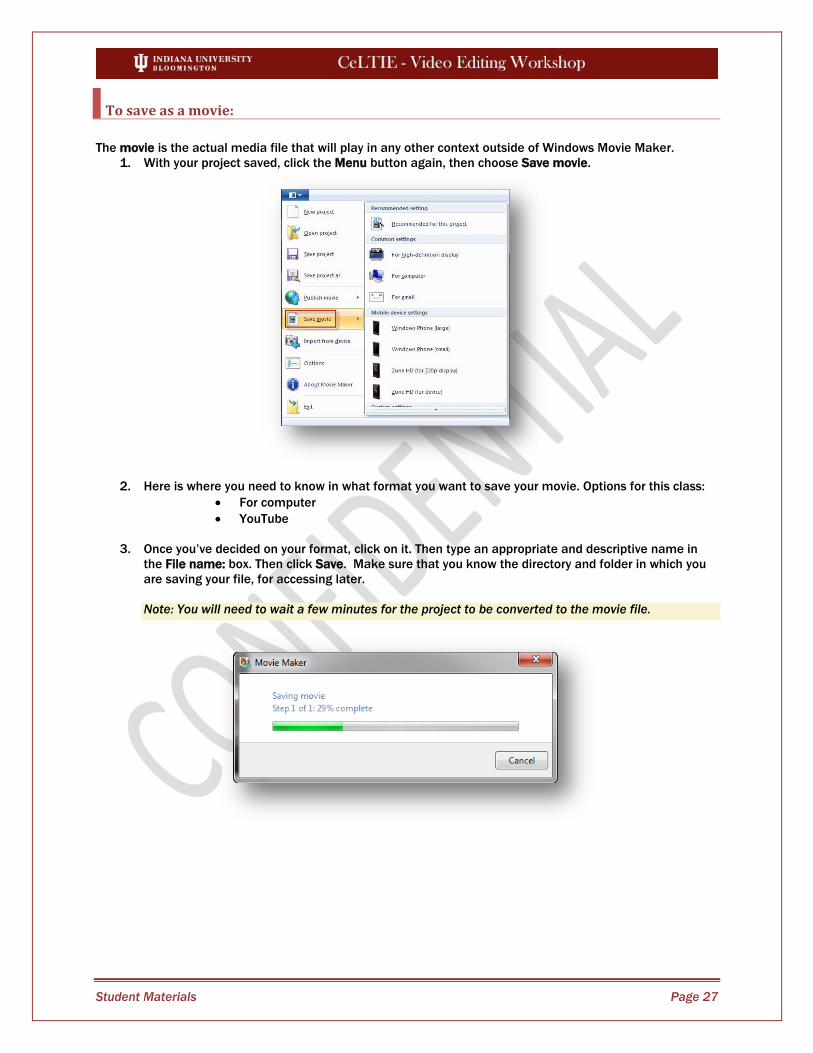
The movie is the actual media file that will play in any other context outside of Windows Movie Maker.
1. With your project saved, click the Menu button again, then choose Save movie.
2. Here is where you need to know in what format you want to save your movie. Options for this class:
For computer
YouTube
3. Once you’ve decided on your format, click on it. Then type an appropriate and descriptive name in
the File name: box. Then click Save. Make sure that you know the directory and folder in which you
are saving your file, for accessing later.
Note: You will need to wait a few minutes for the project to be converted to the movie file.
Student Materials Page 28
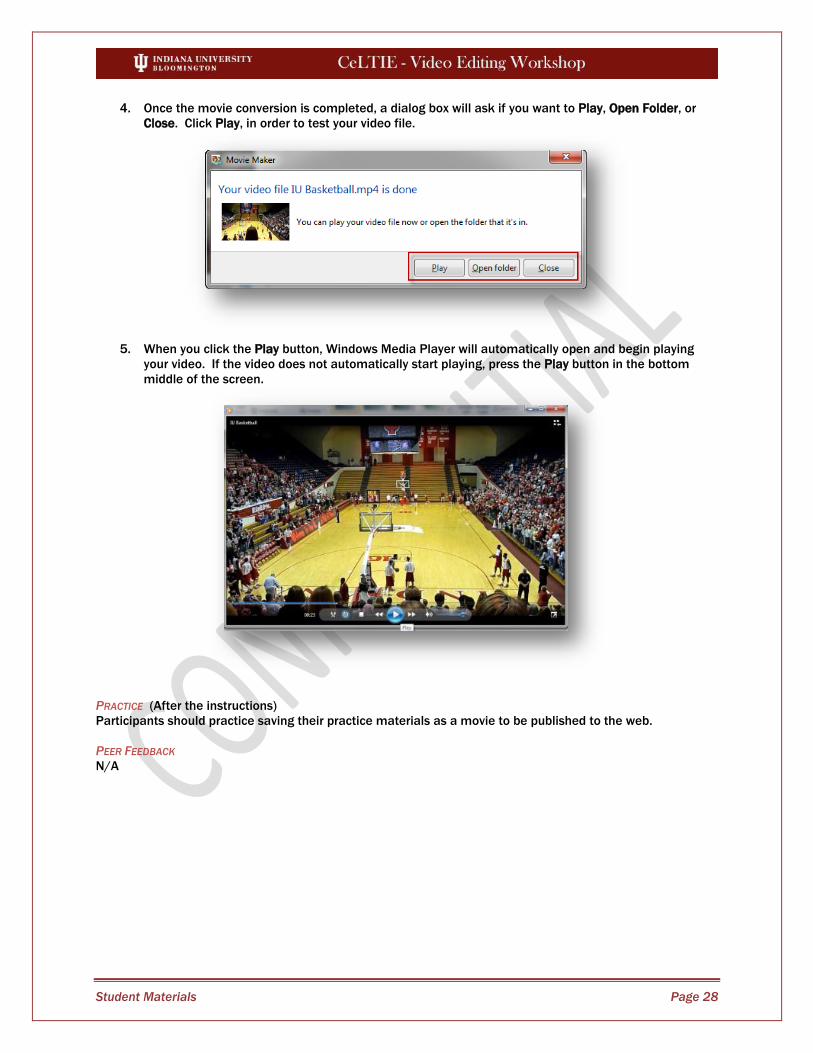
4. Once the movie conversion is completed, a dialog box will ask if you want to Play, Open Folder, or
Close. Click Play, in order to test your video file.
5. When you click the Play button, Windows Media Player will automatically open and begin playing
your video. If the video does not automatically start playing, press the Play button in the bottom
middle of the screen.
PRACTICE (After the instructions)
Participants should practice saving their practice materials as a movie to be published to the web.
PEER FEEDBACK
N/A
Student Materials Page 29
Objective #10: Given a completed and formatted draft of a movie/video, publish the video.
This will be done by uploading the media to YouTube or a DVD. The media will be published without any degradation or loss of information to the content or format.
PROJECTED TIME BREAKDOWN: 15 MINUTES
Observation: N/A
Discussion: 2 minutes
Instruction: 4 minutes
Practice: 5 minutes
Peer Feedback: 4 minutes
OBSERVATION AND DISCUSSION
OBSERVATION
N/A
DISCUSSION
Ask participants to discuss the benefits of uploading a video online (to a site such as YouTube or Vimeo)
versus saving to a DVD.
o DVDs can be played in a DVD player and tend to have higher video quality, but burning DVDs for all of
your students could get expensive.
o DVDs are not as portable and easily accessible as online materials.
o You can only access online materials when you have an internet connection
o Uploading to a public site (if you allow your materials to be viewed by the public), you are sharing
your materials with other language learners and instructors to use
INSTRUCTION
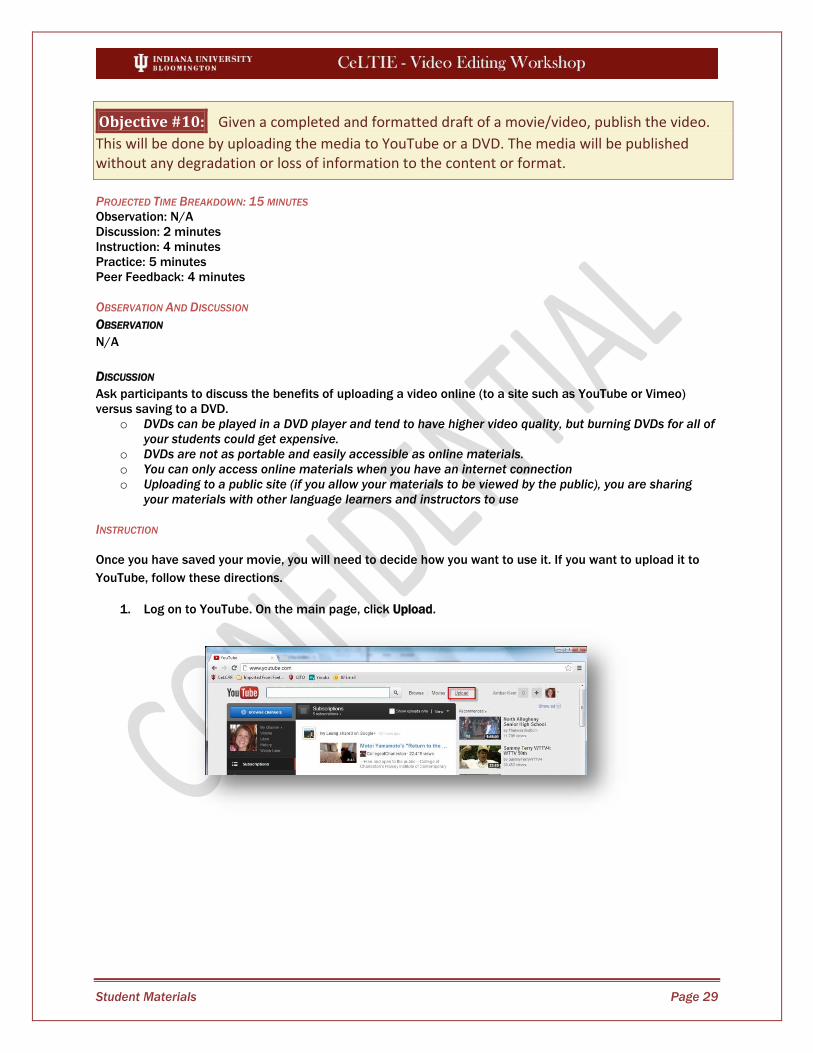
Once you have saved your movie, you will need to decide how you want to use it. If you want to upload it to
YouTube, follow these directions.
1. Log on to YouTube. On the main page, click Upload.
Student Materials Page 30
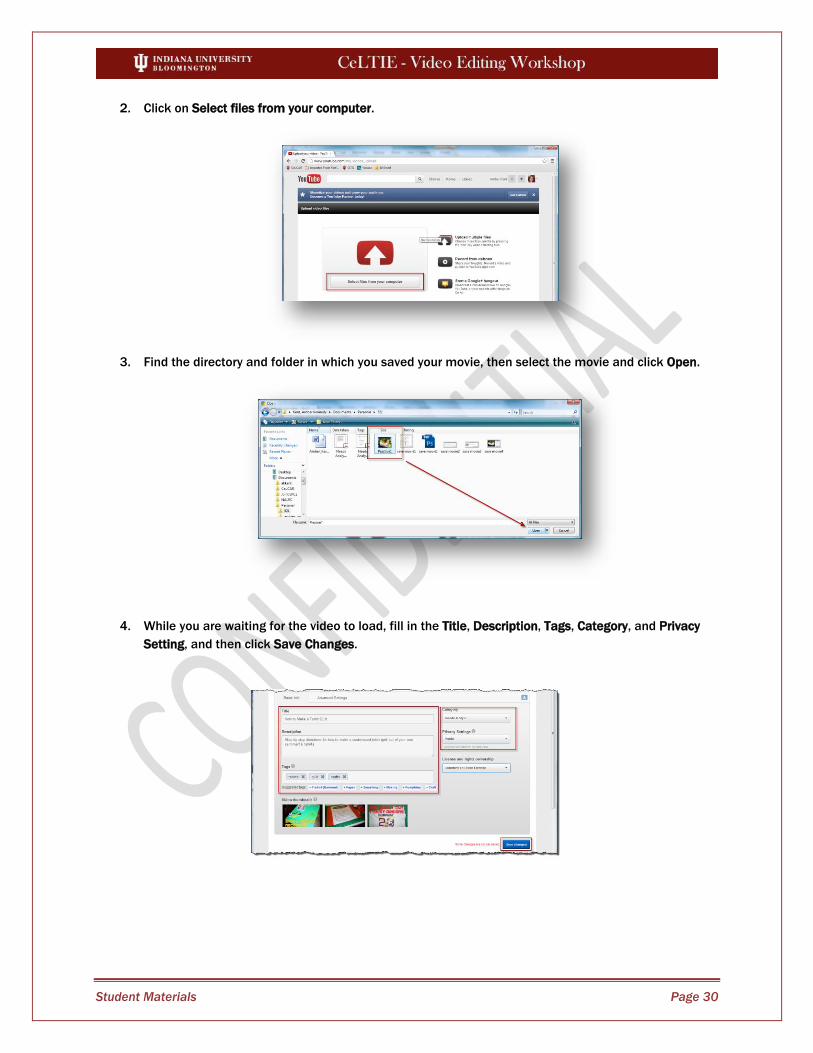
2. Click on Select files from your computer.
3. Find the directory and folder in which you saved your movie, then select the movie and click Open.
4. While you are waiting for the video to load, fill in the Title, Description, Tags, Category, and Privacy
Setting, and then click Save Changes.
Student Materials Page 31
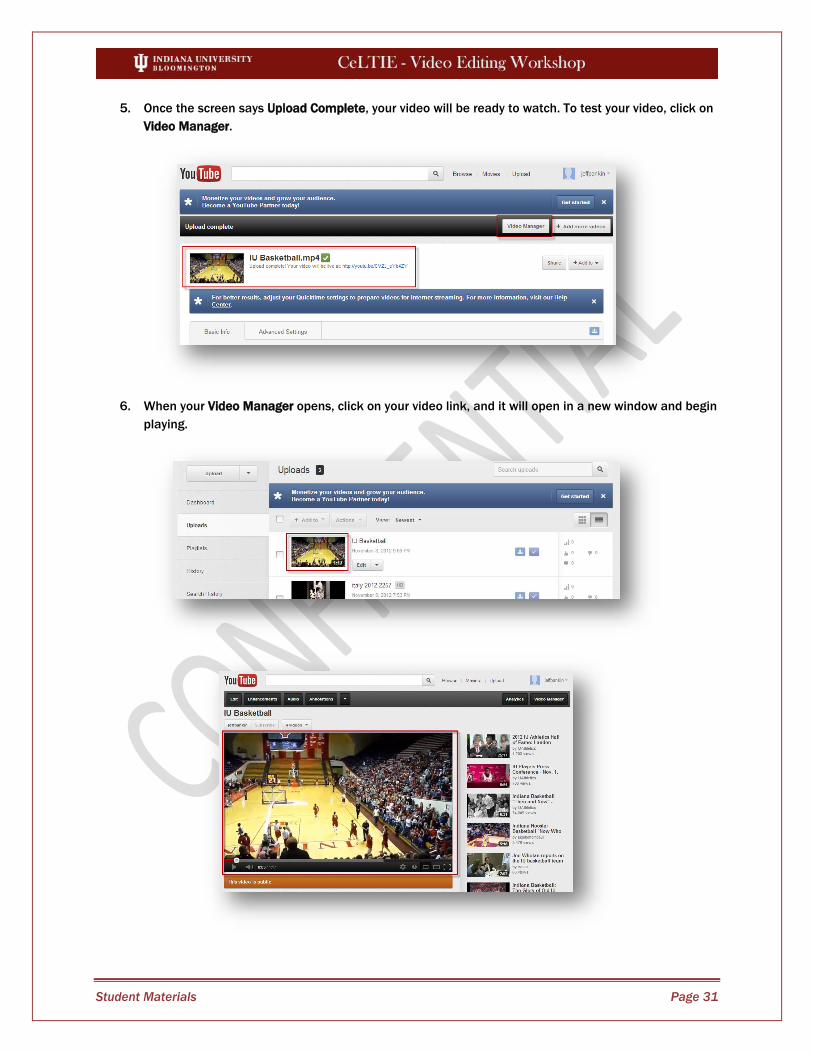
5. Once the screen says Upload Complete, your video will be ready to watch. To test your video, click on
Video Manager.
6. When your Video Manager opens, click on your video link, and it will open in a new window and begin
playing.
Student Materials Page 32
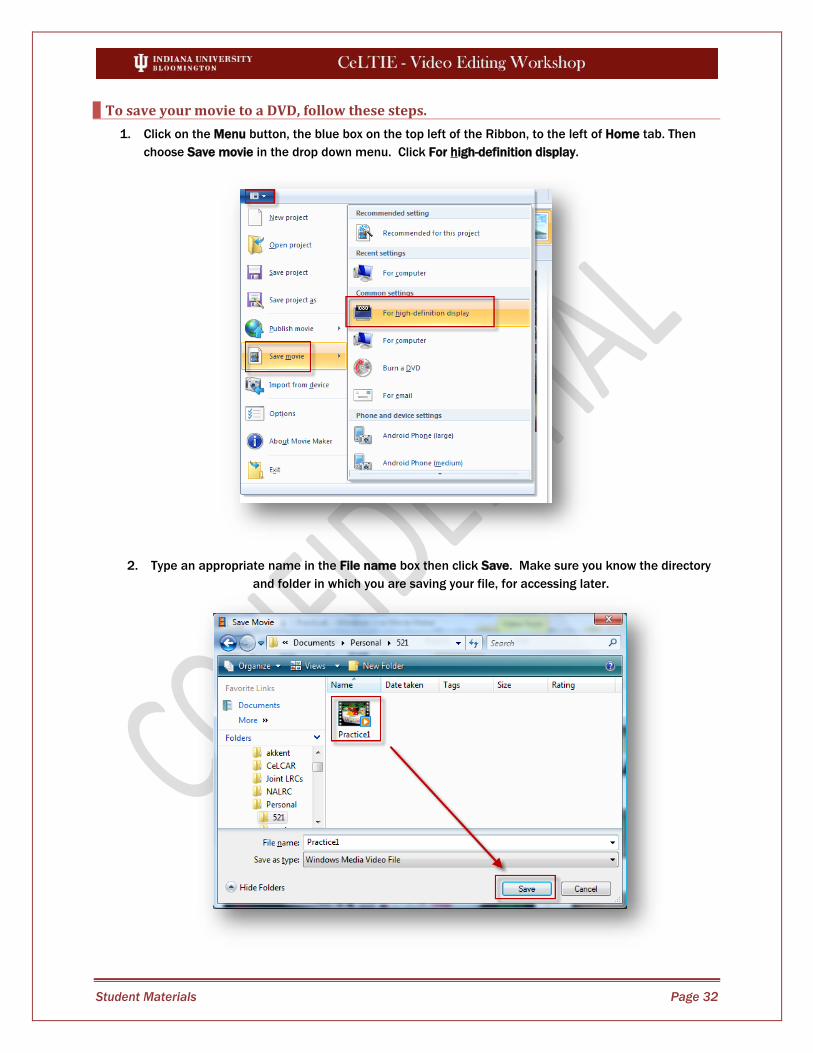
To save your movie to a DVD, follow these steps.
1. Click on the Menu button, the blue box on the top left of the Ribbon, to the left of Home tab. Then
choose Save movie in the drop down menu. Click For high-definition display.
2. Type an appropriate name in the File name box then click Save. Make sure you know the directory
and folder in which you are saving your file, for accessing later.
Student Materials Page 33
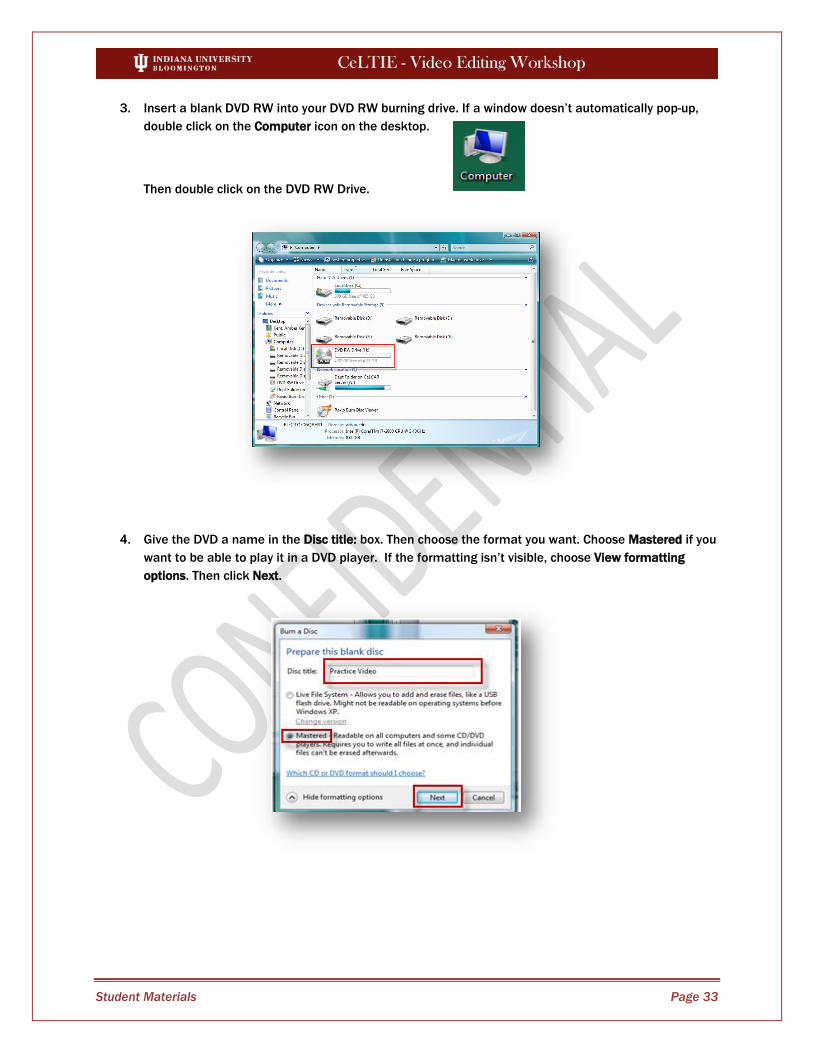
3. Insert a blank DVD RW into your DVD RW burning drive. If a window doesn’t automatically pop-up,
double click on the Computer icon on the desktop.
Then double click on the DVD RW Drive.
4. Give the DVD a name in the Disc title: box. Then choose the format you want. Choose Mastered if you
want to be able to play it in a DVD player. If the formatting isn’t visible, choose View formatting
options. Then click Next.

Student Materials Page 34
5. Now, locate the video you want to burn. If that folder isn’t already open, you will need to open it. Drag
the video into the DVD RW Drive’s window.
6. In the DVD RW Drive’s window, click Burn to disc on the toolbar. When the dialog box opens, click
Next.
Student Materials Page 35
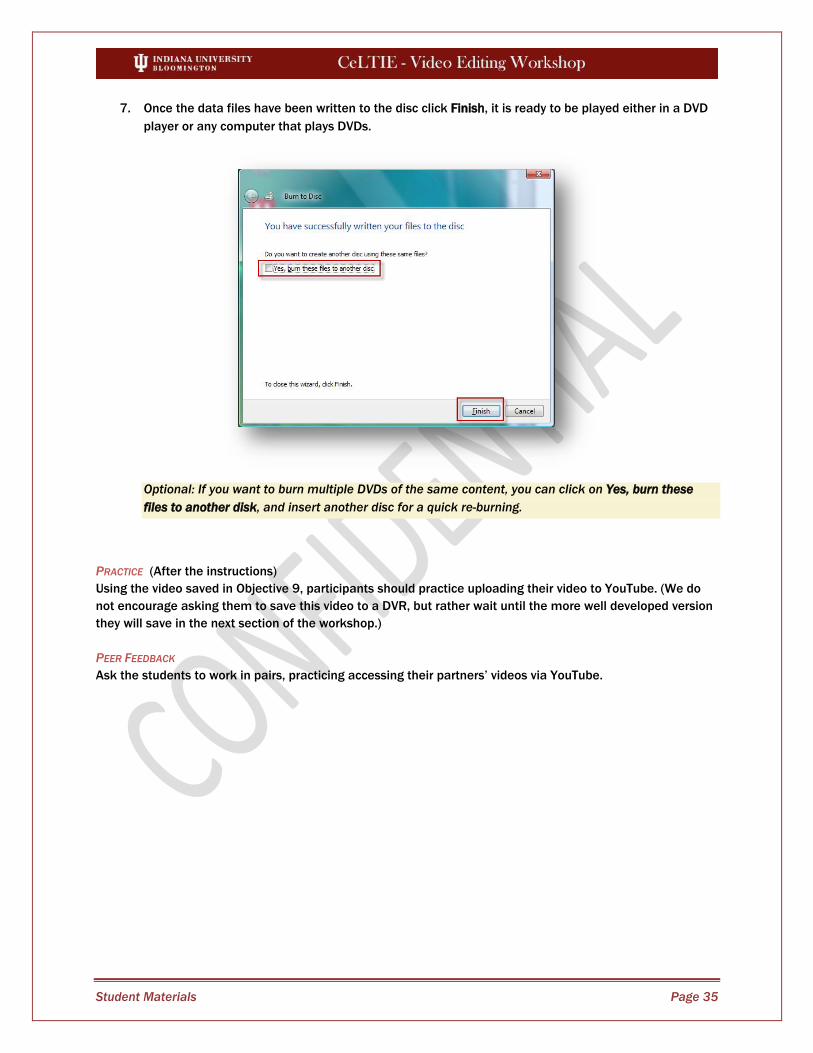
7. Once the data files have been written to the disc click Finish, it is ready to be played either in a DVD
player or any computer that plays DVDs.
Optional: If you want to burn multiple DVDs of the same content, you can click on Yes, burn these
files to another disk, and insert another disc for a quick re-burning.
PRACTICE (After the instructions)
Using the video saved in Objective 9, participants should practice uploading their video to YouTube. (We do
not encourage asking them to save this video to a DVR, but rather wait until the more well developed version
they will save in the next section of the workshop.)
PEER FEEDBACK
Ask the students to work in pairs, practicing accessing their partners’ videos via YouTube.
Student Materials Page 36
Practice
Description of assignment goes here:
Student Materials Page 37
Appendix A. Pre-Workshop Email
Dear Registrant,
Thank you so much for registering for the Video Editing Workshop being hosted at CeLTIE (Ballentine Hall 115)
on Wednesday November 14th from 2:30-5:30.
In order to make the most efficient use of the workshop time, we ask that before Wednesday you do the following
things:
1. Sign up for a YouTube account (if you do not already have one).
a. Attached are step-by-step directions for how to create a new YouTube account.
b. Record your user name and password and bring it with you to the workshop.
c. If you need technical help creating an account, please email Jeff Pankin at [email protected].
2. Bring some video clips and/or pictures.
a. You can bring a digital camera or smart phone with you to upload (if so, make sure you have the
appropriate power cables) or bring materials on a USB or CD.
b. If you don’t have video or pictures to bring, you may use the generic ones we will have available.
c. Videos clips should be no more than approximately 3-4 minutes in length.
d. Ideally videos should be relevant subject matter to your language classroom (people talking, an
interview, cultural activity, etc.)
e. These videos should be YOURS so there should be no copyright infringement.
3. Bring a DVD-RW for burning your finished product.
4. Email Amber Kent at [email protected] the following details about yourself:
In which department do you teach?
What language (and levels) do you teach?
Are you a native English speaker? If not, what is your native language?
Lastly, please understand that this workshop is a pilot workshop with a limited number of participants, and it is
imperative that all participants be present for the entire workshop. So if you must arrive late, leave early, or find you
are unable to attend for any reason, please notify Amber Kent ASAP so that she may find someone else to take
your place.
Sincerely,
Amber Kent

Student Materials Page 38
Appendix B. Create a YouTube Account
Pre-Workshop: If you do not already have a YouTube account, you will need to sign up for a
free one. Follow the directions:
Note: You will be also creating a Google account at the same time. If you have an existing Google account,
then you will be able to skip these directions and use your Google ID to sign into YouTube.
How to Sign up For a YouTube Account
1. Go to http://www.youtube.com/
2. Click on Sign In
3. Then click on Create An Account
Student Materials Page 39
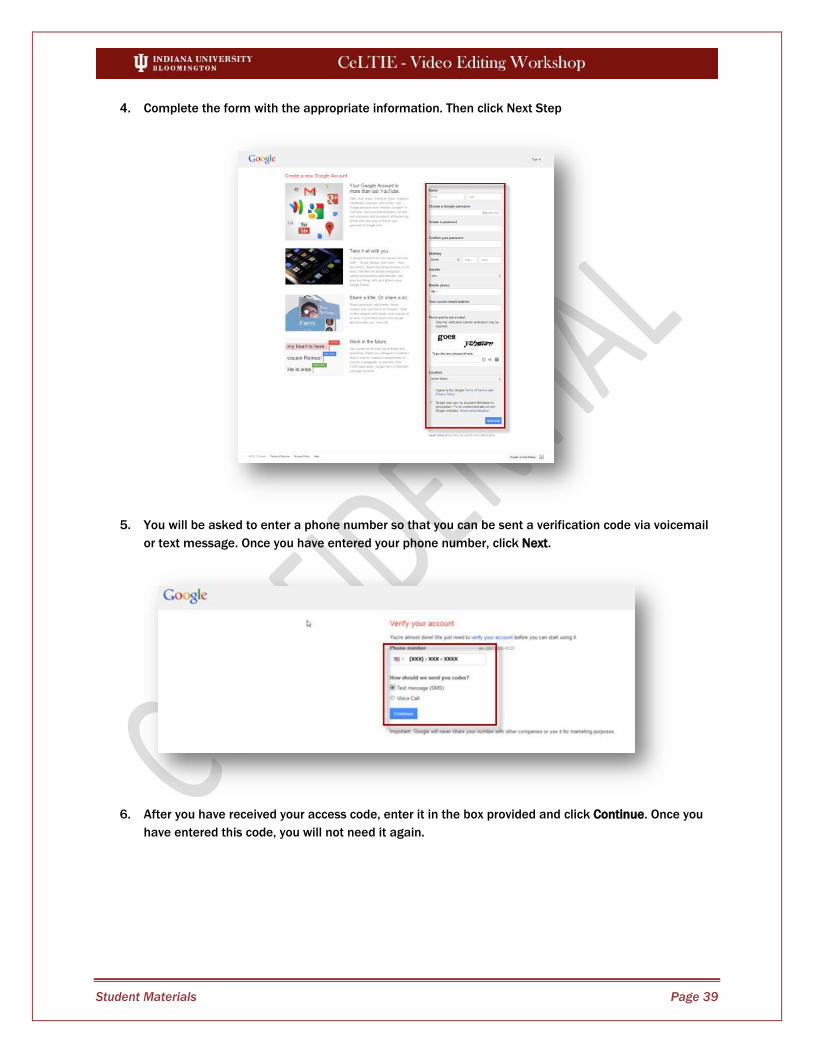
4. Complete the form with the appropriate information. Then click Next Step
5. You will be asked to enter a phone number so that you can be sent a verification code via voicemail
or text message. Once you have entered your phone number, click Next.
6. After you have received your access code, enter it in the box provided and click Continue. Once you
have entered this code, you will not need it again.
Student Materials Page 40
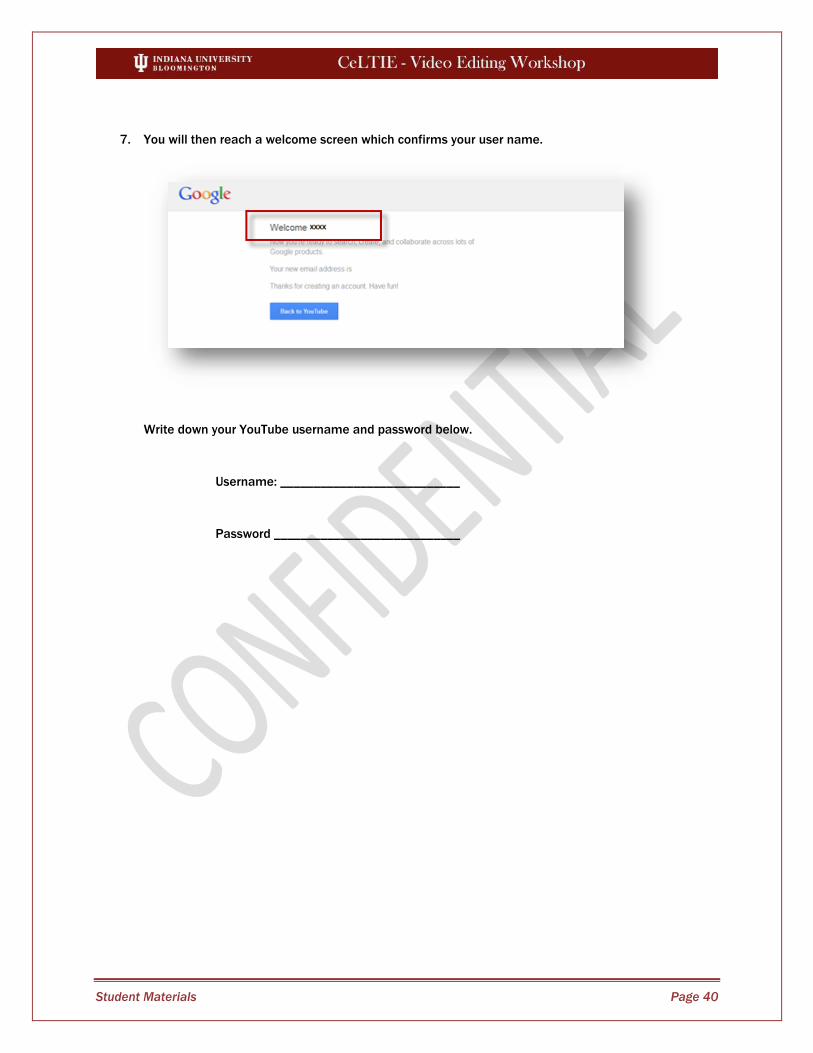
7. You will then reach a welcome screen which confirms your user name.
Write down your YouTube username and password below.
Username: ___________________________
Password ____________________________
Student Materials Page 41
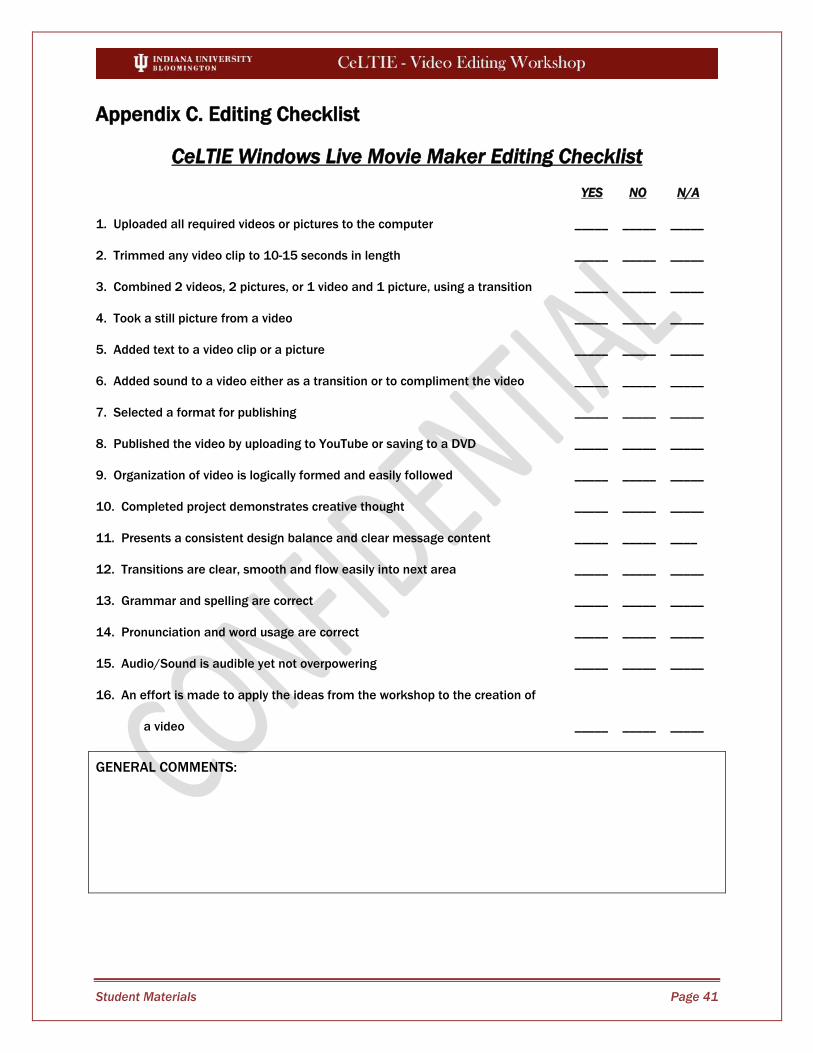
Appendix C. Editing Checklist
CeLTIE Windows Live Movie Maker Editing Checklist
YES NO N/A
1. Uploaded all required videos or pictures to the computer _____ _____ _____
2. Trimmed any video clip to 10-15 seconds in length _____ _____ _____
3. Combined 2 videos, 2 pictures, or 1 video and 1 picture, using a transition _____ _____ _____
4. Took a still picture from a video _____ _____ _____
5. Added text to a video clip or a picture _____ _____ _____
6. Added sound to a video either as a transition or to compliment the video _____ _____ _____
7. Selected a format for publishing _____ _____ _____
8. Published the video by uploading to YouTube or saving to a DVD _____ _____ _____
9. Organization of video is logically formed and easily followed _____ _____ _____
10. Completed project demonstrates creative thought _____ _____ _____
11. Presents a consistent design balance and clear message content _____ _____ ____
12. Transitions are clear, smooth and flow easily into next area _____ _____ _____
13. Grammar and spelling are correct _____ _____ _____
14. Pronunciation and word usage are correct _____ _____ _____
15. Audio/Sound is audible yet not overpowering _____ _____ _____
16. An effort is made to apply the ideas from the workshop to the creation of
a video _____ _____ _____
GENERAL COMMENTS:
Student Materials Page 42
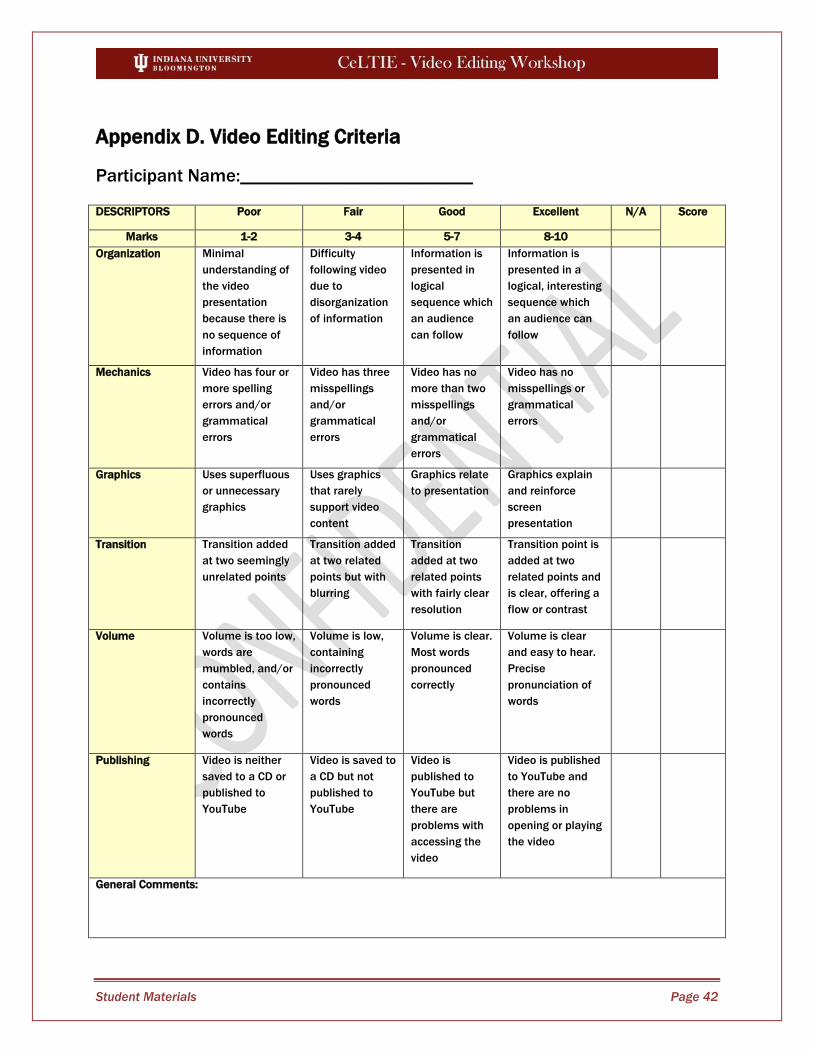
Appendix D. Video Editing Criteria
Participant Name:_________________________
DESCRIPTORS Poor Fair Good Excellent N/A Score
Marks 1-2 3-4 5-7 8-10
Organization Minimal
understanding of
the video
presentation
because there is
no sequence of
information
Difficulty
following video
due to
disorganization
of information
Information is
presented in
logical
sequence which
an audience
can follow
Information is
presented in a
logical, interesting
sequence which
an audience can
follow
Mechanics Video has four or
more spelling
errors and/or
grammatical
errors
Video has three
misspellings
and/or
grammatical
errors
Video has no
more than two
misspellings
and/or
grammatical
errors
Video has no
misspellings or
grammatical
errors
Graphics Uses superfluous
or unnecessary
graphics
Uses graphics
that rarely
support video
content
Graphics relate
to presentation
Graphics explain
and reinforce
screen
presentation
Transition Transition added
at two seemingly
unrelated points
Transition added
at two related
points but with
blurring
Transition
added at two
related points
with fairly clear
resolution
Transition point is
added at two
related points and
is clear, offering a
flow or contrast
Volume Volume is too low,
words are
mumbled, and/or
contains
incorrectly
pronounced
words
Volume is low,
containing
incorrectly
pronounced
words
Volume is clear.
Most words
pronounced
correctly
Volume is clear
and easy to hear.
Precise
pronunciation of
words
Publishing Video is neither
saved to a CD or
published to
YouTube
Video is saved to
a CD but not
published to
YouTube
Video is
published to
YouTube but
there are
problems with
accessing the
video
Video is published
to YouTube and
there are no
problems in
opening or playing
the video
General Comments:

Student Materials Page 43
Appendix E. Post-Workshop Survey
CeLTIE Windows Movie Maker Workshop Survey
1. What was the most effective aspect of this workshop?
2. What was th
3. e least effective aspect of this workshop?
3. How effective was the workshop’s content and activities in regards to authentic application?
___ 5 – Excellent ___ 4 – Above Average ___ 3 – Average ___ 2- Below Average ___ 1 – Ineffective
4. How effective were the requirements for the final product in regards to what you expected to learn from
the workshop?
___ 5 – Excellent ___ 4 – Above Average ___ 3 – Average ___ 2- Below Average ___ 1 – Ineffective
5. What level of importance do you feel creating and using learning videos plays in your teaching?
___ 5 – Highly Important ___ 4 – Somewhat important ___ 3 – Neither important or unimportant
___ 2 – Somewhat unimportant ___ 1 – Unimportant
6. Do you feel the assistance given to you during the workshop was:
_____ Excellent _____Sufficient _____Insufficient
7. Do you feel the information covered in this workshop and the student guide is beneficial in preparing you
to produce videos for your students? If not, why not?