Embed Size (px)
Citation preview
Microfluidics/ Bioengineering
Cell Biology
Biophysics
www.BioTechniques.com/rd1BioTechniques Rapid Dispatches doi: 10.2144/000113928
We describe the use of adhesive tape as a mold to fabricate poly(dimethylsiloxane) (PDMS) compartments with sub-milli-meter dimensions that we ultimately employed for patterning primary rat heart microvessel endothelial cells (MVECs) on a culture-treated Petri dish in order to perform a wound healing assay. Compared with conventional techniques of cell culture, cell patterning (see References 1 and 2 for reviews of cell patterning techniques) makes it possible to select the areas of a culture dish that are populated by one type of cell or another or by no cells. The ability to control the spatial organi-zation of mammalian cells has opened new routes for tissue engineering (3,4), for the study of intracellular mechanisms in single cells (5,6), intercellular communication in patterned co-cultures (7,8), and the devel-opment of cell-based sensors (9,10).
For patterning cells, researchers can opt for
microfabrication techniques (namely micro-patterning) capable to produce patterns with dimensions similar to those of biological cells (1–10); that is, down to a few micrometers. Micropatterning, however, requires the use of the photolithographic equipment typically available in a clean room, which limits its use by researchers who lack an expertise in microfabrication. Alternatively, a number of non-photolithographic approaches (for a review see Reference 11) have been proposed to pattern cells that do not require access to photolithography. Most of these clean room-free approaches involve (i) preparing a mold (normally called master) by non-photo-lithographic means, and (ii) casting PDMS to form a replica of the master—this later step is known as soft lithography (12). Reported non-photolithographic methods to fabricate masters include transferring the layout of the master onto a transparency with a photo-copier (13), with a printer of wax (14) or toner
(15), onto a thermoplastic polymer (Shrinky Dinks; 16) or a printed circuit board (17). The use of these methods for patterning cells, however, is limited in some cases because (13–15) the masters are too shallow—less than ~15 µm—and the resulting replicas do not allow cells to flow along such shallow cavities; in other cases (16,17), the materials required for producing the master are not commonly found in conventional biomedical laboratories.
We recently demonstrated that office adhesive tape, patterned by hand with a blade to the required shape, produced masters for soft lithography (18) quickly (~30 min), inexpensively (~$1 per master), readily (only materials and tools typically found in biomedical laboratories are required), and reproducibly (more than 50 PDMS replicas have been obtained from one single adhesive-tape master). In this paper, we show that soft-lithographic
Adhesive-tape soft lithography for patterning mammalian cells: application to wound-healing assaysAnil B. Shrirao1, Ali Hussain2, Cheul H. Cho2, and Raquel Perez-Castillejos2
1Department of Electrical and Computer Engineering, and 2Department of Biomedical Engineering, New Jersey Institute of Technology, Newark, NJ, USA
This paper introduces a benchtop method for patterning mammalian cells—i.e., for culturing cells at specific lo-cations—on planar substrates. Compared with standard cell culture techniques, which do not allow the control of what areas of a monolayer are populated by one type of cell or another, techniques of cell patterning open new routes to cell biology. Researchers interested in cell patterning, however, are oftentimes hindered by limited access to photolithographic capabilities. This paper shows how cells can be patterned easily with sub-millimeter precision using a non-photolithographic technique that is based on the use of office adhesive tape and poly(dimethylsiloxane) (PDMS). This method is fast (~4 h to go from a layout to have the cells patterned in the shape of such layout) and only requires materials and tools readily available in a conventional biomedical laboratory. A wound-healing assay is presented here that illustrates the potential of the technique (which we call tape-based soft lithography) for pattern-ing mammalian cells and studying biologically significant questions such as collective cellular migration.
Keywords: tape; soft lithography; clean room-free; cell patterning; collective cell migration; microvascular; endothelial cell; MVEC
Benchmarks
Method summary:This paper introduces a benchtop method for patterning mammalian cells that does not require access to photolithographic capabil-ities. This paper shows how cells can be patterned easily with sub-millimeter precision using a non-photolithographic technique that is based on the use of office adhesive tape and PDMS. This method is fast, biocompatible, reliable, safe, inexpensive, and suitable for biomedical researchers, as it only requires materials and tools commonly found in a biomedical laboratory. We believe this tape-based soft lithography can empower biologically oriented researchers to produce their own microfluidic devices, freeing them from the need to use a clean room.
®

www.BioTechniques.com/rd2BioTechniques Rapid Dispatches doi: 10.2144/000113928
Microfluidics/ Bioengineering
Cell Biology
Biophysics
replicas of adhesive-tape masters can be used for patterning mammalian cells on standard polystyrene cell culture-treated Petri dishes. Specifically, we describe the fabrication of tape-based masters and their replication. We used the PDMS replicas to pattern MVECs on Petri dishes for studying their collective migration. The pattern of cells consisted of three adjacent, albeit separated, areas populated with MVECs—these areas are schematized in yellow in Figure 1B.
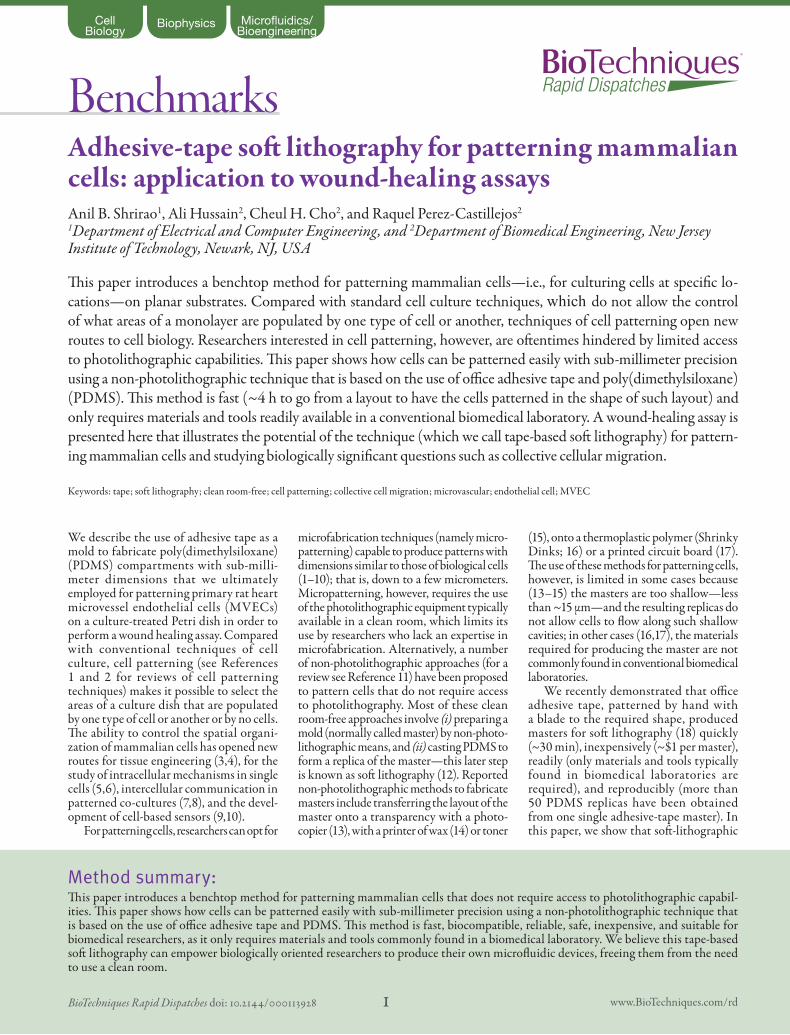
In order to restrict the regions of the Petri dish where cells would be allowed to attach, we created a system of PDMS compartments with the same planar dimen-sions as the desired cell-covered areas. The PDMS compartments were prepared by casting PDMS in a mold (master) made of adhesive tape. Briefly, we attached a layer of adhesive tape (Scotch 3650, 3M, St. Paul, MN, USA) on a glass slide (Figure 1A, step 1; Fisher Scientific, Morris Plains, NJ, USA) and then, using a blade (Fisher Scientific), patterned the adhesive tape in the shape chosen for the areas that will be ultimately covered by cells (Figure 1A, step 2). The tape surrounding the chosen layout was removed with tweezers (Figure 1A, step 3) and the resulting construct of patterned tape attached to the glass slide was rinsed with isopropanol (to remove any residues of adhesive) and then placed in an oven at 65°C for ~5 min to strengthen the adhesion of the tape to the slide (Figure 1A, step 4).
We covered the tape-and-glass master with PDMS prepolymer (Sylgard 184, Dow Corning Corp., Midland, MI, USA) to start the process of soft lithography (Figure 1A, step 5). After curing the PDMS (covering the master) for at least 1 h in an oven at 65°C, the replica was separated from the master and holes were pierced at both ends of each of the three compartments using a puncher (Figure 1A, steps 6–8; Ted Pella Inc., Redding, CA, USA). Finally, the PDMS replica, with the grooves facing down, was laid on a Petri dish (Figure 1A, step 9; Fisher Scientific) and pressure was applied gently to the replica with the fingertips in order to ensure its conformal adhesion to the dish. As a result, the grooves in the PDMS replica were closed by the Petri dish and the compartments became accessible only via the through holes opened in step 8. The compartments could then be filled with liquids, which did not leak among adjacent compartments (Figure 1C). The height of the compartments fabricated with this technique is determined by the thickness of the adhesive tape for the master— the tape we used in this study (Scotch Moving and Storage Tape, Cat. No. 3650) was ~60 µm thick (Figure 1D). For fabricating taller compartments one can prepare a taller master using (i) a thicker tape or (ii) several layers of thinner tape. (See Supplementary Materials for a detailed protocol of the fabri-cation of the tape-based master and its repli-cation by soft lithography.)
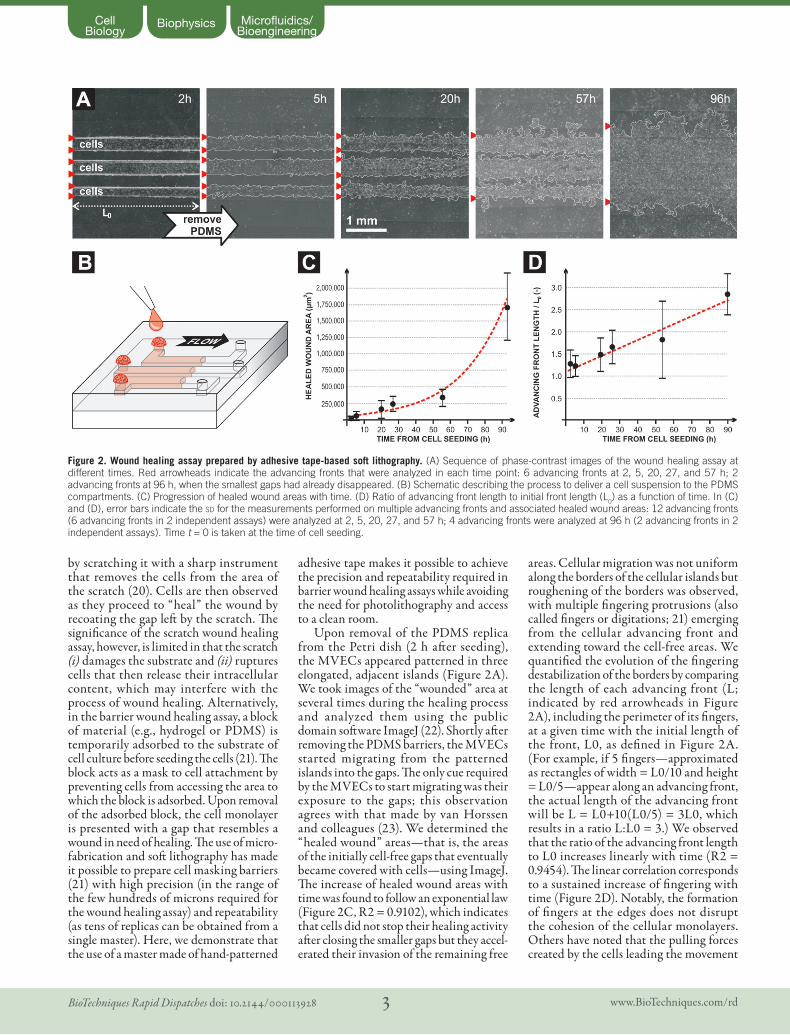
We conformally adhered the PDMS replica (Figure 1B) to a Petri dish and filled the three resulting compartments with a suspension of primary rat heart MVECs (VEC Technologies, Rensselaer, NY, USA); this procedure was similar to that in Figure 1C although here we used a cell suspension instead of the colored inks of Figure 1C. MVECs were delivered into the PDMS compartments (Figure 2B) at a concentration of 25 × 106 cells/mL, which resulted in a surface cell density of 1,500 cells/mm2 after gravity seeding; the surface cell density is the product of the volumetric cell concentration times the height of the compartment: (25 × 106 cells/mL) × 60 µm = 1,500 cells/mm2. This concentration of the suspension was chosen so that, after gravity seeding for only 2 h in a 5% CO2 humidified incubator, MVECs reached confluence in the areas of the dish under the PDMS compartments (Figure 2A). Two hours after delivering the cell suspension into the compartments, the PDMS replicas were gently peeled off from the Petri dishes, which were then kept in the incubator for up to 96 h (4 days).
Collective cell migration is essential in multiple physiopathological mecha-nisms, including organogenesis, cancer metastasis, and regeneration and wound healing (19). The conventional approach to study collective cell migration is known as the scratch wound healing assay in which a cellular monolayer is “wounded”
Figure 1. Microfluidic compartments made by casting PDMS on patterned adhesive tape. (A) Sequence of steps to prepare a master with adhesive tape (steps 1–4) and subsequently, to fabricate a system of microfluidic compartments by replicating the tape-based master with PDMS (steps 5–9). (B) Layout of the system of three adjacent compartments used here to pattern mammalian cells. Photos of the three-compartment system after fabrication: (C) top view, with inks filling the compartments for ease of visualization, and (D) cross-sectional view of the central compartment.
www.BioTechniques.com/rd3BioTechniques Rapid Dispatches doi: 10.2144/000113928
Microfluidics/ Bioengineering
Cell Biology
Biophysics
by scratching it with a sharp instrument that removes the cells from the area of the scratch (20). Cells are then observed as they proceed to “heal” the wound by recoating the gap left by the scratch. The significance of the scratch wound healing assay, however, is limited in that the scratch (i) damages the substrate and (ii) ruptures cells that then release their intracellular content, which may interfere with the process of wound healing. Alternatively, in the barrier wound healing assay, a block of material (e.g., hydrogel or PDMS) is temporarily adsorbed to the substrate of cell culture before seeding the cells (21). The block acts as a mask to cell attachment by preventing cells from accessing the area to which the block is adsorbed. Upon removal of the adsorbed block, the cell monolayer is presented with a gap that resembles a wound in need of healing. The use of micro-fabrication and soft lithography has made it possible to prepare cell masking barriers (21) with high precision (in the range of the few hundreds of microns required for the wound healing assay) and repeatability (as tens of replicas can be obtained from a single master). Here, we demonstrate that the use of a master made of hand-patterned
adhesive tape makes it possible to achieve the precision and repeatability required in barrier wound healing assays while avoiding the need for photolithography and access to a clean room.
Upon removal of the PDMS replica from the Petri dish (2 h after seeding), the MVECs appeared patterned in three elongated, adjacent islands (Figure 2A). We took images of the “wounded” area at several times during the healing process and analyzed them using the public domain software ImageJ (22). Shortly after removing the PDMS barriers, the MVECs started migrating from the patterned islands into the gaps. The only cue required by the MVECs to start migrating was their exposure to the gaps; this observation agrees with that made by van Horssen and colleagues (23). We determined the “healed wound” areas—that is, the areas of the initially cell-free gaps that eventually became covered with cells—using ImageJ. The increase of healed wound areas with time was found to follow an exponential law (Figure 2C, R2 = 0.9102), which indicates that cells did not stop their healing activity after closing the smaller gaps but they accel-erated their invasion of the remaining free
areas. Cellular migration was not uniform along the borders of the cellular islands but roughening of the borders was observed, with multiple fingering protrusions (also called fingers or digitations; 21) emerging from the cellular advancing front and extending toward the cell-free areas. We quantified the evolution of the fingering destabilization of the borders by comparing the length of each advancing front (L; indicated by red arrowheads in Figure 2A), including the perimeter of its fingers, at a given time with the initial length of the front, L0, as defined in Figure 2A. (For example, if 5 fingers—approximated as rectangles of width = L0/10 and height = L0/5—appear along an advancing front, the actual length of the advancing front will be L = L0+10(L0/5) = 3L0, which results in a ratio L:L0 = 3.) We observed that the ratio of the advancing front length to L0 increases linearly with time (R2 = 0.9454). The linear correlation corresponds to a sustained increase of fingering with time (Figure 2D). Notably, the formation of fingers at the edges does not disrupt the cohesion of the cellular monolayers. Others have noted that the pulling forces created by the cells leading the movement
Figure 2. Wound healing assay prepared by adhesive tape-based soft lithography. (A) Sequence of phase-contrast images of the wound healing assay at different times. Red arrowheads indicate the advancing fronts that were analyzed in each time point: 6 advancing fronts at 2, 5, 20, 27, and 57 h; 2 advancing fronts at 96 h, when the smallest gaps had already disappeared. (B) Schematic describing the process to deliver a cell suspension to the PDMS compartments. (C) Progression of healed wound areas with time. (D) Ratio of advancing front length to initial front length (L0) as a function of time. In (C) and (D), error bars indicate the sd for the measurements performed on multiple advancing fronts and associated healed wound areas: 12 advancing fronts (6 advancing fronts in 2 independent assays) were analyzed at 2, 5, 20, 27, and 57 h; 4 advancing fronts were analyzed at 96 h (2 advancing fronts in 2 independent assays). Time t = 0 is taken at the time of cell seeding.

www.BioTechniques.com/rd4BioTechniques Rapid Dispatches doi: 10.2144/000113928
Microfluidics/ Bioengineering
Cell Biology
Biophysics
of the fingers are transmitted to the rest of the cells in the monolayer through strong cell-cell adhesions (24). The good agreement we found between the results of our wound healing assay and those of others (21, 23) strongly supports our thesis that tape-based masters mimic the potential of other barrier wound healing assays (including photo-lithographic ones) in the study of cellular collective migration.
We have shown that a 60 µm-thick adhesive-tape master was capable of producing PDMS replicas that we ultimately used for patterning MVECs. Compared with other methods for patterning cells, the tape-based soft lithographic method we describe here presents a distinct collection of advantages. It is (i) fast—requiring ~4 h to pattern the cells, which includes ~30 min to prepare the master, ~1 h to cure the PDMS replica, ~30 min to prepare the compartments and seed the cells in them, and ~2 h to allow that the cells attach to the substrate; (ii) biocompatible—retaining the viability and functional activity of cells after patterning, as shown by the motility of MVECs right after removing the PDMS barriers in the wound healing assays; (iii) reliable—producing more than 50 replicas from a single tape master; (iv) simple—entailing no previous knowledge of microfab-rication by the user; (v) safe—not involving the use of harmful chemicals when used as directed; (vi) inexpensive—costing less than $1 for the master and a PDMS replica; and (vii) suitable for biomedical researchers—necessitating only materials and tools commonly found in a biomedical laboratory. Construction of a tape-based master may be limited by the manual dexterity of the user with a handheld scalpel. This limitation, however, can be circumvented by utilizing a laser or a craft cutter to pattern the tape. The potential of this technique for biological studies was informed here by the devel-opment of a wound healing assay to study the collective migration of MVECs on standard polystyrene cell culture-treated Petri dishes. Our observations of the collective migration of MVECs matched well those published previously by other researchers. In conclusion, we believe that tape-based soft lithography can empower biologically oriented researchers to produce their own PDMS replicas and microfluidic devices, freeing them from the need to fabricate their masters by photolithography in a clean room.
AcknowledgmentsThis work was performed at the Perez-Castillejos’ Tissue Models Laboratory and Cho’s Stem Cells and Tissue Engineering
Laboratory, at the New Jersey Institute of Technology (NJIT). The authors want to thank Dr. Eric T. Mack for critically reviewing the manuscript. This work was supported by NJIT startup funds.
Competing interestsThe authors declare no competing interests.
References1. Fink, J., M. Théry, A. Azioune, R. Dupont, F.
Chatelain, M. Bornens, and M. Piel. 2007. Comparative study and improvement of current cell micro-patterning techniques. Lab Chip 7:672-680.
2. Goubko, C.A. and X. Cao. 2009. Patterning multiple cell types in co-cultures: A review. Mater. Sci. Eng. C 29:1855-1868.
3. McBeath, R., D.M. Pirone, C.M. Nelson, K. Bhadriraju, and C.S. Chen. 2004. Cell shape, cytoskeletal tension, and RhoA regulate stem cell lineage commitment several studies have noted that changes in cell shape themselves can alter the differentiation of precommitted mesenchymal lineages. Dev. Cell 6:483-495.
4. Yuan, B., Y. Jin, Y. Sun, D. Wang, J. Sun, Z. Wang, W. Zhang, and X. Jiang. 2012. A strategy for depositing different types of cells in three dimensions to mimic tubular structures in tissues. Adv. Mater. 24:890-896.
5. Théry, M., A. Jiménez-Dalmaroni, V. Racine, M. Bornens, and F. Jülicher. 2007. Experimental and theoretical study of mitotic spindle orien-tation. Nature 447:493-496.
6. Khatau, S.B., C.M. Hale, P.J. Stewart-Hutchinson, M.S. Patel, C.L. Stewart, P.C. Searson, D. Hodzic, and D. Wirtz. 2009. A perinuclear actin cap regulates nuclear shape. Proc. Natl. Acad. Sci. USA 106:19017-19022.
7. Cho, C.H., J. Park, A.W. Tilles, F. Berthiaume, M. Toner, and M.L. Yarmush. 2010. Layered patterning of hepatocytes in co-culture systems using microfabricated stencils. BioTechniques 48:47-52.
8. Kim, J., M. Hegde, and A. Jayaraman. 2010. Co-culture of epithelial cells and bacteria for investigating host-pathogen interactions. Lab Chip 10:43-50.
9. Håkanson, M., M. Textor, and M. Charnley. 2011. Engineered 3D environments to elucidate the effect of environmental parameters on drug response in cancer. Integr. Biol. (Camb). 3:31-38.
10. Khetani, S.R. and S.N. Bhatia. 2008. Microscale culture of human liver cells for drug devel-opment. Nat. Biotechnol. 26:120-126.
11. Marlon, S.T., B. Millare, J.M. Clift, D. Bao, C. Hong, and V.I. Vullev. 2010. Print-and-Peel Fabrication for Microfluidics: What’s in it for Biomedical Applications? Ann. Biomed. Eng. 38:21-32.
12. Xia, Y. and G.M. Whitesides. 1998. Soft lithog-raphy. Annu. Rev. Mater. Sci. 28:153-184.
13. Tan, A., K. Rodgers, J.P. Murrihy, C. O’Mathuna, and J.D. Glennon. 2001. Rapid fabrication of microfluidic devices in poly(dimethylsiloxane) by photocopying. Lab Chip 1:7-9.
14. Kaigala, G.V., S. Ho, R. Penterman, and C.J. Backhouse. 2007. Rapid prototyping of micro-
fluidic devices with a wax printer. Lab Chip 7:384-387.
15. Bao, N., Q. Zhang, J.-J. Xu, and H.-Y. Chen. 2005. Fabrication of poly(dimethylsiloxane) microf luidic system based on masters directly printed with an office laser printer. J. Chromatogr. A 1089:270-275.
16. Grimes, A., D.N. Breslauer, M. Long, J. Pegan, L.P. Lee, and M. Khine. 2008. Shrinky-Dink microfluidics: rapid generation of deep and rounded patterns. Lab Chip 8:170-172.
17. Abdelgawad, M., M.W.L. Watson, E.W.K. Young, J.M. Mudrik, M.D. Ungrin, and A.R. Wheeler. 2008. Soft lithography: masters on demand. Lab Chip 8:1379-1385.
18. Shrirao, A.B., R. Perez-Castillejos. 2010. Simple fabrication of microfluidic devices by replicating Scotch-tape masters. Lab Chip: Chips & Tips.
19. Friedl, P. and D. Gilmour. 2009. Collective cell migration in morphogenesis, regeneration and cancer. Nat. Rev. Mol. Biol. 10:445-457.
20. Gov, N.S. 2007. Collective cell migration patterns: follow the leader. Proc. Natl. Acad. Sci. USA 104:15970-15971.
21. Poujade, M., E. Grasland-Mongrain, A. Hertzog, J. Jouanneau, P. Chavrier, B. Ladoux, A. Buguin, and P. Silberzan. 2007. Collective migration of an epithelial monolayer in response to a model wound. Proc. Natl. Acad. Sci. USA 104:15988-15993.
22. Rasband, W.S. 1997-2012. ImageJ, U.S. National Institutes of Health, Bethesda, Maryland, USA, http://imagej.nih.gov/ij/.
23. van Horssen, R., N. Galjart, J.A.P. Rens, A.M.M. Eggermont, and T.L.M. ten Hagen. 2006. Differential effects of matrix and growth factors on endothelial and fibroblast motility: Application of a modified cell migration assay. J. Cell. Biochem. 99:1536-1552.
24. Trepat, X., M.R. Wasserman, T.E. Angelini, E. Millet, D.A. Weitz, J.P. Butler, and J.J. Fredberg. 2009. Physical forces during collective cell migration. Nat. Phys. 5:426-430.
Received 29 June 2012; accepted 17 August 2012.
Address correspondence to Raquel Perez-Castillejos, Department of Biomedical Engineering, New Jersey Institute of Technology, Newark, NJ, USA. Email: [email protected]
Supplementary material for this article is avail-able at www.BioTechniques.com/article/113928.
To purchase reprints of this article, contact: [email protected]
www.BioTechniques.com/rd1BioTechniques Rapid Dispatches doi: 10.2144/000113928
Legend ATTENTION * HINT REST
ProcedureFabrication of the master from adhesive tape and glass.1. Draw the layout of the master, at its final scale, on a sheet of paper—in other words, the printout of the master layout should be the identical size to the desired master.
ATTENTION: The outside dimen-sions of the layout must be smaller than (i) the glass slide on which the master will be prepared, and also smaller than (ii) the surface onto which the mammalian cells will be patterned. (Here we patterned the cells on a 35 mm-diameter cell culture-treated Petri dish.)ATTENTION: When patterning the tape with a handheld blade, we recommend the structure consist of (i) features larger than 250 µm and (ii) straight lines, which are easier to cut by hand than curved lines. Alternative methods to cut the adhesive tape—e.g., laser (1) or craft (2) cutters—may allow curved shapes and features smaller than 250 µm.
2. Rinse the glass slide with isopropanol and dry it using compressed, filtered air, nitrogen, or argon.3. Remove any remaining particles of dust from the glass slide by covering the slide with adhesive tape; gently press the tape to ensure its complete adhesion to the slide and then remove the tape. Repeat this step 4–5 times to ensure that the slide is free of dust.4. Attach a new piece of adhesive tape on the clean surface of the glass slide. To avoid trapping air bubbles between the tape and the glass slide, lay the slide onto a flat substrate with the clean surface of the slide
facing up. Attach one end of the adhesive tape to one end of the slide, and slowly work the tape toward the other end of the slide by gently applying pressure with your gloved fingertip. It helps keep the free end of the tape under tension and above the glass slide, while you move your fingertip parallel to the edge of the tape.
ATTENTION: It is crucial to avoid the formation of bubbles under the tape for the tape-based masters to be (i) uniformly thick and (ii) reusable for tens of cycles of soft lithog-raphy.* HINT: If some air bubbles still form between the tape and the slide after following the procedure described above, we recommend spraying the cleaned glass slide with filtered water, laying a piece of adhesive tape (with the adhesive facing down) onto the water-covered glass slide, and then slowly squeezing the water out by applying pressure with your gloved fingertip from one end to the other of the piece of tape.
5. Fix the layout of the master (step 1) to a flat surface. Place the tape-covered glass slide (step 4) over the layout, with the adhesive tape facing up. Center the slide over the layout (Figure 1A) and then use additional pieces of adhesive tape (i.e., blue tape in Figure 1A for ease of visualization) to immobilize the glass slide onto the layout of the master.6. Cut the glass-supported adhesive tape according to the underlying layout using a blade or a scalpel (Figure 1B).
ATTENTION: For the best results, hold the blade at a 90° angle to the glass surface (i.e., perpendicular to the glass slide), yielding vertical edges of the trimmed tape, which will (i) increase the lifetime of the tape-based master during multiple processes of repli-cation, and (ii) facilitate the separation of the PDMS from the master.
* HINT: Guide the movement of the blade with a metal-edged ruler or another glass slide (Figure 1B) to aid in cutting straight lines. Note that the use of a glass slide enables seeing the underlying layout of the master at all times.
7. Remove the areas of unwanted adhesive tape using tweezers with a sharp, pointed tip (Figure 1C).
ATTENTION: Carefully inspect the cuts in the tape (a magnifying glass is helpful) to ensure that all cuts are complete, especially at the corners, before removing the unwanted tape.
8. Gently press the remaining adhesive tape to the glass slide with your gloved fingertip or a small, clean roller to ensure complete adhesion.9. Place a few drops of isopropanol on the glass-supported trimmed tape (i.e., the master) and rub it gently with your gloved fingertips or with a clean, lint-free brush. Rinse the master thoroughly with isopro-panol and dry it under filtered, compressed air. Isopropanol removes any adhesive residue on the master that may have been left behind by the cutting of the tape.10. Keep the master at 65°C for at least 5 min. This thermal treatment increases the adhesion of the tape (especially near the edges) to the glass slide but does not result in melting or deformation of the trimmed tape.11. Place the master in a non-culture-treated Petri dish.
REST: You can store the master at room temperature in a dust-free environment—e.g., inside a Petri dish covered with a lid and wrapped in film or foil.
Fabrication of the micro-featured patterning structures by replicating in PDMS the tape-glass master
Adhesive-tape soft lithography for patterning mammalian cellsProtocol For: Adhesive-tape soft lithography for patterning cells: application to wound-healing as-saysAnil B. Shrirao1, Ali Hussain2, Cheul H. Cho2, and Raquel Perez-Castillejos2*1 Department of Electrical and Computer Engineering, and 2 Department of Biomedical Engineering, New Jersey Institute of Technology, Newark, NJ, USA
®

www.BioTechniques.com/rd2BioTechniques Rapid Dispatches doi: 10.2144/000113928
12. With the tape-glass master in a Petri dish and the adhesive tape facing up, pour degassed poly(dimethylsiloxane) (PDMS) pre-polymer slowly (to avoid the formation of bubbles) into the dish until reaching the desired thickness of PDMS over the master—we have found a thickness of 5 mm of PDMS over the master produces a durable structure that is easy to work with. Place the covered Petri dish on a flat surface and allow the PDMS pre-polymer to level off.
* HINT: If bubbles form as the PDMS pre-polymer is poured onto the master, place the Petri dish in a vacuum desiccator for ~20 min or until bubbles disappear from the pre-polymer.
13. Place the covered Petri dish in an oven at 65°C for at least 1 h.
* HINT: You can leave PDMS overnight at 65°C to maximize the crosslinking of the polymer.REST: Cured PDMS can be stored for months at room temperature.
Patterning of cells using the PDMS replicas of tape-glass masters14. Using a blade or a scalpel, cut through the cured PDMS to the glass, leaving a margin of ~5 mm around the perimeter of the tape master (Figure 1D). Peel the cured PDMS (i.e., the replica) from the master. Immediately place the replica, with the grooves facing down, on a clean glass slide to avoid contaminating the replica with dust.
ATTENTION: Avoid contaminating the master with dust. Immediately after removing the replica from the master (step 14), degassed PDMS pre-polymer should be poured onto the master and cured as described in step 13. Always store the masters covered with cured PDMS.* HINT: The tape-and-glass master can be reused multiple times—at least 50 times, according to our experience.
15. Punch holes through the PDMS replica for the inlets and outlets of the compart-ments using a coring tool or a blunt needle. Ensure that the holes go through the whole slab of PDMS by inserting a needle or tweezers into each hole.16. Prepare a suspension of cells in cell culture media at a concentration in the range of 25–40 × 106 cells/mL (that is, 25,000–40,000 cells/µL).
* HINT: The concentration of cells in the suspension used for plating in these microchannels needs to be ~100 times higher than the concen-tration typically used in Petri dishes.
17. Carefully separate the PDMS replica from the glass slide. Treat the surface of the replica by exposing it (with the micro-features facing up) to air plasma using either (i) a benchtop plasma cleaner (3) or (ii) a handheld corona treater (4).
ATTENTION: If you do not have access to a plasma cleaner or a corona treater, you can skip this step and go directly to step 18.ATTENTION: The hydrophilic properties of PDMS decline rapidly in ambient condi-tions. The PDMS replica should be used within 15–20 min after the plasma surface treatment. We recommend the suspension of cells be prepared (step 16) prior to treating the replica with plasma (step 17).
18. Remove dust particles from the surface of the replica (with the micro-features facing up) by adhering repeatedly a piece of tape (as described in step 3). Sterilize the replica by submerging it in a solution of 70% ethanol in de-ionized (DI) water for a few seconds.19. Take the replica into the cell culture hood and aspirate the remaining solution of 70% ethanol from the replica. Rinse the replica thoroughly with DI water, aspirate
the remaining water, and then allow the replica to dry for ~1 min in the hood.20. Place the replica on a clean, dry culture-treated Petri dish, with the grooves facing down. Apply gentle pressure to the replica to ensure it seals conformally (reversibly) to the dish.
ATTENTION: Proper conformal sealing of the replica to the Petri dish prevents leaks between adjacent compartments—or micro-channels (Figure 1E).
21. Deposit a drop of concentrated cell suspension (as prepared in step 16) on each inlet of each channel. Capillary force will draw the cell suspension into the micro-channels. The volume of each drop should be in excess of the volume of the channel itself in order to ensure that the whole channel gets filled with the concentrated cell suspension.
ATTENTION: If you do not have access to a plasma cleaner or a corona treater, you may cause the drops at the inlets to flow into the compartments by applying vacuum (with a pipette tip connected to the vacuum line of the cell culture hood) gently to the outlet of each compartment.
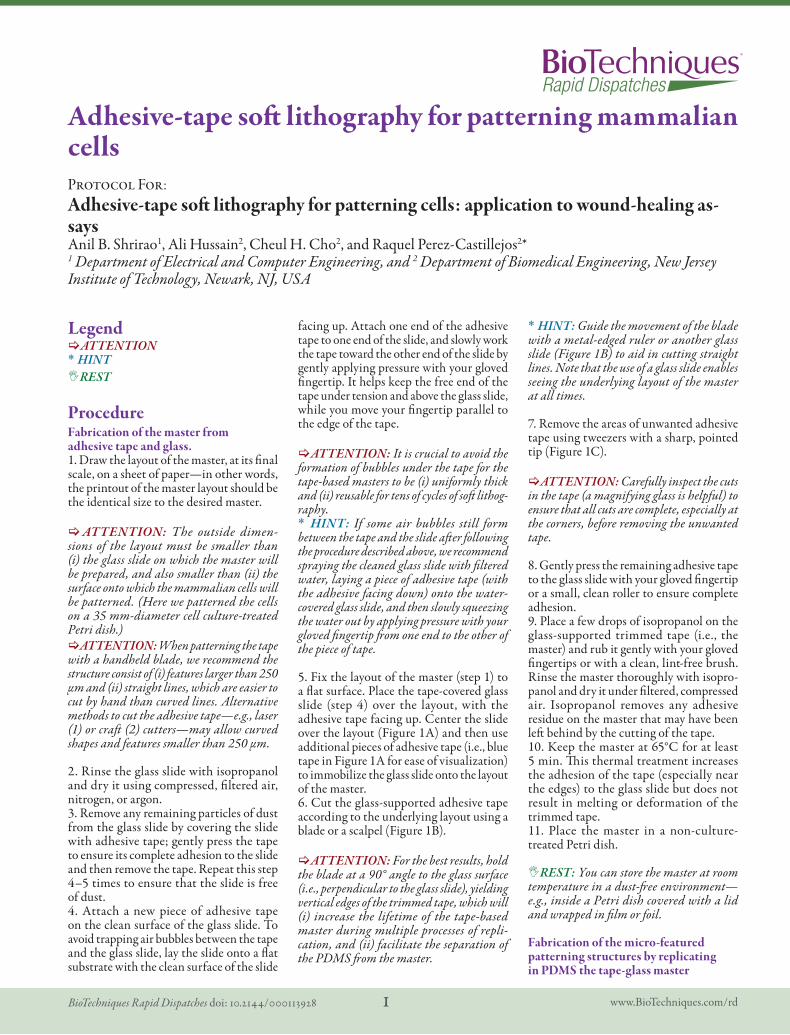
Figure S1. Protocol for patterning cells using adhesive-tape soft lithography. (A) A glass slide covered with transparent adhesive tape fixed onto the layout of the master. We used blue tape to fix the slide for ease of visualization. (B) Cutting the adhesive tape with a scalpel. (C) Removing areas of adhesive tape that do not belong to the master. After curing in a 65-°C oven, the PDMS replica was cut with a scalpel (D) and placed (with the grooves facing down) on a clean, dry Petri dish (E). The conformal seal between PDMS and the dish prevents leaks between adjacent channels—as shown here with colored inks. (F) Patterned MVEC cells stained with calcein AM after removal of the PDMS replica.

www.BioTechniques.com/rd3BioTechniques Rapid Dispatches doi: 10.2144/000113928
22. Deposit a drop of 50–100 µL of fresh media on each port (i.e., inlet and outlet) ~30 min after adding the cell suspension. These drops act as reservoirs of fresh media for the cells as they attach to the dish—i.e., during the seeding process.23. Allow the cells to attach to the Petri dish for 2 h in the incubator.24. Gently rinse the channels with fresh media by removing the droplets of old media from the inlets and outlets, and replacing them with drops of fresh media.25. Separate the replica from the Petri dish carefully, using tweezers. Rinse the dish thoroughly with fresh media or PBS (Figure 1F). ATTENTION: Alternatively, the PDMS replica can remain conformally sealed to the Petri dish if required. Remember to exchange the culture media in the compartments more frequently than in a Petri dish.
26. Add fresh media to the Petri dish and proceed with your experiment.
Recipes• Degassed poly(dimethylsiloxane) mixture (~ 22 g per Petri dish, freshly prepared)PDMS, base elastomer 20 gPDMS, curing agent 2gMix the PDMS base elastomer and curing agent at a 10:1 (wt/wt) ratio and expose to house vacuum (desiccator) for ~ 20 min or until bubbles are removed from the mixture.• 70% ethanol in water• Culture media for MVEC: DMEM high glucose with 10% v/v fetal bovine serum (FBS), 2% v/v penicillin-streptomycin, 2 mM L-glutamine, insulin/transferring/selenious acid (ITS; 5 mg/mL, 5 mg/mL, 5 ng/mL, respectively) and 10 ng/mL vascular endothelial growth factor.
Reagents• Isopropanol (Cat. No. BP2632–4, Fisher Scientific, Morris Plains, NJ, USA)• Ethyl alcohol, denatured 95% (Cat. No. S96857, Fisher Scientific)• Poly(dimethylsiloxane) or PDMS (Sylgard 184, Dow Corning Corp., Midland, MI, USA)• Primary rat microvessel endothelial cells (Cat. No. RHMVEC, VEC Technologies, Rensselaer, NY, USA)• High-glucose DMEM (Cat. No. SH30081.01, Hyclone, Logan, UT, USA)• FBS (Cat. No. 9871–5200, USA Scien-tific, Ocala, FL, USA)• Penicillin-streptomycin (Cat. No. 15140, Gibco, Carlsbad, CA, USA)
• L-glutamine (Cat. No. 25030–081, Gibco)• ITS acid (Cat. No. 41400045, Invitrogen, Carlsbad, CA, USA)• Vascular endothelial growth factor (Cat. No. V4512, Sigma-Aldrich, St. Louis, MO, USA)• Calcein, AM (Cat. No. L3224A, Invit-rogen)• Fountain Pen Inks for visualization: south sea blue (Cat. No. 51060-W7, Waterman, Paris, France) and red (Cat. No. 51060-W3, Waterman)
Equipment• Scotch tape (Cat. No. 3650, 3M, St. Paul, MN, USA; Scotch Moving and Storage Tape)• Glass slides, pre-cleaned from manufac-turer (Cat. No. 12–550, Fisher Scientific)• Non-Culture-treated Petri dish (Cat. No. 0875712)• Tissue-Culture-treated Petri dish (Cat. No. CC7682–3340, USA Scientific)• Nitrile gloves (Cat. No. FFS-700-M, Microflex Corp., Reno, NV, USA)• Protective goggles (Cat. No. 19–130–2088, Fisher Scientific)• Stainless steel scalpel or surgical blade (Cat. No. 08–916–5B, Fisher Scientific)• Pointed-tip tweezers (Cat. No.08–953E and 08–953F, Fisher Scientific)• Oven (Cat. No. 13–246–506GA, Fisher Scientific)• Vacuum desiccator (Cat. No. F42012–0000B, Bel-Art Products, Wayne, NJ, USA).• Puncher (Cat. No. 15074, Ted Pella Inc., Redding, CA, USA)• Plasma cleaner (Cat. No. PDC-001, Harrick Plasma, Ithaca, NY, USA)• Corona Treater (Cat. No. BD-20AC, Electro-Technic Products, Chicago, IL, USA).
References1. Luo, L.W., C.Y. Teo, W.L. Ong, K.C. Tang, L.F.
Cheow, and L. Yobas. 2007. Rapid prototyping of microfluidic systems using a laser-patterned tape. J. Micromech. Microeng. 17:111.
2. Yuen, P.K. and V.N. Goral. 2010. Low-cost rapid prototyping of flexible microfluidic devices using a desktop digital craft cutter. Lab Chip 10:384-387.
3. Duffy, D., J. McDonald, O. Schueler, and G. Whitesides. 1998. Rapid Prototyping of Micro-fluidic Systems in Poly(dimethylsiloxane). Anal. Chem. 70:4974-4984.
4. Haubert, K., T. Drier, and D. Beebe. 2006. PDMS bonding by means of a portable, low-cost corona system. Lab Chip 6:1548-1549.
Address correspondence to Raquel Perez-Castillejos, Department of Biomedical Engineering, New Jersey Institute of Technology, Newark, NJ, USA. Email: [email protected]
To purchase reprints of this article, contact: [email protected]