Embed Size (px)
Citation preview

-1-
~~~~ Basket Weave Placemats Basket Weave Placemats Basket Weave Placemats Basket Weave Placemats ~~~~Designed for the Knifty Knitter Loom Set
© 2007 Bethany Dailey
~ Supplies: Knifty Knitter Loom Set ~Yarn Needle ~Scissors
~6mm Crochet Hook ~1 Skein Lion Brand Thick & Quick per Placemat
~Row Counter (not required, but helpful)
~ Pattern Note: This pattern is specifically written for the creation of
placemats, but the Basket Weave Stitch can be incorporated into any project. Just
keep in mind that this particular version of the stitch is completed in a series of
16 pegs and 6 rows (Allowing for 4 pegs on each end for a Garter Stitch border
and a repetition of the pattern 4 times). Adjust to pattern as needed.
-2-
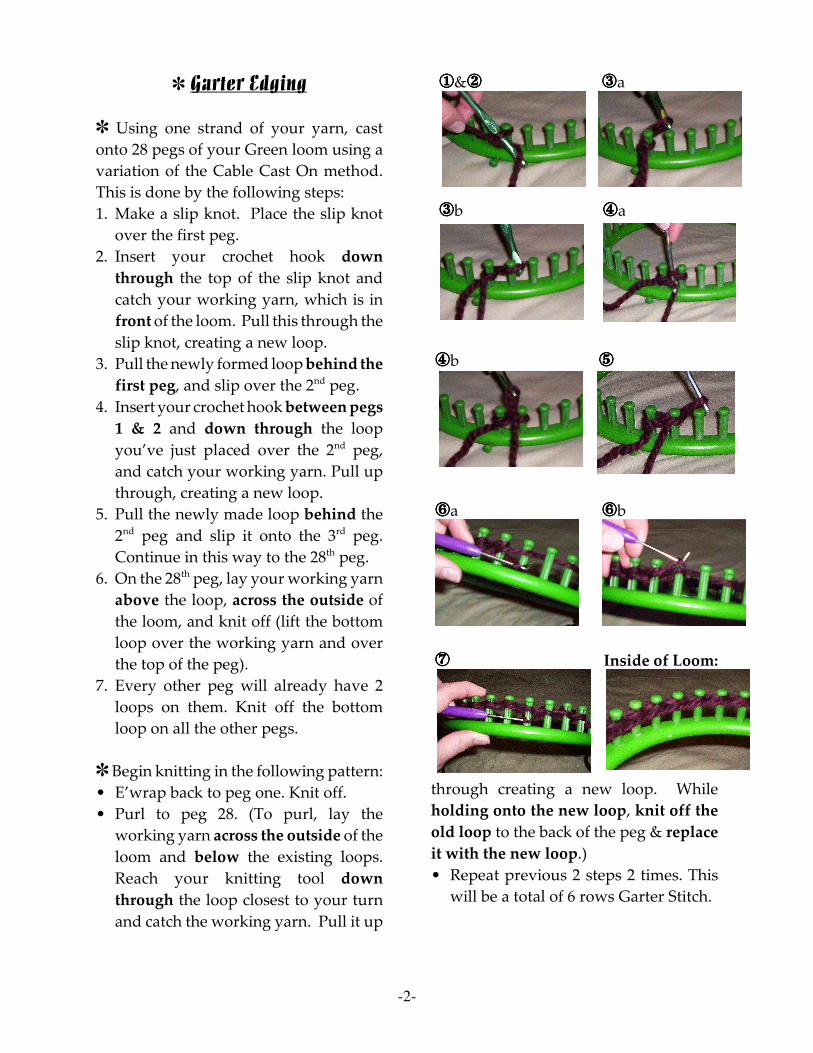
~ Garter Edging
~ Using one strand of your yarn, cast
onto 28 pegs of your Green loom using a
variation of the Cable Cast On method.
This is done by the following steps:
1. Make a slip knot. Place the slip knot
over the first peg.
2. Insert your crochet hook down
through the top of the slip knot and
catch your working yarn, which is in
front of the loom. Pull this through the
slip knot, creating a new loop.
3. Pull the newly formed loop behind the
first peg, and slip over the 2nd peg.
4. Insert your crochet hook between pegs
1 & 2 and down through the loop
you’ve just placed over the 2nd peg,
and catch your working yarn. Pull up
through, creating a new loop.
5. Pull the newly made loop behind the
2nd peg and slip it onto the 3rd peg.
Continue in this way to the 28th peg.
6. On the 28th peg, lay your working yarn
above the loop, across the outside of
the loom, and knit off (lift the bottom
loop over the working yarn and over
the top of the peg).
7. Every other peg will already have 2
loops on them. Knit off the bottom
loop on all the other pegs.
~ Begin knitting in the following pattern:
• E’wrap back to peg one. Knit off.
• Purl to peg 28. (To purl, lay the
working yarn across the outside of the
loom and below the existing loops.
Reach your knitting tool down
through the loop closest to your turn
and catch the working yarn. Pull it up
ÎÎÎÎ&ÏÏÏÏ ÐÐÐÐa
ÐÐÐÐb ÑÑÑÑa
ÑÑÑÑb ÒÒÒÒ
ÓÓÓÓa ÓÓÓÓb
ÔÔÔÔ Inside of Loom:
through creating a new loop. While
holding onto the new loop, knit off the
old loop to the back of the peg & replace
it with the new loop.)
• Repeat previous 2 steps 2 times. This
will be a total of 6 rows Garter Stitch.

-3-
~ Basket Weave Stitch:
~ To create the Basket Weave Stitch, follow the
chart below. When you have finished with
row 6, you will be at peg 28, so for row 7,
follow the left pointing arrow from peg 28 to
peg 1. Then you will switch directions on row
8 and go to the right.
~ On the chart, the EW= e’wrap peg and knit
off. The P= purl peg.
~ Repeat these 6 rows until you reach
row #72.
~ Begin knitting in the following pattern:
• E’wrap back to peg one. Knit off.
• Purl to peg 28.
• Repeat previous 2 steps 2 times. This
will be a total of 6 rows Garter Stitch.
~ Cast off using the Crochet Chain One
Method. Do this by the following steps:
© Copyright, Bethany A Dailey. GettinItPegged.com
For personal, non-commercial use only. All rights reserved.
~ It may be helpful to use a sticky note, or paper to
cover the rows
you’ve already
knit, so that
you can keep
track of where
you are.
1. Place peg 28's loop onto your crochet hook.
2. Loop your working yarn over the hook and pull
a new loop through the old, letting the old loop
slip off the hook.
3. Place peg 27's loop onto your crochet hook & pull
through the loop on the hook.
4. Repeat from step #2 until you have reached the
last loop on peg 1. Trim yarn to 4" and pull thru
last loop and cinch to secure.
5. Weave in ends and block. Repeat & Enjoy!
R
O
W
„„„„
1 2 3 4 5 6 7 8 9 1
0
1
1
1
2
1
3
1
4
1
5
1
6
1
7
1
8
1
9
2
0
2
1
2
2
2
3
2
4
2
5
2
6
2
7
2
8
P
E
G
»»»»
7 E
W
E
W
E
W
E
W
E
W
E
W
P P E
W
E
W
P P E
W
E
W
P P E
W
E
W
P P E
W
E
W
P P E
W
E
W
E
W
E
W
»
8 º
P P P P
E
W
E
W P P
E
W
E
W P P
E
W
E
W P P
E
W
E
W P P
E
W
E
W P P P P P P
9 E
W
E
W
E
W
E
W
E
W
E
W P P
E
W
E
W P P
E
W
E
W P P
E
W
E
W P P
E
W
E
W P P
E
W
E
W
E
W
E
W
»
1
0
º
P P P P P P
E
W
E
W P P
E
W
E
W P P
E
W
E
W P P
E
W
E
W P P
E
W
E
W P P P P
1
1
E
W
E
W
E
W
E
W P P
E
W
E
W P P
E
W
E
W P P
E
W
E
W P P
E
W
E
W P P
E
W
E
W
E
W
E
W
E
W
E
W
»
1
2
º
P P P P P P
E
W
E
W P P
E
W
E
W P P
E
W
E
W P P
E
W
E
W P P
E
W
E
W P P P P