Embed Size (px)
Citation preview
.
CD PlayerHD-CD1
Owner’s ManualYou can print more than one page of a PDF onto a single sheet of paper.
Contents Connections Playback Settings Tips Appendix
1Front panel Display Rear panel Remote Index
Accessories 4Inserting the batteries 5Operating range of the remote control unit 5
Features 6High quality sound 6High performance 6
Part names and functions 7Front panel 7Display 9Rear panel 10Remote control unit 11
ConnectionsConnecting to a device with digital audio input connectors 16Connecting to a stereo audio amplifier 17Connecting devices with remote control connectors 18
Connection 18Setting 18
Connecting the timer device 19Connecting the power cord 20
PlaybackBasic operation 22
Turning the power on 22Switching the display’s brightness 22
Playing CDs 23Playing CDs 23A-B repeat playback 25Playing tracks in a specific order (Program playback) 25Skipping tracks you don’t want to hear (Delete program playback) 26Rewinding tracks slightly to listen again (Quick replay) 27Switching the display (CD-TEXT) 28
Playing DATA CDs (MP3, WMA and AAC files) 29Playing files 30
Contents Connections Playback Settings Tips AppendixContents
2Front panel Display Rear panel Remote Index
SettingsMenu map 32
Menu operation 33H/P AMP GAIN 34Digital Out 34Timer Play 35Quick Replay 35Auto Standby 35
TipsTips 37Troubleshooting 38
AppendixPlayable media 42
Discs 42Files 42Playback order of music files 43About discs and files 44
Cautions on using media 45Inserting a disc 45How to handle media 46Cleaning discs 46
Explanation of terms 47Trademark information 48Specifications 49Index 52
Contents Connections Playback Settings Tips Appendix
3Front panel Display Rear panel Remote Index
Thank you for purchasing this Marantz product.To ensure proper operation, please read this owner’s manual carefully before using the product.After reading this manual, be sure to keep it for future reference.
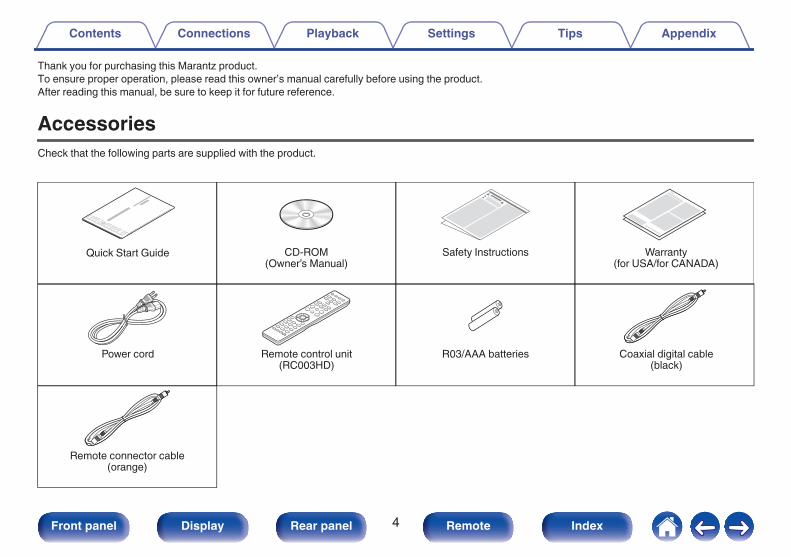
AccessoriesCheck that the following parts are supplied with the product.
.
Quick Start Guide CD-ROM(Owner’s Manual)
Safety Instructions Warranty (for USA/for CANADA)
Power cord Remote control unit(RC003HD)
R03/AAA batteries Coaxial digital cable(black)
Remote connector cable(orange)
Contents Connections Playback Settings Tips Appendix
4Front panel Display Rear panel Remote Index
Inserting the batteries
1 Remove the rear lid in the direction of the arrow andremove it.
.
2 Insert two batteries correctly into the batterycompartment as indicated.
.
Batteries
3 Put the rear cover back on.
NOTE0 To prevent damage or leakage of battery fluid:0 Do not use a new battery together with an old one.0 Do not use two different types of batteries.
0 Remove the batteries from the remote control unit if it will not be in use for longperiods.
0 If the battery fluid should leak, carefully wipe the fluid off the inside of the batterycompartment and insert new batteries.
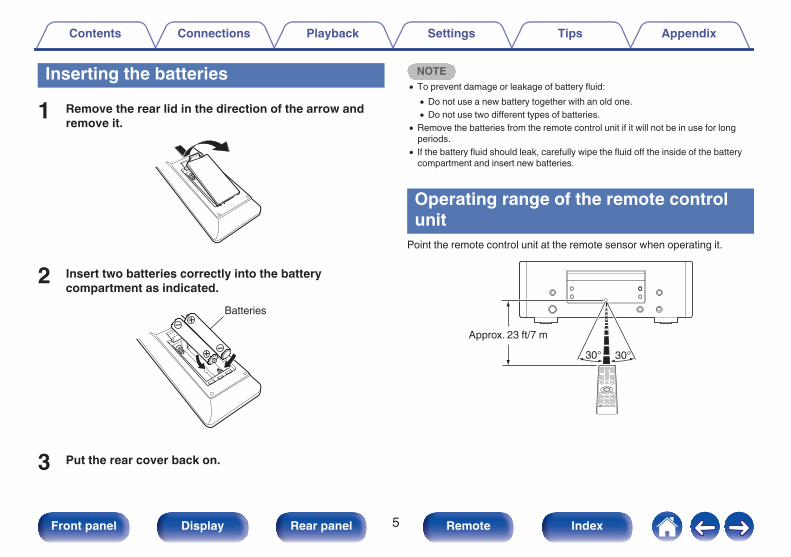
Operating range of the remote controlunit
Point the remote control unit at the remote sensor when operating it.
.
Approx. 23 ft/7 m30°30°
Contents Connections Playback Settings Tips Appendix
5Front panel Display Rear panel Remote Index
FeaturesHigh quality sound0 Using Marantz original HDAM® SA2 circuit
The unit uses an HDAM® SA2 circuit, whose quality has been proved inSuper Audio CD players and high-end amplifiers, as a high-speedbuffer amplifier.You can enjoy the high speed and high-quality sound like that producedby high-end equipment.
0 Incorporates a Cirrus Logic advanced D/A converter, CS4398A D/A converter is an essential element for the audio quality of a CDplayer. The CS4398 Cirrus Logic D/A Converter, which has a reputationfor high precision and has been adopted for other Marantz Super AudioCD players, is adopted for this unit.
0 High grade headphone circuitThe high-grade headphone circuit incorporates a high-speed bufferamplifier to enable headphone listening of high quality soundreproduction, late at night or in other such situations.
High performance0 Supports MP3, WMA and AAC file playback (v p. 29)
MP3, WMA and AAC files that have been recorded onto CD-R or CD-RW discs can be played back on this CD player.
0 Gain selector functionThis unit has a gain control function with three levels that can beswitched according to the characteristics of the connected headphones.
0 Quick replay function (Audio CDs only) (v p. 27)Simply press the Q.REPLAY P button on the remote control duringplayback, and the track rewinds the set amount of time (setting range:5-60 seconds), and resumes playing from the rewind point.
0 Supports CD-TEXT displayCD-Text is an extension to the existing audio CD standard that enablestext information, such as the name of the artist, album title and songtitles to be stored on an audio CD. CDs with the following logos supportthis function.
.
CD TEXTTEXT
0 Large 16-character / 2-line displayText information appears on the large display during MP3 playback.
Contents Connections Playback Settings Tips Appendix
6Front panel Display Rear panel Remote Index
Part names and functionsFront panel
.
q w e r t iuy o Q1Q0
Q3Q2 Q4
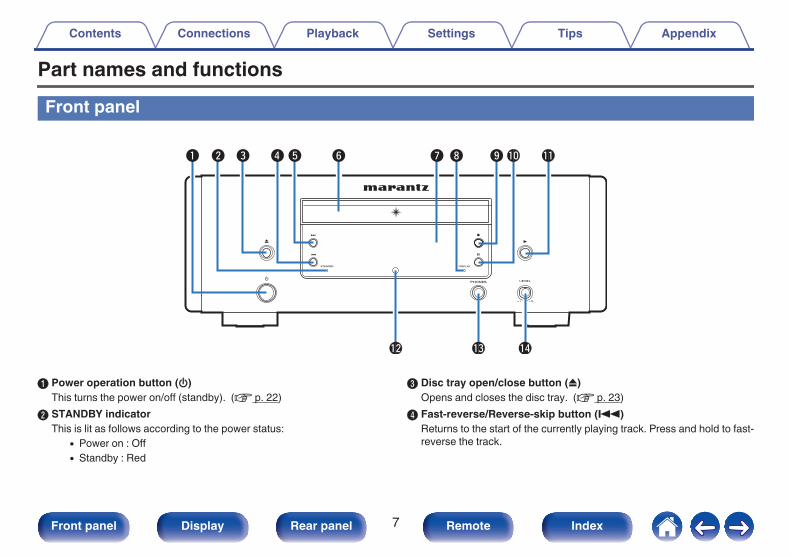
A Power operation button (X)This turns the power on/off (standby). (v p. 22)
B STANDBY indicatorThis is lit as follows according to the power status:
0 Power on : Off0 Standby : Red
C Disc tray open/close button (5)Opens and closes the disc tray. (v p. 23)
D Fast-reverse/Reverse-skip button (8)Returns to the start of the currently playing track. Press and hold to fast-reverse the track.
Contents Connections Playback Settings Tips Appendix
7Front panel Display Rear panel Remote Index
.
Q3Q2 Q4
t iuy o Q1Q0
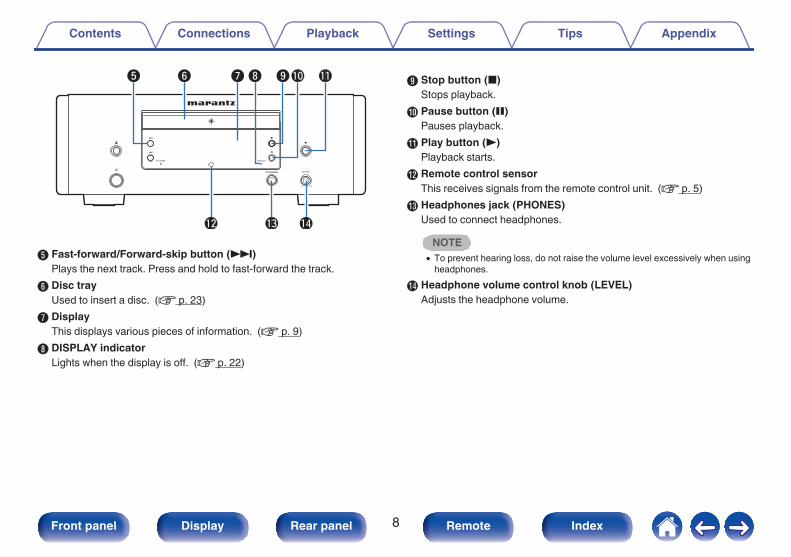
E Fast-forward/Forward-skip button (9)Plays the next track. Press and hold to fast-forward the track.
F Disc trayUsed to insert a disc. (v p. 23)
G DisplayThis displays various pieces of information. (v p. 9)
H DISPLAY indicatorLights when the display is off. (v p. 22)
I Stop button (2)Stops playback.
J Pause button (3)Pauses playback.
K Play button (1)Playback starts.
L Remote control sensorThis receives signals from the remote control unit. (v p. 5)
M Headphones jack (PHONES)Used to connect headphones.
NOTE0 To prevent hearing loss, do not raise the volume level excessively when using
headphones.N Headphone volume control knob (LEVEL)
Adjusts the headphone volume.
Contents Connections Playback Settings Tips Appendix
8Front panel Display Rear panel Remote Index
Display
.
wq t ye r
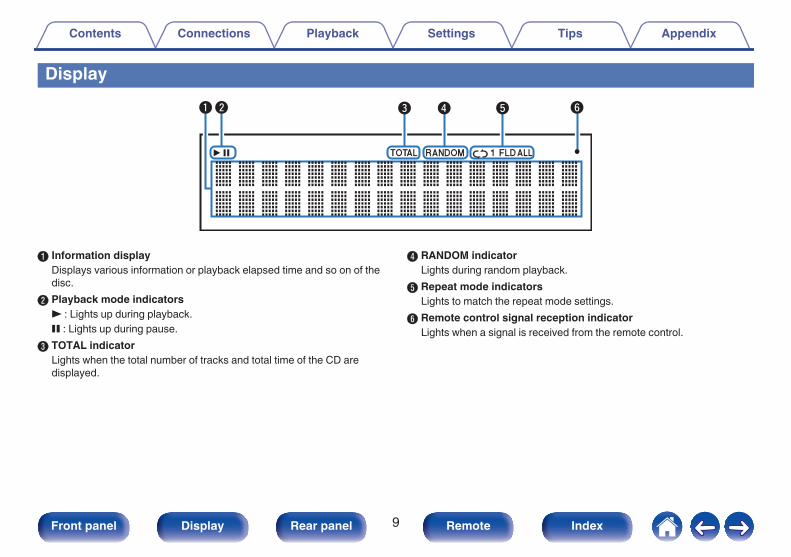
A Information displayDisplays various information or playback elapsed time and so on of thedisc.
B Playback mode indicators1 : Lights up during playback.3 : Lights up during pause.
C TOTAL indicatorLights when the total number of tracks and total time of the CD aredisplayed.
D RANDOM indicatorLights during random playback.
E Repeat mode indicatorsLights to match the repeat mode settings.
F Remote control signal reception indicatorLights when a signal is received from the remote control.
Contents Connections Playback Settings Tips Appendix
9Front panel Display Rear panel Remote Index
Rear panel
.
q w e tr
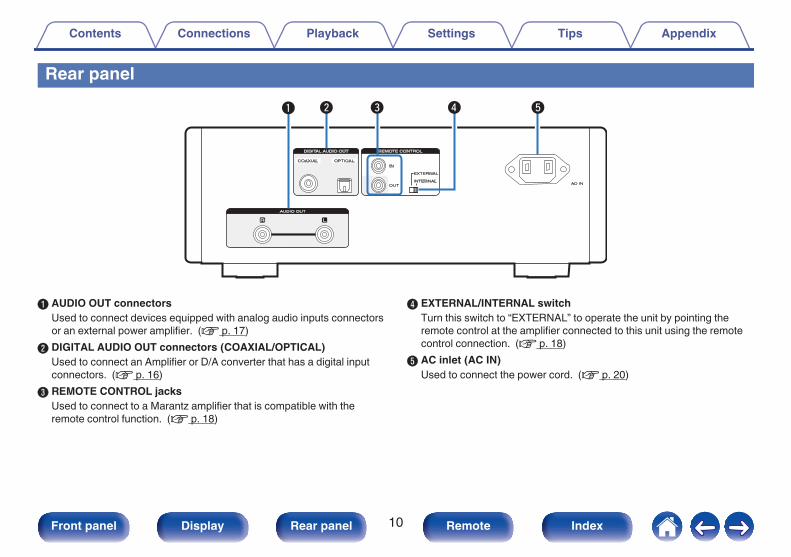
A AUDIO OUT connectorsUsed to connect devices equipped with analog audio inputs connectorsor an external power amplifier. (v p. 17)
B DIGITAL AUDIO OUT connectors (COAXIAL/OPTICAL)Used to connect an Amplifier or D/A converter that has a digital inputconnectors. (v p. 16)
C REMOTE CONTROL jacksUsed to connect to a Marantz amplifier that is compatible with theremote control function. (v p. 18)
D EXTERNAL/INTERNAL switchTurn this switch to “EXTERNAL” to operate the unit by pointing theremote control at the amplifier connected to this unit using the remotecontrol connection. (v p. 18)
E AC inlet (AC IN)Used to connect the power cord. (v p. 20)
Contents Connections Playback Settings Tips Appendix
10Front panel Display Rear panel Remote Index
Remote control unit
.
wq
e
r
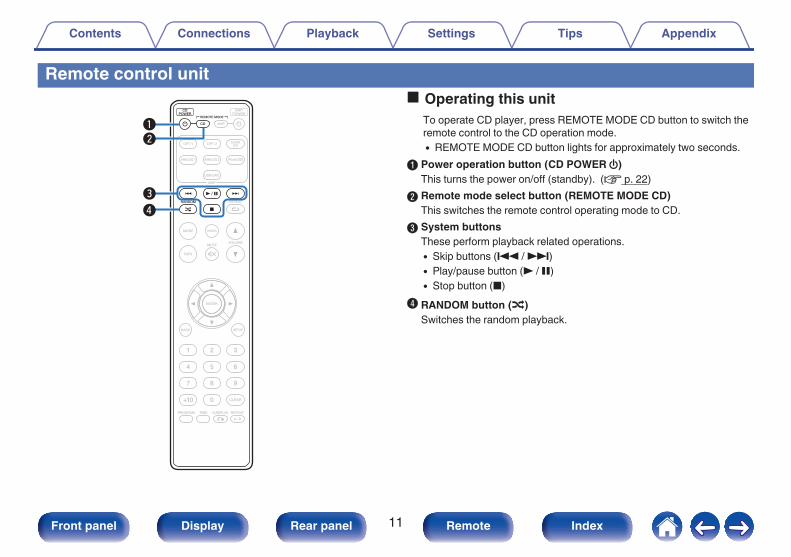
o Operating this unitTo operate CD player, press REMOTE MODE CD button to switch theremote control to the CD operation mode.0 REMOTE MODE CD button lights for approximately two seconds.
A Power operation button (CD POWER X)This turns the power on/off (standby). (v p. 22)
B Remote mode select button (REMOTE MODE CD)This switches the remote control operating mode to CD.
C System buttonsThese perform playback related operations.0 Skip buttons (8 / 9)0 Play/pause button (1 / 3)0 Stop button (2)
D RANDOM button (P)Switches the random playback.
Contents Connections Playback Settings Tips Appendix
11Front panel Display Rear panel Remote Index

.
i
u
y
t
Q1
o
Q0
E Playback mode switching button (MODE)This switches the playback mode.
F Information button (INFO)This switches the track information shown in the display duringplayback.
G Cursor buttons (uio p)These select items.
H BACK buttonThis returns to the previous item.
I Number buttons (0 – 9, +10)These enter letters or numbers into the unit.
J Program button (PROGRAM)This sets program playback. (v p. 25)
K TIME buttonThis switches the playback time display.
Contents Connections Playback Settings Tips Appendix
12Front panel Display Rear panel Remote Index
.
Q6
Q7Q8
Q2
Q5
Q4
Q3
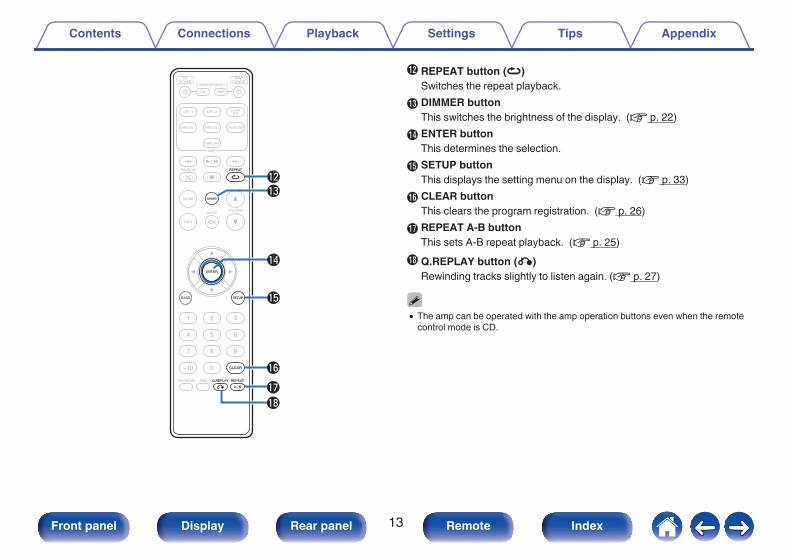
L REPEAT button (L)Switches the repeat playback.
M DIMMER buttonThis switches the brightness of the display. (v p. 22)
N ENTER buttonThis determines the selection.
O SETUP buttonThis displays the setting menu on the display. (v p. 33)
P CLEAR buttonThis clears the program registration. (v p. 26)
Q REPEAT A-B buttonThis sets A-B repeat playback. (v p. 25)
R Q.REPLAY button (P)Rewinding tracks slightly to listen again. (v p. 27)
0 The amp can be operated with the amp operation buttons even when the remotecontrol mode is CD.
Contents Connections Playback Settings Tips Appendix
13Front panel Display Rear panel Remote Index
.
e
w
q
t
r
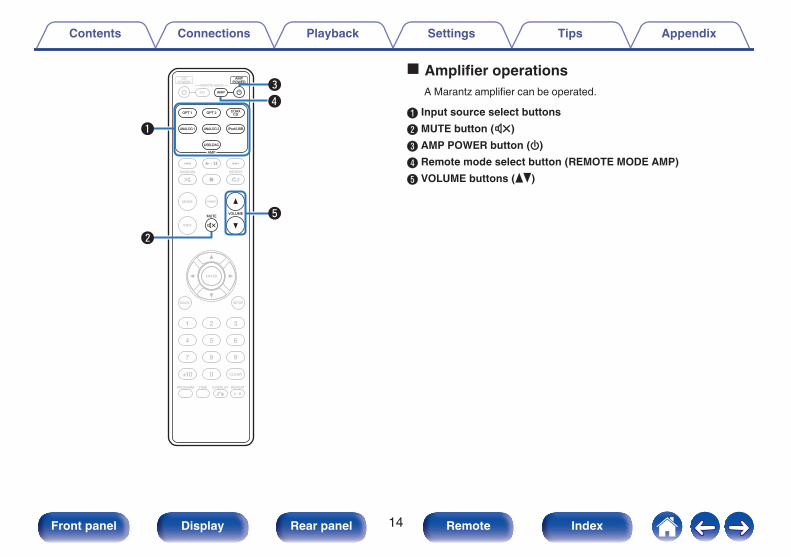
o Amplifier operationsA Marantz amplifier can be operated.
A Input source select buttonsB MUTE button (:)C AMP POWER button (X)D Remote mode select button (REMOTE MODE AMP)E VOLUME buttons (df)
Contents Connections Playback Settings Tips Appendix
14Front panel Display Rear panel Remote Index

o ContentsConnecting to a device with digital audio input connectors 16Connecting to a stereo audio amplifier 17Connecting devices with remote control connectors 18Connecting the timer device 19Connecting the power cord 20
NOTE0 Do not plug in the power cord until all connections have been completed.0 Do not bundle power cords together with connection cables. Doing so can result in
noise.
o Cables used for connectionsProvide necessary cables according to the devices you want to connect.
Audio cable (Sold separately).
R
L
R
L
Remote connector cable(supplied)
.
Optical cable(Sold separately)
.
Coaxial digital cable(supplied)
.
Contents Connections Playback Settings Tips AppendixConnections
15Front panel Display Rear panel Remote Index
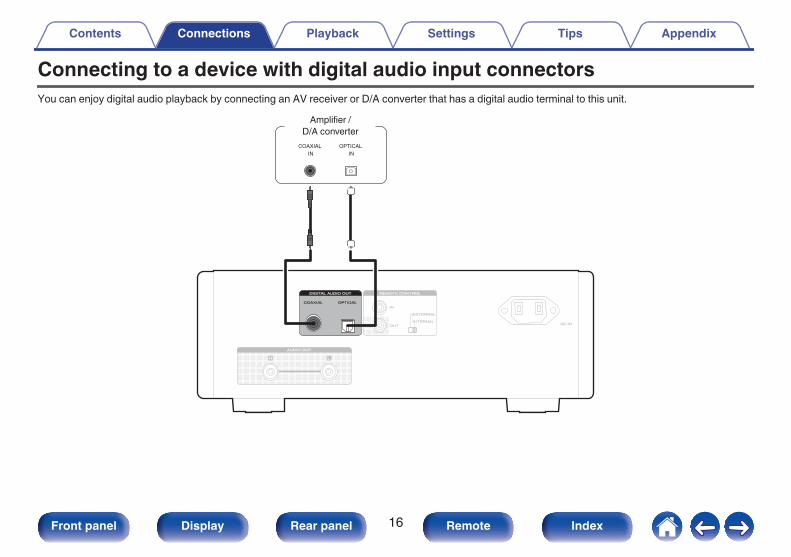
Connecting to a device with digital audio input connectorsYou can enjoy digital audio playback by connecting an AV receiver or D/A converter that has a digital audio terminal to this unit.
.
OPTICALIN
COAXIALIN
Amplifier / D/A converter
Contents Connections Playback Settings Tips Appendix
16Front panel Display Rear panel Remote Index
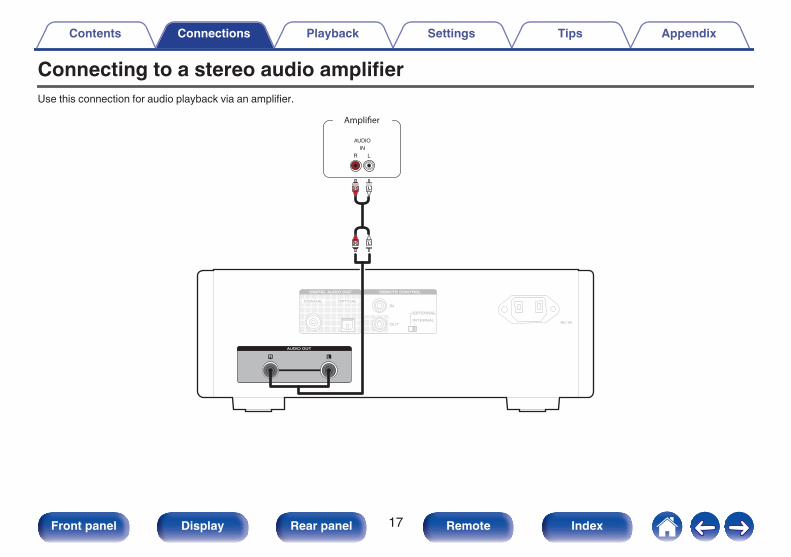
Connecting to a stereo audio amplifierUse this connection for audio playback via an amplifier.
.
R L
R L
AUDIO
R LIN
Amplifier
Contents Connections Playback Settings Tips Appendix
17Front panel Display Rear panel Remote Index
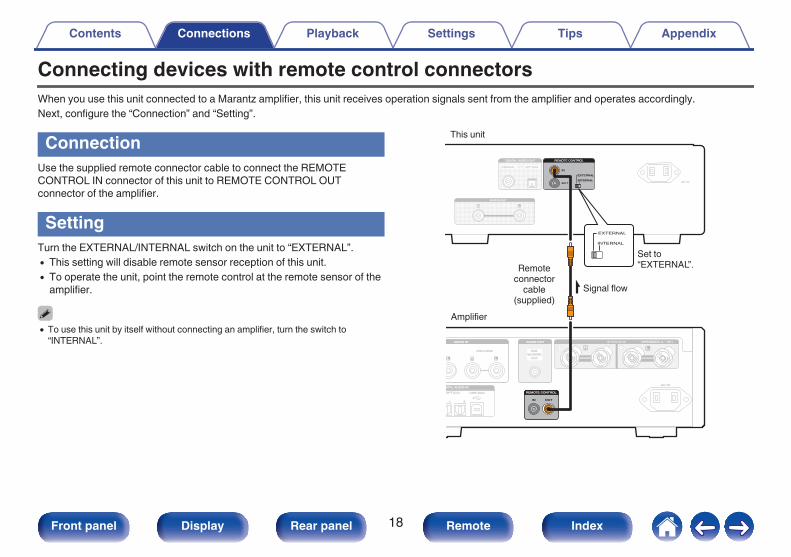
Connecting devices with remote control connectorsWhen you use this unit connected to a Marantz amplifier, this unit receives operation signals sent from the amplifier and operates accordingly.Next, configure the “Connection” and “Setting”.
ConnectionUse the supplied remote connector cable to connect the REMOTECONTROL IN connector of this unit to REMOTE CONTROL OUTconnector of the amplifier.
SettingTurn the EXTERNAL/INTERNAL switch on the unit to “EXTERNAL”.0 This setting will disable remote sensor reception of this unit.0 To operate the unit, point the remote control at the remote sensor of the
amplifier.
0 To use this unit by itself without connecting an amplifier, turn the switch to“INTERNAL”.
.
GITAL AUDIO INDIGITAL AUDIO IN
USB-DACUSB-DACOPTICALOPTICAL
1 2
L LR
SUB SUB WOOFERWOOFER
OUTOUT
ANALOG2ANALOG2ANALOG1
AC INAC IN
AUDIO OUT AUDIO OUT AUDIO IN AUDIO IN
ININ OUTOUT
REMOTE CONTROLREMOTE CONTROL
This unit
Remote connector
cable (supplied)
Signal flow
Set to “EXTERNAL”.
Amplifier
Contents Connections Playback Settings Tips Appendix
18Front panel Display Rear panel Remote Index
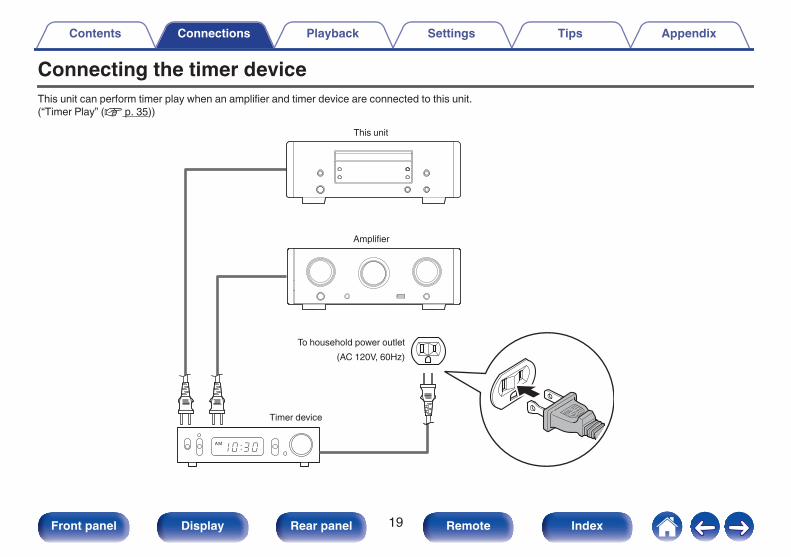
Connecting the timer deviceThis unit can perform timer play when an amplifier and timer device are connected to this unit.(“Timer Play” (v p. 35))
.
This unit
Amplifier
To household power outlet (AC 120V, 60Hz)
Timer device
Contents Connections Playback Settings Tips Appendix
19Front panel Display Rear panel Remote Index
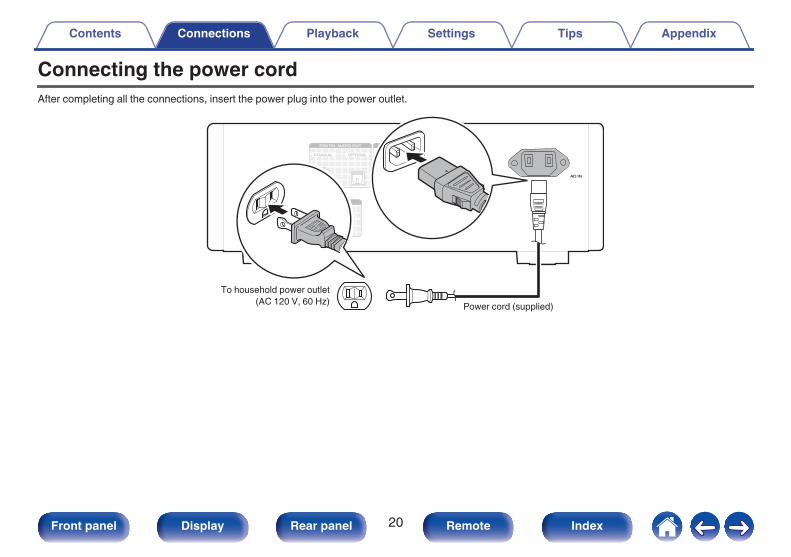
Connecting the power cordAfter completing all the connections, insert the power plug into the power outlet.
.
Power cord (supplied)
To household power outlet (AC 120 V, 60 Hz)
Contents Connections Playback Settings Tips Appendix
20Front panel Display Rear panel Remote Index
o ContentsBasic operation 22Playing CDs 23Playing DATA CDs (MP3, WMA and AAC files) 29
Contents Connections Playback Settings Tips AppendixPlayback
21Front panel Display Rear panel Remote Index
Basic operation
.
CD POWER X
DIMMER
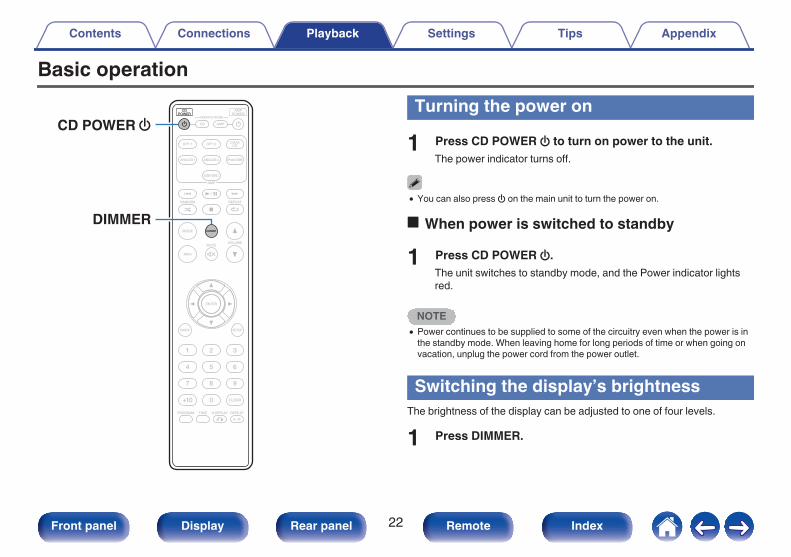
Turning the power on
1 Press CD POWER X to turn on power to the unit.The power indicator turns off.
0 You can also press X on the main unit to turn the power on.
o When power is switched to standby
1 Press CD POWER X.The unit switches to standby mode, and the Power indicator lightsred.
NOTE0 Power continues to be supplied to some of the circuitry even when the power is in
the standby mode. When leaving home for long periods of time or when going onvacation, unplug the power cord from the power outlet.
Switching the display’s brightnessThe brightness of the display can be adjusted to one of four levels.
1 Press DIMMER.
Contents Connections Playback Settings Tips Appendix
22Front panel Display Rear panel Remote Index
Playing CDs
.
CLEAR
Q.REPLAY
INFO
TIMEREPEAT A-B
REPEAT
0 – 9,+10
8 91/32
RANDOM
PROGRAM
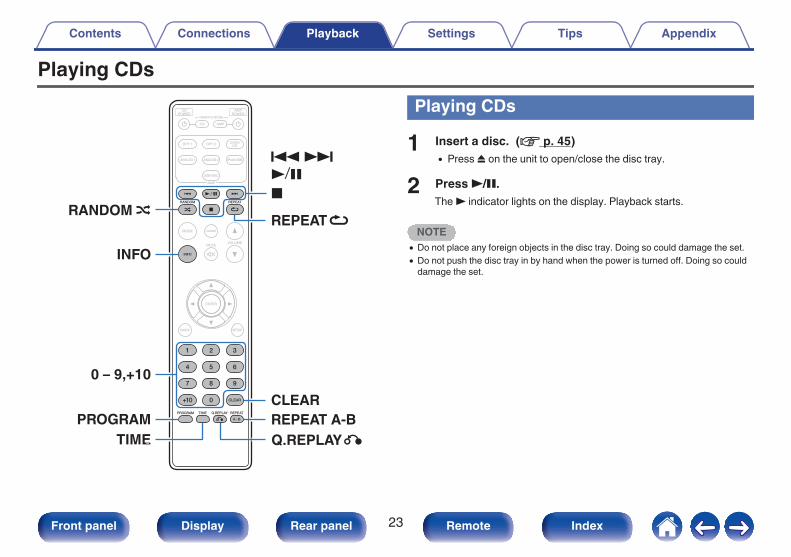
Playing CDs
1 Insert a disc. (v p. 45)0 Press 5 on the unit to open/close the disc tray.
2 Press 1/3.The 1 indicator lights on the display. Playback starts.
NOTE0 Do not place any foreign objects in the disc tray. Doing so could damage the set.0 Do not push the disc tray in by hand when the power is turned off. Doing so could
damage the set.
Contents Connections Playback Settings Tips Appendix
23Front panel Display Rear panel Remote Index
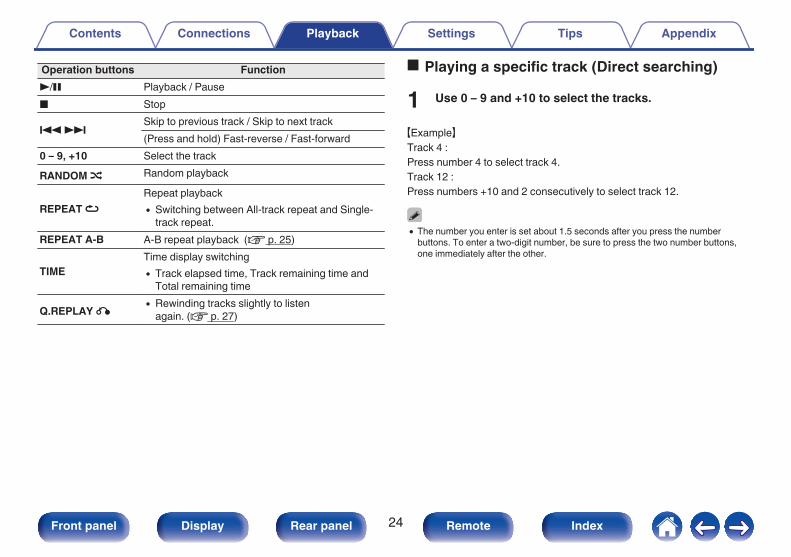
Operation buttons Function1/3 Playback / Pause2 Stop
8 9 Skip to previous track / Skip to next track(Press and hold) Fast-reverse / Fast-forward
0 – 9, +10 Select the trackRANDOM P Random playback
REPEAT LRepeat playback0 Switching between All-track repeat and Single-
track repeat.REPEAT A-B A-B repeat playback (v p. 25)
TIMETime display switching0 Track elapsed time, Track remaining time and
Total remaining time
Q.REPLAY P 0 Rewinding tracks slightly to listenagain. (v p. 27)
o Playing a specific track (Direct searching)
1 Use 0 – 9 and +10 to select the tracks.
GExampleHTrack 4 :Press number 4 to select track 4.Track 12 :Press numbers +10 and 2 consecutively to select track 12.
0 The number you enter is set about 1.5 seconds after you press the numberbuttons. To enter a two-digit number, be sure to press the two number buttons,one immediately after the other.
Contents Connections Playback Settings Tips Appendix
24Front panel Display Rear panel Remote Index
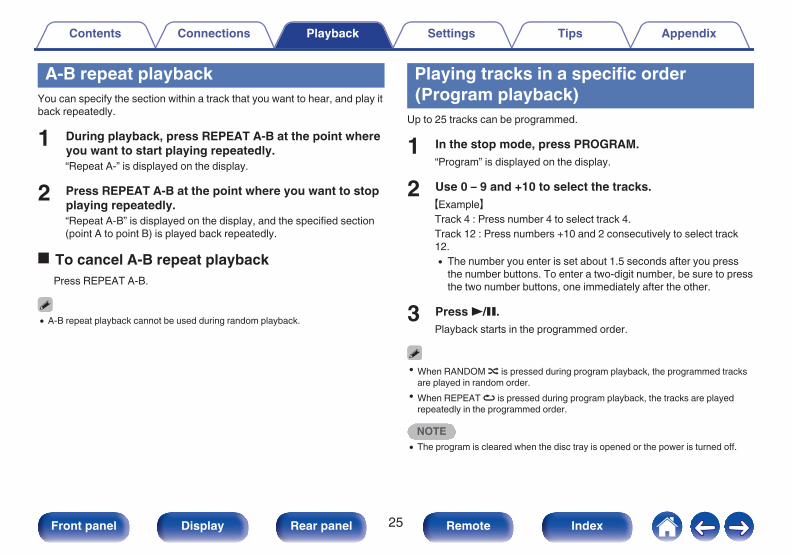
A-B repeat playbackYou can specify the section within a track that you want to hear, and play itback repeatedly.
1 During playback, press REPEAT A-B at the point whereyou want to start playing repeatedly.“Repeat A-” is displayed on the display.
2 Press REPEAT A-B at the point where you want to stopplaying repeatedly.“Repeat A-B” is displayed on the display, and the specified section(point A to point B) is played back repeatedly.
o To cancel A-B repeat playbackPress REPEAT A-B.
0 A-B repeat playback cannot be used during random playback.
Playing tracks in a specific order(Program playback)
Up to 25 tracks can be programmed.
1 In the stop mode, press PROGRAM.“Program” is displayed on the display.
2 Use 0 – 9 and +10 to select the tracks.GExampleHTrack 4 : Press number 4 to select track 4.Track 12 : Press numbers +10 and 2 consecutively to select track12.0 The number you enter is set about 1.5 seconds after you press
the number buttons. To enter a two-digit number, be sure to pressthe two number buttons, one immediately after the other.
3 Press 1/3.Playback starts in the programmed order.
0 When RANDOM P is pressed during program playback, the programmed tracksare played in random order.
0 When REPEAT L is pressed during program playback, the tracks are playedrepeatedly in the programmed order.
NOTE0 The program is cleared when the disc tray is opened or the power is turned off.
Contents Connections Playback Settings Tips Appendix
25Front panel Display Rear panel Remote Index
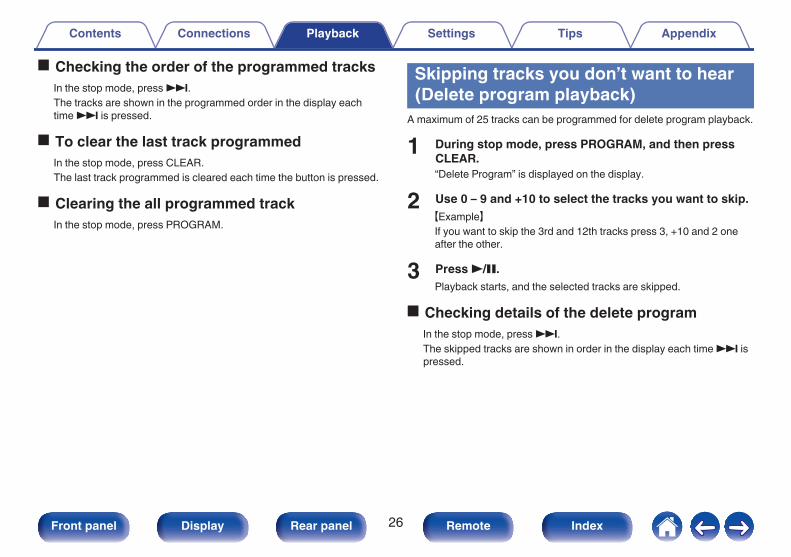
o Checking the order of the programmed tracksIn the stop mode, press 9.The tracks are shown in the programmed order in the display eachtime 9 is pressed.
o To clear the last track programmedIn the stop mode, press CLEAR.The last track programmed is cleared each time the button is pressed.
o Clearing the all programmed trackIn the stop mode, press PROGRAM.
Skipping tracks you don’t want to hear(Delete program playback)
A maximum of 25 tracks can be programmed for delete program playback.
1 During stop mode, press PROGRAM, and then pressCLEAR.“Delete Program” is displayed on the display.
2 Use 0 – 9 and +10 to select the tracks you want to skip.GExampleHIf you want to skip the 3rd and 12th tracks press 3, +10 and 2 oneafter the other.
3 Press 1/3.Playback starts, and the selected tracks are skipped.
o Checking details of the delete programIn the stop mode, press 9.The skipped tracks are shown in order in the display each time 9 ispressed.
Contents Connections Playback Settings Tips Appendix
26Front panel Display Rear panel Remote Index
o To clear the last delete program trackIn the stop mode, press CLEAR.The last track set in the delete program is cleared in order each timeCLEAR is pressed.
o Clearing the all delete program tracksIn the stop mode, press PROGRAM.
Rewinding tracks slightly to listenagain (Quick replay)
Simply press Q.REPLAY P during playback to rewind the track theamount of time set in the menu and playback again. (Default setting : 10sec)For details on the settings, see “Quick Replay” (v p. 35).
NOTE0 The quick replay function is enabled only during CD playback.0 Quick replay cannot by used between different tracks. Also, if the overall time of
the track being played back is shorter than the quick play setting time, or if theplayback time is shorter than the quick play setting time, when Q.REPLAY P ispressed the track is played back from the start.
Contents Connections Playback Settings Tips Appendix
27Front panel Display Rear panel Remote Index

Switching the display (CD-TEXT)0 You can view text information stored on a disc as CD-TEXT on this unit.Mainly, information on the current track being played is displayed.0 A maximum of 32 characters can be displayed.
1 During playback, press INFO.Switching between the title name, artist name and album name.
0 You can set which information is displayed first when INFO is pressed.0 The player can display the following characters:
ABCDEFGHIJKLMNOPQRSTUVWXYZabcdefghijklmnopqrstuvwxyz0123456789! ” # $ % & : ; < > ? @ \ [ ] _ ` l ~ ^ ’( ) * + , - . / = (space)
0 A period (“.”) is displayed instead of any character that cannot be displayed by theplayer.
NOTE0 As the stored information differs depending on the disc, all of the information may
not be displayed.
Contents Connections Playback Settings Tips Appendix
28Front panel Display Rear panel Remote Index
Playing DATA CDs (MP3, WMA and AAC files)
.
INFO
TIMEREPEAT A-B
REPEAT
0 – 9,+10
8 91/32
MODE
uio pENTER
RANDOM
BACK
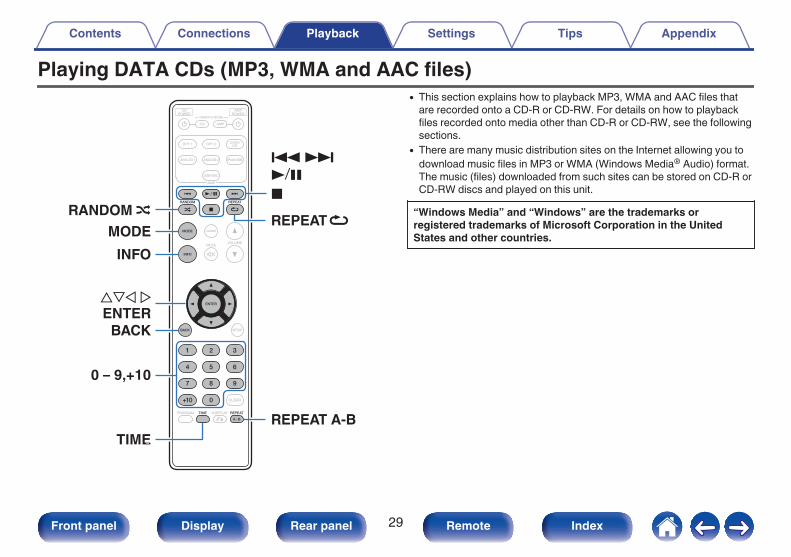
0 This section explains how to playback MP3, WMA and AAC files thatare recorded onto a CD-R or CD-RW. For details on how to playbackfiles recorded onto media other than CD-R or CD-RW, see the followingsections.
0 There are many music distribution sites on the Internet allowing you todownload music files in MP3 or WMA (Windows Media® Audio) format.The music (files) downloaded from such sites can be stored on CD-R orCD-RW discs and played on this unit.
“Windows Media” and “Windows” are the trademarks orregistered trademarks of Microsoft Corporation in the UnitedStates and other countries.
Contents Connections Playback Settings Tips Appendix
29Front panel Display Rear panel Remote Index
Playing files
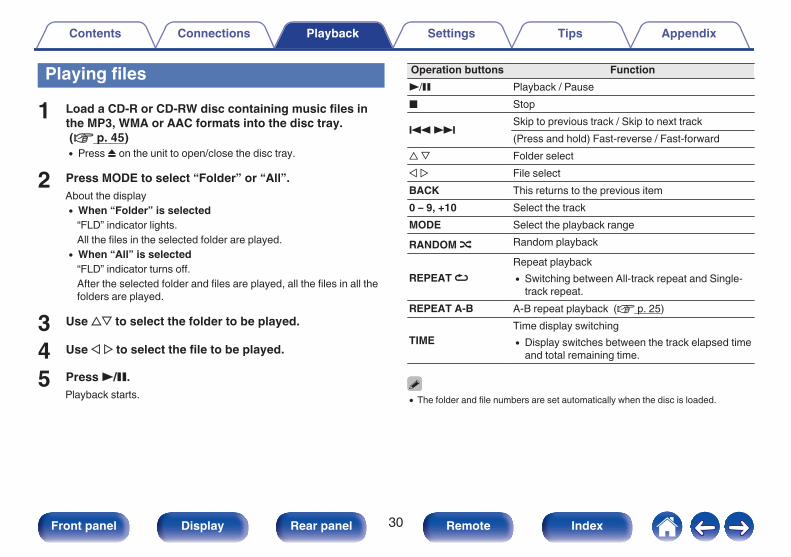
1 Load a CD-R or CD-RW disc containing music files inthe MP3, WMA or AAC formats into the disc tray. (v p. 45)0 Press 5 on the unit to open/close the disc tray.
2 Press MODE to select “Folder” or “All”.About the display0 When “Folder” is selected
“FLD” indicator lights.All the files in the selected folder are played.
0 When “All” is selected“FLD” indicator turns off.After the selected folder and files are played, all the files in all thefolders are played.
3 Use ui to select the folder to be played.
4 Use o p to select the file to be played.
5 Press 1/3.Playback starts.
Operation buttons Function1/3 Playback / Pause2 Stop
8 9 Skip to previous track / Skip to next track(Press and hold) Fast-reverse / Fast-forward
u i Folder selecto p File selectBACK This returns to the previous item0 – 9, +10 Select the trackMODE Select the playback rangeRANDOM P Random playback
REPEAT LRepeat playback0 Switching between All-track repeat and Single-
track repeat.REPEAT A-B A-B repeat playback (v p. 25)
TIMETime display switching0 Display switches between the track elapsed time
and total remaining time.
0 The folder and file numbers are set automatically when the disc is loaded.
Contents Connections Playback Settings Tips Appendix
30Front panel Display Rear panel Remote Index
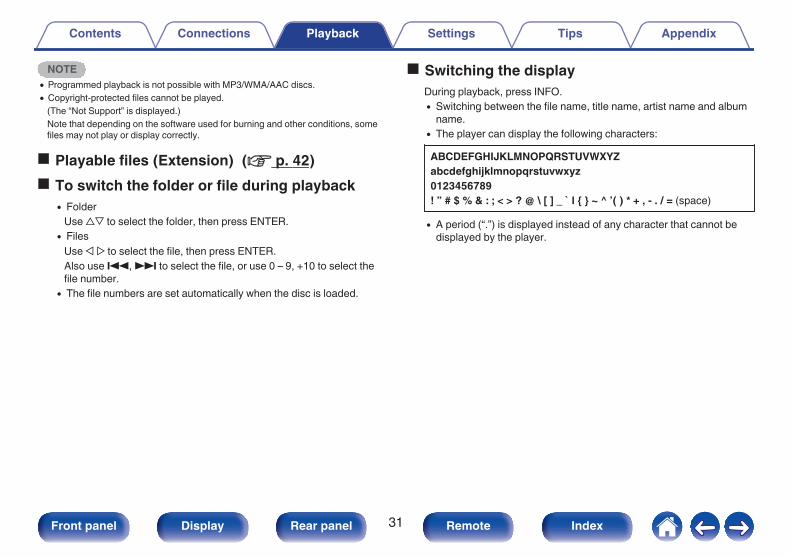
NOTE0 Programmed playback is not possible with MP3/WMA/AAC discs.0 Copyright-protected files cannot be played.
(The “Not Support” is displayed.)Note that depending on the software used for burning and other conditions, somefiles may not play or display correctly.
o Playable files (Extension) (v p. 42)o To switch the folder or file during playback
0 FolderUse ui to select the folder, then press ENTER.
0 FilesUse o p to select the file, then press ENTER.Also use 8, 9 to select the file, or use 0 – 9, +10 to select thefile number.
0 The file numbers are set automatically when the disc is loaded.
o Switching the displayDuring playback, press INFO.0 Switching between the file name, title name, artist name and album
name.0 The player can display the following characters:ABCDEFGHIJKLMNOPQRSTUVWXYZabcdefghijklmnopqrstuvwxyz0123456789! ” # $ % & : ; < > ? @ \ [ ] _ ` l ~ ^ ’( ) * + , - . / = (space)
0 A period (“.”) is displayed instead of any character that cannot bedisplayed by the player.
Contents Connections Playback Settings Tips Appendix
31Front panel Display Rear panel Remote Index
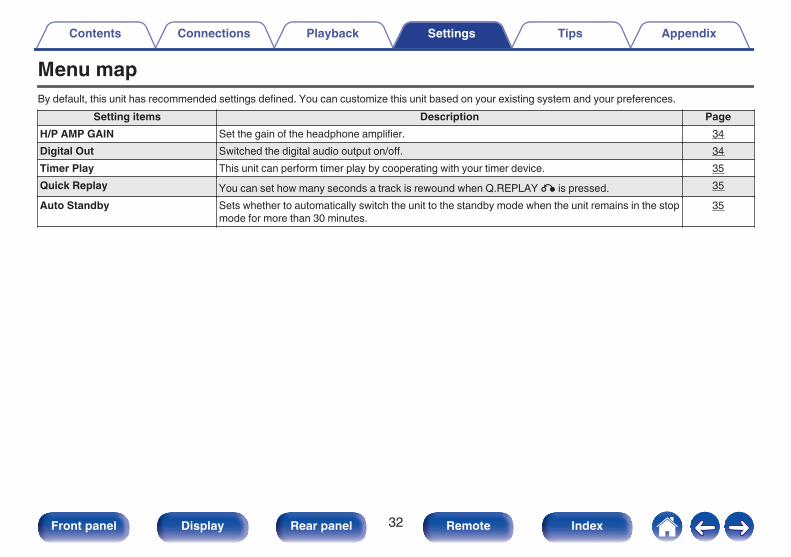
Menu mapBy default, this unit has recommended settings defined. You can customize this unit based on your existing system and your preferences.
Setting items Description PageH/P AMP GAIN Set the gain of the headphone amplifier. 34Digital Out Switched the digital audio output on/off. 34Timer Play This unit can perform timer play by cooperating with your timer device. 35Quick Replay You can set how many seconds a track is rewound when Q.REPLAY P is pressed. 35Auto Standby Sets whether to automatically switch the unit to the standby mode when the unit remains in the stop
mode for more than 30 minutes.35
Contents Connections Playback Settings Tips AppendixSettings
32Front panel Display Rear panel Remote Index
.
SETUP
uio pENTERBACK
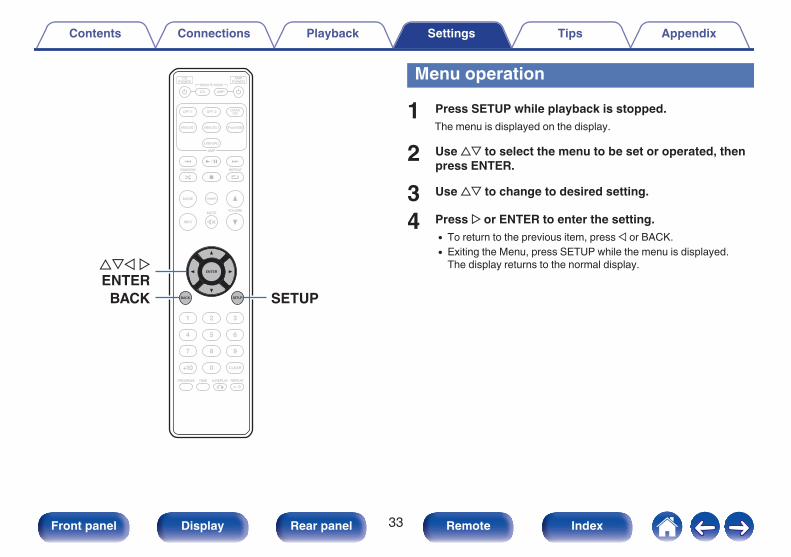
Menu operation
1 Press SETUP while playback is stopped.The menu is displayed on the display.
2 Use ui to select the menu to be set or operated, thenpress ENTER.
3 Use ui to change to desired setting.
4 Press p or ENTER to enter the setting.0 To return to the previous item, press o or BACK.0 Exiting the Menu, press SETUP while the menu is displayed.
The display returns to the normal display.
Contents Connections Playback Settings Tips Appendix
33Front panel Display Rear panel Remote Index
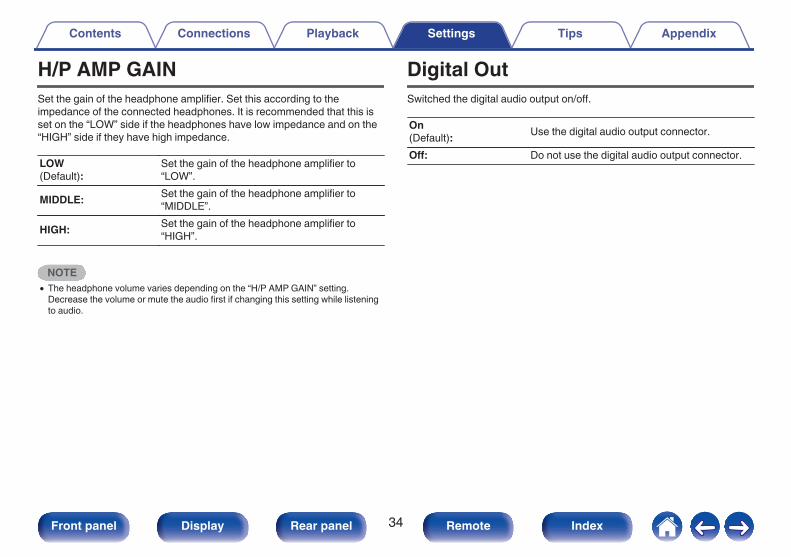
H/P AMP GAINSet the gain of the headphone amplifier. Set this according to theimpedance of the connected headphones. It is recommended that this isset on the “LOW” side if the headphones have low impedance and on the“HIGH” side if they have high impedance.
LOW(Default):
Set the gain of the headphone amplifier to“LOW”.
MIDDLE: Set the gain of the headphone amplifier to“MIDDLE”.
HIGH: Set the gain of the headphone amplifier to“HIGH”.
NOTE0 The headphone volume varies depending on the “H/P AMP GAIN” setting.
Decrease the volume or mute the audio first if changing this setting while listeningto audio.
Digital OutSwitched the digital audio output on/off.
On(Default): Use the digital audio output connector.Off: Do not use the digital audio output connector.
Contents Connections Playback Settings Tips Appendix
34Front panel Display Rear panel Remote Index
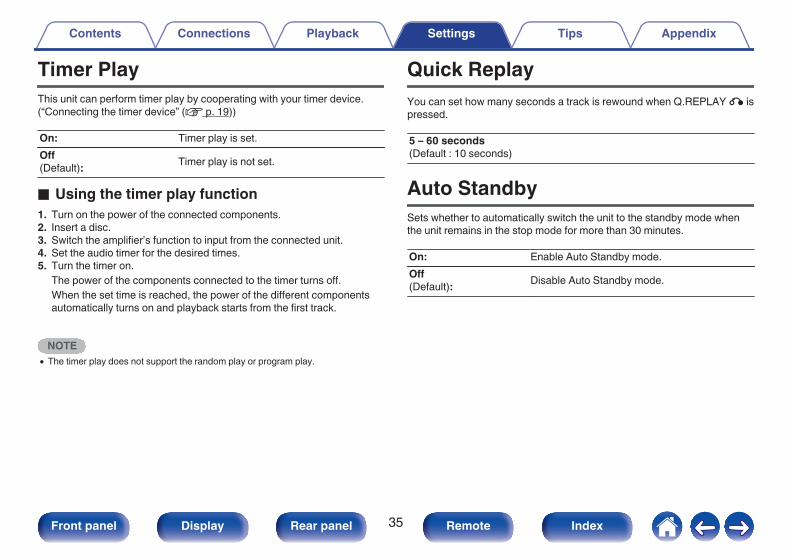
Timer PlayThis unit can perform timer play by cooperating with your timer device.(“Connecting the timer device” (v p. 19))
On: Timer play is set.Off(Default): Timer play is not set.
o Using the timer play function1. Turn on the power of the connected components.2. Insert a disc.3. Switch the amplifier’s function to input from the connected unit.4. Set the audio timer for the desired times.5. Turn the timer on.
The power of the components connected to the timer turns off.When the set time is reached, the power of the different componentsautomatically turns on and playback starts from the first track.
NOTE0 The timer play does not support the random play or program play.
Quick ReplayYou can set how many seconds a track is rewound when Q.REPLAY P ispressed.
5 – 60 seconds(Default : 10 seconds)
Auto StandbySets whether to automatically switch the unit to the standby mode whenthe unit remains in the stop mode for more than 30 minutes.
On: Enable Auto Standby mode.Off(Default): Disable Auto Standby mode.
Contents Connections Playback Settings Tips Appendix
35Front panel Display Rear panel Remote Index
o ContentsTipsI want to display CD-TEXT 37I want to skip tracks on a CD 37I want to repeatedly listen to a specific section 37I want to playback just the specified folder 37
TroubleshootingPower does not turn on / Power is turned off 38Operations cannot be performed through the remote control unit 39Display on this unit shows nothing 39No sound comes out 40Desired sound does not come out 40Cannot playback discs 41
Contents Connections Playback Settings Tips AppendixTips
36Front panel Display Rear panel Remote Index
TipsI want to display CD-TEXT0 This unit is compatible with CD-TEXT. Press the INFO button to switch the displayed information. (v p. 28)I want to skip tracks on a CD0 Select the tracks that you want to skip in delete program playback mode. (v p. 26)I want to repeatedly listen to a specific section0 Set A-B repeat playback. (v p. 25)I want to playback just the specified folder0 The MODE button to set the playback range to “Folder”. (v p. 30)
Contents Connections Playback Settings Tips Appendix
37Front panel Display Rear panel Remote Index
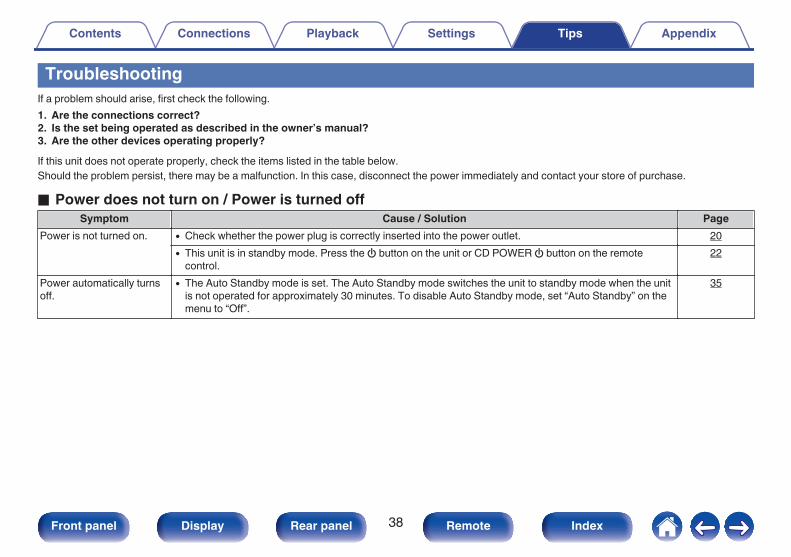
TroubleshootingIf a problem should arise, first check the following.1. Are the connections correct?2. Is the set being operated as described in the owner’s manual?3. Are the other devices operating properly?If this unit does not operate properly, check the items listed in the table below.Should the problem persist, there may be a malfunction. In this case, disconnect the power immediately and contact your store of purchase.
o Power does not turn on / Power is turned offSymptom Cause / Solution Page
Power is not turned on. 0 Check whether the power plug is correctly inserted into the power outlet. 200 This unit is in standby mode. Press the X button on the unit or CD POWER X button on the remote
control.22
Power automatically turnsoff.
0 The Auto Standby mode is set. The Auto Standby mode switches the unit to standby mode when the unitis not operated for approximately 30 minutes. To disable Auto Standby mode, set “Auto Standby” on themenu to “Off”.
35
Contents Connections Playback Settings Tips Appendix
38Front panel Display Rear panel Remote Index
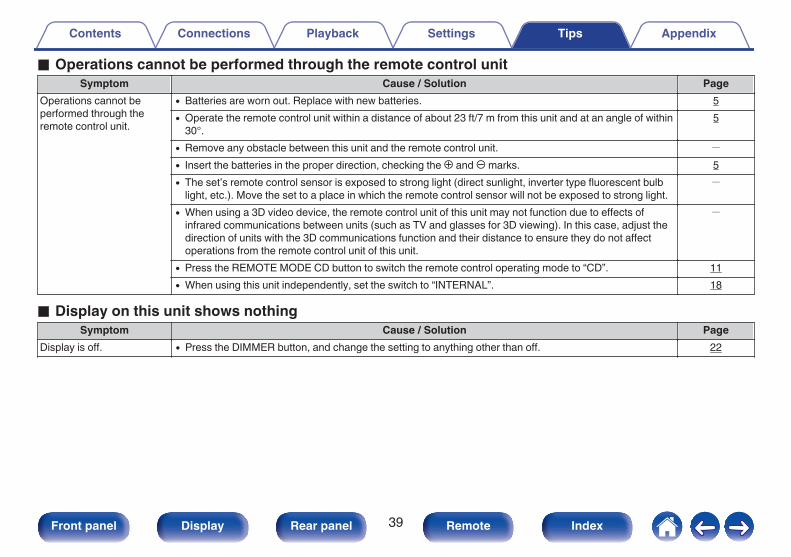
o Operations cannot be performed through the remote control unitSymptom Cause / Solution Page
Operations cannot beperformed through theremote control unit.
0 Batteries are worn out. Replace with new batteries. 50 Operate the remote control unit within a distance of about 23 ft/7 m from this unit and at an angle of within
30°.5
0 Remove any obstacle between this unit and the remote control unit. -
0 Insert the batteries in the proper direction, checking the q and w marks. 50 The set’s remote control sensor is exposed to strong light (direct sunlight, inverter type fluorescent bulb
light, etc.). Move the set to a place in which the remote control sensor will not be exposed to strong light.-
0 When using a 3D video device, the remote control unit of this unit may not function due to effects ofinfrared communications between units (such as TV and glasses for 3D viewing). In this case, adjust thedirection of units with the 3D communications function and their distance to ensure they do not affectoperations from the remote control unit of this unit.
-
0 Press the REMOTE MODE CD button to switch the remote control operating mode to “CD”. 110 When using this unit independently, set the switch to “INTERNAL”. 18
o Display on this unit shows nothingSymptom Cause / Solution Page
Display is off. 0 Press the DIMMER button, and change the setting to anything other than off. 22
Contents Connections Playback Settings Tips Appendix
39Front panel Display Rear panel Remote Index
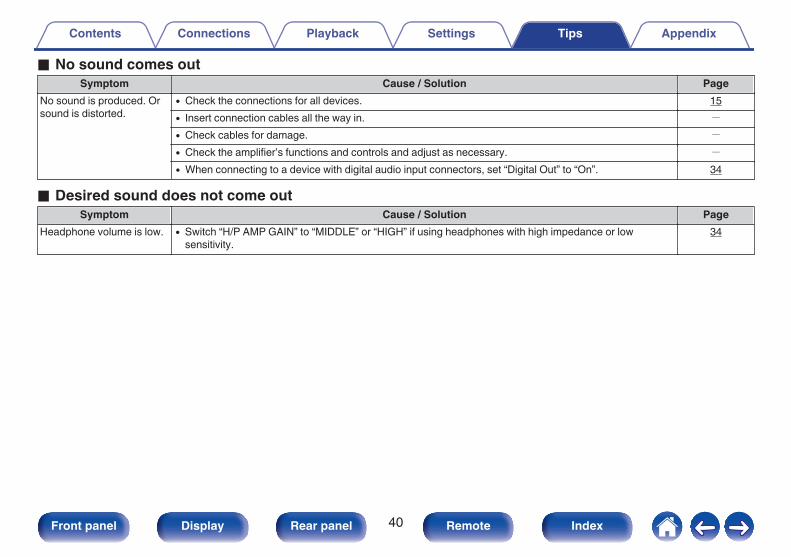
o No sound comes outSymptom Cause / Solution Page
No sound is produced. Orsound is distorted.
0 Check the connections for all devices. 150 Insert connection cables all the way in. -
0 Check cables for damage. -
0 Check the amplifier’s functions and controls and adjust as necessary. -
0 When connecting to a device with digital audio input connectors, set “Digital Out” to “On”. 34
o Desired sound does not come outSymptom Cause / Solution Page
Headphone volume is low. 0 Switch “H/P AMP GAIN” to “MIDDLE” or “HIGH” if using headphones with high impedance or lowsensitivity.
34
Contents Connections Playback Settings Tips Appendix
40Front panel Display Rear panel Remote Index
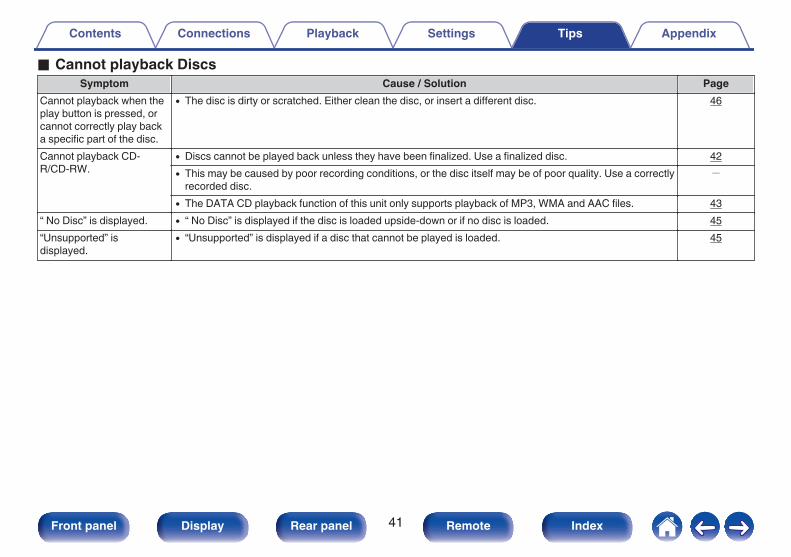
o Cannot playback DiscsSymptom Cause / Solution Page
Cannot playback when theplay button is pressed, orcannot correctly play backa specific part of the disc.
0 The disc is dirty or scratched. Either clean the disc, or insert a different disc. 46
Cannot playback CD-R/CD-RW.
0 Discs cannot be played back unless they have been finalized. Use a finalized disc. 420 This may be caused by poor recording conditions, or the disc itself may be of poor quality. Use a correctly
recorded disc.-
0 The DATA CD playback function of this unit only supports playback of MP3, WMA and AAC files. 43“ No Disc” is displayed. 0 “ No Disc” is displayed if the disc is loaded upside-down or if no disc is loaded. 45“Unsupported” isdisplayed.
0 “Unsupported” is displayed if a disc that cannot be played is loaded. 45
Contents Connections Playback Settings Tips Appendix
41Front panel Display Rear panel Remote Index
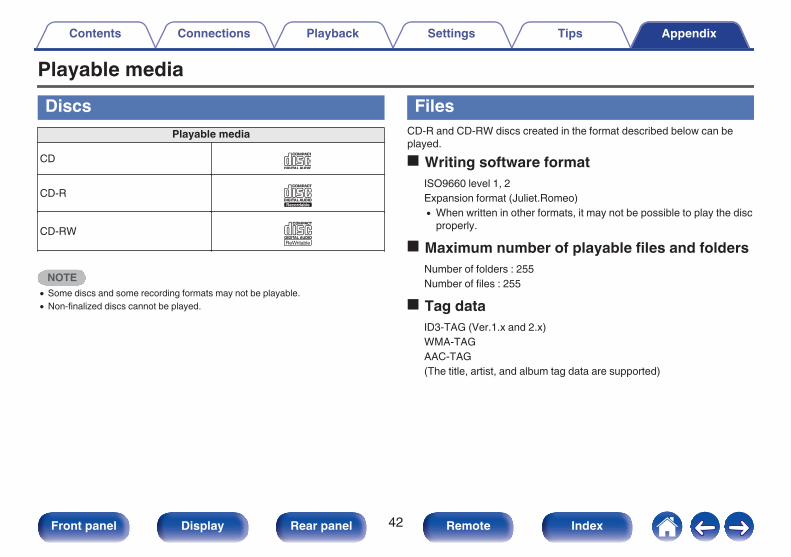
Playable mediaDiscs
Playable media
CD.
CD-R.
CD-RW.
NOTE0 Some discs and some recording formats may not be playable.0 Non-finalized discs cannot be played.
FilesCD-R and CD-RW discs created in the format described below can beplayed.o Writing software format
ISO9660 level 1, 2Expansion format (Juliet.Romeo)0 When written in other formats, it may not be possible to play the disc
properly.o Maximum number of playable files and folders
Number of folders : 255Number of files : 255
o Tag dataID3-TAG (Ver.1.x and 2.x)WMA-TAGAAC-TAG(The title, artist, and album tag data are supported)
Contents Connections Playback Settings Tips AppendixAppendix
42Front panel Display Rear panel Remote Index
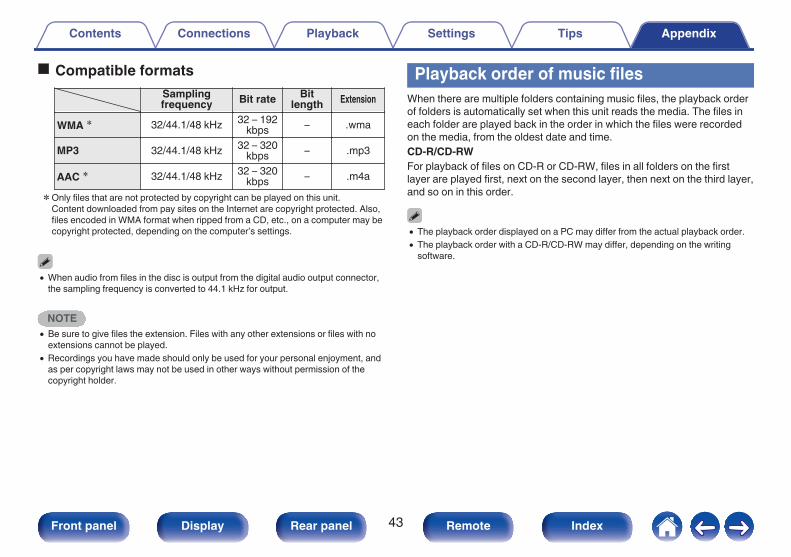
o Compatible formats Sampling
frequency Bit rate Bitlength Extension
WMA z 32/44.1/48 kHz 32 – 192kbps – .wma
MP3 32/44.1/48 kHz 32 – 320kbps – .mp3
AAC z 32/44.1/48 kHz 32 – 320kbps – .m4a
zOnly files that are not protected by copyright can be played on this unit.Content downloaded from pay sites on the Internet are copyright protected. Also,files encoded in WMA format when ripped from a CD, etc., on a computer may becopyright protected, depending on the computer’s settings.
0 When audio from files in the disc is output from the digital audio output connector,the sampling frequency is converted to 44.1 kHz for output.
NOTE0 Be sure to give files the extension. Files with any other extensions or files with no
extensions cannot be played.0 Recordings you have made should only be used for your personal enjoyment, and
as per copyright laws may not be used in other ways without permission of thecopyright holder.
Playback order of music filesWhen there are multiple folders containing music files, the playback orderof folders is automatically set when this unit reads the media. The files ineach folder are played back in the order in which the files were recordedon the media, from the oldest date and time.CD-R/CD-RWFor playback of files on CD-R or CD-RW, files in all folders on the firstlayer are played first, next on the second layer, then next on the third layer,and so on in this order.
0 The playback order displayed on a PC may differ from the actual playback order.0 The playback order with a CD-R/CD-RW may differ, depending on the writing
software.
Contents Connections Playback Settings Tips Appendix
43Front panel Display Rear panel Remote Index
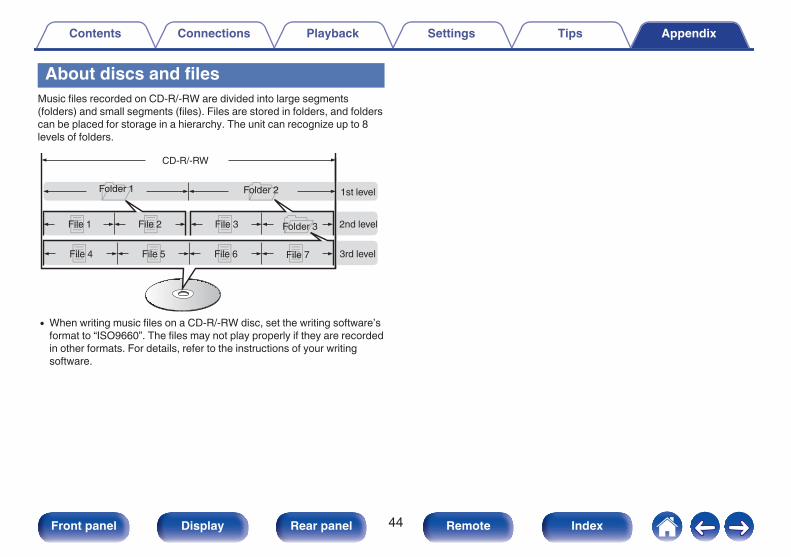
About discs and filesMusic files recorded on CD-R/-RW are divided into large segments(folders) and small segments (files). Files are stored in folders, and folderscan be placed for storage in a hierarchy. The unit can recognize up to 8levels of folders.
.
3rd levelFile 7File 6File 5File 4
2nd levelFolder 3File 3File 2File 1
1st levelFolder 1 Folder 2
CD-R/-RW
0 When writing music files on a CD-R/-RW disc, set the writing software’sformat to “ISO9660”. The files may not play properly if they are recordedin other formats. For details, refer to the instructions of your writingsoftware.
Contents Connections Playback Settings Tips Appendix
44Front panel Display Rear panel Remote Index
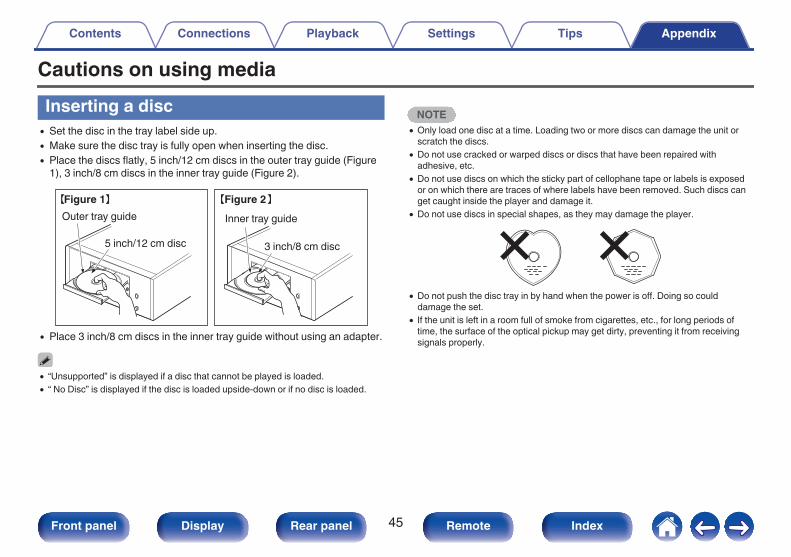
Cautions on using mediaInserting a disc0 Set the disc in the tray label side up.0 Make sure the disc tray is fully open when inserting the disc.0 Place the discs flatly, 5 inch/12 cm discs in the outer tray guide (Figure
1), 3 inch/8 cm discs in the inner tray guide (Figure 2).
.
5 inch/12 cm disc
Outer tray guide Inner tray guide
3 inch/8 cm disc
Figure 2Figure 1
0 Place 3 inch/8 cm discs in the inner tray guide without using an adapter.
0 “Unsupported” is displayed if a disc that cannot be played is loaded.0 “ No Disc” is displayed if the disc is loaded upside-down or if no disc is loaded.
NOTE0 Only load one disc at a time. Loading two or more discs can damage the unit or
scratch the discs.0 Do not use cracked or warped discs or discs that have been repaired with
adhesive, etc.0 Do not use discs on which the sticky part of cellophane tape or labels is exposed
or on which there are traces of where labels have been removed. Such discs canget caught inside the player and damage it.
0 Do not use discs in special shapes, as they may damage the player.
.
0 Do not push the disc tray in by hand when the power is off. Doing so coulddamage the set.
0 If the unit is left in a room full of smoke from cigarettes, etc., for long periods oftime, the surface of the optical pickup may get dirty, preventing it from receivingsignals properly.
Contents Connections Playback Settings Tips Appendix
45Front panel Display Rear panel Remote Index
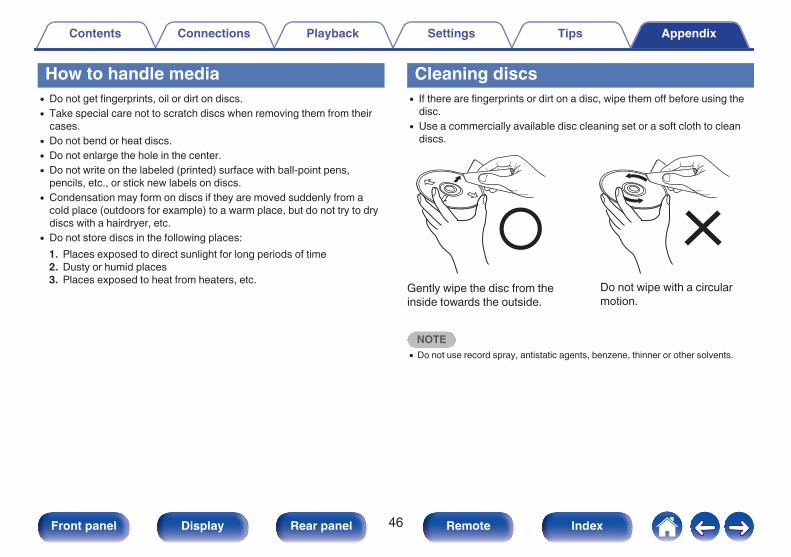
How to handle media0 Do not get fingerprints, oil or dirt on discs.0 Take special care not to scratch discs when removing them from their
cases.0 Do not bend or heat discs.0 Do not enlarge the hole in the center.0 Do not write on the labeled (printed) surface with ball-point pens,
pencils, etc., or stick new labels on discs.0 Condensation may form on discs if they are moved suddenly from a
cold place (outdoors for example) to a warm place, but do not try to drydiscs with a hairdryer, etc.
0 Do not store discs in the following places:1. Places exposed to direct sunlight for long periods of time2. Dusty or humid places3. Places exposed to heat from heaters, etc.
Cleaning discs0 If there are fingerprints or dirt on a disc, wipe them off before using the
disc.0 Use a commercially available disc cleaning set or a soft cloth to clean
discs.
.
Gently wipe the disc from the inside towards the outside.
Do not wipe with a circular motion.
NOTE0 Do not use record spray, antistatic agents, benzene, thinner or other solvents.
Contents Connections Playback Settings Tips Appendix
46Front panel Display Rear panel Remote Index
Explanation of termsMP3 (MPEG Audio Layer-3)This is an internationally standardized audio data compression scheme,using the “MPEG-1” video compression standard. It compresses the datavolume to about one eleventh its original size while maintaining soundquality equivalent to a music CD.WMA (Windows Media Audio)This is audio compression technology developed by MicrosoftCorporation.WMA data can be encoded using Windows Media® Player.To encode WMA files, only use applications authorized by MicrosoftCorporation. If you use an unauthorized application, the file may not workproperly.Sampling frequencySampling involves taking a reading of a sound wave (analog signal) atregular intervals and expressing the height of the wave at each reading indigitized format (producing a digital signal).The number of readings taken in one second is called the “samplingfrequency”. The larger the value, the closer the reproduced sound is to theoriginal.
Dynamic rangeThe difference between the maximum undistorted sound level and theminimum discernible level above the noise emitted by the device.Bit rateThis is the amount of audio data recorded on a disc that is read in onesecond.FinalizingThis process enables CDs recorded with a CD recorder or drive to beplayed by other players.Linear PCMThis is an uncompressed PCM (Pulse Code Modulation) signal. Unlikelossy compression audio sources such as MP3, no audio quality ordynamic range deteriorates.
Contents Connections Playback Settings Tips Appendix
47Front panel Display Rear panel Remote Index
Trademark information
.
Adobe, the Adobe logo and Reader are either registered trademarks ortrademarks of Adobe Systems Incorporated in the United States and/orother countries.
Contents Connections Playback Settings Tips Appendix
48Front panel Display Rear panel Remote Index
Specificationso Audio performance0 Analog output
Channels: 2-channelsPlayable frequency range: 2 Hz – 20 kHzPlayable frequency response: 2 Hz – 20 kHz (±0.5 dB)S/N: 110 dBDynamic range: 100 dBHarmonic distortion: 0.002 % (1 kHz)Wow & flutter: Crystal accuracy
0 Output levelSignal type: 2.2 V RMS stereoHeadphone output: 28 mW/32 Ω/ohms (variable maximum)
0 Digital outputCoaxial: 0.5 Vp-p / 75 Ω/ohmsOptical: –19 dBm
0 Optical readout systemLaser: AlGaAsWave length: 780 nmSignal type: 16-bit linear PCMSampling frequency: 44.1 kHz
Contents Connections Playback Settings Tips Appendix
49Front panel Display Rear panel Remote Index
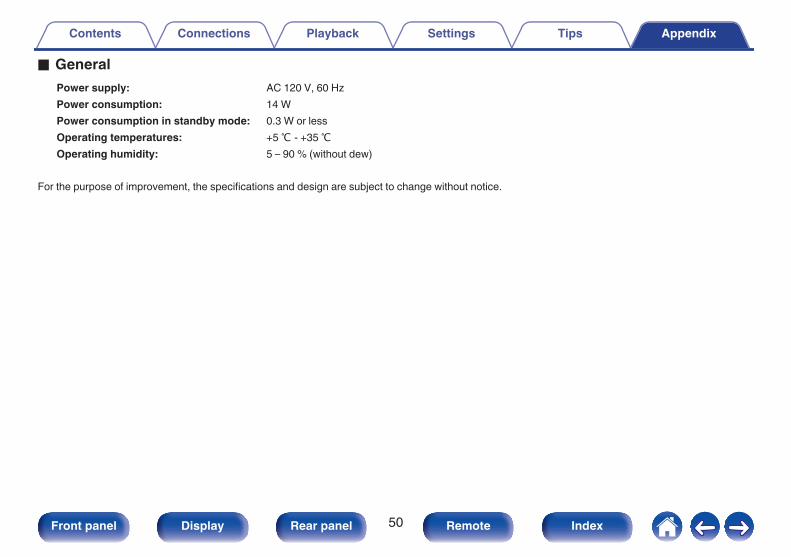
o GeneralPower supply: AC 120 V, 60 HzPower consumption: 14 WPower consumption in standby mode: 0.3 W or lessOperating temperatures: +5 - +35 Operating humidity: 5 – 90 % (without dew)
For the purpose of improvement, the specifications and design are subject to change without notice.
Contents Connections Playback Settings Tips Appendix
50Front panel Display Rear panel Remote Index
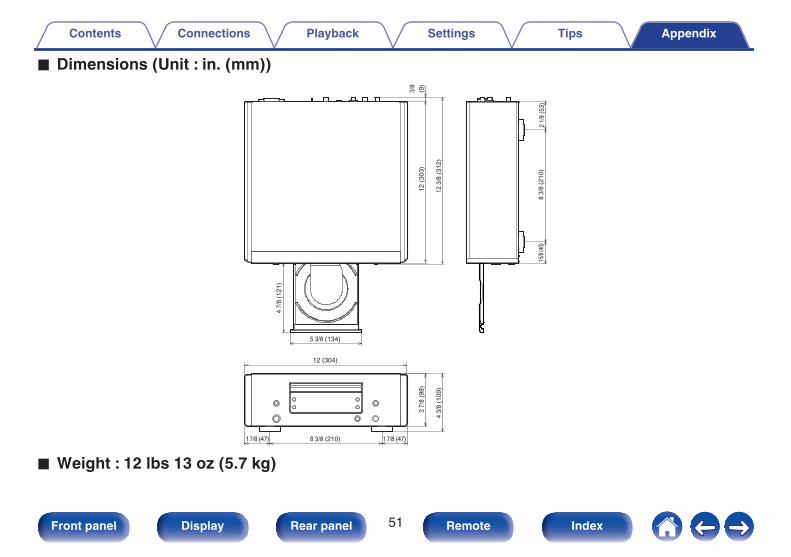
o Dimensions (Unit : in. (mm))
.
8 3/
8 (2
10)
1 5/8
(40)
2 1/
8 (5
3)
12 (304)
3 7/
8 (9
8)
4 3/
8 (1
09)
8 3/8 (210)1 7/8 (47) 1 7/8 (47)
12 (
303)
12 3
/8 (
312)
3/8
(9)
4 7/
8 (1
21)
5 3/8 (134)
o Weight : 12 lbs 13 oz (5.7 kg)
Contents Connections Playback Settings Tips Appendix
51Front panel Display Rear panel Remote Index
Indexv A
A-B repeat playback ....................................... 25Amplifier ................................................... 16, 17Auto Standby ................................................. 35
v CCD ............................................................ 23, 23CD-TEXT ....................................................... 28
v DD/A converter ................................................. 16DATA CD ....................................................... 29Delete program playback ............................... 26Display ............................................................. 9Display brightness .......................................... 22
v FFront panel ....................................................... 7
v MMenu map ...................................................... 32
v PProgram playback .......................................... 25
v RRandom playback .................................... 24, 30Rear panel ...................................................... 10Remote control ............................................... 18Remote control unit ........................................ 11Repeat playback ...................................... 24, 30
v TTimer device .................................................. 19Tips ................................................................ 37Troubleshooting ............................................. 38
Contents Connections Playback Settings Tips Appendix
52Front panel Display Rear panel Remote Index
3520 10478 00AMCopyright © 2016 D&M Holdings Inc. All Rights Reserved.
53