Embed Size (px)
Citation preview

Caves, Canyons, Cactus & Critters
Middle School Geology
A curriculum and activity guide for Carlsbad Caverns National Park

Caves, Canyons, Cactus & Critters Geology Curriculum
I. Introduction.............................................................................................................. 1
A. Purpose of the curriculum................................................................................. 1
B. Format of the Curriculum .................................................................................. 2
C. Suggestions for trips to accompany this curriculum...................................... 4
II. Activity Units
C. Surf Carlsbad! Activities related to the development of the Delaware Basin and Capitan Reef........................................................................ 5 1. A House Made of Sponge? Game introducing the
various organisms believed to have formed the Capitan Reef. ....................... 6
2. Old Salts Activity designed to demonstrate the precipitation and sedimentation of salts in the Delaware Basin..................... 11
3. Is it Limestone, or Did I Get Gyped? Activity to introduce the main Permian Age rocks found in the Carlsbad Caverns National Park Area and the minerals they are made of; limestone, gypsum, halite, sandstone, shale. (A very basic mineralogy and petrology lab.) ........................................................................................ 14
4. Meet My Pet Fossil, Rocky Activity in which students make plaster-of-Paris fossils and then study a real fossil; describing it, its environment, what and how it ate, etc. ..................................................... 19
B. Wandering Continents A study of plate tectonics............................................ 23
1. Apples, Eggs, and the Earth An activity designed to present information on the layers of the Earth. .......................................................... 24
2. Come Visit Me In Tropical... Antarctica? Activity in which the supercontinent of Pangea is reconstructed using modern continents, imagination, and a little help. ...................................................... 27
C. Clams Got Wings! An exploration of uplift and mountain building. .................. 31 1. You’re stressing me out! Activities designed to demonstrate
stresses in the Earth’s crust. ......................................................................... 32
2. Achy Breaky Earth Students will build cardboard or clay models demonstrating the three major types of faults and the three major types of folds. ....................................................................... 34
D. Oil Munchers Activities exploring the role of anaerobic bacteria in the formation of caves in Carlsbad Caverns National Park............................. 39 1. It’s More Than Just Dead Dinosaurs An activity designed
to model oil and gas formation and traps. ..................................................... 40
2. Strange Things in Strange Places An activity to explore bacteria that live in strange places (underground anaerobes, Lechuguilla Cave, thermal springs, Mars) ..................................................... 45
3. Stinky Gas and Alabaster An activity to demonstrate gypsum replacement of limestone in the formation of the caves of the Guadalupes......................................................................................... 48
E. Mother Nature’s Gravel Company Activities designed to introduce the topics of weathering and erosion. ................................................................. 52
1. Ice Wedgies! An activity designed to study the effect of freeze/thaw cycles on rock. ........................................................................... 53
2. Huff ‘n’ Puff A lab designed to study the effect of obstacles on sand dune migration................................................................................. 55
3. Flash Flood Fantasy A lab that demonstrates the effects of erosion and deposition in the Basin and Range region of the US southwest. ............................................................................................... 59
4. Nature’s Acids A look at how natural acids contribute to cave formation. ...................................................................................................... 62
F. Hangy Downys, Sticky Upys, and Other Pretty Cave Decorations Activities that explore the origin of various cave formations. .............................. 65
1. Hangy Downys and Sticky Upys An activity to grow stalactites and stalagmites. ............................................................................................ 66
2. Not Just Your Average Decoration A look at other special cave decorations (cave pearls, popcorn, corrosion features, etc.)......................... 70
3. It’s a Small World A look at microclimates.................................................. 73
4. Drip, Drip, Drip A study of infiltration and water chemistry.......................... 78
5. A River Runs Through It... Literally! A look at another manner in which caves can form.................................................................................... 82
III. State Standard/Benchmarks ................................................................................. 85
IV. Glossary ................................................................................................................. 92
V. Suggested Resources ........................................................................................... 97
1
Introduction A. Purpose of the Curriculum
Even without its spectacularly decorated caves, Carlsbad Caverns National Park would still be a special place to geologists. It is a world-class site in which to study ancient reef environments and had contributed greatly to our knowledge of carbonate shelf structures. When the caves of the park are added in, it creates a location second to none in the unique beauty of its surface and the mystery of its depths.
This curriculum is designed to assist the middle school teacher who wants to introduce some of the special geology of Carlsbad Caverns National Park to their students. While a background in geology is helpful, it is not a prerequisite. By studying the background material provided and doing a little library and Internet research, most teachers should be able to comfortably teach the lessons contained here.
On the following pages, I have included a description of the lesson format and suggestions of fieldtrips to take to Carlsbad Caverns National Park. Please read these prior to using this curriculum. Hopefully they will give you more insight into the author’s intent and the manner in which this guide was written.

2
B. Format of the Curriculum
The curriculum is broken into six units. Each unit has an opening page in which the topic of that unit is discussed. Each of the lessons is then written in the following format:
Lesson Title Brief description of the lesson that can be used as an opening query for your students.
Summary: Brief summary of what the lesson will cover. Duration: Estimated duration of the lesson and activity. Your mileage may vary. Setting: Most are done in a classroom or lab, but some are also messy. This tells where you may want to do the activity. Vocabulary: Key vocabulary words are listed here and defined in the glossary. Standards/Benchmarks Addressed: State standards and benchmarks are keyed to the standard and benchmark section at the back of the curriculum. Objectives Students will:
• objectives of the lesson are listed here.
Materials Materials needed for demonstrations, the lesson, or activities are listed here.
Background This section contains enough background material to get you through the lesson. You may want to do your own background research, as well.
Procedure Warm up: This section describes some possible opening activities to focus students on the topic of the lesson.
Activity 1. This is a detailed description of the activity. 2. Unlike many chemistry labs, you are allowed to experiment outside the bounds!! 3. Use these activities as an opportunity to explore with your students. 4. If they ask, “What if...” feel free to modify the procedure to try to answer their questions. 5. DO NOT STRESS OUT!! 6. HAVE FUN!!
Wrap Up: This section contains suggested discussion topics and activities to bring closure to the lesson.
Assessment Have students:

3
• Do something to prove that they have learned. • These are only suggestions. • You know your students. Modify the assessment to meet the needs of your class.
Extensions These are other activities that you might want to do to extend the lesson or to allow your students to continue to explore.
Resources These are the resources used in writing the background material and contain valuable information. Some are very easy to follow, others are quite technical.
But there are many more resources than those listed here. The most valuable resource is people. The National Park Service, the Bureau of Land Management, the Forest Service, and Soil and Water Conservation Service, your county extension office and many local businesses all have people who can help. Most would welcome the opportunity to speak to your students. Contact them.

4
C. Suggestions for trips to accompany this curriculum.
During a regular tour of Carlsbad Cavern, or a tour of Spider Cave or Slaughter Canyon Cave, have students look for the following features. Lessons from this curriculum that describe the features have been listed as well.
1. speleothems such as stalactites, stalagmites, and columns and features such as joints, or cracks in the bedrock, that control their growth – Hangy Downys and Sticky Upys; Nature’s Acids
2. directional speleothems – Not Just Your Average Decoration 3. evidence of microclimates – It’s a Small World 4. fossils – Meet My Pet Fossil, Rocky 5. gypsum – Stinky Gas and Alabaster
Hike up Slaughter Canyon in Carlsbad Caverns National Park or McKittrick Canyon in Guadalupe Mountains National Park. Point out and discuss the rock features seen on the canyon walls. Among these should be the massive Capitan Reef formation that forms the large, tan cliffs in the canyon. This was part of the main reef. Also, pay attention to the horizontal layers that begin up the canyon and end at one of the cliffs or near the edge of the escarpment. These are the backreef layers. They were deposited in the lagoon between the reef and the shore. Have the students look for fossils and try to describe what organism may have formed them. Have students look for evidence of joints, or vertical cracks, in the hillsides. Also, have students look for and describe evidence of weathering and erosion. – A House Made of...Sponge?; Is it Limestone, or Did I Get Gyped?; Meet My Pet Fossil, Rocky; You’re Stressing Me Out!; Achy Breaky Earth; Ice Wedgies!; Flash Flood Fantasy
While at the Carlsbad Cavern National Park visitor center, walk to the edge of the escarpment and point out and discuss the following with the students:
1. The escarpment parallels the basin-ward side of the ancient reef. The slope of the escarpment is probably similar to the actual slope of the ancient reef. – A House Made of...Sponge?
2. The flats you are looking on are full of basin deposits, formed in the ancient basin. – Old Salts; Is it Limestone or Did I Get Gyped?
3. The light colored areas in the basin are probably gypsum, one of the rocks deposited in the ancient reef. – Old Salts
4. Look for evidence of joints and horizontal layers. If they are not readily visible in the rock, look for lines of dark green vegetation. Plants will grow along joints or the boundaries between layers due to the water stored in those features. – You’re Stressing Me Out!; Achy Breaky Earth; Drip, Drip, Drip

5
Surf Carlsbad! As hard as it may be to believe, the southeastern corner of New Mexico was once a shallow inland sea; home to a fascinating barrier reef that is exposed today in the Guadalupe Mountains where Carlsbad Caverns National Park is located. The growth of this reef, as well as the development of thick basin deposits and a series of backreef deposits, has resulted in a world-class geologic classroom. Geologists from around the world come to the Carlsbad Caverns National Park to study backreef-reef-basin sequences, carbonate shelf formation, evaporite basins, and the fascinating caves that form in these soluble rocks.
This unit will focus on the rocks formed in this ancient reef environment. In the first activity, students will study the main reef-forming organisms found in the Capitan Reef. The second activity will provide students the opportunity to study the development of the thick salt deposits found in the Delaware Basin. In the third activity, students will learn to identify the main sedimentary rocks found in Carlsbad Caverns National Park. The last activity will give students the opportunity to explore ancient life through fossils.
The background for these activities is closely tied to the book Stories From Stones: The Geology of the Guadalupe Mountains. It is strongly recommended that you read this book or have a working knowledge of the geology of the Guadalupe Mountains prior to teaching this unit.

6
A House Made of... Sponge? What types of organisms would you have seen if you had
visited the Permian Reef when it was forming?
Summary: Students will discuss organisms that formed the Permian Reef and will then participate in a game where they are required to recall the information learned. Duration: 50-minute class period Setting: Classroom Vocabulary: calcareous, reef, extinction, Pangea Standards/Benchmarks Addressed: SC11-E5, SC12-E5 Objectives Students will:
• name and describe several organisms responsible for forming the Permian Reef.
Background During the late Permian Period (280-225 million years ago) North America was a part of the
super continent Pangea. Carlsbad Caverns National Park was located very close to the equator. A shallow inland ocean covered southeastern New Mexico and the area known as the “Permian Basin.” The Hovey Channel to the south-southwest connected this ocean to the larger Permian Ocean. Conditions in the western part of the basin, an area that is called the “Delaware Basin” today, were favorable to the development and growth of many of the organisms living in the ancient ocean. Included in those organisms were a variety of shellfish, fusilinids, algae, echinoderms,
trilobites, corals, and colonial organisms such as sponges and bryozoans.
Among the shellfish were organisms such as pelecypods and brachiopods. The shells of these organisms were calcareous, consisting of calcium carbonate (CaCO3). Pelecypods are classified as bivalves and are identified by their hinged, two-halved shell in which the halves are usually symmetrical or the same. Scallops would be an example of modern day bivalves. Brachiopods were similar, but the two-halves of their shells are not symmetrical. They are sometimes referred to as “flying” shellfish due to the “wing-like” appearance of their shells. While brachiopods lived primarily on the reef, pelecypods are believed to have lived more along the reef/backreef boundary, closer to the lagoon area. Both fed by filtering food particles suspended in the water.
Another group of shellfish found in the Permian Sea was the gastropods. Gastropods would be most familiar to us as the common snail. They are recognized by their coiled shell and the way they move about on a wide, flat foot. A gastropod’s primary source of food was algae.
Though they are thought of as the major reef-builders in modern oceans, corals were rare in the Permian Sea. Many of those found are solitary horn corals. Instead, algae were one of the primary reef-building organisms found in the Permian Sea. Several varieties of calcareous algae were present in the reef area and contributed greatly to the growth of the reef. The other major

7
reef builders were sponges. Sponges were colony creatures forming a calcareous house in which they would live and filter food from the water. Several species of sponge have been found in many shapes and forms.
Bryozoans were another type of colonial organism that lived in the Permian Sea. Bryozoans formed colonies resembling delicate fans along the ocean floor. Like many other organisms along the reef, bryozoans also filtered their food from the water.
Echinoderms were also present. They are easily identified by their five “ray” or five-part symmetry. An echinoderm frequently found among fossils in the reef is the crinoid, a flowerlike organism that filtered food particles suspended in the water.
Many people think of the extinction of the dinosaurs as the greatest extinction of all time. However, it pales in comparison to the mass extinction that occurred at the end of the Permian Period. By some estimates, nearly ninety percent of the species on Earth at that time became extinct.
Materials • One set of Reef Builders cards per group of students (pre-mounting on cardboard will
make the cards more durable) • Paper for notes during warm-up • Paper for keeping score
Procedure Warm Up: Inform students that the information you are about to discuss will be very useful later in the lesson. Suggest that they write down the names and characteristics of the organisms you will be discussing while you write difficult to spell words on the board.
Discuss reefs, how they are formed from the calcareous remains of living organisms, how they form in tropical environments along shallow ocean areas, etc. Use modern-day reefs such as the Great Barrier Reef in Australia or the reefs of Belize as examples in your discussions.
Describe and discuss the organisms responsible for building reefs today. Compare and contrast those to the reef-builders of the Permian Period. Be sure to focus on the environments in which they live, how their shells are formed, and how they feed.
Ask students to list the characteristics found off the coast of Australia or Belize that make ideal environments for reef-building organisms (warm tropical water, shallow water allowing more light, well oxygenated water, etc.). Ask students if they believe conditions near Carlsbad, New Mexico, were different during the Permian Period. Ask them to describe what they think the area near Carlsbad Caverns National Park would have been like 230 million years ago.
Activity 1. Tell students that they are going to use their knowledge of reef-building organisms from
the Permian Period in a game. Have students form into groups of three or four. 2. Hand out the Reef Builder cards, face down, to each group of students and instruct them
to not look at the cards before being told to do so. 3. Explain that each card lists four characteristics of a reef-building organism from the
Permian Period. They will try to guess what the organism is while being given the clues.

8
4. The person initially given the cards will read the clues, one at a time in order, until someone in the group guesses the organism or until all clues are used without a successful guess.
5. Students begin to read the clues while others in the group attempt to guess the name of the organism. Points are given for successful answers as shown below. The student who successfully answers will be the reader for the next card. • One clue - 4 points • Two clues - 3 points • Three clues - 2 points • Four clues - 1 point
6. The game continues until all of the cards have been read. For those students with the highest score, or who score more than a pre-determined number of points, provide a prize or reward.
Wrap Up: Discuss what might happen to the reef if any of the environmental conditions changed (change in water temperature, sea level, available oxygen, etc.). Have students theorize about what might have brought about the eventual end of growth on the Permian Reef.
Discuss current reefs and any conditions that may be threatening their growth (ocean warming, sea level changes, other organisms that feed on reef builders, etc.). Have students describe how studying ancient environments, such as the Permian Reef, can help us better understand our Earth today.
Assessment Have students:
• name an organism when given a set of its characteristics. • explain what characteristics make an area of the ocean favorable for reef growth. • describe why the study of fossils can help us make informed decisions about our Earth
today.
Extension Working in a group of three or four, students select an ecosystem from a given list (desert, rain forest, mountains, etc.). Have them discuss within their group the types of organisms, plants and animals, which would be typical for that ecosystem. They should list the organisms, as well as characteristics we would use to identify that organism.
They will then move forward into the future 230 million years and describe what a person studying fossils from their ecosystem might find. They should also try to predict any misconceptions a future paleontologist might have from misinterpreting the fossils.
Resources Doyle, Peter. 1996. Understanding Fossils: An Introduction to Invertebrate Paleontology. New
York, NY: John Wiley & Sons, Inc.
Jagnow, David and Jagnow, Rebecca. 1992. Stories from Stones: The Geology of the Guadalupe Mountains. Carlsbad, NM: Carlsbad Caverns Guadalupe Mountains Association.

9
Reef Builder Cards A House Made of Sponge?
• I filter my food from the water around me.
• I lived along the boundary between the reef and lagoon.
• My home is formed from two nearly identical shell halves.
• I am similar to modern day scallops. Answer: pelecypod
• I feed on algae growing on the ocean bottom.
• My home is a coiled shell made of calcium carbonate.
• I move around on a wide, flat foot. • Today, you would refer to me as a
common snail. Answer: gastropod
• I filter my food from the water around me.
• I wasn’t very common in the Permian Sea.
• During the Permian Period, I was often found in the shape of a horn.
• I form many of the reefs found in the world today.
Answer: coral
• I filter my food from the water around me.
• I lived along the top of the reef mound.
• My home is formed from two shell halves that are not the same size or shape.
• My shell sometimes looks like it has wings.
Answer: brachiopod

10
• I filter my food from the water around me.
• I live in a colony with hundreds of other creatures just like me.
• We were one of the main reef builders in the Permian Sea.
• Today, the remains of my home are often used as an absorbent cleaning device.
Answer: sponge
• I filter my food from the water around me.
• I live in a colony with hundreds of other creatures just like me.
• Our home was often a pretty fan shaped structure attached to the ocean floor.
• My skeletal remains often look like little broken twigs.
Answer: bryozoan
• I filtered my food from the water around me.
• I lived along the top and front of the reef, firmly attached to the sea bottom.
• One of my varieties looked like a beautiful water flower, but was really an animal.
• My body is identified by its five-part symmetry.
Answer: Echinoderm or crinoid
• I am a very important photosynthesizer in the ocean.
• I am one of the oldest organisms on Earth.
• I helped form the reef by growing in great mounds that left large calcium carbonate deposits behind.
• Gastropods feed on me. Answer: Algae

11
Old Salts
How did the massive salts beds near Carlsbad Caverns form?
Summary: Students will build their own miniature “evaporite basin” and record observations as salts begin to precipitate out of the water. Duration: Two or three 50-minute class periods Setting: Classroom or lab Vocabulary: evaporite, precipitation, salinity, saturation Standards/Benchmarks Addressed:SC2-E3, SC5-E2, SC6-E1 Objectives Students will:
• describe how the massive salt beds near Carlsbad Caverns formed. • make evaporite basins.
Background Guess what? The oceans are salty! Ok, that should come as no surprise to anybody. However, the oceans contain more than just sodium chloride, the compound you probably know as table salt. As rivers flow downhill to some ocean, bay, or gulf they dissolve minerals from the land they pass across or through. These dissolved minerals take the form of ions, electrically charged atoms or groups of atoms. The most common of these ions are sodium (Na+), chloride (Cl-), magnesium (Mg+2), sulfate (SO4
-2), calcium (Ca+2), and potassium (K+). Additionally, carbon dioxide (CO2) dissolved in water can
form the carbonate ion (CO3-2). The combination of electrically negative and positive ions results
in a compound called a “salt.” The most common salt is table salt, or sodium chloride. It is composed of a base unit of one sodium ion and one chloride ion.
In the ancient Permian Sea, the salinity of the water would change periodically. Seasonal variations in temperature and freshwater input are thought to have resulted in annual salinity cycles. On a longer scale, the Delaware Basin would periodically be cut off from the Permian Ocean due to changes in sea level or closure of the Hovey Channel to the southwest. This would result in increased salinity as the water in the basin began to evaporate. As the water evaporated, the concentration of the less soluble salts would reach the saturation point and these salts would begin to precipitate out of the water and settle to the bottom, forming the thick deposits of evaporite rocks found there today. If the water continued to evaporate and become more saline, the more soluble salts would begin to precipitate. Eventually, as the ancient Permian Sea was isolated from the Permian Ocean for the last time, the most abundant salt, sodium chloride, began to precipitate and the thick salt beds of the Salado Formation were formed. It is in this formation that the WIPP repository is located. At some point during this deposition, potassium chloride was deposited, forming the mineral sylvite. The rock containing this mineral is commonly called potash and is mined near Carlsbad.
Organisms living in the ancient sea used these salts to their advantage. Many of them would extract the calcium and carbonate ions from the water and use them to build shells of calcium carbonate, or what is also referred to as the mineral calcite. This compound is the main

12
component of the rock limestone. Much of the sand along the reef was formed from calcium carbonate precipitated out of the water or from the crushed and ground skeletal remains of organisms. These carbonate sands filled in voids in the reef and were trapped in the massive algal mats that formed along the reef.
Over time, erosion has removed the overlying layers and exposed the reef and the salts deposited in the basin. Calcium carbonate is much less soluble than the other salts. In fact, in the semi-arid environment near the Carlsbad Caverns, the limestone formed from this compound is resistant to weathering and forms the bulk of the Guadalupe Mountains. In the basin to the southeast of the Carlsbad Caverns, deposits of gypsum (CaSO4) are exposed at the surface. Gypsum has a solubility that is about ten times that of limestone. As a result, the gypsum in the basin weathers faster than the limestone in the Guadalupe Mountains. Groundwater moving through cracks in the gypsum beds has formed hundreds of shallow caves near the surface. The largest of these, the Parks Ranch Cave System, is over four miles in length and is located about six miles south of White’s City, within sight of the Carlsbad Caverns visitor center. Salt beds do exist on the surface in some very arid parts of the world, such as the region around the Dead Sea in Israel. Near Carlsbad, annual rainfall and groundwater are sufficient to dissolve these salt beds underground, before they are exposed at the surface.
Materials • measuring cup, 1 cup (250 ml) • measuring spoon, tablespoon (15 ml) • glass bowl, 2qt. • table salt • Epsom salts • scissors • hand lens • black construction paper • lid from large jar or shallow, flat bottomed bowl
Procedure Warm up: Ask the students how many have a parent or other relative who works at a potash mine or at the Waste Isolation Pilot Plant (WIPP). Ask in what kind of rocks the potash mines and the WIPP repository are located. Discuss the thick beds of rock salt found near Carlsbad. Have the students propose what conditions could have created beds of rock salt 2000 feet thick. Point out that rock salt (halite) is not the only evaporite mineral in the basin. Gypsum and limestone are also evaporite rocks forming part of an evaporite sequence a mile thick.
In several places, such as the gypsum plain south of White’s City, New Mexico, we find some of the gypsum layers exposed on the surface. Ask the students to brainstorm reasons that we do not find the halite beds exposed at the surface. What happens to them when erosion causes them to be near the surface?
Activity Halite:
1. In a bowl, dissolve 4 tablespoons (60 ml) table salt in one cup (250 ml) water.

13
2. Allow the bowl to sit undisturbed until the water evaporates (may take several weeks). If time will not allow for this, expose the bowl to moderate heat, such as an incandescent bulb to speed evaporation.
3. Have the students study the crystals that form in the bottom of the bowl with a hand lens and draw what they observe. Have them compare the crystals in the bottom of the bowl with any they find along the sides of the bowl.
Epsomite: 1. Cut a circle from black construction paper that fits inside a large jar lid or in a flat-
bottomed bowl. 2. Dissolve four tablespoons (60 ml) Epsom Salts Mix in one cup (250 ml) water. 3. Pour a thin layer of this solution over the black paper. 4. Allow to stand overnight or longer, if necessary. 5. Have the students study the crystals that form in the bottom of the bowl with a hand
lens and draw what they observe.
Have the students compare and contrast the halite and the epsomite crystals.
Wrap Up: Discuss what happens to the salt dissolved in ocean water if the ocean begins to evaporate. Ask which dissolves faster in a glass of cool water, salt, or sugar? Using the students’ knowledge that salt dissolves easier, discuss the concept of solubility and the fact that some substances dissolve easier than others. Ask the students if that would mean that some substances would precipitate out, or form crystals, easier than others. Discuss the three main salts found in the Delaware Basin and how they formed at different times as the Permian Sea was cut off from the Permian Ocean and began to evaporate.
Assessment Have students:
• name the three principal evaporite rocks found in the Delaware Basin. • explain why the rocks formed in separate layers, even though they all formed from the
same evaporating body of water.
Extensions Given a particular set of objectives or questions, have students design and perform their own experiment related to solubility and salt. Some suggested objectives are:
• Using several salts, find out which one is the most soluble and which will precipitate out of the water first.
• Does mixing two or more salts affect their solubility? • How does the temperature of water affect solubility?
Resources Feather, Ralph, et al. 1999. Glencoe Earth Science. Westerville, OH: Glencoe/McGraw-Hill.
Hill, Carol. 1996. Geology of the Delaware Basin, Guadalupe, Apache, and Glass Mountains, New Mexico and West Texas: Permian Basin Section SEPM, Publication No. 96-39.
Van Cleave, Janice. 1991. Earth Science For Every Kid. New York, NY: John Wiley & Sons, Inc.

14
Is it Limestone, or did I get “Gyped?” What types of rocks would have formed in the ancient Permian Sea?
Summary: Students identify the primary rock types found in the area around Carlsbad Caverns using properties such as color, grain size, mineral content, and reactivity with acid. Duration: Two 50-minute class periods Setting: Classroom or lab Vocabulary: sediment, sedimentary, texture Standards/Benchmarks Addressed: SC5-E2, SC6-E1, SC12-E2 Objectives Students will:
• identify samples of limestone, gypsum, halite, sandstone, and shale using various chemical and physical properties.
Background The principal rock types found near the Carlsbad Caverns National Park are limestone, gypsum, halite, sandstone, and shale. All of these rocks are sedimentary. They are formed from sediments deposited on or near the Capitan Reef during the Permian Period, approximately 230 million years ago. Sedimentary rocks fall under three classifications: clastic or detrital, chemical, and organic.
Clastic, or detrital, sedimentary rocks are formed from the broken remnants of other rocks. These broken remains, or sediments, can vary in size from a fraction of a millimeter to several meters. They can be well sorted, with only a narrow size range found within a rock, or they can be a mix of sizes. Chemical cements deposited by groundwater moving
through the rock usually hold the sediments together. Sandstone, siltstone, and shale are common clastic sedimentary rocks found in Carlsbad Caverns National Park.
Chemical sedimentary rocks are rocks formed by chemicals precipitating out of water. Most of the chemical sedimentary rocks near Carlsbad precipitated out of the ancient Permian Sea. Gypsum, halite (rock salt), and chemical limestone are examples of chemical sedimentary rocks found in Carlsbad Caverns National Park. Many of the formations seen in the caves of Carlsbad Caverns National Park also formed from minerals left by evaporating water. For more information on the formation of chemical sedimentary rocks, see the activity entitled “Old Salts.”
Organic sedimentary rocks are rocks formed from or by living organisms. Fossils are commonly found in organic sedimentary rocks. Organic limestone and coquina limestone are two organic sedimentary rocks found in Carlsbad Caverns National Park.
Identifying sedimentary rocks begins with determining whether the rock is clastic, chemical, or organic. Then the actual rock type is determined by studying the texture of the rock. Rocks made from larger pieces or crystals are said to have a coarse texture. Rocks made from smaller pieces or crystals are said to have a fine texture. Other properties used to identify rocks are

15
their color, taste, and reactivity with certain acids. The table provided in the procedure will guide you through the steps needed to identify the sedimentary rocks of Carlsbad Caverns National Park. You will need to provide close assistance to students in the early part of the activity.
Materials • several samples each of limestone, gypsum, halite, sandstone and shale • hand lenses • small sample of dilute HCl for teacher’s demonstration • white vinegar • copies of data sheets and identification chart
Procedure Warm up: Divide class into groups of three or four students. Give each group a rock from the materials list. Do not identify the rocks at this time.
As the students to brainstorm a list of as many properties as they can that could be used to describe their rock. Have the students share some of their observations with the class. Write the observations on the board and discuss similarities and differences in their observations.
Display the identification chart on a board or overhead projector.
Describe how the various types of sedimentary rocks are formed. Tell students that they will be using this chart to identify rocks they are given. Have students copy the identification chart.
Activity 1. Give each group one sedimentary rock sample at a time. Do not give a new rock until
the students have determined the name of the first one they were given. 2. Have students classify the rock as clastic, chemical, or organic. Most will need
assistance on the first rock. 3. Have students determine the texture of the rock (sediment or crystal size, fossils) 4. Have students list any fossils or minerals they see. 5. Have students write any other observations they make. If they believe that they have
limestone, they should request your assistance in placing a drop of vinegar on the sample and watching for it to fizz. Dilute HCl can be used, but only under strict supervision with goggles. After, rinse the sample thoroughly.
6. Using the identification table, students determine the name of the rock and show you their data table and rock sample. If they are correct, they continue with another rock until they have tested six rocks.
Wrap Up: On the back of their data table, as a class, or both, have the students answer the following:
• What properties best helped you identify clastic rocks? chemical? organic? • Describe one environment where sandstone might form. • If the mineral halite forms by evaporation, would it be clastic, chemical, or organic?
Assessment Have students:
• submit completed data sheets and answers to questions.

16
Extensions Provide students with a cross section drawing of the Capitan Reef similar to that on pages 8-9 in Stories From Stones. As a class or in groups, discuss and attempt to determine where the sediments that formed each of the rock samples used in the activity would have been deposited.
Resources Feather, Ralph, et al. 1999. Glencoe Earth Science. Westerville, OH: Glencoe/McGraw-Hill.
Jagnow, David and Jagnow, Rebecca. 1992. Stories from Stones: The Geology of the Guadalupe Mountains. Carlsbad, NM: Carlsbad Caverns Guadalupe Mountains Association.

17
Sedimentary Rock Identification Chart Is it Limestone, or did I get “Gyped?”
Clastic or Detrital Rocks (made from broken pieces of other rocks)
Name Texture/Composition
Conglomerate Rounded mix of sizes larger than 2mm in diameter - gravel
Breccia Angular mix of sizes larger than 2mm in diameter - gravel
Sandstone Made from cemented sand (0.06-2mm diameter) - sand
Siltstone Made from powdered sediments, smaller than sand in size - silt
Shale Made from microscopic particles of other rocks - clay
Chemical Rocks (appear to be made of crystals)*
Name Identifying Properties
Limestone gray/tan/light brown, fizzes in dilute HCl or Acetic Acid (vinegar)
Rock Salt colorless/white/blue, tastes like salt, dissolves easily in water
Gypsum white, forms long, slender crystals, or looks like crushed sugar
*Of the sedimentary rocks, limestone is hardest and gypsum is softest.
Organic Rocks (identified by fossils in them)
Name Identifying Properties
Limestone brown to gray crystalline rock with fossils
Coquina large shell fragments, looks like Rice Krispy Treat

18
Data and Observations Is it Limestone, or did I get “Gyped?”
Sample Observations Minerals or Fossils Present
Texture Detrital, Chemical, or
Organic
Rock Name
A
B
C
D
E
F
19
Meet my Pet Fossil, Rocky What are fossils and how do they form?
Summary: Students will describe the various ways in which fossils form, make a Plaster-of-Paris fossil, and attempt to describe an organism and the environment in which it lived by studying its fossil. Duration: Two or three 50-minute class periods Setting: Classroom or lab Vocabulary: cast, fossil, mold, paleontologist, petrified, trace fossil Standards/Benchmarks Addressed: SC2-E3, SC3-E1, SC5-E2, SC6-E1, SC12-E5 Objectives Students will:
• describe the processes by which fossils form. • prepare a plaster-of-Paris cast/mold fossil. • study a fossil and attempt to describe the organism that left it and the environment in
which it lived.
Background Dinosaurs... Sixty-foot-long sharks... Dragonflies the size of a man... Armadillos the size of a Volkswagen beetle...
What do they have in common? They certainly don’t exist today. However, all of them did exist at one time and the way we know this is that we have found and studied their remains. The
remains, imprints, or traces of living organisms left in rock are called fossils. From fossils, we can tell not only what lived and where it lived, but how it lived, what it ate, if it had a social structure, and many other valuable facts.
Most organisms do not create fossils. In fact, certain conditions are necessary if organisms are to have a better chance of being preserved as a fossil. First, a dead organism must be protected from scavengers or decay caused by microorganisms. Organisms that are buried rapidly have a much better chance of being preserved. In fact, many of the best fossils found were deposited in or near swampy areas, where there was a greater chance of rapid burial in non-oxygenated muds.
Jellyfish fossils are hard to find. This isn’t due to a lack of jellyfish, but rather it is due to a lack of hard parts in the jellyfish. Hard parts such as bones, shells, or teeth make better fossils. Sharks have been in the Earth’s oceans since the Paleozoic Era, but the most common shark fossils we find are teeth. The cartilage skeleton of sharks rarely survives the fossilization process.
Fossils occur in many forms: petrified remains, carbonaceous films, molds and casts, original remains, and trace fossils. Petrified remains are turned to stone. As groundwater containing dissolved minerals soaks into and through the buried organism, the minerals replace the original tissues. With the deposition of these minerals, the organism literally “turns to stone.”
20
Carbonaceous films are fossils that can preserve evidence of softer tissues. All organisms are composed of tissues that contain carbon. As the organism is buried, heat and pressure change the structure of the tissue, forcing gases and liquids from the body and leaving behind a carbonaceous film. The resulting fossil shows the outline of the original organism and sometimes details of the body structure as well as the skeletal structure.
Molds and casts are formed when a fossil decays, erodes, or dissolves away. The void left behind is called a mold. This void is then filled with sediments washed in through cracks or by minerals that precipitate out of groundwater. This new “replacement” fossil is called a cast. Mold and cast fossils are quite common in the rocks of Carlsbad Caverns National Park. In the activity associated with this lesson, students will make mold and cast fossils.
Sometimes, paleontologists, scientists who study fossils, are fortunate enough to find the actual remains of an organism. Any fan of Jurassic Park is well aware of the existence of insect remains trapped in amber. Amber is a rock made from sap. In the case of Jurassic Park, insect’s 175 million years ago were trapped and preserved in a drop of tree sap. This protected the insects’ body from decay or petrification and, in the story line, even preserved DNA in the blood the insect had ingested. A more realistic recent story centered on Mammoth remains found frozen in ice. Other actual remains have been found in the La Brea Tar Pit of California.
Trace fossils are evidence that an organism was there without any remains present. Examples of trace fossils are tracks, drag marks, wormholes, and burrows. From these fossils, it is possible to determine such things as an organism’s size, lifestyle, hunting behavior, and diet.
Studying fossils provides clues to ancient environments as well. Carlsbad Caverns National Park is located in the semi-arid northern reaches of the Chihuahuan Desert at elevations ranging from around 3000 feet up to around 7500 feet. However, a quick look at the fossils of the park reveals a time when a sea covered the area. Sponges, algae, crinoids, mollusks, and brachiopods were common in this ancient sea and we find their fossils today. Studying these fossils has provided evidence of a massive barrier type reef that most believe was present 230 million years ago. Ongoing studies of the fossils in the park continue to provide insights into the geologic history of the area.
Materials • paper bowls or butter tubs • plaster-of-Paris • leaf, shell, bone, or other materials to turn into fossils • petroleum jelly • actual fossils (if none are available, models or photos of fossils can be substituted) • old vinyl record, any size or artist will do • old, weathered bone
Procedure Warm up: Hold up an LP vinyl record for the students to view and ask for them to describe what it is. Have them speculate how old it is and what it would take to make it work. Ask them to describe the person they think first owned it.
Hold up an old, weathered bone. Ask the students to describe the organism that it came from. Ask them to speculate how old it is and what part of the animal it came from.

21
Hold up a fossil for the class to view. Ask students to describe how it is similar to and different from the two previous items.
Discuss the background material with the class, being sure to focus on how fossils form, types of fossils, and what we can learn from fossils.
Activity Making a Fossil (Do in groups of three or four):
1. Prepare plaster-of-Paris to that it is smooth and thick 2. Fill bowl or tub with plaster to a depth of about one inch. 3. Coat object to be fossilized (leaf, shell, bone, etc.) with a thin layer of petroleum jelly. 4. Press the object into the plaster, but do not allow the plaster to flow over the top of
the object. 5. Allow the plaster to dry at least 24 hours and then remove the object. 6. Coat the top of the plaster with a thin layer of petroleum jelly. 7. Pour more plaster of Paris on top to a depth of about one inch and allow to dry for at
least 24 hours. 8. Separate the two halves. The original half represents a mold fossil and the second
plaster poured represents a cast fossil.
Amateur Paleontologist Lab 1) Provide each group of students an actual fossil (models or photos can be
substituted). 2) Each group must study the fossil and provide their best answers to the following:
a. What is the name of the fossil? b. How, and what, did the fossil eat? c. How did the fossil move or how did it attach itself to the ground or ocean bottom? d. Find one structure or object on the fossil and explain, in detail, what it was used
for. 3) Repeat with two or three other fossils.
Wrap Up: Ask the students how easy it was to answer the paleontologist lab questions. Ask students how they think a professional paleontologist answers those questions. Lead the discussion to focus on the present being the key to the past. In other words, the best information we have to help us learn about the past is what we find on Earth today.
Ask students to list points for and against the statement “the present is the key to the past” and discuss as a class.
Assessment Have students:
• submit mold/cast fossils and Paleontologist Lab work to teacher. • Describe the necessary conditions for a fossil to form. • Describe five types of fossils. • List five important things that we can determine by studying fossils.
22
Extensions Have students hypothesize what fossils would be left behind by today’s society. What would a paleontologist 230 million years from now think about the organisms that were alive today? What would they think about our eating habits, social structure, transportation, and entertainment?
Resources Feather, Ralph, et al. 1999. Glencoe Earth Science. Westerville, OH: Glencoe/McGraw-Hill.
Van Cleave, Janice. 1991. Earth Science For Every Kid. New York, NY: John Wiley & Sons, Inc.
Carolina Biological Supply Company – www.carolina.com
Fisher Scientific – www1.fishersci.com
Flinn Scientific, Inc. – www.flinnsci.com
Sargent-Welch – www.sargentwelch.com

23
Wandering Continents Carlsbad was, at one time, located near the equator. Fossils of tropical plants have been found in Antarctica. The same animals and rocks are found on different continents. These, and many other pieces of evidence, point to an earth that may not be as static as we would like to believe. Throughout the past century, scientists looking at these, as well as many other bits of information, have come to the conclusion that the continents are moving. Research has shown that the floor of the Atlantic Ocean is spreading in the middle. Seismology has found evidence of large, convective plumes in the mantle that move the broken lithospheric plates around like a conveyor belt.
Continents moving around on the surface of a planet are going to do some damage. Colliding continents result in mountains as they crumple up. The heat generated by the friction of their impact causes some of the rock making up the continents to melt. This molten rock rises to the surface, near the point of the collision, and creates a volcano. Continents pulling apart result in basins. These basins sink below sea level and are covered by water. Earthquakes are an obvious consequence of stresses in the lithospheric plates as well.
The activities of this unit are designed to supplement classroom studies of plate tectonics and their effect on the surface of the earth.

24
Apples, Eggs and Earth What is the earth like inside?
Summary: Students will use apples and hard-boiled eggs to model the earth’s internal structure. Duration: One 50-minute class period Setting: Classroom Vocabulary: convection cell, crust, inner core, lithosphere, mantle, model, Mohorovicic Discontinuity, outer core, plasticity Standards/Benchmarks Addressed: SC1-E1, SC2-E2, SC2-E3, SC4-E1, SC4-E5, SC6-E1, SC6-E8, SC12-E3 Objectives Students will:
• describe the earth’s internal layers. • use apples or hard-boiled eggs to model the earth’s internal layers.
Background What is the earth like inside? Is it all magma? How do we know? Throughout history, there has been speculation on what was really in the center of our planet. Some speculated that the earth was a hollow sphere with an entire civilization living on the inside. In 1864, Jules Verne wrote Journey to the Center of the Earth in which the lost continent of Atlantis, dinosaurs, and a great deal of adventure were found at the center of the earth. It was only in the past century that we began to have any understanding of what was really in the center of our planet.
It is only with the development of the science of seismology that we have been able to peek at what lies beneath us. In 1909, a Yugoslav scientist Andrija Mohorovicic discovered that seismic waves changed speed somewhere between 32 and 64 kilometers beneath the earth’s surface. The Mohorovicic Discontinuity, as it came to be called, marked the boundary between the earth’s crust and the mantle. Subsequent studies have shown the earth’s interior to be composed of four major layers: the crust, the mantle, the outer core, and the inner core. Recent studies have shown that even these layers can be subdivided and boundaries between them may not be as clearly defined as it was once thought.
The earth’s dense center is called the inner core. It has a radius of approximately 1,300 kilometers and begins at a depth of around 5,150 kilometers. It is composed of nickel and iron. Temperatures in the inner core reach 5,000o C. This is well beyond the melting point of nickel and iron. However, the intense pressure at the center of the earth pushes the atoms of nickel and iron together so tightly that they remain solid.
Around the inner core is the liquid outer core. It begins at a depth of about 2900 kilometers and is around 2250 kilometers thick. The lower pressures in this layer allow the nickel and iron to

25
melt. However, the temperatures are still high, ranging from around 2200oC in the upper part to almost 5000oC near the inner core.
The layer directly beneath the earth’s crust is the mantle. It is composed mostly of the elements silicon, oxygen, iron, and magnesium. Even though it is solid, the high temperatures and pressure allow the solid rock to flow. This property is referred to as plasticity. Temperatures range from 2200oC near the bottom to 870oC near the top. Seismic research has indicated that the mantle contains great, slow moving convection cells. In these cells, the hotter, less dense mantle material rises toward the top while the cooler, denser material sinks toward the bottom.
The thin, outermost layer of the earth is called the crust. It consists mainly of the elements oxygen, silicon, magnesium, and aluminum. Iron, calcium, sodium, and potassium are also abundant. The thickness of the crust varies from 8 kilometers under the oceans to 70 kilometers under continents. The younger, denser areas of oceanic crust are composed primarily of basaltic rocks and are thinner. The older, less dense areas of continental crust are thicker and composed primarily of granitic rocks.
The earth’s crust and the upper part of the mantle compose the lithosphere. The lithosphere is broken into large sections called lithospheric plates. There are seven major plates and several minor plates. Most plates contain both continental and oceanic crust. The movement of these plates is called continental drift.
Materials • hard boiled eggs (one per group) • apples (one per group) • small sharp knives (one per group) • paper for drawing observations • crayons or colored pens • basketball • solid rubber ball
Procedure Warm up: Ask the students, “What is a model?” Discuss the ways in which a model is built to a particular scale.
Hold up a basketball, a solid rubber ball, and an apple and ask the students, “Which of these provides the best model of what the earth is like inside?” List the reasons for their choice on the board or on an overhead.
Activity: This activity can be done in groups, or as a teacher-led demonstration. 1. Show the students a hard-boiled egg. Ask them to describe its parts to you. Discuss the
fragile nature of the shell. Ask the students if they think the egg would be a good model of the earth.
2. Gently tap the egg on a hard surface, trying to make it crack into large “plates.” Describe the earth’s crust to the students and introduce the idea of lithospheric plates. While doing this, outline the plates with a marker. Have the students draw what they observe.
3. Using a sharp knife gently cut the egg lengthwise and show it to the students. Introduce the idea of the layers in the earth and describe each layer to the students. Be sure to point out that even though a single yolk represents the core, the earth actually has two

26
layers at its core. Ask the students to list good and bad points of using an egg to model the earth’s interior.
4. Give each group an apple and a knife and have them do the following: a. Slice the apple, top to bottom, into as many pieces, or wedges, as the group has
students. b. Have each student sketch his or her slice of apple on a piece of paper. c. On their sketch, have the students label each of the layers in the apple with the
name of the layer in the earth it represents. d. For each layer, have students list its properties on the paper. e. On the paper, have students list good and bad points of using an apple to model the
earth’s interior.
Wrap Up: Allow students to eat their slice of the “earth.”
Solicit suggestions from the students for other objects that could be used to model the earth. For each, briefly discuss its good and bad points.
Assessment Have students:
• turn in papers with sketches and answers. • list and describe each of the layers in the earth. • tell what characteristics make a good model.
Extensions Have students design and build their own model of the earth’s interior using materials of their own choosing.
Resources Coble, Charles, et al. 1993. Prentice Hall Earth Science. Englewood Cliffs, NJ: Prentice Hall.
Ford, Brent. 1996. Project Earth Science: Geology. Arlington, VA: National Science Teachers Association.

27
Come Visit Me in Tropical... Antarctica? Why are tropical plant fossils found in Antarctica?
Summary: Students will use a map of the continents as they are today and attempt to work backward to reconstruct Pangea. Duration: One 50-minute class period Setting: Classroom Vocabulary: continental drift, sea-floor spreading, plate tectonics Standards/Benchmarks Addressed: SC1-E1, SC1-E2, SC2-E1, SC2-E2, SC4-E1, SC4-E5, SC5-E2, SC6-E1, SC6-E8, SC12-E3 Objectives Students will:
• describe evidence for the theory of continental drift. • explain the importance of continental drift in the formation of the Capitan Reef.
Background Have you ever taken a really close look at a globe or a map of the earth and noticed that some of the continents look as if they would almost fit together like the pieces of a jigsaw puzzle? In the early 1900s, a scientist named Alfred Wegener did just that. In fact, he went so far as to propose that the continents were moving and had at one time been joined into a single large landmass. He named this landmass Pangea, meaning, “all land.” Prior to his death in 1930, he lacked the evidence to convince many of his theory. However, since that time researchers have enough proof that Wegener’s theory is now widely accepted as accurate.
Among the pieces of evidence supporting the theory of continental drift are the puzzle-like fit of the continents, fossil clues, climate clues, and rock clues. Fossils of the same animal, a Mesosaurus, have been found in both South America and Africa. The fossil fern, Glossopteris, has been found in Africa, Australia, India, South America, and in Antarctica. Other fossils have also been found on continents separated by hundreds or thousands of miles of ocean water. Several hypotheses, including continental drift, have been proposed to explain this.
Fossils of plants from much warmer climates have been found in Antarctica and on Spitzbergen, an island in the Arctic Ocean. Additionally, evidence of glaciation has been found in warm regions of South America, Africa, India and Australia. Again, several hypotheses have been proposed to explain this, one of which is continental drift.
Similar rock types and structures have been found in Africa and South America. If you were to fit the two together like the pieces of a puzzle, these layers would match. Mountains similar to the Appalachian Mountains of the eastern United States have been found in Greenland and western Europe. Again, if you were to fit the continents together like the pieces of a puzzle, these mountains would match like one long chain. Several hypotheses could be proposed, including continental drift.

28
Since the early 1960s, additional evidence has come from research regarding the spreading of the Atlantic Ocean floor and actual measurements of continental movement. Princeton University scientist Harry Hess first suggested sea-floor spreading. However, it was not until scientists aboard the research ship Glomar Challenger gathered information from the rocks on the ocean floor that sea-floor spreading was confirmed. Actual measurements have now been made that indicate the exact direction, and speed, at which the continents are moving.
With confirmation of continental drift, a new theory called plate tectonics was proposed. It states that the crust of the earth is broken into plates that move around on the mantle. Included in the theory are descriptions of the plates, the forces in the asthenosphere, part of the upper mantle, that drive them, and what happens along the plate boundaries.
Materials • Copies of continent maps (from this activity, or others you have copied from another
source, including the continental shelf if possible) one per student • photos or pictures from magazines cut in a jigsaw pattern • scissors • paste (glue sticks are best) • paper
Procedure Warm up: Give each group of three or four students one of the photos or pictures that has been cut up and tell them to reform the image. After they are done ask what clues they used to help them.
Have the students look at a map that clearly shows all of the continents. Ask if they think the continents look a little like a poorly constructed jigsaw puzzle.
Activity 1. Give the students copies of the continents sheet (or the continent maps you are
providing). 2. Instruct the students to cut out each continent and arrange them on a piece of paper as
they are found today. 3. Tell the students that they are to do their best to fit the continents together like a jigsaw
puzzle. However, they cannot pick up a continent, they must slide them. They are not allowed to “leapfrog” over other continents. Suggest that they may want to close the Atlantic Ocean first, since South America and Africa obviously fit.
4. Once they have the continents arranged as they believe that they may have been at one time, have them glue them onto the piece of paper.
Wrap Up: As a class, discuss any difficulties the students had fitting the continents together. Ask the students, “If the continents were really together like this at one time, what evidence should I find to support it?” Discuss all answers.
Lead a class discussion of Alfred Wegener’s theory of continental drift and the evidence that has been found since that time to support it.
Assessment Have students:
• submit their “continental” jigsaw puzzles.

29
• describe evidence supporting the theory of continental drift.
Extensions Have students conduct further studies regarding what happens at plate boundaries. Focus on divergent, convergent, and transform fault boundaries. Describe various surface features seen on the earth that serve as evidence of these boundaries.
Resources Feather, Ralph, et al. 1999. Glencoe Earth Science. Westerville, OH: Glencoe/McGraw-Hill.
Ford, Brent. 1996. Project Earth Science: Geology. Arlington, VA: National Science Teachers Association.

30
Wandering Continents Worksheet

31
Clams Got Wings! When I was ten years old, my family took a trip to the mountains. While there, we went for a walk in a meadow at an elevation of around 3000 meters. In that field were the first fossils I ever found. There was something about those fossils that I didn’t understand, however. They were fossils of snails and clams in excess of six inches. I was smart enough to know that they were from animals that lived in an ocean environment but I couldn’t figure out how they ended up on the top of a mountain in New Mexico, far from any ocean.
A study of the earth’s history reveals a planet whose outer layer flexes; some areas rise and fall many times as tectonic plates collide or pull apart. The highest mountain in the world is topped by marine limestone formed in an ocean between Eurasia and India in the distant past. The movement of tectonic plates on the earth’s surface creates great stress in the crust. As a result of this stress, the crust is stretched, folded, and broken in many places.
In this unit, students will be introduced to stresses that shape the earth’s surface. They will have the opportunity to learn how to identify the various faults and folds geologists study.

32
You’re Stressing Me Out! What kinds of stress in the earth cause
earthquakes, volcanoes, and build up mountains?
Summary: Students demonstrate the various forms of stress found in the earth’s crust. Duration: One 50-minute class period Setting: Classroom Vocabulary: compression, shear, stress, tension Standards/Benchmarks Addressed: SC2-E1, SC4-E1, SC4-E5, SC5-E2, SC6-E1, SC12-E3 Objectives Students will:
• describe tension, compression, and shear.
Background As the lithospheric plates move around on the surface of the earth, a significant amount of stress builds up along their boundaries. This stress can be in the form of compression where plates are colliding, tension where a plate is being pulled apart, or shear where plates are sliding sideways past each other.
As plates collide, compression forces the rocks at the boundaries to fold, or, when their elastic limit is reached, to break. These breaks are known as reverse faults. Earthquakes are common in these areas. The Andes Mountains of South America are found along the converging boundary of the South American and Nazca Plates. The mountains and volcanoes of southern Europe are formed along the converging African and Eurasian plates.
Tension is the stress created when a plate begins to split or when plates begin to pull apart. As the rocks along one of these boundaries reach their
elastic limits, they begin to break in normal faults. The stretching of rocks and the dropping of faulted blocks along this boundary creates low areas called rift valleys. One of the best-known divergent boundaries is found along the Mid-Atlantic Ridge, where the South American and North American plates are moving away from the African and Eurasian plates. Another example of a rift valley is the Rio Grande rift that runs north to south through central New Mexico. Results of this rifting are the north-south mountain chains bordering the Rio Grande, such as the Sandia Mountains, and much of the historical volcanic activity of central New Mexico.
Shear occurs when two plates slide sideways past each other with very little vertical movement. The fault created by this boundary is called a slip-strike fault. Drag along the boundary, due to friction between the plates, results in additional stress. This stress creates a series of other faults that radiate away from the boundary. Periodic earthquakes serve to relieve this stress. A widely known example of a slip-strike fault is the San Andreas Fault of California.

33
In this activity, the focus will be on understanding the various forms of stress that build in the crust as the lithospheric plates move. The next lesson, Achy Breaky Earth, will explore the faults and folds that occur as a result of stress.
Materials • clay – enough for each student or group to have three 4"x6"x1/2" layers • wax paper • paper to sketch and write notes
Procedure Warm up: Show the students pictures of an area after an earthquake. Ask the students to describe the destruction they observe. Ask them “What caused this damage?” Once an earthquake has been determined to be the cause, ask, “Would you say that energy was released by this earthquake?” Ask students what they believe the source of that energy to be.
Activity 1. Have students place the three pieces of clay separately on pieces of wax paper. 2. With their hands, have the students slowly begin to push on opposite ends of one of the
pieces, causing it to compress. Have them sketch what they observe. 3. Have the students hold the second piece of clay in their hands and begin to slowly pull it
apart. Again, have the students sketch what they observe. 4. While holding one side of the last piece of clay flat on the wax paper, have the students
begin slowly pushing the other side sideways with their other hand so that one hand slides past the other. Again, have the students sketch what they observe.
Wrap Up: Ask students the following questions: • What happens to the clay when your hands compress it from opposite directions? • What happens to the clay when you stretch it? • What happens to the clay when you push it so that your hands slide past one another?
Discuss the concept of stress in the earth’s crust and its possible sources. Describe tension, compression, and shear and relate them to the students’ clay samples.
Assessment Have students:
• define stress and describe its causes in the earth’s crust. • describe tension, compression, and shear and give examples of what types of structures
develop in the earth’s crust as a result of each.
Extensions Look at aerial or satellite photos and attempt to find areas on the earth’s surface where stress is found. A tectonic map of the earth’s surface such as those found in most Earth Science textbooks would be helpful. At each location, have students attempt to determine the type of stress present.
Resources Feather, Ralph, et al. 1999. Glencoe Earth Science. Westerville, OH: Glencoe/McGraw-Hill.

34
Achy Breaky Earth What are the different types of breaks and folds in the Earth called?
Summary: Students describe and prepare models of various faults and folds. Duration: Two or three 50-minute class periods Setting: Classroom Vocabulary: anticline, elastic limit, monocline, normal fault, reverse fault, slip-strike fault, syncline Standards/Benchmarks Addressed: SC2-E1, SC2-E3, SC4-E1, SC4-E5, SC5-E2, SC6-E1, SC12-E3 Objectives Students will:
• describe the three primary types of faults (normal, reverse, slip-strike). • describe the three primary types of folds (syncline, anticline, monocline). • build clay or cardboard models demonstrating the various faults and folds.
Background The stresses in the earth that were discussed in the lesson titled You’re stressing me out! result in faulting and folding at the boundaries of the earth’s tectonic plates. In this activity, students will be identifying the various types of faults and folds, as well as building models to represent them.
As stress is applied to an object, that object will begin to give, to fold, or bend. Some objects, such as clay, bend easily. Other objects, such as rocks, required a great deal of heat and pressure before they bend.
The folds that form in mountains are a result of compression. An upward fold is called an anticline and a downward fold is called a syncline. A fold on which there is only a single slope is called a monocline.
Anticline
Syncline Monocline
There is a limit to how far things can bend and stretch. This is called the elastic limit. Once this point is passed, the object will break, whether it is a rubber band or a rock. If rocks break and movement happens along the break, it is called a fault. A fault caused by compression, in which one block slides up and over the other, is called a reverse fault. A fault caused by tension, or stretching, in which one block sinks relative to the other, is called a normal fault. A fault caused by shear, in which one block slides sideways along another with very little vertical movement, is called a slip-strike fault.

35
Normal FaultNormal Faults are formed by tension
Reverse FaultReverse Faults are formed by compression

36
Slip-Strike FaultSlip-Strike Faults are formed by shear
Faulted mountains are found many places in the world. One of the most spectacular regions is the Himalayas where the Indo-Australian plate is colliding into the Eurasian plate. Compression forces have raised ocean-formed limestone to an elevation of over 8,000 meters in that area. In the western United States, stretching of the North American plate has resulted in many north-south trending fault-block mountain ranges. These mountains form the Basin and Range Province of the southwest. The abrupt edges of the mountain ranges mark a series of normal faults with displacements often in excess of one mile. The Guadalupe Mountains, in which Carlsbad Cavern is located, is an example of a fault-block range. The most spectacular evidence of this is found along the western escarpment near Guadalupe Peak and is clearly visible from Salt Flat, Texas.
On the earth’s surface, large scale faulting and folding result in long, linear features when photographed from space. Planetary geologists look for these features as evidence of tectonic activity on other planets. Using these features for clues, they have been able to determine that other planets in our solar system have also experienced tectonic activity. On several planets, they have found evidence of geologic activity that is ongoing. In this lesson, students will be asked to look at maps and try to find surface features on earth that would provide evidence of tectonic activity.
Materials • textbooks showing diagrams of the varieties of faults and folds • maps showing surface features such as mountain ranges and river valleys • wax paper • clay • cardboard boxes • crayons or markers • scissors • tape, paste, or glue

37
Procedure Warm up: Have students study the maps and look for features that have some sort of a regular form or shape (linear, round, or oval, etc.). Discuss with the students what might cause these shapes to form on the earth’s surface. The discussion should include plate tectonics and the resulting faults and folding.
Using drawings on overheads or the board, as well as textbook sketches, describe and discuss the various faults and folds with the students.
Activity Faults
1. Cut and tape, or paste, cardboard boxes to make two “fault blocks” per group, or per student, with one side sloped at about 30o as shown below.
Block 1 Block 2
FAULT
2. Color layers on the boxes that match on both sides. Students can even build little
towns (Monopoly house size) on the top of the blocks if they wish. 3. When the blocks are finished, students can slide them along the fault to model
reverse, normal, and slip-strike faults.
Folds 1. Layer together two colors of modeling clay in a rectangle about 3"x6"x1". Prepare
three blocks in this manner. 2. Place one block of clay over a gap of about four inches between two books. Place a
small weight in the middle. Have students sketch what happens. The fold formed will be a syncline.
3. Lay one of the clay blocks on a piece of wax paper. Have the students push the ends of the clay together slowly, as shown below. The fold formed will be an anticline.
4. Place another block of clay on a book with about one to two inches of clay on the
book and a weight on the clay over the book to hold it in place. Let the remainder hang over the edge. The fold formed will be a monocline.
Wrap Up: Discuss the various forms of stress that accounted for the various faults and folds. Have students sketch and label each one.
Assessment Have students:
• name each fault and fold correctly when shown a model or drawing.

38
• describe the stress or forces in the earth that account for faulting and folding.
Extensions Obtain photos of other planets or moons. Have the students study the photos for evidence of faults or folds. Have the students describe what this evidence indicates about that planet.
Resources Feather, Ralph, et al. 1999. Glencoe Earth Science. Westerville, OH: Glencoe/McGraw-Hill.
Sprinkel, D.A., Chidsey, T.C., and Anderson, P.B., editors. 2000. Geology of Utah’s Parks and Monuments. Salt Lake City, UT. Utah Geological Association, publication 28.
VanCleave, Janice. 1991. Janice VanCleave’s Earth Science For Every Kid. New York, NY, John Wiley & Sons, Inc.

39
Oil Munchers Caves form by many different methods. The caves of the Guadalupe Mountains, including the caves of Carlsbad Caverns National Park, were formed by one of the more unusual processes. The formation of the caves is tied very closely to the hydrocarbon deposits of the Delaware Basin, found at the base of the Guadalupe Escarpment.
Massive deposits of gypsum have been found in many of the caves of the Guadalupe Mountains. For many years, geologists attempted to develop models explaining these deposits, but had little success. It is only in the past 20-30 years that a model has been proposed that not only explains the gypsum deposits, but also explains the unique morphology of the caves. In this model, anaerobic bacteria deep underground in the Delaware Basin facilitate a reaction between hydrocarbons and calcium sulfate, or anhydrite. Anhydrite is an anhydrous form of gypsum, which has water included in its crystalline structure.
According to the model, a byproduct of this reaction, hydrogen sulfide gas, rose through cracks in the rocks to the top of the water table in the Guadalupe Mountains. There, oxygen combined with the hydrogen sulfide gas to produce sulfuric acid. This sulfuric acid reacted with the limestone rock of the ancient reef and began to dissolve vast caverns. As the hydrogen sulfide was oxidized deeper and deeper in the cracks, the deep pits of the caves formed. When groundwater levels changed, the passages formed at new levels. One byproduct of the reaction of sulfuric acid and limestone (primarily calcium carbonate) was calcium sulfate, or gypsum, which was subsequently deposited in the great voids.
In this unit, students will engage in activities designed to help introduce various components of Guadalupe Mountain speleogenesis. Very complex chemical reactions and processes have been simplified in these activities. If students are interested in learning more, recommend that they read the book Stories From Stones: The Geology of the Guadalupe Mountains. Also, recommend that they take chemistry as part of their high school course work.
40
It’s More Than Just Dead Dinosaurs! How does oil and gas form and why does it collect in one place underground?
Summary: Students will describe how oil and gas form and how they are trapped underground. Duration: Three or four 50-minute class periods Setting: Classroom or lab Vocabulary: hydrocarbons, kerogen, permeable, petroleum, petroleum trap, porosity Standards/Benchmarks Addressed: SC5-E2, SC6-E1, SC12-E1, SC12-E2, SC12-E5 Objectives Students will:
• describe how oil and gas form. • describe three types of oil and gas traps.
Background Life, as we know it, would not be possible, without fossil fuels. The most important of these fuels is petroleum. Another word commonly used in reference to petroleum is hydrocarbons. Molecules of petroleum consist mainly of the elements hydrogen and carbon. Most petroleum deposits are found in rocks formed in marine environments.
The formation of petroleum begins in marine basins where microscopic organisms and algae live suspended in the water. As they die, they sink to
the bottom where they become mixed in with the mud at the bottom of the basin. The low oxygen environment in the bottom water keeps the organisms from oxidizing, or decaying. As the sediments continue to accumulate, the layer bearing the remains of the microscopic organisms is buried deeper and deeper. Eventually, heat and pressure build to the point that the remains of the organisms begin to undergo chemical changes. First, the remains are converted into a waxy hydrocarbon called kerogen. Further heat and pressure causes the kerogen to convert to the various forms of petroleum with which you are familiar: methane or natural gas, oil, gasoline, kerosene, and diesel oil. The rocks these hydrocarbons come from are called source rocks.
Within the petroleum reservoir, the various hydrocarbons begin to sort themselves based on density and to migrate through rocks with pathways formed by cracks, spaces between grains, or pores in the rocks. These openings are referred to as porosity. If the areas of porosity are connected and fluid can move through them, the rocks are said to be permeable. The hydrocarbons will migrate along a bed with permeability until they reach the surface, or reach some geologic structure that traps them in place. The permeable rock in which the petroleum is eventually stored is referred to as a reservoir rock. Within the reservoir, the gaseous hydrocarbons, being less dense, move to the top. Typically, there is water associated with hydrocarbon reservoirs. Since the water is denser, it is found on the bottom. The liquid hydrocarbons, or oil, are found in the middle.

41
The structures, or petroleum traps, that stop or slow hydrocarbon migration can take several forms. Four of the more common traps are structural traps, stratigraphic traps, salt domes, and reefs. In the case of a structural trap, features such as faults or folds trap the oil and gas against an impermeable layer. In stratigraphic traps, reservoirs are created by differences in the sedimentary layers. Often a permeable sandstone layer will be “trapped” between two impermeable shale layers. If these layers are tilted, the hydrocarbons will rise through the sandstone layer. If this layer thins and eventually pinches out, it will trap the hydrocarbons, producing a petroleum reservoir. In the case of a salt dome, a bed of salt “blisters” and shifts upward through the more dense layers that overlie it. In doing this, it raises part of the overlying layers, including potential reservoir rocks. Salt is impermeable, so any hydrocarbons moving along a permeable layer will become trapped in the reservoir. Due to the nature of the organisms that form it, a reef becomes a very porous and permeable bed of limestone. If the reef lies near source rocks and is capped by an impermeable layer, it becomes an excellent reservoir rock.
In the Delaware Basin, the hydrocarbons are thought to be of marine origin, resulting from the remains of microscopic organisms that lived in the ancient seas. Within the basin today, most of the petroleum that is found is located in stratigraphic traps. The Capitan Reef certainly meets the requirement of being porous. The caves of the Carlsbad Caverns National Park are just an example of the great porosity to be found in the ancient reef. But current research seems to indicate that no hydrocarbons ever migrated into, or through, the great reef. There is, however, evidence of hydrocarbon migration under the reef from the basin to the southeast, to the backreef, northwest of the park. Why the hydrocarbons did not enter the reef is still a source of speculation and research for geologists from around the world.
Impermeable
Impermeable
Permeable
Anticline Structural Trap
Gas
Oil
Water
Impermeable Layer
Impermeable LayerPermeable Layer
Water
Oil
Gas
Stratigraphic "Pinch-out" Trap
ImpermeableLayer
Impermeable Layer
ImpermeableLayer
Permeable Layer
Permeable LayerImpermeableSalt Dome
water
water
Oil
Salt Dome Trap Impermeable layer
Impermeable layer
PermeableLimestone
Porous andPermeable Reef
OilGas
Reef Trap
Materials • graduated 250 ml beakers – 3

42
• 100 ml beakers – 3 • several 2 or 3-liter soda bottles • oil (can be cooking oil or motor oil) • sand (several colors, if possible) • gravel (several colors, if possible) • scoria (holy lava rock, batman!) • clay
Procedure Warm up: Ask students how oil and gas form. Most students will respond that it forms from dead dinosaurs. Discuss with the students the need for a low oxygen environment if oil and gas are to form from an organism and how most dinosaurs were not in a position to be preserved.
Ask students if much lives in the oceans. Guide the discussion to the topic of microscopic organisms, such as algae, diatoms, and plankton. Ask the students what happens to those organisms when they die. Discuss and describe how these microscopic organisms, small as they are, “pile up” on the ocean floor where the low oxygen environment allows them to be buried and slowly converted into hydrocarbons. If any student doubts that this is possible, you might want to review with the class the diet of the world’s largest mammal, the blue whale, which feeds on these very microscopic organisms.
Discuss and describe with the students how these microorganisms are, with time, pressure, and heat converted into hydrocarbons.
Activity 1. Prepare bottles to demonstrate porosity and permeability as follows:
Filled with sand
Filled with gravel
clay
sand
sand
a. Cut the bottom 3 or 4 inches from three 3-liter bottles and turn them over. b. Glue a single layer of cloth into the bottom of each to keep the sand and gravel from
coming out. c. Fill the bottles as shown
2. Turn all three bottles upside-down with a graduated 250 ml beaker under each. Ask the students, “If I pour 100 ml of water into each of these at the same time, which will it travel through fastest?” Be open to all suggestions. Have the students justify their guesses. Have students assist you and pour 100 ml into each bottle at the same time. Monitor the 250 ml beakers to see which bottle the water passes through fastest. Discuss the results with the class. Solicit their hypotheses regarding the different rates of infiltration through the bottles.

43
3. Define porosity for the students. Show students a piece of scoria (lava rock with holes in it), a piece of sandstone, and a piece of conglomerate or a handful of gravel. Ask which of the samples exhibit porosity. Students should answer “all three” Ask which would form a rock through which fluids would move the easiest. Some students may select the scoria, due to the size of the pores. Point out to students that even though all three samples have porosity, the holes are not connected in the scoria, so fluid would not move through it as easily. The pores in the gravel are bigger than the pores in the sand or sandstone, so fluid would move through the gravel easier. Discuss the differences in porosity and permeability. Expand discussion to point out that water is not the only fluid that moves through the ground, oil and gas also migrate.
4. Ask the students what happens when you mix oil and water. Mix 100 ml water with 10 ml oil and have students observe and describe the results. Ask them why the oil rests on the top of the water. If necessary, review the concept of density and why some objects float on others. Ask the students what would happen in a permeable layer of rock if water, oil, and natural gas were mixed. Discussion should lead to the idea that they would separate with the gas on top and the water on the bottom.
5. Ask the students, “If the hydrocarbons are moving through the ground in a permeable layer of rock, what could stop them?” Entertain all suggestions. Describe the concept of petroleum traps to the students. Using overhead or board drawings, demonstrate and discuss stratigraphic, structural, salt dome, and reef traps.
6. Cut the bottom off empty 3 liter soda bottles approximately 5 inches from the bottom. Leaving the cap tightly secured, turn empty 3-liter soda bottles over and place the top into the bottom, using the bottom as a stand. In the bottle, have each group use sand, gravel, clay, or other materials you have provided to construct a model of one of the petroleum traps you have assigned them. With several colors of materials, you can have the students be very creative in their models.
Wrap Up: Display the models in view of all students. Using the models in your discussion, briefly review the concepts of porosity, permeability, and the various types of petroleum traps. Ask the students to critique the strong and weak points of using the 3-liter bottle models to discuss these concepts.
Assessment Have students:
• List three things this lesson taught them that they didn’t already know or that they learned more about as a result of the lesson.
• Describe how oil and gas are formed. • Define and describe permeability and porosity. • Describe three types of petroleum traps.
Extensions Have a guest speaker involved in the oil and gas industry speak on oil and gas exploration and how wells are drilled.
Have students research society’s dependence on petroleum. Have them include alternative energy sources in their research.
Resources Chernicoff, S., Fos, H.A., and Venkatakrishnan, R. 1997. Essentials of Geology. New York, NY:
Worth Publishers.

44
Hill, Carol. 1996. Geology of the Delaware Basin, Guadalupe, Apache, and Glass Mountains, New Mexico and West Texas: Permian Basin Section SEPM, Publication No. 96-39.
Murck, B.W., Skinner, B.J., and Porter, S.C. 1996. Environmental Geology. New York, NY: John Wiley & Sons, Inc.
Shew, R.D. 1998. Geology of the Guadalupe Mountains. Guidebook prepared for field seminar/workshop conducted by Guadalupe Mountains National Park and New Mexico State University-Carlsbad.
Shew, R.D., and Shew, D.M. 2000. Geology and Natural History of McKittrick Canyon. Guidebook prepared for workshop conducted by Guadalupe Mountains National Park and New Mexico State University-Carlsbad.

45
Strange Things in Strange Places Just how extreme an environment can some things live in?
Summary: Students will use information learned in class discussion to play a game in which they describe several environments in which bacteria are found. Duration: One or two 50-minute class periods Setting: Classroom Vocabulary: anaerobic bacteria, corrosion residues, extremophile, moonmilk, pool fingers Standards/Benchmarks Addressed: SC1-E2, SC12-E7 Objectives Students will:
• describe three “hostile” environments in which bacteria are found.
Background When we think of the environments in which organisms live, we tend to think of our own comfort zone. When asked to think of organisms that live in extreme environments, most people will think of polar bears, camels, or birds. Cold weather, hot and dry, or high above the earth are as extreme an environment as most people can imagine for living organisms. However, research has shown that some microorganisms can live in environments far more extreme than was once thought possible.
Microorganisms have been found living in some very hostile environments. Among these are the cold of the Arctic and Antarctic, volcanic vents, hot vents on the ocean floor, in very dry locations, in rocks deep in the earth, in severe chemical environments, in hot springs, and in high-radiation environments. These extremophiles were not really recognized until the 1970s, but after their discovery were found to be located in the harshest environments on earth.
Throughout the course of their evolution, these organisms developed traits that enabled them to live in their particular, peculiar environments. Those living in freezing temperatures have, as part of their cellular composition, anti-freeze compounds, such as salts, sugars, and amino acids. Thermophiles, those organisms that thrive in excessive heat, are found in the hot springs of Yellowstone National Park and deep in the middle of the Atlantic Ocean, near black smokers, vents that spew superheated water. Those living in extreme chemical environments have developed body processes that enable them to deal with excessively acidic, alkaline, or salty environments.
Extremophiles have also been found deep underground. Some of these extremophiles actually live in the rock. They are anaerobic and do not require oxygen to respire. Some of these feed off hydrogen gas released when groundwater reacts with the rocks through which it is passing. In the Delaware Basin, anaerobic bacteria obtained the energy to live by facilitating the redox reactions of sulfur contained in gypsum and carbon contained in methane. At the boundary of the Castile Formation (impermeable gypsum) and the underlying Delaware Mountain Group (permeable oil and gas bearing beds), bacteria facilitated the following reaction:

46
Ca2++2SO4-2+2CH4+2H+=2H2S+CaCO3+3H2O+CO2
In this reaction, the sulfur in anhydrite (CaSO4) was reduced and combined with the acidic hydrogen (H+) to produce hydrogen sulfide (H2S). The carbon contained in methane (CH4) was oxidized to produce a carbonate ion (CO3
-2) that combined with the available calcium ion (Ca2) to produce limestone (CaCO3). This limestone often carries the structures and bedding seen in gypsum next to it, so it is believed that this alteration from gypsum to limestone occurred in-situ. The hydrogen sulfide then moved through cracks into the reef where, near the water table, it was oxidized to form sulfuric acid (H2SO4). This acid dissolved the great voids that became the caves of the Guadalupe Mountains. A byproduct of this reaction occurred when the sulfate ion (SO4
-2) combined with calcium ions (Ca+2) released in the reaction and water to form gypsum (CaSO4� 2H2O).
In the caves of Carlsbad Caverns National Park, an abundance of evidence has been obtained that indicates microbes are responsible for many of the more unusual features seen. Among those unusual features are corrosion residues, a material composed mostly of insoluble residues. Research has indicated that these residues are the offal of the bacteria that have eaten the bedrock. In the areas where this residue is found, it coats the floors and walls of the cave. Pool fingers are slender calcite fingers, up to 30 cm long and around 2 to 6 mm in diameter. These fingers formed below the water level in pools and contained what have been interpreted to be bacterial filaments. Moonmilk is a pasty material consisting of calcite, hydromagnesite, gypsum, or other materials. It occurs in limited deposits in the caves of the Guadalupe Mountains. When studied at high magnification, it appears to contain filaments or fibers that may be bacterial in origin. Much of this research has been conducted in Lechuguilla Cave.
Microbiologists continue to study the life in the caves of Carlsbad Caverns National Park. While the entrance area of Lechuguilla Cave was mined for many years, the first know entry of humans into the depths did not occur 1986. That year, a group of cave explorers from Colorado, following air blowing through a pile of rock and dirt on the floor dug into a passage leading to the depths of the cave. As soon as the park realized what a unique resource the cave was, restrictions were placed on exploration and research in the cave to help preserve its unique environment. Numerous new bacteria have been found in the cave. Dr. L.M. Mallory and others have been very active in studying these bacteria and their possible help in creating a cure for cancer and other illnesses. NASA has shown a great interest in the microbes of Lechuguilla Cave. Exobiologists theorize that any life found on other planets in our solar system will be microbial, similar to that in Lechuguilla Cave. They hope that studying those organisms will show them the “fingerprint” of any potential aliens.
Materials • markers or crayons • large (2' x 3') sheets of paper
Procedure Warm up: Ask the students “What criteria are essential for something to live?”
Have the students name the most extreme environments they can think of where something could still live.
Discuss with the class the various hostile environments on earth in which microbes live. Remind them that a form of e. coli bacteria lives in their gastrointestinal tract.

47
Discuss the role bacteria have played in the development of the caves of Carlsbad Caverns National Park.
Activity 1. Give the students one large (2' x 3') of paper and crayons or markers. 2. Tell the students that they are going to design an organism that can live in an extreme
environment. Give them several examples of extreme environments to choose from. Tell them that they must explain how their organism adapts to the particular challenges of its environment.
3. Have each group present their work to the class and open the floor for questions for each group.
Wrap Up: Ask the students what this lesson has to do with space travel.
Lead in a discussion about how the environments of other bodies in the solar system, such as Mars, Io, Ganymede and Europa, may harbor the same environment in which one of these organisms could live.
Assessment Have students:
• describe three ways that microbes have adapted to hostile environments. • briefly, describe the role microbes have played in the development of the caves of the
Guadalupe Mountains. • explain why NASA is interested in the microbes found in Carlsbad Caverns National
Park caves.
Extensions Using the internet, have students locate NASA related websites describing the search for extraterrestrial life. Have students study and report on a potential trip to Jupiter’s moon, Europa, or on the search for life beneath the surface of Mars.
Resources DuChene, H.R., and Hill, C.A. 2000. The Caves of the Guadalupe Mountains Research
Symposium. In Hose, L.D. (ed.) Journal of Cave and Karst Studies 62(2).
Hill, C.A. 1987. Geology of Carlsbad Cavern and Other Caves in the Guadalupe Mountains, New Mexico and Texas. Socorro, NM: New Mexico Bureau of Mines and Mineral Resources, Bulletin 117.
Hill, Carol. 1996. Geology of the Delaware Basin, Guadalupe, Apache, and Glass Mountains, New Mexico and West Texas: Permian Basin Section SEPM, Publication No. 96-39.
Jagnow, David and Jagnow, Rebecca. 1992. Stories from Stones: The Geology of the Guadalupe Mountains. Carlsbad, NM: Carlsbad Caverns Guadalupe Mountains Association.
Sasowsky, I.D. and Palmer, M.V. 1994. Breakthroughs in Karst Geomicrobiology and Redox Geochemistry. Karst Waters Institute, Special Publication 1.
Smith, R.B. and Siegel, L.J. 2000. Windows Into the Earth. New York, NY: Oxford University Press.

48
Stinky Gas and Alabaster How did all that gypsum get into the caves of Carlsbad Caverns National Park?
Summary: After class discussion, students will engage in a card game designed to demonstrate the processes leading to the alteration of limestone to gypsum in the caves of Carlsbad Caverns National Park. Duration: One to two 50-minute class periods Setting: Classroom Vocabulary: dissolve, escarpment, joint, lava tube Standards/Benchmarks Addressed: SC2-E1, SC12-E1, SC12-E7 Objectives Students will:
• describe the relationship of cave openings in limestone and the gypsum deposits found in them.
Background Caves form through many different processes. The classic model for the formation of solution caves states that mildly acidic meteoric water dissolves bedrock as it descends through it. As the bedrock dissolves, the widened cracks, or joints, become cave passages. Some of these widened passages may eventually contain large underground rivers, as is the case in Mammoth Cave National Park in Kentucky. Similar processes account for cave formation in gypsum. In the Parks Ranch
Cave System in southeastern New Mexico, approximately 10 km southeast of the Carlsbad Caverns National Park, infrequent cloudbursts can fill gypsum cave passages to the ceiling. These caves are often called “desert storm drains.”
On shield volcanoes, such as the extinct volcanoes in El Malpais National Monument, cave passages are found in the old lava flows. During the last eruption in this area, fast moving lava cooled and solidified near the surface while the hot, liquid lava continued to flow inside. Eventually, the lava flowed out of the tube in places, leaving behind an opening, or a cave.
Near the edge of mountain escarpments where faulting has occurred, tectonic caves are found. These caves are formed as a fault or a joint widens along the edge of an escarpment rather that being formed by dissolved bedrock. Several of these caves are found along the Algerita Escarpment, in the Guadalupe Mountains west and northwest of Carlsbad Caverns National Park. These caves are often deep shafts lined with a great deal of loose rock.
Glaciers often have caves along their base. As the ice of the glacier melts, water will work its way to the base of the glacier where it flows along the ice/bedrock boundary. There, it can melt a passage large enough for human to traverse. These glacier caves sometimes go several hundred feet under a glacier.
The caves of Carlsbad Caverns National Park have a different story. They were formed by acidic groundwater. However, this water did not descend from above. Rather, the necessary

49
components actually rose from the nearby Delaware Basin. In the Delaware Basin, the Castile Formation, composed primarily of anhydrite or gypsum, overlays the sands, limestone, and shale of the oil and gas producing Delaware Mountain Group. Methane gas, moving through the rocks of the Delaware, was stopped on reaching the impermeable Castile. At that point, anaerobic bacteria living in the rock facilitated the redox reactions in which the sulfur contained in anhydrite was altered to become hydrogen sulfide gas and the carbon contained in the methane gas became part of a calcium carbonate rock, limestone. Hydrogen sulfide gas is easily identified by its strong, rotten egg odor. The methane gas produced from the Delaware Basin is, for the most part, considered to be “sour gas” due to the amount of hydrogen sulfide it contains. The reaction is summarized in the following formula:
Ca2++2SO4-2+2CH4+2H+=2H2S+CaCO3+3H2O+CO2
In this reaction, the sulfur in anhydrite (CaSO4) was reduced and combined with the acidic hydrogen (H+) to produce hydrogen sulfide (H2S). The carbon contained in methane (CH4) was oxidized to produce a carbonate ion (CO3
-2) that combined with the available calcium ion (Ca2) to produce limestone (CaCO3). This limestone often carries the structures and bedding seen in gypsum next to it, so it is believed that this alteration from gypsum to limestone occurred in place.
The hydrogen sulfide then moved through cracks, or joints, into the reef where it began to migrate upward. Near the water table, it encountered oxygenated water and was oxidized to form sulfuric acid (H2SO4). This acid dissolved the great voids that became the caves of the Guadalupe Mountains. The joints along which the hydrogen sulfide gas rose were gradually widened until they became the deep pits that characterize many caves of the Guadalupe Mountains. The Bottomless Pit in Carlsbad Cavern is an example of such a pit.
A byproduct of this reaction occurred when the sulfate ion (SO4-2) combined with calcium ions
(Ca+2) released in the reaction and water to form gypsum (CaSO4� 2H2O). In Carlsbad Cavern, some of these massive gypsum deposits can be found in the Big Room near the Jumping Off Place, the Talcum Passage, and in the New Mexico room. In some caves of the Carlsbad Caverns National Park, such as Lechuguilla Cave, sulfur has been deposited in its native yellow crystalline state.
Materials • Copies of the cards printed at the end of the lesson (glued to cardboard and laminated).
You will need one set of cards for each group of three to four students. Number of each card per set: Methane and gypsum (15); Bacteria (5); H2S Gas and calcite replacing Anhydrite (10); Oxygen + H2S = Sulfuric Acid (15); Dissolves limestone and deposits gypsum (10).
Procedure Warm up: Ask the class how caves form. Write all ideas on an overhead or board. Discuss the various ideas presented.
Describe and discuss with the class the current model of how the caves of the Guadalupe Mountains formed.
Activity 1. The objective of the game is to be the first to obtain a complete set of five cards and lay
them down in order (Methane and Gypsum, Anaerobic Bacteria, H2S Gas, Sulfuric Acid, Deposits Gypsum). Provide each group of three or four students with a complete set of game cards. Tell students to shuffle the cards and leave them face down.

50
2. Tell the students to deal each person in the group a hand of five cards and to look at their own hand, but not to show anyone else.
3. Tell the dealer to place the remainder of the stack face down on the table. This becomes the “draw pile.” Tell them to then turn over the first card on the deck, placing it on the table next to the draw deck. This will start the “discard pile.”
4. The person to the dealer’s left will be the first to go. They have a choice of picking up the top card on the “draw pile” or the top card on the “discard pile.” In selecting, they should remember that they are trying to be the first to get a complete set of five cards.
5. After drawing, that player must select a card from their hand to discard. He/she places that card, face up, on the discard pile. Play then moves to the next person who also chooses between the unknown, face down card on the “draw pile” or the known, face up card on the “discard pile.”
6. The game continues until one player has a complete set of five cards. They MUST lay the cards down in the proper order. It is the responsibility of the other group members to see that this is done correctly.
7. Play can continue through one hand or through several, depending on what time allows.
Wrap Up: Hold up game cards, one at a time, and have students tell which step comes next.
Ask the students to again describe the ways in which caves can form. Ask if they had ever considered that bacteria could be responsible for the formation of a cave like Carlsbad Cavern.
Assessment Have students:
• describe three different ways in which caves form. • describe the role of bacteria in the formation of Carlsbad Cavern. • explain how calcium in the limestone of the Capitan Reef can be altered to become part
of large gypsum deposits in caves.
Extensions Have students conduct internet and library research on other caves with unusual stories. Examples of possible caves to study are Cueva de Villa Luz in Tabasco, Mexico where slimy bacterial formations hang from the ceiling over acidic water. These slimy formations have been given the name “snottites.” This activity does not need to focus on bacterial activity in caves. Rather, the students should look for facts that they find to be interesting and unusual.
Resources DuChene, H.R., and Hill, C.A. 2000. The Caves of the Guadalupe Mountains Research
Symposium. In Hose, L.D. (ed.) Journal of Cave and Karst Studies 62(2).
Hill, C.A. 1987. Geology of Carlsbad Cavern and Other Caves in the Guadalupe Mountains, New Mexico and Texas. Socorro, NM: New Mexico Bureau of Mines and Mineral Resources, Bulletin 117.
Jagnow, David and Jagnow, Rebecca. 1992. Stories from Stones: The Geology of the Guadalupe Mountains. Carlsbad, NM: Carlsbad Caverns Guadalupe Mountains Association.

51
Stinky Gas and Alabaster Materials

52
Mother Nature’s Gravel Company Anyone hiking the backcountry of Carlsbad Caverns National Park will immediately notice that it’s very rocky. Big angular rocks breaking off cliffs on the hillsides, round, bowling ball size rocks, and sand and gravel bars in the canyon bottoms all make up a major part of the landscape. The processes that take the limestone, sandstone, and shale bedrock of the Guadalupe Mountains and turn them into smaller sediments are called weathering and erosion.
The processes that break rocks into smaller pieces are referred to as weathering. Mechanical weathering breaks the rocks into smaller pieces without changing their chemical composition. Examples of mechanical weathering are root pry, ice wedging, abrasion, and differential heating. With chemical weathering, the chemical composition of the rock is changed. Examples are reactions with water, acids, and oxygen. The smaller pieces of rock that result from weathering are called sediment. In Carlsbad Caverns National Park, all of these processes are active.
The processes that move sediments are referred to as erosion. The primary agents of erosion are wind, water, gravity and ice (glaciation). In Carlsbad Caverns National Park, all of these, except ice, are active processes.
In this unit, activities will explore weathering by ice wedging and by acids, two of the most active processes in the park. Erosion by wind and water will be the subjects of activities as well.

53
Ice Wedgies! What breaks rocks apart in the mountains?
Summary: Students will model the effect of freeze/thaw cycles on the weathering of rocks. Duration: Part of two 50-minute class periods with overnight activity. Setting: Classroom Vocabulary: abrasion, differential heating, ice wedging, mechanical weathering, root pry Standards/Benchmarks Addressed: SC2-E3, SC5-E2, SC6-E1, SC12-E1, SC12-E3 Objectives Students will:
• describe the four major types of mechanical weathering. • model ice wedging.
Background The processes by which a rock is broken into smaller pieces without being changed chemically are called mechanical weathering. The most common of these processes are root pry, abrasion, differential heating, and ice wedging. When a plant’s root grows through a crack in a rock, it begins to exert a gradual pressure on the sides of that crack. Slowly, over time, the pressure increases and the crack widens until, eventually, the rock is broken.
Abrasion is the wearing away of rocks by solid particles carried by wind, water, or other forces. Classic examples of weathering can be found at Arches National Park, Zion National Park, and Bryce Canyon National Park. In all of these Utah parks, sand carried on the wind has carved unusual shapes and spectacular windows. Along the bottoms of the canyons in the Guadalupe Mountains in Texas and New Mexico are places where the bedrock has been scoured smooth by abrasives carried in floodwater.
Differential heating is the stress created within a rock when the outer part of the rock expands and contracts with daily heating while the interior of the rock remains stable. The stresses generated by this flexing eventually cause layers or sheets to break loose and peel away from the surface of the rock. Another form of differential heating called intergranular disintegration occurs in rocks composed of a mix of light and dark colored minerals. When exposed to sunlight, dark colored minerals absorb more of the energy than the light minerals and heat at a different rate. This difference in heating rates, combined with differences in thermal expansion rates, causes stress between the mineral crystals. With the cycle repeated daily over several years, the crystals eventually break apart from one another. Running your hand across granite or diorite weathered this way will yield a handful of crystals resembling salt and pepper.
Ice wedging begins when water seeps into cracks in a rock. It is dependent on cycles of nightly freezing and daily thawing of that water. As the water freezes at night and changes state from a liquid to a solid, the molecules of H2O align into a repeating pattern known as an ice crystal. This orderly arrangement of molecules takes up more space than the same molecules in a liquid state. Due to this, the ice expands approximately 9% and exerts great pressure on the sides of

54
the crack. During the day, the water melts, possibly more water seeps into the crack, and the cycle begins again. As these freeze/thaw cycles continue over a span of years, the crack continues to widen until the rock is broken. This method is most effective in regions that have a maximum number of freeze/thaw cycles throughout the course of a year. During the late fall to early spring months, this would be an active process in the high Guadalupe Mountains.
Materials • plastic one-liter soda bottles (one per three or four person group) • marker that will mark on plastic bottle
Procedure Warm up: Ask students to describe any processes they can think of that would turn big rocks into small rocks in nature. List and discuss these ideas.
Describe and discuss root pry, abrasion, and differential heating.
Discuss the concept of ice wedging.
Activity: This activity will involve leaving items in a freezer overnight. 1. Pour about 800 ml water in one-liter soda bottles and put cap on. 2. Mark the water level on the side of the bottle. 3. Place all bottles in a freezer overnight. Set them in a pan or container that can hold the
volume of water used, just in case. 4. Remove bottles from freezer immediately prior to use in class. 5. Have students mark level of ice in the bottle and make note of any deformations they
see on the bottle.
Wrap Up: Discuss what was observed. Have the students hypothesize why the volume of water increases when it becomes ice.
Ask if any student has ever had pipes freeze and burst during winter. Discuss the effect that freezing would have on anything containing water.
Review ice wedging and incorporate observations from the lab into the discussion.
Assessment Have students:
• list the forms of mechanical weathering. • describe the processes by which the forms of mechanical weathering work.
Extensions Have students design and perform experiments or demonstrations modeling one of the three other forms of mechanical weathering mentioned in the background material.
Have students make a list of any examples of mechanical weathering they observe over the course of one week.
Resources Coble, Charles, et al. 1993. Prentice Hall Earth Science. Englewood Cliffs, NJ. Prentice Hall.
Feather, Ralph, et al. 1999. Glencoe Earth Science. Westerville, OH: Glencoe/McGraw-Hill.

55
Huff ‘n’ Puff Why and how do sand dunes form?
Summary: Students will use information learned in class discussion to model sand dune migration. Duration: One 50-minute class period Setting: Classroom Vocabulary: abrasion, deflation, deposition, desert pavement, slip face Standards/Benchmarks Addressed: SC2-E3, SC5-E2, SC6-E1, SC12-E3 Objectives Students will:
• describe how sand dunes form. • describe the effect of obstacles on sand dune migration.
Background Energy is defined as the ability to do work or to move a mass a distance. Anyone who has been around the Carlsbad area during spring knows that, by this definition, wind has energy. Wind regularly fills the air with dirt and debris it has picked up and moves the debris to new locations.
Two words used to describe erosion by wind are deflation and abrasion. When the wind blows across loose particles and picks up or moves the smaller ones, it is referred to as
deflation. When wind-borne objects strike stationary objects or sediment and loosen them so that they too are eroded, it is referred to as abrasion. Deposition occurs when the wind slows and loses energy. Without the energy it once had, the wind can no longer carry the sediments it once did and they begin to settle to the ground.
Several factors can make it difficult for wind to pick up sediments. Sediment size is one such factor. As the wind blows across an area containing several sizes of loose sediment, it begins to carry away the smaller particles, leaving the larger ones behind. Over time, these larger sediments will form a protective coating on the ground, preventing the wind from further deflating the smaller sediments. This protective layer is called desert pavement and is seen in the Carlsbad Caverns National Park area.
Two other factors affecting the ability of wind to deflate sediments are vegetative cover and moisture. Vegetative cover protects the soil under it from wind and helps to keep the soil moist. When sediments are moist, they will remain packed and resistant to deflation. When vegetation is removed, the soil is exposed to the sun. As the soil begins to dry, it can be deflated easier by the wind. In a time of drought, this is a natural process. A lack of rainfall will cause vegetation to die. As it dies, the soil underneath will be exposed to the wind and eroded. Any human activity that disrupts vegetative cover can also accelerate wind erosion. Such activities are surface mining, farming, and construction. During the 1930s, in the central part of the United States,

56
farmland was left in an unvegetated state due to drought. Wind moving across these fields deflated great quantities of topsoil and carried it as far as New England and the North Atlantic Ocean. Today, in an effort to prevent or slow these “dust bowl” type storms, windbreaks are often planted along fields. Windbreaks are typically rows of trees planted between fields. These rows of trees disrupt and slow the flow of air at ground level and inhibit its ability to deflate soil in fields.
The wind deposit with which most people are familiar is sand dunes. Sand dunes are mounds of sand that migrate in directions dictated by the prevailing winds in an area. As the wind moves across the windward side of the dune, the side with the more gradual slope, it deflates, the sediments on that side of the dune and carries or bounces them up the dune to the top. As the wind moves across to the back, or leeward, side of the dune, its speed slows and it looses energy. This steeper side where sediments are deposited is referred to as the slip face. Near the dune, the wind will form eddies, or backward rotating areas. In these lower energy areas, sand carried from the front of the dune will be deposited. In this way, the dune migrates in the direction the wind is blowing.
Wind
Original Dune Dune at later time
Movement ofsand grains
Materials • sand • flour • gravel • rocks 1" - 2" diameter • 9" x 13" baking pans or similar size tubs • soda straws • cardboard sheets • tape • paper for sketching
Procedure Warm up: Define energy for the class. Ask for examples of things in nature that have energy. For each example, ask for proof.
slip face

57
If students do not suggest it, ask, “Does wind have energy?” Answers may vary. If some students say no, you may want to ask about such things as sailboats, tornadoes, and springtime in the southwest.
Once it has been established that wind does have energy, discuss deflation, abrasion and deposition. Ask students for examples of ways to keep the wind from eroding soils. Discuss the dust bowl conditions of the 1930s. Describe desert pavement and ask where students think it might be found.
Ask students if anyone has ever visited sand dunes anywhere, including White Sands National Monument, Great Sand Dunes National Monument, or the sand dunes east of Carlsbad, New Mexico. Ask about the shape of the dunes. Describe and discuss sand dune movement.
Activity 1. Mix the sand, gravel, and flour thoroughly. 2. Cover the bottom of a pan or washbasin with 1/2 inch of the mixture. Put one or two of
the rocks in the pan near the middle. Use one setup per group of two to four students. Allow the students to “sculpt” the landscape in any form they choose but establish the guideline that once the wind starts blowing, they cannot touch the sediments in the pan again.
3. Have students use three or four pieces of cardboard and tape to construct a barrier around their “dune field.”
4. Using the straw, students will GENTLY blow the sand from one side of the pan. The wind must always come from the same side throughout the activity. Tell students that if the sediments are not moving, they need to make more wind. If their table looks like a field during the dust bowl days, they do not need as much wind.
5. Have students sketch their dune field four or five times during the activity at an interval of about three or four minutes between sketches. The first sketch should be drawn before beginning. In particular, have them sketch dunes and how they change, areas of deflation and deposition, what happens to sediments around the larger rocks, formation of desert pavement, and any place they see the sediments being sorted by size.
Wrap Up: After cleaning sand and flour off of tables or desks, ask students who have been to sand dunes if the features they saw in their pan looked familiar to what they have seen at areas with sand dunes. Ask students for examples of other areas where they’ve seen sediments pile up along the side of an object like the rock in their pan. Some examples might be along a street curb during a dust storm, and around the side of a house or fence during a sand storm or during a snowstorm.
Ask the students what can be done to prevent wind erosion. Suggestions should include planting vegetation and windbreaks.
Assessment Collect sketches. Have students:
• define and explain deflation, abrasion and deposition. • list three factors affecting wind erosion. • describe two ways to prevent or slow wind erosion. • describe how a sand dune moves.
58
Extensions Have students:
• do internet or library research and gather photos of sand dunes from around the world. • study the photos and attempt to determine the prevailing wind direction. • identify any features in the photo designed to stop or slow wind erosion. • compare and contrast the dunes to determine if dunes can have several different basic
shapes. Have them research the various dune shapes (barchan dunes, transverse dunes, parabolic dunes, seif dunes, star dunes, dome-shaped dunes, and reversing dunes) and attempt to determine what types are found in each of the photos. (Barchan and seif are the most common)
Resources Feather, Ralph, et al. 1999. Glencoe Earth Science. Westerville, OH: Glencoe/McGraw-Hill.
VanCleave, Janice. 1991. Janice VanCleave’s Earth Science For Every Kid. New York, NY, John Wiley & Sons, Inc.

59
Flash Flood Fantasy Why is water the primary agent of erosion in the arid southwest?
Summary: Students will observe and describe gully and canyon erosion in the desert southwest using stream trays they have made. Duration: Two 50-minute class periods Setting: Classroom and outside Vocabulary: alluvial fan, arroyo, bar, canyon, meander, undercut bank, waterfall Standards/Benchmarks Addressed: SC2-E3, SC5-E2, SC6-E1, SC12-E3 Objectives Students will:
• name features formed by moving surface water. • describe erosion features formed in stream trays or canyon models.
Background The four primary agents of erosion are wind, water, gravity, and ice. Of these, the most active on the earth’s surface is water. Even in the semi-arid southwestern United States, water does more to sculpt the land than wind, ice, or gravity. Most of the precipitation in the area around Carlsbad Caverns National Park comes in the form of brief, heavy rainfall associated with thunderstorms. From a small, obscure mudflow along the flanks of North Slaughter Canyon to a road-blocking flash flood in Walnut Canyon, the effects of these periodic, intense rains can be seen throughout the park.
Most of the deposits and landforms seen along valleys where rivers flow year-round are similar to or identical to those formed by periodic flooding in the desert southwest. Among these are canyons, arroyos, waterfalls, meanders, bar deposits, undercut banks, and, at the mouths of canyons, alluvial fans. Canyons, arroyos, and falls are features familiar to anyone who has spent time in the mountains near a river that meanders its way past, flowing downhill. In fact, a bend in a river is called a meander. The deposits of rocks, gravel, and sand, rounded by the abrasive action of fast moving floodwater, are called bars. A close examination of bar deposits will reveal that the sediments in a bar deposit are sorted by size. As the water in a river or a flooding canyon flows around, over, and through obstacles, its velocity changes. These changes in velocity and energy result in sediments being sorted, or deposited in different places along a stream or canyon bottom. Often, the fast moving water along the outer edge of a meander will cut into the bank, leaving soil and plants or trees above. When this happens, it is referred to as an undercut bank.
As a flash flood roars down a canyon in the Guadalupe Mountains, or in similar fault-block mountains, it has a great deal of energy and moves sediment that is large in volume and large in size. Mountains like the Guadalupes are typified by deep canyons that cut suddenly through the face of an escarpment and open abruptly into flat plains or a flat valley floor paralleling the escarpment. As the highly energetic flood waters rush from the confines of the canyon and

60
spread onto the flats beyond the canyon mouth, they slow and suddenly lose energy. As a result of this lost energy, the sediments carried by the flood begin to be deposited rapidly. A large, cone-shaped pile of flood debris and sediment called an alluvial fan is found at the mouth of canyons like those seen in the Guadalupe Mountains. Often, inactive areas of the fan will be overgrown with vegetation typical of the desert and canyon bottoms. However, arroyos leading from the canyon mouth will cut through these areas leading floodwaters and sediments to the areas of the fan where active deposition occurs.
Materials • vinyl rain gutter cut in 2-foot sections • endcaps for rain gutter – one per rain gutter section • sand or dirt • rocks – 1 or 2 inch diameter • water source – 1-liter bottles with sport top and a refill source works great!
Procedure Warm up: Ask students if any have ever seen a flash flood. Have students describe the effects of the flood that they observed during and after. Have them describe changes made in the landscape and on roadways and any sediment deposits they noticed.
Discuss the role that periodic flash flooding plays in shaping the landscape in and near Carlsbad Caverns National Park. Describe the various features associated with moving water.
Activity 1. Using 2-foot sections of vinyl rain gutter, prepare stream/canyon models as shown.
EndCap
2' vinyl rain gutter
Elevate this end
sand or dirt
rock
2. Fill each gutter with dirt approximately 2/3 full at the gutter end and slope to where dirt
ends about 2/3 of the distance to the end (see drawing). The dirt can be packed some and sculpted so that the middle section is slightly lower than the edges. Place a rock on the dirt at the upper end. Water will be poured on this rock. If they wish, allow students to build small villages with “Monopoly” houses.
3. Be sure to do this part of the activity in an outside location where water and mud will not create a problem for others. Set the canyon model at a slope with the capped end three to four inches higher than the lower end. After this point, students should be instructed that they are not to touch or manipulate the dirt any further. From this point on, only the water will be allowed to do that work.
4. Instruct (and model) students to gently pour water on the rock and let it flow out the mouth of the canyon. This may take a few minutes since the dirt will absorb much of the water initially.

61
5. Once a stream begins to flow the length of the canyon, students are to stop and sketch the canyon, being sure to show where various features such as arroyos, falls, and bar deposits are forming.
6. Instruct students to continue gently pouring water to simulate periodic flash floods and stopping every three or four minutes to draw a new sketch, paying close attention to changes along the canyon.
7. Tell students to pay particular attention to deposits in, or near, the canyon mouth. Point out the alluvial fans that begin to develop just outside the canyon mouth. Instruct students to include these in their sketches.
8. Clean up the mess.
Wrap Up: Discuss the features students saw develop in their canyons. Ask if any have seen similar features in real life.
Assessment Collect sketches. Have students:
• describe the various landforms and deposits associated with moving water.
Extensions Have students:
• study the effect of slope on runoff and erosion by tilting the canyon models at several different heights.
• study the effect of vegetation on erosion by mixing grass in with the dirt. • vary the intensity of water flow as a study on the effect of water speed on erosion.
Resources Feather, Ralph, et al. 1999. Glencoe Earth Science. Westerville, OH: Glencoe/McGraw-Hill.
VanCleave, Janice. 1991. Janice VanCleave’s Earth Science For Every Kid. New York, NY, John Wiley & Sons, Inc.

62
Natural Acids What makes those big holes in the ground?
Summary: Students will describe the source of various acids that form caves and will model the effect of acids on carbonate rocks. Duration: One 50-minute class period Setting: Classroom or lab Vocabulary: acid, infiltration, karst, resurging streams, sinkholes, sinking streams Standards/Benchmarks Addressed: SC2-E3, SC5-E2, SC6-E1, SC12-E3 Objectives Students will:
• describe the sources of two cave forming acids. • model the effect of acids on carbonate rocks.
Background Natural formed acids weather rocks. The lesson Stinky Gas and Alabaster described the processes by which sulfuric acid from below can form caves like those in Carlsbad Caverns National Park. However, a different process forms most caves in carbonate rocks. Groundwater contains carbonic acid, the same weak acid that gives sodas their fizz, and can dissolve carbonate rocks like limestone. In arid regions, such as those in the desert southwest, insufficient rainfall prevents this from becoming a dominant cave forming process. However, in the eastern United States this process forms most caves. The longest cave system in the world, the Mammoth Cave – Flint Ridge system,
was formed as mildly acidic groundwater dissolved a series of large, underground river passages beneath the sinkhole plain of southwestern Kentucky.
As rainwater falls, it absorbs some carbon dioxide from the surrounding air. However, most of the carbon dioxide in the groundwater comes from the soil the water passes through as it infiltrates, or sinks into the ground. As the groundwater moves through cracks, or joints, in the limestone bedrock it begins to slowly dissolve the rock. The chemical reactions involved in this process are shown below.
carbon dioxide water CO2 + H2O
calcium bicarbonate carbonic acid calcite solution
H2CO3 + CaCO3 Ca2+ + 2HCO31-
The rivers formed by this mildly acidic groundwater will flow gradually downhill until reaching a base water table or reemerging onto the surface as a spring. In Mammoth Cave National Park, the underground river eventually flows into the Green River, the base level river for the area. Cave passages in Mammoth Cave National Park have been formed on several levels. Older cave passages are located higher, corresponding to a time when they emerged into a shallower
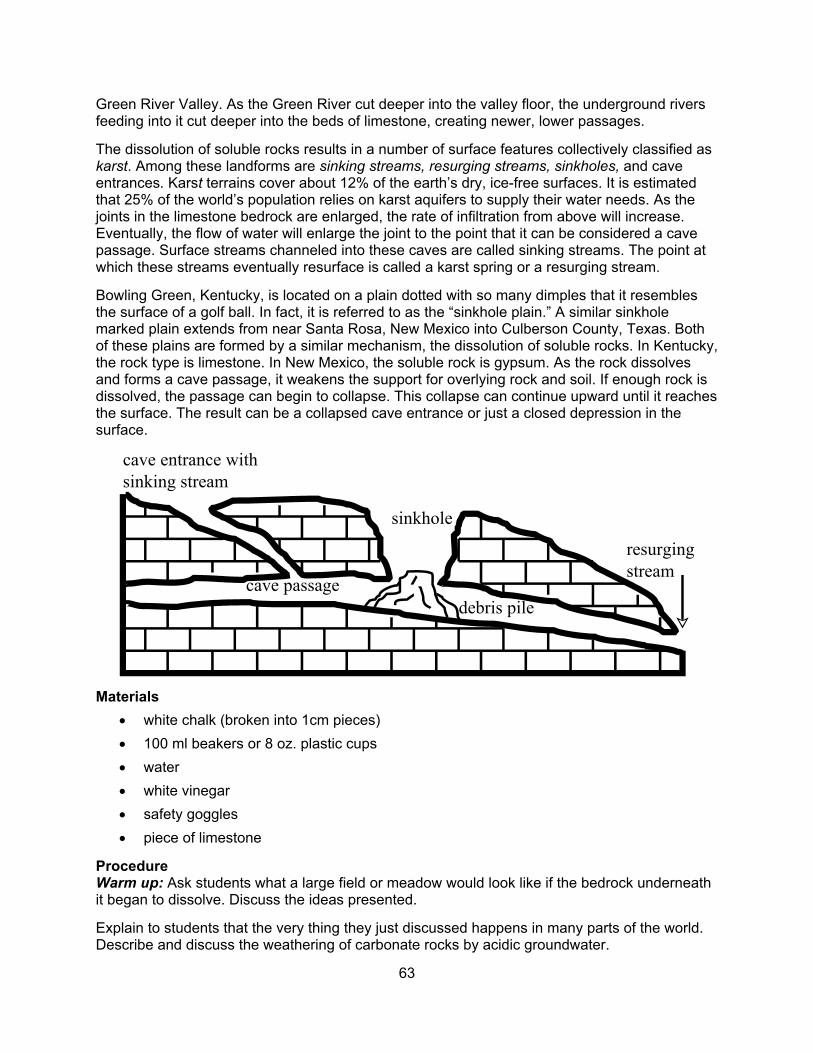
63
Green River Valley. As the Green River cut deeper into the valley floor, the underground rivers feeding into it cut deeper into the beds of limestone, creating newer, lower passages.
The dissolution of soluble rocks results in a number of surface features collectively classified as karst. Among these landforms are sinking streams, resurging streams, sinkholes, and cave entrances. Karst terrains cover about 12% of the earth’s dry, ice-free surfaces. It is estimated that 25% of the world’s population relies on karst aquifers to supply their water needs. As the joints in the limestone bedrock are enlarged, the rate of infiltration from above will increase. Eventually, the flow of water will enlarge the joint to the point that it can be considered a cave passage. Surface streams channeled into these caves are called sinking streams. The point at which these streams eventually resurface is called a karst spring or a resurging stream.
Bowling Green, Kentucky, is located on a plain dotted with so many dimples that it resembles the surface of a golf ball. In fact, it is referred to as the “sinkhole plain.” A similar sinkhole marked plain extends from near Santa Rosa, New Mexico into Culberson County, Texas. Both of these plains are formed by a similar mechanism, the dissolution of soluble rocks. In Kentucky, the rock type is limestone. In New Mexico, the soluble rock is gypsum. As the rock dissolves and forms a cave passage, it weakens the support for overlying rock and soil. If enough rock is dissolved, the passage can begin to collapse. This collapse can continue upward until it reaches the surface. The result can be a collapsed cave entrance or just a closed depression in the surface.
cave entrance withsinking stream
sinkhole
cave passagedebris pile
resurgingstream
Materials • white chalk (broken into 1cm pieces) • 100 ml beakers or 8 oz. plastic cups • water • white vinegar • safety goggles • piece of limestone
Procedure Warm up: Ask students what a large field or meadow would look like if the bedrock underneath it began to dissolve. Discuss the ideas presented.
Explain to students that the very thing they just discussed happens in many parts of the world. Describe and discuss the weathering of carbonate rocks by acidic groundwater.

64
Describe landforms that result from the dissolution of soluble rocks.
Activity 1. Provide students with safety goggles. 2. Place 100 ml water in one of the beakers or plastic cups. 3. Place 100 ml vinegar in another beaker or cup. 4. Give each group of students two pieces of chalk. Have them place one in the water and
the other in the vinegar and record their observations.
Wrap Up: Explain to the students that chalk is a type of limestone made of the shells of tiny animals.
Show the class a piece of limestone. Have them list similarities and differences between chalk and limestone. Be sure to point out that they are chemically similar. Ask the students what they would expect to happen if the limestone was exposed to a weak acid like vinegar.
Review the manner in which caves form as soluble rocks are dissolved by mildly acidic groundwater.
Assessment Have students
• describe what happens to limestone when it is exposed to acidic groundwater. • describe surface features found in areas underlain by soluble bedrock.
Extensions Have students research pollution problems found in karst aquifers. Examples of aquifers include those found in the karst areas of the eastern US (Kentucky, Tennessee, northwest Georgia, northeast Alabama, Missouri and Florida would be good places to start). Also, the Edwards Aquifer of central Texas would be a good topic of study. Have them describe the most common sources of pollution, research methods, and activities being done to slow or prevent pollution.
Have the students study the effects of temperature, chalk size, and concentration of acid on the rate at which the chalk dissolves.
Conduct the same experiment using chips of limestone.
Resources Feather, Ralph, et al. 1999. Glencoe Earth Science. Westerville, OH: Glencoe/McGraw-Hill.
Moore, G.W., and Sullivan, G.N. 1978. Speleology: The Study of Caves. Teaneck, NJ: Zephyrus Press, Inc.
VanCleave, Janice. 1991. Janice VanCleave’s Earth Science For Every Kid. New York, NY, John Wiley & Sons, Inc.

65
Hangy Downys, Sticky Upys and Other Pretty Cave Decorations
If you were to ask most people to describe a cave formation, they would probably describe “hangy downys and sticky upys”, more properly known as stalactites and stalagmites. While these are probably the best-known cave formations, caves contain many other fascinating formations as well. Cave pearls, popcorn, hydromagnesite balloons, and selenite crystals are just a few examples of other features that grow in caves.
Other features found in caves result from the corrosion of bedrock and formations. These corrosion features are usually the result of the same compound, carbonic acid, which resulted in the formation of the large stalactites and stalagmites. However, the processes involved in corrosion features are quite different. A key player in the development of corrosion features is rising warm air.
A cave is a climate unto itself, and within a cave are many small variations in that climate. These “microclimates” often result in beautiful formations that can only occur in just the right set of conditions. Typically, the microclimates are a result of air movement, or the lack of it, within a cave system.
Water is another key player in the development of cave decorations. Without it, the Carlsbad Cavern would be a rather barren hole in the ground. Mildly acidic groundwater, migrating down through the limestone bedrock, carried dissolved calcite to the cavernous voids where it was deposited in the form of stalactites, stalagmites, and draperies. The migration of water from the surface to the cave has been the topic of many studies. A topic of concern recently has been the transportation of pollutants from the visitor center and office area into the cave by groundwater. Several studies have focused on determining the rate of groundwater infiltration into the cave in many areas.
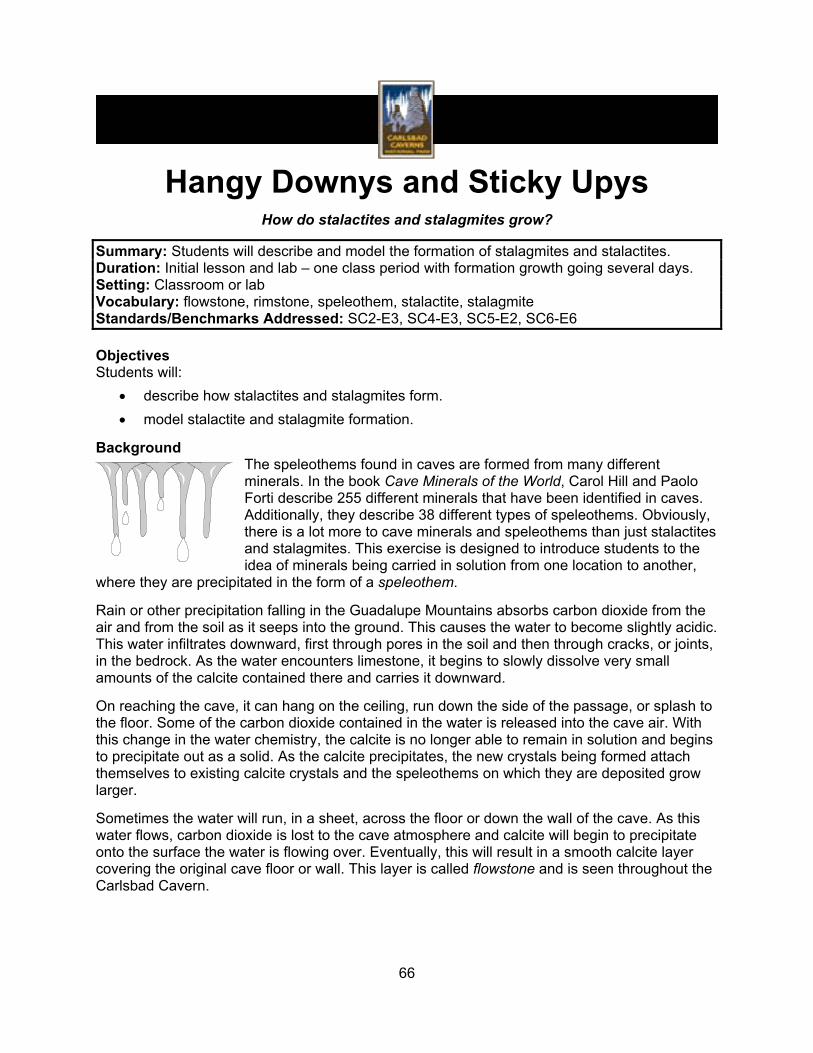
66
Hangy Downys and Sticky Upys How do stalactites and stalagmites grow?
Summary: Students will describe and model the formation of stalagmites and stalactites. Duration: Initial lesson and lab – one class period with formation growth going several days. Setting: Classroom or lab Vocabulary: flowstone, rimstone, speleothem, stalactite, stalagmite Standards/Benchmarks Addressed: SC2-E3, SC4-E3, SC5-E2, SC6-E6 Objectives Students will:
• describe how stalactites and stalagmites form. • model stalactite and stalagmite formation.
Background The speleothems found in caves are formed from many different minerals. In the book Cave Minerals of the World, Carol Hill and Paolo Forti describe 255 different minerals that have been identified in caves. Additionally, they describe 38 different types of speleothems. Obviously, there is a lot more to cave minerals and speleothems than just stalactites and stalagmites. This exercise is designed to introduce students to the idea of minerals being carried in solution from one location to another,
where they are precipitated in the form of a speleothem.
Rain or other precipitation falling in the Guadalupe Mountains absorbs carbon dioxide from the air and from the soil as it seeps into the ground. This causes the water to become slightly acidic. This water infiltrates downward, first through pores in the soil and then through cracks, or joints, in the bedrock. As the water encounters limestone, it begins to slowly dissolve very small amounts of the calcite contained there and carries it downward.
On reaching the cave, it can hang on the ceiling, run down the side of the passage, or splash to the floor. Some of the carbon dioxide contained in the water is released into the cave air. With this change in the water chemistry, the calcite is no longer able to remain in solution and begins to precipitate out as a solid. As the calcite precipitates, the new crystals being formed attach themselves to existing calcite crystals and the speleothems on which they are deposited grow larger.
Sometimes the water will run, in a sheet, across the floor or down the wall of the cave. As this water flows, carbon dioxide is lost to the cave atmosphere and calcite will begin to precipitate onto the surface the water is flowing over. Eventually, this will result in a smooth calcite layer covering the original cave floor or wall. This layer is called flowstone and is seen throughout the Carlsbad Cavern.

67
Surface soils and rock containing carbon dioxide
Precipitation
1. Meteoric water infiltrating into the ground absorbs carbon dioxide from the air and from the soil it passes through.2. This acidic water dissolves the mineral calcite as it moves downward through cracks, or joints, in the limestone bedrock and carries it down to the cave.3. As the water hangs from the ceiling, runs down the side of the cave, or splashes to the ground, it releases carbon dioxide. Calcite then precipitates out of the water and attaches to the surface, forming soda straws, stalactites, stalagmites, draperies, and several other speleothems.
Often, water flowing across the floor of the cave will collect in pools. As water flows over the edge of these pools to continue downstream, it becomes turbulent. This causes carbon dioxide in the water to be released to the cave atmosphere. As a result, calcite begins to precipitate and attach to the edge of the pool. Over a period of time, the buildup of calcite at the edge of the pool can build a dam, actually deepening the pool. These rimstone dams, or gours, are found in

68
many of the caves of Carlsbad Caverns National Park. Possibly the most spectacular of these is the Chinese Wall in Slaughter Canyon Cave.
The growth rate for speleothems varies from cave to cave and also varies between locations within the same cave. According to Hill and Forti, speleothem growth rates are affected by such factors as climate and water infiltration patterns. They cite studies in which wide ranges of growth rates were obtained for speleothems from several locations. In one study, growth rates ranged from 0.22 to 9.29 cm/100 years. They point out a study by Derek Ford in which he concludes that most cave travertine (calcite) grew during the last half of the Pleistocene Period, making it less than one million years old. However, in spite of the variability of calcite growth rates, it is still a very slow process on a human scale, with little growth being seen in the span of a human lifetime.
Students often ask how to remember which formation is a stalactite and which is a stalagmite. Stalactite has the letter ‘c’ in it like the word ceiling. Stalactites hang from the ceiling. Stalagmite has the letter ‘g’ in it like the word ground. Stalagmites grow from the ground. Stalactites must hang on ‘tite’ or they will fall. If they keep growing, stalagmites someday ‘mite’ reach the top of the cave. Most students will be able to use one of these methods to help them remember the difference in the two types of speleothem.
Materials • Epsom salts • small jars (two per set) • cotton yarn • washers or other items to be used as small weights • scissors • food coloring • spoon • aluminum foil • paper
Procedure Warm up: Show students photos of decorated cave passages. Have them describe the speleothems that they see. Ask them to write a summary of how they think the speleothems they see were formed.
Describe and discuss, as a class, the mechanisms by which the most common calcite speleothems are formed. Discuss the slow rate of speleothem growth and the factors influencing it.
Activity 1. Prepare a saturated Epsom salt solution. This can be done by filling each jar 2/3 full with
Epsom salt and adding water to the same height. Stir. 2. Cut pieces of yarn 50 cm in length. Tie a weight to each end. 3. Place each end of the yarn in different jars and press the weight to the bottom of the jar. 4. Make a tray at least 60 cm long by folding and crimping the ends of a piece of aluminum
foil.

69
5. Place the jars on the tray. The string should hang between them with the lowest part of the loop 2-3 cm above the tray.
6. Allow the jars to remain undisturbed for one week. Have the students check the speleothem growth daily. Have students draw the changes in the speleothems daily or plot the growth on a graph.
7. If desired, food coloring can be added to the Epsom salt solutions.
Wrap Up: Briefly, review the mechanisms of speleothem growth with the students. Discuss the strong and weak points of the Epsom salt model they have been observing for the past week. Tell the students that some cave formations are formed from the same mineral as that contained in Epsom salts. The mineral is called epsomite and has the chemical formula MgSO4
.7H2O. Epsomite speleothems grow much faster than calcite speleothems. According to Hill and Forti, some epsomite speleothems have been known to grow 25-35 cm in a matter of a few weeks.
Assessment Have students
• submit drawing or graphs demonstrating the growth rate of the epsomite speleothems made in class.
• describe how calcite speleothems like stalactites and stalagmites form. • describe three factors that affect the growth rate of speleothems.
Extensions Use the procedure described above to create Epsom salt speleothems, but create them in a cave diorama. Several solutions with different colors can be used. Place the jars on top of the box in which the diorama will be built. Place the box on an aluminum foil tray or a shallow cookie sheet. Make hole in the top of the box that the yarn will pass through easily. Drape some pieces of yarn down through the box and back up to another jar. Other shorter pieces of yarn can be suspended with one end in a jar and the other hanging into the “cave.” Encourage students to be creative in attempting to replicate several varieties of speleothems.
Resources Ambrose, Janet, et.al. eds. 1999. About Bats, Caves and Deserts. Carlsbad, NM: Carlsbad
Caverns National Park.
Hill, Carol and Forti, Paolo, 1997, Cave Minerals of the World, 2nd ed. Huntsville, AL: National Speleological Society, Inc.
Jagnow, David and Jagnow, Rebecca. 1992. Stories from Stones: The Geology of the Guadalupe Mountains. Carlsbad, NM: Carlsbad Caverns Guadalupe Mountains Association.
Van Cleave, Janice. 1991. Earth Science For Every Kid. New York, NY: John Wiley & Sons, Inc.

70
Not Just Your Average Decoration Are there other types of formations that can be found in caves?
Summary: Students will use information learned in class discussion to model the formation of other cave decorations such as cave pearls, popcorn, and corrosion features. Duration: One 50-minute class for initial lesson. Five to ten minutes daily for one to two weeks thereafter. Setting: Classroom Vocabulary: cave pearl, cave popcorn, condensation/corrosion, frostwork, saturated Standards/Benchmarks Addressed: SC2-E3, SC4-E3, SC5-E2, SC6-E6 Objectives Students will:
• describe how three other types of cave formations are formed. • build a model showing how cave popcorn is formed.
Background Caves contain many more speleothems than the stalagmites and stalactites most people are familiar with. Three of the other more common speleothems or features found in the caverns are cave pearls, directional frostwork and popcorn (a form of coralloid), and condensation/corrosion features.
Cave pearls grow in shallow pools of water saturated with the mineral calcite. Sand grains, bat bones, rock, shell, wood fragments, or other small pieces of calcite can form the nuclei around which the pearls will grow. As carbon
dioxide is lost to the air, calcite is deposited on the object, as well as along the floor and edges of the pool. As more and more calcite is added, the pearls will become rounded. Agitation, typically from dripping water, is believed to keep the pearls from adhering to the bottom of the shallow pool.
Directional frostwork, directional popcorn, and condensation/corrosion features owe their existence to air circulation within a cave. Directional frostwork and popcorn form as cool, drier air descends into a cave during the winter months. For a detailed drawing and discussion of seasonal air circulation in caves, see the lesson It’s a Small World. This drier air causes water to evaporate faster on the side of formations facing the entrance of a cave. As the water evaporates, calcite will precipitate and form the delicate frostwork forms or the coral-like popcorn. Several good examples of directional popcorn can be seen along the main passage in the Carlsbad Cavern between the natural entrance and the Iceberg Rock. In this area, popcorn grows on the entrance facing side of many stalactites and stalagmites. Some passages in the Left-Hand Tunnel, between the Lunchroom and Lake of the Clouds have excellent examples of directional frostwork.
Condensation/corrosion features are formed when carbon dioxide gas, released from water in the cave, is absorbed by water condensed on the cave wall or ceiling. According to Hill, three atmospheric conditions must be present for this to occur: a high carbon dioxide level in the air,

71
high humidity in the air, and a temperature gradient, or difference, between the air in different passages. The carbon dioxide is released from pools in the cave, such as the Lake of the Clouds in Carlsbad Cavern. If the air near the pool is warmer than air in another upper passage, density driven air currents (see It’s a Small World) will cause the warmer, moisture and carbon dioxide laden air to rise up to and along the ceiling. On reaching the ceiling and ceiling formations, the water will begin to condense onto these cooler surfaces. The carbon dioxide will dissolve into this fresh water, causing it to become acidic and aggressive to the calcite bedrock and formations. Over a period of time, the bedrock will become “punky,” or soft and marked by corrosion. Speleothems will be etched by acidic water along the side facing into the rising airflow. The water (now saturated with calcium carbonate, or calcite) can then be moved to the edge of the corroded area by the gentle airflow. There, the carbon dioxide might again degas, causing the calcite to precipitate and causing rims to grow along the edge of the corroded area. This type of condensation/corrosion is very evident on the Creeping Ear, located in the Lake of the Clouds Passage, Carlsbad Cavern.
Materials • Carbonated soda in a transparent plastic bottle • Tap water • Carbonated water • White vinegar • Three small spray bottles • White chalk • Clay • Aluminum foil or small foil pans (about 10 cm diameter)
Procedure This activity is designed to simulate condensation/corrosion processes in caves.
Warm up: While standing in the middle of the classroom, rapidly shake the soda and act like you are going to open it. When students seem to be concerned about this, ask why you shouldn’t open the bottle. Discuss the carbonation of sodas and how it causes soda to fizz. Ask what happens if you leave the soda open overnight. Have students hypothesize what happens to the fizz. Lead them to an understanding of degassing, in which most of the carbon dioxide leaves the liquid and returns to the air. Ask students what would they think would happen if the degassed carbon dioxide encountered a drop of pure water with no carbon dioxide in it. During the discussion, lead them to understand that carbon dioxide will leave a soda where it is found in excess. It will also reenter, or dissolve into, pure water.
Describe and discuss the carbon dioxide degassing that occurs from pools in caves. Discuss the background material with students, being sure to cover the manner in which the less dense, warmer air rises and carries the carbon dioxide upward. Be sure to discuss the manner in which the carbon dioxide dissolves into condensed water along the cave wall, causing that water to become mildly acidic.
Activity 1. Place three balls of clay (about 1" diameter) in the bottom of separate aluminum pans. If
using aluminum foil, fold the edges and tuck the corners to make trays about 10 cm long. Mark one of the pans “tap water,” one of the pans “carbonated water,” and the last “vinegar.”
72
2. Stick one piece of chalk upright in each of the balls of clay. 3. In one spray bottle place tap water, in another place carbonated water, and in the third
place vinegar. The carbonated water should be refreshed each day. 4. Using the spray bottles, lightly mist each piece of chalk with the liquid for which it is
labeled. Do not drench the chalk! Take care not to spray the other pieces of chalk. 5. Place the pans where they will not be disturbed. 6. Once per day, examine the chalk. Have the students record their observations using
written descriptions, drawings, or photographs. 7. Continue for one week, or until substantial differences can be seen.
Wrap Up: Have the class summarize what they observed with the chalk. Use class discussion or written work. Ask students to describe the ways in which the demonstration they have done in class is similar to the processes that occur in cave environments.
Assessment Have students
• describe condensation/corrosion features found in caves. • explain why popcorn is often found on the side of stalagmites facing the entrance of a
cave.
Extensions Using the Epsom salt speleothem model from the lesson Hangy Downys and Sticky Upys, have students design and build a model of directional popcorn. Remember that air currents used in the model must be very light.
Resources Hill, Carol, 1987, Geology of Carlsbad Cavern and Other Caves in the Guadalupe Mountains,
New Mexico and Texas. Socorro, NM: New Mexico Bureau of Mines & Mineral Resources Bulletin 117.
Hill, Carol and Forti, Paolo, 1997, Cave Minerals of the World, 2nd ed. Huntsville, AL: National Speleological Society, Inc.
Jagnow, David and Jagnow, Rebecca. 1992. Stories from Stones: The Geology of the Guadalupe Mountains. Carlsbad, NM: Carlsbad Caverns Guadalupe Mountains Association.

73
It’s a Small World Why is the cave so cold and damp?
Summary: Students will observe and describe microclimates around their school. Duration: One 50-minute class period Setting: Classroom and around school Vocabulary: circulation, dense, microclimate Standards/Benchmarks Addressed: SC5-E2, SC6-E1, SC12-E7 Objectives Students will:
• describe various natural microclimates. • explain why caves are microclimates. • search for and describe microclimates found around their school building.
Background All caves have their own unique climates. These microclimates, as they are called, are determined by many factors such as entrance elevation, available moisture in the cave, shape and size of the passages, and mean annual temperature. Seasonal variations in the airflow of Carlsbad Cavern have resulted in a number of interesting directional speleothems (see Not Just Your Average Decoration lesson). When air on the surface cools during the fall and winter months, it becomes more dense. As the air near a cave entrance becomes denser, it begins to flow into the cave and down. It will continue to
flow deeper into the cave until it reaches the lowest level of the cave or meets a layer of air with the same density. Meanwhile, the air in the cave is heated by the surrounding rock, causing it to become less dense and rise. In this way, convective cells of air circulation are set up in a cave system. Cool, drier surface air sinks in along the lower portion of cave passages, while warmer, more humid air from the cave rises along the ceiling toward high points in the cave. A circulation cell like this is responsible for the corrosion features found near Lake of the Clouds, Carlsbad Cavern.
This seasonal inflow causes seasonal fluctuations in temperature and humidity along the main pathways leading to the depths of the cave. However, along some passages, such as blind passages that have an entrance, but no outlet, there is very little air circulation. In these areas, the annual temperature and humidity variations are minimal.
Local tectonics and stratigraphy play a major role in the availability of moisture in a cave. Perched aquifers can intercept infiltrating water above one section of a cave and divert it to another. Additionally, cracks in the bedrock, or joints, provide preferential pathways for groundwater flow. Frequently these joints will cut across a perched aquifer, providing a pathway for water to descend toward the cave. As the groundwater flowing along joints intercepts a cave passage, a wetter section of the cave will be formed. In that region, flowstone, stalagmites, stalactites, draperies, columns, pools, and rimstone dams may be abundant.

74
The entrance area of a cave is a special climate zone. The cooler temperatures, increased humidity, availability of water, and shelter of the rock make this zone a haven for desert wildlife. Cave swallows frequently build nests along the cliffs found around cave entrances such as Carlsbad Cavern. These birds can be seen returning from a day of feeding just as the bats that live in the cave are leaving for a night foraging in the desert skies. Ringtail cats, skunks, porcupines, squirrels, and snakes are just a few of the other animals that enjoy the special ecosystem that exists in a cave entrance. Insects, arachnids, arthropods, and many smaller creatures thrive in the entrance as well. Guano deposits usually mark the path leading from the bat roost area to the entrance. Within these deposits, a microscopic world of living organisms is found.
Materials • sling psychrometer (Celsius) NOTE: Alcohol thermometers are strongly recommended,
rather than mercury! • thermometer (Celsius)
Procedure Warm up: Ask students to estimate the temperature outside. Ask them to estimate the temperature inside the classroom. Ask them to estimate the temperature in the principal’s office. Ask if they believe the air outside is more or less humid than the air inside.
Describe the concept of microclimates to the students. Point out that around a school, several microclimates can exist. On a hot, summer day, there can be a difference of several degrees between the hot, sunny, south side of the building and the comparatively cooler, shady, north side. Additionally, the humidity can vary in those areas as well. In this lab, students will look for several different microclimate zones in, and around, their school building. They will then compare those to the microclimates found in caves.
Activity 1. Have the student’s list several places around the school building where they believe
differences in temperature and humidity may be found. As a class, or in groups, select three or four of those locations to study.
2. At each of those locations, record the temperature and the wet and dry bulb readings from the psychrometer. Remember, the fabric sock on the wet bulb of the psychrometer must be moistened prior to use, preferably with distilled water. The psychrometer must then be spun gently for several minutes and checked periodically. This continues until the wet bulb temperature stabilizes.
3. Inexpensive sling psychrometers are available from several science supply houses. Some thermometers have a small eye at the top to which a string could be attached. However, this is not recommended, as these eyes tend to break fairly easily under these conditions. Simple student psychrometers can be built by taping, or gluing, small, inexpensive thermometers to a support, such as a thin piece of wood, and attaching a sock made of gauze to the bulb. The dry bulb temperature can be obtained from the regular thermometer being used to determine air temperature. Once the students have obtained their data, they can determine the relative humidity of their microclimate zones by using the data table provided with the psychrometer, or the data table provided at the end of this session. On the data table, they will need to find the dry bulb temperature along the vertical axis. They will need to calculate the difference in the wet and dry bulb temperatures and find this value on the horizontal axis of the table. Once both numbers have been found, the relative humidity can be determined.

75
Thermometer
Cotton Gauze Sock
Hole for tying string used to swing psychrometer
Sturdy backboard of some sort
Simple Sling Psychrometer
Wrap Up Discuss any difference in temperature and relative humidity that the students observed.
Have the students attempt to explain why those differences were found. They should consider such things as shading, protection from wind, proximity to a source of moisture (leaky faucet, condensation dripping from evaporative cooler, evaporative coolers, etc.).
Have students list any factors they can think of that would be responsible for the existence of microclimates in a cave. Have them list and describe the consequences of several possible microclimates. As an example, a high amount of water and drier, inflowing air will result in increased evaporation and more speleothems.
End with a discussion of the various organisms that utilize the unique ecosystem and microclimate found in and near the entrance of a cave.
Assessment Have students:
• describe several factors that contribute to the development of microclimates in caves. • describe procedures and equipment that might be used by speleologists when studying
microclimates in caves.
Extensions Have students:
• Use the equipment from this lab to study microclimates around their community and to evaluate the impact these microclimates have. As an example, the Bataan Bridge crosses the Pecos River in Carlsbad, New Mexico and underneath a very interesting microclimate is found. The area under the bridge is slightly more humid, cooler, and darker. As a result, it is home to a healthy population of swallows and bats. It the water of the Pecos, the bridge also modifies the climate by creating shaded, cooler zones in the water. Fish are frequently found in these shaded areas during the hot, sunny summer months.
Resources Feather, Ralph, et al. 1999. Glencoe Earth Science. Westerville, OH: Glencoe/McGraw-Hill.
(Contains a lab activity for using a sling psychrometer on pp. 428-429, 719.)

76
Hill, Carol, 1987, Geology of Carlsbad Cavern and Other Caves in the Guadalupe Mountains, New Mexico and Texas. Socorro, NM: New Mexico Bureau of Mines & Mineral Resources Bulletin 117.

77
Relative Humidity in Percent It’s a Small World
Dry Bulb - Wet Bulb Temperatures (°C) Tdb (°C) 1 2 3 4 5 6 7 8 9 10 12 14 16 18 20
2 84 68 52 37 22 8 4 85 70 56 42 29 26 3 6 86 73 60 47 34 22 11 8 87 75 63 51 39 28 18 7 10 88 76 65 54 44 33 23 14 4 12 89 78 67 57 47 38 29 20 11 3 14 89 79 69 60 51 42 33 25 17 9 15 90 80 71 62 54 45 37 29 22 14 18 91 81 73 64 56 48 41 33 26 19 6 20 91 82 74 66 58 51 44 37 30 24 11 22 91 83 75 68 60 53 46 40 34 27 16 5 24 92 84 76 69 62 55 49 43 37 31 20 9 26 92 85 77 70 64 57 51 45 39 34 23 14 4 28 92 85 78 72 65 59 53 47 42 37 26 17 8
30 93 86 79 73 67 61 55 49 44 39 29 20 12 4
32 93 86 80 74 68 62 56 51 46 41 32 23 15 8 1
34 93 87 81 75 69 63 58 53 48 43 34 26 18 11 5
36 93 87 81 75 70 64 59 54 50 45 36 28 21 14 8
38 94 88 82 76 71 65 60 56 51 47 38 31 23 17 11
40 94 88 82 77 72 66 62 57 52 48 40 33 26 19 13
42 94 88 83 77 72 67 63 58 54 50 42 34 28 21 16
44 94 89 82 78 73 68 64 59 55 51 43 36 29 23 18

78
Drip, Drip, Drip How long does it take water to get from the surface into the cave?
Summary: Students will explore infiltration rates and the factors that affect it. Duration: Two 50-minute class periods Setting: Classroom or lab Vocabulary: infiltration, groundwater, porosity, permeability, aquifer, aquiclude, water table, zone of aeration, zone of saturation Standards/Benchmarks Addressed: SC2-E3, SC5-E2, SC6-E1, SC12-E7 Objectives Students will:
• describe factors influencing infiltration rates. • build a model demonstrating the effect of different soil and rock types on infiltration.
Background Much of the material in this lesson will duplicate that from It’s More Than Just Dead Dinosaurs! That is because the ideas of porosity, permeability, and the flow of fluids through rock reservoirs are basically the same. The activity involves the use of the same bottles to model fluid flow underground.
As precipitation falls to the ground, one of three things can happen to it. It can evaporate and return to the atmosphere as water vapor. Sometimes this happens after the water has been intercepted and held on vegetation for a period of time. It can also happen as water evaporates from puddles left by a rainstorm or as the
water held in muddy soil is drawn out and given the energy to evaporate by the sun. Other water can infiltrate into the ground, percolating downward to become groundwater. That which does not evaporate or infiltrate begins to seek low spots and, in the process of moving across the ground, becomes what is called runoff. Runoff can range from large rivers, such as the Mississippi River, to small rills along the edge of a mud puddle in a student’s backyard.
This lesson will focus on infiltration. The principle factor affecting the rate of infiltration is the composition of the soil. As water begins to infiltrate it fills the openings, or pores, in the soil as it moves downward. Some soils contain gravel or sand. In these soils, the pores will be larger and the soil will be more permeable. This means that the water can move through the soil faster. The openings are smaller in soils with silt or clay sized particles. Water will move slower through these soils. Additionally, molecular attraction between water molecules and clay particles further slows the rate of infiltration. If the rate of precipitation exceeds the rate of infiltration, the ground becomes saturated with water. That is, all of the pore spaces in the soil fill with water. When this happens, any excess water begins to flow down gradient across the surface as runoff.
As water infiltrates downward, it will eventually reach a permeable layer in which groundwater is stored. This layer is called an aquifer. In the aquifer, the region in which most spaces are filled with air is called the zone of aeration. The region in which most spaces are water filled is called the zone of saturation. The top of the zone of saturation is referred to as a water table. The
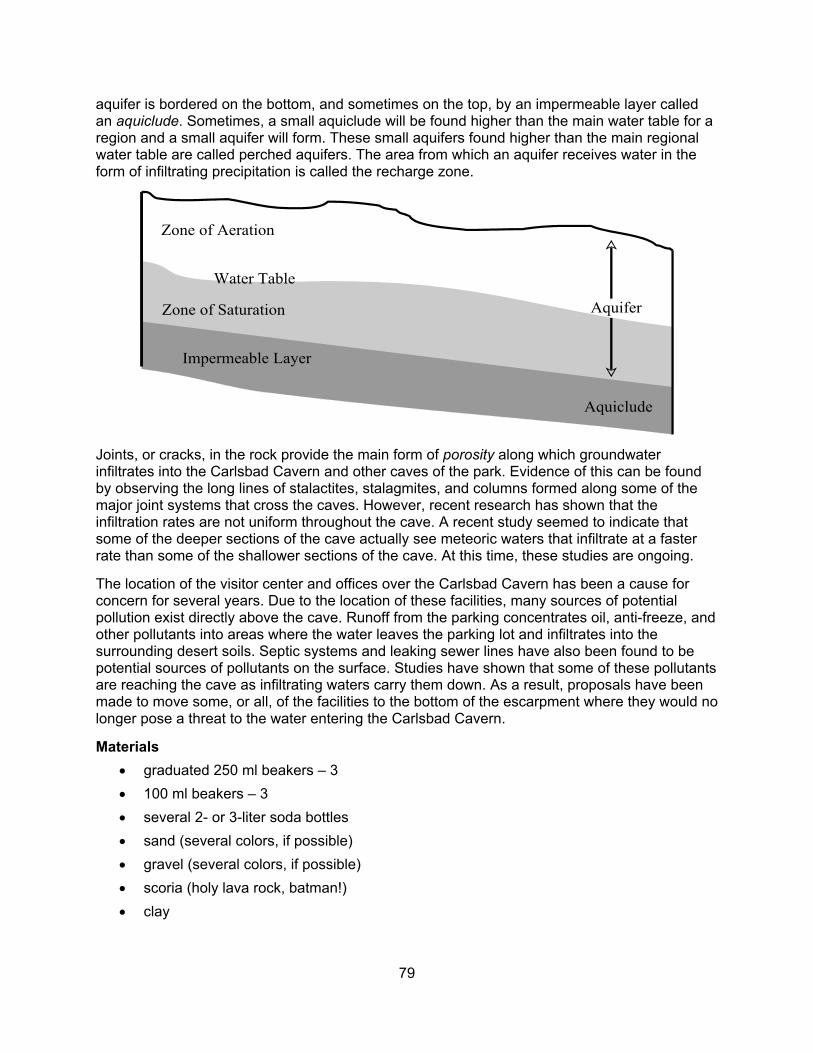
79
aquifer is bordered on the bottom, and sometimes on the top, by an impermeable layer called an aquiclude. Sometimes, a small aquiclude will be found higher than the main water table for a region and a small aquifer will form. These small aquifers found higher than the main regional water table are called perched aquifers. The area from which an aquifer receives water in the form of infiltrating precipitation is called the recharge zone.
Impermeable Layer
Zone of Aeration
Zone of Saturation
Water Table
Aquifer
Aquiclude
Joints, or cracks, in the rock provide the main form of porosity along which groundwater infiltrates into the Carlsbad Cavern and other caves of the park. Evidence of this can be found by observing the long lines of stalactites, stalagmites, and columns formed along some of the major joint systems that cross the caves. However, recent research has shown that the infiltration rates are not uniform throughout the cave. A recent study seemed to indicate that some of the deeper sections of the cave actually see meteoric waters that infiltrate at a faster rate than some of the shallower sections of the cave. At this time, these studies are ongoing.
The location of the visitor center and offices over the Carlsbad Cavern has been a cause for concern for several years. Due to the location of these facilities, many sources of potential pollution exist directly above the cave. Runoff from the parking concentrates oil, anti-freeze, and other pollutants into areas where the water leaves the parking lot and infiltrates into the surrounding desert soils. Septic systems and leaking sewer lines have also been found to be potential sources of pollutants on the surface. Studies have shown that some of these pollutants are reaching the cave as infiltrating waters carry them down. As a result, proposals have been made to move some, or all, of the facilities to the bottom of the escarpment where they would no longer pose a threat to the water entering the Carlsbad Cavern.
Materials • graduated 250 ml beakers – 3 • 100 ml beakers – 3 • several 2- or 3-liter soda bottles • sand (several colors, if possible) • gravel (several colors, if possible) • scoria (holy lava rock, batman!) • clay

80
Procedure Warm up: This activity is almost identical to It’s More Than Just Dead Dinosaurs! However, it focuses on groundwater, rather than oil and gas migration.
Discuss the concept of groundwater, infiltration, and the movement of groundwater with the class. If possible, secure a groundwater model to use with the class discussion or bring in a speaker with groundwater experience. Your local Soil and Water Conservation offices, county extension office, National Park Service personnel, Forest Service Personnel, or Bureau of Land Management personnel may have the expertise and materials to help with this.
Discuss the role of infiltrating water in cave development and potential hazards posed by the infiltration of polluted water.
Activity 1. Set up three bottles as shown in the activity It’s More Than Just Dead Dinosaurs!
Filled with sand
Filled with gravel
clay
sand
sand
a. Cut the bottom 3 or 4 inches from three 3-liter bottles and turn them over. b. Glue a single layer of cloth into the bottom of each to keep the sand and gravel from
coming out. c. Fill the bottles as shown.
2. Turn all three bottles upside-down with a graduated 250 ml beaker under each. Ask the students, “If I pour 100 ml of water into each of these at the same time, which will it travel through fastest?” Be open to all suggestions. Have the students justify their guesses. Have students assist you and pour 100 ml into each bottle at the same time. Monitor the 250 ml beakers to see which bottle the water passes through fastest. Discuss the results with the class. Solicit their hypothesis regarding the different rates of infiltration through the bottles.
3. Define porosity for the students. Show students a piece of scoria (lava rock with holes in it), a piece of sandstone, and a piece of conglomerate or a handful of gravel. Ask which of the samples exhibit porosity. Students should answer “all three.” Ask which would form a rock through which fluids would move the easiest. Some students may select the scoria, due to the size of the pores. Point out to students that even though all three samples have porosity, the holes are not connected in the scoria, so fluid would not move through it as easily. The pores in the gravel are bigger than the pores in the sand or sandstone, so fluid would move through the gravel easier. Discuss the differences in porosity and permeability.
4. Ask the students what happen if the water reached an opening, like a cave. Have them describe what might happen to the dissolved minerals in the water as it hangs from the ceiling of a cave passage. Have them explain where those minerals come from.
81
5. Ask the students, “If the water is moving through the ground in a permeable layer of rock, what could stop it?” Entertain all suggestions. Describe aquifers and aquicludes to the students. Using overhead or board drawings, demonstrate and discuss zone of aeration, zone of saturation, aquifer and aquiclude.
Wrap Up: Review the role of groundwater in cave formation.
Ask the students where they get the water they drink. Lead to a discussion of how the water must come from a surface reservoir or from a well before it makes it to them. Discuss potential sources of pollution along that pathway and what should be done to protect their drinking water.
Assessment Have students:
• describe the conditions necessary for an aquifer to form and for groundwater to move through it.
• explain how pollution could get into a cave system that has no entrance.
Extensions • Build several bottle models and test other materials to see which is the most permeable. • Conduct research on the local drinking water system. Have students find out where it
comes from, how it is treated, etc. • Study the local wastewater treatment system. Where does it go after you flush? How is it
treated? What eventually happens to the water? Try to fit this in to a very large-scale discussion of the water cycle (There is no new water, just used water).
Resources Chernicoff, S., Fos, H.A., and Venkatakrishnan, R. 1997. Essentials of Geology. New York, NY:
Worth Publishers.
Feather, Ralph, et al. 1999. Glencoe Earth Science. Westerville, OH: Glencoe/McGraw-Hill.
Murck, B.W., Skinner, B.J., and Porter, S.C. 1996. Environmental Geology. New York, NY: John Wiley & Sons, Inc.

82
A River Runs Through it... Literally! How do some other caves form?
Summary: Students will describe the processes in which caves are formed as moving water dissolves bedrock. Duration: Initial lesson will take one 50-minute class with 5-10 minutes per day for several days after. Setting: Classroom or lab Vocabulary: karst, dissolve, soluble Standards/Benchmarks Addressed: SC2-E3, SC5-E2, SC6-E1 Objectives Students will:
• build a model of a cave or karst valley formed in bedrock dissolved by moving water. • describe the processes by which moving water forms karst valleys or caves.
Background Most of the caves in Carlsbad Caverns National Park were formed when rising H2S gas from the Delaware Basin oxidized to form sulfuric acid near the water table (see the lesson Stinky Gas and Alabaster). This acid dissolved the limestone rock of the ancient Capitan Reef and the caves were created. However, most caves are not formed that way. Many of the gypsum caves on the Eastern Plains of New Mexico were formed as water, moving through joints in the gypsum bedrock, dissolved the rock, forming passages. Most of these gypsum caves only see water during the monsoon season when heavy rainfall from thunderstorms or prolonged rain floods them. However, some of the caves actually contain water year-round in the form of streams and pools. As the water makes its way through the cave system, it will eventually join a deep aquifer or resurface
at a karst spring. Many of the big pools on the Delaware River near Carlsbad Caverns National Park are fed by these karst springs.
The longest cave in the world, Mammoth Cave, is found near Bowling Green, Kentucky. Much of Mammoth Cave lies within the borders of Mammoth Cave National Park. The bedrock in which the Mammoth Cave system was formed is limestone. As the meteoric waters infiltrated into the ground, they began to absorb carbon dioxide and became mildly acidic. This acidic water then began to dissolve the rock through which it was passing. Eventually, traversable passages were formed. With a total surveyed length of well over 300 miles, Mammoth Cave was formed from the interconnecting passages of many underground streams and rivers. These streams eventually fed into the Green River, the base level river for the area. Over the years, the Green River cut deeper and deeper into its canyon bottom. As it cut deeper, the streams and rivers forming Mammoth Cave also cut deeper. As a result, Mammoth Cave is formed on several levels, all corresponding to the down cutting of the Green River. In much of the United States, the caves that are found have been formed in this manner. Large numbers of limestone caves are found in the eastern US, on the Ozark Plateau, and in central Texas. Caves have not

83
formed in this manner in the limestone of the Guadalupe Mountains in New Mexico and Texas. This is primarily due to the low amount of precipitation each year.
The gypsum caves of New Mexico and Mammoth Cave of Kentucky were formed by similar processes. However, they are formed on different time scales. Gypsum is typically ten times more soluble in water containing CO2 than limestone is; depending on how much CO2 is in the water. This means that gypsum caves will form at a faster rate than similar limestone caves.
Lave tubes are another type of cave found in New Mexico and other areas of the western US. Lava tubes are formed on the flanks of shield volcanoes. As lava flows away from a volcanic vent, that which is near the surface begins to cool and harden. Eventually, a seemingly solid surface can form. However, under that solid crust, liquid lava can still flow. As the eruption dies out, the level of the liquid lava will drop and a tube, or lava cave, will be left behind. Access to these caves is often gained through holes where the ceiling has collapsed.
Living in an area with soluble bedrock presents a number of unique problems. As caves form near the surface, the ceiling often collapses into them, creating sinkholes. A region in which the landscape contains cave entrances, sinkholes, sinking streams, and springs flowing from holes in the ground is called karst. While the development of sinkholes and other karst features may not be much of a problem in southeastern New Mexico, it is a big problem in Florida and on the Sinkhole Plain of Kentucky. Roadways and houses have been swallowed by sinkholes in these states. In these areas, caves are usually the primary storm drain system. If rainfall amounts exceed the amount of water the cave can process, or if a collapse has blocked some of a cave passage, water can back up in the system, causing flooding in sinkholes. Houses and buildings near these sinkholes can be flooded, even if they are miles from the nearest river. An even bigger problem is that of groundwater pollution. It is estimated that 25% of the world’s population obtains its water from karst aquifers. Typically, in non-karst aquifers, impurities are filtered out as water infiltrates and makes its way down to the aquifer. In a karst aquifer, the routes from the surface to the aquifer are quite direct, allowing for very little filtration. Runoff from parking lots, feedlots, and dumps often feeds directly into cave systems. The Hidden River Cave system under Bowling Green, Kentucky, was such a problem. Cleanup efforts have improved the status of the cave, but pollution is still a constant threat. Most of the karst aquifers in the US are threatened due to pollution and development on the surface.
For more information on karst and cave development, refer to the lesson Natural Acids.
Materials • sugar cubes • distilled water • cake pan • dropper or bottle with sports lid that can slowly drop water • photos of various types of caves
Procedure Warm up: Have the students compare and contrast the various types of caves shown in the photos.
Describe the various processes of cave formation to the students.

84
Activity 1. Very lightly moisten the edges of the sugar cubes and stick them together on a cake pan
or cookie sheet in a block 10 cubes wide x 5 cubes high x 20 cubes long (or whatever size you prefer).
2. Lift one edge of the pan or sheet 1 to 2 inches to give it a gentle slope. The pan will represent an impermeable lower layer of rock.
3. Select a point on top of the sugar block, near the upper end, on which you will slowly begin to drop water.
4. Begin slowly dropping water on the pre-selected spot at a rate of about 5 ml per day. 5. Over the course of several days, have students document the change in the block as the
sugar is dissolved. 6. If you schedule does not allow for several days of observation, increase the rate at which
you apply the water.
Wrap Up: Ask students what it would be like to live in an area where caves are actively forming underneath you. Discuss problems faces by those living in Florida and on the Sinkhole Plain near Bowling Green, KY.
Assessment Have students:
• describe the processes that form caves like Mammoth Cave in Kentucky. • describe the problems associated with living in an area where caves are actively
forming.
Extensions Have students build several sugar blocks and apply water at different rates. Have students monitor and document their observations. Lead students to draw conclusions about the possible effects of annual rainfall on the rate at which karst features form.
Resources Moore, George, and Sullivan, Nicholas. 1978. Speleology: The Study of Caves. Teaneck, NJ:
Zephyrus Press, Inc.
Veni, George, et.al. 2001. Living With Karst. Alexandria, VA: American Geological Institute Environmental Awareness Series, 4.

85
CONTENT STANDARDS WITH BENCHMARKS
Science Unifying Concepts and Processes CONTENT STANDARD 1 Students will understand science concepts of order and organization. SC1-E1 Students will apply information about the predictability and organization of the universe and its subsystems. SC1-E2 Students will apply prediction to scientific problems and events. CONTENT STANDARD 2 Students will use evidence, models, and explanations to explore the physical world. SC2-E1 Students will identify and organize evidence needed to predict changes in natural and artificial systems. SC2-E2 Students will organize phenomena into hypotheses, models, laws, theories, principles, and paradigms. SC2-E3 Students will design and develop models. CONTENT STANDARD 3: Students will use form and function to organize and understand the physical world. SC3-E1 Students will explain function by referring to form and explain form by referring to function. CONTENT STANDARD 4: Students will understand the physical world through the concepts of change, equilibrium, and measurement. SC4-E1 Students will illustrate that constancy and change are properties of objects and processes. SC4-E2 Students will illustrate that energy and matter can be transformed and changed but the sum remains the same.

86
SC4-E3 Students will use elementary scientific devices to measure objects and simple phenomena. SC4-E4 Students will employ mathematics to quantify properties of objects and phenomena. SC4-E5 Students will relate the contributions of external and internal forces to change in the form and function of objects, organisms, and natural systems. Science as Inquiry CONTENT STANDARD 5: Students will acquire the abilities to do scientific inquiry. SC5-E1 Students will use the scientific method within the classroom and school environment. SC5-E2 Students will employ equipment, tools, a variety of techniques, and information sources to gather, analyze, and interpret data. SC5-E3 Students will explain that scientific theories emphasize evidence, have logically consistent arguments, and use scientific principles, models, and theories. Well-accepted scientific theories are formulations of apparent relationships or underlying principles of certain observed phenomena that have been verified to a very high degree. CONTENT STANDARD 6: Students will understand the process of scientific inquiry. SC6-E1 Students will use different kinds of methods, including observation, experiments, and theoretical and mathematical models to answer a variety of scientific questions. SC6-E2 Students will use their own understanding of science to guide their scientific investigations. SC6-E3 Students will use criteria for sound scientific investigations to verify the truth of the results of their own and others’ investigations. SC6-E4 Students will choose appropriate methods and analytic techniques for specific science problems and investigations. SC6-E5 Students will use technology and scientific methods to gather evidence to enhance the accuracy of their findings.

87
SC6-E6 Students will describe the results of investigations with teachers, peers, parents, and others. SC6-E7 Students will explain that scientific investigations can result in new ideas, objects, methods, techniques, and procedures for investigation. SC6-E8 Students will explain that in areas where there is not a great deal of experimental or observational evidence, it is typical for scientists to differ with one another about the theory, hypothesis, or evidence being investigated. Physical Science CONTENT STANDARD 7: Students will know and understand the properties of matter. SC7-E1 Students will identify the characteristic properties of elements and compounds such as density, boiling point, and solubility. SC7-E2 Students will explain that the characteristic properties of an element or compound are independent of the amount (size) of the sample. SC7-E3 Students will discriminate between elements based on the characteristic ways in which they react with other elements to form compounds that are different substances with unique characteristic properties. CONTENT STANDARD 8: Students will know and understand the properties of fields, forces, and motion. SC8-E1 Students will explain that when an object is not being subjected to a force, the object will continue to move at a constant speed and in a straight line. SC8-E2 Students will describe quantitatively how an object’s position, speed, and direction explain motion. SC8-E3 Students will compare and contrast gravity to other forces in the world and universe. CONTENT STANDARD 9: Students will know and understand the concepts of energy and the transformation of energy. SC9-E1 Students will apply knowledge about energy and energy transformation to science problems.

88
SC9-E2 Students will explain how chemical reactions can take place in time periods ranging from less than a second to millions of years. SC9-E3 Students will explain how chemical reactions involve concentration, pressure, temperature, and catalysts. Life Science CONTENT STANDARD 10: Students will know and understand the characteristics that are the basis for classifying organisms. SC10-E1 Students will use information about living things including:
• The roles of structure and function as complementary in the organization of living systems.
• Cells as the fundamental unit of life. • The functions of cells which sustain life. • Cell division. • The use of nutrients by cells. • The role of heredity and environment in the characteristics of individual organisms. • Those small genetic differences between offspring and parents may accumulate in
succeeding generations and may or may not be advantageous for the species. • Disease as a breakdown in the structures or function of an organism.
SC10-E2 Students will categorize organisms according to reproductive and other characteristics. CONTENT STANDARD 11: Students will know and understand the synergy among organisms and the environments of organisms. SC11-E1 Students will distinguish among organisms based on the way an organism regulates its internal environment in relation to changes in its external environment. SC11-E2 Students will describe how organisms obtain and use resources, grow, reproduce, and maintain a stable internal environment while living in a constantly changing external environment. SC11-E3 Students will predict behavior in relation to changes in an organism’s internal and external environments. SC11-E4 Students will use knowledge of population characteristics to distinguish specific populations.

89
SC11-E5 Students will categorize organisms based on the function they serve within their ecosystem. SC11-E6 Students will examine the impact humans have had on other species and natural systems over time. SC11-E7 Students will illustrate the impact that overpopulation might have on various regions of the world. SC11-E8 Students will analyze consumption of nonrenewable resources based on population factors (birth rate, death rate, and density). SC11-E9 Students will illustrate the role of personal control of basic needs on health outcomes. SC11-E10 Students will model responsible health behaviors for peers and others. SC11-E11 Students will demonstrate the impact of nutrition and exercise on personal health. Earth and Space Science CONTENT STANDARD 12: Students will know and understand properties of earth science. SC12-E1 Students will explain how Earth’s materials can be transformed from one state to another. SC12-E2 Students will experiment with the uses of Earth’s materials as resources. SC12-E3 Students will model natural processes that shape the Earth’s surface. SC12-E4 Students will observe, measure, and record weather changes that occur daily. SC12-E5 Students will explain how fossils are formed and how fossils provide evidence of the complexity and diversity of life over time. SC12-E6 Students will use a rectilinear coordinate system such as latitude and longitude to locate points on the surface of Earth.

90
SC12-E7 Students will describe the interaction between the Earth’s lithosphere, hydrosphere, atmosphere, and biosphere. CONTENT STANDARD 13: Students will know and understand basic concepts of cosmology. SC13-E1 Students will model the predictable patterns of the sun and planets in the solar system. SC13-E2 Students will describe the elements of the universe including stars, galaxies, dust clouds, and nebulae. SC13-E3 Students will explain various scientific theories for the origin of the universe. SC13-E4 Students will explain how instruments and vehicles are used for space exploration work. Technology and the History of Science CONTENT STANDARD 14: Students will know and understand the differences between the interactions of science and technology. SC14-E1 Students will design and conduct experiments that distinguish between natural and artificial objects and materials. SC14-E2 Students will demonstrate trade-offs in safety, cost, efficiency, and appearance related to technological solutions provided through science. SC14-E3 Students will compare and contrast a variety of scientific and technological solutions to problems. SC14-E4 Students will examine the role of technology, particularly computers and other electronic advances, in the advancement of science. CONTENT STANDARD 15: Students will know and understand the impact between science and technology in society. SC15-E1 Students will illustrate the impact that work settings have on scientific investigations.

91
SC15-E2 Students will demonstrate how the direction for scientific investigations is related to social issues and challenges. SC15-E3 Students will explain how the benefits of science and technology are enjoyed by some groups and not by other groups. SC15-E4 Students will compare and contrast the science contributions of people with diverse interests, talents, qualities, and motivations from a variety of social and ethnic backgrounds. SC15-E5 Students will predict new areas of scientific inquiry based on previous research. SC15-E6 Students will analyze the impact of culture, gender, and other factors on an individual’s choice of science as a career. SC15-E7 Students will differentiate between ethical and unethical scientific practices and research. Science in Personal, Social and Environmental Perspectives CONTENT STANDARD 16: Students will know and understand the relationship between natural hazards and environmental risks for organisms. SC16-E1 Students will analyze environmental risks for personal and social costs. SC16-E2 Students will determine options for reducing and eliminating environmental risks and for coping with natural catastrophic events. SC16-E3 Students will predict the human and financial costs of slow natural events such as drought and rapid natural events such as earthquakes. SC16-E4 Students will develop models for prevention of substance abuse including tobacco, alcohol, and other drugs, and to reduce the associated environmental risks.

92
Geology Glossary A
abrasion: The wearing away of rocks or other materials as they are struck by wind, water, or ice carried sediments. acid: Naturally occurring chemicals, with a pH less than 7.0, that are aggressive towards carbonate rocks. alluvial fan: A triangular deposit of sediment left by a stream that has lost velocity upon entering a broad, relatively flat valley. anaerobic bacteria: Bacteria that utilize some element(s) other than oxygen as a crucial part of their metabolic processes. anticline: Upward pointing fold in rock. aquiclude: Impermeable body of rock that may absorb water slowly but does not transmit it. aquifer: A permeable body of rock or soil that both stores and transports groundwater. arroyo: A small, deep, usually dry channel eroded by a short-lived or intermittent or intermittent desert stream.
B bar: Sorted deposit of sediments formed in slower moving portions of stream or river channels.
C calcareous: Consisting primarily of the mineral calcite (calcium carbonate). canyon: Name typically given to a steep sided, narrow bottomed, V-shaped, river carved valley.
cave pearl: Concentrically banded concretions that form in shallow cave pools. cave popcorn: A nodular, globular, or coral-like speleothem. compression: Stress that reduces the volume or length of a rock, as that produced by the convergence of plate margins. condensation/corrosion: The process by which water contained in the air and charged with a high level of carbon dioxide condenses out on bedrock or speleothem surfaces and corrodes them. continental drift: The hypothesis, proposed by Alfred Wegener, that today’s continents broke off from a single supercontinent and then plowed through the ocean floors into their present positions. This explanation of the shapes and locations of Earth’s current continents evolved into the theory of plate tectonics. convection cell: The cyclical movement in which heated matter (air, water, mantle material, etc.) becomes less dense and begins to rise. Cooler material, higher up, becomes more dense and begins to sink lower. As it moves lower, it is eventually heated and begins to rise. This cycle is seen in the seasonal air circulation of caves, the earth’s mantle, the deep currents in earth’s oceans, and in developing thunderstorms. corrosion residues: Deposits of insoluble residue, or bacterial offal, formed as bacteria “eat” the bedrock of caves. Large deposits are found near Apricot Pit in Lechuguilla Cave, Carlsbad Caverns National Park. crust: A layer of rock deposited by the sheet flow of saturated water over a cave surface. These crusts can be formed of

93
calcite (calcium carbonate) or gypsum (hydrous calcium sulfate).
D deflation: The process by which wind erodes a surface by picking up and transporting loose rock particles. density: Amount of matter in a given amount of a substance, or mass per unit volume. d=m/v deposition: Process by which sediments are laid down in new locations. desert pavement: A closely packed layer of rock fragments concentrated in a layer along the earth’s surface by the deflation of finer particles. differential heating: The process by which darker mineral grains in a rock heat at a faster rate that lighter colored grains. The stress this creates between the mineral grains eventually causes them to break apart in a process called intergranular disintegration. dissolution: A form of chemical weathering in which water molecules, sometimes in combination with acid or another compound in the environment, attract and remove oppositely charged ions or ion groups from a mineral or rock.
E elastic limit: The limit beyond which the deformation of rock, or other material, becomes permanent and the material will not be able to rebound to its original shape or volume. When the elastic limit of rock is exceeded, it will usually rupture, forming a fault. escarpment: A steep slope or cliff. Often, these are formed along faults.
evaporite: inorganic chemical sediment that precipitates when the salty water in which it had dissolved evaporates. extinct: No longer in existence. extremophile: Bacteria, or other microbes, that live in harsh, extreme conditions.
F flowstone: A layer of calcium carbonate rock deposited by the sheet flow of saturated water over a cave surface. frostwork: A needle-like speleothem resembling cactus or thistle plants, or in its composite stalagmitic form, Christmas Trees or fir trees.
G groundwater: Water found underground.
H hydrocarbons: A molecule that is made entirely of hydrogen and carbon.
I ice wedging: A form of mechanical weathering caused by the freezing of water that has entered a pore or crack in a rock. The water expands as it freezes, widening the cracks or pores and often loosening or dislodging rock fragments. infiltration: The process by which water from precipitation soaks into the soil. inner core: Solid, innermost layer of the earth.
J joint: A crack, or break in crustal rock.
94
K karst: A landscape characterized by caves, sinkholes, underground streams, and other features formed by the slow dissolving of bedrock. kerogen: A solid, waxy, organic substance that forms when pressure and heat from the earth act on the remains of plants and animals.
L lava tube: A cave formed when a tongue of lava, flowing down a marked slope, solidifies on its outer surface, while the interior remains molten and continues to flow. When the liquid lava has drained out of the interior of the tongue, a tubular cavity remains. lithosphere: A layer of solid, brittle rock comprising the outer 100 kilometers of the earth, encompassing both the crust and the outer-most parts of the upper mantle.
M mantle: The middle layer of the earth, lying just below the crust and consisting of relatively dense rocks. The mantle is divided into two sections, the upper mantle and the lower mantle. meander: A bend, or loop, in a river. mechanical weathering: The process by which a rock or mineral is broken down into smaller fragments without altering its chemical makeup. microclimate: A small, localized area possessing climatic properties distinctly different from those of the region in general. model: A symbolic representation of an idea, system, or structure to make something understandable. Models help solve problems and deal with things difficult
to see because they are too large or too small. Mohorovicic Discontinuity (Moho): The seismic discontinuity between the base of the earth’s crust and the top of the mantle. P-waves passing through the Moho change their velocity by approximately one kilometer per second, with the higher velocity occurring in the mantle and the lower in the crust. mold: Fossil formed in a rock by a dissolved organism that leaves an empty space, showing its outward shape. monocline: Unidirectional fold in which the rock on one side of the fold has dropped relative to the rock on the other side of the fold. moonmilk: A soft, microcrystalline substance found in caves. It is plastic and pasty when wet, but crumbly and powdery when dry. It looks and feels like white cream cheese.
N normal fault: A fault marked by a generally steep dip along which the hanging wall has moved downward relative to the footwall.
O outer core: Liquid layer of the earth directly beneath the mantle and surrounding the inner core.
P paleontologist: Scientist who attempts to learn about past environments and organisms by studying fossils. Pangea: One large landmass of which all continents were once a part, according to the theory of continental drift. permeability: The capability of a given substance to allow the passage of a fluid.

95
Permeability depends upon the size and the degree of connection among a substance’s pores. petrified: Having turned to stone. petroleum: The most common and versatile fossil fuel, comprised of a group of naturally occurring substances made up of hydrocarbons. These substances may be gaseous, liquid, or semisolid. petroleum trap: Geological situations in which hydrocarbons are produced by a source rock, migrate through a reservoir rock, and are trapped by a cap rock. plasticity: The ability of a solid to flow. plate tectonics: The theory that the earth’s lithosphere consists of large, rigid plates that move horizontally in response to the flow of the asthenosphere beneath them, and that interactions among the plates at their borders cause most major geologic activity. pool fingers: Stalactite-shaped speleothems formed subaqueously in cave pools. porosity: The percentage of a soil, rock, or sediment’s volume that is made up of pores. precipitation: 1. The process by which an element or compound becomes separated from a solution in a solid form. 2. Water that falls from the atmosphere to the earth’s surface in the form of rain, snow, sleet, or hail.
R reef: A ridge that forms in clear, moderately salty seawater near the shoreline and is composed of the carbonate remains of algae, sponges, and corals. resurging streams: A stream found in a karst area that emerges from underground
through a karst feature such as a cave entrance. reverse fault: A fault marked by a hanging wall that has moved upward relative to the footwall. rimstone: Barriers of calcite, aragonite, or other minerals that obstruct cave streams or shallow pools. root pry: Mechanical weathering process caused by plant roots growing in a crack in a rock.
S salinity: The amount of dissolved salts in water. saturation: The state of a fluid when it can hold no more of another substance. Air is saturated when it can hold no more water vapor and clouds form. Cave water is saturated when it can hold no more calcium carbonate and the mineral begins to deposit on speleothems. sea-floor spreading: The expansion of ocean basins following plate rifting, as new oceanic lithosphere is formed by continuing basaltic eruptions along mid-ocean ridges. sediment: A collection of transported fragments or precipitated materials that accumulate, typically in loose layers, as of sand or mud. sedimentary: Of, or pertaining to, sediments. shear: Stress that slices rocks into parallel blocks that slide in opposite directions along their adjacent sides. sinkholes: A circular, often funnel-shaped depression in the ground that forms when soluble rocks dissolve. sinking streams: Formed when streams enter the earth through karst features such as cave entrances or solutionally widened

96
cracks. Sometimes, the stream will appear to sink into a gravel or sand bed as it descends into a karst system. slip face: The steep leeward slope of a dune. slip-strike fault: Faults caused by shearing stress in the block movement is largely horizontal, parallel to the strike of the fault plane. The most famous of North America’s slip-strike faults is the San Andreas Fault of the west coast. soluble: Able to be dissolved in a solvent, usually water. speleothem: A mineral deposit that precipitates from solution in a cave. stalactite: An icicle-like mineral formation that hangs from the ceilings of a cave and is usually made up of travertine, which precipitates as water rich in dissolved calcium carbonate drips down from the cave’s ceiling. stalagmite: A cone-shaped mineral that forms on the floor of a cave and is usually made up of travertine, which precipitates as water rich in dissolved calcium carbonate drips down from the cave’s ceiling. stress: The push-pull force acting on a rock or another solid to deform it. syncline: Downward pointing fold in rock.
T tension: Stress that stretches of extends rocks, so that they become thinner vertically and longer laterally. Tension is caused by divergence, or rifting. texture: A description of the size of individual soil particles, the sediment sizes in a sedimentary rock, or crystal sizes in any rock. trace fossil: Mark or evidence of the activities of an organism.
U undercut bank: Area along the outer edge of a stream meander in which the erosive action of the stream has cut deep underneath the bank while leaving the upper part of the bank intact.
W water table: The surface that lies between the zone of aeration and the zone of saturation.
Z zone of aeration: A region below the earth’s surface that is marked by the presence of both water and air in the pores of rocks and soil. zone of saturation: A region that lies below the zone of aeration and is marked by the presence of water and the absence of air in the pores of rocks and soil.

97
Suggested Resources Ambrose, Janet, et.al. eds. 1999. About Bats, Caves and Deserts. Carlsbad, NM:
Carlsbad Caverns National Park.
Chernicoff, S., Fos, H.A., and Venkatakrishnan, R. 1997. Essentials of Geology. New York, NY: Worth Publishers.
Coble, Charles, et al. 1993. Prentice Hall Earth Science. Englewood Cliffs, NJ: Prentice Hall.
Doyle, Peter. 1996. Understanding Fossils: An Introduction to Invertebrate Paleontology. New York, NY: John Wiley & Sons, Inc.
DuChene, H.R., and Hill, C.A. 2000. The Caves of the Guadalupe Mountains Research Symposium. In Hose, L.D. (ed.) Journal of Cave and Karst Studies 62(2).
Feather, Ralph, et al. 1999. Glencoe Earth Science. Westerville, OH: Glencoe/McGraw-Hill.
Ford, Brent. 1996. Project Earth Science: Geology. Arlington, VA: National Science Teachers Association.
Hill, Carol and Forti, Paolo, 1997, Cave Minerals of the World, 2nd ed. Huntsville, AL: National Speleological Society, Inc.
Hill, Carol, 1987, Geology of Carlsbad Cavern and Other Caves in the Guadalupe Mountains, New Mexico and Texas. Socorro, NM: New Mexico Bureau of Mines & Mineral Resources Bulletin 117.
Hill, Carol. 1996. Geology of the Delaware Basin, Guadalupe, Apache, and Glass Mountains, New Mexico and West Texas: Permian Basin Section SEPM, Publication No. 96-39.
Jagnow, David and Jagnow, Rebecca. 1992. Stories from Stones: The Geology of the Guadalupe Mountains. Carlsbad, NM: Carlsbad Caverns Guadalupe Mountains Association.
Moore, G.W., and Sullivan, G.N. 1978. Speleology: The Study of Caves. Teaneck, NJ: Zephyrus Press, Inc.
Murck, B.W., Skinner, B.J., and Porter, S.C. 1996. Environmental Geology. New York, NY: John Wiley & Sons, Inc.
Sasowsky, I.D. and Palmer, M.V. 1994. Breakthroughs in Karst Geomicrobiology and Redox Geochemistry. Karst Waters Institute, Special Publication 1.
Shew, R.D. 1998. Geology of the Guadalupe Mountains. Guidebook prepared for field seminar/workshop conducted by Guadalupe Mountains National Park and New Mexico State University-Carlsbad.
Shew, R.D., and Shew, D.M. 2000. Geology and Natural History of McKittrick Canyon. Guidebook prepared for workshop conducted by Guadalupe Mountains National Park and New Mexico State University-Carlsbad.

98
Smith, R.B. and Siegel, L.J. 2000. Windows Into the Earth. New York, NY: Oxford University Press.
Sprinkel, D.A., Chidsey, T.C., and Anderson, P.B., editors. 2000. Geology of Utah’s Parks and Monuments. Salt Lake City, UT: Utah Geological Association, publication 28.
VanCleave, Janice. 1991. Janice VanCleave’s Earth Science For Every Kid. New York, NY, John Wiley & Sons, Inc.
Veni, George, et.al. 2001. Living With Karst. Alexandria, VA: American Geological Institute Environmental Awareness Series, 4.
Websites of interest: Science equipment supply companies:
Carolina Biological Supply Company www.carolina.com Fisher Scientific www1.fishersci.com Flinn Scientific, Inc. www.flinnsci.com Sargent-Welch www.sargentwelch.com
Agencies administering public lands in and near Carlsbad Caverns National Park: Carlsbad Caverns National Park www.nps.gov/cave/ www.carlsbad.caverns.national-park.com/ Guadalupe Mountains National Park www.nps.gov/gumo/ www.guadalupe.mountains.national-park.com/ Lincoln National Forest www.fs.fed.us/r3/lincoln/ Bureau of Land Management www.blm.gov/nhp/index.htm
Sources of information on cave conservation and exploration: Carlsbad Caverns Guadalupe Mountains Association www.ccgma.org/ National Speleological Society www.caves.org/ Cave Research Foundation www.cave-research.org/