Embed Size (px)
Citation preview
EN
GL
ISH
Table of Contents Introduction .............................................................................................................3Cautions and Warnings (Intended Use) ............................................................3Items Included .........................................................................................................4Unpack ......................................................................................................................4 a) Attaching the Legs ..........................................................................................4 b) VitalSim Connections ....................................................................................5Getting Started .......................................................................................................5 a) Cricothyroid Membrane ...............................................................................5 b) Pupil Replacement .........................................................................................5In Use ........................................................................................................................5 a) Obstructed Airway ........................................................................................6 b) VitalSim Obstructed Airway .........................................................................6 c) Tension Pneumothorax Decompression ...................................................6 d) IV Cannulation ................................................................................................6 e) Intramuscular Injections ...............................................................................6 f) Urinary Catheterization ................................................................................6VitalSim Functionalities .........................................................................................7 a) Cardiac Related Skills ....................................................................................7 b) Blood Pressure Arm ......................................................................................7 c) Heart, Breath and Bowel Sounds and Speech .........................................7 d) Spontaneous Breathing .................................................................................7 e) Airway Closures .............................................................................................7After Use ..................................................................................................................7 a) Cricothyroid Membrane/ Neck Skin Collars ...........................................7 b) IV Cannulation ................................................................................................8 c) Intramuscular Injection .................................................................................8 d) Urinary Catheterization ...............................................................................8 e) Pneumothorax ................................................................................................8 i) Mid-Clavicular .............................................................................................8 ii) Mid-Axillary ................................................................................................8 f) Chest Drain ......................................................................................................8Maintenance .............................................................................................................9 a) Cleaning ............................................................................................................9 b) Extend Cleanliness ........................................................................................9 c) Attaching/ Removing Arms ...........................................................................9 d) IV Arm Skin and Vein Replacement ............................................................9TroubleShooting ................................................................................................... 10Technical Data ...................................................................................................... 10 a) General .......................................................................................................... 10 b) Wireless Remote Control ........................................................................ 10 c) ALS Simulator Manikin ............................................................................... 10Parts ........................................................................................................................ 10
Language Versions Español ................................................................................................................... 11Italiano .................................................................................................................... 21Français ................................................................................................................... 31Deutsch .................................................................................................................. 41Nederlands ............................................................................................................ 51 Norsk ...................................................................................................................... 61Svenska ................................................................................................................... 71Suomi ...................................................................................................................... 79
....................................................................................................................... 87日本語 .................................................................................................................... 97한국어 .................................................................................................................. 107
IntroductionThe Advanced Life Support Simulator is a realistic interactive training manikin for simulating a wide range of advanced life saving skills in pre-hospital emergencies. The simulator responds to clinical intervention, instructor control, and comprehensive pre-programmed scenarios for effective practice of diagnosis and treatment of a patient. With spontaneous breathing, airway control, voice, sounds, ECG, and many other clinical features, the Advanced Life Support Simulator is the fully functional pre-hospital simulator.
The manufacturing quality of this manikin should provide many sessions of training when reasonable care and maintenance are practiced.
Laerdal Recommends
Endotracheal Tube – Size 7.5Laryngeal Mask Airway – # 4
Combitube- Large Adult or TrainerKING LT – # 4
Needle or Catheter – Size 21-gauge or smaller
Cautions and Warnings
This product contains Natural Rubber latex which may cause allergic reactions when in contact with humans.
Cautions and Warnings• This product contains Natural Rubber latex which may cause allergic
reactions when in contact with humans.• There are electronic components mounted inside the airway head. The
following techniques should not be performed on this manikin due to the inability to properly sanitize the airway if they are performed:
• Mouth-to-mouth/Mouth-to-mask ventilation • Insertion of simulated vomit for suctioning • Lubricate the oral and nasal airways liberally with the lubricant provided
prior to inserting any instrument, tube or airway device into the airway. Additionally, instruments and tubes should also be lubricated prior to use.
• Do not allow the manikin's skin to come in direct contact with ink or photocopied paper, as this can permanently stain the skin. Avoid using colored plastic gloves when handling the manikin, as they may also cause discoloration.
• Care should be taken when palpating the pulses to not use excessive force as this will result in no pulse being felt. Only two individual pulses can be felt at the same time.
• If a training session involves the administration of fluids and/or drugs into the IV arm, empty the arm immediately following the training session.
• Defibrillation• Only apply the defibrillator to a defibrillation post or zap plate which is
properly mounted on the manikin's chest.• Do not provide more than 2 x 360J defibrillator discharges per minute
as an average over a period of time to prevent overheating.• The manikin chest must be kept dry. Special attention should be taken
when using IV Arm.• Do not apply conductive gel or conductive defibrillation pads intended
for patient use to prevent chest skin pitting.• Do not use cables or connectors with visible damage.• Observe all normal safety precautions for use of defibrillators. • Defibrillation must be performed over the two defibrillation
connectors only.
Air Tank Precautions: The right thigh of the ALS Simulator contains a compressed air tank. Contents under pressure:
• Do not puncture• Do not store in excessive heat• Release pressure in air tank prior to shipment
Do not pressurize above 120 psi or remove any safety devices to increase pressure. The tank protected with safety devices not allowing the pressure to exceed 150psi. Do not disassemble or attempt to repair the internal parts of the right thigh. In the event of failure and contact the Laerdal Service Center immediately for instructions.
This device generates, uses and possibly radiates radio-frequency energy. If it is not installed and used in accordance with the instructions, it may cause harmful interference to radio communications. In that case, the user is
ENGLISH
ALS Simulator 3 Laerdal
encouraged to attempt correction of the interference by:• Reorienting or relocating the receiving antenna.• Increasing the distance between the device and receiver.• Connecting the device to an outlet on a circuit different from that to
which the receiver is connected.• Consulting the dealer or an experienced radio/TV technician for help.
Electromagnetic radiation from other radio transmitters or other electronic equipment may cause noise in the head speaker. To eliminate this noise, move manikin away from the radiation source or turn the head speaker volume to zero.
Items Included:
ALS Simulator(1) Adult, Full-body Simulator(1) Articulating IV Training Arm(1) Blood Pressure Training Arm (1) Manikin Lubricant(1) Interchangeable Pupil Set(6) Neck Skin Collars (1) Cricothyroid Membrane Tape Roll(1) Set of Replacement Pneumothorax Bladders (2) Mid-Clavicular Bladders (2) Mid Axillary Bladders(6) Chest Drain Modules(1) 10 Foot Manikin Connector Cable(1) Air Pump(1) Set of Defibrillation Posts(1) Carry Case (1) Jacket(1) Pants(1) Directions for Use(1) Software CD(1) Learning Materials
Skills Taught:
Airway Management Skills• Assessment of Respirations• Obstructed airway • Tongue Edema • Right Lung Blockage • Left Lung Blockage • Both Lung Blockage• Endotracheal intubation• Nasotracheal intubation• Digital intubation• Oropharyngeal airway insertion • Nasopharyngeal airway insertion • Bag Valve Mask• Retrograde intubation• Lightwand intubation• Laryngeal Mask Airway insertion• Laryngeal Tube Insertion• Combitube insertion• Trans-Tracheal Jet Ventilation• Surgical cricothyrotomy• Needle cricothyrotomy• Suctioning techniques• Stomach auscultation to verify proper airway positioning• Head Tilt/Chin Lift• Modified Jaw thrust• Ventilations
Drug Administration• IV insertion, infusion and bolus into peripheral veins of forearm,
antecubital fossa and dorsum of the hand• Subcutaneous and intramuscular injections
Tension Pneumothorax Decompression• Bilateral mid-clavicular sites• Mid-axillary site (Right)
Chest Tube Insertion• Mid-axillary site (Left)
Cardiac Related Skills• 3 – 4 lead ECG with over 1400 rhythm variations available for
interpretation.• Pacing with variable threshold, with or without capture • Defibrillation capabilities (25 -360 joules) • Programmable scenario base algorithms for instructor control• Closed chest compressions
Circulatory Skills• Bilateral carotid pulse• Measurement of Noninvasive Blood Pressure - Brachial and radial pulses - Auscultation or palpation of noninvasive blood pressure measurement - VitalSim allow values to be set for systolic, diastolic pressures, heart
rate, auscultatory gap and volume
Sounds and Speech• 13 different heart sounds synchronized with ECG• 8 different lung sounds• 5 bowel sounds• 9 preprogrammed vocal sounds• Live voice through the use of a wireless microphone
Logging and Scenario Functions• Sensored Events Include:
• Airway Opened via Head Tilt/Chin Lift or Modified Jaw Thrust• Pulse check• Ventilations• Compressions• Defibrillation• Pacing
• Customizable Events• PC scenario editor for user defined and pre-programmed scenarios.• Student logs can be stored and downloaded for post training review and
debriefing.• VitalSim Control Unit will hold up to ten (10) scenarios and twenty-five
(25) student logs.
Unpack:The ALS Simulator is packaged without the legs attached. Remove the upper body and legs from the packaging and attach the legs to the torso.
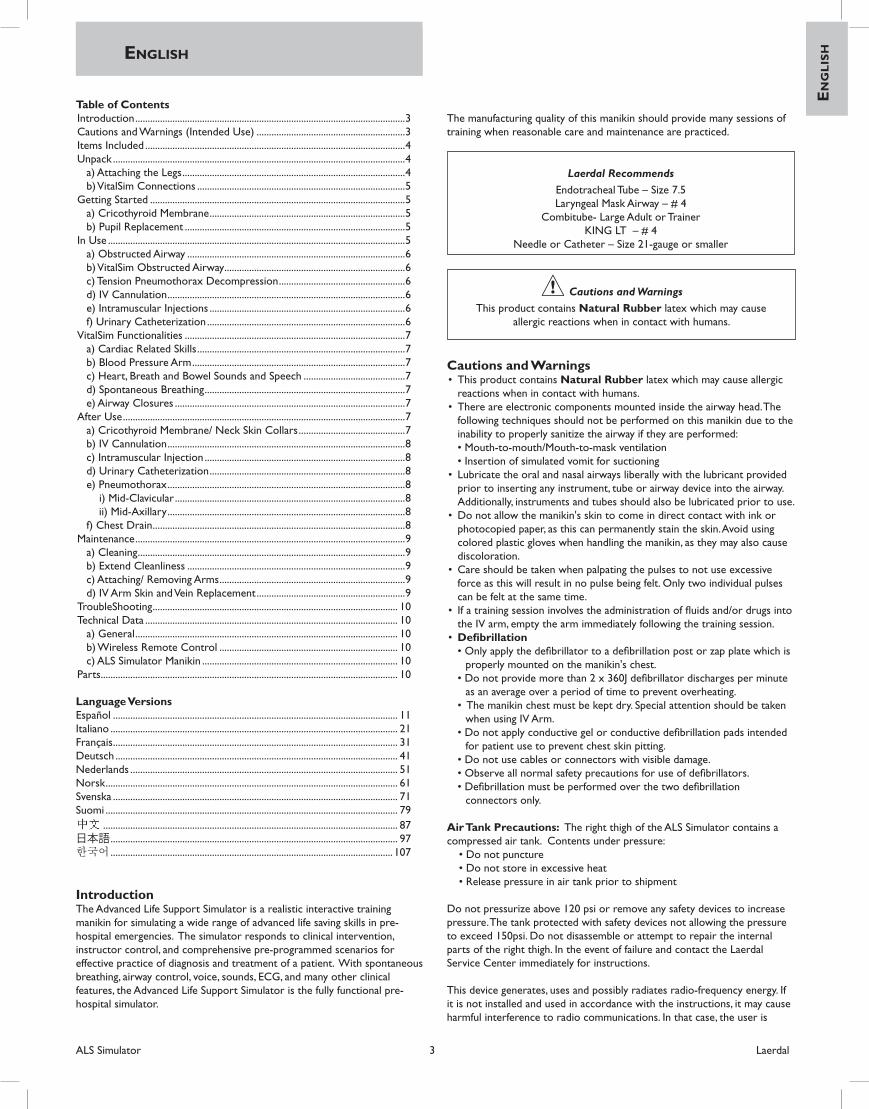
To attach Right Leg (with enclosed air tank):1. Remove bladder reservoir from pelvis.2. Remove blank genitalia module from pelvic region of torso.3. Carefully slide the tubing and wiring exiting the fixed bolt from the upper
thigh of the right leg through the abdominal connector hole and into internal cavity of pelvic area. (Photo 1)
Photo 1
Laerdal 4 ALS Simulator
EN
GL
ISH
4. Continue to advance the bolt and wiring though the connector hole until the thigh is flush with the torso of the manikin.
5. From inside abdominal area, slip the longer air connection tube through the provided thumb nut, then slip the shorter electronic wire through the thumb nut.
6. Connect the wire and cable inside the pelvis.7. Tighten the thumb nut until desired articulation is achieved. 8. Replace bladder reservoir in torso.9. Replace blank genitalia module in pelvic region of torso.
Fig. 1
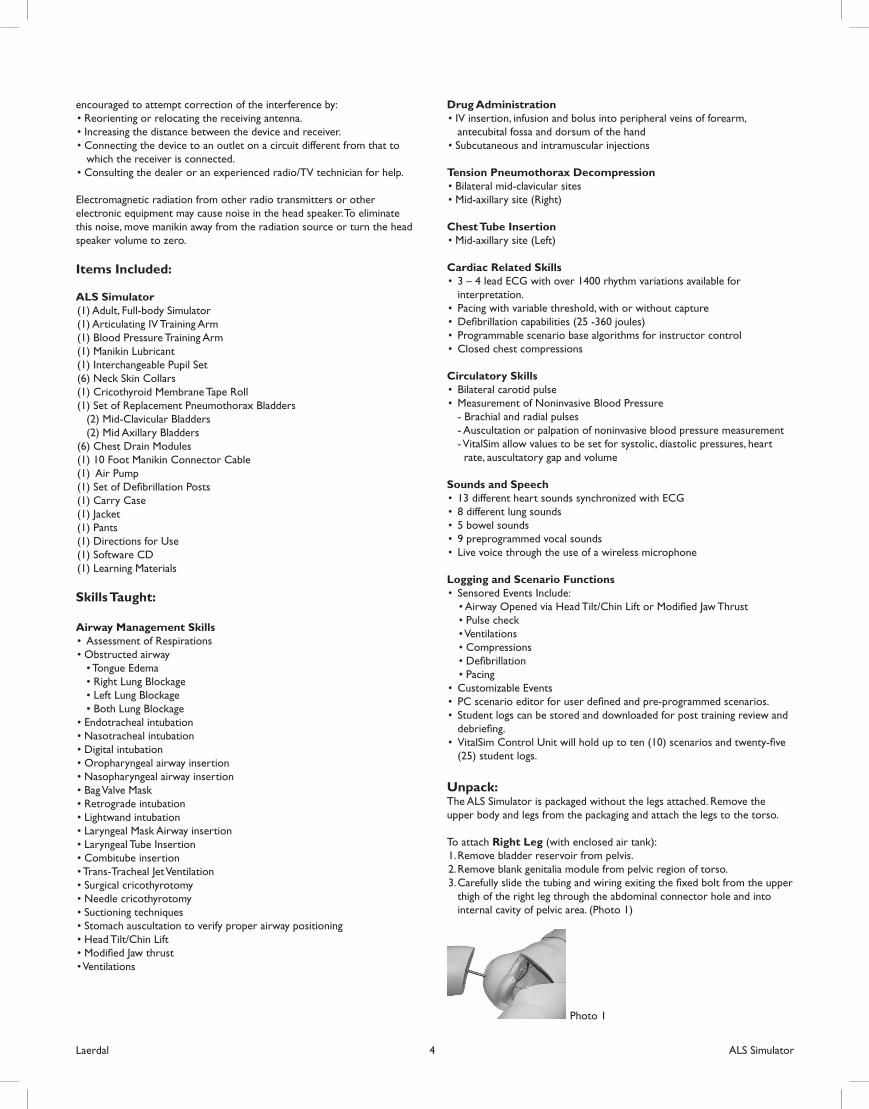
To attach Left leg:10. Remove thigh injection pad from upper leg.11. Remove bladder reservoir from pelvis.12. Remove blank genitalia module from pelvic region of torso.13. Place a washer onto threaded 6” bolt.14. Insert threaded bolt through upper leg, abdominal connector hole and
into internal cavity of pelvic area. (Figure 1)15. From inside abdominal area, slip a washer, a spring and another washer
on bolt.16. Screw a wing nut onto bolt and tighten until desired articulation is
achieved. This may be easier with the knee bent.17. Replace bladder reservoir in torso.18. Replace blank genitalia module in pelvic region of torso.19. Replace thigh injection pad onto upper leg.
VitalSim™ Connections1. Connect ALS Simulator to VitalSim Unit (Photo 2), via 37 pin cable
located on lower right side of manikin. 2. Connect the clear tubing exiting the manikin’s right side.3. Attach blood pressure cuff to manikin’s left arm. 4. Attach clear pneumatic tubing from blood pressure cuff (Photo 3) to
corresponding clear pneumatic tubing exiting the manikins left shoulder.
Photo 2 Photo 3
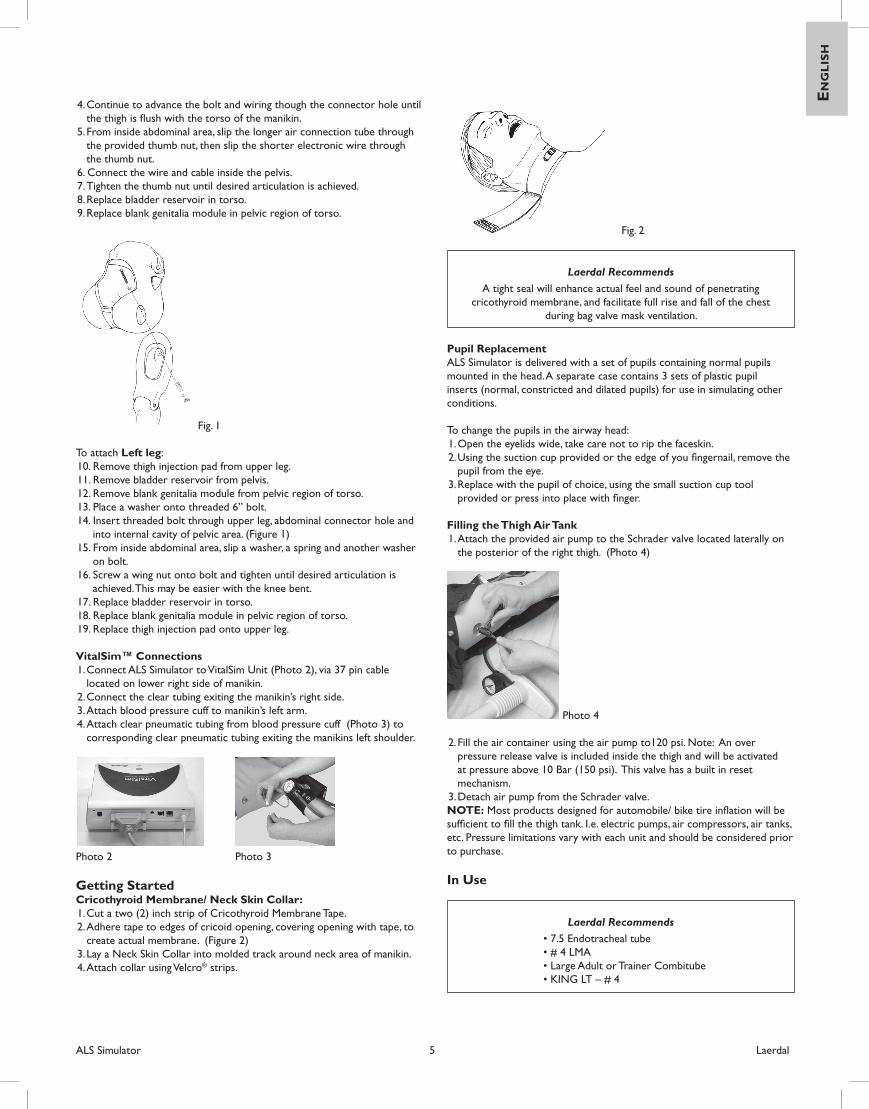
Getting StartedCricothyroid Membrane/ Neck Skin Collar:1. Cut a two (2) inch strip of Cricothyroid Membrane Tape.2. Adhere tape to edges of cricoid opening, covering opening with tape, to
create actual membrane. (Figure 2)3. Lay a Neck Skin Collar into molded track around neck area of manikin.4. Attach collar using Velcro® strips.
Fig. 2
Laerdal Recommends
A tight seal will enhance actual feel and sound of penetrating cricothyroid membrane, and facilitate full rise and fall of the chest
during bag valve mask ventilation.
Pupil ReplacementALS Simulator is delivered with a set of pupils containing normal pupils mounted in the head. A separate case contains 3 sets of plastic pupil inserts (normal, constricted and dilated pupils) for use in simulating other conditions.
To change the pupils in the airway head: 1. Open the eyelids wide, take care not to rip the faceskin.2. Using the suction cup provided or the edge of you fingernail, remove the
pupil from the eye.3. Replace with the pupil of choice, using the small suction cup tool
provided or press into place with finger.
Filling the Thigh Air Tank1. Attach the provided air pump to the Schrader valve located laterally on
the posterior of the right thigh. (Photo 4)
Photo 4
2. Fill the air container using the air pump to120 psi. Note: An over pressure release valve is included inside the thigh and will be activated at pressure above 10 Bar (150 psi). This valve has a built in reset mechanism.
3. Detach air pump from the Schrader valve.NOTE: Most products designed for automobile/ bike tire inflation will be sufficient to fill the thigh tank. I.e. electric pumps, air compressors, air tanks, etc. Pressure limitations vary with each unit and should be considered prior to purchase.
In Use
Laerdal Recommends
• 7.5 Endotracheal tube • # 4 LMA • Large Adult or Trainer Combitube • KING LT – # 4
ALS Simulator 5 Laerdal

Airway Management:1. Spray inside of pharynx, nostrils and all intubation tubes with a liberal
amount of provided manikin lubricant or liquid soap. Sit the manikin upright to allow lubricant to coat passages.
2. Perform further intubation procedures as per your local training protocol.
NOTE: Should incorrect ventilation be performed, air will pass through esophagus, causing distention of the abdomen.
Obstructed Airway (Manual Inflation of Tongue):1. Locate inflation bulb at lower left side of torso labeled “tongue.”2. Tighten air release knob.3. Pump bulb several times to inflate tongue to desired size.
To deflate tongue, loosen air release knob.
VitalSim Obstructed Airway Right/ Left/ Both Lung Blockages:
See VitalSim DFU for complete airway blockage functionality and operating information.
Tension Pneumothorax Decompression (Manual Inflation of Pneumothorax):1. Locate inflation bulb which exits lower left side of manikin, labeled
“pneumo.”2. Tighten air release knob so that as you pump the bulb, no air escapes.3. Pump bulb several times to prepare three (3) sites for decompression.4. Decompress the site, bilateral mid-clavicular or right side mid-axillary or
per your local training protocol.
When the site is “decompressed,” air can be heard/observed passing through catheter.
IV Cannulation:
Laerdal Recommends
Use a 21G or smaller catheter for IV cannulation to extend the life of your manikin’s IV arm.
1. Attach an IV bag with tubing. Note: Make sure the clamp is closed.2. Use a syringe to inject blood concentrate and 500cc of water into an IV
bag with tubing. Note: Make sure the clamp is closed. This will serve as the “blood source” bag. (Photo 5)
Photo 5
3. Attach the “blood source” bag with IV tubing to one of the latex tubes exiting the manikin’s right IV arm.
4. Attach an empty bag with IV tubing to the second latex tube exiting the manikin’s right IV arm. This bag will serve as the collection reservoir.
5. Control flow of blood from arm, via clamp on collection reservoir tubing. Put collection bag on floor to allow the now closed system to gravity feed.
6. Hang “blood source“ bag from IV pole and open clamp to allow concentrate to flow through arm. Note: A blood pressure cuff can be
used as a pressure infuser. This will allow the blood bag to be placed on the floor or between the mattress and frame. (Photo 6)
Photo 6
7. When the “blood source” bag is empty, switch the “blood source“ bag and reservoir. Hang the now full reservoir and place empty reservoir bag on floor to reverse flow of concentrate. NOTE: Be sure to adjust the flow regulator. The collection reservoir clamp should always be used to control flow rate.
The arm is now ready for cannulation. Train per local protocol. NOTE: Do not use iodine as this will permanently stain the manikin.
Laerdal Recommends
When using a catheter or other venipuncture device, spray with lubricant spray for easier insertion.
Intramuscular Injections:Medications can be administered via intramuscular injections bilaterally in the deltoids and thighs and in the gluteal and ventro-gluteal locations.
Laerdal Recommends
Medications may be administered via local protocol. All precautionsand safety measures must be followed during training.
Urinary Catheterization:1. Remove blank genitalia from the manikin.2. Lift and rotate the pelvic pin to one side. NOTE: Failure to replace the
pelvic pin will result in pelvic spread.3. Lift the urinary reservoir. 4. Using the urinary valves provided, attach threaded end of the connector
valve to the corresponding threaded urinary connector on the genitalia (Photo 7-9).
5. Place the C Clamp over the valve, leaving loose.6. Slide the smooth end of valve the to meet the ridge on the connector.
Photo 7 (Slide tube to meet ridge on connector.)
7. Move the C Clamp over the connector and the valve.
Photo 8 (Area where clamp is placed.)
8. Squeeze to tighten the C Clamp. This will lock the C Clamp in place.
Laerdal 6 ALS Simulator
EN
GL
ISH
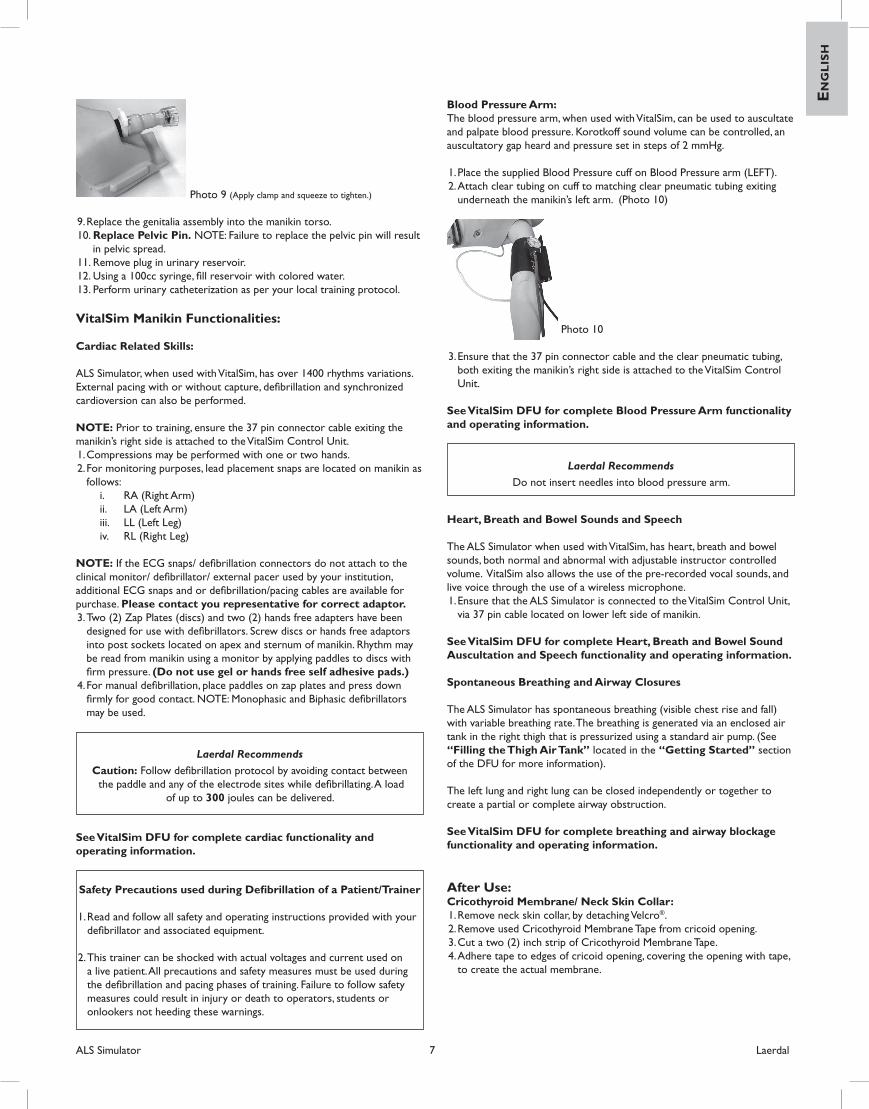
Photo 9 (Apply clamp and squeeze to tighten.)
9. Replace the genitalia assembly into the manikin torso.10. Replace Pelvic Pin. NOTE: Failure to replace the pelvic pin will result
in pelvic spread.11. Remove plug in urinary reservoir.12. Using a 100cc syringe, fill reservoir with colored water.13. Perform urinary catheterization as per your local training protocol.
VitalSim Manikin Functionalities:
Cardiac Related Skills:
ALS Simulator, when used with VitalSim, has over 1400 rhythms variations. External pacing with or without capture, defibrillation and synchronized cardioversion can also be performed.
NOTE: Prior to training, ensure the 37 pin connector cable exiting the manikin’s right side is attached to the VitalSim Control Unit. 1. Compressions may be performed with one or two hands.2. For monitoring purposes, lead placement snaps are located on manikin as
follows: i. RA (Right Arm)ii. LA (Left Arm)iii. LL (Left Leg)iv. RL (Right Leg)
NOTE: If the ECG snaps/ defibrillation connectors do not attach to the clinical monitor/ defibrillator/ external pacer used by your institution, additional ECG snaps and or defibrillation/pacing cables are available for purchase. Please contact you representative for correct adaptor.3. Two (2) Zap Plates (discs) and two (2) hands free adapters have been
designed for use with defibrillators. Screw discs or hands free adaptors into post sockets located on apex and sternum of manikin. Rhythm may be read from manikin using a monitor by applying paddles to discs with firm pressure. (Do not use gel or hands free self adhesive pads.)
4. For manual defibrillation, place paddles on zap plates and press down firmly for good contact. NOTE: Monophasic and Biphasic defibrillators may be used.
Laerdal Recommends
Caution: Follow defibrillation protocol by avoiding contact between the paddle and any of the electrode sites while defibrillating. A load
of up to 300 joules can be delivered.
See VitalSim DFU for complete cardiac functionality and operating information.
Safety Precautions used during Defibrillation of a Patient/Trainer
1. Read and follow all safety and operating instructions provided with your defibrillator and associated equipment.
2. This trainer can be shocked with actual voltages and current used on
a live patient. All precautions and safety measures must be used during the defibrillation and pacing phases of training. Failure to follow safety measures could result in injury or death to operators, students or onlookers not heeding these warnings.
Blood Pressure Arm:The blood pressure arm, when used with VitalSim, can be used to auscultate and palpate blood pressure. Korotkoff sound volume can be controlled, an auscultatory gap heard and pressure set in steps of 2 mmHg.
1. Place the supplied Blood Pressure cuff on Blood Pressure arm (LEFT).2. Attach clear tubing on cuff to matching clear pneumatic tubing exiting
underneath the manikin’s left arm. (Photo 10)
Photo 10
3. Ensure that the 37 pin connector cable and the clear pneumatic tubing, both exiting the manikin’s right side is attached to the VitalSim Control Unit.
See VitalSim DFU for complete Blood Pressure Arm functionality and operating information.
Laerdal Recommends
Do not insert needles into blood pressure arm.
Heart, Breath and Bowel Sounds and Speech
The ALS Simulator when used with VitalSim, has heart, breath and bowel sounds, both normal and abnormal with adjustable instructor controlled volume. VitalSim also allows the use of the pre-recorded vocal sounds, and live voice through the use of a wireless microphone.1. Ensure that the ALS Simulator is connected to the VitalSim Control Unit,
via 37 pin cable located on lower left side of manikin.
See VitalSim DFU for complete Heart, Breath and Bowel Sound Auscultation and Speech functionality and operating information. Spontaneous Breathing and Airway Closures
The ALS Simulator has spontaneous breathing (visible chest rise and fall) with variable breathing rate. The breathing is generated via an enclosed air tank in the right thigh that is pressurized using a standard air pump. (See “Filling the Thigh Air Tank” located in the “Getting Started” section of the DFU for more information).
The left lung and right lung can be closed independently or together to create a partial or complete airway obstruction.
See VitalSim DFU for complete breathing and airway blockage functionality and operating information.
After Use:Cricothyroid Membrane/ Neck Skin Collar:1. Remove neck skin collar, by detaching Velcro®. 2. Remove used Cricothyroid Membrane Tape from cricoid opening.3. Cut a two (2) inch strip of Cricothyroid Membrane Tape.4. Adhere tape to edges of cricoid opening, covering the opening with tape,
to create the actual membrane.
ALS Simulator 7 Laerdal
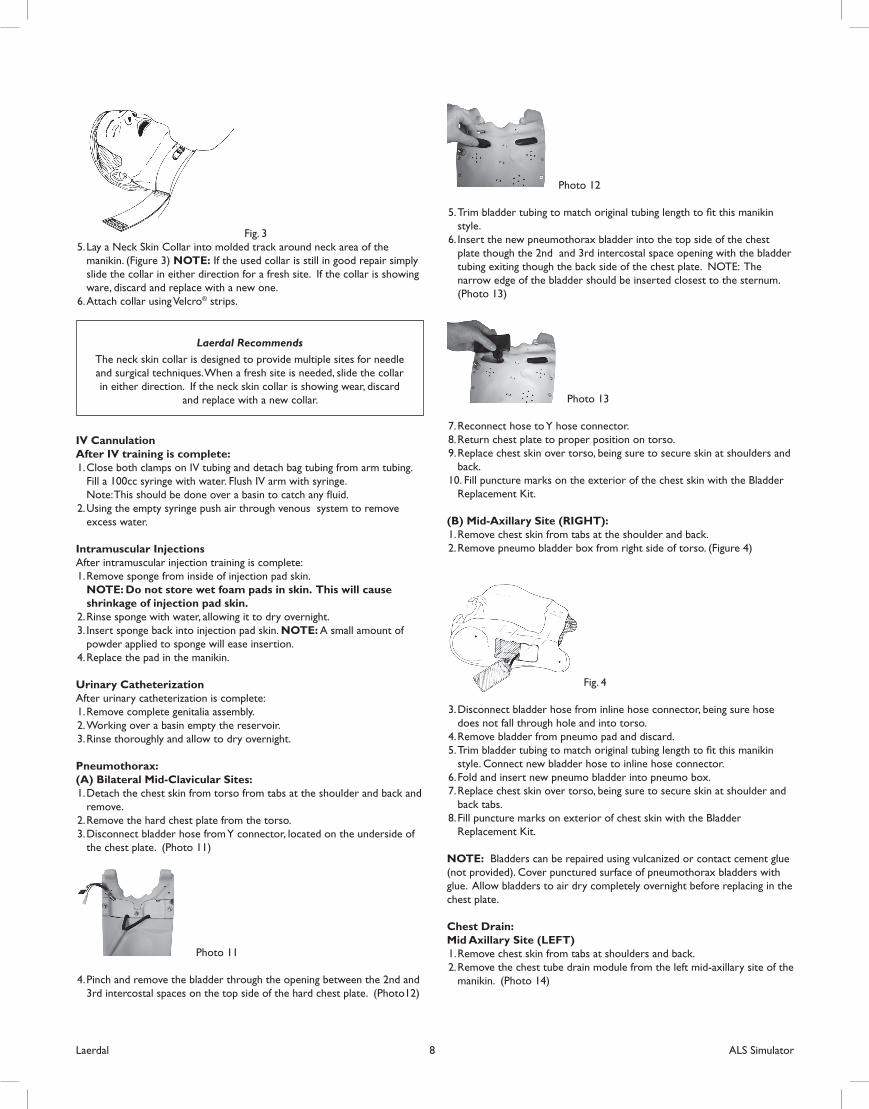
Fig. 3 5. Lay a Neck Skin Collar into molded track around neck area of the
manikin. (Figure 3) NOTE: If the used collar is still in good repair simply slide the collar in either direction for a fresh site. If the collar is showing ware, discard and replace with a new one.
6. Attach collar using Velcro® strips.
Laerdal Recommends
The neck skin collar is designed to provide multiple sites for needle and surgical techniques. When a fresh site is needed, slide the collar in either direction. If the neck skin collar is showing wear, discard
and replace with a new collar.
IV CannulationAfter IV training is complete:1. Close both clamps on IV tubing and detach bag tubing from arm tubing.
Fill a 100cc syringe with water. Flush IV arm with syringe. Note: This should be done over a basin to catch any fluid. 2. Using the empty syringe push air through venous system to remove
excess water.
Intramuscular InjectionsAfter intramuscular injection training is complete:1. Remove sponge from inside of injection pad skin. NOTE: Do not store wet foam pads in skin. This will cause
shrinkage of injection pad skin.2. Rinse sponge with water, allowing it to dry overnight.3. Insert sponge back into injection pad skin. NOTE: A small amount of
powder applied to sponge will ease insertion.4. Replace the pad in the manikin.
Urinary CatheterizationAfter urinary catheterization is complete:1. Remove complete genitalia assembly. 2. Working over a basin empty the reservoir.3. Rinse thoroughly and allow to dry overnight.
Pneumothorax:(A) Bilateral Mid-Clavicular Sites:1. Detach the chest skin from torso from tabs at the shoulder and back and
remove.2. Remove the hard chest plate from the torso.3. Disconnect bladder hose from Y connector, located on the underside of
the chest plate. (Photo 11)
Photo 11
4. Pinch and remove the bladder through the opening between the 2nd and 3rd intercostal spaces on the top side of the hard chest plate. (Photo12)
Photo 12
5. Trim bladder tubing to match original tubing length to fit this manikin style.
6. Insert the new pneumothorax bladder into the top side of the chest plate though the 2nd and 3rd intercostal space opening with the bladder tubing exiting though the back side of the chest plate. NOTE: The narrow edge of the bladder should be inserted closest to the sternum. (Photo 13)
Photo 13
7. Reconnect hose to Y hose connector.8. Return chest plate to proper position on torso.9. Replace chest skin over torso, being sure to secure skin at shoulders and
back.10. Fill puncture marks on the exterior of the chest skin with the Bladder
Replacement Kit.
(B) Mid-Axillary Site (RIGHT):1. Remove chest skin from tabs at the shoulder and back.2. Remove pneumo bladder box from right side of torso. (Figure 4)
Fig. 4
3. Disconnect bladder hose from inline hose connector, being sure hose does not fall through hole and into torso.
4. Remove bladder from pneumo pad and discard.5. Trim bladder tubing to match original tubing length to fit this manikin
style. Connect new bladder hose to inline hose connector.6. Fold and insert new pneumo bladder into pneumo box.7. Replace chest skin over torso, being sure to secure skin at shoulder and
back tabs.8. Fill puncture marks on exterior of chest skin with the Bladder
Replacement Kit.
NOTE: Bladders can be repaired using vulcanized or contact cement glue (not provided). Cover punctured surface of pneumothorax bladders with glue. Allow bladders to air dry completely overnight before replacing in the chest plate.
Chest Drain: Mid Axillary Site (LEFT)1. Remove chest skin from tabs at shoulders and back.2. Remove the chest tube drain module from the left mid-axillary site of the
manikin. (Photo 14)
Laerdal 8 ALS Simulator

EN
GL
ISH
Photo 14
3. Insert a new chest drain module.4. Replace the chest skin over the torso being sure to secure the skin at
the shoulders and both sides.
Maintenance: Cleaning1. Clean with mild soap and water; do not submerse the manikin or parts in
cleaning fluids or water.2. Use only on clean surface. Avoid felt tipped markers, ink pens, acetone,
iodine or other staining products and avoid placing the manikin on newsprint or inked lines of any kind.
3. To ensure longevity, each manikin should be cleaned after each training session and a general inspection should be conducted regularly.
4. Modules and all other parts should be drained and air-dried thoroughly before storage and disinfected when needed. After use of injection pads (use water only), accumulated water should be squeezed out. Do not store wet foam pads in the skin. To prevent mildew or mold, pads can be soaked in a mild solution of disinfectant and water or bleach and water. Squeeze excess solution from pads, allow them to dry, then store or reinsert in manikin.
5. Articulating parts will benefit from a light application of talcum powder prior to training sessions.
To extend the cleanliness of your manikin:1. Use a small towel and lightly dust the manikin head and chest with a
small amount of powder (provided). Wipe away any excess.2. Use gloves when handling the manikin.3. Avoid felt tipped markers, ink pens, iodine and newsprint, these will stain
the manikin.
Laerdal Recommends
Use only on clean surface. Avoid felt tipped markers, ink pens, acetone, iodine or other staining products and avoid placing the manikin on newsprint or inked lines of any kind. These will stain the manikin.
Attaching/Removing arms:1. Remove deltoid injection pad from upper arm.2. Detach chest skin from tabs at shoulders and back.3. Remove skin to reveal internal portion of upper chest.4. Lift hard chest plate to reveal inside sockets for arm connections.5. Place one washer on threaded 4 ½” bolt.6. Insert threaded bolt through upper arm and through torso so that it is
visible in chest cavity. (Figure 5)
Fig. 5
7. From inside of chest area, slip a washer, a spring and another washer on bolt.
8. Screw a wing nut on bolt and tighten until desired articulation is achieved.9. Replace hard chest plate.10. Pull chest skin back onto shoulder area.11. Connect chest skin to torso at shoulder and back tabs.12. Replace deltoid injection pad on upper arm.
To remove arms(s), reverse procedure.
IV Arm:Replacing Skin and Veins:
Laerdal Recommends
When excessive leaking occurs at the puncture sites, either a new vein system or skin should be installed to reduce loss of fluid.
We recommend working at a basin when replacing skin and veins.
Replacing skin: 1. Cut off skin. This can be done with a sharp knife or scalpel. (Figure 6)2. Discard skin.
Fig. 6
Replacing veins: (Keeping skin)1. Lubricate inside of skin with liquid detergent; let it flow down into the
finger area.2. Begin at top of arm and slowly pull skin down and remove from arm. Do
not roll, as that will cause skin to bind. Thumb will detach with skin.3. Remove tubing from track in mandrel. Glue may need to be scraped away.4. Rinse and dry vein grooves well and swab with alcohol. Be sure to
remove any excess glue.
Fig. 7
5. Place new veins along grooves, (Figure 7) spot gluing as needed. (We recommend a fast-drying glue applied sparingly every 2 to 3 inches.)
6. Generously lather arm mandrel with liquid soap.
Laerdal Recommends
Heat arms skins before replacing on mandrel. This can be done with a hair-dryer.
7. Slide hand into skin. (Photo 15)
Photo 15
ALS Simulator 9 Laerdal
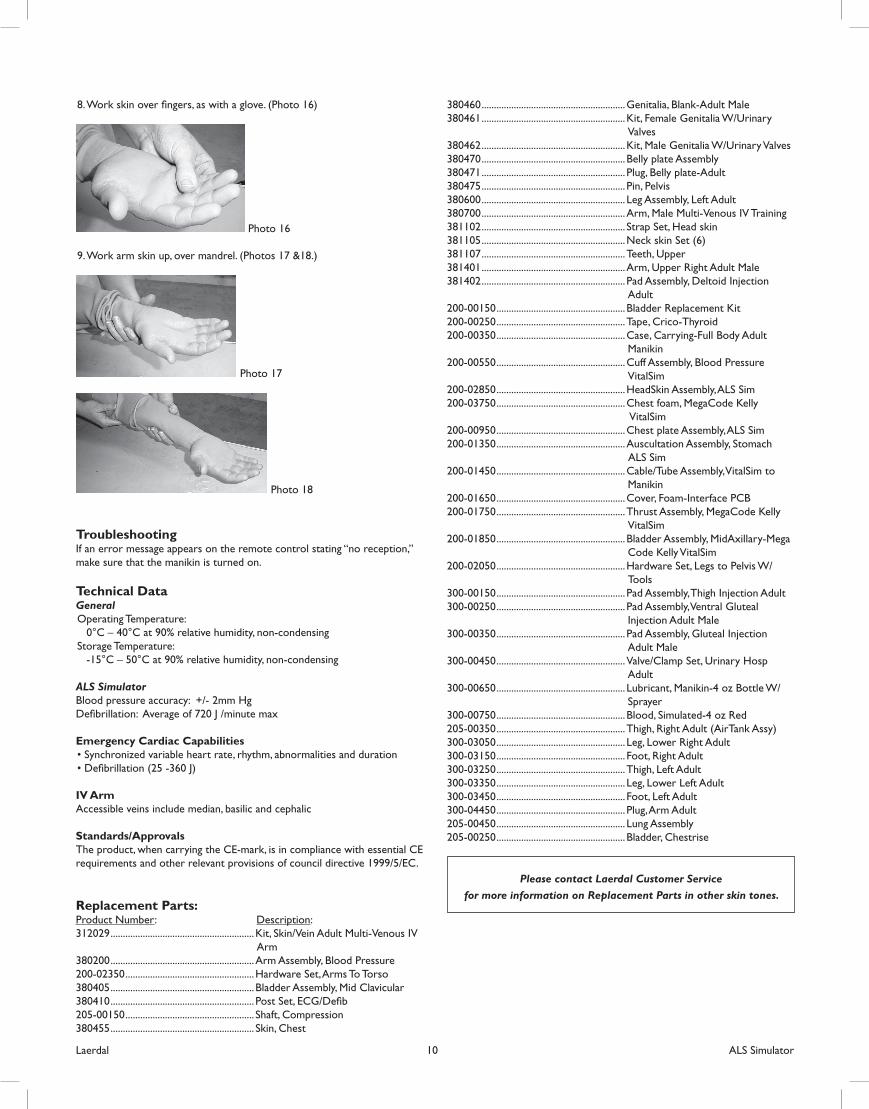
8. Work skin over fingers, as with a glove. (Photo 16)
Photo 16
9. Work arm skin up, over mandrel. (Photos 17 &18.)
Photo 17
Photo 18
TroubleshootingIf an error message appears on the remote control stating “no reception,” make sure that the manikin is turned on.
Technical DataGeneralOperating Temperature: 0°C – 40°C at 90% relative humidity, non-condensingStorage Temperature: -15°C – 50°C at 90% relative humidity, non-condensing
ALS SimulatorBlood pressure accuracy: +/- 2mm HgDefibrillation: Average of 720 J /minute max
Emergency Cardiac Capabilities• Synchronized variable heart rate, rhythm, abnormalities and duration• Defibrillation (25 -360 J)
IV ArmAccessible veins include median, basilic and cephalic
Standards/Approvals The product, when carrying the CE-mark, is in compliance with essential CE requirements and other relevant provisions of council directive 1999/5/EC.
Replacement Parts:Product Number: Description:312029 ..........................................................Kit, Skin/Vein Adult Multi-Venous IV
Arm380200 ..........................................................Arm Assembly, Blood Pressure200-02350 ....................................................Hardware Set, Arms To Torso380405 ..........................................................Bladder Assembly, Mid Clavicular380410 .......................................................... Post Set, ECG/Defib205-00150 .................................................... Shaft, Compression380455 .......................................................... Skin, Chest
380460 ..........................................................Genitalia, Blank-Adult Male380461 ..........................................................Kit, Female Genitalia W/Urinary
Valves380462 ..........................................................Kit, Male Genitalia W/Urinary Valves380470 ..........................................................Belly plate Assembly380471 .......................................................... Plug, Belly plate-Adult380475 .......................................................... Pin, Pelvis380600 .......................................................... Leg Assembly, Left Adult 380700 ..........................................................Arm, Male Multi-Venous IV Training381102 .......................................................... Strap Set, Head skin381105 ..........................................................Neck skin Set (6)381107 ..........................................................Teeth, Upper381401 ..........................................................Arm, Upper Right Adult Male381402 .......................................................... Pad Assembly, Deltoid Injection
Adult200-00150 ....................................................Bladder Replacement Kit200-00250 ....................................................Tape, Crico-Thyroid200-00350 ....................................................Case, Carrying-Full Body Adult
Manikin200-00550 ....................................................Cuff Assembly, Blood Pressure
VitalSim200-02850 ....................................................HeadSkin Assembly, ALS Sim200-03750 ....................................................Chest foam, MegaCode Kelly
VitalSim200-00950 ....................................................Chest plate Assembly, ALS Sim200-01350 ....................................................Auscultation Assembly, Stomach ALS Sim200-01450 ....................................................Cable/Tube Assembly, VitalSim to
Manikin200-01650 ....................................................Cover, Foam-Interface PCB200-01750 ....................................................Thrust Assembly, MegaCode Kelly
VitalSim200-01850 ....................................................Bladder Assembly, MidAxillary-Mega
Code Kelly VitalSim200-02050 ....................................................Hardware Set, Legs to Pelvis W/
Tools 300-00150 .................................................... Pad Assembly, Thigh Injection Adult300-00250 .................................................... Pad Assembly, Ventral Gluteal
Injection Adult Male300-00350 .................................................... Pad Assembly, Gluteal Injection
Adult Male300-00450 ....................................................Valve/Clamp Set, Urinary Hosp
Adult300-00650 .................................................... Lubricant, Manikin-4 oz Bottle W/
Sprayer300-00750 ....................................................Blood, Simulated-4 oz Red205-00350 ....................................................Thigh, Right Adult (AirTank Assy)300-03050 .................................................... Leg, Lower Right Adult300-03150 .................................................... Foot, Right Adult300-03250 ....................................................Thigh, Left Adult300-03350 .................................................... Leg, Lower Left Adult300-03450 .................................................... Foot, Left Adult300-04450 .................................................... Plug, Arm Adult205-00450 .................................................... Lung Assembly205-00250 ....................................................Bladder, Chestrise
Please contact Laerdal Customer Service
for more information on Replacement Parts in other skin tones.
Laerdal 10 ALS Simulator