Embed Size (px)
Citation preview
150 PSI 6 CFM Model 12V6CF
Serial No. _______________________
Questions?As a manufacturer, we are com-mitted to providing you complete customer satisfaction. If you have questions, or find there are missing or damaged parts, we will guaran-tee you complete satisfaction. To avoid unnecessary delays, contact your dealer immediately
CAUTION:Read all safety precautions and instructions in the manual carefully
OWNER’S MANUAL
“Air Where And When You Need I t !” ®
WARRANTY
Voltair, Inc. warrants the Voltair against defective workmanship and parts in accordance with the warranty given to us by our suppliers for one full year. If during the warranty period it is thought that the unit becomes inoperative due to a defect, the Voltair needs to be returned to the dealer to determine the proper course of action. The dealer shall contact Voltair, Inc. regarding a warranty inspection or replacement. Voltair, Inc. reserves the right to void any warranty claim if the Voltair has been altered, shows bad maintenance, shows abuse, or has been dismantled without proper authorization. Voltair, Inc. can request that the unit be returned for inspection. Voltair will not war-ranty and is not liable for improper installation. Improper installation can be the result of poor judgment in running power to the compressor, not installing a circuit breaker or not using a DOT approved air storage tank.
VOLTAIR, INC. IS NOT RESPONSIBLE OR LIABLE FOR INDIRECT, SPECIAL OR CONSEQUENTIAL DAM-AGES ARISING OUT OF OR IN CONNECTION WITH THE USE OR PERFORMANCE OF THE PRODUCT OR OTHER DAMAGES WITH RESPECT TO ANY ECONOMIC LOSS, LOSS OF PROPERTY, LOSS OF REV-ENUES OR PROFITS, LOSS OF ENJOYMENT OR USE, COSTS OF REMOVAL, INSTALLATION OR OTHER CONSEQUENTIAL DAMAGES OF WHATSOEVER NATURE.
Voltair, Inc., Henderson, NE
TABLE OF CONTENTS
WARNING: Please read through these instructions before installing the 12-Voltair air compressor
IMPORTANT SAFETY PRECAUTIONS ................................................................................................. 4BEFORE YOU BEgIN PICTURE DIAgRAM ...................................................................................................................5INSTALLATION ASSEMBLY .................................................................................................................................. 6 OIL ................................................................................................................................................. 6 FINDINg A LOCATION FOR THE 12-VOLTAIR .......................................................................7 DRILLINg/SECURINg ................................................................................................................7 ELECTRICAL gROUND WIRE, POSITIVE WIRE ............................................................................. 8 BATTERY FACTS (helping you pick the best battery for you).......................................... 8 TOggLE SWITCH (OPTIONAL) .................................................................................. 9 CIRCUIT BREAkER (OPTIONAL) ............................................................................... 9 PLUMBINg AIR STORAgE TO YOUR COMPRESSOR CHOOSINg THE RIgHT SIzE AIR TANk .................................................................. 10 FINDINg A LOCATION FOR AN AIR TANk ............................................................... 10OPERATION AND ADJUSTMENT .......................................................................................................... 11MAINTENANCE ........................................................................................................................................ 11WIRINg DIAgRAM ................................................................................................................................... 12TROUBLESHOOTINg .............................................................................................................................. 13WARRANTY CARD .................................................................................................................................. 15
“Air Where And When You Need I t !” ® Page �

IMPORTANT SAFETY PRECAUTIONS
WARNING: To reduce the risk of burns, fire, electric shock, or injury to persons, read the following important safety precautions and information before operating this air compressor.
1.
“Air Where And When You Need I t !” ® Page �
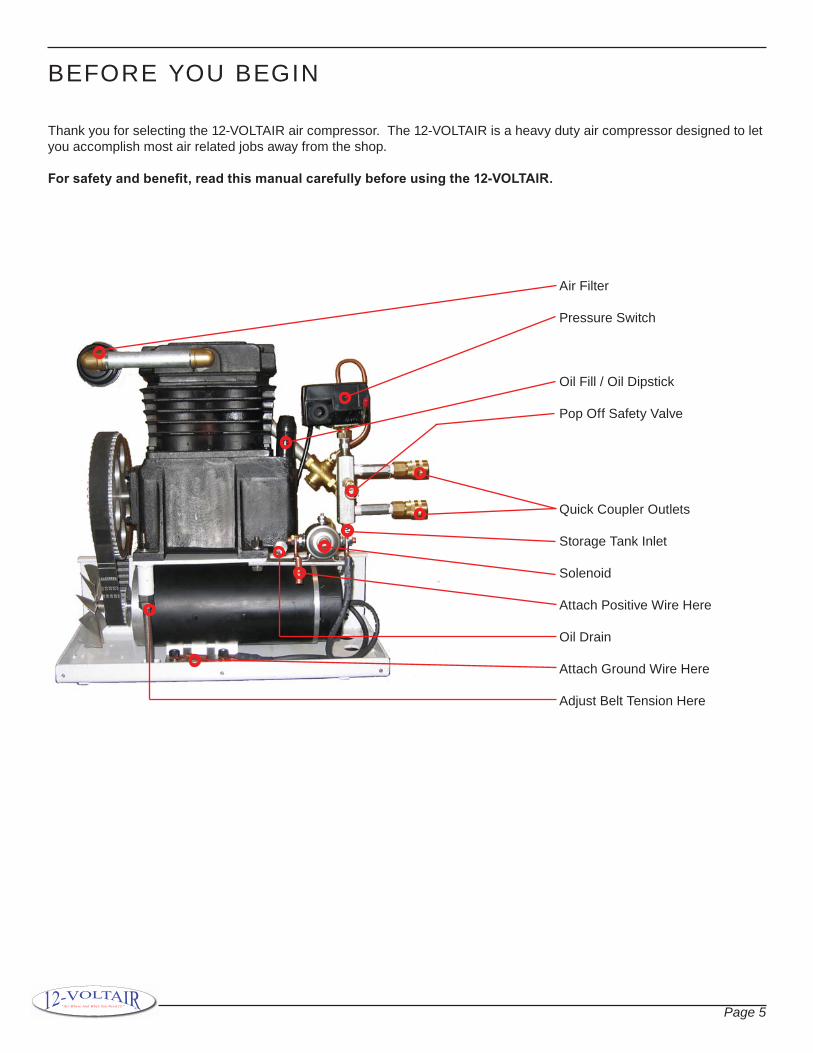
BEFORE YOU BEgIN
Thank you for selecting the 12-VOLTAIR air compressor. The 12-VOLTAIR is a heavy duty air compressor designed to let you accomplish most air related jobs away from the shop.
For safety and benefit, read this manual carefully before using the 12-VOLTAIR.
Air Filter
Pressure Switch
Oil Fill / Oil Dipstick
Pop Off Safety Valve
Quick Coupler Outlets
Storage Tank Inlet
Solenoid
Attach Positive Wire Here
Oil Drain
Attach ground Wire Here
Adjust Belt Tension Here
“Air Where And When You Need I t !” ® Page �
ASSEMBLY
Be sure to check over the 12-Voltair and inspect for any damages.
1. Side LatchesUse the provided 1/4” x 1” bolt, lock washer and nut to secure the anchor bracket to the outside of the compressor. Once the anchor bracket has been secured use the 1/4” x 1 1/4” bolt and 1/4” lock nut to secure the rubber hold down in-between the ears of the anchor bracket.
2. Quick CouplerInstall the threaded nipple and quick coupler into the right side of the compressor through the two holes of the 12-Voltair cabinet.
3. Remove Service Panel- remove the 7 screws that hold the front service panel on the 12-Voltair. Once removed, there is no need to reattach until your installation is complete.
4. Check Belt Tension- Although the 12-Voltair has been shipped with the proper amount of belt tension, please check to make sure that it has not come loose during shipping.
5. Check Oil- The 12-Voltair is not shipped with any oil. It takes approximately 2 cups of oil to fill compressor to the full level on the dipstick. Do not overfill. See specs below on what oil should be used. -20F - 70F (-7C - 21C) 10W non detergent compressor oil 50F - 110F (10C - 73C) 30W non detergent compressor oil -20F - 110F (-7C - 73C) 40W synthetic non detergent compressor oil
Voltair recommends the use of synthetic non detergent compressor oil for year around use. Amsoil is just one manufacturer that can provide this oil (800) 9�6-�69� - part #PCKQT
“Air Where And When You Need I t !” ® Page 6
Rubber Hold Down1/4” x 1 1/4” Bolt
1/4” Lock NutAnchor Bracket
1/4” x 1” BoltCabinet side
1/4” Nut
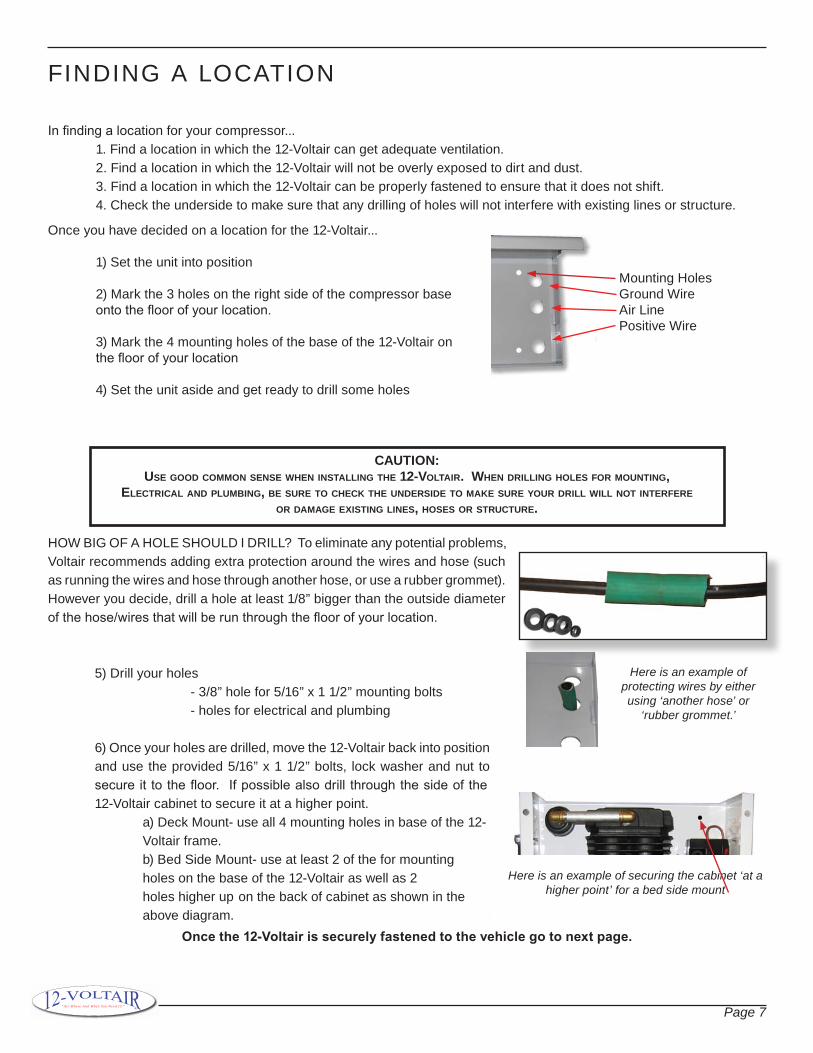
In finding a location for your compressor... 1. Find a location in which the 12-Voltair can get adequate ventilation. 2. Find a location in which the 12-Voltair will not be overly exposed to dirt and dust. 3. Find a location in which the 12-Voltair can be properly fastened to ensure that it does not shift. 4. Check the underside to make sure that any drilling of holes will not interfere with existing lines or structure.
CAUTION:Use gOOd COmmON seNse wheN INsTAllINg The 12-VOlTAIr. wheN drIllINg hOles fOr mOUNTINg,
eleCTrICAl ANd plUmbINg, be sUre TO CheCk The UNdersIde TO mAke sUre yOUr drIll wIll NOT INTerfere Or dAmAge exIsTINg lINes, hOses Or sTrUCTUre.
HoW BIG oF A Hole SHoUld I dRIll? To eliminate any potential problems, Voltair recommends adding extra protection around the wires and hose (such as running the wires and hose through another hose, or use a rubber grommet). However you decide, drill a hole at least 1/8” bigger than the outside diameter of the hose/wires that will be run through the floor of your location.
Once the 12-Voltair is securely fastened to the vehicle go to next page.
FINDINg A LOCATION
Once you have decided on a location for the 12-Voltair...
1) Set the unit into position 2) Mark the 3 holes on the right side of the compressor base onto the floor of your location. 3) Mark the 4 mounting holes of the base of the 12-Voltair on the floor of your location
4) Set the unit aside and get ready to drill some holes
5) Drill your holes - 3/8” hole for 5/16” x 1 1/2” mounting bolts - holes for electrical and plumbing 6) Once your holes are drilled, move the 12-Voltair back into position and use the provided 5/16” x 1 1/2” bolts, lock washer and nut to secure it to the floor. If possible also drill through the side of the 12-Voltair cabinet to secure it at a higher point. a) Deck Mount- use all 4 mounting holes in base of the 12- Voltair frame. b) Bed Side Mount- use at least 2 of the for mounting holes on the base of the 12-Voltair as well as 2 holes higher up on the back of cabinet as shown in the above diagram.
Here is an example of securing the cabinet ‘at a higher point’ for a bed side mount
Here is an example of protecting wires by either using ‘another hose’ or
‘rubber grommet.’
“Air Where And When You Need I t !” ® Page �
Mounting Holesground WireAir LinePositive Wire
ELECTRICAL
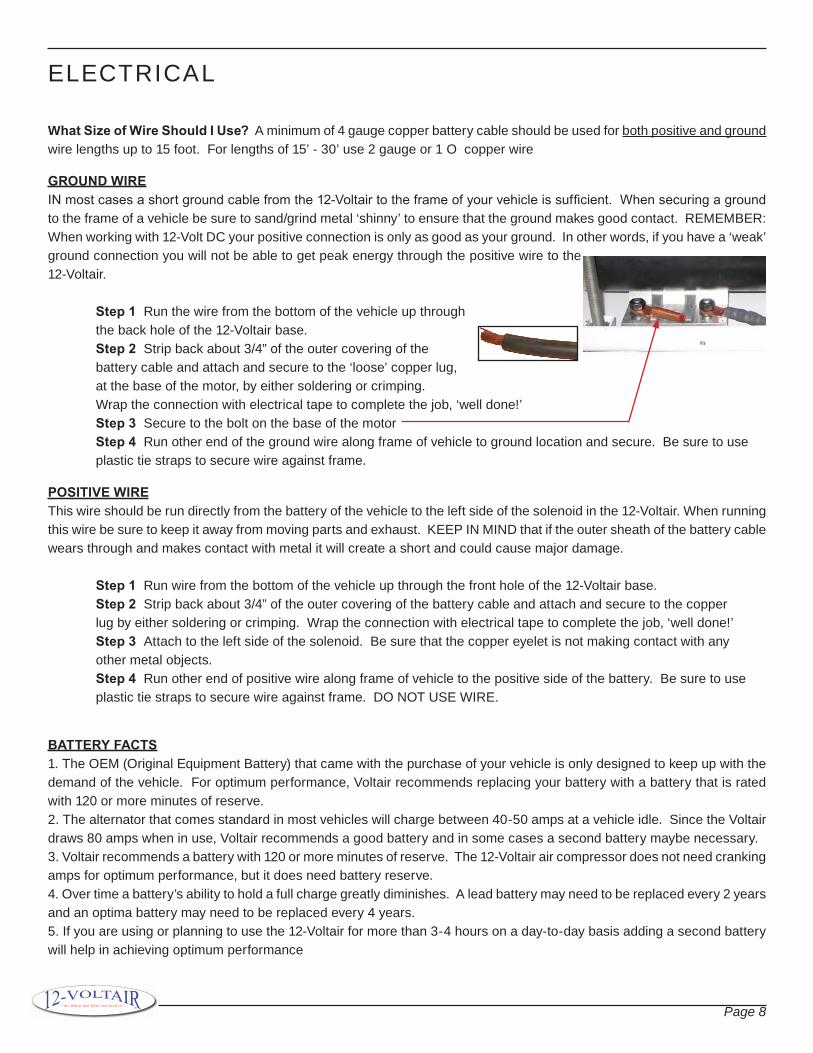
What Size of Wire Should I Use? A minimum of 4 gauge copper battery cable should be used for both positive and ground wire lengths up to 15 foot. For lengths of 15’ - 30’ use 2 gauge or 1 O copper wire
GROUnd WIReIN most cases a short ground cable from the 12-Voltair to the frame of your vehicle is sufficient. When securing a ground to the frame of a vehicle be sure to sand/grind metal ‘shinny’ to ensure that the ground makes good contact. REMEMBER: When working with 12-Volt DC your positive connection is only as good as your ground. In other words, if you have a ‘weak’ ground connection you will not be able to get peak energy through the positive wire to the 12-Voltair. Step 1 Run the wire from the bottom of the vehicle up through the back hole of the 12-Voltair base. Step 2 Strip back about 3/4” of the outer covering of the battery cable and attach and secure to the ‘loose’ copper lug, at the base of the motor, by either soldering or crimping. Wrap the connection with electrical tape to complete the job, ‘well done!’ Step 3 Secure to the bolt on the base of the motor Step 4 Run other end of the ground wire along frame of vehicle to ground location and secure. Be sure to use plastic tie straps to secure wire against frame.
POSITIVe WIReThis wire should be run directly from the battery of the vehicle to the left side of the solenoid in the 12-Voltair. When running this wire be sure to keep it away from moving parts and exhaust. kEEP IN MIND that if the outer sheath of the battery cable wears through and makes contact with metal it will create a short and could cause major damage.
Step 1 Run wire from the bottom of the vehicle up through the front hole of the 12-Voltair base. Step 2 Strip back about 3/4” of the outer covering of the battery cable and attach and secure to the copper lug by either soldering or crimping. Wrap the connection with electrical tape to complete the job, ‘well done!’ Step 3 Attach to the left side of the solenoid. Be sure that the copper eyelet is not making contact with any other metal objects. Step 4 Run other end of positive wire along frame of vehicle to the positive side of the battery. Be sure to use plastic tie straps to secure wire against frame. DO NOT USE WIRE.
BATTeRY FACTS1. The OEM (Original Equipment Battery) that came with the purchase of your vehicle is only designed to keep up with the demand of the vehicle. For optimum performance, Voltair recommends replacing your battery with a battery that is rated with 120 or more minutes of reserve.2. The alternator that comes standard in most vehicles will charge between 40-50 amps at a vehicle idle. Since the Voltair draws 80 amps when in use, Voltair recommends a good battery and in some cases a second battery maybe necessary. 3. Voltair recommends a battery with 120 or more minutes of reserve. The 12-Voltair air compressor does not need cranking amps for optimum performance, but it does need battery reserve.4. Over time a battery’s ability to hold a full charge greatly diminishes. A lead battery may need to be replaced every 2 years and an optima battery may need to be replaced every 4 years.5. If you are using or planning to use the 12-Voltair for more than 3-4 hours on a day-to-day basis adding a second battery will help in achieving optimum performance
“Air Where And When You Need I t !” ® Page 8
ELECTRICAL (oPTionAl)
TOGGLe SWITCH
The Voltair is designed/manufactured with the solenoid activating the pressure switch. By default, when the pressure switch is in the on position, the Voltair will run whether the vehicle ignition is on or off. If your system would drop below 125 PSI, the compressor would kick on and run until the pressure reached 150- regardless of whether or not you are in the vehicle or not. To avoid this, Voltair, Inc. recommends installing a remote toggle switch and powering this switch with a keyed ignition power source. This way, the 12-Voltair will only run if both this switch and ignition are in the on position.
To turn the 12-Voltair on and off from a convenient location (i.e.- inside your vehicle) follow the steps below
Step 1 Run an 18 gauge wire from the bottom of the vehicle up through one of the three holes of the 12- Voltair. Step 2 Remove the wire from the left side of the solenoid (the same terminal that the wire from the vehicle is hooked to) and connect to the wire you just pulled up. Step 3 Run the other end of the 18 gauge wire to the location (wherever you see fit to put the toggle switch) of the toggle switch and connect to one of the terminals. Step 4 Run a wire from the other terminal of the toggle switch to a 12-volt power source. Preferably a power source that only has power when the keyed ignition is in the on position. Consult your automobile manufacture to assist you in locating a 12 VDC power source, that only has power when the ignition is in the ‘on’ position.
YOUR SWITCH SHOULd Be ReAdY TO GO
CIRCUIT BReAkeR
One way to protect against the positive wire shorting is installing a circuit breaker. Voltair recommends a 150 amp circuit breaker. AW Direct is just one dealer who can be reached at (800) 243-3194 Part #SCB-150. This is a device that is mounted right next to your battery that will trip in the event that you have a wire that would short out.
“Air Where And When You Need I t !” ® Page 9
PLUMBINg
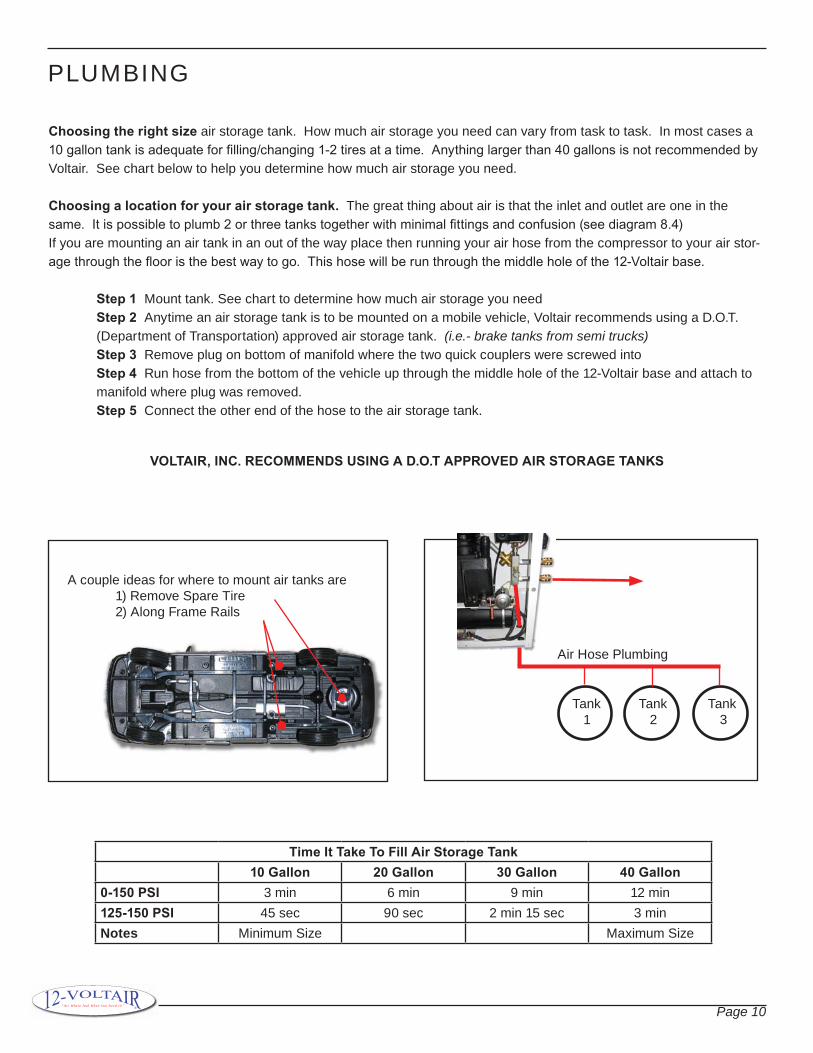
Choosing the right size air storage tank. How much air storage you need can vary from task to task. In most cases a 10 gallon tank is adequate for filling/changing 1-2 tires at a time. Anything larger than 40 gallons is not recommended by Voltair. See chart below to help you determine how much air storage you need.
Choosing a location for your air storage tank. The great thing about air is that the inlet and outlet are one in the same. It is possible to plumb 2 or three tanks together with minimal fittings and confusion (see diagram 8.4)If you are mounting an air tank in an out of the way place then running your air hose from the compressor to your air stor-age through the floor is the best way to go. This hose will be run through the middle hole of the 12-Voltair base.
Step 1 Mount tank. See chart to determine how much air storage you need Step 2 Anytime an air storage tank is to be mounted on a mobile vehicle, Voltair recommends using a D.O.T. (Department of Transportation) approved air storage tank. (i.e.- brake tanks from semi trucks) Step 3 Remove plug on bottom of manifold where the two quick couplers were screwed into Step 4 Run hose from the bottom of the vehicle up through the middle hole of the 12-Voltair base and attach to manifold where plug was removed. Step 5 Connect the other end of the hose to the air storage tank.
VOLTAIR, InC. ReCOmmendS USInG A d.O.T APPROVed AIR STORAGe TAnkS
“Air Where And When You Need I t !” ® Page 10
Time It Take To Fill Air Storage Tank10 Gallon 20 Gallon 30 Gallon 40 Gallon
0-150 PSI 3 min 6 min 9 min 12 min125-150 PSI 45 sec 90 sec 2 min 15 sec 3 minNotes Minimum Size Maximum Size
Tank Tank Tank 1 2 3
Air Hose Plumbing
A couple ideas for where to mount air tanks are 1) Remove Spare Tire 2) Along Frame Rails
MAINTENANCE
Under optimum conditions you can count on your 12-Voltair to provide “Air Where And When You Need It!” for a long, long time.
Check the items below atleast once a year or every 300 hours of use.
Check air filter and replace as needed Check oil level Drain oil and replace if using a petroleum based non-detergent compressor oil If you are using a synthetic based compressor oil drain oil every 3 years or 600 hours Check Belt to make sure that it there is adequate belt tension Check pump pulley to make sure that side flanges are securely fastened Remove any debris that may have fallen inside the case of the 12-Voltair Check positive (wire attached to left terminal of solenoid) to make sure that there is not any excessive wear and is still securely fastened. Check plumbing to make sure that there are not any air leaks
To order parts consult your dealer or call (402) 723-4985
“Air Where And When You Need I t !” ® Page 11
WIRINg
“Air Where And When You Need I t !” ® Page 12
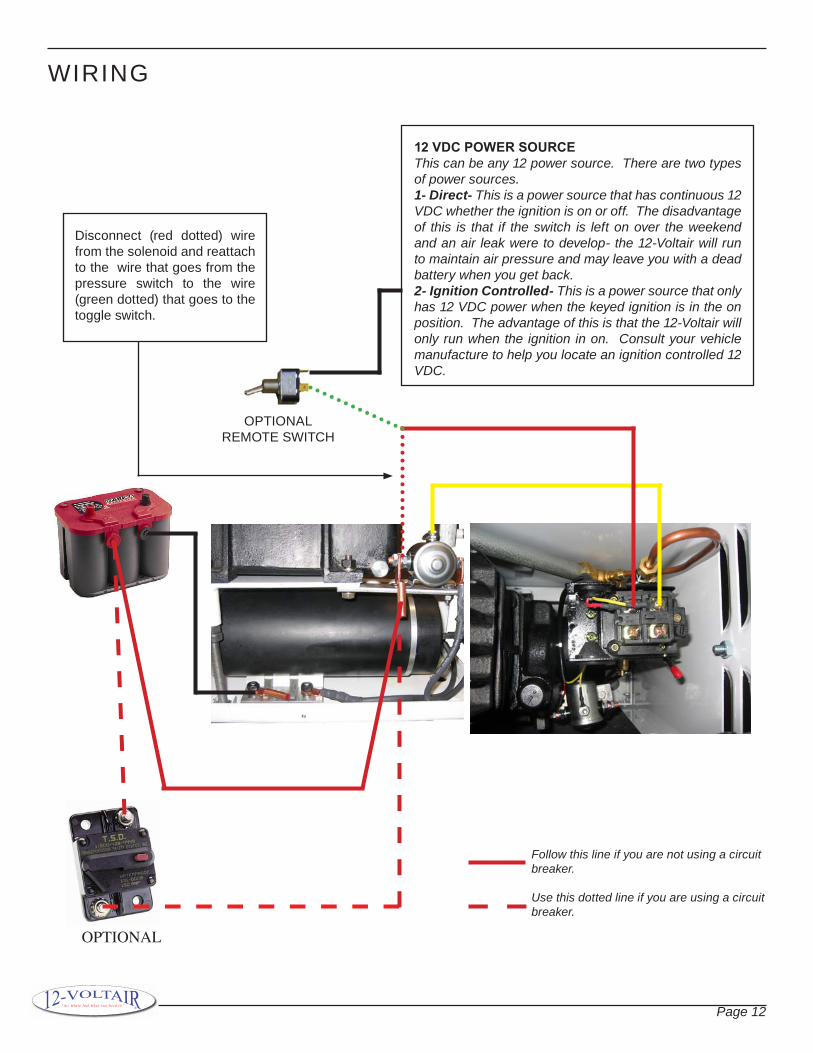
OPTIONAL REMOTE SWITCH
OPTIONAL
12 VdC POWeR SOURCeThis can be any 12 power source. There are two types of power sources.1- Direct- This is a power source that has continuous 12 VDC whether the ignition is on or off. The disadvantage of this is that if the switch is left on over the weekend and an air leak were to develop- the 12-Voltair will run to maintain air pressure and may leave you with a dead battery when you get back.2- Ignition Controlled- This is a power source that only has 12 VDC power when the keyed ignition is in the on position. The advantage of this is that the 12-Voltair will only run when the ignition in on. Consult your vehicle manufacture to help you locate an ignition controlled 12 VDC.
Disconnect (red dotted) wire from the solenoid and reattach to the wire that goes from the pressure switch to the wire (green dotted) that goes to the toggle switch.
Follow this line if you are not using a circuit breaker.
Use this dotted line if you are using a circuit breaker.
TROUBLESHOOTINg
mY 12-VOLTAIR nOT RUn 1. Check if the switch on the pressure switch is in the auto (down) position 2. Check the air pressure. If you have more than 120 PSI in the compressor, the compressor will not kick in and run until the pressure has dropped below 120 PSI Before proceeding with this troubleshooting guide, be sure to disconnect the wire on the right
side of the solenoid. This is the wire that goes to the inside of the motor.
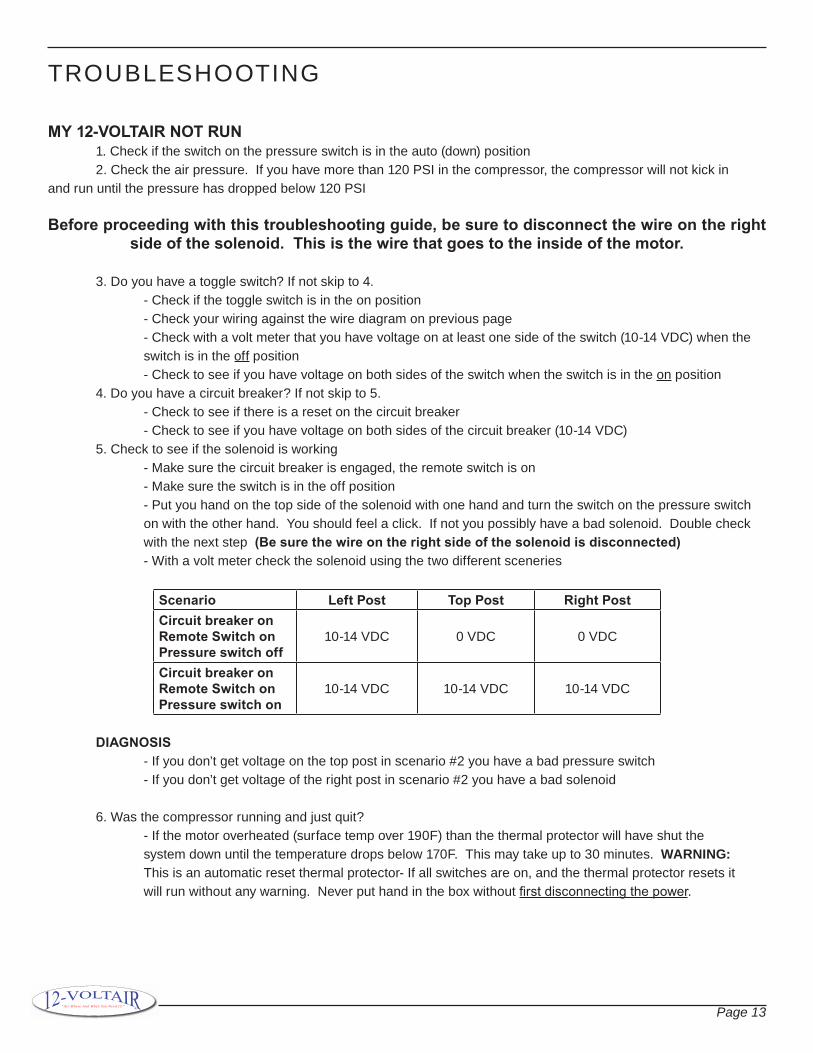
3. Do you have a toggle switch? If not skip to 4. - Check if the toggle switch is in the on position - Check your wiring against the wire diagram on previous page - Check with a volt meter that you have voltage on at least one side of the switch (10-14 VDC) when the switch is in the off position - Check to see if you have voltage on both sides of the switch when the switch is in the on position 4. Do you have a circuit breaker? If not skip to 5. - Check to see if there is a reset on the circuit breaker - Check to see if you have voltage on both sides of the circuit breaker (10-14 VDC) 5. Check to see if the solenoid is working - Make sure the circuit breaker is engaged, the remote switch is on - Make sure the switch is in the off position - Put you hand on the top side of the solenoid with one hand and turn the switch on the pressure switch on with the other hand. You should feel a click. If not you possibly have a bad solenoid. Double check with the next step (Be sure the wire on the right side of the solenoid is disconnected) - With a volt meter check the solenoid using the two different sceneries
Scenario Left Post Top Post Right PostCircuit breaker onRemote Switch onPressure switch off
10-14 VDC 0 VDC 0 VDC
Circuit breaker onRemote Switch onPressure switch on
10-14 VDC 10-14 VDC 10-14 VDC
dIAGnOSIS - If you don’t get voltage on the top post in scenario #2 you have a bad pressure switch - If you don’t get voltage of the right post in scenario #2 you have a bad solenoid
6. Was the compressor running and just quit? - If the motor overheated (surface temp over 190F) than the thermal protector will have shut the system down until the temperature drops below 170F. This may take up to 30 minutes. WARNING: This is an automatic reset thermal protector- If all switches are on, and the thermal protector resets it will run without any warning. Never put hand in the box without first disconnecting the power.
“Air Where And When You Need I t !” ® Page 1�
TROUBLESHOOTINg
mY 12-VOLTAIR SHAkeS A LOT. 1. Check to make sure there is adequate belt tension. You should have anywhere from 1/4” - 3/8” movement when applying 50% pressure to the belt directly between the motor and pump pulleys 2. Check to make sure that the motor and compressor are securely fastened to the frame. Make sure that bolts have not come loose.
mY 12-VOLTAIR RUnS BUT IS nOT ABLe TO PUmP UP AnY PReSSURe 1. Check to see if you have any external air leaks - Disconnect any air storage tanks and plug tank supply line and run compressor to see if pressure builds up - If this fixes the problem you have a leak that needs to be fixed
mY 12-VOLTAIR jUST STARTS - STOPS - STARTS - STOPS 1. You probably don’t have an external air storage supply tank. The compressor is shutting down with 150 PSI in the air lines and a small leak is draining the pressure down to 125 PSI and the compressor is kicking back on to build the pressure back up to 150 PSI.
mY COmPReSSOR RUnS FAST AT BeGInnInG BUT SOUndS LIke IT SLOWS dOWn AFTeR IT HAS RUn FOR 5, 10, 15 mInUTeS. BATTERY STEP 1 Recharge battery to make sure you have a good full charge if the problem still exists- STEP 2 STEP 2 Replace battery with a new battery. See battery facts on page 8 - if this does not fix that problem- STEP 3 STEP 3 Check your alternator. OPTION 1- Take it to a mechanic for him to check OPTION 2- With an DC amp meter and the vehicle running, check the wire between the battery and the alternator to see if the alternator is charging
WHen RUnnInG THe 12-VOLTAIR FOR exTended PeRIOdS OF TIme, mY VeHICLe jUST SHUTS OFF BATTERY- check the steps above to diagnose a problem
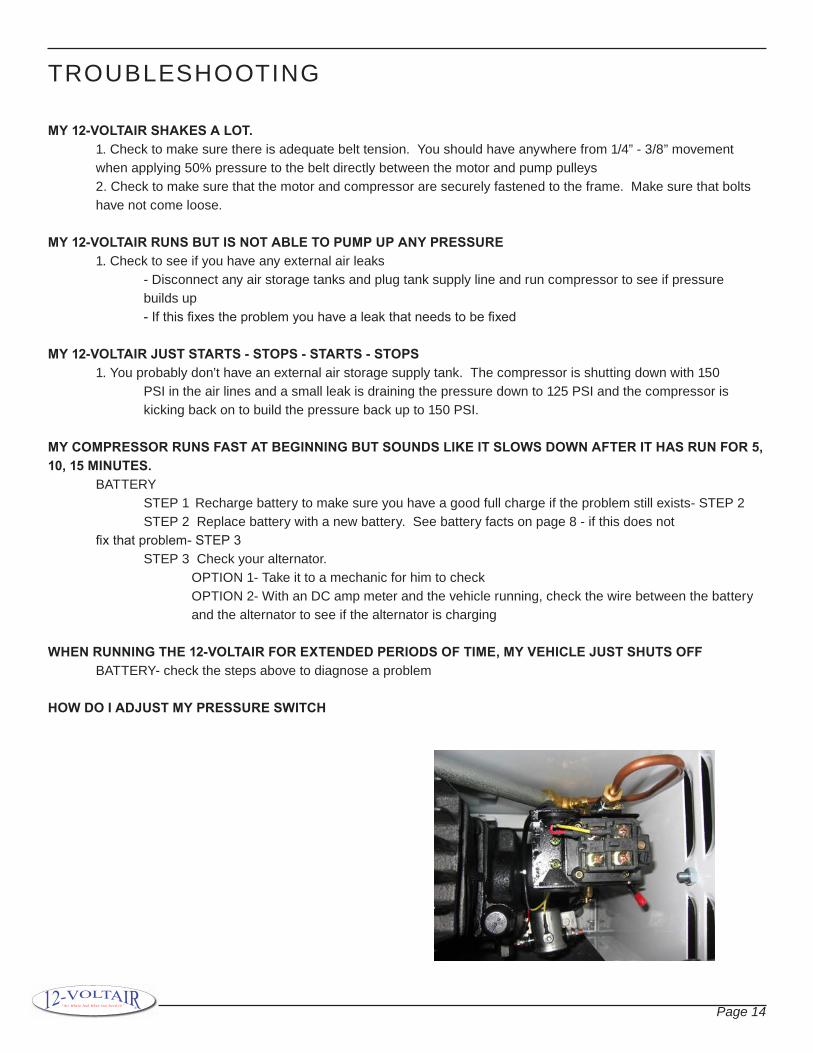
HOW dO I AdjUST mY PReSSURe SWITCH
“Air Where And When You Need I t !” ® Page 1�
WARRANTY
12-Voltair Warranty Card
Voltair, Inc. would like to congratulate you on your purchase of the best 12 Volt Air compressor on the market. Please take the time to fill out this information and return to Voltair, Inc. By filling out this form we can help keep track of your purpose as well as assist us in learning how this product is being used.
Name
Address City State zip
Phone Number Fax Number E-mail
mOdeL # 12V6CF
SeRIAL # located on the right side of the base of the 12-Voltair, just below the back of the motor
1. Who Installed the 12-Voltair Customer Dealer 2. How often do you plan to use your 12-Voltair? Daily Weekly Monthly 3. What of the following best describes the area in which you will be operating this compressor?
Check all that apply Aerial Management Co.’s Off-road Aerial Forestry Oil field/Gas Auto Parts stores Fuel/Lube Road Repair Catalog firms Government Rural Fire Departments Companies with fleet of vehicles Law Enforcement Towing Associations Contractor Manufacturer OEM Towing Companies Crane Military Truck parts stores Fish & Game Departments Mobile Detailing & Trim firms Other ____________________ Fleet Maintenance Municipalities
mail Completed Form toVoltair, Inc.515 Road 11York, NE 68467
FAx Completed Form to (810) 885-8284
download form from www.12-Voltair.com/warrantycarde-mail Completed Form [email protected]
“Air Where And When You Need I t !” ® Page 1�

Thank-You for your purchase. We
sincerely hope that your 12-Voltair
wi l l provide you with “Air Where
And When You need i t! ”
The Voltair Team
“Air Where And When You Need I t !” ® Page 16