Embed Size (px)
Citation preview

Guillermo is an engineering stu-dent at the prestigious Ecole
Polytechnique in Saint Etienne,France. He is supporting Pascale, ateacher delivering a unit on electricityto six-year-olds (French CP level) in alocal primary school. At the end ofthe class, they review the activities:
“Have you seen the diagrams thechildren made today? Their progressis amazing!” comments Pascale.“Next week we’ll learn about theswitch. Can you come and help? Itwould be great if we could worktogether again.”
“Sure. I can provide diagrams, helpyou prepare the materials and guidethe children’s ideas,” says Guillermo.“The switch is quite a difficult topicfor six-year-olds. Perhaps we could
introduce it by asking them how theycould turn off a light bulb withoutdisconnecting the wires.”
As part of a project called La main àla pâtew1, between 1500 and 2000 sci-ence or engineering students inFrance coach primary-school classes(children aged 3-11) during sciencelessons. The project was launched in1996 by physics Nobel Prize winnerGeorges Charpak and the Académiedes Sciences to promote investigationand inquiry-based science teaching inprimary schools. Although it began inFrance, the project now runs in morethan 20 partner countries. There areLa main à la pâte mirror websites inGermanw2, Spanishw3, Serbianw4,
www.scienceinschool.org44 Science in School Issue 11 : Spring 2009
Catch them young:university meetsprimary school
Teaching science at primary school canbe a challenge. At La main à la pâte,Samuel Lellouch and David Jasmin senduniversity students to support primary-school teachers. Why not try two of theiractivities in your classroom?
Image courtesy of Fabrice Krot, La Maison des Sciences
Imag
eco
urte
syof
letty
17
/ iStoc
kphoto
sis_11_2*:Layout 1 23.04.2009 14:03 Uhr Seite 44
Projects in science education
www.scienceinschool.org 45Science in School Issue 11 : Spring 2009
Arabianw5 and Chinesew6, as well as aninternational web portal, TeachingSciencew7. With versions in English,French and Spanish, this portalincludes links to many of La main à lapâte’s partner projects in countriessuch as Belgium, Sweden, Turkey andSwitzerland.
While an inquiry-based approachmakes science more enjoyable forchildren, as well as helping themdevelop important skills and acquirescientific knowledge, it can be time-consuming. Particularly at first,preparing and running the sessionscan be a lot of work: finding materi-als, organising experimental work,and guiding individual groups orchildren. Moreover, many primary-school teachers do not feel confident
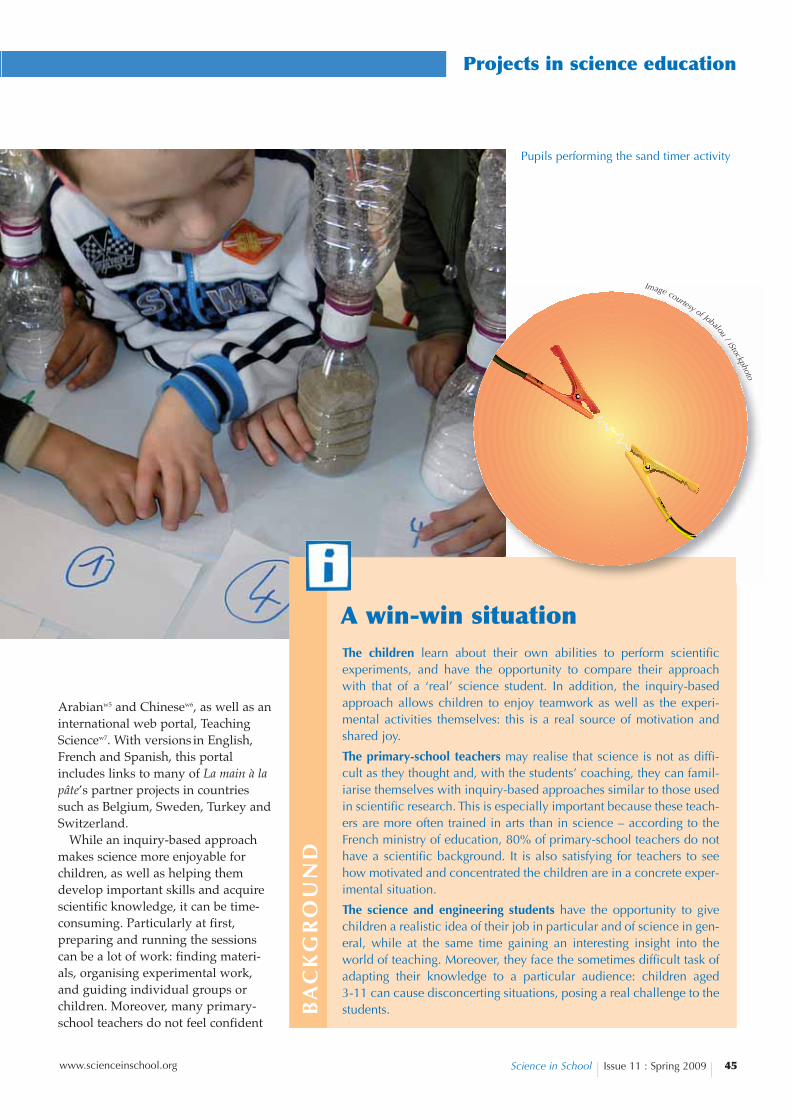
A win-win situationThe children learn about their own abilities to perform scientificexperiments, and have the opportunity to compare their approachwith that of a ‘real’ science student. In addition, the inquiry-basedapproach allows children to enjoy teamwork as well as the experi-mental activities themselves: this is a real source of motivation andshared joy.
The primary-school teachers may realise that science is not as diffi-cult as they thought and, with the students’ coaching, they can famil-iarise themselves with inquiry-based approaches similar to those usedin scientific research. This is especially important because these teach-ers are more often trained in arts than in science – according to theFrench ministry of education, 80% of primary-school teachers do nothave a scientific background. It is also satisfying for teachers to seehow motivated and concentrated the children are in a concrete exper-imental situation.
The science and engineering students have the opportunity to givechildren a realistic idea of their job in particular and of science in gen-eral, while at the same time gaining an interesting insight into theworld of teaching. Moreover, they face the sometimes difficult task ofadapting their knowledge to a particular audience: children aged 3-11 can cause disconcerting situations, posing a real challenge to thestudents.B
AC
KG
RO
UN
D
Pupils performing the sand timer activity
Image courtesy of Jobalou/ iStockphoto
sis_11_2*:Layout 1 23.04.2009 14:03 Uhr Seite 45
enough to run scientific activities inlessons.
Students like Guillermo help over-come such difficulties. Coming fromengineering schools, technical univer-sities and university science depart-ments all over France, they volunteerto help teachers use an inquiry-basedapproach in the classroom. For atleast seven consecutive weeks, third-year students spend half a day perweek at a primary school. Each stu-dent helps a teacher to prepare thelesson – finding materials, preparinghandouts, and setting up the experi-ments, as well as helping with the sci-
entific concepts and knowledge. Theteacher remains in charge of the les-son, and the student supports boththe teacher and the children through-out the inquiry process. Once the les-son is over, the student and teacheranalyse it together.
To allow more students and teach-ers to participate in such partner-ships, as of 2009 the French ministryof education and ministry of researchand higher education have joined thisproject, developing it into ASTEPw8 :supporting teachers through theinvolvement of scientists in primaryeducation.
Furthermore, La main à la pâte is theFrench co-ordinator of the EuropeanPollen projectw9 (see box), which alsopromotes an inquiry-based approach,but with a stronger emphasis on com-munity participation. Saint-Etienne,the French Pollen seed city, has con-centrated on strengthening the linksbetween primary schools and its uni-versity. Based on this experience, theyhave created a guide and a trainingunit for scientists and teachers, bothof which are available online inFrench and Englishw10.
Below are two teaching activitiesdeveloped by teachers and students
involved in the La main à la pâte andPollen projects. Details of many moreactivities are available on the La mainà la pâtew1 and Pollenw9 websites.
How can the bear’s nose beswitched on?
This activity, discussed by Pascaleand Guillermo, is a teaching unit insix sessions to introduce the notion ofthe electric switch to children aged 3 – 6w11. It can provide some ideas forteaching children about electricity, atopic that is often neglected in pri-mary schools because teachers find itdifficult to know how to approach itin class.
In the next section you will find thebasic background knowledgerequired for the teacher and the classto work on this unit, while subse-quent sections outline the activityitself. Further background informa-tion developed by La main à la pâte forteaching electricity at primary-schoollevel can be downloaded from theScience in School websitew12.
Background knowledge forteacher and class
The key is to know what a simpleelectric circuit is. It consists of a con-
www.scienceinschool.org46 Science in School Issue 11 : Spring 2009
Pollen: scientificcoaching ata EuropeanlevelPollen is a European projectwhich aims to stimulate andsupport inquiry-based sci-ence education in Europeanprimary schools. Within theproject, 12 seed cities forscience in 12 EU countrieshave been selected toinvolve the whole commu-nity (including families, sci-entific partners, city halls,and cultural centres) inenhancing science teachingat primary-school level.
Teachers and scientists out-side seed cities can getinvolved by forming localpartnerships to become partof Pollen. They can alsocontribute to the onlineresourcesw9, which arefreely available.B
AC
KG
RO
UN
D
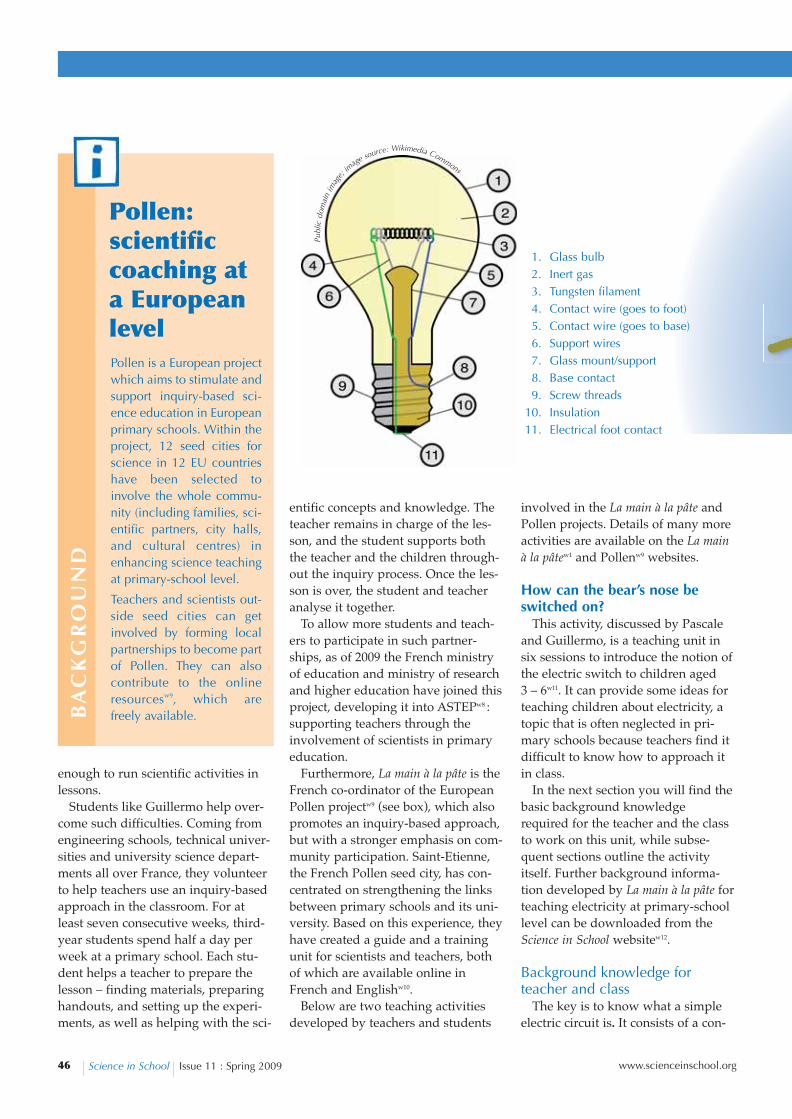
1. Glass bulb 2. Inert gas3. Tungsten filament4. Contact wire (goes to foot)5. Contact wire (goes to base)6. Support wires7. Glass mount/support8. Base contact9. Screw threads
10. Insulation11. Electrical foot contact
Publ
icdo
mai
nim
age;
image source: Wikimedia Commons
sis_11_2*:Layout 1 23.04.2009 14:03 Uhr Seite 46

tinuous series of conductive objects,including a battery, electric cables anda light bulb. All these objects must bein contact with each other, one afterthe other, forming a closed loop – anuninterrupted circuit. Of course youcan’t see what’s inside the battery,and it’s dangerous to take it apartsince it will generally contain harmfulchemicals, but a functioning battery isbuilt to ensure circuit continuity,allowing electricity to flow. If the cir-cuit is cut at some point, the batterycan no longer ensure the flow of elec-tricity.
To understand that the circuitreally forms a loop, the class caninitially take a close look at alight bulb without a socket andwith broken glass. They can seethat it contains two differentcontacts (the base contact andthe electrical foot contact; seeimage on page 46), and theycan then trace the path fol-lowed by the electricityfrom one of the contactsthrough the filament tothe other contact.
Unfortunately, at pri-mary-school level there is noexperiment to visualise which
direction the electricity flows in, sinceyou’d have to be able to watch thetiny electrons. The important thing atthis level is that electricity can moveonly if the circuit contains a workingbattery and forms a closed loop. Howdo you know if electricity is flowingthrough the circuit? At primary-school level, the only way is to see if alight bulb in this circuit is glowing ornot.
If electricity is flowing through thecircuit, the electrical current will trav-el through the filament; because of the
filament’s electrical resistance,it will become white-hot andgenerate light and heat. The fil-ament is always inside a glassreceptacle containing a vacu-um or an inert (noble) gas, toprevent it from reacting withthe oxygen in the air (i.e.,burning).
When introducing theswitch, the main thing is thatpupils understand that it is amoveable element of an elec-tric circuit which, dependingon its position, can eitherensure or interrupt the con-tinuous flow of electricity.Once this concept has been
established, any item which fulfilsthis function is a valid switch, even ifit’s only a paperclip with two splitpins (see images above), or – forsmaller children – a crocodile clip (seeimage below) with which they canopen and close the simple electric circuit they made.
Equipment and materials
· Light bulb screwed/fixed into abase
· Connecting cables
· Battery
· Pocket torch
· Undecorated papier maché bearhead with a light bulb as its nose(or similar inspiring setup)
· Materials to decorate the head(colours, etc.)The electrical supplies can be pur-
chased from local material companies,if they’re not yet available at theschool.
ProcedureEach step takes about 45 minutes.
The following is just a proposed sum-mary of the teaching unit. The pupilsshould focus on a familiar object tobegin with, starting with a real-life
Projects in science education
www.scienceinschool.org 47Science in School Issue 11 : Spring 2009
A switch made with a paperclip and two split pins
Public domain im
age; image source: W
ikimedia C
omm
ons
A crocodileclip
A split pin
Image courtesy of Jean Jannon / Pixelio
Image courtesy of N
icola Graf
sis_11_2*:Layout 1 23.04.2009 14:03 Uhr Seite 47
use of battery and bulb, such as apocket torch. After that, they canwork in a more formal way with abattery and a bulb as a model for thatobject.
Step 1
· Switch on a pocket torch.
· Discuss with the pupils: Which ele-ments are required to turn on apocket torch?The answer is: a battery, a switch,and a light bulb.
Step 2
· Discuss with the pupils: How canthe bulb be switched on and off out-side the torch?
· Take the bulb out of the torch.
· Light the bulb with a simple bat-tery.
· Let the pupils draw the setup andtry it out experimentally.
· Discuss with the pupils: Whatis/are the element(s) that gener-ate light within the light bulb? The answer is: the filament.
Step 3Discuss with the pupils: How can
we connect the bulb when the batteryis far away?
The answer should involve connect-ing each pole of the battery to one ofthe bulb’s contacts by adding twocables, which can be secured withcrocodile clips, for example (seeimage below).
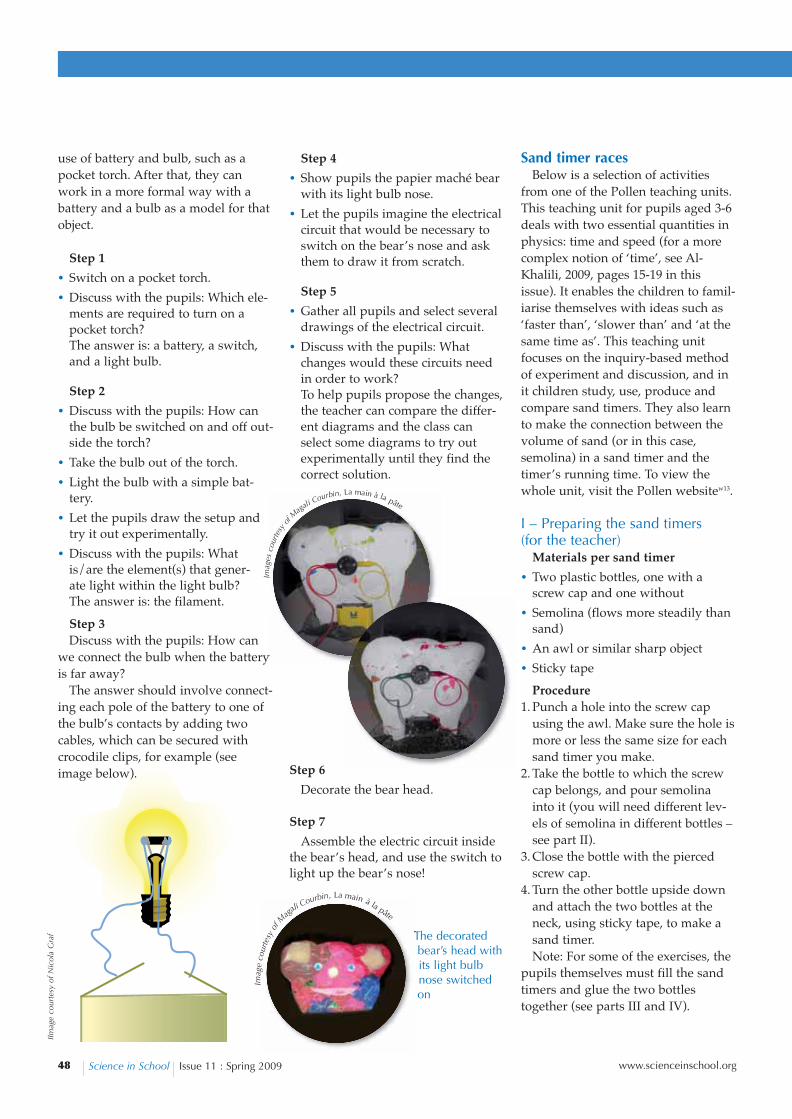
Step 4
· Show pupils the papier maché bearwith its light bulb nose.
· Let the pupils imagine the electricalcircuit that would be necessary toswitch on the bear’s nose and askthem to draw it from scratch.
Step 5
· Gather all pupils and select severaldrawings of the electrical circuit.
· Discuss with the pupils: Whatchanges would these circuits needin order to work?To help pupils propose the changes,the teacher can compare the differ-ent diagrams and the class canselect some diagrams to try outexperimentally until they find thecorrect solution.
Step 6
Decorate the bear head.
Step 7
Assemble the electric circuit insidethe bear’s head, and use the switch tolight up the bear’s nose!
Sand timer racesBelow is a selection of activities
from one of the Pollen teaching units.This teaching unit for pupils aged 3-6deals with two essential quantities inphysics: time and speed (for a morecomplex notion of ‘time’, see Al-Khalili, 2009, pages 15-19 in thisissue). It enables the children to famil-iarise themselves with ideas such as‘faster than’, ‘slower than’ and ‘at thesame time as’. This teaching unitfocuses on the inquiry-based methodof experiment and discussion, and init children study, use, produce andcompare sand timers. They also learnto make the connection between thevolume of sand (or in this case,semolina) in a sand timer and thetimer’s running time. To view thewhole unit, visit the Pollen websitew13.
I – Preparing the sand timers (for the teacher)
Materials per sand timer
· Two plastic bottles, one with ascrew cap and one without
· Semolina (flows more steadily thansand)
· An awl or similar sharp object
· Sticky tape
Procedure1. Punch a hole into the screw cap
using the awl. Make sure the hole ismore or less the same size for eachsand timer you make.
2. Take the bottle to which the screwcap belongs, and pour semolinainto it (you will need different lev-els of semolina in different bottles –see part II).
3. Close the bottle with the piercedscrew cap.
4. Turn the other bottle upside downand attach the two bottles at theneck, using sticky tape, to make asand timer.Note: For some of the exercises, the
pupils themselves must fill the sandtimers and glue the two bottlestogether (see parts III and IV).
www.scienceinschool.org48 Science in School Issue 11 : Spring 2009
Imag
esco
urte
syof
Magali
Courbin, La main à la pâte
The decoratedbear’s head withits light bulbnose switchedon
Imag
eco
urte
syof
Mag
aliCourbin, La main à la pâte
IImag
e co
urte
sy o
f Nic
ola
Gra
f
sis_11_2*:Layout 1 23.04.2009 14:03 Uhr Seite 48

II – Compare the time requiredfor three sand timers to finish (20 minutes)
Materials for each group of fourpupils:
Three plastic bottle sand timersfilled with three different levels ofsemolina and marked in differentcolours: red for the emptiest, blue forthe middle one, and black for thefullest.
Procedure1. Divide the class into groups of four
pupils each.2. Three of the pupils have one sand
timer each, and the fourth is thenote-taker.
3. Instruct the pupils to turn the sandtimers over, and rank them accord-ing to how fast they finish.
4. Repeat the experiment three times,with the pupils changing roles.
5. Discuss: Why didn’t the sand timerwith the least semolina (red) alwaysfinish first?
6. Conclude: The three sand timershave to be turned over at the sametime.
7. Decide to always use the samemethod to compare the sand timers:
· One ‘measuring’ pupil with nosand timer counts to three.
· On the count of three, the otherpupils in the group turn over thesand timers.
· When one sand timer has run out,the person who turned it overraises his or her hand and saysthe name of the sand timer colour,for instance: “Red!”
· The ‘measurer’ notes the order inwhich the sand timers finish.
8. Repeat the experiment three or fourtimes.
9. Is the finishing order now alwaysthe same? Why/why not?
III – How can we adjust the timethat a sand timer takes to finish?(20 minutes)
Materials for each child
· 3 empty sand timers marked in red,blue and black
· Semolina
· A sheet to record the finishing order
Procedure1. Divide the class into small groups.2. Hand out charts telling pupils the
order in which the sand timersshould finish (for instance red, thenblue, then black).
3. Instruct the pupils: fill up the threesand timers to achieve the resultsprovided in the chart.
4. Check and record the results.5. The pupils should learn that the
more semolina their sand timer has,the longer it will take to finish.
IV – Predicting the order in whichthe sand timers will finish accord-ing to semolina volumes (20 minutes)
Materials for each child
· 3 empty plastic bottle sand timersmarked in different colours
· Semolina
· A funnel (can be made by rolling uppaper)
· A small jar
· Filling level instructions (e.g. 1 jarof semolina for the red sand timer, 2for the black and 3 for the blue)
Table 2: Example of filling level instruc-tions for three sand timers. O = one jarof semolina
OO > X OOO > X O > X
Projects in science education
www.scienceinschool.org 49Science in School Issue 11 : Spring 2009
Image courtesy of Fabrice Krot, La Maison des Sciences
1st 2nd 3rd
X X X
X X X
X X X
Table 1: Example of a written record by agroup of four children. Column 1: sandtimer that finishes first. Column 2: sandtimer that finishes second. Column 3:sand timer that finishes third. The colourof the X represents the colour the sandtimer was marked in
sis_11_2*:Layout 1 23.04.2009 14:03 Uhr Seite 49
www.scienceinschool.org50 Science in School Issue 11 : Spring 2009
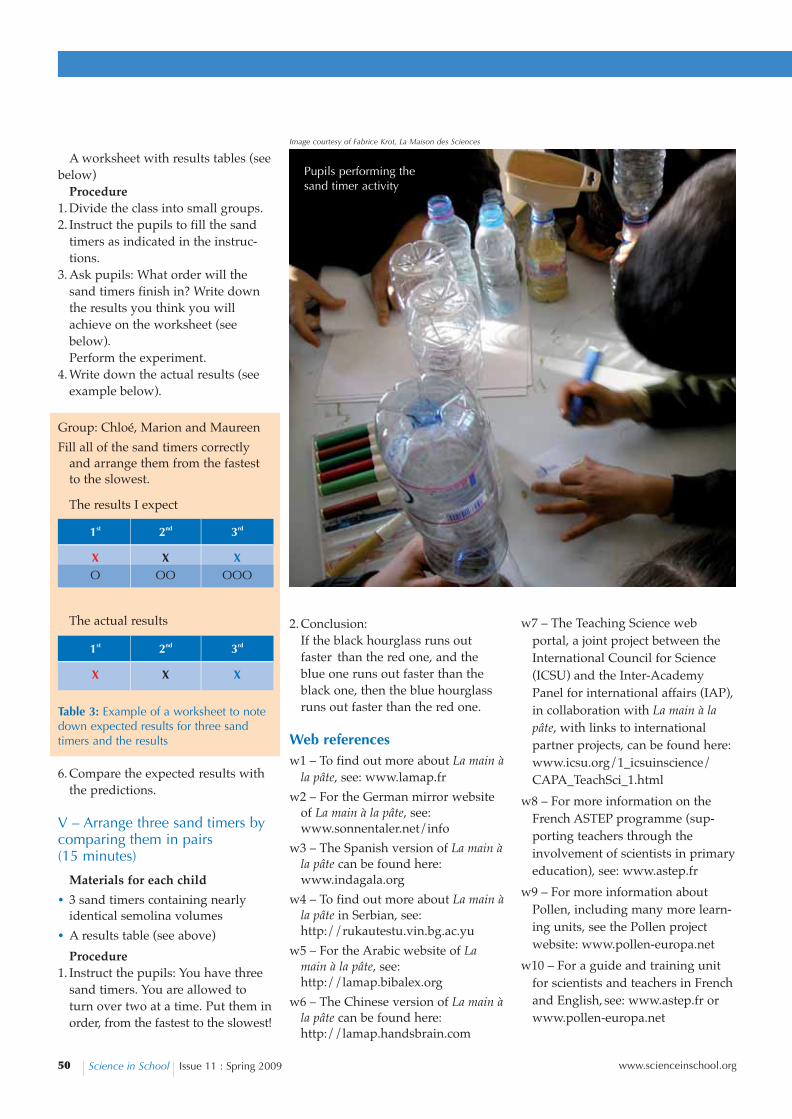
A worksheet with results tables (seebelow)
Procedure1. Divide the class into small groups.2. Instruct the pupils to fill the sand
timers as indicated in the instruc-tions.
3. Ask pupils: What order will thesand timers finish in? Write downthe results you think you willachieve on the worksheet (seebelow).Perform the experiment.
4. Write down the actual results (seeexample below).
Group: Chloé, Marion and Maureen
Fill all of the sand timers correctlyand arrange them from the fastestto the slowest.
6. Compare the expected results withthe predictions.
V – Arrange three sand timers bycomparing them in pairs (15 minutes)
Materials for each child
· 3 sand timers containing nearlyidentical semolina volumes
· A results table (see above)
Procedure1. Instruct the pupils: You have three
sand timers. You are allowed toturn over two at a time. Put them inorder, from the fastest to the slowest!
2. Conclusion:If the black hourglass runs outfaster than the red one, and theblue one runs out faster than theblack one, then the blue hourglassruns out faster than the red one.
Web referencesw1 – To find out more about La main à
la pâte, see: www.lamap.fr
w2 – For the German mirror websiteof La main à la pâte, see:www.sonnentaler.net/info
w3 – The Spanish version of La main àla pâte can be found here:www.indagala.org
w4 – To find out more about La main àla pâte in Serbian, see:http://rukautestu.vin.bg.ac.yu
w5 – For the Arabic website of Lamain à la pâte, see:http://lamap.bibalex.org
w6 – The Chinese version of La main àla pâte can be found here:http://lamap.handsbrain.com
w7 – The Teaching Science web portal, a joint project between theInternational Council for Science(ICSU) and the Inter-AcademyPanel for international affairs (IAP),in collaboration with La main à lapâte, with links to internationalpartner projects, can be found here:www.icsu.org/1_icsuinscience/CAPA_TeachSci_1.html
w8 – For more information on theFrench ASTEP programme (sup-porting teachers through theinvolvement of scientists in primaryeducation), see: www.astep.fr
w9 – For more information aboutPollen, including many more learn-ing units, see the Pollen projectwebsite: www.pollen-europa.net
w10 – For a guide and training unitfor scientists and teachers in Frenchand English, see: www.astep.fr orwww.pollen-europa.net
1st 2nd 3rd
X X XO OO OOO
Pupils performing thesand timer activity
Image courtesy of Fabrice Krot, La Maison des Sciences
1st 2nd 3rd
X X X
Table 3: Example of a worksheet to notedown expected results for three sandtimers and the results
The results I expect
The actual results
sis_11_2*:Layout 1 23.04.2009 14:03 Uhr Seite 50
w11 – The French-language version ofthe teaching activity ‘How can thebear’s nose be switched on?’ (‘Lenez de l’ours – Réaliser un montagequi permette d’allumer uneampoule’) can be found on the La main à la pâte website (www.lamap.fr) or herehttp://tinyurl.com/lenezdelours
w12 – Further information aboutteaching electricity at primaryschool can be downloaded here:www.scienceinschoool.org/2009/issue11/pollen
w13 – The sand timer teaching unit isavailable in English on the Pollenwebsite (www.pollen-europa.net) orhere: http://tinyurl.com/ hourglassraceAdditionally, there are a number ofexamples based on the sand timeractivity in the Pollen methodologi-cal guide: www.pollen-europa.netor http://tinyurl.com/ guideforteachers
David Jasmin has a PhD in physicsand has been working in science edu-cation and science popularizationsince 1995. He has contributed as aresearch engineer to La main à la pâtesince 1997 and is head of this pro-gramme since 2005. Besides, he is thescientific coordinator of the Pollenproject. He is also the author and editor of various books on primaryschool science education.
Samuel Lellouch is a second-yearengineering student at the EcolePolytechnique in Saint Etienne, one of the most prestigious engineering‘Grande Ecoles’ in France. In2007/2008, he spent six months supporting primary school teachers in class in a low-income suburb inParis.
Projects in science education
www.scienceinschool.org 51Science in School Issue 11 : Spring 2009
Inspectors aside, outside visitors are welcome inschool science lessons – in addition to being a freshface, they can bring another kind of expertise to bear.Undergraduate science students have a good chanceof relating to schoolchildren simply by virtue of notbeing the regular class teacher. University students canalso be a powerful antidote to the ‘boffin’ stereotype,at a time when formative attitudes to science in gener-al and scientists in particular are being developed. Avisiting university student would be welcomed too bythe teacher, who in primary schools is unlikely to havea science background him/herself. The visitor will besomeone who can probably make the experimentswork, and has a better chance of dealing adequatelywith the awkward science questions pupils are likelyto supply!
Numerous organisations are keen to involve school-children under their understanding of science man-date. Hopefully this article will encourage you to makecontact so that soon you will also be welcoming thesevisitors into your classrooms, through initiatives such
as the European-wide Pollen project or their nationalequivalent, for example the ‘Researchers in Residence’scheme or ‘Student Associates’ scheme in the UK.
The article details two hands-on investigative activitiessuitable for most primary-school science classrooms.One is about electricity, often not covered in primaryschools using practical work; the other is about fairtesting and good experimental technique. The first mayinclude apparatus less commonly found as class sets inprimary schools. The sand timer activity makes gooduse of a simple homemade piece of apparatus,enabling a variety of questions to be asked and predic-tions tested. Both activities are highly suitable for ‘howand why’ discussions with school pupils. They havebeen tried and tested with the help of university stu-dents in the classroom, and their successful deploy-ment should encourage primary-school teachers to trya more investigative hands-on approach to science les-sons – either with or without visiting help.
Ian Francis, UK
RE
VIE
W
sis_11_2*:Layout 1 23.04.2009 14:03 Uhr Seite 51