Embed Size (px)
Citation preview
Catalyst 2960-X Switch NetFlow Lite Configuration Guide, Cisco IOSRelease 15.0(2)EXFirst Published: July 10, 2013
Americas HeadquartersCisco Systems, Inc.170 West Tasman DriveSan Jose, CA 95134-1706USAhttp://www.cisco.comTel: 408 526-4000 800 553-NETS (6387)Fax: 408 527-0883
Text Part Number: OL-29032
THE SPECIFICATIONS AND INFORMATION REGARDING THE PRODUCTS IN THIS MANUAL ARE SUBJECT TO CHANGE WITHOUT NOTICE. ALL STATEMENTS,INFORMATION, AND RECOMMENDATIONS IN THIS MANUAL ARE BELIEVED TO BE ACCURATE BUT ARE PRESENTED WITHOUT WARRANTY OF ANY KIND,EXPRESS OR IMPLIED. USERS MUST TAKE FULL RESPONSIBILITY FOR THEIR APPLICATION OF ANY PRODUCTS.
THE SOFTWARE LICENSE AND LIMITEDWARRANTY FOR THE ACCOMPANYING PRODUCT ARE SET FORTH IN THE INFORMATION PACKET THAT SHIPPED WITHTHE PRODUCT AND ARE INCORPORATED HEREIN BY THIS REFERENCE. IF YOU ARE UNABLE TO LOCATE THE SOFTWARE LICENSE OR LIMITED WARRANTY,CONTACT YOUR CISCO REPRESENTATIVE FOR A COPY.
The Cisco implementation of TCP header compression is an adaptation of a program developed by the University of California, Berkeley (UCB) as part of UCB's public domain versionof the UNIX operating system. All rights reserved. Copyright © 1981, Regents of the University of California.
NOTWITHSTANDINGANYOTHERWARRANTYHEREIN, ALL DOCUMENT FILES AND SOFTWARE OF THESE SUPPLIERS ARE PROVIDED “AS IS"WITH ALL FAULTS.CISCO AND THE ABOVE-NAMED SUPPLIERS DISCLAIM ALL WARRANTIES, EXPRESSED OR IMPLIED, INCLUDING, WITHOUT LIMITATION, THOSE OFMERCHANTABILITY, FITNESS FORA PARTICULAR PURPOSEANDNONINFRINGEMENTORARISING FROMACOURSEOFDEALING, USAGE, OR TRADE PRACTICE.
IN NO EVENT SHALL CISCO OR ITS SUPPLIERS BE LIABLE FOR ANY INDIRECT, SPECIAL, CONSEQUENTIAL, OR INCIDENTAL DAMAGES, INCLUDING, WITHOUTLIMITATION, LOST PROFITS OR LOSS OR DAMAGE TO DATA ARISING OUT OF THE USE OR INABILITY TO USE THIS MANUAL, EVEN IF CISCO OR ITS SUPPLIERSHAVE BEEN ADVISED OF THE POSSIBILITY OF SUCH DAMAGES.
Any Internet Protocol (IP) addresses and phone numbers used in this document are not intended to be actual addresses and phone numbers. Any examples, command display output, networktopology diagrams, and other figures included in the document are shown for illustrative purposes only. Any use of actual IP addresses or phone numbers in illustrative content is unintentionaland coincidental.
Cisco and the Cisco logo are trademarks or registered trademarks of Cisco and/or its affiliates in the U.S. and other countries. To view a list of Cisco trademarks, go to this URL: http://www.cisco.com/go/trademarks. Third-party trademarks mentioned are the property of their respective owners. The use of the word partner does not imply a partnershiprelationship between Cisco and any other company. (1110R)
© 2013 Cisco Systems, Inc. All rights reserved.
C O N T E N T S
P r e f a c e Preface v
Document Conventions v
Related Documentation vii
Obtaining Documentation and Submitting a Service Request vii
C H A P T E R 1 Using the Command-Line Interface 1
Information About Using the Command-Line Interface 1
Command Modes 1
Using the Help System 3
Understanding Abbreviated Commands 4
No and default Forms of Commands 4
CLI Error Messages 4
Configuration Logging 5
How to Use the CLI to Configure Features 5
Configuring the Command History 5
Changing the Command History Buffer Size 6
Recalling Commands 6
Disabling the Command History Feature 7
Enabling and Disabling Editing Features 7
Editing Commands through Keystrokes 8
Editing Command Lines That Wrap 9
Searching and Filtering Output of show and more Commands 10
Accessing the CLI through a Console Connection or through Telnet 11
C H A P T E R 2 Configuring NetFlow Lite 13
Finding Feature Information 13
Prerequisites for NetFlow Lite 13
Catalyst 2960-X Switch NetFlow Lite Configuration Guide, Cisco IOS Release 15.0(2)EX OL-29032 iii
Restrictions for NetFlow Lite 14
Information About NetFlow Lite 15
NetFlow Lite Overview 15
Flow Records 16
NetFlow Lite Match Parameters 16
NetFlow Lite Collect Parameters 18
Exporters 19
Export Formats 21
Monitors 21
Samplers 22
Stacking 22
Default Settings 22
How to Configure NetFlow Lite 23
Creating a Flow Record 23
Creating a Flow Exporter 25
Creating a Flow Exporter Using a Template 27
Creating a Flow Monitor 30
Creating a Sampler 33
Applying a Flow to an Interface 34
Configuring a Bridged NetFlow on a VLAN 36
Configuring Layer 2 NetFlow 37
Monitoring NetFlow Lite 39
Configuration Examples for NetFlow Lite 39
Example: Configuring a Flow 39
Additional References 40
Feature History and Information for NetFlow Lite 41
Catalyst 2960-X Switch NetFlow Lite Configuration Guide, Cisco IOS Release 15.0(2)EXiv OL-29032
Contents
Preface
This book describes configuration information and examples for NetFlow Lite on the switch.
• Document Conventions, page v
• Related Documentation, page vii
• Obtaining Documentation and Submitting a Service Request, page vii
Document ConventionsThis document uses the following conventions:
DescriptionConvention
Both the ^ symbol and Ctrl represent the Control (Ctrl) key on a keyboard.For example, the key combination ^D or Ctrl-D means that you holddown the Control key while you press the D key. (Keys are indicated incapital letters but are not case sensitive.)
^ or Ctrl
Commands and keywords and user-entered text appear in bold font.bold font
Document titles, new or emphasized terms, and arguments for which yousupply values are in italic font.
Italic font
Terminal sessions and information the system displays appear in courierfont.
Courier font
Bold Courier font indicates text that the user must enter.Bold Courier font
Elements in square brackets are optional.[x]
An ellipsis (three consecutive nonbolded periods without spaces) aftera syntax element indicates that the element can be repeated.
...
A vertical line, called a pipe, indicates a choice within a set of keywordsor arguments.
|
Catalyst 2960-X Switch NetFlow Lite Configuration Guide, Cisco IOS Release 15.0(2)EX OL-29032 v
DescriptionConvention
Optional alternative keywords are grouped in brackets and separated byvertical bars.
[x | y]
Required alternative keywords are grouped in braces and separated byvertical bars.
{x | y}
Nested set of square brackets or braces indicate optional or requiredchoices within optional or required elements. Braces and a vertical barwithin square brackets indicate a required choice within an optionalelement.
[x {y | z}]
A nonquoted set of characters. Do not use quotation marks around thestring or the string will include the quotation marks.
string
Nonprinting characters such as passwords are in angle brackets.< >
Default responses to system prompts are in square brackets.[ ]
An exclamation point (!) or a pound sign (#) at the beginning of a lineof code indicates a comment line.
!, #
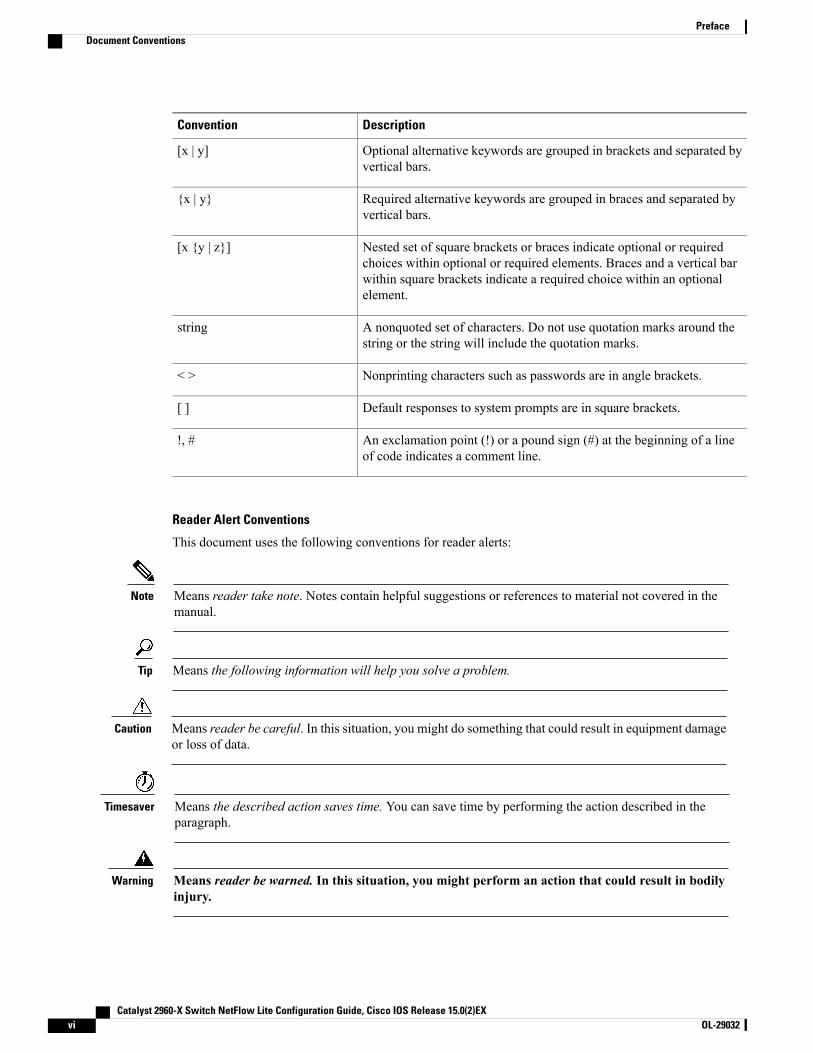
Reader Alert Conventions
This document uses the following conventions for reader alerts:
Means reader take note. Notes contain helpful suggestions or references to material not covered in themanual.
Note
Means the following information will help you solve a problem.Tip
Means reader be careful. In this situation, you might do something that could result in equipment damageor loss of data.
Caution
Means the described action saves time. You can save time by performing the action described in theparagraph.
Timesaver
Means reader be warned. In this situation, you might perform an action that could result in bodilyinjury.
Warning
Catalyst 2960-X Switch NetFlow Lite Configuration Guide, Cisco IOS Release 15.0(2)EXvi OL-29032
PrefaceDocument Conventions
Related Documentation
Before installing or upgrading the switch, refer to the release notes.Note
• Catalyst 2960-X Switch, located at http://www.cisco.com/go/cat2960x_docs.
• Cisco SFP and SFP+ modules documentation, including compatibility matrixes, located at:
http://www.cisco.com/en/US/products/hw/modules/ps5455/tsd_products_support_series_home.html
Obtaining Documentation and Submitting a Service RequestFor information on obtaining documentation, submitting a service request, and gathering additional information,see the monthlyWhat's New in Cisco Product Documentation, which also lists all new and revised Ciscotechnical documentation, at:
http://www.cisco.com/en/US/docs/general/whatsnew/whatsnew.html
Subscribe to theWhat's New in Cisco Product Documentation as a Really Simple Syndication (RSS) feedand set content to be delivered directly to your desktop using a reader application. The RSS feeds are a freeservice and Cisco currently supports RSS version 2.0.
Catalyst 2960-X Switch NetFlow Lite Configuration Guide, Cisco IOS Release 15.0(2)EX OL-29032 vii
PrefaceRelated Documentation

Catalyst 2960-X Switch NetFlow Lite Configuration Guide, Cisco IOS Release 15.0(2)EXviii OL-29032
PrefaceObtaining Documentation and Submitting a Service Request
C H A P T E R 1Using the Command-Line Interface
This chapter contains the following topics:
• Information About Using the Command-Line Interface, page 1
• How to Use the CLI to Configure Features, page 5
Information About Using the Command-Line InterfaceThis section describes the Cisco IOS command-line interface (CLI) and how to use it to configure your switch.
Command ModesThe Cisco IOS user interface is divided into many different modes. The commands available to you dependon whichmode you are currently in. Enter a questionmark (?) at the system prompt to obtain a list of commandsavailable for each command mode.
You can start a CLI session through a console connection, through Telnet, a SSH, or by using the browser.
When you start a session, you begin in user mode, often called user EXEC mode. Only a limited subset ofthe commands are available in user EXECmode. For example, most of the user EXEC commands are one-timecommands, such as show commands, which show the current configuration status, and clear commands,which clear counters or interfaces. The user EXEC commands are not saved when the switch reboots.
To have access to all commands, youmust enter privileged EXECmode. Normally, youmust enter a passwordto enter privileged EXEC mode. From this mode, you can enter any privileged EXEC command or enterglobal configuration mode.
Using the configurationmodes (global, interface, and line), you canmake changes to the running configuration.If you save the configuration, these commands are stored and used when the switch reboots. To access thevarious configuration modes, you must start at global configuration mode. From global configuration mode,you can enter interface configuration mode and line configuration mode.
This table describes the main command modes, how to access each one, the prompt you see in that mode, andhow to exit the mode.
Catalyst 2960-X Switch NetFlow Lite Configuration Guide, Cisco IOS Release 15.0(2)EX OL-29032 1
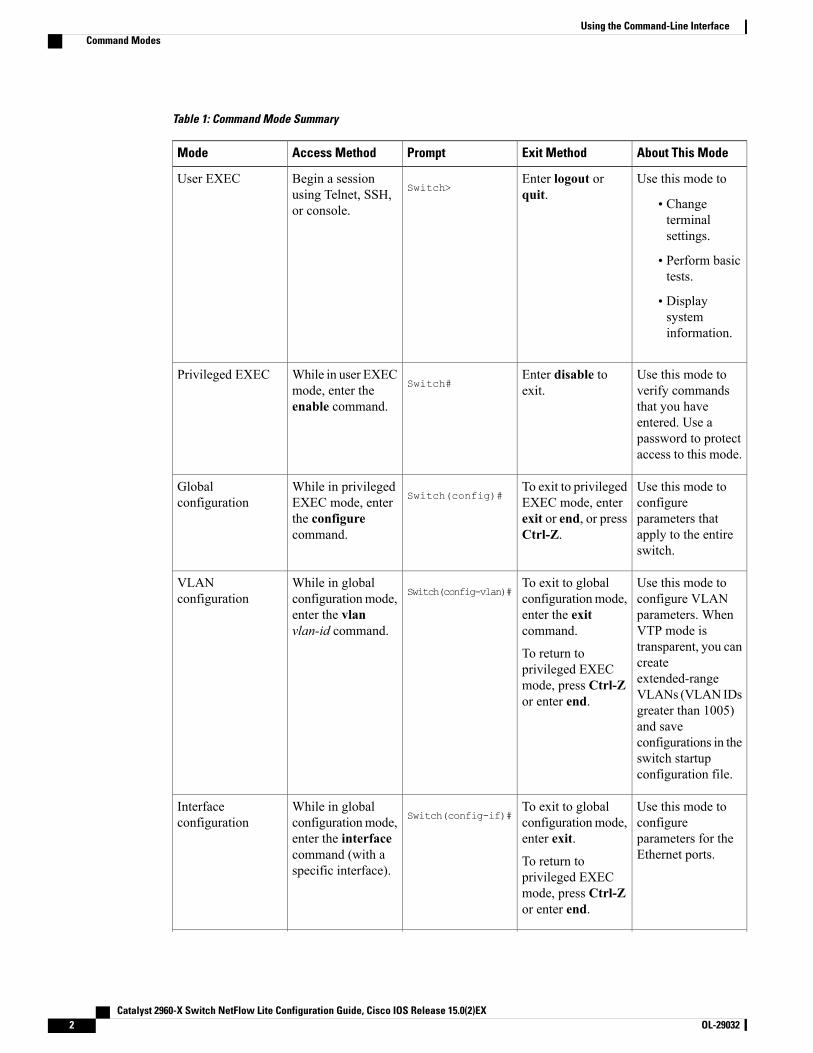
Table 1: Command Mode Summary
About This ModeExit MethodPromptAccess MethodMode
Use this mode to
• Changeterminalsettings.
• Perform basictests.
• Displaysysteminformation.
Enter logout orquit.Switch>
Begin a sessionusing Telnet, SSH,or console.
User EXEC
Use this mode toverify commandsthat you haveentered. Use apassword to protectaccess to this mode.
Enter disable toexit.Switch#
While in user EXECmode, enter theenable command.
Privileged EXEC
Use this mode toconfigureparameters thatapply to the entireswitch.
To exit to privilegedEXEC mode, enterexit or end, or pressCtrl-Z.
Switch(config)#While in privilegedEXEC mode, enterthe configurecommand.
Globalconfiguration
Use this mode toconfigure VLANparameters. WhenVTP mode istransparent, you cancreateextended-rangeVLANs (VLAN IDsgreater than 1005)and saveconfigurations in theswitch startupconfiguration file.
To exit to globalconfigurationmode,enter the exitcommand.
To return toprivileged EXECmode, press Ctrl-Zor enter end.
Switch(config-vlan)#While in globalconfigurationmode,enter the vlanvlan-id command.
VLANconfiguration
Use this mode toconfigureparameters for theEthernet ports.
To exit to globalconfigurationmode,enter exit.
To return toprivileged EXECmode, press Ctrl-Zor enter end.
Switch(config-if)#While in globalconfigurationmode,enter the interfacecommand (with aspecific interface).
Interfaceconfiguration
Catalyst 2960-X Switch NetFlow Lite Configuration Guide, Cisco IOS Release 15.0(2)EX2 OL-29032
Using the Command-Line InterfaceCommand Modes
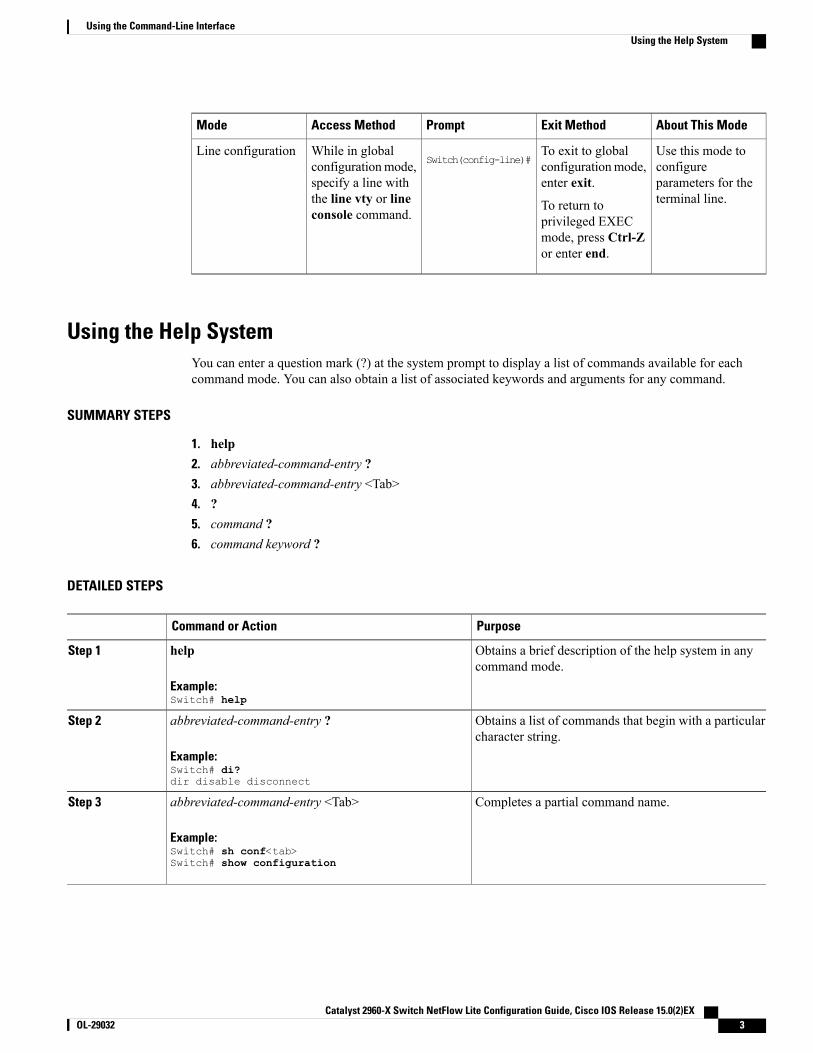
About This ModeExit MethodPromptAccess MethodMode
Line configuration Use this mode toconfigureparameters for theterminal line.
To exit to globalconfigurationmode,enter exit.
To return toprivileged EXECmode, press Ctrl-Zor enter end.
Switch(config-line)#While in globalconfigurationmode,specify a line withthe line vty or lineconsole command.
Using the Help SystemYou can enter a question mark (?) at the system prompt to display a list of commands available for eachcommand mode. You can also obtain a list of associated keywords and arguments for any command.
SUMMARY STEPS
1. help2. abbreviated-command-entry ?3. abbreviated-command-entry <Tab>4. ?5. command ?6. command keyword ?
DETAILED STEPS
PurposeCommand or Action
Obtains a brief description of the help system in anycommand mode.
help
Example:Switch# help
Step 1
Obtains a list of commands that begin with a particularcharacter string.
abbreviated-command-entry ?
Example:Switch# di?dir disable disconnect
Step 2
Completes a partial command name.abbreviated-command-entry <Tab>
Example:Switch# sh conf<tab>Switch# show configuration
Step 3
Catalyst 2960-X Switch NetFlow Lite Configuration Guide, Cisco IOS Release 15.0(2)EX OL-29032 3
Using the Command-Line InterfaceUsing the Help System
PurposeCommand or Action
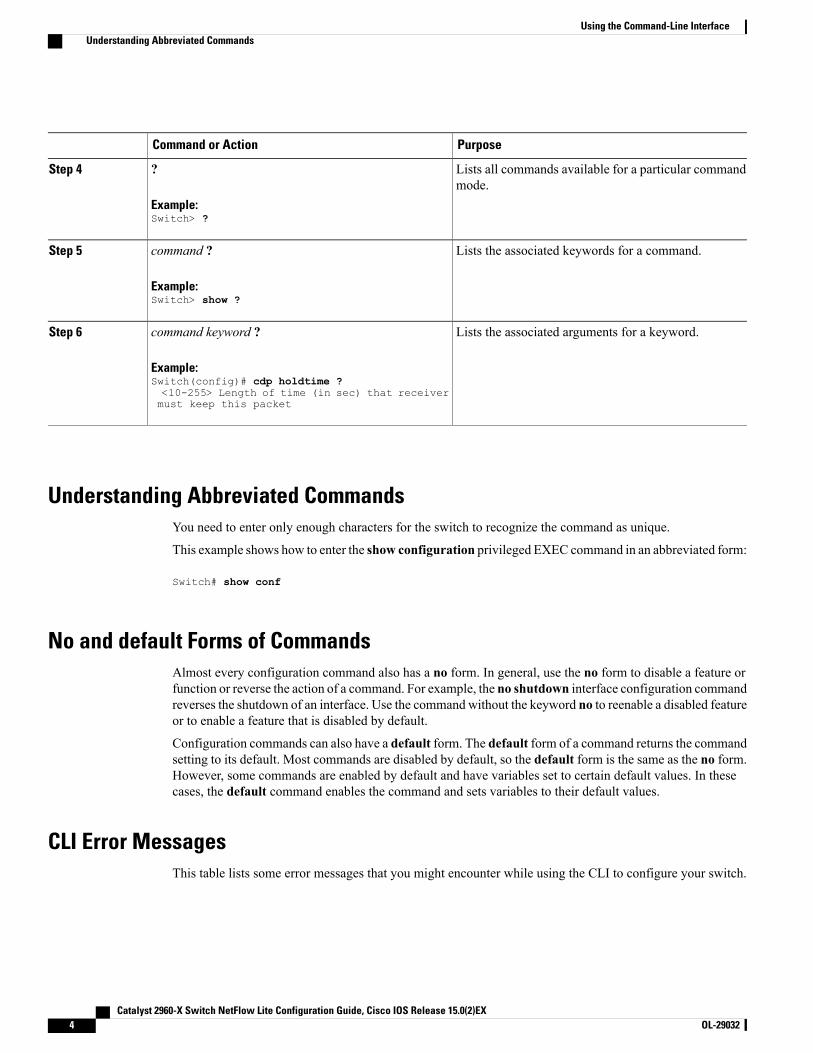
Lists all commands available for a particular commandmode.
?
Example:Switch> ?
Step 4
Lists the associated keywords for a command.command ?
Example:Switch> show ?
Step 5
Lists the associated arguments for a keyword.command keyword ?
Example:Switch(config)# cdp holdtime ?<10-255> Length of time (in sec) that receiver
Step 6
must keep this packet
Understanding Abbreviated CommandsYou need to enter only enough characters for the switch to recognize the command as unique.
This example shows how to enter the show configuration privileged EXEC command in an abbreviated form:
Switch# show conf
No and default Forms of CommandsAlmost every configuration command also has a no form. In general, use the no form to disable a feature orfunction or reverse the action of a command. For example, the no shutdown interface configuration commandreverses the shutdown of an interface. Use the command without the keyword no to reenable a disabled featureor to enable a feature that is disabled by default.
Configuration commands can also have a default form. The default form of a command returns the commandsetting to its default. Most commands are disabled by default, so the default form is the same as the no form.However, some commands are enabled by default and have variables set to certain default values. In thesecases, the default command enables the command and sets variables to their default values.
CLI Error MessagesThis table lists some error messages that you might encounter while using the CLI to configure your switch.
Catalyst 2960-X Switch NetFlow Lite Configuration Guide, Cisco IOS Release 15.0(2)EX4 OL-29032
Using the Command-Line InterfaceUnderstanding Abbreviated Commands
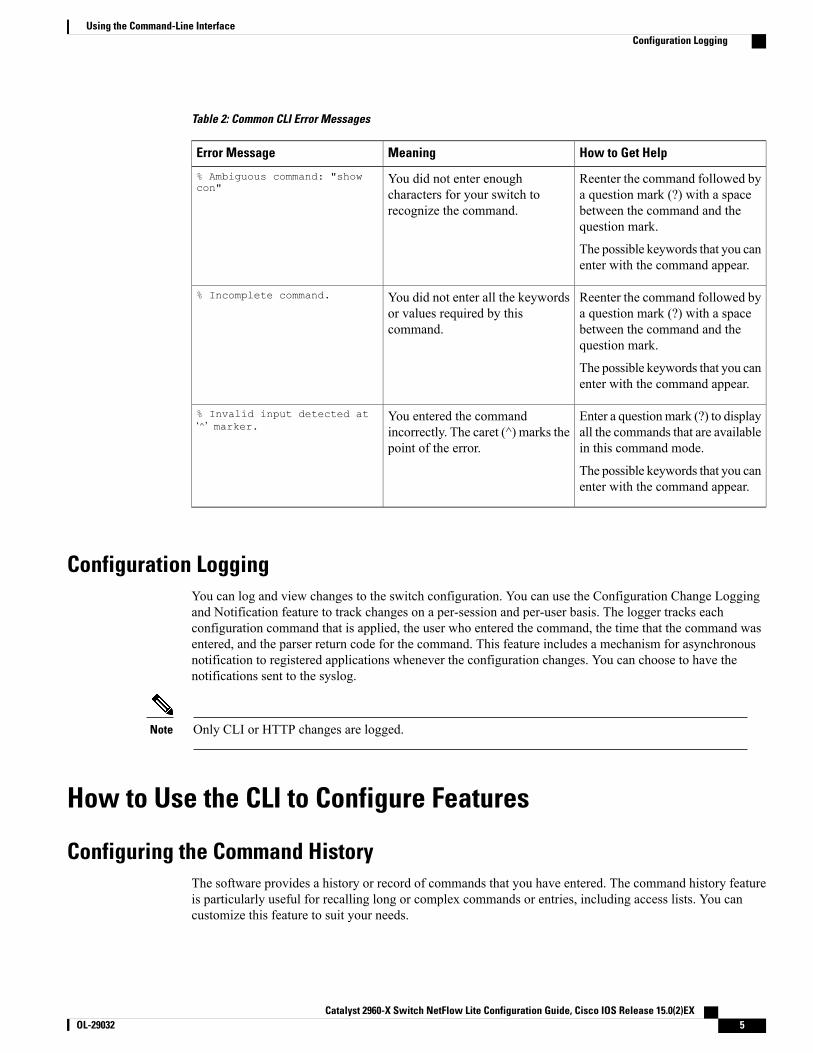
Table 2: Common CLI Error Messages
How to Get HelpMeaningError Message
Reenter the command followed bya question mark (?) with a spacebetween the command and thequestion mark.
The possible keywords that you canenter with the command appear.
You did not enter enoughcharacters for your switch torecognize the command.
% Ambiguous command: "showcon"
Reenter the command followed bya question mark (?) with a spacebetween the command and thequestion mark.
The possible keywords that you canenter with the command appear.
You did not enter all the keywordsor values required by thiscommand.
% Incomplete command.
Enter a questionmark (?) to displayall the commands that are availablein this command mode.
The possible keywords that you canenter with the command appear.
You entered the commandincorrectly. The caret (^) marks thepoint of the error.
% Invalid input detected at‘^’ marker.
Configuration LoggingYou can log and view changes to the switch configuration. You can use the Configuration Change Loggingand Notification feature to track changes on a per-session and per-user basis. The logger tracks eachconfiguration command that is applied, the user who entered the command, the time that the command wasentered, and the parser return code for the command. This feature includes a mechanism for asynchronousnotification to registered applications whenever the configuration changes. You can choose to have thenotifications sent to the syslog.
Only CLI or HTTP changes are logged.Note
How to Use the CLI to Configure Features
Configuring the Command HistoryThe software provides a history or record of commands that you have entered. The command history featureis particularly useful for recalling long or complex commands or entries, including access lists. You cancustomize this feature to suit your needs.
Catalyst 2960-X Switch NetFlow Lite Configuration Guide, Cisco IOS Release 15.0(2)EX OL-29032 5
Using the Command-Line InterfaceConfiguration Logging
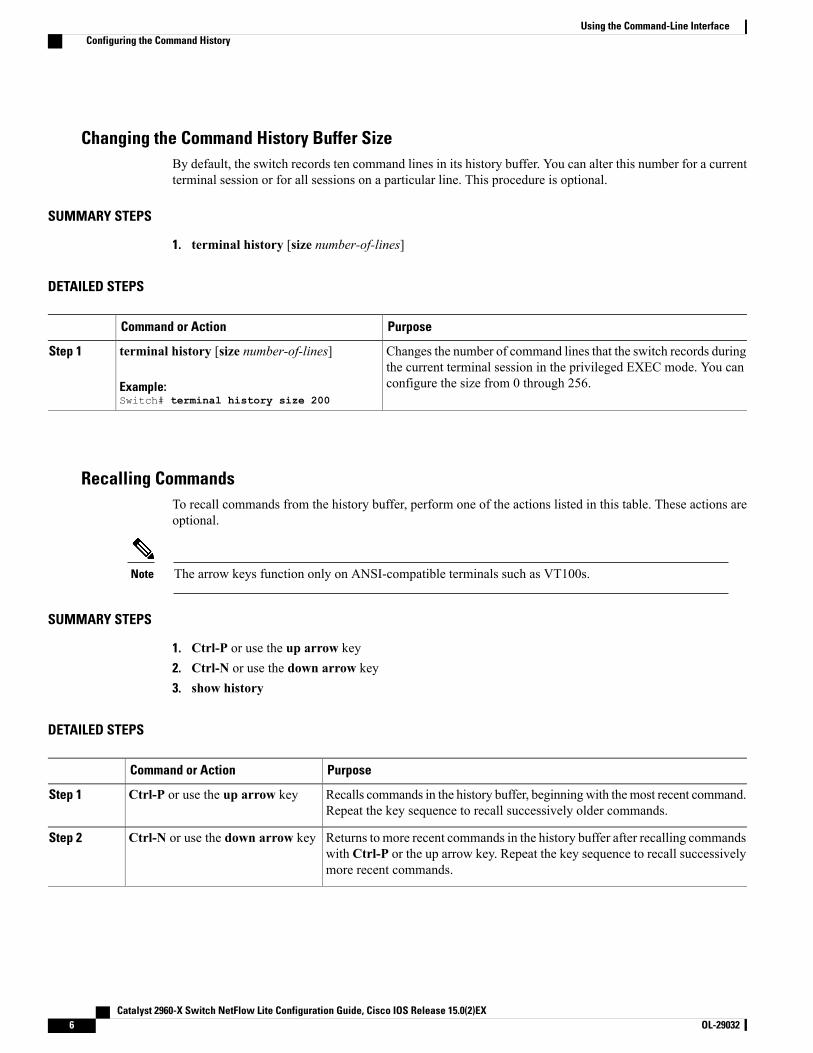
Changing the Command History Buffer SizeBy default, the switch records ten command lines in its history buffer. You can alter this number for a currentterminal session or for all sessions on a particular line. This procedure is optional.
SUMMARY STEPS
1. terminal history [size number-of-lines]
DETAILED STEPS
PurposeCommand or Action
Changes the number of command lines that the switch records duringthe current terminal session in the privileged EXEC mode. You canconfigure the size from 0 through 256.
terminal history [size number-of-lines]
Example:Switch# terminal history size 200
Step 1
Recalling CommandsTo recall commands from the history buffer, perform one of the actions listed in this table. These actions areoptional.
The arrow keys function only on ANSI-compatible terminals such as VT100s.Note
SUMMARY STEPS
1. Ctrl-P or use the up arrow key2. Ctrl-N or use the down arrow key3. show history
DETAILED STEPS
PurposeCommand or Action
Recalls commands in the history buffer, beginningwith themost recent command.Repeat the key sequence to recall successively older commands.
Ctrl-P or use the up arrow keyStep 1
Returns to more recent commands in the history buffer after recalling commandswith Ctrl-P or the up arrow key. Repeat the key sequence to recall successivelymore recent commands.
Ctrl-N or use the down arrow keyStep 2
Catalyst 2960-X Switch NetFlow Lite Configuration Guide, Cisco IOS Release 15.0(2)EX6 OL-29032
Using the Command-Line InterfaceConfiguring the Command History
PurposeCommand or Action
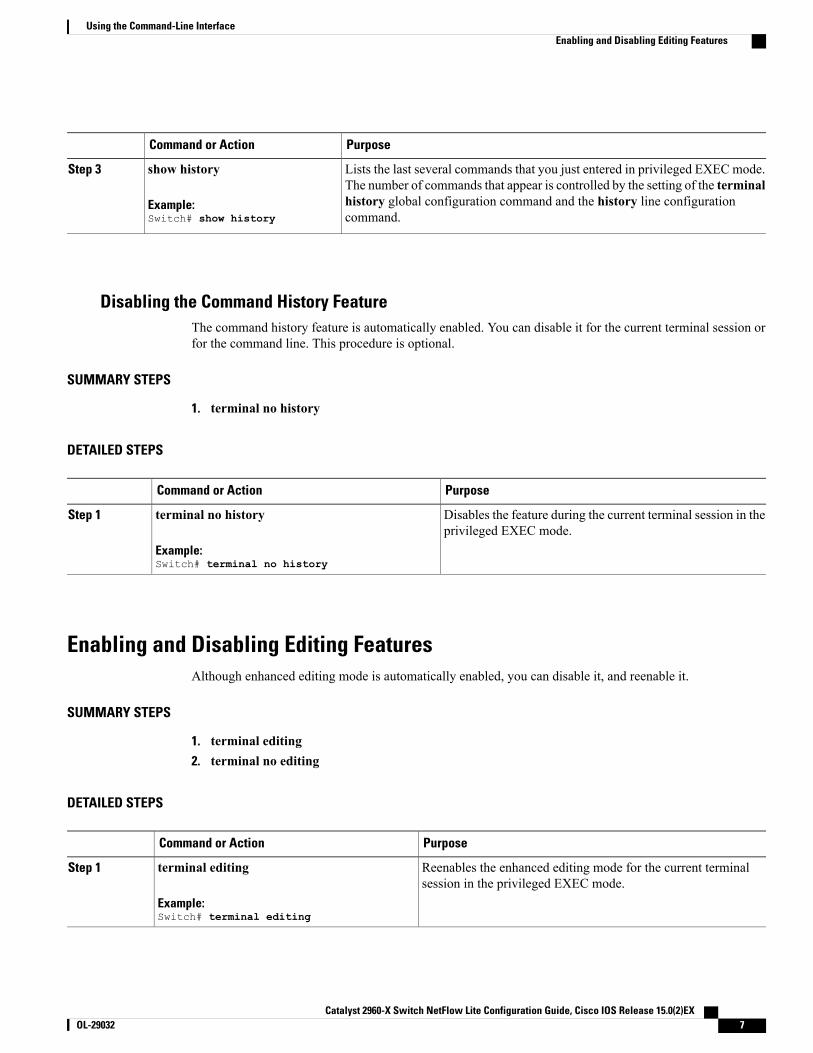
Lists the last several commands that you just entered in privileged EXEC mode.The number of commands that appear is controlled by the setting of the terminal
show history
Example:Switch# show history
Step 3
history global configuration command and the history line configurationcommand.
Disabling the Command History FeatureThe command history feature is automatically enabled. You can disable it for the current terminal session orfor the command line. This procedure is optional.
SUMMARY STEPS
1. terminal no history
DETAILED STEPS
PurposeCommand or Action
Disables the feature during the current terminal session in theprivileged EXEC mode.
terminal no history
Example:Switch# terminal no history
Step 1
Enabling and Disabling Editing FeaturesAlthough enhanced editing mode is automatically enabled, you can disable it, and reenable it.
SUMMARY STEPS
1. terminal editing2. terminal no editing
DETAILED STEPS
PurposeCommand or Action
Reenables the enhanced editing mode for the current terminalsession in the privileged EXEC mode.
terminal editing
Example:Switch# terminal editing
Step 1
Catalyst 2960-X Switch NetFlow Lite Configuration Guide, Cisco IOS Release 15.0(2)EX OL-29032 7
Using the Command-Line InterfaceEnabling and Disabling Editing Features

PurposeCommand or Action
Disables the enhanced editingmode for the current terminal sessionin the privileged EXEC mode.
terminal no editing
Example:Switch# terminal no editing
Step 2
Editing Commands through KeystrokesThe keystrokes help you to edit the command lines. These keystrokes are optional.
The arrow keys function only on ANSI-compatible terminals such as VT100s.Note
Table 3: Editing Commands
DescriptionEditing Commands
Moves the cursor back one character.Ctrl-B or use the left arrow key
Moves the cursor forward one character.Ctrl-F or use the right arrow key
Moves the cursor to the beginning of the commandline.
Ctrl-A
Moves the cursor to the end of the command line.Ctrl-E
Moves the cursor back one word.Esc B
Moves the cursor forward one word.Esc F
Transposes the character to the left of the cursor withthe character located at the cursor.
Ctrl-T
Erases the character to the left of the cursor.Delete or Backspace key
Deletes the character at the cursor.Ctrl-D
Deletes all characters from the cursor to the end ofthe command line.
Ctrl-K
Deletes all characters from the cursor to the beginningof the command line.
Ctrl-U or Ctrl-X
Deletes the word to the left of the cursor.Ctrl-W
Catalyst 2960-X Switch NetFlow Lite Configuration Guide, Cisco IOS Release 15.0(2)EX8 OL-29032
Using the Command-Line InterfaceEnabling and Disabling Editing Features
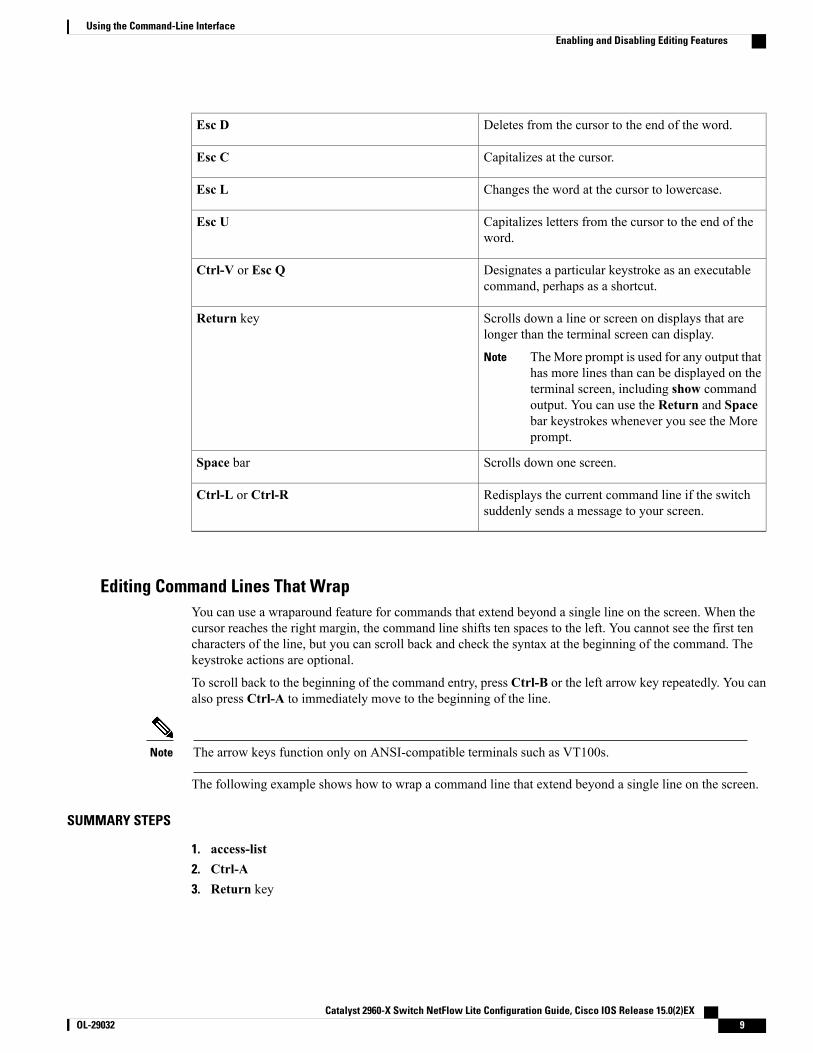
Deletes from the cursor to the end of the word.Esc D
Capitalizes at the cursor.Esc C
Changes the word at the cursor to lowercase.Esc L
Capitalizes letters from the cursor to the end of theword.
Esc U
Designates a particular keystroke as an executablecommand, perhaps as a shortcut.
Ctrl-V or Esc Q
Scrolls down a line or screen on displays that arelonger than the terminal screen can display.
TheMore prompt is used for any output thathas more lines than can be displayed on theterminal screen, including show commandoutput. You can use the Return and Spacebar keystrokes whenever you see the Moreprompt.
Note
Return key
Scrolls down one screen.Space bar
Redisplays the current command line if the switchsuddenly sends a message to your screen.
Ctrl-L or Ctrl-R
Editing Command Lines That WrapYou can use a wraparound feature for commands that extend beyond a single line on the screen. When thecursor reaches the right margin, the command line shifts ten spaces to the left. You cannot see the first tencharacters of the line, but you can scroll back and check the syntax at the beginning of the command. Thekeystroke actions are optional.
To scroll back to the beginning of the command entry, press Ctrl-B or the left arrow key repeatedly. You canalso press Ctrl-A to immediately move to the beginning of the line.
The arrow keys function only on ANSI-compatible terminals such as VT100s.Note
The following example shows how to wrap a command line that extend beyond a single line on the screen.
SUMMARY STEPS
1. access-list2. Ctrl-A3. Return key
Catalyst 2960-X Switch NetFlow Lite Configuration Guide, Cisco IOS Release 15.0(2)EX OL-29032 9
Using the Command-Line InterfaceEnabling and Disabling Editing Features
DETAILED STEPS
PurposeCommand or Action
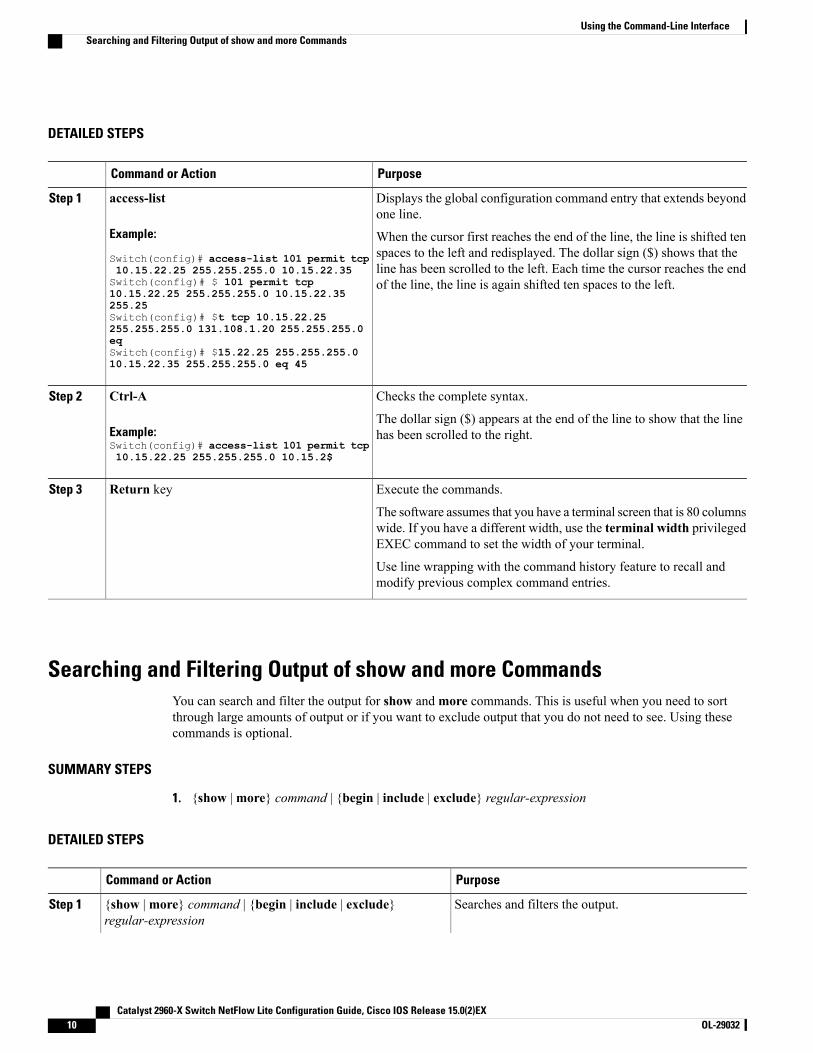
Displays the global configuration command entry that extends beyondone line.
access-list
Example:
Switch(config)# access-list 101 permit tcp
Step 1
When the cursor first reaches the end of the line, the line is shifted tenspaces to the left and redisplayed. The dollar sign ($) shows that theline has been scrolled to the left. Each time the cursor reaches the endof the line, the line is again shifted ten spaces to the left.
10.15.22.25 255.255.255.0 10.15.22.35Switch(config)# $ 101 permit tcp10.15.22.25 255.255.255.0 10.15.22.35255.25Switch(config)# $t tcp 10.15.22.25255.255.255.0 131.108.1.20 255.255.255.0eqSwitch(config)# $15.22.25 255.255.255.010.15.22.35 255.255.255.0 eq 45
Checks the complete syntax.Ctrl-AStep 2
Example:Switch(config)# access-list 101 permit tcp10.15.22.25 255.255.255.0 10.15.2$
The dollar sign ($) appears at the end of the line to show that the linehas been scrolled to the right.
Execute the commands.Return keyStep 3
The software assumes that you have a terminal screen that is 80 columnswide. If you have a different width, use the terminal width privilegedEXEC command to set the width of your terminal.
Use line wrapping with the command history feature to recall andmodify previous complex command entries.
Searching and Filtering Output of show and more CommandsYou can search and filter the output for show andmore commands. This is useful when you need to sortthrough large amounts of output or if you want to exclude output that you do not need to see. Using thesecommands is optional.
SUMMARY STEPS
1. {show |more} command | {begin | include | exclude} regular-expression
DETAILED STEPS
PurposeCommand or Action
Searches and filters the output.{show |more} command | {begin | include | exclude}regular-expression
Step 1
Catalyst 2960-X Switch NetFlow Lite Configuration Guide, Cisco IOS Release 15.0(2)EX10 OL-29032
Using the Command-Line InterfaceSearching and Filtering Output of show and more Commands
PurposeCommand or Action
Expressions are case sensitive. For example, if you enter| exclude output, the lines that contain output are notdisplayed, but the lines that contain output appear.
Example:Switch# show interfaces | include protocolVlan1 is up, line protocol is upVlan10 is up, line protocol is downGigabitEthernet1/0/1 is up, line protocol is downGigabitEthernet1/0/2 is up, line protocol is up
Accessing the CLI through a Console Connection or through TelnetBefore you can access the CLI, you must connect a terminal or a PC to the switch console or connect a PC tothe Ethernet management port and then power on the switch, as described in the hardware installation guidethat shipped with your switch.
If your switch is already configured, you can access the CLI through a local console connection or through aremote Telnet session, but your switch must first be configured for this type of access.
You can use one of these methods to establish a connection with the switch:
• Connect the switch console port to a management station or dial-up modem, or connect the Ethernetmanagement port to a PC. For information about connecting to the console or Ethernet managementport, see the switch hardware installation guide.
• Use any Telnet TCP/IP or encrypted Secure Shell (SSH) package from a remote management station.The switch must have network connectivity with the Telnet or SSH client, and the switch must have anenable secret password configured.
• The switch supports up to 16 simultaneous Telnet sessions. Changes made by one Telnet user arereflected in all other Telnet sessions.
• The switch supports up to five simultaneous secure SSH sessions.
After you connect through the console port, through the Ethernet management port, through a Telnetsession or through an SSH session, the user EXEC prompt appears on the management station.
Catalyst 2960-X Switch NetFlow Lite Configuration Guide, Cisco IOS Release 15.0(2)EX OL-29032 11
Using the Command-Line InterfaceAccessing the CLI through a Console Connection or through Telnet

Catalyst 2960-X Switch NetFlow Lite Configuration Guide, Cisco IOS Release 15.0(2)EX12 OL-29032
Using the Command-Line InterfaceAccessing the CLI through a Console Connection or through Telnet
C H A P T E R 2Configuring NetFlow Lite
• Finding Feature Information, page 13
• Prerequisites for NetFlow Lite, page 13
• Restrictions for NetFlow Lite, page 14
• Information About NetFlow Lite, page 15
• How to Configure NetFlow Lite, page 23
• Monitoring NetFlow Lite, page 39
• Configuration Examples for NetFlow Lite, page 39
• Additional References, page 40
• Feature History and Information for NetFlow Lite, page 41
Finding Feature InformationYour software release may not support all the features documented in this module. For the latest featureinformation and caveats, see the release notes for your platform and software release.
Use Cisco Feature Navigator to find information about platform support and Cisco software image support.To access Cisco Feature Navigator, go to http://www.cisco.com/go/cfn. An account on Cisco.com is notrequired.
Prerequisites for NetFlow LiteThe following are prerequisites for your NetFlow Lite configuration:
• NetFlow Lite is only supported on switches running the LAN Base image. Switches running the LANLite image do not support NetFlow Lite.
• Two targets for attaching a NetFlow Lite monitor are supported:
◦Port—Monitor attachment is only supported on physical interfaces and not on logical interfaces,such as EtherChannels.
Catalyst 2960-X Switch NetFlow Lite Configuration Guide, Cisco IOS Release 15.0(2)EX OL-29032 13
◦VLAN—Monitor attachment is supported on VLAN interfaces only (SVI) and not on a Layer 2VLAN.
Restrictions for NetFlow LiteThe following are restrictions for NetFlow Lite:
• Monitor restrictions:
◦Monitor attachment is only supported in the ingress direction.
◦One monitor per interface is supported, although multiple exporters per interface are supported.
◦Only permanent and normal cache is supported for the monitor; immediate cache is not supported.
◦Changing any monitor parameter will not be supported when it is applied on any of the interfacesor VLANs.
◦When both the port and VLANs have monitors attached, then VLAN monitor will overwrite theport monitor for traffic coming on the port.
◦Flow monitor type and traffic type (type means IPv4, IPv6, and data link) should be same for theflows to be created.
◦You cannot attach an IP and port-based monitor to an interface at the same time on the switch. A48-port switch supports a maximum of 48 monitors (IP or port-based) and for 256 SVIs, you canconfigure up to 256 monitors (IP or port-based).
◦When running the show flow monitor flow_name cache command, the switch displays cacheinformation from an earlier switch software version (Catalyst 2960-S) with all fields entered aszero. Ignore these fields, as they are inapplicable to the switch.
• Sampler restrictions:
◦Only sampled NetFlow is supported.
◦For both port and VLANS, a total of only 4 samplers (random or deterministic) are supported onthe switch.
◦The sampling minimum rate for both modes is 1 out of 32 flows, and the sampling maximum ratefor both modes is 1 out of 1022 flows.
◦You must associate a sampler with a monitor while attaching it to an interface. Otherwise, thecommand will be rejected. Use the ip flow monitor monitor_name sampler sampler_name inputinterface configuration command to perform this task.
◦When you attach a monitor using a deterministic sampler (for example, s1), every attachment withthe same sampler s1 uses one new free sampler from the switch (hardware) out of 4 availablesamplers. You are not allowed to attach a monitor with any sampler, beyond 4 attachments.
When you attach a monitor using a random sampler (for example, s2), only the first attachmentuses a new sampler from the switch (hardware). The remainder of all of the attachments using thesame sampler s2, share the same sampler.
Because of this behavior, when using a deterministic sampler, you can always make sure that thecorrect number of flows are sampled by comparing the sampling rate and what the switch sends.
Catalyst 2960-X Switch NetFlow Lite Configuration Guide, Cisco IOS Release 15.0(2)EX14 OL-29032
Configuring NetFlow LiteRestrictions for NetFlow Lite
If the same random sampler is used with multiple interfaces, flows from any interface can alwaysbe sampled, and flows from other interfaces can always be skipped.
• Stacking Restrictions:
◦The switch supports homogeneous stacking and mixed stacking. Mixed stacking is supported onlywith the Catalyst 2960-S switches. A homogenous stack can have up to eight stackmembers, whilea mixed stack can have up to four stack members. All switches in a switch stack must be runningthe LAN Base image.
◦The switch supports NetFlow Lite running on a mixed stack configuration, where both Catalyst2960-X and Catalyst 2960-S switches reside in the same stack. But in such a mixed stackconfiguration, the master switch must always be a Catalyst 2960-X switch. The Catalyst 2960-Sswitch must never be the master switch in this type of mixed stack configuration.
◦Each switch in a stack (hardware) can support the creation of a maximum of 16,000 flows at anytime. But as the flows are periodically pushed to the software cache, the software cache can holda much larger amount of flows (1048 Kb flows). From the hardware flow cache, every 20 seconds(termed as poll timer), 200 flows (termed as poll entries) are pushed to software.
◦Use the remote command all show platform hulc-fnf poll command to report on eachswitch's current NetFlow polling parameters.
◦Use the show platform hulc-fnf poll command to report on the master switch's currentNetFlow polling parameters.
• Network flows and statistics are collected at the line rate.
• ACL-based NetFlow is not supported.
• Only NetFlowVersion 9 is supported for Flexible NetFlow exporter using the export-protocol commandoption. If you configure NetFlow Version 5, this version will be accepted, but the NetFlow Version 5export functionality is neither currently available nor supported.
Information About NetFlow Lite
NetFlow Lite OverviewNetFlow Lite uses flows to provide statistics for accounting, network monitoring, and network planning.
A flow is a unidirectional stream of packets that arrives on a source interface and has the same values for thekeys. A key is an identified value for a field within the packet. You create a flow using a flow record to definethe unique keys for your flow.
The switch supports the NetFlow Lite feature that enables enhanced network anomalies and security detection.NetFlow Lite allows you to define an optimal flow record for a particular application by selecting the keysfrom a large collection of predefined fields.
All key values must match for the packet to count in a given flow. A flow might gather other fields of interest,depending on the export record version that you configure. Flows are stored in the NetFlow Lite cache.
You can export the data that NetFlow Lite gathers for your flow by using an exporter and export this data toa remote NetFlow Lite collector.
Catalyst 2960-X Switch NetFlow Lite Configuration Guide, Cisco IOS Release 15.0(2)EX OL-29032 15
Configuring NetFlow LiteInformation About NetFlow Lite
You define the size of the data that you want to collect for a flow using a monitor. The monitor combines theflow record and exporter with the NetFlow Lite cache information.
Flow RecordsA flow record defines the keys that NetFlow Lite uses to identify packets in the flow, as well as other fieldsof interest that NetFlow Lite gathers for the flow. You can define a flow record with any combination of keysand fields of interest.
A flow record also defines the types of counters gathered per flow. You can configure 64-bit packet or bytecounters.
Related Topics
Creating a Flow Record, on page 23
Example: Configuring a Flow, on page 39
NetFlow Lite Match ParametersThe following table describes NetFlow Lite match parameters. Use these match parameters when creating aNetFlow Lite flow record. You must configure at least one of the following match parameters for the flowrecords.
Catalyst 2960-X Switch NetFlow Lite Configuration Guide, Cisco IOS Release 15.0(2)EX16 OL-29032
Configuring NetFlow LiteFlow Records
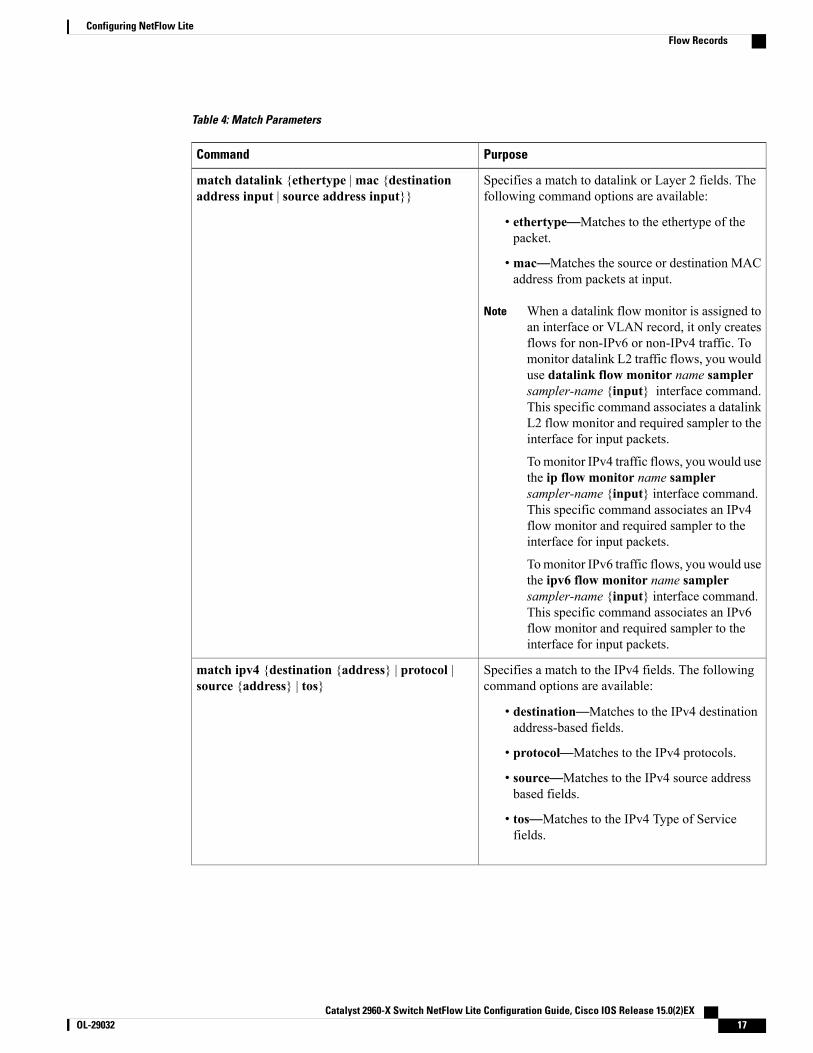
Table 4: Match Parameters
PurposeCommand
Specifies a match to datalink or Layer 2 fields. Thefollowing command options are available:
• ethertype—Matches to the ethertype of thepacket.
• mac—Matches the source or destination MACaddress from packets at input.
When a datalink flow monitor is assigned toan interface or VLAN record, it only createsflows for non-IPv6 or non-IPv4 traffic. Tomonitor datalink L2 traffic flows, you woulduse datalink flow monitor name samplersampler-name {input} interface command.This specific command associates a datalinkL2 flow monitor and required sampler to theinterface for input packets.
Tomonitor IPv4 traffic flows, you would usethe ip flow monitor name samplersampler-name {input} interface command.This specific command associates an IPv4flow monitor and required sampler to theinterface for input packets.
Tomonitor IPv6 traffic flows, you would usethe ipv6 flow monitor name samplersampler-name {input} interface command.This specific command associates an IPv6flow monitor and required sampler to theinterface for input packets.
Note
match datalink {ethertype |mac {destinationaddress input | source address input}}
Specifies a match to the IPv4 fields. The followingcommand options are available:
• destination—Matches to the IPv4 destinationaddress-based fields.
• protocol—Matches to the IPv4 protocols.
• source—Matches to the IPv4 source addressbased fields.
• tos—Matches to the IPv4 Type of Servicefields.
match ipv4 {destination {address} | protocol |source {address} | tos}
Catalyst 2960-X Switch NetFlow Lite Configuration Guide, Cisco IOS Release 15.0(2)EX OL-29032 17
Configuring NetFlow LiteFlow Records
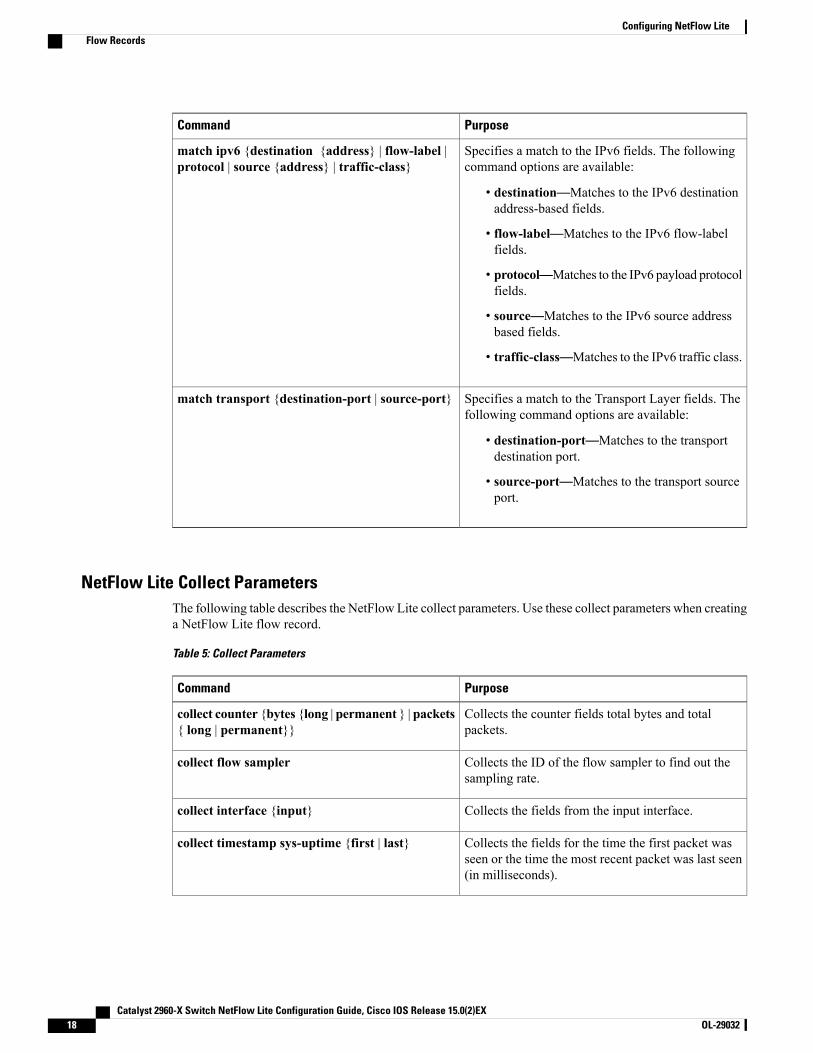
PurposeCommand
Specifies a match to the IPv6 fields. The followingcommand options are available:
• destination—Matches to the IPv6 destinationaddress-based fields.
• flow-label—Matches to the IPv6 flow-labelfields.
• protocol—Matches to the IPv6 payload protocolfields.
• source—Matches to the IPv6 source addressbased fields.
• traffic-class—Matches to the IPv6 traffic class.
match ipv6 {destination {address} | flow-label |protocol | source {address} | traffic-class}
Specifies a match to the Transport Layer fields. Thefollowing command options are available:
• destination-port—Matches to the transportdestination port.
• source-port—Matches to the transport sourceport.
match transport {destination-port | source-port}
NetFlow Lite Collect ParametersThe following table describes the NetFlow Lite collect parameters. Use these collect parameters when creatinga NetFlow Lite flow record.
Table 5: Collect Parameters
PurposeCommand
Collects the counter fields total bytes and totalpackets.
collect counter {bytes {long | permanent } | packets{ long | permanent}}
Collects the ID of the flow sampler to find out thesampling rate.
collect flow sampler
Collects the fields from the input interface.collect interface {input}
Collects the fields for the time the first packet wasseen or the time the most recent packet was last seen(in milliseconds).
collect timestamp sys-uptime {first | last}
Catalyst 2960-X Switch NetFlow Lite Configuration Guide, Cisco IOS Release 15.0(2)EX18 OL-29032
Configuring NetFlow LiteFlow Records
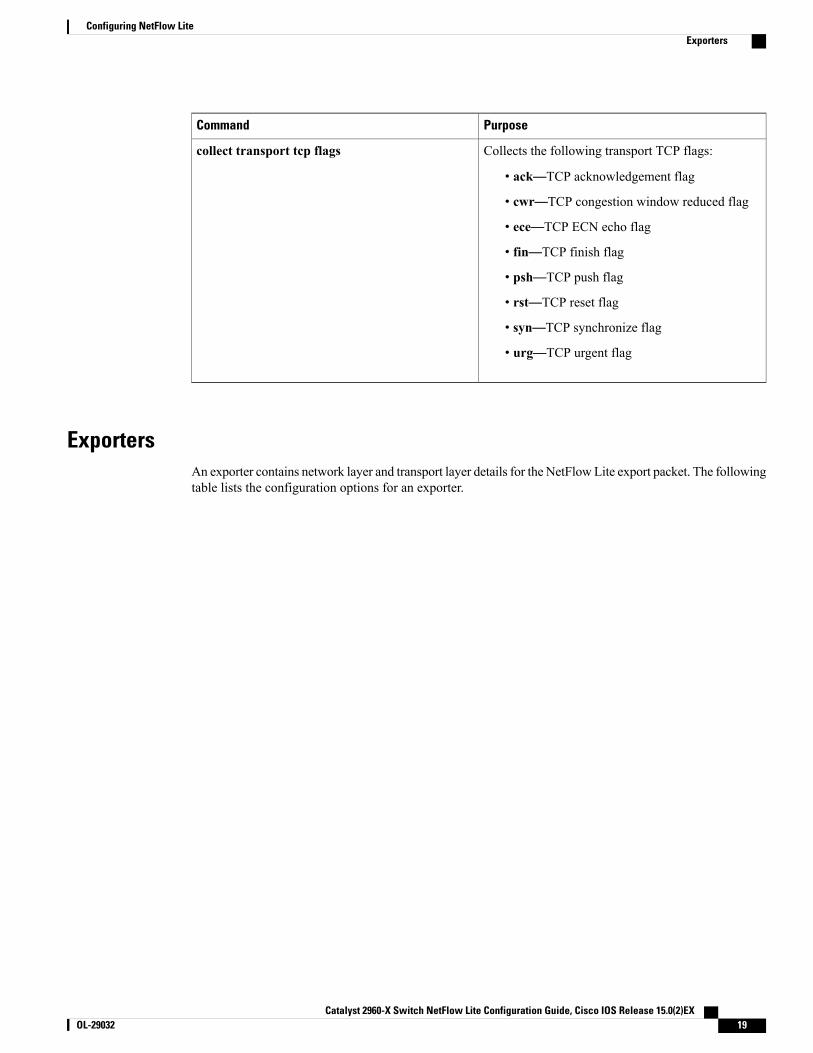
PurposeCommand
Collects the following transport TCP flags:
• ack—TCP acknowledgement flag
• cwr—TCP congestion window reduced flag
• ece—TCP ECN echo flag
• fin—TCP finish flag
• psh—TCP push flag
• rst—TCP reset flag
• syn—TCP synchronize flag
• urg—TCP urgent flag
collect transport tcp flags
ExportersAn exporter contains network layer and transport layer details for the NetFlowLite export packet. The followingtable lists the configuration options for an exporter.
Catalyst 2960-X Switch NetFlow Lite Configuration Guide, Cisco IOS Release 15.0(2)EX OL-29032 19
Configuring NetFlow LiteExporters
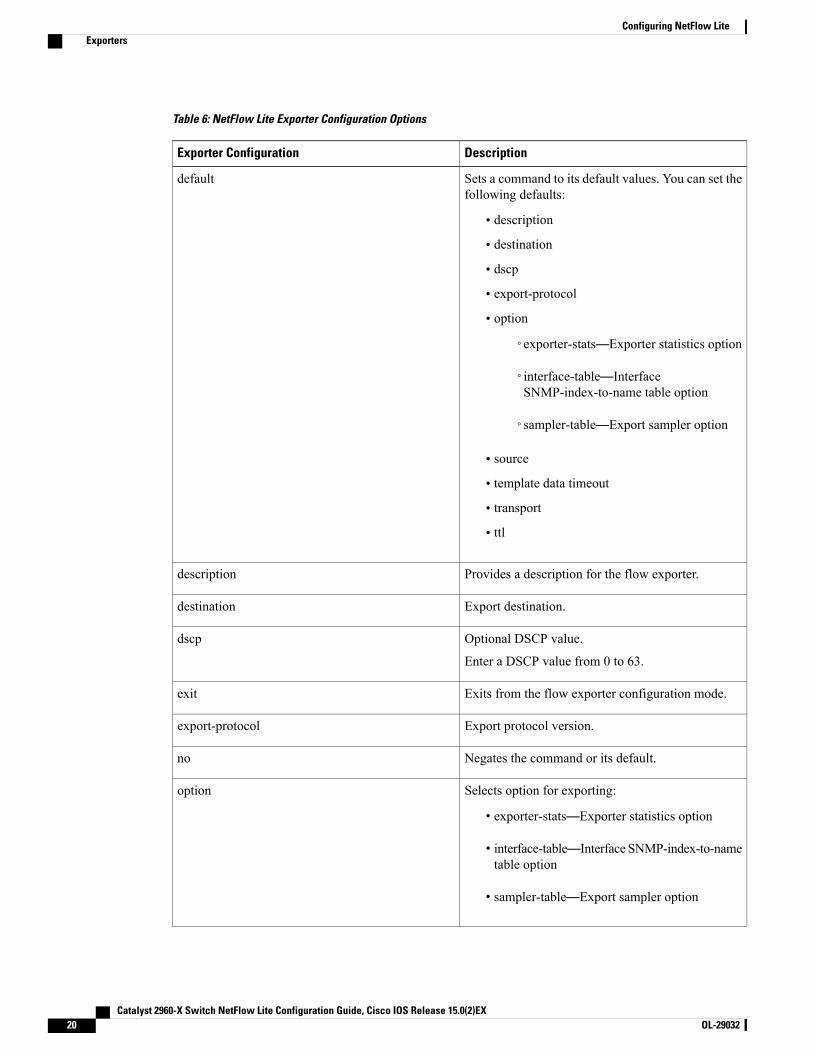
Table 6: NetFlow Lite Exporter Configuration Options
DescriptionExporter Configuration
Sets a command to its default values. You can set thefollowing defaults:
• description
• destination
• dscp
• export-protocol
• option
◦exporter-stats—Exporter statistics option
◦interface-table—InterfaceSNMP-index-to-name table option
◦sampler-table—Export sampler option
• source
• template data timeout
• transport
• ttl
default
Provides a description for the flow exporter.description
Export destination.destination
Optional DSCP value.
Enter a DSCP value from 0 to 63.
dscp
Exits from the flow exporter configuration mode.exit
Export protocol version.export-protocol
Negates the command or its default.no
Selects option for exporting:
• exporter-stats—Exporter statistics option
• interface-table—Interface SNMP-index-to-nametable option
• sampler-table—Export sampler option
option
Catalyst 2960-X Switch NetFlow Lite Configuration Guide, Cisco IOS Release 15.0(2)EX20 OL-29032
Configuring NetFlow LiteExporters

DescriptionExporter Configuration
Originating interface for the net flow.source
Flow exporter template configuration.template
Transport protocol.
Enter the UDP transport protocol and a port value.Enter a port value from 1 to 65535.
transport
Optional TTL or hop limit. Enter a TTL value from1 to 255.
ttl
The switch exports data to the collector whenever a timeout occurs, or when the flow is terminated (TCP Finor Rst received, for example), or when the cache is full. You can configure the following timers in the flowmonitor record to force a flow export:
• Active timeout—The flow continues to have the packets for the past m seconds since the flow wascreated.
• Inactive timeout—The flow does not have any packets for the past n seconds.
Export FormatsThe switch supports only NetFlow Version 9 export formats. NetFlow Version 9 export format provides thefollowing features and functionality:
• Variable field specification format
• Support for IPv6 and Layer 2 fields
• More efficient network utilization
For information about the Version 9 export format, see RFC 3954.Note
MonitorsA monitor references the flow record and flow exporter. You apply a monitor to an interface on the switch.
Related Topics
Creating a Flow Monitor, on page 30
Example: Configuring a Flow, on page 39
Catalyst 2960-X Switch NetFlow Lite Configuration Guide, Cisco IOS Release 15.0(2)EX OL-29032 21
Configuring NetFlow LiteMonitors
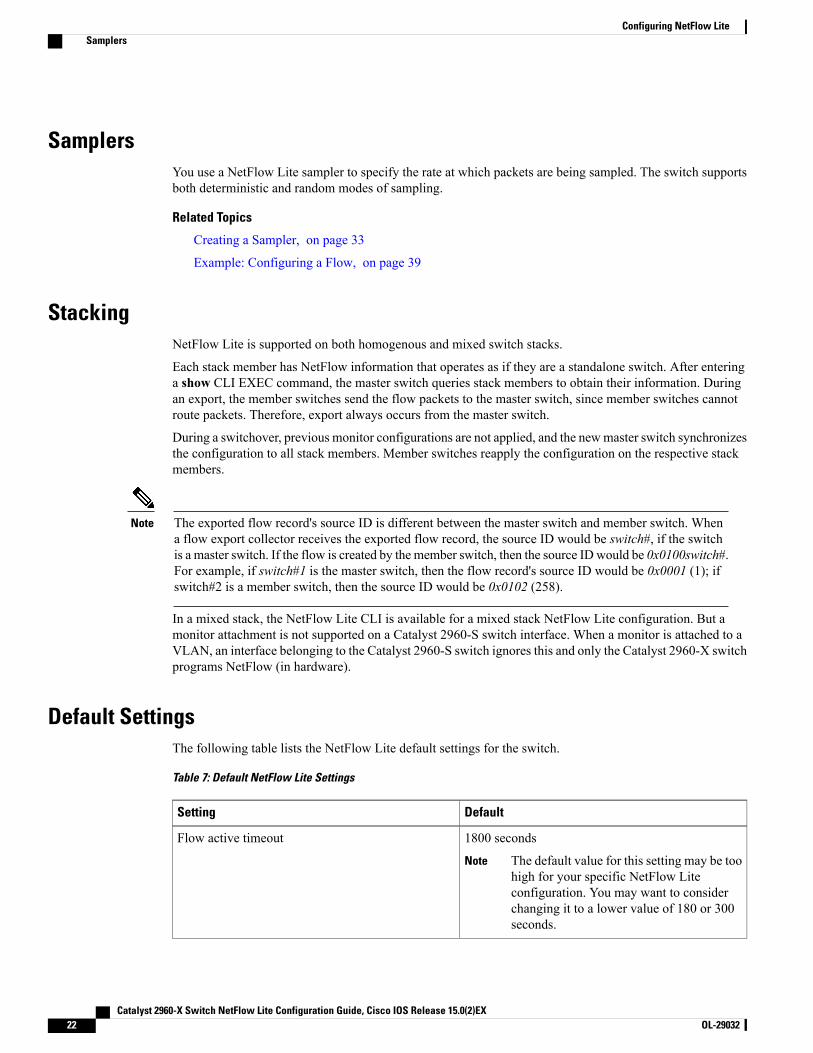
SamplersYou use a NetFlow Lite sampler to specify the rate at which packets are being sampled. The switch supportsboth deterministic and random modes of sampling.
Related Topics
Creating a Sampler, on page 33
Example: Configuring a Flow, on page 39
StackingNetFlow Lite is supported on both homogenous and mixed switch stacks.
Each stack member has NetFlow information that operates as if they are a standalone switch. After enteringa show CLI EXEC command, the master switch queries stack members to obtain their information. Duringan export, the member switches send the flow packets to the master switch, since member switches cannotroute packets. Therefore, export always occurs from the master switch.
During a switchover, previous monitor configurations are not applied, and the newmaster switch synchronizesthe configuration to all stack members. Member switches reapply the configuration on the respective stackmembers.
The exported flow record's source ID is different between the master switch and member switch. Whena flow export collector receives the exported flow record, the source ID would be switch#, if the switchis a master switch. If the flow is created by the member switch, then the source IDwould be 0x0100switch#.For example, if switch#1 is the master switch, then the flow record's source ID would be 0x0001 (1); ifswitch#2 is a member switch, then the source ID would be 0x0102 (258).
Note
In a mixed stack, the NetFlow Lite CLI is available for a mixed stack NetFlow Lite configuration. But amonitor attachment is not supported on a Catalyst 2960-S switch interface. When a monitor is attached to aVLAN, an interface belonging to the Catalyst 2960-S switch ignores this and only the Catalyst 2960-X switchprograms NetFlow (in hardware).
Default SettingsThe following table lists the NetFlow Lite default settings for the switch.
Table 7: Default NetFlow Lite Settings
DefaultSetting
1800 seconds
The default value for this setting may be toohigh for your specific NetFlow Liteconfiguration. You may want to considerchanging it to a lower value of 180 or 300seconds.
Note
Flow active timeout
Catalyst 2960-X Switch NetFlow Lite Configuration Guide, Cisco IOS Release 15.0(2)EX22 OL-29032
Configuring NetFlow LiteSamplers
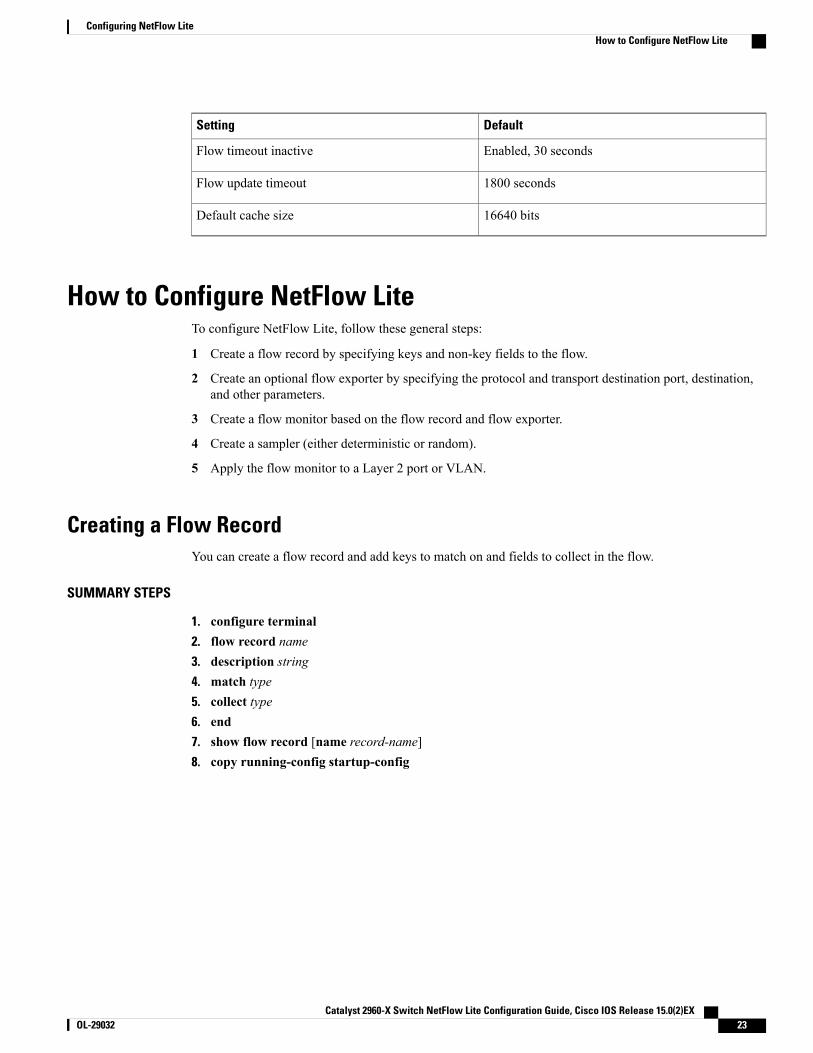
DefaultSetting
Enabled, 30 secondsFlow timeout inactive
1800 secondsFlow update timeout
16640 bitsDefault cache size
How to Configure NetFlow LiteTo configure NetFlow Lite, follow these general steps:
1 Create a flow record by specifying keys and non-key fields to the flow.
2 Create an optional flow exporter by specifying the protocol and transport destination port, destination,and other parameters.
3 Create a flow monitor based on the flow record and flow exporter.
4 Create a sampler (either deterministic or random).
5 Apply the flow monitor to a Layer 2 port or VLAN.
Creating a Flow RecordYou can create a flow record and add keys to match on and fields to collect in the flow.
SUMMARY STEPS
1. configure terminal2. flow record name3. description string4. match type5. collect type6. end7. show flow record [name record-name]8. copy running-config startup-config
Catalyst 2960-X Switch NetFlow Lite Configuration Guide, Cisco IOS Release 15.0(2)EX OL-29032 23
Configuring NetFlow LiteHow to Configure NetFlow Lite
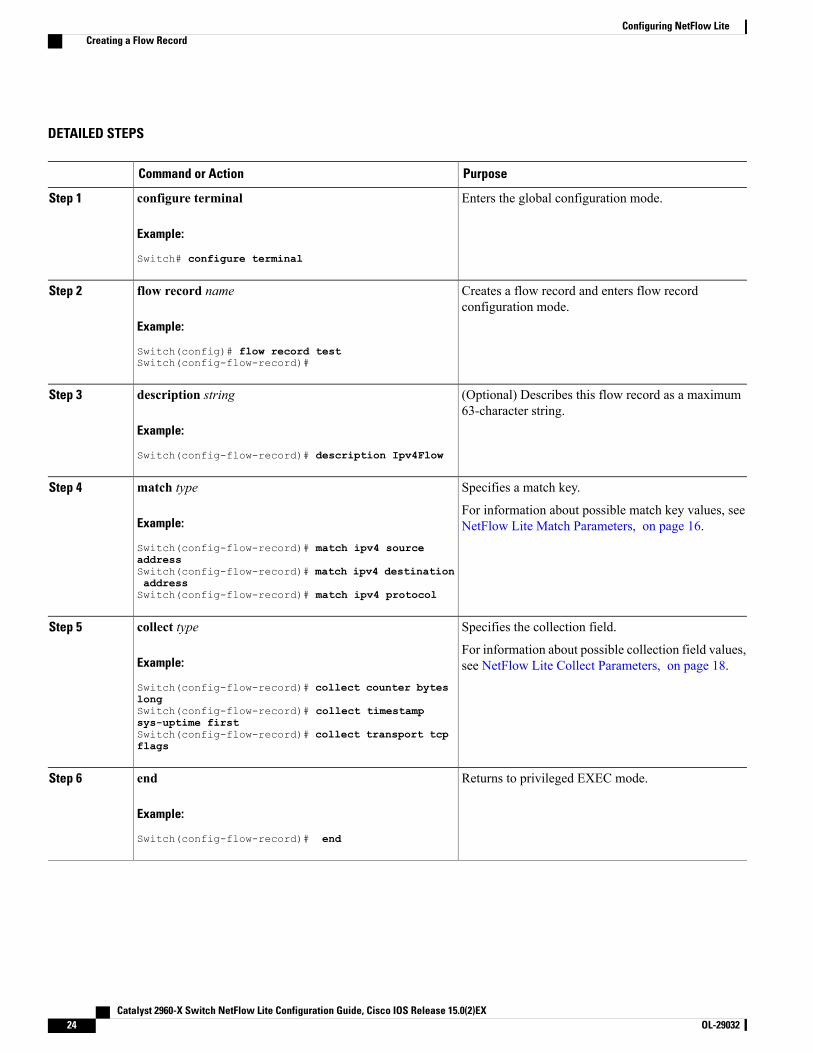
DETAILED STEPS
PurposeCommand or Action
Enters the global configuration mode.configure terminal
Example:
Switch# configure terminal
Step 1
Creates a flow record and enters flow recordconfiguration mode.
flow record name
Example:
Switch(config)# flow record test
Step 2
Switch(config-flow-record)#
(Optional) Describes this flow record as a maximum63-character string.
description string
Example:
Switch(config-flow-record)# description Ipv4Flow
Step 3
Specifies a match key.match typeStep 4
Example:
Switch(config-flow-record)# match ipv4 source
For information about possible match key values, seeNetFlow Lite Match Parameters, on page 16.
addressSwitch(config-flow-record)# match ipv4 destinationaddressSwitch(config-flow-record)# match ipv4 protocol
Specifies the collection field.collect typeStep 5
Example:
Switch(config-flow-record)# collect counter bytes
For information about possible collection field values,see NetFlow Lite Collect Parameters, on page 18.
longSwitch(config-flow-record)# collect timestampsys-uptime firstSwitch(config-flow-record)# collect transport tcpflags
Returns to privileged EXEC mode.end
Example:
Switch(config-flow-record)# end
Step 6
Catalyst 2960-X Switch NetFlow Lite Configuration Guide, Cisco IOS Release 15.0(2)EX24 OL-29032
Configuring NetFlow LiteCreating a Flow Record
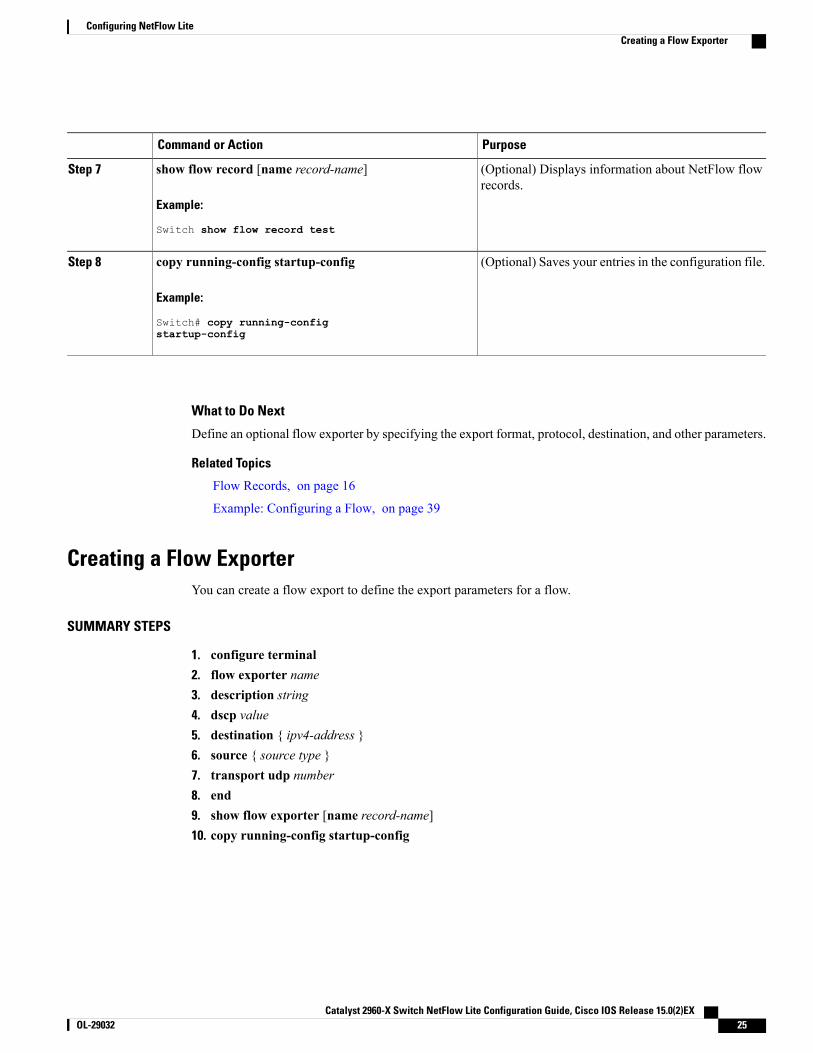
PurposeCommand or Action
(Optional) Displays information about NetFlow flowrecords.
show flow record [name record-name]
Example:
Switch show flow record test
Step 7
(Optional) Saves your entries in the configuration file.copy running-config startup-config
Example:
Switch# copy running-config
Step 8
startup-config
What to Do Next
Define an optional flow exporter by specifying the export format, protocol, destination, and other parameters.
Related Topics
Flow Records, on page 16
Example: Configuring a Flow, on page 39
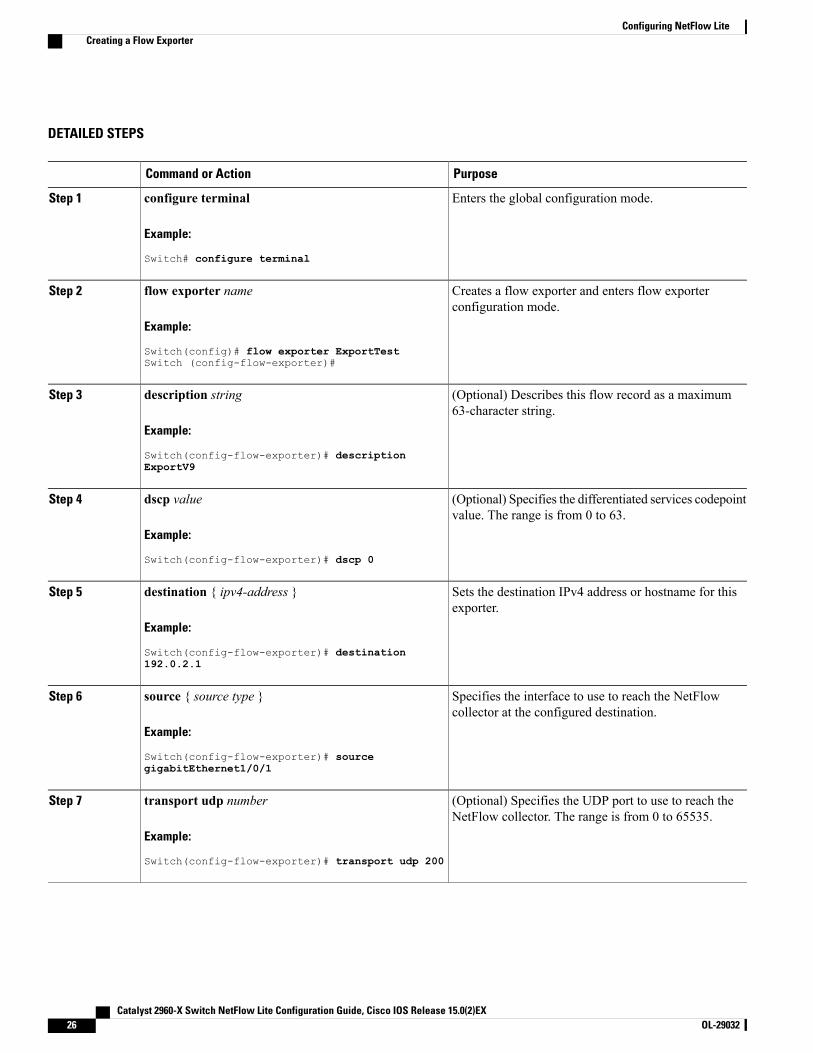
Creating a Flow ExporterYou can create a flow export to define the export parameters for a flow.
SUMMARY STEPS
1. configure terminal2. flow exporter name3. description string4. dscp value5. destination { ipv4-address }6. source { source type }7. transport udp number8. end9. show flow exporter [name record-name]10. copy running-config startup-config
Catalyst 2960-X Switch NetFlow Lite Configuration Guide, Cisco IOS Release 15.0(2)EX OL-29032 25
Configuring NetFlow LiteCreating a Flow Exporter
DETAILED STEPS
PurposeCommand or Action
Enters the global configuration mode.configure terminal
Example:
Switch# configure terminal
Step 1
Creates a flow exporter and enters flow exporterconfiguration mode.
flow exporter name
Example:
Switch(config)# flow exporter ExportTest
Step 2
Switch (config-flow-exporter)#
(Optional) Describes this flow record as a maximum63-character string.
description string
Example:
Switch(config-flow-exporter)# description
Step 3
ExportV9
(Optional) Specifies the differentiated services codepointvalue. The range is from 0 to 63.
dscp value
Example:
Switch(config-flow-exporter)# dscp 0
Step 4
Sets the destination IPv4 address or hostname for thisexporter.
destination { ipv4-address }
Example:
Switch(config-flow-exporter)# destination
Step 5
192.0.2.1
Specifies the interface to use to reach the NetFlowcollector at the configured destination.
source { source type }
Example:
Switch(config-flow-exporter)# source
Step 6
gigabitEthernet1/0/1
(Optional) Specifies the UDP port to use to reach theNetFlow collector. The range is from 0 to 65535.
transport udp number
Example:
Switch(config-flow-exporter)# transport udp 200
Step 7
Catalyst 2960-X Switch NetFlow Lite Configuration Guide, Cisco IOS Release 15.0(2)EX26 OL-29032
Configuring NetFlow LiteCreating a Flow Exporter
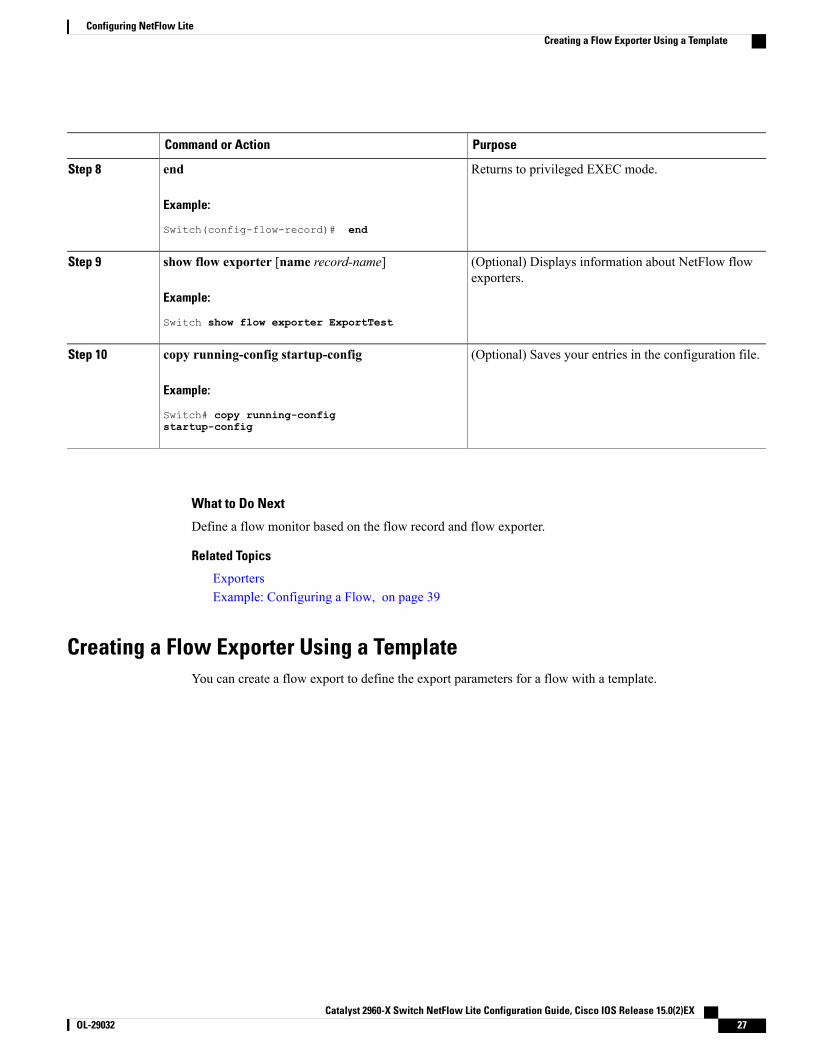
PurposeCommand or Action
Returns to privileged EXEC mode.end
Example:
Switch(config-flow-record)# end
Step 8
(Optional) Displays information about NetFlow flowexporters.
show flow exporter [name record-name]
Example:
Switch show flow exporter ExportTest
Step 9
(Optional) Saves your entries in the configuration file.copy running-config startup-config
Example:
Switch# copy running-config
Step 10
startup-config
What to Do Next
Define a flow monitor based on the flow record and flow exporter.
Related Topics
ExportersExample: Configuring a Flow, on page 39
Creating a Flow Exporter Using a TemplateYou can create a flow export to define the export parameters for a flow with a template.
Catalyst 2960-X Switch NetFlow Lite Configuration Guide, Cisco IOS Release 15.0(2)EX OL-29032 27
Configuring NetFlow LiteCreating a Flow Exporter Using a Template

SUMMARY STEPS
1. configure terminal2. flow exporter name3. description string4. destination { ipv4-address }5. source { source type }6. transport udp number7. template data timeout timeout_value8. option interface-table9. option sampler-table10. end11. show flow exporter [name record-name]12. copy running-config startup-config
DETAILED STEPS
PurposeCommand or Action
Enters the global configuration mode.configure terminal
Example:
Switch# configure terminal
Step 1
Creates a flow exporter and enters flow exporterconfiguration mode.
flow exporter name
Example:
Switch(config)# flow exporter FE
Step 2
Switch (config-flow-exporter)#
(Optional) Describes this flow record as a maximum63-character string.
description string
Example:
Switch(config-flow-exporter)# description
Step 3
ExportV9
Sets the destination IPv4 address or hostname for thisexporter.
destination { ipv4-address }
Example:
Switch(config-flow-exporter)# destination
Step 4
192.0.2.1
Catalyst 2960-X Switch NetFlow Lite Configuration Guide, Cisco IOS Release 15.0(2)EX28 OL-29032
Configuring NetFlow LiteCreating a Flow Exporter Using a Template
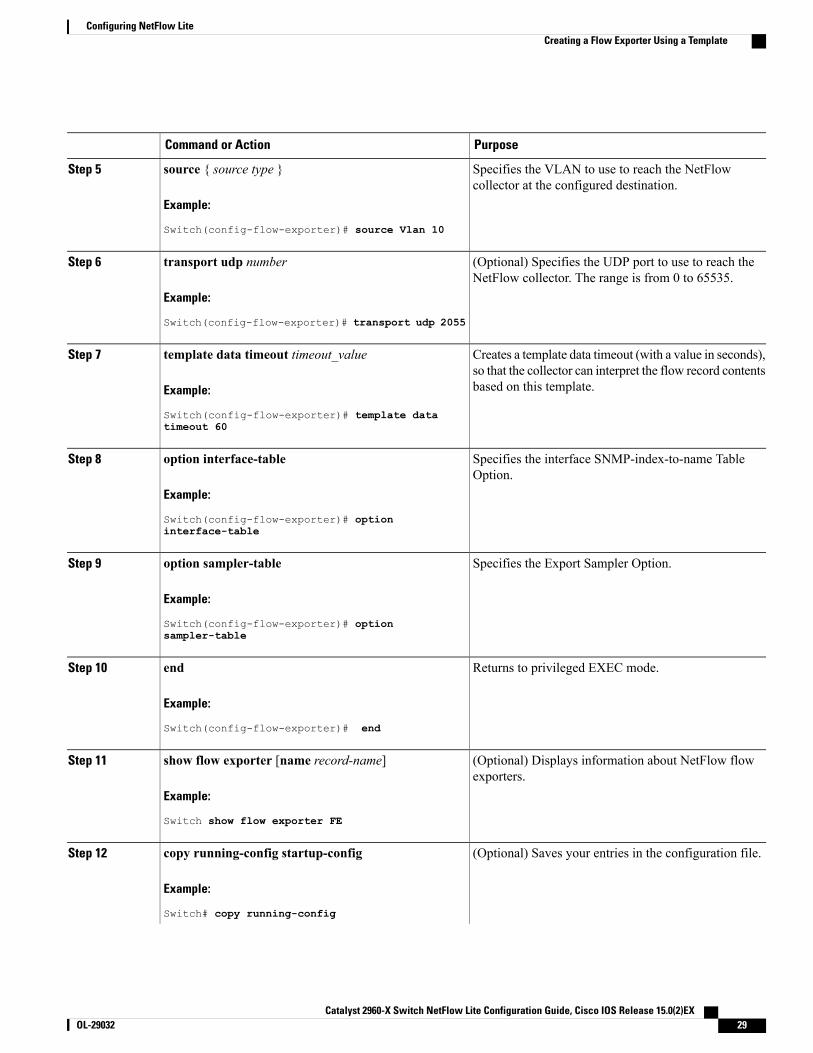
PurposeCommand or Action
Specifies the VLAN to use to reach the NetFlowcollector at the configured destination.
source { source type }
Example:
Switch(config-flow-exporter)# source Vlan 10
Step 5
(Optional) Specifies the UDP port to use to reach theNetFlow collector. The range is from 0 to 65535.
transport udp number
Example:
Switch(config-flow-exporter)# transport udp 2055
Step 6
Creates a template data timeout (with a value in seconds),so that the collector can interpret the flow record contentsbased on this template.
template data timeout timeout_value
Example:
Switch(config-flow-exporter)# template data
Step 7
timeout 60
Specifies the interface SNMP-index-to-name TableOption.
option interface-table
Example:
Switch(config-flow-exporter)# option
Step 8
interface-table
Specifies the Export Sampler Option.option sampler-tableStep 9
Example:
Switch(config-flow-exporter)# optionsampler-table
Returns to privileged EXEC mode.end
Example:
Switch(config-flow-exporter)# end
Step 10
(Optional) Displays information about NetFlow flowexporters.
show flow exporter [name record-name]
Example:
Switch show flow exporter FE
Step 11
(Optional) Saves your entries in the configuration file.copy running-config startup-config
Example:
Switch# copy running-config
Step 12
Catalyst 2960-X Switch NetFlow Lite Configuration Guide, Cisco IOS Release 15.0(2)EX OL-29032 29
Configuring NetFlow LiteCreating a Flow Exporter Using a Template
PurposeCommand or Action
startup-config
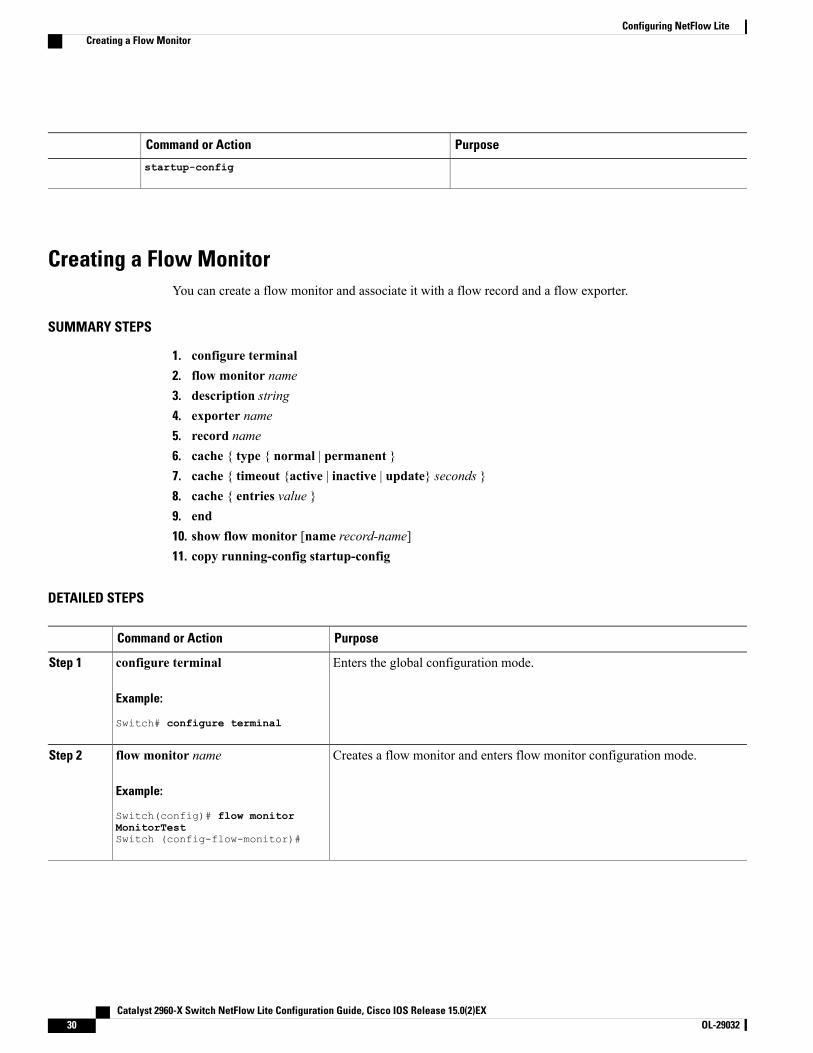
Creating a Flow MonitorYou can create a flow monitor and associate it with a flow record and a flow exporter.
SUMMARY STEPS
1. configure terminal2. flow monitor name3. description string4. exporter name5. record name6. cache { type { normal | permanent }7. cache { timeout {active | inactive | update} seconds }8. cache { entries value }9. end10. show flow monitor [name record-name]11. copy running-config startup-config
DETAILED STEPS
PurposeCommand or Action
Enters the global configuration mode.configure terminal
Example:
Switch# configure terminal
Step 1
Creates a flow monitor and enters flow monitor configuration mode.flow monitor nameStep 2
Example:
Switch(config)# flow monitorMonitorTestSwitch (config-flow-monitor)#
Catalyst 2960-X Switch NetFlow Lite Configuration Guide, Cisco IOS Release 15.0(2)EX30 OL-29032
Configuring NetFlow LiteCreating a Flow Monitor
PurposeCommand or Action
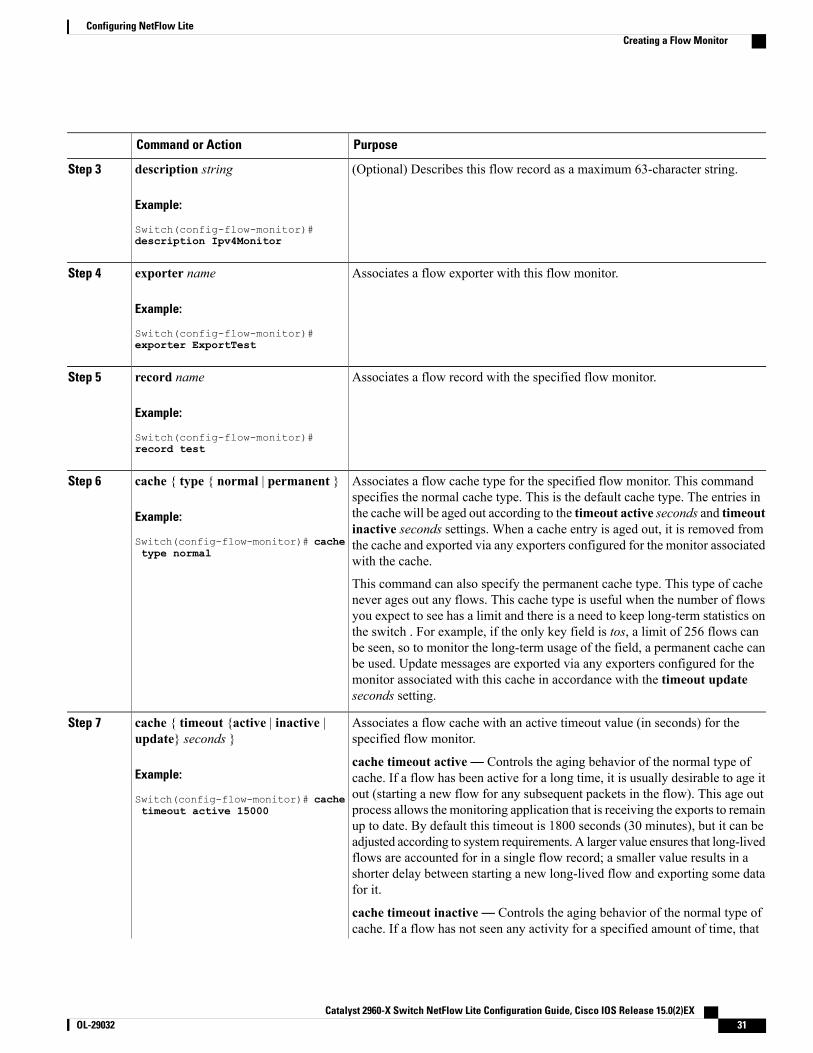
(Optional) Describes this flow record as a maximum 63-character string.description string
Example:
Switch(config-flow-monitor)#
Step 3
description Ipv4Monitor
Associates a flow exporter with this flow monitor.exporter nameStep 4
Example:
Switch(config-flow-monitor)#exporter ExportTest
Associates a flow record with the specified flow monitor.record nameStep 5
Example:
Switch(config-flow-monitor)#record test
Associates a flow cache type for the specified flow monitor. This commandspecifies the normal cache type. This is the default cache type. The entries in
cache { type { normal | permanent }
Example:
Switch(config-flow-monitor)# cache
Step 6
the cache will be aged out according to the timeout active seconds and timeoutinactive seconds settings. When a cache entry is aged out, it is removed fromthe cache and exported via any exporters configured for the monitor associatedwith the cache.
type normal
This command can also specify the permanent cache type. This type of cachenever ages out any flows. This cache type is useful when the number of flowsyou expect to see has a limit and there is a need to keep long-term statistics onthe switch . For example, if the only key field is tos, a limit of 256 flows canbe seen, so to monitor the long-term usage of the field, a permanent cache canbe used. Update messages are exported via any exporters configured for themonitor associated with this cache in accordance with the timeout updateseconds setting.
Associates a flow cache with an active timeout value (in seconds) for thespecified flow monitor.
cache { timeout {active | inactive |update} seconds }
Step 7
Example:
Switch(config-flow-monitor)# cache
cache timeout active— Controls the aging behavior of the normal type ofcache. If a flow has been active for a long time, it is usually desirable to age itout (starting a new flow for any subsequent packets in the flow). This age outprocess allows the monitoring application that is receiving the exports to remaintimeout active 15000
up to date. By default this timeout is 1800 seconds (30 minutes), but it can beadjusted according to system requirements. A larger value ensures that long-livedflows are accounted for in a single flow record; a smaller value results in ashorter delay between starting a new long-lived flow and exporting some datafor it.
cache timeout inactive— Controls the aging behavior of the normal type ofcache. If a flow has not seen any activity for a specified amount of time, that
Catalyst 2960-X Switch NetFlow Lite Configuration Guide, Cisco IOS Release 15.0(2)EX OL-29032 31
Configuring NetFlow LiteCreating a Flow Monitor
PurposeCommand or Action
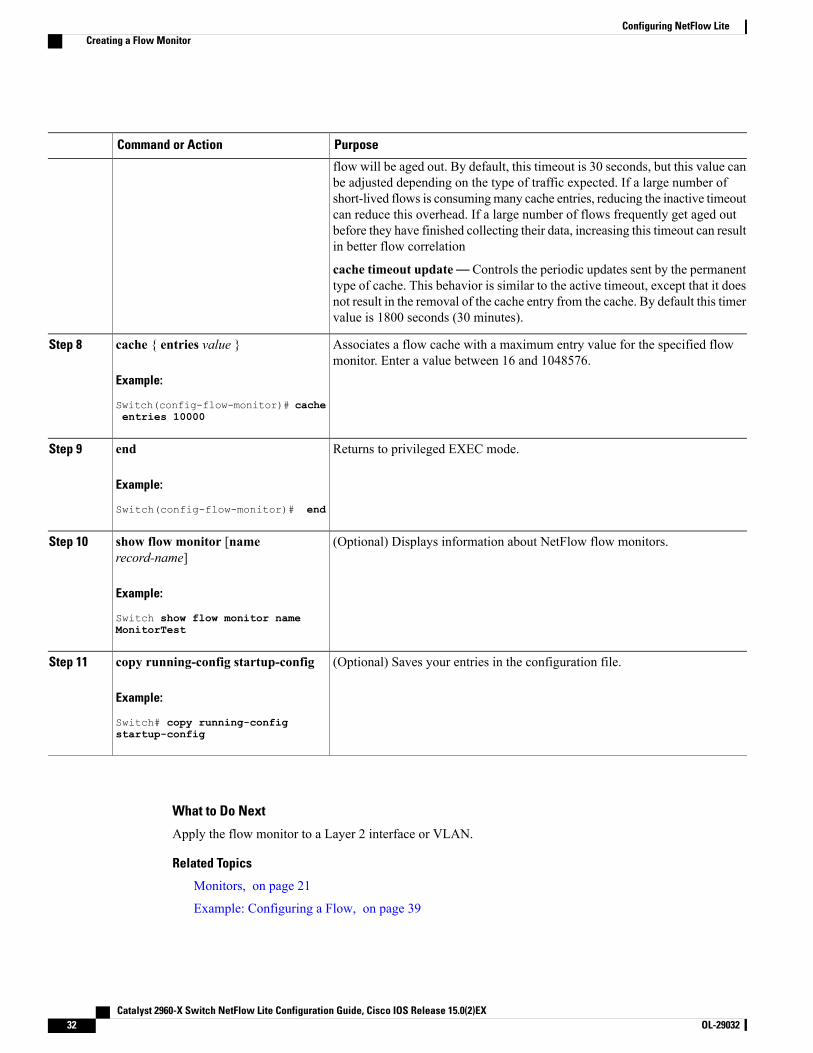
flow will be aged out. By default, this timeout is 30 seconds, but this value canbe adjusted depending on the type of traffic expected. If a large number ofshort-lived flows is consumingmany cache entries, reducing the inactive timeoutcan reduce this overhead. If a large number of flows frequently get aged outbefore they have finished collecting their data, increasing this timeout can resultin better flow correlation
cache timeout update— Controls the periodic updates sent by the permanenttype of cache. This behavior is similar to the active timeout, except that it doesnot result in the removal of the cache entry from the cache. By default this timervalue is 1800 seconds (30 minutes).
Associates a flow cache with a maximum entry value for the specified flowmonitor. Enter a value between 16 and 1048576.
cache { entries value }
Example:
Switch(config-flow-monitor)# cache
Step 8
entries 10000
Returns to privileged EXEC mode.end
Example:
Switch(config-flow-monitor)# end
Step 9
(Optional) Displays information about NetFlow flow monitors.show flow monitor [namerecord-name]
Step 10
Example:
Switch show flow monitor nameMonitorTest
(Optional) Saves your entries in the configuration file.copy running-config startup-config
Example:
Switch# copy running-config
Step 11
startup-config
What to Do Next
Apply the flow monitor to a Layer 2 interface or VLAN.
Related Topics
Monitors, on page 21
Example: Configuring a Flow, on page 39
Catalyst 2960-X Switch NetFlow Lite Configuration Guide, Cisco IOS Release 15.0(2)EX32 OL-29032
Configuring NetFlow LiteCreating a Flow Monitor
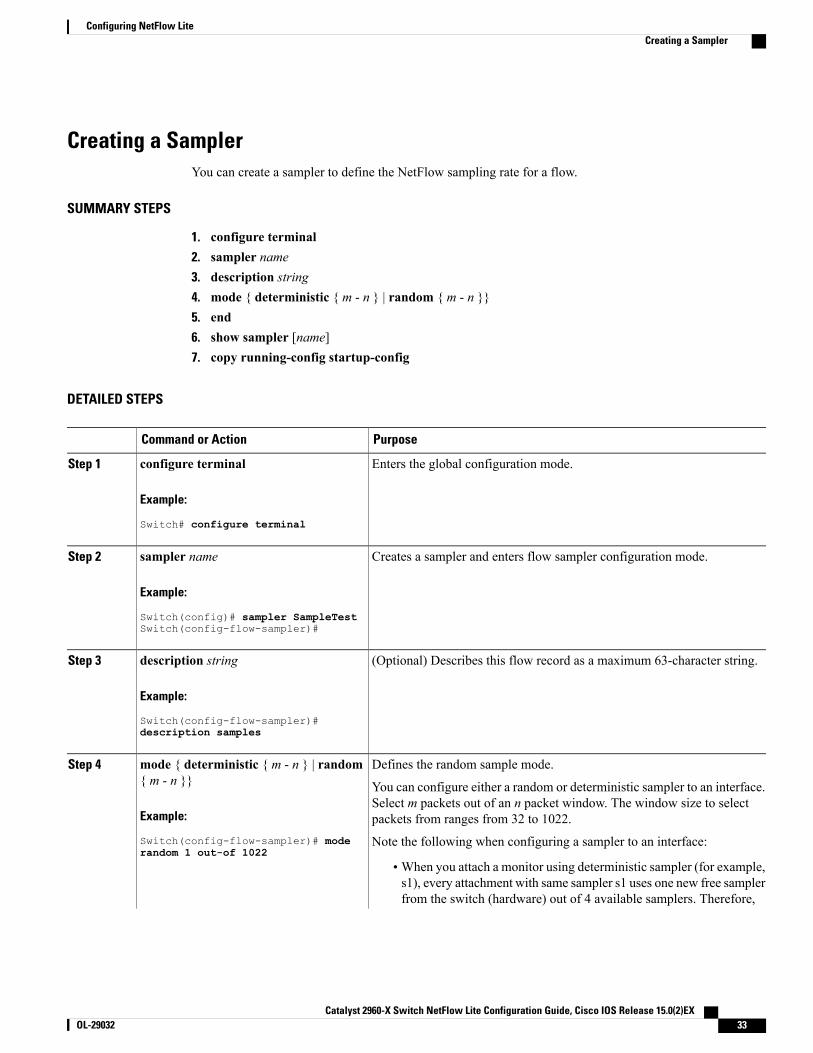
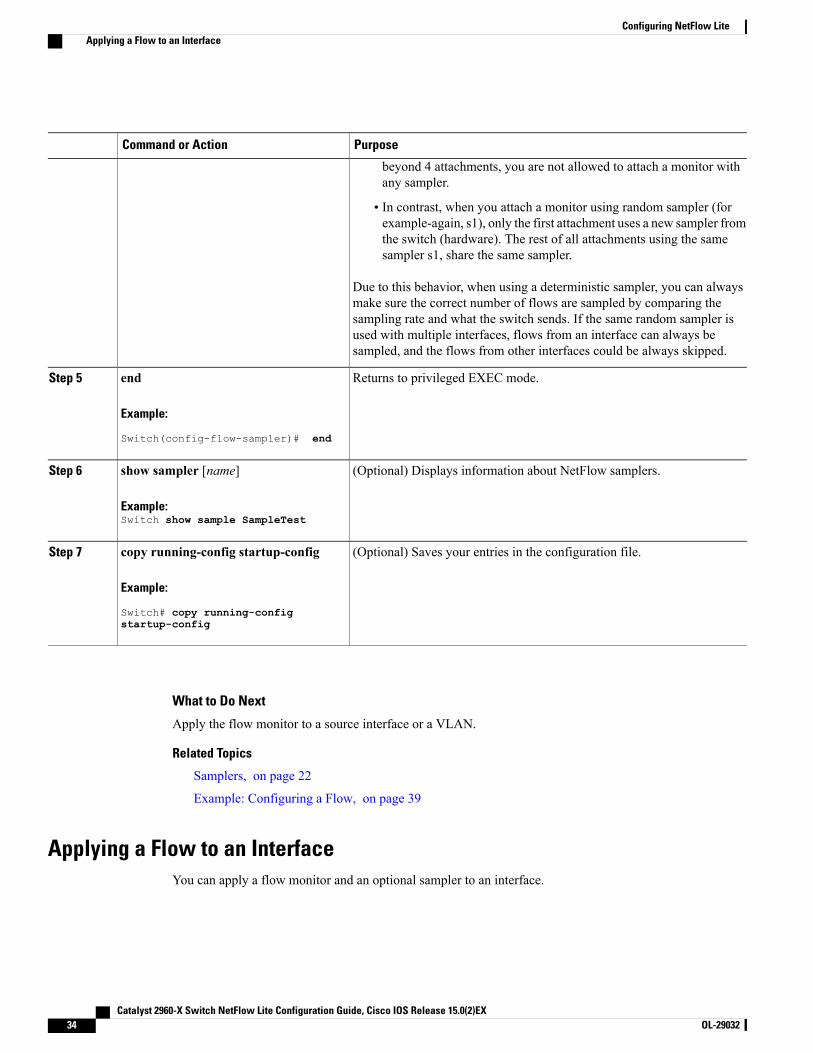
Creating a SamplerYou can create a sampler to define the NetFlow sampling rate for a flow.
SUMMARY STEPS
1. configure terminal2. sampler name3. description string4. mode { deterministic { m - n } | random { m - n }}5. end6. show sampler [name]7. copy running-config startup-config
DETAILED STEPS
PurposeCommand or Action
Enters the global configuration mode.configure terminal
Example:
Switch# configure terminal
Step 1
Creates a sampler and enters flow sampler configuration mode.sampler nameStep 2
Example:
Switch(config)# sampler SampleTestSwitch(config-flow-sampler)#
(Optional) Describes this flow record as a maximum 63-character string.description stringStep 3
Example:
Switch(config-flow-sampler)#description samples
Defines the random sample mode.mode { deterministic { m - n } | random{ m - n }}
Step 4
You can configure either a random or deterministic sampler to an interface.Select m packets out of an n packet window. The window size to selectpackets from ranges from 32 to 1022.Example:
Switch(config-flow-sampler)# mode Note the following when configuring a sampler to an interface:random 1 out-of 1022
• When you attach a monitor using deterministic sampler (for example,s1), every attachment with same sampler s1 uses one new free samplerfrom the switch (hardware) out of 4 available samplers. Therefore,
Catalyst 2960-X Switch NetFlow Lite Configuration Guide, Cisco IOS Release 15.0(2)EX OL-29032 33
Configuring NetFlow LiteCreating a Sampler
PurposeCommand or Action
beyond 4 attachments, you are not allowed to attach a monitor withany sampler.
• In contrast, when you attach a monitor using random sampler (forexample-again, s1), only the first attachment uses a new sampler fromthe switch (hardware). The rest of all attachments using the samesampler s1, share the same sampler.
Due to this behavior, when using a deterministic sampler, you can alwaysmake sure the correct number of flows are sampled by comparing thesampling rate and what the switch sends. If the same random sampler isused with multiple interfaces, flows from an interface can always besampled, and the flows from other interfaces could be always skipped.
Returns to privileged EXEC mode.end
Example:
Switch(config-flow-sampler)# end
Step 5
(Optional) Displays information about NetFlow samplers.show sampler [name]Step 6
Example:Switch show sample SampleTest
(Optional) Saves your entries in the configuration file.copy running-config startup-config
Example:
Switch# copy running-config
Step 7
startup-config
What to Do Next
Apply the flow monitor to a source interface or a VLAN.
Related Topics
Samplers, on page 22
Example: Configuring a Flow, on page 39
Applying a Flow to an InterfaceYou can apply a flow monitor and an optional sampler to an interface.
Catalyst 2960-X Switch NetFlow Lite Configuration Guide, Cisco IOS Release 15.0(2)EX34 OL-29032
Configuring NetFlow LiteApplying a Flow to an Interface
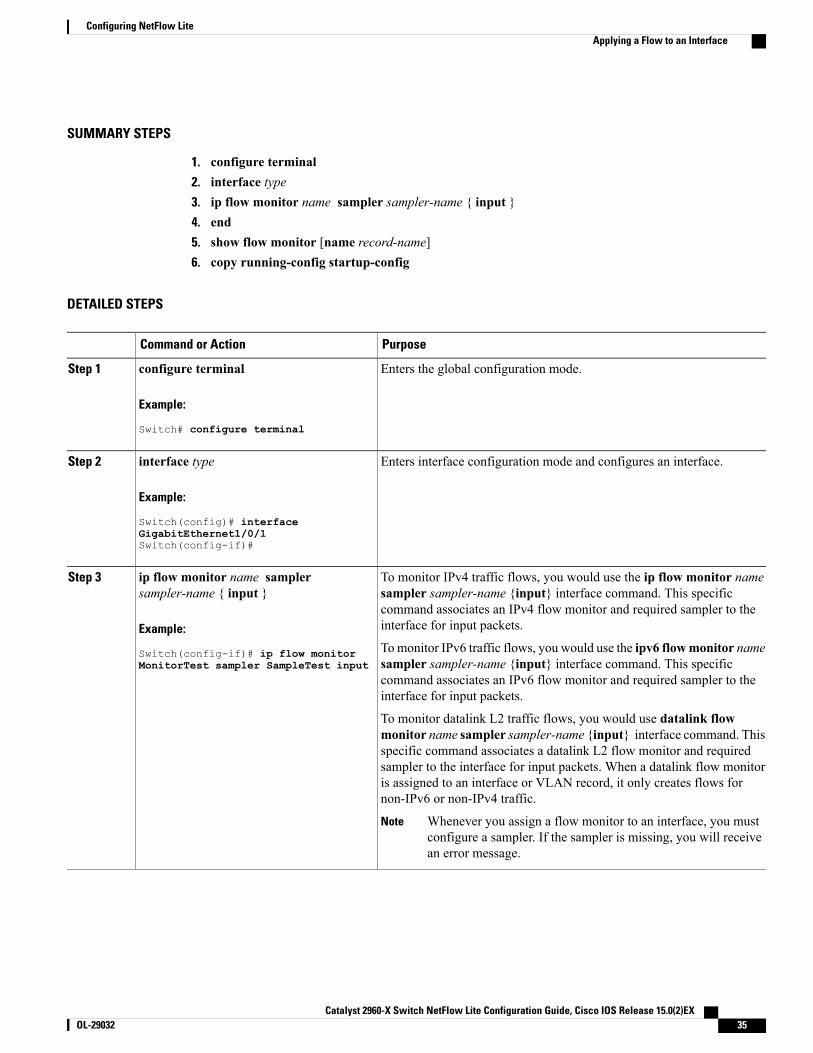
SUMMARY STEPS
1. configure terminal2. interface type3. ip flow monitor name sampler sampler-name { input }4. end5. show flow monitor [name record-name]6. copy running-config startup-config
DETAILED STEPS
PurposeCommand or Action
Enters the global configuration mode.configure terminal
Example:
Switch# configure terminal
Step 1
Enters interface configuration mode and configures an interface.interface typeStep 2
Example:
Switch(config)# interfaceGigabitEthernet1/0/1Switch(config-if)#
To monitor IPv4 traffic flows, you would use the ip flow monitor namesampler sampler-name {input} interface command. This specific
ip flow monitor name samplersampler-name { input }
Step 3
command associates an IPv4 flow monitor and required sampler to theinterface for input packets.Example:
Switch(config-if)# ip flow monitor Tomonitor IPv6 traffic flows, you would use the ipv6 flowmonitor namesampler sampler-name {input} interface command. This specificMonitorTest sampler SampleTest inputcommand associates an IPv6 flow monitor and required sampler to theinterface for input packets.
To monitor datalink L2 traffic flows, you would use datalink flowmonitor name sampler sampler-name {input} interface command. Thisspecific command associates a datalink L2 flow monitor and requiredsampler to the interface for input packets. When a datalink flow monitoris assigned to an interface or VLAN record, it only creates flows fornon-IPv6 or non-IPv4 traffic.
Whenever you assign a flow monitor to an interface, you mustconfigure a sampler. If the sampler is missing, you will receivean error message.
Note
Catalyst 2960-X Switch NetFlow Lite Configuration Guide, Cisco IOS Release 15.0(2)EX OL-29032 35
Configuring NetFlow LiteApplying a Flow to an Interface
PurposeCommand or Action
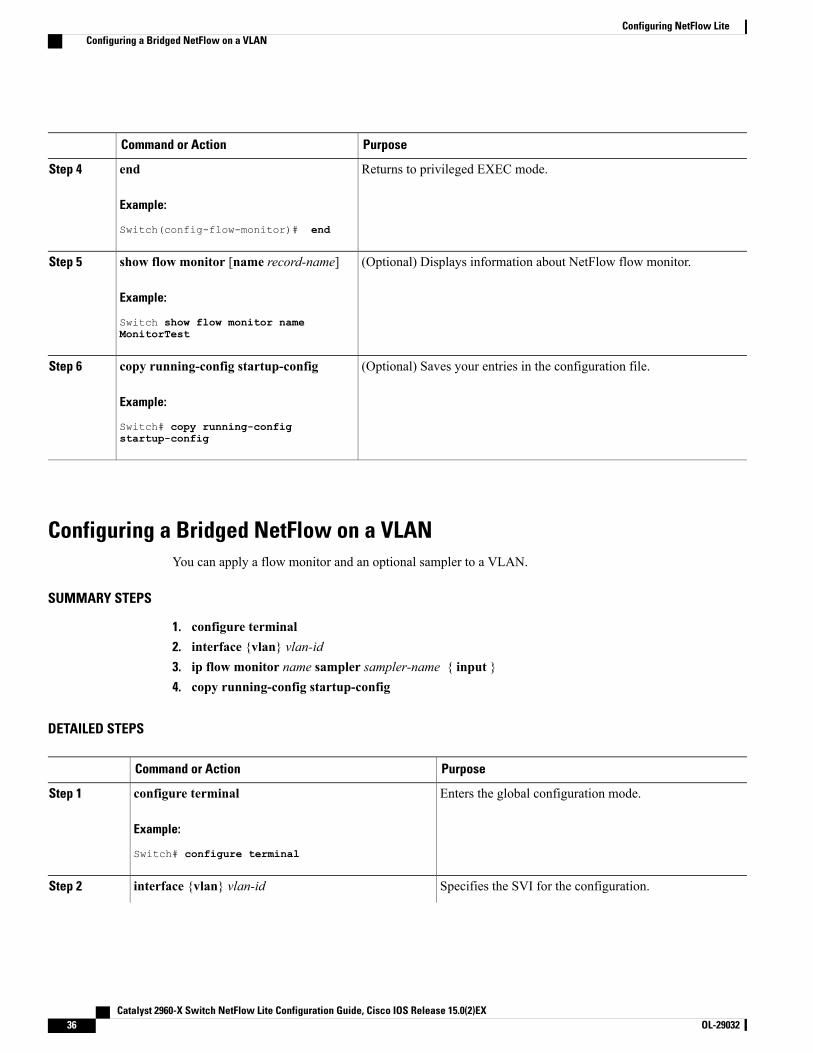
Returns to privileged EXEC mode.end
Example:
Switch(config-flow-monitor)# end
Step 4
(Optional) Displays information about NetFlow flow monitor.show flow monitor [name record-name]Step 5
Example:
Switch show flow monitor nameMonitorTest
(Optional) Saves your entries in the configuration file.copy running-config startup-configStep 6
Example:
Switch# copy running-configstartup-config
Configuring a Bridged NetFlow on a VLANYou can apply a flow monitor and an optional sampler to a VLAN.
SUMMARY STEPS
1. configure terminal2. interface {vlan} vlan-id3. ip flow monitor name sampler sampler-name { input }4. copy running-config startup-config
DETAILED STEPS
PurposeCommand or Action
Enters the global configuration mode.configure terminal
Example:
Switch# configure terminal
Step 1
Specifies the SVI for the configuration.interface {vlan} vlan-idStep 2
Catalyst 2960-X Switch NetFlow Lite Configuration Guide, Cisco IOS Release 15.0(2)EX36 OL-29032
Configuring NetFlow LiteConfiguring a Bridged NetFlow on a VLAN
PurposeCommand or Action
Example:
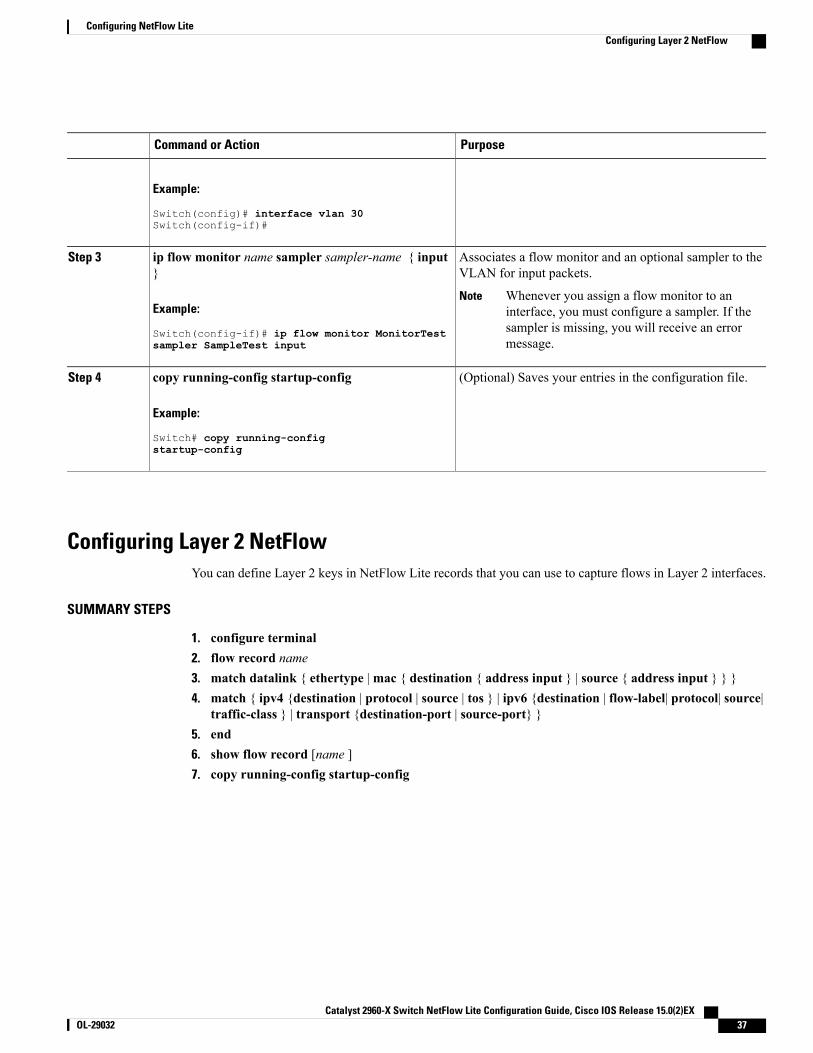
Switch(config)# interface vlan 30Switch(config-if)#
Associates a flow monitor and an optional sampler to theVLAN for input packets.
ip flow monitor name sampler sampler-name { input}
Step 3
Example:
Switch(config-if)# ip flow monitor MonitorTest
Whenever you assign a flow monitor to aninterface, you must configure a sampler. If thesampler is missing, you will receive an errormessage.
Note
sampler SampleTest input
(Optional) Saves your entries in the configuration file.copy running-config startup-config
Example:
Switch# copy running-config
Step 4
startup-config
Configuring Layer 2 NetFlowYou can define Layer 2 keys in NetFlow Lite records that you can use to capture flows in Layer 2 interfaces.
SUMMARY STEPS
1. configure terminal2. flow record name3. match datalink { ethertype |mac { destination { address input } | source { address input } } }4. match { ipv4 {destination | protocol | source | tos } | ipv6 {destination | flow-label| protocol| source|
traffic-class } | transport {destination-port | source-port} }5. end6. show flow record [name ]7. copy running-config startup-config
Catalyst 2960-X Switch NetFlow Lite Configuration Guide, Cisco IOS Release 15.0(2)EX OL-29032 37
Configuring NetFlow LiteConfiguring Layer 2 NetFlow
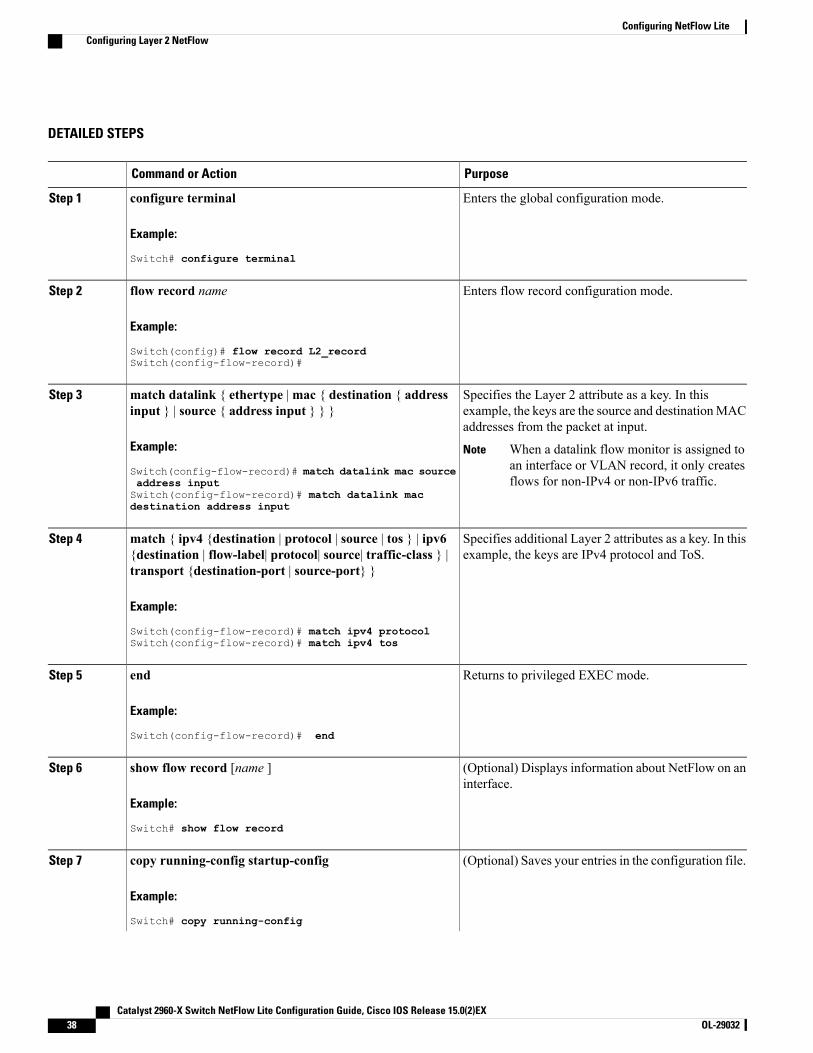
DETAILED STEPS
PurposeCommand or Action
Enters the global configuration mode.configure terminal
Example:
Switch# configure terminal
Step 1
Enters flow record configuration mode.flow record nameStep 2
Example:
Switch(config)# flow record L2_recordSwitch(config-flow-record)#
Specifies the Layer 2 attribute as a key. In thisexample, the keys are the source and destinationMACaddresses from the packet at input.
match datalink { ethertype |mac { destination { addressinput } | source { address input } } }
Example:
Switch(config-flow-record)# match datalink mac source
Step 3
When a datalink flow monitor is assigned toan interface or VLAN record, it only createsflows for non-IPv4 or non-IPv6 traffic.
Note
address inputSwitch(config-flow-record)# match datalink macdestination address input
Specifies additional Layer 2 attributes as a key. In thisexample, the keys are IPv4 protocol and ToS.
match { ipv4 {destination | protocol | source | tos } | ipv6{destination | flow-label| protocol| source| traffic-class } |transport {destination-port | source-port} }
Step 4
Example:
Switch(config-flow-record)# match ipv4 protocolSwitch(config-flow-record)# match ipv4 tos
Returns to privileged EXEC mode.endStep 5
Example:
Switch(config-flow-record)# end
(Optional) Displays information about NetFlow on aninterface.
show flow record [name ]
Example:
Switch# show flow record
Step 6
(Optional) Saves your entries in the configuration file.copy running-config startup-configStep 7
Example:
Switch# copy running-config
Catalyst 2960-X Switch NetFlow Lite Configuration Guide, Cisco IOS Release 15.0(2)EX38 OL-29032
Configuring NetFlow LiteConfiguring Layer 2 NetFlow

PurposeCommand or Action
startup-config
Monitoring NetFlow LiteThe commands in the following table can be used to monitor NetFlow Lite.
Table 8: NetFlow Lite Monitoring Commands
PurposeCommand
Displays information about NetFlow flow exportersand statistics.
show flow exporter [ name | name [statistics |templates] ]
Displays information about NetFlow flow exportersand statistics.
show flow exporter [ name name ]
Displays information about NetFlow flow monitorsand statistics.
show flow monitor [ name name [ cache { format{ csv | record | table } ] | statistics ]
Displays information about NetFlow flow records.show flow record [ name record-name]
Displays information about NetFlow samplers.show sampler [ name name]
Configuration Examples for NetFlow Lite
Example: Configuring a Flow
When configuring a flow, you need to have the protocol, source port, destination port, first and lasttimestamps, and packet and bytes counters defined in the flow record. Otherwise, you will get the followingerror message: "Warning: Cannot set protocol distribution with this Flow Record. Require protocol, sourceand destination ports, first and last timestamps and packet and bytes counters."
Note
This example shows how to create a flow and apply it to an interface:
Switch# configure terminalEnter configuration commands, one per line. End with CNTL/Z.
Switch(config)# flow exporter export1Switch(config-flow-exporter)# destination 10.0.101.254
Catalyst 2960-X Switch NetFlow Lite Configuration Guide, Cisco IOS Release 15.0(2)EX OL-29032 39
Configuring NetFlow LiteMonitoring NetFlow Lite
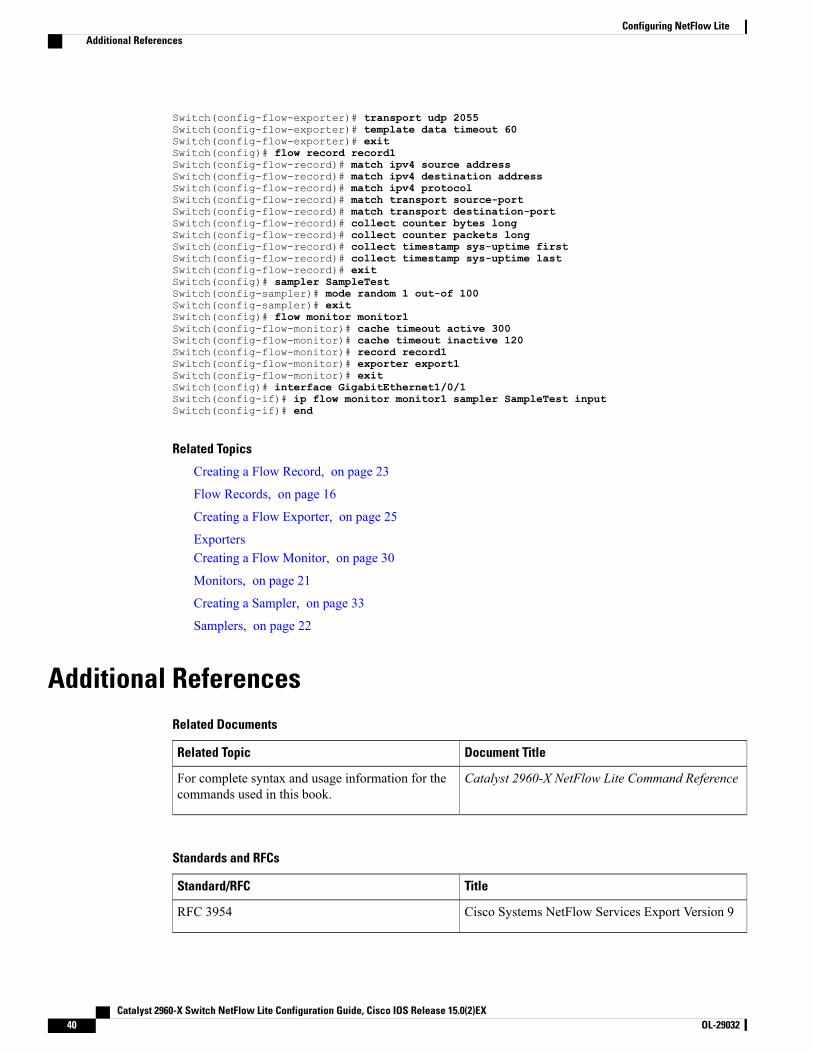
Switch(config-flow-exporter)# transport udp 2055Switch(config-flow-exporter)# template data timeout 60Switch(config-flow-exporter)# exitSwitch(config)# flow record record1Switch(config-flow-record)# match ipv4 source addressSwitch(config-flow-record)# match ipv4 destination addressSwitch(config-flow-record)# match ipv4 protocolSwitch(config-flow-record)# match transport source-portSwitch(config-flow-record)# match transport destination-portSwitch(config-flow-record)# collect counter bytes longSwitch(config-flow-record)# collect counter packets longSwitch(config-flow-record)# collect timestamp sys-uptime firstSwitch(config-flow-record)# collect timestamp sys-uptime lastSwitch(config-flow-record)# exitSwitch(config)# sampler SampleTestSwitch(config-sampler)# mode random 1 out-of 100Switch(config-sampler)# exitSwitch(config)# flow monitor monitor1Switch(config-flow-monitor)# cache timeout active 300Switch(config-flow-monitor)# cache timeout inactive 120Switch(config-flow-monitor)# record record1Switch(config-flow-monitor)# exporter export1Switch(config-flow-monitor)# exitSwitch(config)# interface GigabitEthernet1/0/1Switch(config-if)# ip flow monitor monitor1 sampler SampleTest inputSwitch(config-if)# end
Related Topics
Creating a Flow Record, on page 23
Flow Records, on page 16
Creating a Flow Exporter, on page 25
ExportersCreating a Flow Monitor, on page 30
Monitors, on page 21
Creating a Sampler, on page 33
Samplers, on page 22
Additional ReferencesRelated Documents
Document TitleRelated Topic
Catalyst 2960-X NetFlow Lite Command ReferenceFor complete syntax and usage information for thecommands used in this book.
Standards and RFCs
TitleStandard/RFC
Cisco Systems NetFlow Services Export Version 9RFC 3954
Catalyst 2960-X Switch NetFlow Lite Configuration Guide, Cisco IOS Release 15.0(2)EX40 OL-29032
Configuring NetFlow LiteAdditional References
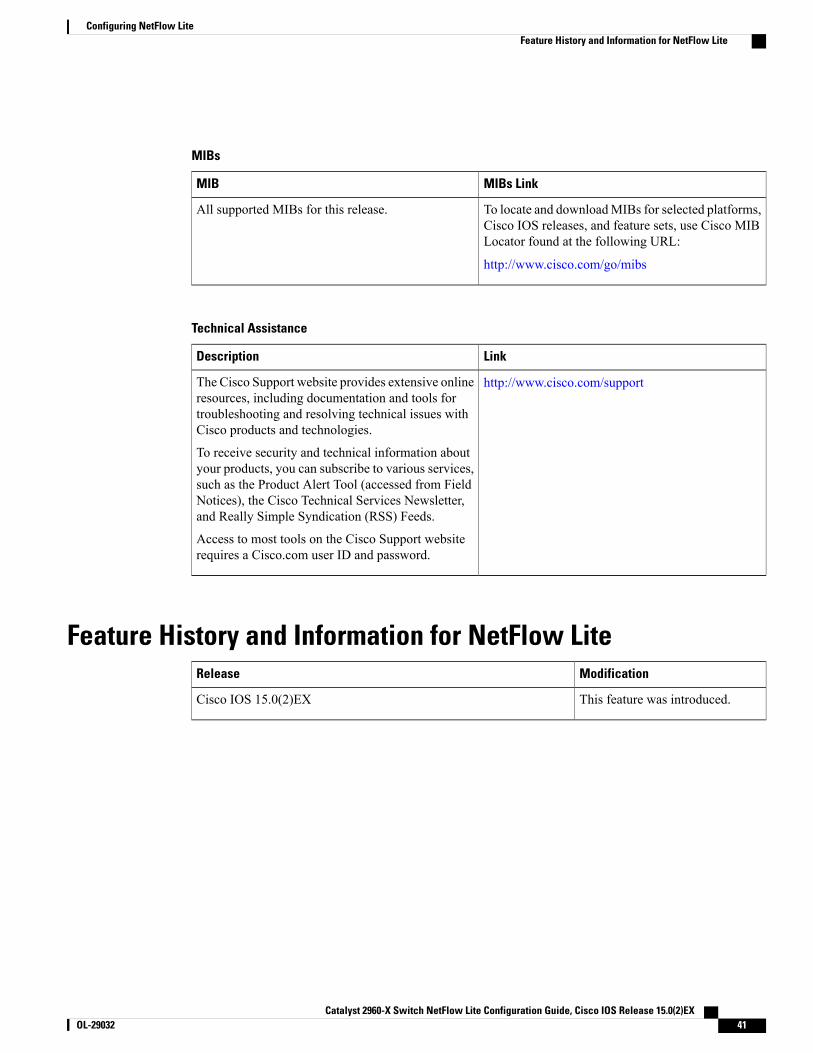
MIBs
MIBs LinkMIB
To locate and downloadMIBs for selected platforms,Cisco IOS releases, and feature sets, use Cisco MIBLocator found at the following URL:
http://www.cisco.com/go/mibs
All supported MIBs for this release.
Technical Assistance
LinkDescription
http://www.cisco.com/supportThe Cisco Support website provides extensive onlineresources, including documentation and tools fortroubleshooting and resolving technical issues withCisco products and technologies.
To receive security and technical information aboutyour products, you can subscribe to various services,such as the Product Alert Tool (accessed from FieldNotices), the Cisco Technical Services Newsletter,and Really Simple Syndication (RSS) Feeds.
Access to most tools on the Cisco Support websiterequires a Cisco.com user ID and password.
Feature History and Information for NetFlow LiteModificationRelease
This feature was introduced.Cisco IOS 15.0(2)EX
Catalyst 2960-X Switch NetFlow Lite Configuration Guide, Cisco IOS Release 15.0(2)EX OL-29032 41
Configuring NetFlow LiteFeature History and Information for NetFlow Lite

Catalyst 2960-X Switch NetFlow Lite Configuration Guide, Cisco IOS Release 15.0(2)EX42 OL-29032
Configuring NetFlow LiteFeature History and Information for NetFlow Lite
I N D E X
A
additional references 40
B
bridged NetFlow 36
C
collect parameters 18
D
default settings 22
E
export formats 21exporters 19
F
flow exporter 25, 27template 27
flow monitor 30flow record 23flow records 16
collectors 16keys 16
I
interface configuration 34
L
Layer 2 NetFlow 37
M
match parameters 16monitoring 39
P
prerequisites 13
R
restrictions 14
S
sampler 33samplers 22stacking 22
T
timestamp sys-uptime 18transport tcp flags 18
V
VLAN 36
Catalyst 2960-X Switch NetFlow Lite Configuration Guide, Cisco IOS Release 15.0(2)EX OL-29032 IN-1

Catalyst 2960-X Switch NetFlow Lite Configuration Guide, Cisco IOS Release 15.0(2)EXIN-2 OL-29032
Index