Embed Size (px)
Citation preview

21 DAYS TOCREATE A HABIT
CALENDAR &EXERCISECATALOGUE
DISCLAIMER
Please consult your physician before starting any exercise programs. Go at your ownintensity and listen to your body. Stop immediately if you feel faint or any pains. Thelisted workouts are examples only and may not be suitable for everyone. Ask thefitness centre staff if you have any questions on the exercises or for alternatives.
CONTACT US
QUADREAL FITNESS CENTRE STAFF
2
21 DAYS TOCREATE A HABIT

CHALLENGE CALENDAR
2
MARCH
21 DAYS TOCREATE A HABIT

Most current psychological research says that when forming or changing a habitcompletely, it takes anywhere from 66 to 180 days depending on the complexity ofthe habit. The theory of the 21 days to change a habit comes from the concept of
detox. In order to remove toxins from the body, one must abstain for at least 3 weeksto ensure the absolute removal of those toxins. This concept has been transferred to
many other areas since then, including the fitness industry. In honor of this old wives'tale we are running a challenge for 21 days to kickstart your fitness and to give you
that stepping stone towards forming a new healthy habit of your own.
Pick one exercise every day for 21 days and complete it. Each exercise willcome with instructions on how to do it, how many reps, and how manysets. You can do just the one exercise or you can add it into your own
workout for that particular day. Once you have completed the exercise forthe day mark it complete on your challenge calendar by writing theexercise on the date completed. This is a for fun challenge you can
complete on your own. The sample calendar provided begins March 8th,but you can adjust the start date to whenever you like.
What do I have to do to be a part of the challenge?
Why?

SquatDescription: Stand with your feet hip width apart. Look forward and relax your shoulders. Hands can be relaxed
down by torso (Easiest), or straight out in front at shoulder height, or straight up above head, or one to twodumbbells can be added for additional load (Most Difficult: Dumbbells can be down at sides, resting on
shoulders, or one can be held at chest height with both hands). Engage your abdominal muscles as you slowlysend your hips back. Bend your knees at the same time to lower towards a 90 degree bend in the legs. At the
bottom your back should be straight. This means that your bum is not curling under your torso and your chest isnot rolling down. Pause for a brief moment at the bottom before squeezing your glutes (bum muscles) and
pushing down through your heels to bring your hips forward and up back to standing position. Repeat until allreps are completed. 8-10 reps for beginners, 10-15 for intermediates, 16-20 for more experienced. 3-4 Sets
LungeDescription: Stand with your feet hip width apart. Look forward and relax your shoulders. Take a large step
directly forward while keeping the distance between your feet (Don’t step in and stack feet). Front foot should beflat on the floor while the back foot is up on the toes. Squeeze your glute muscles so that your hips both face
forward and your bum is tucked underneath your torso (Stack your spine). Straighten torso up (Don't leanforward). Engage your abdominal muscles for support and slowly start to bend both knees. Lower as much as you
are able or until your back knee is hovering an inch above the floor. Pause for a moment before slowly comingup. To come up, push evenly through both legs. Once at the top of the movement step the front leg backwards to
return to the standing position. Repeat on the other leg until all reps are completed. 8-10 reps on each side forbeginners, 10-15 on each side for intermediates, 16-20 on each side for more experienced. 3-4 Sets
3

Push UpDescription: On the ground (Most difficult), or against the wall/countertop (Easiest), or on a chair/bench placehands shoulder width apart underneath shoulder joint (Or just below shoulder height if you are against thewall). If against a wall then walk feet out until the body has created a small angle (about 30 degrees) and thebody is flat (Bum should be in line with the body) to create a plank position. If on the floor extend legs, tuck
under toes (Can also be done from the knees instead), engage abdominal muscles, and lift the mid body up tocreate a long flat body with hands directly underneath shoulders. Squeeze glute muscles to pull hips down ifyour body is creating a pyramid. Look in the center a few inches above your finger tips to avoid neck strain.
Slowly bend elbows to lower the body down towards the floor. As you are moving pull shoulder blades downand together to create a long neck. Lower until as much as you are able or until your chest is hovering a few
inches above the ground. Pause for a moment before pushing down through your hands, squeezing your absin, pulling shoulders down away from your ears, and extending arms to straight. At the top of the movementpause before repeating until all reps are completed. 8-10 reps for beginners, 10-15 for intermediates, 16-20
for more experienced. 3-4 Sets
Back ExtensionDescription: Lay on the ground on your stomach. Hands can be beside your torso (Easiest), beside your chestand underneath your shoulders, straight out in front of you (Most difficult), or behind your head. Look down at
the ground, relax your neck and pull your shoulders down and back. Engage your abdominal muscles forsupport. Slowly lift your torso and arms off the ground by engaging your glutes and back muscles. Think abouttrying to lift the upper body as if it is unbendable. Lift all the way to your hips; not just the upper chest. For the
basic back extension leave your feet on the ground. To make the exercise more difficult lift the feet andsqueeze the legs together when you lift your torso. Pause at the top of the movement before slowly releasingdown to the ground. Repeat until all reps are completed. 8-10 reps for beginners, 10-15 for intermediates, 16-
20 for more experienced. 3-4 Sets
4
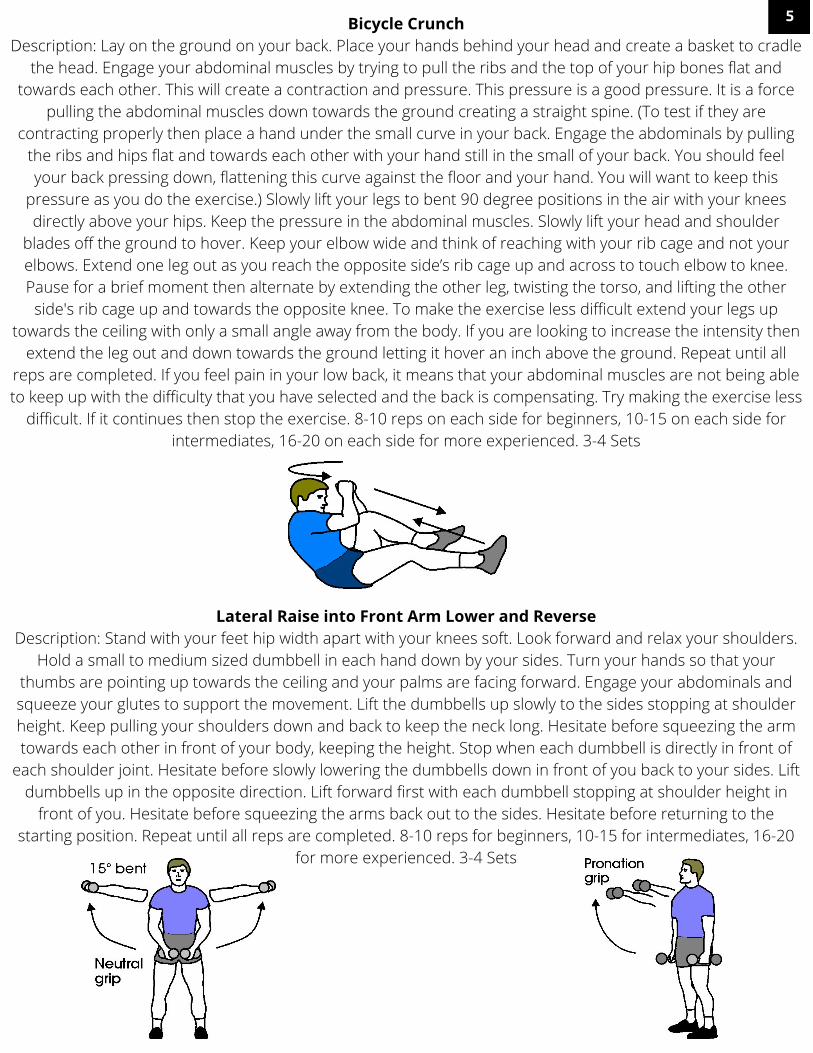
5Bicycle CrunchDescription: Lay on the ground on your back. Place your hands behind your head and create a basket to cradle
the head. Engage your abdominal muscles by trying to pull the ribs and the top of your hip bones flat andtowards each other. This will create a contraction and pressure. This pressure is a good pressure. It is a force
pulling the abdominal muscles down towards the ground creating a straight spine. (To test if they arecontracting properly then place a hand under the small curve in your back. Engage the abdominals by pulling
the ribs and hips flat and towards each other with your hand still in the small of your back. You should feelyour back pressing down, flattening this curve against the floor and your hand. You will want to keep this
pressure as you do the exercise.) Slowly lift your legs to bent 90 degree positions in the air with your kneesdirectly above your hips. Keep the pressure in the abdominal muscles. Slowly lift your head and shoulder
blades off the ground to hover. Keep your elbow wide and think of reaching with your rib cage and not yourelbows. Extend one leg out as you reach the opposite side’s rib cage up and across to touch elbow to knee.Pause for a brief moment then alternate by extending the other leg, twisting the torso, and lifting the other
side's rib cage up and towards the opposite knee. To make the exercise less difficult extend your legs uptowards the ceiling with only a small angle away from the body. If you are looking to increase the intensity then
extend the leg out and down towards the ground letting it hover an inch above the ground. Repeat until allreps are completed. If you feel pain in your low back, it means that your abdominal muscles are not being ableto keep up with the difficulty that you have selected and the back is compensating. Try making the exercise less
difficult. If it continues then stop the exercise. 8-10 reps on each side for beginners, 10-15 on each side forintermediates, 16-20 on each side for more experienced. 3-4 Sets
Lateral Raise into Front Arm Lower and ReverseDescription: Stand with your feet hip width apart with your knees soft. Look forward and relax your shoulders.
Hold a small to medium sized dumbbell in each hand down by your sides. Turn your hands so that yourthumbs are pointing up towards the ceiling and your palms are facing forward. Engage your abdominals andsqueeze your glutes to support the movement. Lift the dumbbells up slowly to the sides stopping at shoulderheight. Keep pulling your shoulders down and back to keep the neck long. Hesitate before squeezing the armtowards each other in front of your body, keeping the height. Stop when each dumbbell is directly in front of
each shoulder joint. Hesitate before slowly lowering the dumbbells down in front of you back to your sides. Liftdumbbells up in the opposite direction. Lift forward first with each dumbbell stopping at shoulder height in
front of you. Hesitate before squeezing the arms back out to the sides. Hesitate before returning to thestarting position. Repeat until all reps are completed. 8-10 reps for beginners, 10-15 for intermediates, 16-20
for more experienced. 3-4 Sets
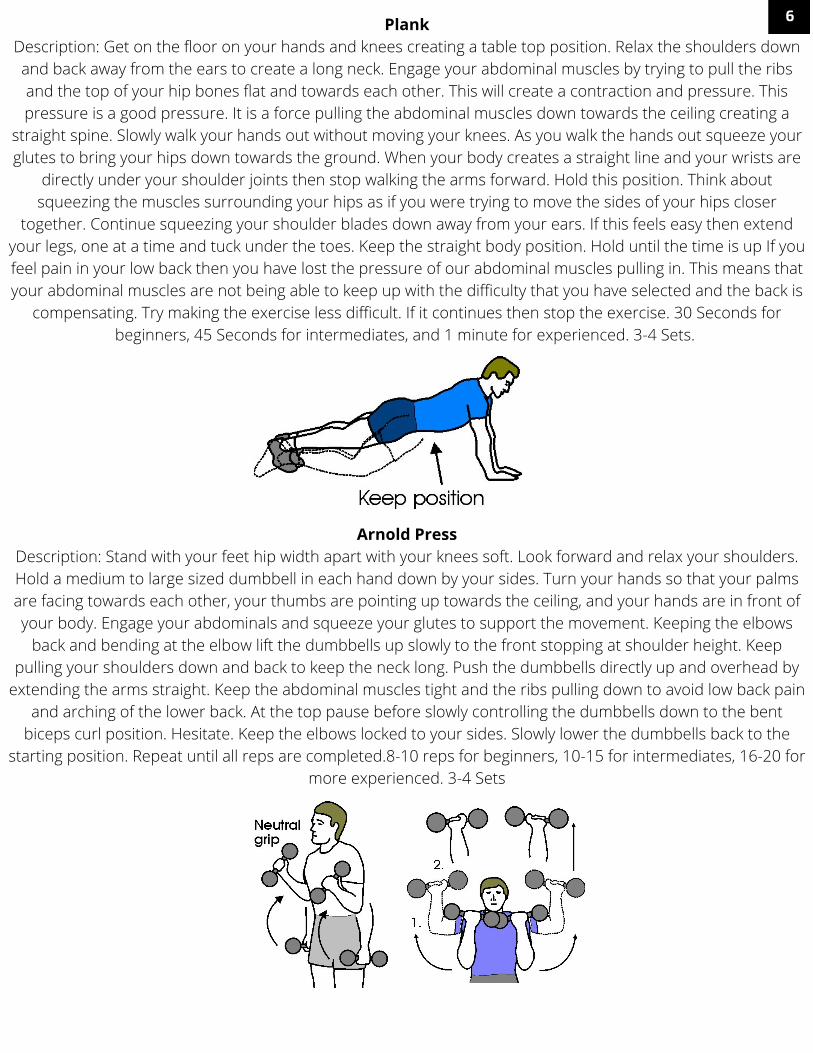
66PlankDescription: Get on the floor on your hands and knees creating a table top position. Relax the shoulders downand back away from the ears to create a long neck. Engage your abdominal muscles by trying to pull the ribsand the top of your hip bones flat and towards each other. This will create a contraction and pressure. Thispressure is a good pressure. It is a force pulling the abdominal muscles down towards the ceiling creating a
straight spine. Slowly walk your hands out without moving your knees. As you walk the hands out squeeze yourglutes to bring your hips down towards the ground. When your body creates a straight line and your wrists are
directly under your shoulder joints then stop walking the arms forward. Hold this position. Think aboutsqueezing the muscles surrounding your hips as if you were trying to move the sides of your hips closer
together. Continue squeezing your shoulder blades down away from your ears. If this feels easy then extendyour legs, one at a time and tuck under the toes. Keep the straight body position. Hold until the time is up If youfeel pain in your low back then you have lost the pressure of our abdominal muscles pulling in. This means thatyour abdominal muscles are not being able to keep up with the difficulty that you have selected and the back is
compensating. Try making the exercise less difficult. If it continues then stop the exercise. 30 Seconds forbeginners, 45 Seconds for intermediates, and 1 minute for experienced. 3-4 Sets.
Arnold PressDescription: Stand with your feet hip width apart with your knees soft. Look forward and relax your shoulders.Hold a medium to large sized dumbbell in each hand down by your sides. Turn your hands so that your palmsare facing towards each other, your thumbs are pointing up towards the ceiling, and your hands are in front ofyour body. Engage your abdominals and squeeze your glutes to support the movement. Keeping the elbows
back and bending at the elbow lift the dumbbells up slowly to the front stopping at shoulder height. Keeppulling your shoulders down and back to keep the neck long. Push the dumbbells directly up and overhead by
extending the arms straight. Keep the abdominal muscles tight and the ribs pulling down to avoid low back painand arching of the lower back. At the top pause before slowly controlling the dumbbells down to the bent
biceps curl position. Hesitate. Keep the elbows locked to your sides. Slowly lower the dumbbells back to thestarting position. Repeat until all reps are completed.8-10 reps for beginners, 10-15 for intermediates, 16-20 for
more experienced. 3-4 Sets
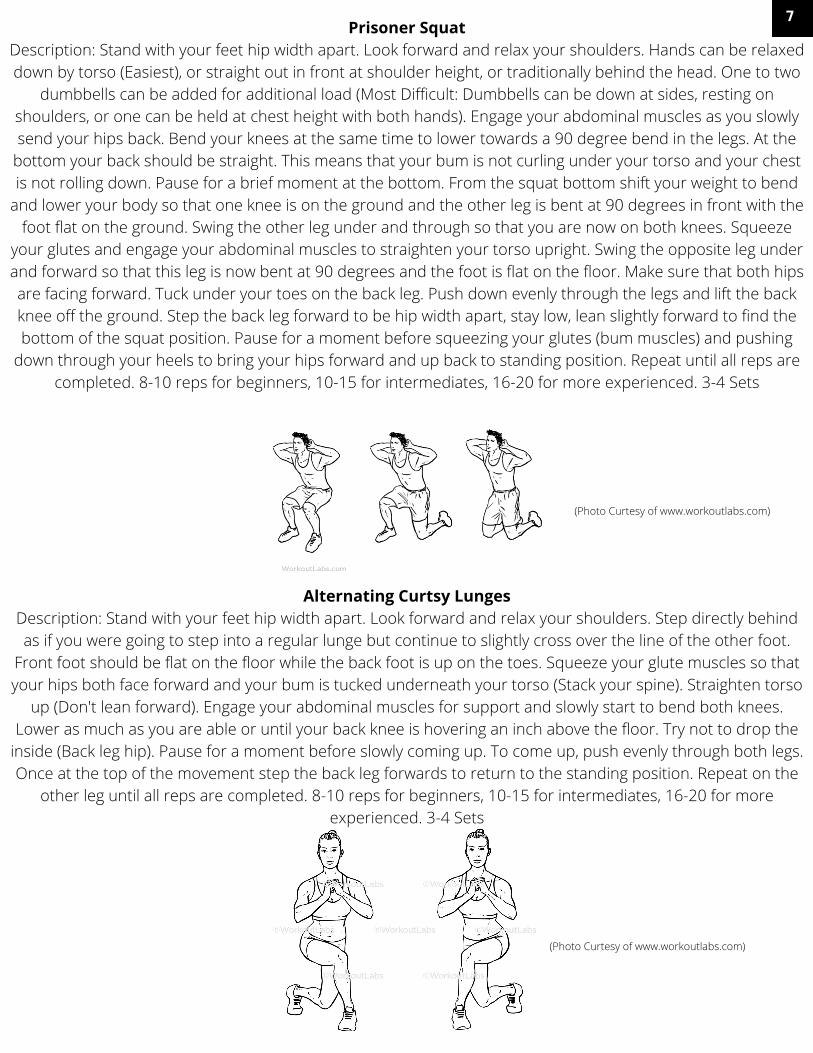
Prisoner SquatDescription: Stand with your feet hip width apart. Look forward and relax your shoulders. Hands can be relaxeddown by torso (Easiest), or straight out in front at shoulder height, or traditionally behind the head. One to two
dumbbells can be added for additional load (Most Difficult: Dumbbells can be down at sides, resting onshoulders, or one can be held at chest height with both hands). Engage your abdominal muscles as you slowlysend your hips back. Bend your knees at the same time to lower towards a 90 degree bend in the legs. At the
bottom your back should be straight. This means that your bum is not curling under your torso and your chestis not rolling down. Pause for a brief moment at the bottom. From the squat bottom shift your weight to bend
and lower your body so that one knee is on the ground and the other leg is bent at 90 degrees in front with thefoot flat on the ground. Swing the other leg under and through so that you are now on both knees. Squeeze
your glutes and engage your abdominal muscles to straighten your torso upright. Swing the opposite leg underand forward so that this leg is now bent at 90 degrees and the foot is flat on the floor. Make sure that both hipsare facing forward. Tuck under your toes on the back leg. Push down evenly through the legs and lift the backknee off the ground. Step the back leg forward to be hip width apart, stay low, lean slightly forward to find thebottom of the squat position. Pause for a moment before squeezing your glutes (bum muscles) and pushing
down through your heels to bring your hips forward and up back to standing position. Repeat until all reps arecompleted. 8-10 reps for beginners, 10-15 for intermediates, 16-20 for more experienced. 3-4 Sets
(Photo Curtesy of www.workoutlabs.com)
Alternating Curtsy LungesDescription: Stand with your feet hip width apart. Look forward and relax your shoulders. Step directly behindas if you were going to step into a regular lunge but continue to slightly cross over the line of the other foot.
Front foot should be flat on the floor while the back foot is up on the toes. Squeeze your glute muscles so thatyour hips both face forward and your bum is tucked underneath your torso (Stack your spine). Straighten torso
up (Don't lean forward). Engage your abdominal muscles for support and slowly start to bend both knees.Lower as much as you are able or until your back knee is hovering an inch above the floor. Try not to drop the
inside (Back leg hip). Pause for a moment before slowly coming up. To come up, push evenly through both legs.Once at the top of the movement step the back leg forwards to return to the standing position. Repeat on the
other leg until all reps are completed. 8-10 reps for beginners, 10-15 for intermediates, 16-20 for moreexperienced. 3-4 Sets
(Photo Curtesy of www.workoutlabs.com)
7
Side Lunge to BalanceDescription: Stand with your feet hip width apart. Look forward and relax your shoulders. Take a large step
directly to the right to create a pyramid-like shape with your body. Engage your abdominal muscles forsupport. Slowly start to bend your right knee while keeping the left leg straight as you slowly send your hipsback This will shift your body weight over to the right and may create a stretch in the groin and legs. At the
bottom your back should be straight. This means that your bum is not curling under your torso and your chestis not rolling down. Lower as much as you are able or until your right knee is bent at 90 degrees. Pause for a
moment before squeezing your glutes (bum muscles) and pushing down through your right heel and throughthe side of your leg to bring your hips forward, up and bring the right leg back into the body. Standing balanced
on the left leg with the right leg bent to 90 degrees in the air. Pause for a moment before slowly lowering theRight foot down to the starting position. Repeat on the other leg until all reps are completed. 8-10 on each side
reps for beginners, 10-15 on each side for intermediates, 16-20 on each side for more experienced. 3-4 Sets
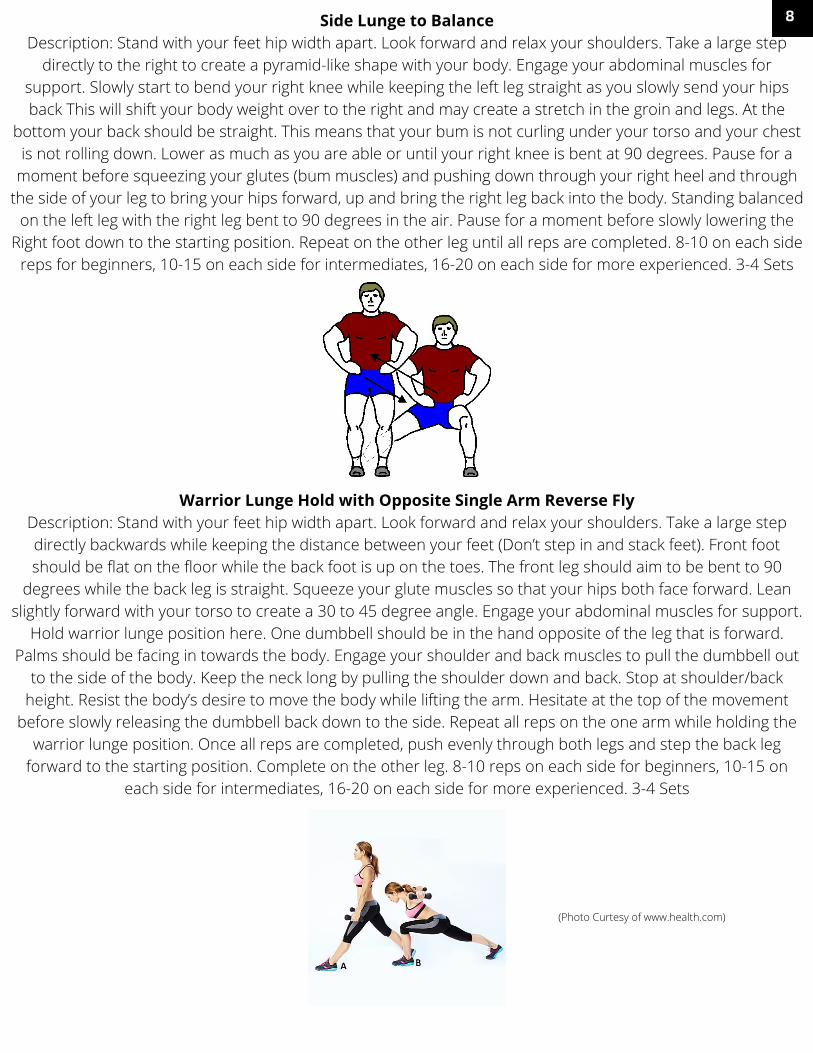
Warrior Lunge Hold with Opposite Single Arm Reverse FlyDescription: Stand with your feet hip width apart. Look forward and relax your shoulders. Take a large stepdirectly backwards while keeping the distance between your feet (Don’t step in and stack feet). Front footshould be flat on the floor while the back foot is up on the toes. The front leg should aim to be bent to 90
degrees while the back leg is straight. Squeeze your glute muscles so that your hips both face forward. Leanslightly forward with your torso to create a 30 to 45 degree angle. Engage your abdominal muscles for support.
Hold warrior lunge position here. One dumbbell should be in the hand opposite of the leg that is forward.Palms should be facing in towards the body. Engage your shoulder and back muscles to pull the dumbbell out
to the side of the body. Keep the neck long by pulling the shoulder down and back. Stop at shoulder/backheight. Resist the body’s desire to move the body while lifting the arm. Hesitate at the top of the movement
before slowly releasing the dumbbell back down to the side. Repeat all reps on the one arm while holding thewarrior lunge position. Once all reps are completed, push evenly through both legs and step the back leg
forward to the starting position. Complete on the other leg. 8-10 reps on each side for beginners, 10-15 oneach side for intermediates, 16-20 on each side for more experienced. 3-4 Sets
(Photo Curtesy of www.health.com)
8
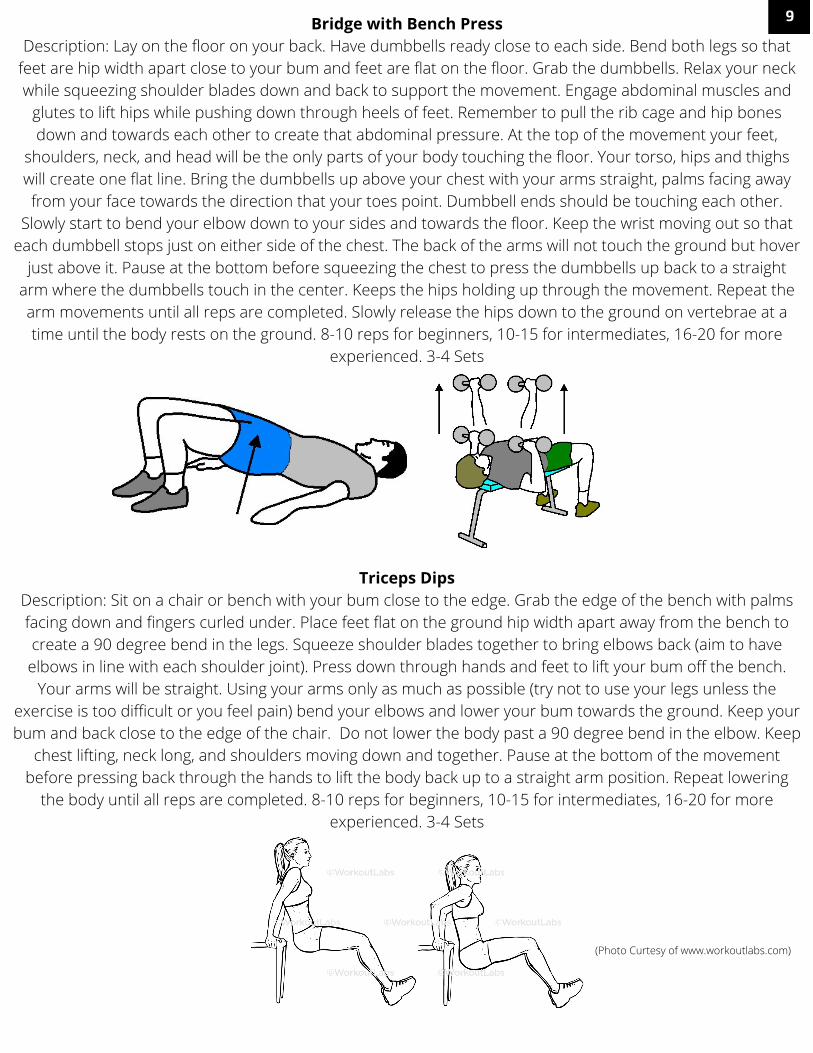
Bridge with Bench PressDescription: Lay on the floor on your back. Have dumbbells ready close to each side. Bend both legs so that
feet are hip width apart close to your bum and feet are flat on the floor. Grab the dumbbells. Relax your neckwhile squeezing shoulder blades down and back to support the movement. Engage abdominal muscles and
glutes to lift hips while pushing down through heels of feet. Remember to pull the rib cage and hip bonesdown and towards each other to create that abdominal pressure. At the top of the movement your feet,
shoulders, neck, and head will be the only parts of your body touching the floor. Your torso, hips and thighswill create one flat line. Bring the dumbbells up above your chest with your arms straight, palms facing awayfrom your face towards the direction that your toes point. Dumbbell ends should be touching each other.
Slowly start to bend your elbow down to your sides and towards the floor. Keep the wrist moving out so thateach dumbbell stops just on either side of the chest. The back of the arms will not touch the ground but hover
just above it. Pause at the bottom before squeezing the chest to press the dumbbells up back to a straightarm where the dumbbells touch in the center. Keeps the hips holding up through the movement. Repeat thearm movements until all reps are completed. Slowly release the hips down to the ground on vertebrae at atime until the body rests on the ground. 8-10 reps for beginners, 10-15 for intermediates, 16-20 for more
experienced. 3-4 Sets
Triceps DipsDescription: Sit on a chair or bench with your bum close to the edge. Grab the edge of the bench with palmsfacing down and fingers curled under. Place feet flat on the ground hip width apart away from the bench tocreate a 90 degree bend in the legs. Squeeze shoulder blades together to bring elbows back (aim to haveelbows in line with each shoulder joint). Press down through hands and feet to lift your bum off the bench.
Your arms will be straight. Using your arms only as much as possible (try not to use your legs unless theexercise is too difficult or you feel pain) bend your elbows and lower your bum towards the ground. Keep yourbum and back close to the edge of the chair. Do not lower the body past a 90 degree bend in the elbow. Keep
chest lifting, neck long, and shoulders moving down and together. Pause at the bottom of the movementbefore pressing back through the hands to lift the body back up to a straight arm position. Repeat lowering
the body until all reps are completed. 8-10 reps for beginners, 10-15 for intermediates, 16-20 for moreexperienced. 3-4 Sets
(Photo Curtesy of www.workoutlabs.com)
9
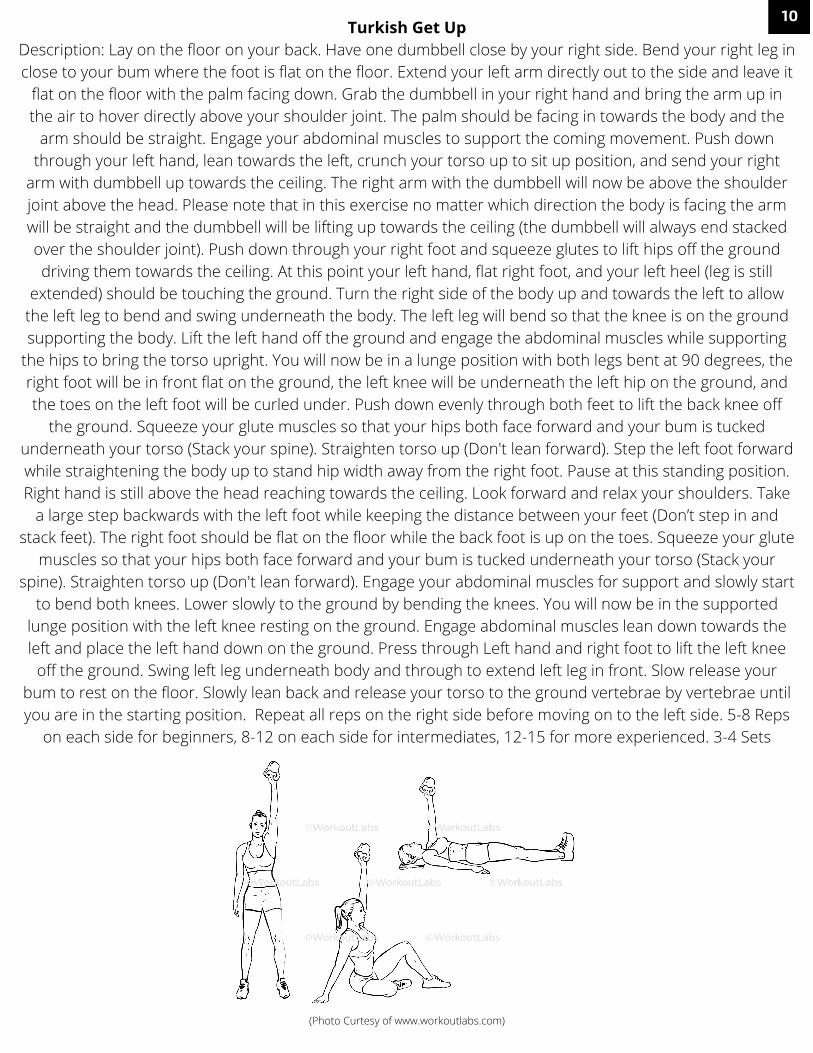
Turkish Get UpDescription: Lay on the floor on your back. Have one dumbbell close by your right side. Bend your right leg inclose to your bum where the foot is flat on the floor. Extend your left arm directly out to the side and leave it
flat on the floor with the palm facing down. Grab the dumbbell in your right hand and bring the arm up inthe air to hover directly above your shoulder joint. The palm should be facing in towards the body and the
arm should be straight. Engage your abdominal muscles to support the coming movement. Push downthrough your left hand, lean towards the left, crunch your torso up to sit up position, and send your right
arm with dumbbell up towards the ceiling. The right arm with the dumbbell will now be above the shoulderjoint above the head. Please note that in this exercise no matter which direction the body is facing the armwill be straight and the dumbbell will be lifting up towards the ceiling (the dumbbell will always end stackedover the shoulder joint). Push down through your right foot and squeeze glutes to lift hips off the grounddriving them towards the ceiling. At this point your left hand, flat right foot, and your left heel (leg is still
extended) should be touching the ground. Turn the right side of the body up and towards the left to allowthe left leg to bend and swing underneath the body. The left leg will bend so that the knee is on the groundsupporting the body. Lift the left hand off the ground and engage the abdominal muscles while supporting
the hips to bring the torso upright. You will now be in a lunge position with both legs bent at 90 degrees, theright foot will be in front flat on the ground, the left knee will be underneath the left hip on the ground, andthe toes on the left foot will be curled under. Push down evenly through both feet to lift the back knee off
the ground. Squeeze your glute muscles so that your hips both face forward and your bum is tuckedunderneath your torso (Stack your spine). Straighten torso up (Don't lean forward). Step the left foot forwardwhile straightening the body up to stand hip width away from the right foot. Pause at this standing position.Right hand is still above the head reaching towards the ceiling. Look forward and relax your shoulders. Take
a large step backwards with the left foot while keeping the distance between your feet (Don’t step in andstack feet). The right foot should be flat on the floor while the back foot is up on the toes. Squeeze your glute
muscles so that your hips both face forward and your bum is tucked underneath your torso (Stack yourspine). Straighten torso up (Don't lean forward). Engage your abdominal muscles for support and slowly start
to bend both knees. Lower slowly to the ground by bending the knees. You will now be in the supportedlunge position with the left knee resting on the ground. Engage abdominal muscles lean down towards theleft and place the left hand down on the ground. Press through Left hand and right foot to lift the left knee
off the ground. Swing left leg underneath body and through to extend left leg in front. Slow release yourbum to rest on the floor. Slowly lean back and release your torso to the ground vertebrae by vertebrae untilyou are in the starting position. Repeat all reps on the right side before moving on to the left side. 5-8 Reps
on each side for beginners, 8-12 on each side for intermediates, 12-15 for more experienced. 3-4 Sets
(Photo Curtesy of www.workoutlabs.com)
10
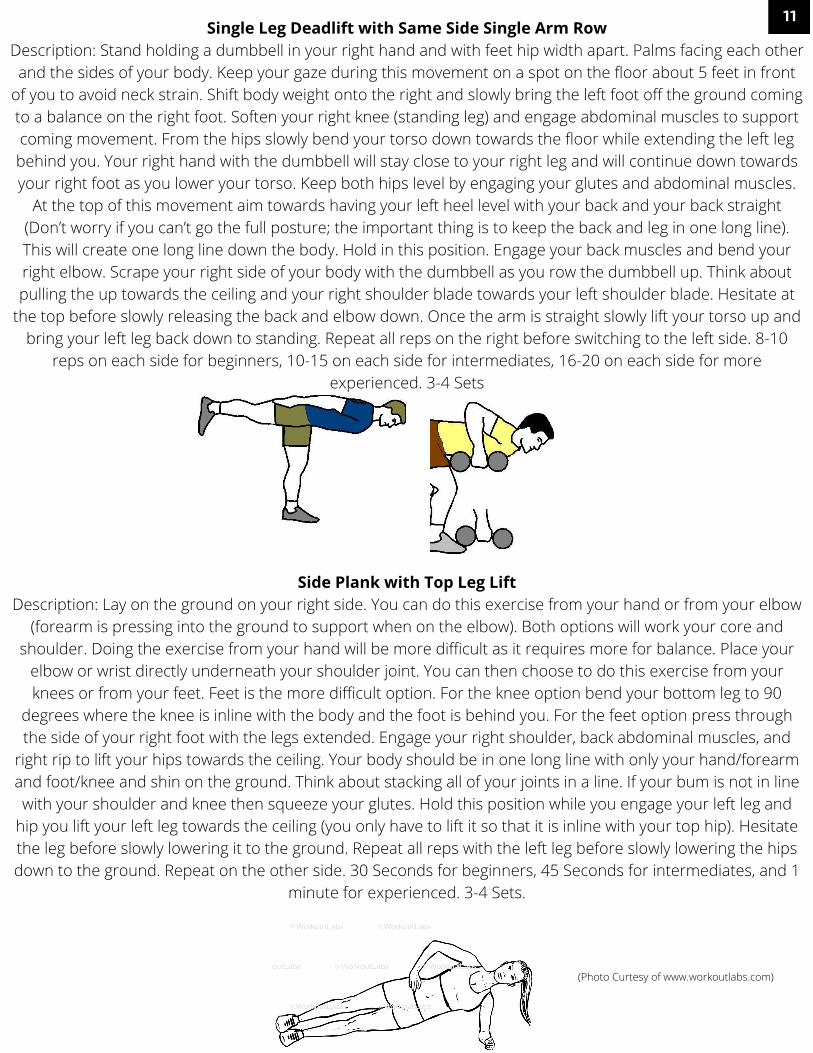
Single Leg Deadlift with Same Side Single Arm RowDescription: Stand holding a dumbbell in your right hand and with feet hip width apart. Palms facing each otherand the sides of your body. Keep your gaze during this movement on a spot on the floor about 5 feet in front
of you to avoid neck strain. Shift body weight onto the right and slowly bring the left foot off the ground comingto a balance on the right foot. Soften your right knee (standing leg) and engage abdominal muscles to supportcoming movement. From the hips slowly bend your torso down towards the floor while extending the left legbehind you. Your right hand with the dumbbell will stay close to your right leg and will continue down towardsyour right foot as you lower your torso. Keep both hips level by engaging your glutes and abdominal muscles.
At the top of this movement aim towards having your left heel level with your back and your back straight(Don’t worry if you can’t go the full posture; the important thing is to keep the back and leg in one long line).This will create one long line down the body. Hold in this position. Engage your back muscles and bend yourright elbow. Scrape your right side of your body with the dumbbell as you row the dumbbell up. Think aboutpulling the up towards the ceiling and your right shoulder blade towards your left shoulder blade. Hesitate at
the top before slowly releasing the back and elbow down. Once the arm is straight slowly lift your torso up andbring your left leg back down to standing. Repeat all reps on the right before switching to the left side. 8-10
reps on each side for beginners, 10-15 on each side for intermediates, 16-20 on each side for moreexperienced. 3-4 Sets
Side Plank with Top Leg LiftDescription: Lay on the ground on your right side. You can do this exercise from your hand or from your elbow
(forearm is pressing into the ground to support when on the elbow). Both options will work your core andshoulder. Doing the exercise from your hand will be more difficult as it requires more for balance. Place your
elbow or wrist directly underneath your shoulder joint. You can then choose to do this exercise from yourknees or from your feet. Feet is the more difficult option. For the knee option bend your bottom leg to 90
degrees where the knee is inline with the body and the foot is behind you. For the feet option press throughthe side of your right foot with the legs extended. Engage your right shoulder, back abdominal muscles, and
right rip to lift your hips towards the ceiling. Your body should be in one long line with only your hand/forearmand foot/knee and shin on the ground. Think about stacking all of your joints in a line. If your bum is not in linewith your shoulder and knee then squeeze your glutes. Hold this position while you engage your left leg and
hip you lift your left leg towards the ceiling (you only have to lift it so that it is inline with your top hip). Hesitatethe leg before slowly lowering it to the ground. Repeat all reps with the left leg before slowly lowering the hipsdown to the ground. Repeat on the other side. 30 Seconds for beginners, 45 Seconds for intermediates, and 1
minute for experienced. 3-4 Sets.
(Photo Curtesy of www.workoutlabs.com)
11

Weighted Burpee (Man Maker)Description: Stand holding a dumbbell in each hand with feet hip width apart (can also be shoulder width forthis exercise). Palms facing each other and the sides of your body. Knees are soft and abdominal muscles areengaged to support the coming movement. Slowly send your hips back and bend your knees at the same time
to lower towards a 90 degree bend in the legs. At the bottom your back should be straight. This means thatyour bum is not curling under your torso and your chest is not rolling down. Look down and place the
dumbbells on the ground but don’t let go of them. Step back each foot one at a time or jump both feet back tocreate a plank position. Your body should create a straight line with you toes and hands supporting you whileholding the dumbbells (Important note: If your dumbbells are round then place dumbbells on the ground, letgo of them, and then place hands on the ground to step back/create the plank position). At this point you can
drop your knees to the ground or stay on your toes to make the exercise more difficult. This will create onelong line down the body. Hold in this position. Engage your back muscles and bend your right elbow. Scrape
your right side of your body with the dumbbell as you row the dumbbell up. Think about pulling the uptowards the ceiling and your right shoulder blade towards your left shoulder blade. Hesitate at the top beforeslowly releasing the back and elbow down. Repeat with the left arm. At this point you can add a push up if youwould like extra work. Look forward and step or jump feet back to hip width or shoulder width apart. Engage
biceps (upper arm muscles) to bring weights on shoulders. You should now be in the bottom of a squatposition with the dumbbells on your shoulders. Pause for a brief moment before squeezing your glutes (bummuscles) and pushing down through your heels to bring your hips forward and up back to standing position. If
you would like extra you can also add a shoulder press at the top while standing. Repeat until all reps arecompleted. 5-8 Reps on each side for beginners, 8-12 on each side for intermediates, 12-15 for more
experienced. 3-4 Sets
12
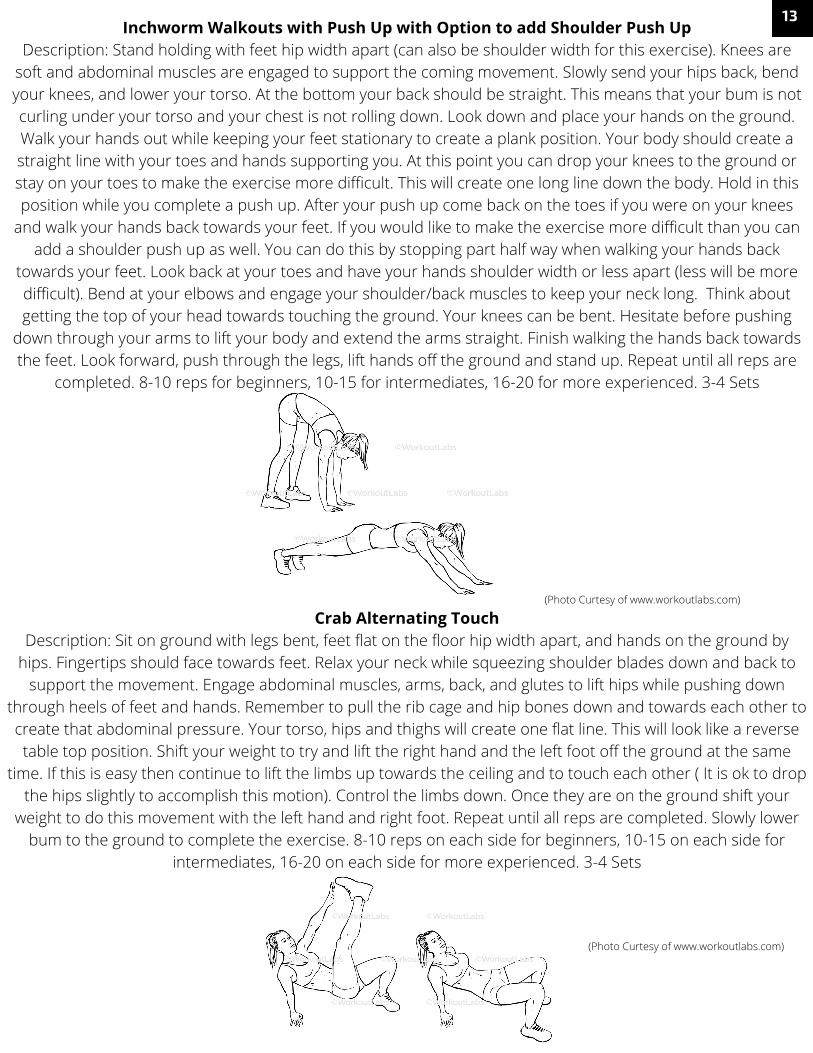
Inchworm Walkouts with Push Up with Option to add Shoulder Push UpDescription: Stand holding with feet hip width apart (can also be shoulder width for this exercise). Knees are
soft and abdominal muscles are engaged to support the coming movement. Slowly send your hips back, bendyour knees, and lower your torso. At the bottom your back should be straight. This means that your bum is notcurling under your torso and your chest is not rolling down. Look down and place your hands on the ground.Walk your hands out while keeping your feet stationary to create a plank position. Your body should create astraight line with your toes and hands supporting you. At this point you can drop your knees to the ground orstay on your toes to make the exercise more difficult. This will create one long line down the body. Hold in thisposition while you complete a push up. After your push up come back on the toes if you were on your knees
and walk your hands back towards your feet. If you would like to make the exercise more difficult than you canadd a shoulder push up as well. You can do this by stopping part half way when walking your hands back
towards your feet. Look back at your toes and have your hands shoulder width or less apart (less will be moredifficult). Bend at your elbows and engage your shoulder/back muscles to keep your neck long. Think aboutgetting the top of your head towards touching the ground. Your knees can be bent. Hesitate before pushing
down through your arms to lift your body and extend the arms straight. Finish walking the hands back towardsthe feet. Look forward, push through the legs, lift hands off the ground and stand up. Repeat until all reps are
completed. 8-10 reps for beginners, 10-15 for intermediates, 16-20 for more experienced. 3-4 Sets
(Photo Curtesy of www.workoutlabs.com)
Crab Alternating TouchDescription: Sit on ground with legs bent, feet flat on the floor hip width apart, and hands on the ground by
hips. Fingertips should face towards feet. Relax your neck while squeezing shoulder blades down and back tosupport the movement. Engage abdominal muscles, arms, back, and glutes to lift hips while pushing down
through heels of feet and hands. Remember to pull the rib cage and hip bones down and towards each other tocreate that abdominal pressure. Your torso, hips and thighs will create one flat line. This will look like a reversetable top position. Shift your weight to try and lift the right hand and the left foot off the ground at the same
time. If this is easy then continue to lift the limbs up towards the ceiling and to touch each other ( It is ok to dropthe hips slightly to accomplish this motion). Control the limbs down. Once they are on the ground shift your
weight to do this movement with the left hand and right foot. Repeat until all reps are completed. Slowly lowerbum to the ground to complete the exercise. 8-10 reps on each side for beginners, 10-15 on each side for
intermediates, 16-20 on each side for more experienced. 3-4 Sets
(Photo Curtesy of www.workoutlabs.com)
13
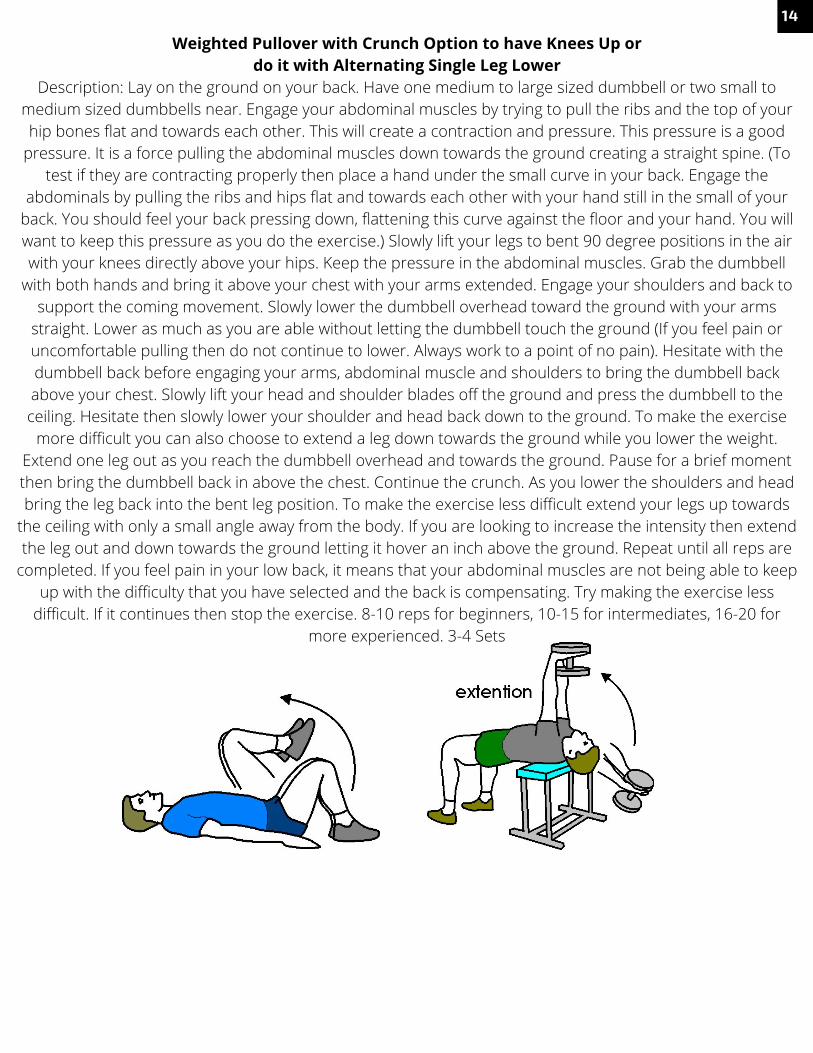
Weighted Pullover with Crunch Option to have Knees Up ordo it with Alternating Single Leg Lower
Description: Lay on the ground on your back. Have one medium to large sized dumbbell or two small tomedium sized dumbbells near. Engage your abdominal muscles by trying to pull the ribs and the top of yourhip bones flat and towards each other. This will create a contraction and pressure. This pressure is a good
pressure. It is a force pulling the abdominal muscles down towards the ground creating a straight spine. (Totest if they are contracting properly then place a hand under the small curve in your back. Engage the
abdominals by pulling the ribs and hips flat and towards each other with your hand still in the small of yourback. You should feel your back pressing down, flattening this curve against the floor and your hand. You willwant to keep this pressure as you do the exercise.) Slowly lift your legs to bent 90 degree positions in the airwith your knees directly above your hips. Keep the pressure in the abdominal muscles. Grab the dumbbell
with both hands and bring it above your chest with your arms extended. Engage your shoulders and back tosupport the coming movement. Slowly lower the dumbbell overhead toward the ground with your arms
straight. Lower as much as you are able without letting the dumbbell touch the ground (If you feel pain oruncomfortable pulling then do not continue to lower. Always work to a point of no pain). Hesitate with thedumbbell back before engaging your arms, abdominal muscle and shoulders to bring the dumbbell backabove your chest. Slowly lift your head and shoulder blades off the ground and press the dumbbell to theceiling. Hesitate then slowly lower your shoulder and head back down to the ground. To make the exercise
more difficult you can also choose to extend a leg down towards the ground while you lower the weight.Extend one leg out as you reach the dumbbell overhead and towards the ground. Pause for a brief momentthen bring the dumbbell back in above the chest. Continue the crunch. As you lower the shoulders and headbring the leg back into the bent leg position. To make the exercise less difficult extend your legs up towards
the ceiling with only a small angle away from the body. If you are looking to increase the intensity then extendthe leg out and down towards the ground letting it hover an inch above the ground. Repeat until all reps are
completed. If you feel pain in your low back, it means that your abdominal muscles are not being able to keepup with the difficulty that you have selected and the back is compensating. Try making the exercise less
difficult. If it continues then stop the exercise. 8-10 reps for beginners, 10-15 for intermediates, 16-20 formore experienced. 3-4 Sets
14