Embed Size (px)
Citation preview

Cash Management Superuser “How To” Guide
Page 1
The Guide below is to assist Superusers (Administrators) in navigating our Cash Management user setups.
There can only be one Superuser/Administrator
If you have questions please call or email our Cash Management Support Group at 1-844-213-5198 or [email protected]
Link to Cash Management Portal: https://online.my100bank.com/CM/bankonline
TABLE OF CONTENTS
Section 1 – Logging in as the Superuser and Creating Users
Section 2 – Nick-naming the Accounts
Section 3 – Bill Pay Enrollment
SECTION 1 – LOGGING IN AS THE SUPERUSER AND CREATING USERS
STEP 1: Login as company Superuser (i.e. Administrator) to create end-user profile(s):
Company ID: Issued by the Cash Management Group.
User ID: superuser (you will be required to change this)
Password: Issued by the Cash Management Group (you will be required to change this)
** If prompted, enter the authentication number from your security token**
Cash Management Superuser “How To” Guide
Page 2
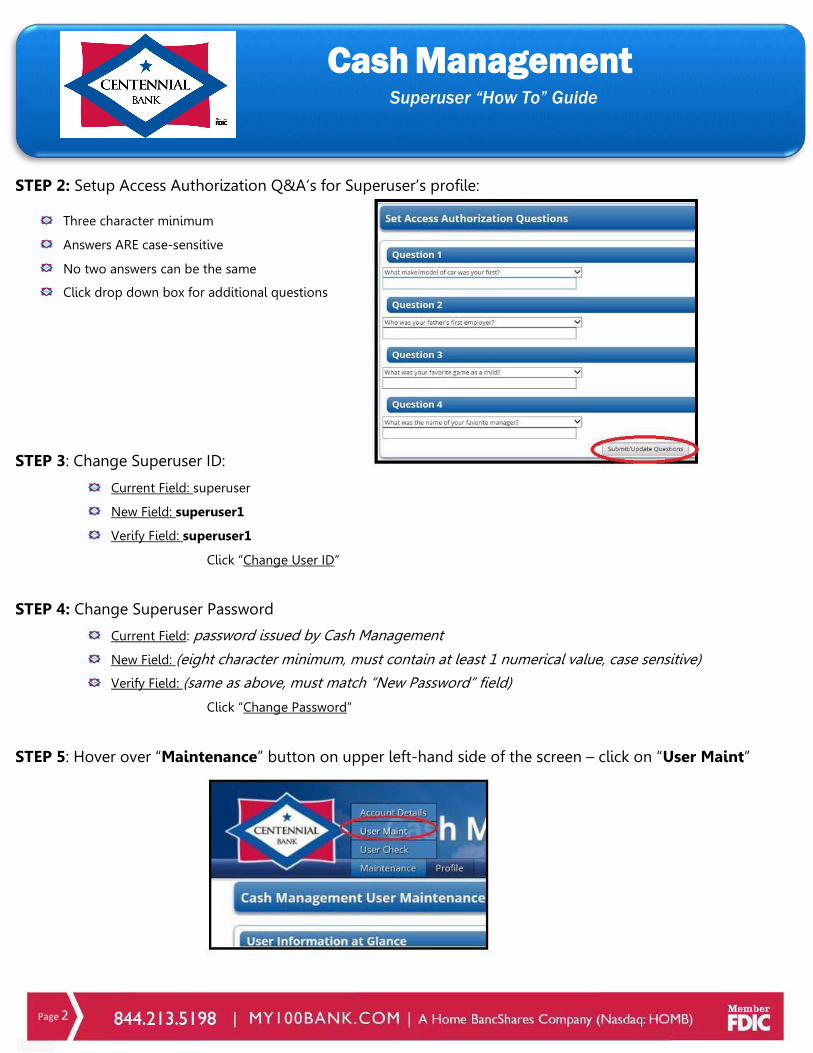
STEP 2: Setup Access Authorization Q&A’s for Superuser’s profile:
Three character minimum
Answers ARE case-sensitive
No two answers can be the same
Click drop down box for additional questions
STEP 3: Change Superuser ID:
Current Field: superuser
New Field: superuser1
Verify Field: superuser1
Click “Change User ID”
STEP 4: Change Superuser Password
Current Field: password issued by Cash Management
New Field: (eight character minimum, must contain at least 1 numerical value, case sensitive)
Verify Field: (same as above, must match “New Password” field)
Click “Change Password”
STEP 5: Hover over “Maintenance” button on upper left-hand side of the screen – click on “User Maint”

Cash Management Superuser “How To” Guide
Page 3
STEP 6: REQUIRED - Update email address of Company Superuser:
Enter email address in the text box
Click “Change Super User”
STEP 7: Create end-user profile:
Enter User ID, Name, and a Temporary Password* in the respective fields under “Add a User” Click “Add User”
*Temporary – User will be prompted toestablish new password during initiallogin*
STEP 8: Input email address and Security Token serial number for User:
Enter User Email Address If applicable, enter the serial number located on the back of User’s Security Token in “ACA/TFA Serial Number” field* REQUIRED - Domestic Wire Transfer Limit – If your company is originating adomestic wire online, this limit is thedollar amount you allow your user toverify per verification.
REQUIRED – International Wire TransferLimit - If your company is originating aninternational wire online, this limit is thedollar amount you allow your user to verifyper verification.
Click the “Update” button
*numerical values only, omit hyphens – e.g., 2712345678

Cash Management Superuser “How To” Guide
Page 4
STEP 9: Establish User Application Behavior Options:
See Behavior Options Detail table below: Review each option to evaluate whether your user needs access to all options
Click “Update” button to save any changes
STEP 10: Scroll down to User Account Access
Select the account number or loan you want your user to view Click “Grant Access”

Cash Management Superuser “How To” Guide
Page 5
STEP 11: User Account Behavior Options for granted access account
See Behavior Options Detail Table below:
STEP 11 A: For Companies/Accounts with Positive Pay See Behavior Options Detail Table – Positive Pay: Select or De-Select boxes Click “Update” button to save any changes
STEP 11 A: For Companies/Accounts with ACH – User Account Behavior Option Extended – If N/A scroll to bottom of page and click back
See Behavior Options Detail Table – ACH below: Select or De-Select boxes Click “Update” button to save any changes Scroll down to assess limits
Click “Update” button to save any changes
Cash Management Superuser “How To” Guide
Page 6
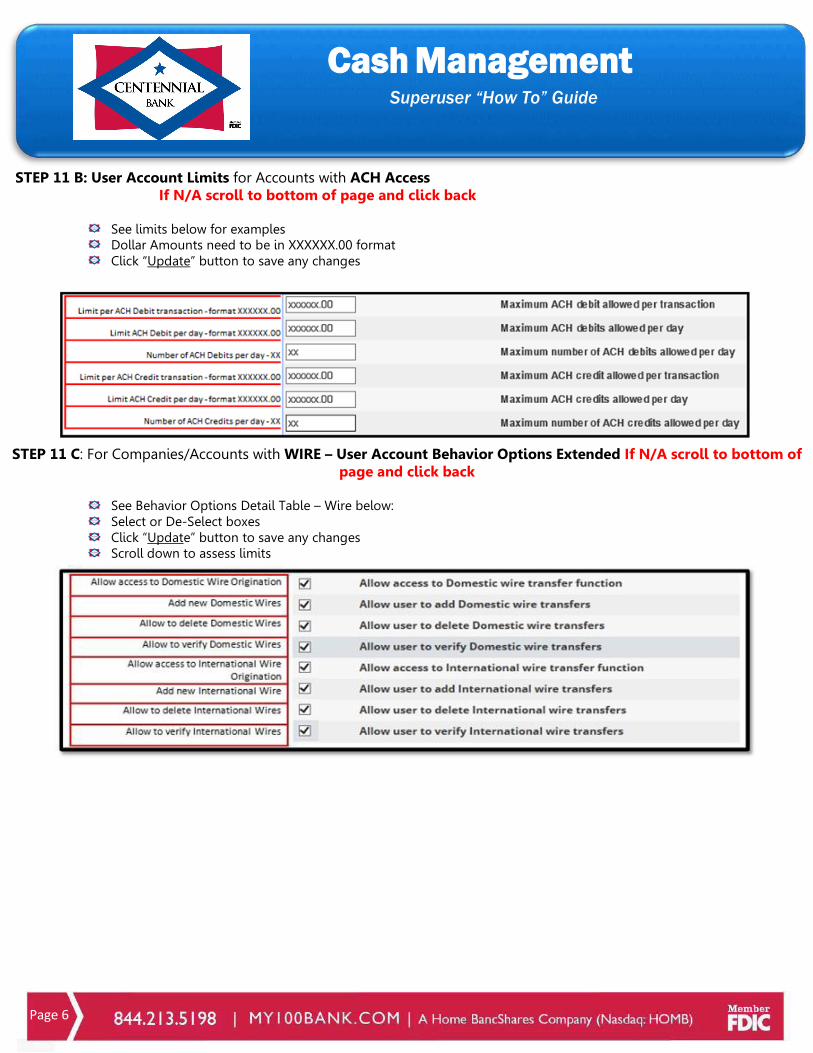
STEP 11 B: User Account Limits for Accounts with ACH Access If N/A scroll to bottom of page and click back
See limits below for examples Dollar Amounts need to be in XXXXXX.00 format Click “Update” button to save any changes
STEP 11 C: For Companies/Accounts with WIRE – User Account Behavior Options Extended If N/A scroll to bottom of page and click back
See Behavior Options Detail Table – Wire below: Select or De-Select boxes Click “Update” button to save any changes Scroll down to assess limits
Cash Management Superuser “How To” Guide
Page 7
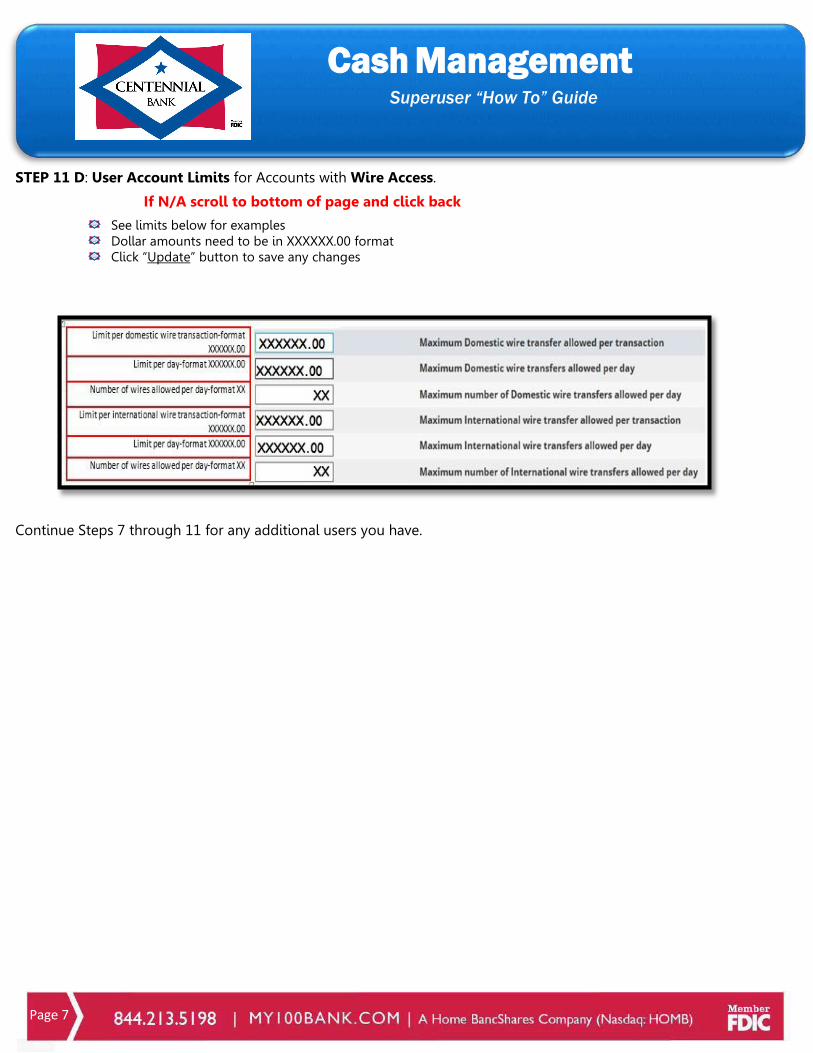
STEP 11 D: User Account Limits for Accounts with Wire Access.
If N/A scroll to bottom of page and click back
See limits below for examples Dollar amounts need to be in XXXXXX.00 format Click “Update” button to save any changes
Continue Steps 7 through 11 for any additional users you have.

Cash Management Superuser “How To” Guide
Pa ge 8
SECTION 2 – NICK-NAMING THE ACCOUNTS
STEP 1: Nick-naming the accounts in Cash Management
Maintenance > Click on “Account Details” Click on the actions button of the account you wish to add a nick-name for
STEP 2: Inputting the Nick-name
On the next screen, scroll all the way down to the bottom of the screen to the Account Nick-name box Type in box the desired nick-name Click “Update”
STEP 3: Continue Step 1 & 2 to change all account nick-names.

Cash Management Superuser “How To” Guide
SECTION 3 – BILL PAY ENROLLMENT
NOTE: Any user receiving bill pay access must sign in with their user login information and verify their email address before bill pay access can be added to their user login.
STEP 1: Enrolling and entitling users for Bill Pay
Log in as the Superuser Hover over Profile and click on “Bill Payment”
STEP 2: Administrator Profile
Create a Profile Name: (Your Lead Company Name) Select the accounts to process bill pay from Click “Add Profile”
STEP 3: Select a User as the Administrator
Select a user to be the Bill Pay Administrator, Click on User’s Name Click on “Add to Bill Pay as Administrator”
o Only the Administrator can create, edit and delete bill pay payees
Page 9

Cash Management Superuser “How To” Guide
STEP 4: Add additional users to Bill Pay
Select any additional users to have Bill Pay Access, Click on User’s Name Click on “Add to Bill Pay as User”
o This user can only send bill pay to existing bill pay payees
*See User Guide for where to setup and process bill pays.
End of Superuser Guide
Thank you for banking with Centennial. Please contact our Cash Management Group for questions 1-844-213-5198 or [email protected]
Page 10