Embed Size (px)
Citation preview

DecisionCast for Business Managers 1
TRAINING MANUAL
DecisionCast 101
Carnegie Mellon University
Author: Amanda Perkins Creation Date: March 17, 2008 Last Updated: October 23, 2015
Version: 1.5

2
Contents
Overview ................................................................................................ 3 What is a data warehouse? ........................................................................... 3 Carnegie Mellon’s Financials Data Warehouse ........................................... 3 Signing on to the Data Warehouse ............................................................... 5 Decision Cast – Adhoc Library .................................................................. 11
Working with Queries/Reports ......................................................... 14 Copying a query/report to your Private Folder ........................................... 14 Renaming a Query: ..................................................................................... 16 Editing a Query/Report............................................................................... 17 Components of a Query/Report .................................................................. 18 Exercise #1 (Instructor Guided) ................................................................. 22 More on Selecting Filter Values................................................................. 33 How to Save to Excel ………………………………………………….. 40 Let’s Review #1 - Circle the appropriate answer(s):.................................. 43 Exercise #2 (Participants do on their own) ................................................ 44 Running a Saved Query/Report .................................................................. 45 More about Filtering................................................................................... 49
Working with Queries/Reports ......................................................... 53 Exercise #3 (Participants do on their own) ................................................ 60 Exercise #4 (Optional Advanced Exercise) ……………………………. 61 Let’s Review #2.......................................................................................... 62
Reference Materials – Section 1 ........................................................ 63 Filter Operators........................................................................................... 63 Options ....................................................................................................... 66 Query Results Icons.................................................................................... 68
Reference Materials - Section 2-Query Descriptions by Domain .. 69

3
Overview
What is a data warehouse?
A data warehouse is a comprehensive data management system designed to enable you to quickly review information and to effectively use it to support sound business decisions. It is a vast storage and information-processing site that gathers sorts and stores existing data.
A data warehouse does not contain new data and cannot be updated by users running queries. Instead, it copies data extracted from existing production systems. Users can access this data freely without worrying about slowing down the day-to-day operations of the production database.
Carnegie Mellon’s Financials Data Warehouse
Financial data is updated nightly Saturday – Thursday from the university’s Oracle Applications Financials system to the data warehouse named CMUDW. Please be aware of the timing delay of this scheduled process when attempting to access data from the data warehouse. The data you see today in the Data Warehouse is yesterday’s data from the Oracle Financial System.
The warehouse was created using software from Decision Point Software, Inc. With the DecisionPoint® DecisionCast™ end user tool, you can tap into the Carnegie Mellon Financials data warehouse to run reports. The Data Warehouse is divided in “domains” which are equivalent to the various Oracle Modules, e.g., General Ledger, Grants, Labor Distribution, Purchasing, Payables, and Receivables.
Queries/reports have been created by the Business Systems and Services team and can be run by any campus user with appropriate security.
First Time Logging into the Data Warehouse (initial password change)
When users are initially established in the warehouse database their passwords are set to expire. You are required to change your initial password before launching DecisionCast. If you do not change your initial password, you will not be able to authenticate when launching DecisionCast.
Initial Password Change
Navigate to the ISQLPlus page at https://isqlplus.andrew.cmu.edu
1. The login.cmu.edu Web Login page will appear. Enter you Andrew User ID and
Password and click on the Login button.

4
2. The Oracle iSQL*Plus Login page opens. a. Enter your Andrew username in the Username field (lower case) b. Enter the initial password given to you by the Oracle Help Desk (case
sensitive) c. Enter fdwprod in the Connection Identifier field (not case sensitive) d. Click on the Login button
3. The Oracle iSQL*Plus Expired Password page opens letting you know that you password is
expired. a. Reenter your initial password in the Old password field b. Enter your new password in the New password field, this password cannot include special characters c. Enter your new password again in the Retype new password field d. Click on the OK button

5
Signing on to the Data Warehouse
1. Go to the Business Systems and Services webpage at https://www.cmu.edu/finance/systems/ and single-click on Financial Data Warehouse.
2. The Citrix MyApps Login window will show. This login is your ANDREW ID and ANDREW Password. Click Login.

6
3. The Citrix Applications window will show. You will see application icons that you have
access to listed. a) For today’s class, single-click on the DecisionCast – Test Icon. Please note: Outside of class, you will normally click on the DecisionCast – Prod Icon
4. The authentication box will open for you to enter your user id and password. a) For today’s class, you will be assigned a user id. The instructor will also give you the
password.

7
5. Do not change the domain, click on the button. Note: The hour glass will not display while the system signs you on.
Decision Cast – Personal Library
1. Decision Cast (DC) will open to your Personal Library when logging in.

8
2. The Personal Library stores reports, alerts, and dashboards that were broadcast to you.
3. On the left under Personal you can switch between Dashboards or Reports and Alerts.
4. DC defaults to Dashboards. At this time, no reports or alerts are broadcast.
5. Periodically the Data Warehouse News Dashboard is broadcast to all Data Warehouse (DW) users.
6. Highlighting the Dashboard causes the Common Tasks to light up for selection. To open the Dashboard, you can double-click on the Dashboard or select Open Dashboard under Common Tasks.

9
Click on Open Dashboard
(i) Double-click on Dashboard
7. At the bottom of the screen is a description of the dashboard.
Data Warehouse News Dashboard
1. Periodically the DW News Dashboard is broadcast to all users with announcements about the data warehouse or items specific to the domains (modules).
2. At the top right is the date and time of the broadcast.
3. Current Headlines usually provides information about updating data in the warehouse.

10
4. Under each domain (Labor Distribution, Grants Accounting, etc.) are specific items associated with that domain.
5. Close the dashboard by clicking on the icon at the top far right corner.
6. Once you’ve read the dashboard you have the option to Delete it. a) Click on Delete under Common Tasks. b) DW will request confirmation of this deletion.
c) Click on Yes to delete it.

11
Decision Cast – Adhoc Library
1. Click on the icon to enter the Adhoc Library where customized queries/reports are available for use.
DC Adhoc Library Folder Structure – Public and Private Folders
1. There are (2) main folders in the Adhoc Library, which are: a) Public Folder – contains subfolders with queries/reports that can be used by
anyone with access to DecisionCast. Most users work out of the subfolder.
b) Private Folder – A users’ personal folder where queries/reports containing filter
values you have specified can be saved and used again. No one but the individual user has access to the Private folder.
2. There are two ways to open folders in the Data Warehouse.
a) Simply click on the plus sign (+) next to the folder.
The plus sign (+) changes into a minus sign (-).
.
A list of sub-folders is displayed.
Note: Some of the sub-folders also have a plus sign (+). These indicate additional sub-folders within the sub-folder.
b) The second way to open the folder is to double-click on the folder name. The
subfolders are then also shown in the “Report List” area to the right of the folders.

12
The folder name is shown at the top.
Note: Notice some of the folders have the same names as the Oracle modules. As mentioned previously the module equivalents in the Data Warehouse are called “domains”. The queries in these folders were created to provide information for the specified domain.
3. Let’s open the query that we will be using for the first class exercise.
a) From the folder, double-click on the General Ledger subfolder. The subfolders for the General Ledger are displayed on the right.
b) Double-click on the GL Journal Detail folder on the right.
c) The General Ledger folder is expanded on the left and the subfolders within the GL Journal Detail folder are shown on the right. Note: the GL Journal Detail folder shows as “open” next to the folder name on the left.
d) Double-click on the folder.

13
e) The folder icon is open on the left. The icon on the right has changed to indicating a query/report.

14
Working with Queries/Reports
Copying a query/report to your Private Folder
For this exercise, we will use the R12 GL Transaction Detail (Macro) query. The folder path was College & Department > General Ledger > GL Journal Detail > GL Transaction Detail.
1. Highlight the query/report R12 GL Transaction Detail (Macro) query.
2. Copy the query. This can be done several ways, such as:
a) Right clicking and selecting ‘Copy’ from the available functions.
b) Using Copy/Paste function under the Menu item Edit.
c) Holding down the Ctrl+C keys (to copy) and then Ctrl+V (to paste).
3. Double-Click on your folder to open it.

15
4. Click on the blank space in the right hand panel and paste the query there using your preferred method (the right-click menu/Paste, the Edit menu/Paste, or Ctrl+V.)
.
a) A copy of the query/report will be placed in your private folder.
i) If a query/report with the same name already exists in the folder, DC will add a number (1) to the end of the name.
16
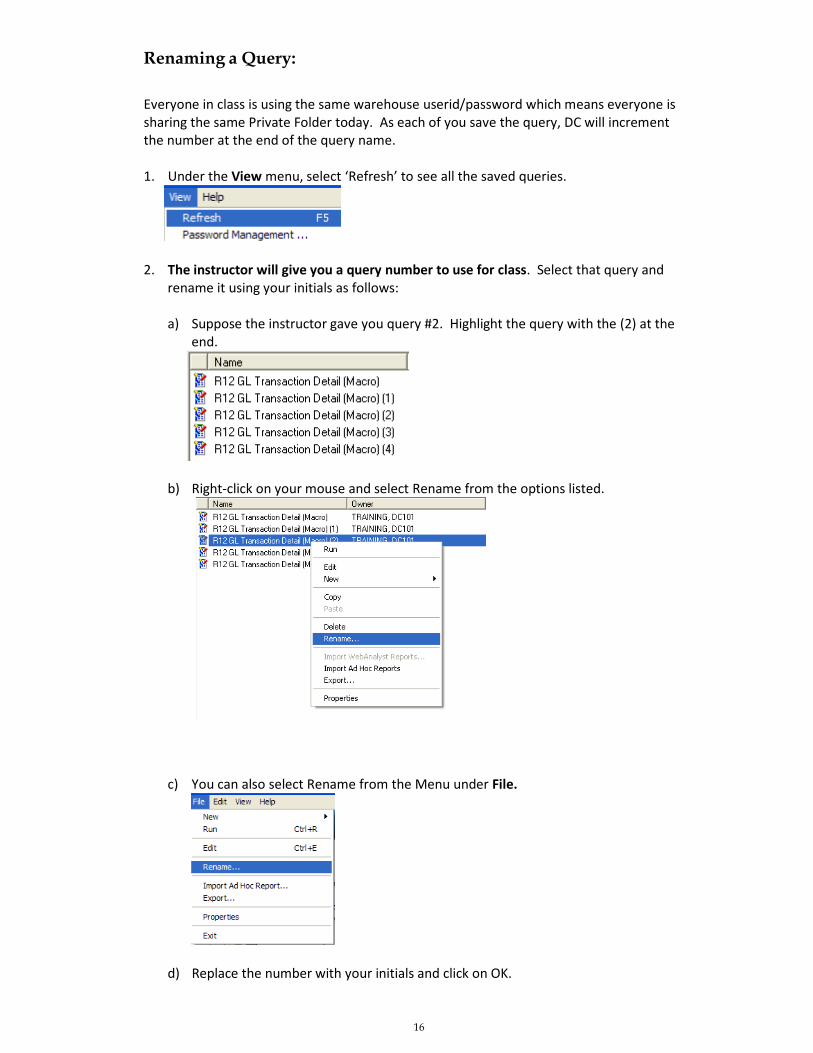
Renaming a Query:
Everyone in class is using the same warehouse userid/password which means everyone is sharing the same Private Folder today. As each of you save the query, DC will increment the number at the end of the query name.
1. Under the View menu, select ‘Refresh’ to see all the saved queries.
2. The instructor will give you a query number to use for class. Select that query and rename it using your initials as follows:
a) Suppose the instructor gave you query #2. Highlight the query with the (2) at the
end.
b) Right-click on your mouse and select Rename from the options listed.
c) You can also select Rename from the Menu under File.
d) Replace the number with your initials and click on OK.

17
e) Select Refresh under Menu item View to see the new query names.
f) This designates which query you will use in class today.
Note: Once you have access to DC, you will have your own unique userid/password and will not share a private folder with anyone. However, there may be times that you want to rename a query to better suit your needs.
Editing a Query/Report
Never edit a query/report in the Public Folder. Doing so would lock the query/report preventing other users from accessing it. In addition, you will not be able to permanently save the changes in the Public Folder.
Prior to editing a query, it is best to copy it into your Private Folder. Since we’ve already copied the GL Transactions Detail (Macro) query, let’s use it to demonstrate editing a query/report.
1. Highlight the query you want to edit and do one of the following:
a) Under the File menu, select ‘Edit’.
b) Do a Ctrl+E.
c) Right click and select ‘Edit’ from the available functions.

18
Components of a Query/Report
When you edit a query/report, the Ad Hoc Browser window opens. Let’s review the components of this window.
1. The window name (Ad Hoc Browser: plus the name of the query/report that is being edited) is displayed in the blue bar at the top.

19
2. The Menu toolbar
Save (Ctrl+S) – save query with same name.
Save as (Ctrl+Shift+S) – save query with new name.
View Query Details Help – takes user to the online help information
Notice the keyboard shortcuts are displayed for the save commands.
Close – Close query
Query SQL
3. The Icon toolbar
Save Run Query Stop query
Note: When a query is running the background of the Stop Query icon turns red indicating that it is available to use.
4. Fact & Measures

20
Fact– refers to the table where measures are extracted for use in the current query.
Measures - basic numeric and additive information that is included in a report; for example PTD Actual Debits, PTD Actual Credits, Net Activity, etc. Usually answers the question – How Much?
5. Dimensions
6. Query Details
Dimensions – descriptive data used to select or group the measures; for example, by Period, Object Code, etc.

21
Dimensions selected for this Measures selected for this particular particular query/report query/report
7. Query Results
a) Tabs
i) Results tab – Where results of the query/report are displayed ii) Options and Query Information – Not covered in this class
b) Toolbar – applies only to query results, this will be covered more in a later section
when we have some query results.

22
Exercise #1 (Instructor Guided)
Your supervisor has asked you to compile detail information for domestic travel expenses for your organization (210100) incurred during the first quarter of fiscal year 2014, (FY14) in order to do some analyses.
To accomplish this we will run the R12 GL Detail Transaction (Macro) query using the following filters/values: Period Name – the instructor will indicate what periods to
select. (Jul13-14, Aug13-14 and Sep13-14 are used in this manual).
Object Code Numbers – 85000 – 85999 (the travel object code
numbers are within this range). Object Code Name – Contains “DOMESTIC” Organization - 210100 (used both in class and in this manual)
The instructor will guide you through this first exercise.
Tip: Chart of Accounts are available for each segment of the GL account string at https://www.cmu.edu/finance/systems/documentation/reference.html

23
Selecting Filter Values
1. In order to see more of the fields under the Query Details, you can lower the Query results screen. Hover over the line separating Query Results from Query Details until it
becomes a hash mark .
a) Click the left mouse button and drag the window down.
2. Use the scroll bar to move up to the top of the list of the Dimensions fields/filters.
3. The first two Dimensions are Period Number and Period Name.

24
is the filter icon. A blue filter indicates a value has been selected. A gray filter indicates that no value has been selected. Hover over any blue filter to see the selected value.
4. Click on the filter icon for Period Name to add/change value(s). The filter window will display. Let’s review the components of the filter window (all filters window have these same components.)
The name of the filter will always be displayed. {This is helpful if you are trying to find a value in the Available Values and none appear. Check to see if you are in the correct filter}
a) One of the first items you see is Filter Operator. Click the down arrow to view the selections. You’ll need to scroll down to see all.
i) We’ll review the filter operators more a little later in this course. The default operator is the equal sign (=).
b) Below the filter operators and to the left are the Available Values. Here we can
search for specific values that are available to use in this filter.
i) The default for the available values is <All>. We could click on the icon to see all available values then scroll down till we find the value we want.

25
Click on the display icon to see all.
Available values default is <ALL>
Period Name is a character field thus the values display in alphabetical order.
ii) For this exercise we want to see the first quarter (first 3 periods) of the Fiscal Year so we will use the wildcard (%) to search for all the periods in this Fiscal Year. (Your instructor will indicate what fiscal year to use. This manual uses Fiscal Year 2014.)
iii) Click into the search field .
iv) Enter ‘%- the fiscal year provided by instructor’ into the field to see all periods
ending with that fiscal year . Note: the naming convention for periods in the Data Warehouse is calendar month, calendar year and then fiscal year (e.g. Jul13-14). {This is also how periods appear in the Oracle Financial Applications}
v) Click on the execute button .
vi) All periods for the selected Fiscal Year will be displayed.
c) Next, for this example, we will select the 3 periods specified by the instructor (Jul13-14 through Sep13-14 used in this manual).
i) Highlight the first period (Jul13-14 for manual) by clicking on it.

26
ii) Although the value is highlighted, it is not selected until you move the value to the Filter Values field on the right. Click on the double right arrows button
to move the value. You could also double click on the value.
Notice that the filter operator changed from an equal sign (=) to the word IN. This occurs when more than one value is placed in the Filter Values field. There is now a “list” of values
iii) Highlight the second period of the fiscal year and click on the button or double click.
iv) Highlight the third period of the fiscal year and click on the button or double click.

27
d) To remove any unwanted values (Apr12-12 in this example) highlight the unwanted Period Name in the Filter Values area.
i) Then click on the left arrows button to remove it.

28
e) Below the Filter Values area, you will see some ‘Options’.
i) The Options are not currently available for use because our Filter Operator is set to ‘IN’ (must be = for Option to be available). We will review these Option features in another filter that we will use.
f) Click on the button. This will close the Filter window and return you to the Ad Hoc Browser window.
i) In addition to the ‘OK’ button, there are two additional buttons available at the
bottom of the filter window, they are:
(1) - used to retain or revert back to the filter values that were set when the window opened.
(2) - used to delete all existing filter values and/or options.
g) Upon returning to the Ad Hoc Browser window, the Period Name filter should be blue. When you hover over it, you should see the values you have selected.
5. Go to the Object Code Number field. Click on the filter icon to open the Filter window.

29
a) The Filter Operator currently shown is the BETWEEN operator. Select this operator when you want to see data for a range of values. For our exercise, we want a range of Object Codes from 85000 to 85999 because the travel object codes that our supervisor asked us to analyze are within this range. The easiest way to change the range above is to simply click into the upper Filter Values field and type in the value 85000.
b) Click into the lower Filter Value field and type in 85999. Hint: When typing in Object Code values remember they have 5 digits.

30
c) Click on the button. In the Ad Hoc Browser window, the filter icon should be blue. When you hover over it you should see the values you have selected.
6. Go to the Object Code Name field. Click on the filter icon to open the Filter Window.
a) For this filter, we are going to use the “Contains” option and then enter DOMESTIC as the Filter Value.
i) Note: The other Options of Match Exactly, Starts With, Ends With, and Match Case will either be used/reviewed during the class exercises or in the Reference Manual portion of this training guide.

31
b) Click on the button. This will give us all Object Code Names that
contain the word ‘DOMESTIC’.
7. The last filter we need to select for this exercise is the Organization Number. Scroll down to the Organization Number in the Dimensions and click on the filter icon.
a) The Organization we want has already been selected. Click on the
button or button to return to the Ad Hoc Browser window.
8. Scroll down the Dimensions to be sure other fields don’t have values selected that would result in incorrect data (or no data) being returned. At the same time, remember that the query may have values selected in filters that should not be changed. Do you remember how we can tell if a value(s) has been selected for a filter?
a) Scroll down to Entity Number. The filter is blue indicating a value was selected.
Hover over the filter.
i) The entity selected is 01, which is correct for organization 210100.
b) The next blue filter we encounter is for the field Set of Books Name (which corresponds to the Ledger in Oracle). Hover over the filter.

32
i) If you recall from the CMU Finance Fundamentals class, Carnegie Mellon is the US Set of Books/Ledger, which includes entity 01 so this value is also correct.
c) The last field to contain a filter value is Batch Actual Flag. When you hover over the
filter you see the value selected is A. This represents actuals (as in actual expenses). This should never be changed.
Note: Information about other queries can be found in the Decision Cast Reference Manual which is reviewed at the end of this class.
Running the Query/Report
We are now ready to run the query/report. Running the query means that the Data Warehouse will take the values you have specified in the filters and find the information that matches.
1. At the top left of the Ad Hoc Browser window are three icons:
2. Click on the center icon to start the query.
3. Notice that the execute icon becomes grayed out and the “x” icon next to it changes to a red background.
This icon allows you to stop the running query.
4. will display in the Query Results sections while the query runs.

33
More on Selecting Filter Values
While the query runs, let’s look at more ways to select filter values. (Changing filter values while the query is running will not affect our results.)
1. Once again, click on the filter for Period Name.
a) If we were searching for a single period, we could enter the letters of the month.
Enter the first three letters of a month in the criteria field then click on the display icon
All periods starting with those letters are displayed

34
2. As we did earlier in our exercise, we can also make use of the wildcard (%).
Entering %-14 will return all periods for Fiscal Year 14
3. Click on the button.
4. Open the Object Code Number filter.
5. Suppose we only wanted a single object code number and not a range (as was specified
for the exercise). First, you would clear the filter by clicking on the button. The following box would appear.
a) Click on the button to clear the filter.

35
b) All values are removed and the Filter Operator reverts to the equal sign (=).
c) In the exercise, we selected the range 85000-85999 which are all the Object Codes that start with 85. We could accomplish the same range by using the ‘Starts With’ Option.
i) Click on the button to the left of Starts With and then type the numbers 85 into the Filter Values field.
(1) Results would include all Object Codes that start with 85.
d) Click on the button.
6. What if you wanted to check how much was spent on office supplies for your department but you don’t know the Object Code Number? You could use the Object Code Name filter. a) Select the filter icon for Object Code Name.

36
b) Click into the field and type %supplies%. Using the wild card on both sides of the word ‘supplies’, says that we want any object code name that
contains the word ‘supplies’. Click on the icon to start the search.
i) Reminder: You have not selected a filter value until you click on the button to move your selection to the Filter Values field.

37
c) Click on the button and close the Object Code Name filter window.
Saving the Query
1. To save a query you can click on the icon or select ‘Save’ under the File menu.
You can also use the shortcut keys shown here.
2. To save a query with a new name or in a new location, choose ‘Save As’ under the File menu.
a. Enter the name for the query and click on the button. Be sure to save the query in your Private folder, not in the Public folder.

38
Query Results
Let’s take a look at the results of our query from Exercise #1 and review some of the functions available on the Query Results toolbar.
1. Results will display in the Query Results area of the Ad Hoc Browser window.
a. To maximize the results data, click on the maximize/minimize button on the far top right of the Query Results section. This changes the Query Results to a full screen. Note: You can click the icon again to return to the minimized results view.
2. Immediately below the Query Results toolbar is a list of Report Filters. This includes the name of the filter and the value chosen for that filter. Turning the Filter Values list off (or
on) can be done by clicking on the icon on the tool bar.
3. Click the icon to turn off (or on) the “Suppress Duplicates” function. The results with duplicates unsuppressed will look similar to an Excel worksheet.

39
4. Let’s review the results data now. Use the scrollbar at the bottom to move to the right in the Query Results.
a. The Dimensions data displays first, which is everything in the yellow. Keep scrolling to the right.
b. When you encounter the white fields, you have reached the Measures in the
results. Do you remember what the Dimensions and the Measures are in a warehouse query?
5. There may be times when you would want to verify your totals before saving the
results. Click on the grand total icon. Scroll all the way down and to the right to see the totals.

40
6. If you prefer to use menus (rather than icons), you can right click in any area of the results.
a. A list of available functions will display. If a function is checked that means that it has been turned on.
b. To close the list, click back into the results or use your ‘Esc” key.
7. We saved the query, but keep in mind saving the query does not save the results. One
of the best ways to save the results is to “Save to Excel”. Click on the icon (or right click and use the menu). The results will be exported to an Excel “special template” worksheet where you can manipulate and/or save your results. The “special template” opens Excel 2013 regardless of what Excel version you might have on your computer.

41
a. The Report Filters will occupy the first row in the worksheet. You could now save the query results file to your computer.
b. To save the query results, click on the green File tab in the Excel ribbon in top left corner of Excel and click on ‘Save As’.

42
c. The Save As window opens and it may look slightly different from what you may be used to seeing in Excel.
d. Select the location where you want to save the file. To save to your desktop:
i. Click on This PC ii. Click on Local Disk C:
iii. Select the Users folder iv. Click on your user id (example shows ‘mstacer’) folder v. Select the Desktop or Documents folder.
e. Type your File name. What are you calling your query results?
f. Click on Save.
g. Close the Excel “special template” file (you don’t need it anymore).

43
Let’s Review #1 - Circle the appropriate answer(s):
1. Used to move a data selection to the Filter Values field in a filter window.
a) b) c) d) e)
2. Used to suppress duplicates so results data looks more like an Excel worksheet.
a) b) c) d) e)
3. Only method used to save query results.
a) b) c) d) e)
4. Which should I use to get grand totals?
a) b) c) d) e)
5. What Operator(s)/Option(s) can I use to retrieve Object Codes 85000 to 85999?
a) |BETWEEN| b) | IN| c) |% | d) |STARTS WITH| e) |ENDS WITH|
6. What Operator(s)/Option(s) can I use to retrieve periods for a full fiscal year?
a) |BETWEEN| b) | IN| c) |% | d) |STARTS WITH| e) |ENDS WITH|
7. Which icon is used to run a query?
a) b) c)
8. Which icon is used to stop a query?
a) b) c) 9. Which icon is used to save a query?
a) b) c)

44
Exercise #2 (Participants do on their own)
Your supervisor has now asked you to compile detail information on expenses related to “MEALS” for a specific period, Dec11-12, and a specific activity code number, activity number 111, in order to do some analyses for your Organization (210100).
Edit the GL Transaction Detail (Macro) query in your private folder.
Review/change the appropriate filter(s) as necessary.
Run the query. When results are returned, turn on the Grand Total function.
Enter the Grand Total for Functional Net Activity

45
Running a Saved Query/Report
There is another way to run a query/report once it is saved to your satisfaction. For instance, the R12 GL Transaction Detail (Macro) query that we’ve been working with has all the appropriate values selected for the filters. However, maybe you have been asked to review dining expenses for a different time period and activity code.
1. Go to your private folder and double-click on the R12 GL Transaction Detail (Macro)
query. The View/Edit Filter Values window will display.
2. In the filter window are the filters and the values that you previously saved for the query. However, the values can be changed as needed. For this example, we want to change the Period Name. Double-click on the filter Period Name.

46
3. The same filter window you saw when editing the query is displayed. You would simply select the new period(s); let’s add May12-12 and remove Dec11-12; then click the filter
window button.
4. Back at the View/Edit Filter Values window; let’s update the Activity Number filter. Filter on all Activity Number’s that starts with “2”.

47
5. Back at the View/Edit Filter Values window; let’s update the Object Code Name filter.
Filter on any Object Code Name that contains “airfare”.

48
6. Once you are done updating the filter values that needed to change, you can click the
button. The query will start to run.
6. DecisionCast defaults to a full Query Results screen when running saved queries, but
you can click on the maximize/minimize button to the far right on the Query Results name line to see the query details.

49
More about Filtering
Period Number/Period Name
Before leaving the General Ledger module let’s talk more about filtering, particularly in regards to the Period Number and Period Name filters.
In the Data Warehouse, the Period Name field is a character field which means range results would be displayed in alphabetical order by month. Thus, you could have August data (for all available periods) before July data (for all available periods) in your results because A precedes J. This would not make much sense when trying to review financial data for a range of periods within our fiscal year, which runs from July to June. Therefore, you should NOT use the BETWEEN filter operator for Period Name when selecting a range of filter values.
In the (incorrect) example below, the BETWEEN operator was selected with periods Jan09- 09 to Mar09-09 selected as the values. The intended result is to see Jan09-09 data, then Feb09-09, and finally Mar09-09 data in the results.
Displayed below is part of the actual query results. This is clearly not the intended result.

50
If you need to query on a range of periods, use a range in the Period Number filter to get the correct results.
Period Number is the first Dimension in the query details. If you look at the data results you have saved, you can see that the Period Number is also the first column in the results. (Note: data results display in the same order that the Dimensions/Measures are listed in the query details.)
In the Oracle system, each period is assigned a Period Number in order to keep the periods in fiscal year order.
Note: DW Period Numbers can be found on the Business Systems and Services website under Documentation>Reference Materials. The DW Period Numbers are listed under Data Warehouse section.

51
Let’s try our previous example again. To see results for the period range of Jan09-09 to Mar09-09 in the correct fiscal year order, we would use Period Numbers 139-141.
Results:

52
Filter Order
The filter order can be key to obtaining the correct results from your query. In the previous example, we selected Period Numbers 139 - 141.
Suppose you had also selected Jun09-09 for the Period Name. If we look at the DW Period Number reference sheet, you would see that Jun09-09 is period number is 144.
Would we get any results?
Let’s review our selected values. In the first field, Period Number, you entered a range of 139-141. In the second field, Period Name, you entered Jun09-09. The period number for Jun09-09 is 144 and is outside the range of Period Numbers selected.
In this scenario, the Data Warehouse would not return any results for the query.

53
Working with Queries/Reports
Let’s work with a query from another warehouse domain, namely, Payables.
1. Under the Adhoc Library, College&Department folder, open the Payables folder.
2. Single-click on the AP Invoice Detail query to highlight it. a) Right-click to ‘Copy’ query from the Public folder to the Private folder
3. Double-click on your folder to open it.

54
4) Click on the blank space in the right hand panel and paste the query there using
your preferred method (the right-click menu/Paste, the Edit menu/Paste, or Ctrl+V.)
.
a) A copy of the query/report will be placed in your private folder.
i) If a query/report with the same name already exists in the folder, DC will add a number (1) to the end of the name.

55
5. Single-click on your assigned AP Invoice Detail query to highlight it. a) Right-click and select ‘Rename’ from the options listed
b) Replace the number with your initials and click on OK.
c) Select View> Refresh or F5 to see the new query names
6. Single-click on your assigned AP Invoice Detail query to highlight it. a) Right-click and select ‘Edit’ from the options listed b) The Ad Hoc Browser window opens. Let’s review the components of this
query.

56
Understanding the data is an important factor when running queries in the warehouse. For instance, the invoice details in this Payables query are not restricted to only supplier invoices.
Invoices in this query also include expense reports (ER) and purchasing card (PRC) transactions. In the case of ER’s, the Vendor Name is the employee that is being reimbursed. For PRC’s, the Vendor name is the cardholder.
Note: If an ER or PRC has been submitted but has not yet been approved and processed by Accounts Payable, it will not show up in the query results. Also, remember that the data in the warehouse is from Oracle production as of yesterday.
In this scenario, your boss wants to get detail on all invoices that have been processed for December 2009 for your Organization (210100). Let’s take a look at the dimensions.
1. Let’s start by clicking on the filter for the Accounting Date to set the date range.

57
2. Take a moment to look at the date. The format is YYYY/MM/DD. The zeros next to it are considered a time stamp and must be included in the filter value. The formatting has to be exact for the query to run properly.
3. You can click on the button in the Available Values section to get a list of all available dates.
a. Then, you can use the scrollbar to scroll down and find/select the appropriate dates.
4. You can also click into each existing date in the filter values fields and very carefully
change the date keeping the proper formatting.
5. Your instructor will tell you what Accounting Dates to use during class. In this manual the dates were changed to 2009/12/01-2009/12/31.

58
6. Click on the button once the dates have been changed.
7. Go to the Organization Number field and select value 210100.
8. Click on the button.
9. Click on the icon to start the query.
10. Let’s take a look at the results. Here, the results have been exported to Excel.

59
a. In the results, we see two types in the column AP Invoice Type – Standard and Expense Report. Let’s review the examples outlined above:
i. Standard – This is a paper expense report that was entered by
someone in Accounts Payable. We know this is an expense report because the invoice number begins with “ER” and the Vendor Name is a person’s name.
ii. Expense Report – This group includes expense reports (which have
invoice numbers that begin with “ER”) and purchasing card transactions (which are the invoice numbers that begin with “PRC”) entered in the Oracle system.
b. Further down are more “Standard” AP Invoice Types.
i. We can tell these are supplier invoices because the AP Invoice Number does not begin with “ER” or “PRC” and there are actual Vendor Names (not employee names).

60
Exercise #3 (Participants do on their own)
Modify the AP Invoice Detail Query to narrow down the results to only show expense reports (ER) (not PRC reports) for employee Alexis A McCune in Organization (210100) for October 2011.
Run the query. When results are returned, turn on the Grand Total function.
Enter the Grand Total for Func Curr Inv Line Amt

61
Exercise #4 (Optional Advanced Exercise)
Your supervisor has asked you to compile detail information for domestic airfare for your organization (210100) and activity code (233) incurred during the second quarter in FY12 in order to complete some analyses. Edit the R12 GL Transaction Detail (Macro) query.
Review/change the appropriate filter(s) as necessary.
Which dimensions do you need to change, update or add a filter too? What months make up the second quarter in FY12? Do you know the object code number or name? What organization are you searching for? Is there a special activity code being used for domestic airfare? Accept the defaults in these dimensions – Entity Number 01, Set of Books Name = Carnegie Mellon, Batch Actual Flag = A
Run the query. When results are returned, turn on the Grand
Total function.
Enter the Grand total for Functional Net Activity
62
Let’s Review #2
Circle the appropriate answer(s):
1. The filter order has nothing to do with obtaining correct results.
a. True b. False
2. Always edit a query/report in the Public folder.
a. True b. False
3. What two functions can you do with this icon - ?
a. Edit the query b. Retrieve available values c. Run query
4. You must always edit a query/report to change filter values?
a. True b. False

63
Reference Materials – Section 1
Filter Operators
Operator
Result
Example
=
Equals
Returns all rows where object code number equals 85111
!=
Not Equal
Not Equal to
Returns all rows where object code number is not equal to 85111
>
Greater than
Returns all rows where object code number is greater than 85111 (85112, 85113…)
<
Less than
Returns all rows where object code number is less than 85111 (10105, 10120…84202…)

64
Operator
Result
Example
<=
Less than or equal to
Returns all rows where object code number is less or equal to 85111 (10105..84202..85111)
>=
Greater than or equal to
Returns all rows where object number is greater or equal to 85111 (85111, 85112, 85400…)
IN
In a list
Returns all rows where object number equals the values listed (85111, 85117, 85119)
NOT IN
Not in a list
Returns all rows where object code number does not equal the values listed (85107…85113..85115)
IS NULL
Is blank
Typically the warehouse would populate any blank field with N/A so this operator would not be useful.
IS NOT NULL
Is not blank
Typically the warehouse would populate any blank field with N/A so this operator would not be useful.

65
Operator
Result
Example
BETWEEN
In a range
Returns all rows where object code number is equal to any numbers from/including 85111 to/including 85202 (85111...85129…85202)
NOT BETWEEN
Outside a
range
Returns all rows where the object code number is less than 85111 or the object code number is greater than 85202. (…85107…85204..)
SAME
Two dimensions are equal
Typically not used in Adhoc queries
Different Than
Two dimensions are not equal
Typically not used in Adhoc queries

66
Options
Another way to filter for data is to use the Options. You cannot select multiple values with these options.
Match Exactly /Match case - When both these defaults are selected the result must match the filter value selected both in naming and in case. If the Match case box is unchecked, the result has to match in naming only. If you typed in the period name, for example, jun06-06, no results would be returned if the Match case box is checked, but results would be returned if the Match case box is not checked.
Starts with – Returns records that begin with the value you entered. For example, if you want all the object code numbers that begin with 85.
Ends with – Returns records that end with the value you enter. For example, if you wanted all of FY 07, you could use this option in the Period Name filter as shown:
Contains – Returns all records that include the value you enter. For example, if you want all GL detail for procurement card verification. In the AP Invoice Number filter you could use the Contains option as shown.

67
Set of Books (Ledgers)
Dept-Div vs Org
Selecting a Set of Books (Ledger) is necessary to avoid duplicate/triplicate data.
(Dept-Div) – Enter Parent organization such as E21040 or C220000
(Org) – Enter Child organization such as 210400
In the Labor Distribution domain, the Parent org is referred to as the Rollup Org and typically would be displayed with Org Name and a letter in parentheses. For instance the Department of Robotics would look like ROBOTICS (E).

68
Query Results Icons
Below is a table of the Query Results toolbar icons and their functions.
TOOLBAR ICON FUNCTION
This command hides the toolbar. To display the toolbar again, right- click on the results grid and select Show Toolbar.
This command saves a results query/report results to a Microsoft Excel spreadsheet.
Use this command to copy query/report results to the Windows clipboard. After you copy the data to the clipboard, use the Paste command in applications such as Excel or Word to insert the data.
Select this command to print out the query/report results.
Use this command to display or hide subtotals for groups of rows in a grid.
If you display subtotals in the results, you can use this command to hide the details and show only the subtotals. Rerun this command to display the details again.
Use this command to display or hide a Grand Total row for the Measures fields in the results.
To freeze the dimension fields (left columns) in a report, select this command. The Results pane continues to display the dimensions when you scroll to the right to view measures.
By default, the Results pane suppresses duplicate dimensions.
Use this command to display or hide the report’s filter values above the results.

69
Reference Materials - Section 2-Query Descriptions by Domain
For a description of available queries for each domain, please visit the Business Systems and Services website at https://www.cmu.edu/finance/systems/ and click on Documents>Reference Materials. Under the Data Warehouse section, choose the DecisionCast Reference Manual document.
At the end of the DecisionCast Reference Manual you will find the list of available queries for the General Ledger, Labor Distribution, Grants Accounting, and Purchasing domains. For each query you will see the Query Name, Filters, and Output Columns. This can be used as a resource to determine which query may provide the information you desire. Below is an example of a query description in the Reference Manual:
Query Name
Filters
Output Columns
GL Transaction Detail (Macro)
Batch Actual Flag is set to “A” for Actuals. Normally, this should not change.
This query is designed to be used in conjunction with the GL Detail Macro which can be found on the Business Systems and Services Web Page under Production Applications.
Period Number/Name * Object Code Number/Name * Funding Source Number/Name * Function Number/Name * Activity Number/Name * Org Number/Name * Entity Number/Name * Effective Date * JE Line Description * Journal Source * Tracking Number * Vendor Name * AP Invoice Number * Purpose * Justification * Merchant Name * JE Batch Name * Batch Category * GL Detail Create By Description * Set of Books Name * Transaction Currency * Transaction Debit/Credit/Net Amounts * Functional Debit/Credit/Net Amounts