Embed Size (px)
Citation preview

CARESTREAM Vue PACS Client Additional Features
Pub. 8J2504 2012-12-03

iii
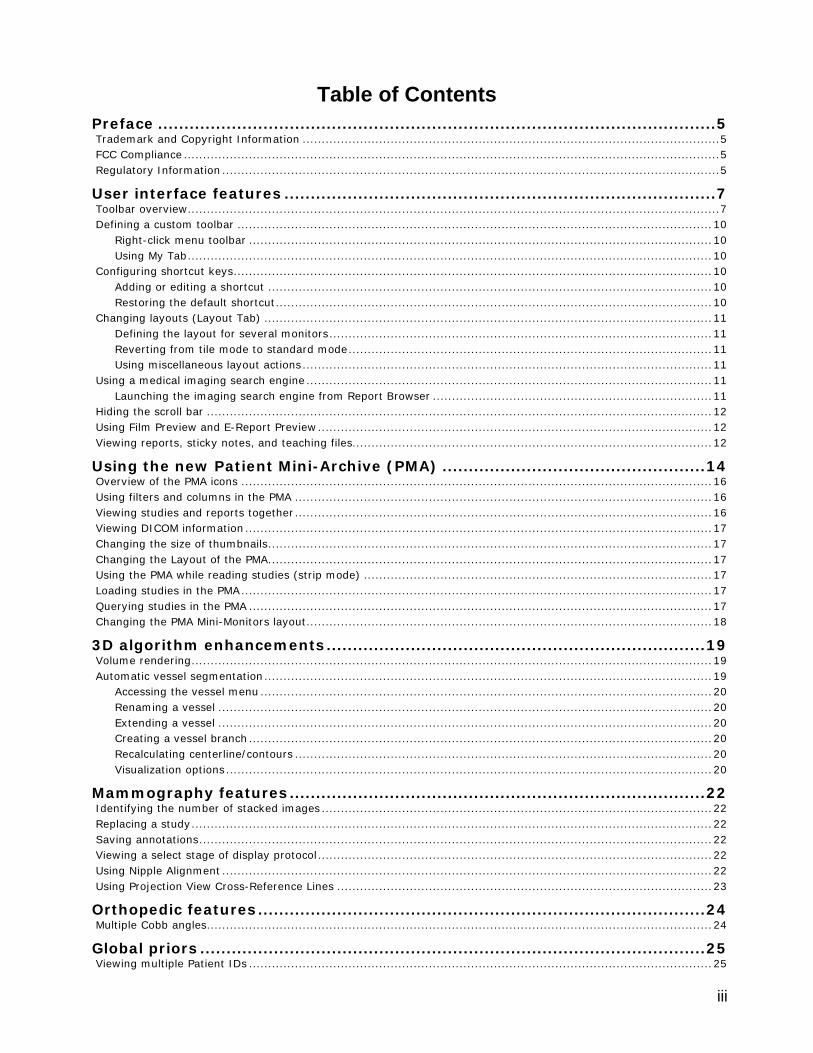
Table of Contents Preface .......................................................................................................... 5 Trademark and Copyright Information ............................................................................................................. 5 FCC Compliance ............................................................................................................................................ 5 Regulatory Information .................................................................................................................................. 5
User interface features .................................................................................. 7 Toolbar overview ........................................................................................................................................... 7 Defining a custom toolbar ............................................................................................................................ 10
Right-click menu toolbar ......................................................................................................................... 10 Using My Tab ......................................................................................................................................... 10
Configuring shortcut keys ............................................................................................................................. 10 Adding or editing a shortcut .................................................................................................................... 10 Restoring the default shortcut .................................................................................................................. 10
Changing layouts (Layout Tab) ..................................................................................................................... 11 Defining the layout for several monitors .................................................................................................... 11 Reverting from tile mode to standard mode ............................................................................................... 11 Using miscellaneous layout actions ........................................................................................................... 11
Using a medical imaging search engine .......................................................................................................... 11 Launching the imaging search engine from Report Browser ......................................................................... 11
Hiding the scroll bar .................................................................................................................................... 12 Using Film Preview and E-Report Preview ....................................................................................................... 12 Viewing reports, sticky notes, and teaching files.............................................................................................. 12
Using the new Patient Mini-Archive (PMA) .................................................. 14 Overview of the PMA icons ........................................................................................................................... 16 Using filters and columns in the PMA ............................................................................................................. 16 Viewing studies and reports together ............................................................................................................. 16 Viewing DICOM information .......................................................................................................................... 17 Changing the size of thumbnails .................................................................................................................... 17 Changing the Layout of the PMA.................................................................................................................... 17 Using the PMA while reading studies (strip mode) ........................................................................................... 17 Loading studies in the PMA ........................................................................................................................... 17 Querying studies in the PMA ......................................................................................................................... 17 Changing the PMA Mini-Monitors layout .......................................................................................................... 18
3D algorithm enhancements ........................................................................ 19 Volume rendering ........................................................................................................................................ 19 Automatic vessel segmentation ..................................................................................................................... 19
Accessing the vessel menu ...................................................................................................................... 20 Renaming a vessel ................................................................................................................................. 20 Extending a vessel ................................................................................................................................. 20 Creating a vessel branch ......................................................................................................................... 20 Recalculating centerline/contours ............................................................................................................. 20 Visualization options ............................................................................................................................... 20
Mammography features ............................................................................... 22 Identifying the number of stacked images ...................................................................................................... 22 Replacing a study ........................................................................................................................................ 22 Saving annotations ...................................................................................................................................... 22 Viewing a select stage of display protocol ....................................................................................................... 22 Using Nipple Alignment ................................................................................................................................ 22 Using Projection View Cross-Reference Lines .................................................................................................. 23
Orthopedic features ..................................................................................... 24 Multiple Cobb angles .................................................................................................................................... 24
Global priors ................................................................................................ 25 Viewing multiple Patient IDs ......................................................................................................................... 25

CARESTREAM Vue PACS Client
iv
Appendix A: CARESTREAM PACS Client, Version 11.0 ................................... 26 Aneurysm measurement .............................................................................................................................. 26 Accuracy of Measurements ........................................................................................................................... 26
In Power Viewer and MPR-based Applications ............................................................................................ 27 3D images (MIP and Volume Rendering) Measurements .............................................................................. 27 Tissue Definition .................................................................................................................................... 27 Coronary Vessels ................................................................................................................................... 27 SUV Calculations on PET-CT Cases ........................................................................................................... 27
CARESTREAM Vue PACS Client
5
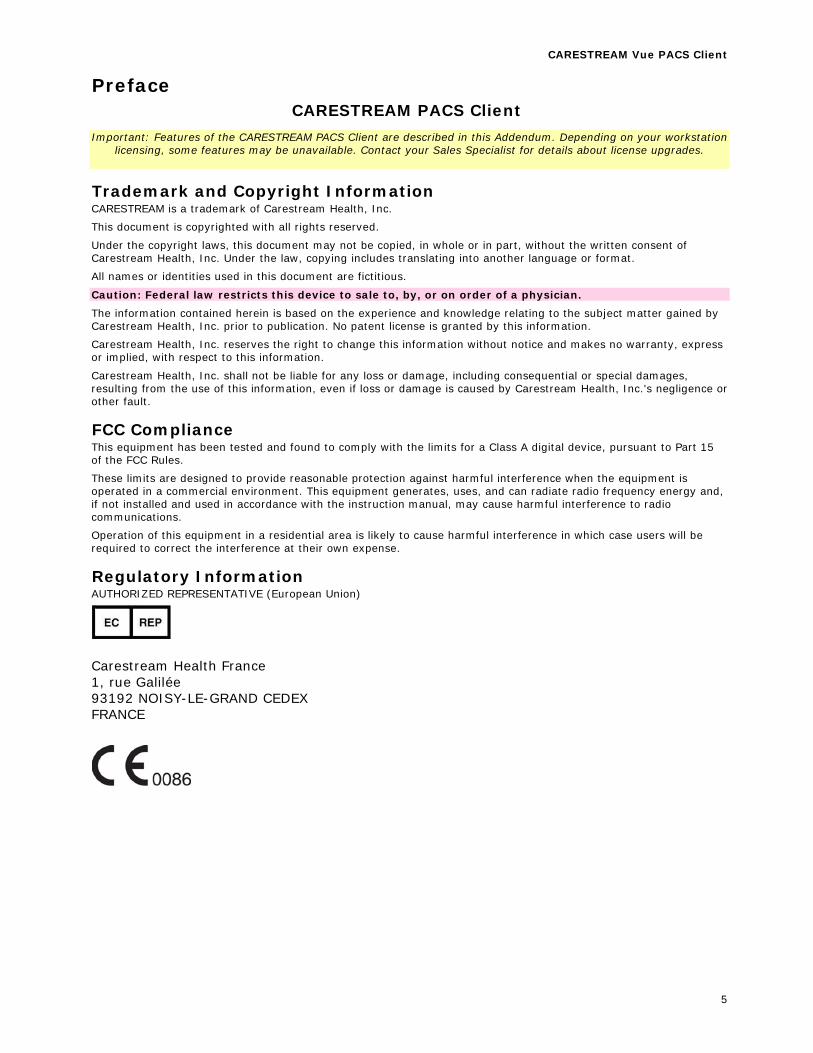
Preface CARESTREAM PACS Client
Important: Features of the CARESTREAM PACS Client are described in this Addendum. Depending on your workstation licensing, some features may be unavailable. Contact your Sales Specialist for details about license upgrades.
Trademark and Copyright Information CARESTREAM is a trademark of Carestream Health, Inc.
This document is copyrighted with all rights reserved.
Under the copyright laws, this document may not be copied, in whole or in part, without the written consent of Carestream Health, Inc. Under the law, copying includes translating into another language or format.
All names or identities used in this document are fictitious.
Caution: Federal law restricts this device to sale to, by, or on order of a physician. The information contained herein is based on the experience and knowledge relating to the subject matter gained by Carestream Health, Inc. prior to publication. No patent license is granted by this information.
Carestream Health, Inc. reserves the right to change this information without notice and makes no warranty, express or implied, with respect to this information.
Carestream Health, Inc. shall not be liable for any loss or damage, including consequential or special damages, resulting from the use of this information, even if loss or damage is caused by Carestream Health, Inc.'s negligence or other fault.
FCC Compliance This equipment has been tested and found to comply with the limits for a Class A digital device, pursuant to Part 15 of the FCC Rules.
These limits are designed to provide reasonable protection against harmful interference when the equipment is operated in a commercial environment. This equipment generates, uses, and can radiate radio frequency energy and, if not installed and used in accordance with the instruction manual, may cause harmful interference to radio communications.
Operation of this equipment in a residential area is likely to cause harmful interference in which case users will be required to correct the interference at their own expense.
Regulatory Information AUTHORIZED REPRESENTATIVE (European Union)
Carestream Health France 1, rue Galilée 93192 NOISY-LE-GRAND CEDEX FRANCE

6
CARESTREAM Vue PACS Client
7
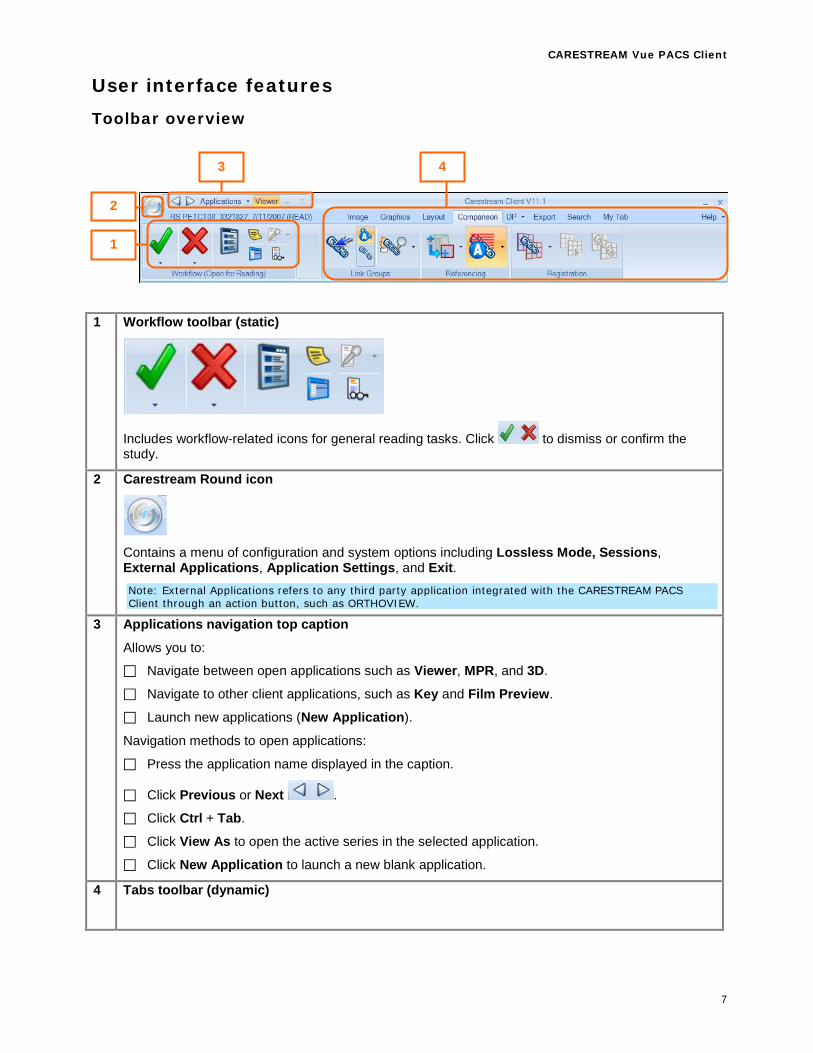
User interface features Toolbar overview
1
Workflow toolbar (static)
Includes workflow-related icons for general reading tasks. Click to dismiss or confirm the study.
2
Carestream Round icon
Contains a menu of configuration and system options including Lossless Mode, Sessions, External Applications, Application Settings, and Exit. Note: External Applications refers to any third party application integrated with the CARESTREAM PACS Client through an action button, such as ORTHOVIEW.
3 Applications navigation top caption
Allows you to:
Navigate between open applications such as Viewer, MPR, and 3D.
Navigate to other client applications, such as Key and Film Preview.
Launch new applications (New Application).
Navigation methods to open applications:
Press the application name displayed in the caption.
Click Previous or Next .
Click Ctrl + Tab.
Click View As to open the active series in the selected application.
Click New Application to launch a new blank application.
4
Tabs toolbar (dynamic)
1
2
3 4
8
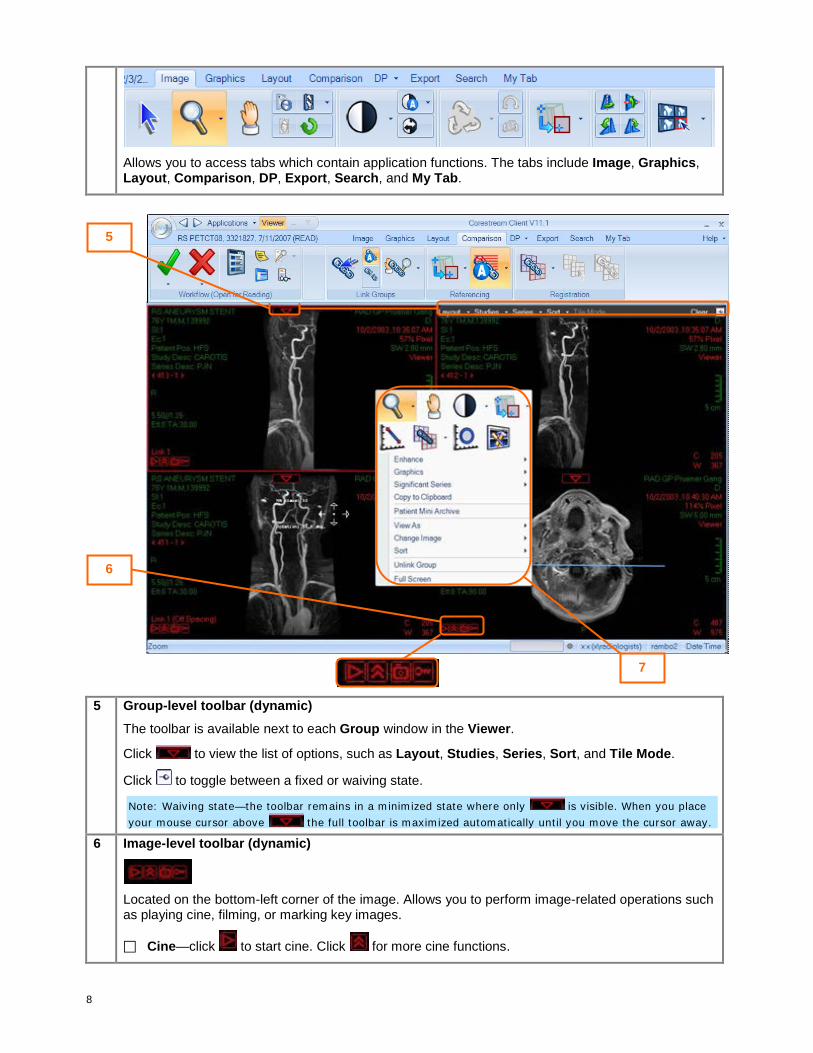
Allows you to access tabs which contain application functions. The tabs include Image, Graphics, Layout, Comparison, DP, Export, Search, and My Tab.
5 Group-level toolbar (dynamic)
The toolbar is available next to each Group window in the Viewer.
Click to view the list of options, such as Layout, Studies, Series, Sort, and Tile Mode.
Click to toggle between a fixed or waiving state.
Note: Waiving state—the toolbar remains in a minimized state where only is visible. When you place your mouse cursor above the full toolbar is maximized automatically until you move the cursor away.
6 Image-level toolbar (dynamic)
Located on the bottom-left corner of the image. Allows you to perform image-related operations such as playing cine, filming, or marking key images.
Cine—click to start cine. Click for more cine functions.
5
6
7

CARESTREAM Vue PACS Client
9
Film—click to film the displayed image.
Key Images—click to mark or unmark a key image. The icon is highlighted when the displayed image is marked as a key image.
7
Right-click menu toolbar
You can customize the Right-click Menu toolbar. You can add icons from other toolbars to put the functions that you use most frequently in one convenient location.

10
Defining a custom toolbar
Right-click menu toolbar You can define the contents of the Right-click Menu toolbar for frequently used functions.
Adding icons 1. Right-click any icon from any application toolbar.
2. Select Add to Right-click Menu.
Removing icons 1. Right-click the image.
2. From the Right-click Menu toolbar, right-click an icon.
3. Select Remove from Right-click Menu.
Using My Tab You can add or remove icons from the application tabs to your personal toolbar (My Tab).
My Tab includes the following default icons: Zoom, Pan, Pointer, Line Measurement, Oval ROI, Swivel, Relate, Custom Matrix Layout, and Registration.
Adding icons 1. Right-click any icon from any application tab.
2. Select Add to My Tab.
Organizing icons You can:
Drag and drop the icon into the desired location in My Tab.
Right-click the icon and select Move Right or Move Left.
Removing icons 1. Click My Tab.
2. Right-click the icon and select Remove from My Tab.
Restoring system defaults 1. Right-click any icon in My Tab.
2. Select Reset My Tab.
Defining a default tab 1. Right-click the tab header.
2. Select Set as default tab.
Configuring shortcut keys The system has a set of available default shortcut keys. You can configure shortcuts for any icon in the application’s toolbar. Each shortcut can exist once in the system.
Adding or editing a shortcut 1. Right-click any icon from any application toolbar.
2. Select Assign Shortcut.
3. In the dialog, click the key or combination (such as Ctrl + key, Alt + key, Shift + key). The dialog adds the shortcut or modifies the existing shortcut.
Note: Click Shortcut List to view a printable list of the defined shortcuts.
Restoring the default shortcut 1. Right-click any icon in any application toolbar.
2. Select Reset Shortcut.
CARESTREAM Vue PACS Client
11
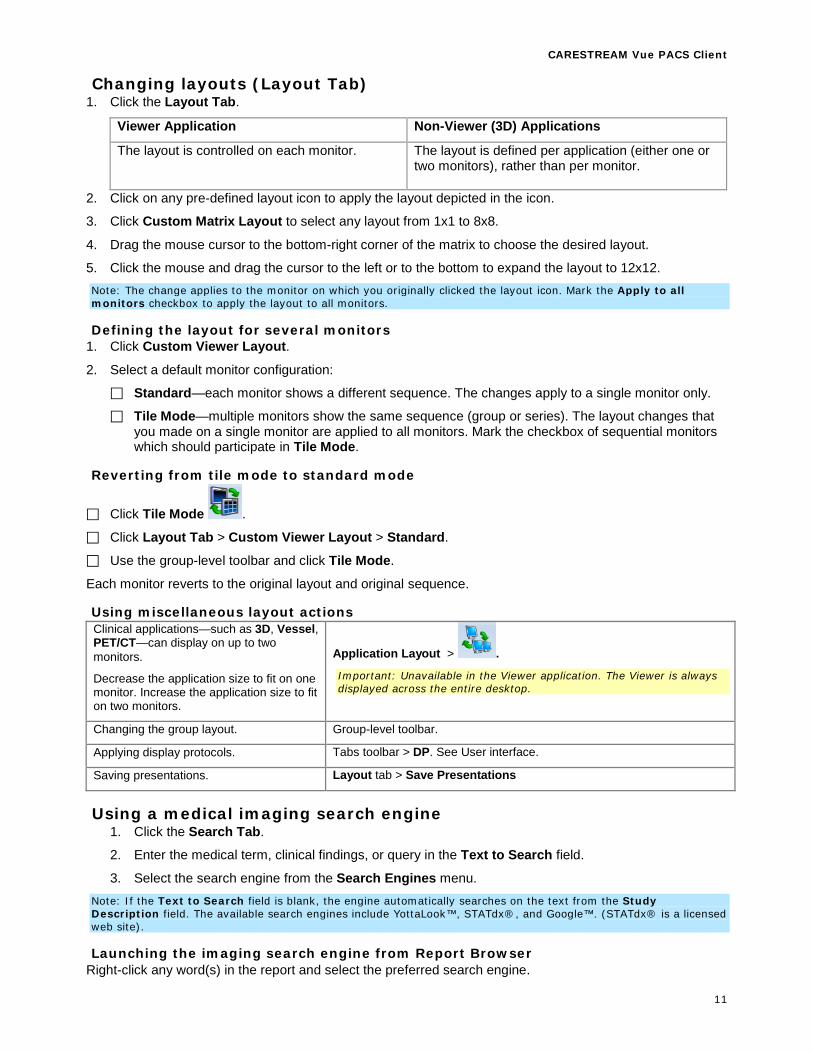
Changing layouts (Layout Tab) 1. Click the Layout Tab.
Viewer Application Non-Viewer (3D) Applications
The layout is controlled on each monitor.
The layout is defined per application (either one or two monitors), rather than per monitor.
2. Click on any pre-defined layout icon to apply the layout depicted in the icon.
3. Click Custom Matrix Layout to select any layout from 1x1 to 8x8.
4. Drag the mouse cursor to the bottom-right corner of the matrix to choose the desired layout.
5. Click the mouse and drag the cursor to the left or to the bottom to expand the layout to 12x12. Note: The change applies to the monitor on which you originally clicked the layout icon. Mark the Apply to all monitors checkbox to apply the layout to all monitors.
Defining the layout for several monitors 1. Click Custom Viewer Layout.
2. Select a default monitor configuration:
Standard—each monitor shows a different sequence. The changes apply to a single monitor only.
Tile Mode—multiple monitors show the same sequence (group or series). The layout changes that you made on a single monitor are applied to all monitors. Mark the checkbox of sequential monitors which should participate in Tile Mode.
Reverting from tile mode to standard mode
Click Tile Mode .
Click Layout Tab > Custom Viewer Layout > Standard.
Use the group-level toolbar and click Tile Mode.
Each monitor reverts to the original layout and original sequence.
Using miscellaneous layout actions Clinical applications—such as 3D, Vessel, PET/CT—can display on up to two monitors.
Decrease the application size to fit on one monitor. Increase the application size to fit on two monitors.
Application Layout > .
Important: Unavailable in the Viewer application. The Viewer is always displayed across the entire desktop.
Changing the group layout. Group-level toolbar.
Applying display protocols. Tabs toolbar > DP. See User interface.
Saving presentations. Layout tab > Save Presentations
Using a medical imaging search engine 1. Click the Search Tab.
2. Enter the medical term, clinical findings, or query in the Text to Search field.
3. Select the search engine from the Search Engines menu. Note: If the Text to Search field is blank, the engine automatically searches on the text from the Study Description field. The available search engines include YottaLook™, STATdx®, and Google™. (STATdx® is a licensed web site).
Launching the imaging search engine from Report Browser Right-click any word(s) in the report and select the preferred search engine.
12
Hiding the scroll bar Click the pin icon . In the hidden mode, the scroll emerges or “waives” when you hover the mouse cursor over the area of the scroll bar.
Using Film Preview and E-Report Preview
In the Export tab, click Film Preview or E-Report Preview .
In the Film Preview or E-Report Preview window you can:
Manipulate images.
Click any of the layout icons on either side of the window to apply a layout.
The Film, Image, and Graphic tabs perform the same image functions as found in the Viewer.
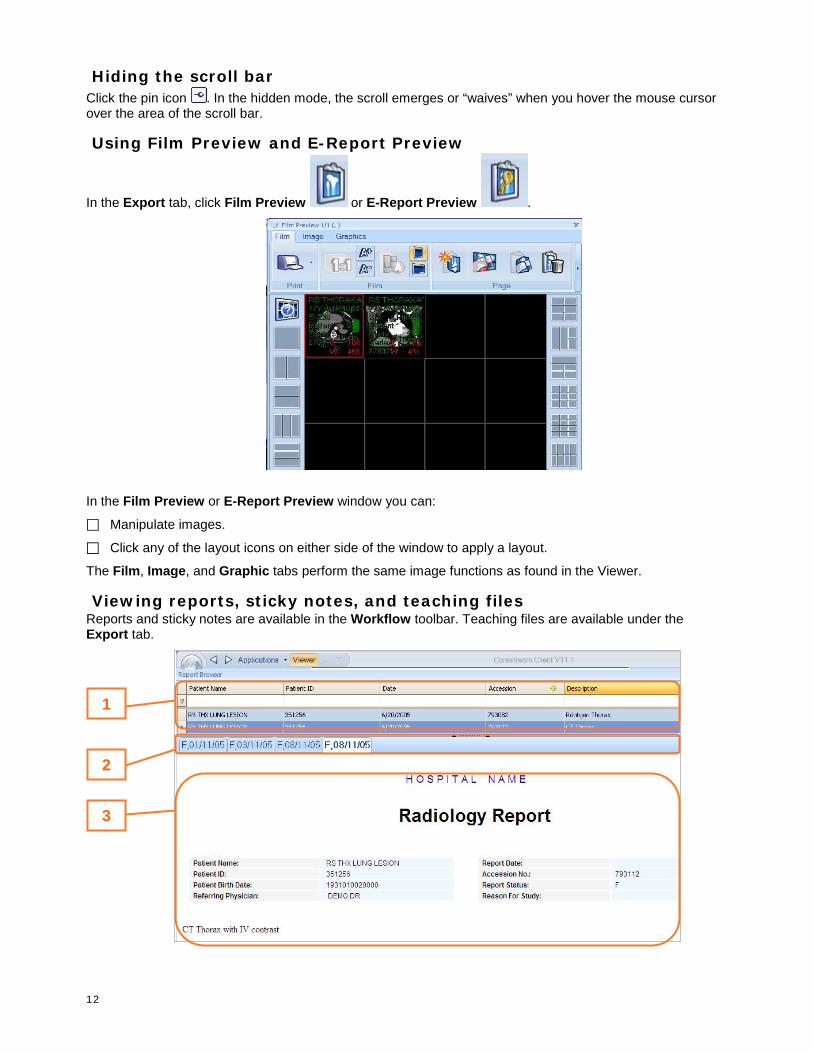
Viewing reports, sticky notes, and teaching files Reports and sticky notes are available in the Workflow toolbar. Teaching files are available under the Export tab.
1
2
3
CARESTREAM Vue PACS Client
13
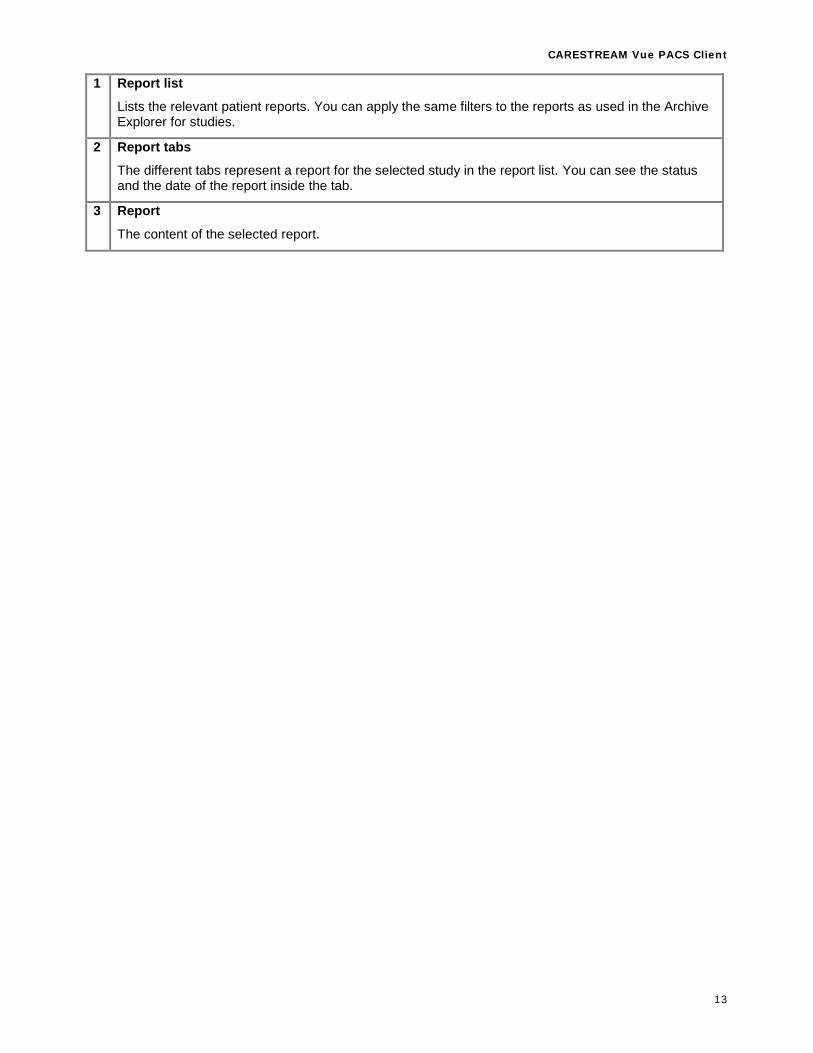
1 Report list
Lists the relevant patient reports. You can apply the same filters to the reports as used in the Archive Explorer for studies.
2 Report tabs
The different tabs represent a report for the selected study in the report list. You can see the status and the date of the report inside the tab.
3 Report
The content of the selected report.
14
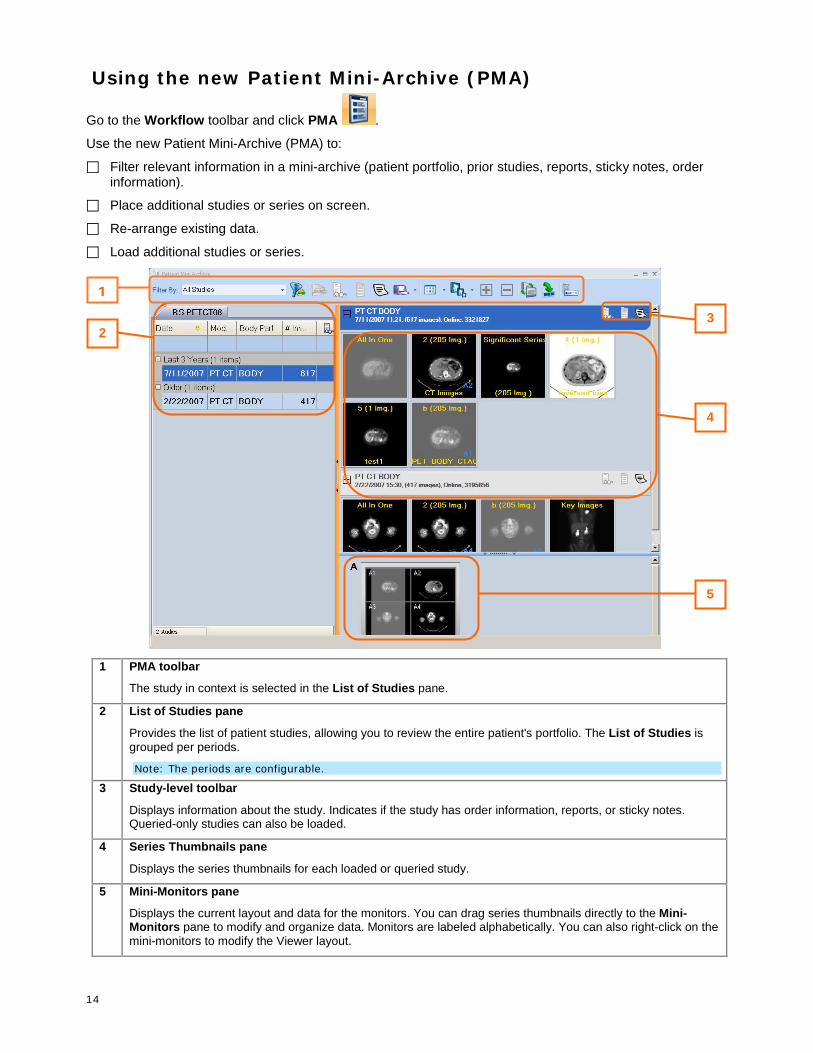
Using the new Patient Mini-Archive (PMA)
Go to the Workflow toolbar and click PMA .
Use the new Patient Mini-Archive (PMA) to:
Filter relevant information in a mini-archive (patient portfolio, prior studies, reports, sticky notes, order information).
Place additional studies or series on screen.
Re-arrange existing data.
Load additional studies or series.
1 PMA toolbar
The study in context is selected in the List of Studies pane.
2 List of Studies pane
Provides the list of patient studies, allowing you to review the entire patient's portfolio. The List of Studies is grouped per periods.
Note: The periods are configurable.
3 Study-level toolbar
Displays information about the study. Indicates if the study has order information, reports, or sticky notes. Queried-only studies can also be loaded.
4 Series Thumbnails pane
Displays the series thumbnails for each loaded or queried study.
5 Mini-Monitors pane
Displays the current layout and data for the monitors. You can drag series thumbnails directly to the Mini-Monitors pane to modify and organize data. Monitors are labeled alphabetically. You can also right-click on the mini-monitors to modify the Viewer layout.
2
4
5
3
1

CARESTREAM Vue PACS Client
15
Use List of Studies to control which studies are shown in the Series Thumbnail pane. Click the series icon in Series Thumbnails and drag the icon to a location in Mini-Monitors.
16
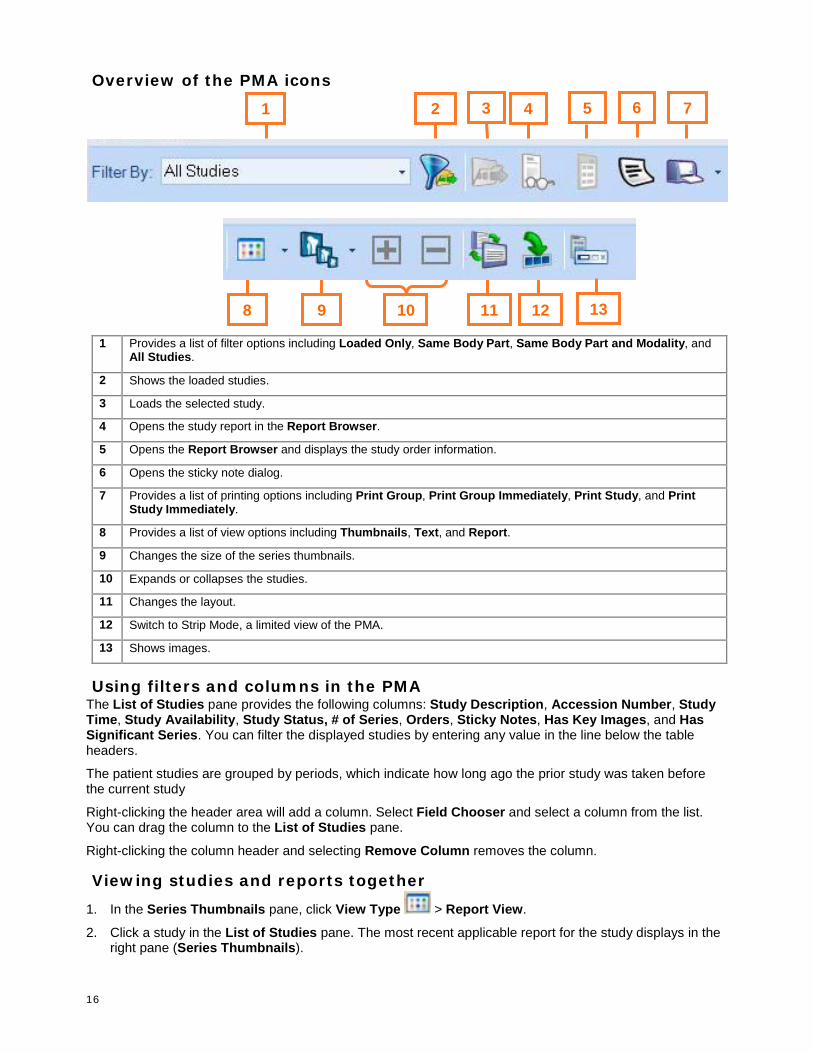
Overview of the PMA icons
1 Provides a list of filter options including Loaded Only, Same Body Part, Same Body Part and Modality, and
All Studies.
2 Shows the loaded studies.
3 Loads the selected study.
4 Opens the study report in the Report Browser.
5 Opens the Report Browser and displays the study order information.
6 Opens the sticky note dialog.
7 Provides a list of printing options including Print Group, Print Group Immediately, Print Study, and Print Study Immediately.
8 Provides a list of view options including Thumbnails, Text, and Report.
9 Changes the size of the series thumbnails.
10 Expands or collapses the studies.
11 Changes the layout.
12 Switch to Strip Mode, a limited view of the PMA.
13 Shows images.
Using filters and columns in the PMA The List of Studies pane provides the following columns: Study Description, Accession Number, Study Time, Study Availability, Study Status, # of Series, Orders, Sticky Notes, Has Key Images, and Has Significant Series. You can filter the displayed studies by entering any value in the line below the table headers.
The patient studies are grouped by periods, which indicate how long ago the prior study was taken before the current study
Right-clicking the header area will add a column. Select Field Chooser and select a column from the list. You can drag the column to the List of Studies pane.
Right-clicking the column header and selecting Remove Column removes the column.
Viewing studies and reports together
1. In the Series Thumbnails pane, click View Type > Report View.
2. Click a study in the List of Studies pane. The most recent applicable report for the study displays in the right pane (Series Thumbnails).
1 2 4
8 9 11 12 10
3 5 6 7
13
CARESTREAM Vue PACS Client
17
Viewing DICOM information To view information dynamically, place the cursor on a series. A tool tip shows the title of each DICOM tag and the complete tag value.
To view DICOM information constantly click View Type > Text View.
Note: View Type > Text View only provides additional DICOM tags, which are configurable.
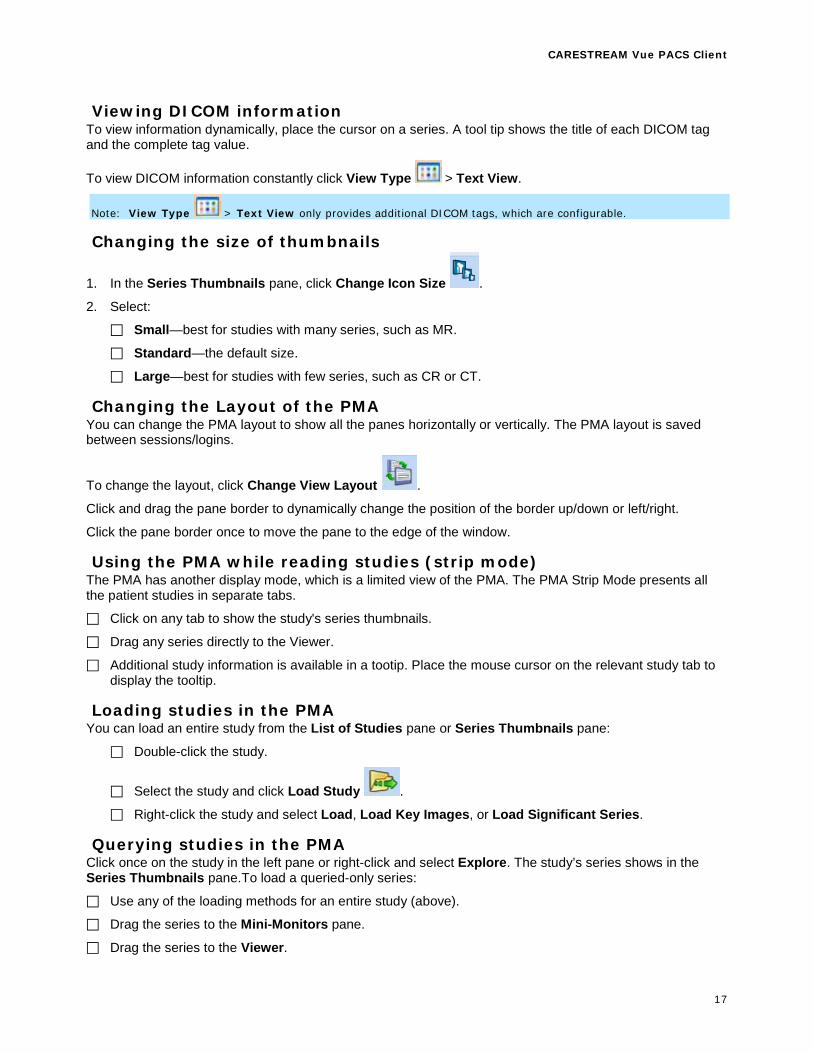
Changing the size of thumbnails
1. In the Series Thumbnails pane, click Change Icon Size .
2. Select:
Small—best for studies with many series, such as MR.
Standard—the default size.
Large—best for studies with few series, such as CR or CT.
Changing the Layout of the PMA You can change the PMA layout to show all the panes horizontally or vertically. The PMA layout is saved between sessions/logins.
To change the layout, click Change View Layout .
Click and drag the pane border to dynamically change the position of the border up/down or left/right.
Click the pane border once to move the pane to the edge of the window.
Using the PMA while reading studies (strip mode) The PMA has another display mode, which is a limited view of the PMA. The PMA Strip Mode presents all the patient studies in separate tabs.
Click on any tab to show the study's series thumbnails.
Drag any series directly to the Viewer.
Additional study information is available in a tootip. Place the mouse cursor on the relevant study tab to display the tooltip.
Loading studies in the PMA You can load an entire study from the List of Studies pane or Series Thumbnails pane:
Double-click the study.
Select the study and click Load Study .
Right-click the study and select Load, Load Key Images, or Load Significant Series.
Querying studies in the PMA Click once on the study in the left pane or right-click and select Explore. The study’s series shows in the Series Thumbnails pane.To load a queried-only series:
Use any of the loading methods for an entire study (above).
Drag the series to the Mini-Monitors pane.
Drag the series to the Viewer.
18
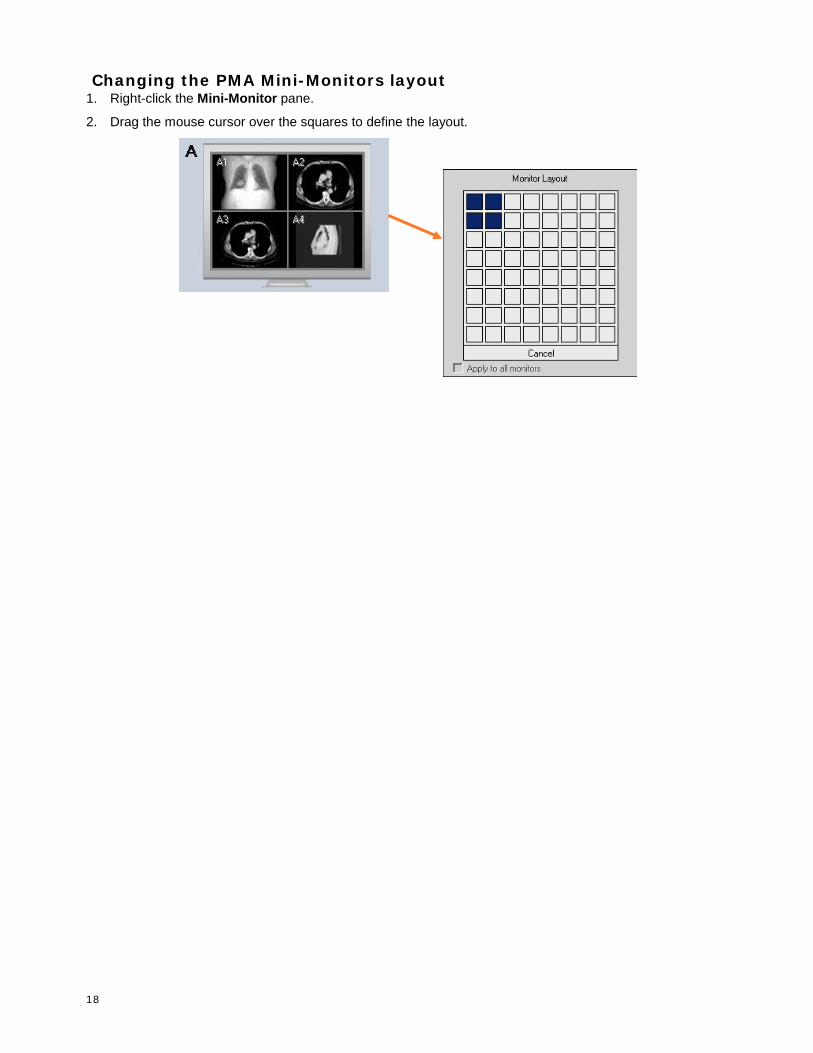
Changing the PMA Mini-Monitors layout 1. Right-click the Mini-Monitor pane.
2. Drag the mouse cursor over the squares to define the layout.
CARESTREAM Vue PACS Client
19
3D algorithm enhancements Volume rendering
A new VolR algorithm creates a more realistic image. The system assesses the hardware and applies one of two modes to set the default. The default is the best performance/quality ratio and interactivity level.
Non-enhanced-VolR Delivers high image rendition performance. You cannot control the level of the Fast or Slow qualities.
Enhanced-VolR Delivers high image quality. You can control the quality/performance ratio to set the interactivity level to High, Normal, or Low.
You can manually select enhanced-VolR mode or non-enhanced-VolR mode.
1. Click the drop-down menu for Edit VolR Protocol .
2. Select or deselect Enhanced VolR.
3. If Enhanced VolR is selected, select High, Normal, or Low.
Your selection overrides the system default selection. Choose the mode based on your workstation.
Workstation Mode
High-end Enhanced-VolR
Standard
Low-end Non-enhanced-VolR
Note: See CARESTREAM PACS v11 Client Online Help for details about the Protocol Editor (search on Working with Volume Rendering Protocols or About Volume Rendering Protocols).
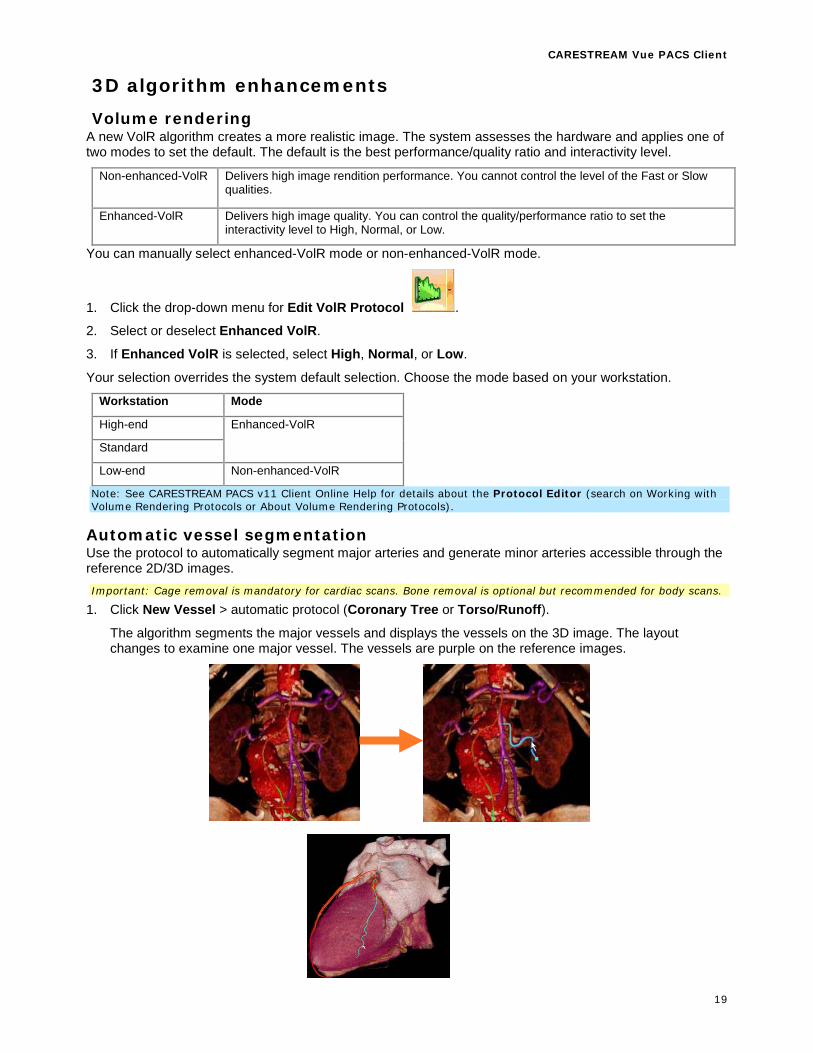
Automatic vessel segmentation Use the protocol to automatically segment major arteries and generate minor arteries accessible through the reference 2D/3D images. Important: Cage removal is mandatory for cardiac scans. Bone removal is optional but recommended for body scans.
1. Click New Vessel > automatic protocol (Coronary Tree or Torso/Runoff).
The algorithm segments the major vessels and displays the vessels on the 3D image. The layout changes to examine one major vessel. The vessels are purple on the reference images.
20
2. Place the mouse cursor over a purple vessel to view the suggested vessel path. The suggested path is cyan (blue).
3. Right-click the suggested path and select one of the options:
Accept—accepts entire suggested path as a vessel.
Accept As—accepts the entire suggested path with a name from a predefined list. Note: You can edit the predefined list through the central configuration.
Accept up to marker—accepts the portion of the suggested path up to the blue marker near the mouse cursor.
Note: Holding the the mouse cursor over a defined vessel produces suggestions for vessels branching from the defined vessel, if applicable.
The vessel is made active and shown in the panoramic image. You can edit the vessel with the correction tools in the Vessel tab.
Accessing the vessel menu Right-clicking a defined vessel in the 3D image opens the menu.
Renaming a vessel You can rename a defined vessel.
1. Right-click the defined vessel or click the Vessel drop-down menu.
2. Select the name in the predefined list.
3. Edit the name from the central configuration.
Extending a vessel You can extend a defined vessel distally or proximally. The operation depends on the location of the cursor in the 2D/3D image.
Right-click the vessel and select Extend or click Extend Vessel.
Automatic path suggestions are shown by purple regions. Right-clicking a purple region opens a menu with options for accepting the suggested extensions.
Left-clicking outside the purple regions extends the vessel up to the click point. Note: This mode of extention is applicable for vessels defined using the other protocols, such as general, aorta, and neck.
Note: Press the Shift key while clicking to maintain the mode for additional seed points.
Important: Click Undo extend to cancel the vessel extension results.
Creating a vessel branch 1. On a defined vessel, move the active vessel cut point to the bifurcation point.
2. Click Branch to create a copy of the defined vessel up to the bifurcation point.
3. Click Extend Vessel to track the desired branch.
Recalculating centerline/contours 1. Change the vessel (edit or truncate).
2. Click Recalculate Contours to update visualization and automatic measurements.
3. Click Recalculate Vessel to re-center the vessel and update the contours based on the new centerline.
Visualization options Show/Hide vessel graphics—toggles the vessel centerlines and contours in all images.
Show/Hide vessel overlays—covers the MPR image with a transparent, color-coded overlay of vessels.
Purple—regions with identified vessels.
Orange—vessels already defined.

CARESTREAM Vue PACS Client
21
Note: Overlay colors and opacity are editable from the central configuration.
Show/Hide vessel suggestions—disable/enable automatic vessel path suggestions and purple regions in 2D/3D images. Note: Pressing Ctrl temporarily disables suggestions during operation of other modes.
Show/Hide data—toggles between vessel-only and full data in VolR image.
22
Mammography features Identifying the number of stacked images Number of Images Annotation Identifies the image index (X) in the stack along with the total number of images stacked in a group (Y).
The format is <X/Y>.
Includes the PR images (presentation states).
Appears on the bottom corner opposite the chest wall for mammography images.
1. Place the mouse over the annotation.
2. Scroll through images using the mouse scroll wheel or by clicking on the arrow of the active annotation for the direction to scroll.
Note: To change the visibility, location, or size, click the Carestream Round icon > Application Settings > Annotation Options > Annotations configuration settings.
Replacing a study You can use Study Replacement to replace all images in a selected study across all stages of the applied display protocol (viewboxes) in one action. The replacement occurs without reloading the entire case. If the study is not already loaded by the display protocol, the study is loaded on demand.
From active annotation: Click the date/time annotation of the target study in the application (Viewer) and select the source study that replaces it.
Target study—the existing study to be replaced.
Source study—the study that replaces the target study.
From the PMA: Drag and drop the study header (name) from the PMA in either Limited View or Full View over the study to be replaced.
Saving annotations Select the Save shortcut key. Confirm saving if prompted.
Select the Save toolbar icon.
Select the Save context menu.
Select the File > Save menu item.
Viewing a select stage of display protocol To view a select stage in the display protocol, sucha as CC or MLO view comparison, select the keypad or shortcut key configured to jump to the selected stage of the display protocol.
Using Nipple Alignment Nipple Alignment automatically aligns mammography images based on the view’s nipple location when:
More than two mammography images with similar projection or positioning are displayed in a viewbox.
The images are loaded through Load To from the Archive Explorer.
The images are loaded through a Display Protocol.
The images are loaded through Reapply DP.
Dragging and dropping from the Limited View PMA or Full View PMA to the Viewer.
Dragging and dropping images between groups of the Viewer.
The magnification mode—such as True Size, Fit to Window, or Same Size—was manually changed.
CARESTREAM Vue PACS Client
23
You selected Study Replacement.
Remove or reapply Nipple Alignment
Select the Nipple Alignment shortcut key, menu item, or toolbar control .
Correcting the Nipple Alignment manually 1. Invoke Correction Mode and Nipple Reference Lines through the shortcut key, menu item or toolbar
control.
2. Left-click the correct nipple location for a specified view.
3. Use keyboard keys to make fine adjustments.
4. Repeat steps 2 to 3 for other views.
5. Toggle off Nipple Correction Mode.
Using Projection View Cross-Reference Lines Displays parallel lines in all opposing mammography views to indicate the correlated area for a selected point of interest.
1. Select the shortcut key, menu item, or toolbar control .
2. Left-click a point of interest in a selected view. Parallel lines display automatically on all opposing reference views, indicating the correlated area of interest.
3. Toggle off the cross-reference lines using the same method in step 1.

24
Orthopedic features Multiple Cobb angles
The Cobb Angle graphics tool is used for measuring the curvature of the spine; the tool now supports consecutive Cobb angles.
1. Click Cobb Angle .
2. Select two points on the image for the first line of the Cobb angle.
3. Select the next two points for the second line that will complete the first Cobb angle. If only a single Cobb angle measurement is needed, end the measurement.
4. Select the next two points for the line that will complete the next consecutive Cobb angle. The two points ending the previous Cobb angle also represent the first two points for this Cobb angle. If this is the final consecutive Cobb angle, end the measurement.
5. Repeat step 4 for additional consecutive Cobb angles measurements.
CARESTREAM Vue PACS Client
25
Global priors Allows you to work on your regular local worklist and receive the history studies from all other sites through the Data Center (GWL). Global Priors is available in the Archive Explorer.
When enabled by permission, the system queries the history list from both the local machine and the Data Center, displaying a consolidated list in the PMA.
The calling system does not have to specify the global worklist connection parameters to benefit from the complete history list.
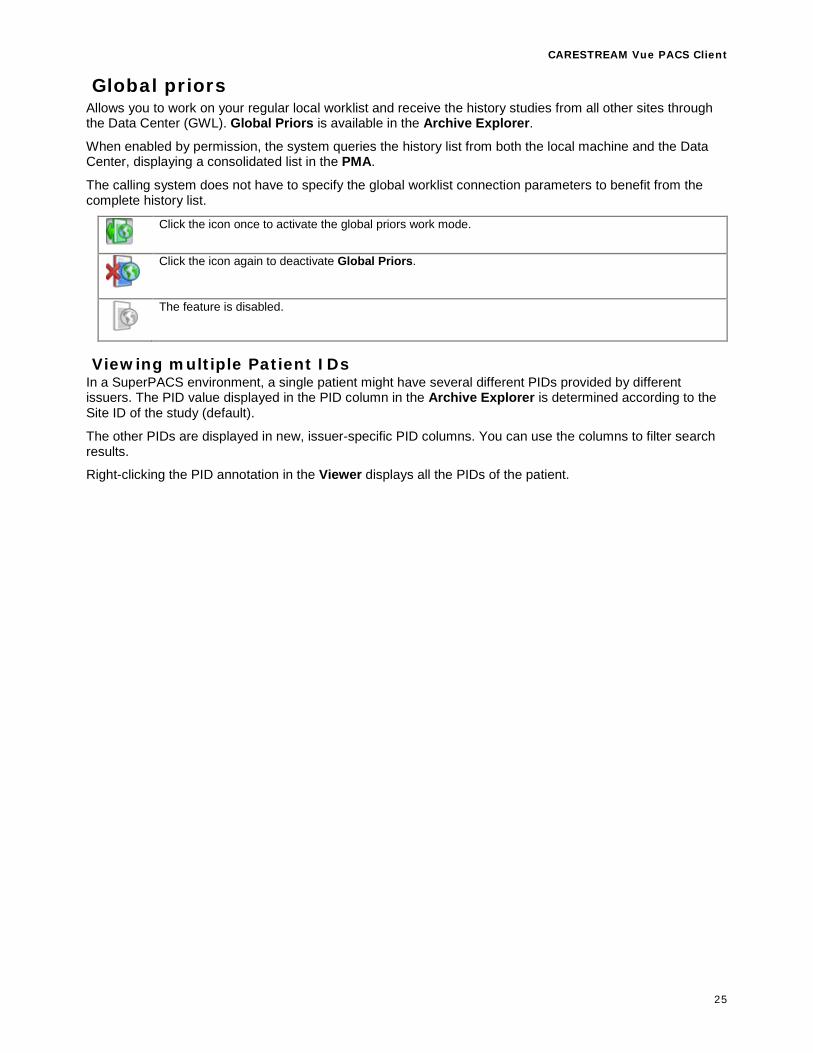
Click the icon once to activate the global priors work mode.
Click the icon again to deactivate Global Priors.
The feature is disabled.
Viewing multiple Patient IDs In a SuperPACS environment, a single patient might have several different PIDs provided by different issuers. The PID value displayed in the PID column in the Archive Explorer is determined according to the Site ID of the study (default).
The other PIDs are displayed in new, issuer-specific PID columns. You can use the columns to filter search results.
Right-clicking the PID annotation in the Viewer displays all the PIDs of the patient.
26
Appendix A: CARESTREAM PACS Client, Version 11.0 This appendix includes supporting information pertinent to CARESTREAM PACS Client, version 11.0 but which was unavailable in the version 11.0 documentation. Important: The feature(s) explained in this section are not new for version 11.1.
Aneurysm measurement Aneurysm measurement is a tool available in Vessel Analysis.
1. Segment a vessel. Important: For an abdominal aortic aneurysm, select aneurysm point of interest when the cross-section is located below the origin of the renal arteries.
2. Six markers are automatically placed on the vessel. Change the locations as needed.
D1—below the renal arteries
E2—at the level of bifurcation
D4—between the end of the aneurysm and E2
E1—at the end of the aneurysm
D3—at the maximum diameter of the aneurysm
D2—at the beginning of the aneurysm
3. Click Vessel Report to obtain:
Measurements of the markers
Measurements of 4 segments:
• L1—distance between end of renal arteries and neck of aneurysm • L2—length of aneurysm • L3—distance between end of aneurysm and bifurcation • L4—sum of the distances from end of the renal arteries to bifurcation
Accuracy of Measurements This section provides information about the accuracy of CARESTREAM PACS viewing application measurements. The accuracy of the measurements relies on a number of factors, particularly the Region of Interest (ROI) being measured.
While the software calculates and displays measurements with a resolution of two decimal places (such as 0.11 mm, 0.11 degree, etc.), several factors limit the accuracy of the measurement.
The image resolution is determined by the size of the area scanned, the matrix size of the captured image and the inter-slice distance for 3D measurements (all three are determined by the modality when the images are created).
For example, the smallest detail in an image acquired with a standard 512 x 512 matrix is 0.5 x 0.5 mm. With a standard 256 x 256 matrix the smallest detail is 1 x 1 mm.
The size of the smallest elements limits the measurement accuracy in the acquisition plane and is the physical minimums. The accuracy in a direction perpendicular to the acquisition plane cannot be better than the distance of the inter-slice.
Other factors including acquisition errors, image artifacts, display settings, and partial volume effects, may affect accuracy for the particular modality and image type. Anatomical features in the images are rarely of a uniform composition or density.
In the Basic Viewer Application regardless of the zoom factor being used to view images, ROI statistics are calculated based on the pixels1 from the original, unzoomed image data as they arrived at the workstation. Region of interest area statistics are based on the pixels inside the graphic defining the region.
1 Pixel—the abbreviation for picture element, the smallest unit a computer monitor can display in 2D.
CARESTREAM Vue PACS Client
27
Using the Straight Line Measurement, measurement accuracy for the displayed length is equal to +/– the image pixel size. To minimize errors to the physical minimum, enlarge the image before positioning the measuring tools.
Using Angle Graphics, measurement accuracy depends on the length of the segments and improves as the length of the segments increase. For an angle measured between segments which are 100x the image pixel size, the measurement accuracy of the displayed angle value is equal to +/– one degree.
Using a Region Of Interest Area Graphic (free draw, smooth curve, rectangle or ellipse), measurement accuracy of the displayed area value is equal to +/– the circumference of the region multiplied by (image pixel size) ^2 / 2.
Mean and standard deviation values for the intensity of the pixels in the region are affected by this accuracy.
In Power Viewer and MPR-based Applications The Line accuracy is one voxel. With high thickness values, accuracy may decrease.
The ROI statistics are affected by the zoom factor used to view images, ROI measurements and statistics are calculated based on the pixels from the original ZOOMED image data.
3D images (MIP and Volume Rendering) Measurements Changes in display settings (window W/L) may result in a change to the apparent dimensions of the anatomical features (e.g., the diameter of a blood vessel). The presence of partial volume voxels2 at the interface between two adjacent anatomical features with different composition or density produces a similar effect.
The automatic algorithms may fail to segment the area the user is analyzing, causing the measurements to be inaccurate. The segmentation and the derived measurements are only an aid for the user. It is the user's responsibility to verify the segmentation. Once the segmentation and measurement positioning is verified, the accuracy of the measurements is one voxel.
Always refer to the Viewer and MPR as baseline to confirm 3D measurements.
Measurements are more accurate when they are performed in the Viewer.
When depositing any measurement tool (Line, Angle, ROI), always check its correct position on reference views.
Tissue Definition The tissue definition tools have an accuracy of up to two voxels due to the smoothed image data. The accuracy of a tissue volume measurement is given to the user per measurement.
Coronary Vessels The Coronary definition tools have an accuracy of one voxel.
SUV Calculations on PET-CT Cases When using an SUV calculation during a PET assessment certain assumptions are made with regard to the reference time for the acquisition of the data series.
It is important to note that SUV is affected by a number of physiological factors which cause changes in the calculated SUV values.
Taking these two factors into account, SUV can be used as a simplified measure of radio pharmaceutical uptake which has a complimentary rather than directive role in the assessment, treatment and staging of disease.
2 Voxel—the abbreviation for volume element, the basic element in a CT or MR data set in 3D.

28
CARESTREAM is a trademark of Carestream Health, Inc.
© Carestream Health, Inc.
150 Verona Street
Rochester, NY 14608