Embed Size (px)
Citation preview

NOAA TECHNICAL MEMORANDUM NMFS-SEFSC-524
CAREFUL RELEASE PROTOCOLS FOR SEA TURTLE
RELEASE WITH MINIMAL INJURY
Sheryan Epperly Lesley Stokes Shawn Dick
June 2004
U.S. Department of Commerce National Oceanic and Atmospheric Administration
NOAA Fisheries Southeast Fisheries Science Center
75 Virginia Beach Drive Miami, Florida 33149


NOAA TECHNICAL MEMORANDUM NMFS-SEFSC-524
CAREFUL RELEASE PROTOCOLS FOR SEA TURTLE RELEASE WITH MINIMAL INJURY
Sheryan Epperly Lesley Stokes Shawn Dick
U.S. DEPARTMENT OF COMMERCE Donald L. Evans, Secretary
NATIONAL OCEANIC AND ATMOSPHERIC ADMINISTRATION
Conrad C. Lautenbacher, Jr. Undersecretary of Commerce for Oceans and Atmosphere
NATIONAL MARINE FISHERIES SERVICE
William T. Hogarth, Assistant Administrator for Fisheries
June 2004
Unpublished reports are used for documentation and timely communication of preliminary results, interim reports, or special-purpose information, and have not received complete formal review, editorial control, or detailed editing.

ii
NOTICE
The NOAA Fisheries (NMFS) does not approve, recommend or endorse any proprietary product or material mentioned in this publication. No reference shall be made to NOAA Fisheries, or to this publication furnished by NOAA Fisheries, in any advertising or sales promotion which would indicate or imply that NOAA Fisheries approves, recommends or endorses any proprietary product or material herein or which has as its purpose any intent to cause or indirectly cause the advertised product to be used or purchased because of NOAA Fisheries publication. This report should be cited as follows: Epperly, S., L. Stokes, and S. Dick. 2004. Careful release protocols for sea turtle release with minimal injury. NOAA Technical Memorandum NMFS-SEFSC-524, 42 pp. This report has an internal document no. PRD-03/04-01 Copies of this report can be obtained from: Maria Bello, Librarian or National Technical Information Center Southeast Fisheries Science Center Southeast Fisheries Science Center NOAA Fisheries 5825 Port Royal Road 75 Virginia Beach Drive Springfield, VA 22161 Miami, FL 33149 (703) 605-6000, (800) 553-6847 (305) 361-4229 or
Director, Protected Resources and Biodiversity Division Southeast Fisheries Science Center NOAA Fisheries 75 Virginia Beach Drive Miami, FL 33149 or http:www.sefsc.noaa.gov/seaturtletechmemos.jsp

iii
ACKNOWLEDGEMENTS The development of these protocols involved a large number of very cooperative people from government, industry, and academia. We are especially grateful to observers participating in the NED experiments for their feedback: Patrick Bellew, Jeff Bernia, Ryan Brown, Thomas Droz, Georg Hinteregger, Jeff Hoffman, Nick Hopkins, Simon Gulak, Daniel Lawson, Juan Levesque, Matthew Maiello, Warren Mitchell, Ben Rhame, Patrick Rice, Jimmy Rollo, Lee Saxon, Brad Segrest, David Scheuermann, Josh Sheldon, Matthew Tierney, Jeff Trew, C. Jain Vaughn, Brian Witt, and C.R. Wurster. Invaluable was the cooperation and assistance of the captains, crew, managers, and owners of the vessels participating in the experimental fishery for their input and willingness to try the gear removal devices and develop many of the procedures outlined in this document: F/V Beth Anne, F/V Bjorn II, F/V Deesie, F/V Destiny, F/V Eagle Eye, F/V Eagle Eye II, F/V Eyelander, F/V Karen L, F/V Monica, F/V Sea Hawk, F/V Seneca, and the F/V WhiteWater. We appreciate also the efforts of many NOAA Fisheries staff: Dennis Lee, Cheryl Brown, Lawrence Beerkircher, John Watson, Charles Bergmann, Dominy Hataway, Nick Hopkins, Lisa Belskis, Chris Sasso, Ben Higgins, Larisa Avens, and Joanne Braun McNeill. This research was carried out [in part] under the auspices of the Cooperative Institute for Marine and Atmospheric Studies (CIMAS), a Joint Institute of the University of Miami and the National Oceanic and Atmospheric Administration, cooperative agreement #NA17RJ1226, and we acknowledge staff Debra Abercrombie and Myrto Argyropoulou; author Lesley Stokes also is affiliated with CIMAS. Many thanks go to the Blue Water Fishermen’s Association, Fisheries Research Institute, and Aquatic Release Conservation. We also would like to thank our academic colleagues for their input: Dr. Craig Harms and Dr. Jeanette Wyneken. A couple of the devices were conceptualized by members from the industry: the turtle tether by Jay McCormack (F/V Destiny), and the large turtle hoist by Jim Budi and Malcolm MacLean. The large turtle hoist was designed, in part, and constructed by the following: Blue Water Fishing Tackle Co., Inc., D.N. Kelley Shipyard, Diversified Marine LLC, Eagle Eye II Corporation, Polar Packaging, Inc., Reidar’s Manufacturing, Inc., F/V Sea Hawk, and Scandia, Inc. This document benefited from reviews by a number of people, including Colleen Bass, Nelson Beideman, Russell Dunn, Greg Fairclough, and Rick Pearson.

iv

v
TABLE OF CONTENTS
Introduction
Part 1 Vessel’s Responsibilities Upon Sighting a Sea Turtle Part 2 Sea Turtles Not Boated
2.1 Equipment and techniques
2.1.1 Turtle tether 2.1.2 Equipment to remove monofilament line
a) Long-handled line clipper/cutter b) Monofilament cutters
2.1.3 Equipment to remove hooks
a) Long-handled dehooker for internal hooks
1) ARC Deep-Hooked (pigtail curl) Dehooker 2) Plate 2.1.3.a.1 “Instructions for the ARC Deep-Hooked (pigtail curl) Dehooker”
b) Long-handled dehooker for external hooks
1) “J-Style” dehooker 2) Plate 2.1.3.b.1 “Instructions for the “J-Style” Dehooker”
2.1.4 Long-handled device to pull an “Inverted V” during disentanglement
2.1.4.1 “Inverted V-Style” Technique
2.2 Possible scenarios encountered
2.2.1 When a turtle is entangled but not hooked
2.2.2 When a turtle is hooked but not entangled
2.2.3 When a turtle is hooked and entangled

vi
Part 3 Sea Turtles Boated 3.1 Boating the turtle 3.1.1 Dip net 3.1.2 Large turtle hoist
3.2 Holding the turtle 3.2.1 Standard automobile tire 3.2.2 Comatose turtles
3.2.3 When to remove hooks
3.3 Opening the mouth 3.3.1 Loops of rope with protective tubing
3.3.2 Large avian oral speculum
3.3.3 Block of hard wood 3.3.4 Set of (3) canine mouth gags
3.3.5 Set of (2) nylon dog chew bones
3.3.6 Hank of rope 3.3.7 Set of (4) PVC splice couplings
3.4 Equipment to remove hooks
3.4.1 Needle-nose or long-nose pliers 3.4.2 Bolt cutters 3.4.3 Short-handled dehooker for internal hooks
a) 16” Hand Held Bite Block Deep-Hooked Turtle ARC Dehooking Device
1) Plate 3.4.3.a “Instructions for the ARC Dehooker with Turtle Bite Block”
vii
3.4.4 Short-handled dehooker for external hooks
a) Short-handled “J-style” dehooker or “Flipstick” b) Scotty’s dehooker
1) Plate 3.4.4.b “Instructions for the Scotty’s Dehooker”
3.5 Equipment to cut monofilament line
3.6 Releasing the turtle
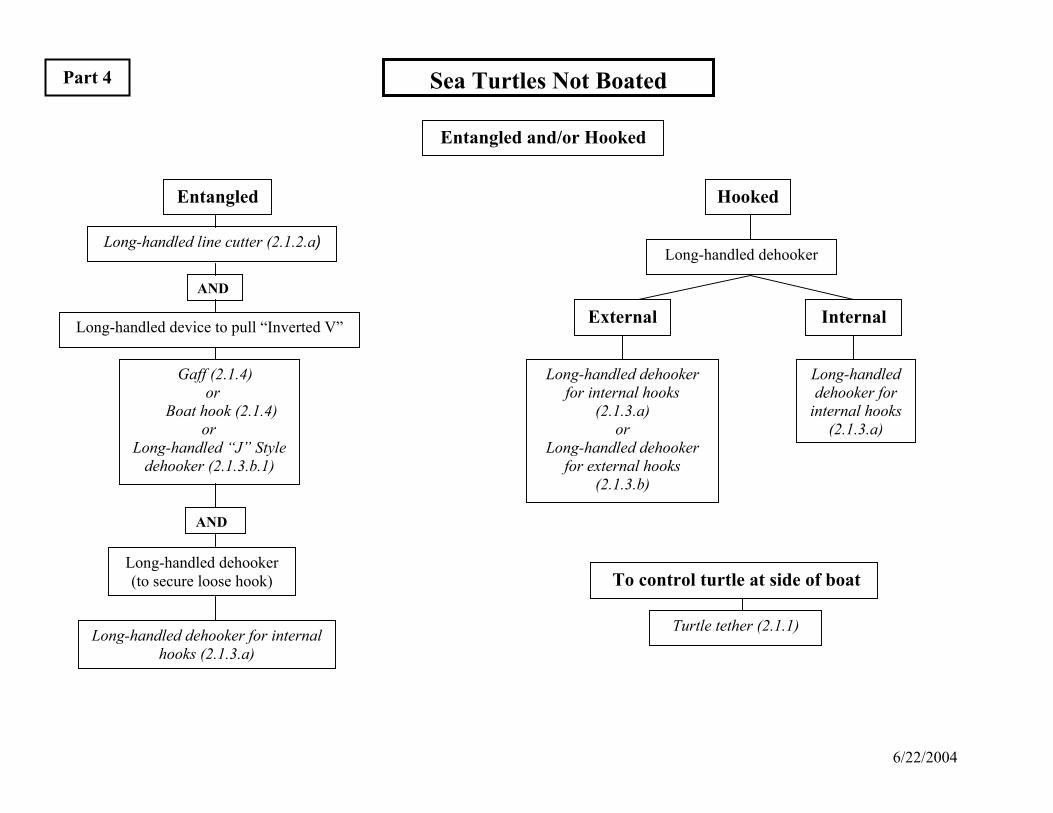
Part 4 Flow chart - Sea Turtles Not Boated
Part 5 Flow chart - Sea Turtles Boated

viii

6/22/2004
Careful Release Protocols for Sea Turtle Release with Minimal Injury Introduction The following sea turtle handling protocols, prepared by NOAA Fisheries Southeast Fisheries Science Center, describe the tools and techniques for removing fishing gear from incidentally captured sea turtles and other bycatch species. They should be followed whenever an interaction, such as a hooking and/or an entanglement, with a sea turtle occurs. The survival benefit of removing gear from animals before release has been clearly demonstrated. The required and recommended equipment and techniques described here are intended to reduce sea turtle injury and promote post-release survival. A demonstration of the use of these tools and techniques can been seen in the video “Removing Fishing Gear from Longline Caught Sea Turtles” (Hataway and Epperly 2004). Although these guidelines were written for sea turtle release, this equipment should also be used for all bycatch species to reduce mortality. These protocols synthesize the results of scientific research involving sea turtle mitigation measures and post-hooking mortality criteria developed for pelagic longline fisheries. In 2001-2003, experiments were conducted in the Western Atlantic Northeast Distant Waters statistical reporting area (NED) to evaluate sea turtle mitigation measures in the pelagic longline fisheries (Watson et al. 2004). Interviews with all of the captains and observers were conducted after each trip to specifically discuss the efficacy of various tools provided to remove gear from sea turtles. Based on the field-testing and user feedback from these experiments, gear removal tools have been updated, and equipment design standards, requirements and recommendations have been revised accordingly. Previously, all U.S. pelagic longline vessels with Federal HMS permits have been required to carry onboard dip nets and line clippers meeting NOAA Fisheries’ design standards, and to comply with handling and release guidelines for the handling of incidentally-caught sea turtles (65 FR 60889, October 13, 2000, and 66 FR 17370, March 30, 2001). The revised gear recommended or required in “Requirements and Equipment Needed for the Careful Release of Sea Turtles Caught in Hook and Line Fisheries,” (NOAA Fisheries 2004) must now be used in accordance with the following protocols to ensure that sea turtles are released with minimal injury. As specified in CFR 50 635.21(a)(3) and 50 CFR 635(c)(5)(ii), these protocols are required to be inside the wheelhouses of all Atlantic vessels that have pelagic longline gear onboard and have been issued, or are required to have, Federal HMS limited access permits.

6/22/2004
1 Part 1 Vessel’s Responsibilities Upon Sighting a Sea Turtle Captains and crews are required to scan the main line as far ahead as possible during gear retrieval to sight turtles in advance and to avoid getting ahead of the main line while retrieving gear. Upon sighting a turtle, the vessel and main line reel speed will be slowed and the vessel direction will be adjusted to move toward the turtle, minimizing tension on the main line and the branch line with the turtle. When the snap of the branch line is in hand, the vessel will continue to move toward the turtle as slowly as possible. If slow speed is not possible, the vessel will stop with the engine out of gear, and the turtle will be brought along side the vessel. The branch line will be retrieved slowly while a crew member keeps a gentle, consistent tension on the line with enough slack to keep the turtle near the vessel and in the water. A laminated instruction card for sea turtle handling/release guidelines will be provided to each vessel to be prominently displayed in the wheelhouse for instant reference (66 FR 48813, September 24, 2001). Once the turtle is brought alongside the vessel, stop and put the vessel in neutral. Do not use gaffs or other sharp objects in direct contact with the turtle to retrieve or control it, although a gaff may be used to control the line (refer to Section 2.1.4.1). Assess the turtle’s condition and size, and determine if it is hooked or entangled and, if hooked, the location of the hook. There are 3 possible sea turtle interactions with the fishing gear: 1) Entangled animal but not hooked, 2) Hooked animal but not entangled, and 3) Hooked and entangled animal. The vessel must be stopped in order to respond to these interactions, and a decision must be made whether the turtle can be brought onboard safely. It is expected that all turtles less than 3 ft in straight carapace length generally can be boated safely if sea conditions permit; larger turtles should also be boated when conditions and equipment permit. If it is determined that the turtle cannot be brought aboard without causing further injury to the turtle, or if conditions are such that the turtle cannot be safely brought aboard, then protocols for turtles not boated should be followed (Part 2). Whenever possible, turtles should be brought onboard to make gear removal easier and safer, following the handling guidelines for turtles boated (Part 3). The vessel must attempt to remove all of the gear, line and hooks from the turtle. The vessel is responsible for the turtle’s safety from first sighting until release, and all efforts should be made to release the turtle with minimal injury and minimal remaining gear.
6/22/2004
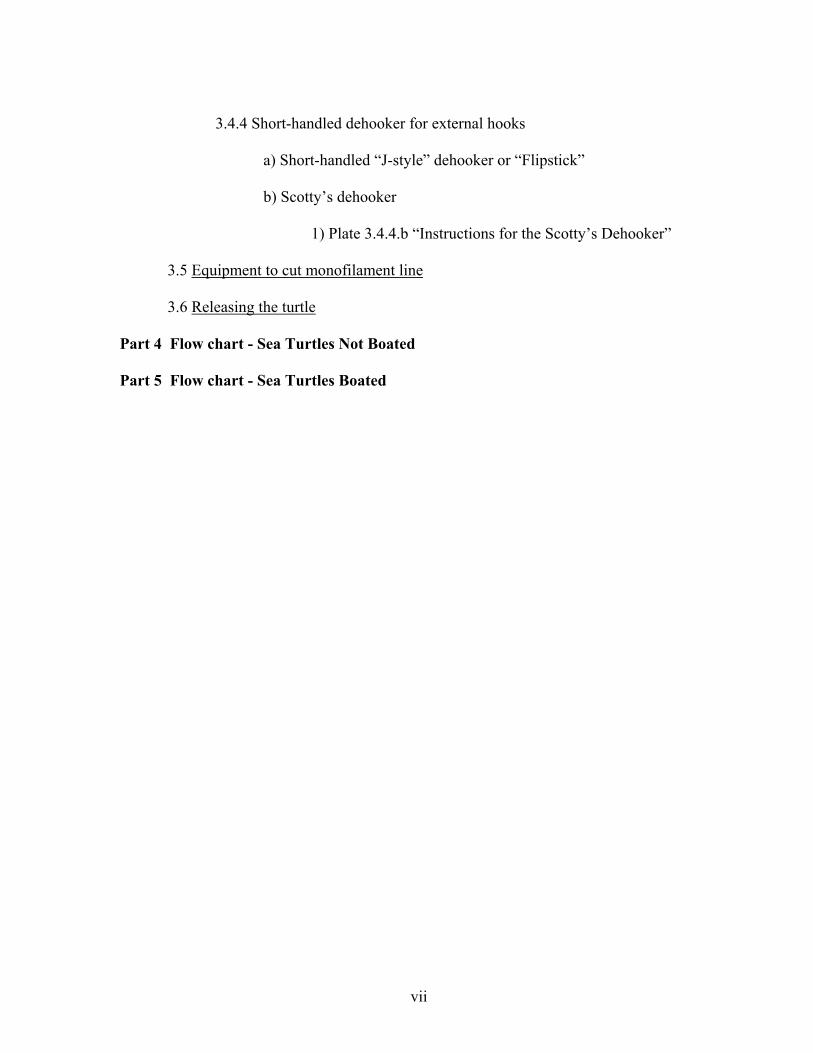
2.0 – 2.1.1 Part 2 Sea Turtles Not Boated When a turtle is too large to be boated, or if sea conditions prevent the safe boating of turtles, vessels must remove the gear while the turtle remains in the water. The turtle should be brought as close as possible, but it may need a short time to calm down before being brought fully alongside, where gear removal must be conducted as quickly as possible. The first section in this chapter details the tools and techniques to be used for gear removal. Next, different possible scenarios involving 3 types of potential gear interactions will be described, outlining the combination of tools best adapted for each scenario. For a quick reference for the equipment used with sea turtles not boated, see the flow chart in Part 4. 2.1 Equipment and techniques
2.1.1 Turtle tether A “Turtle tether” is used to help control the animal near the side of the boat, minimizing the possibility for injury to the crew and the turtle. The tether is used to take pressure off the involved branch line and help stabilize the animal. The end of the negatively buoyant tether line should be threaded through an eyebolt at the end of the tether, then through two eyebolts farther down the pole. A tag line threaded through the end of the tether must be attached to the vessel to ensure that the turtle cannot escape with the tether attached. Loop the stiff rope around the front flipper up to the shoulder region, tighten and cinch the rope in the cleat. Keep a firm hold of the tether pole to keep the animal near the vessel, allowing for dehooking and disentanglement. Use dehookers and line cutters as needed, depending on the type of gear interaction, as described in Sections 2.2.1 - 2.2.3.
6/22/2004
2.1.2
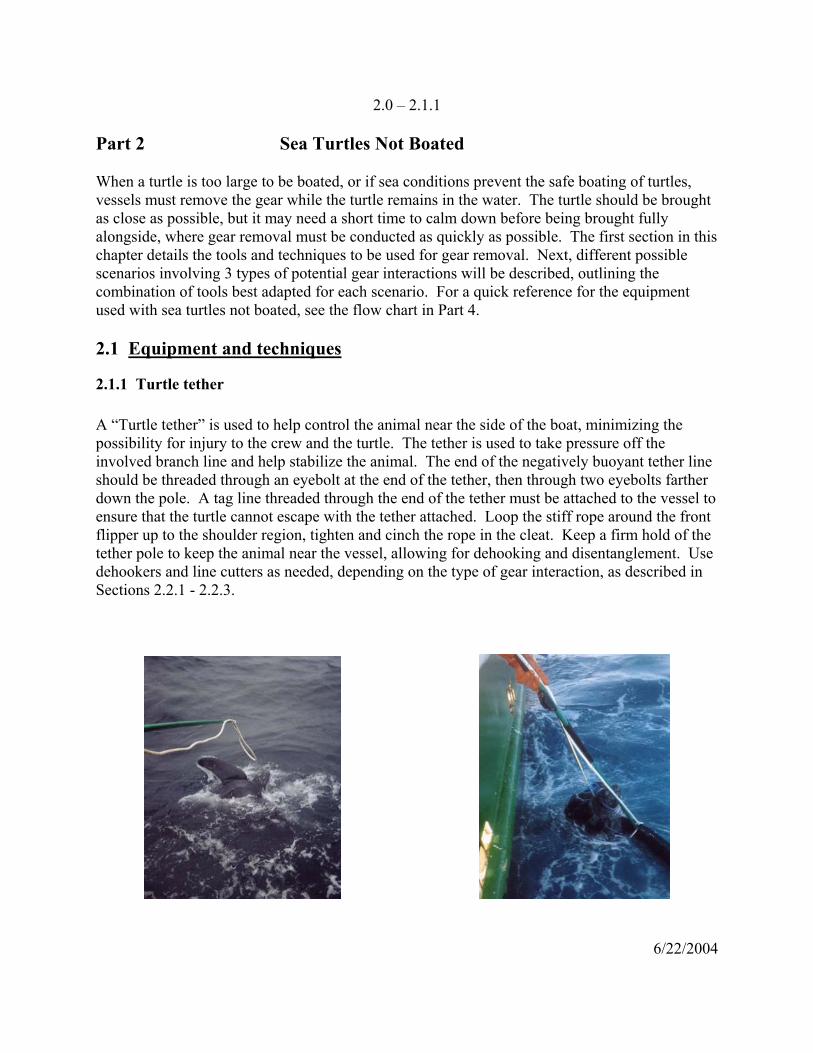
2.1.2 Equipment to cut monofilament line
a) Long-handled line clipper/cutter
A line clipper or cutter is designed to cut high-test monofilament line to assist in removing line from entangled sea turtles. It may also be used to cut the line as close as possible to the hook, minimizing remaining gear when hook removal is not possible. Carefully slide the blunt end of the line cutter under the line that you wish to remove and pull the line cutter to capture the line within the recessed blade(s) of the device.
b) Monofilament cutters If the turtle is close to the vessel, hand-held monofilament cutters may be used to remove line from entangled turtles. Turtles should be released with as little line as possible remaining.
6/22/2004
2.1.3
2.1.3 Equipment to remove hooks
a) Long-handled dehooker for internal hooks
1) ARC Pole Model Deep-Hooked Dehooker (Refer to Plate 2.1.3.a.1) The ARC Pole Model Deep-Hooked Dehooker is one example of a NOAA Fisheries certified piece of equipment. The dehooker is used to remove internal hooks from sea turtles that cannot be boated, but it is also effective on external hooks. This device engages and secures the leader, allowing the hook to be secured within an offset loop without re-engaging the barb during the removal process.
1) The leader person (person controlling the branch line) must carefully bring the animal alongside the vessel, using a tether to help control the turtle if possible. They should stay to the left of the dehooking person and maintain a taut leader.
2) The dehooking person should be to the right of the leader person to capture the leader, and no one should get in between the leader and the dehooking device in case the line breaks or the hook dislodges.
3) There is only one correct way to place the pigtail over the branch line. The leader person must maintain leader tension. The dehooking person places the dehooker on the leader at a 90° angle with the open end of the curl facing them, and the tail end of the curl facing up. Pull until the curl of the dehooking device captures the line (like a bow and arrow), and rotate the device ¼ turn clockwise. When placed correctly, the leader will be in the center of the pigtail curl.
4) Slide the dehooker down the leader until it engages the shank of the hook and bottoms out. Slightly rotate the device back and forth to ensure proper engagement on the hook.
5) When the hook is engaged, the dehooking device must be brought together with the leader, parallel to the line. If the line is not parallel with the dehooking device, the point of the hook will have a tendency to turn out and allow for possible re-engagement after release.
6) Working together, the leader person and the dehooking person must communicate and keep the line taut until the exact moment that the dehooking person disengages the hook with a short, sharp jab downward. The leader person must give a little slack when the dehooking person is jabbing downward, so timing and communication are important. After the hook is removed, the point of the hook will rotate and stop on the offset bend of the dehooker, protecting the point and preventing re-engagement of the hook.

6/22/2004

6/22/2004
Plate 2.1.3.a.1
Instructions for ARC Deep-hooked (pigtail curl) Dehooker This dehooker is designed for removing hooks that are swallowed and are lodged in the mouth, throat, or esophagus of fish, sea turtles, marine mammals, and sea birds without touching or removing the catch from the water. It also can be used for removing hooks that are embedded in the body, flippers, beak, or lip of larger fish, marine mammals, sea turtles, and sea birds. The illustrations depict fish, but the technique is the same for other animals.
Step 1 Step 2 Step 3
Step 4 Step 5 Step 6 (1) Grab the leader with your left hand. (2) Hold the dehooker in your right hand, making sure the open end of the pigtail is facing
up. (3) Place the rod of the dehooker on the leader perpendicular to the leader as you would a
bow and arrow. (4&5) Draw the dehooker back towards you until you engage the line. (6) Turn the dehooker 1/4 turn clockwise. This puts the leader in the center of the curl.

6/22/2004
Plate 2.1.3.a.1 Continued
Step 7 Step 8 Step 9
Step 10 Step 11 Step 12 (7-9) Keeping your hands apart, follow the leader down until the dehooker bottoms out on the
hook. (10) Bring your hands together making sure the leader is tight and parallel with the dehooking
device. (11&12) Give a slight thrust downward with the dehooking device until the hook disengages,
then pull out the dehooker with the hook. The point of the hook will be hidden by the offset bend (so that the hook does not re-engage). The animal is safely and instantly released.
6/22/2004
2.1.3 Continued
b) Long-handled dehooker for external hooks
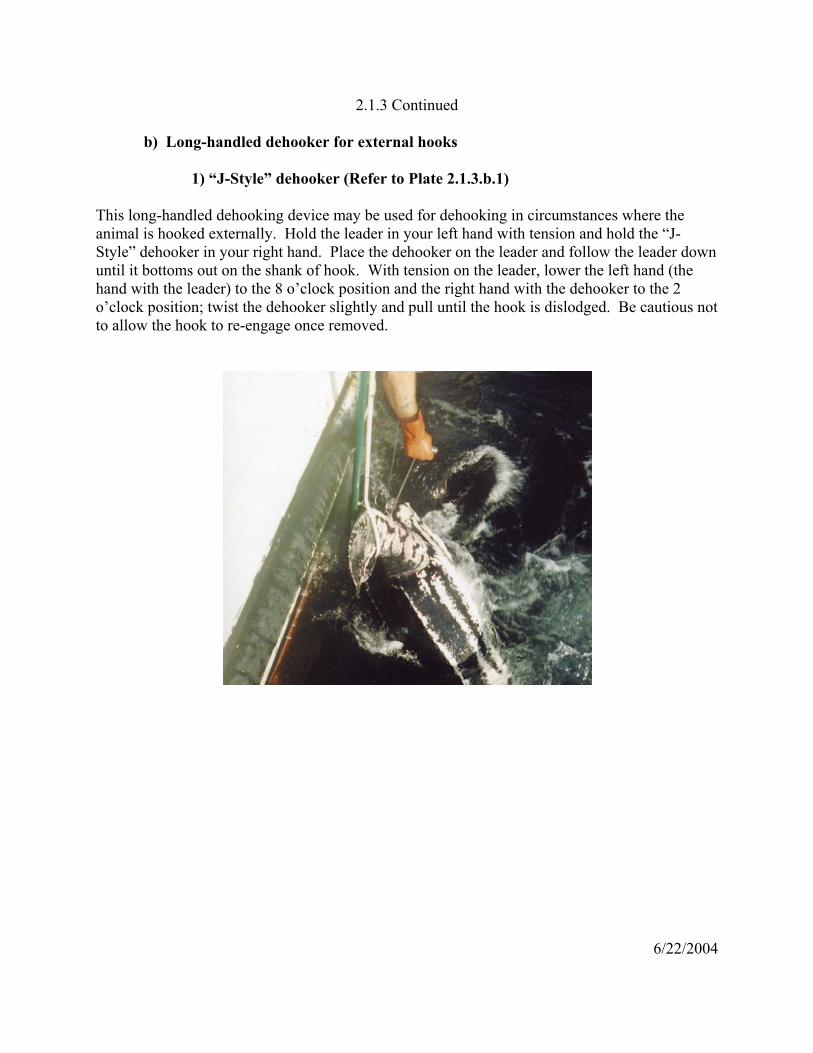
1) “J-Style” dehooker (Refer to Plate 2.1.3.b.1) This long-handled dehooking device may be used for dehooking in circumstances where the animal is hooked externally. Hold the leader in your left hand with tension and hold the “J-Style” dehooker in your right hand. Place the dehooker on the leader and follow the leader down until it bottoms out on the shank of hook. With tension on the leader, lower the left hand (the hand with the leader) to the 8 o’clock position and the right hand with the dehooker to the 2 o’clock position; twist the dehooker slightly and pull until the hook is dislodged. Be cautious not to allow the hook to re-engage once removed.

6/22/2004
6/22/2004
Plate 2.1.3.b.1
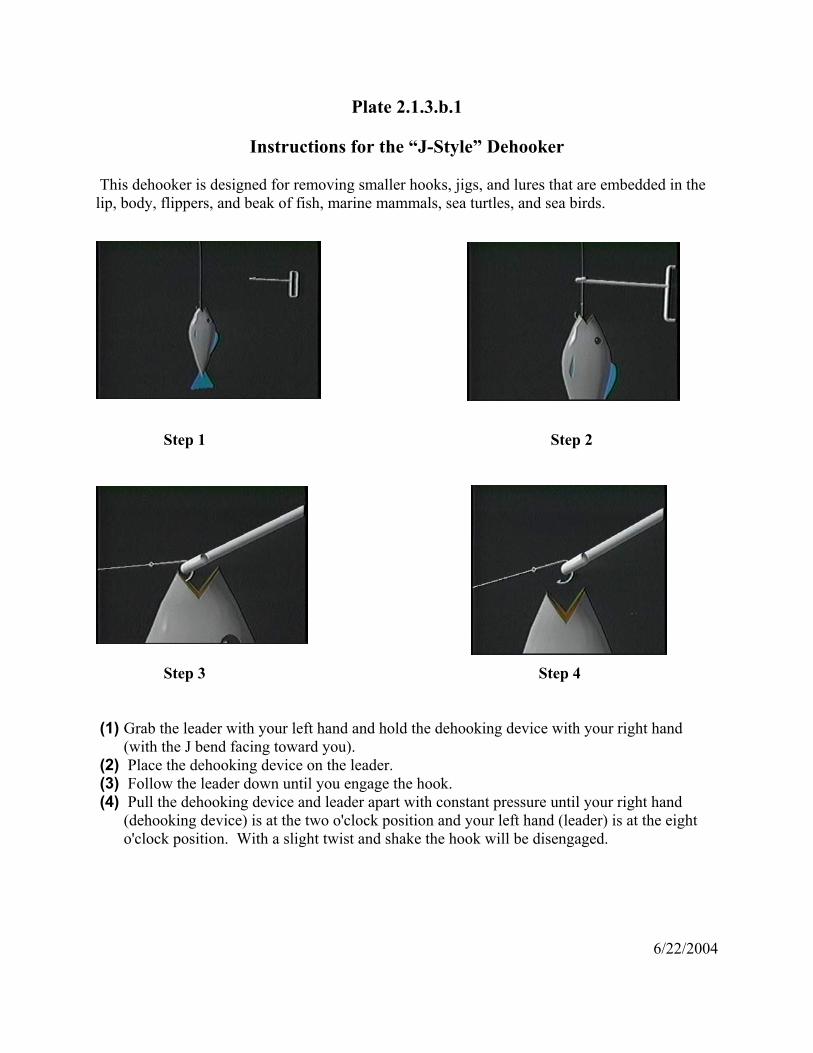
Instructions for the “J-Style” Dehooker
This dehooker is designed for removing smaller hooks, jigs, and lures that are embedded in the lip, body, flippers, and beak of fish, marine mammals, sea turtles, and sea birds.
Step 1 Step 2
Step 3 Step 4
(1) Grab the leader with your left hand and hold the dehooking device with your right hand
(with the J bend facing toward you). (2) Place the dehooking device on the leader. (3) Follow the leader down until you engage the hook. (4) Pull the dehooking device and leader apart with constant pressure until your right hand
(dehooking device) is at the two o'clock position and your left hand (leader) is at the eight o'clock position. With a slight twist and shake the hook will be disengaged.

6/22/2004

6/22/2004
2.1.4 – 2.1.4.1 2.1.4 Long-handled device to pull an “Inverted V” during disentanglement A standard boat hook, long-handled “J-Style” dehooker, or standard fishing gaff may be used to assist in disentanglements and to pull a “V” for dehooking entangled sea turtles, as described in the “Inverted V” dehooking technique below.
2.1.4.1 “Inverted V-Style” technique 1) Once at the surface, the animal may have a tendency to entangle itself more. After the
first inspection, let the turtle calm down for a short period of time (in some cases up to 10 minutes) then gently draw it to the boat, using the tether when practical to control the animal.
2) An additional crew member should carefully engage the monofilament leader closest to the embedded hook with a gaff, boat hook or long-handled “J-Style” dehooker, depending on the distance to the hook. If using a gaff, care should be taken to ensure that the point of the gaff does not ever contact the turtle. The gaff person should pull the line upward into an “Inverted V” to enable engagement of the dehooking device on the line closest to the hook.
3) Follow the instructions in Section 2.1.3 to remove the hook from the turtle using a long-handled dehooking device. The gaff person would serve the same function as the leader person.
4) After the hook is removed and secured by the dehooker, carefully remove all line with the line cutter to disentangle the animal (Section 2.1.2).
6/22/2004
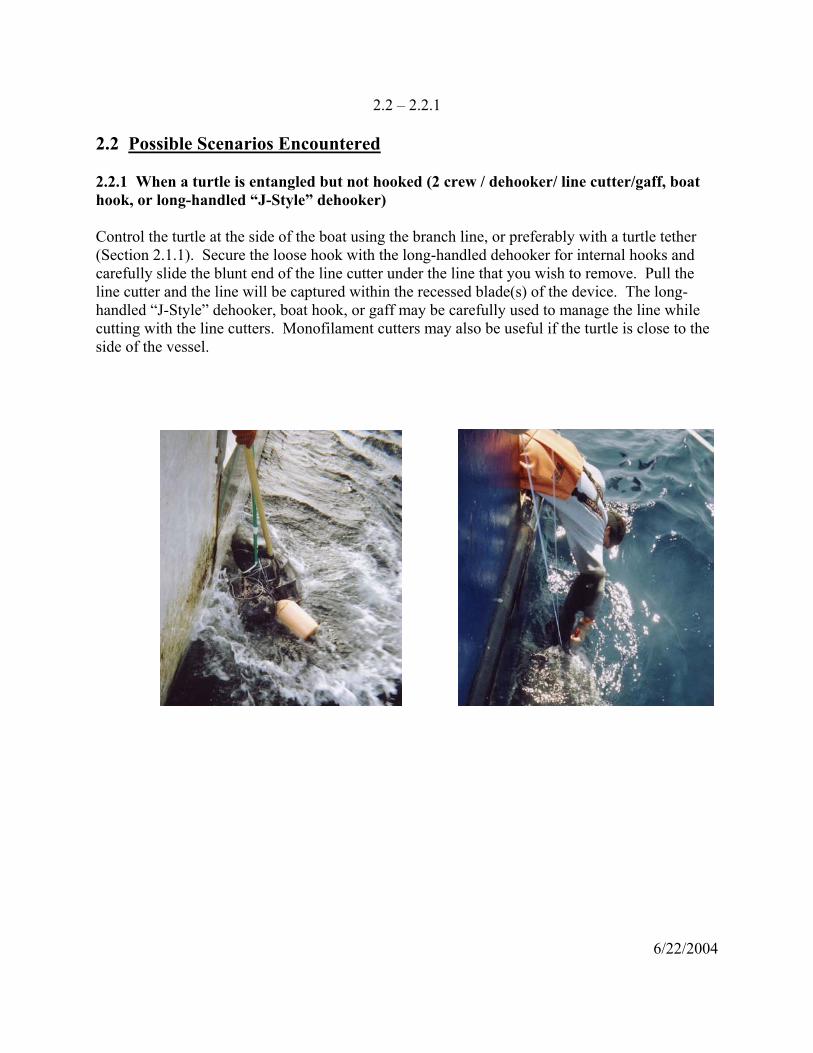
2.2 – 2.2.1 2.2 Possible Scenarios Encountered 2.2.1 When a turtle is entangled but not hooked (2 crew / dehooker/ line cutter/gaff, boat hook, or long-handled “J-Style” dehooker) Control the turtle at the side of the boat using the branch line, or preferably with a turtle tether (Section 2.1.1). Secure the loose hook with the long-handled dehooker for internal hooks and carefully slide the blunt end of the line cutter under the line that you wish to remove. Pull the line cutter and the line will be captured within the recessed blade(s) of the device. The long-handled “J-Style” dehooker, boat hook, or gaff may be carefully used to manage the line while cutting with the line cutters. Monofilament cutters may also be useful if the turtle is close to the side of the vessel.

6/22/2004
2.2.2 2.2.2 When a turtle is hooked but not entangled (at least 2 crew, turtle tether and long- handled dehooker or “J-Style” dehooker). Control the turtle at the side of the boat using the branch line, or preferably with a turtle tether (Section 2.1.1). The choice of dehooker will depend on the location and depth of the hook. Do not ever attempt to remove hooks that have been swallowed beyond where the insertion point of the barb is visible, or when it appears that hook removal will cause further serious injury to the turtle. If the hook cannot be removed, ensure that as much line as possible is removed and, if possible, remove some of the hook with bolt cutters. The long-handled dehooker for internal hooks may be used when the hook is more deeply embedded; the long-handled dehooker for external hooks may be used when the turtle is lightly hooked, and hooks are easily removed using a simple pushing or pulling motion.

6/22/2004
2.2.3 2.2.3 When a turtle is hooked and entangled (multiple crew /turtle tether/ dehooker/ line
cutter /gaff or long-handled “J-Style” dehooker) Control the turtle at the side of the boat using the branch line, or preferably with a turtle tether (Section 2.1.1). For turtles wrapped in line or hooked in the armpit or shoulder with the line running under, not over the turtle, the “Inverted V-Style” technique is necessary for release (See Section 2.1.4.1). Follow the instructions in Sections 2.2.1 and 2.2.2 for removing hooks and line.

6/22/2004
3.1
Part 3 Sea Turtles Boated
3.1 Boating the turtle
It is very important that the turtle is never pulled out the water, even partially or for a short distance, using the branch line. This could cause serious injury to the turtle, especially when the turtle has swallowed the hook. Once boated, the turtle will be handled according to the procedures for boated turtles (Section 3.2 – 3.6). For a quick reference for the equipment used with sea turtles boated, see the flow chart in Part 5.

6/22/2004
3.1.1 3.1.1 Dip net If the turtle is small enough, and if conditions are such that it can be brought aboard the vessel safely, a crew member will use a dip net (meeting standards specified in NMFS regulations) to carefully bring the turtle aboard. The net will be placed under the turtle, and it will be safely lifted out of the water and onto the deck. If the vessel is equipped with “cut out doors,” use this door to minimize the distance from the water for the turtle to be retrieved.
6/22/2004
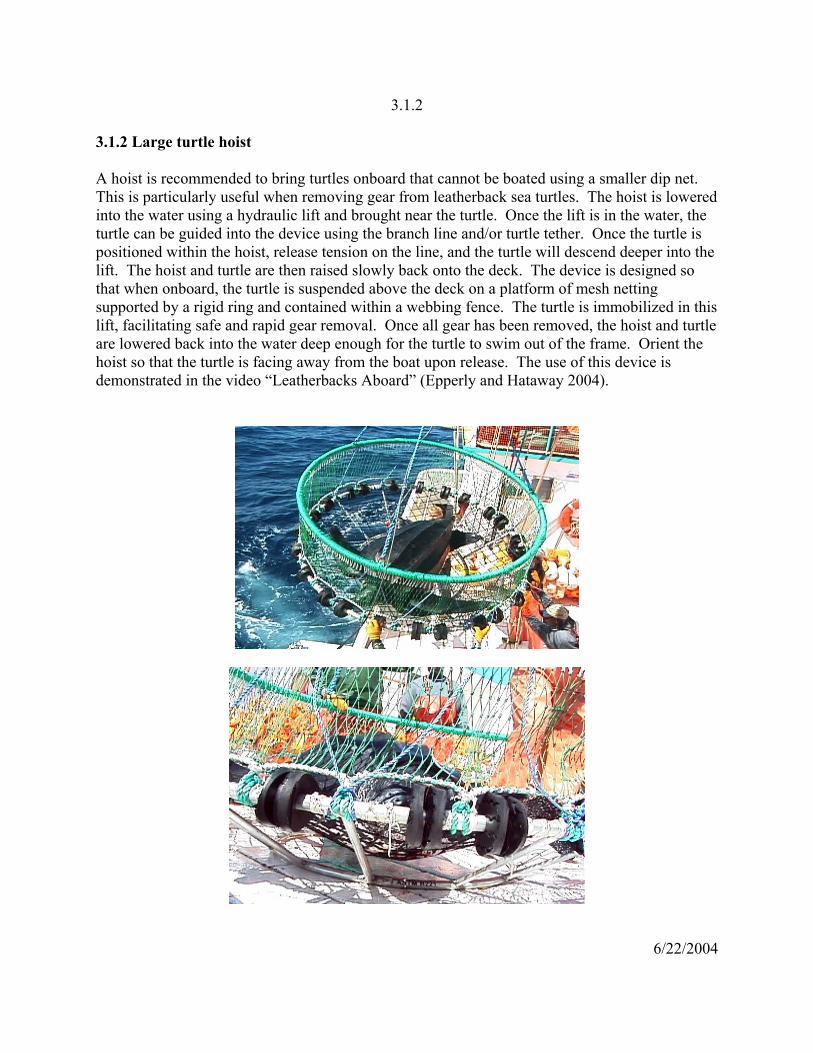
3.1.2 3.1.2 Large turtle hoist A hoist is recommended to bring turtles onboard that cannot be boated using a smaller dip net. This is particularly useful when removing gear from leatherback sea turtles. The hoist is lowered into the water using a hydraulic lift and brought near the turtle. Once the lift is in the water, the turtle can be guided into the device using the branch line and/or turtle tether. Once the turtle is positioned within the hoist, release tension on the line, and the turtle will descend deeper into the lift. The hoist and turtle are then raised slowly back onto the deck. The device is designed so that when onboard, the turtle is suspended above the deck on a platform of mesh netting supported by a rigid ring and contained within a webbing fence. The turtle is immobilized in this lift, facilitating safe and rapid gear removal. Once all gear has been removed, the hoist and turtle are lowered back into the water deep enough for the turtle to swim out of the frame. Orient the hoist so that the turtle is facing away from the boat upon release. The use of this device is demonstrated in the video “Leatherbacks Aboard” (Epperly and Hataway 2004).
6/22/2004
3.2 – 3.2.1
3.2 Holding the turtle
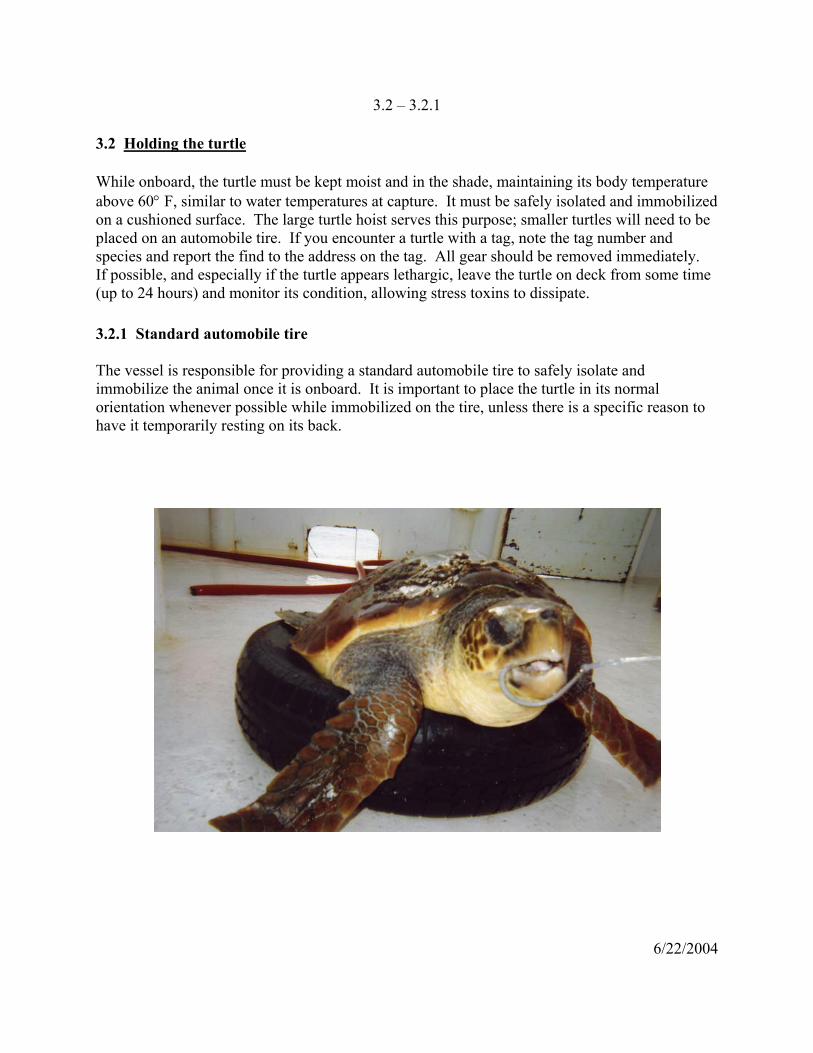
While onboard, the turtle must be kept moist and in the shade, maintaining its body temperature above 60° F, similar to water temperatures at capture. It must be safely isolated and immobilized on a cushioned surface. The large turtle hoist serves this purpose; smaller turtles will need to be placed on an automobile tire. If you encounter a turtle with a tag, note the tag number and species and report the find to the address on the tag. All gear should be removed immediately. If possible, and especially if the turtle appears lethargic, leave the turtle on deck from some time (up to 24 hours) and monitor its condition, allowing stress toxins to dissipate. 3.2.1 Standard automobile tire The vessel is responsible for providing a standard automobile tire to safely isolate and immobilize the animal once it is onboard. It is important to place the turtle in its normal orientation whenever possible while immobilized on the tire, unless there is a specific reason to have it temporarily resting on its back.

6/22/2004
3.2.2
3.2.2 Comatose turtles If a turtle appears to be comatose (unconscious), you should attempt to revive it before release per 66 FR 67495, December 31, 2001. Place the turtle on its plastron (lower shell) and elevate the hindquarters several inches to permit the lungs to drain off water. A comatose but live sea turtle may, in some cases, exhibit absolutely no movement or signs of life (no muscle reflexes). In other cases, an unconscious turtle may show some evidence of eyelid or tail movement when touched. Sea turtles may take some time to revive; do not give up too quickly. Regulations allow a fisherman to keep a turtle on deck up to 24 hours for resuscitation purposes without a permit. Even turtles successfully resuscitated benefit from being held on deck as long as possible to allow toxins that built up as a result of stress to dissipate from the body. Keep the skin, and especially the eyes, moist while the turtle is on deck by covering the animal’s body with a wet towel, periodically spraying it with water, or by applying petroleum jelly to its skin and carapace. A turtle that has shown no sign of life after 24 hours on deck (held in the shade, kept moist and its body temperature maintained above 60° F) may safely be considered dead. If the turtle cannot be revived before returning to port, it should be returned to the water, preferably in a non-fishing area.
6/22/2004
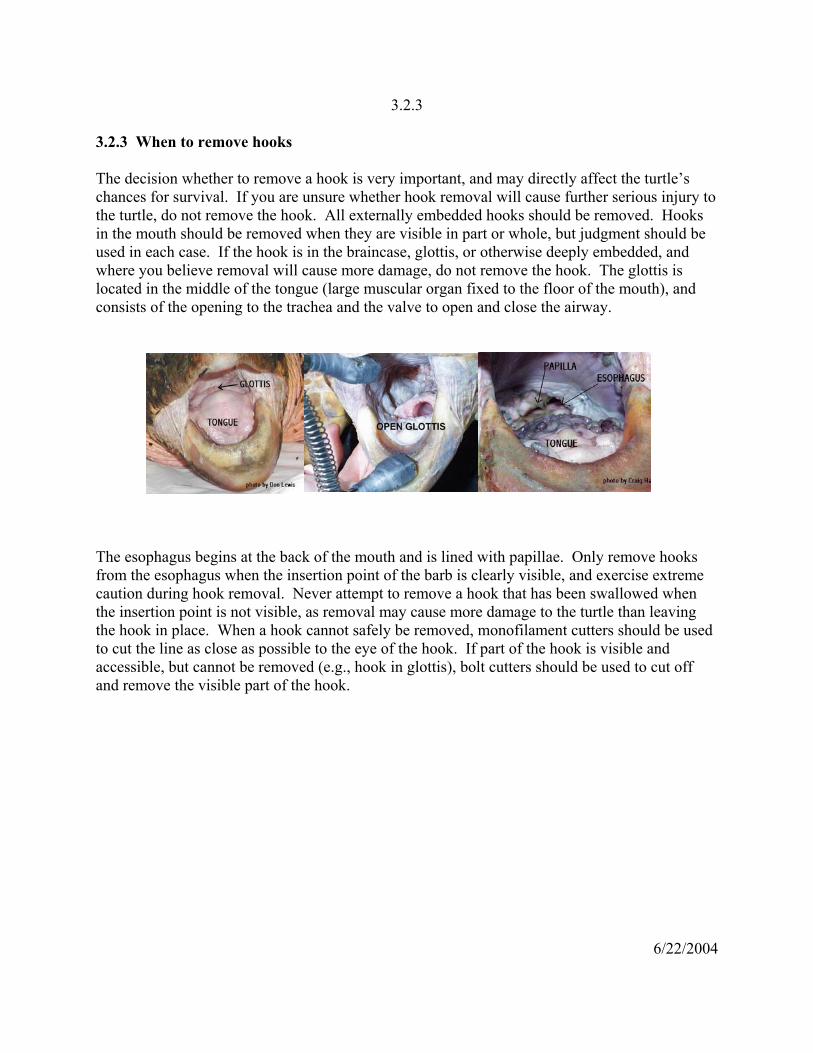
3.2.3 3.2.3 When to remove hooks The decision whether to remove a hook is very important, and may directly affect the turtle’s chances for survival. If you are unsure whether hook removal will cause further serious injury to the turtle, do not remove the hook. All externally embedded hooks should be removed. Hooks in the mouth should be removed when they are visible in part or whole, but judgment should be used in each case. If the hook is in the braincase, glottis, or otherwise deeply embedded, and where you believe removal will cause more damage, do not remove the hook. The glottis is located in the middle of the tongue (large muscular organ fixed to the floor of the mouth), and consists of the opening to the trachea and the valve to open and close the airway.
The esophagus begins at the back of the mouth and is lined with papillae. Only remove hooks from the esophagus when the insertion point of the barb is clearly visible, and exercise extreme caution during hook removal. Never attempt to remove a hook that has been swallowed when the insertion point is not visible, as removal may cause more damage to the turtle than leaving the hook in place. When a hook cannot safely be removed, monofilament cutters should be used to cut the line as close as possible to the eye of the hook. If part of the hook is visible and accessible, but cannot be removed (e.g., hook in glottis), bolt cutters should be used to cut off and remove the visible part of the hook.
6/22/2004
3.3
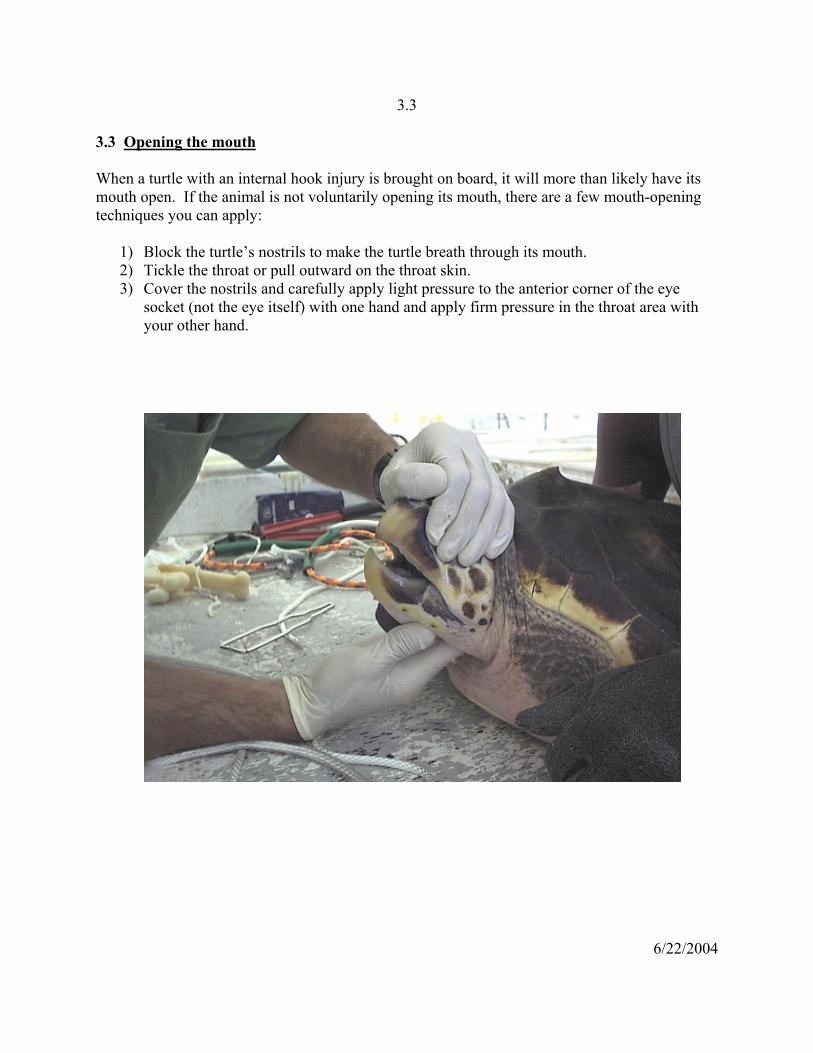
3.3 Opening the mouth When a turtle with an internal hook injury is brought on board, it will more than likely have its mouth open. If the animal is not voluntarily opening its mouth, there are a few mouth-opening techniques you can apply:
1) Block the turtle’s nostrils to make the turtle breath through its mouth. 2) Tickle the throat or pull outward on the throat skin. 3) Cover the nostrils and carefully apply light pressure to the anterior corner of the eye
socket (not the eye itself) with one hand and apply firm pressure in the throat area with your other hand.

6/22/2004
3.3 Continued If you still cannot open the mouth, use the rope loops covered with protective tubing or the avian speculum as mouth openers. The mouth openers will enable you to open the turtle’s mouth, and the mouth gags will maintain your access inside a turtle’s mouth so you can remove any hooks and/or line. Keep in mind that different mouth gags will block your view inside the mouth in various ways. Therefore, select which mouth gag will best suit the dehooking or disentanglement procedure that you need to perform. You can improve your visibility at the back of the turtle’s mouth and upper esophagus by using the needlenose pliers. After securing the mouth open, gently slide the pliers in the closed position forward into the upper esophagus and separate the pliers’ jaws to open the “throat.”

6/22/2004
3.3.1 – 3.3.2 The following devices can be used to open the mouth and/or maintain the mouth in an open position: 3.3.1 Loops of rope with protective tubing (both a mouth opener and mouth gag) Slide the ropes with the protected tubing in between the jaws and move them away from the front of the mouth to gain the greatest leverage. Care should be taken to avoid contact with the eyes. With the free ends of the rope knotted together to form a loop, you can hold the lower rope loop with your foot and the other with one hand, leaving one free hand.
3.3.2 Large avian oral speculum (both a mouth opener and mouth gag) Slide the avian speculum flat inside the turtle’s mouth and rotate it. Notice that the speculum is stepped and can be used for different sized turtles by selecting for its different widths. This mouth opener can be used only on the smallest of the animals.

6/22/2004
3.3.3 – 3.3.4 3.3.3 Block of hard wood (mouth gag) Soak the wood block/handle first to soften it and decrease damage to the beak. Position it in the posterior corner of the jaw to keep the mouth open.
3.3.4 Set of (3) canine mouth gags (mouth gag) This type of gag locks into the open position and allows for hands free operation once it is in place. The canine mouth gag’s arms are compressible when they are perpendicular to the main axis. The rubber feet on the gag lock nicely into the groove on the upper and lower beak. When the turtle bites down on the extremity of the arms, they will shift from being perpendicular and therefore will lock. Use the smallest one possible that will not crush. Compress the gag and insert it in the turtle’s mouth. As the turtle opens its mouth, the gag will expand. Maintain your hold on the gag until it has locked in place. Do not force the turtle’s mouth open all the way; let the spring tension on the gag and turtle’s own mouth movement set the maximum open position. Position the mouth gag at the front center of the jaw with the axis off to one side to provide the maximum open working area in the mouth and the surest footing for the gag.

6/22/2004
3.3.5 – 3.3.6 3.3.5 Set of (2) nylon dog chew bones (mouth gag) Position the proper size dog bone in the posterior corner of the jaw to keep the mouth open. The larger bones are easy to hold, but block access to much of the mouth. Smaller bones do not reduce your view inside the turtle’s mouth and work equally well.
3.3.6 Hank of rope (mouth gag)
Position the lanyard in the posterior corner of the jaw to keep the mouth open. Alternatively, you can place the rope across the entire width of the mouth and block both sides of the jaw, but this blocks your view of the back of the mouth.

6/22/2004
3.3.7 3.3.7 Set of (4) PVC splice couplings (mouth gag)
Insert the appropriate size PVC splice coupling (chosen by considering both the size of the turtle and the tools to be used) inside the turtle’s mouth. Hold it steady with a pair of pliers to stabilize it inside the mouth. In order to prevent the coupling from interfering with the dehooking devices, thread the line through the coupling before inserting it.
6/22/2004
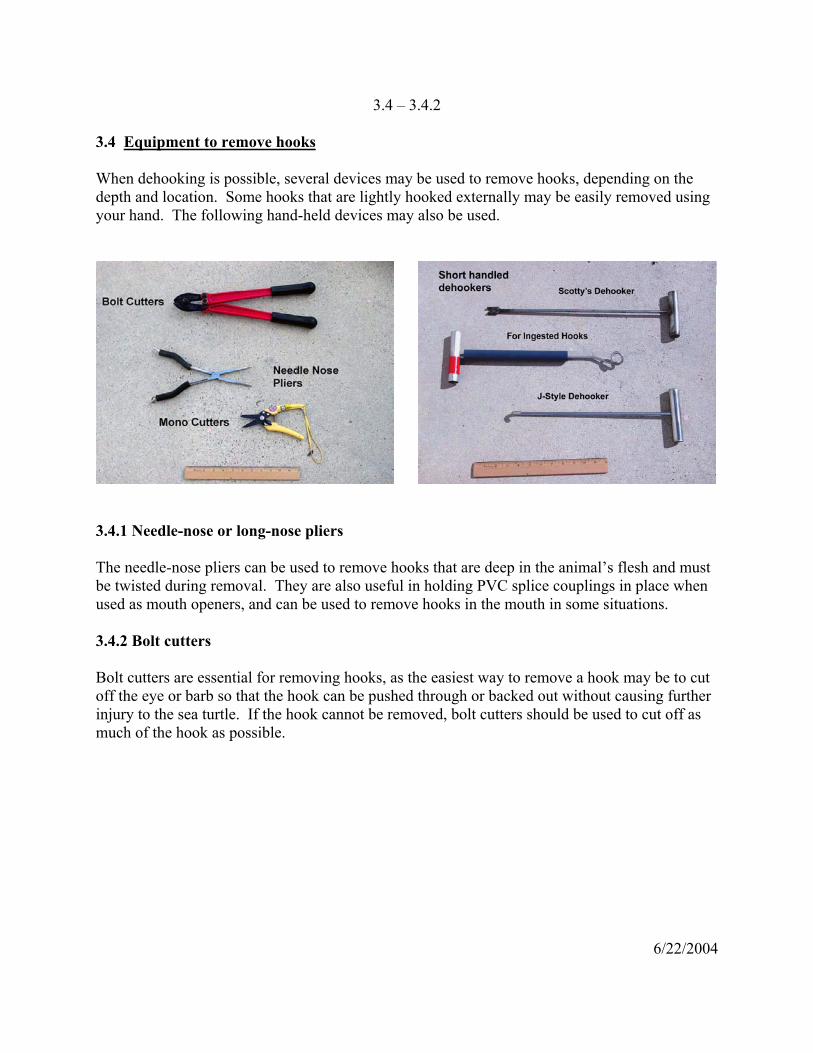
3.4 – 3.4.2 3.4 Equipment to remove hooks When dehooking is possible, several devices may be used to remove hooks, depending on the depth and location. Some hooks that are lightly hooked externally may be easily removed using your hand. The following hand-held devices may also be used.
3.4.1 Needle-nose or long-nose pliers The needle-nose pliers can be used to remove hooks that are deep in the animal’s flesh and must be twisted during removal. They are also useful in holding PVC splice couplings in place when used as mouth openers, and can be used to remove hooks in the mouth in some situations. 3.4.2 Bolt cutters Bolt cutters are essential for removing hooks, as the easiest way to remove a hook may be to cut off the eye or barb so that the hook can be pushed through or backed out without causing further injury to the sea turtle. If the hook cannot be removed, bolt cutters should be used to cut off as much of the hook as possible.

6/22/2004
3.4.3 3.4.3 Short-handled dehooker for internal hooks
a) 16” Hand Held Bite Block Deep-Hooked Turtle ARC Dehooking Device (Refer to Plate 3.4.3.a)
This device has been designed to prevent sea turtles from biting down on the dehooking device during internal hook removal. The PVC bite block also reduces the damage on the sea turtle’s beak if the turtle bites down.
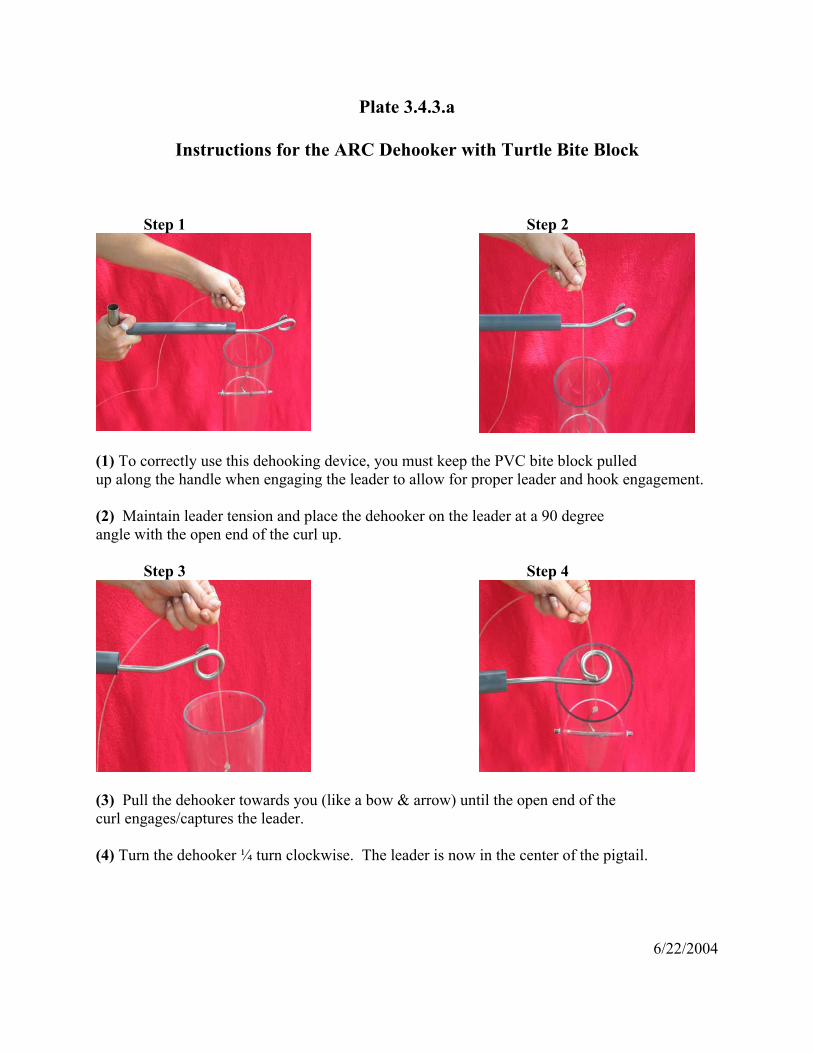
a) To correctly use this dehooking device, you must keep the PVC bite block pulled up along the handle when engaging the leader to allow for proper leader and hook engagement.
b) Maintain leader tension and place the dehooker on the leader at a 90° angle with the open end of the curl up.
c) Pull the dehooker towards you (like a bow and arrow) until the open end of the curl engages (captures) the leader.
d) Turn the dehooker ¼ turn clockwise. The leader is now in the center of the pigtail. e) Release the bite block, allowing it to fall to the bottom of the dehooker. Following the
leader, insert the curl and PVC end into the mouth as far as the animal will allow before it bites down.
f) Once the sea turtle bites down, the dehooker will still slide up to 5” in and out. g) With the sliding motion allowed by the bite block, continue to follow the leader down to
the shank of the hook. h) After the dehooker is seated on the shank of the hook, (leader tight) give a sharp jab
downward with the dehooker. The hook is removed, and the point of the hook will rotate and stop on the offset bend of the dehooker, protecting the point and preventing re-engagement of the hook.
i) After hook is dislodged, keep the leader tight and pull the dehooker out until it stops at the PVC bite block.
j) The bite block will cover the hook and further prevent re-engagement. Wait for the turtle to open its mouth and remove the entire dehooking device and hook.
6/22/2004
Plate 3.4.3.a
Instructions for the ARC Dehooker with Turtle Bite Block
Step 1 Step 2
(1) To correctly use this dehooking device, you must keep the PVC bite block pulled up along the handle when engaging the leader to allow for proper leader and hook engagement. (2) Maintain leader tension and place the dehooker on the leader at a 90 degree angle with the open end of the curl up.
Step 3 Step 4
(3) Pull the dehooker towards you (like a bow & arrow) until the open end of the curl engages/captures the leader. (4) Turn the dehooker ¼ turn clockwise. The leader is now in the center of the pigtail.

6/22/2004
Plate 3.4.3.a Continued Step 5 Step 6
(5) Release the bite block, allowing it to slide to the bottom of the dehooker. Following the leader, insert the curl and PVC end into the mouth as far as the animal will allow. (6) Should the sea turtle bite down, the dehooker will slide up to 5” in and out.
Step 7 Step 8
(7) With the sliding motion allowed by the bite block, continue to follow the leader down the shank of the hook. (8) After the dehooker is seated on the shank of the hook, (leader tight) give a sharp, short jab downward with the dehooker. As the hook is removed, the point of the hook will rotate and stop on the offset angle of the dehooker, protecting the point and preventing re-engagement of the hook

6/22/2004
Plate 3.4.3.a Continued
Step 9 Step 10
(9) After the hook is dislodged, keep the leader tight and pull the dehooker out until it stops at the PVC bite block. (10) The bite block will cover the hook and further prevent re-engagement. Step 11
(11) Wait for the turtle to open its mouth and remove the entire dehooking device and hook.

6/22/2004
6/22/2004
3.4.4
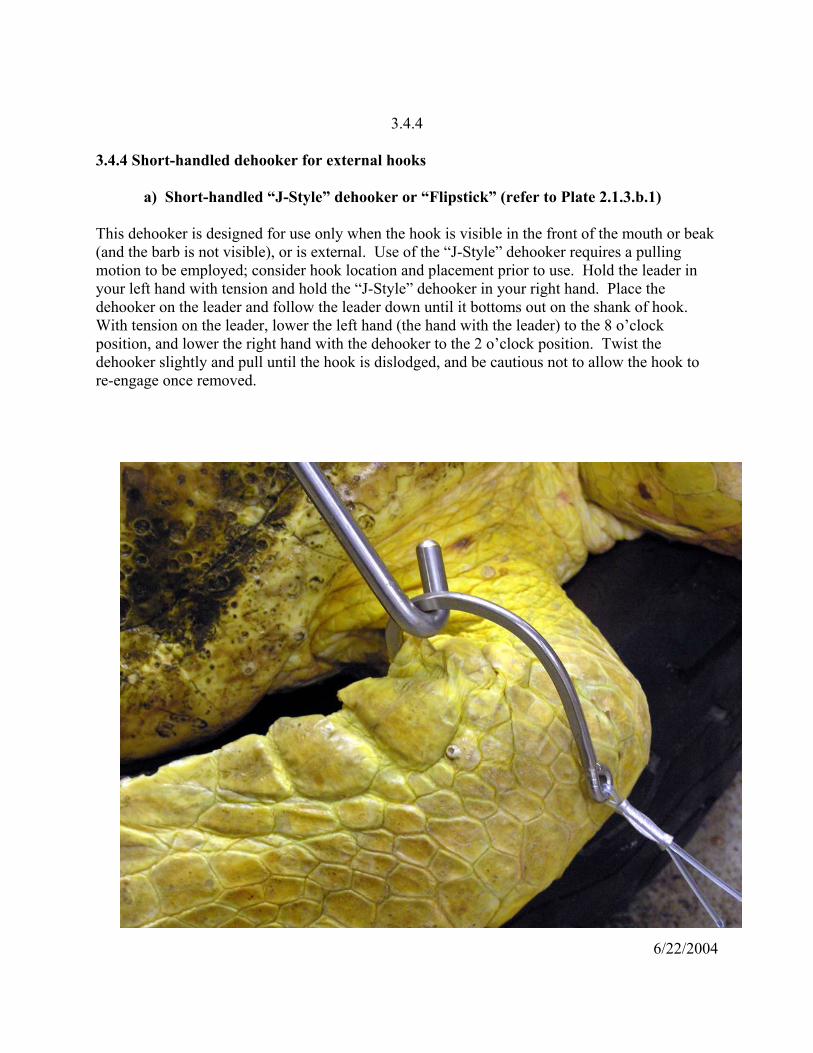
3.4.4 Short-handled dehooker for external hooks
a) Short-handled “J-Style” dehooker or “Flipstick” (refer to Plate 2.1.3.b.1)
This dehooker is designed for use only when the hook is visible in the front of the mouth or beak (and the barb is not visible), or is external. Use of the “J-Style” dehooker requires a pulling motion to be employed; consider hook location and placement prior to use. Hold the leader in your left hand with tension and hold the “J-Style” dehooker in your right hand. Place the dehooker on the leader and follow the leader down until it bottoms out on the shank of hook. With tension on the leader, lower the left hand (the hand with the leader) to the 8 o’clock position, and lower the right hand with the dehooker to the 2 o’clock position. Twist the dehooker slightly and pull until the hook is dislodged, and be cautious not to allow the hook to re-engage once removed.
6/22/2004
3.4.4 Continued
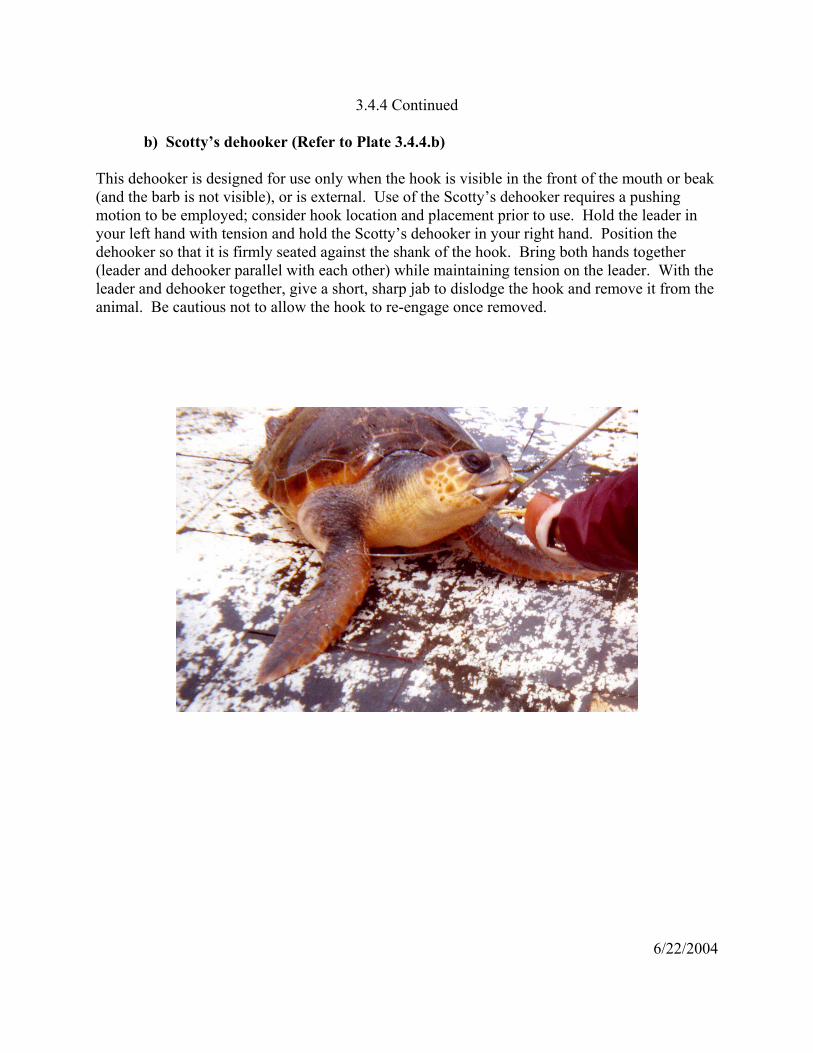
b) Scotty’s dehooker (Refer to Plate 3.4.4.b) This dehooker is designed for use only when the hook is visible in the front of the mouth or beak (and the barb is not visible), or is external. Use of the Scotty’s dehooker requires a pushing motion to be employed; consider hook location and placement prior to use. Hold the leader in your left hand with tension and hold the Scotty’s dehooker in your right hand. Position the dehooker so that it is firmly seated against the shank of the hook. Bring both hands together (leader and dehooker parallel with each other) while maintaining tension on the leader. With the leader and dehooker together, give a short, sharp jab to dislodge the hook and remove it from the animal. Be cautious not to allow the hook to re-engage once removed.

6/22/2004
Plate 3.4.4.b
Instructions for Scotty’s Dehooker This dehooker is designed for removing hooks visible in the front of the mouth or beak, or external hooks. Use of Scotty’s dehooker requires a pushing motion, and hook location should be considered when choosing this tool.
Step 1 Step 2
Step 3 Step 4
Step 5
(1) Hold leader in left hand with tension and hold Scotty’s dehooker in right hand. (2) Position the dehooker so that it is firmly seated against the shank of the hook. (3) Bring both hands together (leader and dehooker parallel with each other) while maintaining tension on the leader. With the leader and dehooker together, give a short, sharp jab to dislodge the hook and remove it from the animal. (4) Rotate or twist slightly if necessary to remove the hook. (5) Be careful not to allow the hook to re-engage once removed.

6/22/2004

6/22/2004
3.5 – 3.6
3.5 Equipment to cut monofilament line See Section 2.1.2.b. 3.6 Releasing the turtle Once gear is removed and the turtle recovered, boated turtles should be released in waters of similar temperature as at capture, preferably in a non-fishing area. Release the turtle by lowering it over the aft portion of the vessel, close to the water’s surface, when gear is not in use and the engines are in neutral. The turtle’s behavior and swimming and diving abilities should be monitored after release and recorded in the daily logbook.

6/22/2004
References Epperly, S. and D. Hataway. 2004. Leatherbacks Aboard. Video.
http://www.sefsc.noaa.gov/seaturtlefisheriesobservers.jsp. National Marine Fisheries Service, Southeast Fisheries Science Center, Miami, FL.
Hataway, D. and S. Epperly. 2004. Removing Fishing Gear from Longline Caught Sea Turtles.
Video. http://www.sefsc.noaa.gov/seaturtlefisheriesobservers.jsp. National Marine Fisheries Service, Southeast Fisheries Science Center, Miami, FL.
NOAA Fisheries. 2004. Final Supplemental Environmental Impact Statement for the Reduction
of Sea Turtle Bycatch and Bycatch Mortality in the Atlantic Pelagic Longline Fishery. U.S. Department of Commerce, National Marine Fisheries Service, Office of Sustainable Fisheries, Highly Migratory Species Management Division, Silver Spring, MD. Public Document.
Watson, J.W., D.G. Foster, S. Epperly, and A. Shah. 2004. Experiments in the Western Atlantic
Northeast Distant Waters to Evaluate Sea Turtle Mitigation Measures in the Pelagic Longline Fishery. Report on Experiments Conducted in 2001-2003. http://www.mslabs.noaa.gov/mslabs/docs/pubs.html. National Marine Fisheries Service, Southeast Fisheries Science Center, Mississippi Laboratory.
6/22/2004
Entangled and/or Hooked
Entangled Hooked
Long-handled line cutter (2.1.2.a)
InternalExternal
Long-handled dehooker for
internal hooks (2.1.3.a)
Long-handled dehooker for internal hooks
(2.1.3.a) or
Long-handled dehooker for external hooks
(2.1.3.b)
Long-handled device to pull “Inverted V”
To control turtle at side of boat
Turtle tether (2.1.1)
Gaff (2.1.4) or Boat hook (2.1.4) or Long-handled “J” Style
dehooker (2.1.3.b.1)
AND
Long-handled dehooker
AND
Long-handled dehooker (to secure loose hook)
Long-handled dehooker for internal hooks (2.1.3.a)
Sea Turtles Not BoatedPart 4

6/22/2004
Large turtle hoist
(3.1.2)
Dip net (3.1.1)
Standard automobile tire (3.2.1)
Monofilament cutters (2.1.2.b) and long-nose pliers (3.4.1) and bolt cutters (3.4.2)
(2 sets required to be aboard): 2 rope loops w/ hose (3.3.1)
or Large avian oral speculum (3.3.2) or Block of hard wood (3.3.3)
or Set of 3 canine mouth gags (3.3.4) or Set of 2 dog chew bones (3.3.5)
or Hank of rope (3.3.6) or Set of 4 PVC splice couplings (3.3.7)
Mouth opener/gag
Short-handled dehooker for internal
hooks (3.4.3)
Short-handled dehooker for external hooks
(3.4.4) or
Short-handled dehooker for internal hooks
(3.4.3)
For Boating For Gear Removal
OR
Short-handled dehooker
Back of Mouth orEsophagus
Beak or Front of Mouth
Short-handled dehooker for external hooks (3.4.4)
or Short-handled dehooker for
internal hooks (3.4.3)
AND ExternalInternal
Sea Turtles Boated Part 5
For Holding
Large turtle hoist
(3.1.2)
Short-handled dehooker
AND
AND
AND
OR