Embed Size (px)
Citation preview
Canvas Basics for Students
Revised: September 02, 2018
Authored by: Stanley Stephney
ASU CITS LMS Support Team

2
Canvas Basics for Students
Table of Contents
Introduction ............................................................................................................................................................................ 2
How to Use This Guide ............................................................................................................................................................ 3
Requirements .......................................................................................................................................................................... 3
Logging in to Canvas................................................................................................................................................................ 4
The Dashboard ........................................................................................................................................................................ 5
How to Access Courses ........................................................................................................................................................... 6
The Course Home Page ........................................................................................................................................................... 7
Announcements ...................................................................................................................................................................... 7
Viewing the Syllabus ............................................................................................................................................................... 7
How to Submit Assignments ................................................................................................................................................... 8
How to View Assignment Instructions ................................................................................................................................ 8
Okay, Now Here’s How to Submit Assignments ................................................................................................................. 9
Double-Checking Your Submission ................................................................................................................................... 10
Taking Quizzes (Tests) ........................................................................................................................................................... 11
Viewing Your Grades ............................................................................................................................................................. 12
Discussions ............................................................................................................................................................................ 12
Posting/Replying to Discussions ....................................................................................................................................... 12
Editing Discussion Posts .................................................................................................................................................... 13
Deleting Discussion Posts .................................................................................................................................................. 14
Modules ................................................................................................................................................................................ 14
Conversations (Inbox) ........................................................................................................................................................... 15
Sending Messages to Your Instructor ............................................................................................................................... 15
Logging Out of Canvas ........................................................................................................................................................... 17
Further Info and Help ............................................................................................................................................................ 17
Introduction This Guide for students is meant to teach the core basics of Canvas – just enough info to get into classes and get your
work done, and CITS strongly advises all students that use Alcorn’s Canvas system to read this guide from beginning to
3
end. If you need to know any further information about Canvas beyond the basics, you can check out the resources in
Further Info and Help section at the end of this guide.
How to Use This Guide Just read this guide from start to finish, but be sure to keep in mind that any bold text that you see in numbered steps
throughout this guide indicate text that you should see on your computer screen. Any text that you see that looks
like this indicates something that you should type.
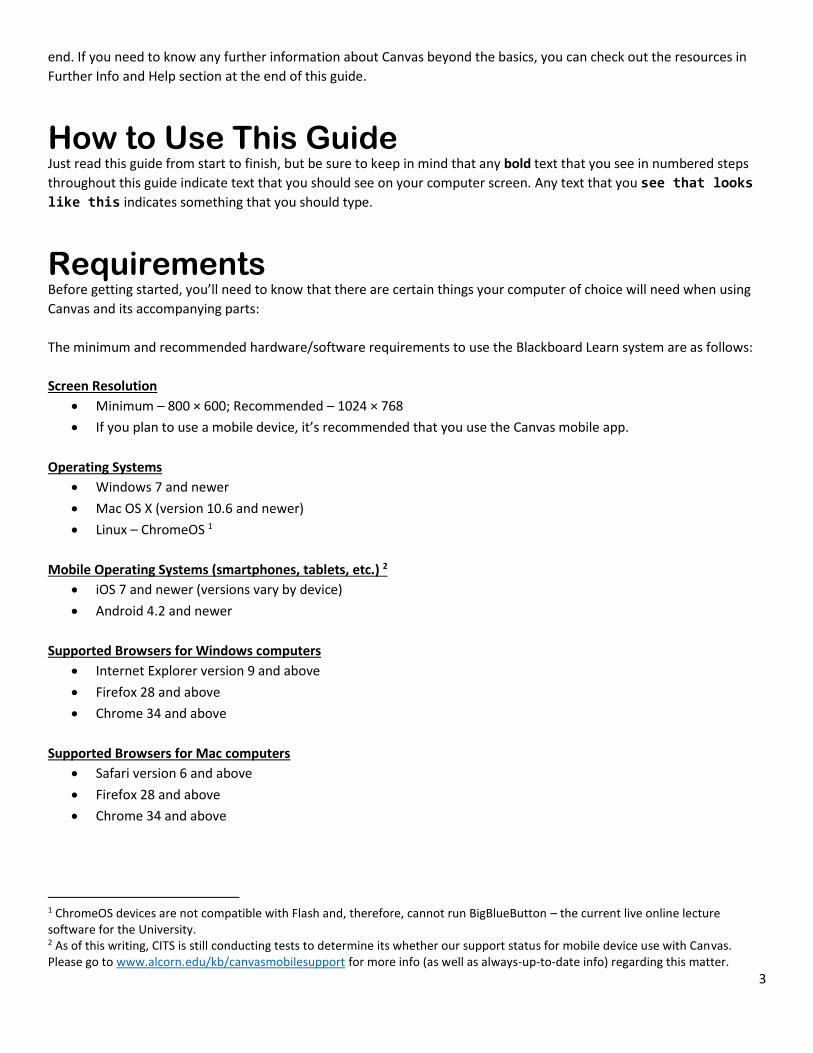
Requirements Before getting started, you’ll need to know that there are certain things your computer of choice will need when using
Canvas and its accompanying parts:
The minimum and recommended hardware/software requirements to use the Blackboard Learn system are as follows:
Screen Resolution
Minimum – 800 × 600; Recommended – 1024 × 768
If you plan to use a mobile device, it’s recommended that you use the Canvas mobile app.
Operating Systems
Windows 7 and newer
Mac OS X (version 10.6 and newer)
Linux – ChromeOS 1
Mobile Operating Systems (smartphones, tablets, etc.) 2
iOS 7 and newer (versions vary by device)
Android 4.2 and newer
Supported Browsers for Windows computers
Internet Explorer version 9 and above
Firefox 28 and above
Chrome 34 and above
Supported Browsers for Mac computers
Safari version 6 and above
Firefox 28 and above
Chrome 34 and above
1 ChromeOS devices are not compatible with Flash and, therefore, cannot run BigBlueButton – the current live online lecture software for the University. 2 As of this writing, CITS is still conducting tests to determine its whether our support status for mobile device use with Canvas. Please go to www.alcorn.edu/kb/canvasmobilesupport for more info (as well as always-up-to-date info) regarding this matter.

4
Hardware and Other Requirements
Use a computer 5 years old or newer when possible
4GB of RAM or more
2GHz processor
Along with compatibility and web standards, Canvas has been carefully crafted to accommodate low bandwidth
environments.
Minimum of 512kbps; CITS Recommends at least 1Mbps (1000kbps).
⚠
NOTE: Though Internet Explorer and Microsoft Edge are officially supported browsers by Instructure (the makers of Canvas), CITS’s LMS Support team strongly recommends and supports the use of either Mozilla Firefox or Google Chrome for the best possible experience in using Canvas.
Though not required, we at CITS highly recommend the following for an optimal viewing experience with the Canvas
system on desktop/laptop computers:
A minimum screen resolution of 1024 × 768 pixels
Logging in to Canvas There are two ways to get to Alcorn’s Canvas system. You can either…
1. Open your web browser, and in the address box, type canvas.alcorn.edu.
2. Press Enter on your keyboard. You will be brought to the Canvas login page.
3. Next enter your username, which is your full Alcorn Student Email address (e.g., [email protected]
or [email protected]).
4. For your Password, enter the same password that you use for your Alcorn Student Email account.
5. Click the Sign In button.
…OR, you can…
1. Go to the Alcorn web page at www.alcorn.edu.
Step 3
Step 4
Step 5
5
2. In the bar at the very top of the page to the right, hover your mouse over where it says STUDENTS. A small gray
menu will pop out.
3. In the little gray menu that pops out, click on Canvas LMS.
4. Next enter your username, which is your full Alcorn Student Email address (e.g., [email protected]
or [email protected]).
5. For your Password, enter the same password that you use for your Alcorn Student Email account.
6. Click the Sign In button.
Either set of these steps will bring you into the Canvas system. If you don’t know the username and/or password to your
Alcorn Email account, you can go the Alcorn CITS Knowledge Base (kb.alcorn.edu) to learn how to activate your Gold
Account or how to reset your username and password (http://kb.alcorn.edu/index.php/article/activating-your-alcorn-
emailcanvas-account-students).
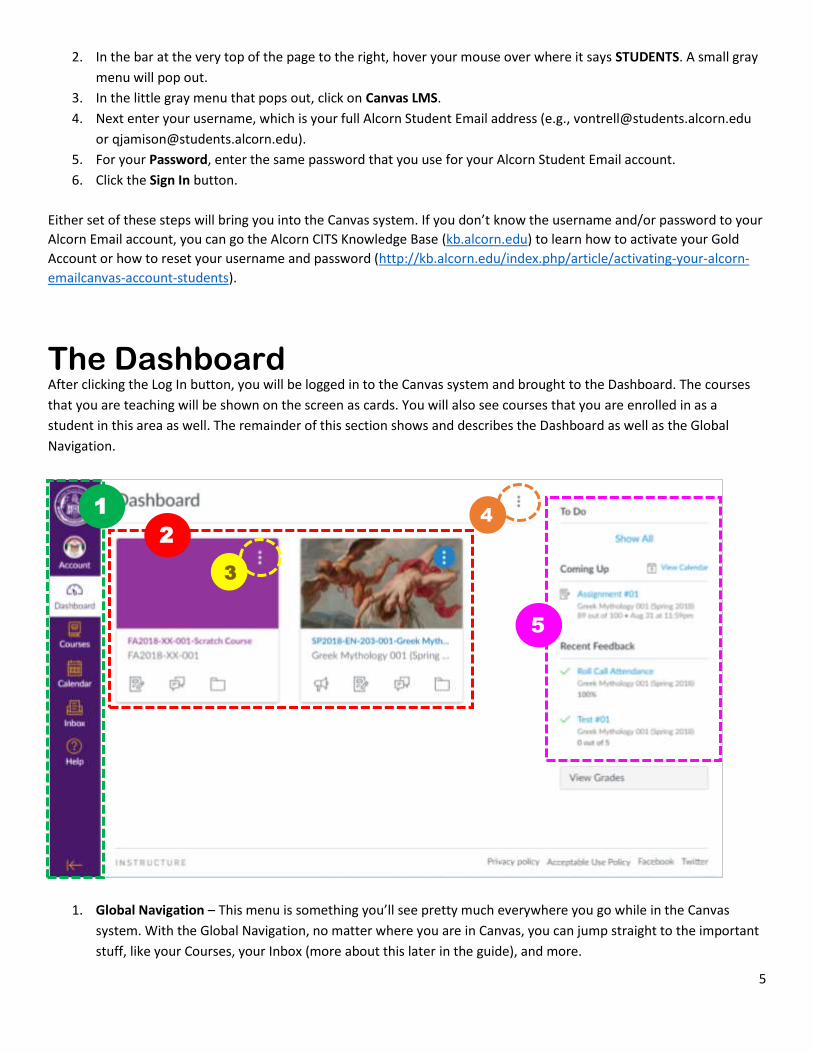
The Dashboard After clicking the Log In button, you will be logged in to the Canvas system and brought to the Dashboard. The courses
that you are teaching will be shown on the screen as cards. You will also see courses that you are enrolled in as a
student in this area as well. The remainder of this section shows and describes the Dashboard as well as the Global
Navigation.
1. Global Navigation – This menu is something you’ll see pretty much everywhere you go while in the Canvas
system. With the Global Navigation, no matter where you are in Canvas, you can jump straight to the important
stuff, like your Courses, your Inbox (more about this later in the guide), and more.
2
1
3
4
5
6
2. Course Cards – These “cards” are here to show you your courses as well as a bit of info about them; the icons at
the bottom of the cards indicate the availability of recently added/changed items (e.g., Assignments,
Discussions, Course Files, etc.) within the course.
3. Course Card Options – For each course card you’ll see an Options button – denoted by three vertical dots in the
upper-right corner of said card. These options give you a chance to put a color overlay on top of the course’s
image (more on adding course images later) as well as setting a Nickname for your course.
4. Dashboard Options – In the Dashboard options – also denoted as three vertical dots (most options buttons in
Canvas will appear in this fashion) – gives you the option to switch to Recent Activity View, which will show
recent activity that has taken place in all of your courses as opposed to showing you just the courses. You also
choose whether or not to use the Color Overlay on your cards here.
5. To Do’s, Coming Up, and Recent Feedback – the Coming Up section lets you see upcoming course activities and
due dates from across all of your courses’ calendars; ToDos show you a list of non-graded course activities to do
in your courses; and Recent Feedback is a list of your coursework items that have been graded.
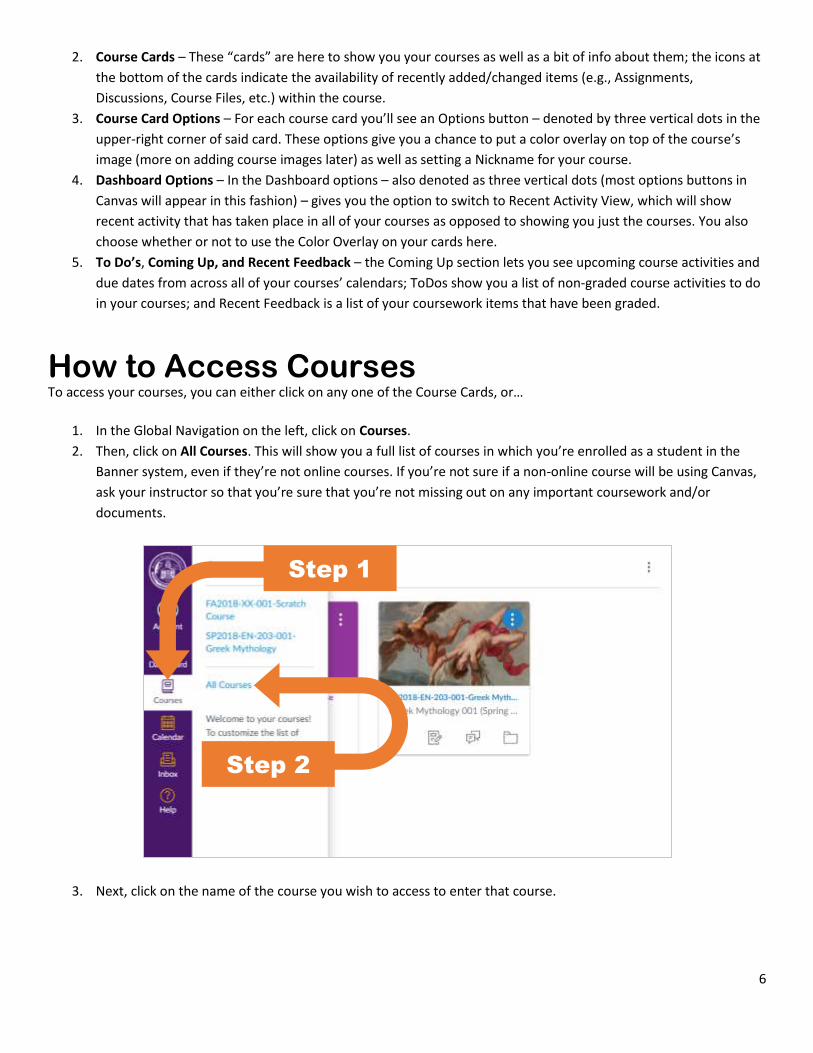
How to Access Courses To access your courses, you can either click on any one of the Course Cards, or…
1. In the Global Navigation on the left, click on Courses.
2. Then, click on All Courses. This will show you a full list of courses in which you’re enrolled as a student in the
Banner system, even if they’re not online courses. If you’re not sure if a non-online course will be using Canvas,
ask your instructor so that you’re sure that you’re not missing out on any important coursework and/or
documents.
3. Next, click on the name of the course you wish to access to enter that course.
Step 1
Step 2

7
Please note that if a course is not Published, then no students will be able to enter that course in Canvas until the
instructor Publishes the course. Though some instructors do post and Publish materials early, typically, instructors don’t
Publish courses until the first day of the semester.
The Course Home Page Once you enter a course, you will see the Home Page. By default, that will be a stream of recent activity notifications of
things that have happened within the course (e.g., assignments posted, syllabus changed, etc.). However, you can see a
variety of different things on your course’s home page. The key to succeeding in a Canvas course is to make sure you
check all of the available areas/sections of the course in the navigation on the left side of the screen to keep current
with any new/upcoming/coming-due coursework. The remainder of this guide will explain what each of the most
commonly used areas contain and how to interact within some of those areas.
Announcements The Announcements area of the course contains Announcements made by the instructor intended for all students to
view. Make sure to check this area every time you check your Canvas courses for any new messages from your instructor
in regard to your course(s).
The Announcements area of the course. Note that two of Announcements are unread; you can tell by the purple dots on the left side of them.
Viewing the Syllabus Upon the first time you enter a course, the Syllabus is always a great place to check out first, as that gives you vital
information such as: instructor contact info, textbook information, your instructor’s various policies/procedures for
handling the course, assignment schedules, etc.
Clicking on Syllabus in the Course Navigation will show you one of two things – either you’ll directly see the body of your
course syllabus on that page, or you will see a downloadable link to your course syllabus there. Below the syllabus itself,

8
you’ll see the Course Summary, which is a table that shows a listing of graded activities (Assignments, Quizzes/Tests,
Graded Discussions).
The Syllabus Area. Notice the assignment due dates listed in the Course Summary area at the bottom.
How to Submit Assignments
How to View Assignment Instructions Wait! Before we get to viewing Assginments in a course, you may want to view critical info about it, such as the
instructions, due date, how the assignment is submitted, etc. To view the instructions and other Assignment Details:
1. First, enter the course in Canvas that has the Assignment that you’re ready to submit.
2. In the course, click on the Assignments area of your course in the Course Navigation on the Left.
3. Click the title of the Assignment that you wish to make a submission to.
On the next page, you’ll see the details of the Assignment, like in the image below:
9
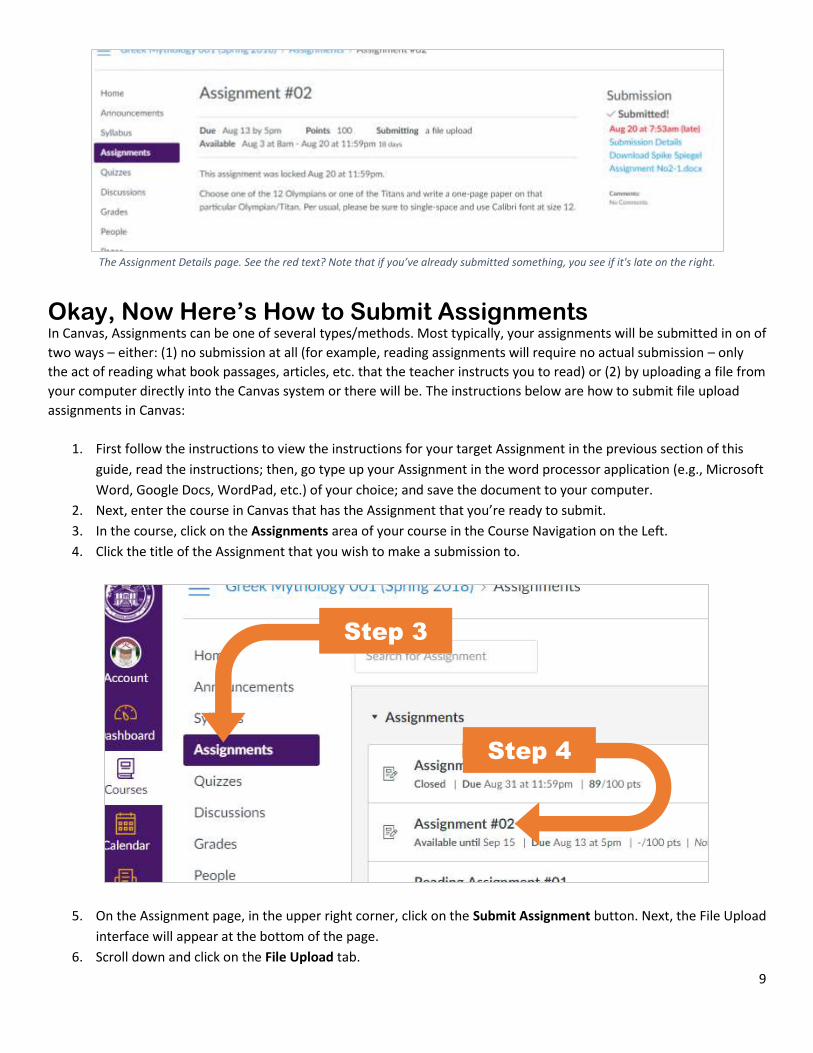
The Assignment Details page. See the red text? Note that if you’ve already submitted something, you see if it's late on the right.
Okay, Now Here’s How to Submit Assignments In Canvas, Assignments can be one of several types/methods. Most typically, your assignments will be submitted in on of
two ways – either: (1) no submission at all (for example, reading assignments will require no actual submission – only
the act of reading what book passages, articles, etc. that the teacher instructs you to read) or (2) by uploading a file from
your computer directly into the Canvas system or there will be. The instructions below are how to submit file upload
assignments in Canvas:
1. First follow the instructions to view the instructions for your target Assignment in the previous section of this
guide, read the instructions; then, go type up your Assignment in the word processor application (e.g., Microsoft
Word, Google Docs, WordPad, etc.) of your choice; and save the document to your computer.
2. Next, enter the course in Canvas that has the Assignment that you’re ready to submit.
3. In the course, click on the Assignments area of your course in the Course Navigation on the Left.
4. Click the title of the Assignment that you wish to make a submission to.
5. On the Assignment page, in the upper right corner, click on the Submit Assignment button. Next, the File Upload
interface will appear at the bottom of the page.
6. Scroll down and click on the File Upload tab.
Step 3
Step 4

10
7. Click the Choose File button. This will bring up the Open File dialog window, which gives you a view of all the
files on your computer.
8. In the Open dialog window, find and click on the file you would like to submit and click the Open button.
9. If you have any extra files to submit for the assignment, you can click on the +Add Another File link to bring up
another Choose File button and repeat steps 6 and 7 as necessary.
10. If you have any Comments in regard to the Assignment that you wish to inform the instructor of, then you can
add them in the Comments box.
11. Once you’re ready to submit your Assignment file(s), click on the Submit Assignment button.
Double-Checking Your Submission If you want to be sure that you’ve submitted your assignment, you’ll definitely want to double-check your work. There
are two ways to double-check that your assignment is submitted. You can either…
1. In the course you’d like to check, click on Assignments on the left.
2. Check for Not Yet Graded under the Assignment that you’re checking for a submission under
…OR…
1. In the course you’d like to check, click on Grades on the left.
Step 5
Step 6
Step 7
Step 8
Step 10
Step 9
Step 11
11
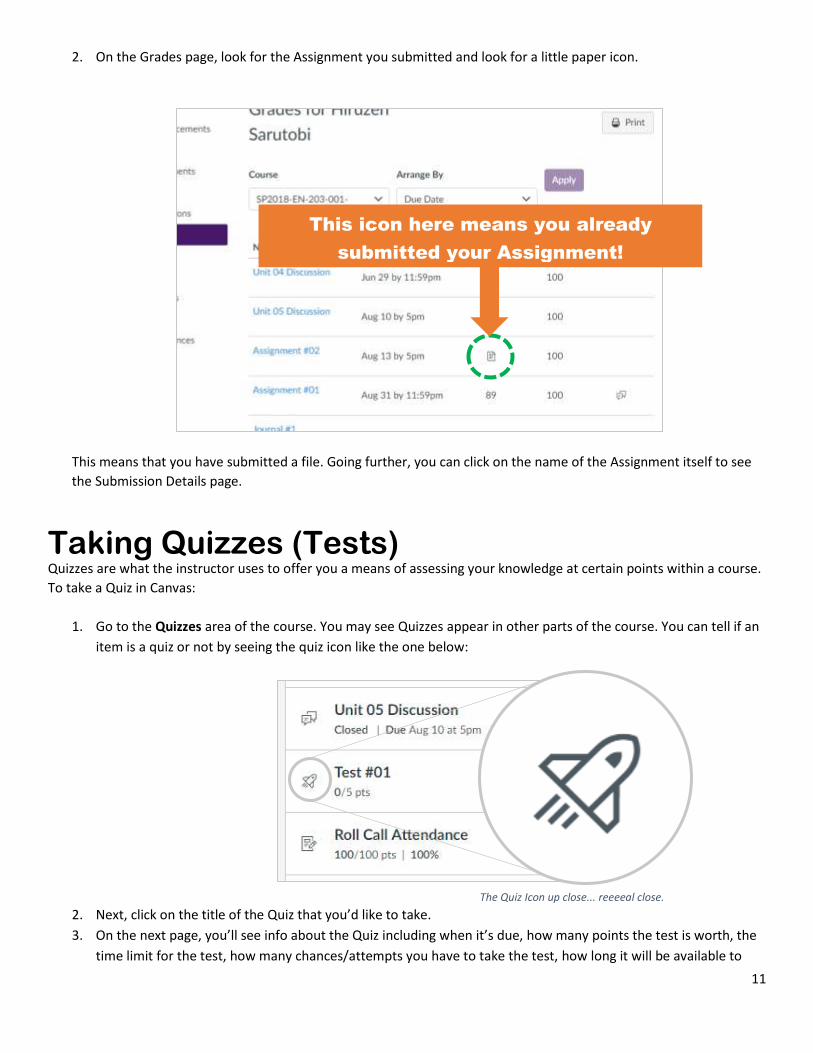
2. On the Grades page, look for the Assignment you submitted and look for a little paper icon.
This means that you have submitted a file. Going further, you can click on the name of the Assignment itself to see
the Submission Details page.
Taking Quizzes (Tests) Quizzes are what the instructor uses to offer you a means of assessing your knowledge at certain points within a course.
To take a Quiz in Canvas:
1. Go to the Quizzes area of the course. You may see Quizzes appear in other parts of the course. You can tell if an
item is a quiz or not by seeing the quiz icon like the one below:
2. Next, click on the title of the Quiz that you’d like to take.
3. On the next page, you’ll see info about the Quiz including when it’s due, how many points the test is worth, the
time limit for the test, how many chances/attempts you have to take the test, how long it will be available to
This icon here means you already
submitted your Assignment!
The Quiz Icon up close... reeeeal close.

12
take, and any special instructions (aside from answer each question). When you’re ready to take the Quiz, click
on the Take the Quiz button, making sure to follow any instructions givens on the instruction page.
Viewing Your Grades 1. Navigate to the course in which you wish to view your grades.
2. To view your grades in the class, click on Grades in the Course Navigation on the left.
3. Here on the Grades page, you will see your Grades listed by Due Date by default. If you’d like you can change
that to be listed by Module (more on Modules later), Assignment Group, and title.
Each grade on record will show the name of the course activity (Quiz, graded Discussion, etc.), the due date for said
activity, the grade you scored, the highest possible score for the course activity, and icon that links to any comments
for your graded activity, if the instructor gave comments.
Discussions Discussions are a means for you and your instructor to offer a platform for you and the entire class to discuss various
topics related (or not related) to your course. To get to your Discussions:
1. In your course, click on the Discussions in the Course Navigation.
This will bring you to the Discussion index page. This is where you’ll see a list of the Discussions for the class. You can
expect to see a variety of Discussion topics with most instructors breaking up Discussions by book chapter, course topic,
or current week of the course.
Posting/Replying to Discussions To reply to your instructor’s initial post:
1. Click on the title of a Discussion to open a Discussion. On the Discussion page, you’ll see the instructor’s initial
post/instructions and beneath that you’ll notice a link that says Reply on the screen.
2. Click the Reply link. You'll see a text box appear.
3. In the text box that appears, you can type in your post.
4. Just below the box, click the Attach link to attach any files that are pertinent to your post. If you don’t see an
Attach link/button, then your instructor may not have allowed you to make Attachments.
5. When you’re ready to make your post, click on the Post Reply button.

13
This will turn your post go from being a draft into an actual post on the page with your name and the date & time you
last clicked on Reply Post for that post.
Editing Discussion Posts If your instructor allows it, you can go back and edit your posts to make corrections. To edit posts:
1. Within the course that has the Discussion post that you’d like to edit, click on Discussions in the Course
Navigation on the left.
2. Scroll down to the post that you made and click on the Options icon (three vertical dots) in the upper right
corner of the post. This will pop out an options menu for your post.
3. Click on Edit.
4. This will switch the view of your post to the Edit view of the post. Make your changes, and when you’re done,
click on the Done button.
The post will go back to being a set post in the Discussion, showing under your name the same date & time that you
originally made the post, but you’ll see a message just below the body of your post saying that you edited the post along
with the date & time that you clicked the Done button to save your edits.
Step 2
Step 3
Step 5 Step 4

14
Deleting Discussion Posts If your instructor allows it, you can go delete your Discussion posts to make corrections. To delete Discussion posts:
1. Within the course that has the Discussion post that you’d like to edit, click on Discussions in the Course
Navigation on the left.
2. Scroll down to the post that you made and click on the Options icon (three vertical dots) in the upper right
corner of the post. This will pop out an options menu for your post.
3. Click on Delete.
4. Your web browser will give you a popup asking to confirm your deletion. Click OK/Yes/Delete to delete your
post.
Modules Modules are used by some instructors to offer a way to more easily and intuitively flow through your course’s materials
(handouts, lecture notes, lecture videos, etc.) and activities (graded Discussions, Assignments, Quizzes, etc.). The main
thing to keep in mind with modules is that you’ll typically start with the first item at the top of the page and as you work
your way through each item in the module, you can scroll to the bottom of the page and see a Next button. You can click
on that to move on to the next item to read/complete in your course. See screenshots below to see what we mean…
The Modules page. Every item you go to here will give you a chance to flow to the after after it with a link at the bottom of each page. See the next
screenshot to see what I mean...

15
The bottom of the 0.1 Intro page. Notice the Next button that takes you to the next course activity in the Module.
The bottom of the The Olympians page. After passing the first item – the intro – notice that there is a Previous button to the left that can take me
back to the Intro page if I wish to go back. Clicking Next from The Olympians page will take me to Assignment #01.
Conversations (Inbox) Conversations are pretty much like email, but not really email. It’s a messaging system, and all the
messages/conversations found in the Conversations (Inbox) feature of Canvas live inside the Canvas system. To get to
Conversations…
1. In the Global Navigation (the purple bar on the left side of the screen), click on Inbox.
Sending Messages to Your Instructor To send messages to your instructor:
1. In the Global Navigation, click on Inbox.
2. Next, in the upper right corner, click on the Compose a new message button. This will bring up the Compose
Message popup.
16
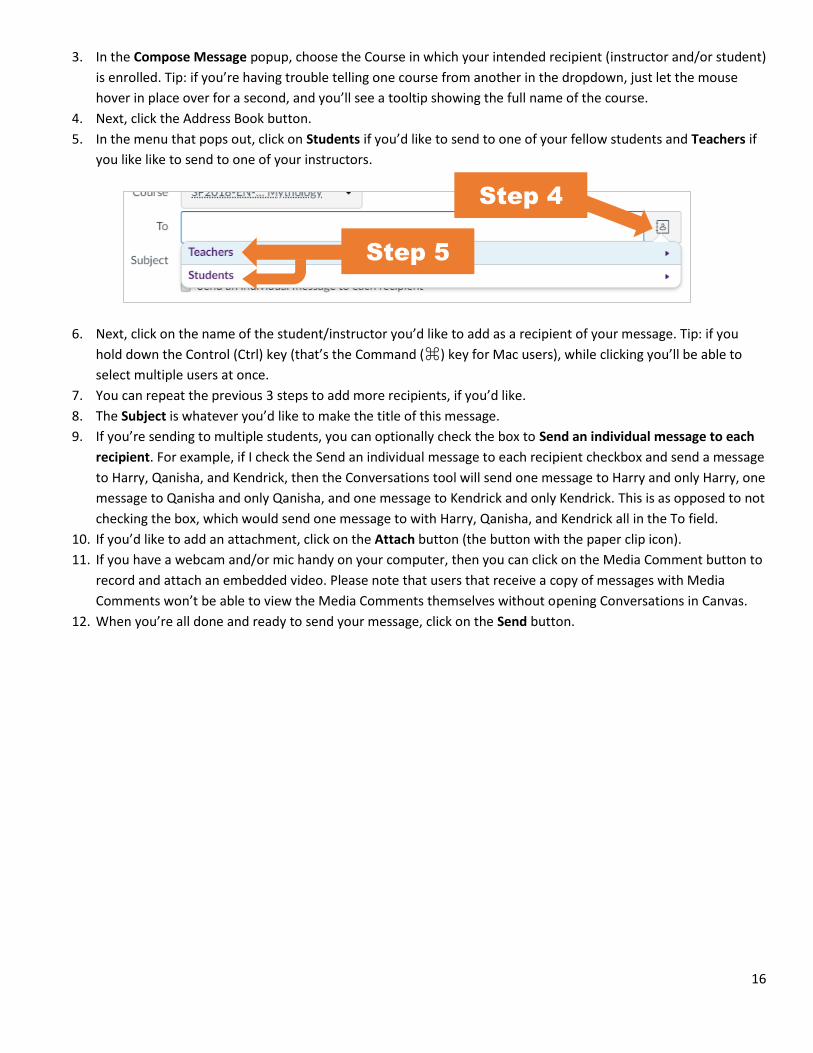
3. In the Compose Message popup, choose the Course in which your intended recipient (instructor and/or student)
is enrolled. Tip: if you’re having trouble telling one course from another in the dropdown, just let the mouse
hover in place over for a second, and you’ll see a tooltip showing the full name of the course.
4. Next, click the Address Book button.
5. In the menu that pops out, click on Students if you’d like to send to one of your fellow students and Teachers if
you like like to send to one of your instructors.
6. Next, click on the name of the student/instructor you’d like to add as a recipient of your message. Tip: if you
hold down the Control (Ctrl) key (that’s the Command (⌘) key for Mac users), while clicking you’ll be able to
select multiple users at once.
7. You can repeat the previous 3 steps to add more recipients, if you’d like.
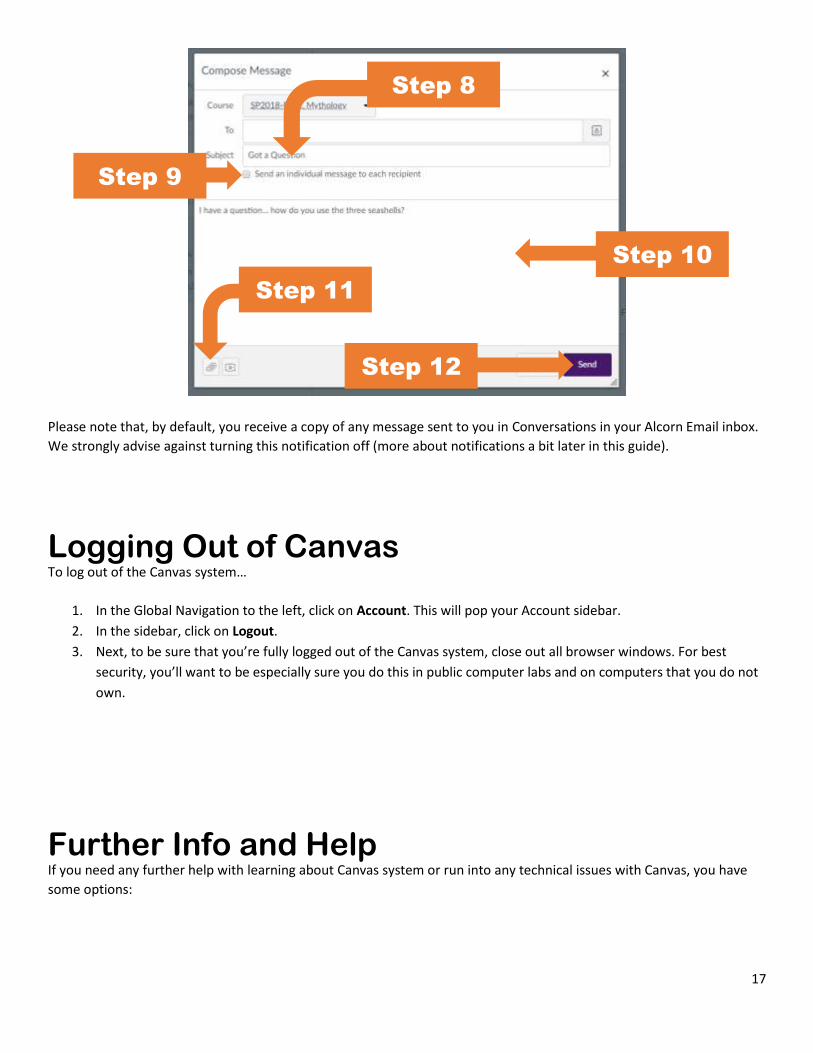
8. The Subject is whatever you’d like to make the title of this message.
9. If you’re sending to multiple students, you can optionally check the box to Send an individual message to each
recipient. For example, if I check the Send an individual message to each recipient checkbox and send a message
to Harry, Qanisha, and Kendrick, then the Conversations tool will send one message to Harry and only Harry, one
message to Qanisha and only Qanisha, and one message to Kendrick and only Kendrick. This is as opposed to not
checking the box, which would send one message to with Harry, Qanisha, and Kendrick all in the To field.
10. If you’d like to add an attachment, click on the Attach button (the button with the paper clip icon).
11. If you have a webcam and/or mic handy on your computer, then you can click on the Media Comment button to
record and attach an embedded video. Please note that users that receive a copy of messages with Media
Comments won’t be able to view the Media Comments themselves without opening Conversations in Canvas.
12. When you’re all done and ready to send your message, click on the Send button.
Step 5
Step 4
17
Please note that, by default, you receive a copy of any message sent to you in Conversations in your Alcorn Email inbox.
We strongly advise against turning this notification off (more about notifications a bit later in this guide).
Logging Out of Canvas To log out of the Canvas system…
1. In the Global Navigation to the left, click on Account. This will pop your Account sidebar.
2. In the sidebar, click on Logout.
3. Next, to be sure that you’re fully logged out of the Canvas system, close out all browser windows. For best
security, you’ll want to be especially sure you do this in public computer labs and on computers that you do not
own.
Further Info and Help If you need any further help with learning about Canvas system or run into any technical issues with Canvas, you have
some options:
Step 8
Step 9
Step 10
Step 11
Step 12

18
If you’re already in Canvas, in the Global Navigation on the left, you can click on Help to see a set of Help
resources, including the phone number for the 24/7 Hotline for students (you can also see that below in this
list), a link to chat live online with a 24/7 agent, and more.
You can come by our physical office on the Lorman campus in the Administration Building, Room 300.
You can also call 1-855-589-6656 at any time, 24 hours a day, 7 days a week.
You can also review the latest version of this guide as well as other student Canvas Help Resources on the
Canvas Help page at www.alcorn.edu/canvashelp.