Embed Size (px)
Citation preview
PracticeGrowth
Same Day Treatment
Step-by-StepGuidelines
EducationalContinuum
Wan
t To
Grow
Your
Pra
ctic
e?
DIEM
®
Can H
elp!
DIEM® Provides Clinicians One Solution At A Time
• Differentiate Your Practice By Offering Patient Treatment In One Day*
• Surgical And Restorative Components Developed For Immediate Loading Protocols
• Guidelines Allow For Simple Adoption Of Treatment Into The Practice
• Didactic And Over-The-Shoulder Training
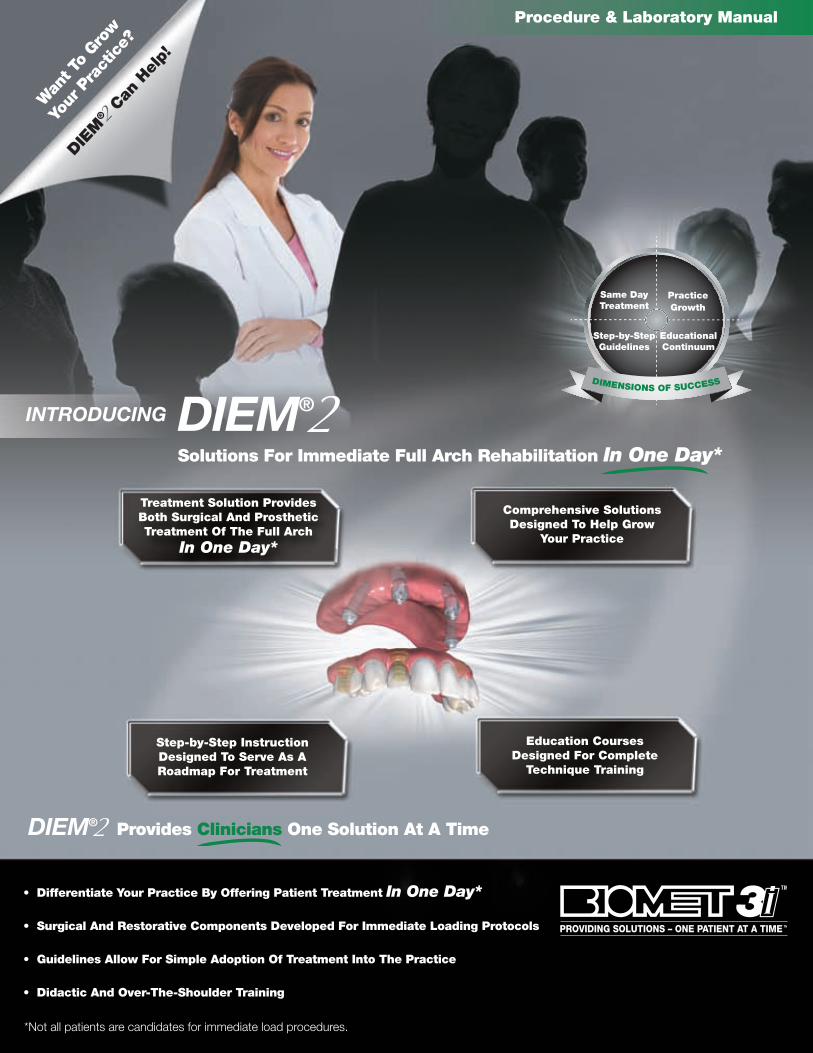
DIEM®
Solutions For Immediate Full Arch Rehabilitation In One Day*
Comprehensive Solutions Designed To Help Grow
Your Practice
Treatment Solution Provides Both Surgical And ProstheticTreatment Of The Full Arch
In One Day*
Step-by-Step Instruction Designed To Serve As A Roadmap For Treatment
Education Courses Designed For Complete
Technique Training
INTRODUCING
*Not all patients are candidates for immediate load procedures.
Procedure & Laboratory Manual

3
Treatment Planning Considerations
Pre-Treatment DiagnosticsSurgeon, Restorative Dentist and LaboratoryTechnician:• Review medical history/medical consultation
as needed• Clinical and radiographic evaluations
Clinical Evaluation Extraoral factors:• Skeletal/dental malocclusion• Temporomandibular joint health/disease• Mandibular range of motion
Intraoral factors:• Condition of the remaining teeth• Soft tissue contours, type and thickness• Condition of the alveolar bone
Prosthetic factors:• Pre-prosthetic determination of the vertical dimension
of occlusion, lip support, incisal display at rest,speaking, smiling, lip mobility and resultingtransition zone
• Interarch distance• Condition of pre-existing dentures; need and design
considerations for provisional restorations
Radiographs options:• CT scans• Periapical radiographs• Panoramic radiographs
Treatment Indications For ImmediateImplant Prostheses
• Adequate bone quality equal to or greater than Type III • Adequate bone volume for implant placement• Adequate restorative volume that provides space for
implant restorative components and prostheses• Adequate A/P spread (curvature of the arch) for
optimal positioning of implants and to decrease theextent of cantilevers.
Patients With The Following Are NotConsidered To Be Optimal Candidates ForImmediate Occlusal Loading:• Systemic diseases:
- Bleeding disorder- Uncontrolled metabolic disease (Diabetes)- Uncontrolled cardiovascular disease- Uncontrolled hypertension- Compromised immune system (autoimmune
diseases, HIV)• Parafunctional habits• Poor bone quality - Type IV (implants unable to
achieve primary stability)• Lack of bone quantity• Limited arch curvature (poor A/P spread)
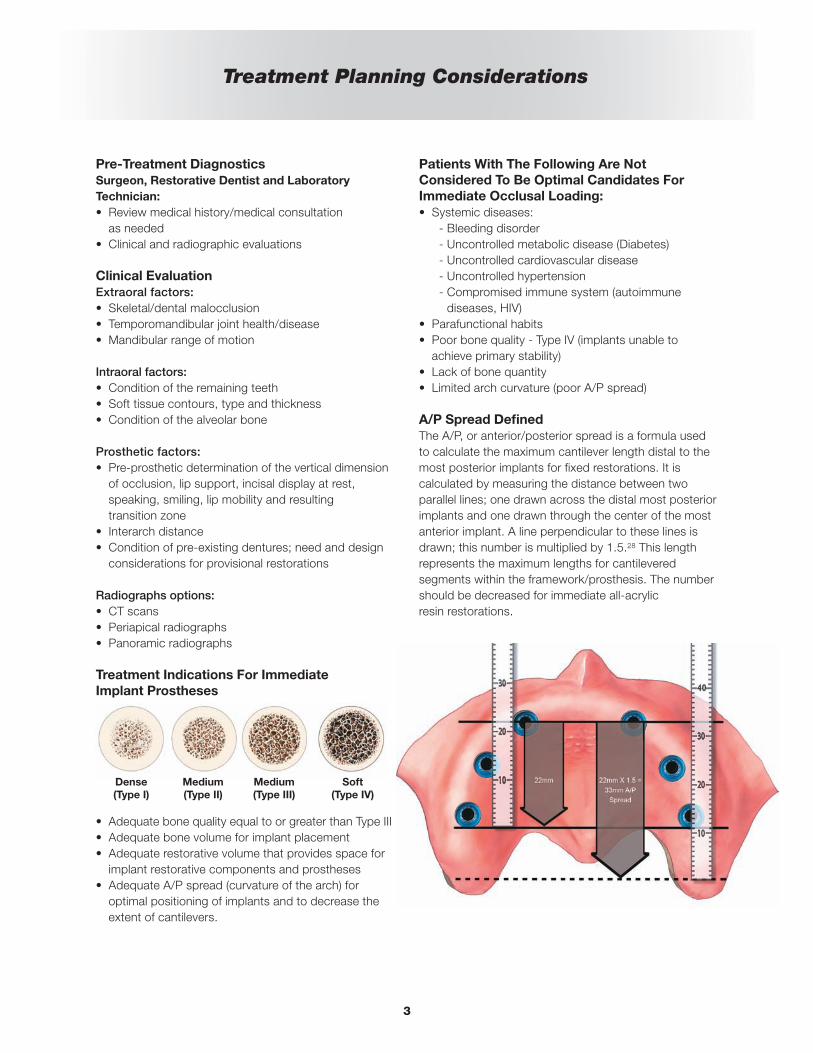
A/P Spread DefinedThe A/P, or anterior/posterior spread is a formula usedto calculate the maximum cantilever length distal to themost posterior implants for fixed restorations. It iscalculated by measuring the distance between twoparallel lines; one drawn across the distal most posteriorimplants and one drawn through the center of the mostanterior implant. A line perpendicular to these lines isdrawn; this number is multiplied by 1.5.28 This lengthrepresents the maximum lengths for cantileveredsegments within the framework/prosthesis. The numbershould be decreased for immediate all-acrylic resin restorations.
Dense(Type I)
Medium(Type II)
Medium(Type III)
Soft(Type IV)
1
In the 1960s, loading dental implants with functionalocclusal forces immediately after implant placementfrequently resulted in fibrous encapsulation of implantsin alveolar bone. This led to relative degrees of implantmobility and ultimately loss of implants with the potentialloss of the prostheses.1 Brånemark et al.2 initiallydescribed the placement and restoration ofendosseous, machined (turned), commercially pure (cp)titanium implants with surgical and prosthetic protocolsthat included unloaded healing periods of approximatelyfour months for mandibular implants and six months formaxillary implants.3 Throughout the last three decades,the use of dental implants has grown significantly inclinical use throughout the world and, under certainspecific clinical circumstances, Immediate OcclusalLoading (IOL®) of endosseous implants was found to beas efficacious as the results clinicians obtained withpreviously reported unloaded healing protocols.4-11
Two of the primary benefits of IOL® Protocols includereduction in the number of surgical procedures and theamount of time required for insertion of immediate, fixed,provisional prostheses. This is especially true forpatients with debilitated dentitions who no longer haveto go through prolonged healing periods, which includewearing complete dentures. In order for clinicians andpatients to select an IOL® Protocol, the protocols mustprovide at least similar implant survival rates ascompared to the Cumulative Survival Rates (CSRs)associated with unloaded healing protocols.
Years of evidence-based research drove the developmentof clinical guidelines for each type of immediate loadingprocedure: Immediate Occlusal Loading in the edentulousmandible and Immediate Occlusal Loading in theedentulous maxillae.
Immediate Occlusal Loading In TheEdentulous Mandible
Authors have reported favorableresults for immediate occlusalloading in the edentulous jaws. In1997, Tarnow et al. reported 98%Cumulative Survival Rates (CSR; sixmandibular, four maxillary jaws) oneto six years post implantplacement.6 In 2000, Cooper et al.reported 98% CSR 18 months post
implant placement.7 In 2003, Testori et al. reported onefailure, due to infection, in a study involving 92OSSEOTITE® Implants that were immediately loadedwith fixed prostheses in edentulous mandibles. Testori etal. reported a 98.9% CSR for OSSEOTITE® Implants upto 48 months post implant placement. The prostheticCSR for these patients during the same period was 100percent.10
More recently in 2009, Pieri et al. reported a 98.6% CSRin which 144 implants in 23 patients were restored withfull arch restorations immediately post implant placement.Pieri et al suggested immediate loading dental implantsplaced immediately after multiple extractions is a viabletreatment option for edentulous arches when implantswere stable at the time of placement and rigidly splintedwith screw-retained titanium-resin prostheses.12
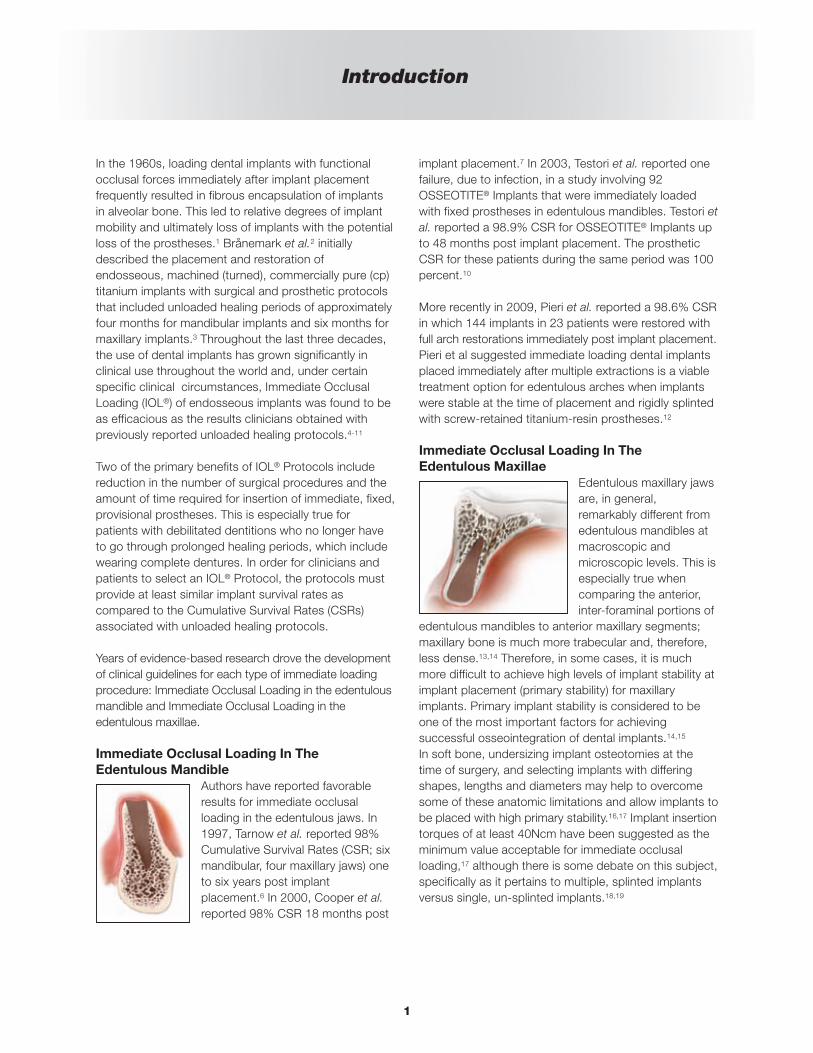
Immediate Occlusal Loading In TheEdentulous Maxillae
Edentulous maxillary jawsare, in general,remarkably different fromedentulous mandibles atmacroscopic andmicroscopic levels. This isespecially true whencomparing the anterior,inter-foraminal portions of
edentulous mandibles to anterior maxillary segments;maxillary bone is much more trabecular and, therefore,less dense.13,14 Therefore, in some cases, it is muchmore difficult to achieve high levels of implant stability atimplant placement (primary stability) for maxillaryimplants. Primary implant stability is considered to beone of the most important factors for achievingsuccessful osseointegration of dental implants.14,15
In soft bone, undersizing implant osteotomies at thetime of surgery, and selecting implants with differingshapes, lengths and diameters may help to overcomesome of these anatomic limitations and allow implants tobe placed with high primary stability.16,17 Implant insertiontorques of at least 40Ncm have been suggested as theminimum value acceptable for immediate occlusalloading,17 although there is some debate on this subject,specifically as it pertains to multiple, splinted implantsversus single, un-splinted implants.18,19
Introduction
2
In the last several years, a number of reports haveaddressed the treatment of edentulous maxillary jawswith implant-supported prostheses utilizing bothstraight and tilted implant placement protocolsusing four or more implants.20-26 In a literature reviewof maxillary immediate occlusal loading studies in 2006,Del Fabbro et al.19 found a wide variety of studies interms of the numbers of implants placed by clinicians,for maxillary immediate occlusal loading protocols, aswell as differing surgical and prosthetic protocols.These studies reported that the mean number ofmaxillary implants placed for immediate occlusal loadingwas eight.18
In 2009, Romanos and Nentwig reported the results of aprospective clinical trial regarding immediate occlusalloading for maxillary implants.27 Ninety implants wereplaced (six in each maxillary arch) in 15 patients.Immediately after surgery, the implants were loaded withprovisional acrylic resin prostheses (immediate occlusalloading). The provisional prostheses remained infunction for six to eight weeks; a soft/liquid diet wasrecommended for this time period. Definitive fixedrestorations were fabricated and delivered approximatelysix to eight months post implant placement. Romanosand Nentwig reported three implant failures after a meanloading period of 42.4 (±19.15) months (CSR 96.7%).Romanos and Nentwig concluded that immediateloading, splinted, maxillary implants can be usedsuccessfully when implant primary stability, cross-archstabilization and soft diets for the initial stages of healinghave been prescribed and followed.
previously offered a solution forImmediate Occlusal Loading in the mandible with itsoriginal DIEM® Guidelines introduced in 2004. Now, thissolution has been expanded with NEW DIEM® , a solution for rehabilitation in both arches, utilizinginnovative products to deliver full arch fixed provisionalprostheses in as little as one day.*
Advantages of DIEM® -For Patients And Clinicians
For Patients:
• Eliminates dentures for patients with hopeless dentition
• Eliminates loose fitting or painful dentures
• Enables patients to return home on the day of surgerywith prostheses that look aesthetically pleasing andfunction normally*
• Reduces the number of procedures and follow-up visits
• Allows for fixed interim prostheses for increasedpatient satisfaction
For Clinicians:
• Decreases surgical morbidity
• Reduces the need for bone augmentation
• Offers an additional innovative procedure for the dentalpractice
• Allows for implant dentistry access to a largeedentulous or partially edentulous patient population
• Is designed to increase implant treatment acceptancedue to a single day procedure
• Increases practice productivity and efficiency byreducing chairside visits for each case
Introduction (Cont’d)
*Not all patients are candidates for immediate load procedures.
3
Treatment Planning Considerations
Pre-Treatment DiagnosticsSurgeon, Restorative Dentist and LaboratoryTechnician:• Review medical history/medical consultation
as needed• Clinical and radiographic evaluations
Clinical Evaluation Extraoral factors:• Skeletal/dental malocclusion• Temporomandibular joint health/disease• Mandibular range of motion
Intraoral factors:• Condition of the remaining teeth• Soft tissue contours, type and thickness• Condition of the alveolar bone
Prosthetic factors:• Pre-prosthetic determination of the vertical dimension
of occlusion, lip support, incisal display at rest,speaking, smiling, lip mobility and resultingtransition zone
• Interarch distance• Condition of pre-existing dentures; need and design
considerations for provisional restorations
Radiographs options:• CT scans• Periapical radiographs• Panoramic radiographs
Treatment Indications For ImmediateImplant Prostheses
• Adequate bone quality equal to or greater than Type III • Adequate bone volume for implant placement• Adequate restorative volume that provides space for
implant restorative components and prostheses• Adequate A/P spread (curvature of the arch) for
optimal positioning of implants and to decrease theextent of cantilevers.
Patients With The Following Are NotConsidered To Be Optimal Candidates ForImmediate Occlusal Loading:• Systemic diseases:
- Bleeding disorder- Uncontrolled metabolic disease (Diabetes)- Uncontrolled cardiovascular disease- Uncontrolled hypertension- Compromised immune system (autoimmune
diseases, HIV)• Parafunctional habits• Poor bone quality - Type IV (implants unable to
achieve primary stability)• Lack of bone quantity• Limited arch curvature (poor A/P spread)
A/P Spread DefinedThe A/P, or anterior/posterior spread is a formula usedto calculate the maximum cantilever length distal to themost posterior implants for fixed restorations. It iscalculated by measuring the distance between twoparallel lines; one drawn across the distal most posteriorimplants and one drawn through the center of the mostanterior implant. A line perpendicular to these lines isdrawn; this number is multiplied by 1.5.28 This lengthrepresents the maximum lengths for cantileveredsegments within the framework/prosthesis. The numbershould be decreased for immediate all-acrylic resin restorations.
Dense(Type I)
Medium(Type II)
Medium(Type III)
Soft(Type IV)
4
Low Profile Abutment Selection
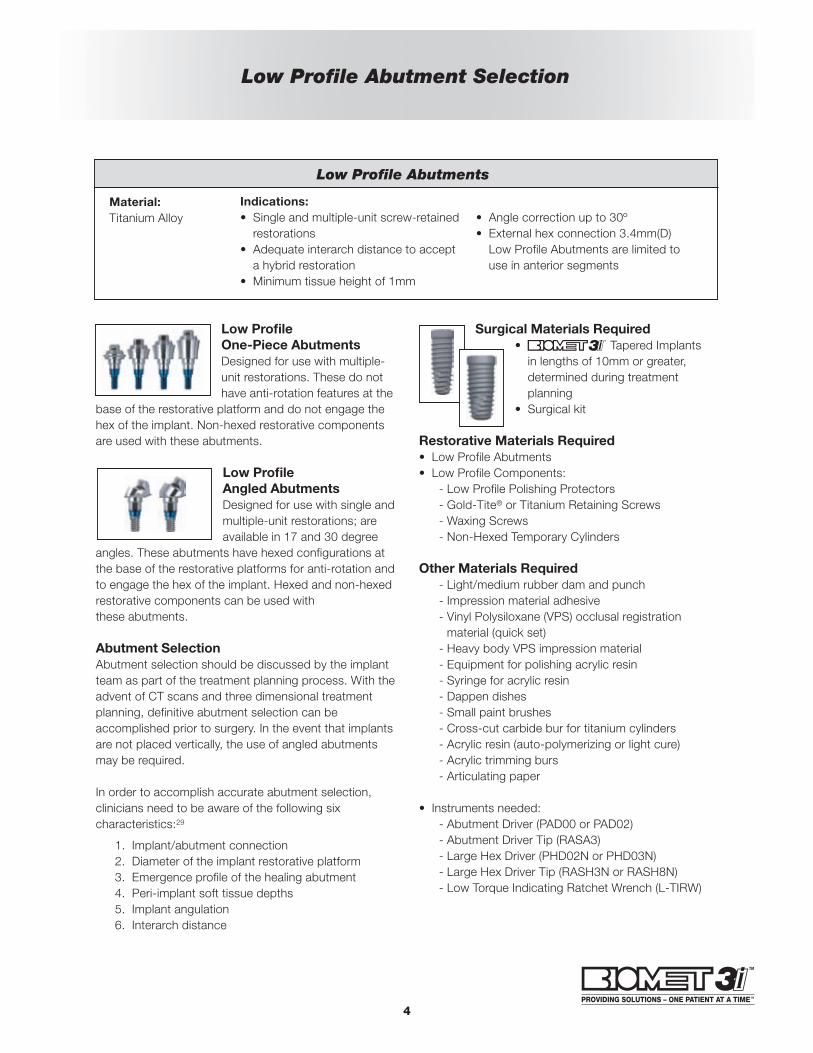
Low Profile One-Piece AbutmentsDesigned for use with multiple-unit restorations. These do nothave anti-rotation features at the
base of the restorative platform and do not engage thehex of the implant. Non-hexed restorative componentsare used with these abutments.
Low ProfileAngled AbutmentsDesigned for use with single andmultiple-unit restorations; areavailable in 17 and 30 degree
angles. These abutments have hexed configurations atthe base of the restorative platforms for anti-rotation andto engage the hex of the implant. Hexed and non-hexedrestorative components can be used withthese abutments.
Abutment SelectionAbutment selection should be discussed by the implantteam as part of the treatment planning process. With theadvent of CT scans and three dimensional treatmentplanning, definitive abutment selection can beaccomplished prior to surgery. In the event that implantsare not placed vertically, the use of angled abutmentsmay be required.
In order to accomplish accurate abutment selection,clinicians need to be aware of the following sixcharacteristics:29
1. Implant/abutment connection2. Diameter of the implant restorative platform3. Emergence profile of the healing abutment4. Peri-implant soft tissue depths5. Implant angulation6. Interarch distance
Surgical Materials Required• Tapered Implantsin lengths of 10mm or greater,determined during treatmentplanning
• Surgical kit
Restorative Materials Required• Low Profile Abutments• Low Profile Components:
- Low Profile Polishing Protectors- Gold-Tite® or Titanium Retaining Screws- Waxing Screws- Non-Hexed Temporary Cylinders
Other Materials Required- Light/medium rubber dam and punch- Impression material adhesive- Vinyl Polysiloxane (VPS) occlusal registrationmaterial (quick set)
- Heavy body VPS impression material- Equipment for polishing acrylic resin- Syringe for acrylic resin- Dappen dishes- Small paint brushes- Cross-cut carbide bur for titanium cylinders- Acrylic resin (auto-polymerizing or light cure)- Acrylic trimming burs- Articulating paper
• Instruments needed:- Abutment Driver (PAD00 or PAD02)- Abutment Driver Tip (RASA3)- Large Hex Driver (PHD02N or PHD03N)- Large Hex Driver Tip (RASH3N or RASH8N) - Low Torque Indicating Ratchet Wrench (L-TIRW)
Low Profile Abutments
Material:Titanium Alloy
Indications:• Single and multiple-unit screw-retainedrestorations
• Adequate interarch distance to accepta hybrid restoration
• Minimum tissue height of 1mm
• Angle correction up to 30º• External hex connection 3.4mm(D)Low Profile Abutments are limited touse in anterior segments
DIEM® Surgical Flow Chart
5
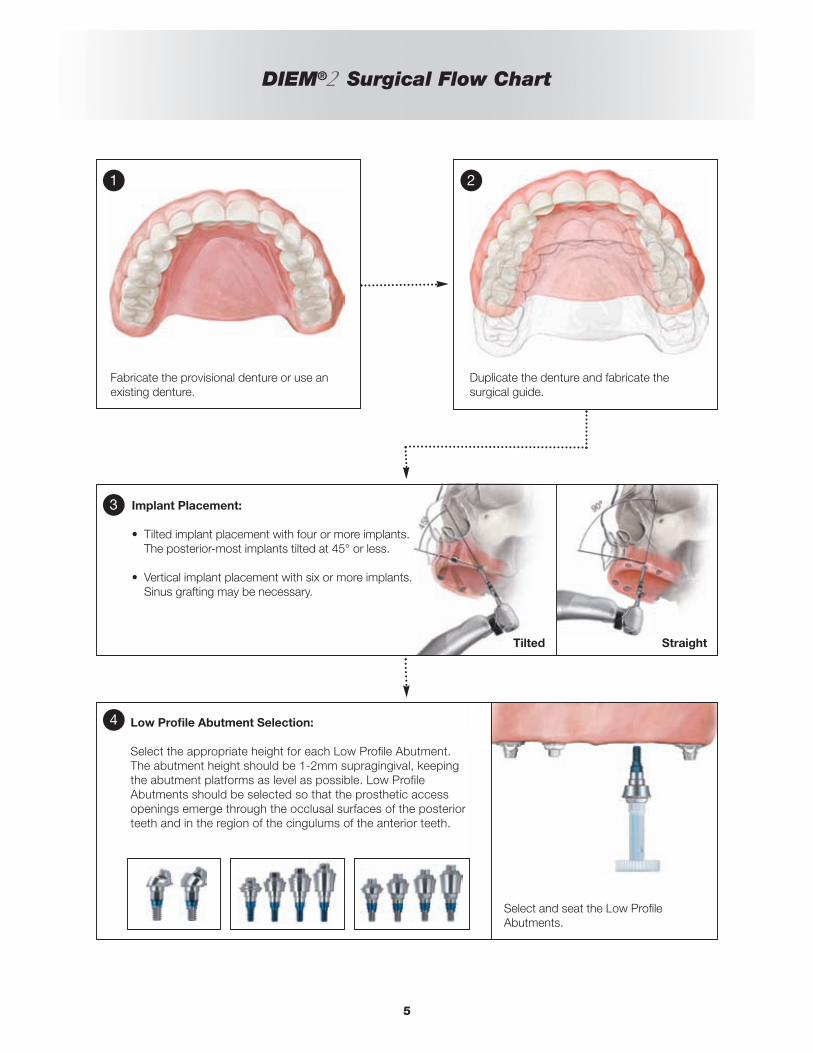
Fabricate the provisional denture or use anexisting denture.
Select and seat the Low ProfileAbutments.
Low Profile Abutment Selection:
Select the appropriate height for each Low Profile Abutment. The abutment height should be 1-2mm supragingival, keepingthe abutment platforms as level as possible. Low ProfileAbutments should be selected so that the prosthetic accessopenings emerge through the occlusal surfaces of the posteriorteeth and in the region of the cingulums of the anterior teeth.
Duplicate the denture and fabricate thesurgical guide.
Implant Placement:
• Tilted implant placement with four or more implants.The posterior-most implants tilted at 45° or less.
• Vertical implant placement with six or more implants.Sinus grafting may be necessary.
1 2
3
4
Tilted Straight

DIEM® GuidelinesProsthetic Procedure For Denture Conversion
6
1. Fill the anterior portion of the provisional prosthesis with heavy body VPSimpression material or quick set occlusal registration material.
2. Seat the prosthesis into the mouth. Use the palatal portion of the maxillaryprosthesis to accurately and completely seat the prosthesis. Make surethe dental midline is consistent with the facial midline. If an occlusalregistration was previously made clinically or in the laboratory, it can beused to accurately position the prosthesis on the mandibular dentition.Have the patient close into centric occlusion. Let the VPS impressionmaterial set in the intaglio surface of the prosthesis.
3. Remove the provisional prosthesis. The locations of the abutments havebeen recorded in the impression. Drill holes into the prosthesis at theabutment locations identified in the impression. Drill each hole slightlylarger than the diameters of the Low Profile Abutments.
4. Place the temporary cylinders onto the Low Profile Abutments. Make surethat all of the cylinders are completely seated onto the abutments.
DIEM® GuidelinesProsthetic Procedure For Denture Conversion
7
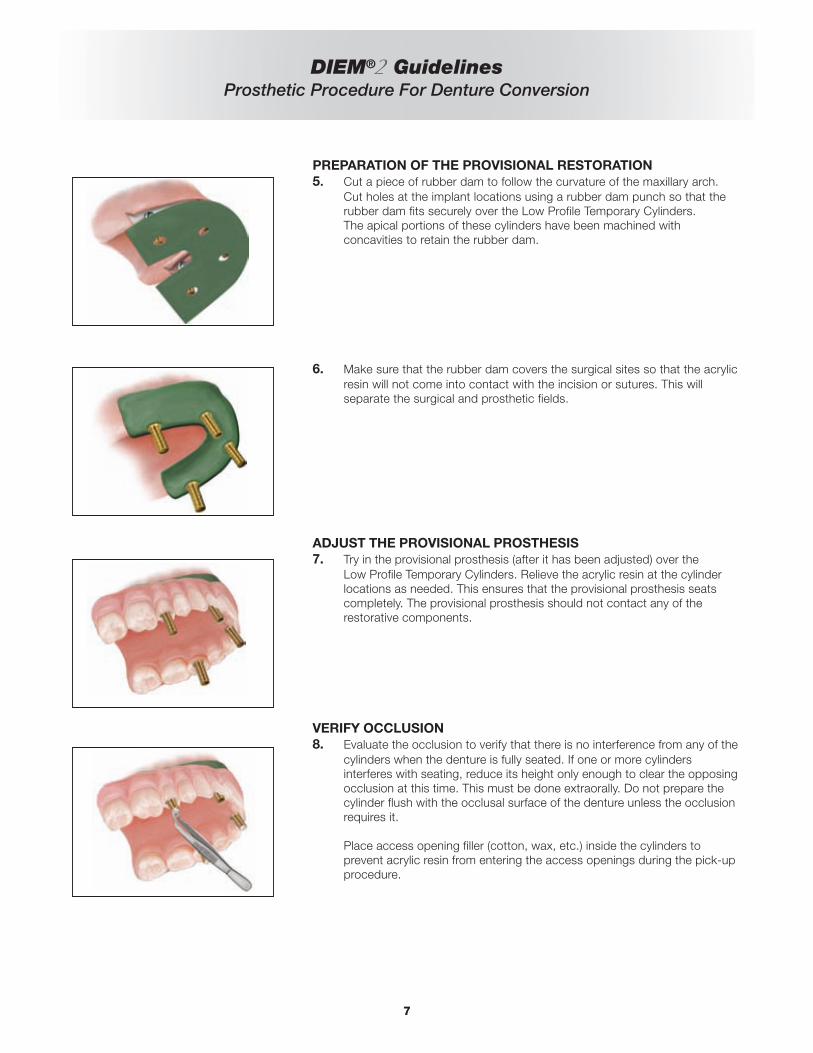
PREPARATION OF THE PROVISIONAL RESTORATION5. Cut a piece of rubber dam to follow the curvature of the maxillary arch.
Cut holes at the implant locations using a rubber dam punch so that therubber dam fits securely over the Low Profile Temporary Cylinders.The apical portions of these cylinders have been machined withconcavities to retain the rubber dam.
6. Make sure that the rubber dam covers the surgical sites so that the acrylicresin will not come into contact with the incision or sutures. This willseparate the surgical and prosthetic fields.
ADJUST THE PROVISIONAL PROSTHESIS7. Try in the provisional prosthesis (after it has been adjusted) over the
Low Profile Temporary Cylinders. Relieve the acrylic resin at the cylinderlocations as needed. This ensures that the provisional prosthesis seatscompletely. The provisional prosthesis should not contact any of therestorative components.
VERIFY OCCLUSION8. Evaluate the occlusion to verify that there is no interference from any of the
cylinders when the denture is fully seated. If one or more cylindersinterferes with seating, reduce its height only enough to clear the opposingocclusion at this time. This must be done extraorally. Do not prepare thecylinder flush with the occlusal surface of the denture unless the occlusionrequires it.
Place access opening filler (cotton, wax, etc.) inside the cylinders toprevent acrylic resin from entering the access openings during the pick-upprocedure.

DIEM® GuidelinesProsthetic Procedure For Denture Conversion
LUTE DENTURE TO TEMPORARY CYLINDERS9a. Inject autopolymerizing acrylic resin around the base of the temporary
cylinders.
9b. Load a monojet syringe with a thin mix of autopolymerizing acrylic resin.Inject resin into the intaglio surface of the denture. Seat the provisionalprosthesis.
9c. Have the patient close into centric occlusion. Make sure that theprovisional prosthesis is positioned properly – midline, occlusion andvertical dimension. Let the acrylic resin completely polymerize.
REMOVE PROVISIONAL PROSTHESIS FROM MOUTH ANDREDUCE CYLINDERS10a. Remove all access opening fillers from the temporary cylinders. Unscrew
the waxing screws and remove the provisional prosthesis from theLow Profile Abutments. Remove the rubber dam. Adjust the heights of thecylinders to conform with the palatal and occlusal surfaces of the denture.
10b. Place Low Profile Abutment Polishing Protectors into the temporarycylinders inside the provisional prosthesis. Fill any voids around thecylinders with autopolymerizing acrylic resin. Allow the resin to polymerize.Remove flanges, excess resin; minimize the length of the cantilevers.
10c. Finish and polish the provisional prosthesis.
8
DIEM® GuidelinesProsthetic Procedure For Denture Conversion
9
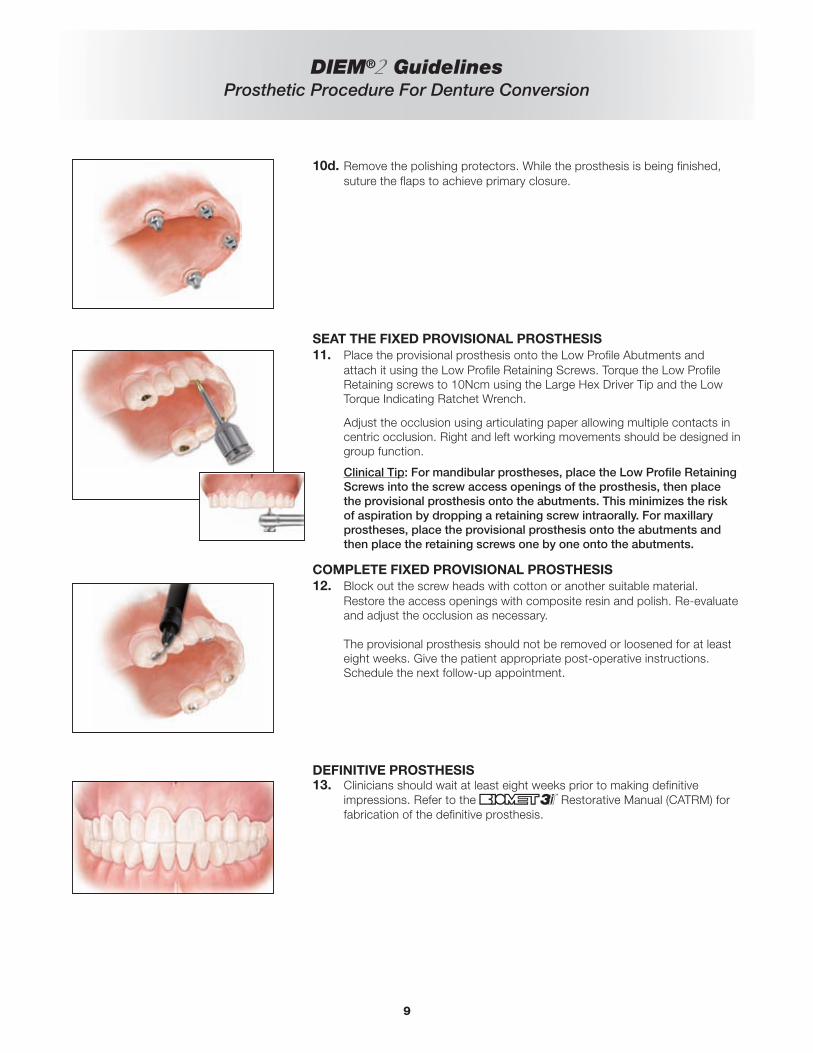
10d. Remove the polishing protectors. While the prosthesis is being finished,suture the flaps to achieve primary closure.
SEAT THE FIXED PROVISIONAL PROSTHESIS11. Place the provisional prosthesis onto the Low Profile Abutments and
attach it using the Low Profile Retaining Screws. Torque the Low ProfileRetaining screws to 10Ncm using the Large Hex Driver Tip and the LowTorque Indicating Ratchet Wrench.
Adjust the occlusion using articulating paper allowing multiple contacts incentric occlusion. Right and left working movements should be designed ingroup function.
Clinical Tip: For mandibular prostheses, place the Low Profile RetainingScrews into the screw access openings of the prosthesis, then placethe provisional prosthesis onto the abutments. This minimizes the riskof aspiration by dropping a retaining screw intraorally. For maxillaryprostheses, place the provisional prosthesis onto the abutments andthen place the retaining screws one by one onto the abutments.
COMPLETE FIXED PROVISIONAL PROSTHESIS12. Block out the screw heads with cotton or another suitable material.
Restore the access openings with composite resin and polish. Re-evaluateand adjust the occlusion as necessary.
The provisional prosthesis should not be removed or loosened for at leasteight weeks. Give the patient appropriate post-operative instructions. Schedule the next follow-up appointment.
DEFINITIVE PROSTHESIS13. Clinicians should wait at least eight weeks prior to making definitive
impressions. Refer to the Restorative Manual (CATRM) forfabrication of the definitive prosthesis.
DIEM®
Certain® Ordering Information
10
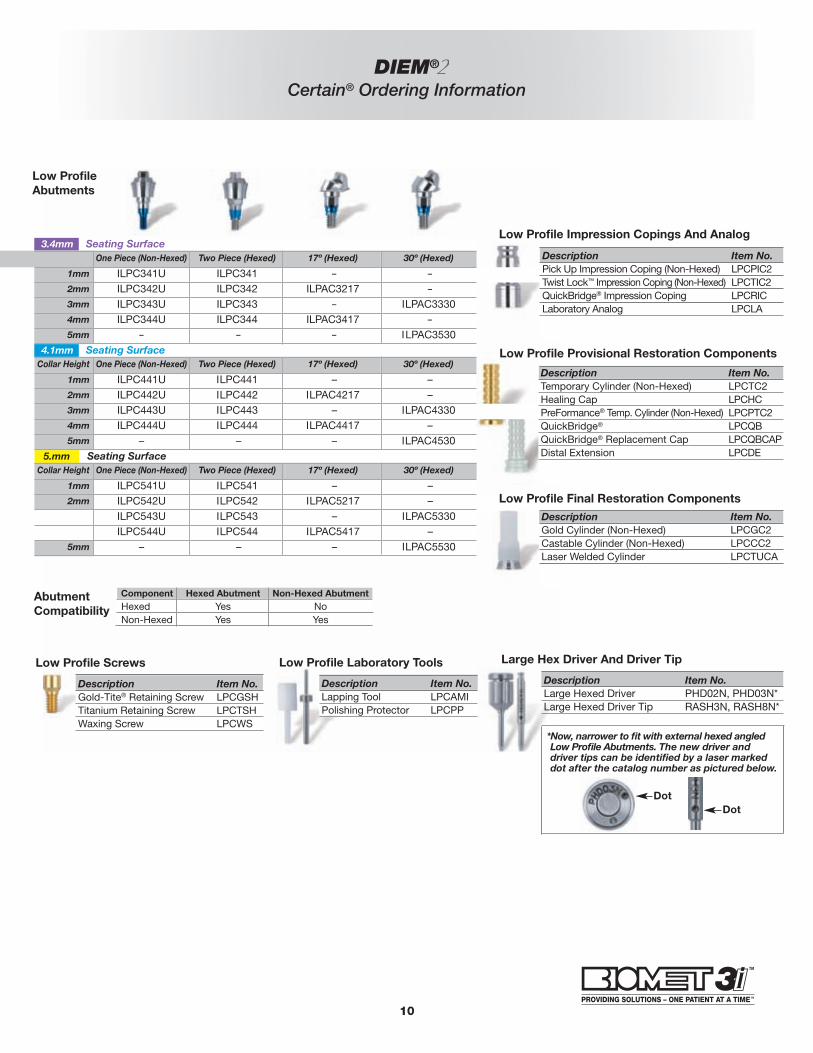
Low Profile Impression Copings And Analog3.4mm Seating SurfaceCollar Height One Piece (Non-Hexed) Two Piece (Hexed) 17º (Hexed) 30º (Hexed)
1mm ILPC341U ILPC341 – –2mm ILPC342U ILPC342 ILPAC3217 –3mm ILPC343U ILPC343 – ILPAC33304mm ILPC344U ILPC344 ILPAC3417 –5mm – – – ILPAC3530
4.1mm Seating Surface
5.mm Seating Surface
Collar Height One Piece (Non-Hexed) Two Piece (Hexed) 17º (Hexed) 30º (Hexed)
1mm ILPC441U ILPC441 – –2mm ILPC442U ILPC442 ILPAC4217 –3mm ILPC443U ILPC443 – ILPAC43304mm ILPC444U ILPC444 ILPAC4417 –5mm – – – ILPAC4530
Collar Height One Piece (Non-Hexed) Two Piece (Hexed) 17º (Hexed) 30º (Hexed)
1mm ILPC541U ILPC541 – –2mm ILPC542U ILPC542 ILPAC5217 –3mm ILPC543U ILPC543 – ILPAC53304mm ILPC544U ILPC544 ILPAC5417 –5mm – – – ILPAC5530
Low Profile Final Restoration Components
Description Item No.Pick Up Impression Coping (Non-Hexed) LPCPIC2Twist Lock™ Impression Coping (Non-Hexed) LPCTIC2QuickBridge® Impression Coping LPCRICLaboratory Analog LPCLA
Description Item No.Gold Cylinder (Non-Hexed) LPCGC2Castable Cylinder (Non-Hexed) LPCCC2Laser Welded Cylinder LPCTUCA
Large Hex Driver And Driver Tip
*Now, narrower to fit with external hexed angledLow Profile Abutments. The new driver anddriver tips can be identified by a laser markeddot after the catalog number as pictured below.
Description Item No.Large Hexed Driver PHD02N, PHD03N*Large Hexed Driver Tip RASH3N, RASH8N*
Low ProfileAbutments
DotDot
Low Profile Screws
Description Item No.Gold-Tite® Retaining Screw LPCGSHTitanium Retaining Screw LPCTSHWaxing Screw LPCWS
Low Profile Laboratory Tools
Description Item No.Lapping Tool LPCAMIPolishing Protector LPCPP*
AbutmentCompatibility
Component Hexed Abutment Non-Hexed AbutmentHexed Yes NoNon-Hexed Yes Yes
Low Profile Provisional Restoration Components
Description Item No.Temporary Cylinder (Non-Hexed) LPCTC2Healing Cap LPCHCPreFormance® Temp. Cylinder (Non-Hexed) LPCPTC2QuickBridge® LPCQBQuickBridge® Replacement Cap LPCQBCAPDistal Extension LPCDE

References
11
1. Linkow L, Charchee R. Theories and Techniques of OralImplantology. St. Louis, MO: Mosby. 1970; pp. 74-76.
2. Brånemark PI, Hansson BO, Adell R, et al. Osseointegratedimplants in the treatment of the edentulous jaw: experiencefrom a 10-year period. Scand J Plast Reconstr Surg. 1977;2:1-132.
3. Albrektsson T, Zarg GA, Worthington P, et al. The long-termefficacy of currently used dental implants: a review andproposed criteria for success. Int J Oral Maxillofac Implants.1986;1:11-25.
4. Schnitman PA, Wohrle PS, Rubenstein JE. Immediate fixedinterim prostheses supported by two-stage threaded implants;methodology and results. J Oral Implantol. 1990;16:96-105.
5. Schnitman PA, Wohrle PS, Rubenstein JE, et al. Ten-year resultsfor Brånemark implants immediately loaded with fixedprostheses at implant placement. Int J Oral Maxillofac Implants.1997;12:495-503.
6. Tarnow D, Emtiaz S, Classi A. Immediate loading of threadedimplant at stage I surgery in edentulous arches: tenconsecutive case reports with 1- to 5-year data. Int J OralMaxillofac Implants. 1997;12:319-324.
7. Cooper LF, Rahman A, Moriarty J, et al. Immediate mandibularrehabilitation with endosseous implants: simultaneousextraction, implant placement and loading. Int J Oral MaxillofacImplants. 2002;17:517-525.
8. Horiuchi K, Uchida H, Yamamoto K. Immediate loading ofBrånemark system implants following placement inedentulous patients: a clinical report. Int J Oral MaxillofacImplants. 2000;15:824-830.
9. Grunder U. Immediate functional loading of immediateimplants in edentulous arches: two-year results. Int J Perio RestDent. 2001;6:545-551.
10. Testori T, Del Fabbro M, Szmuklr-Moncler S, et al. Immediateocclusal loading of OSSEOTITE® Implants in the completelyedentulous mandible. Int J Oral Maxillofac Implants.2003;18:544-551.
11. Testori T, Meltzer A, Del Fabbro M, et al. Immediate occlusalloading of OSSEOTITE® Implants in the lower edentulous jaw.A multicenter prospective study. Clin Oral Impl Res.2004;15:278-284.
12. Pieri F, Aldini NN, Fini M, Corinaldesi G. Immediate occlusalloading of immediately placed implants supporting fixedrestorations in completely edentulous arches: a 1-yearprospective pilot study. J Periodontol. 2009;80(3):411-21.
13. Jaffin RA, Berman CL. The excessive loss of Brånemark fixturesin type IV bone: a 5-years analysis. J Periodontol. 1991;62:2-4.
14. Esposito M, Hirsch JM, Lekholm U, et al. Biological factorscontributing to failures of osseointegrated oral implants.(II) Etiopathogenesis. 1998;106:721-764.
15. Lekholm U, Zarb GA. Patient selection and preparation. InBrånemark P-I, Zarb GA, Albrektsson T (eds): Tissue-IntegratedProstheses: Osseointegration in clinical dentistry. Chicago,Quintessence. 1985; pp. 199-202.
16. Friberg B, Jemt T, Lekholm U. Early failures in 4,641consecutively placed Brånemark dental implants. A study fromstage I surgery to the connection of completed prostheses.Int J Oral Maxillofac Implants. 1991;6:142-146.
17. Adrianssens P, Herman M. Immediate implant function in theanterior maxilla: a surgical technique to enhance primarystability for Brånemark MKIII and MKIV implants. Arandomized, prospective clinical study at the 1-year follow-up.Appl Osseoint Res. 2001;2:17-21.
18. Van Den Bogaerde L, Pedretti G, Dellacasa P, et al. Early functionof splinted implants in maxillas and posterior mandibles usingBrånemark system machined-surface implants: an 18-monthprospective clinical multicenter study. Clin Implant Dent RelatRes. 2003;5(Suppl 1):21-28.
19. Del Fabbro M, Testori T, Francetti L, et al. Systematic review ofsurvival rates for immediately loaded dental implants. Int JPeriodontics Restorative Dent. 2006;26:249-263.
20. Calandriello R, Tomatis M. Simplified treatment of the atrophicposterior maxilla via immediate/early function and tiltedimplants: a prospective 1-year clinical study. Clin Implant DentRel Res. 2005;7:1-12.
21. Malo P, Rangert B, Nobre M. All-on-4 immediate functionconcept with Brånemark system implants for completelyedentulous maxillae: a 1-year retrospective clinical study. ClinImplant Dent Relat Res. 2005;7(Suppl 1):S88-S94.
22. Balshi SF, Wolfinger GJ, Balshi TJ. A prospective studyimmediate functional loading, following the Teeth in a Dayprotocol: a case series of 55 consecutive edentulous maxillas.Clin Implant Dent Relat Res. 2005;7:24-31.
23. Capelli M, Zuffetti F, Del Fabbro M, Testori T. Immediaterehabilitation of the completely edentulous jaw with fixedprostheses supported by either upright or tilted implants: amulticenter clinical study. Int J Oral Maxillofac Implants.2007;22:639-644.
24. Testori T, Del Fabbro M, Capelli M, Zuffetti F, Francetti L, WeinsteinRL. Immediate occlusal loading and tilted implants for therehabilitation of the atrophic edentulous maxilla: 1-yearinterim results of a multicenter prospective study. Clin OralImplants Res. 2008;19:227-232.
25. Fazi G, Tellini S, Vangi D, Branchi R. Three-dimensional finiteelement analysis of different implant configurations for amandibular fixed prosthesis. Int J Oral Maxillofac Implants.2011;26:752-759.
26. Baghai Naini R, Nokar S, Borghei H, Alikhasi M. Tilted or parallelimplant placement in the completely edentulous mandible? Athree-dimensional finite element analysis. Int J Oral MaxillofacImplants. 2011;26:776-781.
27. Romanos GE, Nentwig GH. Immediate functional loading in themaxilla using implants with platform switching: five-yearresults. Int J Oral Maxillofac Implants. 2009;24(6):1106-12.
28. English C. E. The critical A-P Spread. The Implant Society.March-April 1990;1(1):2-3.
29. Drago C, Lazzara R. Guidelines for implant abutment selectionfor partially edentulous patients. Comp Cont Dent Ed.2010;31:14-28.

Not Available In All Markets. Please Consult With Your Local BIOMET 3i Sales Representative For Availability.
Certain, DIEM, Gold-Tite, IOL, OSSEOTITE, PreFormance and QuickBridge are registered trademarks of BIOMET 3i LLC.NanoTite, Providing Solutions – One Patient At A Time and Twist Lock are trademarks of BIOMET 3i LLC. BIOMET 3i is atrademark of BIOMET, Inc. ©2012 BIOMET 3i LLC.
Scan With YourSmartphone!
In order to scan QR codes,your mobile device must have a QR codereader installed.
Join Us
Follow Us
Watch Us
Comprehensive Treatment
Enhanced Knowledge
Business Excellence
REV B 12/11
To Implement DIEM® Into Your Practice Today, Please Contact Your Local Sales Representative
Or Visit
diem2.biomet3i.com
DownloadIt
BIOMET 3i4555 Riverside DrivePalm Beach Gardens, FL 334101-800-342-5454Outside The U.S.: +1-561-776-6700Fax: +1-561-776-1272www.biomet3i.com
BIOMET 3iEurope, Middle East & AfricaWTC Almeda Park, Ed. 1, Planta 1ªPl. de la Pau, s/n08940, Cornellà de Llobregat(Barcelona) SpainPhone: +34-93-470-55-00Fax: +34-93-371-78-49
EC REP