Embed Size (px)
Citation preview

™
© 2016 TechSmith Corporation C ..._ All rights reserved
Version 9.0/3.0 | Oct. 2016
�TechSmith®
Camtasia Help Topics

All rights reserved
This manual, as well as the software described in it, is furnished under license and may be used or copied only in accordance with the terms of such license. The content of this manual is furnished for informational use only, is subject to change without notice and should not be construed as a commitment by TechSmith Corporation. TechSmith Corporation assumes no responsibility or liability for any errors or inaccuracies that may appear in this manual.
Trademarks
All-In-One Capture, Camtasia, Camtasia Relay, Camtasia Studio, Coach’s Eye, Coach’s Eye +, DubIt, EnSharpen, Enterprise Wide, Jing, Knowmia, Morae, Rich Recording Technology (RRT), Screencast, Screencast.com, ScreenChomp, Show The World, SmartFocus, Snagit, TechSmith, TechSmith AppShow, TechSmith Fuse, TechSmith Loop, TechSmith Relay, TechSmith Screencast, TechSmith Smart Player, and TSCC are either registered marks or marks of TechSmith Corporation in the U.S. and/or other countries. This list is not a comprehensive list of all TechSmith Corporation marks. The absence of a name/mark or logo in this notice does not constitute a waiver of any intellectual property rights that TechSmith Corporation has established in any of its product, feature or service names/marks or logos. All other marks are the property of their respective owners..
Table of ContentsTable of Contents 3
Record the Screen 9
To Record the Screen 9
Windows 9
Mac 10
About SmartFocus™ 11
Related Articles 11
Project Creation, Collaboration, and Archiving 13
About The Camtasia Project File 13
To Create a Camtasia Project File 13
Crucial Steps for Success: Complete Your Video in this Order 14
Share a Project Across Windows / Mac Platforms 14
Non-Compatible Media List 15
Work with Cross Platform Projects 16
Create a Camtasia Windows Archive or Backup Project 16
To Create a Zipped Project 17
To Import a Zipped Project 17
Collaboration Best Practices 17
Related Articles 19
Camtasia Media Bin 20
Import Media Into Bin 20
Supported Media 20
Media Bin Tasks 21
Related Articles 22
Camtasia for Windows Media Library 23
Media Files & Timeline Assets 24
Camtasia 9-3 Help | 3
Working with the Library 25
Manage Library Content 26
Export & Import Zipped Library Assets 27
Related Articles 28
Camtasia Editor Properties 29
Related Articles 31
Canvas Options 32
Canvas Tools 32
Working with the Canvas 34
Related Articles 35
Timeline Tracks and Basic Editing 36
Timeline Tracks 36
Timeline Editing Tasks 39
Related Articles 44
Transitions 45
Use Trimmed Content In Transitions 46
Working with Transitions 47
Related Articles 48
Working with Audio 49
Edit Audio on Timeline 49
Add Audio Effects 50
Related Articles 52
Annotations and Callouts 53
Annotation Types 53
Working with Annotations 57
Related Articles 59
Animations 60
To Use Animations 60
Camtasia 9-3 Help | 4

Working with Animations 62
Use Easing to Change the Effect 62
Related Articles 65
Zoom & Pan Animations 66
Add a Zoom In / Zoom Out Sequence 66
Add a Zoom and Pan Sequence 67
Related Articles 68
Cursor Effects 69
Cursor Effect Types 70
Working with Cursor Effects 70
Related Articles 70
Visual Effects 71
Visual Effects 72
Working with Visual Effects 74
Related Articles 75
Behaviors 76
To Use Behaviors 76
Working with Behaviors 77
Related Articles 78
Interactive Quiz or Survey 79
Quiz Features 79
Set Up a Quiz 79
Quiz Questions and Options 80
Working with Quizzes 82
Quiz Reporting 82
About the CSV Report 83
Production Wizard Reporting Options (Windows) 83
Share Video Wizard Reporting Options For Mac 84
Camtasia 9-3 Help | 5

Related Articles 84
Captions 85
Add Basic Captions 85
Working with Captions 86
ADA Compliancy Tips 89
Camtasia Caption Types 90
Other Camtasia Windows Captioning Methods 92
Related Articles 93
Share Your Audio or Video 95
Share Your Video 95
Create an Audio File 95
Produce a Selection of the Timeline (Windows only) 95
Create a Production Preset (Windows only) 95
Related Articles 96
Project Settings (Change Canvas Dimensions) 97
To change the Canvas / Editing Dimensions 97
Related Articles 98
Markers and Interactive Table of Contents 99
To Add a Marker 99
About Markers 99
Create an Interactive Table of Contents (TOC) 102
Camtasia Mac Interactive TOC 102
Camtasia Windows Interactive TOC 102
Related Articles 103
Camtasia 8 to 9 - Where is it now? 104
Camtasia Tools 104
Camtasia Tool Icons 104
Camtasia Properties 106
Camtasia 9-3 Help | 6

Timeline Toolbar 108
Camtasia Menus 109
File Menu 109
Edit Menu 111
View Menu 113
Play Menu (Removed) 115
Tools Menu (Removed) 116
Help Menu 117
Camtasia 9 Modify Menu (New) 118
Camtasia 9 Share Menu (New) 121
Related Articles 122
Camtasia Hotkeys 123
Recorder Options 123
Project Options 123
Program Options 124
Canvas Options 125
Timeline Editing 127
Timeline Navigation 128
Marker and Quiz Options 130
Animations and Effects 131
Text Options for Annotations 131
Captions 132
PowerPoint Add-In Hotkeys (Windows Only) 133
ScreenDraw (Windows Only) 133
To Use ScreenDraw 133
Related Articles 135
The TechSmith Smart Player 136
Other Smart Player Hosting Options 137
Camtasia 9-3 Help | 7

iPhone Compatibility 137
Self-Maintained Website 137
Related Articles 137
Tips for Creating Engaging Videos 138
Be Prepared 138
Brush Up on Your Public Speaking Skills 139
Let your personality shine through – use a bit of humor if the situation fits. 139
Filmography 139
Learn the Basics 140
Projects and Teamwork 140
Get Great Audio 141
Recording the Screen 141
The Use of Special Effects 142
Editing 143
Share Your Video 143
Related Articles 143
Camtasia 9-3 Help | 8
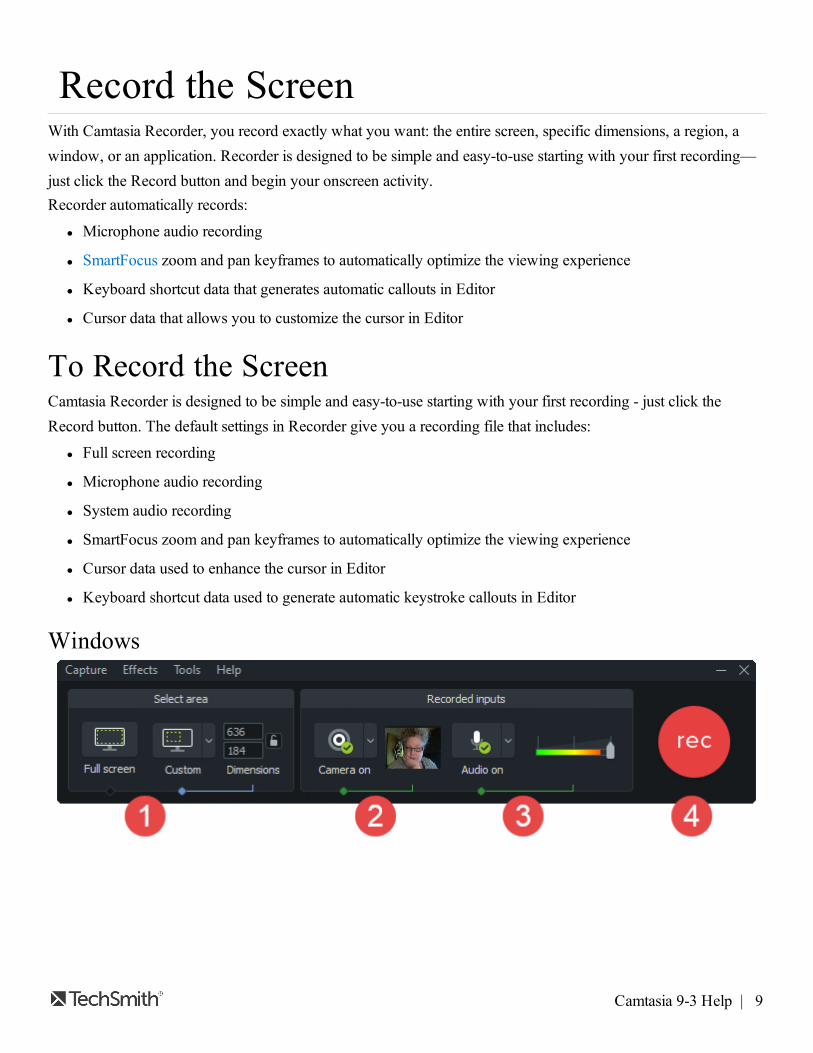
Record the ScreenWith Camtasia Recorder, you record exactly what you want: the entire screen, specific dimensions, a region, awindow, or an application. Recorder is designed to be simple and easy-to-use starting with your first recording—just click the Record button and begin your onscreen activity.Recorder automatically records:
l Microphone audio recording
l SmartFocus zoom and pan keyframes to automatically optimize the viewing experience
l Keyboard shortcut data that generates automatic callouts in Editor
l Cursor data that allows you to customize the cursor in Editor
To Record the ScreenCamtasia Recorder is designed to be simple and easy-to-use starting with your first recording - just click theRecord button. The default settings in Recorder give you a recording file that includes:
l Full screen recording
l Microphone audio recording
l System audio recording
l SmartFocus zoom and pan keyframes to automatically optimize the viewing experience
l Cursor data used to enhance the cursor in Editor
l Keyboard shortcut data used to generate automatic keystroke callouts in Editor
Windows
Camtasia 9-3 Help | 9

Mac
For both platforms:
1. Choose area to record.l Full screen recording is the default.
l Or, record with custom dimensions or a region you select.
2. If desired, record web camera.
3. Choose audio options.l Microphone audio is recorded by default.
l System Audio is recorded by default.
Camtasia 9-3 Help | 10
4. Click the Record button to begin recording.l Click the Stop button or press F10. (Windows)
l Click the Stop button or press Option + Command + 2 (Mac)
About SmartFocus™During recording, SmartFocus ™ collects data about the actions performed onscreen along with the cursor move-ments. Then during editing, apply the SmartFocus effect to automatically add zoom and pan animations to thevideo. This saves you the time it takes to manually add zoom and pan animations.
To make the best use of SmartFocus during the recording process, use the following tips to help SmartFocus pre-dict where to apply the zoom effects:
l Slow down. Use slow, deliberate mouse movements.
l Limit clicking. Do not randomly click around the screen or repeatedly click with the mouse.
l Record at full screen dimensions and produce at smaller dimensions. SmartFocus is ideal for caseswhen you need to record at full screen or large dimensions, but want to produce the final video at smallerdimensions. For example, if you record a full screen application and then produce the final video for dis-tribution on a smaller mobile device, the full screen recording is not viewable at the original dimensionswithout zooming.
l Record clips longer than 30 seconds. SmartFocus is optimized for recordings longer than 30 seconds. Forshorter clips, manually add zoom and pan animations.
l Hover the cursor where you want the viewer to look. Keep the cursor still on the area of focus in therecording. For example, if you want the viewer to focus on a hyperlink, place the cursor on or near that areaas you speak and then click.
l Do not “talk” with the cursor. Do not move the cursor around the screen as you speak. Try to keep thecursor still in the area of focus in the recording.
l Keep the cursor close when entering text. SmartFocus may not predict the correct action if you click in atext box, move the cursor to the other side of the screen, and then start talking. If you want the viewer to seewhat is typed into the text box, keep the cursor in the text box.
l Use the mouse scroll wheel (if applicable). Try using the mouse scroll wheel instead of clicking and drag-ging on the scroll bar. SmartFocus may zoom in on the scroll bar instead of the content scrolling. Forexample, use the mouse scroll wheel when scrolling long Web pages.
Did you find what you were looking for? Provide feedback.
Related ArticlesAnnotations and CalloutsBehaviors
Camtasia 9-3 Help | 11

Cursor EffectsVisual Effects
Camtasia 9-3 Help | 12

Project Creation, Collaboration, and Archiv-ingCamtasia is a great tool for collaborating on video projects.
l Camtasia Projects can be zipped up and shared with others.
l Camtasia project files are cross-platform compatible. This means you can share your video projects from theWindows platform to the Mac platform and vice-versa.
l The Library in Camtasia Windows allows you to share media assets to ensure consistency in all your videos.
l Quick uploading to Screencast.com gives you a way to review and share your video.
Continue with the following:
l About The Camtasia Project File
l Share a Project Across Windows / Mac Platforms
l Create a Camtasia Windows Archive or Backup Project
l Collaboration Best Practices
About The Camtasia Project FileBy default, you automatically create a Camtasia project file (.tscproj or .cmproj) when you open Editor to create anew video.The Camtasia project file saves all the media in the Media Bin and Library (Windows only), clips, animations,annotations, and effects on the timeline, any editing completed on the timeline, and the editing dimensions.With a project file, you can:
l Continue work on a video at a later time.
l Share a zipped/exported project file with others for collaboration including sharing projects fromWindowsto Mac and vice versa.
l Zip up your project to archive it.
l Repeatedly produce and share your video to a number of popular video formats and destinations.
To Create a Camtasia Project File1. In Camtasia Editor, choose File > New Project.
2. Choose File > Import >Media to add recordings, video, images, and audio clips to the Media Bin.
Camtasia 9-3 Help | 13
3. Drag media, recordings, annotations, and transitions to the timeline.
4. Add animations, effects, and Behaviors to media on timeline.
5. Choose File > Save to save the Camtasia project file. The file is saved as a .camproj file on Windows and a.cmproj on Mac.
Crucial Steps for Success: Complete Your Video in this OrderFor the best video editing, complete your edits in the following order. You may not include each of these steps inevery video project you work on, but, to ensure success, the order below should still be followed.For example, always import all the media and arrange it on the timeline before you begin to edit the audio.Or, edit the audio on the timeline before you add any transitions.
1. Import images, recording files, video clips, and audio and arrange the clips on the timeline.
2. Make basic edits to the clips on the timeline. Cut and split clips, move clips, add markers, etc.
3. Edit the audio.
4. Add voice narration.
5. Add title clips and transitions.
6. Apply SmartFocus and zoom, pan, and other animations.
7. Add annotations, Behaviors, Cursor Effects, and other Visual Effects.
8. Add markers and quizzes or surveys.
9. Add captions.
Captions should be added last, on the platform where production/sharing will take place. Captions arenot cross platform compatible.
Share a Project Across Windows / Mac PlatformsCamtasia project files are cross-platform compatible. This means you can share your video projects from the Win-dows platform to the Mac platform and vice-versa.
However, not all media files and effects work across platforms. Additionally legacy callouts and captions are notcross platform compatible.
When exporting a project to use across platforms, if incompatible media, effects, etc. are in the project, you receivea warning message:
Camtasia 9-3 Help | 14

Non-Compatible Media List
Windows Media and EffectsThese are not compatible with CamtasiaMac
Mac Media and EffectsThese are not compatible with Camtasia Windows
Camtasia Recording Files:CAMREC - Legacy Camtasia Studio record-ing file (Camtasia Studio version 8.3 andearlier)
Camtasia Recording Files:CMREC - Legacy Camtasia recording file (Camtasia version 2.xand earlier)
Video Files:AVI, WMV, SWF, MTS
Video Files:ProRes
Audio Files:WMA
Image Files:Tiff, JPG2000, PDF
LIBZIP - Camtasia Zipped Library FilesAudio Effects:Pitch
Callouts:Camtasia Studio Legacy Callouts
Callouts:Camtasia 2 Legacy Callouts
Captions Captions
Visual Effects:
Camtasia 9-3 Help | 15

Windows Media and EffectsThese are not compatible with CamtasiaMac
Mac Media and EffectsThese are not compatible with Camtasia Windows
Sepia, Mask, Reflection, Spotlight, Window Spotlight, Glow,Freeze Region, Device Frame
Gesture Effects
Work with Cross Platform Projects
To perform this action.... Do this...
Share a video project for the other platform
1. Camtasia > File > Export for Mac/Windows.
2. If you receive a warning notice about incompatible media in theproject, click:
l OK/Continue to continue with the export.
l Cancel to go back to the project without exporting.
3. Name the zipped project and choose a file destination.
4. Click OK/Save.
Open a video project from the other platform
1. Camtasia > File > Import Zipped Project.
2. If you receive a warning notice about incompatible media in theproject, click OK/Continue to open the project.
Note: Incompatible media, effects, captions, etc. will not appear inthe project but will show placeholders where the media should be.If the project is exported again to be used on the originating plat-form, that media will become visible.
Create a Camtasia Windows Archive or Backup ProjectUse the Export Project as Zip option to create a zip file to transfer a project to a new location, save a backupcopy of the project files, or to send the project file for collaboration.
Camtasia 9-3 Help | 16

Moving or deleting original files (for example, on a hard drive or network) that are in a video project canbreak that project. Before moving or deleting any files, open your video projects and export them as aCamtasia zipped project file.Be sure to select the Include all files from the Media Bin in zip option. This creates a self-containedproject with backed up Media Bin files.
To Create a Zipped Project1. In Camtasia, select File > Export As Zip. The Export Project as Zip dialog box opens.
2. Choose a new name for the file, if desired.
3. Click Browse to select a location.
4. Enable the Include all files fromMedia Bin in zip option to include a copy of all media files in the MediaBin within the zip file. If this option is not enabled, only the media on the timeline will be included in the zipfile.
5. Click OK.
To Import a Zipped Project1. In Camtasia, select File > Import Zipped Project.
2. If you receive a warning notice about incompatible media in the project, click OK/Continue to open the pro-ject.
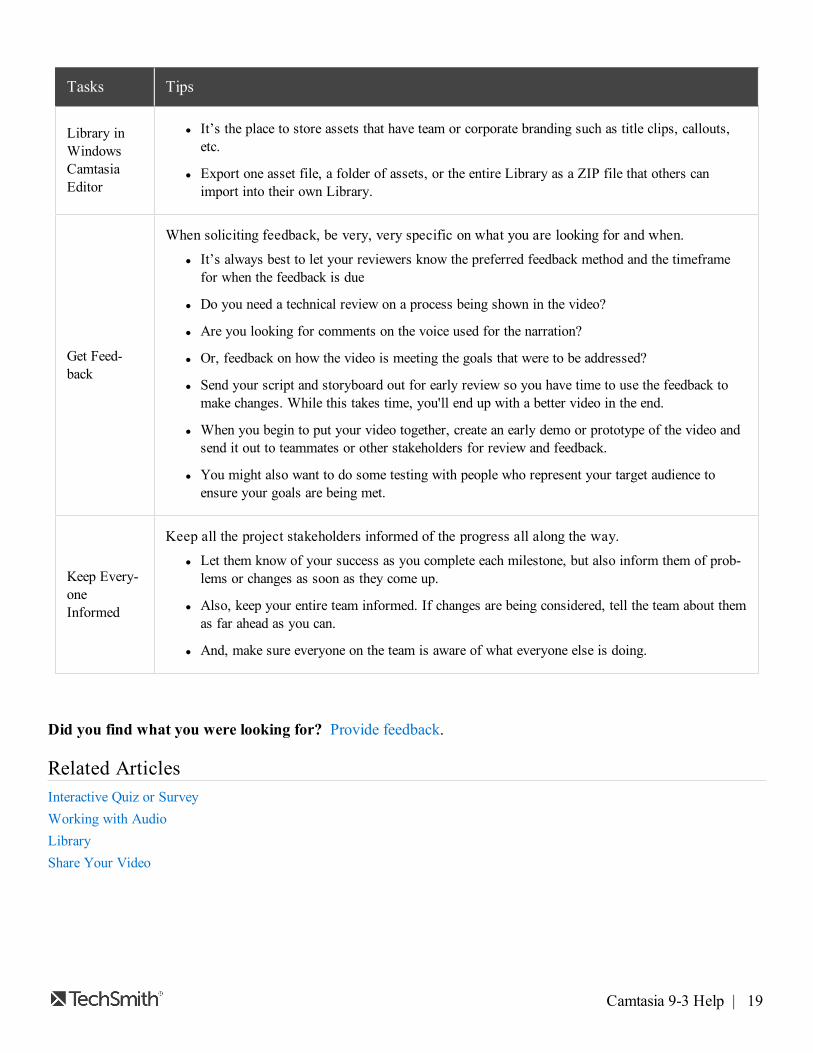
Collaboration Best PracticesTasks Tips
Define theScope
This includes laying out each of the goals, a clear objective, and the overall purpose of the video.Also, if the project warrants it, do some research and collect data to support your goals.
Define theIntendedAudience
Will they be familiar with the terminology and concepts presented in the video?l Do you need to make a separate introductory video?
l Are you motivating, marketing, or instructing?
AssembleYour VideoProject Team
Gather the people together who will be working on your video project and define each role.l Who will write the script or do the voice?
l Who will do the recording, editing, or technical review?
Camtasia 9-3 Help | 17
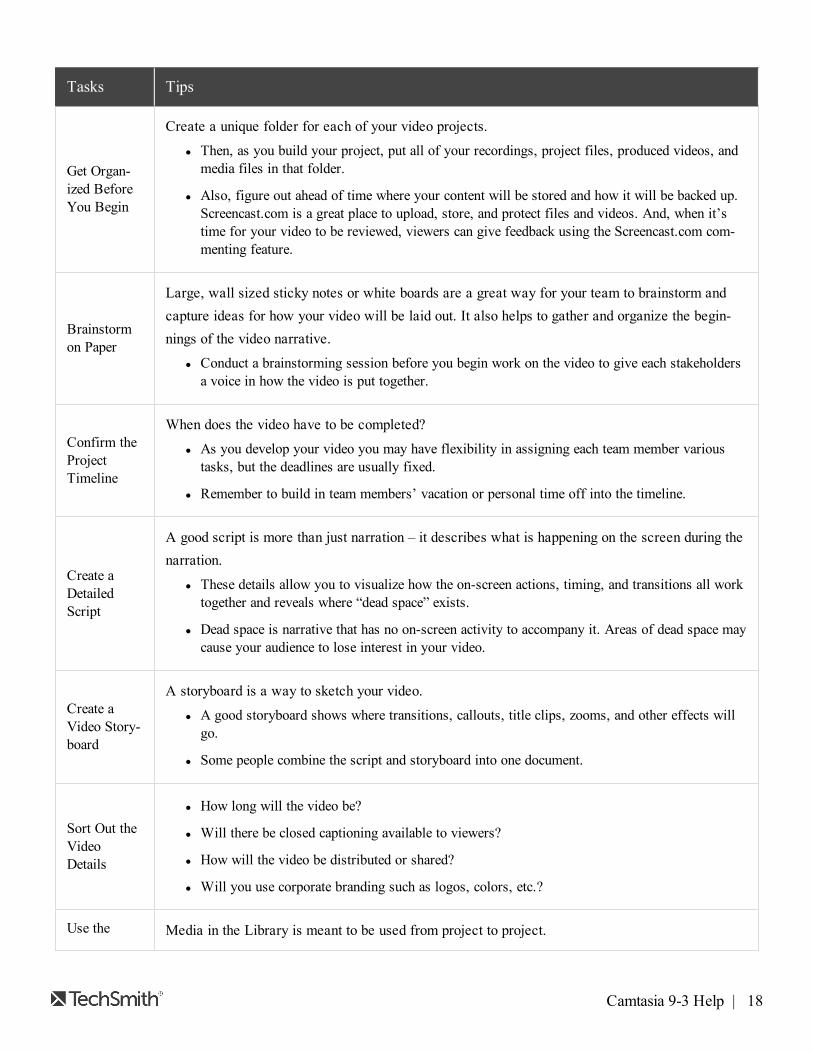
Tasks Tips
Get Organ-ized BeforeYou Begin
Create a unique folder for each of your video projects.l Then, as you build your project, put all of your recordings, project files, produced videos, andmedia files in that folder.
l Also, figure out ahead of time where your content will be stored and how it will be backed up.Screencast.com is a great place to upload, store, and protect files and videos. And, when it’stime for your video to be reviewed, viewers can give feedback using the Screencast.com com-menting feature.
Brainstormon Paper
Large, wall sized sticky notes or white boards are a great way for your team to brainstorm andcapture ideas for how your video will be laid out. It also helps to gather and organize the begin-nings of the video narrative.
l Conduct a brainstorming session before you begin work on the video to give each stakeholdersa voice in how the video is put together.
Confirm theProjectTimeline
When does the video have to be completed?l As you develop your video you may have flexibility in assigning each team member varioustasks, but the deadlines are usually fixed.
l Remember to build in team members’ vacation or personal time off into the timeline.
Create aDetailedScript
A good script is more than just narration – it describes what is happening on the screen during thenarration.
l These details allow you to visualize how the on-screen actions, timing, and transitions all worktogether and reveals where “dead space” exists.
l Dead space is narrative that has no on-screen activity to accompany it. Areas of dead space maycause your audience to lose interest in your video.
Create aVideo Story-board
A storyboard is a way to sketch your video.l A good storyboard shows where transitions, callouts, title clips, zooms, and other effects willgo.
l Some people combine the script and storyboard into one document.
Sort Out theVideoDetails
l How long will the video be?
l Will there be closed captioning available to viewers?
l How will the video be distributed or shared?
l Will you use corporate branding such as logos, colors, etc.?
Use the Media in the Library is meant to be used from project to project.
Camtasia 9-3 Help | 18
Tasks Tips
Library inWindowsCamtasiaEditor
l It’s the place to store assets that have team or corporate branding such as title clips, callouts,etc.
l Export one asset file, a folder of assets, or the entire Library as a ZIP file that others canimport into their own Library.
Get Feed-back
When soliciting feedback, be very, very specific on what you are looking for and when.l It’s always best to let your reviewers know the preferred feedback method and the timeframefor when the feedback is due
l Do you need a technical review on a process being shown in the video?
l Are you looking for comments on the voice used for the narration?
l Or, feedback on how the video is meeting the goals that were to be addressed?
l Send your script and storyboard out for early review so you have time to use the feedback tomake changes. While this takes time, you'll end up with a better video in the end.
l When you begin to put your video together, create an early demo or prototype of the video andsend it out to teammates or other stakeholders for review and feedback.
l You might also want to do some testing with people who represent your target audience toensure your goals are being met.
Keep Every-oneInformed
Keep all the project stakeholders informed of the progress all along the way.l Let them know of your success as you complete each milestone, but also inform them of prob-lems or changes as soon as they come up.
l Also, keep your entire team informed. If changes are being considered, tell the team about themas far ahead as you can.
l And, make sure everyone on the team is aware of what everyone else is doing.
Did you find what you were looking for? Provide feedback.
Related ArticlesInteractive Quiz or SurveyWorking with AudioLibraryShare Your Video
Camtasia 9-3 Help | 19

Camtasia Media BinMedia Bin references all video, audio, and image clips imported into the current project.
l You can add multiple instances of a clip onto the timeline.
l To add a clip to the video, drag the clip from the Media Bin onto the timeline or right-click a clip and selectAdd to Timeline at Playhead.
Import Media Into Bin1. Click theMedia tab.
2. Click > Import Media or File > Import >Media.
3. Browse and select the file(s) to import.
4. Click Open or Import. The media appears in the bin.
Supported Media
Camtasia Windows Supported Media Camtasia Mac Supported Media
Video FilesAVI, MP4, MPG, MPEG, WMV, MOV, SWFNote: Only SWF files created from Jing or a previous
Video FilesAVI, MP4, MPG, MPEG, WMV, MOV, SWF
Camtasia 9-3 Help | 20

Camtasia Windows Supported Media Camtasia Mac Supported Media
version of Camtasia Studio can be imported.
Camtasia Recording FilesTREC, CAMREC (Camtasia Studio 8.3 and earlier)
Camtasia Recording FilesTREC, CMREC (Camtasia 2.x)
Image FilesBMP, GIF, JPG, PNG
Image FilesBMP, GIF, JPG, PNG
Audio FilesM4A, WAV, MP3, WMA
Audio FilesM4A, WAV, MP3
Media Bin Tasks
To perform thisaction....
Do this...
Change Media Bin view...For thumbnails, click
For list view, click
Sort media...Win Only
Right-click media, choose Sort By > then choose option
See media details...Win Only
Right-click media, choose Details.
Camtasia 9-3 Help | 21

To perform thisaction....
Do this...
Remove unused media frombin...
Right-click media, choose Delete Unused Media.This option is not available if all media is being used on timeline.
Rename media fileMac Only
Right-click media, choose Rename then type new name.
Did you find what you were looking for? Provide feedback.
Related ArticlesAnnotations and CalloutsBehaviorsCursor EffectsVisual EffectsLibrary
Camtasia 9-3 Help | 22
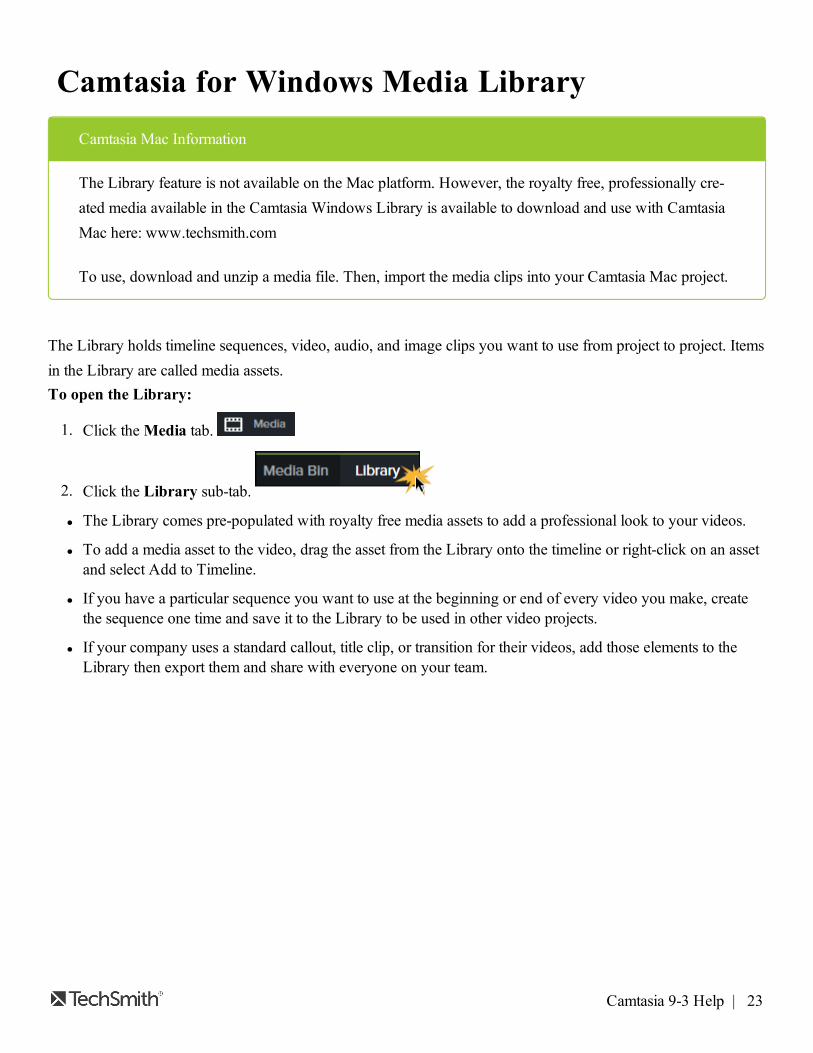
Camtasia for Windows Media LibraryCamtasia Mac Information
The Library feature is not available on the Mac platform. However, the royalty free, professionally cre-ated media available in the Camtasia Windows Library is available to download and use with CamtasiaMac here: www.techsmith.com
To use, download and unzip a media file. Then, import the media clips into your Camtasia Mac project.
The Library holds timeline sequences, video, audio, and image clips you want to use from project to project. Itemsin the Library are called media assets.To open the Library:
1. Click theMedia tab.
2. Click the Library sub-tab.
l The Library comes pre-populated with royalty free media assets to add a professional look to your videos.
l To add a media asset to the video, drag the asset from the Library onto the timeline or right-click on an assetand select Add to Timeline.
l If you have a particular sequence you want to use at the beginning or end of every video you make, createthe sequence one time and save it to the Library to be used in other video projects.
l If your company uses a standard callout, title clip, or transition for their videos, add those elements to theLibrary then export them and share with everyone on your team.
Camtasia 9-3 Help | 23

Media Files & Timeline AssetsThe following media can be added to the Library for use in Camtasia Windows projects.
Cross Platform Compatibility Tip!
Some Library media is not compatible with Camtasia Mac. For best results when creating cross-platformprojects, do not use incompatible file or media types.
Add to Library to reuse in other Win-dows projects.
These media files are not compatible with Camtasia Mac.
Camtasia Recording Files:.trec, .camrec
Camtasia Recording Files:.camrec - Legacy Camtasia Studio recording file (Camtasia Stu-dio version 8.3 and earlier)
Video Files:AVI, MPG, MPEG, WMV, SWF*Only SWF files created with Jing or a previousversion of Camtasia Studio.
Video Files:AVI, WMV, SWF, MTS
Camtasia 9-3 Help | 24

Add to Library to reuse in other Win-dows projects.
These media files are not compatible with Camtasia Mac.
Image Files:BMP, GIF, JPG, PNG
Audio Files:WAV, MP3, WMA, M4A
WMA
LIBZIP - Zipped Library Files LIBZIP - Camtasia Zipped Library Files
Callouts Camtasia Studio Legacy Callouts
Timeline selections with or without transitionsand animations
Groups with or without transitions and anim-ations
Quizzes, Animations, Visual Effects, AudioEffects, Captions, Behaviors, and CursorEffects in a group or on a timeline selection
Working with the Library
To perform this action.... Do this...
To add a media file or timelineasset to the video...
Drag it from the Library onto the timeline or right-click on an asset and selectAdd to Timeline.
To create a Library asset... Make a media or playhead selection on timeline, right-click it and choose: AddTimeline Selection to Libraryor Add to Library
Manage Library media...
l Click the asset in the Library to rename it.
l Drag asset into a folder for better Library organization.
l Drag asset to the timeline to include in the final video.
Camtasia 9-3 Help | 25

Manage Library ContentSaving Media to the Library
When a video sequence is saved in the Library, the entire video is saved. If your video is large, con-sider producing the timeline selection as an MP4 video file, then add that smaller clip to the Library.Keep Library assets as small as possible to improve Camtasia performance.
Moving or deleting Library assets can break other Camtasia projects using those assets. Before movingor deleting any files, open your video projects and export them as a Camtasia zipped project file. Be sureto select the Include all files from the Media Bin in zip option. This creates a self-contained projectwith backed up Media Bin files.
To perform this action.... Do this...
View media details like file name, loc-ation , creator, or size... Right-click on a Library asset and select Details from the context-menu.
Change an asset’s name... Click once on the asset, pause for a moment then click again. The namebecomes highlighted. Type the new name.
Create a folder...Right-click in a blank area of the Library tab. From the context menu,select New Folder then type a name for the folder.Note: Subfolders are not supported in the Library.
Delete an asset from the Library...
Right-click the asset and select Delete from Library from the contextmenu. You are prompted to confirm the delete.Note: If the asset is in use on the timeline, the asset cannot be deletedfrom the Library.
Delete a folder...
Right-click on it and select Delete from Library from the context menu.You are prompted to confirm the delete.Note: If the folder contains assets in use on the timeline, the folder can-not be deleted from the Library.
Remove broken links, rebuild theLibrary indexes, and update folders...Note: If you frequently add, delete,
Go to Edit > Preferences > Advanced tab > Clean Up Library. Youare prompted to confirm the process.
Camtasia 9-3 Help | 26

To perform this action.... Do this...
and move assets within the Library, itis good to perform this routine main-tenance on a regular basis.
Copy or Link assets to Library...
When assets are added to the Library, they are added as a copy of theasset file or a link to the asset file.To select a default method for adding assets, choose Edit > Preferences >
Advanced tab > Library Content group box.l Copy saves a copy of assets in the Library. Since copied assetsincrease the file size of Camtasia projects, it is best to only copyassets used from project to project . Use the Media Bin to hold filesneeded just for the current project.
l Link option links to the original asset file on a hard drive or networklocation. Since moving the asset from its original location breaks pro-jects that link to those files, it is recommended that assets be placed ina location where they will not be moved or accidentally deleted.
Export & Import Zipped Library AssetsIf you or your company uses a particular callout, title clip, survey, transition, etc. in your videos, create thoseassets one time, add them to the Library, then export the Library as a zip file (.libzip) to share with others. Thosewho receive a zipped library file can import that file into Camtasia using the import option. You can export afolder(s) or the entire library.
To perform this action.... Do this...
Export Assets or the EntireLibrary as a Zip File
1. Click to select an asset file or a folder.
2. To select multiple files or folders, press and hold the Ctrl key and click toselect each file/folder.
l To export the entire Library, do not select any files.
3. Right-click a selected asset(s) and select Export Selected Assets from thecontext menu.
4. To export the entire Library, right-click the blank area at the bottom of theLibrary and select Export Library from the context menu
5. Accept the default file location and file name or click the Browse button to
Camtasia 9-3 Help | 27

To perform this action.... Do this...
choose a new location and name. Click OK.
Import Zipped Library File fromEditor
1. In Editor, select File > Library > Import Zipped Library.
2. The Import Zipped Library dialog appears. Browse for and select a .Libzipfile. Click Open.
3. Click OK to begin the import.
Import Zipped Library File fromWindows Explorer
1. In Windows explorer, double-click a .Libzip file.
2. A confirmation dialog appears. Click Yes to begin the import.
Did you find what you were looking for? Provide feedback.
Related ArticlesAnnotations and CalloutsAnimationsCursor EffectsVisual Effects
Camtasia 9-3 Help | 28

Camtasia Editor PropertiesThe Properties pane in the Editor allows you to customize the look of media, Annotations, Behaviors, andEffects added to the timeline.For example, drag-n-drop the Color Adjustment visual effect to the timeline to make a clip brighter or darker.Then use available options in Properties to get the desired effect.
To perform this action... Do this...
Access properties for a clip, media, anim-ation, behavior, or effect...
1. Select on timeline.
2. Click the Properties button.
View all options for each type of media oreffect...
Click a Properties tab at the top of the pane.
Camtasia 9-3 Help | 29

To perform this action... Do this...
Effects can be layered on a media. Tosee options for each effect...
Use the scroll bar on the Properties pane.
Set properties back to the default settings...
Click the rewind button next to the desired option.
Delete an effect, animation, or behaviorfrom a media or clip on the timeline...
Click the X on the Properties box.To undo the delete:
l Press Ctrl+Z or Cmd+Z.
l Choose Edit > Undo.
l Click Undo .
Did you find what you were looking for? Provide feedback.
Camtasia 9-3 Help | 30

Related ArticlesCanvas OptionsProject SettingsWorking with AudioShare Your Video
Camtasia 9-3 Help | 31

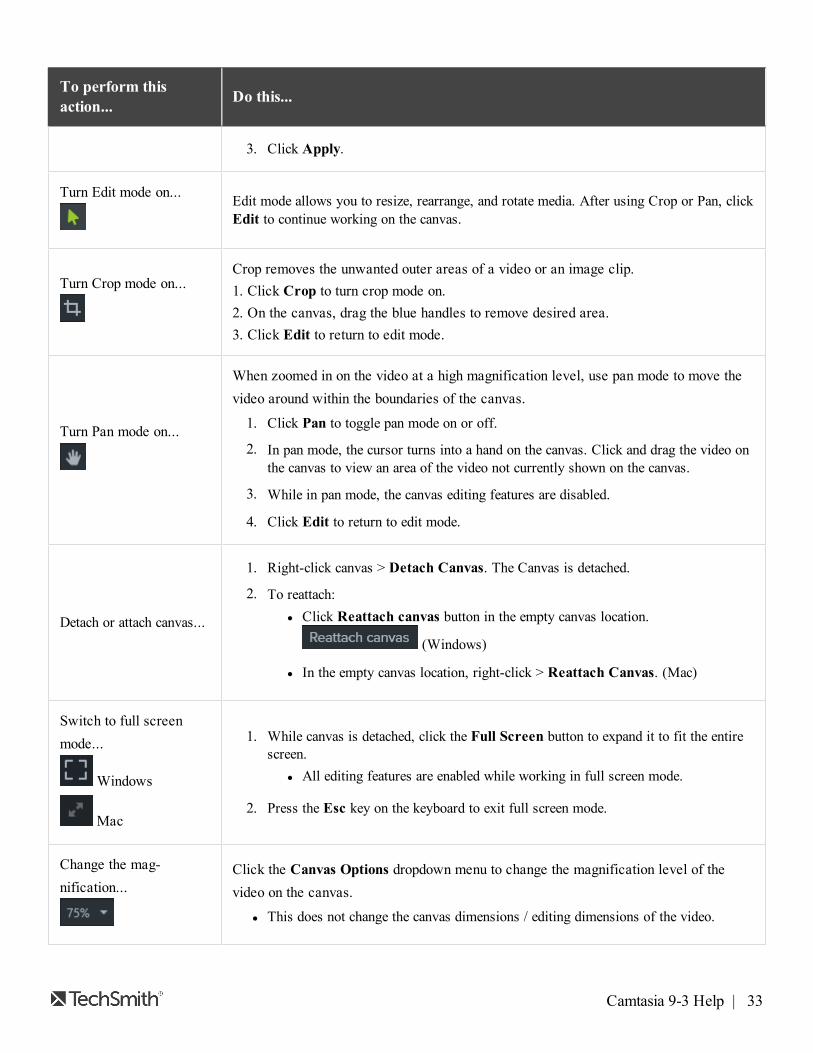
Canvas OptionsThe canvas, sometimes called the preview window, is the working area where you arrange, rotate, resize, andorder the appearance of media on the timeline.
1. Canvas tools are located in the toolbar above the canvas.
2. An inactive area surrounds the canvas. Anything that is off-canvas is not included in the final video.Tip! Add an animation to media located off-canvas to have it move into view.
3. The active part of the canvas. Everything on the active part of the canvas is included in the final video.
4. The outside edges of the canvas contain boundary guidelines to help you snap media to the edge.
Canvas ToolsTo perform thisaction... Do this...
Change canvas color
The canvas is the actual background of your video and appears in the final videowhenever it can be seen during video playback.To change the color of the canvas:
1. Right-click the canvas > Project Settings.
2. In Project Settings, change the Color.
Camtasia 9-3 Help | 32
To perform thisaction... Do this...
3. Click Apply.
Turn Edit mode on... Edit mode allows you to resize, rearrange, and rotate media. After using Crop or Pan, clickEdit to continue working on the canvas.
Turn Crop mode on...Crop removes the unwanted outer areas of a video or an image clip.1. Click Crop to turn crop mode on.2. On the canvas, drag the blue handles to remove desired area.3. Click Edit to return to edit mode.
Turn Pan mode on...
When zoomed in on the video at a high magnification level, use pan mode to move thevideo around within the boundaries of the canvas.
1. Click Pan to toggle pan mode on or off.
2. In pan mode, the cursor turns into a hand on the canvas. Click and drag the video onthe canvas to view an area of the video not currently shown on the canvas.
3. While in pan mode, the canvas editing features are disabled.
4. Click Edit to return to edit mode.
Detach or attach canvas...
1. Right-click canvas > Detach Canvas. The Canvas is detached.
2. To reattach:l Click Reattach canvas button in the empty canvas location.
(Windows)
l In the empty canvas location, right-click > Reattach Canvas. (Mac)
Switch to full screenmode...
Windows
Mac
1. While canvas is detached, click the Full Screen button to expand it to fit the entirescreen.
l All editing features are enabled while working in full screen mode.
2. Press the Esc key on the keyboard to exit full screen mode.
Change the mag-nification...
Click the Canvas Options dropdown menu to change the magnification level of thevideo on the canvas.
l This does not change the canvas dimensions / editing dimensions of the video.
Camtasia 9-3 Help | 33

To perform thisaction... Do this...
l Choose Fit to view the entire video within the boundaries of the canvas.
l When the view is magnified, use Pan mode to move the video around within theboundaries of the canvas.
Working with the CanvasThe canvas is the working area where you arrange, rotate, resize, and order the appearance of media on thetimeline.
To perform thisaction... Do this...
Select media...Click a media on the canvas to select it.When a clip, group, or other media is selected on the canvas, it is also selected on thetimeline.
Move, resize, orrotate...
l To move media, grab and drag to new location on the canvas.
l To size media, grab a handle and drag to desired size.
l To rotate, grab center handle and turn.
l Press and hold the ALT key while dragging the clip for 3-D rotation.
Select more than onemedia...
l Press and hold Shift, then click each media to select.
l Selected media can be moved, rotated, and resized together.
Group media...
Group multiple media together to make moving, editing, and organizing easier.l Tracks within a group can be edited like any other track on the timeline.
l To create a group:1. Press and hold Shift, then click each media to select.2. Right-click one of the selected media and choose Group.
l To ungroup:Right-click a group and choose Ungroup.
Reorder media... l Right-click media > Arrange > choose option.
Camtasia 9-3 Help | 34
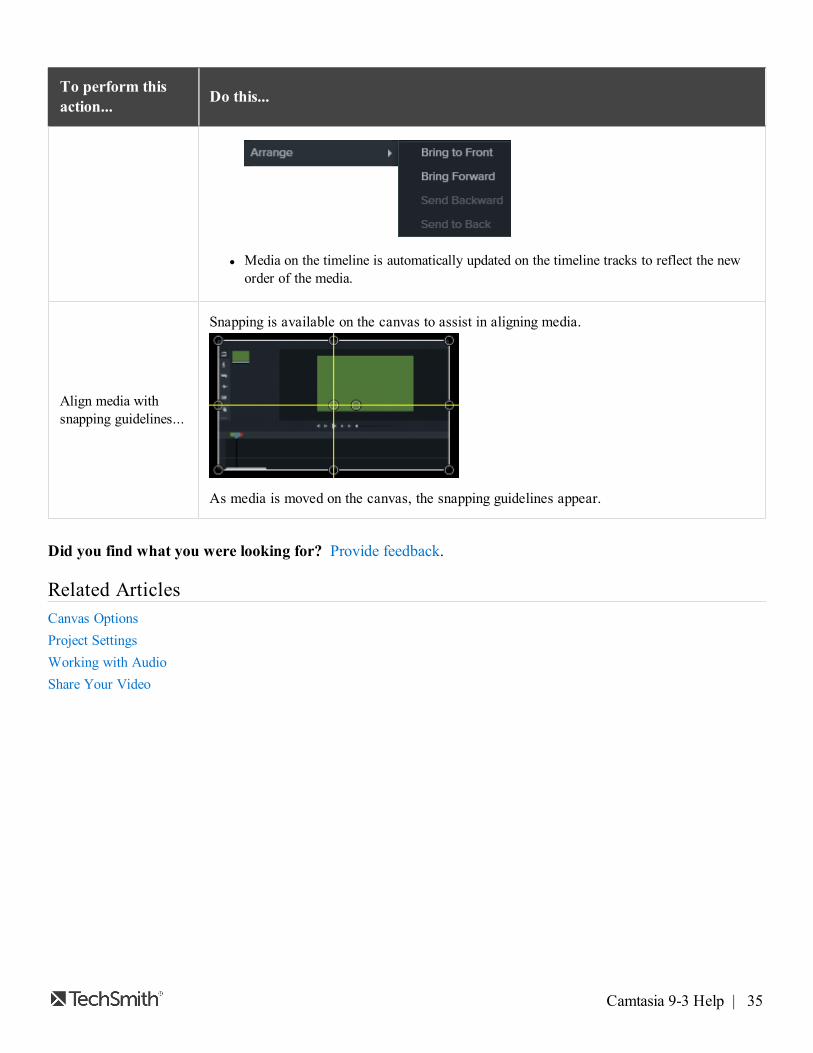
To perform thisaction... Do this...
l Media on the timeline is automatically updated on the timeline tracks to reflect the neworder of the media.
Align media withsnapping guidelines...
Snapping is available on the canvas to assist in aligning media.
As media is moved on the canvas, the snapping guidelines appear.
Did you find what you were looking for? Provide feedback.
Related ArticlesCanvas OptionsProject SettingsWorking with AudioShare Your Video
Camtasia 9-3 Help | 35

Timeline Tracks and Basic Editing
Timeline TracksTracks represents the sequence of media on the timeline both horizontally and vertically.
l Everything that appears at one point in time vertically appears at the same time in the video.
l Only media on a timeline track is included in the final video.
l An unlimited number of tracks can be added to the timeline.
To perform this action.... Do this...
Add a Track
1. Click to add a track to the timeline.
-Or-2. Drag and drop media from the Media Bin or Library onto the "blank" area tocreate a new track.
Scroll through tracks
If there are several tracks on the timeline, use the scroll bar on the right side ofthe timeline to view unseen tracks.
Rename a Track To change a track name, double-click the name and type.
Change Track Size Use the track slider to resize all of the tracks at one time.
Camtasia 9-3 Help | 36

To perform this action.... Do this...
-Or-To resize only one track, hover the mouse over the track border above the nameand drag up or down.
Lock / Unlock TrackLock a track to prevent editing orother changes to the media onthat track.
Lock a Track
Click the lock icon to the left of the track.
The icon turns white and the track dims with a lined effect to indicate the trackis locked.
Unlock a TrackClick the white lock icon to the left of the track. The icon turns gray and thetrack brightens to indicate the track in unlocked.
About Locked Tracksl Media on a locked track appears in the canvas, preview, and the final, pro-duced video.
l Media on locked tracks is included in the video during the production pro-cess.
l Tracks in a group cannot be locked.
l Media on a locked track cannot be cut, copied, deleted, pasted, or modifiedin any way.
Camtasia 9-3 Help | 37

To perform this action.... Do this...
Turn Off / Turn On TrackTurn a track off to prevent mediafrom appearing in the canvas,preview, or the final, producedvideo.
Turn a Track Off
Click the eye icon to the left of the track.
The icon turns white and the track dims to indicate the track is off.
Turn a Track OnClick the white eye icon to the left of the track.The icon turns gray and the track brightens to indicate the track in on.
About Turned Off Tracksl Media on turned off tracks is not included in the video during the productionprocess.
l Turn off a track to sample various audio clips. For example, to hear only thebackground music on a track without the voice-over track, turn off thevoice-over track.
l Media on a turned off track cannot be cut, copied, deleted, pasted, etc.
Show / Hide Quiz or MarkerViewWhen a quiz or marker is addedto the timeline, the quiz ormarker view automaticallyopens.
Click the Show/Hide icon to turn Marker/Quiz view on or off.
Click the Quiz/Marker dropdown menu to choose the desired view.
Tracks inside a Groupl Each piece of media in a group has its own separate track.
l There can be an unlimited number of tracks in a group. Edit the media on a
Camtasia 9-3 Help | 38
To perform this action.... Do this...
group track as you would on a timeline track.
l There is no need to ungroup to edit media in a group.
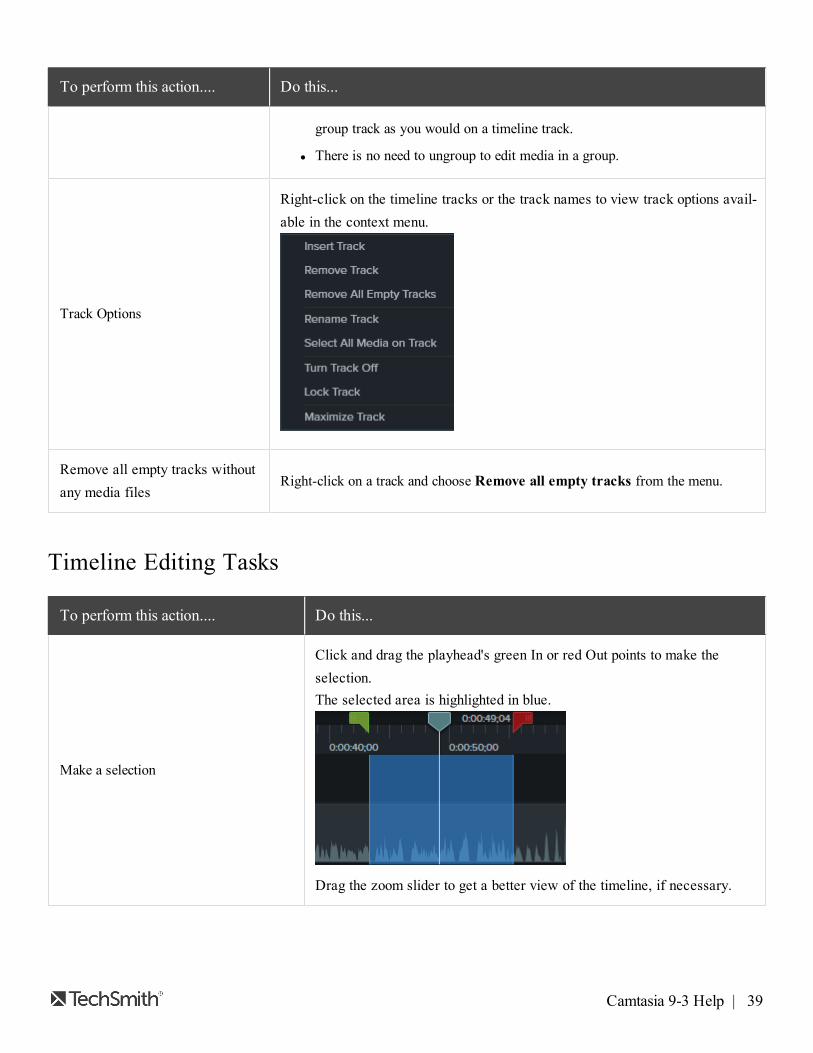
Track Options
Right-click on the timeline tracks or the track names to view track options avail-able in the context menu.
Remove all empty tracks withoutany media files
Right-click on a track and choose Remove all empty tracks from the menu.
Timeline Editing Tasks
To perform this action.... Do this...
Make a selection
Click and drag the playhead's green In or red Out points to make theselection.The selected area is highlighted in blue.
Drag the zoom slider to get a better view of the timeline, if necessary.
Camtasia 9-3 Help | 39

To perform this action.... Do this...
Select a media on timeline Click on a media to select it.
Select more than one media on timelineClick and drag the cursor on the timeline to capture all the desired media.-Or-Press Shift and click on multiple media to select.
Select All MediaDeselect All Media
WindowsCtrl+ ACtrl+D
MacCmd+ACmd+D
Delete a selection
Delete a media
When using Delete, a gap is left between any clips on the timeline.To Delete a Timeline Selection1. Lock tracks on timeline that contain media you do not want to delete.
2. Drag the in or out points to make the selection. Use the zoom slider toget a better view of the timeline, if necessary. The selected area ishighlighted in blue.
3. Press Delete on the keyboard.
-Or-Select a media on the timeline and press Delete.
Cut a selection
Cut a media
A cut removes a selection from the timeline and puts it on the clipboard.l When using the Cut tool, no gap is left on the timeline and remainingmedia is stitched together.
l If desired, paste the elsewhere onto the timeline.
l You can cut a single clip or across multiple clips.
To Cut Media1. Lock tracks on timeline that contain media you do not want to cut.
2. Drag the in or out points to make the selection. Use the zoom slider toget a better view of the timeline, if necessary. The selected area is
Camtasia 9-3 Help | 40
To perform this action.... Do this...
highlighted in blue.
3. Click the Cut button . The selection is cut and media on timelineshifts and is stitched together.
4. To paste the selection elsewhere on the timeline, move the playhead to
a new location and click the Paste button .
-Or-
Select a one or more media on the timeline and click the Cut button .
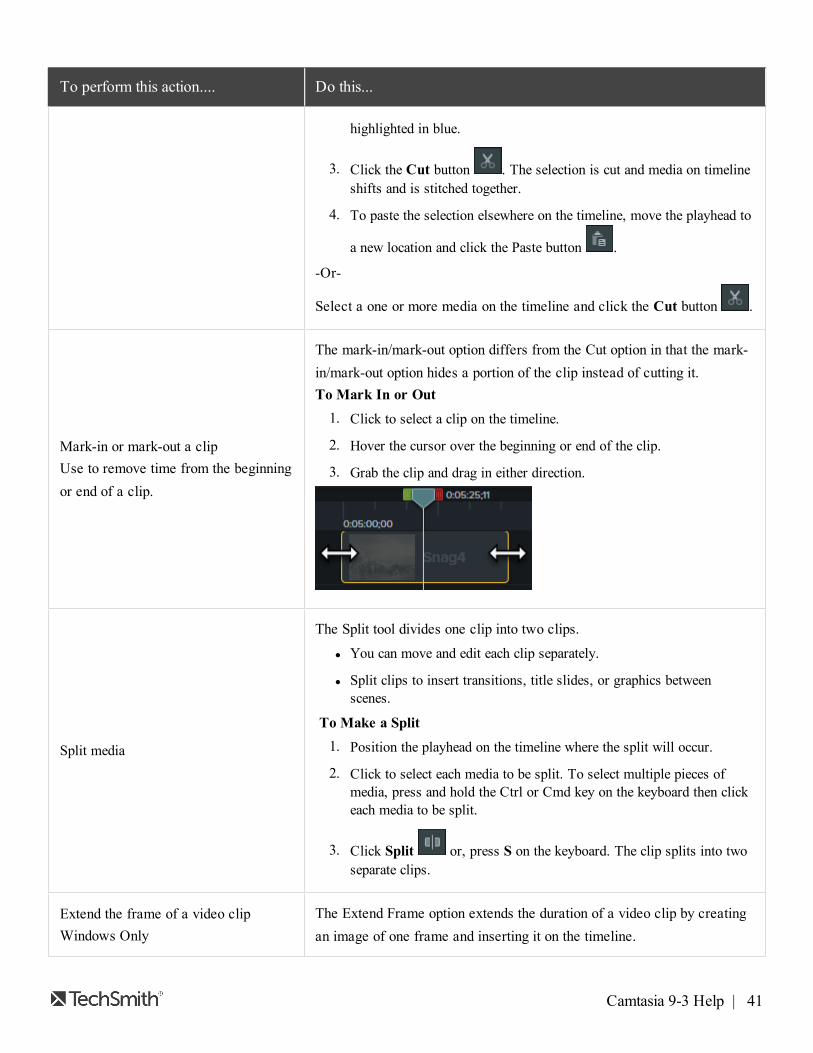
Mark-in or mark-out a clipUse to remove time from the beginningor end of a clip.
The mark-in/mark-out option differs from the Cut option in that the mark-in/mark-out option hides a portion of the clip instead of cutting it.To Mark In or Out1. Click to select a clip on the timeline.
2. Hover the cursor over the beginning or end of the clip.
3. Grab the clip and drag in either direction.
Split media
The Split tool divides one clip into two clips.l You can move and edit each clip separately.
l Split clips to insert transitions, title slides, or graphics betweenscenes.
To Make a Split1. Position the playhead on the timeline where the split will occur.
2. Click to select each media to be split. To select multiple pieces ofmedia, press and hold the Ctrl or Cmd key on the keyboard then clickeach media to be split.
3. Click Split or, press S on the keyboard. The clip splits into twoseparate clips.
Extend the frame of a video clipWindows Only
The Extend Frame option extends the duration of a video clip by creatingan image of one frame and inserting it on the timeline.
Camtasia 9-3 Help | 41

To perform this action.... Do this...
l The extend frame option creates an image clip that only contains oneframe. The rest of the video follows the new image clip. This videoclip is the rest of the original video.
l Use this option to extend the video frame to match the length of theaudio or voice narration.
l You can adjust the duration of the extended frame clip by dragging theend of it along the timeline. Press and hold the Shift key while drag-ging to move all other media on the same track.
To Extend a Frame of a Video Clip1. Position the playhead on the frame to extend.
2. Select the clip on the timeline.
3. Right-click on the clip and select Extend Frame or, press Shift+Eon the keyboard. The Extend Frame dialog box appears.
4. Enter the desired duration of the extended frame.
5. Click OK.
Group media on the timeline
Media on the timeline can be grouped together to:l Help keep the timeline organized
l Resize all the media on the canvas at one time retaining the properaspect ratio
l Move media together on the timeline or on the canvas
l Copy and paste frequently used sequences
l Save frequently used sequences in the Library (Windows only) foruse from project to project
Group Characteristicsl Tracks within a group cannot be locked.
l Groups can contain an unlimited number of media or tracks.
l Groups can be added to other groups.
l Drag media in or out of a group.
To Create a Group1. Select all the media on the timeline to go into the group.
2. Right-click one of the selections and choose Group from the menu.The media is moved into the group.
l Double-click the group title to rename it.
Camtasia 9-3 Help | 42

To perform this action.... Do this...
l Click the plus/minus icon to open or close a group
l Right-click a group and choose Ungroup. Media from thegroup retains its original position on the timeline.
Timeline toolbar
Gives access to basic editing tools such as undo, redo, cut, copy, paste,and split.
Stitch media
l When media is Cut, it is automatically stitched back together.
l When media is Deleted, it is NOT stitched and a gap is left on thetimeline.
l Only sections of media created from one original clip can be stitchedtogether.
l Media must be next to each other to be stitched.
To stitch two media together, right click where the media are touchingand choose Stitch Media.
To separate media, right click on the stitch and choose Unstitch.
Save a video frame as an image
Use the Export Frame As option to save the current frame (seen on thecanvas) as an image file (BMP, GIF, JPG, or PNG).1. Position the playhead on the timeline. Refer to the canvas to ensure
the correct frame is selected.
2. Select Share > Export frame as.
3. The Export Frame As dialog appears. Enter a file name and select afile location.
4. Select a file format from the Save as type field.
5. Click Save.
Did you find what you were looking for? Provide feedback.
Camtasia 9-3 Help | 43

Related ArticlesCamtasia HotkeysAnnotations and CalloutsBehaviorsCursor EffectsVisual Effects
Camtasia 9-3 Help | 44

TransitionsTransitions add a pleasant visual effect between the end of a clip and the beginning of the next clip.
l Transitions can be added to a group or to a single image, annotation, or video clip.
l Use transitions to indicate the passage of time, change in location, to call attention, or to create a smooth flowbetween clips.
l Add transitions to annotations and images to create a custom look.
To add a Transition to the timeline:
1. Choose Transitions.
2. Grab the desired transition...
3. And drag it to the timeline.
4. Drop on an area that lights up as yellow. Yellow indicates a transition can be used at the beginning or end ofa media or clip.
Camtasia 9-3 Help | 45

Use Trimmed Content In TransitionsTransitions use frames at the end of one video and the beginning of another. This can consume portions of thevideo that need to be seen.
The Use Trimmed Content in Transition option has the transition effect use several frames of a video clip thatwas trimmed, split, or cut. This retains the edited portion of the video and allows the effect to appear smoothersince the "good" frames are not being consumed by the transition.
To better understand this concept, consider the following scenario.
Camtasia 9-3 Help | 46

1. Clip A and Clip B are on the timeline. I need to edit Clip A to remove the highlighted portion.
2. Clip A has been edited and all unwanted frames removed.
3. A transition has been added between Clip A and Clip B. The transition consumes the ends of the clips caus-ing the edited portion of Clip A to be cut off.
4. The solution is using the Use Trimmed Content In Transition option. This allowed the transition to useframes previously cut out of the video leaving the edited part fully intact.
To use the trimmed content option, right-click a transition and choose Use Trimmed Content in Transition.
Working with TransitionsTo perform this action... Do this...
Delete Select the transition and press Delete on keyboard.
Change duration... l Drag out end of transition out to extend the duration.
Camtasia 9-3 Help | 47

To perform this action... Do this...
l Drag in end of transition in to shorten the duration.
See details...
Hover over a transition and the Details box appears.
Change transition type... Drag a different transition onto existing transition and drop it there.
Did you find what you were looking for? Provide feedback.
Related ArticlesAnnotations and CalloutsBehaviorsCursor EffectsVisual Effects
Camtasia 9-3 Help | 48

Working with AudioWhen creating a video, it’s important to capture good, quality video. But, it's just as important, if not more so, toget good quality audio.
l Our ears almost always detect an audio error but, our eyes are not so aware of errors occurring on-screen.
l Most people won’t watch a video if the audio is bad – even if the video itself is very good.
l People are more likely to continue watching a poor quality video if the audio is good.
Tips for Getting Great Audio
l Use the best microphone you can afford.
l Use default Camtasia Recorder audio settings.
l ALWAYS do a short test recording to ensure audio is being recorded.
l Use Audio Effects to enhance or correct audio.
l Add audio points to enhance certain areas of the waveform.
There are two ways to work with audio in Camtasia: edit directly on timeline, or add effects.
Edit Audio on TimelineTo perform thisaction.... Do this...
Select audio on thetimeline... Double-click a clip with audio. The clip turns green and the audio bar appears.
Increase or decreasethe volume level...
Drag the audio bar up or down.
Silence a section ofaudio...
Use the playhead to make a selection. Right-click the selection and choose Silence Audio.
Camtasia 9-3 Help | 49

To perform thisaction.... Do this...
Add audio points...
Double-click on the audio bar.
Move audio points... Grab and drag the audio point across the audio bar.
Fade audio in orout...
To create a fade, add three audio points to the audio bar. Drag up or down to create thedesired fade.
Delete audiopoints...
Right-click an audio point and choose to delete selected point or all points.
Separate systemaudio from screenrecording...
Right-click audio and choose Separate Video and Audio.
Change the look ofthe waveform...
Choose Edit > Preferences > Program tab >Mirror waveform.
Save audio as M4Aor WAV
Share > Export Audio Only.Note: Export to MP3 is no longer available.
Add Audio EffectsTo add an audio effect, drag to timeline and drop on clip with audio.
Camtasia 9-3 Help | 50

l Once effect is added, click gray bar under waveform to open effects tray.
l Drag effect on timeline to adjust its duration.
l Customize effects in Properties panel.
To customize thiseffect... Do this...
Noise RemovalHelps reduce back-ground noise.
1. Open Properties pane.
2. Choose Analyze to automate noise removal process. (Windows, only.)
3. Or, manually adjust the Sensitivity and Reduction to get desired effect.
Volume LevelingHelps even out audiolevels.
1. Open Properties pane.
2. Choose level from Variation drop down menu.
3. Or, manually adjust Ratio, Threshold, and Gain to get desired effect.
Fade In / Fade OutCreates smooth trans-ition in to or out ofaudio.
1. Automatically applied to beginning or end of audio clip.
2. Grab audio point(s) and drag to adjust.
Pitch (Mac Only)Adjust frequency ofsound waves to changevoice sound.
1. Open Properties pane.
2. Manually adjust Pitch, Ease In, or Ease Out to get desired effect.
Clip SpeedCause audio and videoclip to play back fasteror slower.
1. Drag effect on timeline to adjust speed.
2. Or, open Properties pane to adjust Duration and Speed to get desired effect.
l Adjust speed higher to cause video to play back faster.
l Adjust speed lower to the video to play back slower.
Camtasia 9-3 Help | 51

Did you find what you were looking for? Provide feedback.
Related ArticlesAnimationsBehaviorsCursor EffectsVisual Effects
Camtasia 9-3 Help | 52

Annotations and CalloutsAnnotations, like callouts or arrows, are graphics that appear on top of a video to draw viewers’ attention toimportant objects or processes.Annotations also include effects like blurs, highlights, and interactive hotspots.
To add an annotation to the timeline:
1. Click the Annotations tab.
2. Click a sub-tab to select a category.
3. Select a Style from the menu. (Only some annotations have this option.)
4. Double-click to add to timeline at playhead. Or, drag annotation to desired location on timeline.
5. Customize in Properties.
Annotation Types
Annotation Category Includes
Callouts
l Speech bubbles and plain text.
l Add a plain text annotation to an image to create a cus-tom callout.
l Choose from various styles like Abstract, Basic, Bold,
Camtasia 9-3 Help | 53
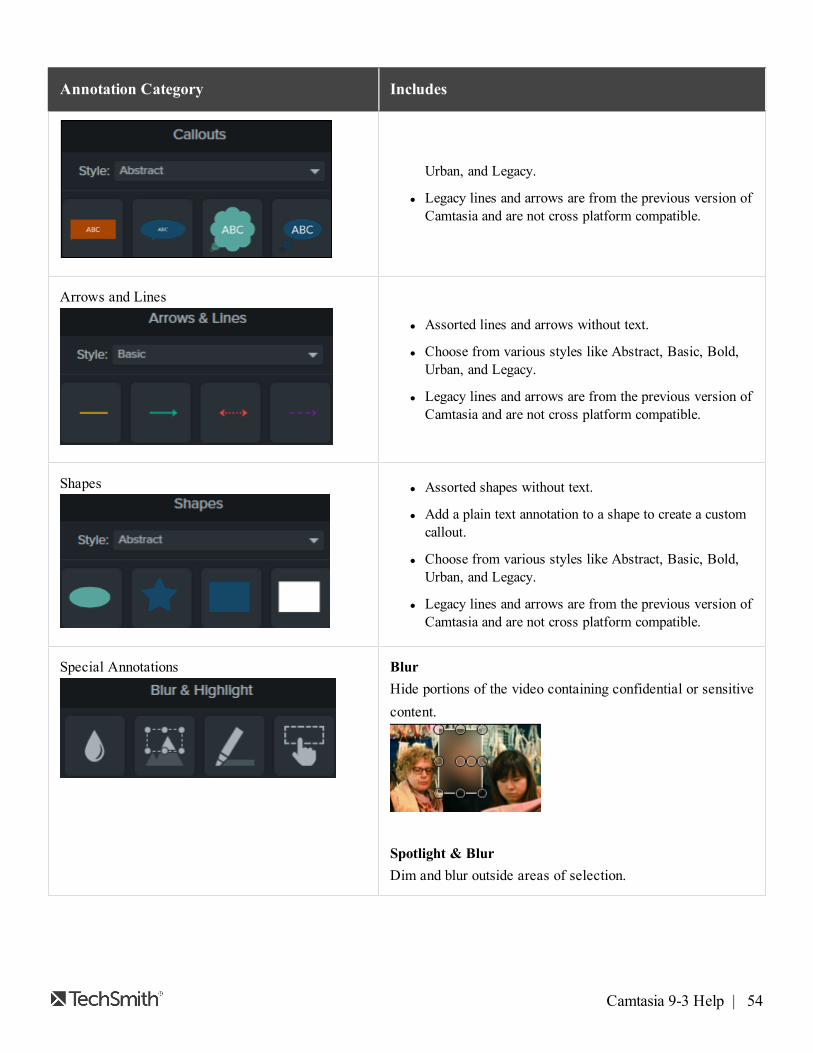
Annotation Category Includes
Urban, and Legacy.
l Legacy lines and arrows are from the previous version ofCamtasia and are not cross platform compatible.
Arrows and Lines
l Assorted lines and arrows without text.
l Choose from various styles like Abstract, Basic, Bold,Urban, and Legacy.
l Legacy lines and arrows are from the previous version ofCamtasia and are not cross platform compatible.
Shapes l Assorted shapes without text.
l Add a plain text annotation to a shape to create a customcallout.
l Choose from various styles like Abstract, Basic, Bold,Urban, and Legacy.
l Legacy lines and arrows are from the previous version ofCamtasia and are not cross platform compatible.
Special Annotations BlurHide portions of the video containing confidential or sensitivecontent.
Spotlight & BlurDim and blur outside areas of selection.
Camtasia 9-3 Help | 54
Annotation Category Includes
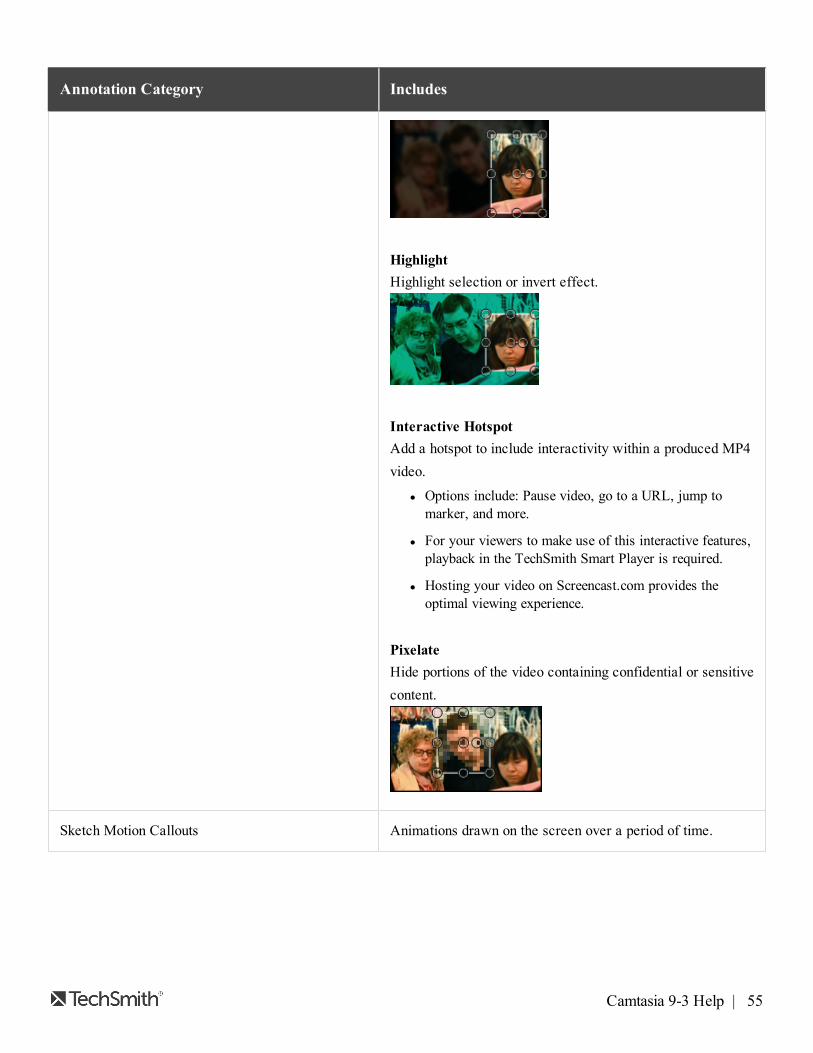
HighlightHighlight selection or invert effect.
Interactive HotspotAdd a hotspot to include interactivity within a produced MP4video.
l Options include: Pause video, go to a URL, jump tomarker, and more.
l For your viewers to make use of this interactive features,playback in the TechSmith Smart Player is required.
l Hosting your video on Screencast.com provides theoptimal viewing experience.
PixelateHide portions of the video containing confidential or sensitivecontent.
Sketch Motion Callouts Animations drawn on the screen over a period of time.
Camtasia 9-3 Help | 55

Annotation Category Includes
Keystroke Callouts
Windows Options
Mac Options
Show keyboard activity in your video. For example, if youpress Ctrl+C (or Cmd+C) on the keyboard as you are record-ing, show that keyboard combination using the keystroke cal-louts.Add Manually1. Drag keystroke annotation to timeline.
2. Enter keystrokes in Properties.
Auto Generate - WindowsKeystroke callouts can be auto generated from keystrokescaptured in a TREC recording.1. Select recording with keystroke data.
2. SelectModify > Generate Keystroke Callouts.
3. Choose options.
4. Click Generate.
Auto Generate - Mac
1. Click Visual Effects tab.
2. Drag the Keystroke effect to a recording with keystrokedata.
Camtasia 9-3 Help | 56
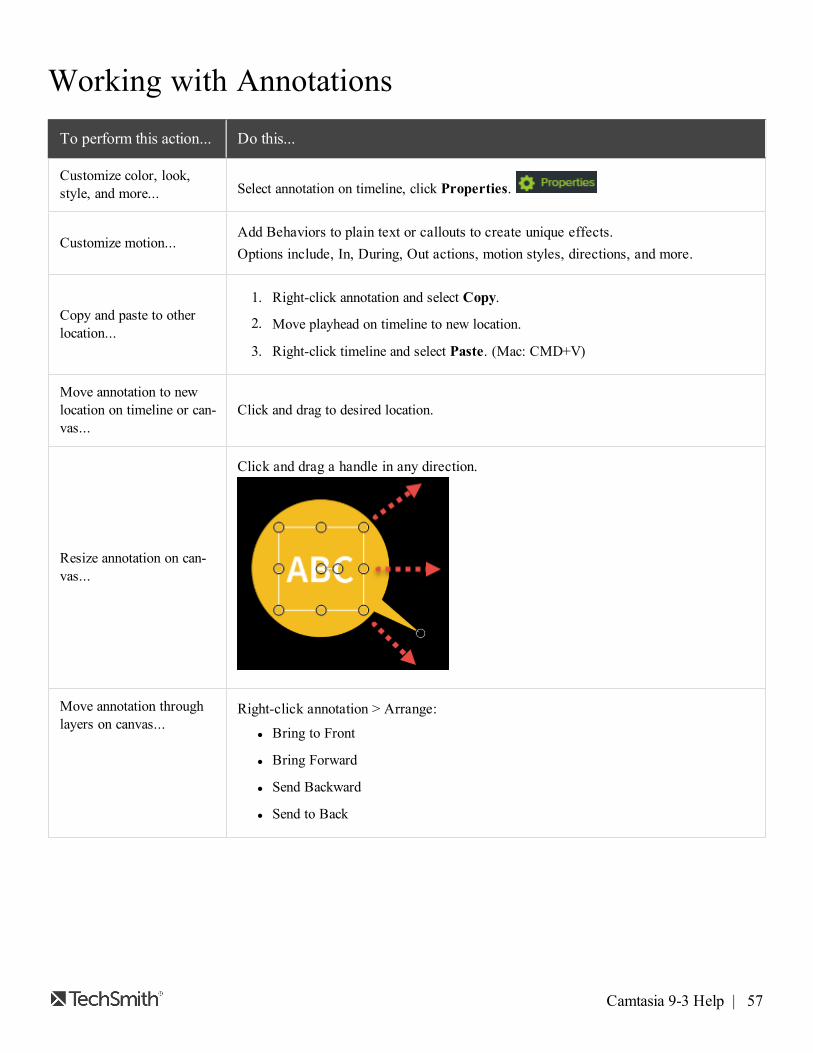
Working with AnnotationsTo perform this action... Do this...
Customize color, look,style, and more... Select annotation on timeline, click Properties.
Customize motion...Add Behaviors to plain text or callouts to create unique effects.Options include, In, During, Out actions, motion styles, directions, and more.
Copy and paste to otherlocation...
1. Right-click annotation and select Copy.
2. Move playhead on timeline to new location.
3. Right-click timeline and select Paste. (Mac: CMD+V)
Move annotation to newlocation on timeline or can-vas...
Click and drag to desired location.
Resize annotation on can-vas...
Click and drag a handle in any direction.
Move annotation throughlayers on canvas...
Right-click annotation > Arrange:l Bring to Front
l Bring Forward
l Send Backward
l Send to Back
Camtasia 9-3 Help | 57

To perform this action... Do this...
Rotate annotation on can-vas...
Grab center handle and drag left or right.
Delete... Select annotation on a clip or media, press Delete on keyboard.
Change duration...l Drag either end of the annotation out to extend the duration.
l Drag either end of the annotation in to shorten the duration.
Did you find what you were looking for? Provide feedback.
Camtasia 9-3 Help | 58

Related ArticlesAnimations
Behaviors
Cursor Effects
Visual Effects
Camtasia 9-3 Help | 59

AnimationsAnimations add interesting focal points to your video.These might include:
l A talking head that smoothly transitions or trades places with a screen recording.
l An image that enters the video from the left, pauses, then flies off to the right.
l Callouts that animate in various ways on the canvas to draw attention to an area in the video.
To Use Animations1. Choose Animations.
2. On Windows, also choose Animations sub-tab.
3. Drag desired animation to clip or media on timeline.
Camtasia 9-3 Help | 60
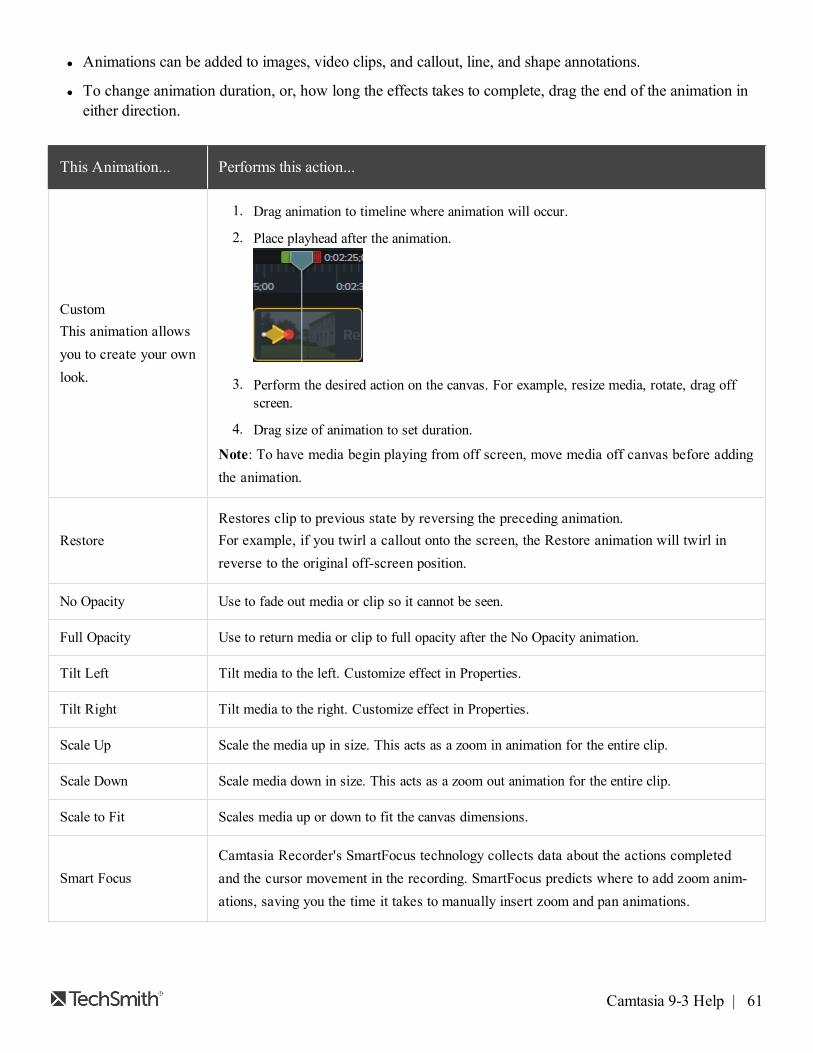
l Animations can be added to images, video clips, and callout, line, and shape annotations.
l To change animation duration, or, how long the effects takes to complete, drag the end of the animation ineither direction.
This Animation... Performs this action...
CustomThis animation allowsyou to create your ownlook.
1. Drag animation to timeline where animation will occur.
2. Place playhead after the animation.
3. Perform the desired action on the canvas. For example, resize media, rotate, drag offscreen.
4. Drag size of animation to set duration.
Note: To have media begin playing from off screen, move media off canvas before addingthe animation.
RestoreRestores clip to previous state by reversing the preceding animation.For example, if you twirl a callout onto the screen, the Restore animation will twirl inreverse to the original off-screen position.
No Opacity Use to fade out media or clip so it cannot be seen.
Full Opacity Use to return media or clip to full opacity after the No Opacity animation.
Tilt Left Tilt media to the left. Customize effect in Properties.
Tilt Right Tilt media to the right. Customize effect in Properties.
Scale Up Scale the media up in size. This acts as a zoom in animation for the entire clip.
Scale Down Scale media down in size. This acts as a zoom out animation for the entire clip.
Scale to Fit Scales media up or down to fit the canvas dimensions.
Smart FocusCamtasia Recorder's SmartFocus technology collects data about the actions completedand the cursor movement in the recording. SmartFocus predicts where to add zoom anim-ations, saving you the time it takes to manually insert zoom and pan animations.
Camtasia 9-3 Help | 61

This Animation... Performs this action...
Note: This option is only available in .trec recordings created by Camtasia Recorder.TREC is the default setting for the recorder.To activate SmartFocus animations:
l Drag to clip on timeline.
l ChooseModify > SmartFocus:
l Apply to Timeline (Windows only)
l Apply to Selected Media
Working with AnimationsTo perform thisaction... Do this...
Delete Select the animation on a clip or media, press Delete on keyboard.
Change duration...l Drag either end of the animation out to extend the duration.
l Drag either end of the animation in to shorten the duration.
Change location on clipor media ... Click the middle of the animation and drag to desired location.
Copy and paste to otherlocation...
l Right-click animation and select Copy.
l Reposition playhead, right-click the media or clip and select Paste.
Use Easing to Change the EffectEasing determines the motion of the effect including how the effect begins and ends.
1. To change the easing action, right-click an animation on the timeline, choose Enable Easing.
2. Select the desired action from the menu.
Camtasia 9-3 Help | 62

Easing Action Effect
Linear
Spring
Bounce
Did you find what you were looking for? Provide feedback.
Camtasia 9-3 Help | 64

Related ArticlesAnnotations and CalloutsBehaviorsCursor EffectsVisual EffectsWindows Zoom and Pan Animations
Camtasia 9-3 Help | 65

Zoom & Pan AnimationsThe Zoom-n-Pan feature is not available for Camtasia Mac. To add a zoom animation, see Animations.
The Zoom-n-Pan tab offers a quick way to add zoom in, zoom out, and pan animations to the timeline.
Add zoom and pan animations to:
l Improve viewing when producing the final video at dimensions smaller than the source recording.
l Focus on important actions within the video, like typing in a text field or selecting an option in a large applic-ation.
l Move from area to area when editing dimensions are large.
Add a Zoom In / Zoom Out Sequence1. Position playhead on timeline where zoom will occur.
2. Choose Animations tool > Zoom-n-Pan tab.
3. Move and size zoom rectangle to get desired effect. That area fills the canvas and is what your viewers see.
Camtasia 9-3 Help | 66
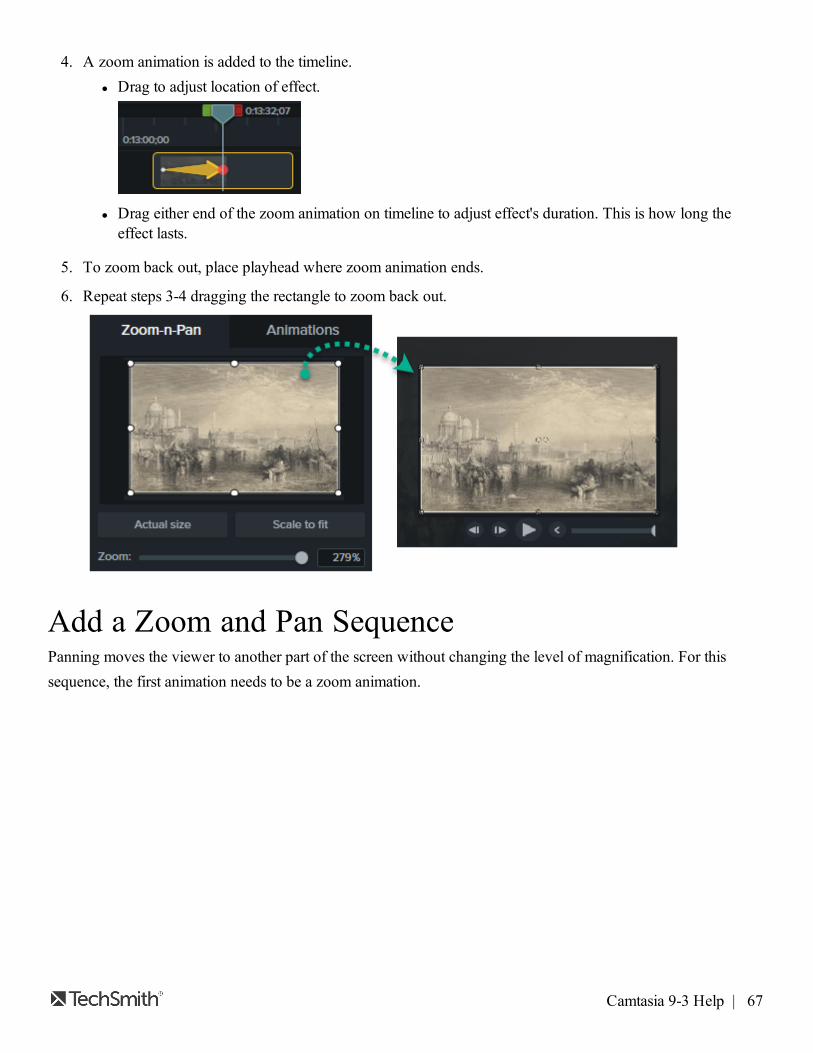
4. A zoom animation is added to the timeline.l Drag to adjust location of effect.
l Drag either end of the zoom animation on timeline to adjust effect's duration. This is how long theeffect lasts.
5. To zoom back out, place playhead where zoom animation ends.
6. Repeat steps 3-4 dragging the rectangle to zoom back out.
Add a Zoom and Pan SequencePanning moves the viewer to another part of the screen without changing the level of magnification. For thissequence, the first animation needs to be a zoom animation.
Camtasia 9-3 Help | 67

1. Position playhead on timeline where zoom will occur.
2. Choose Animations tool > Zoom-n-Pan tab.
3. Move and size zoom rectangle to get desired effect.
4. A zoom animation is added to the timeline.l Drag to adjust location of effect.
l Drag either end of the zoom animation on timeline to adjust effect's duration. This is how long theeffect lasts.
5. To create the pan animation, place playhead where pan will occur. Drag zoom rectangle to another part ofthe canvas without resizing.
6. Repeat step 5 until all pan animations are created.
7. To zoom back out, place playhead where zoom out animation will occur. Move and size zoom rectangle toget desired effect.
Did you find what you were looking for? Provide feedback.
Related ArticlesAnimationsBehaviorsCursor EffectsVisual Effects
Camtasia 9-3 Help | 68

Cursor EffectsIn Camtasia Recorder, cursor data is collected and stored in the TREC recording file. In Editor, the cursor can beenhanced for better visibility using a highlight, spotlight, magnifier, rings, click sounds, and more.
To add a cursor effect to the timeline, place the playhead on a recording that has recorded cursor data.
1. Click the Cursor Effects tab.
2. Click a sub-tab to select a category.
3. Drag desired effect to timeline.
4. Customize in Properties.
Camtasia 9-3 Help | 69
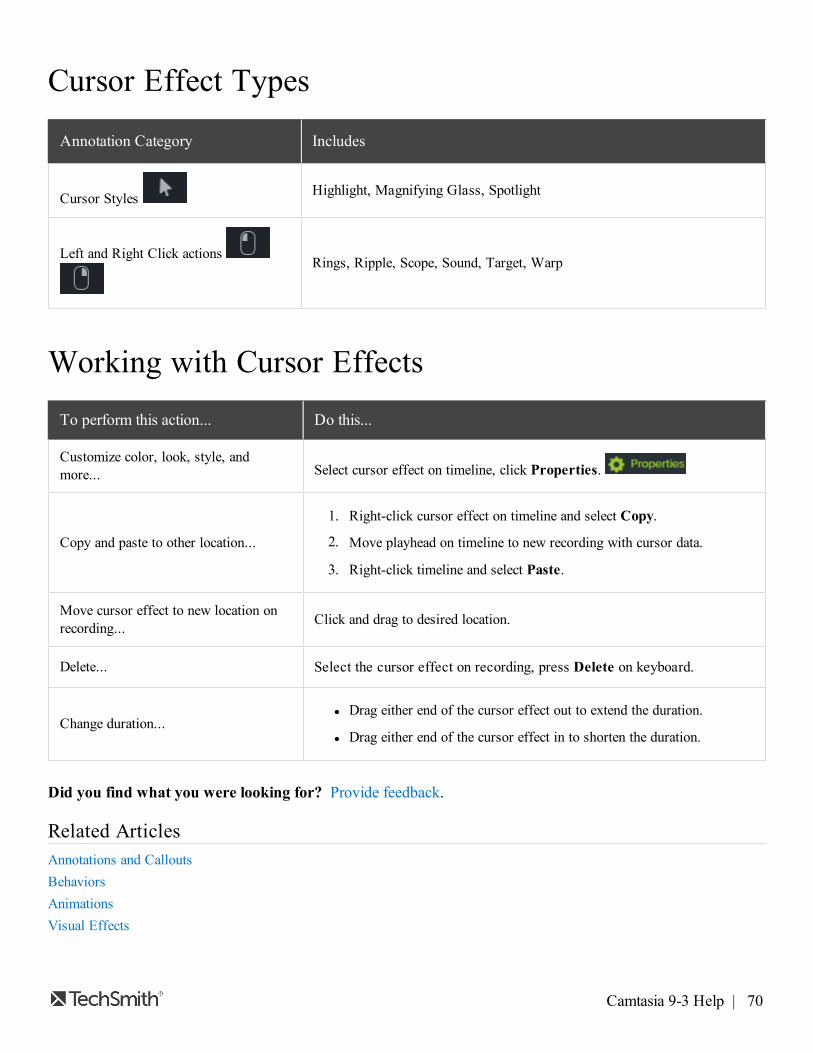
Cursor Effect Types
Annotation Category Includes
Cursor Styles Highlight, Magnifying Glass, Spotlight
Left and Right Click actions Rings, Ripple, Scope, Sound, Target, Warp
Working with Cursor EffectsTo perform this action... Do this...
Customize color, look, style, andmore... Select cursor effect on timeline, click Properties.
Copy and paste to other location...
1. Right-click cursor effect on timeline and select Copy.
2. Move playhead on timeline to new recording with cursor data.
3. Right-click timeline and select Paste.
Move cursor effect to new location onrecording... Click and drag to desired location.
Delete... Select the cursor effect on recording, press Delete on keyboard.
Change duration...l Drag either end of the cursor effect out to extend the duration.
l Drag either end of the cursor effect in to shorten the duration.
Did you find what you were looking for? Provide feedback.
Related ArticlesAnnotations and CalloutsBehaviorsAnimationsVisual Effects
Camtasia 9-3 Help | 70

Visual EffectsVisual effects can improve the look and quality of your video.
For example, drag-n-drop the Color Adjustment visual effect to the timeline to make a clip brighter or darker.Then use available options in Properties to get the desired effect.
To add a visual effect:
1. Click the Visual Effects tab.
2. Drag visual effect to an image, media, or recording.
3. Customize in Properties.
Camtasia 9-3 Help | 71

Visual EffectsThis Effect... Performs this action...
Drop ShadowAdds a drop shadow to callouts, images, video clips, and record-ings.Use properties to adjust the color, angle, offset, opacity, and more.
BorderWindows Only
Adds a border to callouts, images, video clips, and recordings.Use properties to change the color and thickness.
ColorizeChanges the color of callouts, images, video clips, and recordings.Use properties to adjust the color, amount, and easing.
Color AdjustmentChange the brightness, contrast, and saturation of callouts, images,video clips, and recordings.
Remove a Color(Green screen effect)
The Remove a Color feature, also called "Green screen effect", or"Chroma Key effect" allows a color to be removed from a video orimage.Typically this technique is used to remove a one-color backgroundbehind a video or image to allow another image or video to showthrough.
Use properties to adjust the tolerance of the color removal, the soft-ness of the effect, the hue of the color palette, and more.
Camtasia 9-3 Help | 72

This Effect... Performs this action...
Clip SpeedCause media or video clip to play backfaster or slower.
1. Drag effect on timeline to adjust speed.
2. Or, open Properties pane to adjust Duration and Speed to getdesired effect.
l Adjust speed higher to cause video to play back faster.
l Adjust speed lower to the video to play back slower.
Interactive Hotspot
Add a hotspot to include interactivity within a produced MP4 video.l Options include: Pause video, go to a URL, jump to marker, andmore.
l For your viewers to make use of this interactive features, play-back in the TechSmith Smart Player is required.
l Hosting your video on Screencast.com provides the optimalviewing experience.
Device FrameMac Only
Add a Mac device frame graphic over your callouts, images, videoclips, and recordings.Use properties to change the device image.
Freeze RegionMac Only
Freeze a region to isolate and hide an unwanted part of the screenrecording.For example, if an email notification appears during recording, inEditor, add a Freeze Region effect around that pop-up to hide it inthe final video.
GlowMac Only
Add a radiating glow from the center of callouts, images, videoclips, and recordings.Use properties to adjust the radius, intensity, and easing.
MaskMac Only
Add a cropped rectangle or circle effect to callouts, images, videoclips, and recordings.Use properties to adjust the inversion, rotation, opacity, corners,and more.
Reflection Add a reflection or mirror effect to callouts, images, video clips,
Camtasia 9-3 Help | 73

This Effect... Performs this action...
and recordings.Use properties to adjust the distance, opacity, and easing.
SepiaChanges the color of callouts, images, video clips, and recordings toa shade of brown.Use properties to adjust the intensity and easing.
Spotlight
Add a dramatic, theatrical, spot light or shading effect to callouts,images, video clips, and recordings.
l Use properties to adjust color, brightness, focus, and more.
l Align spot light directly on media.
Windows SpotlightHighlights the active window(s) recorded during a process orsequence.Use properties to adjust the zoom, opacity, blur, and easing.
Working with Visual EffectsTo perform this action... Do this...
Customize color, look, style, andmore... Select visual effect on timeline, click Properties.
Copy and paste to other location...
1. Right-click visual effect and select Copy.
2. Move playhead on timeline to new location.
3. Right-click timeline and select Paste.
Move visual effect to new location onmedia... Click and drag to desired location.
Change duration...l Drag either end of the visual effect out to extend the duration.
l Drag either end of the visual effect in to shorten the duration.
Delete... Select visual effect on a clip or media, press Delete on keyboard.
Camtasia 9-3 Help | 74

Did you find what you were looking for? Provide feedback.
Related ArticlesAnnotations and CalloutsZoom-n-PanBehaviorsCursor EffectsTransitions
Camtasia 9-3 Help | 75

BehaviorsBehaviors are animated presets to drag and drop on text and media to liven it up and engage your viewers.These might include:
l Plain text that gently pulsates where you want viewers to click a link.
l Image or a logo that enters the screen then swings back and forth on a hinge.
l Callouts that animate in various ways on the canvas to draw attention to an area in the video.
To Use Behaviors1. Choose Behaviors.
2. Drag desired behavior to clip or media on timeline.
3. Customize in Properties.
Camtasia 9-3 Help | 76

Behaviors can be:
l Added to images, video clips, and plain text, callout, line, and shape annotations.
l Stacked together on a media to create unique effects.
Working with BehaviorsTo perform thisaction... Do this...
Customize...
1. Select behavior on timeline then click Properties.
2. Click Behaviors sub-tab.
3. Choose action to change.
4. Choose desired motion effects.Note: Some motion effects are only available for Plain Text Annotations.
Delete... Select the behavior on a clip or media, press Delete on keyboard.
Change duration...The duration of a behavior cannot be independently changed - it extends the entire length ofa media clip, callout, etc.To change the duration, change the duration of the media clip holding the behavior.
Copy and paste toother location...
l Right-click behavior and select Copy Effects.
l Reposition playhead, right-click the media or clip and select Paste Effects.
Did you find what you were looking for? Provide feedback.
Camtasia 9-3 Help | 77

Related ArticlesAnnotations and CalloutsAnimationsCursor EffectsVisual Effects
Camtasia 9-3 Help | 78

Interactive Quiz or SurveyFor your viewers to make use of Camtasia's interactive features such as a table of contents, closed cap-tions, search capability, hotspot functionality and quizzing, playback in the TechSmith Smart Player isrequired. When producing the final video to share, choose an MP4 option or share to Screencast.com.Hosting your video on Screencast.com provides the optimal viewing experience since the SmartPlayer isbuilt into Screencast.com.
Insert a quiz or survey into your video to:
l Test viewer's knowledge through multiple choice, fill in the blank, short answer, and true/false questions.
l Add open ended questions to gain feedback or gather user information such as an email address to contactthe viewer at a later time.
Quiz Features
l Unlimited number of fill in the blank, multiplechoice, short answer, or true/false questions.
l Require quiz / survey takers to submit a name andemail address.
l Provide up to thirty answers options per ques-tion. l Set the quiz to be scored or unscored.
l Get score reporting via the Camtasia Quiz Ser-vice. l For surveys, use the unscored option.
Set Up a Quiz1. Select media or move playhead to desired quiz location then click the Interactivity tab.
2. Choose to add quiz to media or timeline.
Camtasia 9-3 Help | 79
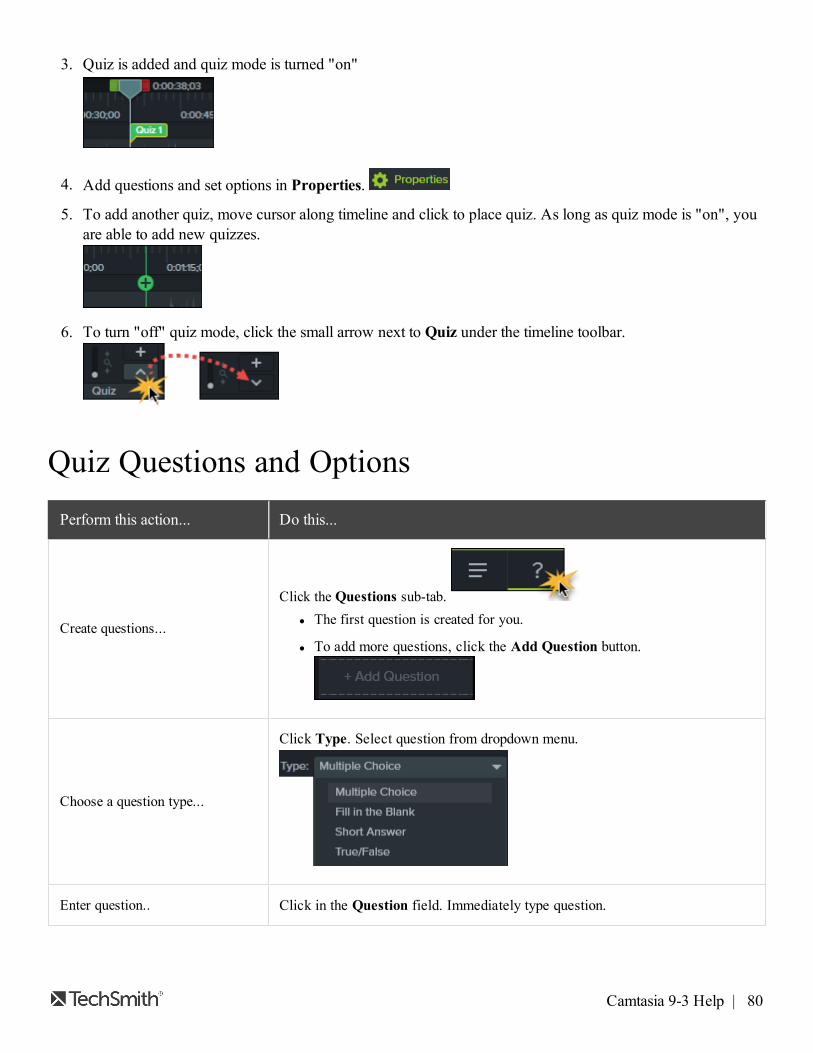
3. Quiz is added and quiz mode is turned "on"
4. Add questions and set options in Properties.
5. To add another quiz, move cursor along timeline and click to place quiz. As long as quiz mode is "on", youare able to add new quizzes.
6. To turn "off" quiz mode, click the small arrow next to Quiz under the timeline toolbar.
Quiz Questions and OptionsPerform this action... Do this...
Create questions...
Click the Questions sub-tab.l The first question is created for you.
l To add more questions, click the Add Question button.
Choose a question type...
Click Type. Select question from dropdown menu.
Enter question.. Click in the Question field. Immediately type question.
Camtasia 9-3 Help | 80

Perform this action... Do this...
Enter or select answer...
For true/false, choose answer type.
For all other questions, click in the answer field. Immediately type answer.
Give feedback for answers...
Check the Display Feedback option.
l Enter a response for a correct / incorrect answers.
l Choose next action to come after correct / incorrect answers.
Preview how quiz appears to yourviewers... Click the Preview button.
Enter quiz name... Click the Quiz Options sub-tab.Enter the name in the Quiz Name field.
Create Survey... Click the Quiz Options sub-tab.
Leave the Score Quiz option unchecked.
Get scores and information aboutquiz... See Quiz Reporting.
Camtasia 9-3 Help | 81

Working with QuizzesTo perform this action... Do this...
Customize color, look, style, andmore...
Select quiz on timeline, click Properties.-Or-Right-click a quiz on timeline and choose editing option from menu.
Delete... Select a quiz on a clip or media, press Delete on keyboard.
Change media quiz to timeline quiz...
To change a media quiz to a timeline quiz, or vice versa:1. Select the quiz.
2. Hover mouse over timeline or media until it turns green.
3. Click to change the quiz location.
Quiz ReportingYou can report the results of the quiz through email or via a SCORM-compliant Learning Management System(LMS).
l If you choose to have quiz results delivered by email, you receive the results through email via the CamtasiaQuiz Service.
l The quiz service takes the collected quiz data and sends it to the quiz creator in the form of two CSV reports:Summary and Detailed.
Camtasia 9-3 Help | 82

About the CSV ReportThe Summary CSV report contains a total score and percentage for each person, per video. While a video mayhave several quizzes, the summary report combines the scores from all quizzes in the video to give one overallscore.
l The Detailed CSV report contains a time stamp, detailed question/answer scores, text field entries, and more.
l The reports are in a comma delimited CSV text file format. This format is best viewed in a program thatallows you to easily manipulate data in columnar format like Microsoft Excel or Google Spreadsheets.
l Reports are sent once each day. No reports are sent if there is no new data collected.
l Reports aggregate data. So, each report contains both old and new data.
l You cannot unsubscribe from the Quiz Service. The only way to stop getting reports is to stop having peopletake the quiz or take the video down from the Web.
l You cannot change the reporting email address.
Production Wizard Reporting Options (Windows)The quiz reporting options are available in the Production Wizard when you choose Screencast.com, or an MP4option with SmartPlayer.
Camtasia 9-3 Help | 83

Share Video Wizard Reporting Options For MacThe quiz reporting options are available in the video Share screen when you choose Screencast.com, or LocalFile >MP4 option.
Reporting Options Details
Report quiz results using SCORM(Only available with Share > LocalFile > MP4)
Provides a packaged eLearning lesson with the video using SCORM.
Report quiz results through email
Enter, then re-enter, the email address of the person to receive the quizreports.
l The email address must match in both fields. An incorrect emailaddress cannot be changed later.
l Quiz results are sent to the recipient once each day if new data ispresent via the Camtasia Quiz Service.
Viewer Identity
Choose viewer identity requirements.Require a name and email from the viewer taking the quiz / survey-Or-Allow them to take the quiz / survey anonymously.
Quiz appearanceChange the text viewers see when they take the quiz or survey.If you create a survey instead of a quiz, you can change the Take quiznow button to read Take survey now.
Did you find what you were looking for? Provide feedback.
Related ArticlesBehaviorsProject SettingsWorking with AudioShare Your Video
Camtasia 9-3 Help | 84
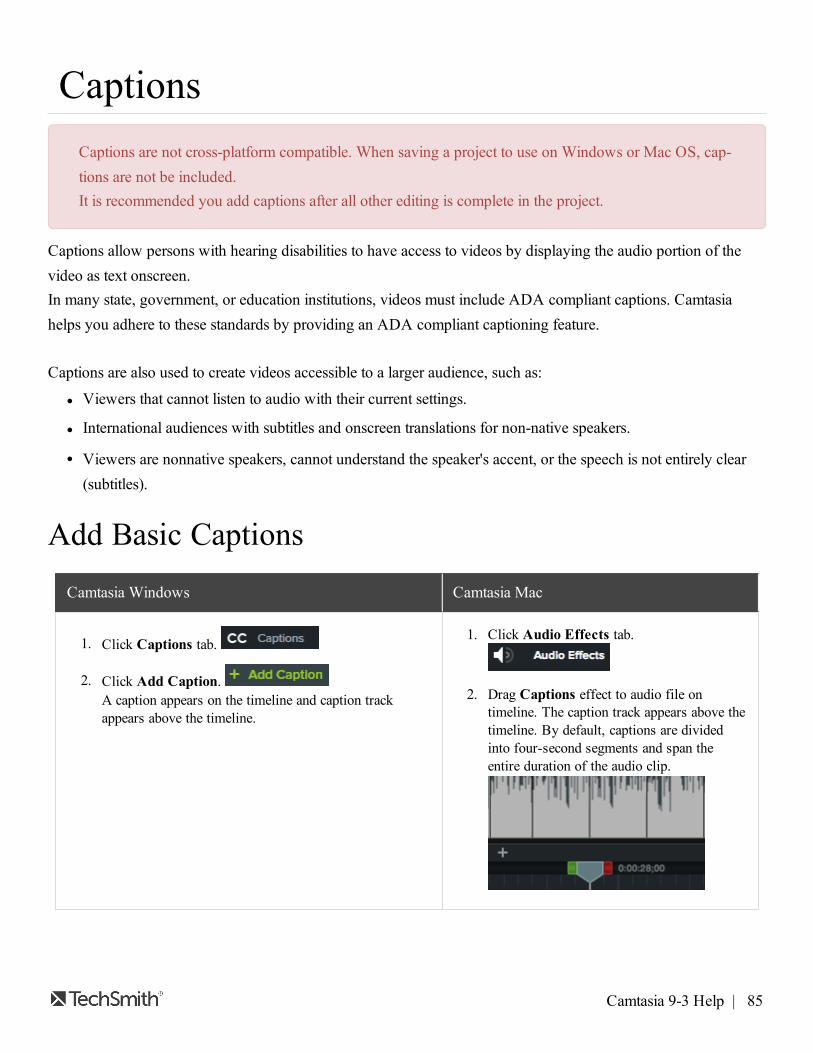
CaptionsCaptions are not cross-platform compatible. When saving a project to use on Windows or Mac OS, cap-tions are not be included.It is recommended you add captions after all other editing is complete in the project.
Captions allow persons with hearing disabilities to have access to videos by displaying the audio portion of thevideo as text onscreen.In many state, government, or education institutions, videos must include ADA compliant captions. Camtasiahelps you adhere to these standards by providing an ADA compliant captioning feature.
Captions are also used to create videos accessible to a larger audience, such as:
l Viewers that cannot listen to audio with their current settings.
l International audiences with subtitles and onscreen translations for non-native speakers.
l Viewers are nonnative speakers, cannot understand the speaker's accent, or the speech is not entirely clear(subtitles).
Add Basic CaptionsCamtasia Windows Camtasia Mac
1. Click Captions tab.
2. Click Add Caption.A caption appears on the timeline and caption trackappears above the timeline.
1. Click Audio Effects tab.
2. Drag Captions effect to audio file ontimeline. The caption track appears above thetimeline. By default, captions are dividedinto four-second segments and span theentire duration of the audio clip.
Camtasia 9-3 Help | 85

Camtasia Windows Camtasia Mac
3. Type desired caption. Press Enter to hear audio whileentering caption.
4. Click to create new caption.
3. Click the first caption segment. The cap-tion is highlighted and the caption editorappears over the canvas.
4. Type desired caption. The timeline playsaudio while typing.
5. Click right arrow to move to next audiosegment and create new caption.
Working with CaptionsTo performthis action...
Do this on Windows Do this on Mac
Add new cap-tion... In caption editor, click to create
new caption.-Or-Click Captions tab > Add caption.
In caption editor, click right arrow to create nextcaption.
Camtasia 9-3 Help | 86

To performthis action...
Do this on Windows Do this on Mac
-Or-
1. Click Audio Effects tab.
2. Drag Captions effect to audio file on timeline
Change fontattributes...
Captions are ADA compliant bydefault. Changing the font can makecaptions non ADA compliant.1. In the caption editor, click the
Font icon.
2. Change font style, color, size, andmore.
Changing the font can make captions non ADA com-pliant. To learn how to write ADA compliant cap-tions, see ADA Compliancy Tips.
1. In the caption editor, click the Font icon.
2. Change font style, color, size, and more.
Return captionsto ADA Com-pliance...
If a selected font attribute is not ADAcompliant, the ADA Compliant buttonin the caption editor turns red.
l To restore ADA compliancy forall captions, click redADA button> Make Compliant button.
l This is a global setting. All cap-tions return to ADA compliancyand all other formatting isremoved.
There is no automatic feature for creating ADAcompliant captions for Camtasia Mac. To learn howto write ADA compliant captions, see ADA Com-pliancy Tips.
Camtasia 9-3 Help | 87
To performthis action...
Do this on Windows Do this on Mac
Loop captionaudio to rehearcaption...
Click the loop button. Click the loop button.
Adjust captionduration...
Grab end of caption and drag in eitherdirection.Windows
Grab end of caption and drag in either direction.
Delete cap-tion...
Select caption on timeline and pressDelete key.
Select caption on timeline. Remove text from cap-tion editor.
Remove all cap-tions fromselected mediaor timeline...
ChooseModify > Captions > Removeall Captions.
Select media on timeline with captions >Modify >Captions > Remove Captions.
Copy and pastecaption to newlocation...
1. Select caption on timeline andclick Copy button on toolbar.
2. Move to new location on timelineand click Paste button on toolbar.
1. Select caption text in the caption editor andpress Cmd+C.
2. Move to new caption. Press Cmd+V to pastetext.
Split caption... Right click caption > Split caption. Right click caption > Split caption.
Camtasia 9-3 Help | 88
To performthis action...
Do this on Windows Do this on Mac
Merge cap-tion...
l Place playhead on caption tomerge. Right click caption >Merge with Previous/Next Cap-tion.
l Or, click gear icon > chooseoption.
l Place playhead on caption to merge. Right clickcaption >Merge with Next Caption.
l Or, click gear icon > choose option.
Hide captionsin sharedvideo...
Click the disable icon on the captions
track.
-Or-Choose Share > Custom Production> New Custom Production >MP4option > Next > Options tab >Uncheck Captions.
View > Hide Caption Track.-Or-
Click Properties > Hide Caption
Track.
Import orexport captionfile...
Supported caption file types are SAMIand SRT (SubRip) files.File > Import > Captions.Share > Export Captions.
Supported caption file types are SAMI and SRT(SubRip) files.File > Import > Captions.Share > Export Captions.
ADA Compliancy TipsThe Americans with Disabilities Act (ADA) is a federal anti-discrimination statute designed to ensure equal accessto opportunities and benefits for qualified individuals with disabilities. The act seeks to remove barriers preventingqualified people with disabilities from enjoying the same opportunities enjoyed by those without disabilities.
Include not more than 32-char-acters-per-line.
One to three lines of text appearonscreen all at once, stay there forthree to seven seconds, and are thenreplaced by another caption.
Time captions to synchronize with theaudio.
Require the use of upper andlowercase letters.
Captions should be synchronized andappear at approximately the sametime as the audio.
Use a font similar to Helveticamedium.
Camtasia 9-3 Help | 89
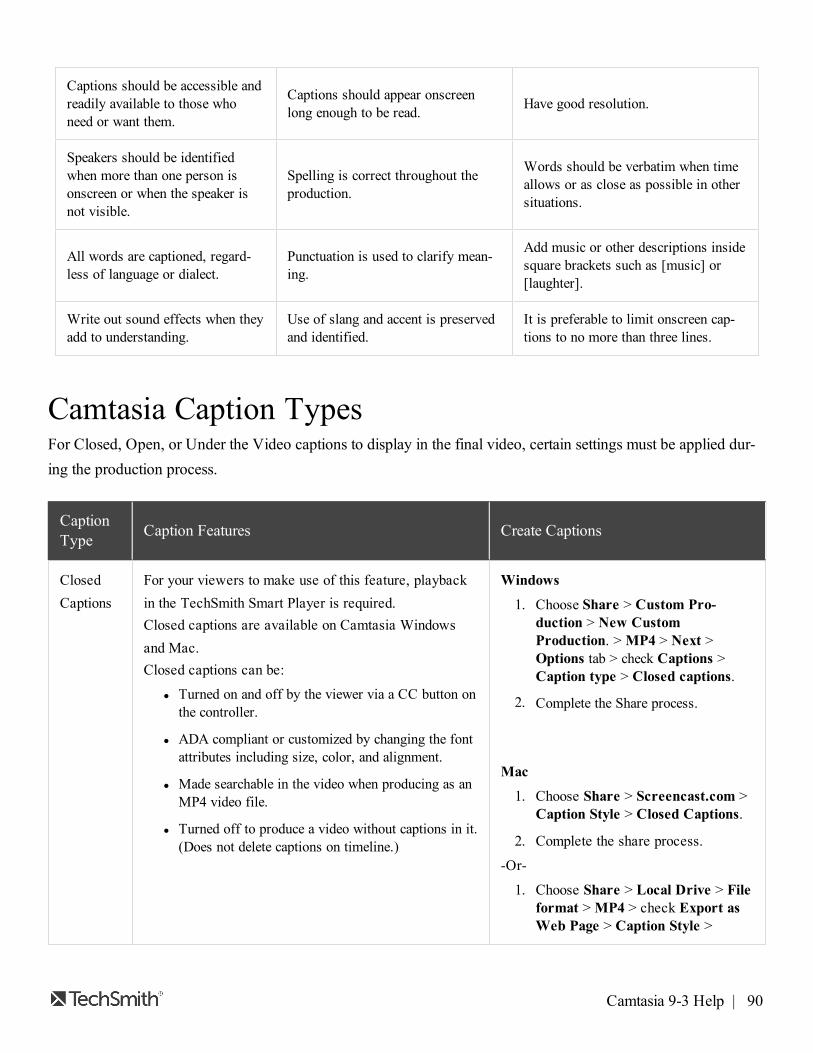
Captions should be accessible andreadily available to those whoneed or want them.
Captions should appear onscreenlong enough to be read. Have good resolution.
Speakers should be identifiedwhen more than one person isonscreen or when the speaker isnot visible.
Spelling is correct throughout theproduction.
Words should be verbatim when timeallows or as close as possible in othersituations.
All words are captioned, regard-less of language or dialect.
Punctuation is used to clarify mean-ing.
Add music or other descriptions insidesquare brackets such as [music] or[laughter].
Write out sound effects when theyadd to understanding.
Use of slang and accent is preservedand identified.
It is preferable to limit onscreen cap-tions to no more than three lines.
Camtasia Caption TypesFor Closed, Open, or Under the Video captions to display in the final video, certain settings must be applied dur-ing the production process.
CaptionType Caption Features Create Captions
ClosedCaptions
For your viewers to make use of this feature, playbackin the TechSmith Smart Player is required.Closed captions are available on Camtasia Windowsand Mac.Closed captions can be:
l Turned on and off by the viewer via a CC button onthe controller.
l ADA compliant or customized by changing the fontattributes including size, color, and alignment.
l Made searchable in the video when producing as anMP4 video file.
l Turned off to produce a video without captions in it.(Does not delete captions on timeline.)
Windows
1. Choose Share > Custom Pro-duction > New CustomProduction. >MP4 > Next >Options tab > check Captions >Caption type > Closed captions.
2. Complete the Share process.
Mac
1. Choose Share > Screencast.com >Caption Style > Closed Captions.
2. Complete the share process.
-Or-
1. Choose Share > Local Drive > Fileformat >MP4 > check Export asWeb Page > Caption Style >
Camtasia 9-3 Help | 90

CaptionType Caption Features Create Captions
Closed Captions.
2. Complete the export process.
Burned InCaptions
l ADA compliant or customized by changing the fontattributes including size, color, and alignment.
l Can be searchable in video when producing as MP4video file.
l Are burned into the video and cannot be turned off.
l Can be located under the video. When the Undervideo captions option is selected during production,space is automatically added to accommodate thecaptions. This increases the vertical dimensions ofthe video.
Windows1. Choose Share > Custom Pro-
duction > New CustomProduction. >MP4 > Next >Options tab > check Captions >Caption type > Burned incaptions.
2. Complete the production process.
Mac
1. Choose Share > Local Drive >Choose File format > CaptionStyle > Burned in captions.
2. Complete the export process.
UnderVideoCaptions
The Under video captions option provided during theproduction process adds blank vertical space to thevideo and places the captions under the video.
l Captions placed under the video cannot be turnedoff.
l This option adds space to the bottom of the videowhere the captions reside. So, the video's verticaldimension is increased.
Windows1. Choose Share > Custom Pro-
duction > New CustomProduction. >MP4 > Next >Options tab > check Captions >Caption type > Under video cap-tions.
2. Complete the production process.
Mac
1. Choose Share > Local Drive >Choose File format >MP4 > checkExport as Web Page > CaptionStyle > Under video captions.
2. Complete the export process.
-Or-
1. Choose Share > Local Drive > Fileformat >MP4 > check Export asWeb Page > Caption Style >
Camtasia 9-3 Help | 91

CaptionType Caption Features Create Captions
Under video captions.
2. Complete the export process.
SearchCapability(WindowsOnly)
The Search feature adds a search pane to the video toallows viewers the ability to search for text within cap-tions, PowerPoint slides, PowerPoint notes, and markers.Viewers click a search result to jump to that location inthe video.
1. Choose Share > Custom Pro-duction > New CustomProduction. >MP4 > Next >Options tab > check Searchable >check Captions > Caption type >Closed captions.
2. Complete the Share process.
Other Camtasia Windows Captioning MethodsTo perform this action... Do this...
Automatically Add Captions with Speech toTextCreate captions from voice narration or audio onthe timeline.
l Makes use of Microsoft’s Speech-to-Textengine.
l Capitalization and punctuation are not addedduring this process.
l For more accurate speech-to-text transcriptionof your audio recordings, go through theVoice Training tutorials provided with theSpeech Recognition software.
1. Select a media to caption that clip, or, leave media unse-lected to caption the entire timeline.
2. Click Captions tab.The Captions tab opens.
3. Click gear icon > Speech-to-text.
4. Read the tip that appears concerning Voice Training.
5. Click Continue. The transcription process begins.
6. Review all captions and make any needed corrections.
Synchronize Text and Audio From ScriptPaste a prepared script into the caption editor thensynchronize captioning with audio playback
1. Copy script to clipboard.
2. Click Captions tab.The Captions tab opens and the caption editor opens abovetimeline.
3. Press CTR L+V on keyboard to paste script into captioneditor.
Camtasia 9-3 Help | 92

To perform this action... Do this...
4. In the Caption tab, click gear icon > Sync captions.
5. Read the instructions that appear and when ready to synccaptions, click Continue. The video begins playing andthe syncing controls appear at the bottom of the Captiontab.
6. To create a new caption, click a word when you hear theword spoken aloud.
7. Click:
l Pause to pause captioning.
l Resume to continue captioning.
l Stop to end captioning.
Did you find what you were looking for? Provide feedback.
Related ArticlesShare Your VideoInteractive Quiz or Survey
Camtasia 9-3 Help | 93

Working with AudioBehaviorsCanvas Options
Camtasia 9-3 Help | 94
Share Your Audio or VideoThe production process, also called rendering, creates a video file based on the sequence of recordings, video andaudio clips, images, and effects on the timeline.Preset production options contain settings optimized for popular distribution methods like Screencast.com, Vimeo,YouTube, your local hard drive, and more.
l Also export your timeline audio as a standalone WAV or M4A file.
l Create and manage production presets. (Windows only)
Share Your Video1. Click Share.
2. Choose desired share option from menu.
l In Windows, the Production Wizard appears. Step through the wizard to create your video.Or, choose Custom Production > New Custom Production to select from other file outputs, further cus-tomize production settings, or save the settings as a preset for future use.
l In Mac, the Export As or a Login screen appears. Choose desired options to create your video.
Create an Audio FileSave the timeline audio as a file.
1. Choose Share > Export Audio Only.
2. Save as .wav or .m4a. (MP3 is no longer an output option.)
Produce a Selection of the Timeline (Windows only)Produce a selection on the timeline to create a short video or to preview an effect.
1. Make selection on timeline.
2. Right-click selection and choose Produce selection as.
3. The Production Wizard appears. Produce video with desired settings.
Create a Production Preset (Windows only)Add a production preset to:
l Create a production standard for company, team, or yourself.
l Save frequently used production settings to be quickly used again.
Camtasia 9-3 Help | 95

1. Click Share > Custom Production > Add/Edit Presets. The Manage Production Presets dialog boxappears.
2. Click New . The Create a Production Preset Wizard opens.
3. Enter a name and description for the preset and choose a file format.
4. Click Next. Step through the rest of the wizard to make selections relevant to the file format you chose.
5. At the end of the wizard, click Finish.
6. In the Manage Production Presets dialog, click Close.
7. The production preset now appears in the dropdown list in the Production Wizard.
Did you find what you were looking for? Provide feedback.
Related ArticlesInteractive Quiz or SurveyWorking with AudioBehaviorsCanvas Options
Camtasia 9-3 Help | 96

Project Settings (Change Canvas Dimen-sions)By default, the canvas displays a preview of how the final video will look when produced and shared.However, if you need to change the size of the video, for best results, choose the canvas dimensions you wantyour final video to be.When changing canvas dimensions, keep these things in mind:
l Choose editing dimensions smaller than the original recording to optimize your recording for SmartFocuszoom animations.
l Editing dimensions of at least 640 x 480 are required for any video to have a table of contents (TOC) or quiz/ survey.
l Change the canvas / edition dimensions before you begin the editing process. Once you begin to edit or addeffects, animations, and annotations, changing your dimensions can skew the look of work already done.
To change the Canvas / Editing Dimensions1. Over the canvas, click theMagnification drop down menu. Choose Project Settings.
2. The Project Settings dialog appears.
l To change dimensions to a standard size preset, click Canvas Dimensions and choose preset frommenu.
Camtasia 9-3 Help | 97

l To enter custom width and height for dimensions, enter dimensions (in pixels) intoWidth and Heightfields.
3. Click Apply.
Did you find what you were looking for? Provide feedback.
Related ArticlesInteractive Quiz or SurveyWorking with AudioLibraryShare Your Video
Camtasia 9-3 Help | 98

Markers and Interactive Table of ContentsFor your viewers to make use of Camtasia's interactive features such as a table of contents, closed cap-tions, search capability, hotspot functionality and quizzing, playback in the TechSmith Smart Player isrequired. When producing the final video to share, choose an MP4 option or share to Screencast.com.Hosting your video on Screencast.com provides the optimal viewing experience since the SmartPlayer isbuilt into Screencast.com.
Use markers to:
l Create navigation points. If you include a table of contents in the final video, the markers appear as inter-active table of contents entries.
l Mark editing points such as mistakes during recording, portions of the recording to cut out, etc.
l Set points to split a long video into multiple videos.
l When you record a PowerPoint or Keynote presentation, Camtasia automatically creates markers on thetimeline for each slide.
To Add a MarkerPress Ctrl+M to open the Marker view. Or, manually toggle the Marker view on or off here:
Once the marker view is open, you are in marker mode which allows you to quickly and efficiently add new mark-ers and edit existing ones.
1. Move the cursor over the marker track or a media clip. A blue diamond appears.
2. Click on the timeline or media to create the marker.
3. When finished adding markers, hide the marker view by clicking the toggle button.
About MarkersMarkers can be added to the timeline or pinned to media on the timeline.
Camtasia 9-3 Help | 99

l By default, markers are added as timeline markers.
l When added to the timeline, markers stay in the same location regardless of what media is added, moved, ordeleted on the timeline.
l When pinned to a media or group, if the media/group is moved, deleted, copied, or pasted, the marker goeswith it.
To perform this task... To this...
Add Marker Shift+M
Show / Hide marker view
Ctrl+M-Or-Click on an existing marker. Markers are seen as blue tri-angles on the timeline or media.
Next Marker Ctrl+]
Select between MarkersCtrl+Shift+[ -Or-Ctrl+Shift+]
Previous Marker Ctrl+[
Timeline Select to Previous Marker Ctrl +Shift+[
Timeline Select to Next Marker Ctrl+Shift+]
Change Marker NameIf you include a table of contents when you pro-duce a video, the marker names appear as the tableof contents entries within the video.
WindowsClick on marker > Enter new name in Properties
> press Enter.
-Or-Right-click marker > Enter new name in Properties
> press Enter.
Mac
Camtasia 9-3 Help | 100

To perform this task... To this...
Click on marker then type name.
Turn a timeline marker into a media marker-Or-Turn a media marker into a timeline marker
1. Hover over the marker that is to be changed.
2. Click on timeline or media to change the location of themarker.
Move the location of a marker Grab the marker by the "flag" or name and drag to desiredposition.
Delete a marker1. Click on marker to select.
2. Press Delete.
Delete all markers
WindowsChoose Modify > Markers > Delete all Markers
MacChoose Modify > Markers > Remove All
Split media at the point of all markersWindowsChoose Modify > Markers > Split at All Markers
Add a marker while recording the screen
WindowsWhile Recorder is running, press Ctrl+M.-Or -
1. In Recorder, choose Tools > Recording toolbars >Enable Effects > OK.
2. Then, during recording, click the Add Marker buttonon the Recording toolbar.
Camtasia 9-3 Help | 101
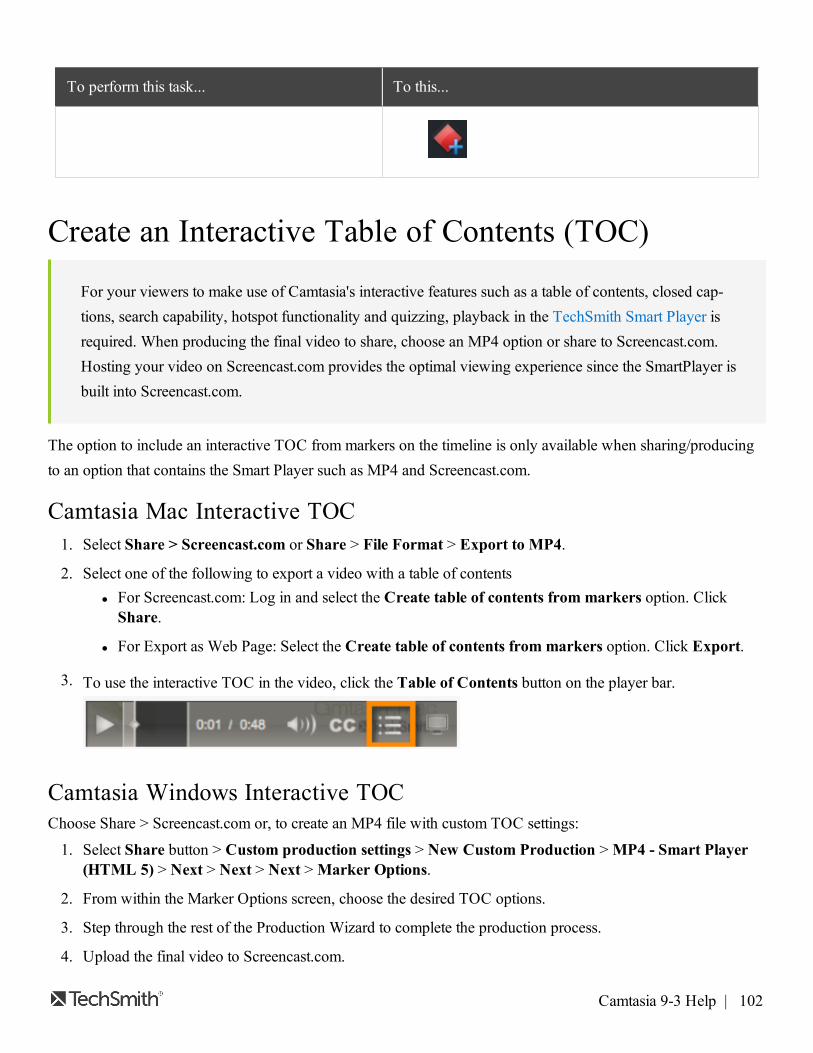
To perform this task... To this...
Create an Interactive Table of Contents (TOC)
For your viewers to make use of Camtasia's interactive features such as a table of contents, closed cap-tions, search capability, hotspot functionality and quizzing, playback in the TechSmith Smart Player isrequired. When producing the final video to share, choose an MP4 option or share to Screencast.com.Hosting your video on Screencast.com provides the optimal viewing experience since the SmartPlayer isbuilt into Screencast.com.
The option to include an interactive TOC from markers on the timeline is only available when sharing/producingto an option that contains the Smart Player such as MP4 and Screencast.com.
Camtasia Mac Interactive TOC1. Select Share > Screencast.com or Share > File Format > Export to MP4.
2. Select one of the following to export a video with a table of contentsl For Screencast.com: Log in and select the Create table of contents from markers option. ClickShare.
l For Export as Web Page: Select the Create table of contents from markers option. Click Export.
3. To use the interactive TOC in the video, click the Table of Contents button on the player bar.
Camtasia Windows Interactive TOCChoose Share > Screencast.com or, to create an MP4 file with custom TOC settings:
1. Select Share button > Custom production settings > New Custom Production >MP4 - Smart Player(HTML 5) > Next > Next > Next >Marker Options.
2. From within the Marker Options screen, choose the desired TOC options.
3. Step through the rest of the Production Wizard to complete the production process.
4. Upload the final video to Screencast.com.
Camtasia 9-3 Help | 102

Table of ContentsOption Description
Number marker entries Number the table of contents entries sequentially in the produced TOC.
Table of contents initiallyvisible
Check to show the table of contents when the video plays.If unchecked, the viewer will need to turn on the TOC via a button on the video con-troller.
Enable or disable markersfor TOC entries Disable any markers you do not want to appear in the table of contents.
Rename To rename a TOC entry, double-click the entry in the list and type a new name. Or,select the entry from the list and click Rename.
Fixed Left Choose to position TOC on the left side of the video.
Fixed Right Choose to position TOC on the right side of the video.
Marker DisplayText with thumbnail: TOC shows both the thumbnail and the textText only: TOC shows only the textThumbnail only: TOC shows only the thumbnail
Did you find what you were looking for? Provide feedback.
Related ArticlesAnnotations and CalloutsBehaviorsCursor EffectsVisual Effects
Windows Zoom and Pan Animations
Camtasia 9-3 Help | 103

Camtasia 8 to 9 - Where is it now?Camtasia 9 has a fresh new look and feel that includes enhanced context menus, additional hotkey functionality,and many user interface and usability changes.
To help you get up and going quickly with Camtasia 9, we've created the following "Where is it now?" map.
l Use this interactive online map or download the PDF.
l See also Camtasia 9 / 3 Hotkeys or download the PDF.
l Continue with Camtasia Tools, Camtasia Properties, Timeline Toolbar, or Camtasia Menus.
Camtasia ToolsIn Camtasia Studio 8, the tools you worked with were laid out horizontally under the Clip Bin and Library. InCamtasia 9, the tools are now laid out vertically on the left, next to the Media Bin and Library.
Camtasia Tool IconsThe icons have changed for the tools. Here's a look at how Camtasia Studio 8 looked compared to the newCamtasia 9 icons.
Camtasia 9-3 Help | 104

8 Icon Camtasia Studio 8 Tool 9 Icon Camtasia 9 Tool
Clip BinMedia BinClick to open > Choose Media Bin
LibraryMedia BinClick to open > Choose Library tab(Windows only)
Callouts
AnnotationsClick to open > Choose from the followingtabs:
Callouts
Arrows
Shapes
Special (Blur, Pixelate, Hotspot, High-
light, etc.)
Sketch Motion Callouts
Keystroke Callouts
Zoom-n-PanAnimationsClick to open > Choose Zoom-n-Pan or Anim-ations
AudioAudio Effects
Transitions Transitions
Cursor Effects Cursor Effects
Camtasia 9-3 Help | 105

8 Icon Camtasia Studio 8 Tool 9 Icon Camtasia 9 Tool
QuizzingInteractivityClick Add Quiz to Timeline.
Visual Properties Visual Effects
Voice Narration Voice Narration
Record Camera -----
No Longer AvailableIn Camtasia Recorder, choose to record webcamera.-Or-Use your Web Camera software.
Captions Captions
----- -----
BehaviorsThis is a new feature.Behaviors are animated presets to drag anddrop on text and media to liven it up andengage your viewers.
Camtasia PropertiesIn Camtasia Studio 8, each tool had its own properties used to change the media or asset's look and behavior.
Camtasia 9-3 Help | 106

The new Properties pane in Camtasia 9 contains more options for you to change, modify, and customize yourmedia, annotations, animations, behaviors, and more.
l Just make a selection on the timeline, click the Properties button , and make your changes.
l Use the tabs across the top of the Properties panel to see every available option.
Camtasia 9-3 Help | 107

Timeline ToolbarThe icons have changed on the timeline toolbar. Here's a look at how Camtasia Studio 8 looked compared to thenew Camtasia 9 icons.
Function Camtasia Studio 8 Timline Tools Camtasia 9 Timeline Tools
Zoom In
Zoom Out
Zoom
Zoom to Fit All Media -----
Undo
Redo
Cut
Copy
Camtasia 9-3 Help | 108

Function Camtasia Studio 8 Timline Tools Camtasia 9 Timeline Tools
Paste
Split
Camtasia MenusMany of the menus are very different in Camtasia 9. We've also added two new menus and removed two menus.
l The tables below compare those in Camtasia 8 with those in Camtasia 9 so you can see at a glance what isdifferent and what the same option is called now.
l Each table also tells you what is new or has been moved or removed completely from the program.
File Menu Edit Menu View Menu Play Menu (No longer avail-able)
Tools Menu (No longer avail-able)
HelpMenu
Camtasia 9 Modify Menu(New) Camtasia 9 Share Menu (New)
File Menu
Camtasia Studio 8 FileMenu Camtasia 9 FileMenu
New Project New Project
Open Project Open Project
Recent Projects Recent Project
Save Project Save
Save Project As Save As
(Was View > Project > Editing dimensions) Project Settings
(Was Tools > Record the screen) New Recording
Export Project as zip Export as Zip
Camtasia 9-3 Help | 109

Camtasia Studio 8 FileMenu Camtasia 9 FileMenu
-----Export for MacNew: Used for cross platform project sharing.
Produce and share (Moved to Share > Local File)
Produce special >l Produce selection as
l Export audio as
l Export frame as
l (Moved to Share > Produce Selection As)
l (Moved to Share > Export Frame As)
l (Moved to Share Export Audio Only)Note: Output to MP3 is no longer available when exportingaudio.
Sign in Sign In
Sign out Sign Out
Import media Import > Media
Import from Google Drive Import > Google Drive
Import from My Places Import > My Places
Recent recordings Import Recent Recordings
Library >l Import media to Library
l New folder
l Export Library
l Import zipped Library
l Get media online
Library >l Import Media to Library
l New Folder
l Export Library
l Import Zipped Library
l Get Media Online
Import zipped project Import Zipped Project
(Was Tools > Sharing > Batch Production) Batch Production
(Was Tools > Sharing > Upload media to FTP) Upload Media to FTP
Connect mobile device Connect Mobile Device
Exit Exit
Camtasia 9-3 Help | 110

Edit Menu
Camtasia Studio 8 EditMenu Camtasia 9 EditMenu
Undo Undo
Redo Redo
Cut Cut
Copy Copy
Paste Paste
----- Delete
----- Ripple Delete
Copy Visual Properties Copy Properties
Paste Visual Properties Paste Properties
Remove from timeline No Longer Available
Remove from Clip Bin No Longer Available
Split Split
Split All Split All
Stitch selected media Stitch Selected Media
----- Separate Video and Audio
----- Group
----- Ungroup
----- Select
----- Deselect All
-----
Arrange >l Bring to Front
l Bring Forward
Camtasia 9-3 Help | 111

Camtasia Studio 8 EditMenu Camtasia 9 EditMenu
l Send Backward
l Send to Back
----- Copy Effects
----- Paste Effects
(Was Play > Jump to)
Jump To >l Beginning
l End
l Next Media
l Previous Media
l Next Animation
l Previous Animation
l Next Marker
l Previous Marker
l Next Quiz
l Previous Quiz
Add to Library Add to Library
Extend Frame (Moved to Modify > Extend Frame)
Clip speed(Moved to Modify > Add Effects > Audio Effects > Clip Speed)-Or-(Moved to Modify > Add Effects > Visual Effects > Clip Speed)
Duration (Moved to Modify > Duration)
Generate keystroke callouts (Moved to Modify > Generate Keystroke Callouts)
Captions >l Import captions
l Export captions
l Remove all captions
l Sync captions
(Moved to Modify > Captions)
Camtasia 9-3 Help | 112

Camtasia Studio 8 EditMenu Camtasia 9 EditMenu
Markers >l Add a timeline marker
l Split at all markers
l Remove all markers
(Moved to Modify > Markers)
SmartFocus >l Apply to selected clips
l Apply to timeline
(Moved to Modify > SmartFocus)
(Was Tools > Options) Preferences
View Menu
Camtasia Studio 8 View Menu Camtasia 9 View Menu
Clip Bin(Clip Bin is now called Media Bin)
Tools > Media Binl Library
l Annotations
l Transitions
l Behaviors
l Zoom-n-Pan
l Animations
l Cursor Effects
l Voice Narration
l Audio Effects
l Visual Effects
l Interactivity
l Captions
-----Hide / Show ToolsNew: Turns the left side Tools pane on or off
----- Hide / Show Properties
Camtasia 9-3 Help | 113

Camtasia Studio 8 View Menu Camtasia 9 View Menu
New: Turns the right side Properties pane on or off
Library (Moved to View > Tools >Library)
Show Marker View Show Marker Track
Show Quiz View Show Quiz Track
Hide Captions
No Longer AvailableTo hide captions in final video:
l Turn track off before producing video.
-Or-l Share > Custom Production > New Custom Production> Next > Options tab > Uncheck Captions
Project >l Project information (No Longer Available)
l Editing dimensions l (Moved to File > Project Settings)
Canvas >l % of magnification (New: Choose from drop-down menu over Canvas)
l Shrink to fit (No Longer Available)
l Fullscreen (New: View > Canvas > Detach Can-
vas > Click Full Screen button.
l Docked (No Longer Available)
Canvas >l Zoom In
l Zoom Out
l Zoom to Fill
l Zoom to 100%
l Detach Canvas / Attach Canvas
Timeline >l Zoom in
l Zoom out
l Zoom to fit
l Zoom to selection
l Zoom to maximum
Timeline >l Zoom In
l Zoom Out
l Zoom to Fit
l Zoom to Selection
l Zoom to Maximum
l Increase Track Heights
l Decrease Track Heights
Camtasia 9-3 Help | 114

Camtasia Studio 8 View Menu Camtasia 9 View Menu
----- Enable Canvas Snapping
Timeline snapping>l Clip edges
l Playhead
l Markers
l Quizzes
Timeline Snapping >l Media Edges
l Playhead
l Animations
l Markers
l Quizzes
Play Menu (Removed)The Play menu is no longer available. Use the Play tools under the canvas or use the hotkeys.
Camtasia Studio 8 PlayMenu No Longer Available
Play from beginning No Longer Available
Play
-----
or, press Spacebar on keyboard
Stop
-----
or, press Spacebar on keyboard
Step backward-----
or, press Comma on keyboard
Step forward-----
or, press Period on keyboard
Camtasia 9-3 Help | 115

Camtasia Studio 8 PlayMenu No Longer Available
Jump to >l Beginning
l End
l Previous clip
l Next clip
l Previous marker
l Next marker
(Moved to Edit > Jump to)
Tools Menu (Removed)
Camtasia Studio 8 ToolsMenu No Longer Available
Record the screen (Moved to File > New Recording)
Record PowerPoint
No Longer AvailableTo record PowerPoint presentation:
l Record using the PPT Recorder plugin within PowerPoint.
l Open presentation, record full screen.
Voice Narration (Moved to View > Tools > Voice Narration)
Record Camera
No Longer AvailableIn Camtasia Recorder, choose to record web camera.-Or-Use your Web Camera software.
Audio (Moved to View > Tools > Audio Effects)
Zoom-n-Pan (Moved to View > Tools > Zoom-n-Pan)
Cursor Effects (Moved to View > Tools > Cursor Effects)
Callouts
(Moved to View > Tools > Annotations)l Callouts
l Arrows
l Shapes
Camtasia 9-3 Help | 116

Camtasia Studio 8 ToolsMenu No Longer Available
l Blur and Highlight
l Sketch Motion
l Keystrokes
Transitions (Moved to View > Tools > Transitions)
Captions (Moved to View > Tools > Captions)
Quizzing (Moved to View > Tools > Interactivity)
Studio toolsNo Longer Available
Sharing >Batch ProductionUpload media to FTP
(Moved to File > Batch Production)(Moved to File Upload Media to FTP)
Speechl Speech Properties
l Improve speech-to-text
No Longer Available(Access is via Captions tab > Caption panel > Gear Icon > Speech-to-Text
Options (Moved to Edit > Preferences)
Help Menu
Camtasia Studio 8 HelpMenu Camtasia 9 HelpMenu
Camtasia Studio HelpOnline Help(An internet connection is now required.)
Show Welcome Window Show Welcome Window
Open Getting Started Project Open Getting Started Project
Reset Balloon TipsNo Longer Available(Control tip display here: Edit > Preferences > Advanced tab > Tips
Tutorials Video Tutorials
Camtasia 9-3 Help | 117

Camtasia Studio 8 HelpMenu Camtasia 9 HelpMenu
(An internet connection is required.)
Technical SupportTechnical Support(An internet connection is required.)
Send FeedbackSend Feedback(An internet connection is required.)
Check for updatesCheck for Updates(An internet connection is required.)
TechSmith on the web >l TechSmith home
l Camtasia Studio home
l TechSmith products
l Tell a friend
TechSmith on the Web >l TechSmith home
l Camtasia Home
l TechSmith Products
l Tell a friend
(An internet connection is required.)
About Camtasia Studio About Camtasia
Register Camtasia online No Longer Available
-----Purchase Camtasia(An internet connection is required.)
----- Enter Software Key
-----Keyboard Shortcuts(An internet connection is required.)
Camtasia 9 Modify Menu (New)
Camtasia Studio 8 Menu Option Camtasia 9ModifyMenu
(Was Edit > Extend Frame) Extend Frame
(Was Edit > Duration) Duration
Camtasia 9-3 Help | 118

Camtasia Studio 8 Menu Option Camtasia 9ModifyMenu
-----
Add Animation >l Custom
l Restore
l No Opacity
l Full Opacity
l Tilt Left
l Tilt Right
l Scale Up
l Scale Down
l Scale to Fit
l SmartFocus
-----
Add Effects >l Visual Effects
l Drop Shadow
l Border
l Colorize
l Color Adjustment
l Remove a Color
l Clip Speed
l Interactive Hotspot
l Audio Effects
l Noise Removal
l Volume Leveling
l Fade In
l Fade Out
l Clip Speed
l Cursor Effects
l Highlight
l Magnify
Camtasia 9-3 Help | 119

Camtasia Studio 8 Menu Option Camtasia 9ModifyMenu
l Spotlight
l Left Click
l Right Click
-----
Add Behavior >l Drifting
l Fade
l Jump and Fall
l Pop Up
l Pulsating
l Reveal
l Scale
l Shifting
l Sliding
(Was Edit > Generate Keystroke Callouts) Generate Keystroke Callouts
Remove >l All Animations
l All Audio Points
l All Transitions
l All Visual Effects
l All Audio Effects
l All Cursor Effects
l Clip Speed
l Remove All Effects
(Was Edit > Captions)
Captions >l Add Caption
l Import Captions
l Export Captions
l Remove All Captions
Camtasia 9-3 Help | 120

Camtasia Studio 8 Menu Option Camtasia 9ModifyMenu
l Sync Captions
l Apply Speech-to-Text
l Speech Properties
l Improve Speech-to-Text
(Was Edit > Markers)
Markers >l Add Timeline Marker
l Split at All Markers
l Remove All Markers
(Was Tools > Quizzing)
Quizzes >l Add Timeline Quiz
l Remove All Quizzes
(Was Edit > SmartFocus)
SmartFocus >l Apply to Selected Media
l Apply to Timeline
Camtasia 9 Share Menu (New)
Camtasia Studio 8 Menu Option Camtasia 9 ShareMenu
(Was File > Produce and Share) Local File
(Was Produce and Share button drop down menu > Share to Screencast.com) Screencast.com
(Was Produce and Share button drop down menu > Share to Vimeo) Vimeo
(Was Produce and Share button drop down menu > Share to YouTube) YouTube
(Was Produce and Share button drop down menu > Share to Google Drive) Google Drive
(Was Produce and Share button drop down menu > Share to My Places) My Places
(Was Produce and Share button > Production Wizard) Custom Production >
Camtasia 9-3 Help | 121

Camtasia Studio 8 Menu Option Camtasia 9 ShareMenu
l New Custom Production
l Add/Edit Presets
(Was File > Produce special > Produce Selection as) Produce Selection As
(Was File > Produce special > Export frame as) Export Frame As
(Was File > Produce special > Export audio as) Export Audio Only (Wav or M4A)
Did you find what you were looking for? Provide feedback.
Related ArticlesHotkeysProject Creation, Collaboration, and ArchivingProject SettingsTimeline Tracks and Basic Editing
Camtasia 9-3 Help | 122

Camtasia HotkeysRecorder Options
FunctionWindows HotkeyEach of these are customizable.Choose Tools > Options > Hotkeys tab.
Mac Hotkey
Start recording F9 -----
Pause recording F9 Cmd+Shift+2
Stop recording F10 Cmd+Option+2
Marker Ctrl+M -----
ScreenDraw Ctrl+Shift+D -----
Select RegionNone(Choose your own)
-----
Hide Tray IconNone(Choose your own)Tools > Options > Hotkeys tab.
-----
Project OptionsFunction Windows Hotkey Mac Hotkey
Launch Recorder Ctrl+R Cmd+Shift+2
Launch online help F1 -----
Save project Ctrl+S Cmd+S
New project Ctrl+N Cmd+N
Camtasia 9-3 Help | 123
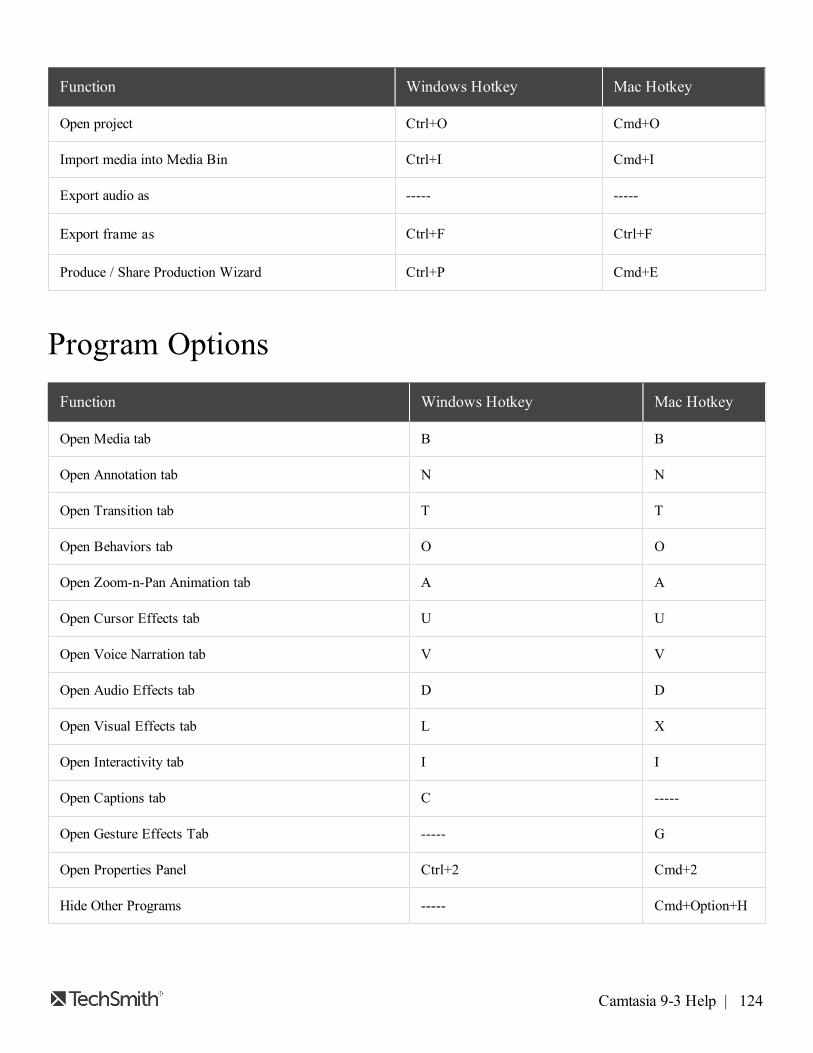
Function Windows Hotkey Mac Hotkey
Open project Ctrl+O Cmd+O
Import media into Media Bin Ctrl+I Cmd+I
Export audio as ----- -----
Export frame as Ctrl+F Ctrl+F
Produce / Share Production Wizard Ctrl+P Cmd+E
Program OptionsFunction Windows Hotkey Mac Hotkey
Open Media tab B B
Open Annotation tab N N
Open Transition tab T T
Open Behaviors tab O O
Open Zoom-n-Pan Animation tab A A
Open Cursor Effects tab U U
Open Voice Narration tab V V
Open Audio Effects tab D D
Open Visual Effects tab L X
Open Interactivity tab I I
Open Captions tab C -----
Open Gesture Effects Tab ----- G
Open Properties Panel Ctrl+2 Cmd+2
Hide Other Programs ----- Cmd+Option+H
Camtasia 9-3 Help | 124
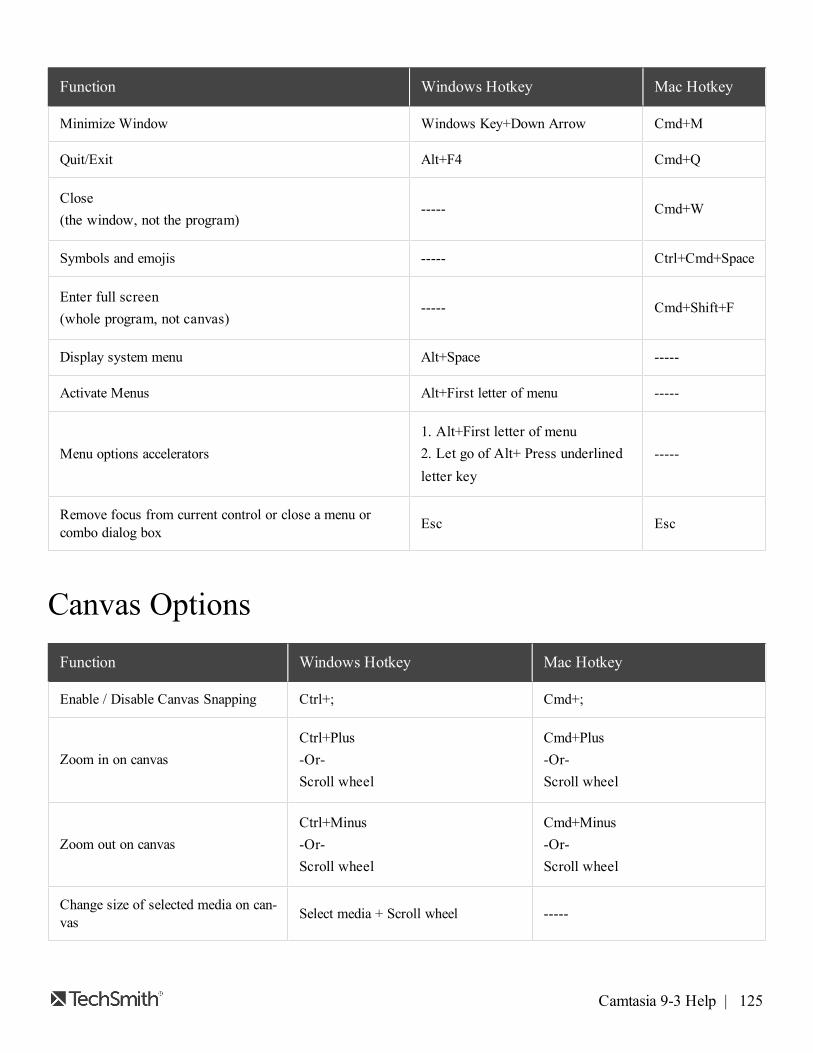
Function Windows Hotkey Mac Hotkey
Minimize Window Windows Key+Down Arrow Cmd+M
Quit/Exit Alt+F4 Cmd+Q
Close(the window, not the program)
----- Cmd+W
Symbols and emojis ----- Ctrl+Cmd+Space
Enter full screen(whole program, not canvas)
----- Cmd+Shift+F
Display system menu Alt+Space -----
Activate Menus Alt+First letter of menu -----
Menu options accelerators1. Alt+First letter of menu2. Let go of Alt+ Press underlinedletter key
-----
Remove focus from current control or close a menu orcombo dialog box Esc Esc
Canvas OptionsFunction Windows Hotkey Mac Hotkey
Enable / Disable Canvas Snapping Ctrl+; Cmd+;
Zoom in on canvasCtrl+Plus-Or-Scroll wheel
Cmd+Plus-Or-Scroll wheel
Zoom out on canvasCtrl+Minus-Or-Scroll wheel
Cmd+Minus-Or-Scroll wheel
Change size of selected media on can-vas Select media + Scroll wheel -----
Camtasia 9-3 Help | 125

Function Windows Hotkey Mac Hotkey
Full screen ----- -----
Exit full screen canvas view Esc Esc
Move selected media on canvas Arrow Keys (hold) Arrow Keys (hold)
Nudge media 1 pixel Arrow Keys (one press at a time) Arrow Keys (one press at a time)
Nudge Media 10 pixels Shift+Arrow Keys (one press at atime)
Shift+Arrow Keys (one press at atime)
Maintain aspect ratio while resizingmedia
Drag corner handle on selectedmedia to resize.
Drag corner handle on selectedmedia to resize.
Override Aspect Ratio when resizingShift + Drag corner handle on selec-ted media to resize.
Shift + Drag corner handle on selec-ted media to resize.
Resize media with aspect ratio andmaintain center point
Ctrl + Drag corner handle on media toresize.
Cmd + Drag corner handle on mediato resize.
Freely Rotate Media (3D)
For CalloutsCtrl (hold both)1. Select media on canvas.2. Press and hold Ctrl.3. Drag on media clip to freely rotatein 3D.Note: Do not use side or rotatehandles.
All Other Media ClipsShift+Ctrl (hold both)1. Select media on canvas.2. Press and hold both Shift + Ctrl.3. Drag on media clip to freely rotatein 3D.Note: Do not use side or rotatehandles.
-----
Camtasia 9-3 Help | 126

Timeline EditingFunction Windows Hotkey Mac Hotkey
Copy Ctrl+C Cmd+C
Cutl Copies to clipboard
l No gap
l Media is stitchedtogether on timeline
Ctrl+X Cmd+Shift+X
Paste Ctrl+V Cmd+ V
DeleteLeaves space on timeline
Delete Delete
Redo Ctrl+Y Cmd+Shift+Z
Undo Ctrl+Z Cmd+Z
Group Ctrl+G Cmd+G
Ungroup Ctrl+U Cmd+U
Pan Spacebar (hold) + Drag on Canvas Spacebar (hold)+ Drag on Canvas
Crop Alt (hold) Alt (hold)
Record Screen Ctrl+R Ctrl+R
Ripple Delete/Cut
Ctrl+Delete1. Make a selection on timeline.2. Press Ctrl+Delete.Selection is deleted and all timelinemedia is shifted.
Cmd+Shift+X1. Make a selection on timeline.2. Press Cmd+Shift+X.Selection is deleted and all timelinemedia is shifted.
Split selected media at play-head S Cmd+T
Split all tracks at playhead Ctrl+Shift+S Cmd+Shift+T
Camtasia 9-3 Help | 127

Function Windows Hotkey Mac Hotkey
Stitch selected media Ctrl+Alt+I Cmd+Option+I
Unstitch ----- -----
Extend frame Shift+E -----
Select All Ctrl+A Cmd+A
Deselect All Ctrl+D Cmd+Shift+A
Add selection to Library Ctrl+Shift+A -----
Open Media Bin tab-Or-Toggle Clip Bin / Libraryview
B B
Show/Hide Tools Panel Ctrl+1 Cmd+1
Show / Hide Properties Ctrl+2 Cmd+2
Timeline NavigationFunction Windows Hotkey Mac Hotkey
Play/Pause/Stop video Spacebar Spacebar
Stop playback and return to previous location ofthe playhead Ctrl+Alt+Space Ctrl+Option+Space
Move playhead to previous clip Ctrl+Alt+Comma Ctrl+Comma
Move playhead to next clip Ctrl+Alt+Period Ctrl+Period
Step Backward on timeline Comma Comma
Step Forward on timeline Period Period
Zoom in on timelineCtrl+Shift+PlusCtrl (hold)+Scroll Wheel
Cmd+Shift+PlusCmd (hold)+Scroll Wheel
Camtasia 9-3 Help | 128

Function Windows Hotkey Mac Hotkey
Zoom out on timelineCtrl+Shift+MinusCtrl (hold)+Scroll Wheel
Cmd+Shift+MinusCmd (hold)+Scroll Wheel
Zoom to see all media on timelineCtrl+Shift+7Ctrl (hold)+Scroll Wheel
Cmd (hold)+Scroll Wheel
Zoom to maximum timeline viewCtrl+Shift+9Ctrl (hold)+Scroll Wheel
Cmd+Shift+9Cmd (hold)+Scroll Wheel
Zoom to timeline selection Ctrl+Shift+8 Cmd+Shift+8
Play from beginning ----- -----
Jump to beginning of timeline Ctrl+Home ----
Jump to beginning select Ctrl+Shift+Home -----
Jump to end of timeline Ctrl+End -----
Jump to end select Ctrl+Shift+End -----
Next clip select Ctrl+Shift+Alt+Right Arrow Cmd+Shift+Option+Period
Previous clip select Ctrl+Shift+Alt+Left Arrow Cmd+Shift+Option+Comma
Split and ripple move everything on trackThis creates space on timeline
Shift + Drag PlayheadShift + Drag Playhead
Ripple moveShift1. Select clip on timeline.2. Hold Shift and drag media.
-----
Ripple trim Hold Shift and trim end of mediain/out. ----
Ripple split and move everything on track atplayhead
Shift+drag playhead Shift+drag playhead
Make timeline selectionCtrlHold and drag playhead
CmdHold and drag playhead
Camtasia 9-3 Help | 129

Function Windows Hotkey Mac Hotkey
Extend timeline range selection right Shift+Period Shift+Period
Extend timeline range selection left Shift+Comma Shift+Comma
Temporarily disable snapping Ctrl Ctrl
Move up or down through tracks Scroll Wheel Scroll Wheel
Increase Track Heights Alt+Plus -----
Decrease Track Heights Alt+Minus -----
Marker and Quiz OptionsFunction Windows Hotkey Mac Hotkey
Add Marker Shift+M Shift+M
Show / Hide marker view Ctrl+M Ctrl+M
Next Marker Ctrl+] Ctrl +]
Select between MarkersCtrl+Shift+[ -Or-Ctrl+Shift+]
-----
Previous Marker Ctrl+[ Ctrl +[
Timeline Select to Previous Marker Ctrl +Shift+[ Ctrl +Shift+[
Timeline Select to Next Marker Ctrl+Shift+] Ctrl+Shift+]
Open Interactivity tab I I
Add Quiz Shift+Q Shift+Q
Show / Hide quiz view Ctrl+Q Ctrl+Q
Jump to and select previous quiz Ctrl+9 Ctrl+9
Jump to and select next quiz Ctrl+0 Ctrl+0
Camtasia 9-3 Help | 130
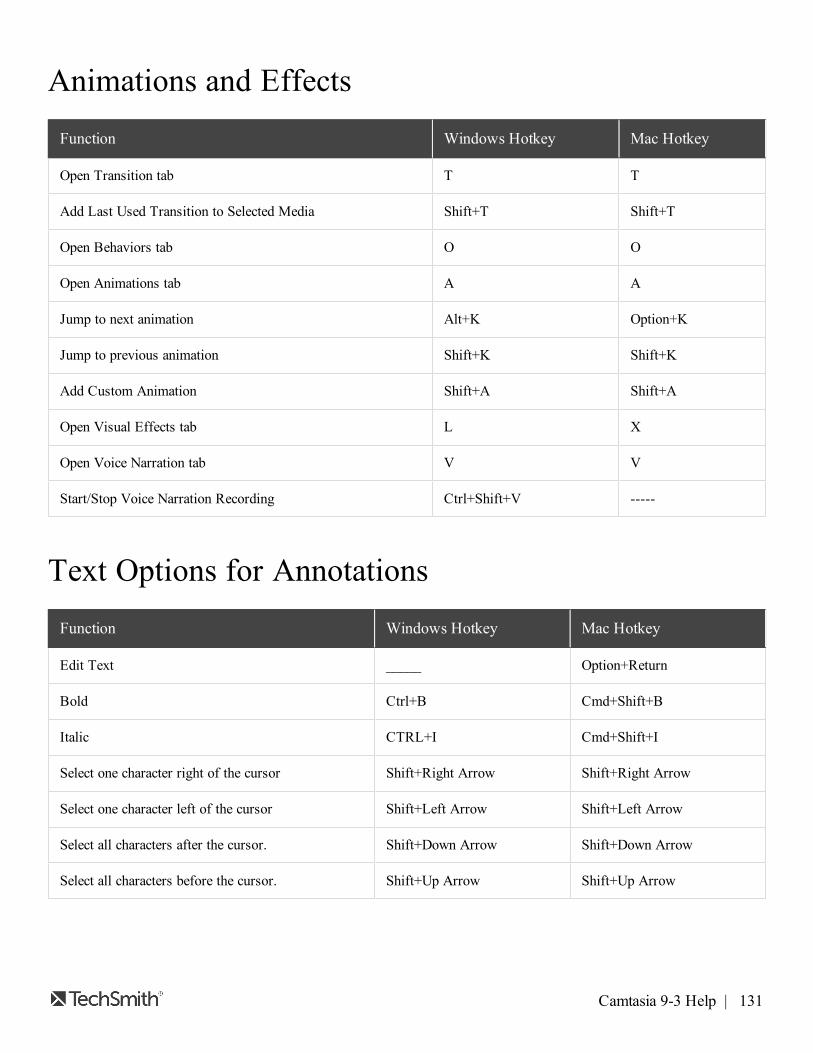
Animations and EffectsFunction Windows Hotkey Mac Hotkey
Open Transition tab T T
Add Last Used Transition to Selected Media Shift+T Shift+T
Open Behaviors tab O O
Open Animations tab A A
Jump to next animation Alt+K Option+K
Jump to previous animation Shift+K Shift+K
Add Custom Animation Shift+A Shift+A
Open Visual Effects tab L X
Open Voice Narration tab V V
Start/Stop Voice Narration Recording Ctrl+Shift+V -----
Text Options for AnnotationsFunction Windows Hotkey Mac Hotkey
Edit Text _____ Option+Return
Bold Ctrl+B Cmd+Shift+B
Italic CTRL+I Cmd+Shift+I
Select one character right of the cursor Shift+Right Arrow Shift+Right Arrow
Select one character left of the cursor Shift+Left Arrow Shift+Left Arrow
Select all characters after the cursor. Shift+Down Arrow Shift+Down Arrow
Select all characters before the cursor. Shift+Up Arrow Shift+Up Arrow
Camtasia 9-3 Help | 131
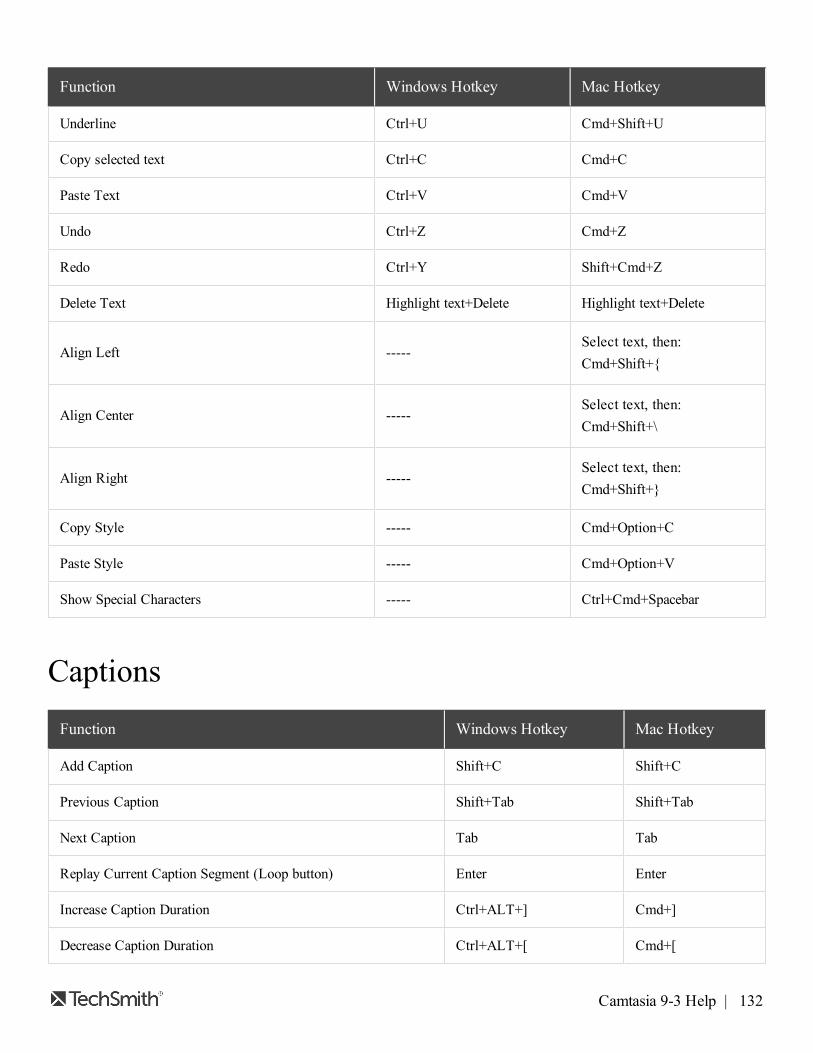
Function Windows Hotkey Mac Hotkey
Underline Ctrl+U Cmd+Shift+U
Copy selected text Ctrl+C Cmd+C
Paste Text Ctrl+V Cmd+V
Undo Ctrl+Z Cmd+Z
Redo Ctrl+Y Shift+Cmd+Z
Delete Text Highlight text+Delete Highlight text+Delete
Align Left -----Select text, then:Cmd+Shift+{
Align Center -----Select text, then:Cmd+Shift+\
Align Right -----Select text, then:Cmd+Shift+}
Copy Style ----- Cmd+Option+C
Paste Style ----- Cmd+Option+V
Show Special Characters ----- Ctrl+Cmd+Spacebar
CaptionsFunction Windows Hotkey Mac Hotkey
Add Caption Shift+C Shift+C
Previous Caption Shift+Tab Shift+Tab
Next Caption Tab Tab
Replay Current Caption Segment (Loop button) Enter Enter
Increase Caption Duration Ctrl+ALT+] Cmd+]
Decrease Caption Duration Ctrl+ALT+[ Cmd+[
Camtasia 9-3 Help | 132

PowerPoint Add-In Hotkeys (Windows Only)Function Current Windows Hotkey
Record Ctrl + Shift + F9
Pause Ctrl + Shift + F9
Stop Ctrl + Shift + F10
ScreenDraw (Windows Only)When using ScreenDraw, all drawing is permanently burned into the recording and cannot be changedor removed. Adding arrows or callouts in Camtasia Editor after recording creates a similar effect.However, arrows and callouts in Camtasia can be edited.
Add drawing effects like arrows and circles over the screen as your record with Camtasia Recorder's ScreenDrawfeature.
l When recording full screen, use the ScreenDraw hotkeys to enable ScreenDraw and to change the tools.
l You can change the tool, color, or width of the drawing tools.
To Use ScreenDraw1. Open Camtasia Windows Recorder.
2. Select Tools > Recording Toolbars > Effects toolbar.
3. Click the Record button to begin recording. After the countdown, the ScreenDraw option appears.l Note: If recording Full Screen, use the ScreenDraw hotkeys to select tools, tool width, shape, andcolor.
4. Click the ScreenDraw button on the Effects toolbar.
5. The ScreenDraw tools expand. Select a tool and click and drag to draw on the screen.l To change the default tools, select an option from the dropdown list next to a tool on the Effects tool-bar.
l To undo the last ScreenDraw action, press Ctrl+Z.
l To exit ScreenDraw mode, press Esc or Ctrl+Shift+D.
Camtasia 9-3 Help | 133
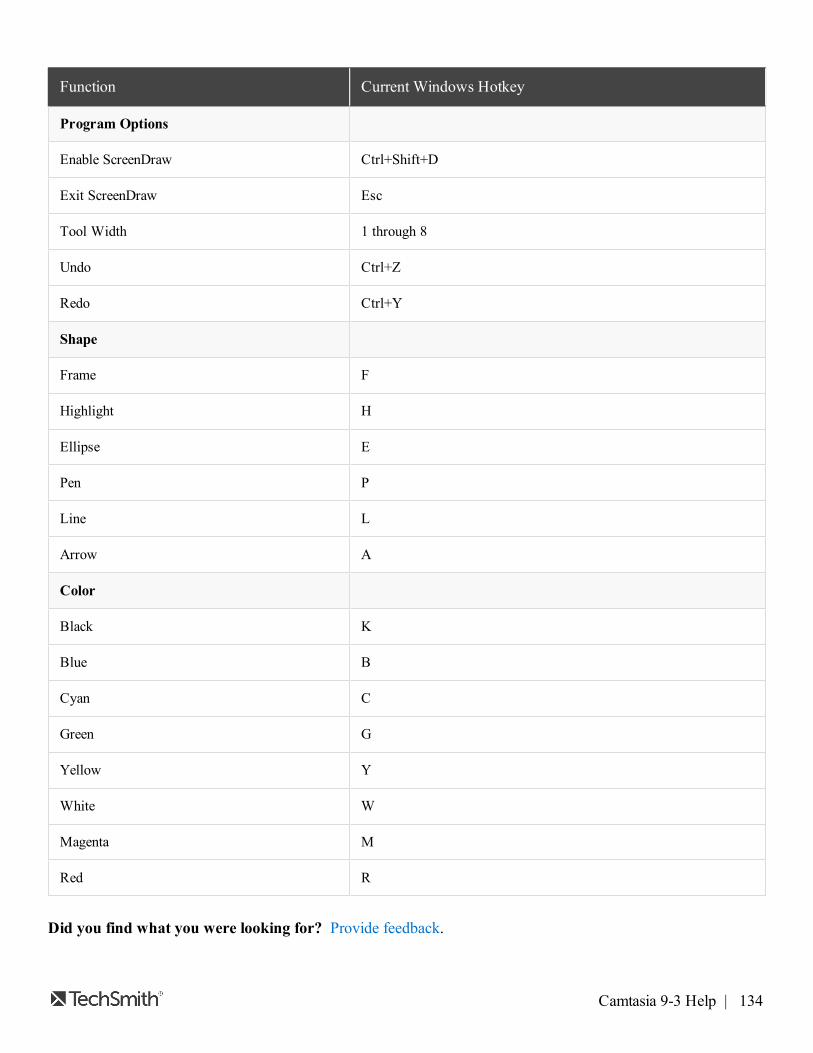
Function Current Windows Hotkey
Program Options
Enable ScreenDraw Ctrl+Shift+D
Exit ScreenDraw Esc
Tool Width 1 through 8
Undo Ctrl+Z
Redo Ctrl+Y
Shape
Frame F
Highlight H
Ellipse E
Pen P
Line L
Arrow A
Color
Black K
Blue B
Cyan C
Green G
Yellow Y
White W
Magenta M
Red R
Did you find what you were looking for? Provide feedback.
Camtasia 9-3 Help | 134

Related ArticlesAnnotations and CalloutsBehaviorsCursor EffectsVisual Effects
Camtasia 9-3 Help | 135

The TechSmith Smart PlayerFor your viewers to make use of Camtasia's interactive features such as a table of contents, closed cap-tions, search capability, hotspot functionality and quizzing, playback in the TechSmith Smart Player isrequired. Hosting your video on Screencast.com provides the optimal viewing experience since theSmartPlayer is built into Screencast.com.
The TechSmith Smart Player is designed to offer a high level of interactivity between your videos and your view-ers. Before you begin the video creation process it is important to understand the benefits and limitations whensharing your content to different hosting services and devices since certain features require the TechSmith SmartPlayer in order to work properly.
The Smart Player is built into the video production and upload process. It is not a standalone applicationor program you download and install yourself.
For example, when producing your video to MP4 and uploading it to Screencast.com, the video will playback inthe Smart Player by default. If your video contains any interactivity like a quiz, searchable table of contents, or hot-spots, the Smart Player will give your viewers the best playback experience.On the other hand, if you upload that same video to YouTube, those interactive features will not be available toyour viewers.
Captions can be imported on YouTube. For more on importing captions, check out: http://www.tech-smith.com/tutorial-camtasia-8-import-export-captions.html.
You need the TechSmithSmart Player if you want to host interactive/quizzing videos on your privatewebsite. For more on how to host the TechSmith Smart Player on your website, check out: http://b-logs.techsmith.com/tips-how-tos/host-the-smart-player-on-your-own-website.
Camtasia 9-3 Help | 136

Other Smart Player Hosting OptionsiPhone CompatibilityThe Smart Player will work on most mobile devices and tablets. However, iPhone users need to download theSmart Player App to view videos with interactivity such as quizzing, table of contents, hotspots and closed cap-tioning. If a viewer tries to watch a video that uses the Smart Player, the viewer will be directed to download theapp, which is free. Once they have the app, they can play back video content created from Camtasia on theiPhone.
Self-Maintained WebsiteYou need the TechSmith Smart Player if you want to host interactive/quizzing videos on your private website. Formore on how to host the TechSmith Smart Player on your website, check out this article and video.
Did you find what you were looking for? Provide feedback.
Related ArticlesAnnotations and CalloutsBehaviorsCursor EffectsVisual EffectsWindows Zoom and Pan Animations
Camtasia 9-3 Help | 137

Tips for Creating Engaging VideosTechSmith’s Customer Engagement Group set out to discover what makes a really good video – one that engagesthe viewer until the very end and leaves them wanting more. We got several video-creators and video-watcherstogether in a room and conducted a focus group activity centered around this question.
The group discovered the vast majority of “what” creates an engaging video happens before you ever click theRecord button inside Camtasia!Things like:
l Setting clear goals for the video
l Speaking slowly
l Creating a script for the narrative
l Using a good microphone for better audio quality
The rest of the “what” had to do with understanding some of the guiding principles of screen recording and somebasic editing tasks within Camtasia.
We thought you would like to see each of the categories the focus group came up with along with their thoughts,ideas, shortcuts, and tips-n-tricks for creating interesting, good, and engaging screencast videos. We hope you findthese as helpful as we did!
Be Prepared1. Know your audience.
Will they be familiar with the terminology and concepts presented in the video?Do you need to make a separate introductory video?
2. Are you motivating, teaching, or selling?Do just one of these in your video and don’t attempt to do a combination of two or three at one time. Createappropriate content to fit your selected category.
3. Watch other videos to learn what makes them engaging, interesting, or bad.
4. Write a script - don’t wing it.A good script contains the narrative and a description of what is happening on the screen during the nar-rative.Following a script also helps eliminate unwanted um’s and ah’s in the audio.
5. Create a storyboard of your video.A storyboard is a way to sketch your video. You should show where transitions, callouts, zooms, and othereffects will go.
Camtasia 9-3 Help | 138

6. Decide and plan what you will record ahead of time.What applications will you use? Do you need forms or fields filled out? Do you use graphics that should becreated ahead of time?
7. It will take you longer than you think.So, don’t wait until the last minute to start your video project.
Brush Up on Your Public Speaking Skills8. Be familiar with your video topic.
You should speak as though you are the expert on your subject.
9. Speak slowly and clearly, and follow the script.Don’t ramble on or feel like you have to speak constantly.
10. Be yourself.
Let your personality shine through – use a bit of humor if the situationfits.11. Speak naturally.
12. Practice saying your script out loud.
13. Listen to your recorded voice and become comfortable hearing yourself.
Filmography14. Get familiar with the terminology and concepts of screen recording.
Read up a bit on video dimensions, video file formats, screencasting, etc.
15. Record big and produce small.Camtasia Recorder automatically records SmartFocus zoom key frames. Add those zoom key frames duringediting to keep the action in your video focused.
16. Tell a story.What are you recording and why is it important?
17. Open with an introduction and close with a summary.Do an introduction of what you will be demonstrating and give a closing summary.
18. Let the video do the talking.You don’t need to talk about every detail or step. Instead, show the steps and talk about the importance ofthe process or workflow that you're demonstrating.
19. Keep the video moving along.Don’t linger in one place for too long. This can cause your viewers to lose interest.
Camtasia 9-3 Help | 139

Learn the Basics20. Watch the Camtasia tutorial videos.
In Camtasia, choose Help > Video Tutorials to view the instructional videos to help get you going.
21. Read the Camtasia help articles.In Camtasia, choose F1 orHelp > Online Help. You’ll find tutorials and instructions for using the Camtasiafeatures.
22. Practice, practice, practice.It takes practice and time to learn the basics and to figure out what works best for you.Make sure you get some practice time in before your first project is due.
23. Do several dry runs to test your script and timing.Make changes and adjustments as needed.
24. Don’t be afraid to make mistakes.Go ahead – jump in and get your feet wet, you’ll learn as you go along.The unlimited Undo and Redo buttons on the timeline toolbar allow you to practice your editing skills or tryout a new feature.
25. Save your work frequently.
Projects and Teamwork26. Get organized before you begin.
Create a unique folder for each of your video projects. Then, as you build your project, put all of your record-ings, project files, produced videos, and media files in that folder.
27. Export your Camtasia Windows Project as a zip file.Media files seen in Camtasia Windows Media Bin are only there by reference. So, if you move the files fromtheir original location, they will be missing in your video project.Export a Camtasia Project as a zip file to create a backup project with all the necessary media files copiedinto the Media Bin and Library. You can also share the zipped project with a team of collaborators or use thezip file to move your project to another computer.
28. Collaborate with Others Working on Another PlatformCamtasia projects can be used on the Windows or Mac platform. When collaborating across platforms,choose File > Export for Mac or File > Export for Windows.
29. Add clips and other assets to the Library for collaboration.Media in the Camtasia Windows Library is meant to be used from project to project. It’s the place to storeassets that have team or corporate branding such as title clips, callouts, etc.Share the Library with others to be consistent from project to project.
30. Create an early demo of the video and send it out for feedback from teammates or other stake-holders.The key here is to do this early on in the process so you have time to use the feedback to make changes toyour script and storyboard. While this takes time, you'll end up with a better video in the end.
Camtasia 9-3 Help | 140

Get Great Audio31. Use the best microphone you can afford.
Sound is critical to screen recording videos. Quite often, if the sound is bad, people will not watch the video.
32. Use the Camtasia Recorder default settings for audio.
33. Do a test recording and make sure audio is being recorded.
34. Adjust the audio volume in Camtasia.If your volume is too low or too loud, use the Audio Effects in Camtasia to adjust the audio up or down.Add audio points to enhance certain areas of the waveform.
35. Background music can add a nice touch if done correctly.If you have background music playing while you are recording narration with a microphone, the backgroundmusic appears on a separate track within Camtasia. Edit the background music to fit the narration using fadeeffects or volume adjustments.
36. Record the audio and video separately.After you become familiar with using Camtasia, try recording the screen without the audio. Within Camtasia,do all of your video editing. When the video editing is complete, add the audio using the Voice Narrationoption. This is the preferred process for people who routinely create screen recordings.
37. Stop and listen to the sound in your recording area.Record your screen with audio but don’t speak. Then, listen to the recording. You’ll be surprised how muchnoise is in a room. Is your chair squeaky or creaky? Is your phone ringer on? Is your keyboard loud whenyou type? Are there pets or kids in the background? Do you have a heating or cooling vent overhead thatcan be heard? Is your mic picking up the humming from your computer and other devices?
38. Record in a quiet location.Try not to record your audio in a public location. Use an office or conference room away from high trafficareas. Place a note on the door letting others know you are recording.
39. Use Camtasia's Audio Effects to enhance the audio.Reduce noise, even out volume level, and eliminate white noise, um’s, and ah’s.
Recording the Screen40. Clean up a cluttered or busy desktop.
It’s best to record a desktop that has a plain background and is free from lots of desktop icons and gadgets
41. Turn off all reminders and pop-ups.Turn off all meeting reminders, email notifications, and other pop-up screens.
42. Look over your Internet browser window.Do you have unnecessary toolbars showing? If so, turn them off or hide them. Do your bookmarks andrecent history reveal too much information about you?
43. Open the applications you’ll be recording and close the ones you won’t.Some applications take time to get up and going and there’s nothing worse than watching a video that
Camtasia 9-3 Help | 141

records applications starting up. If it isn’t critical to show how to launch an application, have all your applic-ations ready to go and use <ALT + TAB> on the keyboard to cycle through the applications. Also, close allapplications that you don’t need such as emails, browser windows, etc.
44. Resize windows and applications to fit recording area.Make sure when you switch to an application it displays in your selected recording area.
45. Record full screen using Camtasia Recorder’s default settings.The default settings found in Recorder gives you a high resolution, master recording file that includesSmartFocus zoom and pan key frames. These key framesautomatically optimize the viewing experience when producing to a smaller dimension such as iPod.
46. Control your mouse movements by using slow movements across the screen.Eliminate jerking or circling with the mouse to bring attention to an area on the screen as this can be very dis-tracting and irritating to viewers. Instead, use Camtasia's Cursor Effects to enhance the cursor after yourecord. Add highlights, animation, and more.
47. You don’t need to start over if you make a mistake.If you make a mistake by clicking the wrong button or you stumble over a word – don’t stop and start over.Just quit speaking for 3 - 5 seconds and then begin where you left off. Then, use Camtasia to cut out the sec-tion where the mistake occurred. The silence on the timeline lets you know where the mistakes are.
48. If you're showing text onscreen, make sure the font is readable.Use a font size that is larger than you think you’ll need. This is especially true when recording a PowerPointpresentation.
49. Make several short recordings instead of one long recording.If your video is longer than 5 minutes, break it up into separate videos.
The Use of Special Effects50. Use effects sparingly.
Just because you can add lots of bells and whistles doesn’t mean you should. A polished, professional videouses effects only when necessary to compliment or enhance the video.
51. Only use one kind of transition per video.Using different transitions can be distracting to viewers. A transition that is well placed and rightly timedshould not be noticed.
52. Use similar callout styles, colors, sizes, etc.Using a lot of different callouts in various colors can be distracting to viewers and may cause your video toappear unprofessional.
53. Cut out long quiet moments where you type, fill out forms, or wait for applications to start up.Instead, use Clip Speed or a transition to show the passage of time.Cut out the section where no action takes place leaving the beginning and end where the action happens.Then, make a split on the timeline between the beginning and end and insert a Fade to Black or Cube rotatetransition.
Camtasia 9-3 Help | 142
Editing54. Practice using the Getting Started sample video project in Camtasia.
Camtasia comes preloaded with a sample project. Use this to practice making basic edits like Cut, Copy,Paste, Split, Undo and Redo. Choose Help > Open Getting Started Project.
55. Learn how the playhead works.The playhead is used to make selections on the timeline.Drag the green In point or red Out point to make a selection.Double-click the gray playhead to bring the points together again.
56. If you need to preserve the audio and cut the video, separate the video and audio.If you need to make edits that involve cutting out portions of your video but you don’t want to cut the audio,right-click the media and select Separate Audio and Video. Then, lock the audio track.
57. Choose to edit with dimensions that correspond to the dimensions your viewers will see in the finalvideo.So, if your video will be shared on an iPad, choose an iPad dimensions for editing.
58. Make all your video edits then add the callouts, title clips, etc.
Share Your Video59. Determine where and how you will share your video before you begin editing. Some Camtasia features rely
on the TechSmith Smart Player to work correctly.
60. You need to produce your video before you can share it.When working on your video in Camtasia, you are working in a video project. To create a shareable video,click the Share button at the top of the screen.
61. Always watch your video from beginning to end before you share it!
Did you find what you were looking for? Provide feedback.
Related ArticlesInteractive Quiz or SurveyWorking with AudioTimeline EditingCamtasia HotkeysAnnotations and CalloutsBehaviorsCursor EffectsVisual EffectsCanvas Options
Camtasia 9-3 Help | 143